

Page 1
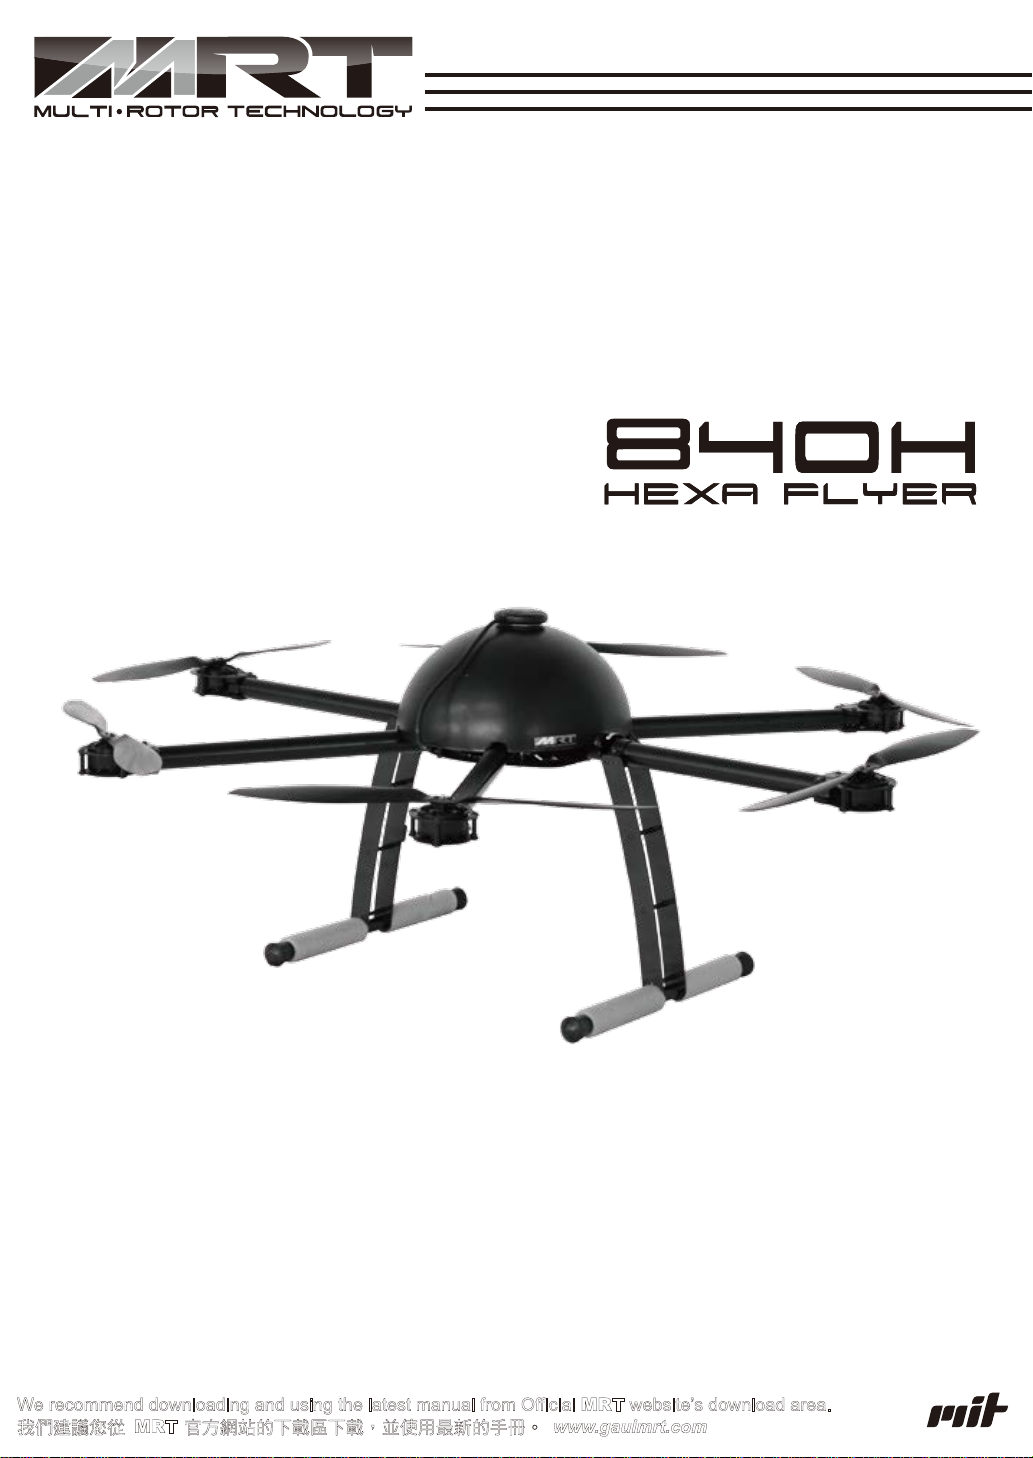
INSTRUCTION MANUAL
V1.0
We recommend downloading and using the latest manual from Official MRT website’s download area.
我們建議您從 MRT 官方網站的下載區下載,並使用最新的手冊。 www.gauimrt.com
© 2013
MADE IN TAIWAN
Page 2
Index
目錄
Preface & Disclaimer & AMA
前言 & 免責聲名 & AMA
840H Specifications 840H 規格
Motor assembly 馬達組裝 P.1
ESC assembly 電子變速器組裝 P.2
Frame assembly 機身組裝 P.3~8
Landing gear assembly 腳架組裝 P.9~10
Propeller assembly 螺旋槳組裝 P.11
Flight stabilizer configuration 控制器配置 P.12
Canopy assembly 艙罩組裝 P.13
Boom folding 軸管折疊 P.14
Maintenance explosion view 維修爆炸圖 P.15~17
Parts list 零件表 P.18
Page 3
Preface & Disclaimer & AMA
Thank you for purchasing MRT Multi-Rotor from Tai Shih Hobby Corporation (TSH).
We hope you will enjoy the joy of flight.
In order to understand full assembly sequences, this instruction manual show the assembly
information of this model, even though some elements might be supplied as pre-assembled.
Please refer to manual whenever carrying out maintenance or replacing parts.
感謝您購買泰世科技出品的 MRT 多旋翼飛行器,我們希望您可以盡情享受飛行的樂趣。
為了要讓使用者詳細瞭解組裝順序,即使有些部件已經預先組裝完成,
本說明書將提供這台遙控模型的組裝資訊。同時,敬請參閱保養與主要零件更換資訊。
CAUTION: This radio controlled Multi-Rotor is not a toy.
警告:這台遙控多旋翼飛行器不是玩具。
SAFETY PRECAUTIONS
This kit includes some pre-assembled components. Please check for any loose screws and
tighten them before you proceed with assembly.
You are responsible for assembly, safe operation, maintenance, inspection and adjustment
of the model.
Before beginning assembly, please read these instructions thoroughly.
Check all parts. If you find any defective or missing parts, contact your local dealer or
MRT distributor.
Before you proceed to Multi-Rotor activity, please check and follow thoroughly related
regulation of aero modeling in your country/region.
前言 & 免責聲明 & AMA
安全資訊與注意事項
這台遙控模型包含預先組合完成的部件。
在進行組裝之前,請仔細檢查這些預先組裝部件上的所有螺絲均有仔細鎖緊。
您有完全的責任對於這台遙控模型的組裝,安全操作,保養,檢查與調整。
請先檢查所有的零件,如果發現任何不良品,遺失品,請向購買的模型店或是當地的泰世
代理商連絡。在您進行遙控多旋翼活動時,請先詳細瞭解與遵守當地遙控模型的相關法規。
Disclaimer
This product is for a radio controlled (RC) Multi-Rotor.
Improper operation, maintenance or assembly can potentially cause a RC Multi-Rotor to
pose a danger to persons or objects including but not limited to the possibility of causing
serious physical injury and even death.
Moving components can present a hazard to operators, and anyone or anything that could
be in the flying area of the RC Multi-Rotor.
Under no circumstance should a minor be allowed to operate this RC Multi-Rotor without the
approval, monitor and direction of his parent or legal guardian who takes full responsibility
for all of the minor's actions.
This product is intended for being operated by experienced mature RC Multi-Rotor
pilots under controlled safety conditions and on locations properly authorized and setup for
safe flying and away from other people.
Do not operate an RC Multi-Rotor within the vicinity of residences, trees, electrical power
lines during inclement weather or near crowds of people.
The manufacturer and/or its distributors assume no responsibility or liability whatsoever
for any damages including but not limited to ones generated by incidental or
consequential damages.
The operator of the Multi-Rotor assumes all responsibility and liability that result from the
correct or incorrect operation of the Multi-Rotor.
Page 4
Preface & Disclaimer & AMA
免責聲明
本產品是無線遙控的多旋翼飛行器。
不當的操作,保養或是組裝有可能導致遙控多旋翼飛行器對於人身或是物品造成危險。
包括,但是不局限於對於人體產生嚴重傷害甚至死亡的可能性。
所有的移動部件可能對於操作的使用者,旁人或是這台遙控多旋翼飛行場的任何人或
物品產生傷害。
未成年的人如果要操作這台遙控多旋翼飛行器需要父母或是監護人的同意,並在監督與指導
下才能進行操作並遠離周遭障礙物及人群等,其父母或是監護人需負起所有責任與法律責任。
以下場合與情況禁止操作遙控多旋翼飛行器:居家房屋附近、天候不佳時、非空曠區域、
樹木、電線竿或是人群附近。
製造廠商與其經銷商都不對於所有的傷害,包含但是不局限於偶然或是連續發生的傷害負擔
任何責任。
本產品的使用者要對於正確地或是不正確地操作的結果需負擔所有責任。
本產品一但離開製造廠商的控制範圍外,製造廠商無法對於下列事項保持監督與
控管:組裝,保養,維修與操作這台遙控多旋翼飛行器。
The Academy of Model Aeronautics (AMA) is a national organization representing
modelers in the United States.
Please refer to the National Model Aircraft safety code from AMA Member Manual
for details: http://www.modelaircraft.org/files/memanual.pdf
These special codes and appropriate documents may be obtained either from the
AMA Web site at www.modelaircraft.org or by contacting AMA.
前言 & 免責聲明 & AMA
Academy of Model Aeronautics
5161 East Memorial Drive
Muncie, IN 47302
Tel.: (765) 287-1256
Fax: (765) 289-4248
Usage Cautions
When flying, the fast rotating propellers of Multi-Rotor can cause serious
damage and injury.
Therefore, please fly with a high safety consciousness, keep multi-rotor away
from human beings, power lines, obstacles and properties etc….
1.Do not get close to or even touch the working motors and propellers,
which can cause serious injury.
2.Check all propellers and motors are installed correctly and secured
firmly before each flight.
3.Do not fly with old or broken parts. Check all parts of the multi-rotor
are in good condition before each flight.
4.Make sure the rotation direction of each propeller is correct (CW or CCW).
5.Do not overload the multi-rotor.
If you have any problem you cannot solve during installation, please contact your local
distributor for timely customer service.
Page 5
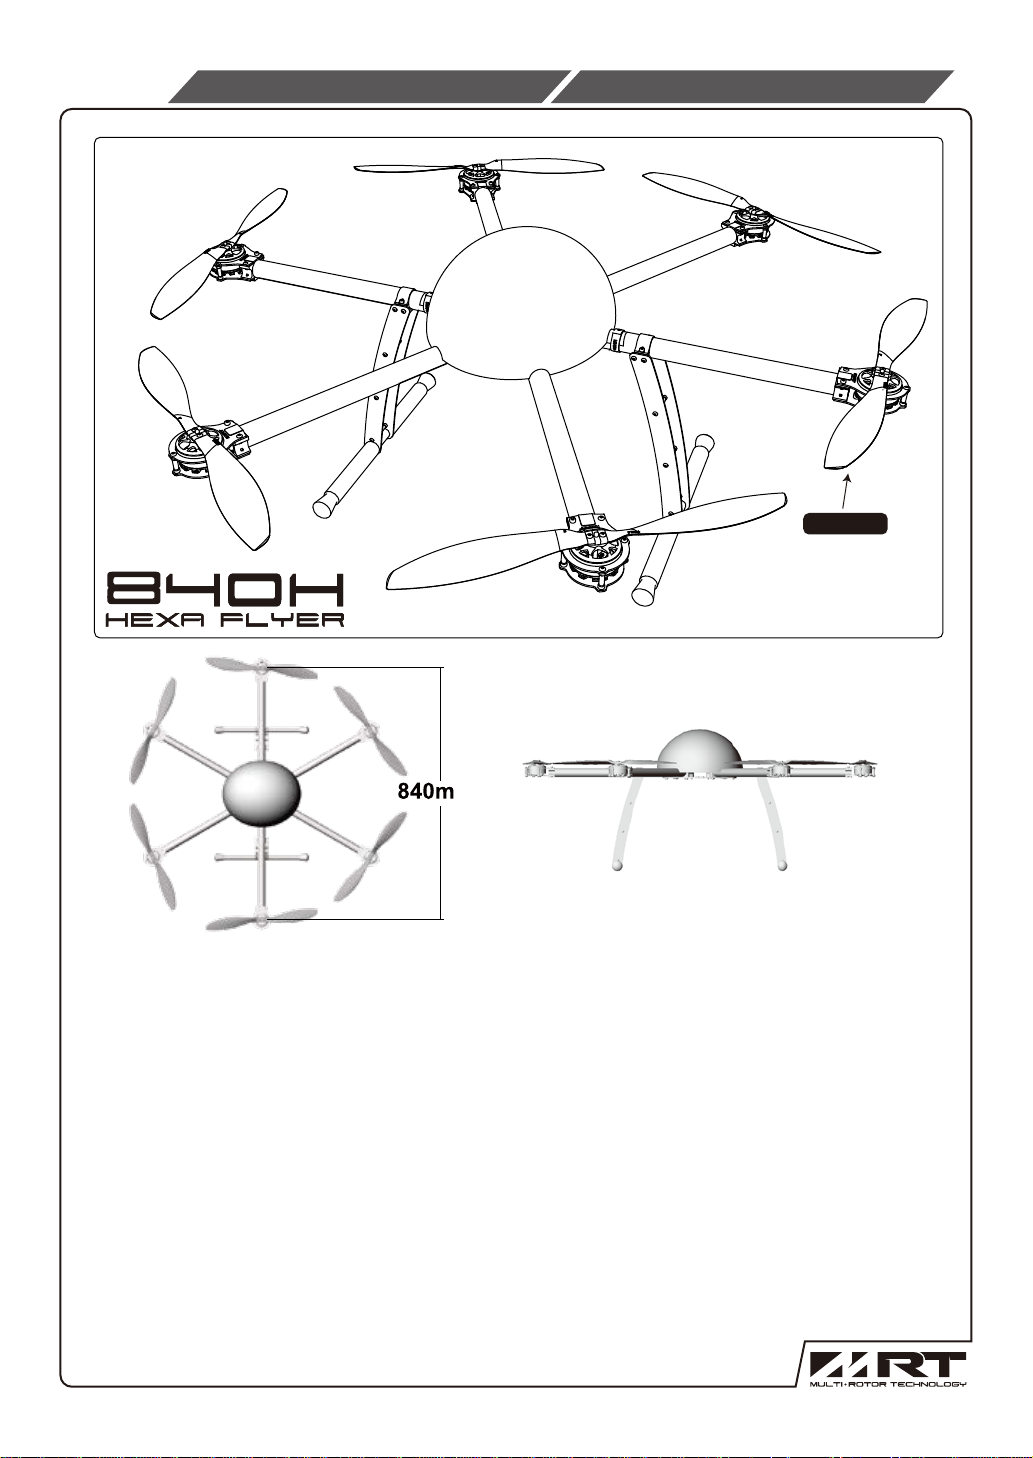
840H Specifications
840H規格
#226074
Spare part item #
此為零件包料號
SPECIFICATIONS
* CROSSING DISTANCE: MOTOR SHAFT TO MOTOR SHAFT 840H (840mm)
* PROPELLER SIZE: 15 inch.
* MOTOR: 320kV BRUSHLESS MOTOR (OPTION).
* ESC: 30A ESC (OPTION).
* STABILIZER SYSTEM: GU-INS (OPTIONS, NOT INCLUDED IN THIS
PACKAGE).
* WEIGHT: 2400g
(WITH RECOMMENDED STANDARD POWER PACKAGE, WITHOUT BATTERY).
* MAXIMUM FLYING WEIGHT: 8000g
(DEPENDS ON POWER PACKAGE, INCLUDING BATTERY & PAYLOAD).
* BATTERY: 22.2v (2S TO 6S LiPo).
* FLYING DURATION: 7~20 MINUTES
(DEPENDS ON BATTERY CAPACITY, PAYLOAD AND FLYING STYLE).
Page 6
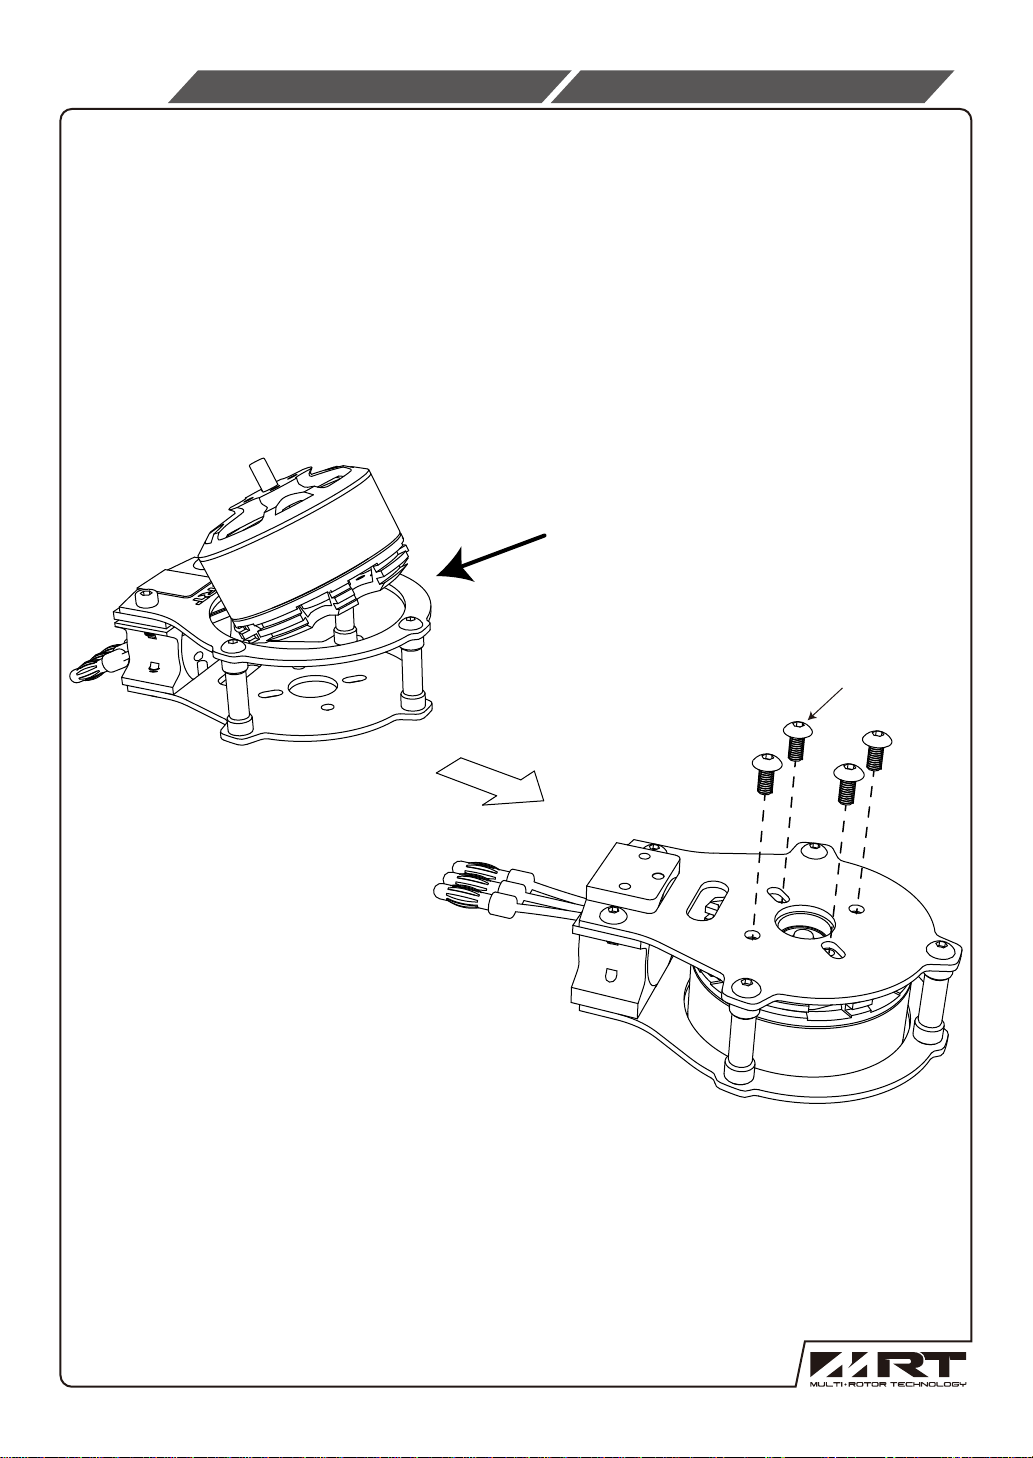
P.1
Put the motor inside the motor mount and secure with M3x6 screws.
將馬達置入馬達艙後鎖緊M3x6螺絲。
Motor assembly
馬達組裝
M3x6 4pcs
Page 7
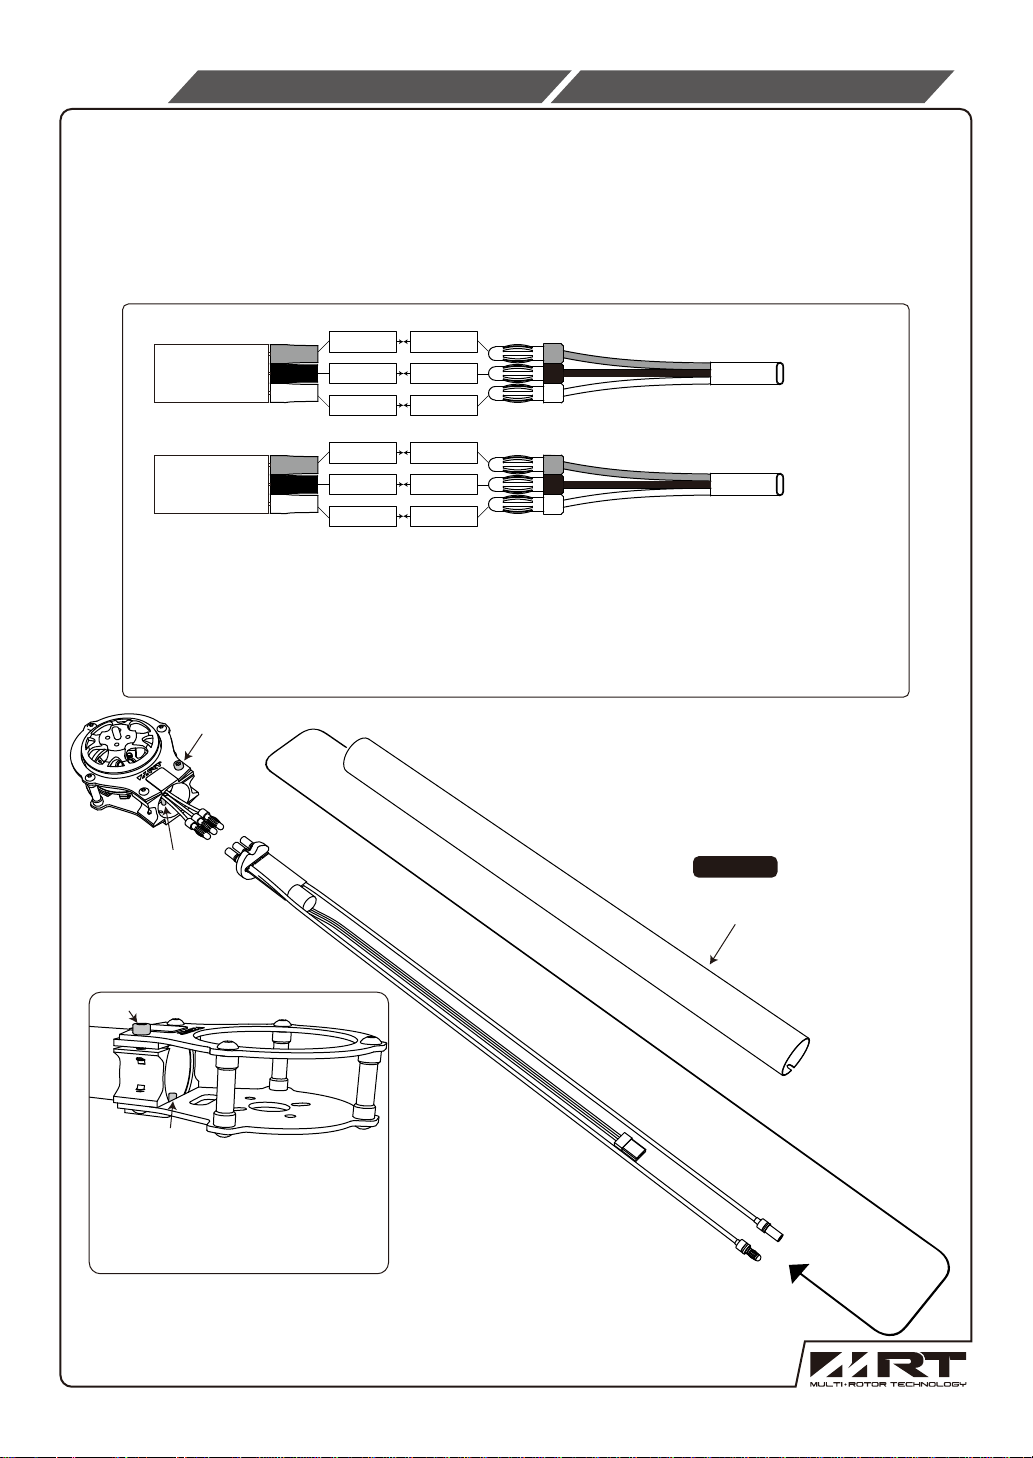
P.2
ESC assembly
電變組裝
Connect ESC cables to the motors.
Notice the 6 sets of motors cable connections:
Motor A spins counter clock wise (CCW).
Motor B spins clockwise (CW).
將電子變速器接至馬達。
(注意六組馬達接頭的顏色區別:A為逆時鐘旋轉,B為順時鐘旋轉)
ESC Motor
ESC
ESC
Set up each of the six boom's Motor/ESC as A or B setup.
A: CCW: Connect ESC with Motor cable of the same color.
B: CW: Connect Black to Red, Red to Black and the yellow cable to the yellow.
將6組動力系統分別製作成A B組:
A:逆時鐘旋轉:電子變速器電源輸出端(3線)與馬達電源線(3線),相同顏色相接即可。
B:正時鐘旋轉:電子變速器電源輸出端(3線)與馬達電源線(3線),黑、紅色線跳接即可。
M3x8
Positioning pin
定位銷
YELLOW
BLACK
RED
YELLOW
BLACK
RED
YELLOW
BLACK
RED
YELLOW
RED
BLACK
A
B
#226068
331mm Boom
(331mm)軸管
M3x8
Positioning pin
定位銷
Attention: Make sure the U-shaped
groove on the boom is fully inserted
and locked in with the positioning pin.
注意:請確認軸管U形槽完全插入定位
銷,再鎖緊M3x8螺絲。
Page 8
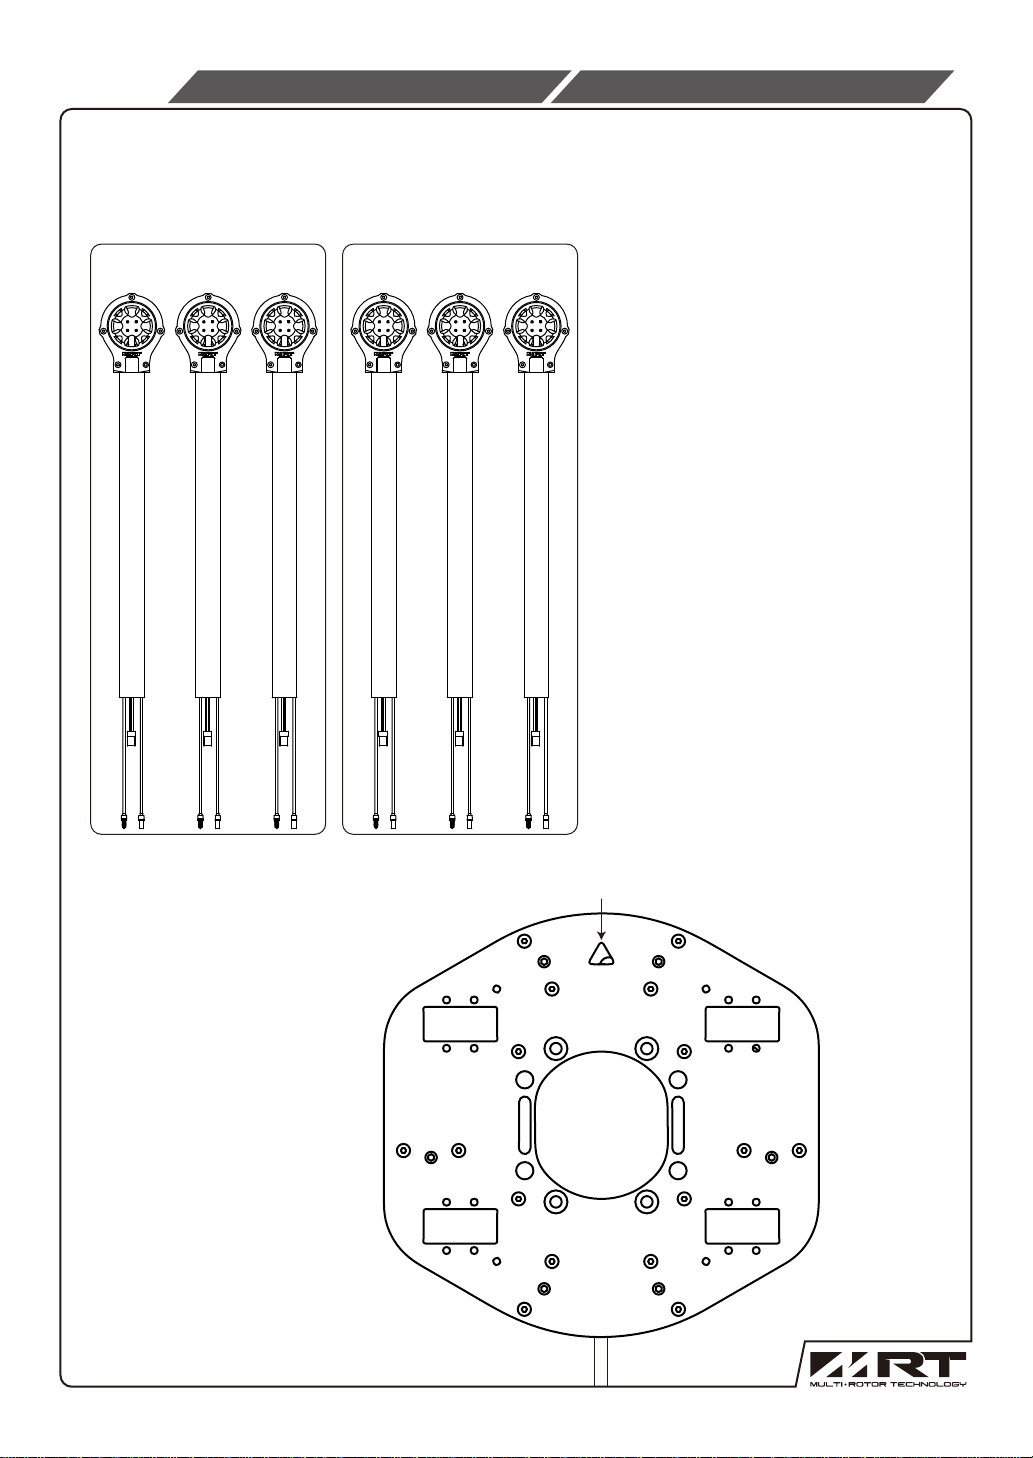
P.3
Make sure to separate the A and B set motors/boom assembly.
Secure the the A set and B set motors onto the frame in position as indicated.
*Incorrect installation will cause the Hexa flyer inability to fly.
將組裝好的軸管,如下圖排列區分,待後續組裝過程插入對應的主體位置。
Frame assembly
機身組裝
A
B
A
B
B
Heading Direction
機首方向
A
B
A
Page 9
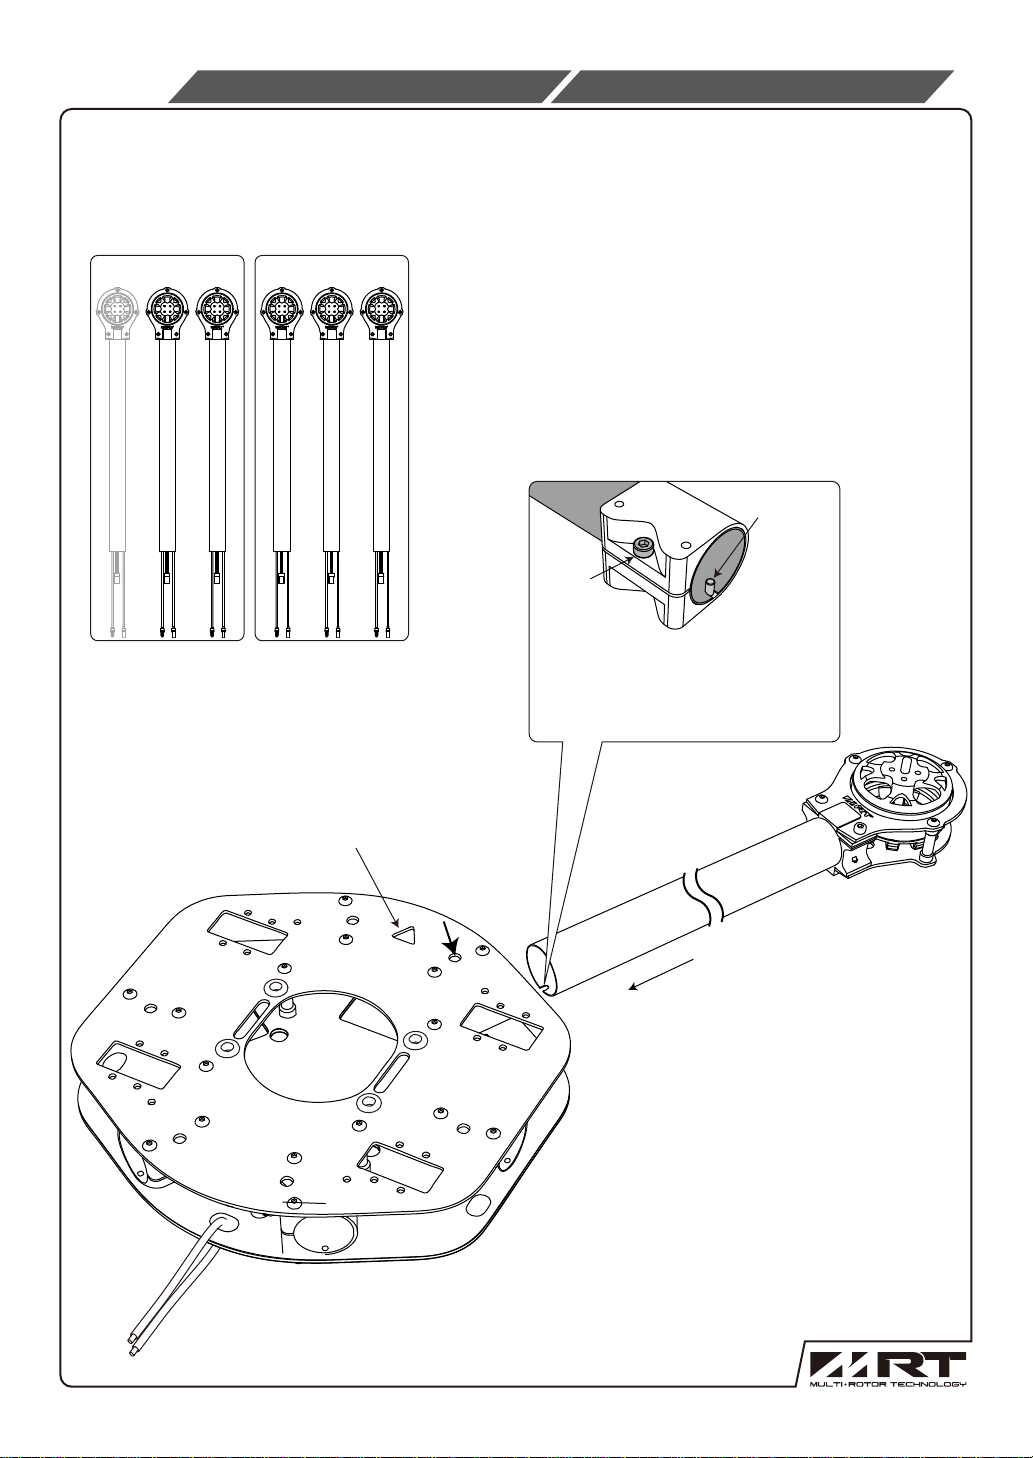
P.4
Frame assembly
機身組裝
Install the Motor/ESC/Boom set assembly in the proper frame location until the
position pin is locked into place with the U-shaped groove on the boom. Tighten
the M3x8 screw.
將組裝好的軸管,插入對應的主體位置至定位,再鎖緊箭頭指示方向的M3x8螺絲。
A B
Positioning pin
定位銷
M3x8
Attention: Make sure the U-shaped groove
on the boom is inserted all the way and
locked into place with the position pin,
then tighten the M3x8 screw.
注意:請確認軸管U形槽完全插入定位銷,
再鎖緊M3x8螺絲。
Heading Direction
機首方向
A
Page 10
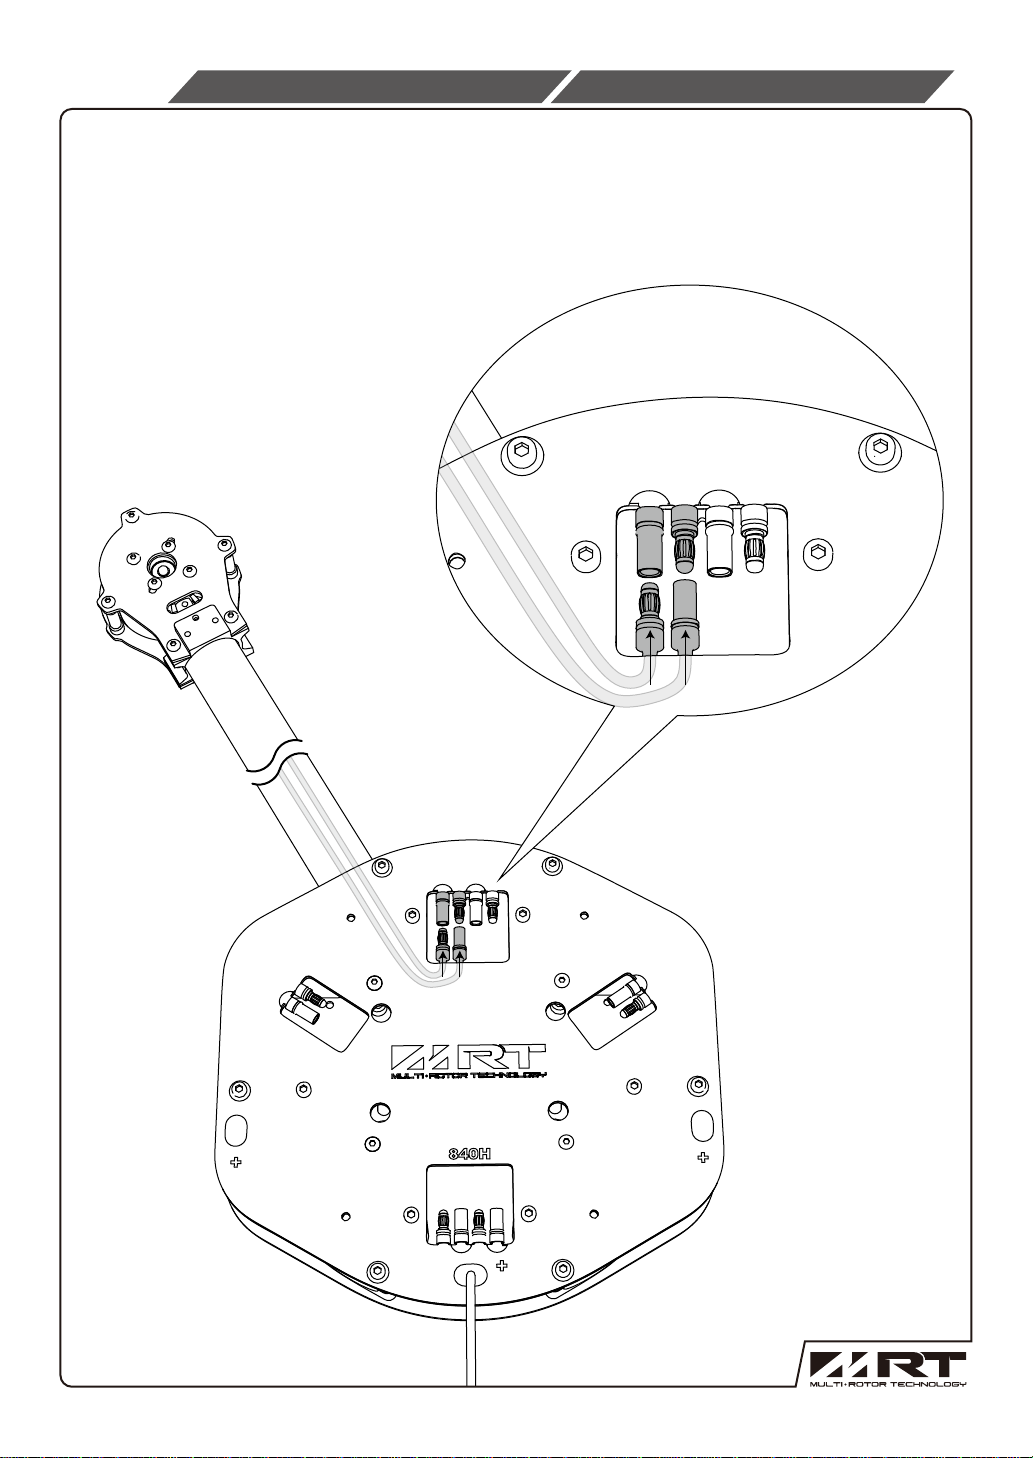
P.5
Heading Direction
機首方向
Connect the ESC cables to the connectors on the bottom circuit frame.
將電子變速器電源端接於主體對應位置。
Frame assembly
機身組裝
A
Heading Direction
機首方向
Page 11
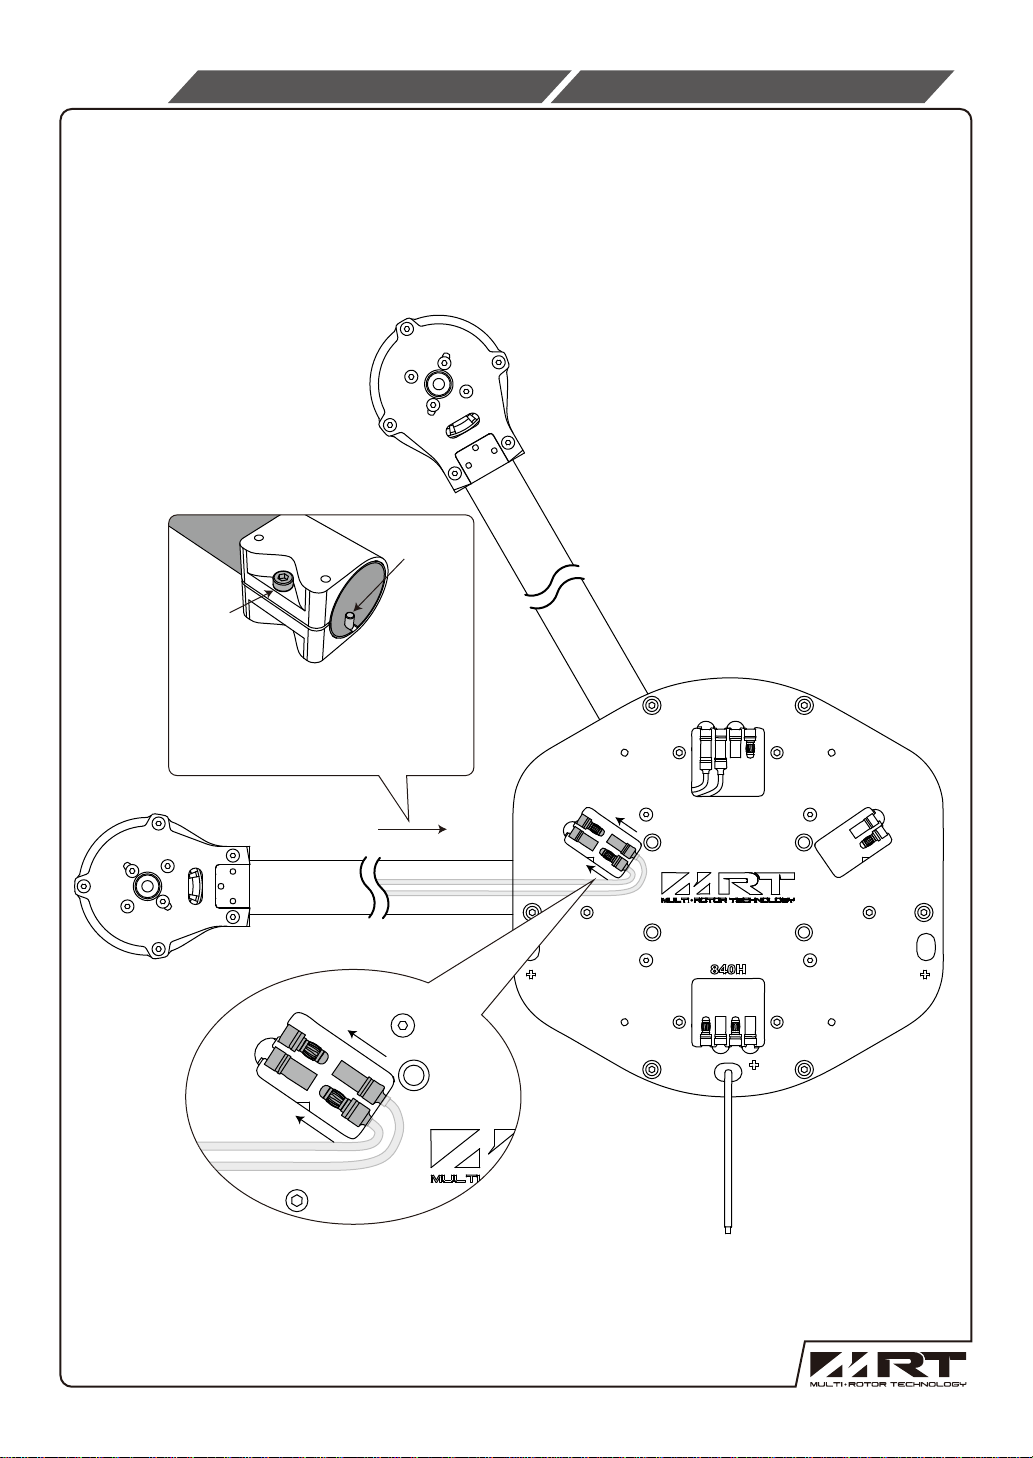
P.6
Heading Direction
機首方向
Frame assembly
機身組裝
1. Install the motor/boom assembly on the proper place on the frame.
2. Tighten M3x8 screws.
3. Connect the ESC cable to the main circuit frame.
1.將組裝好的軸管,插入對應的主體位置。
2.鎖緊M3x8螺絲。
3.接上電子變速器電源端於對應主體位置。
A
Positioning pin
定位銷
M3x8
Attention: Make sure the U-shaped groove
on the boom is inserted all the way and
locked into place with the position pin,
then tighten the M3x8 screw.
注意:請確認軸管U形槽完全插入定位銷,
再鎖緊M3x8螺絲。
B
Heading Direction
機首方向
Page 12
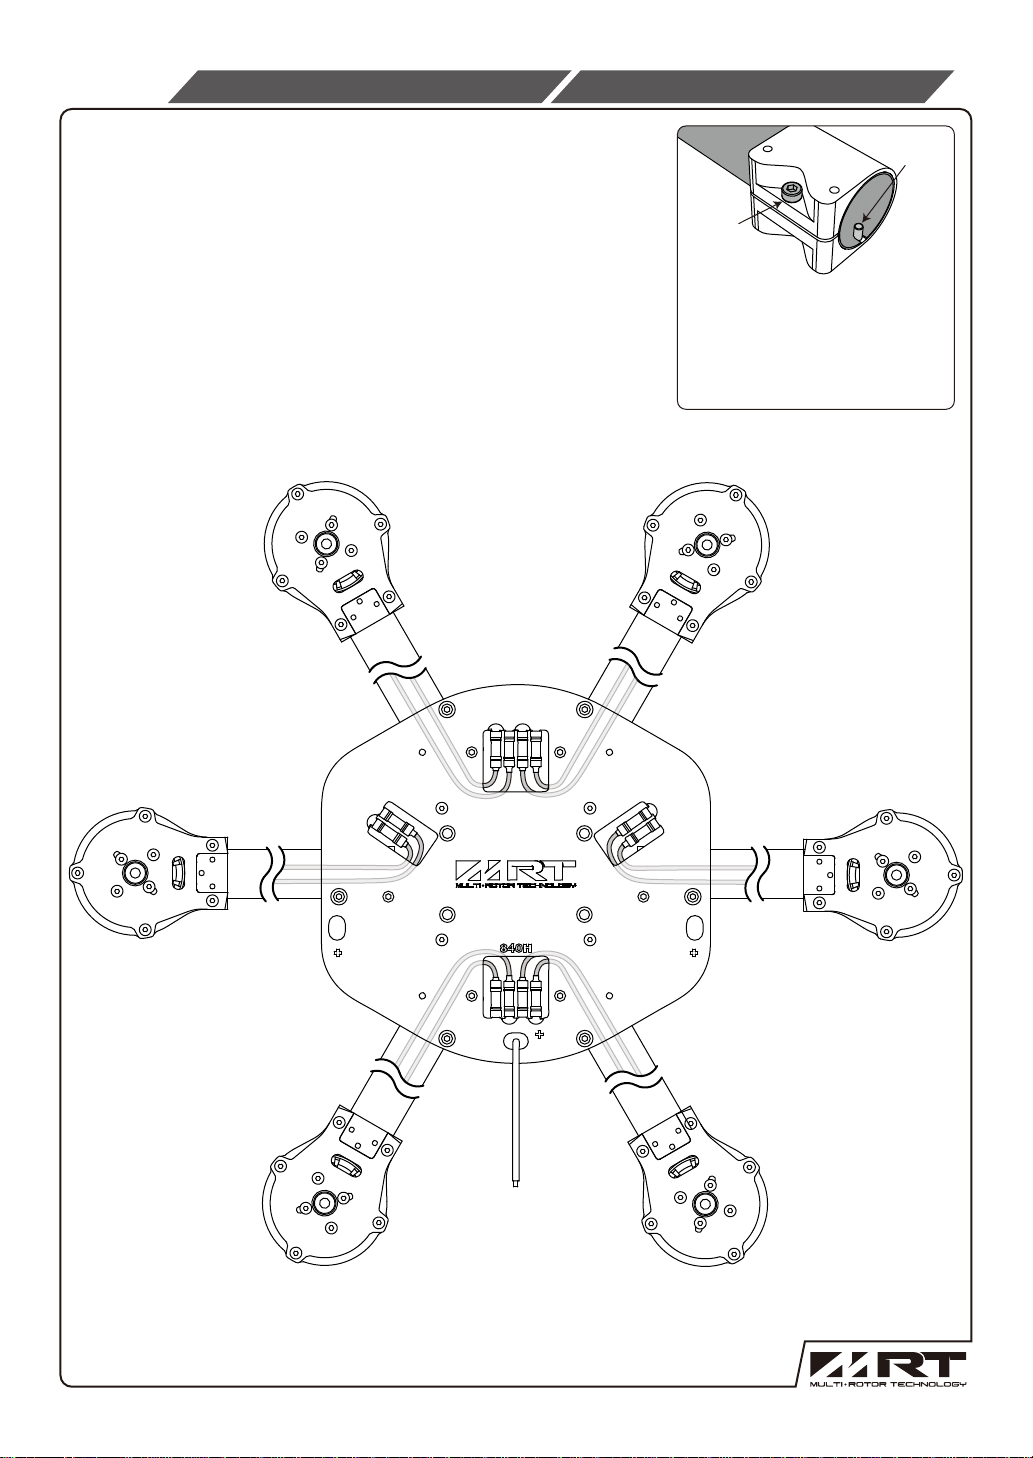
P.7
Frame assembly
機身組裝
Drawing below indicates the 6 sets of ESC cable setup.
Please refer to P4 to P6 installation to complete
the other 4 sets of booms 's installation.
圖示為6組電子變速器安裝接線圖,請配合P4~P6的安裝
將其餘4組組裝完成。
A
Heading Direction
機首方向
B
Positioning pin
定位銷
M3x8
Attention: Make sure the U-shaped
groove on the boom is inserted all the
way and locked into place with the
position pin, then tighten the M3x8
screw.
注意:請確認軸管U形槽完全插入定位
銷,再鎖緊M3x8螺絲。
B
A
A
B
Page 13
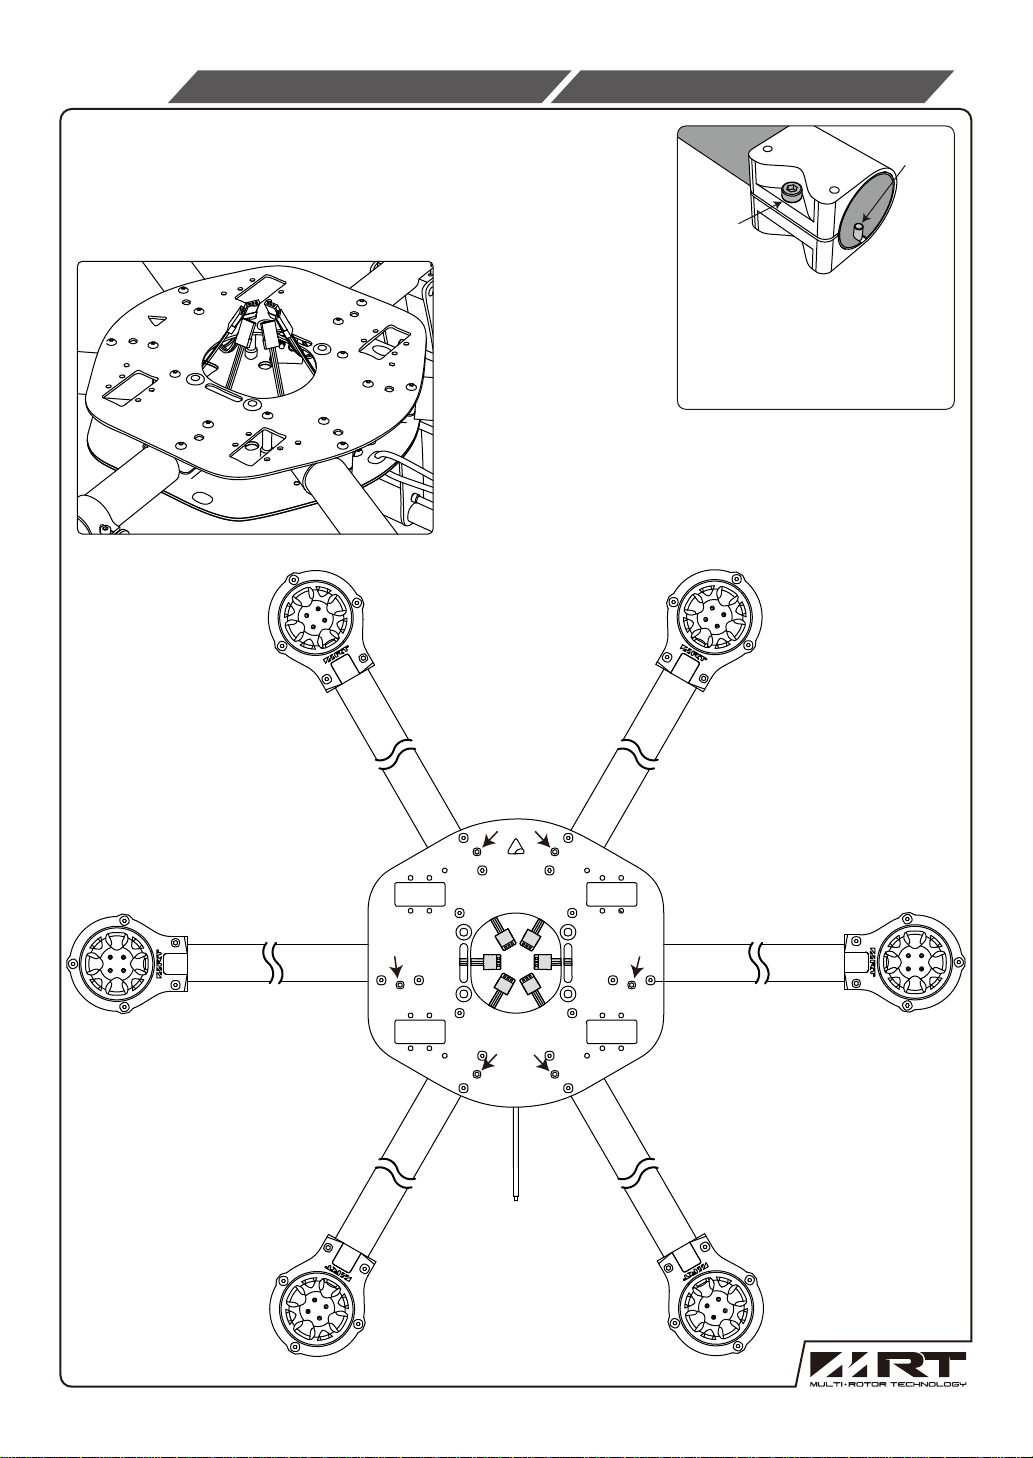
P.8
Frame assembly
機身組裝
Please double check the indicated M3x8 screws are
tightened. Pull up the ESC signal cable connections.
請再次確認箭頭指示方向M3x8螺絲是否鎖緊,
並將訊號線依序拉出。
B
A
Positioning pin
定位銷
M3x8
Attention: Make sure the U-shaped
groove on the boom is inserted all the
way and locked into place with the
position pin, then tighten the M3x8
screw.
注意:請確認軸管U形槽完全插入定位
銷,再鎖緊M3x8螺絲。
A
B
Heading Direction
機首方向
B
A
Page 14
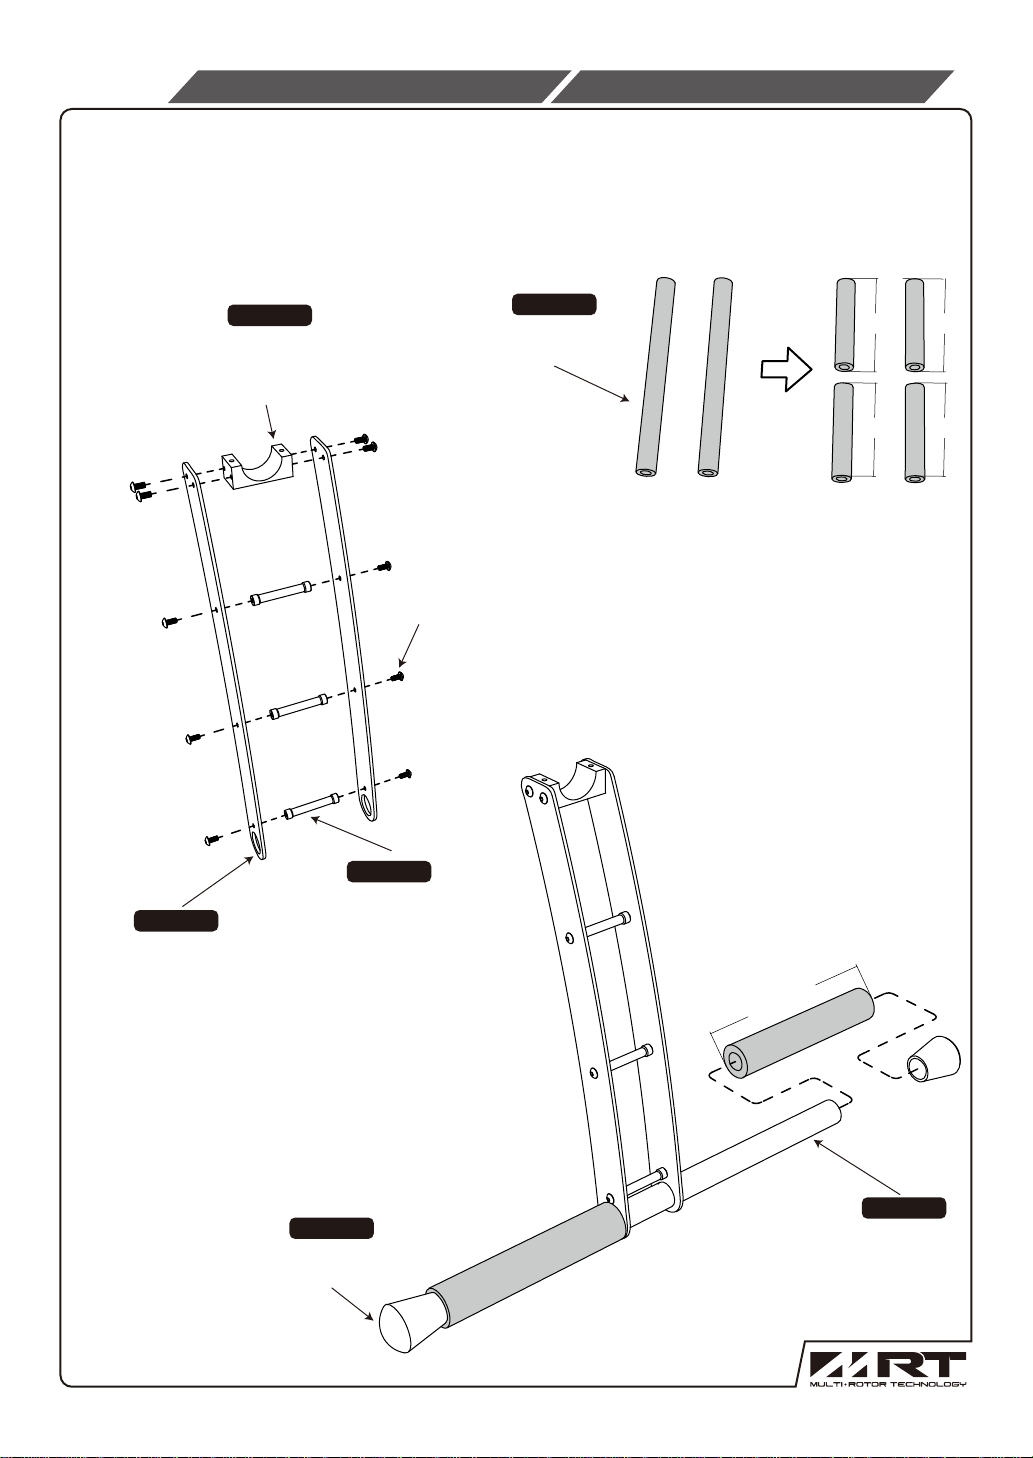
P.9
Landing gear assembly
腳架組裝
Insert the landing gear boom thru the landing gear, adjust so the front and back are
equidistant. Cut the sponge tubes in about 11.5mm sections and insert them onto
the front and back of landing boom.
將腳架鋁管穿過腳架側板並調成等距。
取出零件包內的泡棉管兩支,分別裁切成約11.5cm後套入腳架鋁管。
#226064
Bottom boom clamp
for the landing gear
腳架下管夾
#226069
Landing gear side frame.
腳架側板
M3x6 10pcs
#226072
Cylinder post (36mm)
圓柱(36mm)
#226078
Anti-shock sponge.
減震泡棉
11.5cm 11.5cm
11.5cm11.5cm
Rubber ends for landing boom.
#931057
腳架橡膠墊
isometric
等距
11.5cm
isometric
等距
#931055
Landing boom
腳架鋁管
Page 15
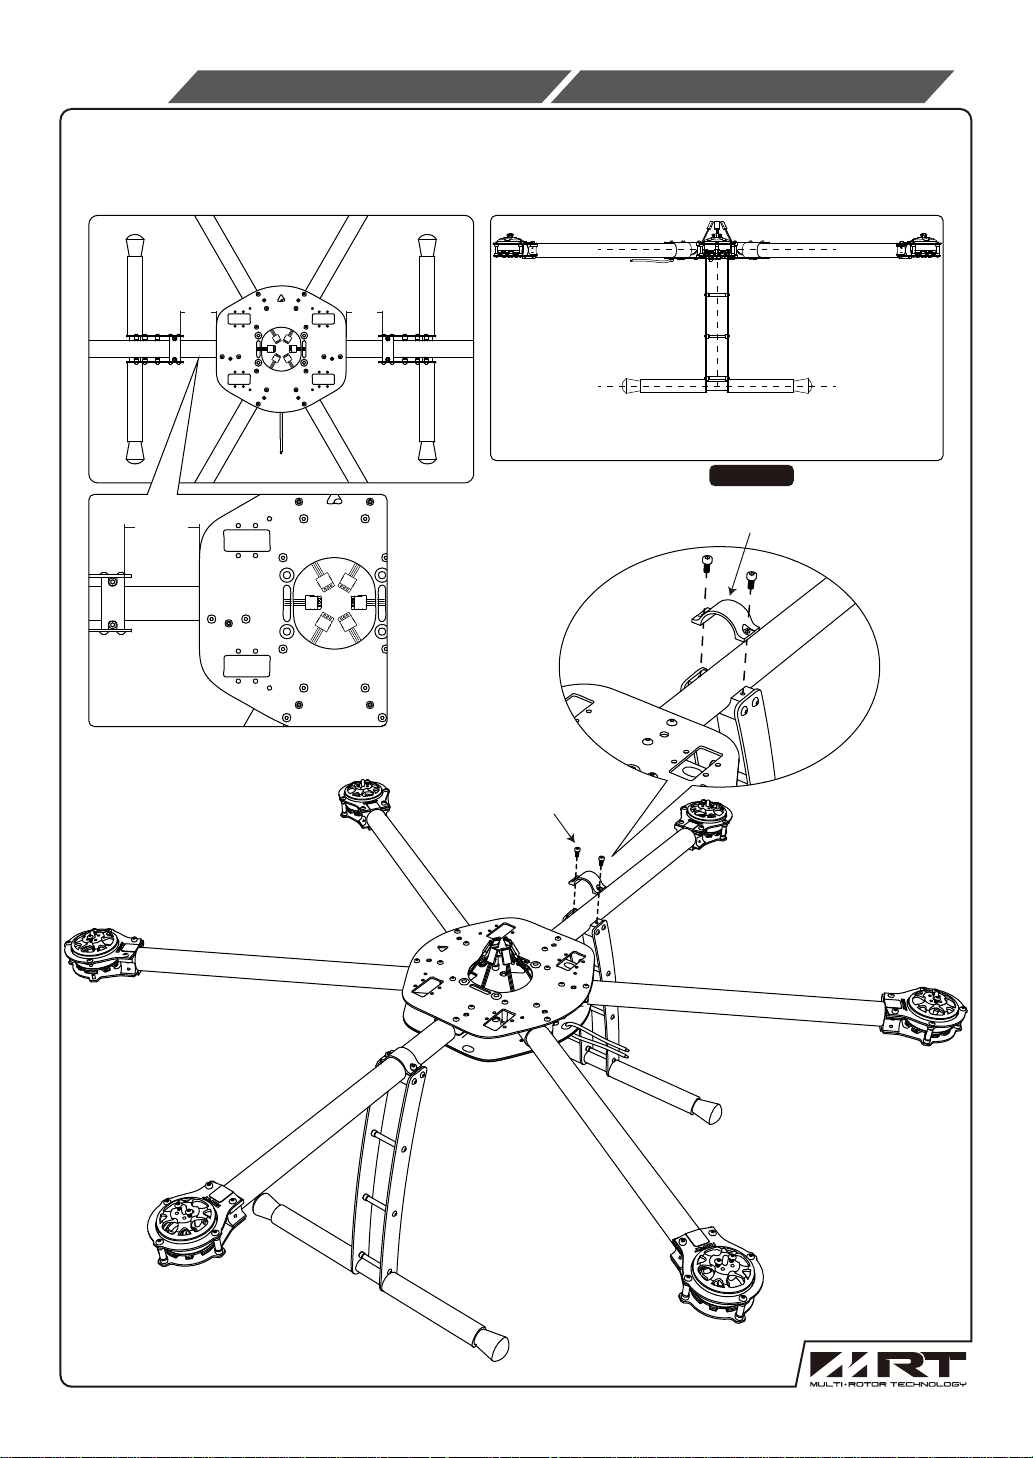
P.10
Heading Direction
機首方向
5cm
5cm
Landing gear assembly
腳架組裝
Secure the landing gear assembly on the the Hexa frame. Leave about 5cm
distance between boom clamp and the frame body.
將腳架組裝於機身,並與機身保留約5cm距離後鎖緊M3x6螺絲。
Heading Direction
機首方向
5cm
5cm
Make sure the landing gear boom is parallele to the
Hexa boom frame.
確認腳架與主體水平。
#226064
Landing gear top clamp.
腳架上管夾
M3x6
M3x6 4pcs
Heading Direction
機首方向
Page 16
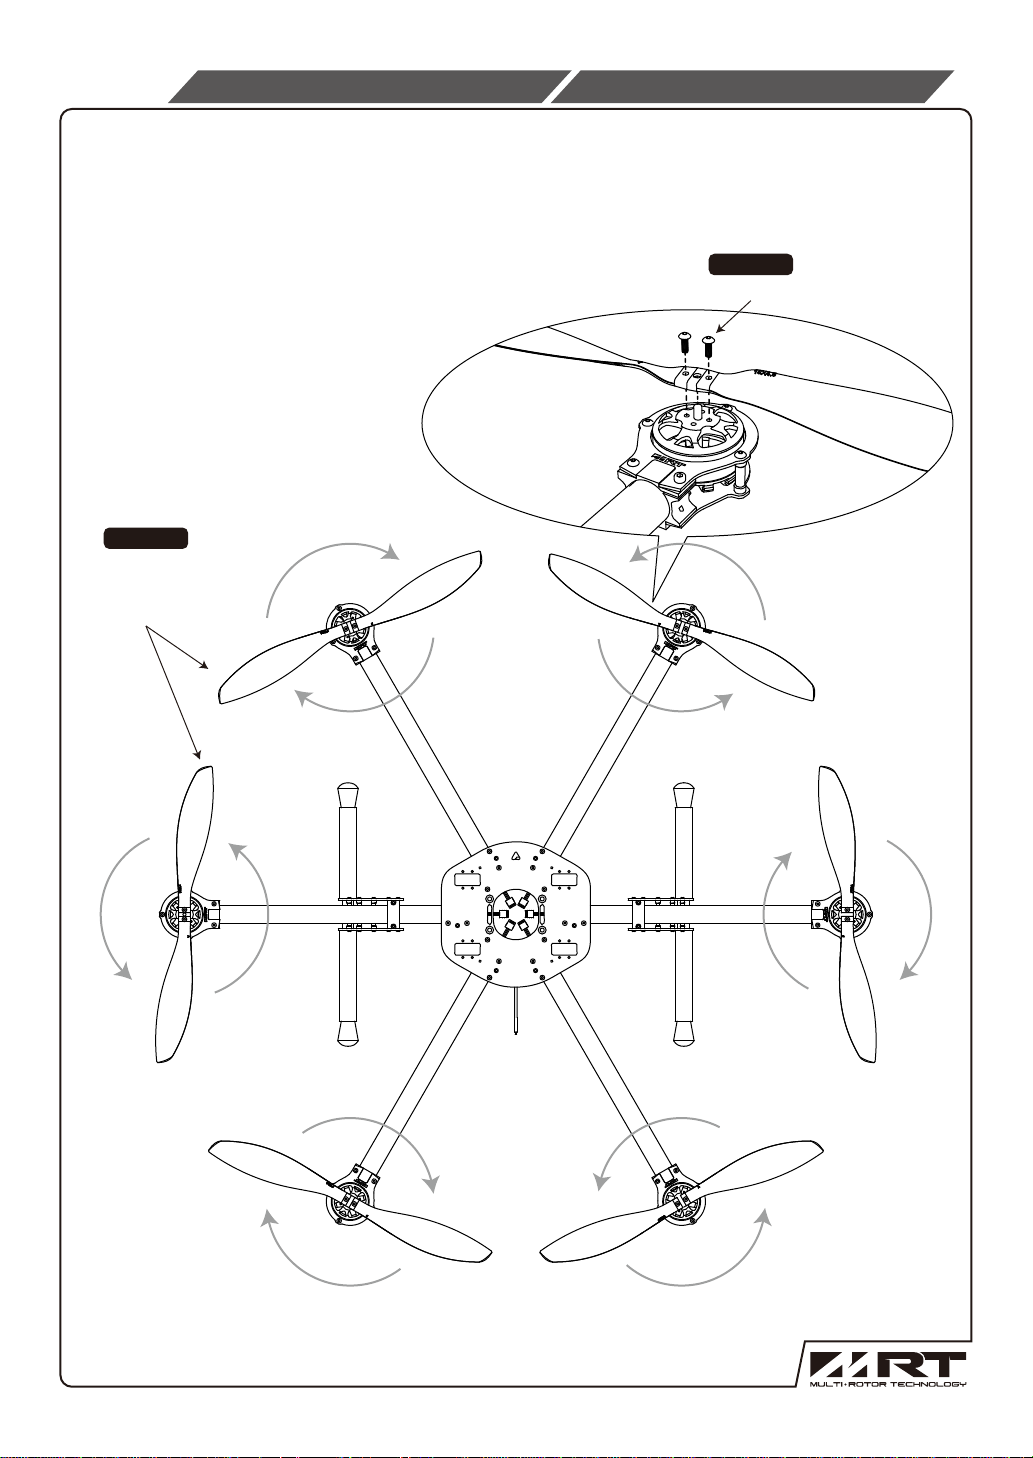
P.11
Attention:
A is CCW spin, must use 15A propeller.
B is CW spin, must use 15B propeller.
Incorrect installation of propellers will cause Hexa-copter to be not flyable.
注意:A為逆時鐘旋轉,配合15A螺旋槳,不可裝錯。
B為順時鐘旋轉,配合15B螺旋槳,不可裝錯。
Propeller assembly
螺旋槳組裝
#226082
M3x8
A
#931105
15 inch CW &
CCW propellers
15吋正逆槳
B
15B
15A
A
15A
Heading Direction
機首方向
A B
15B
15A
15A
B
15B
A
Page 17
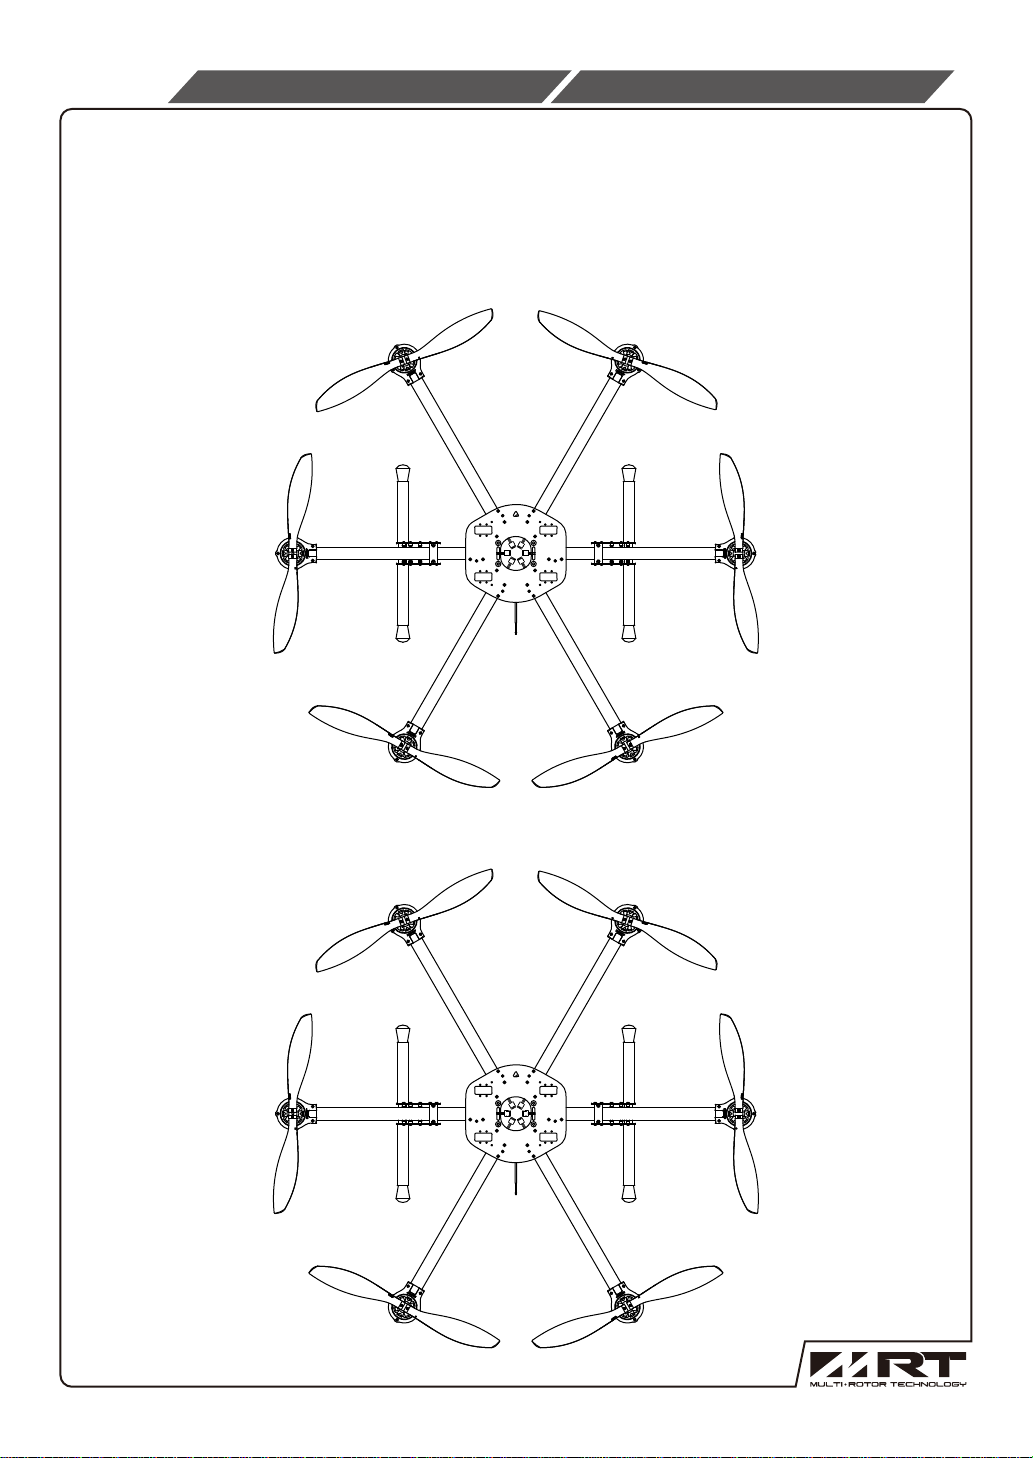
P.12
Please read the instruction manual of multi-rotor flight stabilizer
(from various vendors) thoroughly.
It is very important to connect the ESC signal cables correctly depending on the
CCW (A) and CW (B) motor/propeller spinning direction of each flying arm.
因應市面各廠牌不同的控制儀器,請參閱您的控制器說明書並確認6組馬達訊號線
號碼為A組或B組。
Flight stabilizer configuration
控制器配置
控制器 A
控制器 B
NO.6
NO.5
NO.2
NO.1
Heading Direction
機首方向
NO.2
NO.3NO.4
NO.1
NO.3
Heading Direction
機首方向
NO.6
NO.5NO.4
Page 18
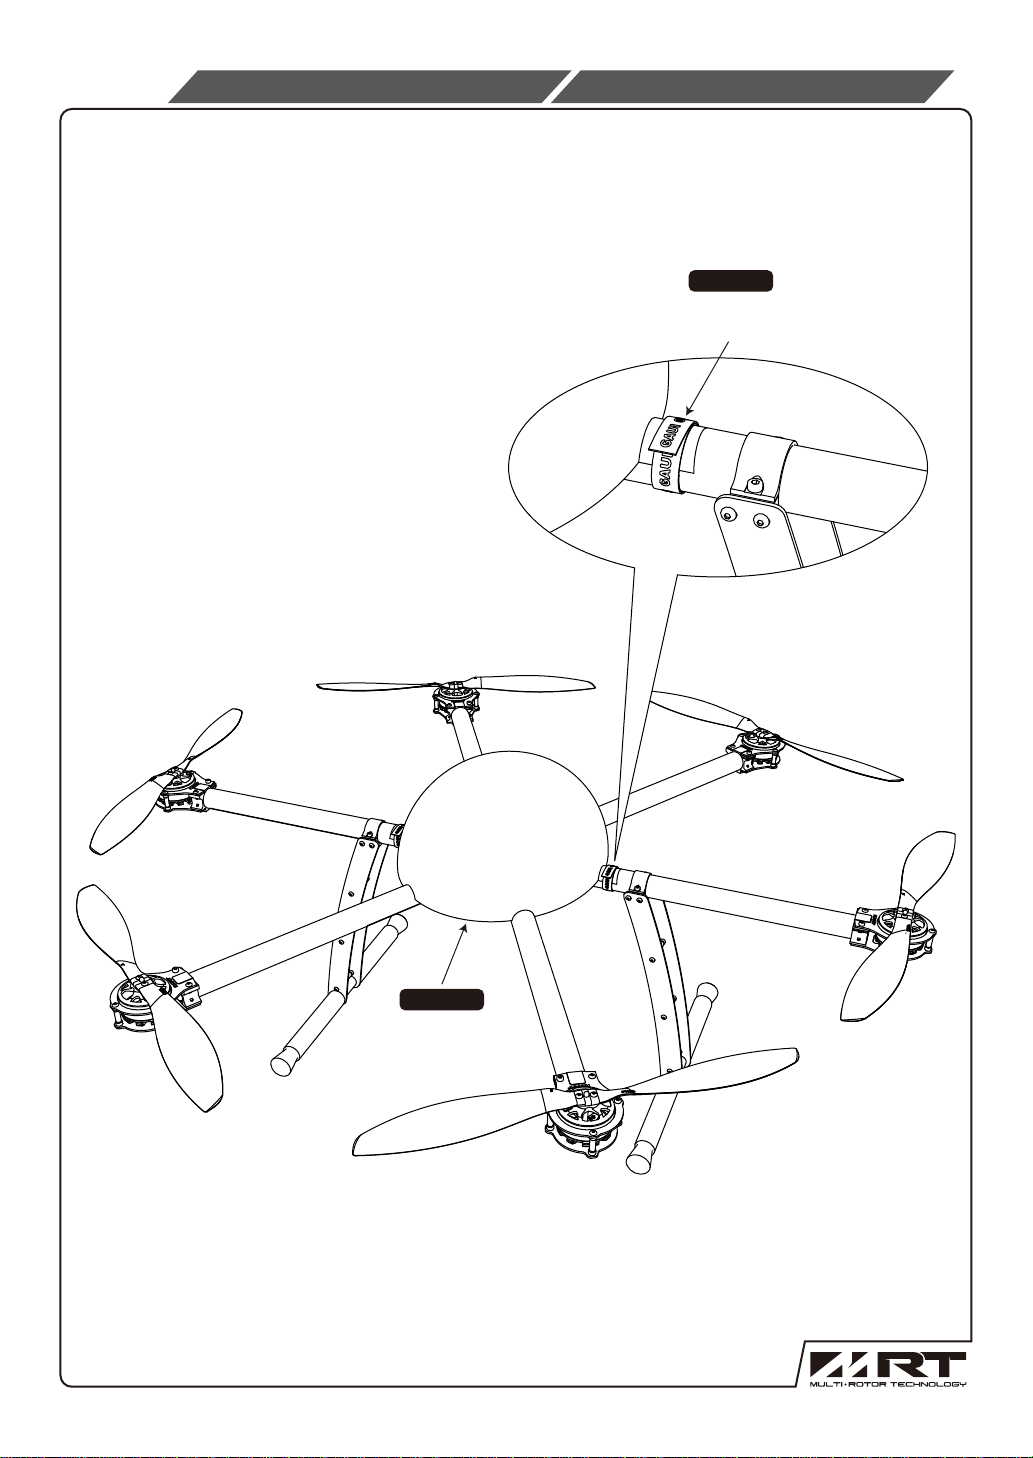
P.13
Canopy assembly
Use touch fasteners to secure the canopy onto the frame.
用魔鬼氈束帶固定艙罩,即完成組裝。
Touch fastener
艙罩組裝
#910030
魔術束帶
#226079
Canopy
艙罩
Page 19
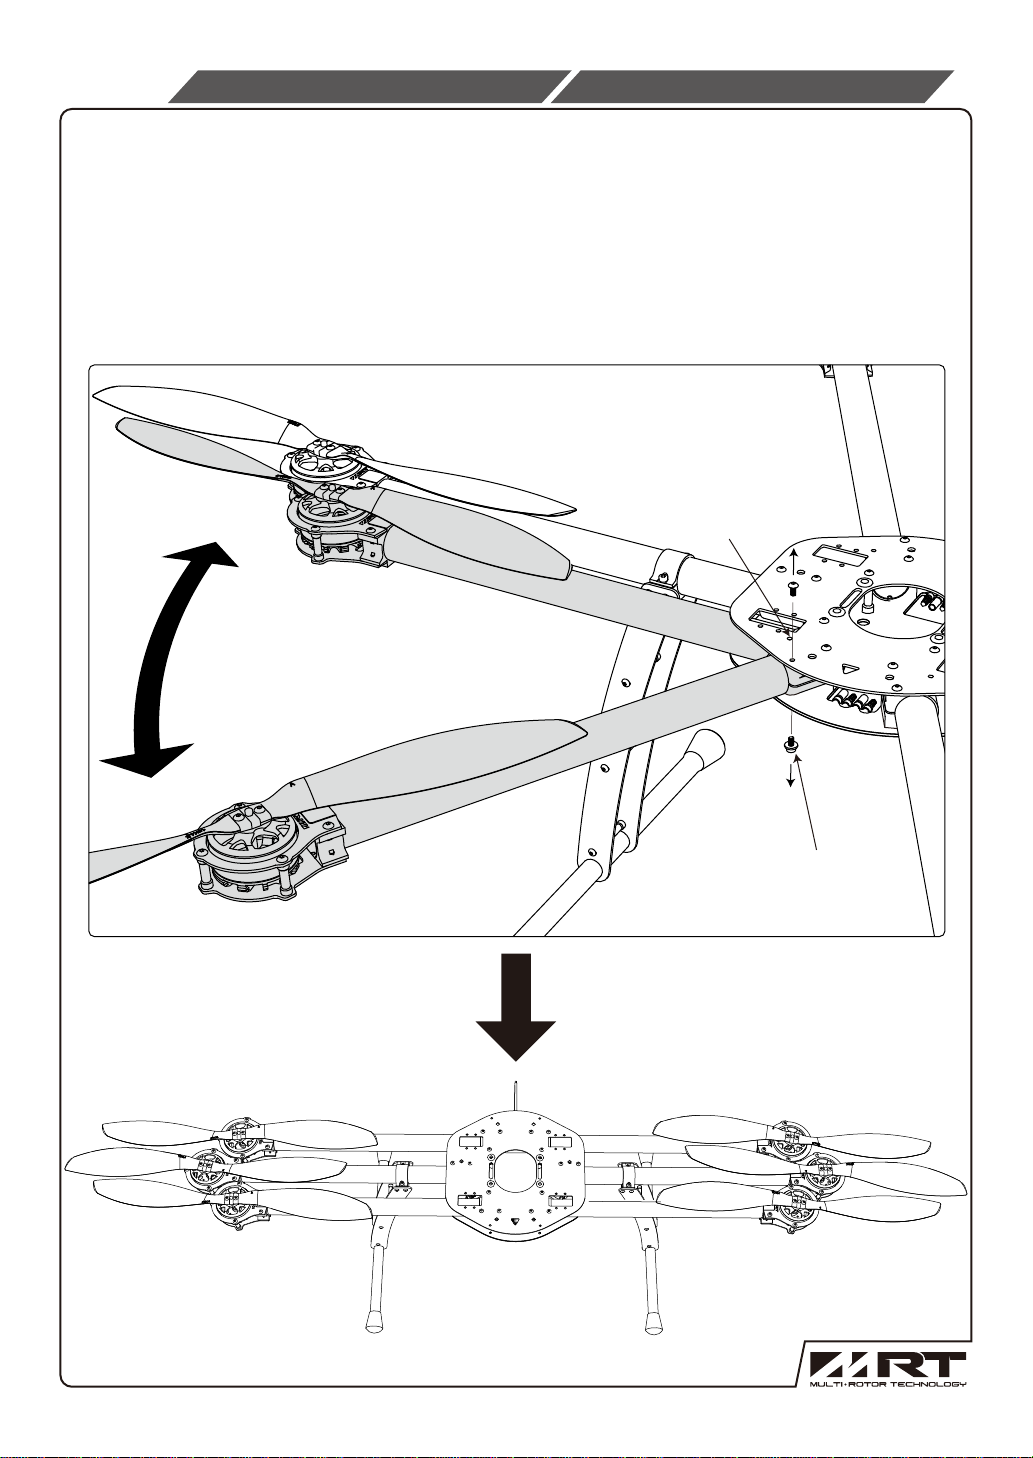
P.14
Boom folding
軸管折疊
840H has foldable design:
If folding/storage is needed, please remove the indicated screws below, but it back
in same location for storage.
(Note, the screw with the Insulation washer must be used on the proper location
and not over-tightened).
840H具折疊收合設計:
如需折合請將圖示的螺絲卸下,折合後再鎖回原來位置。
(注意含絕緣墊片的螺絲不可鎖錯位置或過分鎖緊)
Screw fixture location
螺絲固定孔
Screw with Insulation washer
絕緣螺絲
Page 20
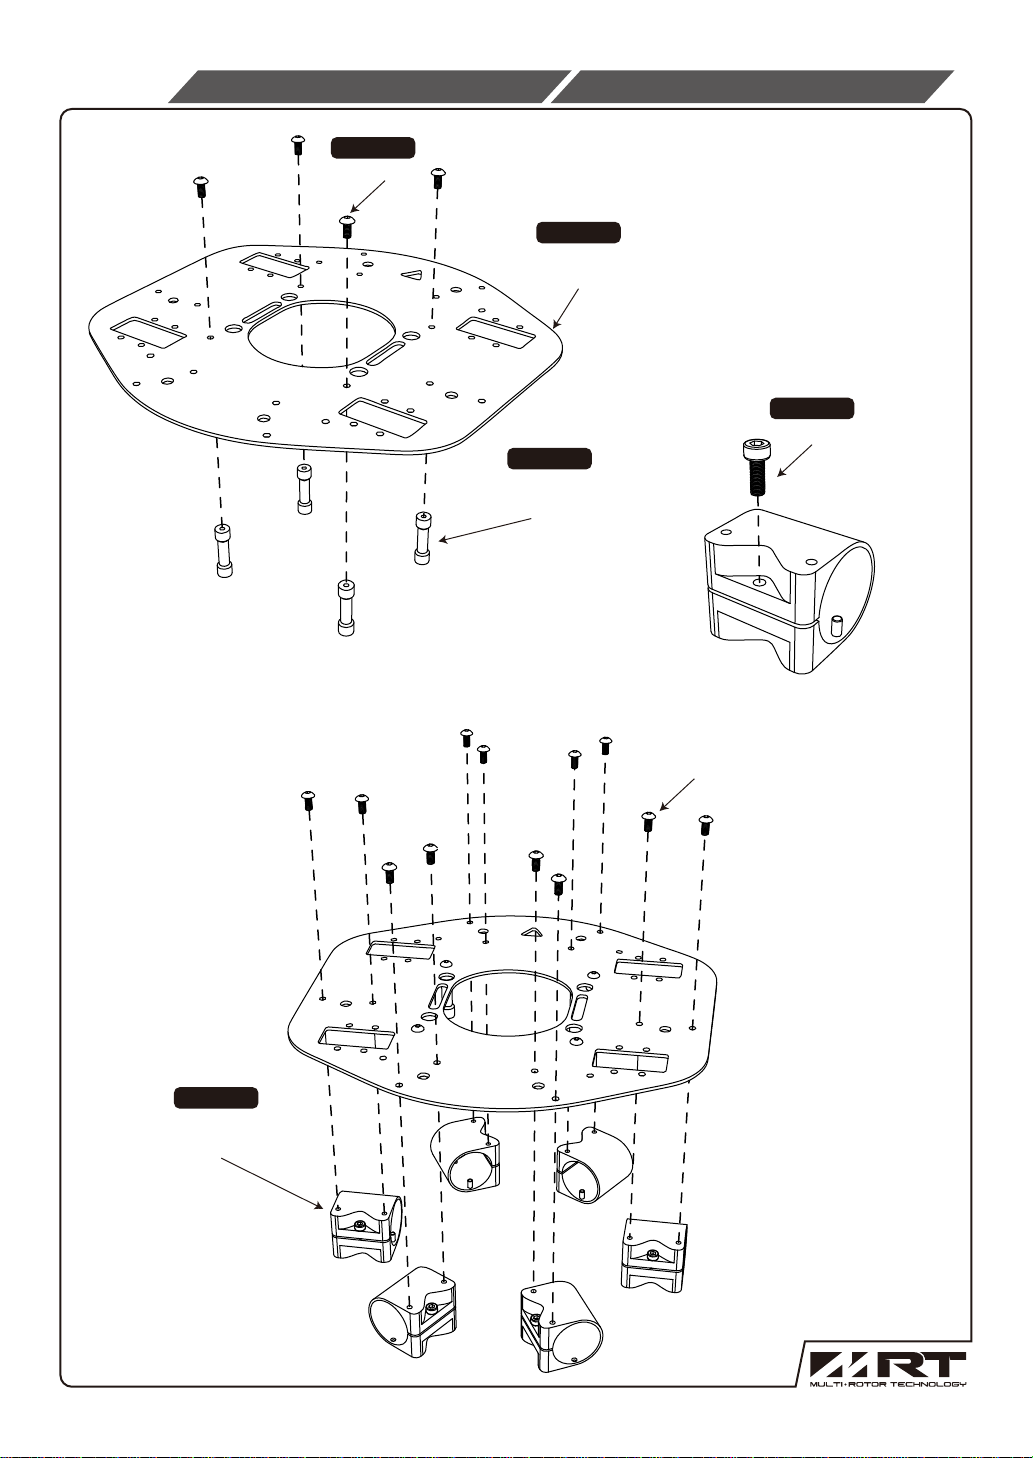
P.15
1.
Maintenance explosion view
#226082
M3x6 4pcs
維修爆炸圖
#226051
Upper frame
上側板
3.
#226070
Cylinder post (26.4mm)
圓柱(26.4mm)
2.
M3x6 12pcs
#226082
M3x8
#226063
Fuselage boom clamp
機身管套
Page 21
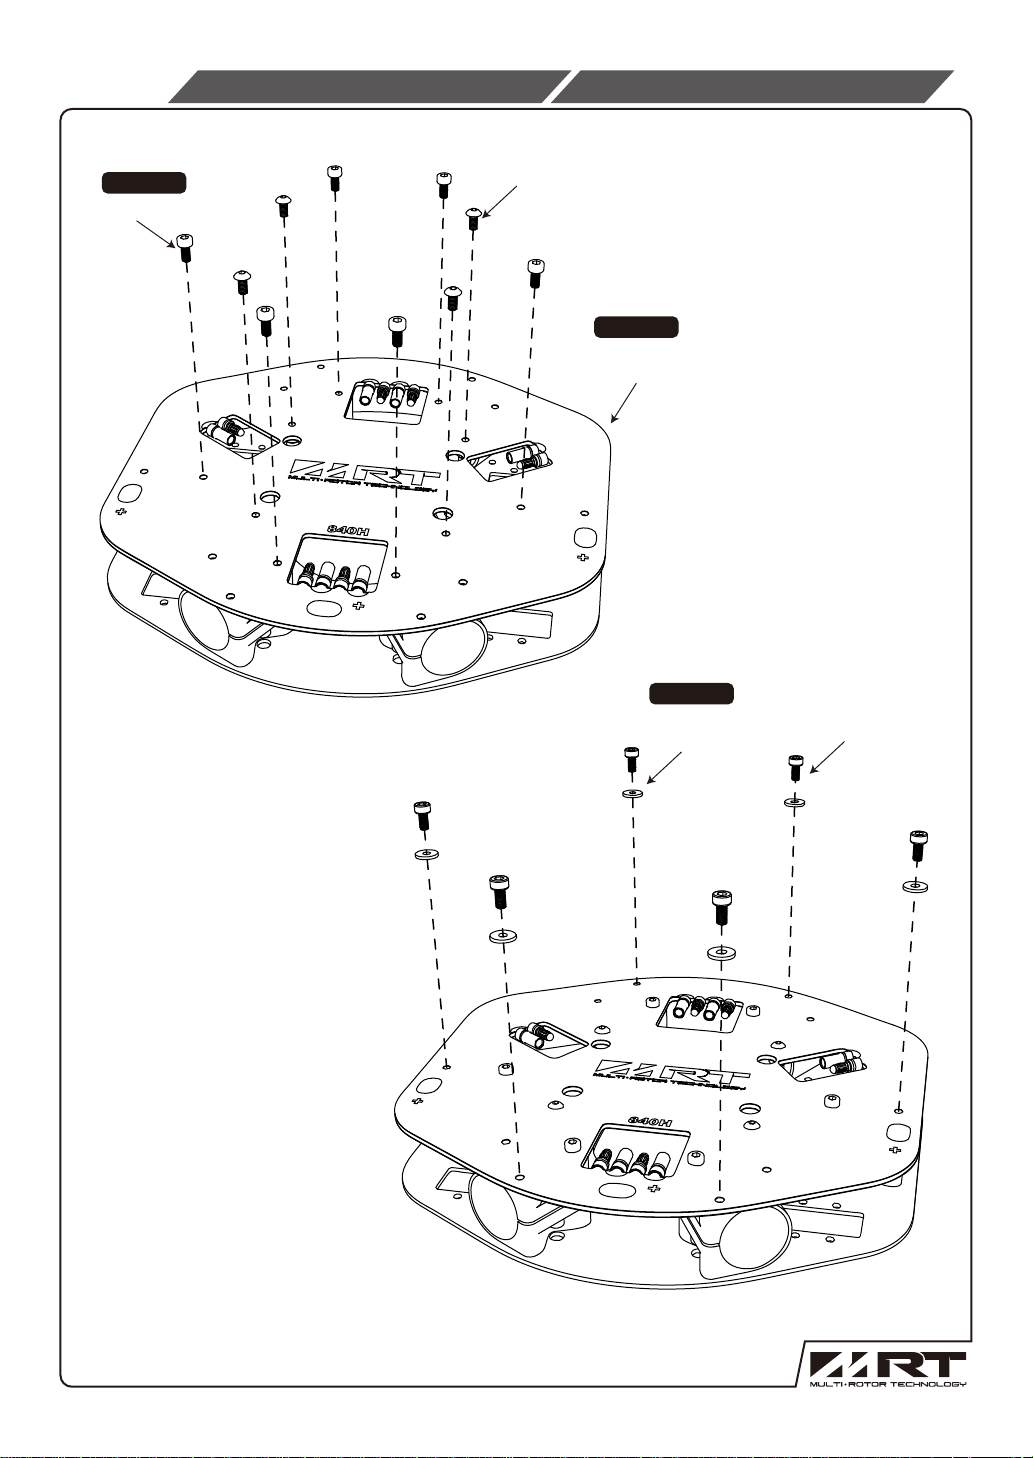
P.16
Maintenance explosion view
維修爆炸圖
#226082
M3x6 6pcs
4.
M3x6 4pcs
Bottom Circuit frame
#226052
機身電路板
#226073
Insulation Washer
絕緣墊片
M3x6 6pcs
5.
Attention: Insulation washer must be properly inserted
with the screw, to prevent current conduction.
注意:絕緣墊片應確實套入螺絲,以防止導電。
Page 22
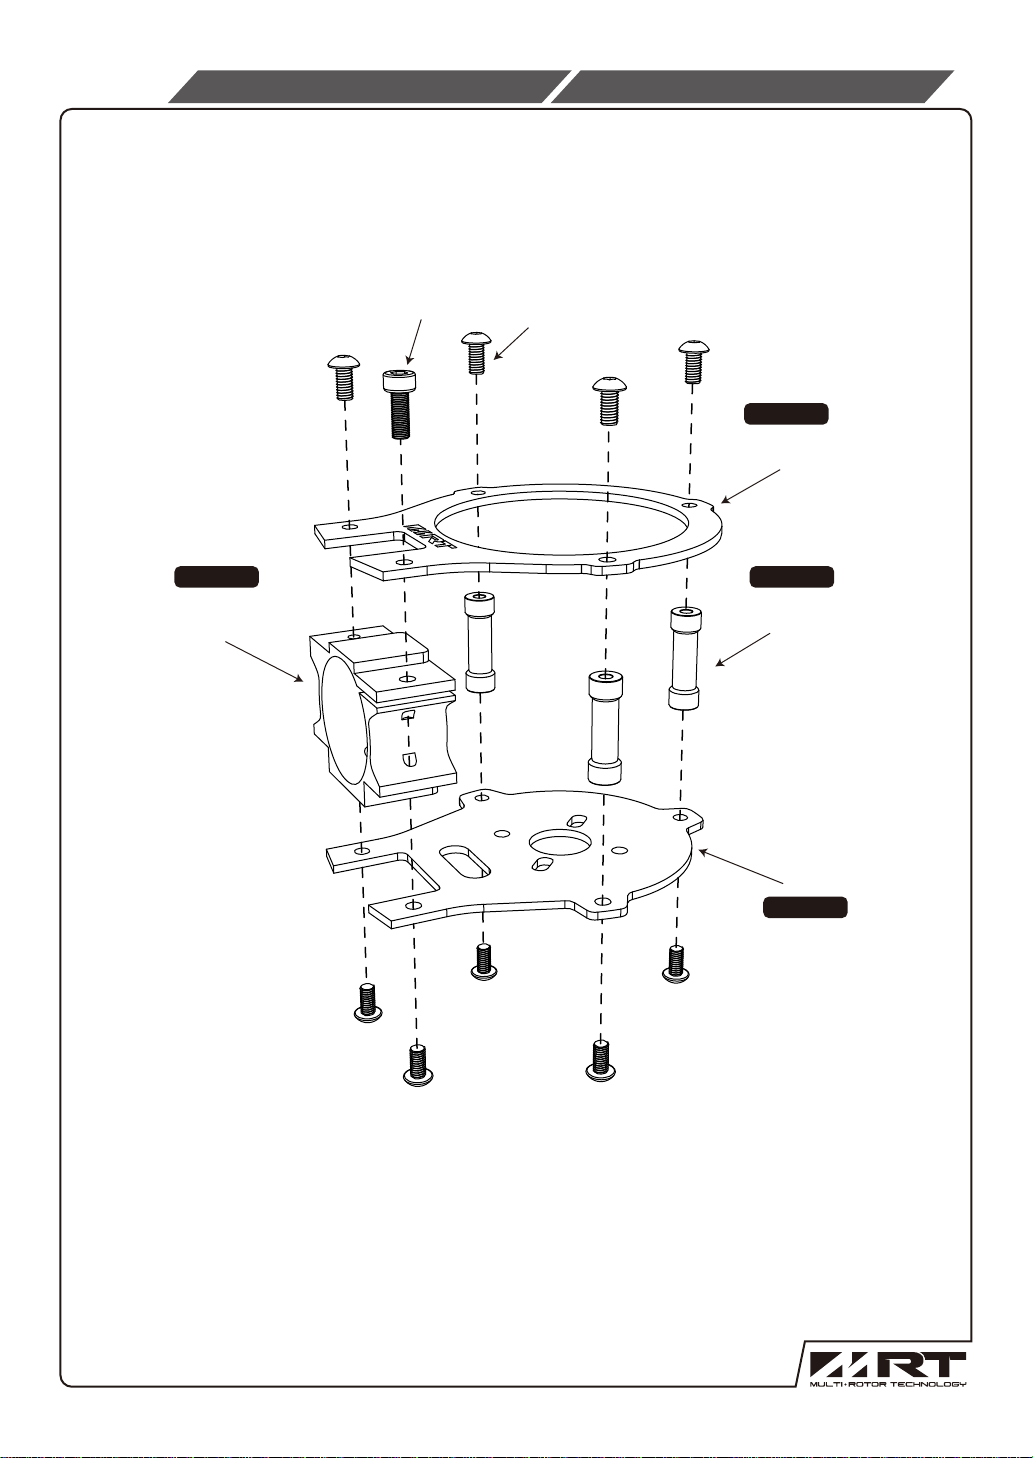
P.17
Maintenance explosion view
維修爆炸圖
6.
#226062
Motor mount boom clamp
馬達座管夾
M3x8
M3x6 9pcs
#226061
Upper Motor mount
馬達上板
#226071
Cylinder post (20mm)
圓柱(20mm)
Motor mount bottom frame
#226061
馬達底板
Page 23
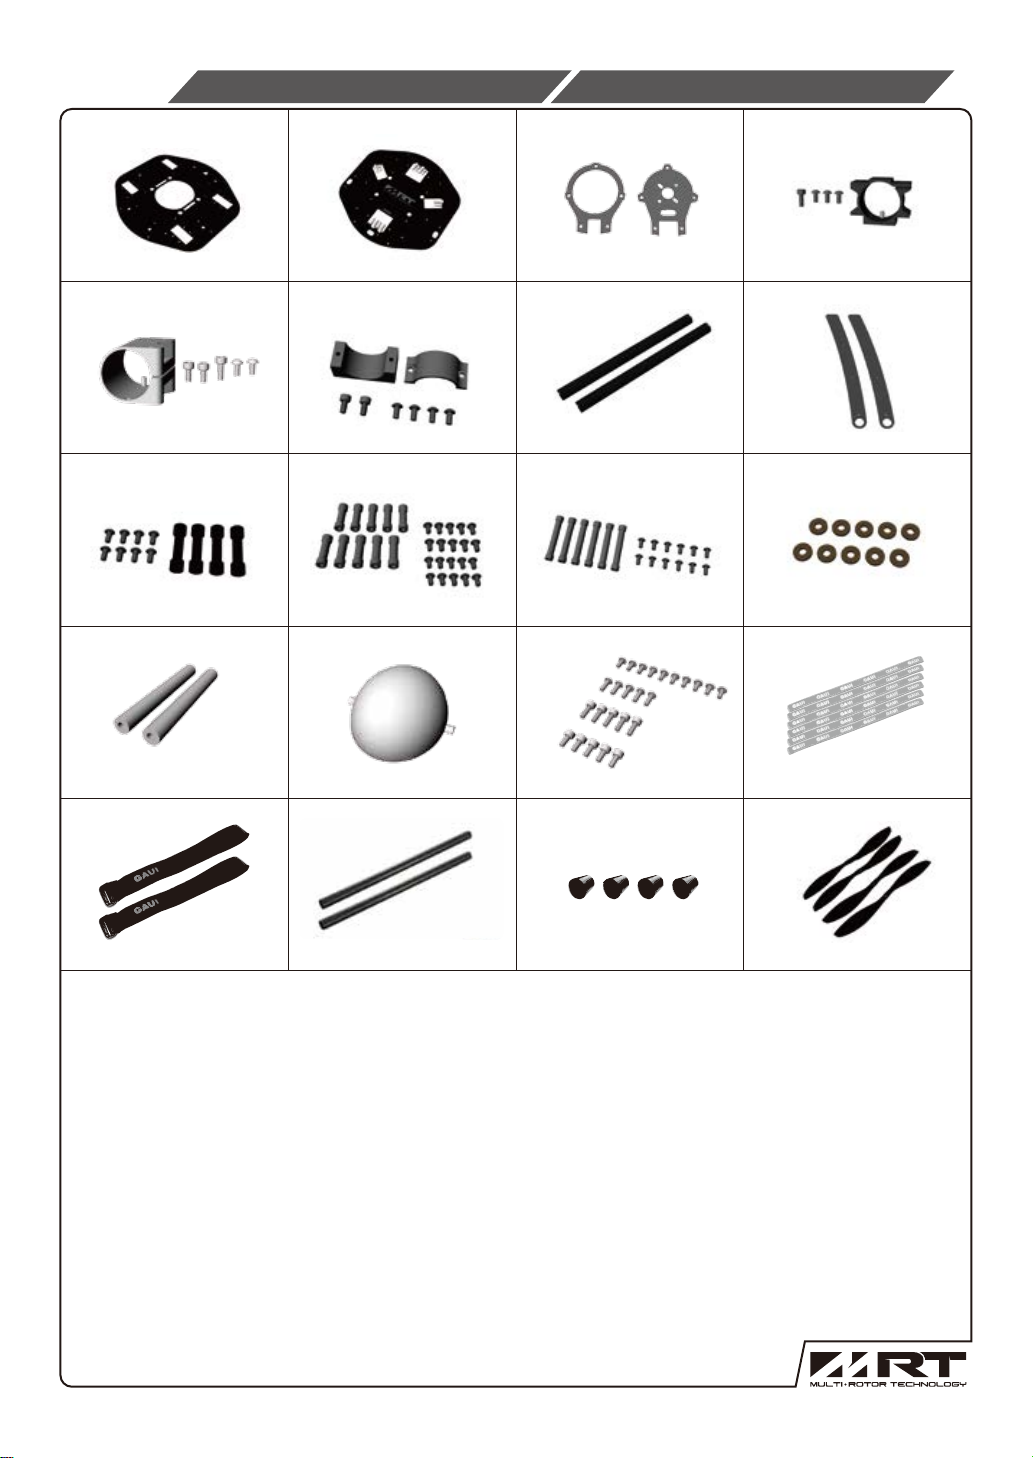
P.18
#226051
Parts list
#226052
#226061
零件表
#226062
840H上側板
840H Top Frame
#226063
840H機身套管
840H Boom Clamp
#226070
840H機身鋁柱包
840H Frame posts pack
#226078
840H腳架減震泡棉(250mm)
840H Landing Gear shock absorbing sponges (250mm)
#910032
840H機身電路板
840H Bottom Circuit Frame
#226064
840H管夾組
840H boom clamp set (for landing gear)
#226071
840H馬達艙鋁柱包
840H Motor mount posts pack
#226079
840H艙罩
840H Canopy
#931055
840H馬達板組
840H Motor Mount Set
#226068
840H軸管組(331mm) x2
840H 331mm Boom x 2pcs
#226072
840H腳架鋁柱包
840H Landing gear posts pack
#226082
840H螺絲綜合包
840H Screws Combo Pack
#931057
840H馬達座管夾
840H Motor Mount Clamp
#226069
840H腳架側板組
840H Landing Gear Side frames (1 set)
#226073
840H螺絲絕緣片
840H Insulation Washer Pack
#910030
魔術束帶 1x20cm(6件組)
Cable Tie with Touch Fastener 1x20cm (6pcs)
#931105
電池黏扣帶(420mm)
Battery Straps (420mm)
多旋翼腳架鋁管(300mm)
Multi-Rotor landing gear boom (300mm)
多旋翼橡膠腳墊(黑)
Multi-Rotor Skid Rubber Damper (Black)
十五吋正逆槳
15 in. Props.(15A and 15B)
Page 24
www.gauimrt.com
TEL : +886-2-86305567
FAX : +886-2-26105567
NO.118, Ren’ai Rd., Bali Dist,.
New Taipei City 249, T aiwan
 Loading...