


NPM
Network Player Module
User Manual

Gato Audio NPM - Network Player Module
Contents
Package contents 3
Overview 4
Roon Ready 4
Bluetooth Upgrade 4
The NET input - Volume Control 4
Button Light Patterns 5
Setting Up 6
Connecting to a Network 6
Ethernet Cable 6
Wi-Fi by WPS 6
Wi-Fi by App 6
Factory Reset 7
Connecting to Bluetooth 8
Initial Connection 8
Disable Bluetooth 8
Reconnect 8
Multiple Connections 8
Enable Roon Ready Devices 9
Firmware Update 9
Mconnect Control App Guide 10
Download Mconnect Control and get Started 10
Player Screen Description 10
Device Setup 11
Select Playback Device 11
Select Music to Play 11
Select Wi-Fi network 11
Device Name Change 11
Static IP Setting 11
Firmware Update 11
Managing Favorites and Playlists 12
Sort Tracks 13
Gapless Playback 13
Technical speci cations 15
Page 2

User Manual
Package contents
Following a Gato Audio product with an installed Network Player Module (NPM), please nd these parts:
• 2 Antennas
• 1 USB Wi-Fi Dongle
• 1 Quick Start Guide
Page 3

Gato Audio NPM - Network Player Module
Overview
The Gato Audio DIA-250S, DIA-400S integrated ampli ers and the PRD-3S preampli er are now available with the fully integrated NPM
module. The NPM module compliments these high performance ampli ers with wired and wireless high end streaming capabilities.
Controlled either directly by app or as an Roon endpoint.
Roon Ready
Roon is an incredibly rich and engaging way to browse and organize your music. It runs on most Mac, Windows, and Linux PCs, or on other
products which include Roon Core. Being Roon Ready means that Gato Audio network players transparently discover and connect to Roon
without any con guration, and bit-perfect audio is delivered from Roon to your network player. Together, Roon and Gato Audio deliver the
power, exibility, and performance of networked audio, with the easiest setup and highest reliability available. For further information about
Roon please go to www.RoonLabs.com.
Bluetooth Upgrade
The Bluetooth input has been upgraded to version 4.2 aptX™ HD supporting 24Bit audio. This ensures your Bluetooth® wireless enabled
device can deliver High De nition (HD) audio. It preserves sound data through the audio transmission, resulting in a “better-than-CD”
listening experience.
The NET input - Volume Control
The NET input channel on your ampli er has its own separate volume control. This is done to protect your system, since the volume can be
controlled by Roon and the Mconnect control app.
Page 4

User Manual
L
R
USBC
Inp
2
t
B
dRT
TO
Sp
LRLRL
B
t
R
L
s
N
l
Sp
L
in
D
y
Button Light Patterns
Wi-Fi / WPS Button:
Dark
Constant On
Mains
Main
eutra
Neutral
Live
Live
+
Link
Link
Wi-Fi not connected
Wi-Fi connected
USB Connector
for Wi-Fi Dongle
Speaker R
eaker R
Coax
oax
Input 1 Input 2 Line outBalanced
USB
L
R
Toslink
oslink
DO NOT REMOVE COVER. NO USER-SERVICEABLE PARTS INSIDE. REFER SERVICING TO QUALIFIED PERSONNEL.
DO NOT REMOVE COVER. NO USER-SERVICEABLE PARTS INSIDE. REFER SERVICING TO QUALIFIED PERSONNEL.
TO REDUCE THE RISK OF ELECTRICAL SHOCK OR FIRE, DO NOT EXPOSE THIS APPLIANCE TO MOISTURE OR RAIN.
REDUCE THE RISK OF ELECTRICAL SHOCK OR FIRE, DO NOT EXPOSE THIS APPLIANCE TO MOISTURE OR RAIN.
Wifi/
WPS
ut 1Input
L
R
Wi-Fi / WPS
Button
Wifi
antenna
Factory
reset
connect
L
Bluetooth
BT
Antenna
BT
antenna
Line ou
L
R
Bluetooth
Connect Button
Ethernet
Connector
LAN
R
Factory Reset
Button
alance
Bluetooth Connect Button:
Dark
Blinking
Bluetooth inactive
Bluetooth connected
Speaker L
eaker
+
Balanced out
alanced ou
RL
Made in
Made
enmark
Denmark
Display
Displa
Blinking
Fast Blinking
Factory Reset Button:
Dark
Constant On
Wi-Fi setup network active
WPS mode activated
Streaming core inactive/booting
Streaming core active and ready
Fast Blinking
Bluetooth open for connection
Page 5

Gato Audio NPM - Network Player Module
Setting Up
Setting the NPM up for network audio streaming is fairly easy. You need to know some basics about connecting to your network using the
name of your network (SSID) and password. You will also need to know how to use phone and/or tablet apps. The setup procedure is this:
1. Connect the NPM to a network of your choice. We o er 3 ways of doing this.
2. Use a phone and/or tablet app of your choice to select and stream music to NPM.
3. To hear music from the network choose the NET input on your ampli er.
For accessing all of the features of the NPM, the Mconnect Control app is needed for your phone or tablet (see page 10 for download
instructions). If you want to make use of subscription based streaming services, such as Tidal, Deezer, Qobuz or Roon, you will have to
purchase these subscriptions separately. These are not included with the NPM.
If you want to use DLNA/UPnP features only there are lots of apps available for both IOS and Android that can be used. Feel free to
download and experiment.
Connecting to a Network
Ethernet Cable
For the most easy and stable network connection we recommend establishing connection with an Ethernet cable.
Simply plug in the Ethernet cable into the socket on the back panel of the ampli er as shown on page 5. The opposite end of the Ethernet
cable should be connected to a router/switch located on the network you wish to connect to.
To avoid network con icts you should not install the USB Wi-Fi dongle into the NPM while connecting with an Ethernet cable.
Turn on the ampli er and select the NET input channel. Use the Mconnect Control app or Roon to stream music to the NPM.
Wi-Fi by WPS
If your router supports connection by WPS (Wi-Fi Protected Setup), this is the easiest way to connect to Wi-Fi.
Before setting up, make sure that the NPM is within range of the Wi-Fi router you want to connect to. To avoid any network con icts also
make sure you have not connected an Ethernet cable into the NPM while connecting to Wi-Fi.
1. Screw one of the antennas on to the USB Wi-Fi dongle and insert the USB Wi-Fi dongle into the USB connector on the back panel of
the ampli er as shown on page 5.
2. Set your router into WPS mode (please consult the user manual of your router).
3. Set the NPM in WPS mode by press and hold the Wi /WPS button on the back panel of the ampli er for 7-10 seconds. After a short
while the Wi /WPS button will start fast blinking. Connection can take up to two minutes.
4. Select the NET input channel on the ampli er when connection has been made. Use the Mconnect Control app or Roon to stream
music to the NPM.
Wi-Fi by App
You can connect the NPM to your Wi-Fi network by using the Mconnect Control app available for IOS and Android (see page 10 for
download instructions).
Before setting up, make sure that the NPM is within range of the Wi-Fi router you want to connect to. To avoid any network con icts also
make sure you have not connected an Ethernet cable into the NPM while connecting to Wi-Fi.
Page 6
User Manual
1. Screw one of the antennas on to the USB Wi-Fi dongle and insert the USB Wi-Fi dongle into the USB connector on the
back panel of the ampli er as shown on page 5.
2. Turn on the NPM Wi-Fi setup network by press and hold the Wi /WPS button on the back panel of the ampli er for 2-5 seconds. After
a short while the Wi /WPS button will start blinking.
3. Go to the Wi-Fi settings of your phone or tablet and connect to the Wi-Fi network of the NPM called (the model name of your
ampli er) eg. “DIA-250S_xx”. Password for this network is “password”.
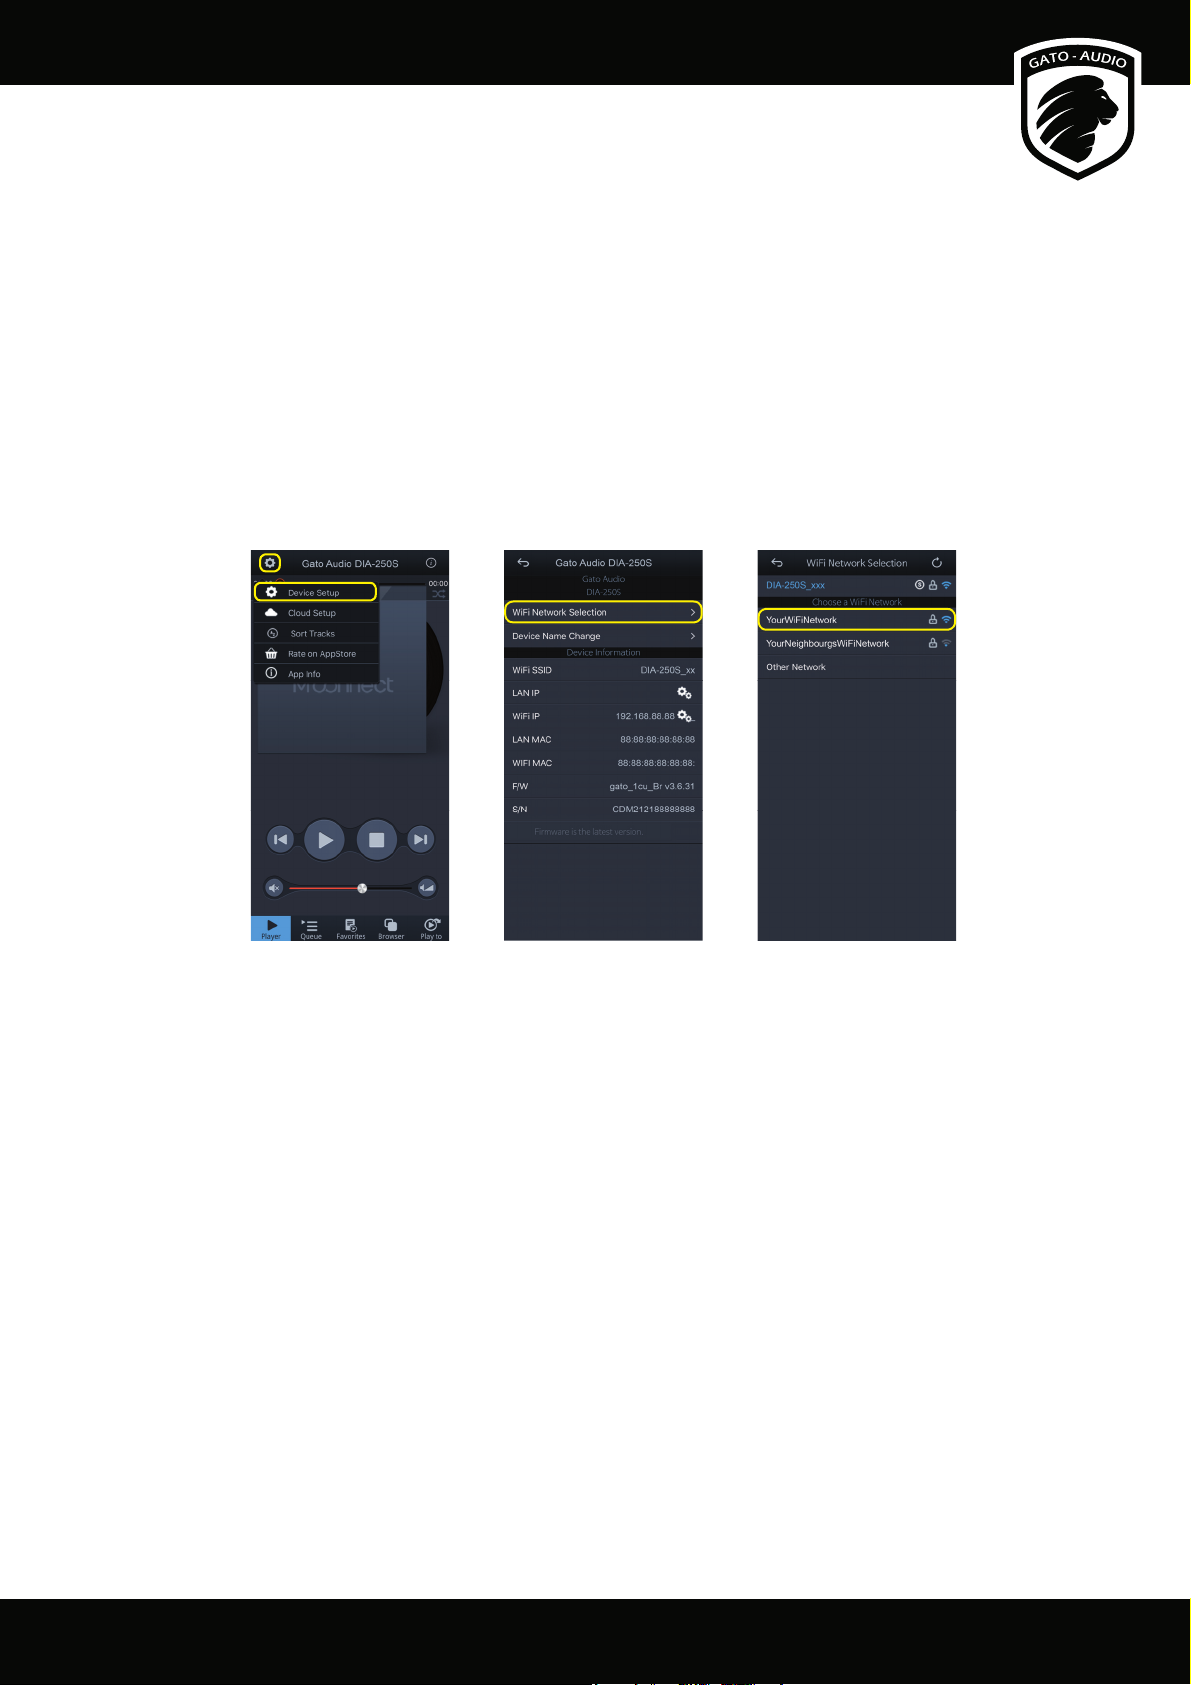
4. When connected, open the Mconnect Control app on your phone or tablet and select the “Setup” icon on the top left corner and then
“Device Setup”.
5. Select “Wi Network Selection”, then select and type in the password for the network you want the NPM to be connected to. The NPM
will reset and connect to your Wi-Fi network. This will take about 40 seconds.
6. Select the NET input channel on the ampli er when connection has been made. Use the Mconnect Control app or Roon to stream
music to the NPM.
Mconnect Control app:
Select the “Setup” icon on the top left Corner and
then “Device Setup”.
Mconnect Control app:
Select “WiFi Network Selection”.
Mconnect Control app:
Select the network you want to connect to and
enter your password.
Factory Reset
If you want to remove the Wi-Fi settings (SSID and password), you need to perform a Factory Reset. Press and hold the Factory Reset
button on the back panel of the ampli er for 2-3 seconds. The NPM will then remove Wi-Fi settings and reset. This will take about a minute.
Page 7

Gato Audio NPM - Network Player Module
Connecting to Bluetooth
Before connecting the NPM to a Bluetooth device (your phone, tablet or computer), you need to screw in the antenna to the back of the
ampli er where it says “BT antenna”, as per the drawing on page 5. To hear music from Bluetooth choose the BT input on your ampli er.
Initial Connection
For initial connection press the “BT connect” button on the back of the ampli er once. Then go to the settings of the Bluetooth device
(your phone or tablet) and connect to (the model name of your ampli er) eg. “Gato Audio DIA-250S”.
Disable Bluetooth
To disable Bluetooth on the NPM press and hold the “BT connect” button on the back of the ampli er for 2-5 seconds. All connected
Bluetooth devices should now be disconnected. To Enable Bluetooth again press and hold the “BT connect” button 2-5 seconds. All
previously connected devices should automatically reconnect if they have Bluetooth enabled.
Reconnect
If you stopped the Bluetooth function on your phone or tablet, you will need to reconnect. Go to the settings of the Bluetooth device (your
phone or tablet) and connect to (the model name of your ampli er) eg. “Gato Audio DIA-250S”. Alternatively enable Bluetooth on your
phone or tablet, then turn o your ampli er and turn it back on. The Bluetooth device should automatically reconnect.
Multiple Connections
The NPM Bluetooth supports multiple devices to be connected at the same time. While a device is connected, press the “BT connect”
button on the back of the ampli er once. Then go to the settings of the new Bluetooth device (your phone or tablet) and connect to (the
model name of your ampli er) eg. “Gato Audio DIA-250S”. The rst device has priority over the following devices.
The NPM Bluetooth stores up to 10 devices that have been connected. When it has stored 10 devices it will automatically make room for
new by deleting the oldest device rst.
Page 8

User Manual
Enable Roon Ready Devices
NPM is Roon Ready, which means that all you have to do is to connect the NPM to the same network as your Roon Core. Then open your
Roon application on your phone, tablet or computer, choose “Settings” and “Audio” and your ampli er should be available for playback.
Make sure that you are not streaming music to the NPM by another app, while trying to connect to it in Roon.
For further information about using Roon please go to www.RoonLabs.com.
In Roon, go to Settings and choose Audio... ...scroll down and enable your Gato Audio device.
Firmware Update
NPM Firmware updates are performed from the Mconnect Control app (see page 10 for download instructions). In the Mconnect Control
app, go to “Device Setup”. From here, new rmware versions are announced and installed. We recommend you to do this once in a while to
make sure that the rmware is up to date.
Please note! Do not interupt the rmware update process by turning the ampli er o ! Make sure the update is fully completed
before turning o the ampli er.
If a new rmware is available, you will be
prompted in the Device setup screen.
The rmware will rst download from a server,
and then the update will start. This will take
several minutes.
Just a little more patience. Do not turn o the
ampli er untill reboot has completed.
Update completed! Enjoy!
Page 9

Gato Audio NPM - Network Player Module
Mconnect Control App Guide
Download Mconnect Control and get Started
To be able to use all streaming features of the NPM, you will need to download the Mconnect
Control app, published by ConversDigital Co., Ltd, available on Apple App Store and GooglePlay.
Search for “mconnect control” should take you there. If you are using a tablet, you may want to
download “mconnect control HD” app which allows using the app in landscape mode.
When downloaded make sure your phone or tablet is connected to the same network as the
NPM.
Player Screen Description
When opening the Mconnect Control app you will enter the “Player” screen of the app:
Device Name:
Name of currently selected playback
device (rendere)
Device Information:
Information of currently selected playback device
Seek & Time Information:
Track time read out and position selection
Shu e On/O :
Playback order for playback queue
Volume Control
Micro Volume Control:
Control volume with micro control bar
Device and App settings
Repeat the queue once :
Repeat the queue continuously :
Repeat current track continuously:
Previous and next track in queue
Repeat:
Previous/Play/Stop/Next:
Play and stop music
This page
Setup:
1
Mute
Mconnect Control app icons
List of current music playing
Queue:
Bookmarked folder in serves
and user created list of tracks
Favorites:
Play to:
List of playback devices on the network
Browser:
List of servers and internet
streaming music services
Page 10

Device Setup
From the “Setup” menu on
the “Player” screen you have
several settings available:
User Manual
From the “Player” screen press the “Setup” icon on the to left corner and select “Device Setup”. Then select the device you
want to modify.
Select Wi-Fi network
Device Name Change
Static IP Setting
Firmware Update
New rmware update will be noti ed and installed from here
Select Playback Device
Select the “Play to” button and then choose the network player you want to stream music to.
Please note that the phone or tablet running the Mconnect Control app must be on the same
network as the networkplayer.
Select Music to Play
Select the “Browser” button to choose the source of the music you want to stream.
Internet Music:
Tidal, Qobuz and Deezer streaming music services are integrated in the Mconnect Control app. If you
want to make use of these services, you will have to purchase these subscriptions separately.
Cloud Storage:
Dropbox and OneDrive are integrated into Mconnect Control app. You will need a Dropbox and
OneDrive account to access these servers.
Local Server:
DLNA/UPnP compatible network storages and PCs will be seen in “Local Server” list.
Page 11

Gato Audio NPM - Network Player Module
Managing Favorites and Playlists
You can add folders in your servers into the “Favorite Folders” list.
This can come in handy if you have several folders in you local
network that you have to navigate to often.
Browse to the folder that you want to add to your “Favorite
Folders” list and press the menu button to the right of the folder.
The folder can be removed from your “Favorite Folders” list again
by the menu button in the favorite folders list.
Mconnect Control can manage playlists with music les across di erent local servers. You can create playlists from several locations in the
app:
Favorites / My Playlists:
New playlists can be created by this menu button
in the “My playlists” pane in “Favorites”.
Browser:
Tracks in Browser list can be added to a Playlist or
to the play queue.
Favorite Folders:
Tracks in Favorite Folders list can be added to a
Playlist or to the play queue.
Play queue:
Tracks in Queue can be added to a Playlist.
Page 12

User Manual
Sort Tracks
Music les in a folder can be sorted by track number and track name:
Track sorting option can
also be applied folder by
folder:
From the Player screen press the “Setup” icon on the to left corner and select “Sort Tracks”. In the “Favorite Folders” list in the “Favorite”
screen, there is sort option in the menu button.
Gapless Playback
The default setting for gapless playback is o . Turn it on from
the Player screen: Press the “Device Info” icon on the upper
right corner and turn it on.
Page 13

Gato Audio NPM - Network Player Module
Page 14

Technical specifications
User Manual
Resolution & Sample Rate
Connectivity
Integrated Internet Streaming Services
Audio Format Support
Dedicated Control App
Network
WiFi Mode support
WiFi Setting options
Bluetooth features
24bit / 192KHz
Wi , Ethernet, Bluetooth, DLNA 1.5 & UPnP AV1.0, Roon Ready, Supports multi room
TIDAL, Deezer, Qobuz
MQA (Roon), AAC, AIFF, MP3, FLAC, WAV, WMA, Apple Lossless, OGG, Monkey’s,
Supports gapless playback
iOS – UI for iPhone & iPad, Android – UI for phone & tablet
Wireless: 802.11 b/g/n 2.4GHz, Cabled: Ethernet 10/100
Client mode, Soft AP Mode (virtual router)
WPS Push Button, Control app setup
Version 4.2, Supports aptX HD (24 bit, 48kHz)
Page 15

Gato Audio
Marielundvej 28
DK-2730 Herlev
Denmark
Phone: +45 4095 2205
www.gato-audio.com
hello@gato-audio.com
510037 GA NPM MAN 1.0 1812
 Loading...