


Instructions for use
TM
EASY
Hygiene chair
EASYTM SoftBack 56-270
1

Safety
Laddning av batteri
Laddning av batteri ska ske då gåbordet inte
används. (Batteriet kan aldrig överladdas.)
Laddning görs genom att stickpropp ansluts
till eluttag.
Innan första användningen så
bör batteriet laddas 24 timmar..
Dear customer, Thank you for choosing a rehabilitation aid from GATE Rehab! We hope
our product meets or exceeds your expectations.
These Instructions for Use contain the information users of the product need to know for
its safe operation. In addition to the instructions for use, there is a technical manual that
describes the chair's structure and which includes information of a more technical nature
and a spare parts list.
READ THESE INSTRUCTIONS FOR USE BEFORE USING THE PRODUCT!
This hygiene stool is designed for indoor use on level surfaces and in wet spaces. Max
user weight is 150 kg.
The product can be raised, lowered or tilted with the aid of encapsulated, concealed electronics. The product is in ingress protection class x5, and can withstand water under a
certain pressure. The product may thus NOT be immersed or used underwater. This also
applies to the frame/castors – may not be immersed in water.
When manoeuvring forward, we recommend use of the directionally lockable castor (right
front castor) for improved stability. However, the directional lock should not be used when
manoeuvring in confined spaces.
The hygiene chair has a fixed battery that is charged via a connection in the remote
control. The time required for a discharged battery to reach an 80% charge is around 12
hours. The remote control has a charging indicator that will show whether or not the battery needs to be charged. Make a habit of always charging the battery if at the end of the
day it has dropped to level 1 (one green bar on the battery indicator). If the hygiene chair
will not be used for a few days, we recommend switching off the battery by means of the
Off button located on the battery.
The hygiene chair also has a service indicator that lights up after around 11 months'
operation as a reminder regarding the scheduled service that must be carried out at least
once per year. Information about how to reset the service indicator can be found in the
technical manual.
The hygiene chair has a number of functions to enhance safety. When tilting forward or
back, the chair will always stop when the horizontal position is reached. The chair cannot
be tilted forward if the seat height is greater than 65cm. In order to raise the chair higher
than 65cm, the seat must be horizontal or tilted to the rear. It is not possible to use the
chair while charging the battery.
2

Users will experience a soft start of around 5 seconds when the chair is raised or lowered.
This is normal and takes place in order to synchronize the two height adjustment actuators.
The hygiene stool is raised and lowered through telescopic pillars with built-in motors.
The pillars have an open design which allows water and dirt to run through internally.
When necessary, clean the pillars and the bottom surfaces with cleaning agent (can be
purchased from GATE). The cleaning agents dissolve dirt and grease and break down any
organic substances. Rinse with water. Note that the pillar base plates are accessible for
mechanical cleaning.
Bear in mind the crush risk that is always present when hands and feet get in the way of
chair movement, especially when tilting forward or when the chair is lowered to its lowest
level. Depending on the setting, the foot rest may touch the floor or the chair frame. Be
aware!
The staff at GATE Rehab hope you enjoy extensive use of your new hygiene chair.
Before you begin using your chair, the battery must be activated. Do this by pressing
the battery ON button (see section in these instructions for use).
3

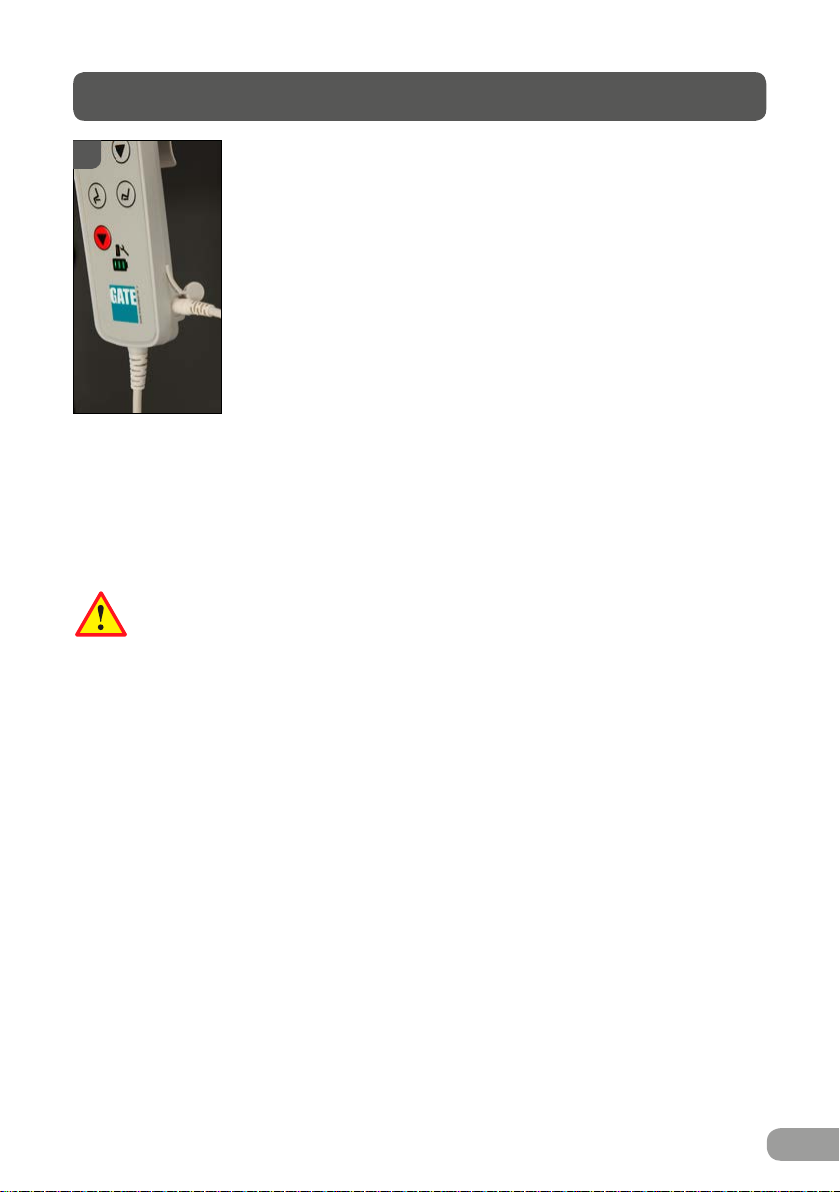
Changing seat height and tilt angle
Rapid
1
up
Up
Forwards
Emergency
lowering
Battery
indicator
Rapid
down
Down
Rearwards
Service
indicator
Normal up/down; Rapid up/down. NOTE! The seat has
a soft start for around 5 sec. before the correct speed is
achieved. Make sure the footrest does not touch the floor
when the seat is at lower levels – this can happen if the
footrest is set for a tall user.
Tilting forwards/rearwards: The chair can be tilted 5 degrees forwards* and 30 degrees rearwards. When tilting,
the chair will always stop at the horizontal position. Thus
to continue tilting forwards or rearwards, the forwards/
rearwards button must be pressed again. When tilting forwards, make sure the footrest does not touch the floor or
frame – this can happen if the footrest is set for a tall user.
*In certain markets, the chair can be tilted further to 6 degrees forwards.
Note! Crush risk if this is done.)
Emergency lowering: if battery charge is insufficient for chair operation or if the
proximity sensor on the height adjustment actuator is defective, the Emergency
lowering button must be used. Upon activation, the chair will revert to the horizontal position and then to the lowest seat height.
Exercise caution when activating as the system safety sensors are bypassed. In
particular, make sure the chair proceeds evenly to its minimum height to prevent
skewing.
Service indicator – the lamp will flash at 4 sec. intervals when actual operating time
reaches 11 months from the last reset. After 12 months, the lamp will remain on. This
indicates the need for scheduled maintenance (page 8). Resetting the service indicator –
see technical manual.
Battery indicator – shows current battery status; 3 bars indicate full charge. When a single
bar shows, the chair should be charged that same day. When a red bar shows, stop
using the chair and charge the battery. Make a habit of always charging the battery if at
the end of the day it has dropped to level 1 (one green bar on the battery indicator). If the
hygiene chair will not be used for a few days, we recommend switching off the battery by
means of the Off button located on the battery.
NOTE! The battery can be damaged if not charged
at least every 14 days in the On position or at least every three months in the Off position.
The remote control enters sleep mode 30 sec. after the last activation.
4
Battery charging
Laddning av batteri
Laddning av batteri ska ske då gåbordet inte
används. (Batteriet kan aldrig överladdas.)
Laddning görs genom att stickpropp ansluts
till eluttag.
Innan första användningen så
bör batteriet laddas 24 timmar..
2
Charge the battery by connecting the charger supplied to a wall
socket and the remote control connector. A discharged battery takes
around 12 hours to charge to 80% and 24 hours to reach 100%
charge. While the battery is charging, the battery indicator will flash
showing actual charge level. All three bars will show a constant green
light when the battery is fully charged. We recommend the battery
always be charged to at least 80% – once begun, charging should
not be interrupted before an 80% charge is achieved.
NOTE! The battery can be damaged if not charged at least every
14 days in the On position or at least every three months in the Off
position.
For safety reasons, chair electronics cannot be used while the battery is charging. Avoid
charging in wet spaces. Make a habit of always charging the battery if at the end of the
day it has dropped to level 1 (one green bar on the battery indicator). If the hygiene chair
will not be used for a few days, we recommend switching off the battery by means of the
Off button located on the battery.
Make sure the remote control socket/charge is always covered/plugged in when
using the chair. Otherwise water may get in and damage the remote control.
5
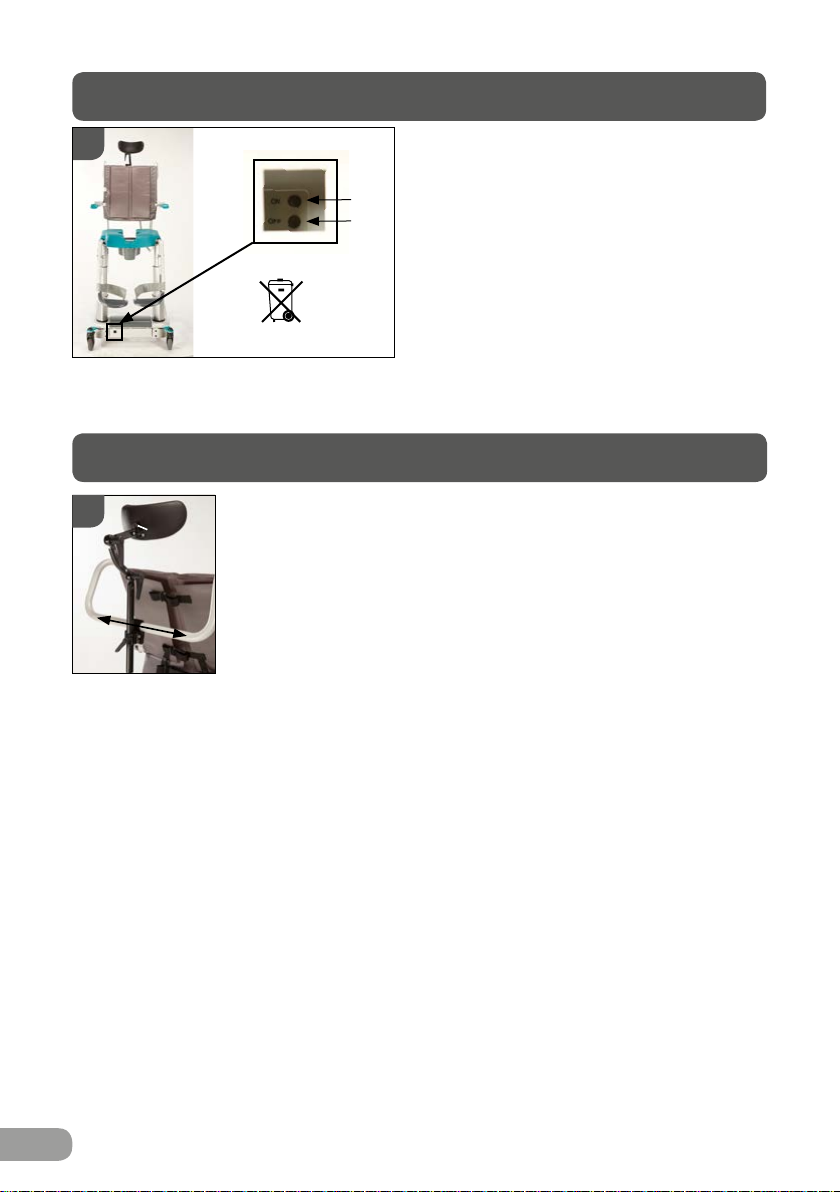
Battery (On/Off)
3
The battery is located under a protective cover
at the base of the chair. The battery has On/
Off buttons that are reached through an open-
ON
ing at the lower front part of the chair. Operate
OFF
the buttons by pressing them with a pointed
object (not sharp).
When delivered from GATE, the battery is
switched off. Activate the battery by pressing
Pb
the On button or connecting the charger to
the remote control. To one side of the buttons,
there is also an LED indicator that shows
battery charge.
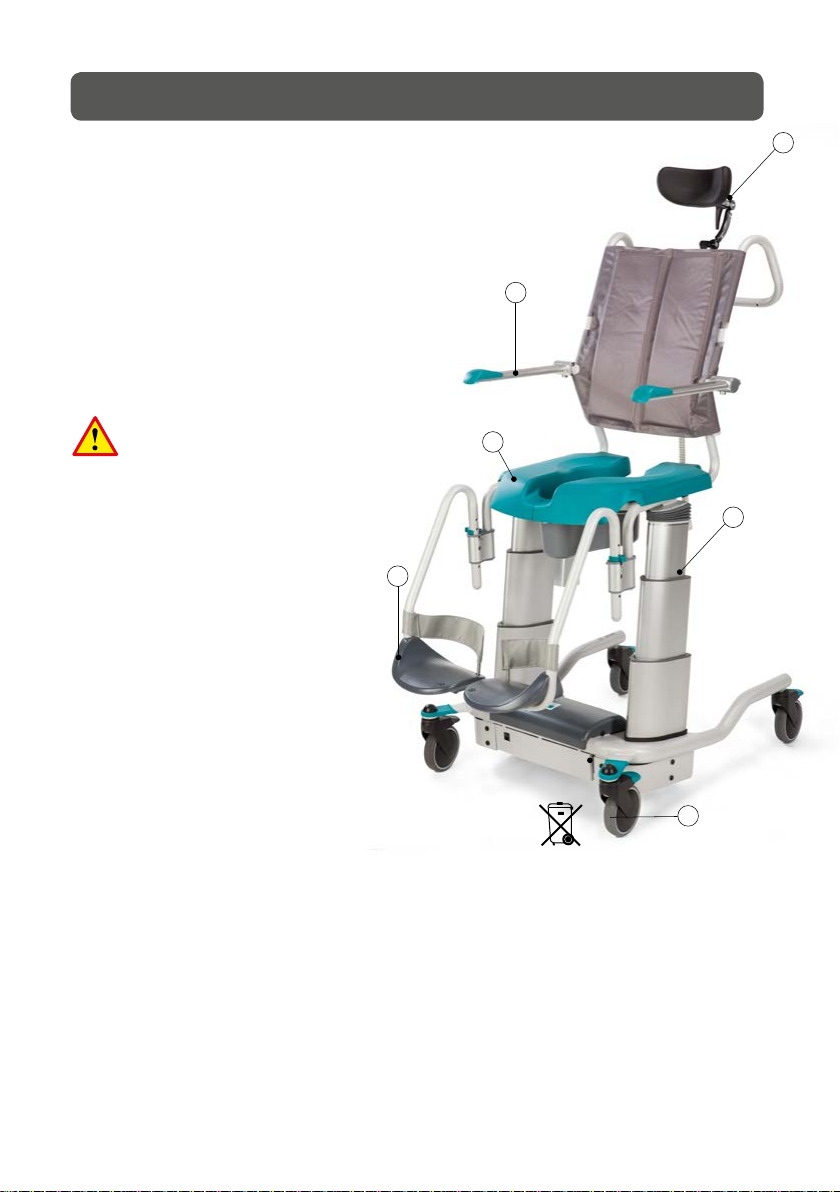
Neck support
4
D
C
C
B
A
The neck support has many degrees of freedom and can be
fixed vertically, horizontally and radially in order to achieve the
very best comfort for the patient (see fig. 4).
a) The neck support holder can be moved sideways (requires
Allen key).
b) Up/down – locked using a lever on the neck support holder.
c) Forward/back – locked by associated lever on the neck support.
d) The pad can be set and locked in the desired position with a
star handle.
6
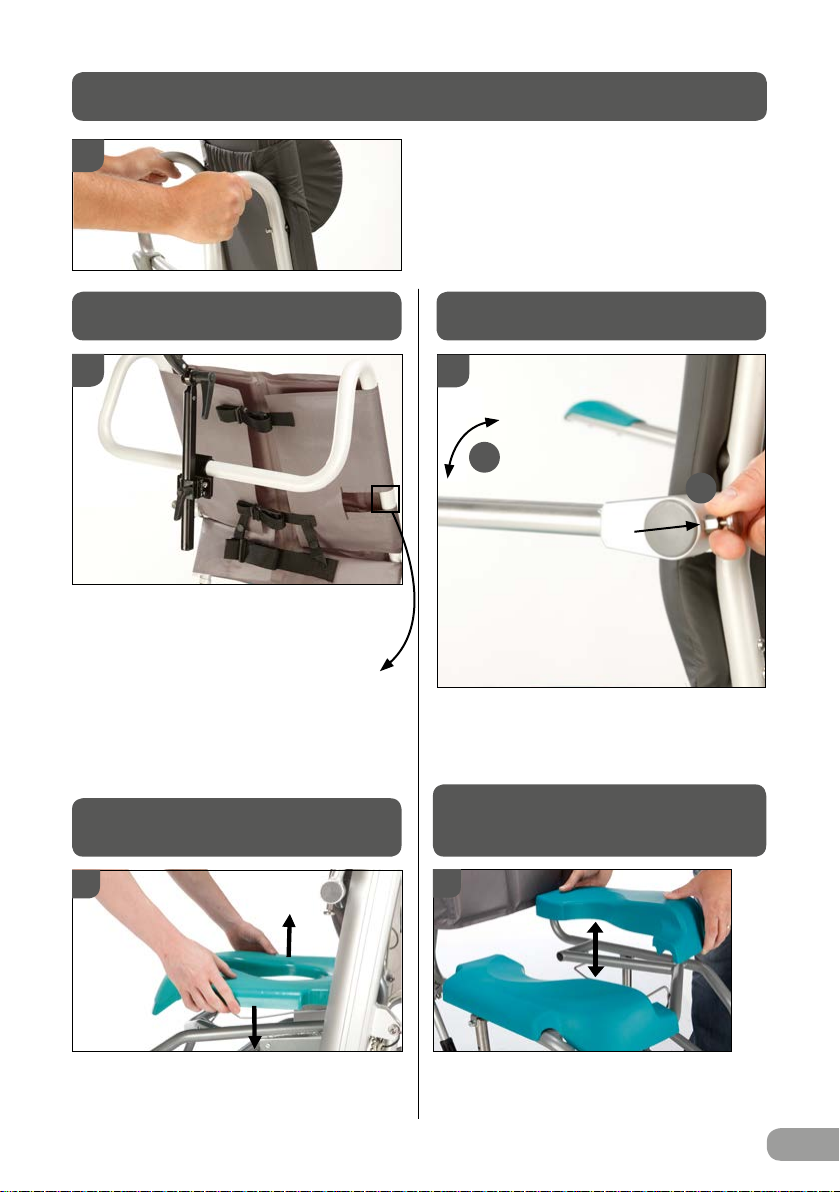
Driving the chair
5
Backstrap
6
The back strap can be set to the preferred
tension using the 3 buckles on the back.
The back strap has a notch on each side
of the armrest intended for the installation
of accessories.
We recommend using the handlebar whenever the chair must be moved (with/without
a patient). The handlebar is designed so
that the chair can be moved forwards and
turned (see fig. 12) easily and with the use
of little force. (see fig. 5)
Armrest lock
7
2
1
The armrest is locked in the extended
position.
To lift the armrest, pull out the pin (1) and
raise the armrest (2).
Installing/removing the seat
8
Installing seat with the rear
opening (accessory).
9
The seat comprises two halves that are
snapped in place with the aid of clamps on
the seat's underside.
7

Sanitary pan Footrest / Heel restraint
10
A
B
11
B
The sanitary pan is slid into position from
behind between the seat and wire guides
as shown in fig. 10.
Make sure the sanitary pan is slid into
position above the wire guides. Also make
sure that the pan assumes the right position in relation to the cutout/seat and that
the pan's rear hook locks into the guide
(see figs. 10 and 11).
12
13
14
The foot rest can be easily set to the
preferred height, swung aside (lift/swing) or
removed (lift away).
Set footrest height by moving the green clip
to the preferred hole.

Castors
The hygiene share has 4 pcs castors (fully braked). The right front
wheel has also a directional lock (see fig. 15, step 1 - directional
lock, step 2 - full brake). When the directional lock is activated
the castor cannot swivel, only moves straight ahead/back. This is
especially useful when moving heavier patients. The chair is much
easier to manoeuvre for personnel. The directional lock should be
released when manoeuvring in confined spaces.
The other castors (3 pcs) with green brake blocks are conventional castors that lock both direction and swivel when braked.
(see fig. 16)
Calibrating the actuators
Calibrating the actuators
The actuators are normally calibrated automatically every time the
chair reaches its end position (min height, max tilt). IF the chair still
does not run parallel, or if the tilt function does not seem to work, an
ACTIVE calibration should be performed. Do this by holding down the
<slow/up>+ <slow/down> buttons simultaneously. After around 15
sec., the chair will move to its end position i.e. minimum height and
maximum rearwards tilt Hold down the buttons until the end positions
are reached. Release the buttons and wait five sec. The chair is now
calibrated and can be used again.
Calibration should NOT be done while user is in the chair! Note that all three
actuators move during the calibration phase. If not, stop calibration immediately and contact customer service/GATE (or your local dealer).
15
16
17

Cleaning
Clean the Easy hygiene chair with detergent/disinfectants commonly
used in healthcare (alcohol-based).
18
The pillars should be cleaned with agents that dissolve grease and also
remove lime stains. Raise the chair to maximum height when cleaning
the pillars. Apply the cleaning agent and leave it to work according to the
instructions (also allow it to run down inside the pillars); flush out.
NOTE! Also clean the pillar base plate periodically. Do so by removing
the bottom plug (see fig. 18) and applying cleaning agent directly in the pillar. Allow to
work; flush out. Elbow grease may be necessary.
Read the warning text on the packaging/cleaning agents and in their data sheets.
NOTE! To avoid crush injuries, make sure protective covers (fig. 18) are always put back.
Troubleshooting when the chair is inoperable
NOTE! Chair cannot be operated above 65 cm seat height if the chair is tilted forward, nor
can the seat be tilted forward if seat height is greater than 65 cm.
Before troubleshooting begins, always restart the battery (see page 4. Hold in the battery’s OFF button for
approx. 5 seconds. Wait for one minute. Activate the battery using the ON button).
Check the battery charge via the remote con-
1)
trol's battery indicator (if necessary, activate
the remote control by pressing any button).
Indicator shows green ==> Calibrate the chair
1a)
(See page 7 ).
1b) Indicator shows red == > Charge the battery. Indicator lamp not lit, not flashing ==> Replace the battery.
Indicator lamp out ==> Connect the remote
control to the charger. If charging is indicated
1.c)
in the remote control, charge the battery as
per instructions. If charging is not indicated,
proceed to 2.
Switch off the battery manually using the battery Off
button (see page 4). Wait one minute. Activate the
2)
battery by pressing its On button (see page 4). Check
that the battery indicator lamp is lit or flashing.
Indicator lamp lit/flashing == > Replace remote control
and charge the battery as per the instructions.
If the chair remains in operable following
completion of the above, contact customer
service at GATE.
Warranty
We provide a two-year warranty against any manufacturing defects (does not apply to wear parts or
battery). The battery is subject to 6 months' warranty for manufacturing defects.
Maintenance
The chair is made from stainless steel/powder coated tubing and aluminium.
Exposed, unpainted parts are made of aluminium or stainless steel. Make sure
the product feels firm and stable – no fasteners may be loose. Damaged or
defective parts should be replaced as soon as possible.
6
Cleaning, general
• Clean the chair by wiping with regular cleaning agent (NOT
Pentanol based) or use a washer/autoclave (max 85 C).
• Remove the seat and clean it separately or use a
washer/autoclave (max 85 C).
NOTE! The remote control/control box (or the
connector/female connector if the remote control is
removed before washing) must be protected from
high pressure water. Use a plastic bag or similar
that can withstand washer water pressure. Place the
remote control/control box or the connector/female
connector so that running water cannot force its
way in.
• Clean the pillars with detergent/disinfectants
commonly used in healthcare (alcoholbased). See special section page 7.
4
• Make sure the protective cover (see page
7, fig. 18) is installed at the bottom of
each pillar.
1
3
Special checks (at least once per
year)
1. Armrest – check that slip protection/wrist
protection are intact and secured.
2. Pillars (electric actuator/raise-lower) + electric
actuator/tilt: check the function of the remote control and
that the electric actuator attachment devices are not loose.
3. Seat/stopped seat – whole and without cracks. No sharp edges
may be present.
4. Footrest platforms – whole and adjustable in the intended manner. Check that the
clips are whole and properly fastened. Heel restraints must be in position at the
back of each footrest platform.
5. Wheels – may not be stiff or loose. Also check that the brakes work.
6. Back strap; the back strap must be intact and may not have any
holes or other damage to the belts and anchors.
Pb
2
5

Information concerning EMC
The Easy hygiene chair has been function tested in both hospital and home care
environments.
The hygiene chair’s principal functions are its ability to be operated up/down, back/
forward together with battery charging. Tests have shown that as long as the interference the chair is exposed to is within the limits of this standard, no failure of the primary
functions can be demonstrated. Interference that is more severe than demonstrated in
these tests, may affect the hygiene chair’s functions such that manoeuvring or battery
charging fails.
The hygiene stool includes the following wiring:
• AC cable to the charger, 3-wire, 2.0 m
• DC cable between the charger and the remote control, 2 parts, 1.0 m
• Signal cable between the control box and remote control, 2.5 m
WARNING! Always replace the hygiene chair’s electrical components or wiring
with original parts from the supplier. Failure to do so may affect the product’s
EMC approval.
Avoid placing/using the chair closer than 0.35 m from other medical equipment and/
or mobile telephones (or other transmitting equipment). This is because there is then a
risk that the product’s main functions may not work as intended or that the product may
interfere with other medical equipment.
CE marked according to MDD 93/42/EEC. 40/5000. Tested/Approved according to SS-ISO 17966: 2016. (Expected lifetime = 5,3 years.)
Would you like to know more?
Contact us at: tel +46 (0)371-318 00
Gate Rehab Development AB
Industrigatan 2 | S-333 75 Reftele SWEDEN
info@gaterd.com | www.gaterd.com
2018-03-27, 7
 Loading...