

Page 1

®
GASTROBACK
Operating Instructions
Design Vacuum Sealer Basic
Art.-Nr. 46010 Design Vacuum Sealer Basic
Read all provided instructions before first usage!
Model and attachments are subject to change
Page 2

Carefully read all provided instructions before you start running the
appliance and pay regard to the warnings mentioned in these
!
instructions.
Important Instructions
• Only use intended foil or plastic bags for vacuum sealing food. Any other plastic bags melt on the sealing band. Leftover plastic on the sealing band would damage the band and the vacuum procedure.
• Never touch the sealing band. The sealing band is very hot while and after use
and can cause personal injury.
• NOTE: For best results do not overload the plastic bag. Leave round about 8 cm
space above the food when cutting the foil, otherwise the appliance cannot generate a
vacuum.
• When vacuuming in foil pay attention that no food particles, liquids, or
grease is in the sealing section of the plastic bag.
• Pre-freeze moist food before vacuum sealing. This way no liquids can get
sucked into the appliance and the food will not get pressed.
• IMPORTANT: For successful operation ensure that the gasket is properly assembled.
• IMPORTANT: When the lid is properly closed after inserting the foil the
appliance is ready for use. You will hear two clicking sounds when the lid snaps in
• The appliance is not for continuous operation. Please wait 2 minutes after one
vacuum procedure before starting another.
• IMPORTANT: The plastic bag is not suitable for microwave or
boil-in-bag cooking.
17
Page 3

Important Safeguards
Carefully read all instructions before operating and save the instructions for future
reference. Do not attempt to use this appliance for any other than the intended use,
as described in these instructions. Any other use, especially misuse, can cause
severe injuries or damage by electric shock, fire or moving mechanical parts.
Any operation, repair and technical maintenance of the appliance or any part of it
other than described in these instructions may only be performed at an authorised
service centre. Please contact your vendor.
Safeguards for Daily Operation
• Do not attempt to operate the appliance using any parts or accessories not
recommended by the manufacturer. Do not operate the appliance, when the
appliance or any part of it is likely to be damaged, to avoid risk of fire, electric
shock or any other damage or injuries to persons. Do not attempt to open the appliance
housing or to repair the power cord. Check the entire appliance regularly for proper
operation. The appliance is likely to be damaged if subject to strain (i.e. overheating,
mechanical or electric shock) or if there are any cracks, excessively frayed parts or
distortions. In this case, immediately unplug the appliance and return the entire
appliance (including all parts and accessories) to an authorised service centre for
examination and repair.
• Close supervision is necessary when the appliance is used near young children.
Do not let young children play with any parts of the appliance or the packing. The
appliance is NOT intended for use by children or infirm persons without supervision.
This appliance is NOT intended for use by persons (including children) with reduced
physical, sensory or mental capabilities, or lack of experience and knowledge, unless they
have been given supervision or instruction concerning use of the appliance by a person
responsible for their safety. Children should be supervised to ensure that they do not
play with the appliance. Take care that no one pulls the appliance by the power
cord, especially when young children are near. Place the appliance on a clean, dry
and stable surface where it is protected from strain (i.e. mechanical or electric shock,
overheating, frost, moisture) and where young children cannot reach it.
• Never lay heavy or hard objects on top of the appliance.
• The work space has to be easily accessible, solid, even, dry and of sufficient size.
The appliance should only be set up on a firm level work surface. The sealing band
gets hot during the sealing process. Beware of not touching the hot sealing band with
any parts of your body or heat-sensitive items.
• During operation keep above the appliance a space of 20 cm to the sides and 1 m
above should be left for the air to circulate. Do not place any cloth or tissue beneath
18
Page 4

or on the appliance, to avoid any risk of fire, electric shock or overheating.
• Always keep the table or counter clean and dry and immediately wipe off spilled
liquids. Do not place the appliance near the edge of the table or counter or on sloping
or wet surfaces or where it can fall.
• After one vacuum procedure let the appliance cool down for 2 minutes before
starting another.
• Always turn the appliance off, unplug and wait for the appliance to cool down,
before cleaning or storing. Close the lid to protect the gasket while storing.
Important Safeguards for all Electrical Appliances
• The sealing band is electrically heated. Ensure that the voltage rating of your
mains power supply corresponds to the voltage requirements of the appliance (230 V,
50 Hz, AC). Always connect the appliance directly to a mains power supply wall
socket with protective conductor (earth) connected properly. The installation of a residual
current safety switch with a maximum rated residual operating current of 30 mA in
the supplying electrical circuit is strongly recommended. If in doubt, contact your
local electrician for further information. Do not use multiple electrical adopters. We
do not recommend using extension cords.
• Do not leave the appliance unattended while connected to the power supply.
Always turn the appliance off and IMMEDIATELY unplug after use and before cleaning.
Always grasp the plug to disconnect the appliance from the power outlet.
• Always handle the power cord with care. Do not pull or strain the power cord.
The power cord should never be knotted or squeezed. Do not let the power cord
hang over the edge of the table or counter. Take care not to tangle the power cord.
• Never pull, rip, bend, clamp, squish or knot the line cord. Pay attention to the
line cord not hanging of the table. Attend to nobody getting caught in loops of the
line cord or pulling the appliance of the work space. When pulling the plug always
catch hold of the enclosure of the plug. Keep the cable away from the heating elements
of the appliance.
• Do not pour or drip any liquids on the appliance or power cord. When liquids
are spilled on the appliance, immediately unplug the appliance and dry it to avoid
risk of electric shock or fire. Do not attempt to operate the appliance, when liquids
are on or in the electrical section of the appliance. When connected to the power
supply, do not touch the appliance, with wet hands, when the appliance is damp
or is touching a wet surface, in order to avoid risk of electric shock. In this case
do not touch the appliance but immediately unplug the power cord from the power
supply and dry the appliance (see ´Care and cleaning`).
19
Page 5

• Do not place the appliance or power cord in a dishwasher!
• The appliance is not for continuous operation. Please wait 2 minutes after one
vacuum procedure before starting another. For additional safety the appliance is fitted
with a thermal cut out. In the event of overheating (for example 35 degrees or
overvoltage of +10%) the appliance will automatically shut down to prevent further
damage. Let the appliance cool down for 2 minutes before you continue to operate
the appliance.
Hot Surfaces – Risk of Burns
The Design Vacuum Sealer Basic is designed for vacuum sealing food. The sealing
band is electrically heated and the heating surface gets hot during operation. The heating starts as soon as the sealing procedure starts. Do not place any foreign burnable
substances (such as papers, plastics, textiles or the like) on the heating surface, to
avoid risk of fire. The appliance needs some time to cool down after one vacuum procedure. Beware of not touching the hot sealing band with any parts of your body
or heat-sensitive items.
• ATTENTION: Only use intended foil or plastic bags for vacuum sealing. Any
other plastic bags will melt and stick on the heating surface of the sealing band.
• Always disconnect the plug and let the appliance cool down before cleaning the appliance.
• Do not place the appliance or any parts of it on or near hot surfaces (heater, gas
burner, grill or oven). Do not place the appliance on the power cord. If the power
cord warms up during operation or is likely to be damaged, it must be replaced by
an authorised service centre. Do not attempt to repair the power cord! Keep the
power cord away from the heating surface of the sealing band. Never place the
appliance on the power cord!
• Do not operate the appliance near inflammable liquids (i.e. high-proof alcohol) to
avoid damage caused by fire.
20
Page 6
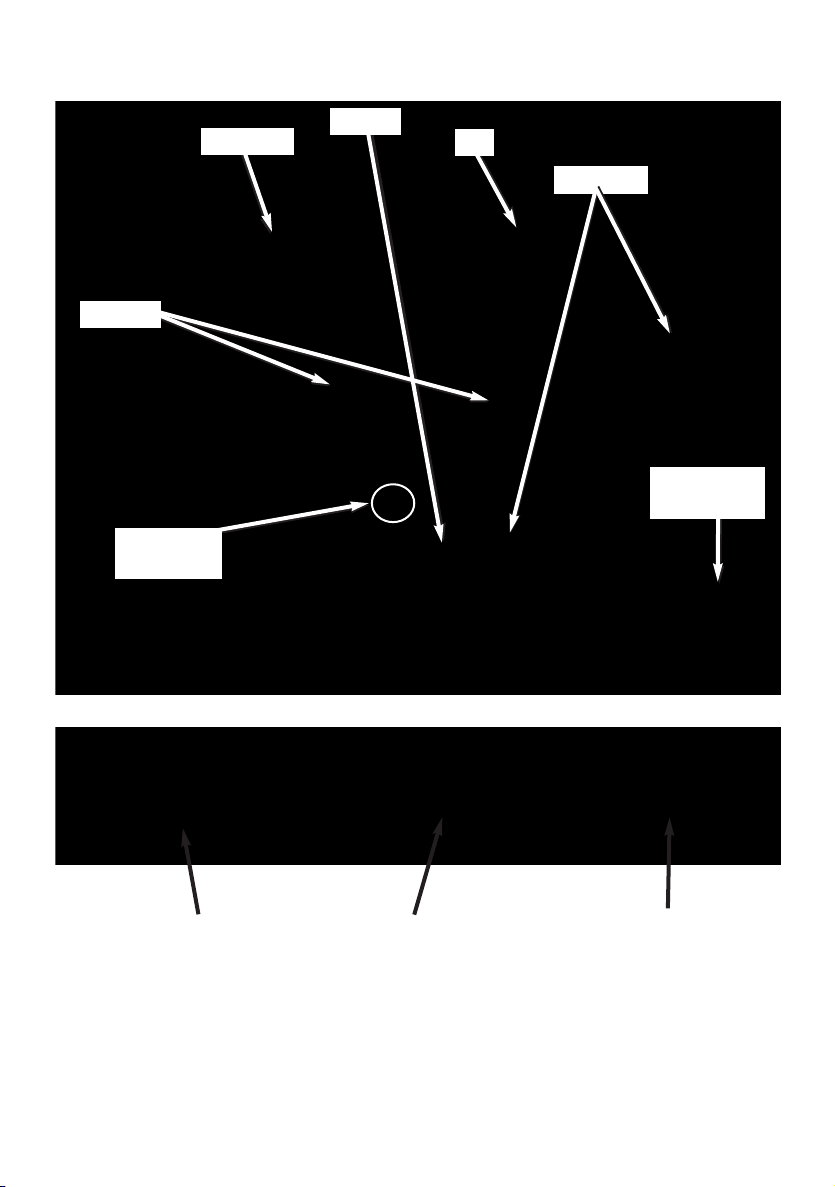
Knowing your Design Vacuum Sealer Basic
grommet
welding gasket
control panel
connection for
vacuum adapter
lid
sealing band
lock/release button
(on both sides)
seal only taste = start
signal light shines red = appliance is working
signal light off = sealing finished
seal only und vacuum seal = signal lights off = vacuum sealing finished
stop working push the button = vacuum = start
signal light shines red
seal only button shines additional = vacuum finished
21
Page 7

Getting the appliance ready for use
1. Remove all promotional materials and packing and place the appliance on
a convenient dry surface (explained in the safeguards). Ensure you have enough
space in front of the appliance to lay down the plastic bag.
2. Pay attention that the gasket (in the bottom of the appliance) is properly assembled.
The gasket has to lay properly inside the cannelure and the edges of the gasket should
not overlap the cannelure. If the appliance is not properly assembled the appliance
cannot generate a vacuum.
3. Connect the appliance directly to a mains power supply wall socket with protective
conductor (earth/ground;
for use.
230 V, 50 Hz, AC, rated for 16 A). The appliance is now ready
Sealing the plastic bag
ATTENTION: Only use intended foil or plastic bags
for vacuum sealing food. Any other plastic bags melt on
the sealing band. Leftover plastic on the sealing band
would damage the band and the vacuum procedure.
1. Get the appliance ready for use. Press the
lock/release buttons on the sides of the appliance to open
the lid (picture A). Ensure the sealing band is clean and
no foreign substance is on the heating surface.
2. Take the roll of foil and cut a piece of foil to a
desired length (not too short!).
IMPORTANT: Make sure to have approximately 8
cm of foil above the food to be able to seal the bag.
3. Place one open end of the foil over the sealing band
(picture B). The end of the foil does not need to extend
into the vacuum chamber because we do not need to
generate vacuum for sealing the bottom of the plastic bag.
4. Close the lid and press the lid down on the marked
lines (picture C). Ensure that the lid is securely locked and
the lock has snapped in (you will hear two clicking sounds
when the lid snaps in). The appliance is now ready for use.
5. Press the Seal Only button (picture D). The appliance
starts to operate. The control light of the Seal Only button
illuminates in red. The appliance is in the sealing mode.
If the bottom is sealed the indicator light switch off.
A
B
C
D
22
Page 8

6. Press the lock/release buttons on the sides of the
appliance to open the lid (picture E) and take out the foil.
ATTENTION: The sealing band gets hot during the
sealing process. Beware of not touching the hot sealing
band with any parts of your body or heat-sensitive items.
7. Check if the weldseam is even. The bottom of the
bag is sealed and leak-proof when you see a smooth
line with no interruption of a pattern on the seam.
How to vacuum-pack in a plastic bag (foil)
8. After sealing the bottom of the plastic bag and ensuring that the seam is leak-proof
you can fill the plastic bag with food.
NOTE: For best results do not overload the plastic bag. Leave approximately 8 cm
of space above the food when cutting the foil, otherwise the appliance cannot
generate a vacuum.
E
NOTE: Pre-freeze moist food before vacuum sealing.
This way no liquids can get sucked into the appliance and the food will not get pressed.
9. Place the open end of the plastic bag in the middle of
the gasket into the vacuum chamber (picture F). Ensure
that the plastic bag is below the round post (which is
the vacuum pump hole) to ensure no vacuum is leaking.
This is very important for vacuum sealing because otherwise the appliance cannot generate a vacuum.
ATTENTION: When vacuuming in foil pay attention
that no food particles, liquids, or grease is in the sealing
section of the plastic bag.
10. Close the lid and press the lid down on the marked
lines (picture G). Ensure that the lid is securely locked and
the lock has snapped in (you will hear two clicking
sounds when the lid snaps in). The appliance is now ready
for use.
11. Press the Vacuum Seal button (picture H). The
appliance starts to operate. The control lamp of the
Vacuum Seal button illuminates in red. The appliance is
generating a vacuum. As soon as the vacuum procedure
is finished the control lamp of the Seal Only button also
illuminates in red. The appliance is in the sealing mode.
F
G
H
23
Page 9

The bag is sealed when both control lamps switch off.
12. Press the lock/release buttons on the sides of the
appliance to open the lid and take out the plastic bag.
ATTENTION: The sealing band gets hot during the
sealing process. Beware of not touching the hot sealing
band with any parts of your body or heat-sensitive
items.
13. Check if the weldseam is even. The bag is sealed
and leak-proof when you see a smooth line with no interruption of a pattern on the
seam and the vacuum is kept.
The appliance is not for continuous operation. Please wait 2 minutes after one
vacuum procedure before starting another.
14. Pull the plug out of the power outlet when you have finished operating.
NOTE: If the desired vacuum is not reached for some unknowable reason, the vacuum
system will shut down automatically after 30 seconds. In this case check if the bag
has a leak, or the bag was not placed properly.
How to vacuum-pack in a container
ATTENTION: Only use special container for vacuum
sealing food. (Gastroback vacuum container are available
in trade.) Any other container (glass or plastic) cannot resist
the pressure and would implode. This can cause personal
injury.
1. Get the appliance ready for use. Press the
lock/release buttons on the sides of the appliance to open
the lid (picture A).
2. Take the provided hose and connect the narrow end
of the hose to the post in the middle of the vacuum
chamber (picture B). The hose has to be attached
securely and should not be able to slip off.
3. Fill the container with its contents.
IMPORTANT: Do not overload the container.
When vacuuming food in a container leave 3 cm
space underneath the lid of the container.
4. Place the large end with the vacuum bell jar over the
black rubber seal on the lid of the container. Press the
vacuum bell jar slightly down. The vacuum bell jar
has to be hermetically sealed (picture C).
24
I
AA
BB
CC
Page 10

5. Press the Vacuum Seal button (picture D).
D
NOTE: Ensure the vacuum bell jar lays correctly in the
recess of the container and is flush with the surface of
the lid during the vacuum procedure.
The appliance starts to operate. The control lamp of the Vacuum Seal button illuminates
in red. The appliance is generating a vacuum. As soon as the vacuum procedure is
finished the control lamp of the Vacuum Seal button switch off. The food is now
vacuum-packed.
When you want to open the container push the rubber seal outwards until you hear
a hissing sound of air. The vacuum pressure will be released. Hold the seal for 2-3
seconds and then open the lid.
Care and cleaning
Remove the plug from the power outlet before cleaning and storing the appliance.
WARNING! Allow the appliance to cool down, before cleaning the appliance. Do
not place the appliance or power cord in a dishwasher. Do not immerse the appli-
ance or power cord in any liquids or spill any liquids on it. Always wipe off spilled
liquids immediately. Do not pour or drip any liquids on the appliance or power
cord. Do not place the appliance on wet or damp surfaces. When liquids are
spilled on the appliance, immediately unplug the appliance and dry the appliance to avoid risk of electric shock or fire.
For easy cleaning – clean the appliance immediately after each use. This way no
leftover food will stick, burn-in or carbonise to the sealing band.
If necessary carefully clean the sealing band with a damp sponge or cloth and warm
soapy water. Do not clean the vacuum sealer or any parts of it in the dishwasher.
Wipe the exterior of the vacuum sealer and power cord with a damp soft cloth. Take care
not to spill or drip water or any other liquids on the appliance. If necessary you can take out
the gasket in the bottom of the appliance for cleaning. Take out the gasket by carefully pulling
it up.
NOTE: Do not clean the gasket in a dishwasher. Pay attention not to lose or damage
the gasket.
ATTENTION: Pay attention that the gasket (in the bottom of the appliance) is properly
assembled. The gasket has to lay properly inside the cannelure and the edges of the
gasket should not overlap the cannelure. If the appliance is not properly assembled
the appliance cannot generate a vacuum.
ATTENTION: The gasket in the lid of the appliance is solidly attached to the lid
and cannot be removed!
25
Page 11

Advantages of vacuum-packing
The process of vacuum-packing removes up to 90% of air inside the bag or container
and seals it air-tight. Air, light and temperature above 0 degree makes the food easily
perishable.
• the vacuum prevents oxidation of food and blocks micro-organisms and bacteria
• it blocks scent and preserves food´s distinct taste, colour, nutrient and freshness
• it reduces bad odours in the refrigerator
• it lengthens food´s freshness up to 5 times
• it preserves the natural colour of frozen food and protects frozen food from freezer-burn
Tips
• For effective results, please refrigerate or freeze food before and after vacuum packing.
• For moist food items, please pre-freeze before vacuum-packing. This way no liquids
can get sucked into the appliance and the food will not get pressed.
• IMPORTANT: The plastic bag is not suitable for microwave or
boil-in-bag cooking.
• NOTE: Before vacuum-packing fish remove its innards.
• NOTE: For best results do not overload the plastic bag. Otherwise the appliance
cannot generate a vacuum.
• When vacuuming in foil pay attention that no food particles, liquids, or grease
is in the sealing section of the plastic bag.
• Do not leave too much air inside the bag. Eliminate extra air of the bag by
squeezing it out carefully before vacuuming it. Too much air inside the bag increases
the vacuum pump loading and may cause the motor insufficient power to draw away
all the air inside the bag!
• There are many non-food uses for vacuum packing. Keep camping supplies such as
matches, first aid kits and clothing clean and dry. Keep flares for auto emergencies
ready. Keep silver and collectibles untarnished.
• Do not vacuum seal objects with sharp points like fish bones and hard shells! Sharp
points may penetrate and tear the bag!
• Fill a bag about 2/3 full with water, seal the end (don't vacuum). Freeze the bag
and use for ice in the cooler, or ice packs for sports injuries.
26
Page 12
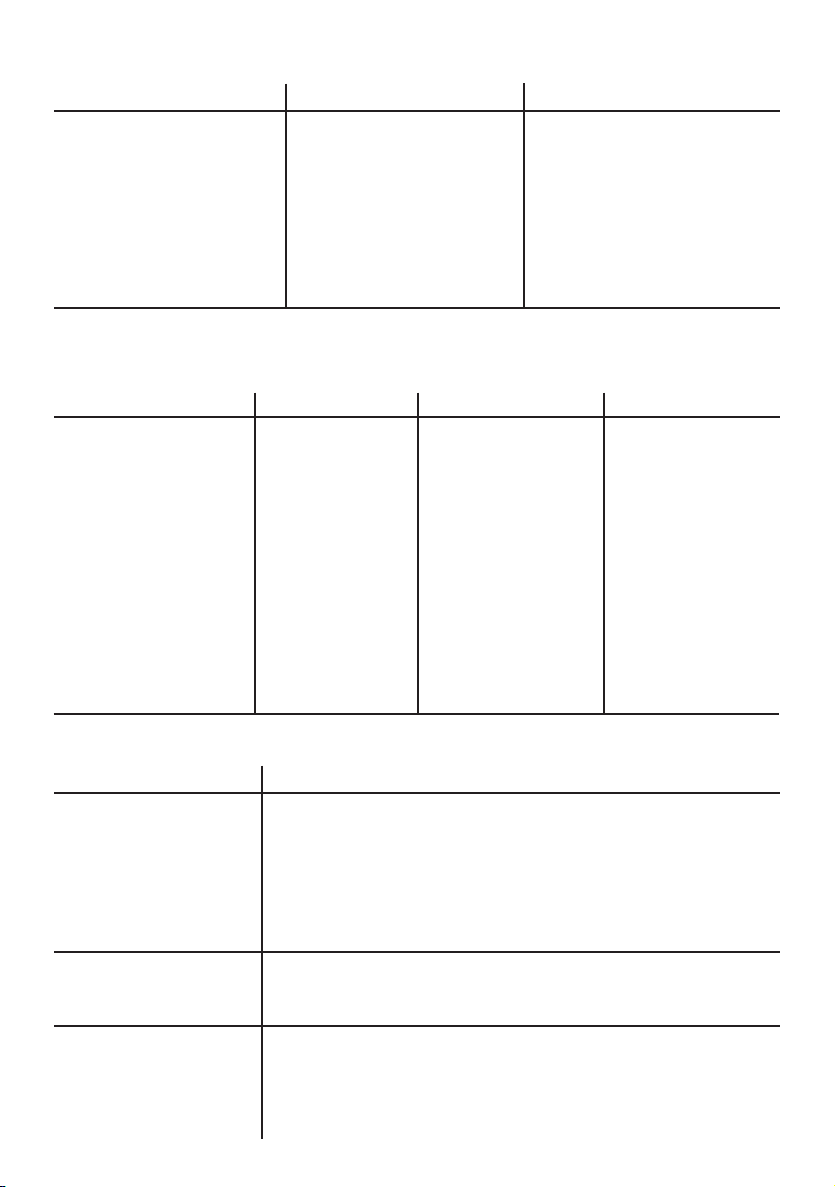
Storage life timetable
Food item standard storing vacuum-packed
fresh raw meet 3 days 9 days
cooked meet 5 days 15 days
fresh fish 2 days 5 days
fruit and vegetables 5 days 15-21 days
sausage/ham 7 days 20 days
soup 2 days 10 days
cookies with cream 2 days 8 days
bread 2 days 8 days
rice/pasta/coffee/tea 180 days 365 days
* storage under refrigeration (between 3-5 degrees)
Storage life timetable
food storage standart storing vacuum-packed
fresh berries refrigerator 1-2 days 10 days
cheese, hard (opened) refrigerator 3-4 months 6-8 months
coffee beans refrigerator 2 weeks 2 years
ground coffee pantry 2 years 3 years
cookies (packaged) pantry 2 months 6 months
fish (meat) freezer 6-8 months 2 years
meet (beef stew type) freezer 6-9 months 3 years
poultry (whole chicken) freezer 12 months 3 years
ground beef freezer 2-3 months 1 year
nuts freezer 6-12 months 2 years
pasta (uncooked) pantry 2 years 3 years
rice (uncooked) pantry 6 months 2 years
sugar pantry 2 years 3 years
fresh vegetables freezer 10 months 3 years
Trouble shooting
possible problem solution
The appliance does not
operate when switching it on
The appliance does not
seal the plastic bag
The appliance does not
generate a full vacuum
• Check if the appliance is properly connected to a power outlet and
check if the power outlet does work. Therefore connect another appliance
to the same power outlet.
• Check if the power cord and the plug have any defects. Contact an
authorised service centre if they show any defects.
• The appliance shuts off automatically to prevent overheating. Let the
appliance cool down for 15 minutes and try again.
• Check if the plastic bag is in proper position (Sealing the plastic bag)
and check if the plastic bag has no food or liquids in the sealing section and
lays evenly.
• Check if:
- the plastic bag is in proper position (sealing the plastic bag) and if
the end of the plastic bag extends to the middle of the gasket into the
vacuum chamber but below the round post.
- the gasket is properly assembled
27
Page 13

Trouble shooting
possible problem solution
The appliance does not
generate a full vacuum
The appliance does not seal
the plastic bag properly
The appliance does not
generate a vacuum inside
the container
After the sealing process is
finished the plastic bag is
loosing its vacuum
- anything sticks to the sealing band or the gaskets
- little pieces of food are inside the plastic bag on the section of the sealing band
- the plastic bag has a hole - You can proof this by dipping the sealed
plastic bag into water. In case of a hole, air would escape when
you put slight pressure on the plastic bag. Depending on the
position of the hole either seal the plastic bag again or use a new one.
• Check if:
- the plastic bag is in proper position (sealing the plastic bag) and if
the end of the plastic bag extends to the middle of the gasket into the
vacuum chamber
- anything sticks to the sealing band or the gasket
- little pieces of food are inside the plastic bag on the section of the sealing band
• In case of an overheated sealing band the plastic bag would melt.
Open the appliance and let it cool down for a few minutes
• In the event of overheating the appliance will automatically shut down
(thermal cut out) to prevent further damage. Let the appliance cool down for
15 minutes and try again.
• Check if:
- the vacuum hose is connected properly to the hose port (how to
vacuum-pack in a container)
- The vacuum bell jar is connected properly to the lid of the container. The
vacuum bell jar has to be hermetically sealed
- the lid of the container is closed properly
- the black rubber seal on the lid of the container is properly
attached to the lid
- the black rubber seal is porous or has holes
- the vacuum hose shows defects in the connection section or the end is broken off
- the security lock of the vacuum chamber is all the way to the left
and the vacuum chamber is properly assembled
- the container is overloaded - Leave 3 cm spare room underneath the lid!
• Folds, crumbs, grease or dampness on the sealing band section of the
bag can cause leaking. Open the bag, clean the inside of the plastic bag
in the section where you want to seal it and seal the bag again.
• Some food (such as fresh fruit and vegetables) can ferment or release
their natural gases.
• Lack of refrigeration or changing temperatures can cause food to spoil.
• Check if the plastic bag has a hole - you can identify this by dipping
the sealed plastic bag into water. If there is a hole, air would escape
when you put gentle pressure on the plastic bag. Depending on the position
of the hole either seal the plastic bag again or use a new one.
28
Page 14

Trouble shooting
possible problem solution
The container is loosing its
vacuum
• Check if:
- the black rubber seal is porous or shows holes
- the sealing ring on the lid of the container is properly assembled,
dirty or damaged
Storage
Always clean the appliance before storing. Operate according to the instructions
´Care and cleaning`. Make sure that there are no foreign substances on the heating
surface of the sealing band and close the lid for storing. Please store the appliance
in a frost-free, clean and dry location where it is out of reach of children and is
protected against excessive loads (such as voltage, heat, humidity). Never lay
heavy or hard objects on top of the appliance. Keep the lid closed. This way the
gaskets and the grommet are protected.
Waste disposal
The appliance has to be disposed by the definition of the regional waste disposal of
electrical scrap. If necessary get information of the regional waste management enterprise.
Warranty
We guarantee that all our products are free of defects at the time of purchase. Any
demonstrable manufacturing or material defects will be to the exclusion of any further claim and within 2 years after purchasing the appliance free of charge repaired
or substituted. There is no Warranty claim of the purchaser if the damage or defect of
the appliance is caused by inappropriate treatment, over loading or installation mistakes.
The Warranty claim expires if there is any technical interference of a third party
without an written agreement. The purchaser has to present the sales slip in assertion-of-claims and has to bear all charges of costs and risk of the transport.
29
Page 15

GASTROBACK GmbH
Gewerbestraße 20 • D-21279 Hollenstedt/Germany
http://www.gastroback.de • E-Mail: [email protected]
 Loading...