

Page 1

Introduction
Purpose
This manual provides instructions for setting up a CFN®+ or ISL+ system that connects to
National Bankcard Services (NBS) for card verification using the FiPay
Table of Contents
Topic Page
Introduction
Important Safety Information
Preparing for Configuration
Islander Plus/CFN Plus Setup
Installing FiPay (NBS)
Disabling Bank Cards at the Island During the Evening
Settlement for NBS
FHO Reporting
Error Message Info
Debug Info
Appendix A: NACS/PCAT Product Reference Tab
Appendix B: Running EPS Consolex GUI Utility
Appendix C: HASP Key Information
Appendix D: Modem Initialization String Info
MDE-4999A
FiPay™ Payment Network Installation and Setup Instructions
October 2012
™
application.
1
3
5
6
12
39
40
42
43
45
47
55
57
59
Cards Accepted
NBS (FiPay) can accept the following cards. To know which cards will be active at your
location, contact your NBS representative.
Bank Cards
American Express
MasterCard
Fleet Cards
MasterCard Fleet
VISA Fleet
SM
WEX
®
Discover
®
VISA
PHH (except Donlen)
Voyager
MDE-4999A FiPay™ Payment Network Installation and Setup Instructions · October 2012 Page 1
®
®
Page 2

Introduction
Related Documents
Document
Number Title GOLD Library
®
MDE-4255 Gasboy
MDE-4811 Islander
MDE-4813 CFN PLUS Installation Manual Gasboy Fleet PLUS System
MDE-4817 SiteOmat In-House Station Controller Setup and
Ma
MDE-4818 SiteOmat In House Station Controller Users Manual Gasboy Fleet PLUS System
Warranty Policy Statement for USA and Canada • Gasboy Safety and Warranty Docs
™
PLUS and ICR PLUS Installation Manual Gasboy Fleet PLUS System
intena
nce Manual
Abbreviations and Acronyms
Term Description
AES Advanced Encryption Standard
API Application Programming Interface
CFN Commercial Fueling Network
ESP Electronic Payment System
FHO Fleet Head Office
FTP File Transfer Protocol
GUI Graphical User Interface
HASP Hardware Against Software Piracy
ICR Island Card Reader
NBS National Bankcard Services
OS Operating System
RAM Random Access Memory
SSL Secure Socket Layer
TAC Technical Assistance Center
TCP/IP Transmission Control Protocol/Internet Protocol
USB Universal Serial Bus
XML Extensible Markup Language
• Gasboy Policy Documents
Gasboy Fleet PLUS System
Warranty
For information on warranty , refer to MDE-4255 Gasboy Warranty Policy Statement for USA
and Canada. If you have any warranty-related questions, contact Gasboy’s W arranty
Department at its Greensboro location.
Page 2 MDE-4999A FiPay™ Payment Network Installation and Setup Instructions · October 2012
Page 3
Important Safety Information
Notes: 1) Save this Important Safety Information section
in a readily accessible location.
2) Although DEF is non-flammable, Diesel is
flammable. Therefore, for DEF cabinets that are
attached to Diesel dispensers, follow all the
notes in this section that pertain to flammable
fuels.
This section introduces the hazards and safety precautions
associated with installing, inspecting, maintaining or servicing
this product. Before performing any task on this product, read
this safety information and the applicable sections in this
manual, where additional hazards and safety precautions for
your task will be found. Fire, explosion, electrical shock or
pressure release could occur and cause death or serious injury,
if these safe service procedures are not followed.
Preliminary Precautions
You are working in a potent ially dangerous environment of
flammable fuels, vapors, and high voltage or pressures. Only
trained or authorized individuals knowledgeable in the related
procedures should install, inspect, maintain or service this
equipment.
Emergency Total Electrical Shut-Off
The first and most important information you must know is how
to stop all fuel flow to the pump/dispenser and island. Loca te
the switch or circuit breakers that shut of f all power to all fueling
equipment, dispensing devices, and Submerged Turbine
Pumps (STPs).
!
WARNING
!
Total Electrical Shut-Off Before Access
Any procedure that requires access to electrical compo nents or
the electronics of the dispenser requires total electrical shut off
of that unit. Understand the function and location of this switch
or circuit breaker before inspecting, installing, maintaining, or
servicing Gasboy equipment.
Evacuating, Barricading and Shutting Off
Any procedure that requires access to the pump/dispenser or
STPs requires the following actions:
The EMERGENCY STOP, ALL STOP, and
PUMP STOP buttons at the cashier’s station
WILL NOT shut off electrical power to the
pump/dispenser. This means that even if you
activate these stops, fuel may continue to flow
uncontrolled.
You must use the TOTAL ELECTRICAL
SHUT-OFF in the case of an emerge ncy and not
the console’s ALL STOP and PUMP STOP or
similar keys.
Important Safety Information
Read the Manual
Read, understand and follow this manual and any other labels
or related materials supplied with this equipment. If you do not
understand a procedure, call a Gasboy Authorized Serv ice
Contractor or call the Gasboy Service Center at
1-800-444-5529. It is imperative to your safety and the sa fety of
others to understand the procedures before beginning work.
Follow the Regulations
Applicable information is available in National Fire Protection
Association (NFPA) 30A; Code for Motor Fuel Dispensing
Facilities and Repair Garages, NFPA 70; National Electrical
Code (NEC), Occupational Safety and Health Administration
(OSHA) regulations and federal, state, and local codes. All
these regulations must be followed. Failure to install, inspect,
maintain or service this equipment in accordance with these
codes, regulations and standards may lead to legal citations
with penalties or affect the safe use and operation of the
equipment.
Replacement Parts
Use only genuine Gasboy replacement parts and retrofit kits on
your pump/dispenser. Using parts other than genuine Gasboy
replacement parts could create a safety hazard and violate
local regulations.
Safety Symbols and Warning Words
This section provides important information about wa rning
symbols and boxes.
Alert Symbol
This safety alert symbol is used in this manual and on
warning labels to alert you to a precaution which must be
followed to prevent potential pe rsonal safety hazards. Obey
safety directives that follow this symbol to avoid possible injury
or death.
Signal Words
These signal words used in this manual and on warning labels
tell you the seriousness of particular safety hazards. The
precautions below must be followed to prevent death, injury or
damage to the equipment:
DANGER: Alerts you to a hazard or unsafe practice
!
which will result in death or serious injury.
WARNING: Alerts you to a hazard or unsafe practice
!
that could result in death or serious injury.
CAUTION with Alert symbol: Designates a hazard or
!
unsafe practice which may result in minor injury.
CAUTION without Alert symbol: Designates a hazard
or unsafe practice which may result in property or
equipment damage.
Working With Fuels and Electrical Energy
Prevent Explosions and Fires
• An evacuation of all unauthorized person s and vehicles
from the work area
• Use of safety tape, cones or barricades at the affected
unit(s)
• A total electrical shut-off of the affected unit(s)
Fuels and their vapors will explode or burn, if ignited. Spilled or
leaking fuels cause vapors. Even filling customer tanks wi ll
cause potentially dangerous vapors in the vicinity of the
dispenser or island.
DEF is non-flammable. Therefore, explosion and fire safety
warnings do not apply to DEF lines.
MDE-4999A FiPay™ Payment Network Installation and Setup Instructions · October 2012 Page 3
Page 4
Important Safety Information
No Open Fire
In an Emergency
Inform Emergency Personnel
Compile the following information and inform emergency
Open flames from matches, lighters, welding torches
or other sources can ignite fuels and their vapors.
No Sparks - No Smoking
personnel:
• Location of accident (for example, address, front/back of
building, and so on)
• Nature of accident (for example, possible heart attack, run
over by car, burns, and so on)
Sparks from starting vehicles, starting or using power tools,
burning cigarettes, cigars or pipes can also ignite fuels and their
vapors. Static electricity, including an electrostatic charge on
your body, can cause a spark sufficient to ignite fu el vapors.
Every time you get out of a vehicle, touch the metal of your
vehicle, to discharge any electrostatic charge before you
approach the dispenser island.
• Age of victim (for example, baby, teenager, middle-age,
elderly)
• Whether or not victim has received first aid (for example,
stopped bleeding by pressure, and so on)
• Whether or not a victim has vomited (for example, if
swallowed or inhaled something, and so on)
!
WARNING
Gasoline/DEF ingested may cause
Working Alone
It is highly recommended that someone who is capable of
rendering first aid be present during servicing. Familiarize
yourself with Cardiopulmonary Resuscitat ion (CPR) m ethods, if
unconsciousness and burns to internal organs.
Do not induce vomiting. Keep airway open.
Oxygen may be needed at scene. Seek medical
advice immediately.
you work with or around high voltages. This information is
available from the American Red Cross. Alw ays advise the
station personnel about where you will be working, and caution
them not to activate power while you are working on the
equipment. Use the OSHA Lockout/Tagout procedures. If yo u
are not familiar with this requirement, refer to this information in
the service manual and OSHA documentation.
WARNING
!
DEF generates ammonia gas at higher temperatures.
When opening enclosed panels, allow the unit to air out to
avoid breathing vapors.
If respiratory difficulties develop, move victim away from
source of exposure and into fresh air. If symptoms persist,
seek medical attention.
Working With Electricity Safely
Ensure that you use safe and estab lished practices in working
with electrical devices. Poorly wired devices may ca us e a fire ,
explosion or electrical shock. Ensure that grounding
connections are properly made. Take care that sealing devices
and compounds are in place. Ensure that you do not pinch
WARNING
!
WARNING
!
Gasoline inhaled may cause unconsciousness
and burns to lips, mouth and lungs. Keep airway
open. Seek medical advice immediately.
wires when replacing covers. Follow OSHA Lockout/Tagout
WARNING
requirements. Station employees and service contractors need
to understand and comply with this program completely to
ensure safety while the equipment is do wn .
!
Gasoline/DEF spilled in eyes may cause burns to
eye tissue. Irrigate eyes with water for
approximately 15 minutes. Seek medical advice
Hazardous Materials
immediately.
Some materials present inside electronic enclosures may
present a health hazard if not handled correctly . Ensure that you
clean hands after handling equipment. Do not place any
equipment in the mouth.
WARNING
!
Gasoline spilled on skin may cause burns.
Wash area thoroughly with clear water.
Seek medical advice immediately.
!
WARNING
The pump/dispenser contains a chemical known to the
State of California to cause cancer.
WARNING
!
DEF is mildly corrosive. Avoid contact with eyes, skin, and
clothing. Ensure that eyewash station s an d safety showers
WARNING
!
The pump/dispenser contains a chemical known to the
State of California to cause birth defects or other
reproductive harm.
are close to the work location. Seek medical advice
recommended treatment if DEF spills into eyes.
IMPORTANT: Oxygen may be needed at scene if gasoline has
been ingested or inhaled. Seek medical advice immediately.
Lockout/Tagout
Lockout/T agout covers servicing and maintenance of machines
and equipment in which the unexpected energization or start-up
of the machine(s) or equipment or release of stored energy
could cause injury to employees or personnel. Lockout/Tagout
applies to all mechanical, hydraulic, chemical or other energy,
but does not cover electrical hazards. Subpa rt S of 29 CFR Part
1910 - Electrical Hazards, 29 CFR Part 1910.333 contains
specific Lockout/Tagout provision for electrical hazards.
Page 4 MDE-4999A FiPay™ Payment Network Installation and Setup Instructions · October 2012
Page 5

Preparing for Configuration
Before you configure, obtain the following information from your NBS representative:
• Your Merchant ID#. Cenex
• Phone numbers (primary and secondary) for the
using dialup connectivity to NBS, or Abierto box with dialup backup.
• An open serial port on the desktop computer hosting the FiPay application. A USB t
serial adaptor can be used, if required.
• An available USB port for the software Hard
Note: It is important to have a dialup modem or Abierto router box for connection to the NBS
networ
k.
Preparing for Configuration
®
customers obtain Merchant ID from CHS.
modem used for NBS authorization, if
ware Against Software Piracy (HASP) key.
o
Determine the desktop computer’s serial communicat
application for connection to the NBS host through the modem or Abierto router.
You may also want to determine which of the accepted card types you will use and ensure that
all product information
MDE-4817 SiteOmat In-House Station Cont
CAUTION
Before loading new versions of software and/or initializing NBS, ensure that all previous
transactions are settled and accounted for. Failure to do so can cause a loss of transaction
data or create a problem for the next settlement.
System Requirements
Following is a list of FiPay requirements for a system. If the system on which FiPay is
installed includes other services, then you must scale the system for those services/products, as
required.
Minimum Hardware Requirements
•1 GB of RAM
• 2 GHz of CPU Speed
• 40 GB of Disk Space
ions port to be assigned to the FiPay
is loaded in the Islander Plus system. For more information, refer to
roller Setup and Maintenance Manual.
Minimum Software Requirements
• .NET 2.0 or higher
®
•Windows
XP PROFESSIONAL or Windows 7 Professional Minimum (Windows 2003
Server preferred)
CFN+ or Islander PLUS Minimum Software Requirements
• Operating System - v.BSP 1.08 (SP8) or higher
• SiteOmat - v.SO 6.3.3.088 or higher
Fleet Head Office - v.FHO 6.3.3.035 – DB:342 or higher
MDE-4999A FiPay™ Payment Network Installation and Setup Instructions · October 2012 Page 5
Page 6
Islander Plus/CFN Plus Setup
All Windows Operating Systems must be listed as PROFESSIONAL or
WARNING
Windows version listed as Home, Starter, and so on are NOT
SUPPORTED.
higher to meet the minimum requirements.
™
Windows Vista
is NOT SUPPORTED.
BEFORE YOU BEGIN
FiPay Payment Network software is intended to run on a standalone PC
Before attempting to install FiPay Payment Network sof tware on the same
PC/Server as the Fleet Head Office software, refer to
“Appendix C: HASP Key Information” on page 57.
Before you Begin
Islander Plus/CFN Plus Setup
To accept Credit Card sales using the Islander PLUS system, a Secure Socket Layer (SSL)
connection to the computer running the FiPay application must be established. The Islander
PLUS makes this connection automatically and then the connection is set up using the
following SiteOmat menus:
1 To navigate to the Station Parameters menu, login to the Islander PLUS.
a Navigate to the SETUP page.
b Click the ADVANCED button.
c Click or select the GLOBAL tab at the TOP of the page.
or Server.
2 On the Global page, make the following changes:
a Change the User Activity Timeout to 120.
b Change the Authorization Timeout to 120.
c Click the Save button to save the changes.
Page 6 MDE-4999A FiPay™ Payment Network Installation and Setup Instructions · October 2012
Page 7
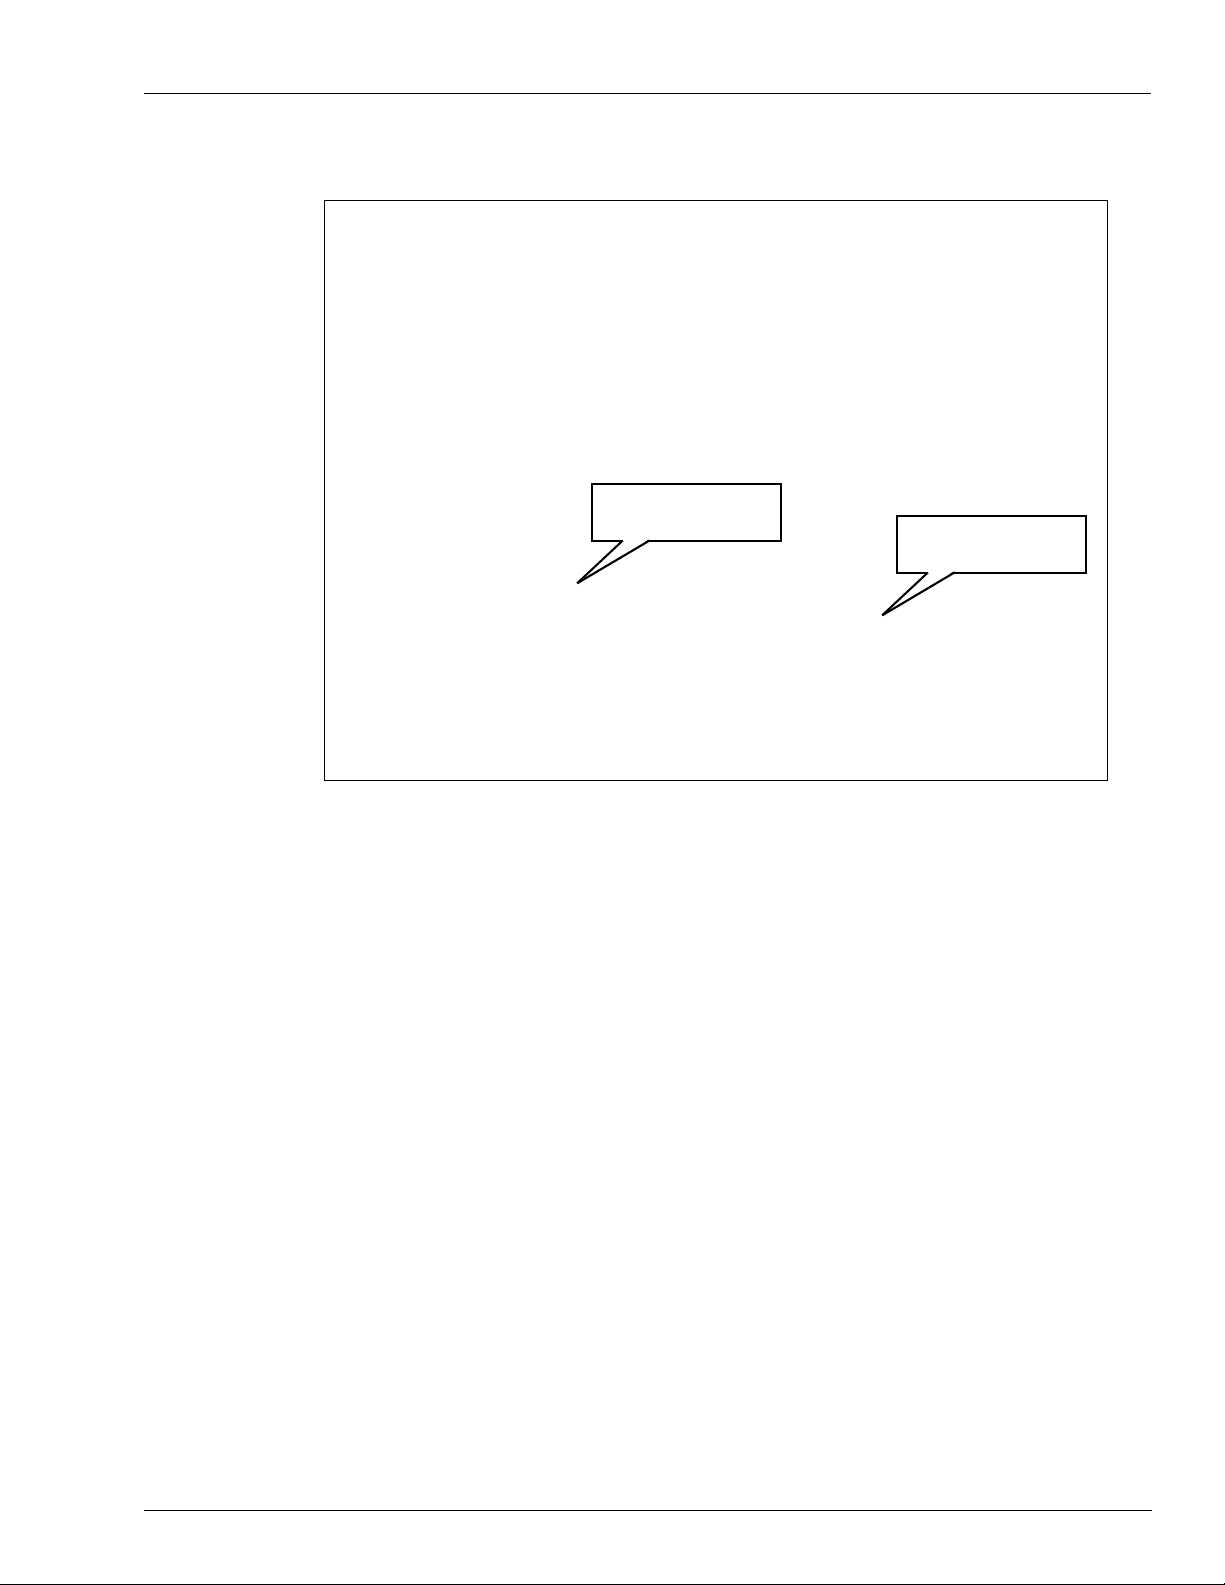
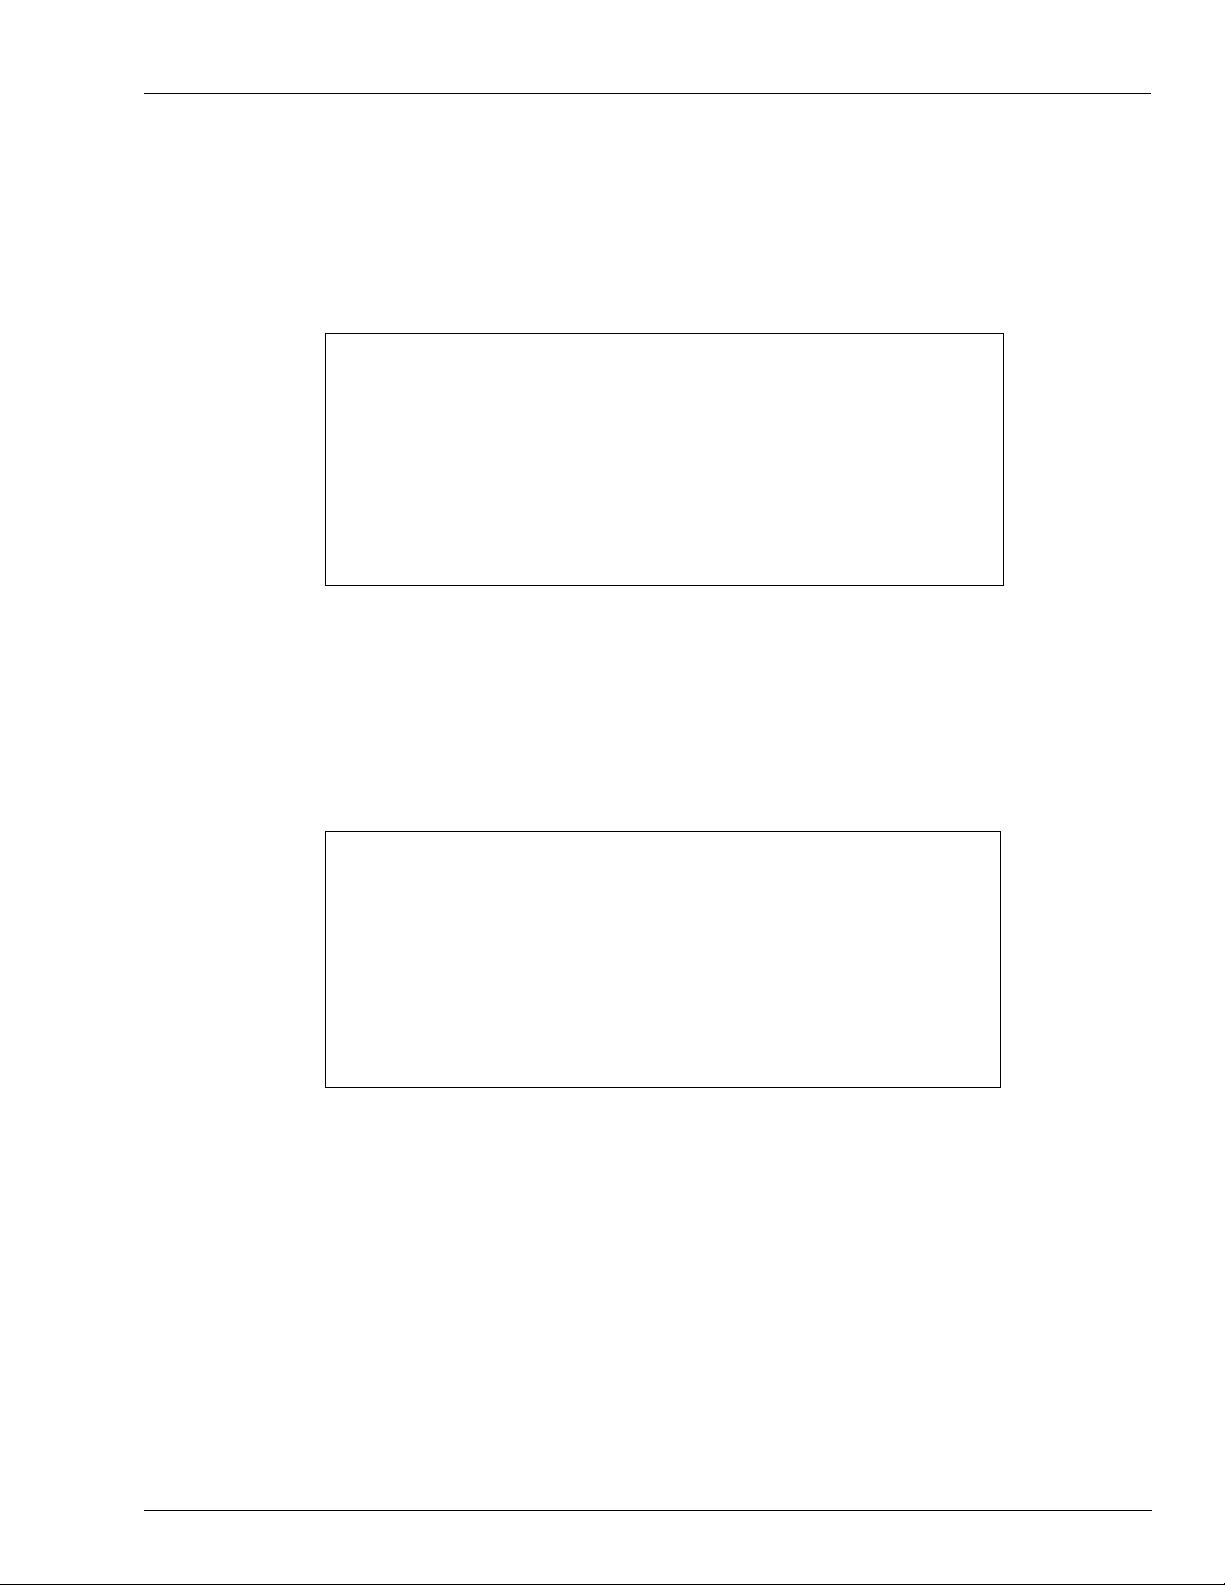
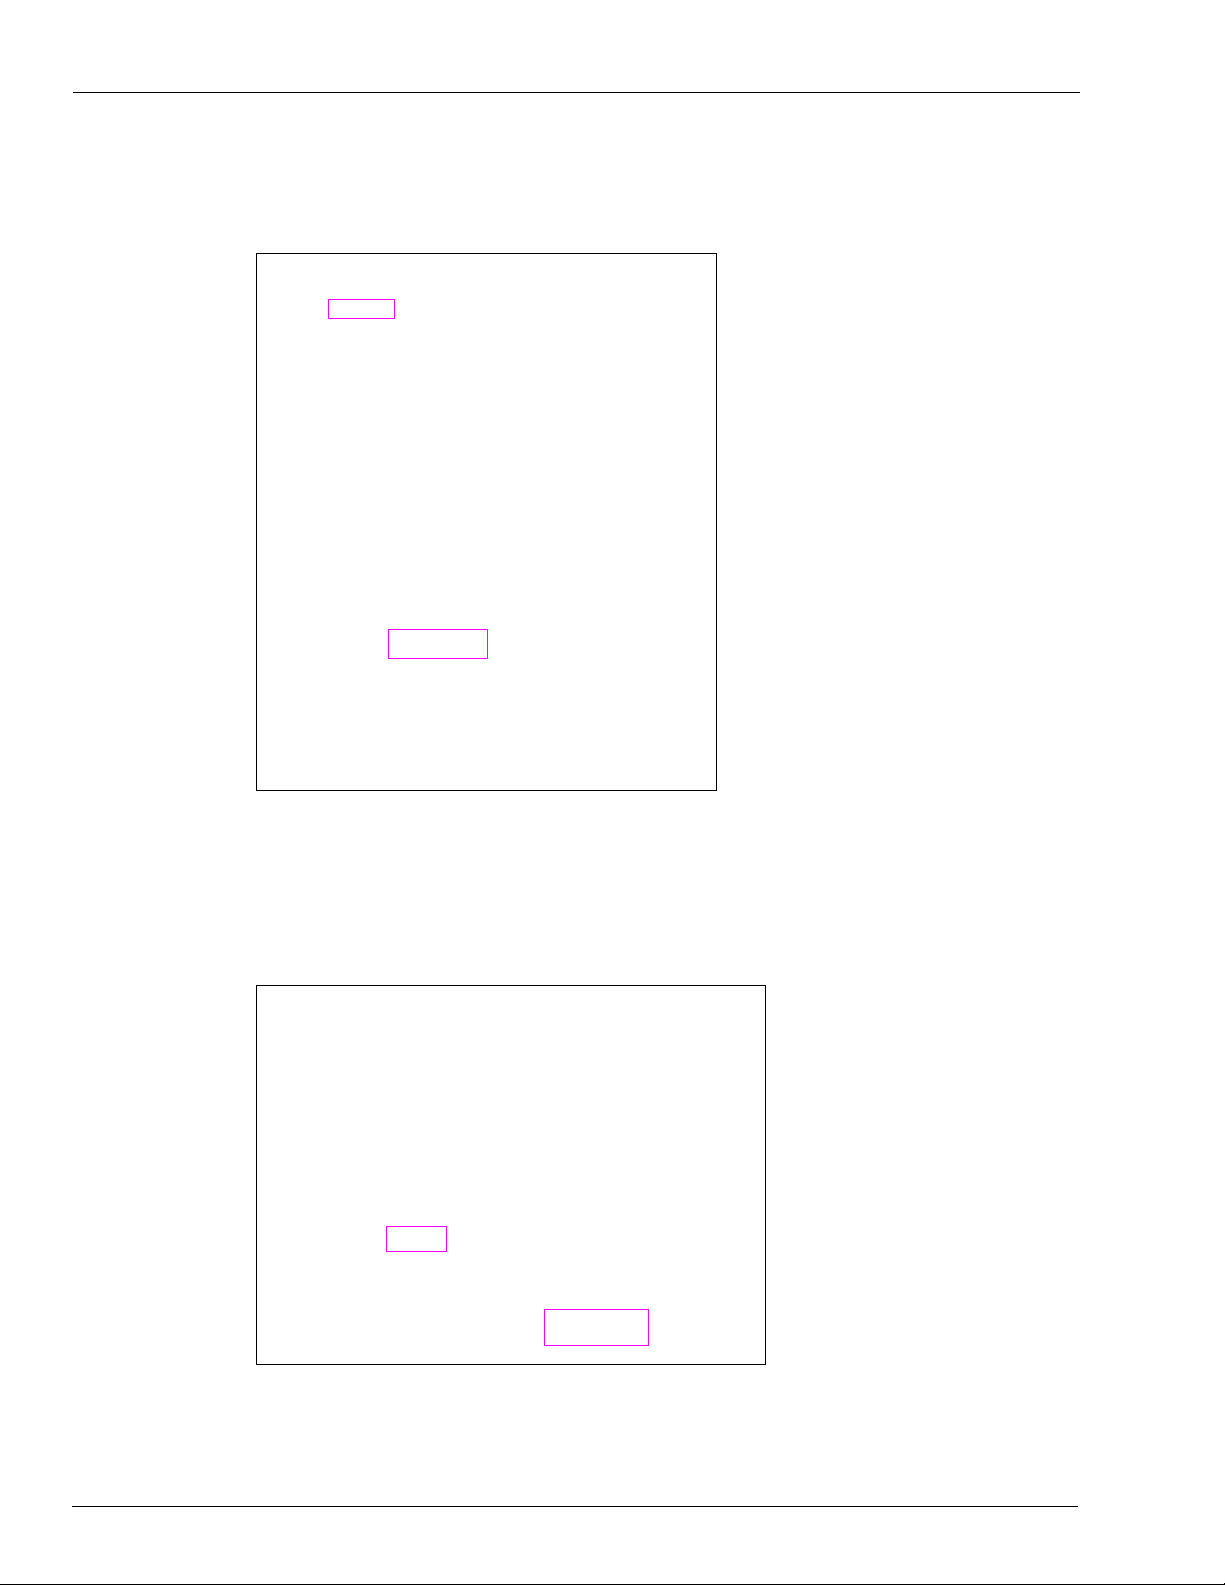
Figure 1: Global Page
User Inactivity Timeout
Set to 120
Islander Plus/CFN Plus Setup
Authorization Timeout
Set to 120
3 Navigate back to the Station Parameters menu and login to the Islander PLUS.
a Navigate to the SETUP page.
b Click the ADVANCED button.
c Click or select the GLOBAL tab at the TOP of the page.
d Click the ADVANCED button again.
MDE-4999A FiPay™ Payment Network Installation and Setup Instructions · October 2012 Page 7
Page 8

Islander Plus/CFN Plus Setup
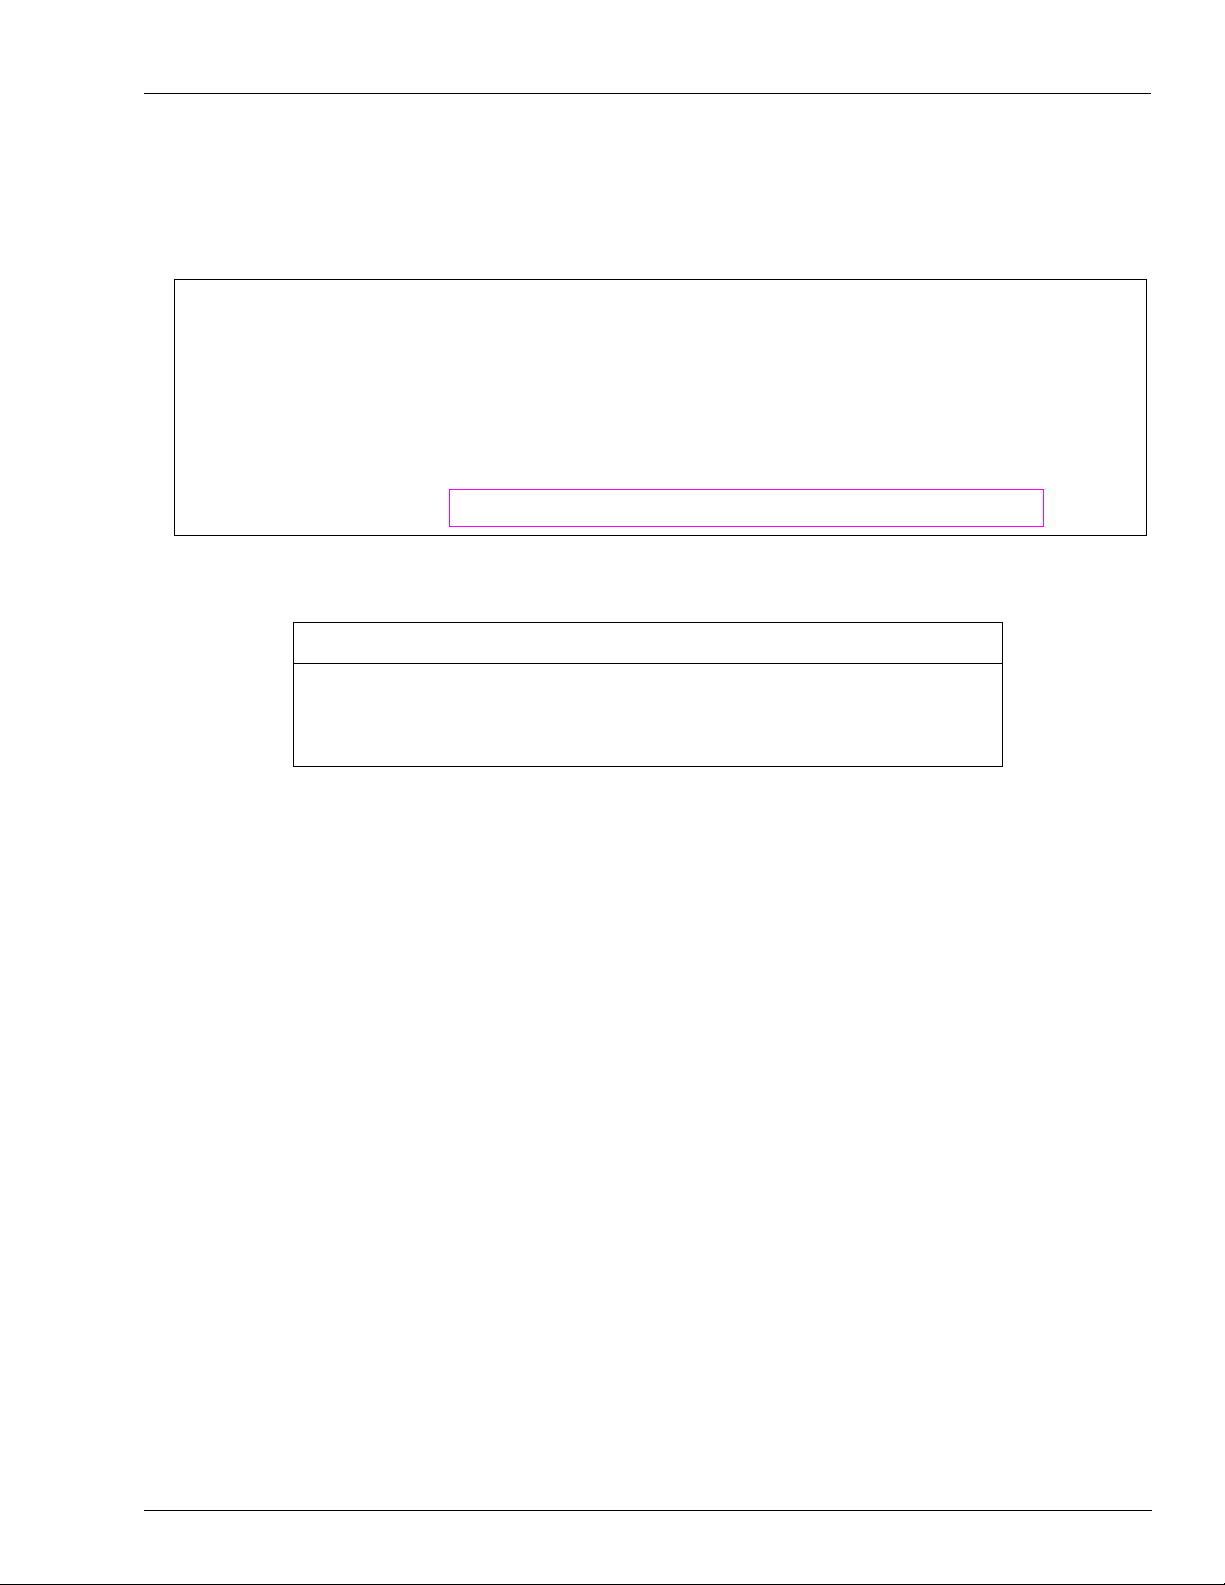
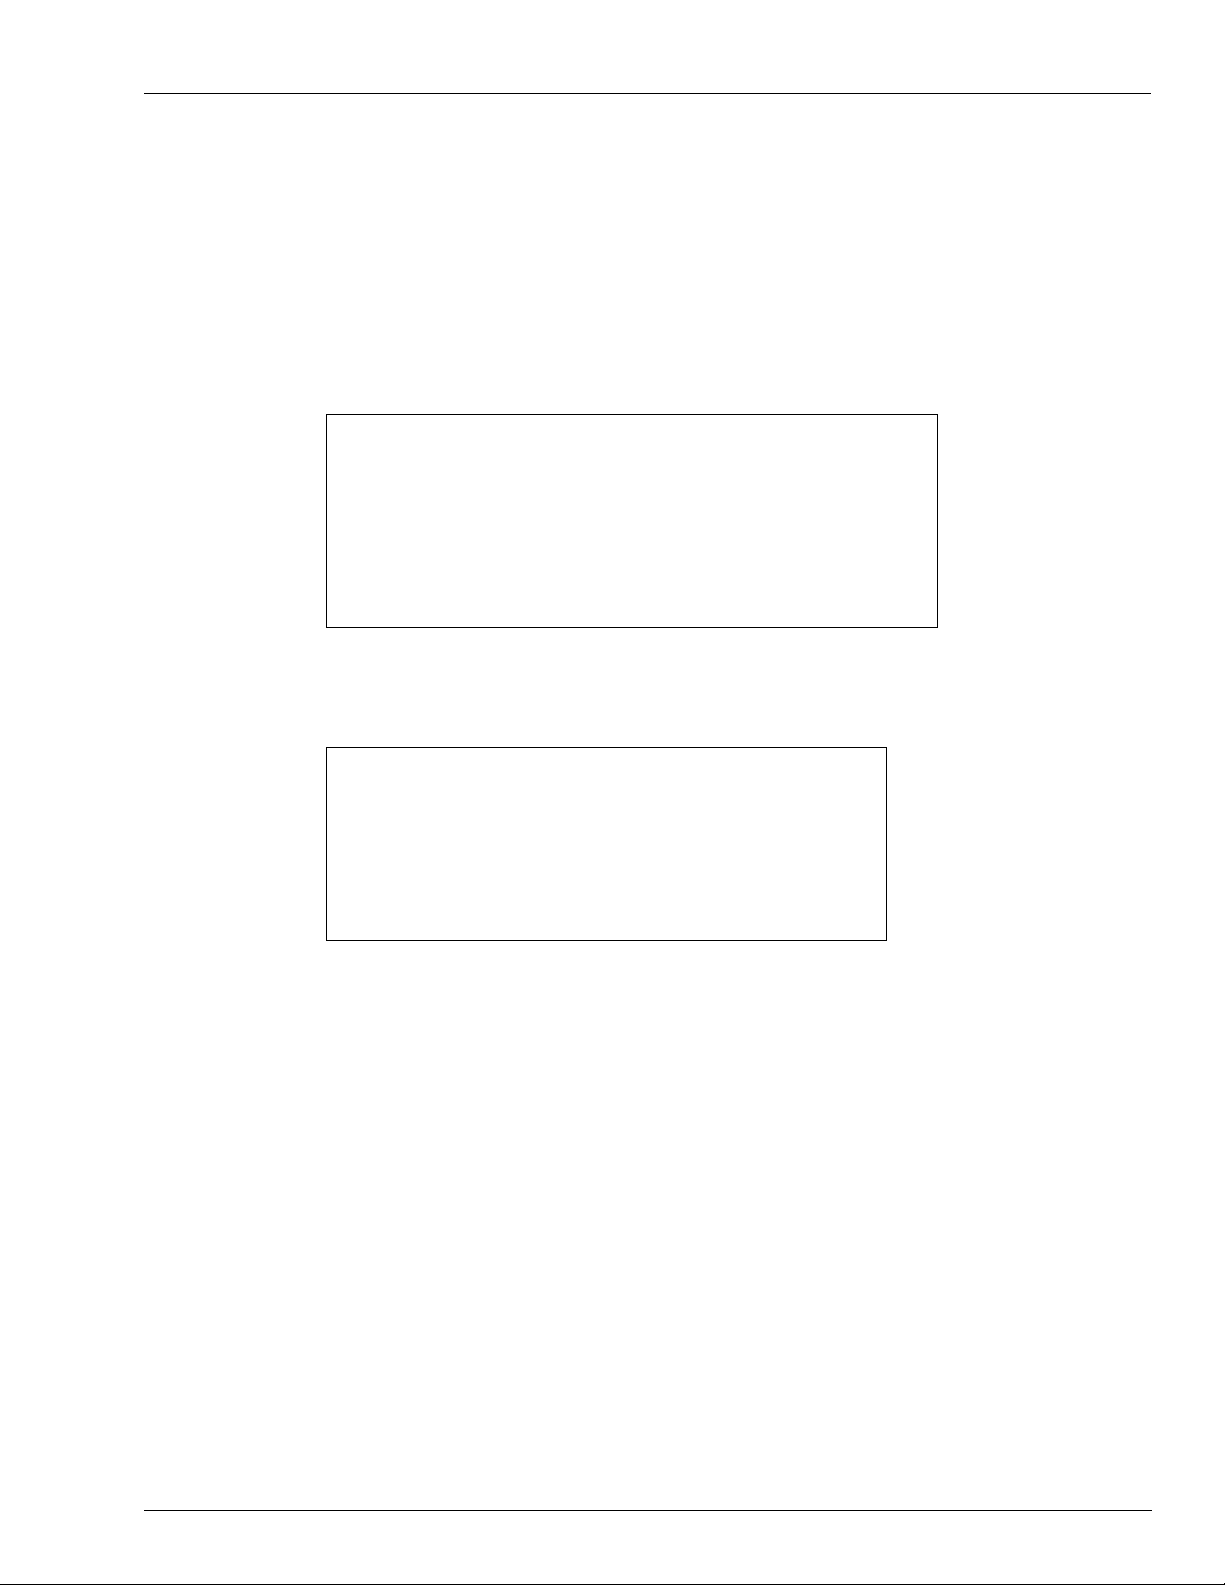
4 In the Payment Terminal section of the page, click the Setup button to configure the Islander
PLUS to accept Credit Cards through FiPay.
Figure 2: Station Parameter Menu
Setup Button
Page 8 MDE-4999A FiPay™ Payment Network Installation and Setup Instructions · October 2012
Page 9
Islander Plus/CFN Plus Setup
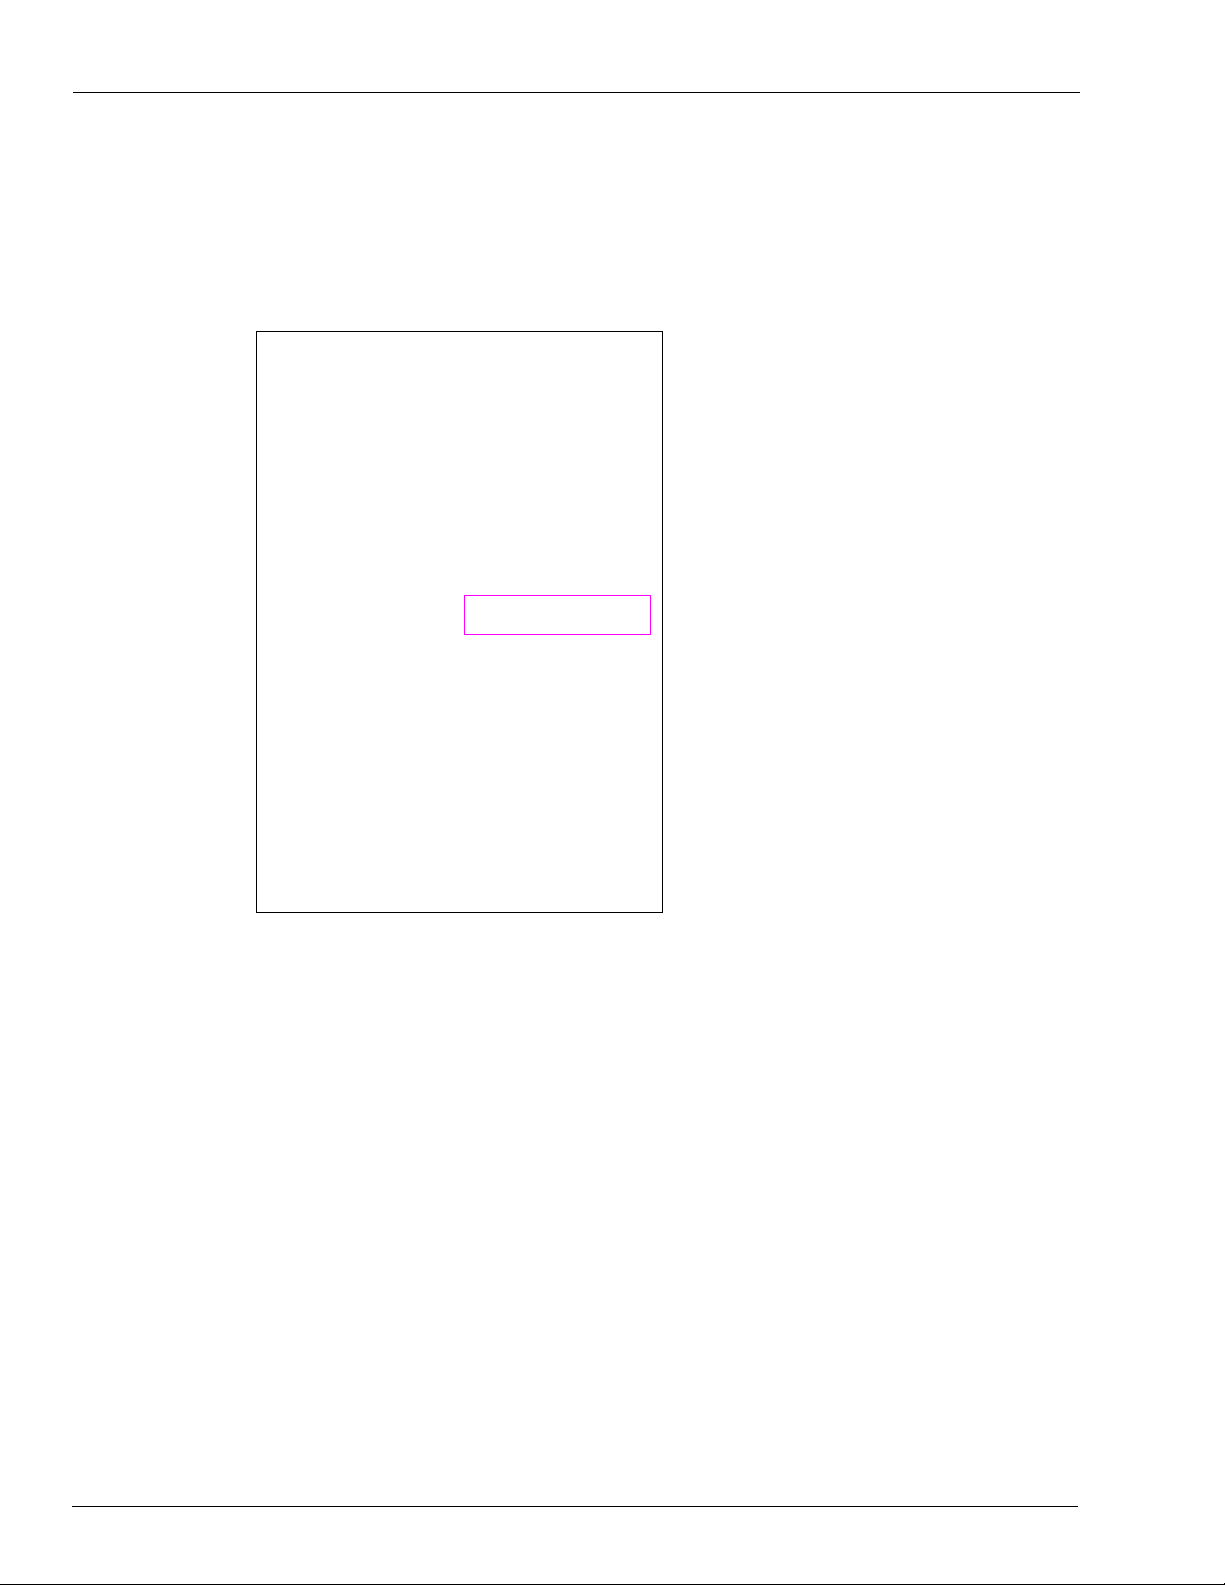
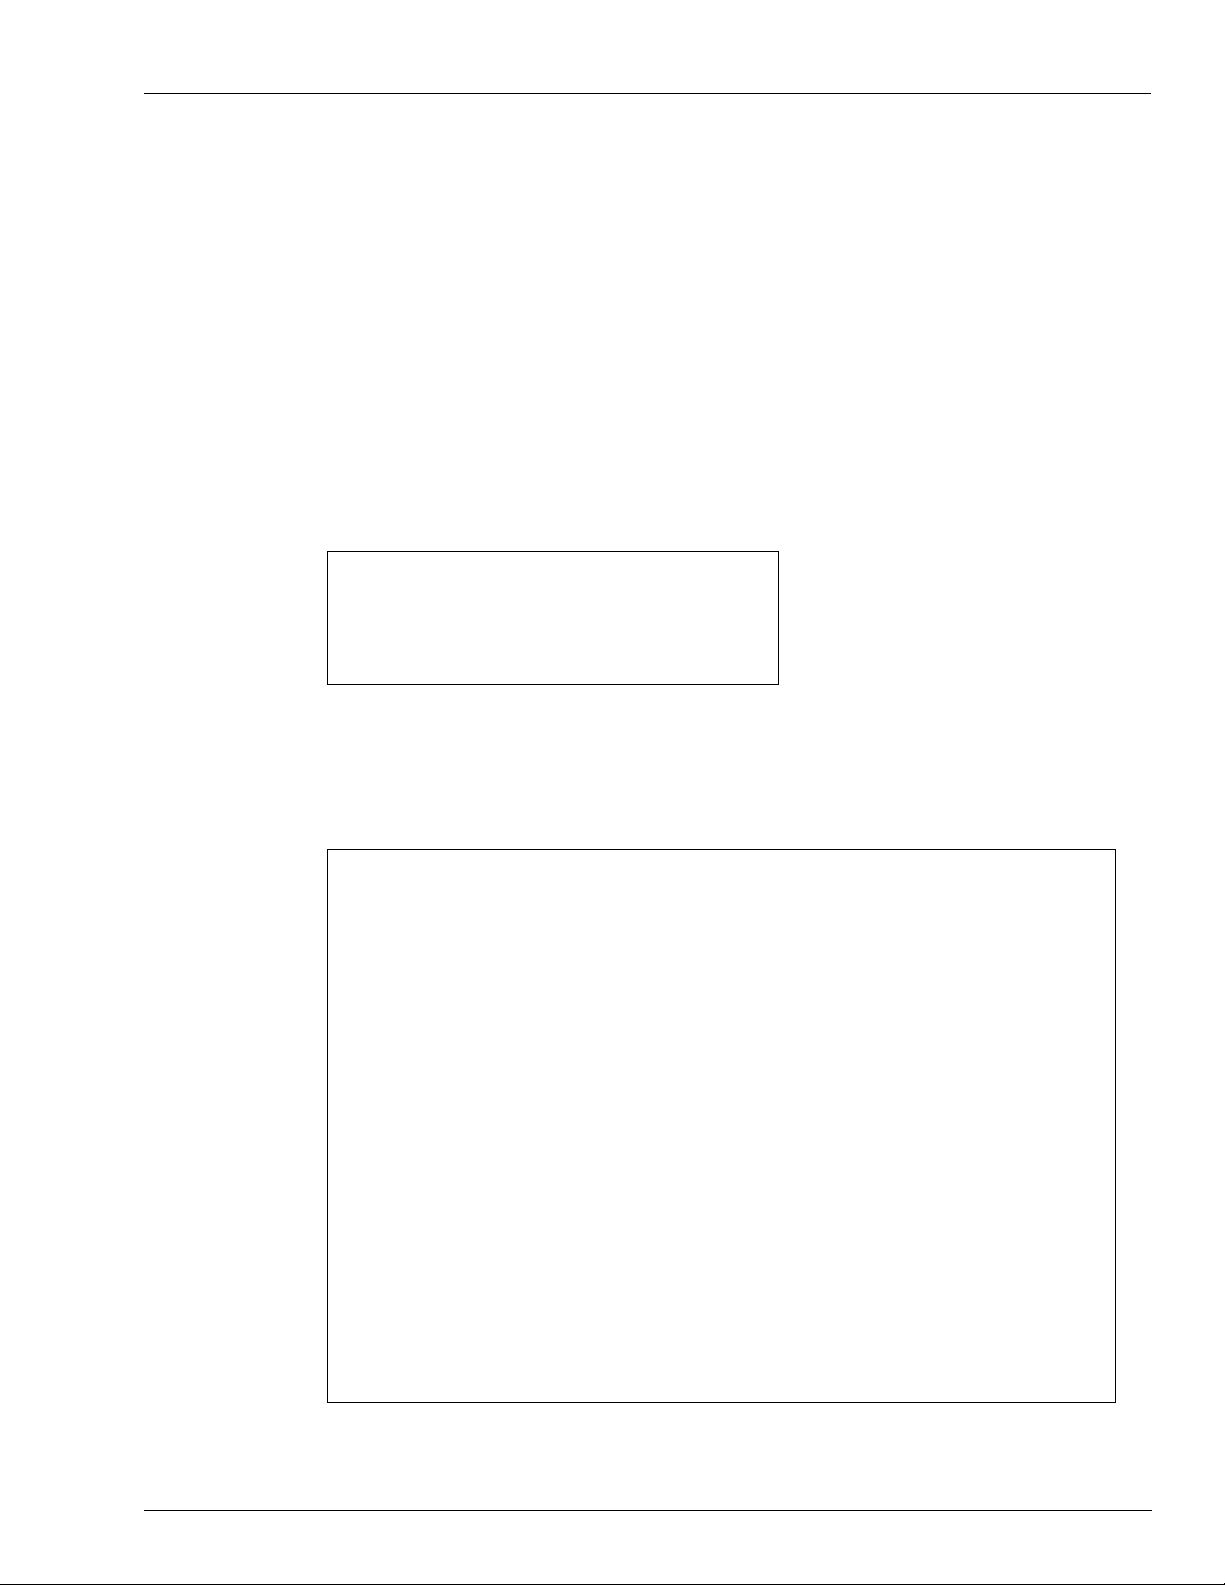
5 Click the Setup button in the Payment Terminal section to open the Setup PAIS screen
(see Figure 3).
Figure 3: Setup PAIS Screen
Credit Processor Drop
Down List
Device IP Address
Device Port
6 Select NBS from the Credit processor drop down list.
7 In the Specific section of the page, set the Device IP to the IP address of the computer that has
FiPay installed. This is usually a standalone PC. However, it can be the same PC that Fleet
Head Office (FHO) is installed on.
8 In the Specific section of the page, set the Device Port to the Transmission Control
Protocol/Internet Protocol (TCP/IP) Port of the computer that has FiPay installed. The
rd port used for FiPay is 24900. Ensure that any Firewalls are set to allow activity on
standa
this port.
Note: Details can be found in “Configuring Windows Firewall” on page 29.
MDE-4999A FiPay™ Payment Network Installation and Setup Instructions · October 2012 Page 9
Page 10
Islander Plus/CFN Plus Setup
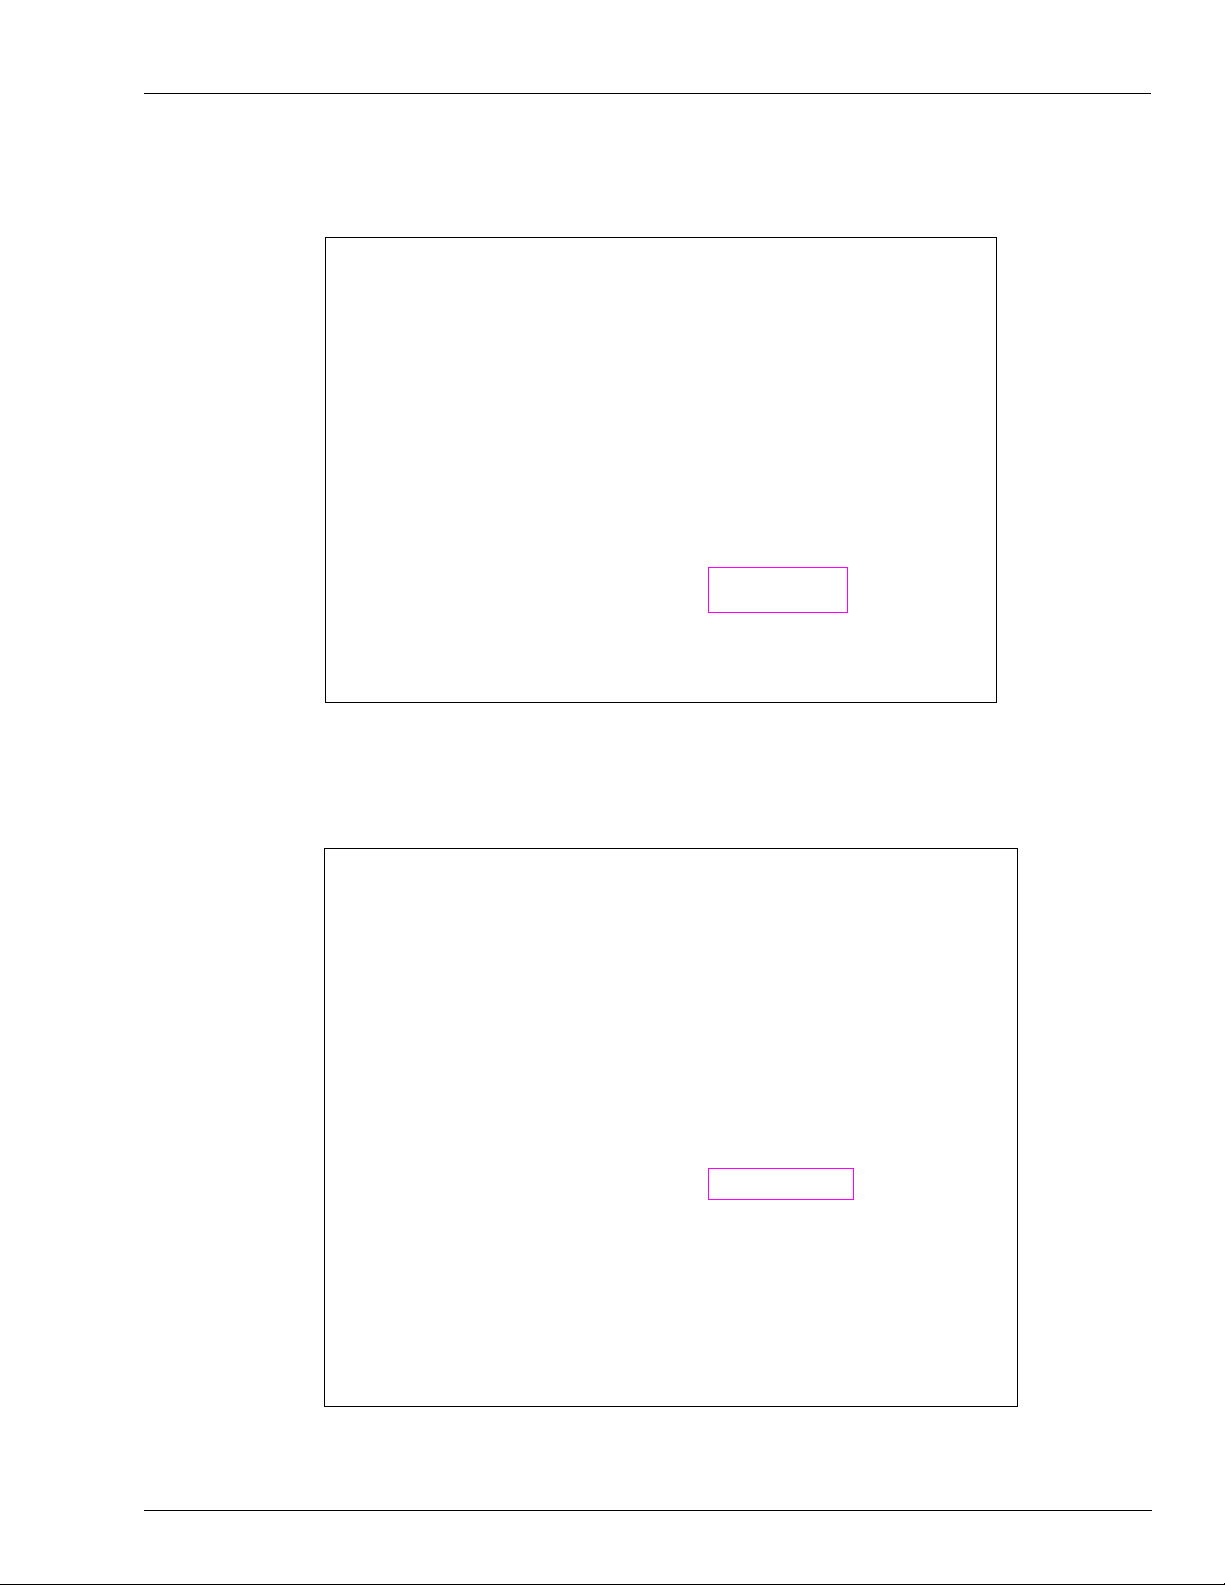
9 In the Specific section of the page, click the Product Map button. When you select
ProductMap on the Payment Setup page, a window appears where you can map the local
product codes that you have loaded into the site to those which are predetermined by the
Network Processor.
Figure 4: Tr anslate Product Codes Screen
External Code sent to
Host. Refer to “Appendix
A: NACS/PCAT Product
Reference Tab” on
page 47.
Translation Drop Down
List
Local Product Codes
Set in the SiteOmat
10 Select NBS from the Translation group drop down list.
11 Select the local product loaded in the Islander PLUS system from the Product name - code
drop down list that you want to cross refer.
12 Set the External code with the corresponding network code for the Local Product set in the
Product name-code box (see Figure 4). For network codes, refer to the NBS Product
Table in
“Appendix A: NACS/PCAT Product Reference Tab” on page 47.
Note: This is the product code sent to the Host network for Cr edit transact
ions and it provides
proper authorization along with the billing information.
13 Repeat steps 9 and 10 for all local product codes.
14 Click OK to save your data when you have finished your entries or click Cancel to exit the
screen without saving.
Page 10 MDE-4999A FiPay™ Payment Network Installation and Setup Instructions · October 2012
Page 11
Islander Plus/CFN Plus Setup
15 Set the Station to process End of Day (Settlement) with the Host network.
a Enable end of day processing by selecting the Daily run enabled checkbox.
b Use the Time to run daily drop down boxes to set the time when the End of day will occur
with the Host network.
Figure 5: Setup PAIS Screen
Daily run checkbox and
Time to run drop down
Set to 120
lists
16 Additional settings that are NOT typically changed are as follows:
a Timeout: 30 seconds is default. This is the time allowed to contact the Host network.
Must be set to 120.
b Card may not be reused with: 10 minutes is default. This timer controls when the same
card is used second
time. Set 0 to disable.
c Pre-authorization amount: 400 is default. This is the Maximum dollar amount allowed
even if the Host network authorizes a greater value.
17 Additional setting must NEVER be changed unless advised to by Gasboy Technical Support.
a PAIS tasks:
b App log: App Port:
c Comm log: Comm port:
MDE-4999A FiPay™ Payment Network Installation and Setup Instructions · October 2012 Page 11
Page 12
Installing FiPay (NBS)
Installing FiPay (NBS)
To install FiPay (NBS), proceed as follows:
1
Place the FiPay (NBS) executable file that is provided to you or downloaded from the File
Transfer Protocol (FTP) site on the C: drive of the system you wish to install it on.
IMPORTANT INFORMATION
Before you start, ensure that you have your FiPay HASP key available. While it is not
required to be inserted for FiPay to install, you must insert this key for FiPay to operate
properly.
2 Double-click the build executable file and follow the prompts to install or upgrade the
software. This file can be installed from any location on the hard drive or removable drive.
Note: If you already have a version of FiPay installed on this machine, you will be prompted
to pres
erve this directory for backup purposes later in the process.
Figure 6: FiPay Executable File
3 After clicking the executable file, a MS-DOS
®
window appears followed by a number of file
names that scroll across the screen (see Figure 7) as they are unzipped for the installation.
Figure 7: MS-DOS Window
Page 12 MDE-4999A FiPay™ Payment Network Installation and Setup Instructions · October 2012
Page 13
Installing FiPay (NBS)
4 After the files are unzipped, you will be prompted to Enter the Drive letter where you want
to install the FiPay application. Enter the drive where the application will be installed and
press Enter.
Figure 8: Drive Letter Prompt
5 After entering the Drive letter, you will be prompted to enter the type of install: (U) Upgrade,
(N) New, or (M) Multi. Select the option that applies to your installation.
Figure 9: Installation Type Prompt
a Enter U for upgrade. This copies the previous version’s configuration.
b Enter N for new. This creates directory and installs application for a single station.
c Enter M for multiple. This creates directory and installs application for two or more stations.
MDE-4999A FiPay™ Payment Network Installation and Setup Instructions · October 2012 Page 13
Page 14

Installing FiPay (NBS)
New Install
6 Enter “N” for the NEW installation option. The installation package will copy files to the
WANSUPP directory and Site Configuration screen will display (see Figure 10).
Figure 10: Site Configuration Screen
7 Enter the Type of Site configuration that applies to the install.
• Abierto Router: This is a third-party devi
ce that connects serially to the FiPay application
computer and then connects to NBS through TCP/IP. For the specific parameters required
for setup of a device, you must contact Abierto and then match FiPay to those parameters.
• Dial via Modem connection: Use
this selection if you are connecting a standard modem
to the FiPay application computer. You will be prompted for the main and backup phone
numbers to contact NBS for authorization.
• Abierto Router with Dial Backup via Modem: This incorporates both
the Abierto setup
along with a dialup backup routine. If for some reason a TCP/IP connection is not
available, then the system will fallback on the dialup access to NBS.
Option 1: Abierto Router (See Figure 11 and Figure 12 on page 15)
8 Enter the Terminal ID. This is the terminal ID for this location. Contact NBS for this number.
Cenex customers obtain Terminal ID from CHS.
9 Enter the COM Port for Abierto Router. This is the COM port of the computer hosting the
FiPay application.
10 Enter the Min Dial Attempts. This is the number of redial attempts.
11 Enter the FiPay Timeout. This is the number of seconds before FiPay will timeout and abort
the authorization attempt. This number must always be less than the Islander PLUS system.
12 Enter the Auto Key Renewal. This is the number of days left for the security keys to
automatically renew.
13 Enter the Fleetcard $PreAuth. This is the PreAuth amount used for Fleet Cards.
14 Enter the Non-Fleetcard $PreAuth. This is the PreAuth amount used for Credit Card and
other non-Fleet cards.
Page 14 MDE-4999A FiPay™ Payment Network Installation and Setup Instructions · October 2012
Page 15

Installing FiPay (NBS)
15 Review the data entered at the Are these variables correct? (Y/N) prompt. Enter Yes to save
the configuration or enter No to re-enter the configuration data.
Figure 11: Abierto Router Site Configuration
Notes: 1) The information shown in this figure is an example only.
2) Terminal ID will begin with GB.
Figure 12: Successful Configuration of Abierto Router
MDE-4999A FiPay™ Payment Network Installation and Setup Instructions · October 2012 Page 15
Page 16

Installing FiPay (NBS)
16 After the configuration has been saved, the HASP key driver installation will begin. Press any
17 The script will then copy the driver files for the HASP to your computer and make the required
key to continue the installation process.
configuration changes to your computer for it to operate. At this point, you will see the
following two messages (see Figure 13). The first message indicates that the driver is being
loa
ded and second message indicates that the operation has
Figure 13: Operation Successful Message
(i)
been successfully completed.
(ii)
IMPORTANT INFORMATION
The HASP key does not have to be inserted for the drivers to be successfully installed.
However, it must be inserted before FiPay service will start and function.
18 Press any key to complete the software installation.
19 To complete the installation and start the FiPay service, refer to “Service Install Verification
and Start-up” on pa
ge 26.
Option 2: Dialup Modem (See Figure 14 and Figure 15 on page 17)
20 Enter the Terminal ID. This is the terminal ID for this location. Contact NBS for this number.
Cenex customers obtain Terminal ID from CHS.
21 Enter the COM Port for Dialup Modem. This is the COM port of the computer connected to
the modem.
22 Enter the NBS Phone Number. This is the number used by FiPay to Dial Out for
authorization.
23 Enter the Modem Init String. This allows you to edit the Init string for the Dial Out modem
used for authorization.
Note: You MUST include amp; after each ampersand symbol used in the i
details, refer to “Appendix B: Running EPS Consolex GUI Utility” on
24 Enter the NBS Backup Phone Number. This is the number used by FiPay to Dial Out for
authorization.
nit string. For more
page 55.
25 Enter the Min Dial Attempts. This is the number of redial attempts.
26 Enter the FiPay Timeout. This is the number of seconds before FiPay will timeout and abort
the authorization attempt. This number must always be less than the Islander PLUS system.
27 Enter the Auto Key Renewal. This is the number of days left for the security keys to renew
automatically.
Page 16 MDE-4999A FiPay™ Payment Network Installation and Setup Instructions · October 2012
Page 17
Installing FiPay (NBS)
28 Enter the Fleetcard $PreAuth. This is the PreAuth amount used for Fleet Cards.
29 Enter the Non-Fleetcard $PreAuth. This is the PreAuth amount used for Credit Card and
other non-Fleet cards.
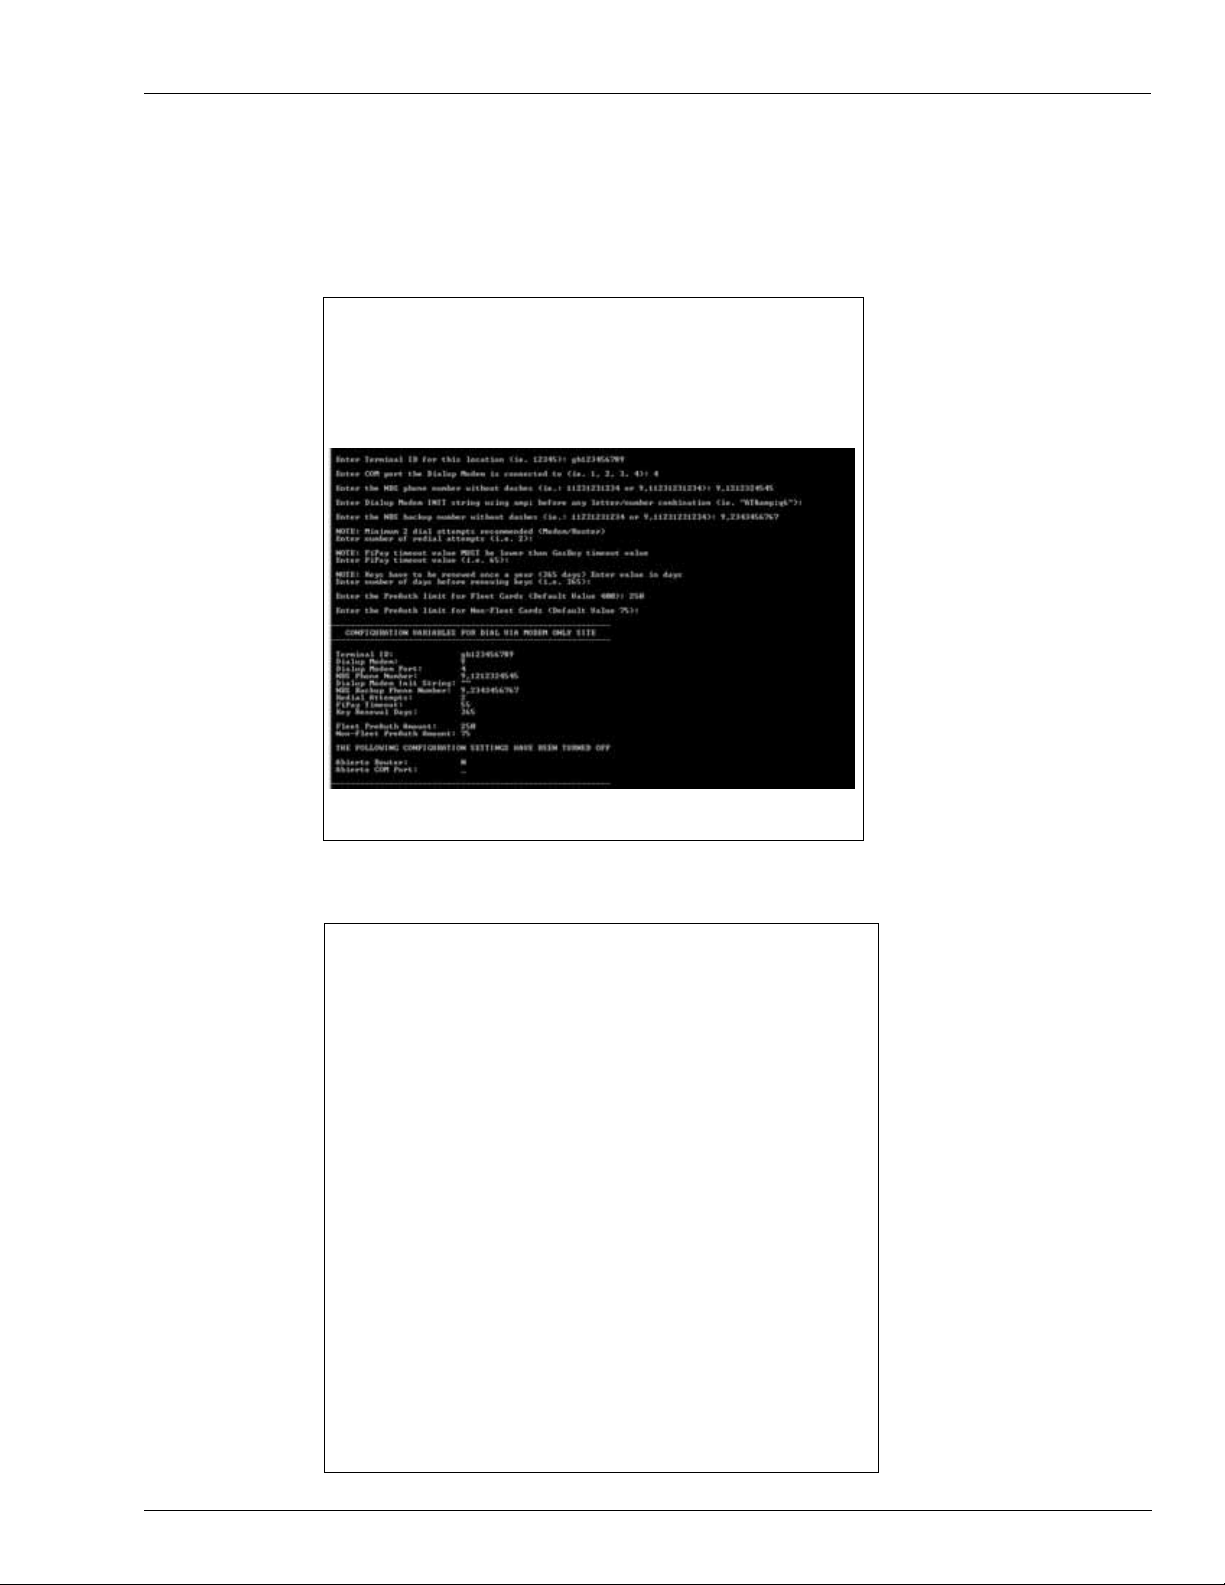
Figure 14: Dialup Modem Site Configuration
Notes: 1) The information shown in this figure is an example only.
2) Terminal ID will begin with GB.
Figure 15: Successful Configuration of Dialup Modem
MDE-4999A FiPay™ Payment Network Installation and Setup Instructions · October 2012 Page 17
Page 18
Installing FiPay (NBS)
30 After the configuration has been saved, the HASP key driver installation will begin. Press any
31 The script will then copy the driver files for the HASP to your computer and make the required
key to continue the installation process.
configuration changes to your computer for it to operate. At this point, you will see the
following two messages (see Figure 16). The first message indicates that the driver is being
loa
ded and second message indicates that the operation has
Figure 16: Operation Successful Message
(i)
been successfully completed.
(ii)
IMPORTANT INFORMATION
The HASP key does not have to be inserted for the drivers to be successfully installed.
However, it must be inserted before FiPay service will start and function.
32 Press any key to complete the software installation.
33 To complete the installation and start the FiPay service, refer to “Service Install Verification
and Start-up” on pa
ge 26.
Option 3: Abierto Router with Dialup Modem (See Figure 17 on page 19
and Figure 18 on page 20)
34 Enter the Terminal ID. This is the terminal ID for this location. Contact NBS for this number.
Cenex customers obtain Terminal ID from CHS.
35 Enter the COM Port for Abierto Router. This is the COM port of the computer hosting the
FiPay application.
36 Enter the COM Port for Dialup Modem. This is the COM port of the computer connected to
the modem.
37 Enter the NBS Phone Number. This is the number used by FiPay to Dial Out for
authorization.
38 Enter the Modem Init String. This allows you to edit the Init string for the Dial Out modem
you are using for authorization.
Note: You MUST include amp; after each ampersand symbol used in the i
details, refer to “Appendix D: Modem Initialization St
ring Info” on page 59.
nit string. For more
39 Enter the NBS Backup Phone Number. This is the number used by FiPay to Dial Out for
authorization.
40 Enter the Min Dial Attempts. This is the number of redial attempts.
Page 18 MDE-4999A FiPay™ Payment Network Installation and Setup Instructions · October 2012
Page 19

Installing FiPay (NBS)
41 Enter the FiPay Timeout . This is the number of seconds before FiPay will timeout and abort
the authorization attempt. This number must always be less than the Islander PLUS system.
42 Enter the Auto Key Renewal. This is the number of days left for the security keys to
automatically renew.
43 Enter the Fleetcard $PreAuth. This is the PreAuth amount used for Fleet Cards.
44 Enter the Non-Fleetcard $PreAuth. This is the PreAuth amount used for Credit Card and
other non-Fleet cards.
Figure 17: Abierto Router with Dialup Modem Site Configuration
Notes: 1) The information shown in this figure is an example only.
2) Terminal ID will begin with GB.
MDE-4999A FiPay™ Payment Network Installation and Setup Instructions · October 2012 Page 19
Page 20

Installing FiPay (NBS)
Figure 18: Successful Configuration of Abierto Router with Dialup Modem
45 After the configuration has been saved, the HASP key driver installation will begin. Press any
key to continue the installation process.
46 The script will then copy the driver files for the HASP to your computer and make the required
configuration changes to your computer for it to operate. At this point, you will see the
following two messages (see Figure 19). The first message indicates that the driver is being
loa
ded and second message indicates that the operation has
Figure 19: Operation Successful Message
(i)
been successfully completed.
(ii)
IMPORTANT INFORMATION
The HASP key does not have to be inserted for the drivers to be successfully installed.
However, it must be inserted before FiPay service will start and function.
47 Press any key to complete the software installation.
48 To complete the installation and start the FiPay service, refer to “Service Install Verification
and Start-up” on pa
Page 20 MDE-4999A FiPay™ Payment Network Installation and Setup Instructions · October 2012
ge 26.
Page 21

Upgrade
Installing FiPay (NBS)
1 Enter “U” for the Upgrade option. Following screen will display and prompt to back up the
existing FiPay directory and setup. Select Y for YES and press Enter to back up and transfer
the existing configuration over to the new version. If you select N for NO, you must set up the
FiPay configuration from scratch (see Figure 23 on page 23).
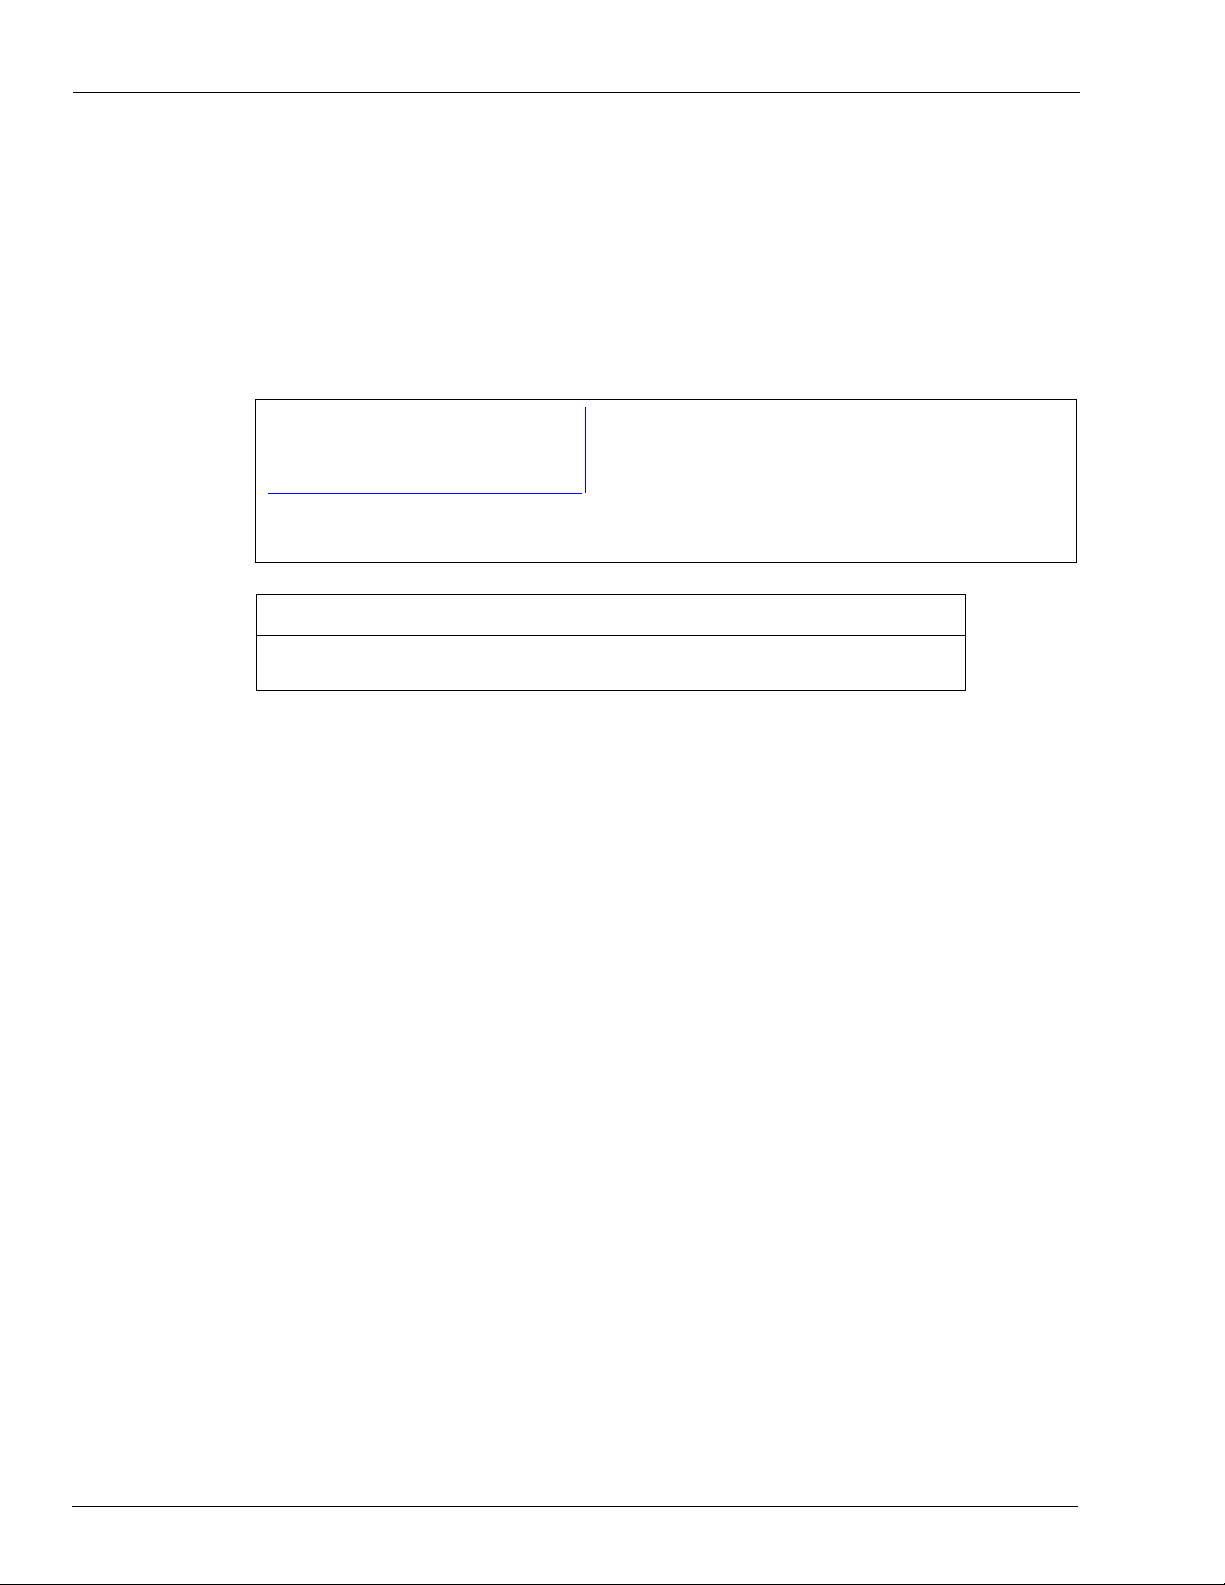
Figure 20: FiPay Backup Message Screen
2 If you receive an error message, “Access Denied”, when you are running the upgrade, a
window might open pointing to the WANSUPP directory and it must be closed to continue.
Figure 21: Access Denied Screen
MDE-4999A FiPay™ Payment Network Installation and Setup Instructions · October 2012 Page 21
Page 22

Installing FiPay (NBS)
The WANSUPP directory must NOT be opened through any other window on the computer.
Else, the message shown in Figure 21 on page 2
this directory are closed and then try again. The upgrade script w
1 appears. Ensure that all windows accessing
ill also prompt you to try
again and when all windows accessing this directory are closed, it must successfully rename
the directory as shown in Figure 22.
Figure 22: Renaming the Directory
Page 22 MDE-4999A FiPay™ Payment Network Installation and Setup Instructions · October 2012
Page 23

Installing FiPay (NBS)
3 After the backup is complete, press any key, and the upgrade will continue.
4 The files and configuration will then be copied into the WANSUPP directory and upgrade will
transfer the existing configuration files into the new application directory.
Figure 23: Configuration Transfer
Figure 24: Tr ansfer Complete
MDE-4999A FiPay™ Payment Network Installation and Setup Instructions · October 2012 Page 23
Page 24

Installing FiPay (NBS)
5 After the configuration has been applied, the HASP key driver installation will begin. Press
6 The script will then copy the driver files for the HASP to your computer and make the required
Note: If you had selected NOT to back up your existing installation, then you will see the
following message and the installation process will terminate (see Figure 25).
Figure 25: Alert Message
any key to continue the installation process.
configuration changes to your computer for it to operate. At this point, you will see the
following two messages (see Figure 26). The first message indicates that the driver is being
ded and second message indicates that the operation has
loa
been successfully completed.
Figure 26: Operation Successful Message
(i)
(ii)
IMPORTANT INFORMATION
The HASP key does not have to be inserted for the drivers to be successfully installed.
However, it must be inserted before FiPay service will start and function.
7 Press any key to complete the software installation.
8 To complete the installation and start the FiPay service, refer to “Multiple” on page 25.
Page 24 MDE-4999A FiPay™ Payment Network Installation and Setup Instructions · October 2012
Page 25

Multiple
Installing FiPay (NBS)
Call Gasboy Technical Assistance Center (TAC) 1-800-444-5529 when using
this option.
1 Enter M for the Multi Gasboy option. Following screen will display after the installation files
uncompress.
Figure 27: Multi Gasboy Installation
2 Press any key to continue with the installation.
3 The HASP key driver installation will begin. Press any key to continue the installation
process.
4 The script will then copy the driver files for the HASP to your computer and make the required
configuration changes to your computer for it to operate. At this point, you will see the
following two messages (see Figure 28). The first message indicates that the driver is being
loa
ded and second message indicates that the operation has
Figure 28: Operation Successful Message
(i)
been successfully completed.
(ii)
IMPORTANT INFORMATION
The HASP key does not have to be inserted for the drivers to be successfully installed.
However, it must be inserted before FiPay service will start and function.
5 Press any key to complete the software installation.
6 Call Gasboy TAC 1-800-444-5529 when using this option.
MDE-4999A FiPay™ Payment Network Installation and Setup Instructions · October 2012 Page 25
Page 26
Installing FiPay (NBS)
Service Install Verification and Start-up
At this point, the installation files and configuration files have been saved or transferred to the
new WANSUPP folder. Now the FIPAYPINCS_CONFIG.XML file must be created for the
FiPay software and service to run.
1 Open a Command Prompt (MS-DOS window). Click Start > Programs > Accessories >
Command Prompt. If Windows 7, right-click the Command Prompt and select Run as
administrator.
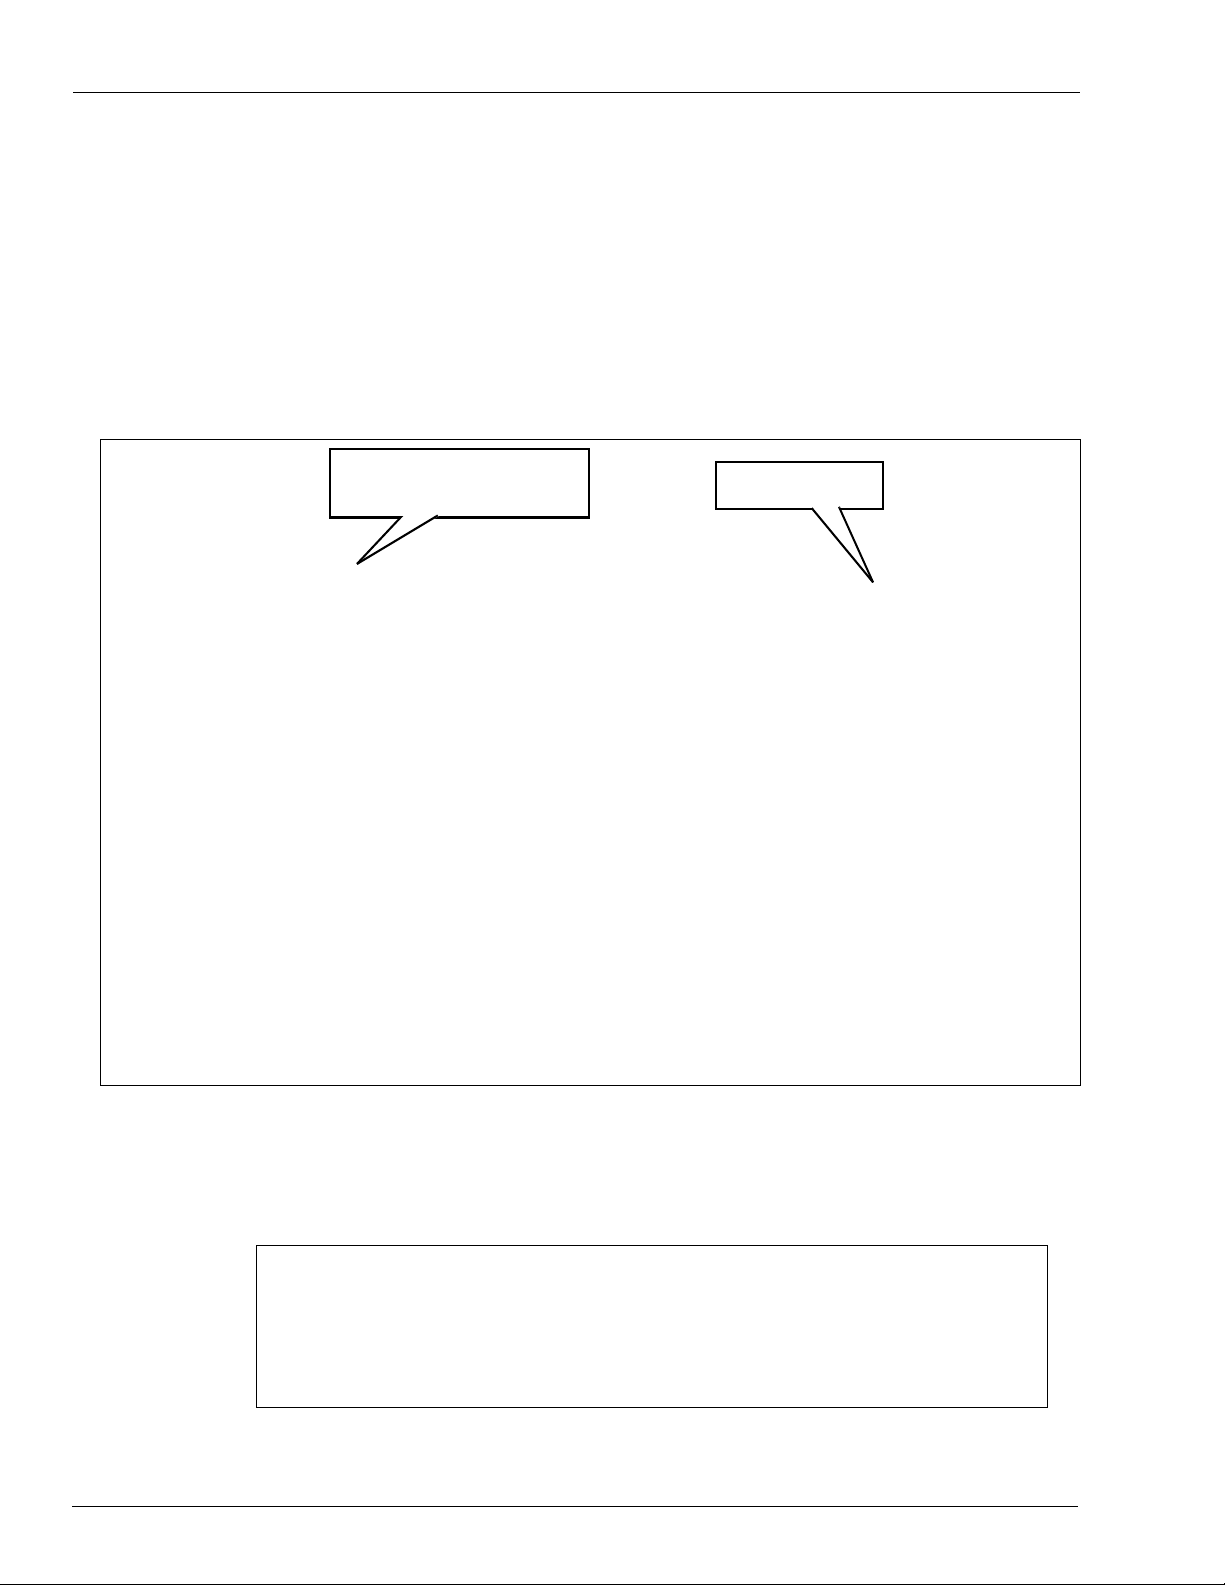
Figure 29: Open a Command Prompt Window
Windows 7 – Command Prompt
Run as administrator
Windows XP
Command Prompt
2 Navigate to the WANSUPP directory using the MS-DOS window. From the drive where Fipay
has been installed, enter cd\WANSUPP and press Enter.
Figure 30: Navigating to WANSUPP
Page 26 MDE-4999A FiPay™ Payment Network Installation and Setup Instructions · October 2012
Page 27
Installing FiPay (NBS)
3 From the WANSUPP directory, type FiPaypinCSX.exe and press Enter. This will write the
configuration parameters to the FIPAYPINCS_CONFIG.XML file and start the fipaypinv4
service.
4 Successful execution of FiPaypinCSX.exe. For common errors, see Figure 31.
Figure 31: FiPaypinCSX Successful
5 MS-DOS window pops open and some data scrolls across the screen, and then the window
closes. FiPaypinCSX.exe was NOT run using the Command Prompt.
6 HASP key check fails and XML (Extensible Markup Language) file is NOT written to. The
FiPay HASP key has not been plugged into a USB port, plug in HASP key and run
FiPaypinCSX.exe again.
Figure 32: HASP Key Error
MDE-4999A FiPay™ Payment Network Installation and Setup Instructions · October 2012 Page 27
Page 28

Installing FiPay (NBS)
7 Start the FiPay service. From a command prompt, navigate to the C:\wansupp directory and
8 Verify if the FipayPinCsx process has started by using Windows Task Manager. Ensure that
then type net start fipaypinv4.
Figure 33: Starting FiPAYPINV4
the “Show processes from all users” checkbox is selected.
Figure 34: Windows Task Manager
Page 28 MDE-4999A FiPay™ Payment Network Installation and Setup Instructions · October 2012
Page 29
Installing FiPay (NBS)
9 You can also start and stop the service from Windows Services (see Figure 3 5) or verify if it is
running.
Figure 35: Windows Services
10
With the Windows Service running, the FiPay software is ready to accept Credit cards.
IMPORTANT INFORMATION
The FiPay software has a built in Graphical User Interface (GUI) for stopping and
starting the FIP AYPINV4 service. For details about a GUI interface that can be used for
starting and stopping the FiPay service, refer to “Appendix B: Running EPS Consolex
GUI Utility” on page 55.
Configuring Windows Firewall
11 If you are using Windows Firewall (or other equivalent software), you may have to create an
exception for the FiPay port (24900) to function. For Wi ndows Firewall, refer to the following
example. For other firewalls, refer to its documentation for information on how to open a
TCP/IP port.
Note: You can perform a similar sequence on your specific firewall if
Wind ows Fir ewall. Note that you may have mor e than one fir ewall in some cases. Ensur e
that you check each firewall instance for proper setup.
you are not using
MDE-4999A FiPay™ Payment Network Installation and Setup Instructions · October 2012 Page 29
Page 30
Installing FiPay (NBS)
Setting Windows XP Exception
To set Windows XP Exception, proceed as follows:
12 From the Start Menu, select Control Panel.
Figure 36: Control Panel
Page 30 MDE-4999A FiPay™ Payment Network Installation and Setup Instructions · October 2012
Page 31
13 Select Security Center.
Figure 37: Security Center
Installing FiPay (NBS)
14 Select Windows Firewall.
Figure 38: Windows Firewall
MDE-4999A FiPay™ Payment Network Installation and Setup Instructions · October 2012 Page 31
Page 32
Installing FiPay (NBS)
15 Click the Exceptions tab and click Add Port.
Figure 39: Exceptions Tab
16 Enter the Name as NBS(FiPAY), Port Number as 24900, and click the TCP option.
17 Click OK to save the exception.
Figure 40: Add a Port Window
Page 32 MDE-4999A FiPay™ Payment Network Installation and Setup Instructions · October 2012
Page 33

Setting Windows 7 Firewall Exception
To set up an exception in the firewall for Windows 7, select Control Panel > System >
Security > Windows Firewall. If you do not have access to these menus, contact your IT
administrator for the proper rights to make the following changes.
To set Windows 7 Firewall Exception, proceed as follows:
18 From the Start Menu, select Control Panel.
Figure 41: Control Panel
Installing FiPay (NBS)
19 Select Advanced settings.
Figure 42: Windows Firewall
MDE-4999A FiPay™ Payment Network Installation and Setup Instructions · October 2012 Page 33
Page 34

Installing FiPay (NBS)
20 Select Inbound Rules.
Figure 43: Advanced Setting Screen
21 From the Inbound Rules screen, select New Rule.
Figure 44: Inbound Rules screen
Page 34 MDE-4999A FiPay™ Payment Network Installation and Setup Instructions · October 2012
Page 35

Installing FiPay (NBS)
22 Follow the New Rule Wizard on the Rule type screen. Select the Port radio button. Click the
Next button.
Figure 45: Rule Type Screen 1
23 On the Ports and Protocol screen, select the TCP and Specific local ports: radio buttons.
Enter the FiPay port typically 24900. Click the Next button.
Figure 46: Rule Type Screen 2
MDE-4999A FiPay™ Payment Network Installation and Setup Instructions · October 2012 Page 35
Page 36

Installing FiPay (NBS)
24 On the Action screen, select the Allow the connection radio button. Click the Next button.
Figure 47: Action Screen
25 On the Profile screen, select all the three checkboxes: Domain, Private, and Public. Click the
Next button.
Figure 48: Profile Screen
Page 36 MDE-4999A FiPay™ Payment Network Installation and Setup Instructions · October 2012
Page 37

Installing FiPay (NBS)
26 On the Name screen, enter a name (typically FIPAY) and add a description. Click the Finish
button.
Figure 49: Name Screen
MDE-4999A FiPay™ Payment Network Installation and Setup Instructions · October 2012 Page 37
Page 38

Installing FiPay (NBS)
Making Changes to the FiPay Configuration (MS-DOS Prompt)
FiPay is configured through an XML file that is created and managed during the installation
process. If any changes are required from the default setting after the installation has been
completed, proceed as follows:
1 Edit the “fipayincs_def.cfg” file and make a change to the settings made during the installation
script.
Figure 50: Editing fipayincs_def.cfg File
Notes: 1) The information shown in this figure is an example only.
2) Terminal ID will begin with GB.
2 Stop the FIPAYPINV4 service, push the changes into the main XML table using the
“FipayPinCsx.exe” program and then restart the FIPAYPINV4 service (see Figure 51).
Figure 51: Restarting FIPAYPINV4 Service
Page 38 MDE-4999A FiPay™ Payment Network Installation and Setup Instructions · October 2012
Page 39
Disabling Bank Cards at the Island During the Evening
Disabling Bank Cards at the Island During the Evening
Currently , this feature is not built into FiPay. However, it can be done with a command prompt
or with couple of batch files and Windows Scheduler. Run a batch file that runs “net stop
xxxxx” and then another one that restarts the service with “net start xxxxx”.
Command Prompt… STOP service to shutdown the FiPay application.
Figure 52: Stopping FiPay Application
Command Prompt… START service to restore FiPay operations.
Figure 53: Starting FiPay Operations
MDE-4999A FiPay™ Payment Network Installation and Setup Instructions · October 2012 Page 39
Page 40

Settlement for NBS
Settlement for NBS
How Settlement Works
There will be a settlement (sometimes referred as a batch or batch balance) done with NBS
at least once a day. This settlement can be accomplished automatically and is set up through
ISL+
by navigating to SETUP > ADVANCED > GLOBAL > ADVANCED > End of Day.
Figure 54: End of Day Window
Settlement is done to post the day’s sales for billing and to check the system’s totals against
NBS to verify if the systems agree. You must pay close attention to the settlement reports and
contact NBS for any discrepancy. You must do a settlement to receive payment for credit
purchases.
The settlement results will be either Settlement BALANCED or Settlement OUT
BALANCE. If an
the error.
When a settlement is executed manually or automatically, a report
FiPay controller PC in a text file. The saved files will be stored in the C:\wansupp\logs
directory and files will be named EOD_Report_yyyymmddhhmmss.rpt.
Where,
• yyyy = Year
• mm = Month
•dd = Day
•hh = Hour
•mm = Minutes
• ss = Seconds
out-of-balance situation occurs, consult your NBS representative to resolve
will be generated on the
OF
Page 40 MDE-4999A FiPay™ Payment Network Installation and Setup Instructions · October 2012
Page 41

Figure 55: Typical EOD Report File Format
Settlement Report
The report for settlement which is printed on the log and stored on the disk is shown in
Figure 56.
Settlement for NBS
Note: TRANSACTION IN BALANCE indicates that all has settled properly.
Figure 56: Settlement Report
Occasionally, NBS may initially authorize the use of a card but when the transaction is
completed, the NBS will reject the completion of that transaction. In this unlikely event, the
message, “Settlement, OUT OF BALANCE, site sent xx.xx” appears.
MDE-4999A FiPay™ Payment Network Installation and Setup Instructions · October 2012 Page 41
Page 42

FHO Reporting
The OUT OF BALANCE report for settlement which is printed on the log and stored on disk
is shown in Figure 57.
Figure 57: Not in Balance Message
FHO Reporting
When there are no real changes to the FHO for FiPay and NO CARD data is stored in the
FHO, there are some reports now available for Credit Transactions through the CUSTOM
reports tab. To obtain some sample reports that will give you Credit Card Sales information,
see Figure 58.
Figure 58: Credit Card Sales Information
Page 42 MDE-4999A FiPay™ Payment Network Installation and Setup Instructions · October 2012
Page 43

A sample report is shown in Figure 59.
Figure 59: Sample Report
Error Message Info
Error Message Info
If there is a configuration error in the XML file created by the installation proc ess, Figu re 60
appears. Record the error and report it to the Gasb
assistance in resolving.
Figure 60: Error Message Information
oy Technical Services Help Desk for
MDE-4999A FiPay™ Payment Network Installation and Setup Instructions · October 2012 Page 43
Page 44

Error Message Info
When reviewing the Event Log of the SiteOmat, you will see some messages such as
acknowledging the swipe of a credit card… noted as CREDIT SERVER.
Figure 61: Event Viewer
Page 44 MDE-4999A FiPay™ Payment Network Installation and Setup Instructions · October 2012
Page 45

Debug Info
Log Files
Debug Info
FiPay keeps a detailed log of all transactions processed in the C:\WANSUPP\LOGS
directory. Files are saved as “system.dayyyyy mmdd ” (for example, system.day20101113).
Figure 62: Log Files
(i)
(ii)
MDE-4999A FiPay™ Payment Network Installation and Setup Instructions · October 2012 Page 45
Page 46

Debug Info
Testing for HASP Key Operation
If the software is run and the HASP key is present and working, you will see the following
information in the “Hostappl.log” file.
Figure 63: Software Information wit h HASP Key
If the software is run without the HASP Key installed, you will see the following information
in the “Hostappl.log” file (see Figure 64).
Figure 64: Software Information wit hout HASP Key
Health Check Files
The health check files are used to monitor the status of the individual processes/nodes. These
files do not contain any data in them, we simply use them by looking at the modified date
stamp. Each process updates its own health check file and if one fails to update in a given
period of time, then that process or processes will be recycled/restarted. If you want to delete
any of them, that process will restart and re-create the health check file.
Figure 65: Health Check Files
Page 46 MDE-4999A FiPay™ Payment Network Installation and Setup Instructions · October 2012
Page 47

Appendix A: NACS/PCAT Product Reference Tab
Appendix A: NACS/PCAT Product Reference Tab
Description Code
Not Used 0
Motor Fuels 001-099
Unleaded Regular 001
Unleaded Plus 002
Unleaded Super 003
Unleaded 4 004
Unleaded 5 005
Unleaded Methanol (5.7% Blend) 006
Unleaded Plus Methanol (5.7% Blend) 007
Super Unleaded Methanol (5.7% Blend) 008
Unleaded Methanol (7.7% Blend) 009
Unleaded Plus Methanol (7.7% Blend) 010
Unleaded Ethanol (5.7% Blend) 011
Unleaded Plus Ethanol (5.7% Blend) 012
Super Unleaded Ethanol (5.7% Blend) 013
Unleaded Ethanol (7.7% Blend) 014
Unleaded Plus Ethanol (7.7% Blend) 015
Methanol/Leaded 016
Ethanol/Leaded 017
Leaded 018
Regular Diesel #2 019
Premium Diesel #2 020
Diesel #1 021
Compressed Natural Gas 022
Liquid Propane Gas 023
Liquid Natural Gas 024
M-85 025
E-85 026
Unleaded - Reformulated 1 027
Unleaded - Reformulated 2 028
Unleaded - Reformulated 3 029
Unleaded - Reformulated 4 030
Unleaded - Reformulated 5 031
Diesel Off-road (#1 and #2 Non-taxable) 032
Ultra Low Sulfur Diesel Off-road (Non-taxable) 033
Biodiesel Blend Off-road (Non-taxable) 034
Ultra Low Sulfur Biodiesel Blend Off-road (Non-taxable) 035
Racing Fuel 036
Super Unleaded Methanol (7.7% Blend) 037
Unleaded Methanol (10% Blend) 038
Unleaded Plus Methanol (10% Blend) 039
MDE-4999A FiPay™ Payment Network Installation and Setup Instructions · October 2012 Page 47
Page 48

Appendix A: NACS/PCAT Product Reference Tab
Description Code
Super Unleaded Methanol (10% Blend) 040
Super Unleaded Ethanol (7.7% Blend) 041
Unleaded Ethanol (10% Blend) 042
Unleaded Plus Ethanol (10% Blend) 043
Super Unleaded Ethanol (10% Blend) 044
B2 Diesel Blend 2% Biodiesel 045
B5 Diesel Blend 5% Biodiesel 046
B10 Diesel Blend 10% Biodiesel 047
B11 Diesel Blend 11% Biodiesel 048
B15 Diesel Blend 15% Biodiesel 049
B20 Diesel Blend 20% Biodiesel 050
B100 Diesel Blend 100% Biodiesel 051
Ultra Low Sulfur #1 052
Ultra Low Sulfur #2 053
Ultra Low Sulfur Premium Diesel #2 054
Ultra Low Sulfur Biodiesel Blend 2% 055
Ultra Low Sulfur Biodiesel Blend 5% 056
Ultra Low Sulfur Biodiesel Blend 10% 057
Ultra Low Sulfur Biodiesel Blend 11% 058
Ultra Low Sulfur Biodiesel Blend 15% 059
Ultra Low Sulfur Biodiesel Blend 20% 060
Ultra Low Sulfur Biodiesel Blend 100% 061
DEF 062
Undefined Fuel–Reserved for PCATS Future Use 063-070
Undefined Fuel–Reserved for Proprietary Use 071-098
Miscellaneous Fuel 099
Automotive Products/Services 100-149
General Automotive Merchandise 100
Motor Oil 101
Car Wash 102
Oil Change 103
Oil Filter 104
Work Order 105
Anti-freeze 106
Washer Fluid 107
Brake Fluid 108
Tires 109
Federal Excise Tax (Tires) 110
Tire Rotation 111
Batteries 112
Lube 113
Inspection 114
Labor 115
Towing 116
Page 48 MDE-4999A FiPay™ Payment Network Installation and Setup Instructions · October 2012
Page 49

Appendix A: NACS/PCAT Product Reference Tab
Description Code
Road Service 117
Auto Accessories 118
Auto Parts 119
Preventative Maintenance 120
Air Conditioning Service 121
Engine Service 122
Transmission Service 123
Brake Service 124
Exhaust Service 125
Body Work 126
Automotive Glass 127
Synthetic Oil 128
Lamps 129
Wipers 130
Hoses 131
Tire-related (Wheel Balance, Valve Stem) 132
Repairs 133
Service Package 134
Automotive Parking 135
Truck Tank Cleaning 136
Other Lubricants 137
Automotive Fuel Additives/Treatment (Injected) 138
Vehicle Rental 139
Air Filter 140
Vehicle Prep 141
Fuel System 142
Undefined Parts/Service–Reserved for
Miscellaneous Parts/Service 149
Aviation Fuels 150-174
Jet Fuel 150
Aviation Fuel Regular 151
Aviation Fuel Premium 152
Aviation Fuel JP8 153
Aviation Fuel 4 154
Aviation Fuel 5 155
Undefined Aviation Fuel–Reserved for PCATS Future Use 156-167
Undefined Aviation Fuel–Reserved for Proprietary Use 168-173
Miscellaneous Aviation Fuel 174
Aviation Products/Services 175-224
Storage 175
Aircraft Ground Handling 176
Aircraft Ground Power Unit 177
Aircraft Labor 178
Aircraft Work Order 179
Proprietary Use 143-148
MDE-4999A FiPay™ Payment Network Installation and Setup Instructions · October 2012 Page 49
Page 50

Appendix A: NACS/PCAT Product Reference Tab
Description Code
Aircraft Maintenance 180
Aircraft Service 181
Transportation 182
De-icing 183
Ramp Fees 184
Catering 185
Hangar Fee 186
Landing Fee 187
Call Out Fee 188
Aircraft Rental 189
Instruction Fee 190
Flight Plans/Weather Brief 191
Charter Fee 192
Communication Fee 193
Aircraft Cleaning 194
Cargo Handling 195
Aircraft Accessories 196
Pilot Supplies 197
Aircraft Parking Fees 198
Aircraft Tiedown Fees 199
Aircraft Sanitation Fees 200
Aircraft Fuel Additive 201
Undefined Aviation–Reserved for PCATS Future Use 202-215
Undefined Aviation–Reserved for Proprietary Use 216-223
Miscellaneous Aviation 224
Marine Fuels 225-249
Marine Fuel 1 225
Marine Fuel 2 226
Marine Fuel 3 227
Marine Fuel 4 228
Marine Fuel 5 229
Marine - Other 230
Undefined Marine Fuel-Reserved for PCATS Future Use 231-242
Undefined Marine Fuel-Reserved for Proprietary Use 243-248
Miscellaneous Marine Fuel 249
Marine Products/Services 250-299
Marine Service 250
Marine Labor 251
Marine Work Order 252
Launch Fee 253
Slip Rental 254
Undefined Marine Services-Reserved for PCATS Future Use 255-280
Undefined Marine Services-Reserved for
Miscellaneous Marine Service 299
Proprietary Use 281-298
Page 50 MDE-4999A FiPay™ Payment Network Installation and Setup Instructions · October 2012
Page 51

Appendix A: NACS/PCAT Product Reference Tab
Description Code
Other Fuels 300-399
Kerosene - Low Sulfur 300
White Gas 301
Heating Oil 302
Bottled Propane 303
Other Fuel (Non-taxable) 304
Kerosene - Ultra Low Sulfur 305
Kerosene - Low Sulfur (Non-taxable) 306
Kerosene - Ultra Low Sulfur (Non-taxable) 307
Undefined Other Fuel-Reserved for PCATS Future Use 308-380
Undefined Other Fuel-Reserved for Proprietary Use 381-398
Miscellaneous Other Fuel 399
Merchandise 400-599
General Merchandise 400
General Ice 401
General Undefined-Reserved for PCATS Future Use 402-409
General Tobacco 410
Cigarettes 411
Tobacco - Other 412
Undefined Tobacco-Reserved for PCATS Future Use 413-417
Undefined Tobacco-Reserved for Proprietary Use 418-419
General Packaged Beverage 420
Packaged Beverages (non-alcoholic) 421
Juice 422
Other Packaged Beverages 423
Undefined Packaged Beverages-Reserved for PCATS Future Use 424-427
Undefined Packaged Beverages-Reserved for Proprietary Use 428-429
General Dispensed Beverage 430
Hot Dispensed Beverages 431
Cold Dispensed Beverages 432
Frozen Dispensed Beverages 433
Other Dispensed Beverages 434
Undefined Dispensed Beverages-Reserved for PCATS Future Use 435-437
Undefined Dispensed Beverages-Reserved for Proprietary Future 438-439
General Snacks 440
Salty Snacks 441
Alternative Snacks 442
Sweet Snacks - Packaged 443
Undefined Snacks-Reserved for PCATS Future Use 444-447
Undefined Snacks-Reserved for Proprietary Use 448-449
General Candy 450
Undefined Candy-Reserved for PCATS Future Use 451-457
Undefined Candy-Reserved for Proprietary Use 458-459
MDE-4999A FiPay™ Payment Network Installation and Setup Instructions · October 2012 Page 51
Page 52

Appendix A: NACS/PCAT Product Reference Tab
Description Code
General Dairy 460
Fluid Milk Products 461
Packaged Ice Cream/Novelties 462
Other Dairy 463
Undefined Dairy-Reserved for PCATS Future Use 464-467
Undefined Dairy-Reserved for Proprietary Use 468-469
General Grocery 470
Groceries - Edible 471
Groceries - Non-Edible 472
Groceries - Perishable 473
Bread - Packaged 474
Frozen Foods 475
Undefined Grocery-Reserved for PCATS Future Use 476-477
Undefined Grocery-Reserved for Proprietary Use 478-479
General Alcohol 480
Beer - Alcoholic 481
Beer - Non-Alcoholic 482
Wine 483
Liquor 484
Undefined Alcohol-Reserved for PCATS Future Use 485-487
Undefined Alcohol-Reserved for
General Deli 490
Packaged Sandwiches/Deli Products 491
Prepared Foods 492
Deli Items 493
Undefined Deli-Reserved for PCATS Future Use 494-497
Undefined Deli-Reserved for Proprietary Use 498-499
General Foodservice 500
Undefined Foodservice-Reserved for PCATS Future Use 501-507
Undefined Foodservice-Reserved for Proprietary Use 508-509
General Lottery 510
Lottery - Instant 511
Lottery - Online 512
Lottery - Other 513
Undefined Lottery-Reserved for PCATS Future Use 514-517
Undefined Lottery-Reserved for Proprietary Use 518-519
General Money Order 520
Money Order - Vendor Payment 521
Money Order - Payroll Check 522
Money Order - Gift Certificate 523
Money Order - Refund Check 524
Money Order - Official Check 525
Money Order - Rebate Check 526
Proprietary Use 488-489
Page 52 MDE-4999A FiPay™ Payment Network Installation and Setup Instructions · October 2012
Page 53

Appendix A: NACS/PCAT Product Reference Tab
Description Code
Money Order - Dividend Check 527
Money Order - Utility Check 528
Undefined Money Order-Reserved for PCATS Future Use 529
General Store Service 530
Home Delivery 531
Prepaid Cards - Purchase 532
Prepaid Cards - Activation/Recharge 533
Membership/Loyalty 534
Undefined Store Services-Reserved for PCATS Future Use 535-537
Undefined Store Services-Reserved for Proprietary Use 538-539
General Health and Beauty Care 540
Undefined Health and Beauty Care-Reserved for PCATS Future Use 541-547
Undefined Health and Beauty Care-Proprietary Use 548-549
General Publications 550
Undefined General Publications-Reserved for PCATS Future Use 551-557
Undefined General Publications-Re
Undefined Merchandise-Reserved PCATS Future Use 560-590
Undefined Merchandise-Reserved Proprietary Use 591-599
Reserved for PCATS Future Use 600-799
Reserved for Proprietary Use 800-899
Negative Transactions 900-949
Discount 1 900
Discount 2 901
Discount 3 902
Discount 4 903
Discount 5 904
Coupon 1 905
Coupon 2 906
Coupon 3 907
Coupon 4 908
Coupon 5 909
Lottery Pay Out - Instant 910
Lottery Pay Out - Online 911
Lottery Pay Out - Other 912
Split Tender 913
Tax Discount/Forgiven 914
Undefined Negative-Reserved for PCATS Future Use 915-940
Undefined Negative-Reserved for Proprietary Use 941-948
Miscellaneous Negative Administrative 949
Administrative 950-999
Tax 1 950
Tax 2 951
Tax 3 952
Tax 4 953
served for Proprietary Use 558-559
MDE-4999A FiPay™ Payment Network Installation and Setup Instructions · October 2012 Page 53
Page 54

Appendix A: NACS/PCAT Product Reference Tab
Description Code
Tax 5 954
Cash Back 955
Cash Back Fee 956
Fee 1 957
Fee 2 958
Fee 3 959
Fee 4 960
Fee 5 961
Miscellaneous Aviation Tax 962
GST/HST (Canadian)/VAT 1 963
PST/QST (Canadian) VAT 2 964
SWT Rate (Canadian) 965
Tax 6 966
Tax 7 967
Tax 8 968
Undefined Administrative-Reserved for PCATS Future Use 969-990
Undefined Administrative-Reserved for Proprietary Use 991-998
Miscellaneous Administrative 999
Page 54 MDE-4999A FiPay™ Payment Network Installation and Setup Instructions · October 2012
Page 55
Appendix B: Running EPS Consolex GUI Utility
Appendix B: Running EPS Consolex GUI Utility
Running EPS Consolex GUI Utility is an alternate way to configure the FiPay parameters.
These features are automatically set up through the installation batch and usually must not be
altered as there are many features that we do not use.
1 To create the “FiPAYpincs_config.xml” configuration file for FiPAYPinCsx to function, you
must run the EPS Console and start the service. FiPA YPinCsx takes the “FiPA Ypincs_def.cfg”
file with your selections and merges it with the ones in the “FiPAYpincs_config.template” file
and creates “FiPAYpincs_config.xml”.
EPS Console is located in the “C:\wansu
Figure 66: EPS Console Location
2 Double-click the “EPSConsolex.exe” file. The “EPSConsolex.exe” executes and following
pp\fipayconsole” folder.
window appears (see Figure 67).
Figure 67: EPS Consolex Window
MDE-4999A FiPay™ Payment Network Installation and Setup Instructions · October 2012 Page 55
Page 56

Appendix B: Running EPS Consolex GUI Utility
3 Click OK and then close the “Login Level Setup” window.
Figure 68: EPS Console Window
On the Home tab, you must see the Start Service button shown in Figure 69.
Figure 69: Start Service
4 Click Start Service. Following window appears.
Figure 70: Service Successful Window
5 Click OK.
Page 56 MDE-4999A FiPay™ Payment Network Installation and Setup Instructions · October 2012
Page 57

Appendix C: HASP Key Information
HASP Key Driver Installation
Appendix C: HASP Key Information
The FiPay upgrade or installation will load the HASP drivers. The script
will automatically
begin this process.
®
Sentinel
HASP keys provide hardware-based Advanced Encryption Standard (AES) 128-bit
encryption protection against illegal or unauthorized use. The solution deters illegal access and
execution of protected software.
Figure 71: HASP Key Driver Installation
The Sentinel HASP-HL key is of the size of a small USB thumb-drive and is coded with a
unique encryption key. This encryption key works only for one customer within the FiPay
application (FipayPinCsx.exe).
FiPay is coded with a special Application Programming Interface (A
PI) call that requires
access to a Sentinel HASP-HL protection key to run. FiPay queries the Sentinel HASP
protection key for predefined information. If the key is not present or the information returned
is incorrect, FiPay will not execute and logs an error message in the “Hostppl.log” log file.
Required Files
Following files are required to use a Sentinel HASP
key with FiPay which are automatically
included in the release package:
• Hasp_net_windows.dll (Located in FiPay folder)
• Hasp_windows_94025.dll (Located in FiPay folder)
• Haspdinst.exe (Device driver for HASP-HL key installed once)
• FipayPinCsx.exe (Hardcoded with AJB’s unique license key)
Compatibility
A
The driver provided is Sentinel H
SP run-time environment installer - Version 5.86 and it is
compatible with the following operating systems:
• Windows Server 2008 R2 and Windows Server 2003 R2
• Windows 7 Pro, Windows XP Pro, and Windows 2000
Note: Windows XP Embedded is not supported with this installer. Use the “SLD” file to install
e Sentinel HASP run-time environment under Windows XP Embedded.
th
MDE-4999A FiPay™ Payment Network Installation and Setup Instructions · October 2012 Page 57
Page 58

Appendix C: HASP Key Information
HASP Key Driver Installation Issues
1 When running the FHO application and FiPay on the same PC, there is a possibility of the two
HASP keys conflicting with one another.
If the following screen displays during the FiPay HASP installation, ST
OP all the four Orpak™
services and restart the FiPay installation.
Figure 72: Sentinel HASP Run-time Environment Installer Window
2 In some system configuration, there is a HASP key conflict when running both the FiPay
HASP and FHO HASP keys. Following error message will display when accessing the Fleet
Head Office.
3 This occurs when the Server/PC is restarted and both HASP keys are inserted.
Note: When this occurs the FHO is longer
4 To fix this, shutdown the PC, unplug the FHO HASP, and start the PC. Re-insert the FHO
communicating to the SiteOmat.
HASP after the OS has loaded.
Figure 73: SiteOmat Head Office Administration
Page 58 MDE-4999A FiPay™ Payment Network Installation and Setup Instructions · October 2012
Page 59

Appendix D: Modem Initialization String Info
Appendix D: Modem Initialization String Info
Figure 74 shows the next few questions with reference to selection “2” and setting up a
Modem Init string parameter that inc
including this character, remember that you must insert “amp;” before it as shown:
AT&q6 will be AT&q6.
Figure 74: Modem Initialization String Information
ludes an ampersand character. For the INIT string
MDE-4999A FiPay™ Payment Network Installation and Setup Instructions · October 2012 Page 59
Page 60

American Express® is a registered trademark of American Express Co. Cenex® is a registered trademark of CHS Inc. CFN® is a registered
trademark of FleetCor Technologies Operating Company LLC. Discover
®
is a registered trademark of Discover Financial Services. FiPay
™
is a trademark of AJB Software Design Inc. Gasboy® is a registered trademark of Gasboy International. Islander™ PLUS is a trademark of
Gasboy International. MasterCard® is a registered trademark of MasterCard International Inc. MS-DOS® is a registered trademark of
™
Microsoft Corporation. Orpak
registered trademark of Visa Inc. W EX
is a trademark of Orpak Systems Ltd. Sentinel® is a registered trademark of SafeNet, Inc. Visa® is a
SM
is a service mark of Wright Express. Windows® is a registered trademark of Microsoft Corporation.
Windows Vista™ is a registered trademark of Microsoft Corporation.
© 2012 GASBOY
7300 West Friendly Avenue · Post Office Box 22087
Greensboro, North Carolina 27420
Phone 1-800-444-5529 · http://www.gasboy.com · Printed in the U.S.A.
MDE-4999A FiPay™ Payment Network Installation and Setup Instruction s · October 2012
 Loading...