

Page 1
Owner’s
Manual
Master Hunter
CX Plus
$3
®
™
Page 2

www.garrett.com
2
Master Hunter® CX Plus Owner’s Manual
3
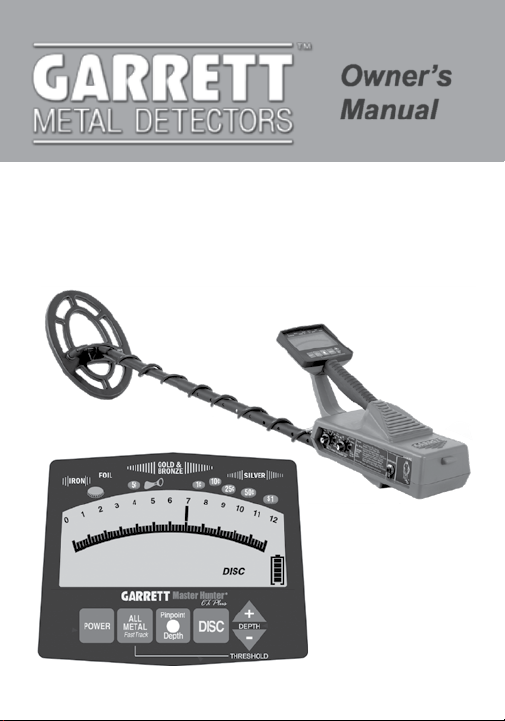
THANK YOU FOR CHOOSING
GARRETT METAL DETECTORS!
Congratulations! As the proud owner of the Garrett
Master Hunter CX (Computer Express) Plus you
have joined an international family of treasure hunters. Men, women and children alike have used their
Garrett detectors to nd coins, relics and gold nuggets that are valued in the millions of dollars. So, to
get the most out your CX Plus and treasure hunting
experiences be sure to carefully read through this
owner’s manual!
Your Master Hunter CX Plus, whose microprocessorcontrolled circuitry has been acclaimed and proven
through countless hours of eld use, is a ne detector for hunting coins or any other metallic objects.
It offers the serious metal detector hobbyist added
depth and completely accurate ground balance and
the precise adjustment available only with microprocessor controls. Computer designed circuitry that
responds to signals from revolutionary PROfor-
mance searchcoils results in greater penetration to
discover and locate treasures of all kinds.
Your Master Hunter CX Plus is engineered with microprocessor based technology and is backed by
more than 40 years of metal detection research and
development by Garrett’s leading team of engineers.
It is remarkable in its ability to locate coins, jewelry
and other metallic objects at exciting depths. And
with Garrett’s revolutionary Graphic Target Analyzer™ (GTA) display that offers target acceptance /
rejection, precise discrimination and other key information, you can spend more time digging treasure
and less time digging trash!
The CX Plus is pre-programmed at the factory to
adapt itself automatically for optimum performance,
yet to always follow your targeting directions. Simply press the ON touchpad and begin hunting immediately without interference from ground minerals.
Garrett’s unique LCD display shows the identity of
your target. Electronic pinpointing and coin depth
measuring offer added assistance.
To prospect for precious metals or hunt for deeply
buried caches, switch to the All Metal Mode and Fast
Track™ will precisely ground balance the circuitry
Page 3

www.garrett.com
4
Master Hunter® CX Plus Owner’s Manual
5
of your detector. The Master Hunter CX Plus is
equipped with a 7”x10” PROformance searchcoil.
Again, welcome to the Garrett treasure hunting family. In becoming a part of this great tradition and
hobby, you have made the right start to successful
treasure hunting.
TABLE OF CONTENTS
Master Hunter® 6
Parts 7
Assembly 8
Features 11
Touchpad Controls 13
Sidepanel Controls 16
Operating Instructions 18
LCD Meter Discrimination 20
Headphone Jack 20
Batteries 21
Bench Testing 24
Test Plot Construction 27
Target Acceptance 28
Searching 32
Searchcoils 36
Gold Prospecting 37
Maintenance 40
Service and Repair 41
Recommended Accessories 43
Recommended Reading 45
RAM Books Order Form 47
Mind Your Manners! 49
Warning 50
Page 4
www.garrett.com
6
Master Hunter® CX Plus Owner’s Manual
7
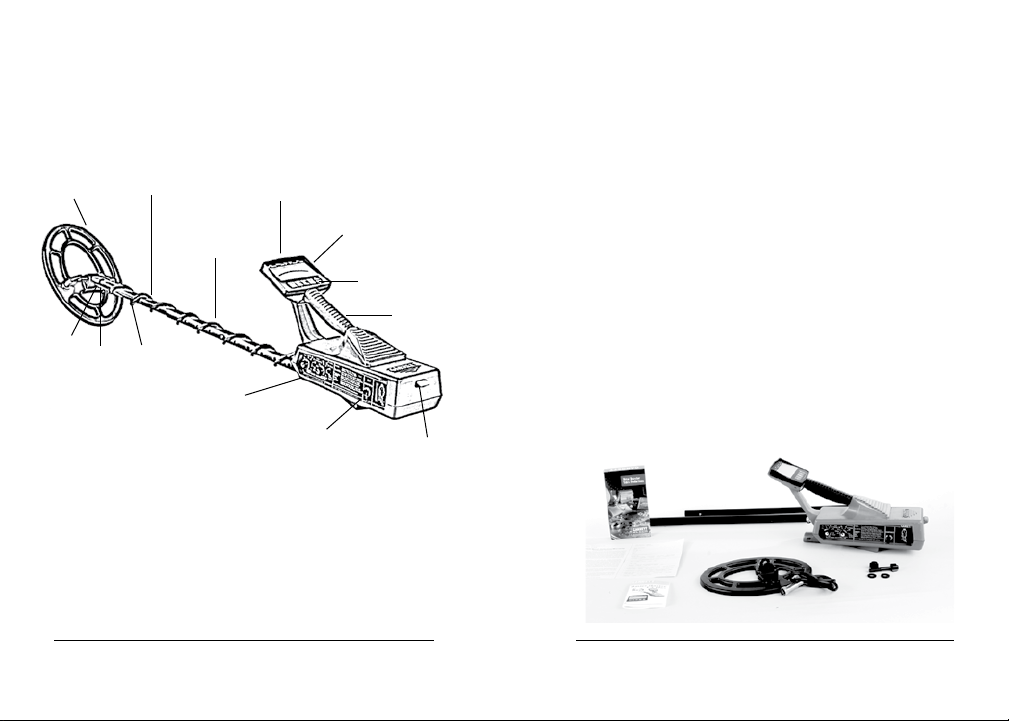
MASTER HUNTER® CX PLUS
Lower
Threaded
Bolt
Stem
Spring
Clip
Upper
Stem
Side Panel
Controls
Searchcoil
Knob
Control
Housing
Headphone
Jack
LCD
Screen
Touchpad
Controls
Handle
Grip
Battery
Cover
PARTS
Before assembling your CX Plus metal detector
ensure you have the complete set of parts, which
include:
• Control Housing
• Upper Stem
• Lower Stem
• Two (2) Mounting Washers
• One (1) Wing Nut
• One (1) Threaded Bolt
• Spring clip
• Searchcoil with Cable
• Instruction Video
• Warranty Registration Card
If any part is missing contact your local dealer.
Page 5
www.garrett.com
8
Master Hunter® CX Plus Owner’s Manual
9
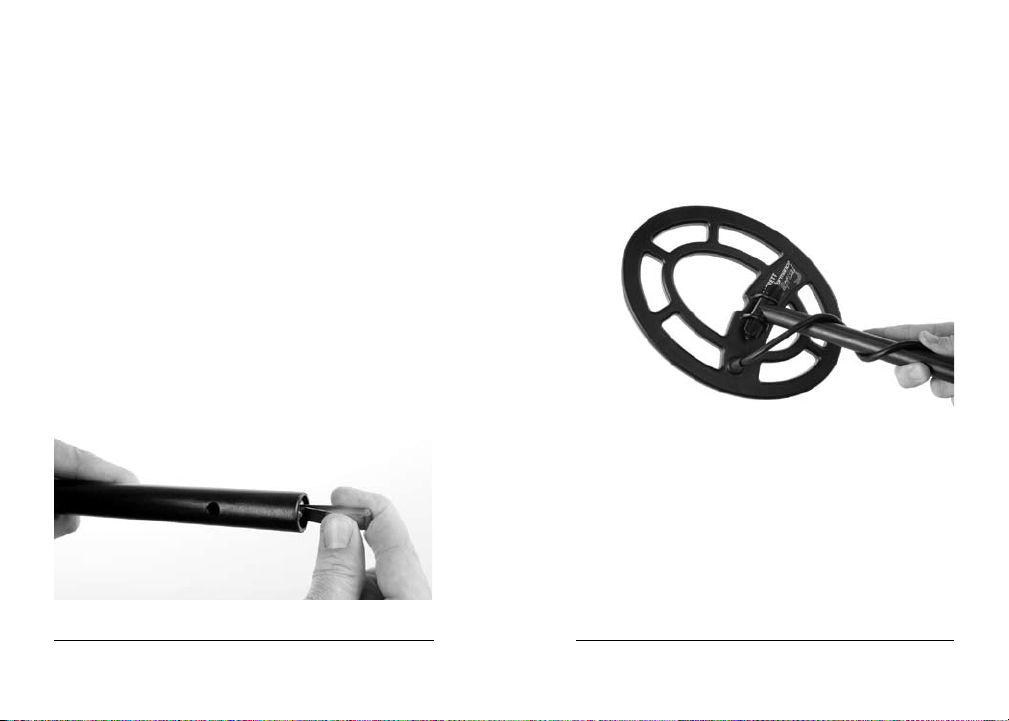
ASSEMBLY
No tools are required to assemble the Master Hunter
CX Plus. Hand tighten all necessary parts.
1. Compress the button end of the spring clip and
insert, button end rst into the lower stem of your
detector so that the buttons pop out of the holes as
they do in the upper stem. These two sets of buttons
will enable you to secure the top stem to the control
housing and to adjust the length of the overall stem
to your height so that you can scan with the detector
comfortably.
2. Attach the lower stem to the searchcoil. Make
certain that two rubber washers are inserted into this
stem before slipping the searchcoil onto it. Place the
threaded bolt through the holes in the connector and
hand tighten the knobs. No tools are needed.
3. Depress buttons in the upper stem and slide into
the control housing until they pop into the holes.
4. Depress the buttons in the lower stem and insert it
into the upper stem. Buttons will pop into the holes
and you can achieve the desired stem length. The
third set of holes from the end is most commonly
used.
Page 6
www.garrett.com
10
Master Hunter® CX Plus Owner’s Manual
11
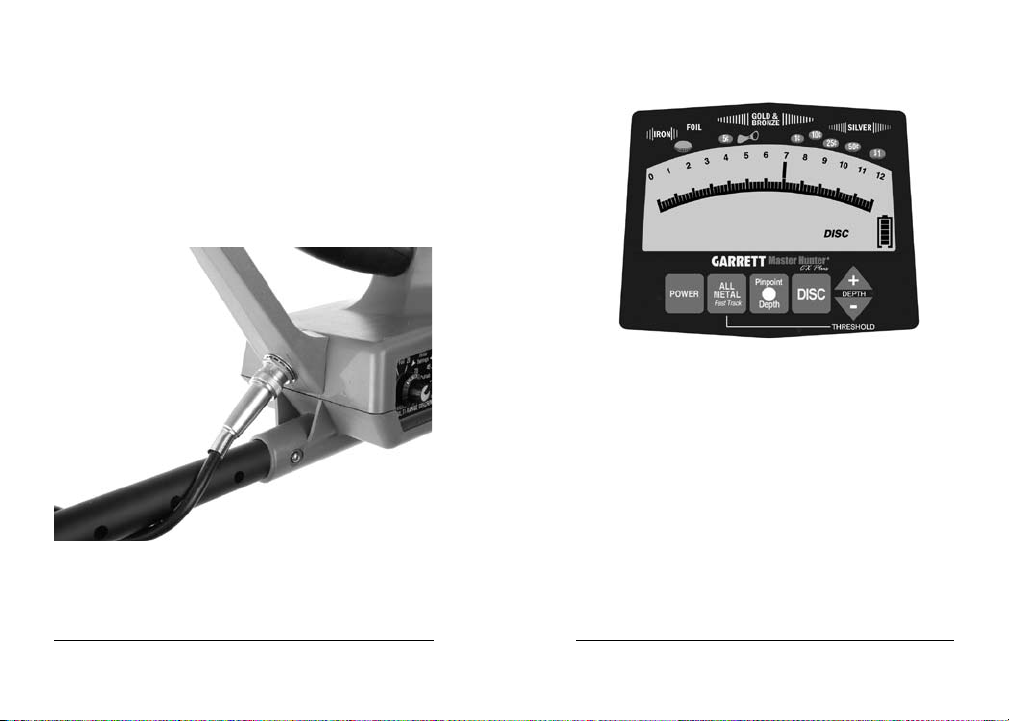
5. Wrap the searchcoil cable securely around the
stem and connect to the detector. The rst cable turn
goes over the top of the stem. The cable should be
snug, but still loose so that the angle of the searchcoil can be easily changed, if required. To connect
the cable to the detector, insert the cable connector
and rotate the collar clockwise until secure.
FEATURES
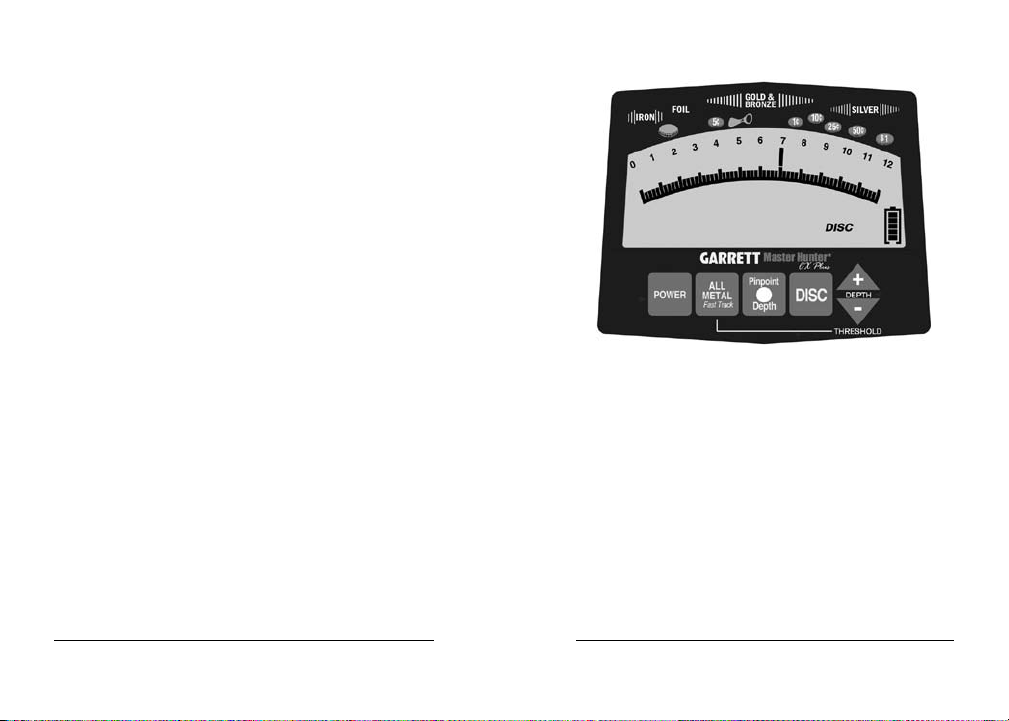
1. LCD - The LCD on the Master Hunter CX Plus
provides extensive visual information for the detector operator. Battery condition is reported continuously while the detector is turned on and information
is provided on detected targets that will aid in their
recovery.
2. UPPER SCALE - The Upper Scale provides information about detected targets while the operating
mode and battery condition are displayed below.
Page 7
www.garrett.com
12
Master Hunter® CX Plus Owner’s Manual
13
Coin depth reads in inches the depth of coin sized
targets. The detector automatically adjusts to report this information correctly whenever the Pinpoint
touchpad is pushed and released, regardless of
which size searchcoil is being used. Large or very
deep objects may not be accurately measured.
The LCD indicates the probable identication of all
targets, whether announced by an audio response
or not.
The 0 to 12 Scale is an aid when setting the Detection Depth (Sensitivity) control. (Do not confuse with
the Coin Depth reading). This scale also provides
target information based on conductivity of the metal
detected, information that will become more valuable
as you gain experience. Conduct tests on metals of
interest to learn approximate readings for the various
denominations.
TOUCHPADS
1. POWER - Press the POWER touchpad once to
turn the CX Plus on. It automatically begins operating in the Discrimination Mode. Press the pad again
and the detector will shut off. The detector will shut
off automatically when no touchpad is pushed and
no target is detected for about 10 minutes.
2. ALL-METAL - This touchpad serves a dual function. When pressed and released, it places the detector in its ALL METAL mode of operation. When
Page 8

www.garrett.com
14
Master Hunter® CX Plus Owner’s Manual
15
pressed and held rmly, its Fast Track function is
activated. As you begin scanning with the searchcoil in a normal manner, ground balance adjustment
is quickly and automatically achieved. Repeat this
procedure at any time to achieve precise ground balance.
3. PINPOINT / DEPTH - Press and hold to activate
the pinpointing function of your Master Hunter CX
Plus after you have discovered a target. A complete discussion of pinpointing can be found in this
owner’s manual. After you have pinpointed a target
and released this touchpad, the display will indicate
how far coin-sized targets lie beneath the bottom of
the searchcoil and the reading will be highly accurate
regardless of the size coil being used. This reading
holds for approximately three (3) seconds.
4. DISC - Press DISC (Discriminate) to return to the
Discriminate Mode when you have been operating in
the All Metal Mode. The CX Plus begins operating in
the Discriminate mode whenever it is turned on.
5. + and - - These two similar pads with arrowheads
(at extreme right of the console) are used to regulate
the Audio Threshold and Detection Depth (sensitivity). If either + or - is pressed, the sensitivity in the
current operating mode will be changed. To change
the audio threshold, press and hold the All Metal
touchpad while regulating the threshold by pressing
the + or - pad.
Special Note: Don’t ever worry about “damaging”
the circuitry of your CX Plus by adjustments that you
make. Just hold down the All Metal touchpad and
press the DISC touchpad to restore factory settings.
Page 9
www.garrett.com
16
Master Hunter® CX Plus Owner’s Manual
17
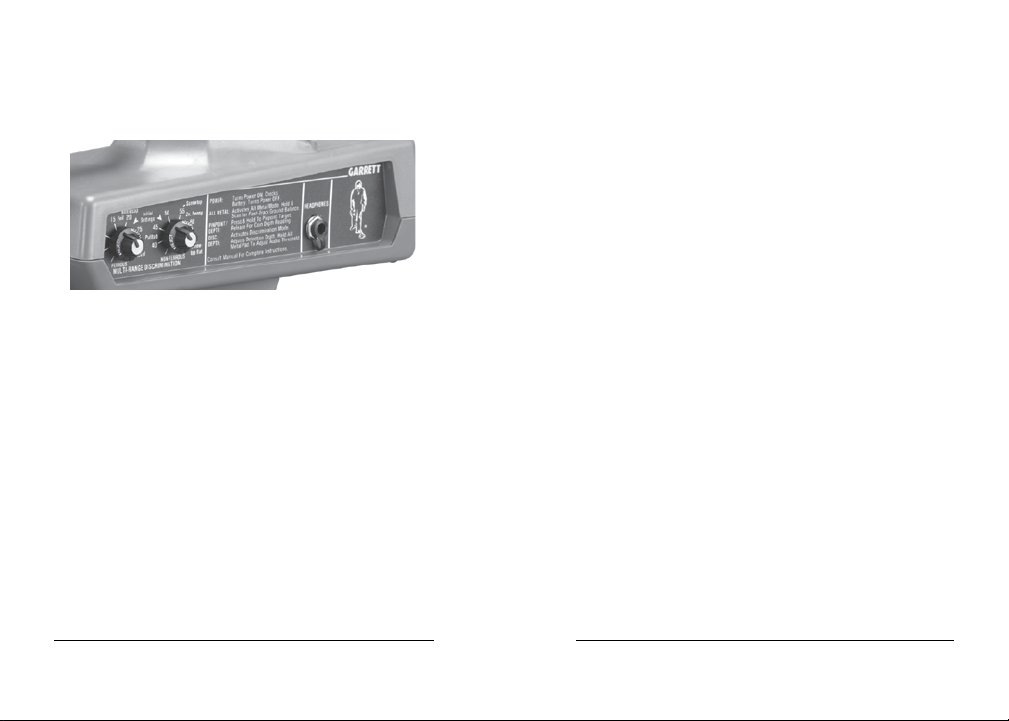
CONTROL FUNCTIONS - SIDE PANEL
It is recommended that you begin hunting with both
controls set at the Initial Setting (>) indicators.
1. FERROUS RANGE - Allows adjustment for the
elimination of targets in the iron range up to but not
including aluminum pulltabs. Targets located and
accepted in this range will cause your audio signal
to grow louder.
2. NON-FERROUS RANGE - Allows adjustment for
elimination of targets in the range of pulltabs through
aluminum screw caps.
Garrett’s Target Elimination controls permit you
to select the targets you desire. Furthermore, the
Multi-Range Discrimination System permits selection of these targets in both Ferrous and Non-Ferrous
ranges. The Ferrous control is adjustable from zero
through bottlecap rejection while the Non-Ferrous
control takes over at pulltab rejection and is adjustable through aluminum screw tops. Proper use of
the two controls will dramatically improve accuracy
by eliminating worthless targets in both the ferrous
and non-ferrous ranges and in accepting many kinds
of gold and silver rings, jewelry and coins.
Page 10

www.garrett.com
18
Master Hunter® CX Plus Owner’s Manual
19
OPERATING INSTRUCTIONS
Discriminate Mode
Whenever you turn on your Master Hunter CX Plus
by pressing the POWER touchpad, you have activated the Discriminate (trash elimination) mode. When
operating in this mode, the CX detects only selected
metal objects.
Garrett’s two Multi-Range Discrimination controls
permit you to select targets you desire. The following settings are marked on the ferrous controls:
• Nails setting will eliminate rusty iron and iron nails.
• Foil setting will eliminate iron, nails and foil. Salt
water will be eliminated near this setting.
• Bottlecaps setting will eliminate steel bottlecaps,
plus iron, nails and foil.
• Nickel setting will eliminate that metal and coins
made of it, plus bottlecaps, iron, nails and foil.
On the Non-Ferrous control knob the settings for
pulltab, screw top, zinc penny and at screwtop indicate the items which will be excluded from detection.
Remember that the elimination is cumulative, i.e. all
items to the left of the pointer will be excluded. Test
typical trash items before taking your Master Hunter
CX Plus into the eld.
Setting the Multi-Range Discrimination controls at
higher settings will cause some rings and coins to
escape detection. Therefore, it is recommended that
you never rotate these knobs any farther clockwise
than necessary. Fill rotation counterclockwise (to the
left) will cause most metallic targets to be accepted.
As the knob is turned farther clockwise (to the right)
more targets will be rejected. As you become familiar with your targets through bench testing, you can
remember the rejection settings of your detector by
the numbers on the controls.
Page 11

www.garrett.com
20
Master Hunter® CX Plus Owner’s Manual
21
LCD METER DISCRIMINATION
BATTERIES
Because many professional treasure hunters rmly
believe that you should dig all targets, they always
search in the All Metal mode. Others search in this
mode and reject unwanted targets by using information reported on the LCD.
When searching in the All Metal mode, always check
the display on every target. You will learn through
experience whether to dig or not.
HEADPHONE JACK
Headphones are a valuable accessory for any metal
detector to mask interference from outside noise.
They permit you to hear small and deep targets that
might be missed when using audio from the detector speaker. Headphones are particularly essential
when you are hunting where noise of people and /
or trafc is excessive. When headphones are not in
use, always leave the rubber plug in place.
The Master Hunter CX Plus utilizes a battery pack
that requires six (6) “C” cell standard or NiMH rechargeable batteries. It is recommended that top
quality, heavy duty or alkaline batteries be used. It
is advisable that you remove the battery pack when
the detector is not in use, particularly for a period of
weeks. The Master Hunter CX Plus should operate
15 to 20 hours with carbon or NiMH batteries and a
longer time with alkaline batteries.
Checking Condition - Battery condition is reported on
the LCD continuously while the detector is operating.
Batteries should be considered weak when only two
elements appear on the display. They should be replaced when less than two elements appear or when
the detector begins making target-like sounds when
no target is encountered.
Page 12

www.garrett.com
22
Master Hunter® CX Plus Owner’s Manual
23
Replacement
and insert pack into the detector. Use nger pressure only and do not screw too tightly.
6. Press down on the pack and begin sliding the battery cover until it snaps. Remove hand and continue
sliding cover until it snaps. Please note that your
Master Hunter CX Plus will lose its Audio Threshold
and Sensitivity settings when the battery pack is removed for approximately four minutes.
1. Slide cover to the rear and slip off completely.
2. Take out battery pack which is not connected by
wire. It may help to turn the detector upside down.
Place your hand over the cavity to catch the pack as
it slides out.
3. Unscrew two thumbscrews to release the top and
remove batteries.
4. Install batteries. Carefully observe polarity of the
batteries.
5. Replace top on pack by tightening the two screws
Page 13

www.garrett.com
24
Master Hunter® CX Plus Owner’s Manual
25
BENCH TESTING
This will enable a treasure hunter to learn about the
discriminating capabilities of the CX Plus before taking it into the eld. The following tests should be performed with the search coil perpendicular to a bench,
oor or other non-metallic surface:
and the sound will decrease or cease when small
nails are scanned across the bottom of the searchcoil.
3. Rotate the control farther and the sound will diminish as steel bottlecaps are tested. You will note
that nails, foils and other small junk items will also be
rejected (i.e. cause no increase in sound).
4. Rotate the Non-Ferrous control farther clockwise
and pulltabs will be rejected. At this setting you will
note that nickels and some rings will also be rejected. The conductivity of this type of target is not great
enough to cause the detector to respond when the
Discrimination controls are set at a high number.
1. Rotate both Multi-Range Discrimination controls
fully counter clockwise. Bring various metallic targets
across the bottom of the searchcoil at a distance of
about two inches. Each target will cause the sound
to increase, a characteristic of true non-discriminating operation.
2. Rotate the Ferrous control to the 3 or 4 position
5. You may nd that slight adjustments to the Discrimination controls may be necessary. For example, you may wish to eliminate almost all trash from
the audio response, yet get an audio signal from all
coins. Adjust the Ferrous control on the left to reject
small iron trash yet still accept nickels. Adjust the
Non-ferrous control to accept all other coins.
6. Experiment with the two control knobs and vari-
Page 14

www.garrett.com
26
Master Hunter® CX Plus Owner’s Manual
27
ous metallic objects. Keep a written record of your
results and use this when searching in the eld.
Again never rotate either control knobs any farther
clockwise than is absolutely necessary to eliminate
targets you do not wish to detect.
TEST PLOT CONSTRUCTION
As you operate and use your CX Plus, you will quick-
ly grow more procient in its use. Building and using
your own test plot will sharply increase this pro-
ciency. Bury several items, including a nail, a piece
of foil, a pulltab, a bottlecap and several coins at
varying depths of one to four inches about 18 inches
apart. Clearly mark where each item is buried. Scan
over them while carefully listening to and studying
the different detection signals.
Remember that newly buried objects, especially
coins, will be somewhat more difcult to detect than
items that have been buried for some time. This is
primarily a metallurgical phenomenon. Experiment
with various detection modes, and pay attention to
both audio and CX Plus display as you scan. Note
your detector’s response at the various settings.
Practice pinpointing and locating targets precisely.
Use both the manual and the electronic methods of
pinpointing.
Page 15

www.garrett.com
28
Master Hunter® CX Plus Owner’s Manual
29
TARGET ACCEPTANCE
which indicated an unacceptable target.
Non-Ferrous Accept: Clear and distinct acceptance
tone.
More on Target Audio
When a metallic object is accepted, the detector’s
speaker or headphone sound will increase from your
audio threshold level. Some rejected targets, however, may cause the audio to “break up” or sound
erratic.
The drawing illustrates what types of targets can be
accepted and rejected in the two ranges. Synchronized audio signals indicate the section in which targets have been detected:
Ferrous Reject: Audio threshold is maintained. No
change in sound.
Ferrous Accept: Normal increase of sound indicates
acceptable target.
Non-ferrous Reject: Audio threshold is maintained,
or there might be a slight decrease in the sound level
This is generally a response to shallow trash targets
and can be remedied by raising the height of your
searchcoil when scanning. Another indication of a
reject target is an audio signal as you scan one way
and no response when scanning from the other direction.
Test typical trash items before hunting with the CX
to determine what signal your detector will give on
encountering them.
Page 16

www.garrett.com
30
Master Hunter® CX Plus Owner’s Manual
31
All Metal Mode
Press the All Metal touchpad to activate the All Metal
mode. In this mode the Master Hunter CX Plus will
respond with an increase in sound to the presence
of any metal or conductive mineral target beneath its
searchcoil. For maximum depth and best operation
over highly mineralized ground, always operate in
the All-Metal mode.
Mineralization is automatically balanced (canceled
out) in the All Metal mode by your CX Plus’ Fast
Track ground balancing which is accomplished by
pressing and holding the All Metal touchpad while
scanning the searchcoil for only a few seconds in a
normal manner. When you turn on the CX Plus, wait
until you hear the audible tone that indicates your
detector is operating. Release the touchpad and
continue scanning. Repeat this procedure at any
time to ground balance the CX Plus precisely, no
matter what type of mineralized soil is underneath.
As you search in the All Metal mode, you should occasionally raise the searchcoil, then lower it. If your
audio level changes, readjust the ground balance
with the Fast Track control, according to the above
instructions. Such readjustment will sometimes be
necessary because of the changing concentrations
of ground minerals, especially when you are prospecting in gold country.
Page 17

www.garrett.com
32
Master Hunter® CX Plus Owner’s Manual
33
SEARCHING
Recovery
Scan the searchcoil at a rate of about one to two
feet per second with the searchcoil about one to two
inches above the ground. When you are searching
in the discriminate mode, detection of a metal target
within the range you have selected with your Discrimination controls will be indicated by an increase
in sound.
Searchcoil Height
Because of the sensitivity of the Master Hunter CX
Plus and its searchcoil, it is not necessary to operate with the searchcoil held to the ground. The recommended operating height is two inches from the
surface. In areas of heavy concentrations of mineral
and rocks, it may be necessary to operate with the
coil held even farther above the surface. Even with
the coil held at this height (or even higher) above the
ground, your Master Hunter and its searchcoil will
continue to penetrate deeply, even into highly mineralized rock or soil.
Whenever your detector locates a target, you’ll want
to recover it with the greatest possible ease. This
is accomplished rst by pinpointing. You can then
utilize another function of the CX Plus for measuring
coin depth.
Pinpoint targets by rst drawing an imaginary “X” on
the ground with the searchcoil at the place where
maximum sound occurs. You’ll notice when operating in the Discriminate Mode that you cannot maintain the detection sound with the searchcoil held
completely still above your target. The searchcoil
must be moving slightly for you to detect the exact
location of your target.
Electronic Pinpointing
Precise pinpointing in either mode is available with
this feature of your Master Hunter CX Plus. When
you press the Pinpoint touchpad and hold it, you can
place the searchcoil directly over your target. Move
it around slightly, and maximum sound will be heard
when the target is directly beneath your searchcoil.
Page 18

www.garrett.com
34
Master Hunter® CX Plus Owner’s Manual
35
When pinpointing, the Master Hunter CX Plus is operating in an All Metal mode, and you can hold the
searchcoil perfectly still with the detector producing
a constant sound.
For most effective electronic pinpointing, place the
searchcoil on the ground to the side of your target.
Press and hold the Pinpoint touchpad. Scan back
and forth across the target, maintaining searchcoil
contact with the ground. You will observe an increase in sound and LCD reading when the target
is directly beneath the searchcoil’s center. You may
also release the touchpad while the coil is over the
target and you will get a coin depth reading.
Coin Depth Measuring
Pinpoint targets as directed above, but keep the
searchcoil in contact with the ground. Move the
searchcoil off to one side of the target and release
the touchpad. The LCD will indicate coin depth in
inches. This reading will hold for about three seconds.
Since the nal step in recovery usually entails digging, it is recommended that you use a probe to help
locate exactly where to dig. Always make as small a
hole as possible. It is quicker, requires less work and
makes relling holes easier. And, you should always
ll your holes.
Page 19

www.garrett.com
36
Master Hunter® CX Plus Owner’s Manual
37
SEARCHCOILS
GOLD PROSPECTING
Your Garrett CX Plus is equipped with a 7”X10”
PROformance searchcoil suitable for almost any
kind of target in any terrain. Also available from your
Garrett dealer are a 10”x14” PROformance Power
DD searchcoil, which you will nd helpful in seeking
large and deep targets, and a 4.5” Crossre for use
in especially trashy locations or in tight places that
larger searchcoils do not reach.
When changing searchcoils, hand-tighten the knobs
only. Never use tools of any kind.
Garrett’s acclaimed TreasureHound™ CX Plus Depth
Multiplier multiplies the depth to which the CX can
detect objects that are larger than a fruit jar. Because
the TreasureHound enables your Master Hunter CX
to search deeper than ever before, it is known as
the “cache hunter’s delight.” Because it detects only
large targets and is not bothered by small pieces of
metal junk, it minimizes the necessity of digging.
Gold and other precious metals can be found in various forms with a Master Hunter CX Plus. You will
most likely be searching for nuggets, but gold can
also be found as lode or hard rock deposits in a vein,
usually mixed with other minerals. The CX Plus can
also be used to locates placer deposits in streams
or dry sand, with such gold then recovered by panning.
Hard work, patience and research are three of the
keys to success in electronic prospecting. Research
is important because it is vital that gold always be
sought in areas where it is known to exist.
The CX Plus is usually operated only in the All Metal
Mode if gold is to be found. This is particularly important when searching for tiny gold nuggets. Furthermore, when prospecting, all targets must be located
and carefully inspected. It is only in this manner that
you can be successful in using a detector to discover
valuable metal nuggets and ore samples.
Although some electronic prospectors have expe-
Page 20

www.garrett.com
38
Master Hunter® CX Plus Owner’s Manual
39
rienced success in using the Discriminate mode to
locate large nuggets, the detector will respond more
effectively to tiny nuggets in the All Metal Mode.
Heavy ground mineralization could also limit depth
of detection in the Discriminate Mode.
Hot rocks, a problem for any electronic prospector,
can be described as a concentration of non-conductive iron mineral that causes a detector to recognize
it as metal.
When you suspect that you have a signal from a
hot rock, locate the target precisely by pinpointing.
Then move your searchcoil away and switch to the
Discriminate mode by pressing the DISC touchpad.
Both Multi-Range Discrimination controls should
both be set at zero. Now scan the target again, trying to keep the exact same distance. If the sound
does not change, decreases or becomes silent, your
target is a hot rock. When this happens, ignore the
target, press ALL METAL touchpad and continue
searching.
If the signal increases at all in the Discriminate Mode,
you should investigate this target more closely and
identify the metal causing your audio to increase.
Page 21

www.garrett.com
40
Master Hunter® CX Plus Owner’s Manual
41
MAINTENANCE
the battery holders and batteries from the detector.
Always remember that your CX Plus is a sensitive
instrument. It is built to withstand rugged treatment
in the outdoors. Use your Garrett detector to the
fullest extent, yet always protect and handle it with
reasonable care.
• Avoid extreme temperatures as much as possible,
such as storing the detector in an automobile trunk
during the summer or winter months.
• Keep the detector clean. Wipe the housing after
use and wash the coil when necessary. Protect the
CX Plus from dust and sand as much as possible.
• Your searchcoil is submersible, but your control
housing is not. Never submerge the control housing
and always protect it from heavy mist, rain or blowing sand.
• Disassemble the stem and wipe it clean after use
in sandy areas.
• When storing longer than about one month, remove
SERVICE AND REPAIR
In case of difculty, read this Owner’s Manual thoroughly to make certain your detector is not inoperable due to manual adjustments. (Just hold down the
All Metal touchpad and press the DISC touchpad to
restore factory settings.) Contact your dealer for additional assistance.
When your detector must be returned to the factory
for service, make certain:
You have checked batteries, switches and connectors. (Weak batteries are the most common cause
of detector “failure”.)
You have contacted your dealer, particularly if you
are not familiar with the CX Plus.
You have included a letter that fully describes
the problem and conditions under which they occur. Make certain to include your name, address
Page 22

www.garrett.com
42
Master Hunter® CX Plus Owner’s Manual
43
and a phone number where you can be contacted
between 8:30 a.m. and 4 p.m., C.S.T.
You have carefully packed the detector in its original
shipping carton or other suitable box.
Make certain that proper insulation or packing material is used to secure all parts. Do not ship stems or
headphones unless they are part of the problem. Be
certain to return all coils.
Ship to:
Garrett Metal Detectors
1881 West State Street
Garland, Texas 75042
Call Garrett’s Customer Service Department (800527-4011) if you have further questions. Please allow approximately one week for Garrett technicians
to examine and repair your detector after they receive it, plus another week for return shipping. All
equipment will be returned UPS or parcel post unless written authorization is given by you to ship collect by air parcel post, UPS Blue (air) or air freight.
RECOMMENDED READING
Recommended Accessories
Your Garrett Master Hunter CX Plus represents the
highest quality in metal detector manufacturing.
Complement it with quality accessories such as
these from Garrett:
• TreasureHound™ Depth Multiplier (Part No.
1611700). This 2-box coil conguration nds larger
targets (gallon-sized cans) at the greatest possible
depths and ignores small trash items.
• 4.5” Crossre Coil (Part No. 2217600).
Use this sniper coil to nd smaller,
shallower targets in trashy
or conned areas.
Page 23

www.garrett.com
44
Master Hunter® CX Plus Owner’s Manual
45
• Deluxe Garrett Headphones (Part No. 1603000).
Allows you to hear faint signals that may denote
deep targets. Also reduces background noise.
• Master Hunter CX Armrest Assembly (Part No.
1601870). Use for additional stability and comfort
while searching.
Since Garrett’s CX Plus is one of the world’s premier
metal detectors, you will be especially interested
in The New Successful Coin Hunting, by
Charles Garrett, lled with “how to” tips and success
stories about nding coins. The CX Plus is an excellent detector for nding every type of treasure and all
of the RAM books are pertinent to its use.
Of particular interest, however, will be How to nd
Lost Treasure, a pocket-sized book ideal for use
in the eld. Well illustrated, this book helps you learn
how to locate treasure “hot spots”, identify and pinpoint buried treasure targets and recover these items
professionally.
For beginners, however, the new edition of Trea-
sure Hunting for Fun and Prot will prove
especially interesting and helpful. Where can you
hunt? How about ghost towns and deserted structures? You will read about them in Charles Garrett’s
Ghost Town Treasures. Robert Marx’s Buried
Treasures You Can Find locates thousands of
sites where treasure is known to have existed.
Page 24

www.garrett.com
46
Master Hunter® CX Plus Owner’s Manual
47
Hobbyists of all ages will want to read Gold Pan-
ning is Easy. Since the CX Plus can be use to
nd gold nuggets, you will be interested in You Can
Find Gold with a Metal Detector. All hobbyists should learn about this interesting and exciting
aspect of metal detecting.
RAM BOOKS ORDER FORM
Please send me the following RAM books:
(Please indicate number of copies desired.)
___ New Successful Coin Hunting ...................$9.95
___ Treasure Hunting for Fun and Prot ..........$9.95
___ Treasure Caches Can Be Found .................$9.95
___ Ghost Town Treasures ................................$9.95
___ Find Gold with a Metal Detector ...............$9.95
___ Buried Treasures You Can Find ...............$14.95
___ Gold of the Americas .................................$9.95
___ Modern Metal Detectors Revised ............$12.95
___ Gold Panning is Easy .................................$9.95
___ How to Find Gold (Metal Detecting and Panning) ....$3.95
___ How to Find Lost Treasure* ......................$3.95
* Free with the purchase of any other RAM book or
Garrett products.
Please send payment to:
RAM Publishing Co.
1881 West State Street
Garland, Texas 75042
(Order form continued on back of this page)
Page 25

www.garrett.com
48
Master Hunter® CX Plus Owner’s Manual
49
MAIL-IN ORDER FORM
Add $2.00 for rst book, and $1.00 for each additional book
ordered (maximum $3.00) for handling and shipping charges.
Total for books $______________
8.25% Tax
Handling Charge $______________
TOTAL $______________
Payment Options:
___ Enclosed check or money order
___ I prefer to order through:
___ American Express ___ MasterCard
___ Visa ___ Discover
Card Number: ______________________________
Expiration Date of Card: _____________________
Phone Number: ____________________________
Signature: _________________________________
Required on credit card purchases
Name: ____________________________________
Address: __________________________________
__________________________________
(TX/CA residents) $______________
MIND YOUR MANNERS!
The following is a Code of Ethics that many treasure
hunt clubs endorse and hobbyists follow to preserve
our exciting hobby of metal detecting. We encourage you to do the same:
• I will keep informed on and obey all laws, regulations and rules governing federal, state and local
public lands.
• I will aid law enforcement ofcials when possible.
• I will cause no willful damage to property of
any kind, including fences, signs and buildings.
• I will always ll the holes I dig.
• I will not destroy property, buildings or the remains
of ghost towns and other deserted structures.
• I will not leave litter or leave uncovered items lying
around.
• I will carry all trash and dug targets with me
when I leave each search area.
• I will observe the Golden Rule, using good outdoor
manners and conducting myself at all times in a manner which will add to the stature and public image of
all people engaged in the eld of metal detection.
Page 26

www.garrett.com
50
Master Hunter® CX Plus Owner’s Manual
51
Warning!
When searching for treasure with your Garrett detector, observe these precautions:
• Never trespass or hunt on private property without
permission.
• Avoid areas where pipelines or electric lines
may be buried.
• National and state parks / monuments, etc. are
absolutely off-limits.
• Deepseeking detectors can detect concealed
pipes, wiring and other potentially dangerous material. When those are located, the proper authorities
should be notied.
• Do not hunt in a military zone where bombs or
other explosives may be buried.
• Do not disturb any pipeline, particularly if it could
be carrying ammable gas or liquid.
• Use reasonable caution in digging toward any
target, particularly in areas you are uncertain of the
ground conditions.
• If you are unsure if you can use your metal
detector in any area, seek permission from the
proper authorities.
NOTES:
Page 27

TM
1881 W. State Street
Garland, Texas 75042
Toll Free:1.800.527.4011
Tel: 972.494.6151
Web: garrett.com
©2007 Garrett Metal Detectors
1529210.E.0707
 Loading...