

Page 1
Magnum 700X Mini-Concentrator
Magnum 700X
Mini-Concentrator
eu
GARRETT
Installation and User Guide
GARRETT
Page 2

Magnum 700X Mini-Concentrators Installation and User Guide (05/98)
Magnum 700X
Mini-Concentrator
Installation and User Guide
Part #: 84-00017 (R5/9 8)
Trademarks
UL is a registered trademark of Und erwriters Laboratories
Ethernet is a trademark of Xerox Corporation
Velcro is a trademark of Velcro USA
UL is a registered trademark of Underwriters Laboratories
Magnum
may be reproduced without prior written permission from Garrett Communications, Inc.
Printed in the United States of America.
is a trademark of Garrett Communi cat ions, Inc.
Important:
parts. Attempted service by unauthorized personnel shall render any and all
warranties null and void. If problems are experienced with a Magnum 700X,
consult Section 5, Troubleshooting, of this User Guide.
1998 Garrett Communications, Inc. All rights reserved. No part of this publication
Magnum 700X Mini-Concentrators contain no user serviceable
GARRETT
i
Page 3

Magnum 700X Mini-Concentrators Installation and User Guide (05/98)
Contacting Gar rett Communications
Please use the mailing address and phone and fax numbers listed below:
Garrett Communications
47823 Westinghouse Drive
Fremont, CA 94539
Phone (510) 438-9071
Fax (510) 438-9072
WWW: http://www.garrettcom.com
E-mail: support@garrettcom.com
Federal Communications Commission
Radio Frequency Interference Statement
This equipment generates, uses and can radiate frequency energy and if not
installed and used properly, that is in strict accordance with the manufacturer's
instructions, may cause interference to radio communication. It has been tested and
found to comply with the limits for a Class A computing device in accordance with the
specifications in Subpart J of Part 15 of FCC rules, which are designed to provide
reasonable protection against such interference when operated in a commercial
environment. Operation of this equipment in a residential area is likely to cause
interference, in which case the user at his own expense will be required to take whatever
measures may be required to correct the interference.
GARRETT
ii
Page 4

Magnum 700X Mini-Concentrators Installation and User Guide (05/98)
Table of Content s
1.0 SPECIFICATIONS ........................................................................................1
1.1 Technical Specifications..................................................................................... 1
1.2,3 Specifications - Port Modules (RPMs and BPMs).......................................... 3
1.4 Ordering Information.......................................................................................... 4
2.0 INTRODUCTION..........................................................................................5
2.1 Inspecting the Package and Produc t.................................................................... 5
2.2 Product Description ...........................................................................................5
2.2.1 Magnum 700X and 700X-Br ** Chassis................................................... 6
2.3 Magnum 700X - Repeater Port Modules (RPMs)............................................... 7
2.3.1 RPM-BNC................................................................................................... 7
2.3.2 RPM-AUI.................................................................................................... 8
2.3.3 RPM-DTE .................................................................................................10
2.3.4 RPM-FST (Fiber ST, Twist-lock Connector)..........................................10
2.3.5 RPM-FSC (Fiber SC, Snap-in Connector) .............................................. 11
2.3.6 RPM-SMF (Single Mode Fiber)............................................................... 11
2.3.7 RPM-TP (Twisted Pair)......................................................................... 13
2.3.8 PM-FP .......................................................................................................13
2.4 Magnum 700X and 700X-Br ** - Bridge Port Modules (BPMs).....................14
2.4.1 BPM-BNC................................................................................................. 14
2.4.2 BPM-AUI.................................................................................................. 15
2.4.3 BPM-FST.................................................................................................. 15
2.4.4 BPM-TP .................................................................................................... 16
2.5 Features and Benefits........................................................................................ 17
2.6 Applications...................................................................................................... 18
3.0 INSTALLATION.........................................................................................19
3.1 Locating Magnum 700X Mini-Concentrators................................................... 19
3.2 Connecting Ethernet Media .............................................................................. 19
3.2.1 Connecting ThinNet 10BASE2 (BNC)..................................................... 20
3.2.2,3 Connecting ThickNet 10BASE5 (AUI and DTE).................................. 20
3.2.4,5,6 Connecting Fiber Optic (3 types)................................................... 20,21
3.2.7 Connecting Twisted Pair (RJ-45, Unshielded or Shielded)....................... 22
3.3 Removing the PM Face Plate............................................................................ 22
3.4 Installing PM Cards.......................................................................................... 24
3.5 Removing PM Cards......................................................................................... 25
4.0 OPERATION ...............................................................................................26
4.1 Repeater Functionality...................................................................................... 26
4.2 BPM Local Bridge Functionality **................................................................ 26
4.3 Powering the Magnum 700X Mini-Concentrator.............................................. 29
4.4,5 Chassis LEDs, PM LEDs.............................................................................. 30
5.0 TROUBLESHOOTING ...............................................................................31
5.1 Before Calling for Assistance........................................................................... 31
5.2 When Calling for Assistance............................................................................. 32
5.3 Return Material Authorization (RMA) Procedure............................................ 32
5.4 Shipping and Packaging Inform a tion................................................................ 33
PPENDIX
A
**
ARRANTY INFORMATION
A: W
CHANGES MADE IN THIS REVISION
...........................................................34
GARRETT
iii
Page 5

Magnum 700X Mini-Concentrators Installation and User Guide (05/98)
MAGNUM
ETHERNET CONNECTIVITY PRODUCTS
"DESIGNED AND MANUFACTURED IN THE USA"
Overview
Garrett Communications offers the Magnum line of Ethernet LAN physical layer
connectivity products with industry-standard functionality. Magnum products are
available worldwide through OEMs, integrators, representatives, retailers and
international distri butors.
Dual Speed 8-port & 16-port Stackable,
10/100 auto-sensing per port
Stackable Hubs, SNMP Optional
10Mb series and 100Mb series, both with optional port modules
Switching Hubs,
unmanaged 500-Series and managed 5000-Series
Two-Port Switches
100Mb RJ-45port + 10 / 100Mb combo port, or +FDX fiber port
Workgroup Hubs
10Mb series and 100Mb series, both with optional port modules
Personal Hubs
, 100Mb
100Mb 4-port with up-link, 6-port with one switched 10/100Mb
Personal Hubs, 10Mb series
8-port + AUI, stackable to 5 high, + optional BNC of fiber port
8 or 9-port and 4 or 5-Port Personal Hubs, w/ man. up-link sw
.
Media Converters, 10Mb and 100Mb series
All media combinations, incl. fiber ST, SC, mm., single mode
The “X-line” of configurable MiXed Media products:
Stackable Concentrators, SNMP optional,
Mini-Concentrators,
7 Ports,
Repeater Port Modules (RPMs),
Bridge Port Modules (BPMs)
Repeaters
6 types for Ethernet media
, 4 types, for segment isolation
13-Ports
, 2-Ports
Workgroup Bridges, 10Mb series
Local segmentation for all media types
Fan-Outs, 10Mb series
2, 4 and 8 Port Models
Transceivers, 10Mb and 100Mb series
10Mb Mini-Transceivers and Coax Models, All Types
100Mb MII-TX and MII-FX models
May. ‘98
GARRETT
i
Page 6

Magnum 700X Mini-Concentrators Installation and User Guide (05/98)
1.0 SPECIFICATIONS
This chapter gives the specifications of the Magnum 700X mixed-media
concentrator, as well as those of the various Port Modules (PMs).
1.1 Technical Specifications
Performance
Data Rate: 10 Mbps
RPM Partitioning: Enforced after 32 consecutive collisions.
RPM Reconnect: Occurs after 512 bits error-free transmission.
BPM Auto-learning Address List: 256 node capacity.
BPM Filtering and Forwarding Rate: 14,880 pps max.
Max imum Ethernet Segment Lengths
DTE (AUI Drop Cable) - 50 m (164 ft)
10BASE-T (twisted pair) - 100 m (328 ft)
Shielded twisted pair - 150m (492 ft)
10BASE2 ThinNet (BNC) - 185 m (607 ft)
10BASE5 ThickNet - 500 m (1,640 ft)
FOIRL multi-mode Fiber optic - 1 km (3,281 ft)
10BASE-FL multi-mode Fiber optic - 2 km (6,562 ft)
Single-mode Fiber optic - 10 km (32,810 ft)
Network Standards
Ethernet V1.0/2.0 IEEE 802.3: 10BASE-T, 10BASE5, 10BASE2,
(The Magnum 700X Mini-Concentrator is a physical layer standard Ethernet
product, and operates independently of all software.)
Operating Environment
Ambient Temperature: 32ºF to 122ºF (0ºC to 50ºC)
Storage Temperature: -20ºC to 60ºC
Ambient Relative Humidity: 10% to 95% (non-condensing)
Power Supply (Internal)
AC Power Connector: IEC-type, male recessed, rear of chassis
Input Voltage: 90 to 260 vac (auto-ranging)
Input Frequency: 47 to 63 Hz (auto-ra nging)
Power Consumption: 40 watts max
GARRETT
10BASE-FL & FOIRL, and DTE
1
Page 7

Magnum 700X Mini-Concentrators Installation and User Guide (05/98)
(1.1 Technical Specifications, continued)
Connectors
Seven Magnum PM ports on the front. BPMs are available with BNC, AUI,
FST, and STP connectors. Th e following are available as RPM configurations.
RJ-45: Shielded, 8-Pin Female (Note:
Shielded 10BASE-T
connectors accept either unshielded or shielded wiring
plugs for standard twisted pair media wiring.)
Fiber Optic: ST (Twist-Lock Connector, for single or multi-mode)
Fiber Optic: SMA (screw-on Connector, for multi-mode, by special order only)
ThinNet: BNC
AUI: D-Sub 15-Pin Female (with slide lock)
DTE: D-Sub 15-Pin Male (with lock posts)
Note: Port Modules are also used with the Magnum 3000X, and as the Bonus Port modules for
Magnum Stackable and Workgroup Hubs. All Port Modules should be installed at the factory
or by trained technicians.
Packaging
Enclosure: High strength sheet metal.
Suitable for wiring closet shelf, wall or desktop mounting.
Port Module Slots: 7
Dimensions: 6.0 in x 10.0 in. x 3.5 in. (15.25 cm x 25.4 cm x 8.89 cm)
Weight: 2.5 lb. (1.1 Kg)
Port Slot Cut-out: 2.2 in. x .75 in. (5.6 cm x 1.9 cm)
Cooling method: Convection
LED Indicators on Chassis
Four chassis LEDs monitor the general status of the unit including
network traffic.
PWR
- Power, Green LED, steady ON indicates t here is AC power.
RX
- Receive, Green LED, blinks to indicate network activity, data
being received from any of the PMs.
JAB
- Jabber, Amber LED, illuminates when jabber condition (illegal
packet size) is detected on any port; affected port is partitioned
temporarily until jabber stops.
COL
- Collision, Yellow LED, flashes when a collision is detected
on any of the PMs.
For the LEDs on each PM, see "Product Description" of the PMs.
Agency Approvals
UL Listed (UL 1950), cUL, CE
Emissions: meets FCC Part 15, Class A
Warranty
Three years, return to factory Made in USA
GARRETT
2
Page 8

Magnum 700X Mini-Concentrators Installation and User Guide (05/98)
1.2 Specifications - Repeater Port Modules (RPMs)
RPM Type : BNC AUI DTE Fiber-mm Fiber-sgl.m TP*
Front Access yes yes yes yes yes yes
Connector Type BNC-f DB-15 f DB-15 m ST or SC Fiber-ST RJ-45
Partition (PART)LED yes yes yes yes yes yes
Receive (RX) LED yes yes yes yes yes yes
LINK LED n.a. n.a. n.a. yes yes yes
Switch on Face Plate yes** n.a. n.a. n.a. n.a. yes***
“Fiber-mm” is mu lti-mode cable, normally used for 10BASE-FL installations, up to 2.0Km.
“Fiber-sgl.m” i s single-mode cable, used for distant installations, up to 10.0Km.
* The RJ-45 connector is shielded; it accepts RJ-45 eight-pin plugs for unshielded
and shielded twisted pair wiring.
** Internal termination switch for BNC, no "T" connector is required.
*** MDI-X (Media Dependent Interface - Crossover) switch for RJ-45 up-link ,
no crossover cable is required.
1.3 Specifications - Bridge Port Modules (BPMs)
BPM Type : BNC AUI Fiber TP*
Connector Type BNC(f) DB-15(f) ST RJ-45
Switch on FP yes** n.a. n.a. yes***
FWD-I LED yes yes yes yes
FWD-X LED yes yes yes yes
LINK LED n.a. n.a. yes yes
* The RJ-45 connector is shielded; it accepts RJ-45 eight-pin plugs for unshielded
and shielded twisted pair wiring.
** Internal termination switch for BNC, no "T" connector is required.
*** MDI-X (Media Dependent Interface - Crossover) switch for RJ-45 up-link ,
no crossover cable is required.
NOTE: As of May, 1998, multiple BPMs (up to six) may be installed
in a 700X chassis to provide parallel bridging for the BPM’s attached
segments. This will increase network performance in applications
where there is significant local traffic on the bridged segments. (see
Section 4.2) Any mix of RPM and BPM types may be configured
together in a 700X, with a maximum of 6 BPMs and 7 total PMs per
unit..
GARRETT
3
Page 9

Magnum 700X Mini-Concentrators Installation and User Guide (05/98)
1.4 Ordering Information
Magnum 700X Mini-Concentrator
Magnum 700X Base chassis with 7 slots for RPMs and BPMs, power supply
Magnum 700X-Br Multi-Bridge chassis with one RJ -45 RPM for the common port, and 6
slots for BPMs and other RPMs, power supply. Includes 5 face plates.
Magnum RPM-BNC Repeater Module with 1 BNC connector, internal termination switch
Magnum RPM-TP R epeater Module w/ 1 shielded female RJ-45 connector + up-link
switch
Magnum RPM-AUI Repeater Module wi th 1 AUI (DB-15 female) c onnector, with slide
lock
Magnum RPM-DTE Repeater Module with 1 DTE (DB -1 5 male) connector, wit h lock
posts
Magnum RPM-FST Repeater Module w/ mm* Fiber ST “twist” 10BASE-FL dual
connector
Magnum RPM-SMF Repeater Module w/ single mode Fiber connector
Magnum RPM-FSM** Repeater Module w/ mm* Fiber SMA “scr ew - on” 10BASE-FL
connector
Magnum BPM-BNC Local Bridge Module with 1 BNC connector
Magnum BPM-AUI Local Bridge Module with 1 AUI connector
Magnum BPM-FST Local Bridge Module with mm* Fiber ST connector
Magnum BPM-TP Local Bridge Modu le with 1 RJ-45 connector + up-link switch
Magnum PM-FP Face Plate - cover f or unused slots
All RPMs and BPMs have LEDs for status information. Refer to Product Description for
NOTE:
details.
* mm = multi-mode
** This item is available by special order only.
Note:
All PMs are interchangeable for use with the Magnum 3000X Stackable
Concentrators and Magnum 3000 Stackable Hubs bonus ports, and the Magnum 1000
Workgroup Hubs bonus ports. The same PMs are also used in the Magnum 30X
Workgroup Bridges and the Magnum 200X and 20X Two-port Repeaters.
Garrett Com munications r eserves the right to change specifications , performance
characteristics and/or model offerings without notice.
GARRETT
4
Page 10

Magnum 700X Mini-Concentrators Installation and User Guide (05/98)
2.0 INTRODUCTION
This chapter describes the functionality of the Magnum 700X and its Port Modules.
2.1 Inspecting the Package and Product
Examine the shipping container for obvious damage prior to installing this product;
notify the carrier of any damage which you believe occurred during shipment or delivery.
Inspect the contents o f this package for any signs of damage and ensure that the items listed
below are included.
This package should contain:
1 Magnum 700X Mini-Concentrator Unit
1 AC Power Cord (U.S. and other 115 vac only)
1 Installation and User Guide
1 Product Registration Card
Note: PMs that are purchased with the 700X unit are usually factory
configured and installed, and may be included as part of the 700X unit.
Remove the Magnum 700X Mini-Concentrator from the shipping container. Be sure to
keep the shipping container should you need to ship the unit at a later date. To validate the
product warranty please complete and return the enclosed Product Registration Card to Garrett
Communications as soon as possible.
In the event there are items missing or damaged contact your supplier. If you need to
return the unit use the original shipping container. Refer to Chapter 5, Troubleshooting, for
specific return procedures.
2.2 Product Description
The 700X Mini-Concentrator is a highly versatile, cost-effective mixed-media Ethernet
concentrator that provides seven (7) slots for Ethernet media connectivity. Any combination of
standard Ethernet media segments are supported. It operates as the central concentrator for
multiple backbone or user segments in mixed-media environments of small and medium-sized
networks.
GARRETT
5
Page 11
Magnum 700X Mini-Concentrators Installation and User Guide (05/98)
Each Magnum 700X unit is a complete operational unit with an internal power supply
enclosed in a lightweight, compact, rugged metal enclosure. The media connectors and the status
LEDs are conveniently accessed from the front. The unit is easily installed and is suitable for
wiring closet shelf, table-top or vertical mounting.
Magnum 700X units operate as multi-port repeaters and provide full repeater
functionality per IEEE 802.3 specifications in compliance with Ethernet V1.0/2.0 standards.
They may also be optionally configured with one or more Bridge Port Modules (BPMs) in order
to isolate the 700X and its attached nodes from the up- stream connected segments for increased
network performance.
2.2.1 Magnum 700X Chassis
The Magnum 700X functions as a seven (7) slot master chassis. Each slot supports a
single Port Module (RPM or BPM) to provide 10BASE-FL, FOIRL, 10BASE2, 10BASE5, or
10BASE-T LAN connectivity. The RPMs are used for one Ethernet segment each and provide
full IEEE 802.3 repeater functionality. The individual BPMs are self-learning and filter and
forward packets at full Ethernet wire speed. A BPM can be used to provide local bridge isolation
between the 700X and the connected segment. Each PMs is equipped with one media interface
connector. Any PM can be installed in any slot of the Magnum 700X chassis.
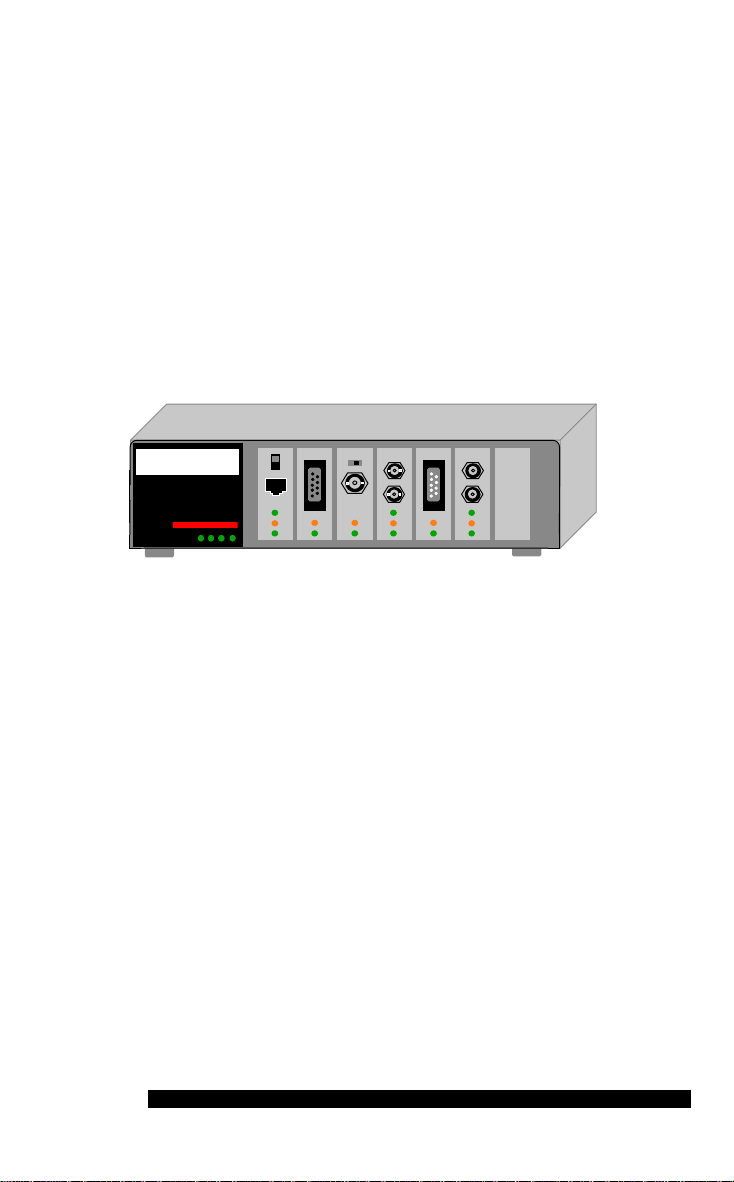
To simplify media
connections, each media interface
connector is accessible from the
front of the unit, along with the
Magnum 700X
Mini-Concentrator
eu
GARRETT
LEDs. No rear access is required
except for the AC power plug.
Figure 2.2.1: Magnum 700X Mini-Concentrator
When configured with multiple RPMs for single- or mixed-media applications, the
total combination of all RPMs will operate as a single repeater. As an example, when the
Magnum 700X is fully configured with seven RPMs connecting seven Ethernet segments, the
entire unit operates as a single repeater. In addition to the typical standard Ethernet interfaces,
RPMs with a DTE connector and RPMs with single-mode fiber connector are also available.
When configured with BPMs, all RPMs and their locally attached nodes will operate as
a single repeater which is isolated from the up-stream segments connected via the local bridge.
The BPMs are self-learning and filter / forward packets for their attached segment.
GARRETT
6
Page 12
Magnum 700X Mini-Concentrators Installation and User Guide (05/98)
The internal power supply is auto-ranging to handle any AC power type worldwide.
Power input may range from 90 to 260 vac, with a frequency rating of 47 to 63 Hz. The unit is
equipped with a rear mounted IEC-type recessed male AC power connector. (When shipped for
use in areas other than 115 vac, a power cord will not be included). The 700X unit is convection
cooled for silent operati on.
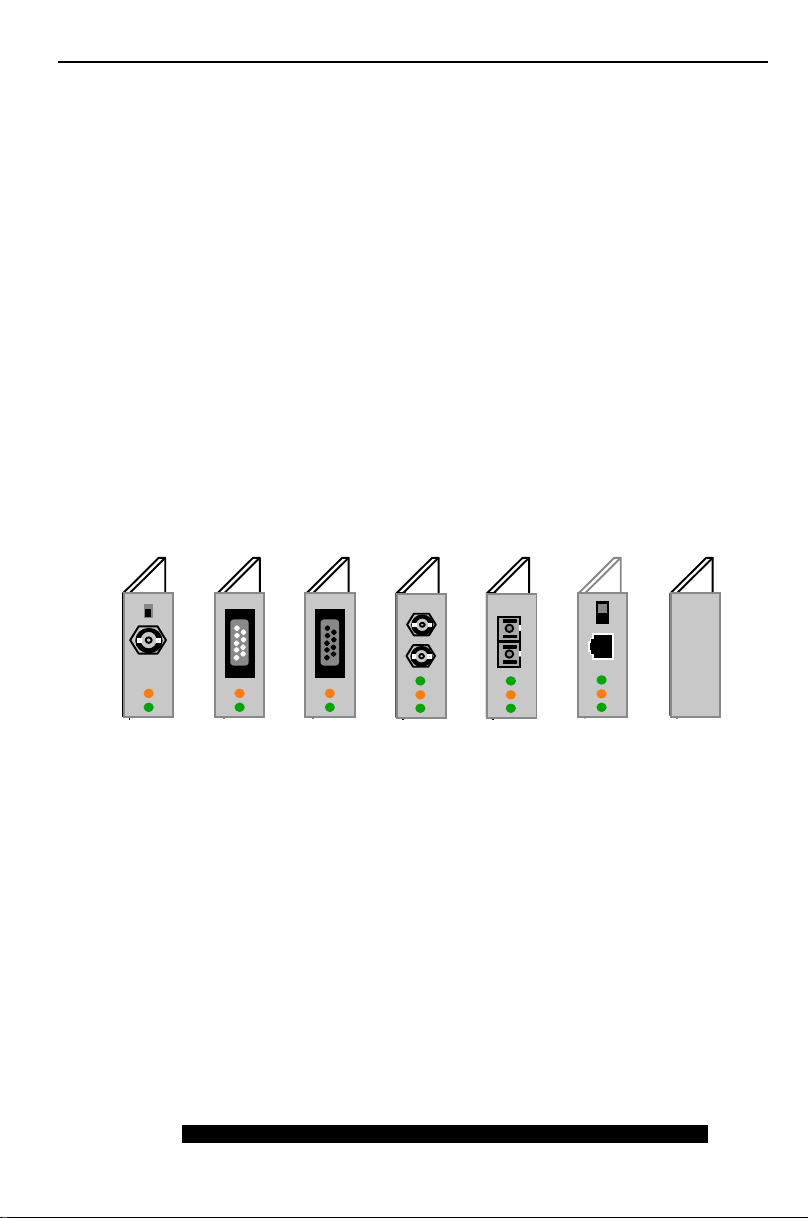
2.3 Magnum 700X - Repeater Port Modules (RPMs)
There are a total of six different RPM cards and each is designed with its own media
cable connector type. A seventh module is used as a face plate when any front slot is not used.
The assortment of standard network connector types for RPMs includes BNC (ThinNet
or 10BASE2), AUI (10BASE5 or ThickNet, DB-15 female for most transceiver connections),
DTE (DB-15 male-AUI for direct connects), ST (Ethernet multi-mode Fiber ST), SC (Ethernet
multi-mode Fiber SC), SMF (Ethernet single-mode Fiber) and RJ-45 (10BASE-T UTP and STP).
They are shown in Figure 2.3. Each RPM is usually factory installed, or may be field installed by
trained technicians as described in Section 3.0, Installation.
Figure 2.3: Magnum RPM Cards: RPM-BNC, RPM-AUI,
RPM-DTE, RPM-FST, RPM-FSC, RPM-TP, & PM-FP
Each of the individual RPMs are described in detail in this section.
2.3.1 RPM-BNC
The Magnum RPM-BNC repeater module is equipped with a standard 10BASE2 coax
connector. This RPM performs full IEEE 802.3 repeater functionality and is used for 10BASE2
ThinNet (commonly referred to as BNC) connections.
The RPM-BNC module is designed with a special switch -selectable internal
termination function that eliminates the need for a "tee" connector and a 50 ohm terminator. To
GARRETT
7
Page 13

Magnum 700X Mini-Concentrators Installation and User Guide (05/98)
take advantage of internal termination, the slide switch should be in the "DOWN" (or right-side)
position. In this configuration, the 10BASE2 segment is directly attached to the BNC port where
it is internally terminated. When the switch is in the "UP" (or left-side) position, the BNC port
requires a "tee" connector (not
supplied) and a 50 ohm terminator
for proper termination. Certain
applications may require a "tee"
connector, used as a tap , to allow
the 10BASE2 coax segment to
continue on past the RPM-BNC
Standard BNC
10BASE2 Connector
1
Internal Termination
Slide Switch
Partition LE D
1
2
Receive LED
2
connection.
Magnum RPM-BNC
The RPM-BNC module includes one partition (PART) and one receive (RX) LED,
which are visible from the front . The PART LED flashes AMBER to indicate that the segment
has been automatically partitioned. As soon as normal transmission resumes, the segment will
be automatically re-established. The RX LED illuminates GREEN intermittently to indicate data
is being received.
Important Note:
for the RPM-BNC Termination Switch -
DOWN (or right): Internally Terminated
UP (or left): Requires "T" Connector.
(To recall the right BNC switch position, remember "tee up" . . as in golf ! )
2.3.2 RPM-AUI
This module is equipped with a 15 pin female AUI connector and a slide-lock, and
performs full IEEE 802.3 repeater functionality. It is used to provide connectivity with a
10BASE5 (ThickNet) backbone or to
any AUI segments. A transceiver is
required when connecting to a
Standard 15-pin
female AUI,
with slide-lock
Partition LED
1
2
Receive LED
ThickNet segment and th e RPM-AUI
supports this convention. The RPM-
1
2
AUI is also a "universal" Ethernet
media interface as it may be u sed with
a variety of different mini-transceivers
Magnum RPM-AUI
GARRETT
8
Page 14

Magnum 700X Mini-Concentrators Installation and User Guide (05/98)
to provide connectivity to any media type.
The RPM-AUI card is equipped with Partition (PART) and Receive (RX) LEDs which
function the same as the identical LEDs on the RPM-BNC (Section 2.3.1 above).
The Magnum RPM-AUI card is also used for connecting Ethernet devices u sing
standard AUI cabling. In this situation, it is important to consider the AUI segment length or
distance to the attached device.
The maximum transmission distance between a backbone transceiver equipped with an
AUI connector and the Magnum RPM-AUI card will vary. When an AUI cable is used to
connect the Magnum RPM-AUI directly to a backbone transceiver, the maximum AUI segment
length is allowed. If the Magnum RPM-AUI is connected to a transceiver that has been cascaded
from another transceiver, the maximum AUI segment length is reduced.
According to Ethernet standards, the maximum distance from the transceiver AUI
connector and the attached device (Magnum RPM-AUI) is 50m (165 ft.). The AUI segment
maximum length is reduced in cascaded configurations. See the following note.
Important Note:
every additional level of network transceiver device "dropped" or "cascaded" from the original
backbone transceiver tap.
The RPM-AUI connector supports standard IEEE signals, summarized in Table 2.3.2.
The maximum transmission distance is decreased by 6m (20 ft.) for
Pin Function Pin Function
1 Control In Circuit Shield 10 Data Out Circuit B
2 Control In Circuit A 11 Data Out Circuit Shield
3 Data Out Circuit A 12 Data In Circuit B
4 D at a In Circuit Shield 13 Voltage Plus (+)
5 Data In Circuit A 14 Voltage Shield
6 Voltage Common 15 Control Out Circuit B
7 Control Out Circuit A SHELL Protective Ground
8 Control Out Circuit Shield (conductive shell)
9 Control In Circuit B
NOTES:
2) Pins 4, 8, 11 and 14 may be connected to pin #1.
GARRETT
Table 2.3.2: AUI Pin Assignments
1) Voltage Plus (pin #13) and Voltage Common (pin # 6) use a single
twisted pair in the AUI cable.
9
Page 15

Magnum 700X Mini-Concentrators Installation and User Guide (05/98)
2.3.3 RPM-DTE
The Magnum RPM-DTE is a module equipped with a 15-pin male DTE connector
with lock posts. (The RPM-DTE is a mating connector for the RPM-AUI which has a 15-pin
female connector an d slide locks. The pin
assignments of the two are the same). The
RPM-DTE card is designed to support direct
Partition LED
1
2
Receive LED
Standard 15-pin
male "AUI"
connections (no transceiver required) using
AUI drop cables to any device that is
equipped with an AUI port. Examples of
1
2
such devices include servers, routers,
bridges, hubs, and UNIX workstations.
Magnum RPM-DTE
2.3.4 RPM-FST (Fiber ST, Twist-lock Connector)
The Magnum RPM-FST is a multi-mode fiber optic module equipped with a dual STtype connector. It functions as an IEEE 802.3 full repeater to support 10BASE-FL and FOIRL
network segments. When used for 10BASE-FL segments, this module supports fiber optic
transmission distances up to 2000m. For
FOIRL applications, it supports fiber
10BASE-FL, FOIRL
ST Connectors
segments of up to 1000m in length. The
RPM-FST includes full transceiver
functionality and does not require an external
1
2
transceiver device. In addition to Partition
(PART) and Receive (RX) LEDs, a LINK
LED indicates proper connectivity with the
remote device.
3
LINK Partition Receive
1
Magnum RPM-FST
2
3
NOTE:
The RPM-FST circuit board contains a six pin jumper which controls the
intensity of the transmitted signal. By default, the jumper is placed across pins 5 & 6. The
jumper may be set as follows, to accommodate distances of up to 4 km:
(continued on next page)
GARRETT
10
Page 16

Magnum 700X Mini-Concentrators Installation and User Guide (05/98)
JUMPER ACROSS DISTANCES SUPPORTED
1 - 2 0 - 2 km
3 - 4 0.5 - 3 km*
5 - 6 1.5 - 4 km*
When fiber c able distances of 2 km or less are needed, the
jumper should be placed across pins 1 and 2.
When fiber cable distances of more than 2 km are
*
selected, the minimum ca ble length mu st also be incr eased,
as shown in the table above.
J1
DEFAULT
2.3.5 RPM-FSC (Fiber SC, Snap-in Connector)
The Magnum RPM-FSC is also a multi-mode fiber optic repeater module, similar to
the RPM-FST. It has the same LEDs indicating port
partitioned (PART), receive activity (RX), and link
10BASE-FL, FOIRL
SC Connectors
operational (LINK). It has the same jumper settings for
extra distance in certain circumstances.
While the functionality of the these two modules
1
2
is the same, the RPM-FSC is equipped with an SC-type
"snap-in" connector instead of an ST-type "twist-lock"
connector.
Magnum RPM-FSC
3
1 2
3 4
5 6
2.3.6 RPM-SMF (Single-mode Fiber)
The Magnum RPM-SMF is a single-mode fiber optic module equipped with a dual STtype connector. It functions as a full repeater to support single-mode fiber networks. The RPMSMF supports fiber optic transmission
Single-mode
ST Connectors
distances of up to 10 Km. The RPM-SMF
includes full transceiver functionality and
does not require an ext ernal transceiver
device.
This module is equipped with
PART, RX, and LINK LEDs identical to
1
2
3
LINK Partition Receive
1
2
3
those of the RPM-FST.
(continued on next page)
Magnum RPM-SMF
2.3.6 RPM-SMF (Single-mode Fiber) - continued
GARRETT
11
Page 17

Magnum 700X Mini-Concentrators Installation and User Guide (05/98)
Note:
Be sure to use single-mode fiber optic cable with this module.
Single-mode fiber has a smaller diameter than multi-mode fiber
(2/15 - 8/60 microns for single-mode, 50/125 or 62.5/125 microns
for multi-mode, where xx/xx are the diameters of the core and the
core plus the cladding respectively).
NOTE:
The RPM-SMF circuit board contains a six pin jumpers, but the jumper is
only to be placed across pins 5 & 6 . (Chg. 11/98) Others are not used.
JUMPER ACROSS DISTANCES SUPPORTED
1 - 2 not used
3 - 4 not used
5 - 6 0 - 10 km
DEFAULT
1 2
3 4
5 6
J1
GARRETT
12
Page 18

Magnum 700X Mini-Concentrators Installation and User Guide (05/98)
2.3.7 RPM-TP (Twisted Pair)
The Magnum RPM-TP card supports Ethernet twisted pair segments of any standard
length. It is equipped with a single RJ-45 connector. The RJ-45 connector is shielded to
minimize emissions and will allow
both unshielded twisted pair (UTP)
and shielded twisted pair (STP)
MDI-X
Cross-Over
Slide Switch
Shielded RJ-45
Connector
segment connections.
The RPM-TP module is also
equipped with a slide switch to allow
for cascaded or up-link connections.
1
2
3
LINK Partition Receive
1
2
3
This feature eliminates the need for a
special twisted pair crossover cable.
Magnum RPM-TP
With the switch in the UP position, the RPM-TP port is used for up-link connections
(i.e.: a connection to another repeater or hub typically.) When used for segments going to
workstations and other user device connections, the switch should be in the DOWN position.
The RPM-TP will support 10BASE-T unshielded twisted pair wiring (UTP)
environments with maximum segment distances up to 100m (325 ft.), or shielded twisted pair
wiring (STP) of 150m (500 ft.). This module is designed with internal transceiver functionality.
The RPM-FST has LINK, PART, and RX LEDs.
Important Note:
DOWN
UP
For the RPM-TP MDI-X Crossover Switch -
(or Right) for workstations and user connections.
(or Left) for Up-Link connections to other hubs, etc.
The RJ-45 pins normally (TP crossover switch DOWN) are per the standard for hubs-to-users
twisted pair wiring: 1 = receive+, 2 = receive-, 3 = transmit+, 6 = transmit-, other pins not used.
When the TP crossover switch is UP, the pins of the RJ-45 port are per the standard for up-links
using twisted pair wiring, i.e., the transmit and the receive pairs are exchanged: 1 = transmit+, 2
= transmit-, 3 = receive+, 6 = receive-, other pins not used.
2.3.8 PM-FP
The PM-FP is a blank face plat e that is installed in
any empty PM slot. When the Magnum 700X chassis contains
less than seven front-mounted PMs, the empty front slots must
be covered with the PM-FP face plate in order to maintain
proper cooling air flow, and for safety.
Magnum PM-FP
GARRETT
13
The Magnum
Note:
PM-FP must be installed
in each empty PM slot.
Page 19

Magnum 700X Mini-Concentrators Installation and User Guide (05/98)
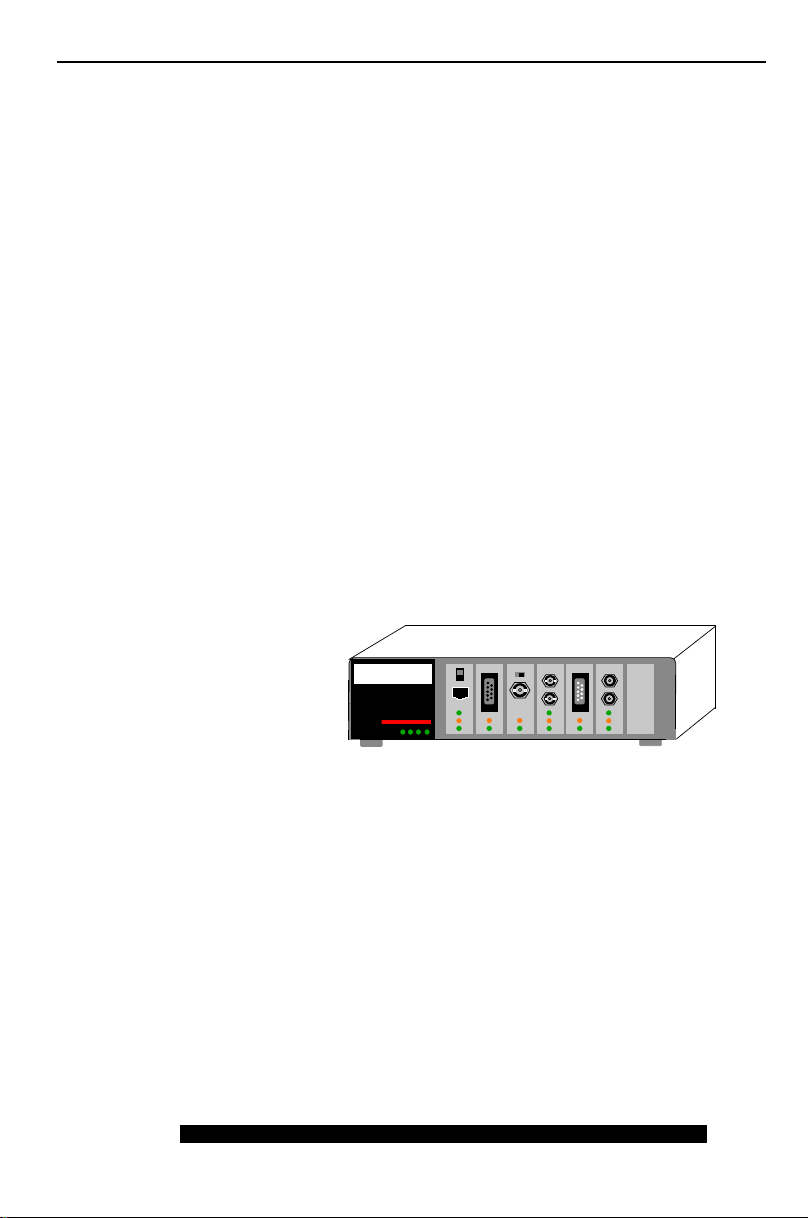
2.4 Bridge Port Modules (BPMs)
To provide optional local segment isolation, individual Bridge Port Modules (BPMs)
are available for Magnum 700Xs. For flexibility, any port of a Magnum 700X may be
configured with a BPM. Multiple (up to 6) BPMs may be configured in one 700X chassis..
There are four different BPM card s and each is designed with its own media connector
type. BPMs are available for the following Ethernet media types: BNC (ThinNet or 10BASE2),
AUI (10BASE5 or ThickNet, DB-15 female for most transceiver connections), ST (Ethernet
multi-mode Fiber ST), and RJ-45 (10BASE-T UTP and STP). They are shown in Figure 2.4.
Each BPM is usually factory installed, but may be field installed by trained technicians as
described in Section 3.0, Installation.
Figure 2.4: Magnum BPM Cards: BPM-TP, BPM-BNC, BPM-ST, BPM-AUI
Each of the individual BPMs are described in detail in this section.
2.4.1 BPM-BNC
The Magnum BPM-BNC bridge module is equipped with a standard 10BASE2 coax
connector. This BPM is self-learning and filters and forwards packets at full Ethernet wire
speed. This module is used for 10BASE2 ThinNet (commonly referred to as BNC) connections
and is designed to isolate the local segment (i.e., the users and devices connected to the Magnum
unit housing the BPM) from the connecting
network (i.e., the users and devices
Standard BNC
10BASE2 Connector
Internal Termination
Slide Switch
connected through the BPM’s media
connector).
The BPM-BNC module is
designed with a special switch -selectable
1
1
2
2
FWD-X LED
FWD-I LED
internal termination function that eliminates
the need for a "tee" connector and a 50 ohm
terminator. For switch details, refer to
Magnum BPM-BNC
GARRETT
14
Page 20

Magnum 700X Mini-Concentrators Installation and User Guide (05/98)
the RPM-BNC section, 2.3.1. The BPM-BNC module includes an FWD-I LED and an FWD-X
LED, which are visible from the front. The FWD-I LED blinks GREEN to indicate that packets
are being forwarded INTO the local Magnum hub or stack.. The FWD-X LED bl inks GREEN to
indicate that packets are being forwarded OUT of the local Magnum hub or stack.
2.4.2 BPM-AUI
This local-bridge module is equipped with a 15 pin female AUI connector and a slidelock. It is self-learning and filters and forwards packets at full Ethernet wire speed. It is used to
provide segment isolation from a 10BASE5
(ThickNet) backbone or any AUI segments. A
Standard 15-pin
female AUI
with slide-lock
FWD-X LED
1
FWD-I LED
2
transceiver is required when connecting to a
ThickNet segment and the BPM-AUI supports
this convention.
1
2
The BPM-AUI card is equipped with
one FWD-I LED and one FWD-X LED, which
are identical to those of the BPM-BNC
Magnum BPM-AUI
(see Section 2.4.1).
The RPM-AUI connector supports standard IEEE signals, which are summarized in
Table 2.3.2 of Section 2.3.2.
2.4.3 BPM-FST
10BASE-FL, FOIRL
ST Connectors
The Magnum BPM-FST is a multi-
FWD-X LED
mode fiber optic local-bridge module equipped
with a dual ST-type connector. It is self-learning
and filters and forwards packets at full Ethernet
2
1
3
1
FWD-I LED
2
LINK LED
3
wire speed. When used for 10BASE-FL
segments, this module supports fiber optic
transmission distances up to 2000m. For FOIRL,
Magnum BPM-FST
it supports fiber segments of up to 1000m in length. The BPM-FST includes full transceiver
functionality and does not require an external transceiver device. The BPM-FST has three status
LEDs. FWD-I and FWD-X are identical to those of the BPM-BNC (Section 2.4.1). In addition,
this module has a GREEN LINK LED, that is always on when the link is operational.
GARRETT
15
Page 21

Magnum 700X Mini-Concentrators Installation and User Guide (05/98)
2.4.4 BPM-TP
The Magnum BPM-TP card is equipped with a single RJ-45 connector and supports
Ethernet twisted pair segments of any standard length. The RJ-45 connector is shielded to
minimize emissions and will allow both unshielded twisted pair (UTP) and shielded twisted pair
(STP) segment connectio ns.
The BPM-TP module is also equipped with a Media Dependent Interface-Crossover
(MDI-X) slide switch to allow for cascaded connections. This feature eliminates the need for a
special twisted pair crossover cable. For MDI-X switch details, refer to the RPM-TP section,
2.3.7.
The BPM-TP will support 10BASE-T unshielded twisted pair wiring (UTP)
environments with maximum segment distances up to 100m (325 ft.), or shielded twisted pair
wiring (STP) of 150m (500 ft.). This
module is designed with internal
transceiver functionality. The LINK,
FWD-I, and FWD-X LEDs of this
BPM are the same as those of the
MDI-X Cro ss-over
Slide Switch
Shielded RJ-45
Connector
FWD-X LED
1
FWD-I LED
2
LINK LED
3
1
3
2
BPM-FST (Section 2.4.3).
GARRETT
16
Magnum BPM-TP
Page 22

Magnum 700X Mini-Concentrators Installation and User Guide (05/98)
2.5 Features and Benefits
Seven Ethernet Segments in a Single Unit
!!!!
The Magnum 700X allows any mix of standard Ethernet media to reside in one
unit, up to seven different segments, to expand and reconfigure any Ethernet
network installation.
RPMs (Repeater Port Modules) for All Standar d Ethernet Media
!!!!
Multiple RPMs support all of the various IEEE 802.3 standards including,
10BASE-FL, FOIRL, 10BASE2, 10BASE5 and 10BASE-T.
Optional Bridge Port Modules (BPMs)
!!!!
The Magnum 700X can be optionally configured with one or more BPMs. Each
BPM contains a miniature, self-learning local bridge module capable of filtering
and forwarding packets at full Ethernet speed. A BPM may be used to bridgeisolate local nodes having significant local inter-node traffic, thus boosting overall
network performance. These modules are available with BNC, AUI, multi-mode
Fiber-ST, and RJ-45 media connectors.
Multiple Mixed-Media Segments Form One Repeater
!!!!
When configured with two or more RPMs supporting a single- or mixed-media
application, the Magnum 700X functions as one multi-port repeater.
!!!!
!!!!
!!!!
GARRETT
Front Mounted Connectors and LEDs
The installation of Magnum 700X units only requires front access for network
connections. Similarly, the status LEDs are all readily visible from the front for
ease of monitoring network operational status over time. This is especially
convenient when the Magnum 700X is mounted on a shelf or in a wiring closet.
Internal "U niversal" Power Supply with Auto-r anging
An internal auto-ranging power supply with a female IEC power cord connector
allows the Magnum 700X to be used throughout the world. No external power
supply unit is required.
LEDs for Chassis, and for each PM Cards
The Magnum 700X chassis and each individual PM card are equipped with frontmounted traffic activity and segment status LEDs. The Magnum 700X chassis
features a Power (PWR), Receive (RX), Collision (COL), and Jabber (JAB)
LEDs.
17
Page 23

Magnum 700X Mini-Concentrators Installation and User Guide (05/98)
2.6 Applications
The Magnum 700X provides connectivity between multiple and various Ethernet
media types from a single chassis device, and includes support for the following IEEE 802.3 10
Mbps standards: 10BASE5, 10BASE2, 10BASE-T, 10BASE-FL, FOIRL. Where more than one
type of Ethernet media is required, the Magnum 700X easily integrates a mixed media network.
Also, the Magnum 700X can be optionally configured with BPMs to offer local-bridge isolation
for any segments.
Figure 2.6 illustrates a Magnum 700X being used to support an existing ThinNet
(10BASE2) network of just a few users, the addition of a new 10BASE-T segment to handle up
to eight more user stations, the future expansion of the network using fiber (10BASE-FL), and an
AUI/DTE drop cable segment to an attached server.
8 user
10BASE-T hub
(New)
UTP Uplink
Segment
Network Server
Magnum 700X
Mini-Concentrator
Existing
10BASE2 ThinNet
(Future)
10BASE-FL
Fiber Segment
Remote 8 user
10BASE-T hub
Figure 2.6: Magnum 700X brings together mixed Ethernet media
Magnum 700X Mini-Concentrators will function properly when the network
installation follows IEEE standards for the various Ethernet media. Each media type has
different installation limitations based on IEEE 802.3 standards, and those specifications should
be adhered to for all applications. A summary of each Ethernet media type and the
corresponding Magnum PM is presented here:
IEEE Standard Reference
Drop Cable AUI 50m (165 ft) n/a RPM-AUI, RPM-DTE, BPM-AUI
10BASE5 ThickNet 500m (1640 ft) 100 RPM-AUI, BPM-AUI
10BASE2 ThinNet185m (607 ft) 30 RPM-BNC, BPM-BNC
10BASE-T Twisted Pair 100m (328 ft) n/a RPM-TP, BPM-TP
FOIRL mm1 Fiber 1.0km(3,281 ft) n/a RPM-FST, RPM-FSM, BPM-FST
10BASE-FL mm1 Fiber 2.0km(6,562 ft) n/a RPM-FST, RPM-FSM, BPM-FST
*sgl.m
1
mm = multi-mode * not currently standardized by IEEE, typically used up to only 4Km distance
2
sgl.m = single-mode
2
Fiber 10.0km(65,620ft) n/a RP M-SMF
Max. Distance Taps PM Type
GARRETT
18
Page 24

Magnum 700X Mini-Concentrators Installation and User Guide (05/98)
3.0 INSTALLATION
This chapter provides instructions for installing the Magnum 700X mixed-media
concentrator and each of th e avai lable Port Modules (PMs).
3.1 Locating Magnum 700X Mini-Concentrators
The location of the Magnum 700X Mini-Concentrator is dependent on the physical
layout of the network and the area to be served. The unit should be set-up in a location that will
accommodate easy and equal access to planned n etwork devices and/or segment connections.
The Magnum 700X is typically shelf mounted either in a wiring closet or in an open area.
Locate an AC receptacle that is within six feet (2 meters) of the intended Magnum
700X site. The rugged metal case of the Magnum 700X will normally protect it from accidental
damage in a wiring closet or in a workplace setting. Keep an open area around the unit so that
convection cooling can occur while the unit is in operation.
3.2 Connecting Ethernet Media
The Magnum 700X Mini-Concentrator is specifically designed to support all Ethernet
media types within a single unit. This is accomplished by using a family of Port Modules (PMs).
The various media types supported along with the corresponding IEEE 802.3 standards and
connector types are as follows:
Media IEEE Standard
ThinNet 10BASE2 BNC
ThickNet 10BASE5 AUI (fe male)
Drop Cable 10BASE5 DTE (male)
Twisted Pair 10BASE-T RJ-45
Fiber (mm1) FOIRL ST or SMA
Fiber (mm1) 10BASE-FL ST or SMA
Fiber (sgl.m2) * ST RPM-SMF
1
mm = multi-mode
2
sgl.m = single-mode
*
not currently standardized by IEEE, typically used up to 4Km actual distance
Connector PM type
RPM-BNC, BPM-BNC
RPM-AUI, BPM-AUI
RPM-DTE
RPM-TP, BPM-TP
RPM-FST, RPM-FSM, BPM-FST
RPM-FST, RPM-FSM, BPM-FST
GARRETT
19
Page 25

Magnum 700X Mini-Concentrators Installation and User Guide (05/98)
3.2.1 Connecting ThinNet 10BASE2 (BNC)
Connect the ThinNet coax cable to the BNC connector on the Magn um RPM-BNC or
BPM-BNC card in the same manner as is done for any standard BNC connection. The PM-BNC
port is specially equipped with an internal termination switch on the front of the card (see Section
4.1 for a description of this switch). This eliminates the need to use a "tee" connector when the
BNC cable is ending at the connection to this PM. Some applications may require a "tee"
connector, used as a tap , to allow the 10BASE2 coax segmen t to continue on past th e PM -BNC
connection.
3.2.2 Connecting ThickNet 10BASE5 (AUI)
Using the steps below as a guide, attach a new or existing 10BASE5 ThickNet drop-cable
directly to the AUI connector on the RPM-AUI or BPM-AUI port.
1. Plug the male end of the cable into the female AUI connector on the PM-AUI
card.
2. Engage the AUI connector slide lock to insure maximum connectivity.
3. Connect the opposite end of the cable into a network AUI port. (This could be a
network backbone transceiver, a hub or fan-out with an AUI backbone port, or an
AUI module in a concentrator.)
The Magnum PM-AUI card may also used for connecting to other Ethernet devices using
standard AUI cabling. In this type of situation, it is important to consider the AUI segment
length to the attached device, including any cascading. (See Chapter 2 for detailed information
on the PM-AUI card, connector pins, and cable lengths.)
3.2.3 Connecting Drop Cable 10BASE5 (DTE)
Using the steps below as a guide, attach the 10BASE5 drop-cable directly to the DTE
connector on the RPM-DTE port.
1. Plug the female end of the cable into the male DTE connector on the RPM-DTE card.
2. Engage the AUI connector slide lock (on the cable) to insure maximum connectivity.
3. Connect the opposite end of the cable into a network AUI port. (This could be a server,
router, bridge, hub, or UNIX workstation.)
3.2.4 Connecting Fiber Optic 10BASE-FL and FOIRL (ST-type, “Twist-Lock")
The following procedure applies to FOIRL and 10BASE-FL applications using an RPMST or BPM-ST card with ST-type fiber connectors. (The primary difference between FOIRL and
GARRETT
20
Page 26

Magnum 700X Mini-Concentrators Installation and User Guide (05/98)
10BASE-FL for users is the maximum distance allowed. 10BASE-FL is used for a fiber segment
length of up to 2000m, while FOIRL is used for fiber segments of up to 1000m in length.)
1. Before connecting the fiber optic cable, remove the protective dust caps from the tips of
the connectors on the PM-ST. Save these dust caps for fu ture use.
2. Wipe clean the ends of the dual connectors with a soft cloth or lint-free lens tissue
dampened in alcohol. Make certain the connectors are clean before connecting.
Note: One strand of the duplex fiber optic cable is coded using color bands
at regular intervals; you must use the color-coded strand on the
associated ports at each end of the fiber optic segment.
3. Connect the Transmit (TX) port (light colored post) on the Magnum PM-FST to the
Receive (RX) port of the remote device. Begin with the color-coded strand of the cable for
this first TX-to-RX connection.
4. Connect the Receive (RX) port (dark colored post) on the PM-FST to the
Transmit (TX) port of the remote device. Use the non-color coded fiber strand for this.
5. The LINK LED on the front of the PM-FST will illuminate when a proper
connection has been established at both ends (and when power is ON in the unit). If
LINK is not lit after cable connection, the normal cause is improper cable polarity. Swap the
fiber cables at the Port Module connector to remedy this situation.
3.2.5 Connecting Fiber Optic (SC-type, "Snap-in")
The same five-step procedure as for fiber ST-type applies to 10BASE-FL applications
using an RPM-FSC card used with SC-type fiber connectors. Follow the five steps as described
in the paragraph above. See Section 2.3.5 for a view of the SC-type connector.
When connecting fiber media to SC connectors, be sure that the fiber cable goes to
another device operating at 10Mb Ethernet speed. (The SC-type fiber connectors are frequently
used at 100Mb speeds, but is rare at 10Mb speed and may be co nfusing accordingly).
3.2.6 Connecting S ingle-Mode Fiber Optic (SMF)
When using the RPM-SMF, be sure to use single-mode fiber cable. Single-mode fiber
cable has a smaller diameter than multi-mode Fiber cable (2/15 - 8/60 microns for single-mode,
50/125 or 62.5/125 microns for multi-mode where xx/xx are the diameters of the core and the
core plus the cladding respect ively). Because of this, single-mode fiber all ows full bandwidth at
longer distances, and may be used to connect nodes up to 10km apart (but note that collisions
increase for distances over 4Km, a maximum-sized collision domain at 10Mb Ethernet speed).
The same five-step procedure for multi-mode fiber ST-type applies to single-mode
fiber connectors. Follow the five steps listed in Section 3.2.4 above.
GARRETT
21
Page 27

Magnum 700X Mini-Concentrators Installation and User Guide (05/98)
3.2.7 Connecting Twisted Pair (RJ-45, Unshielded or Shielded)
The following procedure describes how to connect a 10BASE-T twisted pair segment
to the RJ-45 port on the RPM-TP or BPM-TP. The procedure is the same for both unshielded
and shielded twisted pair segments.
1. Using standard 10BASE-T media, insert either end of the cable with an RJ-45 plug into
the RJ-45 connector of the PM-TP. Note that, even thou gh the PM-TP connector is shi elded,
either unshielded or shielded 10BASE-T cables and wiring may be used.
2. Connect the other end of the cable to the corresponding device.
The Magnum PM-TP is equipped with a cross-over slide switch to accommodate
repeater-to-repeater connect ions without special cross-over connectors.
Set the slide switch to the "down" position for normal twisted pair cable segments from the PMTP to a user device. Set the slide switch to the "up" position for cascaded or up-link segment
connections to another repeater or hub in the network.
To help recall the right slide switch position, remember "up for up-link" !
3.3 Removing the PM Face Plate
The Magnum 700X is normally received from the factory configured with all required
PM modules installed. There may be situations where additional PM cards need to be added or,
in some cases, replaced. In cases where additional PM cards are needed, the face plate for an
available slot must be removed. The following procedure describes this operation.
1. Removing Chassis Cover
STOP!!!
Be sure the power cord is unplugged
from the chassis before attempting to remove
and/or replace an PM car d.
Failure to do so may result in damage to the unit
and will void the warra nty.
GARRETT
22
Page 28

Magnum 700X Mini-Concentrators Installation and User Guide (05/98)
Chassis
Cover
Recessed
Screw Holes
Magnum 700X Chassis
Magnum 700X
Ventilation
Slots
Chassis
Base
Recessed
Screw Holes
Figure 3.3a: Removing Magnum 700X Chassis Cover
There are three screws located on the left and right side of the unit. Remove all screws.
Once removed the chassis cover is easi ly lifted off the chassis base, and the interior of the unit is
exposed. (See Figure 3.3a).
Caution: Be careful n o t to disturb the power supply.
Looking down into the Magnum 700X unit, notice there are individual PM connector
sockets for each PM card. (See Figure 3.3b).
GARRETT
Power Supply
Back of Unit
Left
Side
PM S o ck ets
Front of Unit
Figure 3.3b: Top View of 700X with Chassis Cover Off
23
Power Input
Right
Side
Page 29

Magnum 700X Mini-Concentrators Installation and User Guide (05/98)
2. Remove PM Retaining Screws
On the front of the unit there are two retaining screws for each PM card slot. These
screws are used to secure the face plate in position. These screws are also used to secure
individual PM modules. (See Figure 3.3c).
PM
Retaining
Screws
Magnum 70 0X
Chassis
Base
Magnum 700X Chassis
Figure 3.3c: Front Panel View - PM Retaining Screws
Once the face plate or PM has been removed, proceed to S ect ion 3.4 and install the PM
card.
3.4 Installing PM Cards
Up to seven assorted PM (Port Module) cards are easily installed in the Magnum 700X
Mini-Concentrator chassis. The installation procedure for PMs is described below.
1. Removing 700X Chassis Cover and PM Retaining Screws
Follow the procedure described for Face Plates in Section 3.3, Steps 1 and 2, above.
RP M R e tainin g
Screw Hole
2. Installing the PM Card
Each PM card fits
easily into any available
connector socket slot .
- PM M e dia Int e rface
- ST (Fiber)
- SMA (Fiber)
- BNC (ThinN et)
- AUI (ThickNet)
- RJ-4 5 (Twisted Pair )
- DTE (RS-232)
- SMF (Fiber)
PM Mounting
Plate
Align the connector
pins on the PM card
with the connector
socket inside the unit.
PM
Retaining
Screw H o le
Side View of PM Card
Eight (8 ) Pi n
PM Conector
GARRETT
24
Magnum
PM Card
Page 30

Magnum 700X Mini-Concentrators Installation and User Guide (05/98)
Slowly and firmly push the
PM into position. Once
PM Cards
inserted, secure the PM card
using the two screws on the
front panel of the unit. Once all
PM cards needed have been
Magnum 700X
installed (including face plates
for empty slots), replace the
Magnum 700X Mini-Concentrator
chassis cover.
NOTE:
All PM slots need not be filled in order for the unit to be operational. When
leaving PM slots empty, always use a face plate (Magnum PM-FP ) to cover the
opening in the front panel to keep the unit clean, and for safety.
3.5 Removing PM Cards
To properly remove a PM card from the Magnum 700X Mini-Concentrator, follow the
steps below.
1. Removing 700X Chassis Cover and PM Retaining Screws
Follow the procedure described for Face Plates in Section 3.3, Steps 1 and 2, above.
2. Removing PM Card
Gently pull the PM card up and out of the connector socket. If the slot from which the
PM card has been removed is to remain open be sure to install an PM face plate. If anot her
PM card is replacing the on e that
has been removed, follow the steps
PM Card
as described for installing an PM
card discussed on the preceding
pages.
Magnum 700X
NOTE:
Use a face plate
(Magnum PM-FP) to cover the opening
in the front panel if you are leaving any
700X Mini-Concentrator slots empty.
GARRETT
Magnum 700X Mini-Concentrator
25
Page 31

Magnum 700X Mini-Concentrators Installation and User Guide (05/98)
4.0 OPERATION
This chapter describes the function and operation of the Magnum 700X mixed-media
concentrator and its various Port Modules (PMs).
4.1 Repeater Functionality
The Magnum 700X operates as an Ethernet mini-concentrator or repeater to support the
interconnection of multiple (two to seven) segments. The segments may be individually selected
to be of any media type. The 700X is compliant with IEEE 802.3 specifications and supports all
IEEE-defined Ethernet standard media, inclusive of 10BASE-T, 10BASE-FL, 10BASE2,
FOIRL, 10BASE2, and 10BASE5.
The following describes the basic functionality of the Magnum 700X MiniConcentrator.
1. Repeater Functions:
functions of the Magnum 700X base unit, functioning together as a fully compliant
Ethernet repeater. The entire 70 0X unit counts as a single repeater.
Each RPM port operates in conjunction with the controller
2. Collisions:
port, it generates a jam pattern to the other ports. When a collision signal is detected at
a receiving port, it generat es a jam pattern to the other port. The sequence of jam
signals depends on the sequence and location of collisions.
3. Partit ioning and Re-connection:
(partition) any segment (port) when 64 consecutive collisions occur or after 6.5 ms of
continuous transmissions. Network integrity is checked every 800 ms and segment
(port) reconnection occurs after a 512-bit packet is transmitted without error.
4. Link Stat us:
twisted pair segments. Broken cables or a loss of power at any point in twisted pair
and fiber segments will turn off the LINK LED indicator on the associated RPM.
4.2 BPM Local Bridge Functionality
When configured with BPMs, the network traffic on the Magnum 700X and its RPMattached devices is effectively isolated from the networ k segment connected through each of the
BPMs. The local bridge functionality of the BPM bridge modules is described here.
When a collision is detected at a port other than the original receiving
A Magnum 700X will automatically disconnect
Magnum 700X RPMs indicate link integrity for fiber optic and
GARRETT
26
Page 32

Magnum 700X Mini-Concentrators Installation and User Guide (05/98)
1. Bridge Functions:
Each BPM card contains a compact local bridge module which
filters and forwards packets at full Ethernet wire speed. These micro-bridges are self
learning and have small (256 user) address tables.
Packet filter/forward decisions are made based on whether the packet source
is internal (originates within the local Magnum Hub/Stack) or external (originates from
upstream on the attached segment). If the
packet’s source is internal, it is forwarded to
the outside only if the destination address is
not in the address table. Figure 4.2a shows
Internal packets
are forwarded when
the destination is
NOT IN the address
table.
FWD-X LED “ON”
an internal packet being forwarded to the
external segment.
Figure 4.2b show the
Figure 4.2a: Internal Packet Forwarded
cases where an internal packet is filtered.
When the packet’s source is ext ernal, it
is forwarded to the inside only if the
destination address is in the address
Internal packets
are filtered when
the destination is
IN the address
table.
table.
The filter/forward handling of
external packets are sho wn i n figures
4.2c and 4.2d respectively. When an
internal packet’s source address is not
already in the address tab l e, it is
written there. This happens when a
Figure 4.2b: Internal Packets Filtered
External packets
are forw arded when
the destination is
IN the address
table.
FWD-I LED “ON”
node first sends a packet upon bridge
initialization.
Figure 4.2c: External Packet Forwarded
Note, therefore, that the address table automatically learns addresses,
specifically, it learns those connected via t he RPMs in the front of the 700X, a number
typically well under the 256 table addresses size.
GARRETT
27
Page 33

Magnum 700X Mini-Concentrators Installation and User Guide (05/98)
Should the table become full, the
BPM will clear all entries in the
table by reinitializing itself.
External packets
are filtered when
the destination is
NOT IN the
address tabl e .
When an external
packet’s source address is i n the
address table, it is purged. This
can occur if a node has physically
moved to a different location.
Figure 4.2d: External Packet Filtered
A summary of the filtering, forwarding, and address table maintenance performed by
the BPMs is shown in Table 4.2.
Table 4.2: BPM Functionality
Packet Source Destination Addres s Table Filter/Forward
Source Address
Internal Not in table Not in table Add source to table Forward
Internal Not in table In table Add source to table Filter
Internal In table Not in table Nothing Forward
Address Maintenance Action
Internal In table In table Nothing Filter
External Not in table Not in table Add source to table Filter
External Not in table In table Add source to table Forward
External In table Not in table Purge source from table Filter
External In table In table Purge source from table Forward
2. Throughput Increase:
By using a BPM to isolate a user group segment having
significant local traffic, it is possible to increase overall network throughput. For
example, a segment containing a group of workstations and servers may have heavy
local traffic, but only a small amount of traffic that is directed outside the segment. A
BPM connecting this segment to the rest of the network, as shown in Figure 4.2e, will
keep the local segment traffic is olated from the rest of the network, thus increasing the
effective bandwidth on both the local segment and the rest of the network.
GARRETT
28
Page 34

Magnum 700X Mini-Concentrators Installation and User Guide (05/98)
Magnum 700X
Mini-Concentrator
eu
GARRETT
Network Connection to
Local User Ports with Heavy Local Traffic,
Connected to Magnu m RPMs
External Ne twork via BPM
Figure 3.12.2e: Local Isolation with Bridge Port Module
3. Bridge Transparency:
The BPMs are transparent to both the user and the
application software.
4. LINK and Traffic Status:
The Magnum BPM-TP and BPM-FST indicate link
integrity with an LED. This LINK LED is normally lit. An unlit LINK LED indicates
a broken cable or loss of power at some point in the segment. All BPMs have FWD-I
and FWD-X status LEDs. The FWD-I LED flashes when packets are forwarded into
the local segment. The FWD-X LED flash es when packets are forwarded out of the
local segment.
5. Self-test Diagnostics:
A BPM requires about 15 seconds upon power-up before
bridging services are available. During this time, the BPM performs an internal selftest.
4.3 Powering the Magnum 700X Mini-Concentrator
The Magnum 700X incorporates an internal universal power supply, and has a female
IEC connector for the AC power cord at th e ri ght-rear. A six foot 115 vac power cord is supplied
with each unit. (Except un its being shipped from the GCI factor y ou tside the United States and
Canada will not include a 115 vac power cord.)
The Magnum 700X supports installation environments where the AC voltage is from
90 to 260 volts with a power input frequency between 47 and 63 Hz, and will consume no more
than a maximum of 40 watts. The power connector is located on the back of the unit. In order to
GARRETT
29
Page 35

Magnum 700X Mini-Concentrators Installation and User Guide (05/98)
power down the unit, simply unplug the power cable from either the wall socket, power strip or
power connector on the back of the unit.
When connecting various Ethernet media, there is no need to power down the unit.
Individual segments of any media type can be connected or disconnected without concern for AC
power-related problems or damage to the unit.
4.4 Chassis LEDs
The Magnum 700X Mini-Concentrator is equipped with four LEDs located on the front
of the chassis unit. These LEDs include Power (PWR), Receive (RX) Collision (COL) and
Jabber (JAB). They are used to provide visual indication about the operational condition and
traffic activity of the 700X unit and associated PM cards.
Magnum 700X chassis unit LEDs
LED Description
PWR
RX
COL
JAB
4.5 PM LEDs
For information on the status LEDs of a particular Port Module, please refer to the
cards corresponding section of Chapter 2
Illuminates GREEN to indicate that the 700X unit i s receiving power.
GREEN, ON when data is being received on one or more PM ports.
Flashes YELLOW to indicate a collision has occurred.
Illuminates AMBER to indicate a jabber condition has occurred.
GARRETT
30
Page 36

Magnum 700X Mini-Concentrators Installation and User Guide (05/98)
5.0 TROUBLESHOOTING
All Magnum Ethernet products are designed to provide reliability and consistently
high performance in all network environments. The installation of Magnum 700X MiniConcentrators is a simple procedure (see Section 3.0, INSTALLATION); operation is
very simple and is described in Section 4.0, OPERATION.
Should problems develop during installation or operation, this section should help
to locate, identify and correct such problems. Please follow the suggestions listed below
prior to contacting your supplier. However, if you are unsure of any procedure described
in this section, or if the Magnum 700X is not operating as expected, do not attempt to
repair or alter the unit. Contact your supplier (or if unknown, contact Garrett
Communications) for assistance.
5.1 Before Calling for Assistance
1. If difficulty is encountered when installing or operating the Magnum 700X Mini-
Concentrators, refer back to Section 3.0, Installation and Section 4.0, Operation.
Check to make sure that the various other components of the network are operable.
2. Check the cables and connectors to ensure that they have been properly
connected and the cables/wires have not been crimped or in some way
impaired during installation. (About 90% of network downtime can be attributed
to wiring and connector problems.)
3. Be certain that the AC power cord is plugged into a functioning electrical outlet.
Make sure that the AC power cord is properly plugged into the 700X unit. Use the
PWR LEDs to verify the unit is receiving proper power.
4. If the problem is isolated to a network device other than the Magnum 700X,
it is recommended that the problem device be replaced with a known good
device. Verify whether or not the problem is corrected. If not go to Step 5 below.
If the problem is corrected, the Magnum 700X and its associated cables are
functioning properly.
5. If the problem continues after completing Step 4 above, contact your supplier of
the Magnum 700X unit (or if unknown, contact Garrett Communications) by fax
or by phone for assistance.
GARRETT
31
Page 37

Magnum 700X Mini-Concentrators Installation and User Guide (05/98)
5.2 When Calling for Assistance
Please be prepared to provid e the following information.
1. A complete description of the problem, including the following points:
a. The nature and duration of the problem;
b. Situations when the problem occurs;
c. The components involved in the problem;
d. Any particular applicati on that, when used, appears to create t he problem;
2. An accurat e l ist of Garrett Communications product model(s)involved, with
serial number(s). Include the date(s) that you purchased the products from
your supplier.
3. It is useful to include other network equipment models and related hardware,
including personal computers, workstations, terminals and printers; plus, the
various network media types being used.
4. A record of changes that have been made to your network configuration prior
to the occurrence of the probl em. An y changes to system administrat ion
procedures should all be noted in this record.
5.3 Return Material Authorizat ion (RMA) Procedure
All returns for repair must be accompanied by a Return Material Authorization
(RMA) number. To obtain an RMA number, call Garrett Communications Customer Service
at (510) 438-9071 during business hours in California. When calling, please have the
following information readily available:
Name and phone number of your contact person.
Name of your company / institution
Your shipping address
Product name
Serial Number (or Invoice Number)
Packing List Number (or Sales Order Number)
Date of installation
Failure symptoms, including a full description of the problem.
GARRETT
32
Page 38

Magnum 700X Mini-Concentrators Installation and User Guide (05/98)
Garrett Communications will carefully test and evaluate all returned products, will
repair products that are under warranty at no charge, and will return the warranty-repaired
units to the sender with shipping charges prepaid (see Warranty Information, Appendix A,
for complete details). However, if the problem or condition causing the return cannot be
duplicated by Garrett Communications, the unit will be returned as:
No Problem Found.
Garrett Communications reserves the right to charge for the testing of nondefective units under warranty. Testing and repair of product that is not under warranty
will result in a customer (user) charge.
5.4 Shipping and Packaging Information
Should you need to ship the unit back to Garrett Communications, please follow
these instructions:
1. Package the unit carefully. It is recommended that you use the original
container if available. Units should be wrapped in a "bubble-wrap" plastic sheet
or bag for shipping protection. ( You may retain all connectors and this
Installation Guide.)
CAUTION
Do not pack the unit in Styrofoam "popcorn" type packing material. This material
may cause electro-static shock damage to the unit.
2. Clearly mark the Return Material Authorization (RMA) number on the
outside of the shipping container.
3. Garrett Communications is not responsible for your return shipping charges.
4. Ship the package to:
Garrett Communications
47823 Westinghouse Drive
Fremont, CA 94539
Attn.: Customer Service
GARRETT
33
Page 39

Magnum 700X Mini-Concentrators Installation and User Guide (05/98)
Appendix A: Warranty Information
Garrett Communications warrants its products to be free from defects in materials
and workmanship for a period of three (3) years from the date of shipment by Garrett
Communications.
During this warranty period, Garrett Communications will repair or, at its option,
replace components in the products that prove to be defective at no charge other than
shipping and handling, provided that the product is returned pre-paid to Garrett
Communications.
This warranty will not be effective if, in the opinion of Garrett Communications,
the product has been damaged by misuse, misapplication, or as a result of service or
modification other than by Garrett Communications.
Garrett Communications reserves the right to make a charge for handling and
inspecting any product returned for warranty repair which turns out not to be faulty.
Please complete the warranty card as this acts as a product registration, and mail it
to Garrett Communications within two weeks of your purchase.
GARRETT
34
 Loading...