

Page 1

Owner’s Manual
English / Spanish / French / German
ACE 300i Owner’s Manual
1881 W. State Street
Garland, Texas 75042
USA
Tel: 1.972.494.6151
Email: sales@garrett.com
Fax: 1.972.494.1881
© 2016 Garrett Electronics, Inc. PN 1534210.A.0216
Page 2

TABLE OF CONTENTS
ACE 300i Control Panel ���������������������������������������������������������� 2
Quick Start Guide �������������������������������������������������������������������� 3
ACE 300i Contents �����������������������������������������������������������������4
Detector Assembly ������������������������������������������������������������������5
Power On/Basic Controls �������������������������������������������������������� 6
Frequency Adjust ��������������������������������������������������������������������� 6
Target Information ������������������������������������������������������������������� 7
Audio Features ������������������������������������������������������������������������8
Selecting Modes (Discrimination Patterns) ������������������������������� 9
Sensitivity ������������������������������������������������������������������������������10
Notch Discrimination ������������������������������������������������������������11
Iron Masking ��������������������������������������������������������������������������13
Pinpointing ����������������������������������������������������������������������������� 14
Bench Tests ���������������������������������������������������������������������������16
Hunting Tips With Your ACE 300i����������������������������������������� 17
Troubleshooting Guide ���������������������������������������������������������� 19
Battery Replacement ������������������������������������������������������������20
Metal Detecting Code Of Ethics �������������������������������������������21
Cautions ���������������������������������������������������������������������������������22
Caring For Your ACE 300i Detector ��������������������������������������22
ACE 300i Warranty & Service ����������������������������������������������23
ACE 300i Accessories ����������������������������������������������������������� 24
ACE 300i™
1
Page 3
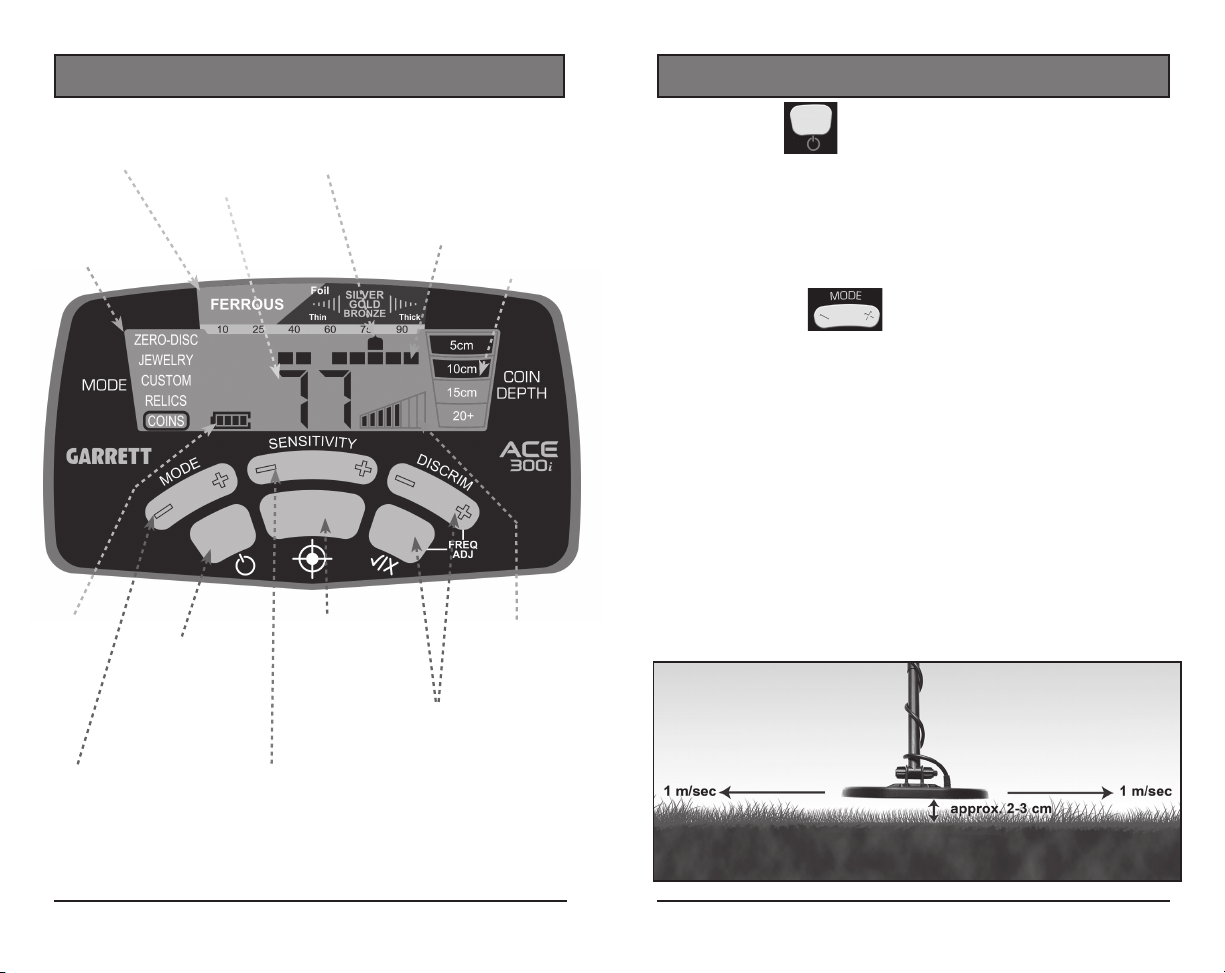
ACE 300i CONTROL PANEL
QUICK START GUIDE
Target ID Legend
indicates metal types.
Mode
Indicator
Battery
Level
Indicator
MODE
Button
selects detection mode (i.e.
discrimination pattern)�
Power ON / OFF:
hold 1 second to turn
power on/off.
Digital
Target ID
SENSITIVITY
Button
increases or
decreases sensitivity�
Target ID Cursor
indicates probable target identity.
Lower Scale
indicates notch
discrimination
pattern.
PINPOINT
Button
Press and hold to
precisely locate a target.
DISCRIM and Accept/Reject
Buttons
Use DISCRIM (+) or (-) to select a
cursor. Then use (/X) button to set
its discrimination on or off.
Frequency Adjust
While holding down (/X) button,
use DISCRIM (+) or (-) to increase
or decrease frequency setting.
Depth
Indicator
indicates depth
of coin-sized
target�
Sensitivity
Setting
1. Power ON.
Press and release the ON / OFF Power button� The ACE 300i
powers on in the last mode used, automatically adjusts for
ground minerals and is ready to search� The detector
operates with four (4) AA batteries which are already
installed by Garrett� (Factory default mode is Coins�)
2. Select Mode.
Use the Mode button to select a different detection mode,
when desired�
3. Adjust settings.
Adjust Sensitivity or Discrimination settings, if desired�
4. Begin scanning.
Lower the searchcoil to approximately 2 to 3cm above the
ground and scan the coil left and right at approximately
1m/second� The coil must be in motion for target
detection, but can remain stationary during Pinpoint�
2
Garrett Metal Detectors
ACE 300
i™
3
Page 4

Searchcoil
Manual
ACE 300i CONTENTS
Control housing with
S-shaped stem
Upper, lower
stem (connected)
Cover-up
Batteries
installed
Coil cover
DETECTOR ASSEMBLY
Loosen lower camlock and extend lower stem� Insert mounting
washers, connect searchcoil to stem as shown, and handtighten wing nut�
Loosen upper camlock, insert S-stem with control housing,
adjust lower stem to comfortable length, and hand-tighten
the camlocks� Wrap cable snugly around the stem with the
first turn of the cable over the stem�
Nut, bolt,
mounting washers
If any part is missing, please contact Garrett Customer Service�
4
Garrett Metal Detectors
Warranty card
Headphones
Note: The arm cuff can be
adjusted by removing the screw
on the bottom and moving it to
the other hole�
5
ACE 300
i™
Page 5

POWER ON/BASIC CONTROLS
TARGET INFORMATION
Battery Level
Indicator
Power ON/OFF
Button
Frequency Adjust
controls
Power ON/OFF—Hold this button for 1 second to turn power
ON or OFF�
Factory Reset —To restore factory settings, press and hold
the power button for 5 seconds (until the detector produces
a fast double beep)�
Battery Level Indicator—Shows continuous status of battery
life� Replace batteries when 1 segment remains�
Frequency Adjust—While
holding down the (/X) button,
use DISCRIM (+) or (-) to increase or decrease the frequency
setting� Choose from four minor frequency adjustments (F1
to F4) in order to minimize interference caused by electrical
sources or other metal detectors�
Target ID Legend
Target ID Legend—Works with the Target ID Cursor to
Target ID Cursor
(Upper Scale)
Discrimination Pattern
(Lower Scale)
Coin Depth
Indicator
Digital Target ID
indicate a target's probable identity, with Ferrous (iron)
targets at the left, non-ferrous targets that are thin or have
low conductivity in the middle, and thick or high conductivity
targets (e�g� thick silver) at the right�
Lower Scale—Displays the current discrimination pattern,
with lighted pixels indicating accepted targets and blank
pixels indicating rejected targets�
Target ID Cursor (Upper Scale)—Will display for every
target, but will produce audio only for targets accepted on the
Lower Scale�
Digital Target ID—Provides a value from 0 to 99 to identify
targets more precisely than the ID cursor�
Coin Depth Indicator—Shows the depth of a coin, or a
similar sized target� Note: targets larger than a coin may
display shallower than actual depth while targets smaller
than a coin may display deeper than actual depth�
The sample chart on the following page provides Digital
Target ID ranges of some commonly found items�
6
Garrett Metal Detectors
FREQUENCY ADJUST
ACE 300
i™
7
Page 6

DIGITAL TARGET ID
Target ID can vary widely based upon the target's size
and thickness because small, thin pieces of metal cannot
conduct electrical current as well as thicker pieces of metal�
In addition, mineralized soils can cause Target ID errors,
especially for small targets�
Tip: Target ID is most reliable when the target is centered
under the searchcoil and the coil is swept flat and at a
constant height above the ground�
AUDIO FEATURES
Tone ID—The ACE 300i produces three distinct tones based
on a target’s metal type and conductivity:
• High conductivity targets (Digital ID > 60) produce a
unique belltone signal�
• Medium to low conductivity targets (Digital ID of 40–60),
produce a medium-pitched signal�
• Ferrous targets (Digital ID < 40) produce a low-pitch
signal�
Headphone Jack—Use any headphones with a 1/4” plug�
SELECTING MODES (Discrimination Patterns)
Example: this is the preset notch discrimination pattern for COINS Mode�
Choose from one of four preset discrimination patterns or
use CUSTOM Mode to save a personal pattern�
Use the MODE buttons to scroll through the five modes:
• ZERO-DISC Mode–Detects every type of metal� All 12
discrimination pixels are switched on; no metals targets
have been notched out (eliminated)� Use this mode to find
all metal items or when the material of the desired object
is unknown� Switch to the Zero-Disc Mode to aid in locating
a target when its signal is inconsistent� Such signals could
mean a trash target is close to a good target�
• JEWELRY Mode–designed to find jewelry such as rings,
bracelets, watches, and necklaces, while ignoring most iron
trash�
• CUSTOM Mode–Can be programmed by the operator
and the ACE 300i will retain the changes when the detector
is switched off� The factory preset for the CUSTOM Mode is
the same as the COINS Mode� Begin with this discrimination
pattern and then use the DISCRIM and Accept/Reject buttons
controls to customize the mode� (For more information, see
pages 11–12.)
8
Garrett Metal Detectors
ACE 300
i™
9
Page 7

• RELICS Mode—designed to eliminate small iron pieces,
while detecting good targets in the lower conductivity range,
such as lead, brass and bronze�
• COINS Mode—designed to find most types of coins
and to eliminate common trash items such as iron and foil�
Some desirable items that respond the same as foil may be
missed� Some digging of junk targets is to be expected, such
as aluminum cans�
SENSITIVITY
Use the (+) or (–) SENSITIVITY buttons to step through the
eight (8) levels� Use increased sensitivity when searching for
very small or very deep targets� Use lower sensitivity levels
when the detector is behaving erratically (due to excessive
metallic trash, highly mineralized soils, electrical interference
or the presence of other metal detectors) and the erratic
operation cannot be resolved with discrimination or by
changing frequency�
NOTCH DISCRIMINATION
Notch Discrimination—Use the DISCRIM (+) or (–) buttons
in conjunction with the ELIM (
objects from detection such as foil or pull-tabs�
The ACE 300i has 12 pixels or "notches" of discrimination,
shown on the lower scale� Any combination of these pixels can
be switched on or off based upon your preference� There are
two primary methods for modifying the Notch Discrimination
Pattern to reject a specific type of trash or unwanted item�
For the first method use the (+) or (-) DISCRIM buttons
to move the Target ID cursor to the left or right� Next, press
the (
/X )
button to eliminate or activate the pixel located
on the Lower Scale, directly below the Target ID cursor� (See
illustrations on next page.)
The second method of modifying the Notch Discrimination
pattern uses only the (
/X )
is audibly detected, simply push the (
a notch at that Target ID Cursor� The next time this item is
encountered, it will not produce an audible signal�
Tip: Notch Discrimination can also be used to find specific
metal items� For example, if an earring has been lost, scan the
matching earring in ZERO-DISC mode and note its Target ID
cursor� Then use the DISCRIM and (
all the pixels except the one for the earring and an additional
pixel on either side to account for some ID variations�
/X )
button to eliminate trash
button� When an unwanted target
/X )
button to create
/X )
buttons to switch off
10
Garrett Metal Detectors
SENSITIVITY
Button
Sensitivity
Indicator
ACE 300
i™
11
Page 8

Example: Manual Modification of Notch Discrimination Pattern
Modify
pattern
with
these
buttons
Use the NOTCH DISC buttons to position the Target ID Cursor above the pixel
you wish to eliminate (see above illustration)� Use the ELIM button to delete
this pixel from the Lower Scale (see below)� This item is now rejected�
IRON MASKING
To prevent an iron object from "masking" out the signal
of an adjacent good target, use just enough discrimination
to barely reject the iron trash (e�g� small nail, as seen in
Illustration 1)� This will allow you to detect the coin and
nail together (see Illustration 2) and not miss/mask a good
target�
Illustration 1
Note: Changes made to the Notch Discrimination pattern
while in CUSTOM Mode will be retained when the detector is
switched OFF� Changes made to all other modes will return to
the factory settings when the detector is switched OFF and
back ON�
12
Garrett Metal Detectors
Illustration 2
ACE 300
i™
13
Page 9

PINPOINTING
Accurate pinpointing enables fast recovery with the
smallest hole possible� To use Pinpoint:
• Position the searchcoil to the side of the target's
suspected location at a fixed height above the ground�
• Press and hold the Pinpoint button and slowly sweep the
searchcoil over the target area while maintaining the
same fixed height above the ground (e�g� 2–3cm)�
• Sweep the searchcoil side-to-side and front-to-back in a
crosshair pattern to locate the peak signal, indicated by
the loudest audio and the greatest number of segments
on the Upper Scale�
• The center of the searchcoil is directly over the target
with the depth of a coin-sized target shown on the
depth scale� The symbol "PP" for pinpoint displays on
the LCD while pinpointing�
It is recommended to practice pinpointing in a test plot�
Upper Scale indicates
signal strength
For the best
pinpointing
results, maintain
a constant height
above the ground
(e�g� 2–3cm)�
Coin Depth
Indicator
PINPOINT Button
(Press and hold to pinpoint)
14
Garrett Metal Detectors
Indicates
pinpointing
center of the
7" x 10"
searchcoil�
ACE 300
i™
15
Page 10

BENCH TESTS
HUNTING TIPS WITH YOUR ACE 300i
You should conduct bench tests to become more familiar
with your detector’s operation� To conduct a bench test:
1� Place the searchcoil on a flat, non-metallic surface that is
several feet from other metallic objects�
2� Select the ZERO-DISC mode�
3� Pass various metal objects (coins, bottle caps, nails, etc�)
across the searchcoil at a distance of 8 to 10cm� Your
metal detector will audibly and visually identify the target�
4� Perform this test in all the modes available on your
detector� Observe the sounds
as well as the graphics on
the LCD that are made in
each mode�
5� Record the results of your
bench tests and refer to them
when hunting in the field�
Once you have determined how your test targets register
on the Target ID during bench tests, test them in the soil� Bury
your targets at recorded depths to create a "test plot�" Note
how various targets read based upon whether they are lying
in the ground flat or at various angles�
Keep accurate records or surface markers to indicate your
test plot targets and their depths� Try testing these targets
again in several months after the ground has settled, during
periods of extreme drought or after a soaking rain� Take note
of any changes in how these targets are detected�
• If you are new to metal detecting, start searching in areas
with sandy and loose soil to make it easier to learn how to
use your metal detector, pinpoint and dig targets�
• Keep your searchcoil height about 2–3cm above and
parallel to the ground at all times for best detection results�
CORRECT
SWING
INCORRECT
SWING
• Swing your searchcoil parallel to plow lines and the
water's edge� This will minimize the negative effects
caused by uneven ground in plowed fields and varying
amounts of moisture near the water� Do not swing the
searchcoil perpendicular to plow lines and the water's edge,
as this may produce abrupt changes in ground response
that can reduce the detector's performance�
• Walk slowly as you scan your searchcoil in a straight line
from side to side at a speed of about 1 meter per second�
Advance the searchcoil about half the length of the
searchcoil at the end of each sweep�
16
Garrett Metal Detectors
ACE 300
i™
17
Page 11

TROUBLESHOOTING GUIDE
Overlap Swing
by 12cm
1m/sec
1m/sec
1m/sec
Overlap Swing
by 12cm
In order to fully search an area, overlap the swings of your searchcoil by
half the length of the coil (about 12cm)� Sweep the searchcoil in a straight
line or with a slight arc at a sweep speed of about 1m/sec�
SYMPTOM SOLUTION
No power
Erratic sounds or
target ID cursor
movement
Intermittent Signals
I’m not finding
specific targets
Target ID Cursor
bounces
1. Ensure batteries are installed in the correct orientation.
2. Replace all old batteries with all new batteries.
1. Ensure your searchcoil is securely connected and the coil
cable is snugly wound around the stem.
2. If using the detector indoors, be aware that excessive
amounts of electrical interference exists, plus excessive
amounts of metal can be found in floors and walls.
3. Determine if you are close to other metal detectors or other
metal structures such as electrical power lines, wire fences,
benches, etc.
4. Adjust frequency.
5. Reduce your sensitivity setting.
Intermittent signals typically mean you’ve found a deeply
buried target or one that is positioned at a difficult angle for
your detector to read. Scan from different directions to help
define the signal. In the case of multiple targets switch to the
ZERO-DISC Mode or press the pinpoint button to precisely
locate all targets. In trashy areas, use the Super Sniper™
or a 5" x 8" DD searchcoil. (NOTE: Iron targets may cause
Intermittent Signals. You can identify iron targets in ZERODISC Mode.)
Ensure you are using the correct mode for the type hunting
you are doing. If specifically hunting for coins, COINS mode
should be your best choice to eliminate other undesirable
targets. You may also use the ZERO-DISC mode, which
detects all metal targets to ensure desired targets are present.
If your Target ID Cursor bounces erratically, chances are
you’ve found a trash target. However, a Target ID Cursor may
bounce if a good target (such as a coin) is not parallel to the
searchcoil (e.g. on edge). It may also bounce if there is one
or multiple “junk” targets laying next to the good target. Scan
from different directions until your Target ID Cursor becomes
more stable.
NOTE: Large, flat pieces of iron—depending on their
orientation in the ground—can read as a good target or can
cause erratic Target ID Cursor movement.
18
Garrett Metal Detectors
ACE 300
i™
19
Page 12

Battery Level
Indicator
BATTERY REPLACEMENT
METAL DETECTING CODE OF ETHICS
The following is a Code of Ethics that many treasure hunters
and clubs follow to preserve our exciting sport of metal
detecting� We encourage you to do the same:
• I will respect private and public property, all historical and
archaeological sites and will do no metal detecting on
these lands without proper permission�
Four bars indicate fully charged batteries� Replace batteries
when there is only 1 bar remaining� The detector will maintain
full performance until the batteries need to be replaced�
NiMH rechargeable batteries may be used, but may have
a shorter life per charge� You can expect 20 to 40 hours of
operation depending on battery type and quality�
Replace the batteries by sliding the cover off the control
housing� Remove batteries when the ACE 300i will be stored
for longer than 30 days�
Note: 1�5V/cell Lithium batteries can also be used, but the
use of 3�7V/cell Lithium batteries will damage the detector�
• I will keep informed on and obey all local and national
legislation relating to the discovery and reporting of found
treasures�
• I will aid law enforcement officials whenever possible�
• I will cause no willful damage to property of any kind,
including fences, signs and buildings�
• I will always fill the holes I dig�
• I will not destroy property, buildings or the remains of
deserted structures�
• I will not leave litter or other discarded junk items lying
around�
• I will carry all rubbish and dug targets with me when I leave
each search area�
• I will observe the Golden Rule, using good outdoor manners
and conducting myself at all times in a manner which will
add to the stature and public image of all people engaged
in the field of metal detection�
20
Garrett Metal Detectors
ACE 300
i™
21
Page 13

CAUTIONS
ACE 300i WARRANTY & SERVICE
When searching for treasure with your Garrett detector, observe
these precautions:
• Never trespass or hunt on private property without permission�
• National and state parks / monuments and military zones, etc�
are absolutely off-limits�
• Avoid areas where pipelines or electric lines may be buried� If
found, do not disturb and notify proper authorities�
• Use reasonable caution in digging any target, particularly if you
are uncertain of the conditions�
• If you are unsure about using your metal detector in any area,
always seek permission from the proper authorities�
CARING FOR YOUR ACE 300i DETECTOR
Your Garrett detector is rugged, designed for outdoor use� However,
as with all electronic equipment, there are some simple ways you
can care for your detector to maintain its high performance�
• Avoid extreme temperatures as much as possible, such as storing
the detector in an automobile trunk during the summer or
outdoors in sub-freezing weather�
• Keep your detector clean� Disassemble the stem and wipe it,
the control housing, and the searchcoil with a damp cloth when
necessary�
• Remember that your searchcoil is submersible, but your
control housing and connectors are not�
• Protect your control housing from heavy mist, rain and blowing
surf�
• When storing for longer than one month, remove the batteries
from the detector�
• When changing batteries, use quality alkaline or rechargeable
batteries, and replace with all new batteries for optimum
performance�
Your ACE 300i detector is warranted for 24 months,
limited parts and labor, but does not cover damage caused
by alteration, modification, neglect, accident or misuse�
In the event you encounter problems with your ACE 300i
detector please read through this Owner’s Manual carefully
to ensure the detector is not inoperable due to manual
adjustments� Press and hold the power button for 5 seconds
to return to the recommended factory settings�
You should also make certain you have:
1� Checked your batteries and connectors� Weak batteries
are the most common cause of detector “failure�”
2� Contacted your dealer for help, particularly if you are not
familiar with the ACE 300i detector�
In the event that repairs or warranty service are necessary
for your ACE 300i, contact the local retail outlet where your
detector was purchased� To avoid excessive shipping and
import charges, do not attempt to return a Garrett product to
the factory in the United States�
Information on international warranty/repair needs can be
found on the Garrett website: www.garrett.com� Click on the
Sport/Hobby Division and then the Technical Support page
for more details�
22
Garrett Metal Detectors
ACE 300
i™
23
Page 14

ACE 300i ACCESSORIES
Garrett offers a complete line of accessories that will
increase your success and enjoyment of treasure hunting
with your new detector.
These products—including optional ACE searchcoils, Garrett
Pro-Pointer pinpointing detectors, and a wide selection of
books on treasure hunting—are available from your dealer or
by calling Garrett's factory at 1-800-527-4011.
To see Garrett's complete collection of metal detector accessories
and books, please visit www.garrett.com and view products
within our Hobby/Sport Division.
24
Garrett Metal Detectors
 Loading...