

Garmin nuvi 350 OEM Honda Access,Canada, nuvi 350 Honda,North America, nuvi 350 Quick Reference
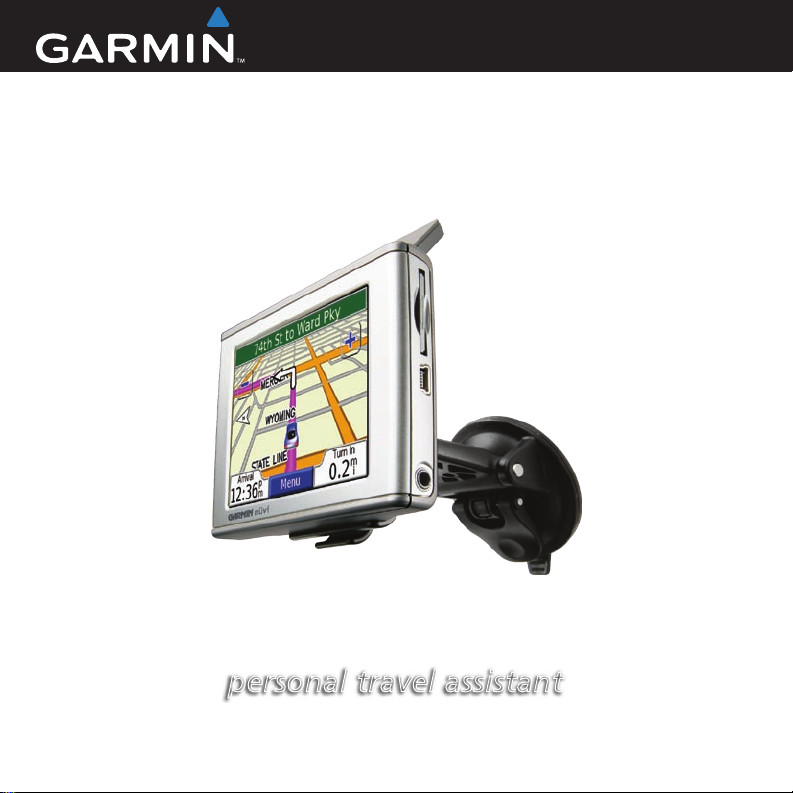
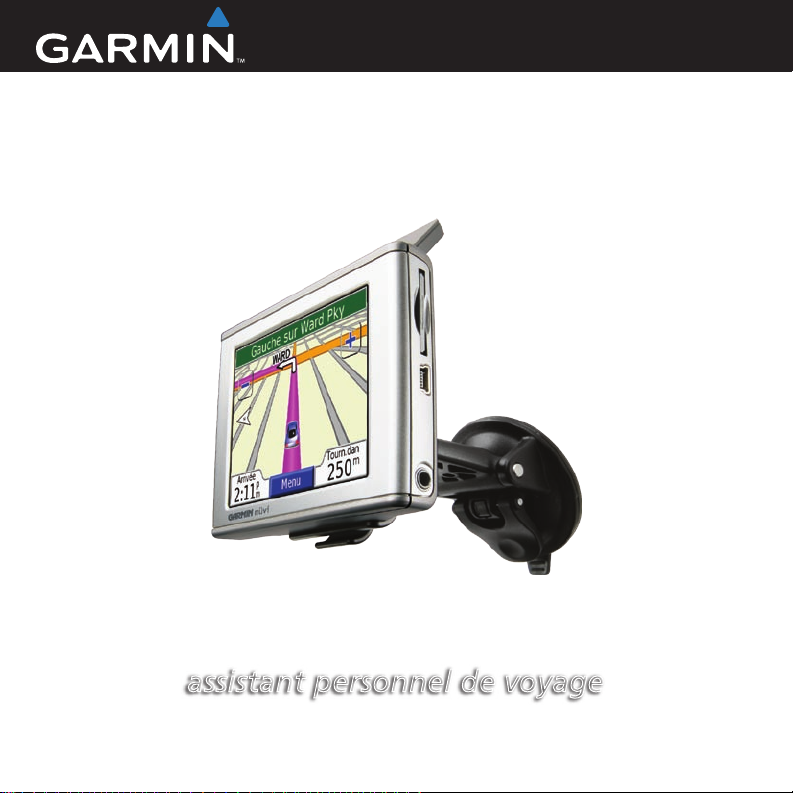
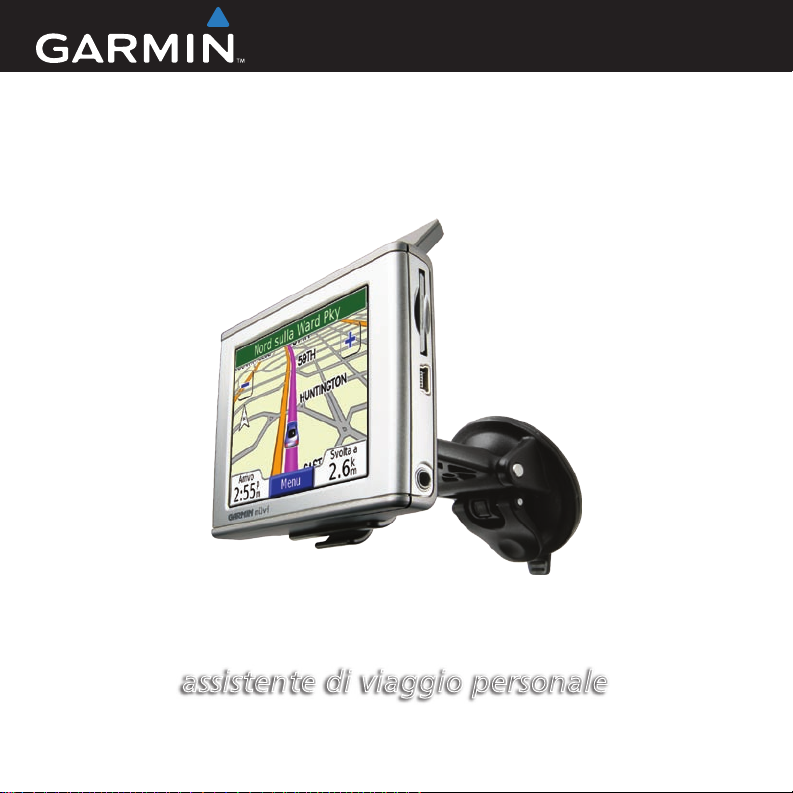
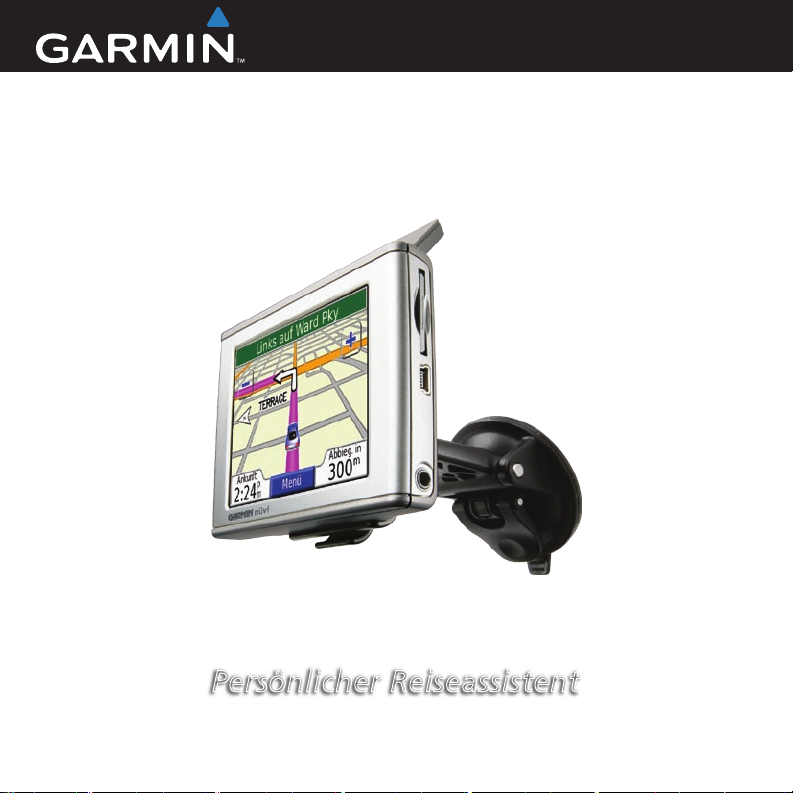
personal travel assistant
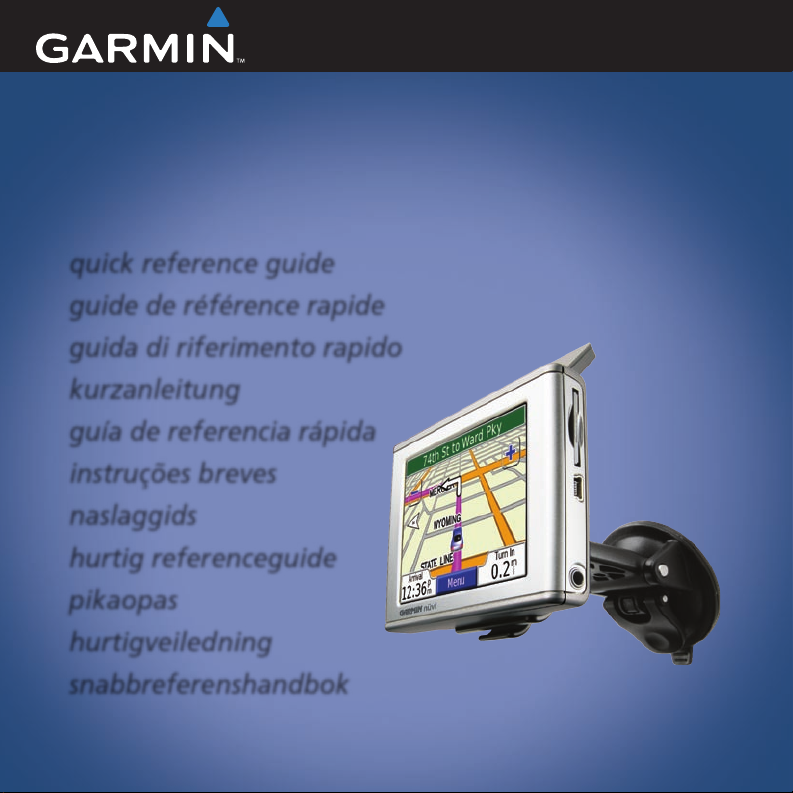
nüvi® 300/350
quick reference guide
guide de référence rapide
guida di riferimento rapido
kurzanleitung
guía de referencia rápida
instruções breves
naslaggids
hurtig referenceguide
pikaopas
hurtigveiledning
snabbreferenshandbok

© 2005–2007 Garmin Ltd. or its subsidiaries
Garmin International, Inc.
1200 East 151st Street,
Olathe, Kansas 66062,
U.S.A.
Tel. 913/397.8200
or 800/800.1020
Fax 913/397.8282
All rights reserved. Except as expressly provided herein, no part of this manual may be
reproduced, copied, transmitted, disseminated, downloaded or stored in any storage medium,
for any purpose without the express prior written consent of Garmin. Garmin hereby grants
permission to download a single copy of this manual onto a hard drive or other electronic
storage medium to be viewed and to print one copy of this manual or of any revision hereto,
provided that such electronic or printed copy of this manual must contain the complete text
of this copyright notice and provided further that any unauthorized commercial distribution
of this manual or any revision hereto is strictly prohibited.
Information in this document is subject to change without notice. Garmin reserves the right
to change or improve its products and to make changes in the content without obligation to
notify any person or organization of such changes or improvements. Visit the Garmin Web
site (www.garmin.com) for current updates and supplemental information concerning the
use and operation of this and other Garmin products.
Garmin® and nüvi® are trademarks of Garmin Ltd. or its subsidiaries, registered in the USA
and other countries. These trademarks may not be used without the express permission of
Garmin. Windows® is a registered trademark of Microsoft Corporation in the United States
and/or other countries. Mac® and iTunes® are registered trademarks of Apple Computer, Inc.
Garmin (Europe) Ltd.
Unit 5, The Quadrangle,
Abbey Park Industrial
Estate, Romsey,
SO51 9DL, U.K.
Tel. 44/0870.8501241
Fax 44/0870.8501251
Garmin Corporation
No. 68, Jangshu 2nd Road,
Shijr, Taipei County, Taiwan
Tel. 886/2.2642.9199
Fax 886/2.2642.9099
February 2007 Part Number 190-00627-91 Rev. C Printed in Taiwan
Quick Reference Guide
nüvi® 300/350
personal travel assistant
WARNING: See the Important Safety and Product Information guide in the product box for product
warnings and other important information.
Check your state and local trafc laws before mounting. Currently, state laws in California and Minnesota
E
prohibit drivers from using suction mounts on their windshields while operating motor vehicles. Other
N
Garmin dashboard or friction mounting options should be used. See the Important Safety and Product
Information guide for more details.
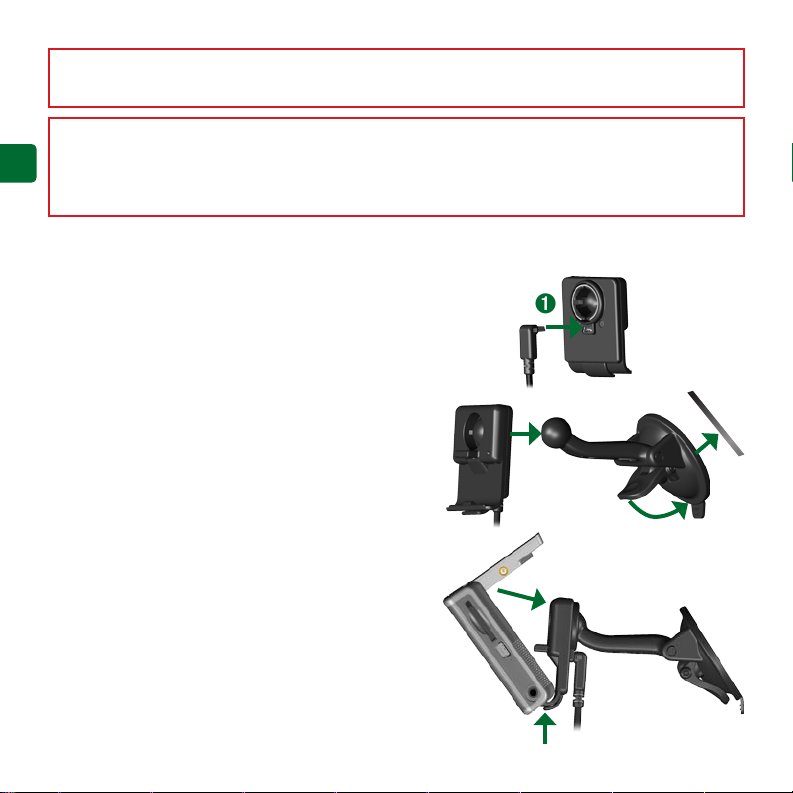
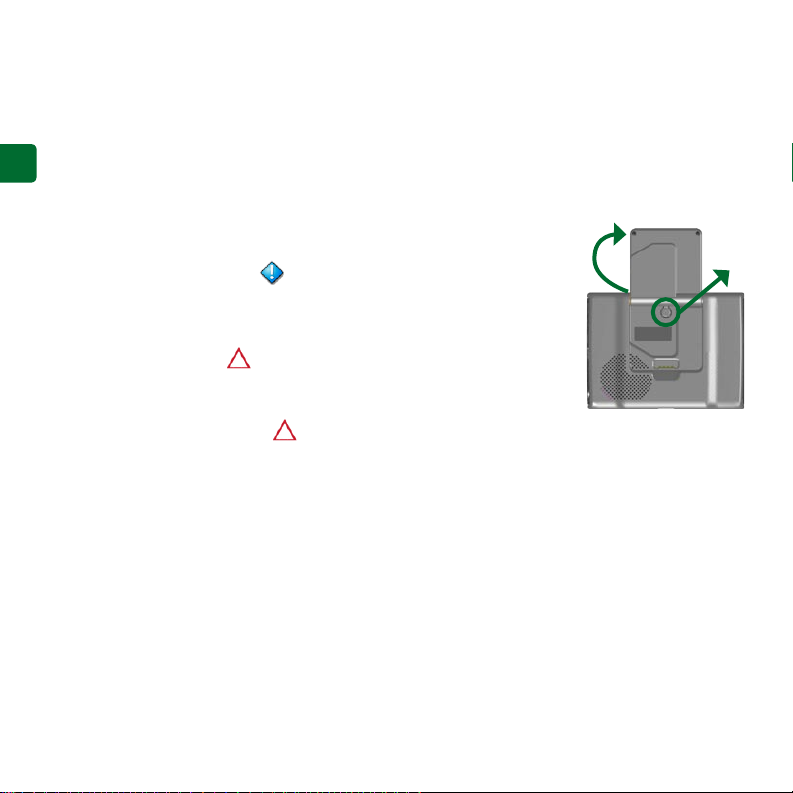
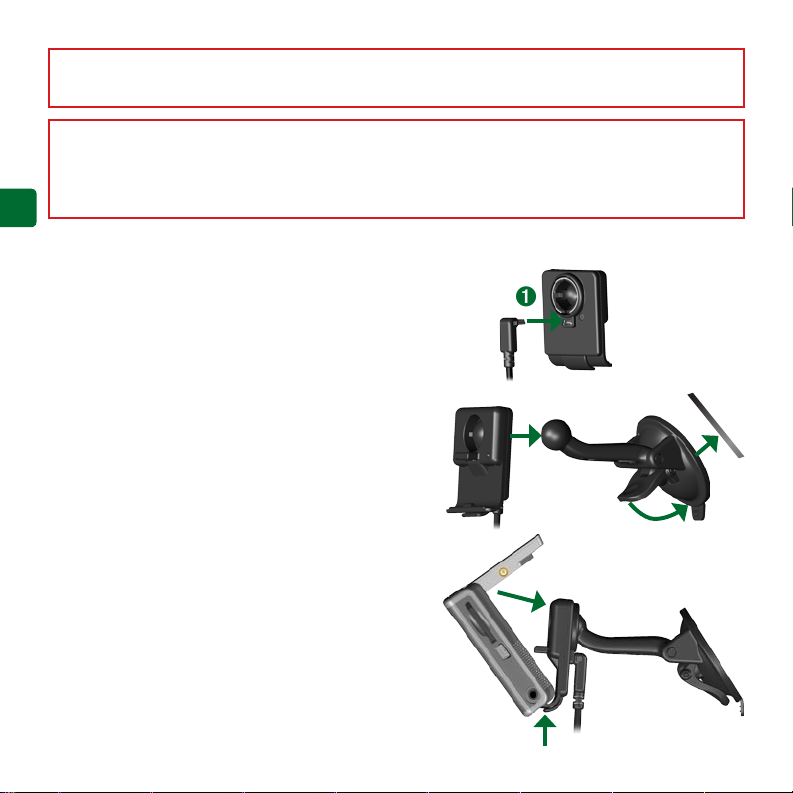
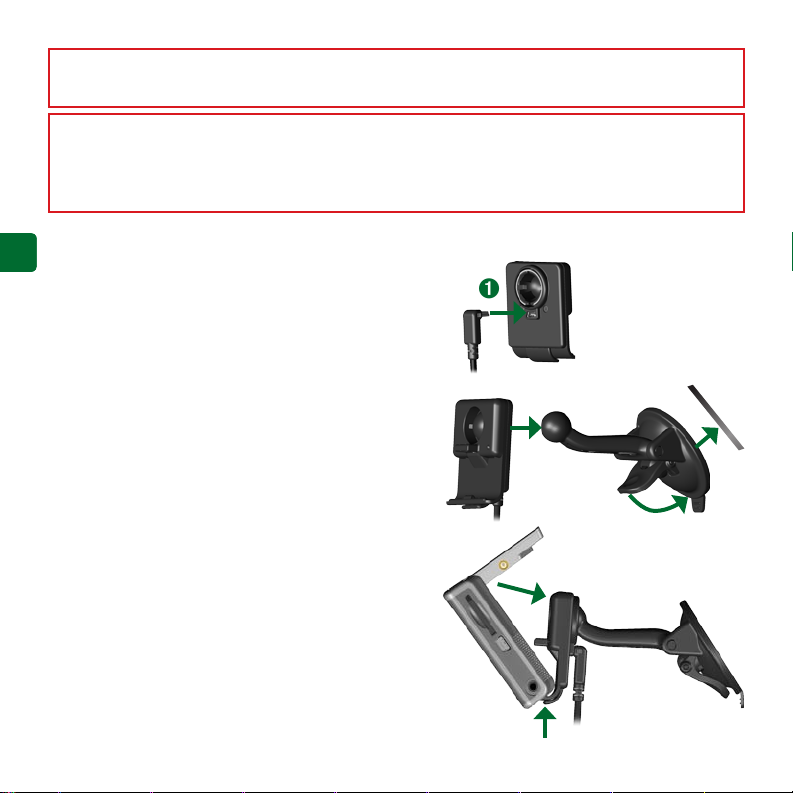
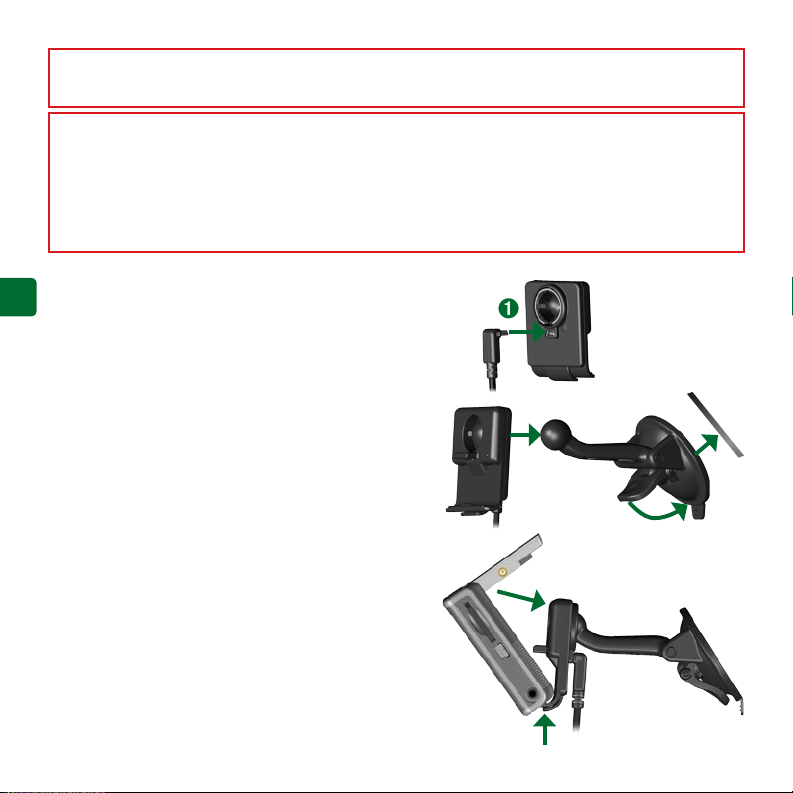
Mounting Your nüvi
For a tight grip, clean and dry your windshield before
mounting the suction cup.
Plug the power cable into the back of the cradle.
1.
Snap the cradle onto the suction cup arm.
2.
Place the suction cup on the windshield.
3.
Flip the lever back, toward the windshield.
4.
Flip up the GPS antenna, and then t the bottom
5.
of your nüvi into the cradle.
Tilt the nüvi back until it snaps into place.
6.
Plug the power cable into a power receptacle
7.
in your vehicle. Your unit should turn on
automatically if it is plugged in and your vehicle
is running.
➊
➋
➍
➏
Windshield
➌
EN-2
➎
WARNING: This product contains a lithium-ion battery. To prevent damage and risk of re due to high
temperatures, remove the unit from the vehicle or store it out of direct sunlight, such as in the glove box. For
more information, see www.garmin.com/safety.
Charging Your nüvi
Connect the nüvi to the mount, and start
•
your vehicle.
Connect the USB cable to the nüvi and
•
your computer.
Connect the AC adapter to a wall outlet
•
and the mini-USB connector on the side
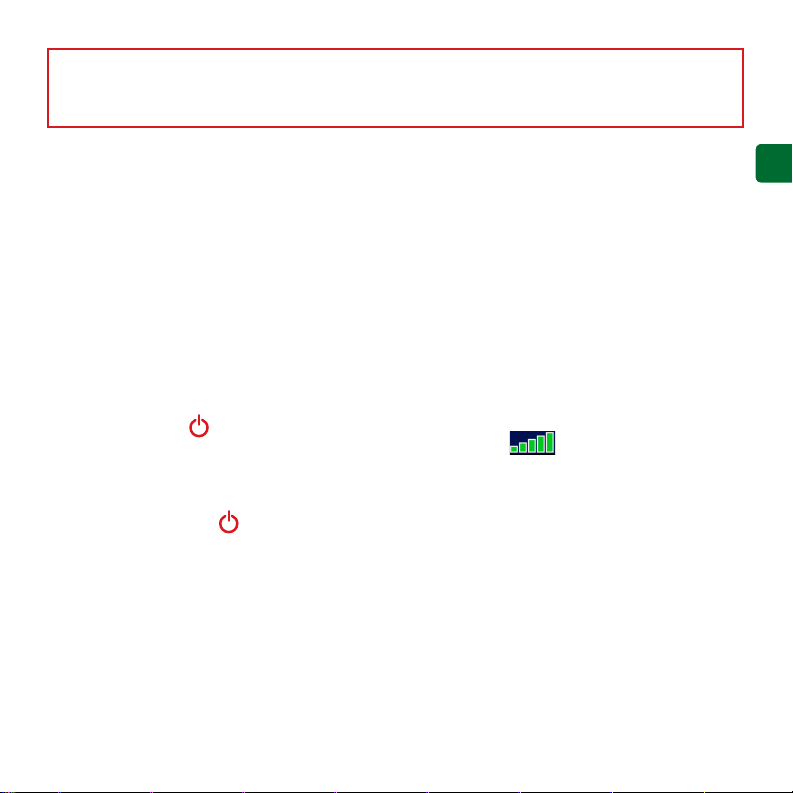
Acquiring Satellites
Before the nüvi can nd your current
location and navigate a route, you must do
the following:
1.
2.
of the nüvi. The AC adapter is included
with the nüvi 350 only.
Turning On the nüvi
Press and hold the Power button on the
top of the unit to turn it on. Follow the onscreen instructions to set up your nüvi; you
only have to do this once. To turn your nüvi
off, press and hold the Power button.
3.
Acquiring satellite signals can take a few
minutes. The bars indicate satellite
strength.
More Information
Download the English owner’s manual from
www.garmin.com/products/nuvi. Click the
Manuals link, and then click Download.
nüvi 350 users: You can access a PDF le
of the owner’s manual on the nüvi’s internal
memory. See page 7 for more information.
E
N
Go outdoors to an open area, away from
tall buildings and trees.
Flip up the GPS antenna on the back
of the nüvi, so that it is parallel to the
ground.
Turn on the nüvi.
EN-3
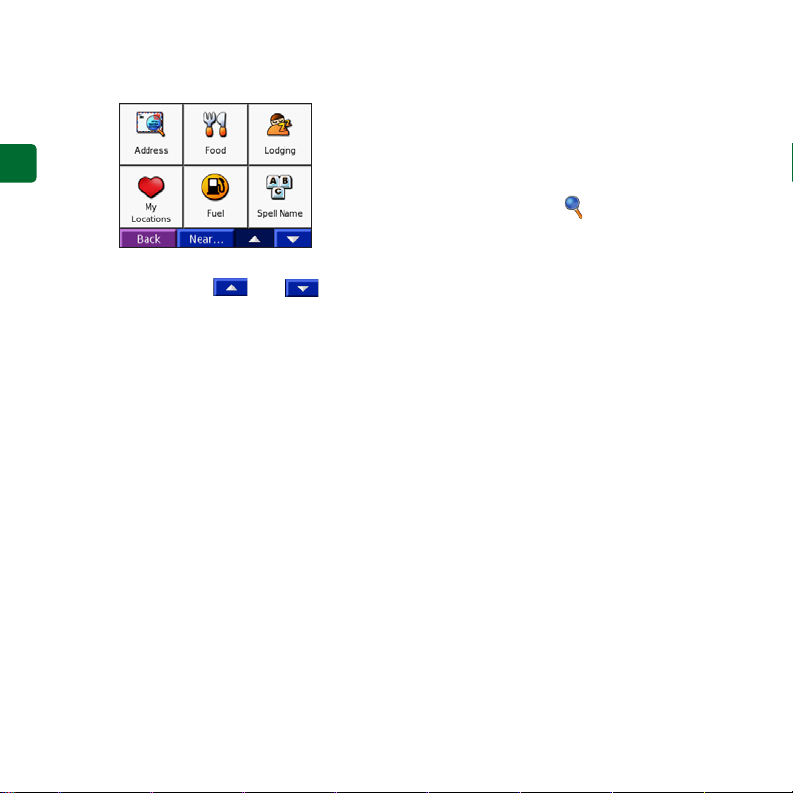
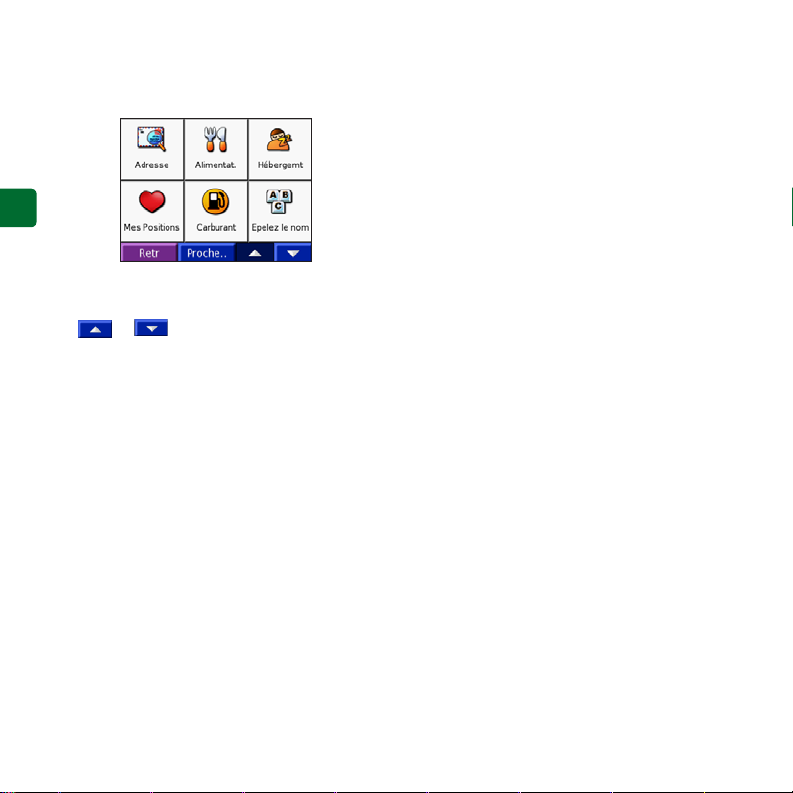
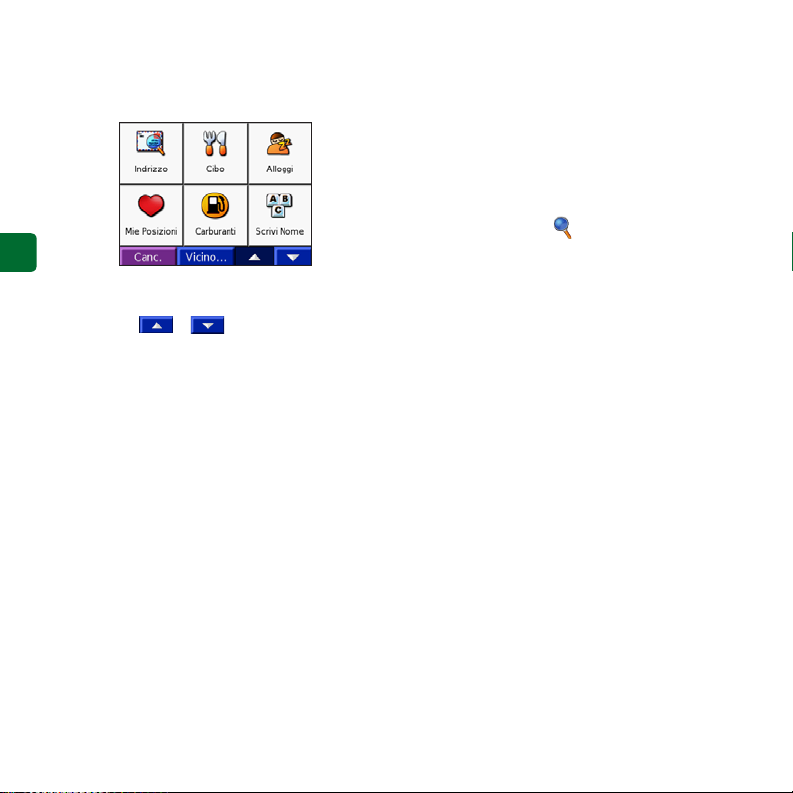
Finding Your Destination
From the Menu page, touch Where to.
1.
E
N
Select a category, and a sub-category, if
2.
necessary. Touch and to see
more choices.
Select a destination.
3.
Touch Go.
4.
Enjoy the route!
5.
As you travel, your nüvi guides you to your
destination with voice prompts, arrows on
the map, and directions at the top of the Map
page. If you depart from the original route,
your nüvi recalculates the route and provides
new route instructions.
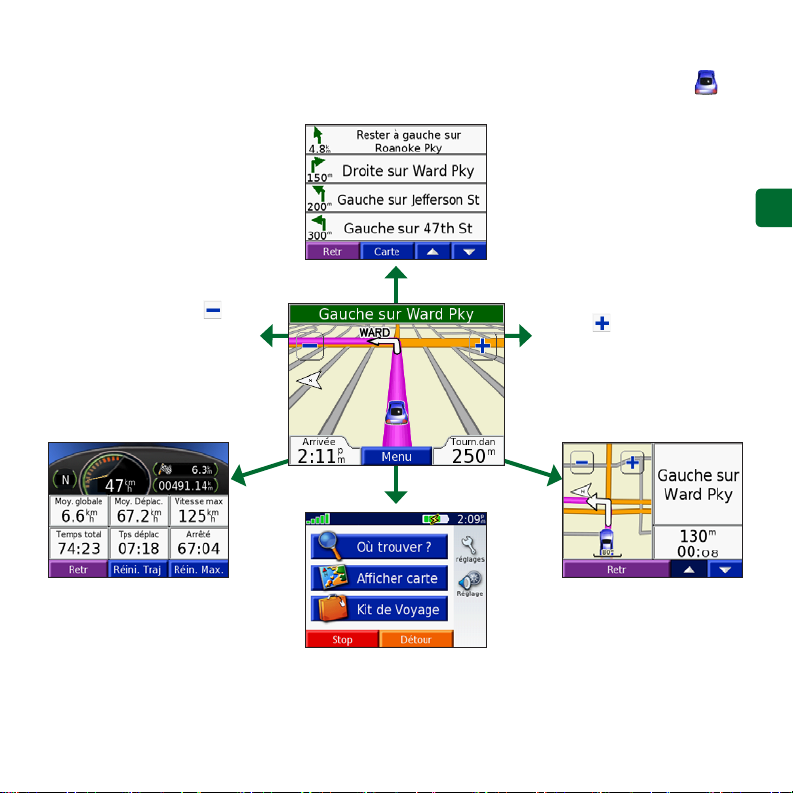
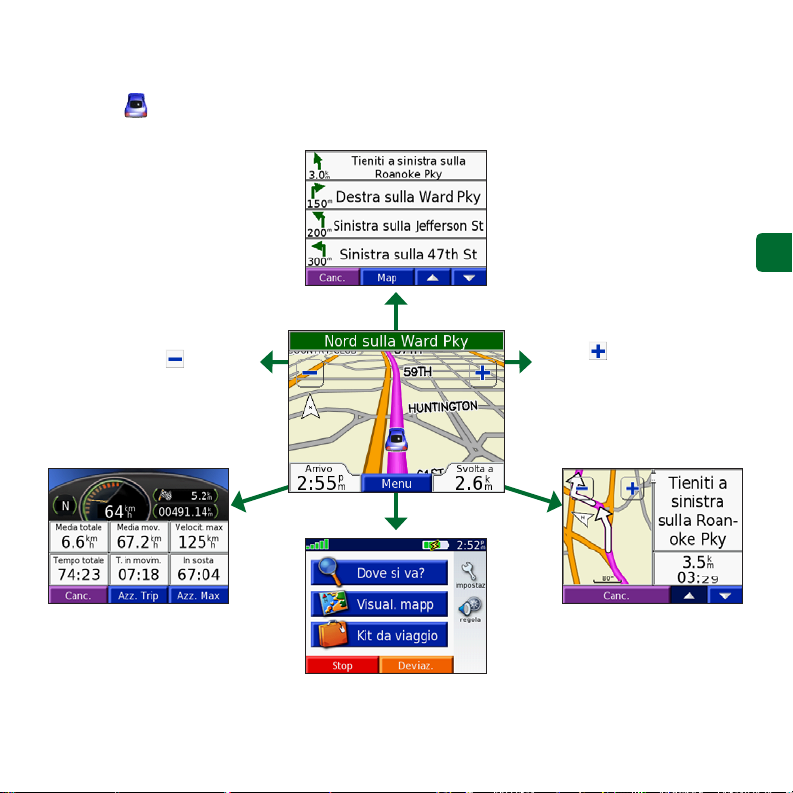
Adding a Stop to the Route
You can add a stop to your route. The nüvi
gives you directions to the stop and then to
your nal destination. Note: You can add
only one stop to your route.
While navigating a route, go to the Menu
1.
page, and touch Where to.
Search for the extra stop.
2.
Touch Go.
3.
Touch Yes to add this stop before your
4.
destination. Or, touch No to make this
your new nal destination.
Taking a Detour
When navigating a route, touch Menu >
Detour.
The nüvi attempts to get you back on your
original route, as soon as possible. If the
route you are currently taking is the only
reasonable option, the nüvi might not
calculate a detour.
Stopping the Route
When navigating a route, touch Menu >
Stop.
EN-4
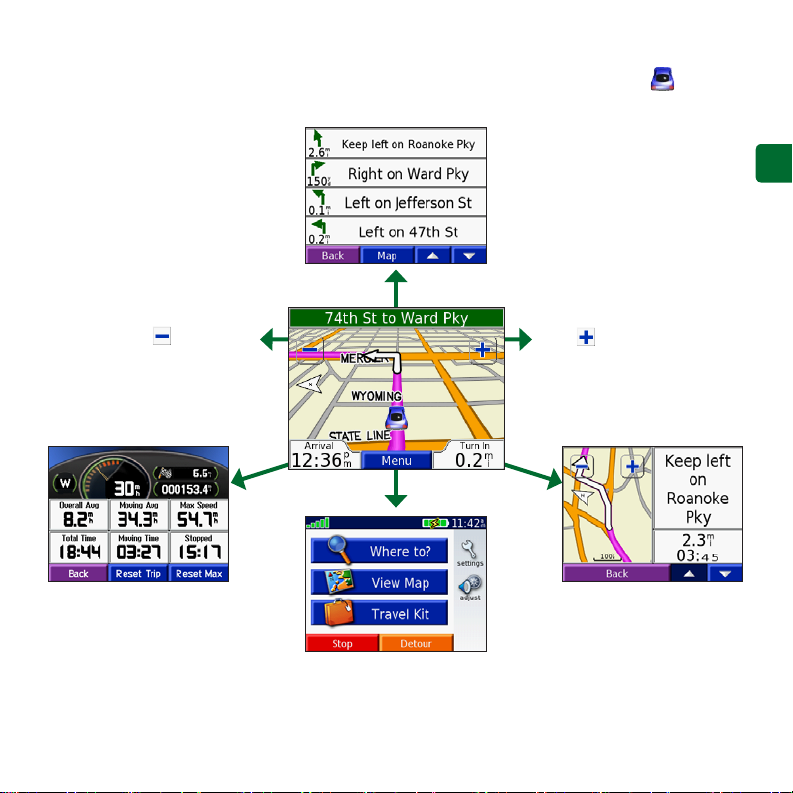
Viewing the Map Page
From the Menu page, touch View map to open the Map page. The position icon shows
your current location. Touch buttons on the Map page to see additional information.
Touch the directions bar to
open the Current Route page.
E
N
Touch to zoom out.
Touch Arrival or Speed to open
the Trip Information page.
Touch to zoom in.
Touch Turn In to open
the Next Turn page.
Touch Menu to open
the Menu page.
EN-5
Finding an Address
From the Menu page, touch Where to >
1.
Address.
Select the country (if necessary) and the
2.
E
N
state/region.
Select or enter the city/postal code.
3.
Type the address number. Touch Done.
4.
Type the street name until a list of
5.
streets appears, or touch Done.
Select the street.
6.
Select a city, if necessary.
7.
Select the address. Touch Go.
8.
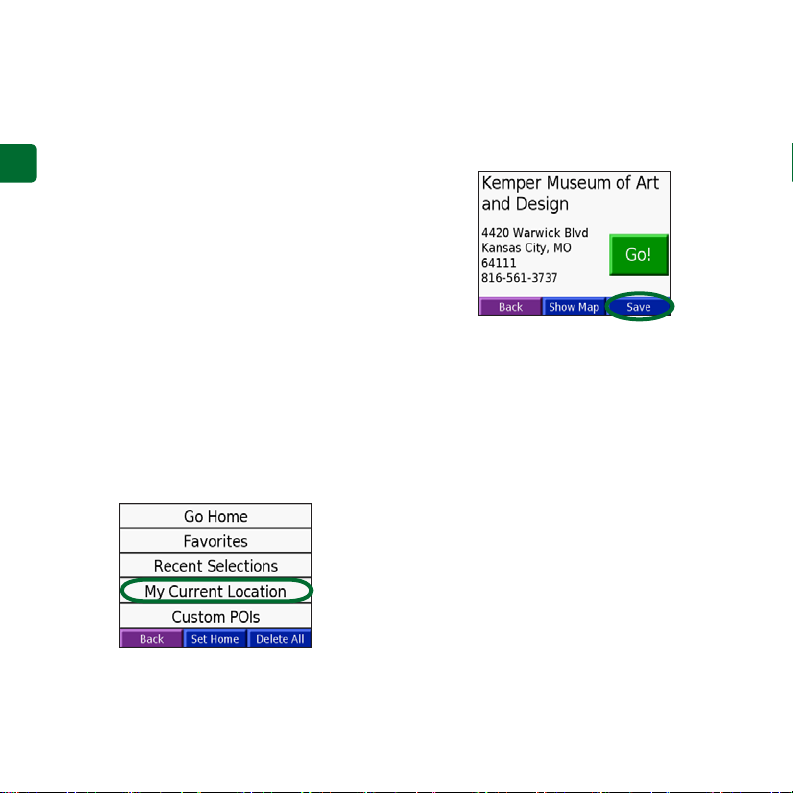
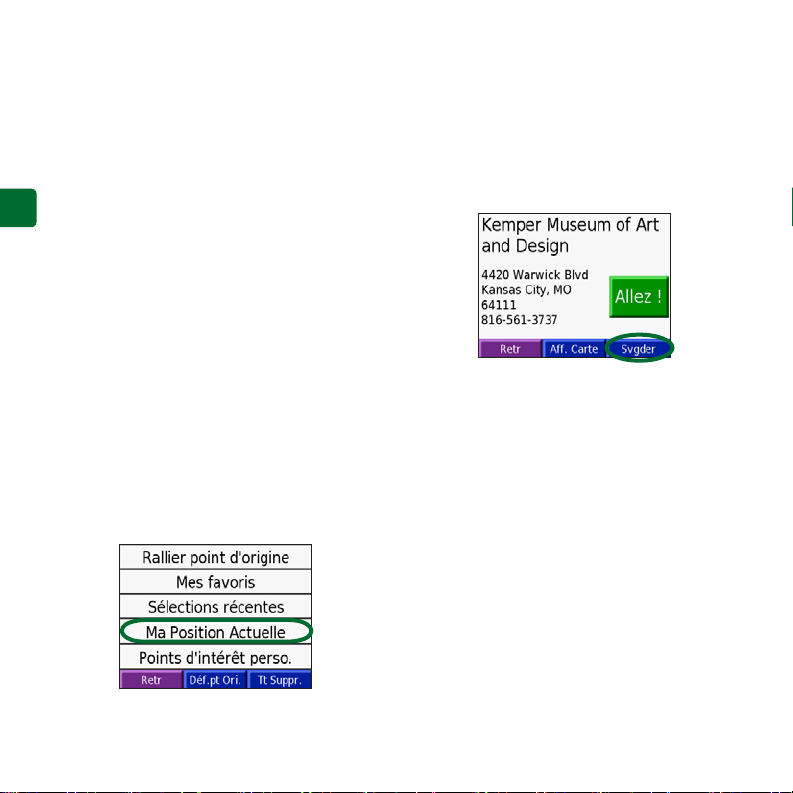
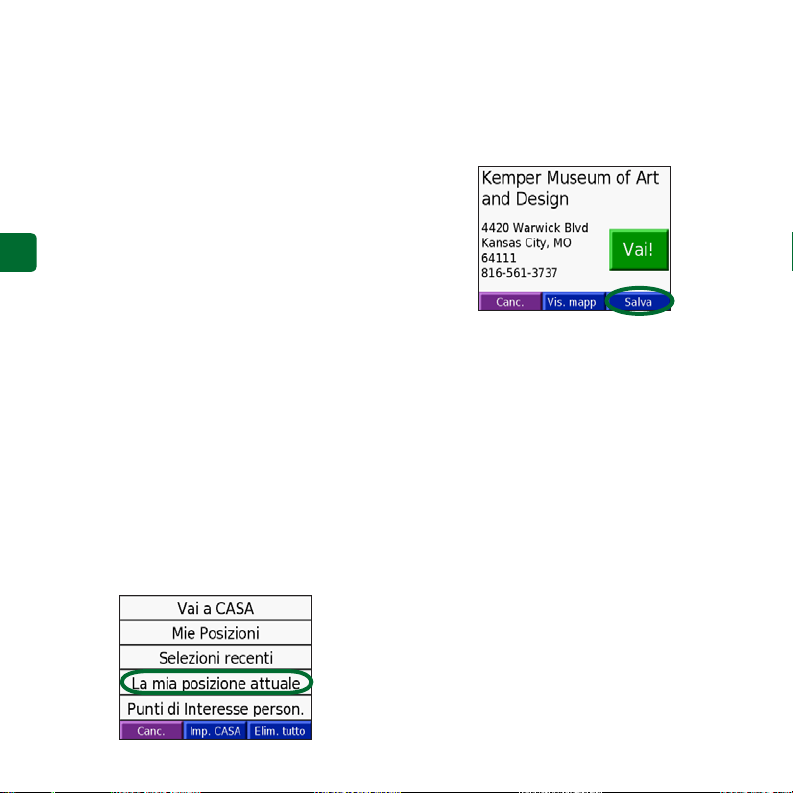
Saving Your Current Location
From the Menu page, touch Where to.
1.
Touch My Locations > My Current
2.
Location.
Touch Save > Yes.
3.
Saving Places You Find
After you have found a place you want
1.
to save, touch Save.
Touch OK. The place is saved in My
2.
Locations > Favorites.
Finding Saved Places
From the Menu page, touch Where to.
1.
Touch My Locations > Favorites.
2.
Setting a Home Location
Touch Where to > My Locations.
1.
Touch Set Home.
2.
Select an option to nd and set your
3.
home location.
After you have set your home location,
you can route to it at any time by touching
Where to > My Locations > Go Home.
EN-6
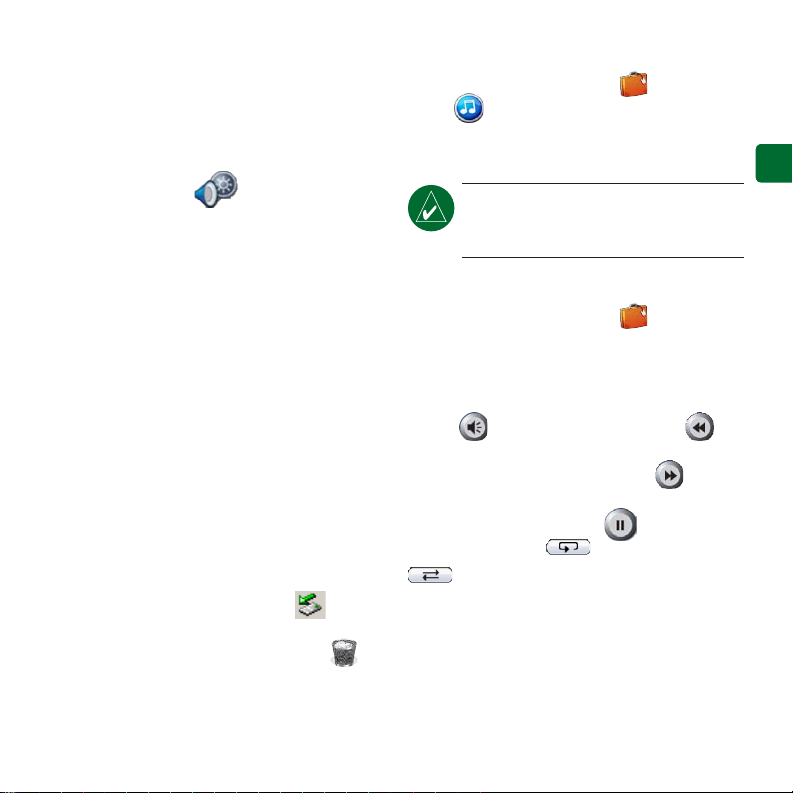
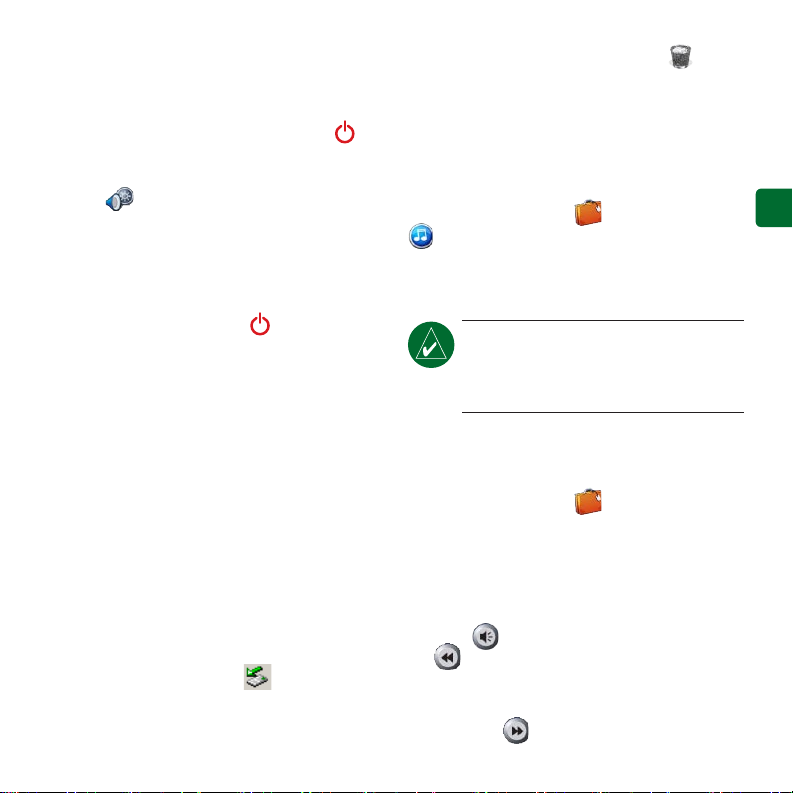
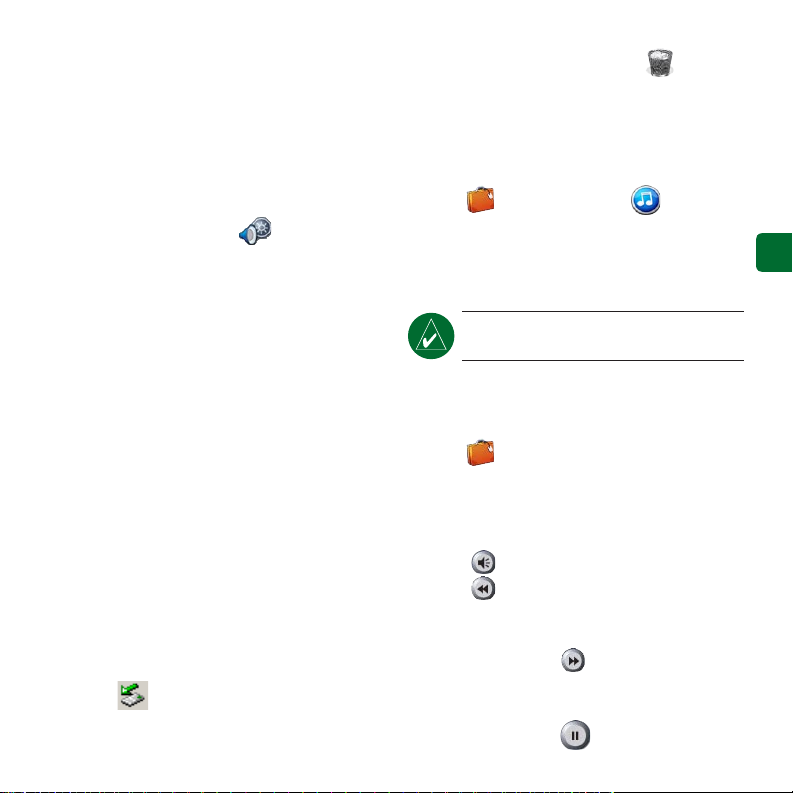
Adjusting the Volume and
Brightness
To access the Quick Settings, quickly press
and release the Power button. Move the
sliders to adjust the volume and brightness.
You can also touch on the Menu page
to adjust the levels.
Touch Lock to prevent accidental screen
taps. To unlock the screen, press the Power
button and touch Unlock.
Loading Files on Your nüvi
Connect the mini-USB connector to the
side of the nüvi. Connect the larger end of
the cable to an available USB port on your
computer.
Your nüvi internal memory and SD card
appear as removable drives in My Computer
on Windows® computers, and as mounted
volumes on Mac® computers. Copy and
paste les from your computer into the nüvi
drives/volumes. When you are nished
transferring les, click the Eject icon
in your system tray on Windows computers,
or drag the volume icon to the Trash on
Mac computers. Unplug your nüvi.
Listening to MP3 Files
From the Menu page, touch Travel
Kit > MP3 Player > Browse. Select a
category. To play the entire category, touch
Play All. To play one song, touch the title.
Playing Audible Books
From the Menu page, touch Travel Kit
> Audible Book Player > Browse. Select a
category and a book.
Controlling Music and Books
Touch to adjust the volume. Tap
to go to the beginning of the song/chapter;
touch and hold to skip back. Tap to skip
to the end of the song/chapter; touch and
hold to skip ahead. Touch to pause the
song/book. Touch to repeat. Touch
E
N
NOTE: The nüvi supports MP3 and
M3U le; it does not support iTunes®
M4A/M4P les.
to shufe.
EN-7
Trafc Information with an FM
TMC Trafc Receiver
To access FM TMC trafc data, connect
a GTM trafc receiver to the mini-USB
E
connector on the side of the nüvi. For
N
more information about Garmin FM trafc
receivers, visit www.garmin.com/trafc.
Viewing Trafc Incidents
From the Menu page, touch to display
trafc incidents in your area.
Avoiding Trafc
The Map page displays when there is
a trafc incident on your current route or
on the road on which you are traveling. To
avoid a trafc incident, touch , select a
trafc incident, and touch Avoid.
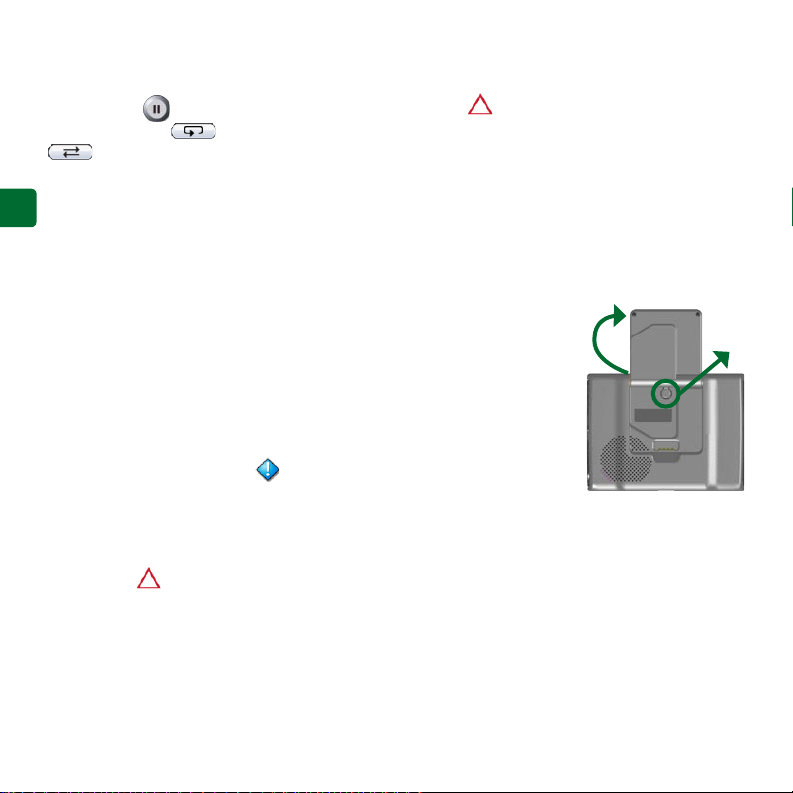
Resetting Your nüvi
If your nüvi locks up (freezes up), turn off
the nüvi and then back on. If this does not
help, reset your nüvi:
Unplug the power and USB cables to
1.
remove external power.
Raise the antenna.
2.
Press the Reset
3.
button for about 3
seconds.
Connect the
4.
nüvi to a power
source using
the power cable.
The nüvi should
automatically turn
back on and operate normally.
➊
➋
Garmin® and nüvi® are trademarks of Garmin Ltd. or its subsidiaries, registered in the USA and other countries.
These trademarks may not be used without the express permission of Garmin.
Windows® is a registered trademark of Microsoft Corporation in the United States and/or other countries. Mac®
and iTunes® are registered trademarks of Apple Computer, Inc.
EN-8
Guide de référence rapide
nüvi® 300/350
assistant personnel de voyage
AVERTISSEMENT : pour prendre connaissance des avertissements et autres informations sur le produit,
consultez le guide Informations importantes sur le produit et la sécurité inclus dans l’emballage.
Vériez les lois en vigueur dans votre état avant d’installer ce produit. Actuellement, les états de Californie
et du Minnesota interdisent aux automobilistes d’utiliser des supports à ventouse sur leur pare-brise pendant
qu’ils conduisent. Dans ce cas, utiliser les autres options de montage sur tableau de bord ou par friction de
Garmin. Pour plus d’informations, consultez le guide Informations importantes sur le produit et la sécurité.
F
R
Installation du nüvi
An de garantir une adhérence maximale, nettoyez et séchez
soigneusement votre pare-brise avant d’installer la ventouse.
Branchez le câble d’alimentation à l’arrière du support.
1.
Enclenchez le support sur le montant de la ventouse.
2.
Installez le support à ventouse sur le pare-brise.
3.
Abaissez le levier vers le pare-brise.
4.
Déployez l’antenne GPS, puis ajustez la partie
5.
inférieure de votre nüvi dans le support.
Inclinez le nüvi vers l’arrière jusqu’à ce qu’il soit
6.
mis en place.
Branchez le câble alimentation sur une prise
7.
de votre véhicule. Votre appareil se met
automatiquement en marche s’il est connecté et si
vous avez démarré votre véhicule.
➊
➋
➍
➏
Pare-brise
➌
FR-2
➎
AVERTISSEMENT : ce produit contient une batterie au lithium-ion. Pour prévenir tout dommage et risque
d’incendie découlant de températures élevées, sortez l’appareil du véhicule ou rangez-le dans un endroit
non exposé aux rayons du soleil, par exemple dans la boîte à gants. Pour plus d’informations, visitez la page
www.garmin.com/safety.
Chargement du nüvi
Connectez le nüvi au support et démarrez
•
votre véhicule.
•
Connectez le câble USB au nüvi et à votre
ordinateur.
Connectez le mini-connecteur USB situé
•
Acquisition des satellites
Pour que le nüvi puisse trouver votre
emplacement actuel et prévoir un itinéraire,
vous devez procéder comme suit :
1.
sur le côté du nüvi et branchez l’adaptateur
secteur sur une prise murale. L’adaptateur
2.
secteur est fourni avec le nüvi 350
uniquement.
Mise sous tension du nüvi
Pour mettre l’appareil en marche, appuyez sur
le bouton Alimentation situé sur le haut de
l’appareil et maintenez-le enfoncé. Suivez les
instructions afchées à l’écran pour congurer
votre nüvi. Vous ne devrez accomplir cette
étape qu’une seule fois. Pour mettre le nüvi
sous ou hors tension, appuyez sur le bouton
Alimentation .
3.
L’acquisition des signaux satellite peut prendre
quelques minutes. Les barres indiquent
la force des signaux satellites.
Informations supplémentaires
Téléchargez le manuel d’utilisation en langue
anglaise à l’adresse suivante : www.garmin.
com/products/nuvi. Cliquez sur le lien
Manuels, puis cliquez sur Télécharger.
Utilisateurs du nüvi 350 : un chier PDF
du manuel d’utilisation est disponible dans la
mémoire interne du nüvi. Reportez-vous à la
page 7 pour plus de renseignements.
F
R
Sortez à l’extérieur, dans une zone
dégagée, loin de bâtiments ou d’arbres
élevés.
Déployez l’antenne GPS située à l’arrière
du nüvi, de telle sorte qu’elle soit parallèle
au sol.
Mettez le nüvi sous tension.
FR-3
Recherche d’une Où trouver
Sur la page Menu, sélectionnez Où
1.
trouver.
F
R
Le cas échéant, sélectionnez une
2.
catégorie et une sous-catégorie. Touchez
et pour afcher davantage
d’options.
Sélectionnez une Où trouver.
3.
Touchez Allez.
4.
Protez bien de la route !
5.
Sur votre trajet, le nüvi vous guide jusqu’à
votre Où trouver avec des invites vocales, des
èches sur la carte et des indications en haut
de la page Carte. Si vous déviez de l’itinéraire
initial, le nüvi recalcule l’itinéraire et fournit
un nouvel itinéraire.
Ajout d’un arrêt à l’itinéraire
Vous pouvez ajouter un arrêt à votre itinéraire.
Le nüvi vous donne les directions jusqu’au
point de passage, puis jusqu’à la Où trouver
nale. Remarque : vous pouvez n’ajouter
qu’un arrêt à votre itinéraire.
Lorsqu’un itinéraire est actif, accédez à la
1.
page Menu, puis touchez Où trouver.
Recherchez l’arrêt supplémentaire.
2.
Touchez Allez.
3.
Touchez Oui pour ajouter cet arrêt avant
4.
votre Où trouver. Ou touchez Non pour
qu’il devienne votre Où trouver nale.
Emprunt d’un détour
Si vous suivez un itinéraire, touchez Menu >
Détour.
Le nüvi tente de vous ramener vers l’itinéraire
initial, dès que possible. Si l’itinéraire suivi est
la seule option possible, le nüvi ne calcule pas
de détour.
Arrêt de l’itinéraire
Si vous suivez un itinéraire, touchez Menu >
Arrêt.
FR-4
Afchage de la page Carte
Dans la page Menu, touchez Afcher carte pour ouvrir la page Carte. L’icône de position
afche votre position actuelle. Pour plus d’informations, utilisez les boutons de la page Carte.
Touchez la barre d’indication des directions
pour ouvrir la page Itinéraire actuel.
Touchez pour
effectuer un zoom
arrière.
Touchez Arrivée ou Vitesse pour
ouvrir la page Informations sur le
voyage.
Touchez Menu pour
ouvrir la page Menu.
Touchez pour
effectuer un zoom
avant.
Touchez Tourner dans
pour ouvrir la page
Prochain virage.
F
R
FR-5
Recherche d’une adresse
Dans la page Menu, touchez Où trouver
1.
> Adresse.
Le cas échéant, sélectionnez le pays et
2.
l’état/région.
Sélectionnez ou entrez la ville/le code
3.
F
R
postal.
Tapez le numéro de l’adresse. Touchez
4.
OK.
Entrez le nom de la rue jusqu’à ce qu’une
5.
liste des rues apparaisse ou touchez OK.
Sélectionnez la rue.
6.
Sélectionnez une ville, au besoin.
7.
Sélectionnez l’adresse. Touchez Allez.
8.
Enregistrement de votre
position actuelle
Sur la page Menu, sélectionnez Où
1.
trouver.
Touchez Mes Positions > Ma Position
2.
Actuelle.
Touchez Svgder > OK.
3.
Enregistrement des lieux
trouvés
Lorsque vous avez trouvé un lieu que
1.
vous souhaitez enregistrer, touchez
Svgder.
Touchez OK. Le lieu est enregistré dans
2.
Mes Positions > Mes Favoris.
Recherche de lieux enregistrés
Sur la page Menu, sélectionnez Où
1.
trouver.
Touchez Mes Positions > Mes Favoris.
2.
Dénition de l’emplacement du
domicile
Touchez Où trouver > Mes positions.
1.
Appuyez sur Déf. point d’origine.
2.
Choisissez une option pour trouver et
3.
dénir l’emplacement de votre domicile.
Une fois votre domicile déni, vous pouvez
établir un itinéraire vers celui-ci à tout moment
en touchant Où trouver > Mes positions >
Rallier point d’origine.
FR-6
Réglage du volume et du
contraste
Pour accéder aux réglages rapides, appuyez
brièvement sur le bouton Alimentation .
Déplacez les curseurs pour ajuster le volume
et la luminosité. Vous pouvez également
toucher sur la page Menu pour régler les
différents niveaux.
Appuyez sur Verrouillag pour empêcher
que quelqu’un n’appuie accidentellement sur
l’écran. Pour déverrouiller l’écran, appuyez
sur le bouton Alimentation .
l’icône du volume vers la Corbeille si
vous utilisez un ordinateur fonctionnant sous
Mac. Débranchez votre nüvi.
Ecoute de chiers MP3
Pour télécharger des chiers MP3 sur votre
nüvi, reportez-vous à la page précédente. Dans
la page Menu, touchez Kit de voyage >
une catégorie. Pour écouter l’ensemble de la
catégorie, appuyez sur Tout. Pour n’écouter
qu’une chanson, appuyez sur son titre.
Téléchargement de chiers sur
votre nüvi
Branchez le mini-connecteur USB sur le côté
du nüvi. Branchez l’extrémité large du câble
sur le port USB disponible de votre ordinateur.
Sous Windows®, la mémoire interne de votre
nüvi, ainsi que sa carte SD apparaissent en tant
que lecteurs amovibles dans Poste de travail ;
sur les ordinateurs fonctionnant sous Mac
apparaissent en revanche en tant que volumes
installés. Copiez-collez des chiers depuis
votre ordinateur vers vos lecteurs/volumes
nüvi. Une fois le transfert de chiers terminé,
cliquez sur l’icône Ejecter dans la barre
d’état système si vous utilisez un ordinateur
fonctionnant sous Windows, ou faites glisser
®
Lecture de livres audio
Pour télécharger des livres audio sur votre
nüvi, reportez-vous à la page précédente. Dans
la page Menu, touchez Kit de voyage
> Lecteur Audible Book > Parcourir.
Sélectionnez une catégorie et un livre.
, ils
Contrôle de la musique et des
livres
Touchez pour régler le volume. Appuyez
sur pour accéder au début de la chanson/
du chapitre ; touchez ce bouton tout en le
maintenant enfoncé pour revenir en arrière.
Appuyez sur pour accéder à la n de
FR-7
F
R
Lecteur MP3 > Parcourir. Sélectionnez
REMARQUE : le nüvi prend en charge
les chiers MP3 et M3U ; il ne prend
pas en charge les chiers M4A/M4P
d’iTunes®.
la chanson/du chapitre ; touchez ce bouton
tout en le maintenant enfoncé pour avancer.
Appuyez sur pour interrompre la chanson/
le livre. Touchez pour répéter. Touchez
pour parcourir.
Informations sur le trac à l’aide
F
R
d’un récepteur FM info trac
Pour accéder aux informations routières
TMC FM, connectez un récepteur GTM
d’informations sur le trac au mini-
connecteur USB situé sur le côté du nüvi. Pour
plus d’informations sur les récepteurs FM
d’informations sur le trac Garmin, visitez le
site www.garmin.com/trafc.
Afchage des problèmes de
circulation
Dans la page Menu, touchez pour afcher
les problèmes de circulation dans votre
secteur.
Contournement du trac
Le symbole s’afche sur la page Carte
lorsqu’un problème de circulation se produit
sur l’itinéraire ou la route que vous empruntez.
Pour contourner le problème en question,
touchez , sélectionnez le problème, puis
touchez Contourner.
Réinitialisation du nüvi
En cas de blocage du nüvi, mettez-le hors
tension, puis de nouveau sous tension. Si
cela ne suft pas à résoudre le problème,
réinitialisez-le :
Débranchez la source d’alimentation ainsi
1.
que les câbles
USB.
Déployez
2.
l’antenne.
Appuyez sur le
3.
bouton Reset
pendant environ
3 secondes.
Connectez le
4.
nüvi à une source
d’alimentation à l’aide du câble prévu à cet
effet. Le nüvi devrait automatiquement se
rallumer et fonctionner normalement.
➊
➋
Garmin® et nüvi® sont des marques commerciales de Garmin Ltd. ou de ses liales, déposées aux Etats-Unis et
dans d’autres pays. Elles ne peuvent être utilisées sans l’autorisation expresse de Garmin.
Windows® est une marque déposée de Microsoft Corporation aux Etats-Unis et/ou dans d’autres pays. Mac® and
iTunes® sont des marques déposées d’Apple Computer, Inc.
FR-8
Guida di riferimento rapido
nüvi® 300/350
assistente di viaggio personale
AVVISO: per avvisi sul prodotto e altre informazioni importanti, vedere la guida Informazioni importanti sul
prodotto e sulla sicurezza inclusa nella confezione.
Prima di eseguire il montaggio, vericare le leggi statali e locali sul trafco. Le attuali leggi degli Stati della
California e del Minnesota vietano di montare ventole sul parabrezza durante la guida di veicoli a motore.
In tal caso, è necessario utilizzare altre opzioni di montaggio, ad esempio sul cruscotto o per attrito. Per
ulteriori dettagli, vedere la Guida Informazioni importanti sul prodotto e sulla sicurezza.
I
I
Montaggio del nüvi
T
T
Per assicurare una presa salda, pulire ed asciugare il
parabrezza prima di installare il supporto a ventosa.
Inserire il cavo di alimentazione sul retro
1.
dell’alloggiamento.
Inserire l’alloggiamento sul braccio del supporto a
2.
ventosa, facendolo scattare in posizione.
Posizionare il supporto a ventosa sul parabrezza.
3.
Spingere indietro la leva, verso il parabrezza.
4.
Estrarre l’antenna GPS, quindi inserire la base del
5.
nüvi nell’alloggiamento.
Inclinare il nüvi verso il retro nché non scatta in
6.
posizione.
Collegare il cavo di alimentazione a una presa
7.
di alimentazione disponibile del veicolo. L’unità
dovrebbe accendersi automaticamente se è
collegata e il veicolo è in movimento.
➊
➋
➍
➏
Parabrezza
➌
IT-2
➎
ATTENZIONE: questo prodotto è dotato di una batteria agli ioni di litio. Per evitare danni o rischi di
incendio a causa delle temperature elevate, rimuovere l’unità dal veicolo o conservarla lontano dalla luce
diretta del sole, ad esempio nel vano portaoggetti. Per ulteriori informazioni, visitare il sito www.garmin.
com/safety.
Caricamento del nüvi
Collegare il nüvi al supporto e mettere in
•
moto il veicolo.
Collegare il nüvi al computer tramite il
•
cavo USB.
Collegare l’adattatore CA a una presa
•
Acquisizione del segnale
satellitare
Afnché il nüvi rilevi la posizione corrente
e crei una rotta, è necessario effettuare le
seguenti operazioni:
1.
a muro e il mini-cavo USB sul lato del
nüvi. L’adattatore CA è fornito solo con il
2.
nüvi 350.
Accensione del nüvi
Per accendere l’unità, tenere premuto
il pulsante di accensione posto
alla sommità. Attenersi alle istruzioni
visualizzate sullo schermo per la
congurazione del nüvi; la congurazione
è un’operazione da svolgere solo una volta
all’inizio. Per spegnere il nüvi, tenere
premuto il pulsante di accensione.
3.
L’acquisizione del segnale satellitare può
richiedere qualche minuto. Le barre
indicano la potenza del segnale.
Per ulteriori informazioni
Scaricare il manuale dell’utente (in inglese)
su www.garmin.com/products/nuvi. Fare
clic sul collegamento Manuali e selezionare
Download.
Utenti del nüvi 350: è possibile accedere
a un le PDF del manuale del produttore
nella memoria interna del nüvi. Per ulteriori
informazioni, vedere pagina 7.
IT-3
I
I
T
T
Posizionarsi in un’area all’aperto, lontano
da edici o alberi alti.
Aprire l’antenna GPS sul retro del nüvi
posizionandola parallelamente al terreno.
Accendere il nüvi.
Ricerca della destinazione
Dalla pagina Menu, selezionare Dove si
1.
va.
I
T
Selezionare una categoria e, se
2.
necessario, una categoria secondaria.
Toccare e per visualizzare altre
opzioni.
Selezionare una destinazione.
3.
Toccare Vai.
4.
Buon viaggio!
5.
Durante il viaggio, la destinazione viene
segnalata con comandi vocali, frecce sulla
mappa e direzioni sulla parte superiore
della pagina Mappa. Se ci si perde, il nüvi
ricalcola il percorso dal nuovo punto e offre
nuove istruzioni da seguire per giungere a
destinazione.
Aggiunta di una sosta alla rotta
È possibile aggiungere una sosta alla
rotta. Il nüvi fornisce le indicazioni per
raggiungere il punto desiderato per la sosta
e la destinazione nale. Nota: è possibile
aggiungere una sola sosta alla rotta.
Con una rotta attiva, andare alla pagina
1.
Menu e toccare Dove si va.
Cercare la destinazione della nuova
2.
fermata.
Toccare Vai.
3.
Toccare Sì per aggiungere questa sosta
4.
prima della destinazione oppure No per
impostare la località selezionata per la
sosta come destinazione nale.
Fare una deviazione
Durante la percorrenza di una rotta, toccare
Menu > Deviazione.
Il nüvi tenta di tornare alla rotta originale
nel minor tempo possibile. Se la rotta
che si sta percorrendo è l’unica opzione
ragionevole, il nüvi potrebbe non calcolare
alcuna deviazione.
Interruzione della rotta
Durante la percorrenza di una rotta, toccare
Menu > Arresto.
IT-4
Visualizzazione della pagina Mappa
Nella pagina Menu, toccare Visualizza mappa per visualizzare la pagina Mappa. L’icona di
posizione mostra la posizione corrente. Per visualizzare ulteriori informazioni, toccare i
pulsanti sulla pagina Mappa.
Selezionare la barra di direzione per aprire
la pagina Percorso corrente.
I
T
Toccare per ridurre
l’immagine.
Toccare Arrivo o Velocità per
aprire la pagina Informazioni
viaggio.
Toccare per
ingrandire l’immagine.
Selezionare Svolta
per aprire la pagina
Prossima svolta.
Toccare Menu per
aprire la pagina Menu.
IT-5
Ricerca di un indirizzo
Nella pagina Menu, toccare Dove si va >
1.
Indirizzo.
Selezionare il paese (se necessario) e lo
2.
stato/regione.
Selezionare o inserire il codice della
3.
città/postale.
Immettere il numero civico. Premere
4.
I
T
Fatto.
Iniziare a inserire il nome della strada
5.
nché non viene visualizzato un elenco di
strade o toccare Fatto.
Selezionare la strada.
6.
Selezionare una città, se necessario.
7.
Selezionare l’indirizzo. Toccare Vai.
8.
Memorizzazione della posizione
corrente
Dalla pagina Menu, selezionare Dove si
1.
va.
Toccare Mie Posizioni > La mia
2.
posizione attuale.
Toccare Salva > Fatto.
3.
Salvataggio delle località trovate
Una volta trovata una località che si
1.
desidera salvare, toccare Salva.
Toccare OK. La località viene memorizzata
2.
in Località personali > Preferiti.
Ricerca delle località salvate
Dalla pagina Menu, selezionare Dove si
1.
va.
Toccare Mie Posizioni > Mie Posizioni.
2.
Impostazione della posizione
della casa
Selezionare Dove si va > Mie Posizioni.
1.
Selezionare Imposta CASA.
2.
Selezionare un’opzione per trovare e
3.
impostare la posizione della casa.
Dopo aver impostato la posizione della casa,
è possibile spostarsi su tale posizione in
qualsiasi momento premendo Dove si va >
Mie Posizioni > Vai a CASA.
IT-6
Regolazione del volume e della
luminosità
Per accedere alla pagina Impostazioni
rapide, premere e rilasciare rapidamente
il pulsante di accensione. Spostare i
dispositivi di scorrimento per regolare
volume e luminosità. Per regolare i livelli,
è anche possibile toccare sulla pagina
Menu.
Selezionare Blocca per evitare pressioni
accidentali dello schermo. Per sbloccare lo
schermo, premere il pulsante di accensione.
Caricamento dei le sul nüvi
Inserire il connettore mini-USB sul anco
del nüvi. Collegare l’estremità più grande
del cavo ad una porta USB disponibile del
computer.
La memoria interna del nüvi e la scheda SD
vengono visualizzate come unità rimovibili
in Risorse del computer sui sistemi
Windows® e come volumi sui computer
Mac®. Copiare e incollare i le dal computer
nelle unità/volumi del nüvi. Dopo aver
trasferito i le, fare clic sull’icona per la
rimozione delle periferiche di archiviazione
di massa sulla barra delle applicazioni
sui computer Windows oppure trascinare
l’icona del volume nel Cestino sui
computer Mac. Scollegare il nüvi.
Ascolto di le MP3
Per caricare le MP3 sul nüvi, vedere la
pagina precedente. Nella pagina Menu,
toccare Kit da viaggio > Lettore
MP3 > Sfoglia. Selezionare una categoria.
Per ascoltare tutti i brani nella categoria,
premere Tutti. Per ascoltare un solo brano,
selezionarne il titolo.
Riproduzione di audiolibri
Per caricare audiolibri sul nüvi, vedere la
pagina precedente. Nella pagina Menu,
toccare Kit da viaggio > Lettore
audiolibri > Sfoglia. Selezionare una
categoria e un libro.
Controllo della musica e dei libri
Toccare per regolare il volume.
Toccare per posizionarsi all’inizio
del brano/capitolo; toccare e tenere
premuto per passare al brano/capitolo
precedente. Toccare per posizionarsi
alla ne del brano/capitolo; toccare e tenere
premuto per passare al brano/capitolo
successivo. Toccare per interrompere
IT-7
I
T
NOTA: il nüvi supporta le MP3 e
M3U, ma non le iTunes® M4A/M4P.

la riproduzione del brano/lettura del libro.
Toccare per attivare la modalità di
ripetizione. Toccare per attivare la
modalità di riproduzione casuale.
Informazioni sul trafco con un
ricevitore delle segnalazioni sul
trafco FM TMC
I
Per accedere ai dati sul trafco FM TMC,
T
collegare un ricevitore delle segnalazioni
sul trafco GTM al mini connettore del
cavo USB sul lato del nüvi. Per ulteriori
informazioni sui ricevitori per segnalazioni
sul trafco in FM di Garmin, visitare il sito
Web www.garmin.com/trafc.
Visualizzazione degli eventi
relativi al trafco
Nella pagina Menu, toccare per
visualizzare gli eventi relativi al trafco
nella propria area.
Come evitare il trafco
Nella pagina della mappa, viene visualizzato
il simbolo quando sulla rotta corrente o
sulla strada che si sta percorrendo si verica
un evento che può generare trafco. Per
evitare un ingorgo, toccare il simbolo ,
selezionare un evento relativo al trafco e
toccare Evitare.
Reimpostazione del nüvi
Se il nüvi si blocca, spegnerlo e
riaccenderlo. Se con questa operazione il
problema non viene risolto, attenersi alla
procedura seguente:
Scollegare i cavi
1.
dell’alimentazione
e USB per
scollegare
l’alimentazione
esterna.
Alzare l’antenna.
2.
Premere il
3.
pulsante Reset per
circa 3 secondi.
Collegare il nüvi a una fonte di
4.
alimentazione tramite il cavo di
alimentazione. Il nüvi dovrebbe
accendersi automaticamente e funzionare
correttamente.
➊
➋
Garmin® e nüvi sono marchi di Garmin Ltd. o società afliate, registrati negli Stati Uniti e in altri Paesi. L’uso di tali marchi non è consentito
senza il consenso esplicito da parte di Garmin.
Windows® è un marchio registrato di Microsoft Corporation negli Stati Uniti e/o in altri paesi. Mac
Computer, Inc.
IT-8
®
e iTunes® sono marchi registrati di Apple
Kurzanleitung
nüvi® 300/350
Persönlicher Reiseassistent
WARNUNG: Lesen Sie alle Produktwarnungen und sonstigen wichtigen Informationen der Anleitung
Wichtige Sicherheits- und Produktinformationen, die dem Produkt beiliegt.
Überprüfen Sie vor der Montage, welche Landesgesetze und regionalen Verkehrsvorschriften bei
Montage und Verwendung zu beachten sind. Derzeit ist nach den Gesetzen der Bundesstaaten Kalifornien
und Minnesota in diesen Staaten allen Fahrern motorbetriebener Fahrzeuge die Verwendung von
Saughalterungen an der Windschutzscheibe beim Fahren untersagt. In diesem Fall müssen andere
Armaturenbrett- oder Haftungshalterungen von Garmin verwendet werden. Weitere Details nden Sie in der
Anleitung Wichtige Sicherheits- und Produktinformationen.
Anbringen des nüvi
D
Damit eine gute Haftung gewährleistet ist, sollten Sie die
E
Windschutzscheibe reinigen und trocknen, bevor Sie die
➊
Saughalterung anbringen.
Schließen Sie das Netzkabel an der Rückseite der
1.
Halterung an.
Rasten Sie die Halterung in den Arm der
2.
Saughalterung ein.
Setzen Sie die Saughalterung auf die
3.
Windschutzscheibe.
Klappen Sie den Hebel in Richtung der
4.
Windschutzscheibe zurück.
Klappen Sie die GPS-Antenne nach oben, und
5.
setzen Sie die Unterseite des nüvi in den Sockel der
Halterung ein.
Drücken Sie den nüvi zurück, bis er einrastet.
6.
Schließen Sie das Stromkabel an einen
7.
Stromanschluss im Fahrzeug an. Das Gerät schaltet
sich automatisch ein, wenn es angeschlossen und
das Fahrzeug angelassen ist.
DE-2
➋
➏
➎
Windschutzscheibe
➍
➌
 Loading...