

Page 1
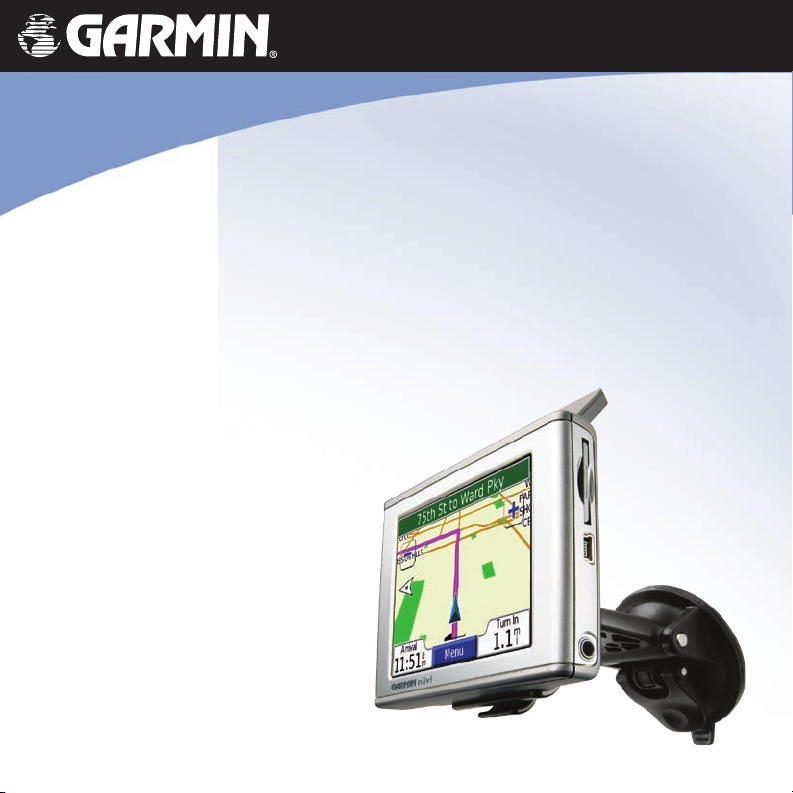
nüvi
personal travel assistant
quick reference guide
guide de référence rapide
™
Page 2

© 2005 Garmin Ltd. or its subsidiaries
Garmin International, Inc.
1200 East 151st Street,
Olathe, Kansas 66062, U.S.A.
Tel. 913/397.8200
or 800/800.1020
Fax 913/397.8282
All rights reserved. Except as expressly provided herein, no part of this manual may be
reproduced, copied, transmitted, disseminated, downloaded or stored in any storage medium,
for any purpose without the express prior written consent of Garmin. Garmin hereby grants
permission to download a single copy of this manual onto a hard drive or other electronic
storage medium to be viewed and to print one copy of this manual or of any revision hereto,
provided that such electronic or printed copy of this manual must contain the complete text of
this copyright notice and provided further that any unauthorized commercial distribution of
this manual or any revision hereto is strictly prohibited.
Information in this document is subject to change without notice. Garmin reserves the right
to change or improve its products and to make changes in the content without obligation to
notify any person or organization of such changes or improvements. Visit the Garmin Web site
(www.garmin.com) for current updates and supplemental information concerning the use and
operation of this and other Garmin products.
Garmin® is a registered trademark and nüvi™ is a trademark of Garmin Ltd. or its subsidiaries
and may not be used without the express permission of Garmin.
November 2005 Part Number 190-00627-50 Rev. A Printed in Taiwan
Garmin (Europe) Ltd.
Unit 5, The Quadrangle,
Abbey Park Industrial Estate,
Romsey, SO51 9DL, U.K.
Tel. 44/0870.8501241
Fax 44/0870.8501251
Garmin Corporation
No. 68, Jangshu 2nd Road,
Shijr, Taipei County, Taiwan
Tel. 886/2.2642.9199
Fax 886/2.2642.9099
Page 3
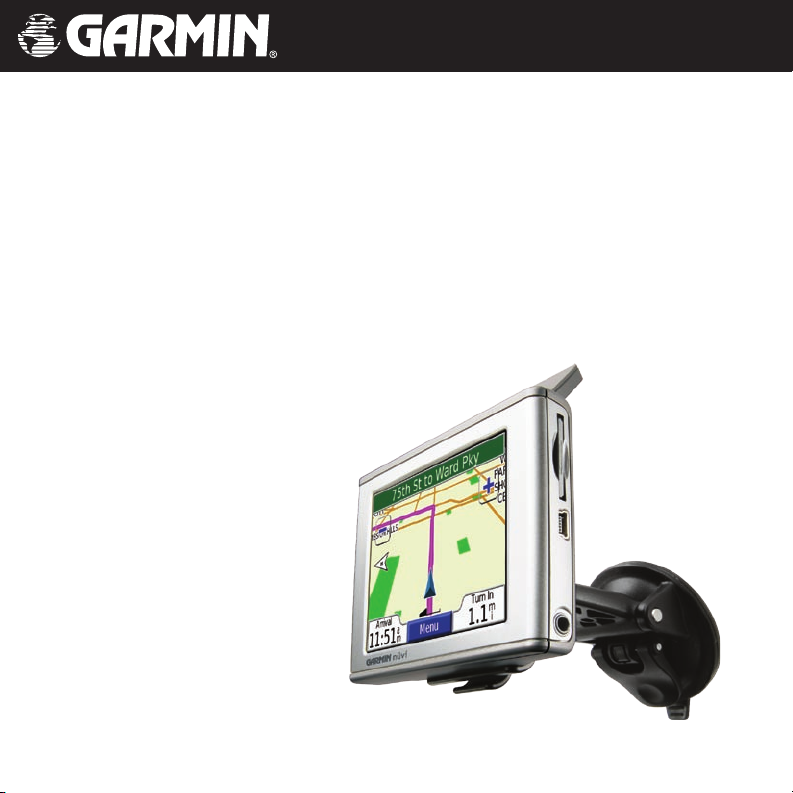
™
nüvi
personal travel assistant
quick reference guide
Page 4
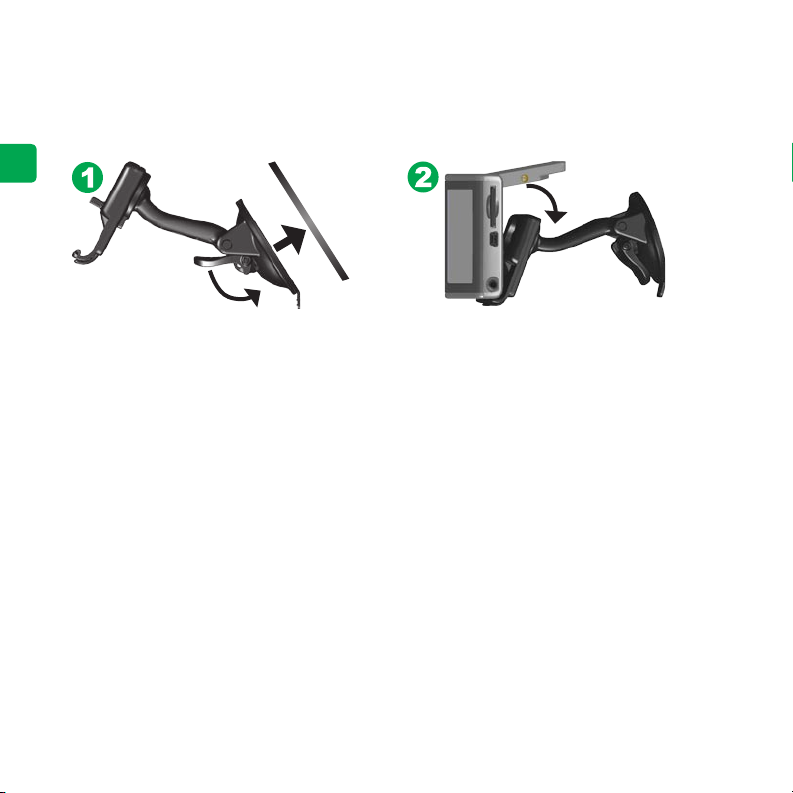
Mounting Your nüvi
To ensure a tight grip, clean and dry your windshield before mounting the
suction cup. Snap the cradle onto the arm of the mount.
E
N
Place the suction cup on the windshield.
Flip the lever back, toward the windshield.
Open the antenna.
Fit the bottom of your nüvi into the cradle.
Tilt your nüvi back until it snaps in place.
If necessary, rotate the cradle.
Plug the small end of the cable into the back of the mount; plug the other end
into a 12/24-Volt receptacle in your vehicle.
To remove your nüvi from the cradle, press the small tab on the bottom of the
cradle up and tilt the nüvi forward.
WARNING: For use in vehicles, it is the sole responsibility of the owner/operator of a vehicle with the nüvi installed to place and
secure the device so it will not interfere with the vehicle operating controls and safety devices, obstruct the driver’s view of driving
conditions, or cause personal injury in the event of an accident.
EN-2
Page 5
Configuring Your nüvi
Press and hold the Power button
the on-screen instructions to set up your nüvi. You only have to do this once.
on the top of the unit to turn it on. Follow
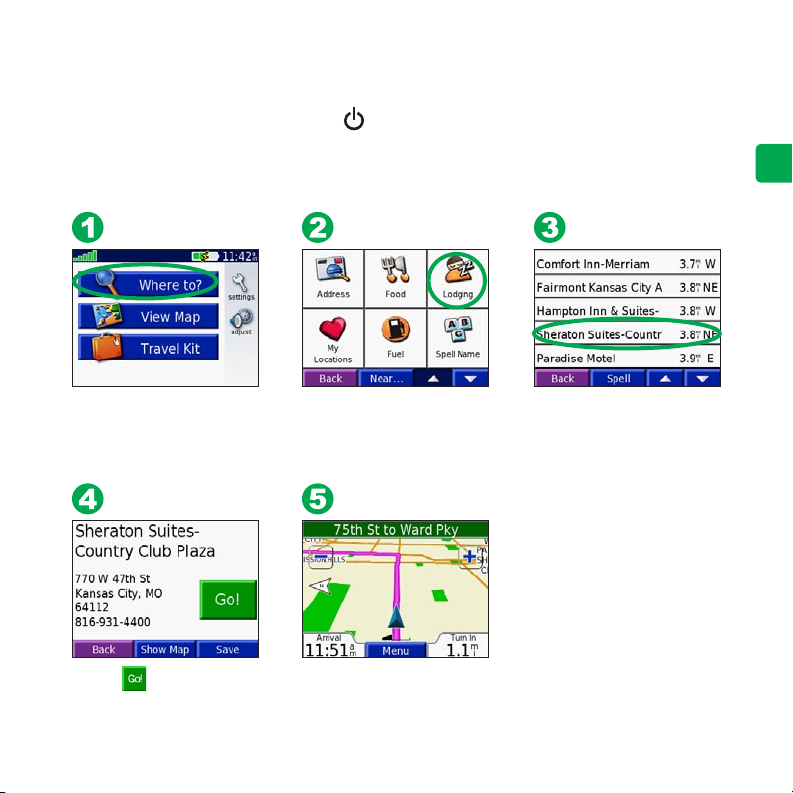
Finding Your Destination
E
N
Touch Where to? Select a category. Touch
the arrows to see more
categories.
Touch .
Enjoy the route!
EN-3
Select a destination.
Touch the arrows to see
more places.
Page 6
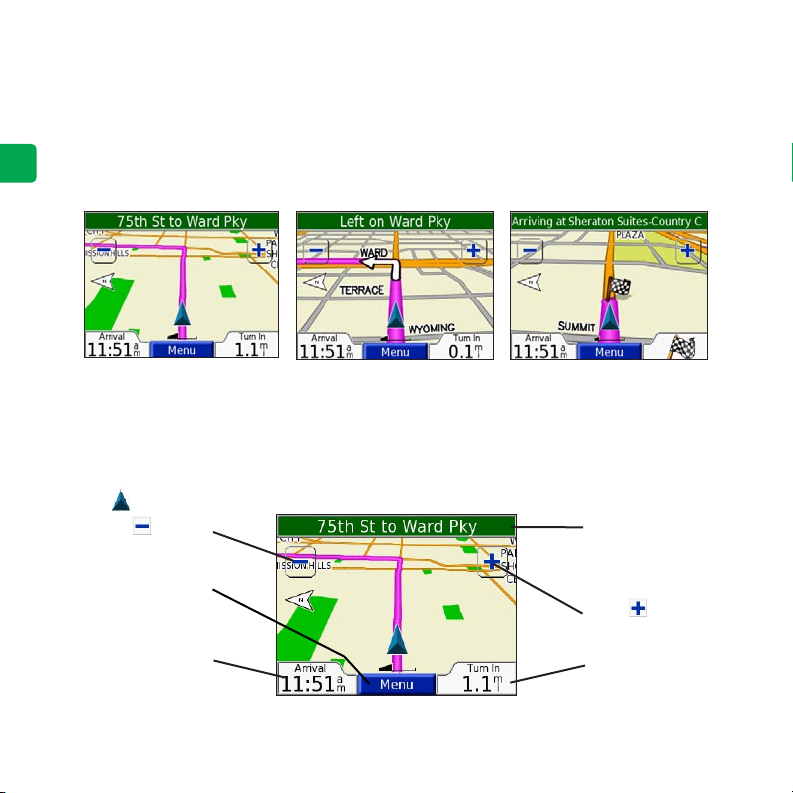
Following Your Route
Follow the route to your destination using the Map page. As you travel, your
nüvi guides you to your destination with voice prompts, arrows on the map,
E
and directions at the top of the Map page. If you depart from the original route,
N
your nüvi recalculates the route and provides new route instructions.
Your route is marked with
a magenta line.
Follow the arrows as you
take turns.
A checkered flag marks
your destination.
Viewing the Map Page
From the Menu page, touch View Map to open the Map page. The position
icon shows your location. Touch and drag the map to view different areas.
Touch to zoom
Touch
return to the Menu
Touch Arrival or
Speed to open the
Trip Information
out.
Menu to
page.
page.
Map Page while Navigating a Route
EN-4
Touch the text bar
to open the Current
Route page.
Touch
in.
Touch Turn In to
open the Next Turn
page.
to zoom
Page 7
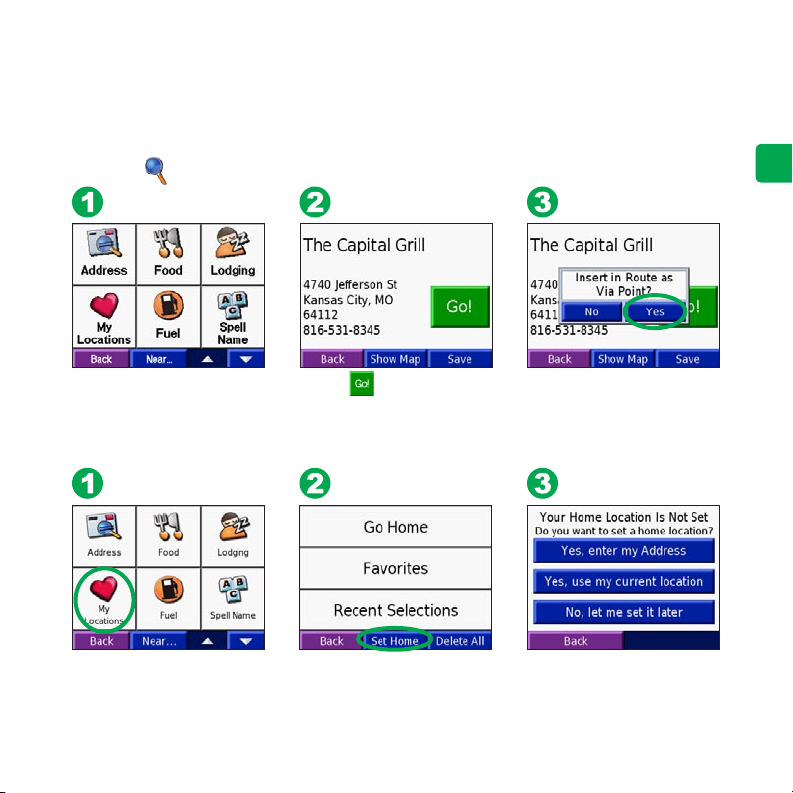
Adding Stops to Your Route
You can add a stop (via point) to your route. The nüvi gives you directions
to the via point and then to your final destination. With a route active, touch
Menu > Where to?
E
N
Search for the extra stop.
Touch .
Setting a Home Location
Touch Where to? > My
Locations.
Touch Set Home.
EN-5
Select an option.
Select an option.
Page 8
Saving Places You Find
E
N
After you have found a
place you want to save,
touch Save.
Touch OK in the pop-up window. The place
is saved in My Locations > Favorites.
Finding Saved Places
From the Menu page,
touch Where to? > My
Locations > Favorites.
Select a place.
EN-6
Touch .
Page 9
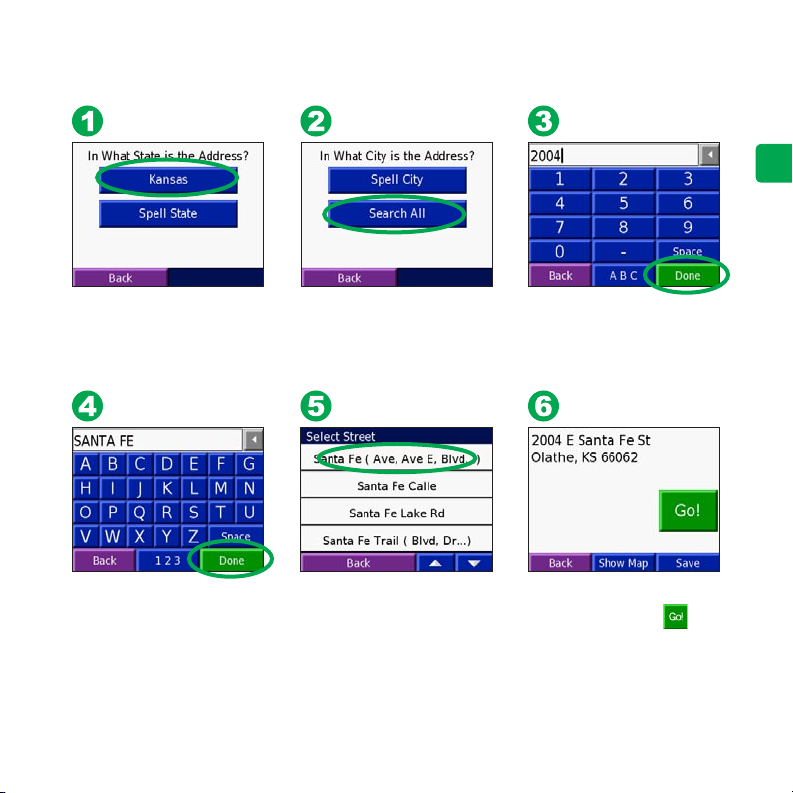
Finding an Address
E
N
Select a state. Type the address
Type the street name
until a list of streets
appears or touch Done.
Touch Search All, or
touch Spell City and
spell the city.
Select the street. Then, if
necessary, select a city.
EN-7
number and touch Done.
Select the address, if
necessary. Touch .
Page 10

Using the Quick Settings
To access the Quick Settings, quickly press and
release the Power button. Move the sliders to adjust
E
the volume and brightness. You can also touch
N
on the Menu page to adjust the levels.
Lock to prevent accidental screen taps. To
Touch
unlock the screen, press the Power button.
Loading Items to Your nüvi
Connect the mini-USB connector on the USB cable to the side of the nüvi.
Connect the larger end of the cable to an available USB port on your computer.
Double-click the My Computer icon on your computer’s desktop. A new
Removable Disk drive appears in your list of
drives: “nuvi” is the available storage in the
nüvi’s internal memory. If you do not see the
“nuvi” in the list of drives, you may need to
disconnect a network drive or map a drive to
your “nuvi.”
Double-click one of the nüvi drives to open
it. Copy and paste the files into the drive.
Power
button
SD card
Mini-USB
connector
slot
EN-8
Headphone plug
Page 11

nüvi Tips
• To quickly return to the Menu page, press and hold the Back button.
• Touch the
• When you are listening to music or an audible book, quickly press the
Power button twice to jump from any page back to the player page. Press
Back to return to the previous page you were viewing (such as the map).
• To extend the battery life, close the antenna when you do not need to receive
GPS signals. If the antenna is closed, GPS is turned off.
Help button to learn more about the nüvi’s Travel Kit.
E
N
Using an FM Traffic Receiver
Using a Garmin FM Traffic Receiver, the nüvi can receive and use traffic
information broadcast over the FM Radio Data System. For more information
about FM Traffic Receivers, visit www.garmin.com.
Connecting the FM Traffic Receiver to Your nüvi
Place your nüvi in the mount and plug it into the 12-volt adapter. Plug the
cable from the FM Traffic Receiver into the mini-USB connector on the side of
the nüvi.
Avoiding Traffic Events
The map page displays a when there is a traffic event on your current route
or on the road you are driving. When you are following a route, touch the
to avoid the traffic.
EN-9
Page 12

Using the Travel Kit
Your nüvi also provides a Travel Kit with several features that are helpful
when you are traveling.
E
N
From the Menu page,
touch Travel Kit.
Touch the arrows to view all items in the Travel
Kit. Touch the item you want to open.
Garmin Language Guide
The Garmin Language Guide puts the data from Oxford’s multilingual
resources and five bilingual dictionaries in the palm of your hand. A trial
version of the Garmin Language Guide is provided. To purchase the Garmin
Language Guide accessory, go to http://www.garmin.com/products/nuvi/
and click the Accessories link. You can also contact your Garmin dealer to
purchase nüvi accessories.
EN-10
Page 13

Listening to MP3 Files
E
N
From the Menu page,
touch Travel Kit.
Select a category.
Touch MP3 Player. Touch Browse.
To play the entire category,
touch Play All. To play one
song, touch the title.
Touch Back to exit the
MP3 page to view other
pages, such as the map.
Touch to adjust the volume. Tap to play the previous song; touch and
hold to skip back. Tap
Touch
to pause the song. Touch to repeat. Touch to shuffle.
to play the next song; touch and hold to skip ahead.
EN-11
Page 14

Playing Audible Books
Visit http://garmin.audible.com to purchase audible books, download them to
your computer, and load them onto your nüvi.
E
N
From the Menu page,
touch Travel Kit >
Audible Book Player.
Touch Browse. Touch a
category.
Touch a book title.
Touch to adjust the volume.
Press and hold and to move forward or
backward. Tap to move by sections through the book.
Touch
to pause the book.
Touch the book cover art to view book information.
To create a bookmark, touch and then touch
Touch .
the Bookmark button.
To view your bookmarks, touch and then touch a bookmark. Touch
to listen to the book from the place.
EN-12
Page 15

Converting Currency
E
N
From the Menu page,
touch Travel Kit.
Touch and then
Currency Converter.
Select two rates. Touch
a field and enter the
number. Touch Done.
More Information
For more information, refer to the English owner’s manual located on your
“nuvi” drive. It is also on the Garmin Web site at http://www.garmin.com/
products/nuvi/. Click the Manuals link and then select Download.
EN-13
Page 16

™
nüvi
assistant de voyage personnel
guide de référence rapide
Page 17

Installation du nüvi
Pour garantir une bonne adhérence, nettoyez et essuyez votre pare-brise avant d’installer
la ventouse.
F
R
Placez la ventouse sur le pare-brise.
Rétractez le levier vers le pare-brise.
Ouvrez l’antenne.
Installez la base du nüvi dans le socle du
montant à ventouse.
Basculez le nüvi vers l’arrière jusqu’à ce qu’il
s’enclenche en position.
Si nécessaire, tournez le socle pour mieux voir
l’affichage.
Branchez l’extrémité étroite du câble sur l’arrière du montant et l’autre extrémité sur la
prise12/24 V de votre véhicule.
Votre appareil se met automatiquement en marche si vous avez démarré votre véhicule.
Pour mettre en marche le nüvi manuellement, appuyez sans relâche sur le bouton Marche
sur le haut de l’appareil.
Pour retirer le nüvi de son socle, appuyez vers le haut sur la petite patte en bas du socle et
basculez le nüvi vers l’avant.
AVERTISSEMENT : Pour une utilisation dans des véhicules, il incombe exclusivement au propriétaire/conducteur du véhicule
d’installer et de fixer le nüvi de manière à ce qu’il n’interfère pas avec les commandes et les dispositifs de sécurité du véhicule, qu’il
n’obstrue pas la vue du conducteur et qu’il ne cause aucune blessure en cas d’accident.
FR-15
Page 18

Configuration du nüvi
Pour mettre en marche, appuyez sans relâche sur le bouton Marche
l’appareil. Suivez les instructions de configuration du nüvi qui s’affichent. Vous ne devez
réaliser cette procédure qu’une seule fois.
F
Rechercher de votre destination
R
sur le haut de
Appuyez sur Où trouver.
Appuyez sur .
Sélectionnez une catégorie.
Appuyez sur les flèches pour
voir d’autres catégories.
Profitez bien de la route !
FR-16
Sélectionnez une
destination. Appuyez sur les
flèches pour voir d’autres
destinations.
Page 19

Suivez votre itinéraire
Suivez l’itinéraire jusqu’à votre destination en utilisant la page Carte. Sur votre trajet, le
nüvi vous guide jusqu’à votre destination avec des invites vocales, des flèches sur la carte
et des indications en haut de la page Carte. Si vous déviez de l’itinéraire initial, le nüvi
recalcule l’itinéraire et fournit un nouvel itinéraire.
F
R
Votre itinéraire est indiqué par
un trait magenta.
Suivez les flèches lorsque
vous tournez.
Le drapeau à carreaux
indique votre destination.
Affichage de la page Carte
Sur la page Menu, appuyez sur Afficher car pour ouvrir la page Carte. L’icône de position
indique votre position. Appuyez-glissez sur la carte pour afficher des zones différentes.
Appuyez sur
pour faire un
zoom arrière.
Appuyez sur Menu
pour retourner à la
page Menu.
Appuyez sur Arrivée
ou sur Vitesse
pour ouvrir la
page Informations
de voyage.
Page Carte en
suivant un itinéraire
FR-17
Appuyez sur la barre
de texte pour ouvrir la
page Itinéraire actuel.
Appuyez sur pour
faire un zoom avant.
Appuyez sur Tourn.
dan pour ouvrir la
page Virage suivant.
Page 20

Ajout d’arrêts sur votre itinéraire
Vous pouvez ajouter un arrêt (point intermédiaire) à votre itinéraire. Le nüvi vous fournit
les indications jusqu’au point intermédiaire, puis jusqu’à votre destination finale. Après
avoir activé un itinéraire, appuyez sur Menu > Où trouver.
F
R
supplémentaire.
Appuyez sur .
Sélectionnez une option.Recherchez l’arrêt
Enregistrement de la position de votre domicile
Appuyez sur Où trouver >
Mes Positions.
Appuyez sur Déf.pt Ori.
FR-18
Sélectionnez une option.
Page 21

Enregistrement des destinations trouvées
F
R
Une fois que vous avez
trouvé une position que
vous voulez enregistrer,
appuyez sur Svgder.
Appuyez sur OK dans la fenêtre
contextuelle. La destination est
enregistrée sous Mes Positions >
Mes favoris.
Recherche de positions enregistrées
Sur la page Menu, sélectionnez
Où trouver > Mes Positions >
Mes favoris.
Sélectionnez une destination.
FR-19
Appuyez sur .
Page 22

Localisation d’une adresse
F
R
Sélectionnez un pays.
Sélectionnez l’etat, au besoin.
Sélectionnez la ville, au besoin.
Sélectionnez la rue. Sélectionnez une ville,
Tapez le numéro de l’adresse
et appuyez sur OK.
au besoin.
FR-20
Tapez le nom de rue et
appuyez sur OK.
Sélectionnez l’adresse, au
besoin. Appuyez sur
.
Page 23

Utilisation des Réglages Rapides
Appuyez brièvement sur le bouton Marche pour accéder
aux Réglages Rapides. Déplacez les curseurs pour ajuster le
volume et la luminosité. Vous pouvez également appuyer sur
les icôn de la page Menu pour ajuster les niveaux.
Appuyez sur Lock pour empêcher que quelqu’un n’appuie
accidentellement sur l’écran. Pour déverrouiller l’écran,
appuyez sur le bouton Marche.
Chargement de données dans le nüvi
Branchez le mini-connecteur USB sur le côté du nüvi. Branchez l’extrémité largedu câble
sur le port USB disponible de votre ordinateur.
Cliquez deux fois sur l’icône Poste de travail du
bureau de l’ordinateur. Deux nouveaux lecteurs
apparaissent sur la liste de vos lecteurs : « nuvi
sd » et « nuvi ». « nuvi » est la mémoire interne
disponible dans le nüvi. « nuvi sd » correspond à
la carte SD insérée dans le nüvi. Si vous n’avez
pas de carte SD dans le nüvi, le lecteur « nuvi sd »
n’apparaît pas sur la liste.
Si « nuvi » n’apparaît pas sur la liste des lecteurs,
il vous faudra peut-être déconnecter un lecteur
Fiche de casque
réseau ou affecter un lecteur à votre unité « nuvi ».
Cliquez deux fois sur l’un des lecteurs nüvi pour l’ouvrir. Copiez et collez les fichiers dans
le lecteur.
Bouton
Marche
Logement
de carte SD
Connecteur
mini-USB
F
R
FR-21
Page 24

Conseils d’utilisation du nüvi
• Pour revenir rapidement à la page Menu, maintenez le bouton Retour enfoncé.
• Appuyez sur le bouton
• Lorsque vous écoutez de la musique ou un livre audio, appuyez deux fois rapidement
F
R
sur le bouton Marche pour revenir depuis n’importe quelle page à la page du lecteur.
Appuyez sur Retour pour revenir à la page affichée précédemment (telle que la carte).
• Pour prolonger l’autonomie de la batterie, repliez l’antenne lorsque vous ne souhaitez
pas recevoir de signaux GPS. Lorsque l’antenne est repliée, le récepteur GPS est éteint.
Aide pour en savoir plus sur le kit de voyage de nüvi.
Informations routières avec un récepteur FM
À l’aide d’un récepteur FM, le nüvi peut recevoir et utiliser les informations routières
diffusées sur le système de radiocommunication de données (RDS) FM. Pour
plus d’informations sur le récepteur FM, visitez le site Web de Garmin (www.garmin.
com). Pour connaître les prestataires participants, reportez-vous au site Web de Garmin, à
l’adresse http://www.garmin.com/fmtraffic.
Connectez le récepteur FM à votre nüvi
Connectez le récepteur FM à votre nüvi Branchez le câble mini-USB dans le connecteur
mini-USB situé sur le côté du nüvi.
Contournement d’événements de trafic
La page de la carte affiche le symbole lorsqu’un événement de trafic apparaît sur
votre itinéraire actuel ou sur la route que vous empruntez. Si vous suivez un itinéraire,
appuyez sur pour éviter l’événement de trafic.
FR-22
Page 25

Utilisation du Kit de Voyag
Le nüvi a également un Kit de Voyag comportant plusieurs fonctions utiles en voyage.
F
R
Sur la page Menu, sélectionnez
Kit de Voyag.
Appuyez sur les flèches pour afficher tous les éléments
du kit de voyage. Appuyez sur l’élément de votre choix.
Guide Lexical
Le Guide Lexical met cinq dictionnaires à votre portée. Une version d’essai du Guide
Lexical vous est fournie. Pour acheter l’accessoire Guide Lexical, rendez-vous sur le site
Web Garmin http://www.garmin.com/products/nuvi/ et cliquez sur le lien
Vous pouvez également contacter votre revendeur Garmin pour acheter des accessoires
nüvi.
FR-23
Accessories.
Page 26

Lecture de fichiers MP3
F
R
Sur la page Menu, sélectionnez
Kit de Voyag.
Sélectionnez une catégorie.
Appuyez sur Lecteur MP3.
Pour lire l’ensemble de la
catégorie, appuyez sur Lec.tot.
Pour n’écouter qu’une chanson,
appuyez sur son titre.
Appuyez sur Parcourir.
Appuyez sur Retr pour
quitter la page MP3 et
afficher d’autres pages,
comme la carte.
Appuyez sur pour régler le volume. Appuyez brièvement sur pour aller au
début de la chanson ou appuyez sans relâche pour revenir en arrière. Appuyez brièvement sur
pour aller à la fin de la chanson ou appuyez sans relâche pour avancer. Appuyez sur
pour marquer une pause. Appuyez sur
pour reprendre la lecture. Appuyez sur
pour mélanger.
FR-24
Page 27

Lecture de livres audio
Visitez le site http://garmin.audible.com pour acheter des livres audio, les télécharger sur
votre ordinateur, puis sur le nüvi.
F
R
Sur la page Menu, sélectionnez
Kit de Voyag >
Lecteur Audible Book
.
Appuyez sur Parcourir.
Appuyez sur une catégorie.
Appuyez sur les symboles et et maintenez-les
enfoncés pour avancer ou revenir en arrière. Appuyez
brièvement sur ces icônes pour passer d’une section à l’autre
du livre.
Appuyez sur le graphique de la couverture du livre pour
afficher des informations sur le livre.
Appuyez sur .
Pour créer un signet, appuyez sur , puis sur le bouton
Signet. Pour afficher vos signets, appuyez sur , puis
appuyez sur un signet. Appuyez sur
livre à partir du signet.
Appuyez sur son titre.
pour écouter le
FR-25
Page 28

Conversion de devises
F
R
Sur la page Menu, sélectionnez
Kit de Voyag.
Appuyez su , puis sur
Convertisseur de devise.
Sélectionnez une devise De et
une devise À. Entrez la valeur
dans le champ vide. Appuyez
sur OK.
Plus d’informations
Pour plus d’informations, reportez-vous au manuel d’utilisation anglais situé sur votre
unité « nuvi ». Le manuel se trouve également sur le site Web de Garmin à l’adresse
http://www.garmin.com/products/nuvi/. Cliquez sur le lien Manuals, puis sélectionnez
Download.
FR-26
Page 29

Page 30

E
N
F
R
For the latest free software updates (excluding map data) throughout the
life of your Garmin products, visit the Garmin Web site at www.garmin.com.
© Copyright 2005 Garmin Ltd. or its subsidiaries
Garmin International, Inc.
1200 East 151st Street, Olathe, Kansas 66062, U.S.A.
Garmin (Europe) Ltd.
Unit 5, The Quadrangle, Abbey Park Industrial Estate, Romsey, SO51 9DL, U.K.
Garmin Corporation
No. 68, Jangshu 2nd Road, Shijr, Taipei County, Taiwan
www.garmin.com
Part Number 190-00627-50 Rev. A
 Loading...