

Page 1
NTX54-Stand Alone
Stand Alone Garmin Navigation
NTV-KIT411/471
BHM
03/25/14
NTV-DOC109
3950 NW 120
th
Ave, Coral Springs, FL 33065 TEL 561-955-9770 FAX 561-955-9760
Page 2
NTV-DOC109
Overview
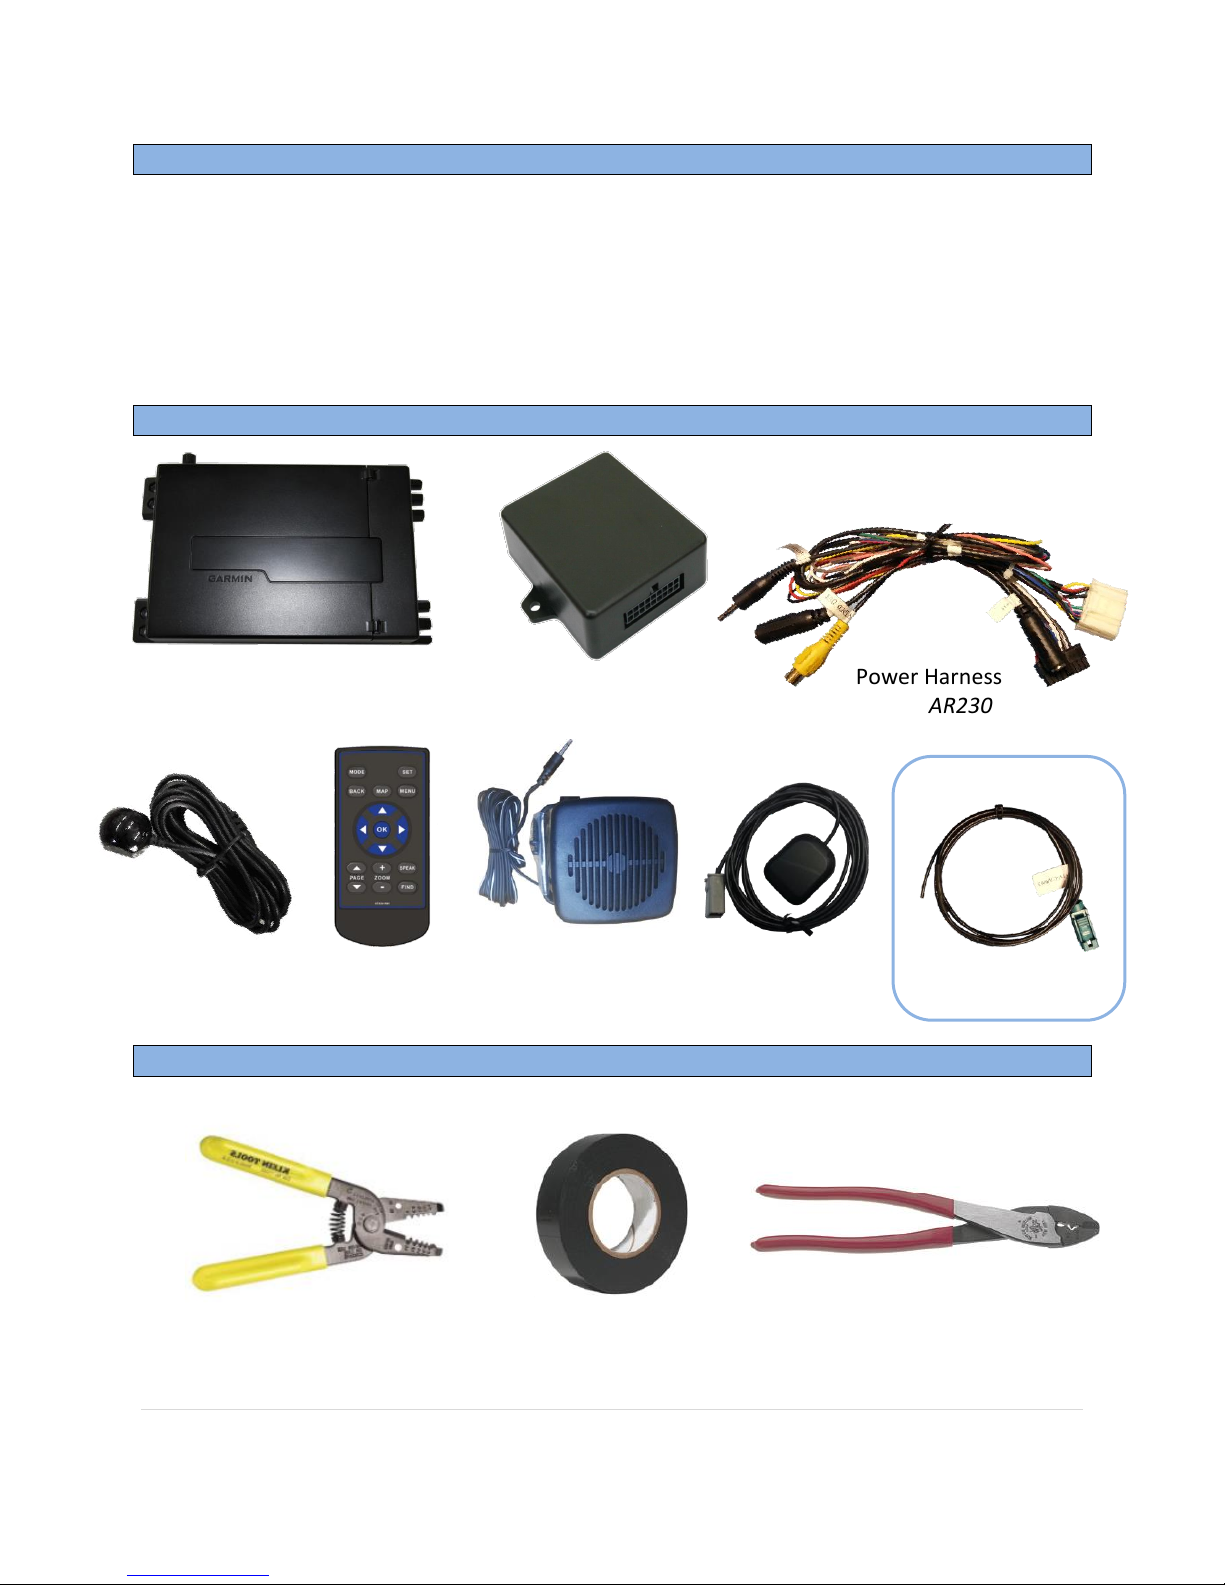
Kit Contents
Required Tools
Stand Alone IR Module
NTV-ASY166
NTX54 Garmin
KIT411: NTV-NAV009
KIT471: NTV-NAV015
IR Remote
NTV-REM004
IR Eye
NTV-MIS038
GPS Antenna
NTV-NAV012
Power Harness
NTV-HAR230
External Speaker
NTV-HDW010
Strippers
Electrical Tape
Crimpers
NAV-Traffic Antenna
NTV-CAB063
NTV-KIT471 only
Stand-Alone navigation powered by Garmin to add navigation to any OEM or aftermarket
screen (additional parts maybe required). The system provides composite or RGB video for
different screen designs. For more versatility, the system has an internal break to interrupt
audio and introduce navigation audio an existing speaker in the vehicle for a seamless
integration into the audio system. Currently this Garmin Navigation is controlled via the
included IR remote control.
BHM
3/25/14
rB2
Agreement: End user agrees to use this product in compliance with all State and Federal laws. NAV-TV Corp. would not be held liable for
misuse of its product. If you do not agree, please discontinue use immediately and return product to place of purchase. This product is
intended for off-road use and passenger entertainment only.
2 | P a g e
Page 3
BHM
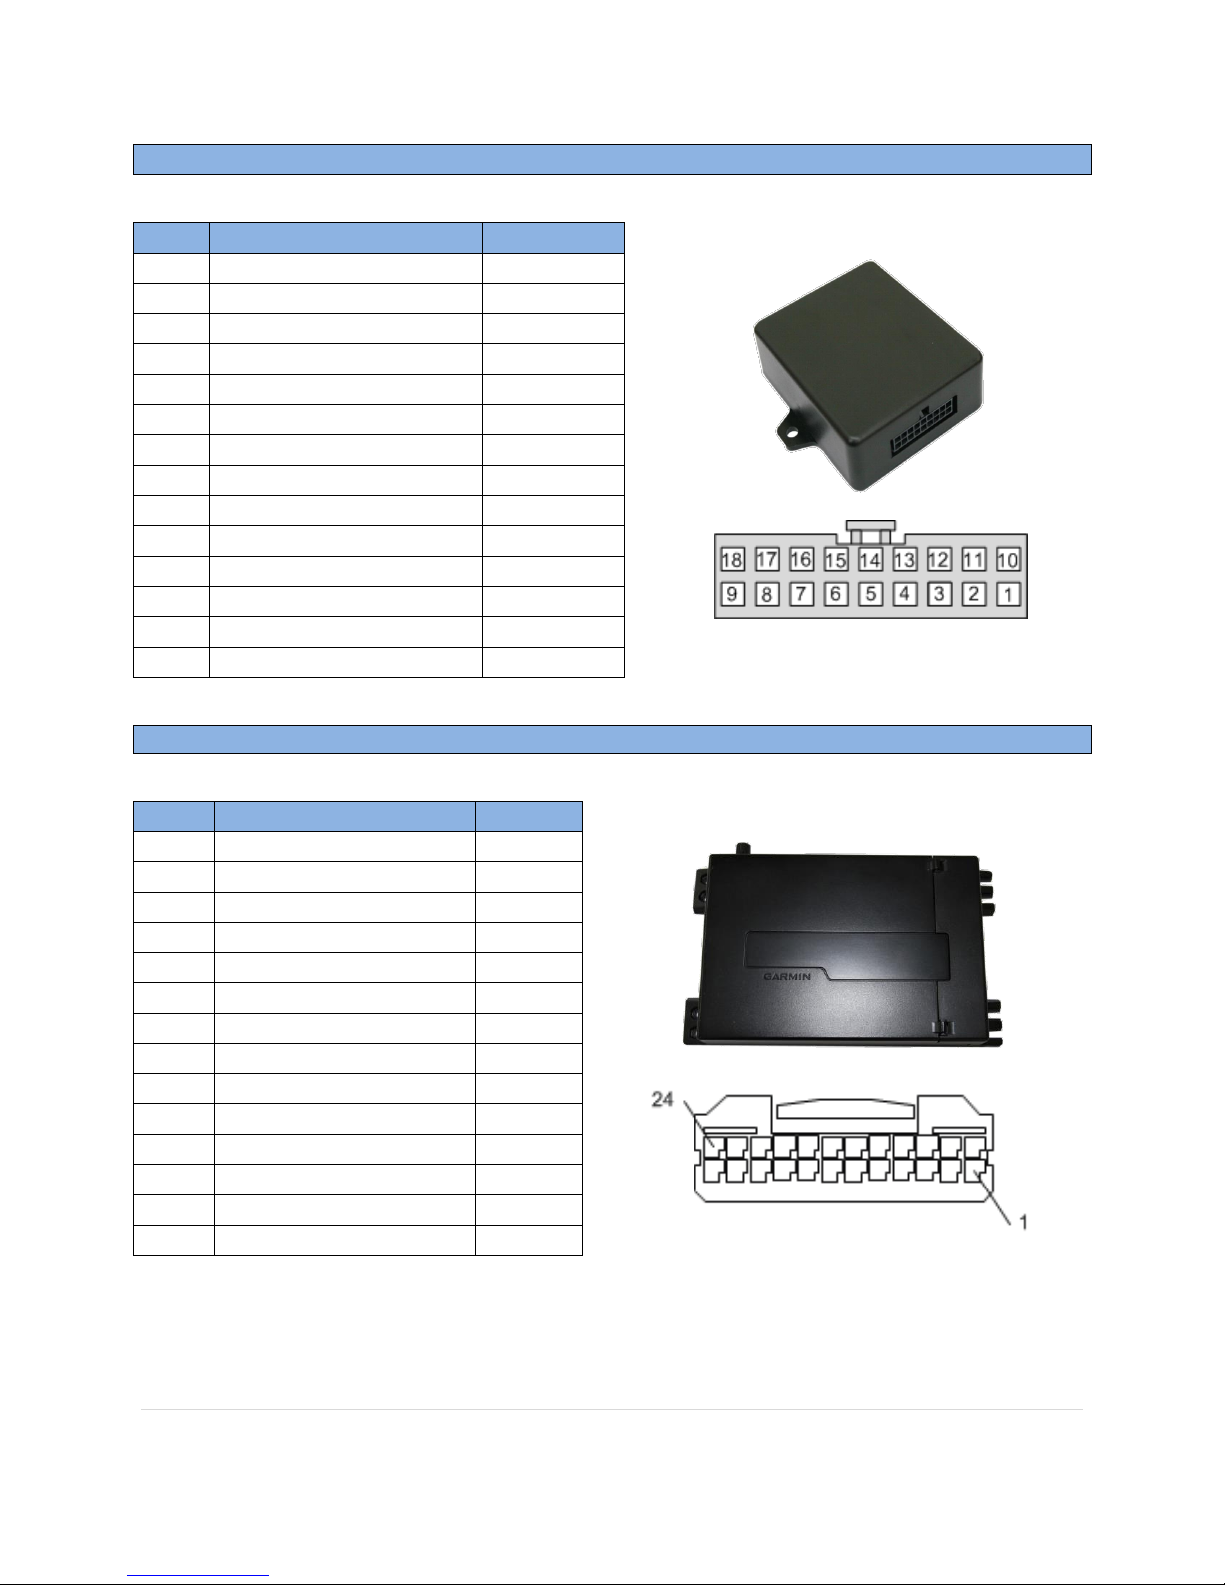
Stand Alone IR Module Pin out
Garmin Navigation Pin out
Pin #
Description
Color
1
12v (+) Ignition
Red 3 MUTE out (-)
Pink 4 RX (IR)
White 5 RS (Garmin)
Green 6 AUDIO IN (+)
White
7
AUDIO OUT (+)
Gray
8
NAV Audio IN + (3.5mm)
White
10
Ground (-)
Black
12
Shield (IR)
-Shield-
13
TX (IR, 5v)
Red
14
TX (Garmin)
Blue
15
AUDIO IN (-)
White/Black
16
AUDIO OUT (-)
Gray/Black
17
NAV Audio IN – (3.5mm)
-Shield-
Pin #
Description
Color
1
Composite Video out
Yellow 2 RGB Shield
-Shield-
3
RGB Green Signal
Green 4 TX Signal
Blue 9 Speaker OUT (+)
Black
12
12v (+) ACC INPUT
Red
13
Composite Shield
-Shield-
14
RGB Blue Signal
Blue
15
RGB Red Signal
Red
16
RGB Sync Signal
White
17
RX Signal
Green
21
Speaker OUT (-)
Black
23
Ground (-) INPUT
Black
24
12v (+) Constant INPUT
Yellow
Wire Side
Wire Side
3/25/14
NTV-DOC109
rB2
Agreement: End user agrees to use this product in compliance with all State and Federal laws. NAV-TV Corp. would not be held liable for
misuse of its product. If you do not agree, please discontinue use immediately and return product to place of purchase. This product is
intended for off-road use and passenger entertainment only.
3 | P a g e
Page 4
BHM
Installation
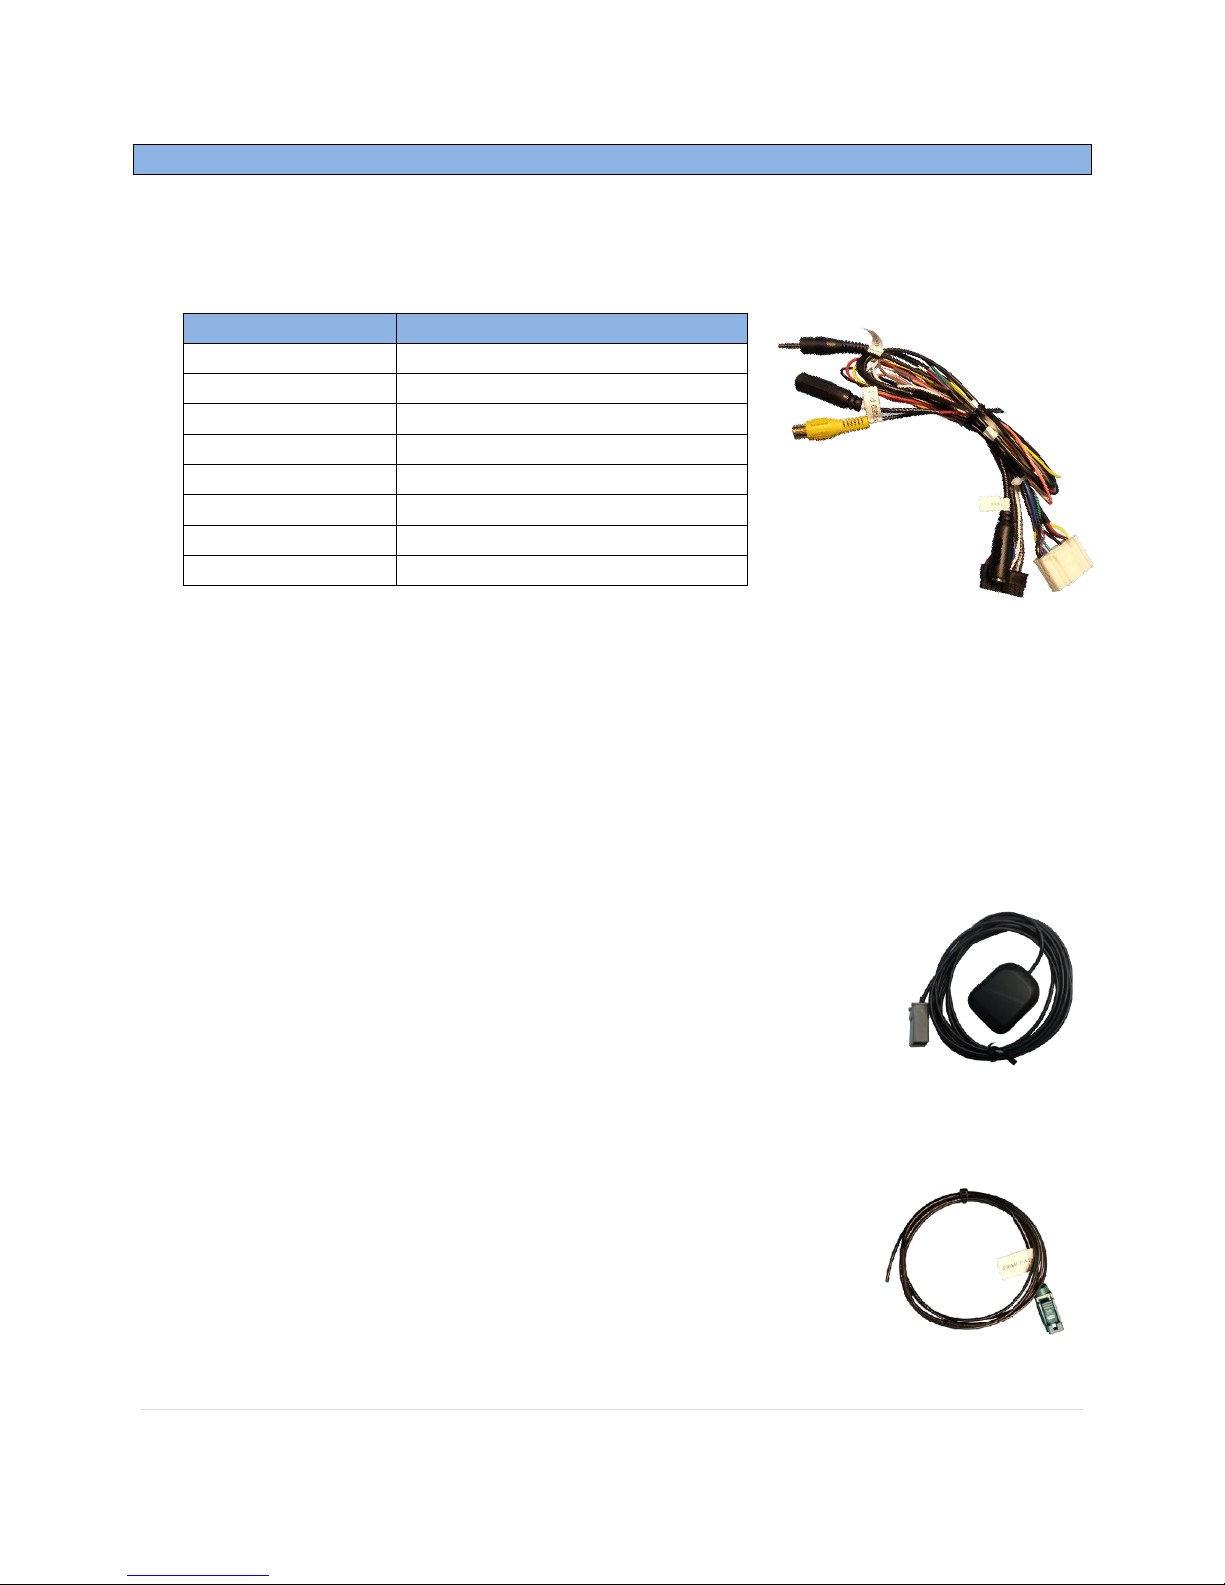
Stand Alone Wires
Connect to car
Black
Chassis Ground (-)
Red
12v ACC (+)
Yellow
12v Constant (+)
*Pink (mute)
Radio MUTE output wire (-)
**Gray
Existing Speaker + (speaker side)
**Gray/Black
Existing Speaker – (speaker side)
**White
Existing Speaker + (car side)
**White/Black
Existing Speaker – (car side)
*Optional: Vehicle may not have a mute wire.
**Optional: Only connect if desired, only if vehicle has an existing center channel speaker
(see step 8)
3/25/14
NTV-DOC109
rB2
1. Remove radio or display from the vehicle and set it aside.
2. From the provided Power Harness, connect the following wires to the car:
3. Connect the video output from the stand alone harness to the display via either composite
(yellow RCA) or RGBS wires.
4. Connect the IR eye to the IR input plug, from the stand alone harness (mount eye in remoteaccessible location).
5. Mount the provided Navigation antenna on or in the dash where it has a clear
view of the sky. Mounting these antennas beneath plastic is usually
acceptable, however if there is any metal between the antenna and the sky
you will likely have connection issues. Run the plug end of the antenna back
to the Garmin navigation module and connect at the proper port.
6. If you purchased a NAV-TRAFFIC Garmin unit: Connect the plug from the provided NavTraffic Antenna to the Garmin navigation module at the proper connector, and run the wire up
an A-Pillar or somewhere close to the outside of the vehicle. Try to keep this antenna as
stretched out as possible.
Agreement: End user agrees to use this product in compliance with all State and Federal laws. NAV-TV Corp. would not be held liable for
misuse of its product. If you do not agree, please discontinue use immediately and return product to place of purchase. This product is
intended for off-road use and passenger entertainment only.
4 | P a g e
Page 5
NTV-DOC109
Stand Alone Garmin Operation
The Stand Alone Garmin system functions just like
any other Garmin navigation system, with the
exception that you must use the remote to control
what’s on screen (via the mounted IR eye).
If you’ve purchased the NAV-Traffic option, the
included antenna must be plugged in to the NAVTraffic port on the Garmin unit, and ran up inside the
dash, or A-pillar as far as possible to gain signal.
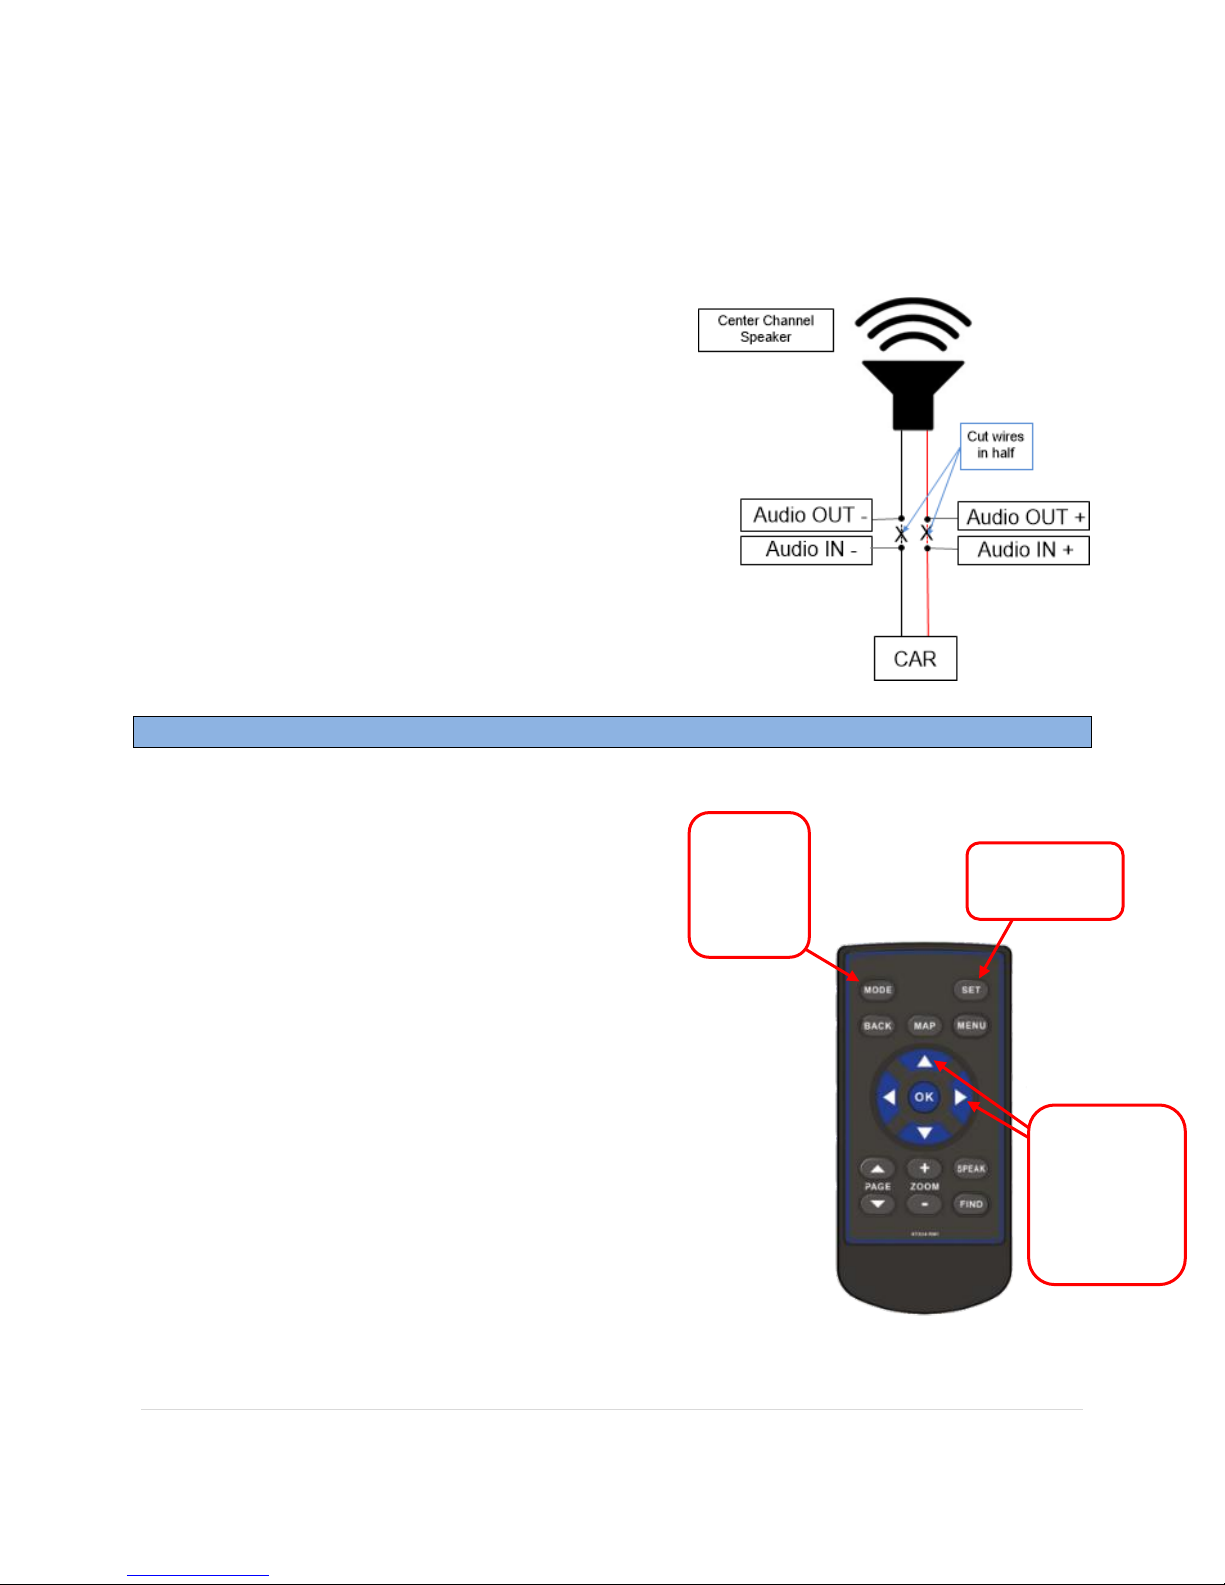
When in the map screen, to gain access to the NAV
Traffic options, you must press the ‘SET’ button on
the remote. To select ‘avoid’ (when it appears), use
the ‘MODE’ button on the remote control.
NAV
Traffic
‘AVOID’
accept
NAV Traffic
select
MENU
controls/
select
location
(on map)
NAV Guidance Audio Options:
7. If using the provided External Speaker for NAV guidance audio, connect it straight to the
3.5mm female plug labeled ‘EXT SPKR’ coming from the 24-pin Garmin NAV plug.
8. If using an existing center channel speaker for NAV
guidance audio:
A. Cut the signal lines (going to the speaker) in
half and connect the Gray, Gray/Black, White and
White/Black wires in. Refer to the chart on step 2 for
proper connection.
B. Connect the 3.5mm wire labeled ‘NAV
AUDIO IN’ to the plug labeled ‘EXT SPKR’ in order for
audio signal to pass through the IR module.
9. The pink wire labeled ‘MUTE’ provides ground when
navigation audio is played back.
BHM
3/25/14
rB2
Agreement: End user agrees to use this product in compliance with all State and Federal laws. NAV-TV Corp. would not be held liable for
misuse of its product. If you do not agree, please discontinue use immediately and return product to place of purchase. This product is
intended for off-road use and passenger entertainment only.
5 | P a g e
Page 6
BHM
FAQs
3/25/14
NTV-DOC109
rB2
1. q. My stand alone navigation doesn’t retain settings after the key is turned off.
1.a. Make certain the yellow wire is connected to a constant source of 12v.
2.q. I receive no GPS signal.
2.a. Make sure the GPS antenna is able to see the satellite by ensuring there is no
metal between the antenna and the sky (it can be mounted inside the dash, underneath
plastic is acceptable, but it cannot be mounted underneath metal).
3.q. I’ve acquired a NAV Traffic antenna, but I have no indication on screen that this Garmin has
NAV Traffic enabled.
3.a. You must order a Stand Alone/Garmin WITH NAV-Traffic (additional cost) from
Nav-TV in order to reap the benefits of live NAV-Traffic. The NTX54 with NAV-Traffic is a
separate module. Units without TMC are not field-upgradable. Contact us at 1-866-477-3336.
4.q. I do not hear any sound coming from the supplied speaker when NAV guidance is played
back.
4.a. Make certain the speaker signal cable is connected into the correct plug labeled
‘AUDIO’. Also, make sure the front of the mounted speaker is not being blocked or muffled in
any way.
5.q. My remote is not functioning.
5.a. Make certain the remote eye is connected into the correct plug labeled
‘INFRARED’. Make sure the battery is inserted into the remote properly. If you happen to
have a cell phone with a camera, aim the remote at the camera lens and press buttons. Most
cell phone cameras are able to see the IR operation.
6.q. I have no video output to my screen.
6.a. Try a different screen, then try a different source to the screen you’re trying to
use, to rule out or confirm its our product that is causing the problem.
Agreement: End user agrees to use this product in compliance with all State and Federal laws. NAV-TV Corp. would not be held liable for
misuse of its product. If you do not agree, please discontinue use immediately and return product to place of purchase. This product is
intended for off-road use and passenger entertainment only.
6 | P a g e
 Loading...