

Page 1

November 2012
maps + more
User’s manual
English (United Kingdom)
Page 2

The crossed-out wheeled bin means that within the European Union
the product must be taken to separate collection at the product end-oflife. This applies to your device but also to any enhancements marked
with this symbol. Do not dispose of these products as unsorted
municipal waste.
Imprint
Garmin Würzburg GmbH
Beethovenstrasse 1a+b
D-97080 Würzburg
The information contained herein may be changed at any time without prior
notification. Neither this manual nor any parts thereof may be reproduced for any
purpose whatsoever without the express written consent of
Garmin Würzburg GmbH, nor may they be transmitted in any form either
electronically or mechanically, including photocopying and recording. All technical
specifications, drawings etc are subject to copyright law.
2012, Garmin Würzburg GmbH
All rights reserved.
Page 3

User’s manual maps + more
User’s manual Table of contents III
Table of contents
1 Introduction ....................................................................................... 9
1.1 About this manual .................................................................................. 9
1.1.1 Conventions ............................................................................ 9
1.1.2 Symbols .................................................................................. 9
1.2 Legal notice ......................................................................................... 10
1.2.1 Liability .................................................................................. 10
1.2.2 Trade marks ......................................................................... 10
1.3 Questions about the product ................................................................ 10
2 Before you begin ............................................................................. 10
2.1 Scope of delivery ................................................................................. 10
2.2 Description of the navigation device .................................................... 11
2.3 Important safety information ................................................................ 11
2.3.1 Navigation safety information ............................................... 12
2.3.2 Safety information for the navigation device ........................ 12
2.4 Mounting/removing the navigation system .......................................... 13
2.4.1 Removing the navigation device........................................... 13
2.4.2 Mounting the navigation device ............................................ 14
2.4.3 Memory card ......................................................................... 15
2.5 Navigating with GPS ............................................................................ 16
3 Switching the navigation device on and off ................................. 16
3.1 Device mounted in the vehicle ............................................................. 17
3.1.1 Switching on the device ........................................................ 17
3.1.2 Screensaver ......................................................................... 17
3.1.3 Switching the device to standby mode ................................. 18
3.1.4 Switching off the device ........................................................ 18
3.2 Device not mounted ............................................................................. 18
3.2.1 Switching on the device ........................................................ 18
3.2.2 Screensaver ......................................................................... 19
3.2.3 Switching the device to standby mode ................................. 19
3.2.4 Switching off the device ........................................................ 19
3.3 Starting the navigation device for the first time .................................... 19
3.4 Manual ................................................................................................. 20
3.5 Options................................................................................................. 21
4 Passw ord lock ................................................................................. 21
4.1 Activating password protection ............................................................ 21
4.1.1 Changing a password ........................................................... 22
4.2 Cancelling password protection ........................................................... 22
4.3 Forgotten your password? ................................................................... 22
5 Operating the navigation system .................................................. 22
5.1 Information ........................................................................................... 22
5.2 Software keyboard ............................................................................... 28
5.2.1 Special keys ......................................................................... 28
5.2.2 Entering data ........................................................................ 29
Page 4

User’s manual maps + more
IV Table of contents User’s manual
5.3 Options................................................................................................. 30
5.4 Menus .................................................................................................. 30
6 Voice command .............................................................................. 30
6.1 Activating the voice command function ............................................... 30
6.2 Use voice command ............................................................................ 31
6.3 Help...................................................................................................... 31
6.4 Deactivating the voice command function ........................................... 31
6.5 Configuring the voice command function ............................................. 31
7 Navigation ....................................................................................... 32
7.1 Starting the navigation application ....................................................... 33
7.2 Specifying a destination ....................................................................... 34
7.2.1 Specifying the country in which the destination is
situated ................................................................................. 34
7.2.2 Entering a destination by voice commands .......................... 35
7.2.3 Entering a destination address ............................................. 36
7.2.4 Enter coordinates ................................................................. 37
7.2.5 Points of interest ................................................................... 39
7.2.6 Direct access to POI ............................................................. 43
7.2.7 Information about the destination ......................................... 43
7.2.8 Favourites ............................................................................. 44
7.2.9 Last destinations ................................................................... 45
7.2.10 Imported addresses from the phone book ............................ 45
7.2.11 Navigating home ................................................................... 46
7.2.12 Selecting destinations on the map........................................ 46
7.2.13 Route preview ....................................................................... 47
7.3 Managing destinations ......................................................................... 49
7.3.1 Saving destinations .............................................................. 49
7.3.2 Deleting a destination from the Favourites list ..................... 50
7.3.3 Defining the home address................................................... 50
7.3.4 Changing the home address ................................................ 52
7.4 Tracks and multi-leg routes ................................................................. 52
7.4.1 Entering the starting point ..................................................... 53
7.4.2 Entering route points ............................................................ 53
7.4.3 Editing route points ............................................................... 54
7.4.4 Managing routes ................................................................... 54
7.4.5 Loading routes or tracks ....................................................... 55
7.4.6 Calculating and displaying routes ......................................... 56
7.4.7 Simulating routes .................................................................. 56
7.4.8 Route preview ....................................................................... 57
8 Options, more functions ................................................................ 59
9 Working with the map ..................................................................... 62
9.1 Selecting the navigation map ............................................................... 62
9.2 Map in Standard mode ........................................................................ 62
9.3 Map in Preview mode .......................................................................... 63
Page 5

User’s manual maps + more
User’s manual Table of contents V
9.4 Map in Navigation mode ...................................................................... 66
9.4.1 Navigation in Vehicle mode .................................................. 66
9.4.2 Navigation in Pedestrian mode............................................. 70
9.4.3 Navigation in Track mode ..................................................... 72
9.4.4 Navigation in Offroad mode .................................................. 73
9.4.5 Map options in Navigation mode .......................................... 73
9.4.6 Quitting navigation ................................................................ 73
9.5 Map in destination search mode .......................................................... 74
9.5.1 Operating in destination search mode .................................. 75
9.6 Range 360 map view ................................................................... 76
9.6.1 Showing the range ................................................................ 76
9.6.2 Configuring the Range 360 map view .................................. 78
10 Useful functions .............................................................................. 78
10.1 Route profiles ....................................................................................... 78
10.1.1 Route profile settings ............................................................ 78
10.1.2 Basic profiles ........................................................................ 79
10.1.3 Creating a new route profile ................................................. 79
10.1.4 Selecting a route profile ........................................................ 80
10.1.5 Managing route profiles ........................................................ 80
10.2 MyPOIs ................................................................................................ 81
10.2.1 Creating your own destinations ............................................ 82
10.2.2 Symbols for your own POIs .................................................. 83
10.2.3 POI-Import: Importing your own POIs onto the
navigation device .................................................................. 83
10.3 Tracks .................................................................................................. 83
10.4 Parking close to the destination ........................................................... 85
10.4.1 Continuing on foot ................................................................ 85
10.4.2 Searching for a car park ....................................................... 85
10.4.3 Back to the destination ......................................................... 86
10.4.4 Charging near the destination ...................................... 86
10.5 Nearby ................................................................................................. 87
10.6 MyBest POI: POIs on your route ......................................................... 87
10.6.1 Displaying POIs along the route ........................................... 87
10.6.2 Navigating to one of the destinations ................................... 89
10.6.3 Selecting categories ............................................................. 89
10.7 Sightseeing .......................................................................................... 90
10.8 Sightseeing tours ................................................................................. 91
10.9 Direct help ............................................................................................ 93
10.10 GPS status, saving the current location ............................................... 94
10.11 Block .................................................................................................... 94
10.12 Turn-by-Turn list .................................................................................. 95
10.13 Low fuel warning ................................................................. 96
10.14 Optical parking system (OPS), Parking assistant ................................ 97
10.15 Door monitoring ................................................................................... 98
Page 6

User’s manual maps + more
VI Table of contents User’s manual
10.16 Special functions for electric vehicles .......................................... 99
10.16.1 Multi-Stop route .................................................................... 99
10.16.2 Driving range warning ......................................................... 100
10.16.3 Private charging stations .................................................... 101
10.17 Special functions for CNG vehicles ........................................... 103
10.17.1 Multi-Stop route .................................................................. 103
10.17.2 Driving range warning ......................................................... 104
10.18 TMC (Traffic information) ................................................................... 105
10.18.1 Preview TMC ...................................................................... 106
10.18.2 Displaying traffic information .............................................. 107
10.18.3 Showing a single message in detail ................................... 109
10.18.4 TMC settings ...................................................................... 109
10.19 Logbook ............................................................................................. 110
11 Car info .......................................................................................... 111
11.1 Trip computer ..................................................................................... 111
11.1.1 Opening the trip computer .................................................. 111
11.1.2 Selecting the period ............................................................ 112
11.1.3 Resetting the trip computer ................................................ 112
11.2 Status ................................................................................ 112
11.2.1 Opening the Status window ................................................ 112
11.2.2 Configuring the Status window ........................................... 112
11.3 Think Blue. Trainer. ........................................................................... 113
11.3.1 Opening the Think Blue. Trainer. application ..................... 113
11.3.2 Status ................................................................................. 113
11.3.3 Analysis .............................................................................. 116
11.3.4 Fuel saving tips .................................................. 118
11.3.5 Energy saving tips ...................................................... 118
11.3.6 Resetting the Think Blue. Trainer. application .................... 118
11.4 Applications for electric vehicles ................................................ 119
11.4.1 Opening the applications for electric vehicles .................... 119
11.4.2 Power flow .......................................................................... 119
11.4.3 e-manager .......................................................................... 120
11.4.4 Energy recovery ................................................................. 125
12 Media .............................................................................................. 126
12.1 Controlling the car radio ..................................................................... 126
12.1.1 Selecting the frequency band ............................................. 128
12.1.2 Setting a certain frequency ................................................. 128
12.1.3 Selecting a radio station ..................................................... 128
12.1.4 Scan: Scanning the frequency band................................... 129
12.1.5 Preset list ............................................................................ 129
Page 7

User’s manual maps + more
User’s manual Table of contents VII
12.2 Media Player ...................................................................................... 130
12.2.1 Supported audio files .......................................................... 131
12.2.2 Selecting a media source ................................................... 132
12.2.3 Selecting files for playing back ........................................... 133
12.2.4 Selecting the play-back mode ............................................ 133
12.2.5 Controlling the play back .................................................... 134
12.3 Options for the radio and media player .............................................. 134
12.3.1 Traffic information (TP) ....................................................... 135
12.3.2 Sound ................................................................................. 135
12.3.3 Volume ............................................................................... 136
12.4 Pictures .............................................................................................. 136
12.4.1 Suitable files ....................................................................... 136
12.4.2 Opening the picture viewer ................................................. 136
12.4.3 Selecting an image file ....................................................... 137
12.4.4 Operating the picture viewer ............................................... 137
12.4.5 Selecting the play-back mode ............................................ 137
12.5 Options for the picture viewer ............................................................ 138
12.5.1 Slideshow (Slide show) ...................................................... 138
12.5.2 Background for the screensaver......................................... 138
13 Handsfree module ......................................................................... 139
13.1 Bluetooth connection ......................................................................... 141
13.1.1 Searching for and pairing Bluetooth devices ...................... 141
13.1.2 Pairing from the mobile phone............................................ 142
13.1.3 Connecting to a device ....................................................... 143
13.1.4 Activating a mobile phone .................................................. 144
13.1.5 Deleting devices ................................................................. 145
13.1.6 Importing a phone book ...................................................... 145
13.1.7 Importing recent calls ......................................................... 146
13.2 Taking a call ....................................................................................... 147
13.3 Receiving a text message .................................................................. 147
13.4 Making a call ...................................................................................... 148
13.4.1 Making a call with the voice commands function ............... 148
13.4.2 Dialling a telephone number ............................................... 149
13.4.3 Dialling a speed call number .............................................. 149
13.4.4 Calling a contact from the phone book ............................... 149
13.4.5 Calling most recently dialled, received or missed
numbers .............................................................................. 150
13.4.6 Transferring a call from your mobile telephone .................. 150
13.5 During a call ....................................................................................... 150
13.5.1 Moving the navigation application to the foreground .......... 150
13.5.2 Entering numbers ............................................................... 151
13.5.3 Muting the microphone ....................................................... 151
13.5.4 Transferring a call to the mobile phone .............................. 151
13.5.5 Ending the call .................................................................... 151
13.6 Useful functions ................................................................................. 152
13.6.1 Navigating to a contact from the phone book ..................... 152
13.6.2 Opening the mailbox ........................................................... 152
Page 8

User’s manual maps + more
VIII Table of contents User’s manual
13.7 Configuring the hands-free module ................................................... 153
13.7.1 Preset ................................................................................. 153
13.7.2 Settings ............................................................................... 153
14 Live Servic es ................................................................................. 155
14.1 Costs .................................................................................................. 155
14.1.1 Data traffic costs ................................................................. 155
14.1.2 Costs incurred when using the Live services ..................... 155
14.2 Requirements for using the Live services .......................................... 156
14.3 Using the Live services ...................................................................... 156
14.3.1 Using the smartphone's Internet connection ...................... 157
14.3.2 Weather service .................................................................. 157
14.3.3 Local search ....................................................................... 158
14.3.4 Traffic information ............................................................... 160
14.4 Configuring the Live services ............................................................. 160
15 Configuring the navigation system ............................................. 161
16 Appendix ....................................................................................... 162
16.1 Technical data of the navigation device ............................................. 162
16.2 End user licence agreement for software and data ........................... 163
16.3 Declaration of conformity ................................................................... 166
17 Troubleshooting ............................................................................ 167
18 Index .............................................................................................. 169
Page 9
User’s manual maps + more
Introduction - 9 -
1 Introduction
1.1 About this manual
1.1.1 Conventions
For better legibility and clarification, the following styles are used in this
manual:
Bold and italics: Names of products
S
MALL CAPITALS: Names of windows and dialogue boxes
Bold: Highlighting of important parts in the text
Underlined: Descriptions of buttons, input boxes and other
elements on the user interface
Underlined and italics: Names of control elements on the navigation device
1.1.2 Symbols
The following symbols draw attention to specific passages of text:
Instructions and tips for operating the software
More detailed information and explanations
Warnings
Symbols in headers indicate that the related chapter is applicable for
certain vehicles only:
Relevant only for vehicles which are powered by an electric motor
Relevant only for vehicles which are powered by a CNG engine
Relevant only for vehicles which are powered by a petrol or Diesel
engine
Page 10

User’s manual maps + more
- 10 - Before you begin
1.2 Legal notice
1.2.1 Liability
The software and manual are subject to change without notice.
Garmin Würzburg GmbH is not liable for the accuracy of the information
contained in this manual or for damages resulting from the use of this
manual.
Suggestions for improvements and information regarding errors are
always welcome so that we can supply you with even better products in
the future.
1.2.2 Trade marks
All brand and trade marks mentioned in this document and registered
by third parties are subject without reservation to copyright law and the
proprietary rights of their respective owners. All trade marks, trade
names and company names used in this document are or may be trade
marks or registered trademarks of their respective owners. All rights
reserved except those explicitly granted.
If the registered trade marks used in this manual are not explicitly
identified as such, this does not imply that the name is not subject to the
rights of a third party.
► Microsoft, Outlook, Excel and Windows are registered trade marks
of the Microsoft Corporation.
► NAVIGON is a registered trade mark of Garmin Würzburg GmbH.
1.3 Questions about the product
You have a question concerning your product? Then visit our website
www.garmin.com/pid and click on "Customer services". There you will
find an area with frequently asked questions (FAQ Center) along with
details of how to contact us by phone or e-mail.
2 Before you begin
2.1 Scope of delivery
Please check that the contents are complete. If anything is missing, get
in touch immediately with the dealer who sold you the product.
The purchased product includes the following:
► navigation device
► Car cradle
► USB cable
► Illustrated installation instructions
Page 11

User’s manual maps + more
Before you begin - 11 -
2.2 Description of the navigation device
1 Touch-screen
2 On/Off
3 Slot for microSD memory card
4 Microphone
5 Mini USB socket for USB cable / mains adapter
2.3 Important safety information
In your own interest, please read the following safety information and
warnings carefully before starting up your navigation system.
Page 12
User’s manual maps + more
- 12 - Before you begin
2.3.1 Navigation safety information
Use the navigation system at your own risk.
Caution! To prevent accidents, do not operate the navigation system
while driving.
Caution! Do not look at the screen unless it is absolutely safe to do so!
Caution! Traffic regulations have priority over any instructions from the
navigation system.
Caution! Follow the instructions of the navigation system only when the
circumstances and the road traffic regulations allow you to do so! The
navigation system will still guide you to your destination even if you
deviate from the calculated route.
Caution! When you use the navigation device in a vehicle, mount it
only in the supplied cradle.
Caution! Check that the cradle is secured and adjusted properly before
each journey.
Note: If you have not understood the spoken instructions or are unsure
about what to do at the next junction, you can refer briefly to the map or
schematic view of your navigation system.
2.3.2 Safety information for the navigation device
Caution! Protect the device from moisture. The device is neither
waterproof nor protected against splash water.
Caution! Do not open the case of the navigation device under any
circumstances.
Caution! Do not expose the navigation device to extreme heat or cold.
This may damage the device or impair its function (see "Technical data"
on page 162).
Caution! Do not subject the navigation device to severe temperature
fluctuations. This can lead to condensation.
Caution! Risk of explosion if battery is replaced by an incorrect type.
Dispose of used batteries according to the instructions.
Page 13
User’s manual maps + more
Before you begin - 13 -
Note: Create a backup of the data which exist in the internal memory of
your navigation device.
This is very easy to do with the Fresh software which can be
downloaded free of charge from our website www.garmin.com/pid.
2.4 Mounting/removing the navigation system
The vehicle is already prepared for the navigation system to be
installed. In the middle of the dashboard is a slot for the cradle of the
navigation device. Power is supplied to the device through this cradle.
Radio traffic information is received via the antenna of the car radio.
The navigation device can be used to control the car radio, and it
receives vehicle data such as consumption, amount of fuel in the tank,
speed, etc.
2.4.1 Removing the navigation device
When you receive your new vehicle, the navigation device is already
installed. To prevent theft we recommend that you do not leave the
navigation system mounted in the vehicle when you park.
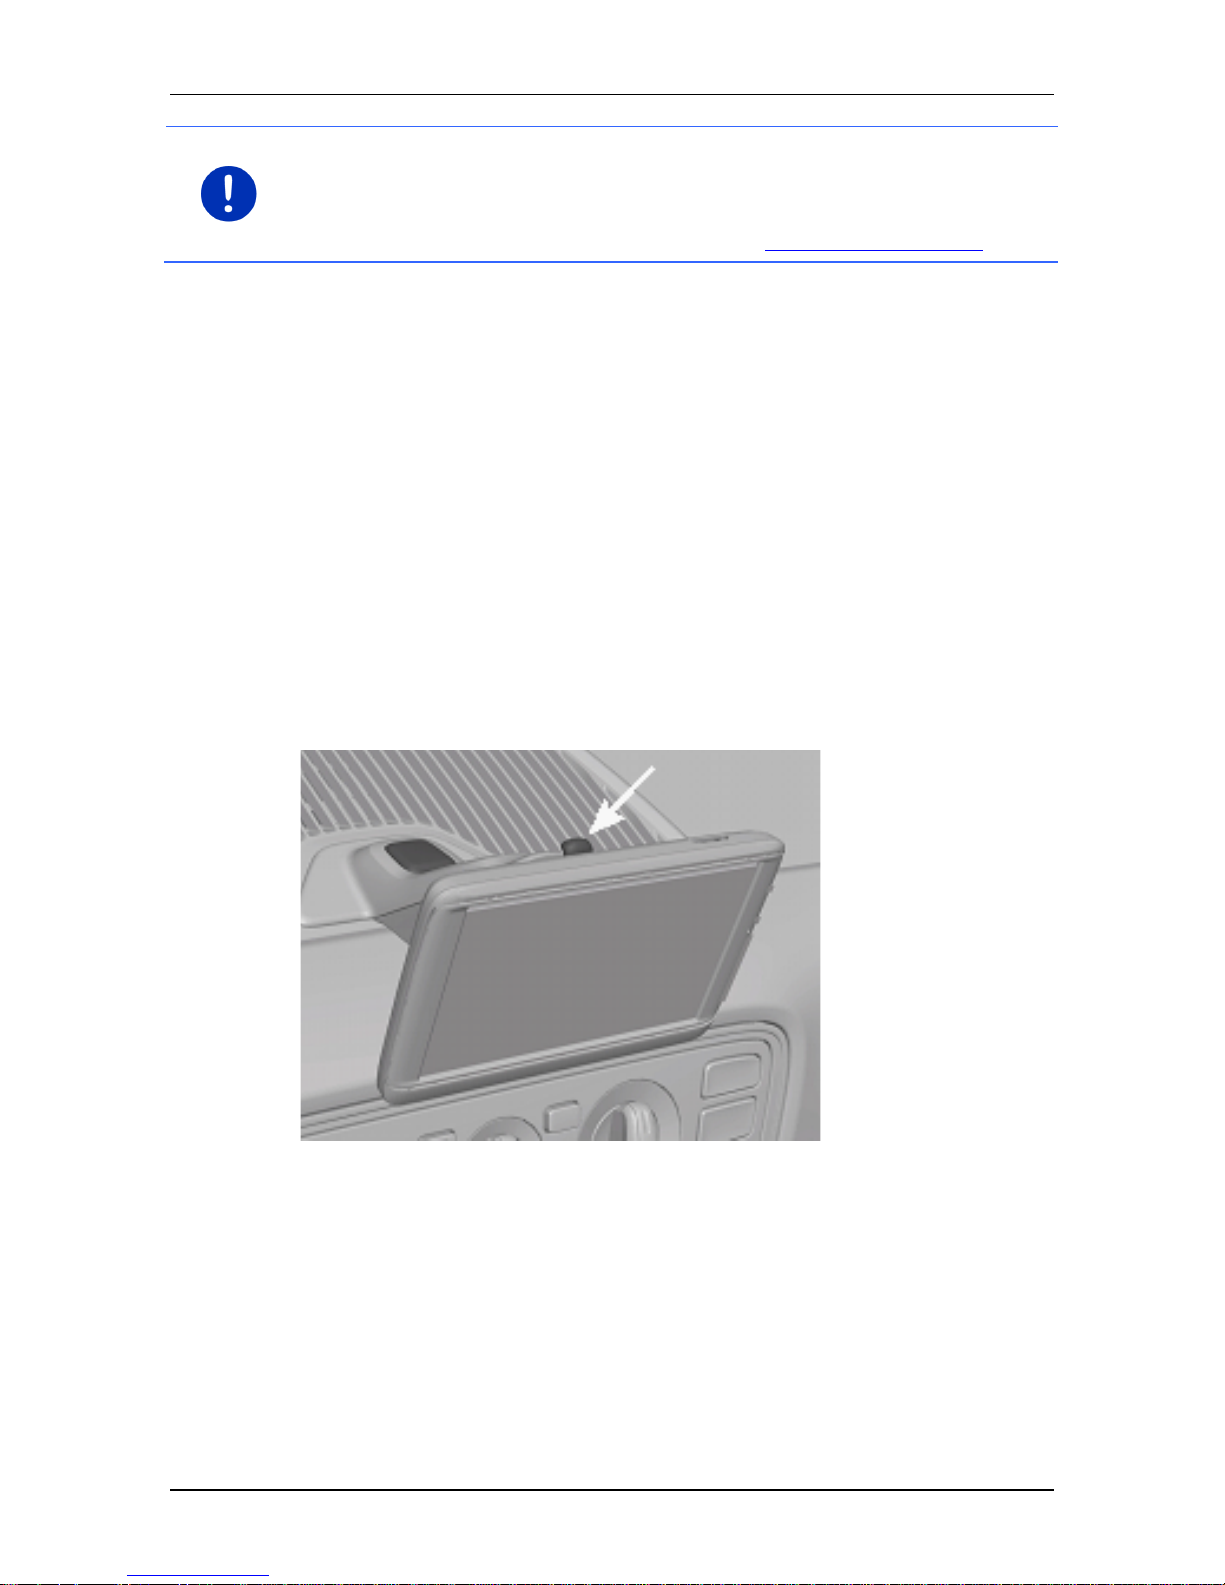
Removing the navigation device from the cradle
1. Press the button at the top of the cradle (see figure).
2. Pull the bottom edge of the navigation device away from the cradle
slightly.
3. Lift the device up and out.
Page 14
User’s manual maps + more
- 14 - Before you begin
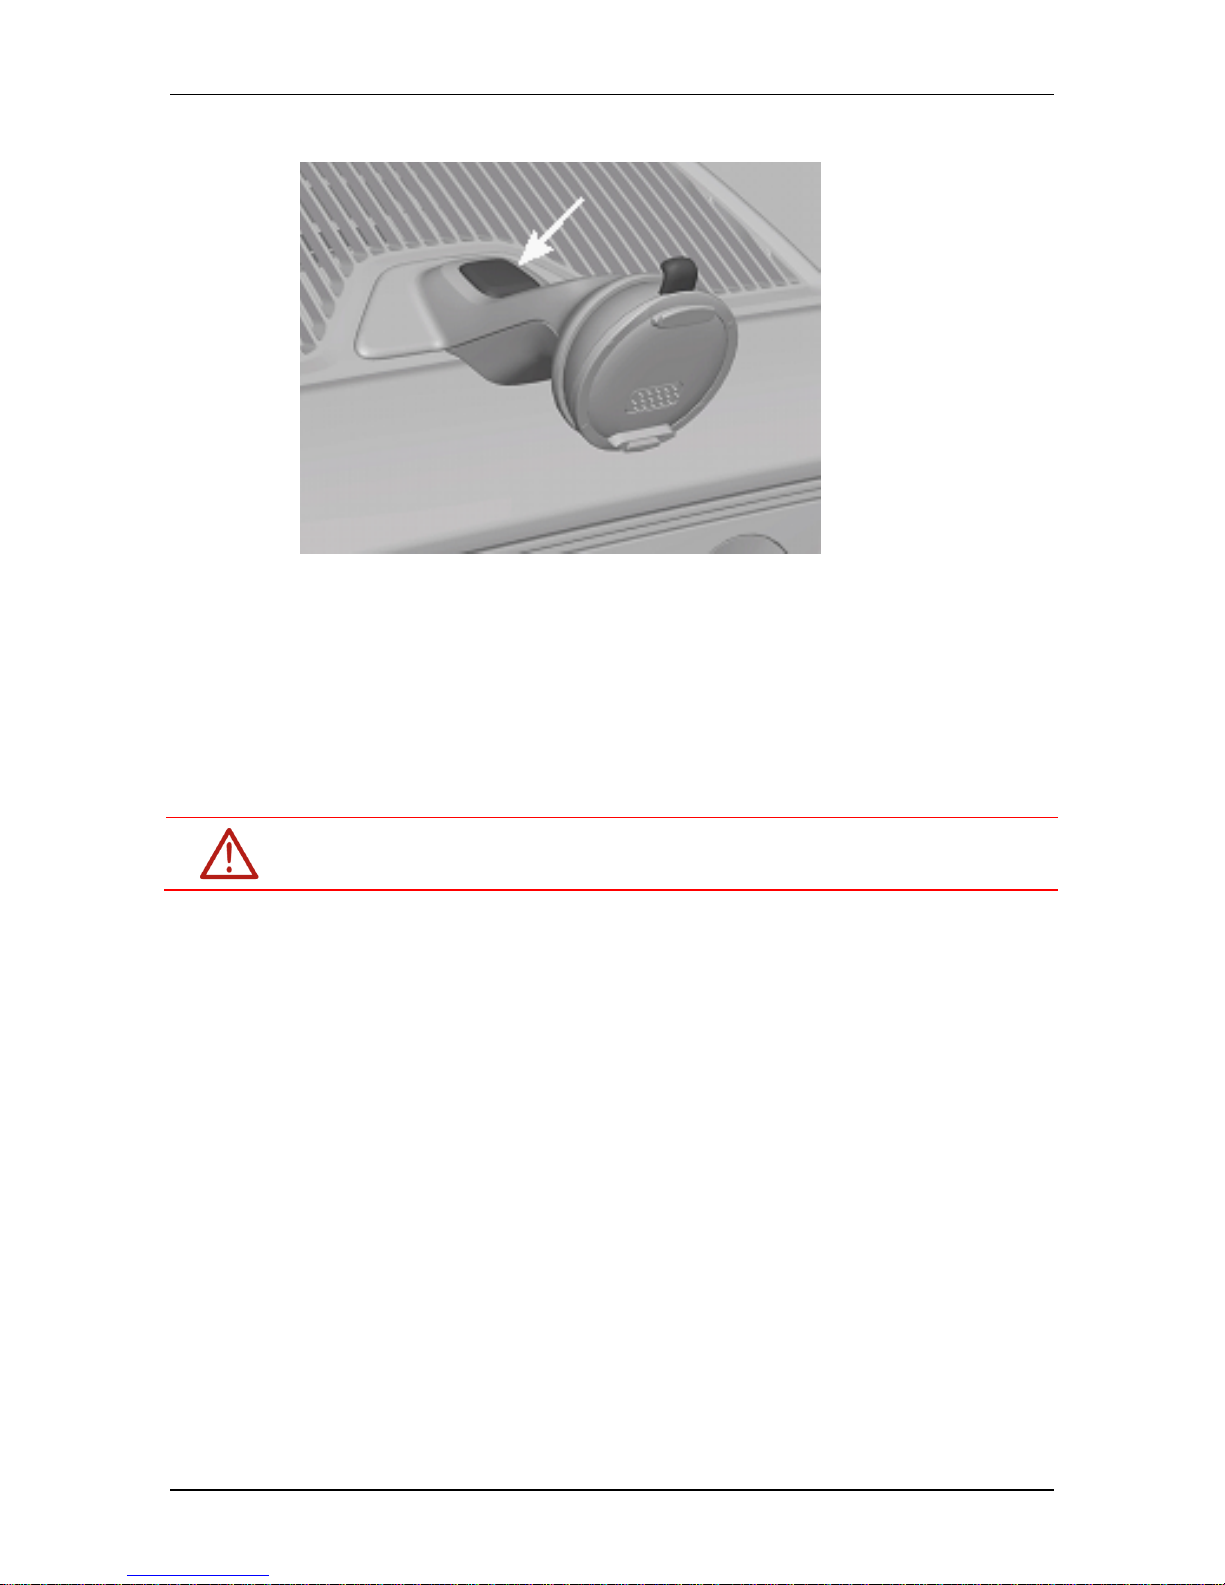
Removing the cradle
1. Press the button at the bottom of the cradle (see figure).
2. Holding the button pressed, take the cradle out of the opening.
Fitting the cover
1. Place the cover over the opening.
2. Press the cover fully into the opening.
2.4.2 Mounting the navigation device
Caution! Be sure to refer to all the safety information in the chapter
"Important safety information" on page 11.
Removing the cover
In the middle of the dashboard is the opening for the cradle of the
navigation device.
► Remove the cover from over the opening in the dashboard.
Fitting the cradle
1. Place the cradle, correctly aligned, over the opening provided for it.
2. Press the cradle into the opening until you hear and feel that it
latches in place.
Fitting the navigation device in the cradle
On the back of the navigation device you will see a circle with two
recesses.
1. Hang the navigation device by the upper recess on the upper lug of
the cradle.
2. Then press it towards the cradle so that it latches in place.
Page 15
User’s manual maps + more
Before you begin - 15 -
Supplying power to the navigation device
The navigation device is supplied with power via the cradle as soon as
the vehicle ignition or radio is switched on. At the same time the
device's battery is charged so that it can also be used outside the
vehicle, e.g. for pedestrian navigation.
Note: It takes approx. 3 hours to charge the device when the battery is
flat. A fully charged battery enables up to 3 hours of use depending on
the device configuration.
Traffic information (TMC)
The navigation device has an integrated TMC receiver. As soon as it is
mounted, the device can receive traffic message updates. If required, it
can change your route dynamically, e.g. in order to avoid a traffic jam.
2.4.3 Memory card
A memory card is not required to operate the navigation system
because all the data needed for navigation are stored in the internal
memory of the device.
Note: If you purchase additional navigation maps, they must be saved
in the internal memory of the navigation device. Navigation data on the
memory card are not used. The slot for memory cards is intended only
for media which you can play back with the media player or the picture
viewer.
When you connect the navigation system to your computer using a USB
cable, the internal memory is detected as the 'NAVIGON' drive. The slot
for the memory card is detected as the 'NAVIGON SD' drive.
Data backups, software updates and navigation map updates can be
carried out quickly and conveniently with the Fresh software, which you
can download free of charge from the website www.garmin.com/pid.
Caution! Do not remove the memory card from the device while the
data saved on it are in the process of being used, e.g. for playing back
music or viewing pictures. Data may be lost as the result.
Note: A change of memory card is detected only when the device has
been switched on. If the memory card is not detected, insert it again
when the device is on and running.
Page 16

User’s manual maps + more
- 16 - Switching the navigation device on and off
2.5 Navigating with GPS
GPS is based on a total of at least 24 satellites orbiting the Earth and
continuously transmitting signals of their position and time. The GPS
receiver receives this data and calculates its own geographical position
on the basis of the information transmitted by the various satellites.
Data from at least three satellites is required for positioning with an
acceptable degree of accuracy. With data from four or more satellites it
is possible in addition to determine the position's altitude above sea
level. Positioning is accurate to within three metres.
Once the navigation device has determined your position, this position
can be used as a starting point for calculating a route.
The map data on your navigation device includes the geographical
coordinates of all digitally recorded points of interest, streets and
places. This enables the device to calculate a route between a starting
point and a destination.
Calculation of the current position and its representation on the map
take place approximately once every second. In other words, your
current position is always shown on the map.
3 Switching the navigation device on and
off
The navigation device can be in one of four states:
► On: The navigation device is on and can be operated.
► Screensaver: The navigation device is on. However, you see only
a screensaver. As long as the screensaver is visible, the device
cannot be operated.
The screensaver is available only when the device is mounted in
the vehicle.
If you switch on the screensaver while navigation is in progress, you
will continue to hear the navigation announcements from the
device.
If music is being played when the screensaver is switched on, the
music will continue.
► Standby: When you switch the navigation device to standby mode,
the next time it is switched on it will start very quickly. In standby
mode the device still consumes a small amount of energy however.
Depending on how full the battery is, it can become flat within a few
days or up to a few weeks.
Page 17

User’s manual maps + more
Switching the navigation device on and off - 17 -
► Off: When you switch off the device, it consumes no energy. It can
then take several months for the battery to become flat. Switching
the device on again triggers a restart which can take some time
(approx. 60 seconds). Your settings and your saved destinations
and routes will be retained.
The procedure for switching the navigation device on and off depends
on whether it is mounted in the vehicle or not.
3.1 Device mounted in the vehicle
When the navigation device is mounted in the vehicle, it does not need
to be switched on or off.
3.1.1 Switching on the device
The navigation device switches on when you switch on the ignition.
Note: The device also switches on when it is fitted in the vehicle while
the ignition is already on.
If the navigation device was previously set to standby, the window
which was last visible will appear.
If the device was previously switched off, it will take several seconds for
the software to be started again. The S
TART window then appears.
If you want to switch on the device with the engine off, press and hold
the (On/Off) key until the device switches on.
3.1.2 Screensaver
Switching on the screensaver
The screensaver is available only under the following conditions:
The device is mounted in the vehicle and is on.
The vehicle's ignition is on.
► Press briefly on the (On/Off) key.
- or -
► In the START window tap on (Switch off).
The screensaver will appear. On it you can see the date, the time and
the outdoor temperature.
Page 18
User’s manual maps + more
- 18 - Switching the navigation device on and off
Using the Fresh software you can install a function which allows you to
select the picture you want to use as the screensaver. Fresh can be
downloaded free of charge from the website www.garmin.com/pid.
The date, the time and the outdoor temperature are shown likewise on
the picture which you selected yourself. For more details refer to the
chapter "Background for the screensaver" on page 138.
Switching off the screensaver
► Press briefly on the (On/Off) key.
- or -
► Tap anywhere on the screen.
The screensaver is phased out. The window which was active when the
screensaver was switched on is visible again.
Note: The screensaver is also switched off automatically when you pull
out the ignition key.
3.1.3 Switching the device to standby mode
When you pull out the ignition key, a message will appear shortly
afterwards telling you that the device is being switched to standby
mode.
► Tap on Standby or wait for the device to go into standby on its own.
3.1.4 Switching off the device
When the device is mounted in the vehicle, there is really no need for it
to be switched off. You can switch it off however if you do not intend to
use it for some time.
► Press the (On/Off) key and keep it pressed until the device
switches off (approx. 5 seconds).
3.2 Device not mounted
Of course you can also switch the device on and off when it is not
mounted in the vehicle.
3.2.1 Switching on the device
► Press briefly on the (On/Off) key.
If the navigation device was previously set to standby, the window
which was last visible will appear.
If the device was previously switched off, it will take several seconds for
the software to be started again. The S
TART window then appears.
Page 19
User’s manual maps + more
Switching the navigation device on and off - 19 -
Forgotten your passwor d?
It can happen that you activate the password but are then unable to
remember it.
► If you forget your password, follow the procedure described in
"Forgotten your password?" on page 22.
3.2.2 Screensaver
When the navigation device is not being supplied with power from the
vehicle, the screensaver is not available.
3.2.3 Switching the device to standby mode
► Press briefly on the (On/Off) key.
- or -
► In the START window tap on (Switch off).
A message will appear telling you that the device will be switched to
standby mode in several seconds.
► Wait for the device to be switched to standby mode or tap on
Standby.
3.2.4 Switching off the device
► Press the (On/Off) key and keep it pressed until the device
switches off (approx. 5 seconds).
- or -
1. Press briefly on the (On/Off) key (max. 1 second).
A message will appear telling you that the device will be switched to
standby mode in several seconds.
2. Tap on Switch off.
3.3 Starting the navigation device for the first time
When you switch on the navigation system for the first time, you will be
asked to make the following settings:
► your preferred language for using the software
► consideration of fast-charging stations
► the unit of length for distances
► the time format
► the date format
► the unit for temperature values
Page 20

User’s manual maps + more
- 20 - Switching the navigation device on and off
The START window opens.
From the S
TART window you can access all the applications of the
navigation device:
► Navigation, see page 32
► Car info, see page 111
► Media, see page 126
► Phone, see page 139
Note: You can open the START window from practically every other
window by tapping on the (Main menu) button.
Note: If you have not used the navigation device for a long time, the
battery may be flat.
If you are using a plug-in mains adapter or have connected your device
to a PC, the device may need charging for a few minutes before it can
be switched on.
3.4 Manual
An excerpt of this manual describing the most important functions of the
navigation device is saved on the navigation device.
To open the manual:
1. In the S
TART window, tap on more > Manual.
The TABLE OF CONTENTS window opens.
Page 21
User’s manual maps + more
Password lock - 21 -
2. Tap on the name of the chapter you want to read.
The content of the chapter is shown.
With the (Up) and (Down) buttons you can scroll up one
page and down one page respectively.
With the (To the left) and (To the right) buttons you can
open the previous or the next chapter respectively.
► Tap on Table of contents to open theTABLE OF CONTENTS window.
► Tap on the (Close) button to close the manual and return to
the START window.
3.5 Options
Some windows offer options that lead to more functions.
A description of all available options can be found in the chapter
"Options, more functions" on page 59.
4 Password lock
You can protect your navigation system from unauthorised use by
creating a password. The password is always requested when the
device is switched on and it is not mounted in your vehicle.
As soon as the device is mounted in a vehicle, it automatically receives
the vehicle's individual ID number. The device knows the refore whether
it is mounted in the "correct" vehicle. In this vehicle the password is
requested only once.
4.1 Activating password protection
1. In the NAVIGATION window tap on More functions > Settings >
Options > Password lock.
The NEW PASSWORD window opens.
2. Enter a password in the New password box and tap on Next.
3. Enter this password again in the Confirm new password box.
4. Tap on Activate.
Note: The password must have exactly 4 digits.
Page 22
User’s manual maps + more
- 22 - Operating the navigation system
4.1.1 Changing a password
1. In the NAVIGATION window tap on More functions > Settings >
Options > Password lock.
The ENTER PASSWORD window opens.
2. Enter the currently valid password in the Enter password box.
3. Tap on Change pass word.
The NEW PASSWORD window opens.
4. Enter a password in the New password box and tap on Next.
5. Enter this password again in the Confirm new password box.
6. Tap on Activate.
Note: The new password must have exactly 4 digits.
4.2 Cancelling password protection
1. In the NAVIGATION window tap on More functions > Settings >
Options > Password lock.
The ENTER PASSWORD window opens.
2. Enter the currently valid password in the Enter password box.
3. Tap on Deactivate.
4.3 Forgotten your password?
If you enter the password wrongly three times, a window will open with
instructions telling you what to do now.
► Follow the instructions on the screen.
5 Operating the navigation sy stem
5.1 Information
The time is indicated at the top edge of many windows. When the
device is mounted in the vehicle and the ignition is on you will also see
the outdoor temperature.
Various information symbols are likewise located at the top of many
windows.
Page 23
User’s manual maps + more
Operating the navigation system - 23 -
GPS
The GPS symbol can show the following GPS reception states:
No GPS (No symbol): The built-in GPS receiver is not operational.
Contact us if the problem persists (see "Questions about the product"
on page 10).
No signal: Data is being received from less than three satellites.
Position cannot be calculated.
GPS ready: Data is being received from at least 3 satellites. Position
can be calculated.
For details of the GPS status refer to chapter "GPS status, saving the
current location" on page 94.
Track
The (Record track) symbol indicates that a track is being recorded
at this moment.
For more information about tracks refer to chapter "Tracks" on page 83.
Compass
The Compass symbol is available only in the map view. It shows you in
which direction you are currently moving. It can indicate the following
points of the compass: N, NE, E, SE, S, SW, W, NW.
Showing and hiding the Compass symbol
You can activate and deactivate the Compass symbol so that it is
shown or hidden.
► In the NAVIGATION window tap on More functions > Settings >
Navigation.
► Scroll with the (To the left) and (To the right) buttons
until you see the Display compass setting.
The currently valid setting value is highlighted (red).
► Tap on the (Toggle) button to alternate between the setting
values.
► Tap on OK.
Page 24
User’s manual maps + more
- 24 - Operating the navigation system
Energy
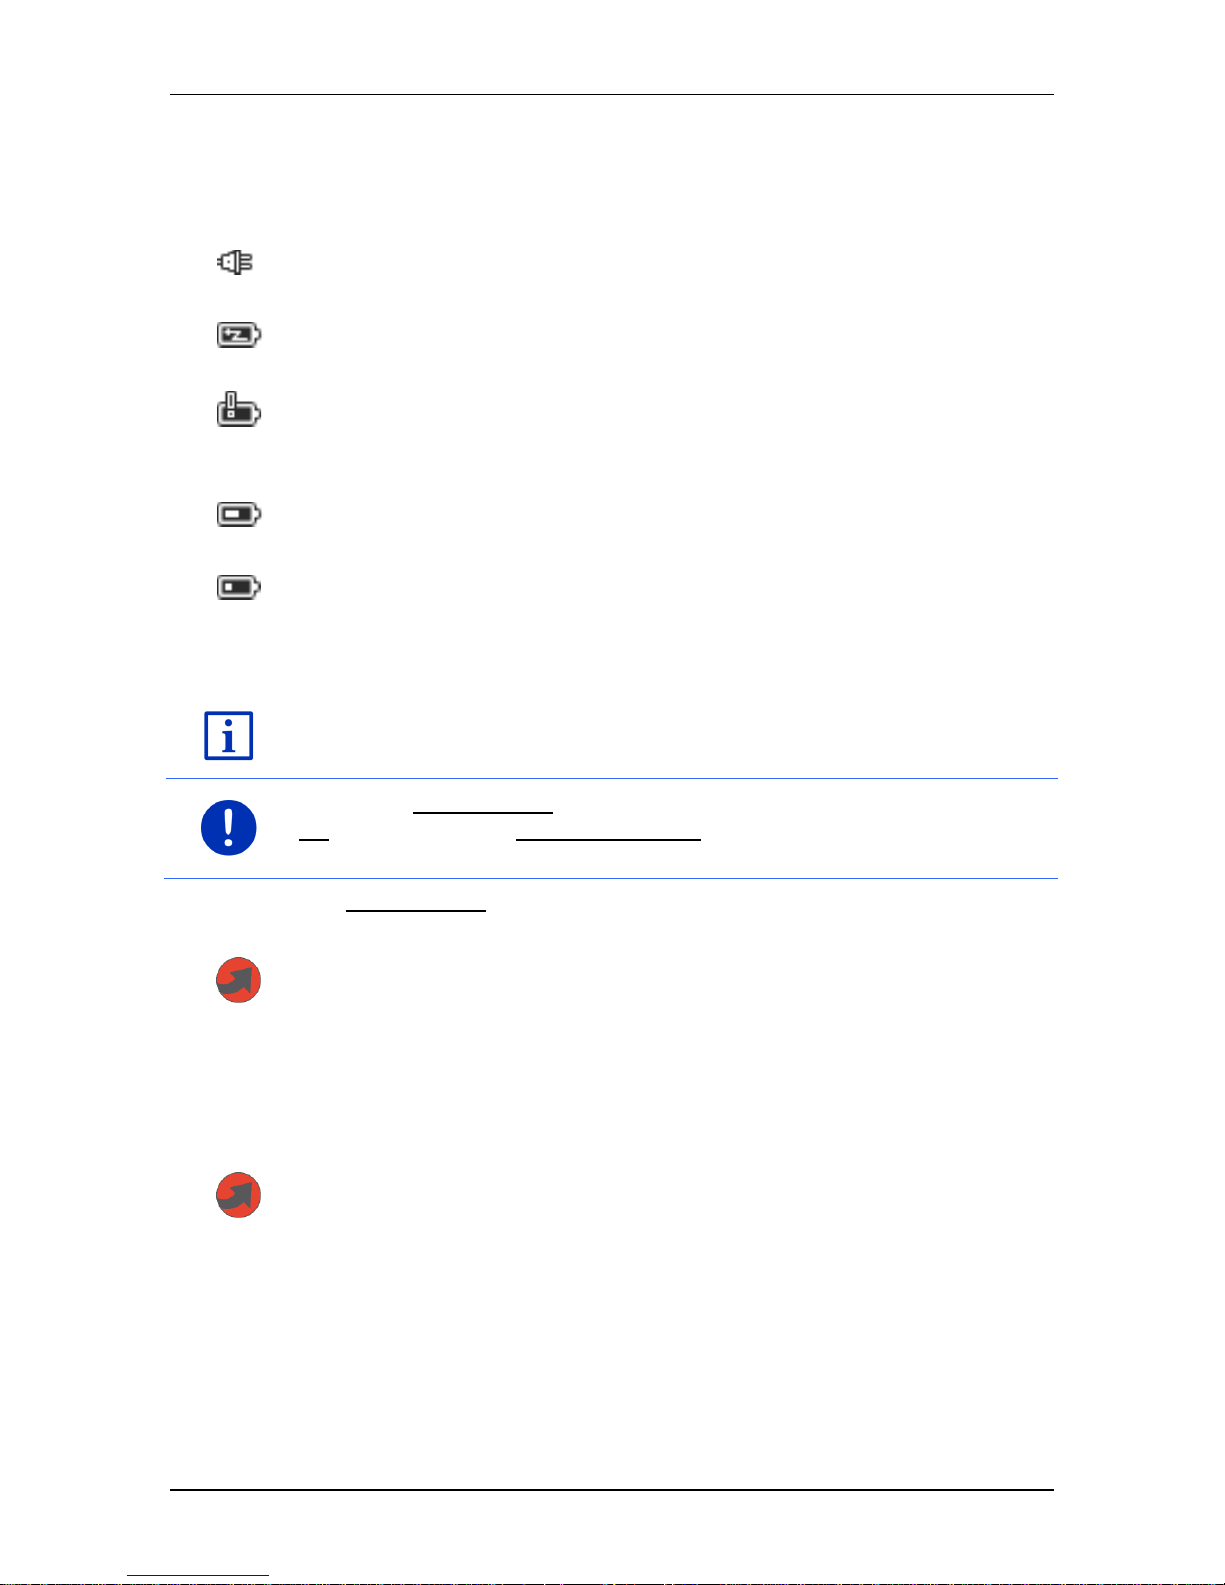
The Energy symbol can indicate the following states of the integrated
battery:
The device is mounted in the vehicle and is being supplied with power
from the vehicle. The battery is fully charged.
The device is mounted in the vehicle and is being supplied with power
from the vehicle. The battery is being charged.
The device is mounted in the vehicle and is being supplied with power
from the vehicle. The battery cannot be charged because its
temperature is too high or too low.
The device is being supplied by its internal battery. The battery charge
is sufficient.
The device is being supplied by its internal battery. The battery charge
is low.
Live Servic es
This section is relevant for you only if your navigation device was ever
connected to a tethering-capable smartphone.
Note: The Live Services symbol will not be shown if you have selected
No as the setting for Use Live services in the Live services settings
(see "Configuring the Live services" on page 160).
The Live Services symbol indicates the availability of the Live services.
The following states can be symbolised:
(Red) No Live Services: There is no connection yet to the Live server.
This can be due to the following:
► There is no Bluetooth connection between the navigation device
and a smartphone (see "Bluetooth connection" on page 141).
► There is no smartphone selected as the Internet access point (see
"Using the smartphone's Internet connection" on page 157).
(Red) Connecting: The number on the symbol indicates which
smartphone has been selected as the Internet access point. There is no
connection yet to the Live server. This can be due to the following:
► A Bluetooth connection was set up between the navigation device
and the smartphone, but the smartphone is configured in such a
way that it is unable to make its Internet connection available to
other devices (no tethering). For details please refer to the user
manual issued for your smartphone.
Page 25
User’s manual maps + more
Operating the navigation system - 25 -
► The mobile radio connection is interrupted.
► The Live server is not answering.
(Light grey) Live Services ready: There is a connection to the Live
server. The Live services are available. The number indicates which of
the two smartphones is currently active as the Internet access point.
Traffic information
TMC
The navigation system has an integrated TMC receiver which supplies
up-to-date traffic information. Using this information the navigation
system can change your route dynamically, for example in order to
avoid a traffic jam.
Note: This function is only available if TMC traffic messages are being
transmitted in the country in which you are travelling. This is not the
case in all countries.
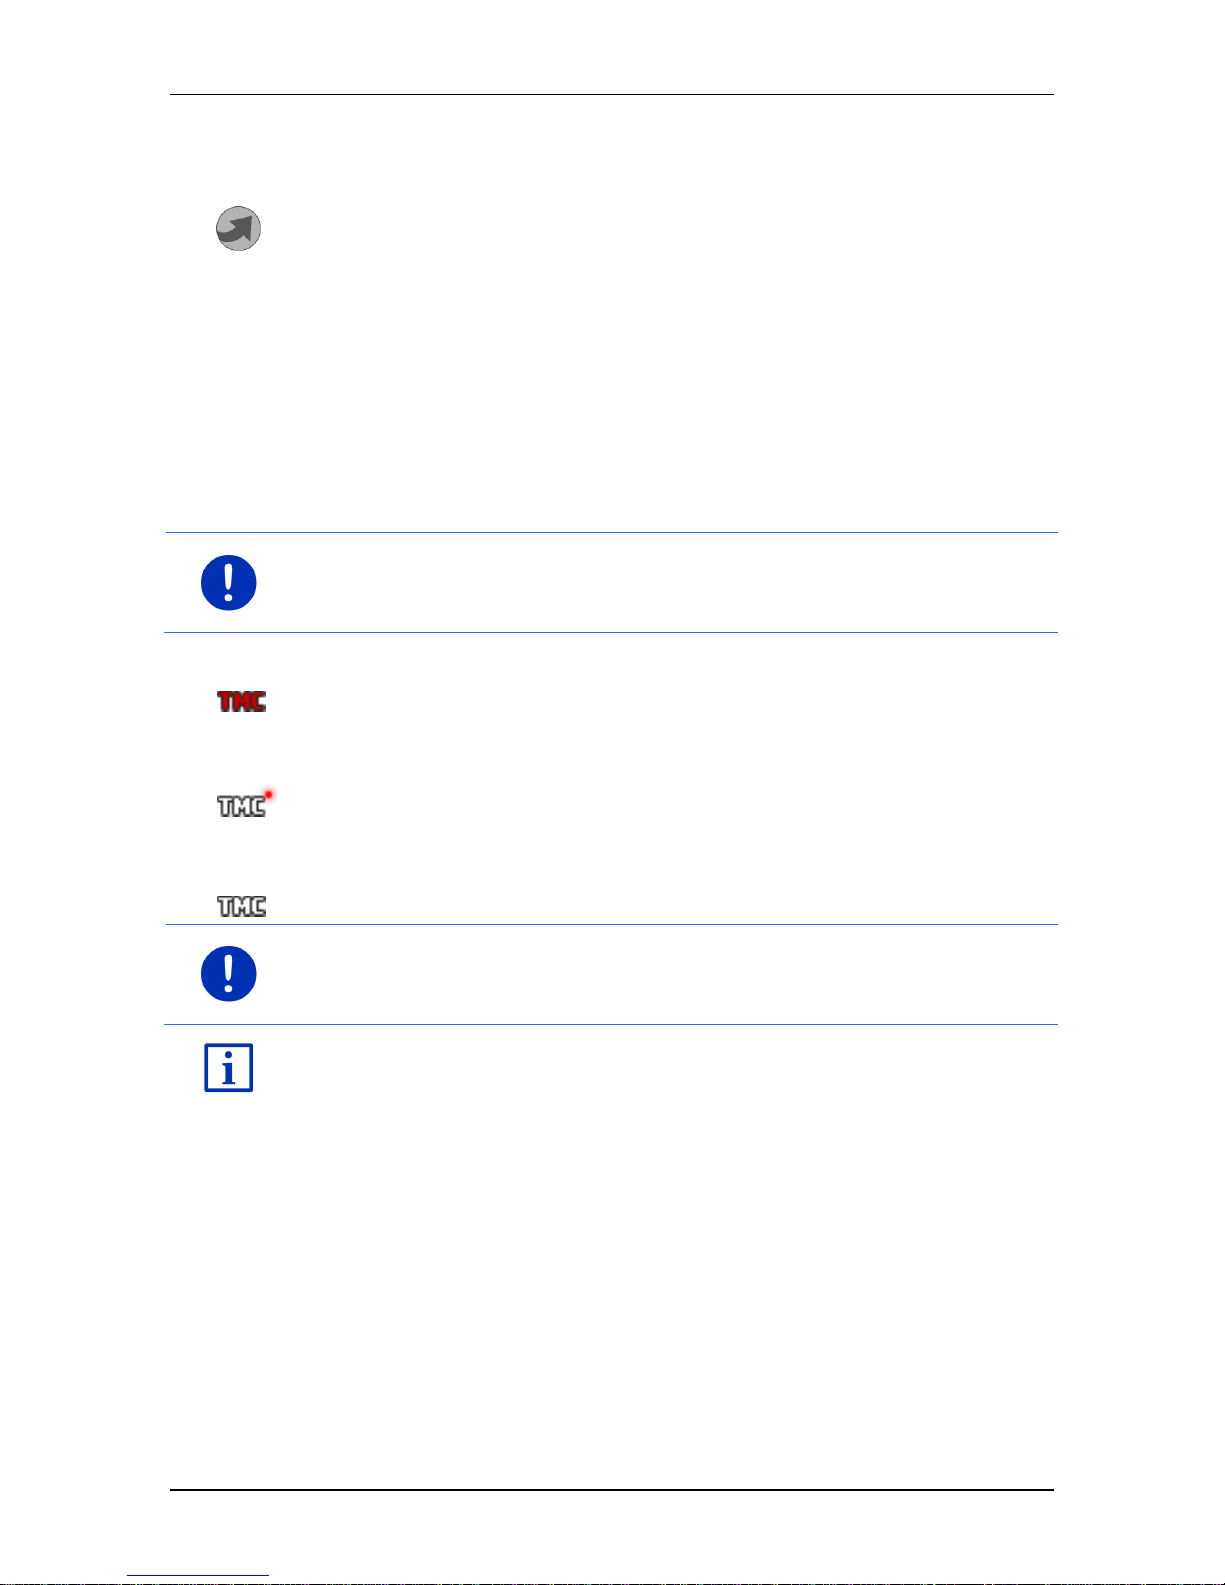
The TMC symbol can display the following TMC reception states:
Tuning (in red): The TMC receiver is operational but cannot find a
transmitter that is sending TCM signals. There are no active traffic
messages.
Tuning: The TMC receiver is operational but cannot find a station that
is transmitting TMC signals. Traffic messages are active however. This
can be the case, for example, when travelling through a tunnel.
TMC on standby (in grey): Traffic messages can be received.
Note: The TMC receiver uses the antenna of the car radio. The Tuning
symbol may still appear therefore when the navigation device is not
mounted in the vehicle.
For details on TMC functionality, please refer to "TMC (Traffic
information)", on page 105.
Traffic Live
You can draw traffic information either from the Live services (Traffic
Live) or from radio stations (TMC) (see "Configuring the Live services",
page 160).
The symbol appears when you are drawing traffic information from the
service.
Page 26
User’s manual maps + more
- 26 - Operating the navigation system
The Traffic Live symbol can indicate the following traffic information
reception states:
(Red) Connecting: The last attempt to call up traffic information from
the Live server failed. This can be the case, for example, when
travelling through a tunnel.
(Light grey) Traffic Live ready: Traffic information was called up
successfully. The active information is up to date.
Traffic information (TP)
The car radio can phase out the playing back of music or navigation
instructions and have traffic messages announced instead when traffic
information is available.
The TP symbol can indicate the following states:
No TP (No symbol): Traffic messages are not phased in.
TP on standby (white): Traffic messages are phased in. When the
traffic message announcement has finished, the original audio source
will be used again.
Tuning (red): The radio looks for a station which transmits traffic
information.
Bluetooth / Phone
The navigation device has an integrated Bluetooth hands-free module.
This enables you to use the device as a hands-free kit for up to two
mobile phones with Bluetooth capability.
The Phone symbol can display the following states of the hands-free
module:
No Bluetooth (No symbol): The Bluetooth function is deactivated.
Not connected (red mobile phone): The navigation device has no
Bluetooth connection to another device.
Connected (white mobile phone): The navigation device is connected
to a mobile phone and can be used as a hands-free car kit. The number
indicates which of the two phones is currently active.
Call in progress (green mobile phone): The hands-free module of the
navigation device is being used for a phone call. The number indicates
which of the two phones is being used to make the call.
Page 27
User’s manual maps + more
Operating the navigation system - 27 -
Muting
The Muting symbol can indicate the following states:
No symbol: The navigation application is not muted.
Muting: The navigation application is muted. If the device is navigating
at the moment, you will not hear any driving instructions.
Note: This symbol indicates only the muted state of the navigation
instructions. It says nothing about the volume of the hands-free module.
The procedure for regulating the volume is described in the chapter
"Navigation in Vehicle mode", section "Volume", on page 69.
Logbook
The Logbook symbol can indicate the following states:
No symbol: The logbook is deactivated. There is no recording of trips.
Logbook: The logbook is activated. Before each navigation you will be
prompted to enter the necessary details for the logbook entry (reason
for the trip, km total, …). It is possible however to suppress the
recording of the trip.
For a description of the logbook refer to the chapter "Logbook" on
page 110.
Media
When the navigation device is mounted in the vehicle and is being
supplied with power from the vehicle, it can control the installed car
radio. The Media symbol then indicates which audio source is active at
the moment.
No symbol: The radio is off or the navigation device is not being
supplied with power from the vehicle.
FM: The current audio source is the radio. It is set to FM reception.
AM: The current audio source is the radio. It is set to AM reception.
DAB (white): The current audio source is the radio. It is set to DAB
reception.
DAB (red): The current audio source is the radio. It is set to DAB
reception. This symbol will appear if no DAB reception is possible and
reception of the selected station via FM is likewise impossible.
AUX-IN audio: The current audio source is an external device which is
connected to the AUX port of the car radio.
Page 28
User’s manual maps + more
- 28 - Operating the navigation system
BT-Audio: The current audio source is an external device (mobile
phone or smartphone) which is connected to the navigation device via
Bluetooth.
CD: The current audio source is the CD which is inserted in the car
radio.
SD card: The current audio source is the MicroSD card which is
inserted in the navigation device.
5.2 Software keyboard
A software keyboard appears on the screen when text entries are
necessary.
All entries can be made on the software keyboard using your fingertips.
Only capital letters can be entered.
When entering town or street names you need not enter any special
characters or umlauts. The navigation system fills in these characters
for you automatically. For example, if you are looking for the town of
"Bärnau", then simply type in the word "BARNAU". Special characters
may be helpful however when naming saved destinations and routes.
5.2.1 Special keys
inserts a space.
deletes the character in front of the cursor.
opens the keyboard with numerals.
Latin, Cyrillic and Greek alphabet
opens the keyboard with the Latin alphabet.
opens the keyboard with the Cyrillic alphabet.
opens the keyboard with the Greek alphabet.
Note: The maximum number of keyboards available is always 2.
When you want to enter addresses, names or POIs, the keyboard with
the alphabet for the country in question will open automatically.
When you want to save a destination to Favourites or when you enter a
POI category or a country, the keyboard with the alphabet of the user
interface will open automatically.
You can also switch from the Cyrillic or Greek keyboard to the Latin
keyboard. Many addresses can then also be entered as transliterations
or in the language of the user interface.
Page 29
User’s manual maps + more
Operating the navigation system - 29 -
Example: The language of the user interface is English. You want to
navigate to Moscow. You have the following options:
► "Москва" (Cyrillic)
► "Moskva" (transliterated)
► "Moscow" (English).
Note: Street names and place names can be entered only in the
language of the user interface if that is how they exist in the map's
database.
Note: The layout for the keyboard with the Latin alphabet can be
configured.
► In the NAVIGATION window tap on More functions > Settings >
General > Keypad layout (Latin).
► Select the layout you want to use (QWERTZ, QWERTY, ABCDEF,
AZERTY).
Umlauts, accents and other letters
Another keyboard with special characters is available for each alphabet.
opens the keyboard with Latin special characters.
opens the keyboard with Cyrillic special characters.
opens the keyboard with Greek special characters.
As soon as you have entered a special character the letter keyboard
reappears.
5.2.2 Entering data
Often you can select an entry from a list. This is the case, for example,
when you enter a location.
As soon as you enter the first letter, the largest city in the given country
that begins with this letter appears.
Enter more letters and after each entry the first city which begins with
these letters will appear.
► When the correct location appears, tap on (OK) in order to
complete the entry.
You can open at any time a list containing all the locations which begin
with the letters or include the text already entered. The more letters you
enter, the shorter the list becomes.
► Tap on (Open list) in order to call up this list.
You can use the (Up) button and the (Down) button to
move through the list.
Page 30
User’s manual maps + more
- 30 - Voice command
► Tap on an entry in the list to select it and transfer it to the input box.
The list closes once an entry has been selected. You are now
finished with entering the city.
► Tap on (Close list) in order to close the list without selecting an
entry.
Note: The list opens automatically as soon as it contains only 4 or less
entries.
5.3 Options
Some windows offer options that lead to more functions.
A description of all available options can be found in the chapter
"Options, more functions" on page 59.
5.4 Menus
Some buttons have menus which open when activated.
► Tap on a menu point to execute its function.
If you would like to quit the options list without selecting a function, tap
on the button you used to open the menu.
6 Voice command
Note: The Voice command function is not available in every language.
For languages in which this function is available, the Voice command
button is shown in the NAVIGATION window. For languages which are
not supported, the Voice command button is replaced by the Show map
button.
Many functions of your navigation device can be called up conveniently
by voice command.
6.1 Activating the voice command function
The voice command function is automatically active in many windows.
This applies in particular to windows in which you are expected to
provide an answer, for example when there is a new traffic message
concerning your route.
Page 31

User’s manual maps + more
Voice command - 31 -
6.2 Use voice command
When the functions in a window can be called up by voice command,
this is indicated in the top left corner of the window by the symbol
(Voice command active).
A single signal tone and the symbol (Speak) indicate that the
navigation system is waiting for your voice command.
► Say a command.
The positive acknowledgement tone sounds (two high-pitch tones)
and the function is executed.
If the navigation system has not understood your instruction or if you do
not say anything within a certain time, the negative acknowledgement
tone (two short low-pitch tones) will sound.
► Say the command again.
If the navigation system has not understood you after several
repetitions, the prompt "Say Help" will appear.
Note: Navigation instructions, warnings and the media player are muted
for as long as the navigation device expects to receive voice commands
from you.
6.3 Help
Say only "Help" if you want to know which voice commands are
currently possible. In nearly all windows in which voice commands are
supported the navigation system will then tell you which commands you
can say in the current window.
6.4 Deactivating the voice command function
The voice command function will be deactivated under the following
conditions:
► If you operate the navigation device with your finger while a voice
command is expected from you.
► If a call is received and during an active phone call if the navigation
device is being used as a hands-free module.
6.5 Configuring the voice command function
You can configure for which tasks you want to use voice commands.
► In the NAVIGATION window tap on More functions > Settings >
General > Use voice command.
Select the tasks for which you want to use Voice Command:
Page 32
User’s manual maps + more
- 32 - Navigation
► Complete: You can use all the voice command functions.
► Answering: You can enter addresses and answer questions
asked by the navigation device.
► Entering addresses: You can enter only addresses with the
voice command function.
For details of how to enter a destination using voice commands refer to
the chapter "Entering a destination by voice commands" on page 35.
For details of how to make a call using voice commands refer to the
chapter "Making a call with the voice commands function" on page 148.
The volume of the voice commands assistant can be controlled
independently of the volume of the navigation instructions. This means
you can still hear the input requests when you have muted the
navigation instructions.
1. In the N
AVIGATION window tap on More functions > Settings >
General > Volume of the assistant.
2. Select the volume for the assistant.
Note: For details of how to configure the navigation system refer to the
chapter "Configuring the navigation system" on page 161.
7 Navigation
Use the navigation system at your own risk.
Caution! Be sure to refer to all the safety information in the chapter
"Important safety information" on page 11.
Impaired GPS reception
If GPS reception is impaired (e.g. because you are in a tunnel),
navigation will be continued. The navigation system will then calculate
your likely position from the route data and your previous driving profile.
As soon as GPS signals are received again, navigation will be
continued with real GPS data.
Arriving at your destination
When you have reached your selected destination, a message to this
effect will be displayed.
Only your current position (red arrow) and the destination flag will now
be shown on the map.
Page 33
User’s manual maps + more
Navigation - 33 -
7.1 Starting the navigation application
You have switched on the navigation device. The START window is
open.
► Tap on Navigation.
The NAVIGATION window is opened. From here you can access all the
functions of the navigation application.
Returning to the Start window
You can go to the START window at any time by tapping on on the
(Start) button. This does not result in the current application
being closed.
Initialising the GPS receiver
Note: Good reception of GPS data requires an unobstructed path from
the GPS receiver to the satellites. Tunnels, narrow thoroughfares
between buildings and reflecting house fronts can restrict GPS
reception greatly or make it impossible. If the GPS receiver or the
navigation device is inside a vehicle, a metallised windscreen or a
windscreen heater can be the cause of poor GPS reception.
As soon as the navigation device has been switched on, initialisation of
the GPS receiver will begin.
The integrated GPS receiver is not initialised for the first time until the
navigation application is started for the first time. It can take up to
5 minutes to initialise the GPS receiver for the first time.
Each time you switch on the navigation device after this, GPS reception
will start within a short time.
If the navigation device has been switched off for more than a week, the
next initialisation can take up to 10 minutes.
Note: Directly after the GPS symbol indicates the GPS ready state, the
accuracy of the positioning may be reduced for a few minutes.
In the top right hand corner of the screen you will see the GPS symbol.
As soon as data from at least three satellites is received, the symbol will
change to (GPS ready).
Note: Initialisation takes the least time if you do not start driving until
the initialisation has finished.
For more details about the symbol refer to the chapter "GPS" on
page 23.
Page 34

User’s manual maps + more
- 34 - Navigation
Returning to the Navigation window
The NAVIGATION window opens when the navigation application is
started.
If another window of the navigation application is open, tap on
(Back). This will return you to the window you came from.
► Tap on (Back) repeatedly until the NAVIGATION window is
opened.
7.2 Specifying a destination
Under New destination you can enter destinations to which you have
not yet navigated or which you have not saved. Here you can
► enter the address of the destination (see "Entering a destination
address " on page 36).
► enter the coordinates of the destination (see "Enter coordinates",
page 37).
► select a point of interest (see "Points of interest" on page 39).
► select a destination with the Direct Access function (see "Direct
access to POI" on page 43).
Under My destinations you can select from the following lists of
destinations and addresses:
► FAVOURITES: All destinations that you have entered and then saved
(see "Favourites" on page 44).
Three special destinations are also saved in the F
AVOURITES list:
► My address: The address which was saved as the home
address (refer to "Defining the home address" on page 50).
► My vehicle: The location of your vehicle is automatically saved
when you leave the vehicle.
► My starting point: The starting point of the last navigation is
automatically saved.
► LAST DESTINATIONS: Destinations to which you have navigated on a
previous occasion (see "Last destinations" on page 45).
► IM PORTED ADDRESSES: Destinations which you have imported into
the navigation device from the phone book of a mobile phone which
was connected via Bluetooth (see "Imported addresses from the
phone book" on page 45).
7.2.1 Specifying the country in which the destination is situated
At top left in the ADDRESS, POI IN A CITY and POI NATIONWIDE windows
you will find the Country button. It bears the flag of the country in which
you can currently select destinations for the navigation application.
Page 35

User’s manual maps + more
Navigation - 35 -
If your destination is in a different country, then proceed as follows:
1. Tap on the Country button.
2. Enter the name of the country in which your destination is situated.
The button shows the flag of the destination country.
Note: The selection list contains only those countries whose maps are
available to the navigation device.
7.2.2 Entering a destination by voice commands
It is particularly convenient to select the destination by voice
commands.
1. In the N
AVIGATION window tap on Voice command.
The VOICE COMMAND window opens.
Entering an address
2. Say "Address".
Indicated at the top is the country for which you can select
addresses.
► Tap on the country if your destination address is situated in a
different country. Then follow the instructions given by the
navigation system.
You will be asked for the address data in this order: City > Street >
House number.
3. Follow the instructions given by the navigation system.
When you have finished entering the address, the map will open in
Preview mode. The destination is indicated on the map.
Entering a POI nearby
2. Say "POI Nearby".
3. Say which category of POI you want (e.g. "Hotel").
A list of nearby hotels opens.
4. Say the number of the hotel to which you want to navigate.
Say "Up" or "Down" in order to scroll in the list.
When you have selected a destination, the map opens in Preview
mode. The destination is indicated on the map.
Entering a Favourite or an address from the phone book
2. Say "My destinations".
3. A list opens. It contains the destinations found in the F
AVOURITES
list, destinations imported from Outlook, and destinations from the
phone book of a connected mobile phone.
Page 36
User’s manual maps + more
- 36 - Navigation
4. Say the number of the destination to which you want to navigate.
Say "Up" or "Down" in order to scroll in the list.
When you have selected a destination, the map opens in Preview
mode. The destination is indicated on the map.
For detailed information on how to start navigation, please refer to the
chapter "Route preview" on page 47. Please read on there.
Note: The Voice command function is not available for every
language. In the languages for which this function is not available, the
Voice command button is replaced by the Show map button.
7.2.3 Entering a destinatio n address
1. In the NAVIGATION window, tap on New destination > Enter an
address.
Note: The following description is based on City first as the order for
entering the address.
If the navigation device contains the map of a country in which the
street is usually listed first (e.g. Sweden, Norway, ...), you can also
choose Street first as the order for entering the destination address.
You can define the order in the NAVIGATION window at More functions >
Settings > General > Input mode for address data.
Please note however that the Street first order of entry is not possible
for all countries. In this case you must enter the city first.
The ADDRESS window opens.
1. Enter the name or the postal code of the destination town.
2. Enter the name of the destination street.
3. Enter the house number. If you do not know the house number,
then leave this box empty.
If you don't know the house number but know the name of a nearby
side street, then tap on the Cross street box and enter the name of
this street.
The navigation system will calculate a route to the intersection of
the streets you have entered.
The D
ETAILED INFORMATION ABOUT THE DESTINATION window opens.
Indicated on the Activate MyRoutes button is whether several route
suggestions are to be calculated (Yes) or not (No).
► Tap on Activate MyRoutes in order to change the setting.
Note: The Activate MyRoutes button is available only when you have
entered all the address information. You can also change this setting
under Options > Settings > Navigation > Activate MyRoutes.
Page 37
User’s manual maps + more
Navigation - 37 -
4. Tap on Start navigation in order to navigate to the stipulated
address.
- or Tap on Parking in order to search for and navigate to a car park
near your destination.
Tap on Parking Charging > Charging near the destination in
order to search for a charging station near the destination.
Sometimes the destination cannot be found exactly because, for
example, the entered combination of place and street name exists
several times.
In this case a window will open with a list of all the addresses
matching your entry plus additional information.
► Tap on the address to which you want to navigate.
If the entered house number is not included on the map, the window
will show an address with the house number closest to the one
entered.
The map opens in Preview mode. The destination is indicated on
the map.
For detailed information on how to start navigation, please refer to the
chapter "Route preview" on page 47. Please read on there.
Note: You don't have to enter all the address details. You can tap on
(Start navigation) before you get that far.
If you specify the town only, the navigation system will calculate a route
to the town centre.
If you specify only the town and street without specifying a house
number or cross street, the navigation system will calculate the best
route to this street.
7.2.4 Enter coordinates
You can also enter the geographic coordinates of your destination. The
coordinates can be entered as decimal degrees or in degrees, minutes
and seconds.
1. In the N
AVIGATION window, tap on New destination > Enter
coordinates.
The ENTER COORDINATES window opens.
Page 38

User’s manual maps + more
- 38 - Navigation
Entering as a decimal number
2. Enter the degree of latitude.
Begin the entry with a minus sign if you want to enter a southern
degree of latitude.
3. Enter the degree of longitude.
Begin the entry with a minus sign if you want to enter a western
degree of longitude.
Entry in minutes / seconds
2. Enter the degree of latitude.
Use the corresponding buttons shown on the keyboard in order to
enter the units:
(degrees), (minutes), (seconds).
The (N S) button alongside the entry box indicates whether it is a
northern or southern degree of latitude. The active setting is
highlighted in colour (red).
► Tap on the button if you want to change the current setting.
3. Enter the degree of longitude.
Use the corresponding buttons shown on the keyboard in order to
enter the units:
(degrees), (minutes), (seconds).
The (E W) button alongside the entry box indicates whether it is an
eastern or western degree of longitude. The active setting is
highlighted in colour (red).
► Tap on the button if you want to change the current setting.
The D
ETAILED INFORMATION ABOUT THE DESTINATION window opens.
Indicated on the Activate MyRoutes button is whether several route
suggestions are to be calculated (Yes) or not (No).
► Tap on Activate MyRoutes in order to change the setting.
4. Tap on Start navigation in order to navigate to the stipulated
address.
- or Tap on Parking in order to search for and navigate to a car park
near your destination.
Tap on Parking Charging > Charging near the destination in
order to search for a charging station near the destination.
Page 39
User’s manual maps + more
Navigation - 39 -
Note: If the destination with the coordinates you entered does not lie on
the road system covered by the map, navigation will be performed as
far as the nearest road point using the mode defined by the selected
route profile. From this point on, the navigation system will automatically
switch to Offroad mode (see "Navigation in Offroad mode" on page 73).
7.2.5 Points of interest
Points of interest, called POI for short, are useful addresses that are
catalogued according to particular criteria.
POIs include ports, airports, restaurants, hotels, petrol stations, public
buildings, doctor's surgeries, hospitals, shopping centres, etc.
Points of interest can be displayed on the map by means of a symbol.
In the N
AVIGATION window tap on More functions > Settings > Map
display > Categories shown in order to select the categories you want to
appear on the map.
Note: If you have created your own POIs, they will be available under
the MyPOIs category. For more details about creating your own POIs
refer to chapter "MyPOIs" on page 81.
POI nearby
POIs nearby are POIs located within a certain radius of your current
location. This means you can always find the nearest petrol station for
example, no matter where you are.
Note: GPS reception must be good enough for determining your
position. Check the (GPS ready) symbol to see whether GPS
reception is good enough.
If GPS reception is not good enough, the system will look for POIs near
the last known position. If there is no last known position, the POI
Nearby function will not be available. For more details refer to the
chapter "Initialising the GPS receiver" on page 33.
Note: The direct access function offers 3 categories of nearby POIs
which can be searched for quickly and without additional entry.
For more details refer to the chapter "Direct access to POI" on page 43.
1. In the NAVIGATION window tap on New destination > Search for
POI > Nearby.
The POI NEARBY window opens.
Page 40

User’s manual maps + more
- 40 - Navigation
2. Select a category from which you would like to find a POI.
Categories in which no destinations are available nearby cannot be
selected.
If sub-categories exist for the category you have selected, the Sub
category list opens.
3. Select the sub-category from which you would like to select a POI.
The Destination list opens. It contains the nearest POIs in the
specified category, sorted by distance.
4. If the list is very long:
► Tap on (Close list).
The keyboard appears.
► Enter a number of letters from the destination.
► Tap on (Open list).
The list now contains only those destinations which begin with the
letters entered.
5. Tap on the name of the destination.
The D
ETAILED INFORMATION ABOUT THE DESTINATION window opens.
Indicated on the Activate MyRoutes button is whether several route
suggestions are to be calculated (Yes) or not (No).
► Tap on Activate MyRoutes in order to change the setting.
6. Tap on Start navigation.
- or Tap on Parking in order to search for and navigate to a car park
near your destination.
Tap on Parking Charging > Charging near the destination in
order to search for a charging station near the destination.
The map opens in Preview mode. The destination is indicated on
the map.
For detailed information on how to start navigation, please refer to the
chapter "Route preview" on page 47. Please read on there.
POIs of nationwide si gnificance
POIs of nationwide significance are airports, sights, national
monuments, large ports etc. This way you can find well-known places of
interest even if you don't know the name of their location.
1. In the N
AVIGATION window tap on New destination > Search for
POI > Nationwide.
The POI NATIONWIDE window opens.
Page 41
User’s manual maps + more
Navigation - 41 -
2. Select a category from which you would like to find a POI.
The Destination list opens. It contains the POI from the selected
category, sorted alphabetically.
3. If the list is very long:
► Tap on (Close list).
The keyboard appears.
► Enter a number of letters from the destination.
► Tap on (Open list).
The list now contains only those destinations which begin with or
contain the letters entered.
4. Tap on the name of the destination.
The D
ETAILED INFORMATION ABOUT THE DESTINATION window opens.
Indicated on the Activate MyRoutes button is whether several route
suggestions are to be calculated (Yes) or not (No).
► Tap on Activate MyRoutes in order to change the setting.
5. Tap on Start navigation.
- or Tap on Parking in order to search for and navigate to a car park
near your destination.
Tap on Parking Charging > Charging near the destination in
order to search for a charging station near the destination.
The map opens in Preview mode. The destination is indicated on
the map.
For detailed information on how to start navigation, please refer to the
chapter "Route preview" on page 47. Please read on there.
POIs in a particular lo cation
POIs in a particular location can be useful when navigating in an
unfamiliar town.
1. In the N
AVIGATION window tap on New destination > Search for
POI > in a city.
The POI IN A CITY window opens.
2. Enter the name or the postal code of the destination town.
3. Select a category from which you would like to find a POI.
Categories in which no destinations are available in the selected
town cannot be entered.
If sub-categories exist for the category you have selected, the Sub
category list opens.
Page 42
User’s manual maps + more
- 42 - Navigation
4. Select the sub-category from which you would like to select a POI.
The Destination list opens. It contains POIs from the specified
category, sorted alphabetically.
5. If the list is very long:
► Tap on (Close list).
The keyboard appears.
► Enter a number of letters from the destination.
► Tap on (Open list).
The list now contains only those destinations which begin with or
contain the letters entered.
6. Tap on the name of the destination.
The D
ETAILED INFORMATION ABOUT THE DESTINATION window opens.
Indicated on the Activate MyRoutes button is whether several route
suggestions are to be calculated (Yes) or not (No).
► Tap on Activate MyRoutes in order to change the setting.
Sometimes the destination cannot be found exactly because, for
example, several restaurants with the same name exist in the town
in question.
In this case a window opens with all the destinations matching your
entry plus additional information.
► Tap on the destination to which you want to navigate.
7. Tap on Start navigation.
- or Tap on Parking in order to search for and navigate to a car park
near your destination.
Tap on Parking Charging > Charging near the destination in
order to search for a charging station near the destination.
The map opens in Preview mode. The destination is indicated on
the map.
For detailed information on how to start navigation, please refer to the
chapter "Route preview" on page 47. Please read on there.
Page 43
User’s manual maps + more
Navigation - 43 -
7.2.6 Direct access to POI
The direct access area contains 3 categories of POI. Destinations in
your vicinity that correspond to one of these categories can be viewed
here quickly and without further entry.
► In the NAVIGATION window tap on More functions > Settings >
General in order to select which categories or sub-categories are to
be available for direct access.
Note: GPS reception must be good enough for determining your
position. Check the (GPS ready) symbol to see whether GPS
reception is good enough.
If GPS reception is not good enough, the system will look for POIs near
the last known position. If there is no last known position, the POI
Nearby function will not be available.
For more details refer to the chapter "Initialising the GPS receiver" on
page 33.
1. In the NAVIGATION window tap on New destination.
The NEW DESTINATION menu opens.
In the Direct access area you are shown the symbols of those POI
categories that are available by direct access.
2. Tap on the category from which you would like to select a POI.
A list opens. It contains the nearest POIs in the specified category,
sorted by distance.
3. Tap on the name of the destination in order to start navigation to it.
The map opens in Preview mode. The destination is indicated on
the map.
For detailed information on how to start navigation, please refer to the
chapter "Route preview" on page 47. Please read on there.
7.2.7 Information about the destination
For many destinations that you specify, there will be further information
available, stored in the navigation system's database.
There is, for example, a telephone number available for many
restaurants. You can then call the restaurant to reserve a table, for
example.
One of the destination entry windows described above is open.
► Tap on Options > Info.
The DESTINATION INFO window opens. It contains all the information
about the specified destination that is stored in the navigation system's
database.
Page 44
User’s manual maps + more
- 44 - Navigation
► Tap on Close in order to close the DESTINATION INFO window again.
► Tap on (Show on map) in order to see the destination on the
map.
► Tap on (Save destination) in order to save the destination in
the FAVOURITES list.
► Tap on (Call) in order to dial the telephone number indicated.
Note: The Call function is only available when the navigation system is
connected via Bluetooth to a mobile phone.
For details of how to connect to a mobile phone refer to chapter
"Bluetooth connection" on page 141.
7.2.8 Favourites
Destinations to which you want to travel often can be saved in the
F
AVOURITES list.
In the F
AVOURITES list you can save up to 500 destinations.
Favourites which you have identified as a charging station are
indicated by the symbols (Normal charging station) or (Highspeed charging station). The home address is always indicated by a
house ( ) even when it is also identified as a charging station.
Information on how to save a destination can be found in chapter
"Saving destinations" on page 49.
1. In the NAVIGATION window, tap on My destinations > Favourites.
2. Tap on the destination to which you want to navigate.
The D
ETAILED INFORMATION ABOUT THE DESTINATION window opens.
Indicated on the Activate MyRoutes button is whether several route
suggestions are to be calculated (Yes) or not (No).
► Tap on Activate MyRoutes in order to change the setting.
3. Tap on Start navigation.
- or Tap on Parking in order to search for and navigate to a car park
near your destination.
Tap on Parking Charging > Charging near the destination in
order to search for a charging station near the destination.
The map opens in Preview mode. The destination is indicated on
the map.
Page 45

User’s manual maps + more
Navigation - 45 -
For detailed information on how to start navigation, please refer to the
chapter "Route preview" on page 47. Please read on there.
Note: Favourites are indicated on the map by a small flag with their
name.
7.2.9 Last destinations
The last 12 destinations to which you have navigated are saved by the
navigation system in the L
AST DESTINATIONS list.
1. In the N
AVIGATION window, tap on My destinations > Last
destinations.
2. Tap on the destination to which you want to navigate.
The D
ETAILED INFORMATION ABOUT THE DESTINATION window opens.
Indicated on the Activate MyRoutes button is whether several route
suggestions are to be calculated (Yes) or not (No).
► Tap on Activate MyRoutes in order to change the setting.
3. Tap on Start navigation.
- or Tap on Parking in order to search for and navigate to a car park
near your destination.
Tap on Parking Charging > Charging near the destination in
order to search for a charging station near the destination.
The map opens in Preview mode. The destination is indicated on
the map.
For detailed information on how to start navigation, please refer to the
chapter "Route preview" on page 47. Please read on there.
7.2.10 Imported addresses from the phone book
The phone book of a mobile phone with which you are connected can
be imported into the navigation device. Addresses from the phone book
are then found in the I
MPORTED ADDRESSES FROM THE PHONE BOOK list.
1. In the N
AVIGATION window tap on My destinations > Imported
addresses > From the phone book.
2. Select the contact you want from the phone book.
3. Tap on the address to which you want to navigate.
The D
ETAILED INFORMATION ABOUT THE DESTINATION window opens.
Indicated on the Activate MyRoutes button is whether several route
suggestions are to be calculated (Yes) or not (No).
► Tap on Activate MyRoutes in order to change the setting.
Page 46
User’s manual maps + more
- 46 - Navigation
4. Tap on Start navigation.
- or Tap on Parking in order to search for a car park near your
destination.
Tap on Parking Charging > Charging near the destination in
order to search for a charging station near the destination.
The map opens in Preview mode. The destination is indicated on
the map.
For detailed information on how to start navigation, please refer to the
chapter "Route preview" on page 47. Please read on there.
7.2.11 Navigating home
You can save one address as Home Address. You can navigate to your
home address at any time by pressing a single button.
More information about entering your home address can be found in the
chapter "Defining the home address" on page 50.
► In the NAVIGATION window tap on Take me home.
If you have not yet entered your home address, a dialog box will
notify you of this.
Navigation starts. The route profile used for the previous navigation will
be applied.
7.2.12 Selecting destinations on the map
You may select a destination directly on the map. This is a quick way to
select towns, streets and POIs.
1. In the N
AVIGATION window tap on Show map.
- or If the voice commands function is available on your navigation
device and for your language:
► In the NAVIGATION window, tap on More functions > Show map.
2. Tap on (destination search).
The map opens in destination search mode.
3. Tap on the point to which you want to navigate.
Note: For details of how to change the map view so that your destination
is easily seen refer to the chapter "Map in destination search mode" on
page 74.
Page 47
User’s manual maps + more
Navigation - 47 -
The destination that you have selected appears under the cross
hairs.
The geographical coordinates of the destination and the
corresponding address are shown in the bottom third of the screen.
4. Tap on (OK).
The DESTINATION ON MAP window opens. The detailed address data
of the selected destination is displayed in the upper left-hand
corner.
5. Tap on Take me there.
The map opens in Preview mode. The destination is indicated on
the map.
For detailed information on how to start navigation, please refer to the
chapter "Route preview" on page 47. Please read on there.
7.2.13 Route preview
The map is open in Preview mode.
The navigation destination is depicted by a small flag.
For detailed information refer to the chapter "Map in Preview mode" on
page 63.
Route profile
The route is calculated on the basis of a route profile. The current route
profile is indicated at the top right edge of the map.
Route profiles take account of the characteristics and special aspects of
the different modes of transport. For example a route profile for bicycles
will exclude motorways from the route calculation but will include roads
which other vehicles are not allowed to use. And a bicycle profile will
calculate different arrival times than a motorcycle profile.
Note: If you select a pedestrian profile, a type of navigation specially
developed for pedestrians will be started (see "Navigation in Pedestrian
mode" on page 70).
► Tap on the Route profile button if you want to select a different
route profile.
For details of how to create and select route profiles refer to the chapter
"Route profiles" on page 78.
Page 48
User’s manual maps + more
- 48 - Navigation
Turn-by-Turn list
► If you want to see detailed directions for the route, tap on Options >
Turn-by-Turn list.
For details of the functions in the window refer to chapter "Turn-by-Turn
list" on page 95.
MyRoutes
When the MyRoutes function is activated, the navigation system
calculates up to three routes on the basis of the currently selected route
profile and shows them on the map in different colours (blue, green,
red) and with a number. For each route there is a button with the same
number and a symbol in the same colour.
When calculating the time of arrival or the trip time, the navigation
system takes account of additional factors such as day of the week,
time of day and particularly your previous driving profile.
The route which corresponds best to the selected route profile is
marked with "MyRoute".
Note: Even when the MyRoutes function is activated, sometimes only
one additional route or no additional routes at all can be calculated for a
particular route. No further suggestion is then shown on the button in
question.
Start navigation
► Tap on the button of the route which you want to use for the
navigation.
Traffic obstruction along the route
If you select a route for which traffic obstructions have been announced,
the P
REVIEW TMC window may open before the navigation starts (see
"Preview TMC" on page 106).
► Select whether you want to use the original route (Current route) or
a detour (Alternative route).
Driving range warning
The (Driving range warning) symbol will appear alongside the
route under the following circumstances:
► The destination is out of range.
► With the vehicle's current driving range you can reach the
destination, but from there you cannot reach a charging station.
If you select a route with range warning, you will be asked whether you
want to calculate a Multi-Stop route.
Page 49
User’s manual maps + more
Navigation - 49 -
The Multi-Stop route considers charging stations along the route and
includes essential charging stops in the route calculation if the
destination is not within range. Consideration is given to all private
charging stations (Favourites) as well as to the public charging stations
recorded in the map. For more details refer to the chapter "Multi-Stop
route" on page 99.
Note: Traffic information (TMC) is then available to a limited extent
only.
No GPS reception
If GPS signal reception is not good enough, the following message will
appear: "Waiting for GPS-Signal…"
You have the following options:
► Wait. As soon as GPS reception is good enough for determining
your position, the route will be recalculated and navigation will
begin.
► Tap on Cancel. The window in which you entered your destination
will open again. Your destination is saved in the LAST DESTINATIONS
list.
► Tap on Demo. The route will be calculated using the centre of the
destination location as starting point. Navigation will then be
simulated on this route.
Tap on (Back) in order to close the demonstration.
Note: If you selected the destination on the map, then the Demo button
is not available.
7.3 Managing destinations
Every destination you enter and destinations from the LAST
DESTINATIONS
and IMPORTED ADDRESSES lists can be saved in the
F
AVOURITES list. This makes sense if you frequently navigate to this
particular destination.
Note: Favourites are indicated on the map by a small flag with their
name.
7.3.1 Saving destinations
1. Enter a destination (see "Entering a destination address " on
page 36 or "Points of interest" on page 39). Do not tap on the Start
navigation button!
Page 50

User’s manual maps + more
- 50 - Navigation
2. Tap on Options > Save destination.
- or -
1. Select a destination from the L
AST DESTINATIONS list or from the
I
MPORTED ADDRESSES list (see "Last destinations" on page 45 or
"Imported addresses from the phone book" on page 45). Do not tap
on the Start navigation button!
2. Tap on Options > Save as favourite.
3. Enter a name for the destination.
4. Tap on Save.
5. The CHARGING STATION window opens. There you can specify
whether the indicated destination is a charging station at which the
vehicle can be charged (Normal charging station or High-speed
charging station) or not (No). If you save the destination as a
charging option, it will be considered as a possible charging station
when a Multi-Stop route is calculated. It will then also appear in the
list of the POI category Charging station when you search for POIs
near your current position.
► Tap on OK.
7.3.2 Deleting a destination from the Favourites list
1. In the NAVIGATION window, tap on My destinations > Favourites.
The FAVOURITES list opens.
2. Select the destination you want to delete.
The D
ETAILED INFORMATION ABOUT THE DESTINATION window opens.
3. Tap on Options > Delete destination.
7.3.3 Defining the home address
You can always start navigation to your home address very quickly by
tapping in the N
AVIGATION window on Take me home.
You can define exactly one destination as your home address. You can
enter the address manually or select a destination from the F
AVOURITES
list.
Your home address is saved in the F
AVOURITES list where it is marked
by a house symbol.
Note: The home address is also indicated on the map by a house
symbol.
The home address is used for calculating and presenting the map
view Range 360. For more details refer to the chapter "Showing the
range" on page 76.
Page 51

User’s manual maps + more
Navigation - 51 -
Entering the home address
1. In the NAVIGATION window tap on Take me home.
A window with the following message opens:
"Would you like to enter the address now?"
If you have already saved favourites, the message will be as
follows:
"Do you want to enter the address, or do you want to select it from
the favourites?"
The currently valid value is highlighted (red).
► If Enter an address is NOT highlighted, tap on (Toggle).
2. Tap on OK.
The ADDRESS window opens.
3. Enter your home address (see "Entering a destination address " on
page 36).
4. Tap on Home address to save the entered address as the home
address.
5. The C
HARGING STATION window opens. There you can enter
whether you can charge your vehicle (Normal charging station or
High-speed charging station) or not (No) at the indicated
destination. If you save the destination as a charging option, it will
be considered as a possible charging station when a Multi-Stop
route is calculated. It will then also appear in the list of the POI
category Charging station when you search for POIs near your
current position.
► Tap on OK.
Selecting the home address from your favourites
1. In the NAVIGATION window tap on Take me home.
A window with the following message opens:
"Do you want to enter the address, or do you want to select it from
the favourites?"
If you have not yet saved any favourites, the message will be as
follows:
"Would you like to enter the address now?"
In this case you must enter the home address manually (see
"Entering the home address" on page 51).
► If Favourites is NOT highlighted, tap on (Toggle).
2. Tap on OK.
The FAVOURITES list opens.
Page 52

User’s manual maps + more
- 52 - Navigation
3. Select the destination which you want to define as your new home
address (see also "Favourites" on page 44).
The D
ETAILED INFORMATION ABOUT THE DESTINATION window opens.
4. Tap on Home address to save the entered address as the home
address.
5. The C
HARGING STATION window opens. There you can specify
whether you can charge your vehicle at the indicated destination
(Normal charging station or High-speed charging station) or not
(No). If you save the destination as a charging option, it will be
considered as a possible charging station when a Multi-Stop route
is calculated. It will then also appear in the list of the POI category
Charging station when you search for POIs near your current
position.
► Tap on OK.
7.3.4 Changing the home address
You can define a different address as the home address at any time.
Proceed as follows:
1. Delete your home address from the F
AVOURITES list (see "Deleting
a destination from the Favourites list" on page 50).
2. Enter the new home address (see "Defining the home address" on
page 50).
Note: You can also define an address from the F
AVOURITES
list as a
new home address.
► In the FAVOURITES list select the address which you want to use as
the new home address.
► Tap on Options > Home address.
7.4 Tracks and multi-leg routes
It is possible to plan routes without GPS reception, for example in the
comfort of your home. Planned routes can be saved for later use. This
allows you to plan as many routes as you like, for example for your
holidays.
1. In the N
AVIGATION window tap on More functions.
The options list opens.
2. Tap on the Routes and tracks option.
The ROUTES AND TRACKS window opens.
Page 53

User’s manual maps + more
Navigation - 53 -
7.4.1 Entering the starting point
The starting point of a route is the point at which you want to begin your
trip. This is not necessarily the current location. If you are planning a
route for your holidays at home, you could, for example, enter your
hotel as the starting point.
The starting point is only important if you want to see a planned route
on the map but currently have no GPS reception, or if you are not
currently at the planned starting point. This is why your selected starting
point has the flow number "0".
As soon as you start navigation, your current location will be used as
the starting point for the route calculation.
The first leg of the route is therefore the journey to the route point with
flow number "1".
1. Tap on the Specify starting point box.
The STARTING POINT menu opens.
If you want to enter your current location as the starting point:
2. Tap on the Current position menu item.
If you want to enter a different starting point:
2. Tap on the corresponding button.
3. Enter the starting point (see the relevant section in the chapter
"Specifying a destination" on page 34).
4. Tap on (Set starting point).
The selected starting point will now be shown next to the 0 (Starting
point) button.
Changing the starting point
► Tap on the starting point (button 0).
The STARTING POINT menu opens. You can now enter a different
starting point. Proceed as described above.
7.4.2 Entering route points
The route points of a route are the destinations that you want to
navigate to.
The flow number for each route point is indicated on a button in front of
it.
1. Tap on the Add route point box.
The ROUTE POINT menu opens.
2. Tap on the button for how you want to enter the destination.
Page 54
User’s manual maps + more
- 54 - Navigation
3. Enter the route point (see the relevant section in chapter
"Specifying a destination" on page 34).
4. Tap on (Add).
The selected route point is now shown next to its flow number.
Repeat these steps for each destination that you want to add to your
route.
7.4.3 Editing route points
Route points can be deleted from a route. The order of the route points
can be changed as you wish.
Note: The starting point (flow number "0") can be neither moved nor
deleted. However you can make another route point into the starting
point provided the Current position setting was not selected for the
starting point.
► Tap on the route point that you want to edit.
The context menu contains the following buttons:
Route point up: Moves the selected route point further to the front.
(Example: route point 2 becomes route point 1)
Route point down: Moves the selected route point further to the
back. (Example: route point 2 becomes route point 3)
Delete: Deletes the selected route point. A dialog window prompts
you to confirm deletion.
► Tap on the number to the left of the symbols if you want to close the
context menu again.
7.4.4 Managing routes
You can save each planned route under a particular name.
Note: Only the start point and route points will be saved, not the
calculated route. When you load a saved route, it must be recalculated
before navigation can start.
You can load, rename or delete stored routes.
Page 55
User’s manual maps + more
Navigation - 55 -
Saving routes
The ROUTES AND TRACKS window is open. You have entered the
starting point and at least one route point.
1. Tap on Options > Save route.
2. Enter a name for the route.
3. Tap on (Save).
If a route has already been saved under this name, you will be
notified accordingly.
► Tap on Yes to overwrite the route
- or -
► Tap on No if you want to enter a different name.
The destination is now saved to the SAVED ROUTES AND TRACKS list.
The dialog window closes.
7.4.5 Loading routes or tracks
1. Tap on Options > Saved routes and tracks.
The SAVED ROUTES AND TRACKS list opens. It shows all the saved
routes and tracks in alphabetical order.
A symbol in front of the name indicates whether it is a route ( )
or a track ( ).
If you want to load a route:
2. Tap on the route that you want to load.
3. Tap on (Load route).
The ROUTES AND TRACKS window opens. The starting point and the
route points of the loaded route have been entered. When
navigation starts, the starting point is replaced by the current
position. You will now be guided to the first route point.
If you want to load a track:
2. Tap on the track that you want to load.
3. Tap on Load track.
The ROUTES AND TRACKS window opens. The current location is
entered as the starting point. The loaded track is entered as route
point '1'. The navigation system will then guide you first to the
starting point of this track.
For details about navigating along recorded tracks refer to chapter
"Navigation in Track mode" on page 72.
Page 56
User’s manual maps + more
- 56 - Navigation
7.4.6 Calculating and displaying routes
It is possible to calculate and display a planned route on the map even
without GPS reception in order to get an impression of the journey.
The R
OUTES AND TRACKS window is open. The starting point and at
least one route point have been entered.
► Tap on Show route.
The map opens in Preview mode.
The starting point and the route points are marked by flags. The
distance and the estimated trip time is given for each leg of the
route.
7.4.7 Simulating routes
It is also possible simply to simulate navigation on a planned route.
Note: GPS reception is not necessary for simulation.
If you have planned a multi-leg route, only the first leg will be simulated.
You have calculated and displayed a route.
1. Tap on Options > Simulation.
► If you have planned a route with only one route point and the
MyRoutes function is activated, you will be prompted to select
a route for the simulation.
The route will be recalculated for simulation purposes.
2. Tap on the button of the route on which you want to simulate the
navigation.
For more details about the MyRoutes function refer to the chapter
"MyRoutes" on page 57.
Stopping simulation
You can stop simulation at any time.
► Tap on (Back).
The ROUTES AND TRACKS window opens.
Page 57
User’s manual maps + more
Navigation - 57 -
7.4.8 Route preview
You have calculated and displayed a route. The map is open in
Preview mode.
Route profile
Route profiles take account of the characteristics and special aspects of
the different modes of transport. For example a route profile for bicycles
will exclude motorways from the route calculation but will include roads
which other vehicles are not allowed to use. And a bicycle profile will
calculate different arrival times than a motorcycle profile.
Note: If you select a pedestrian profile, a type of navigation specially
developed for pedestrians will be started (see "Navigation in Pedestrian
mode" on page 70).
► Tap on the Route profile button if you want to select a different
route profile.
For details of how to create and select route profiles refer to the chapter
"Route profiles" on page 78.
Note: When you load routes which originate from a different provider
than GARMIN, it may be impossible for you to change the route profile
of this route.
Turn-by-Turn list
If you want to see detailed directions for the route, tap on Options >
Turn-by-Turn list.
For details of the functions in the window refer to chapter "Turn-by-Turn
list" on page 95.
MyRoutes
When the MyRoutes function is activated, the navigation system
calculates up to three routes on the basis of the currently selected route
profile and shows them on the map in different colours (blue, green,
red) and with a number.
For each route there is a button with the same number and a symbol in
the same colour.
When calculating the time of arrival or the trip time, the navigation
system takes account of additional factors such as day of the week,
time of day and particularly your previous driving profile.
The route which corresponds best to the selected route profile is
marked with "MyRoute".
Page 58
User’s manual maps + more
- 58 - Navigation
Note: The MyRoutes function can be used only for routes with only one
route point. For routes with two or more route points only one route is
calculated and displayed, regardless of whether you have activated the
function or not.
Note: Even when the MyRoutes function is activated, sometimes only
one additional route or no additional routes at all can be calculated for a
particular route. No further suggestion is then shown on the button in
question.
Start navigation
► Tap on the button of the route which you want to use for the
navigation.
Traffic obstruction along the route
If you select a route for which traffic obstructions have been announced,
the P
REVIEW TMC window may open before the navigation starts (see
"Preview TMC" on page 106).
► Select whether you want to use the original route (Current route) or
a detour (Alternative route).
Driving range warning
The (Driving range warning) symbol will appear alongside the
route under the following circumstances:
► With the vehicle's current driving range you cannot reach the
destination.
► With the vehicle's current driving range you can reach the
destination, but from there you cannot reach a charging station.
If you select a route with range warning, you will be asked whether you
want to calculate a Multi-Stop route.
Note: The Multi-Stop route considers charging stations along the route
and includes essential charging stops in the route calculation if the
destination is not within range. Consideration is given to all private
charging stations (Favourites) as well as to the public charging stations
recorded in the map.
Traffic information (TMC) is then available to a limited extent only.
For more details refer to the chapter "Multi-Stop route" on page 99.
Note: If the planned route includes a track, no range warning can be
issued. Nor is it possible to calculate a Multi-Stop route.
Page 59

User’s manual maps + more
Options, more functions - 59 -
No GPS reception
If GPS signal reception is not good enough, the following message will
appear: "Waiting for GPS-Signal…"
You have the following options:
► Wait. As soon as GPS reception is good enough for determining
your position, the route will be recalculated and navigation will
begin.
► Tap on Cancel. The map opens in Preview mode.
8 Options, more functions
From some windows you can reach more functions.
1. In the N
AVIGATION window tap on More functions.
- or Tap on Options.
2. Tap on the option you would like to use.
► If you would like to quit the options list without selecting an option,
tap again on More functions or Options.
2D/3D: Changes between 2D and 3D mode. The symbol indicates the current
mode.
Add to route: Opens the route planning. The address specified will be added as
a route point (see "Tracks and multi-leg routes" on page 52).
Block: Opens a window in which you can block a section of the route lying
ahead in order to calculate a route which avoids this section, e.g. if you
have heard on the radio of a traffic jam relating to this section
(see "Block" on page 94).
Day/Night: Changes between "Day" and "Night" screen modes. The symbol
indicates the current mode.
Delete all: Deletes all destinations in the list (L
AST DESTINATIONS list or
FAVOURITES list, depending on where you opened the options). The list
is then empty. A dialog window prompts you to confirm deletion.
Delete destination: Deletes the selected destination from the list (L
AST
DESTINATIONS or FAVOURITES, depending on where you opened the
options). A dialog window prompts you to confirm deletion.
Direct help: Opens a window in which you can find in quick and uncomplicated
manner the addresses and phone numbers of offices in your direct
vicinity that can be useful in emergencies (see "Direct help" on
page 93).
Page 60

User’s manual maps + more
- 60 - Options, more functions
Factory settings: Resets all settings to the as-delivered state. Routes and saved
destinations are deleted. The software is re-started and behaves as if
started for the first time after being purchased.
GPS status: Opens the GPS
STATUS window. Here you can see details
regarding GPS reception. You can also save the data of the current
location (see "GPS status, saving the current location" on page 94).
Home address: Saves the selected destination as your home address. You can
then always start navigation to this destination very quickly by tapping in
the N
AVIGATION window on Take me home.
Interim destination: Sets the selected point as interim destination. The
navigation system will first guide you to this interim destination.
Afterwards you can continue navigation to your original destination.
Manual: Opens the manual on the navigation device (see "Manual" on
page 20).
MyReport: Opens the M
YREPORT window. Here you can notify
Garmin Würzburg about any changes to traffic monitoring systems and
routing.
MyRoutes: Opens the map in Preview mode. You are provided with up to three
different suggestions as to how you can continue your journey. Select
one of the routes offered.
New route: Deletes the starting point and all route points from the R
OUTES AND
TRACKS window so that you can plan a new route. If necessary, save
the previously planned route!
Parking: Starts the search for car parks near the destination. Once you have
decided in favour of a car park, you can navigate there directly.
POIs on your route: Opens a list with POIs lying on your route. A destination
shown here can be selected as an interim destination and can be
navigated to (refer to "MyBest POI: POIs on your route" on page 87).
Product information: Here you are shown the version numbers and copyright
details of the hardware and software.
Range 360: Presents the charging status as a radius of action on the map
(see " Range 360 map view" on page 76).
Rename: Opens a window in which you can change the name for the selected
destination or route.
Page 61

User’s manual maps + more
Options, more functions - 61 -
Route profile: Opens the ROUTE PROFILE window. Here you can view the options
for route planning and, if necessary, change them.
Routes and tracks: Opens the R
OUTES AND TRACKS window. Here you can plan
routes, manage planned routes and start navigation on a planned route
(see "Tracks and multi-leg routes" on page 52).
Save as favourite: Saves the selected destination to the F
AVOURITES list (see
"Saving destinations" on page 49).
Save destination: Saves the selected address in the F
AVOURITES list (see
"Saving destinations" on page 49).
Save Position: Opens the S
AVE DESTINATION AS window. Here you can save
your current position under a certain name in the FAVOURITES list.
Save route: Opens a window in which you can save the planned route under a
specific name (see "Saving routes" page 55).
Saved routes and tracks: Opens a window in which you can load a saved route
or a track.
Settings: Opens the S
ETTINGS window. Here you can configure the navigation
system (see "Configuring the navigation system" on page 161).
Show map: Opens the map in Standard mode (see "Map in Standard mode" on
page 62).
Show on map: Shows the selected address on the map.
Sightseeing tours: Opens the SIGHTSEEING TOURS window. There you can select
a sightseeing tour and start the navigation on a tour (see "Sightseeing
tours" page 91).
Simulation: Simulates a navigation on the route indicated. This simulation can
be performed without GPS reception. On multi-leg routes, only the first
leg is simulated.
Skip current destination: Tap on this button to omit the next route point. This
button is active only when at least 2 route points still lie ahead of you
(see "Tracks and multi-leg routes" on page 52).
Start recording, Stop recording: Starts or ends the recording of a track (see
"Tracks" on page 83).
Page 62

User’s manual maps + more
- 62 - Working with the map
Traffic: Opens the TRAFFIC INFORMATION window in which pending reports are
listed (see "TMC (Traffic information)" on page 105).
Turn-by-Turn list: Shows detailed directions for the route, including all points at
which you must turn (see "Turn-by-Turn list" page 95).
9 Working with the map
9.1 Selecting the navigation map
Each country has its own navigation map. However, seamless
navigation over several countries on one continent is possible if a
continuous route can be planned on the maps saved.
Even if maps of countries in other continents are available on the
navigation device, it can only ever work with the maps of a single
continent.
► Tap in the NAVIGATION window on More functions > Settings > Map
display in order to see which maps are currently in use. Here you
can also select a different continent if the navigation device
contains any maps of countries on other continents.
9.2 Map in Standard mode
The map is always in Standard mode when you are not navigating,
have not calculated a route and are not searching for a destination on
the map.
Under the following circumstances the map switches automatically to
Standard mode:
► You begin a trip while the NAVIGATION window is open. The switch
takes place after only a short while.
► You reach the destination of a navigation in Vehicle mode.
To open the map:
► In the NAVIGATION window tap on Show map.
- or If the voice commands function is available on your navigation
device and for your language:
► In the NAVIGATION window tap on More functions > Show map.
Note: If GPS reception is not good enough to establish your location, the
map will be opened in destination search mode.
Page 63
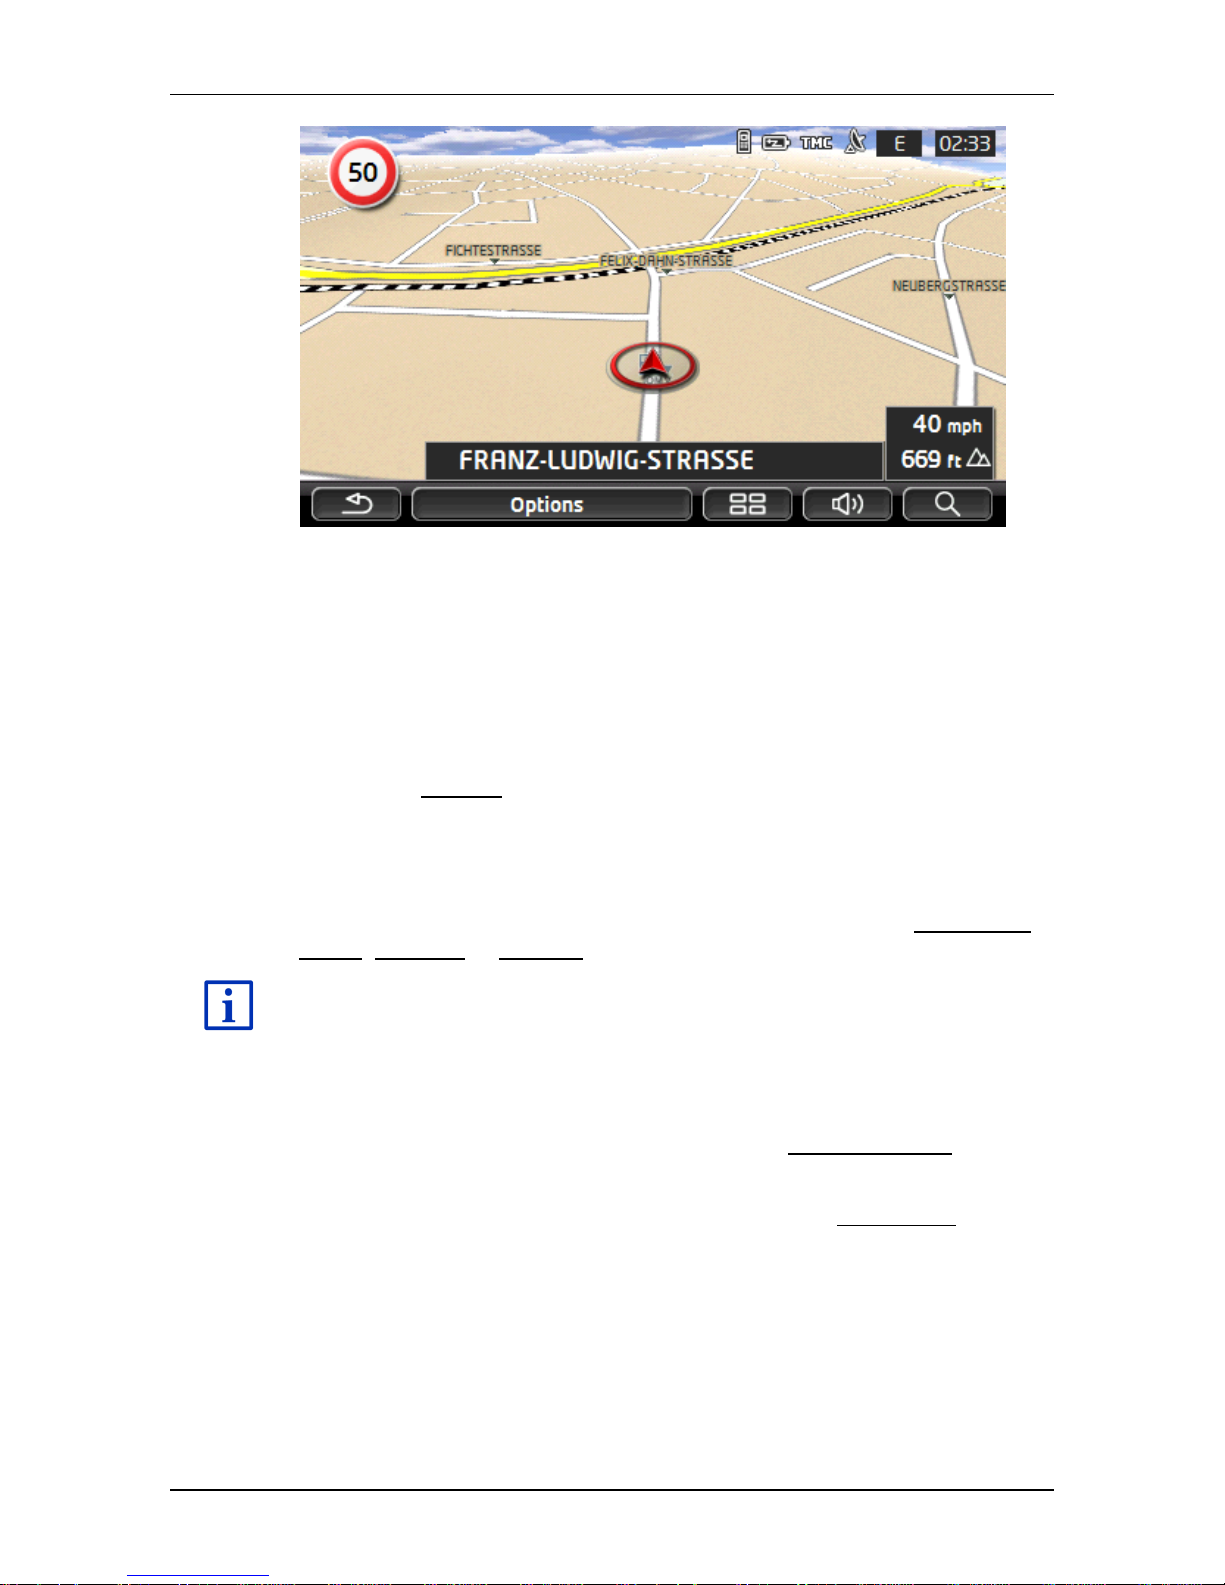
User’s manual maps + more
Working with the map - 63 -
The following features are typical for this view:
► Indicated in the middle of the lower third is your current position (red
arrow). The map view follows your movements so that your position
is always visible on the screen.
► The scale of the map changes according to your speed.
Map options in Standard mode
► Tap on Options.
A window with several buttons opens.
The most important functions for navigation can be reached via buttons
with symbols.
Other functions are found by tapping on one of the buttons Destination,
Route, Services or General.
A description of all available options can be found in the chapter
"Options, more functions" on page 59.
9.3 Map in Preview mode
You have entered a destination and tapped on Start navigation.
- or You have planned or loaded a route and tapped on Show route.
Page 64
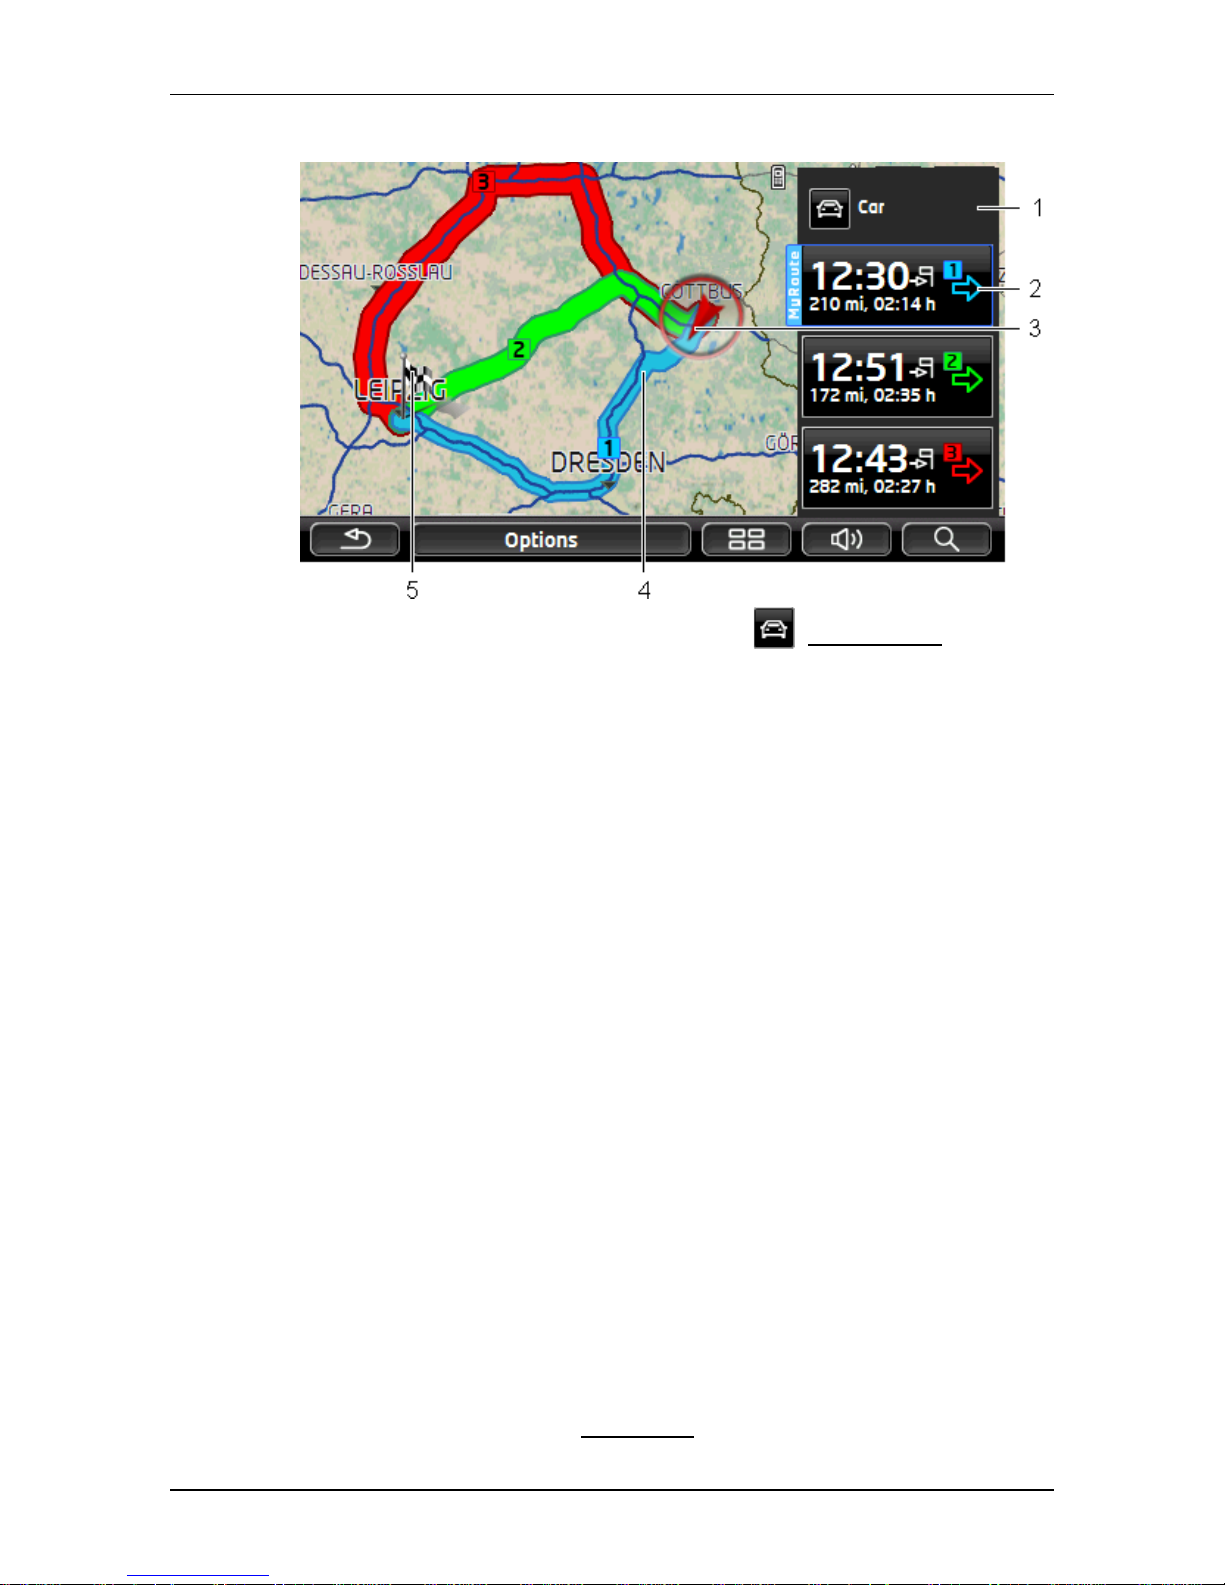
User’s manual maps + more
- 64 - Working with the map
The map opens in Preview mode.
1 The current route profile is indicated on the (Route profile) button.
The symbol illustrates the mode of transport on which the profile is
based (see "Route profiles" on page 78).
► Tap on the symbol to select a different route profile.
2 For each route (blue, green, red) there is a button with the same
number and a symbol in the same colour. Indicated on each button are
the estimated time of arrival, the total distance and the estimated
duration of the particular route.
If traffic messages exist for a route, the number of messages is
indicated in a small traffic sign on the button. The reported obstructions
are also indicated on the route.
The route which corresponds best to the selected route profile is
marked with "MyRoute".
If the MyRoutes function is not activated, only one route is presented.
As soon as you tap on a button, navigation along the route in question
will start.
3 The current position is indicated (red arrow).
If you display a planned or loaded route and the specified starting point
is not your current location, then it is possible that your current position
will not be shown on the preview.
4 When the MyRoutes function is activated, up to three numbered routes
are indicated on the map in different colours (blue, green, red).
In the following cases only one route is shown:
► The MyRoutes function is deactivated.
► You have planned a route with more than one route point.
► A route profile with the Pedestrian speed profile is active.
Page 65
User’s manual maps + more
Working with the map - 65 -
► The route includes a track.
► You have planned a Multi-Stop route, see page 99.
► You have planned a Multi-Stop route, see page 103.
5 The destination is marked with a little flag.
If you display a planned or loaded route, the starting point and each
route point will be marked with a little flag.
In the case of a multi-leg route, the distance and the estimated driving
time for each leg are displayed.
► Tap on the (Route profile) button (see the figure, point 1) in
order to select a different route profile.
► To start the navigation, tap on the button for the route (see figure,
point 2) you want to use for the navigation.
If you display a planned or loaded route, the route may be
recalculated. The starting point for the calculation will now be your
current location. You will first be guided to the first route point
entered.
► Tap on Options > Turn-by-Turn list > in order to view a turn-by-turn
list (see "Turn-by-Turn list" on page 95).
► Tap on (destination search) to view the map in
destination search mode (see "Map in destination search mode"
on page 74).
Page 66
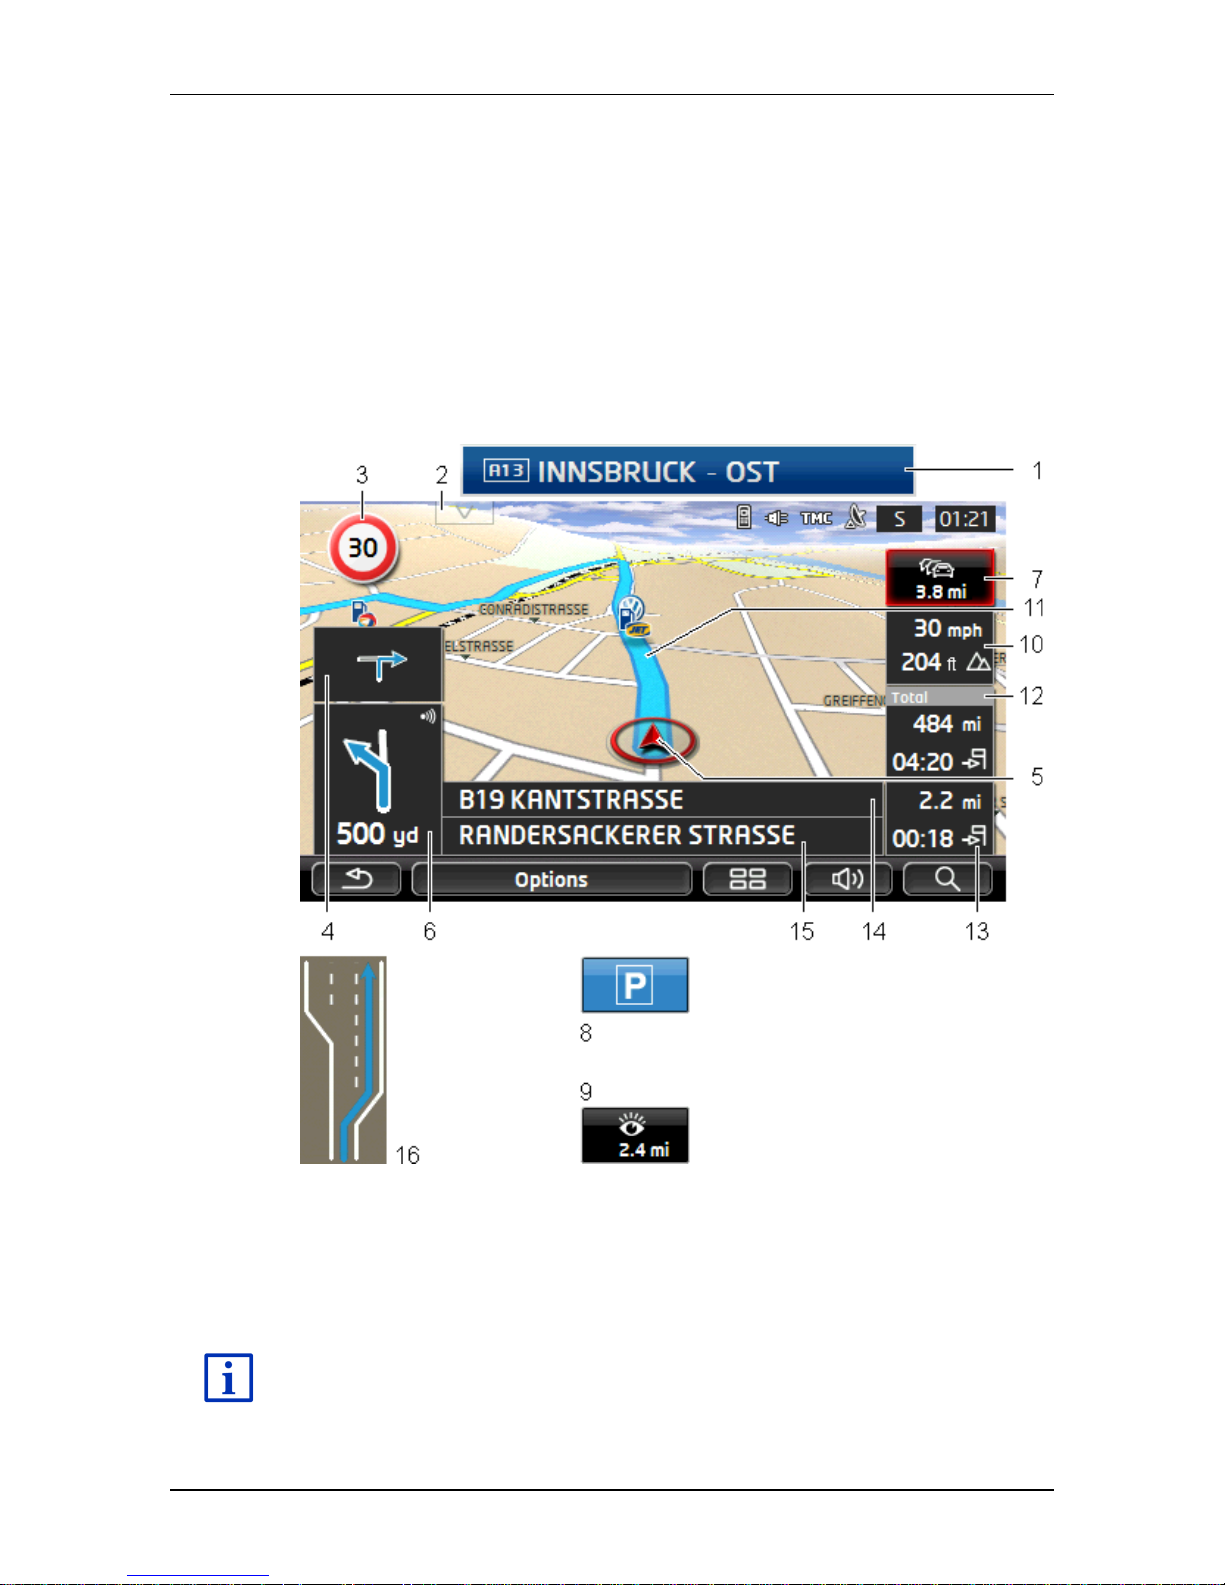
User’s manual maps + more
- 66 - Working with the map
9.4 Map in Navigation mode
How you are guided to your destination depends on various factors (the
route profile selected, your current location, the type of route planning,
traffic information along the route, etc.). Your navigation system
automatically selects the optimum method.
9.4.1 Navigation in Vehicle mode
After the route was shown in Preview mode, navigation was started.
The map opens in Navigation mode.
1 If any information is available about the sign which you should follow, it
will be shown at the top edge of the screen.
► Tap on the display to hide the sign.
2 The POIs on your route bar opens. This button is not visible when a
sign is being shown (see point 1).
For a description of the POIs on your route function refer to chapter
"POIs on your route" on page 87.
3 Possible speed limits may be shown here.
Page 67
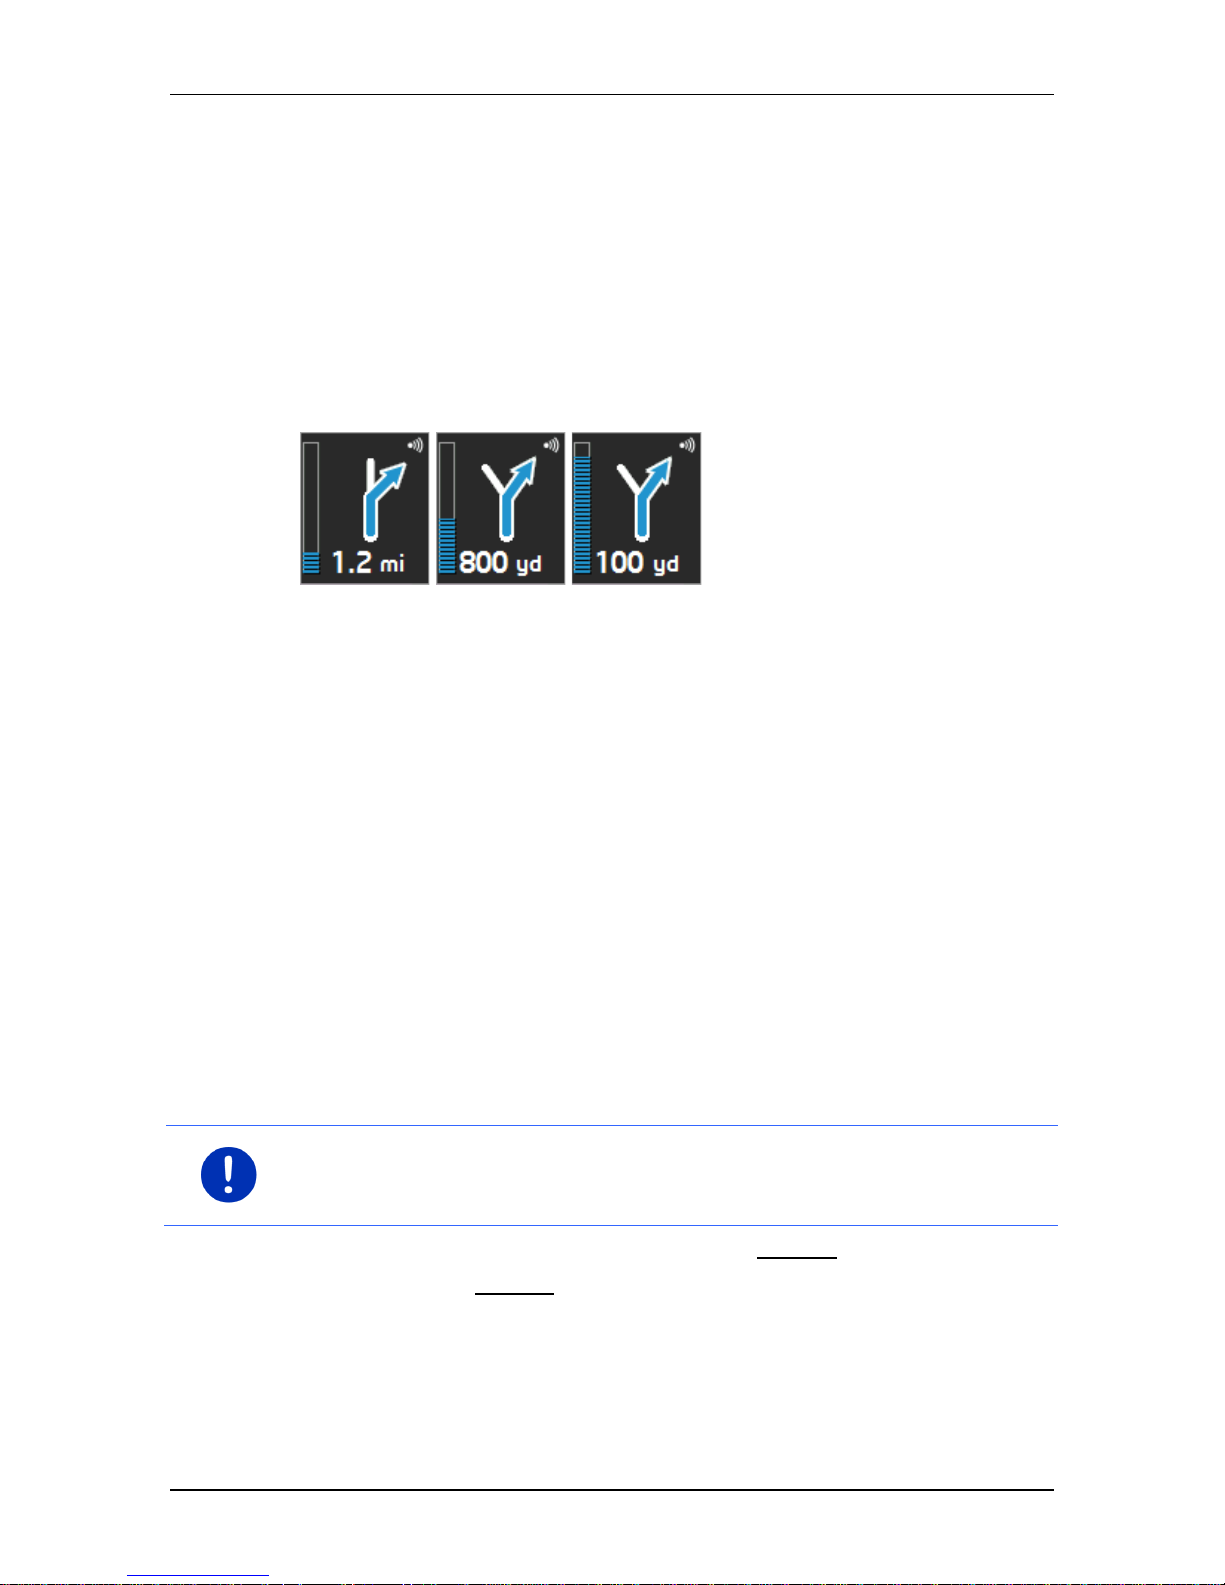
User’s manual maps + more
Working with the map - 67 -
4 When two manoeuvres need to be executed in quick succession, the
small arrow box indicates the second manoeuvre to be executed.
5 Your current position is indicated on the map (red arrow). The section of
the map displayed changes continually so that your current position is
always in view on the map.
6 The large arrow box shows a diagram of the next junction which you
should turn on to. The distance remaining to this junction is indicated
underneath.
As you get closer to the junction you will see a bar in addition to the
distance:
The fuller the bar, the closer you are to the junction.
If you don't have to change direction for a long time, you will see only a
straight arrow. The distance you must continue straight on is indicated
underneath the arrow.
► Tap on the large arrow box to hear current route instructions.
7 The Traffic information box opens if a reported traffic obstruction
affects your route.
If a distance is indicated in the Traffic information box, no detour route
was calculated yet for the traffic obstruction in question.
► Tap on the Traffic information box in order to open the
P
REVIEW TMC window. It shows a map view with the route section
affected by the message and a possible detour.
If no distance is indicated, all the obstructions which are reported for
your route and would lead to a loss of time will be avoided.
► Tap on the Traffic information button to open the TRAFFIC
INFORMATION
window (see "Displaying traffic information" on
page 107).
Note: The calculation of detour routes to avoid reported traffic
obstructions can be performed automatically (see "TMC settings" on
page 109).
8 When you get close to your destination, the Parking button will appear.
If you tap on the Parking box you will be given two options:
► You can select a car park from where you can then continue on
foot.
► When you have parked your vehicle, you can save the current
position and continue the navigation on foot.
Page 68
User’s manual maps + more
- 68 - Working with the map
For a description of the Parking function refer to chapter "Parking close
to the destination" on page 85.
9 When you get close to a Sightseeing sight, the Sightseeing button will
appear instead of the height above sea level and the speed (point 10).
The distance indicated on the button tells you how far away the sight is
(beeline).
If you tap on the Sightseeing button, the D
ESTINATION INFO wind ow will
open (refer to "Displaying information about a Sightseeing sight" on
page 91).
For a description of the Sightseeing function refer to chapter
"Sightseeing" on page 90.
10 The height above sea level and the current speed are shown here.
11 The route is highlighted in blue.
12 In the Total box you can see the distance remaining to the destination,
the estimated duration of the trip and the estimated time of arrival.
► Tap on the arrival time if you want to see the estimated driving time
instead.
► Tap once again on the info box if you want to see the estimated
time of arrival.
13 If you are navigating a multi-leg route, you will see the remaining
distance to the next interim destination and the estimated time of arrival
in the Next box.
► Tap on the arrival time if you want to see the estimated driving time
instead.
► Tap once again on the info box if you want to see the estimated
time of arrival.
14 The name of the route section that you need to drive onto next is shown
in the upper road box.
15 The name of the section you are currently driving on is shown in the
lower road box.
16 Ahead of many junctions the information from points 10 and 12 is
hidden. Instead you are shown which lanes lead to your destination.
► Tap on the box in order to hide the lane information.
Note: The displays of many of the above mentioned areas can be
configured in Options > Settings > Navigation. Some displays will only
function if the required information is available on the map.
Note: If you tap on the large arrow box, the current route instruction will
be repeated.
Page 69
User’s manual maps + more
Working with the map - 69 -
Note: If you leave the road system covered by the map, the navigation
will switch to Offroad mode (see "Navigation in Offroad mode" on
page 73).
► Tap on Options > Route > Turn-by-Turn list in order to view a turn-
by-turn list (see "Turn-by-Turn list" on page 95).
► Tap on (destination search) to view the map in
destination search mode (see "Map in destination search mode"
on page 74).
Volume
The volume of the spoken driving instructions can be adjusted during
navigation.
When the device is mounted in the vehicle:
► You can regulate the volume on the radio when a navigation
instruction is being announced.
Tap on the large arrow box (see point 6 in the figure at the
beginning of this chapter). A current instruction will then be
announced.
When the device is not mounted in the vehicle:
1. Tap on (Volume).
The volume bar opens. It contains three buttons for adjusting the
volume.
(Louder), (Quieter), (Volume on/off).
2. Tap on (Volume) again or wait a few seconds.
The volume bar closes.
Reality View
The map switches to Reality View mode when you approach one of the
following points while driving on the motorway:
► a motorway junction
► a three-leg motorway junction
► the exit you must take to leave the motorway
Page 70
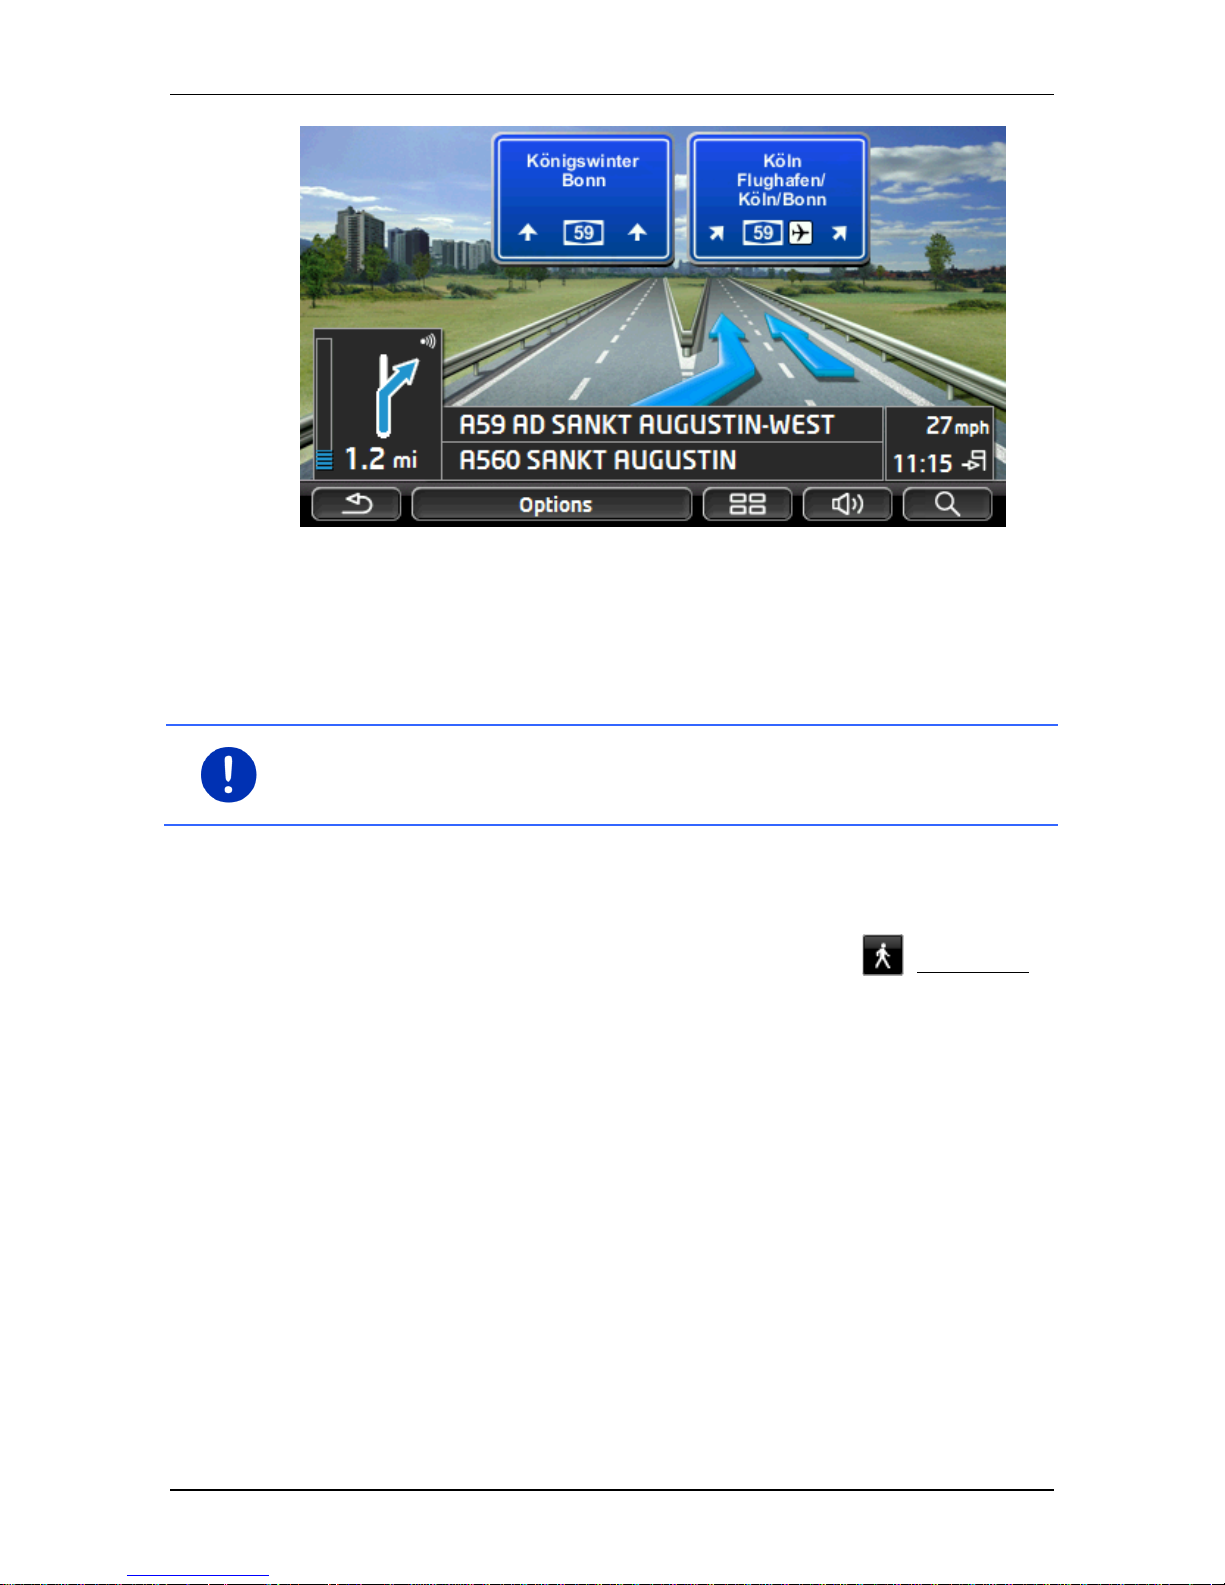
User’s manual maps + more
- 70 - Working with the map
The Reality View mode shows with greater clarity the signposting and
lanes you must follow.
This display does not change until you have passed the spot indicated.
The map will then change back to Navigation mode.
► If you want to change to Navigation mode before then, just tap on
any point on the map.
Note: The Reality View mode is not available for all motorway
junctions and three-leg motorway junctions. Availability depends on the
map material used.
9.4.2 Navigation in Pedestrian mode
This mode is active if you have selected a pedestrian route profile for
the navigation. These profiles can be identified by the (Pedestrian)
symbol.
After the route was shown in Preview mode, navigation was started.
You receive a route proposal which is calculated on the basis of the
digitalised road system. You are also shown in which direction your
destination lies. If you leave the proposed route, for example in order to
take a more pleasant route through a park, you will still see at all times
the direction in which your destination lies.
Please note:
► You will receive no navigation instructions. Instead you will receive
a message when you are getting close to the destination.
► The map view follows your movements so that your position is
always visible on the screen.
► If you leave the calculated route, the route will not be recalculated
automatically.
Page 71
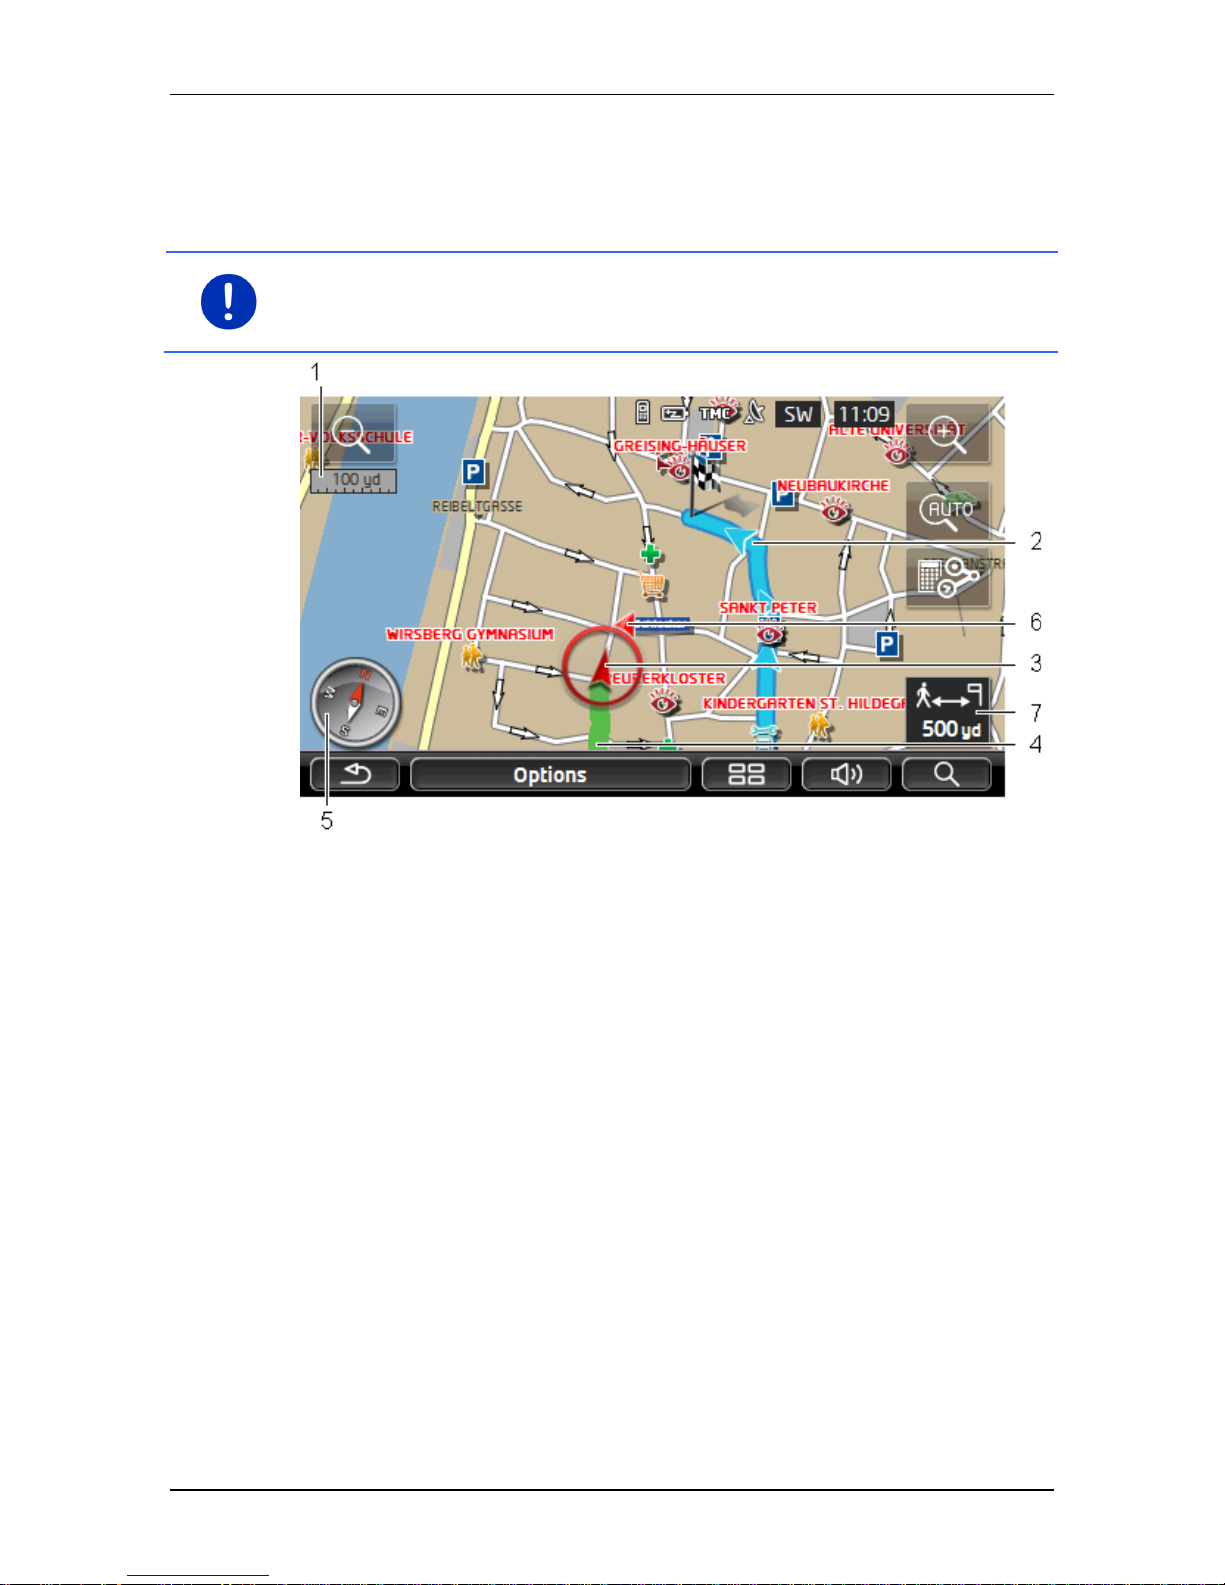
User’s manual maps + more
Working with the map - 71 -
► If you are navigating on a route and more route points are still to
follow, navigation to the next route point will be started immediately
after the message.
► Traffic messages are not taken into account.
Note: In pedestrian mode you must take care to hold the device without
covering it at the top. The GPS receiver is located there and its
reception could be impaired.
1 The scale of the map section shown is indicated here. The length of the
ruler corresponds to the distance indicated.
2 The route which was calculated using the digitalised road system is
marked in blue.
3 The current position is indicated (red arrow). You can see in which
direction you are moving.
4 The part of the route which you have already covered is marked in
green.
5 The compass indicates where north is.
6 The direction in which your destination lies is indicated (red triangle).
7 In this box you are shown the distance remaining to the destination
(beeline).
Page 72
User’s manual maps + more
- 72 - Working with the map
Operating the map
Zoom Out: The map section shown becomes larger, but you will see
fewer details.
Zoom in: The map section becomes smaller, but you will see more
details.
Centre the position: During pedestrian navigation you can shift the
visible map section in order to view the surrounding area on the map.
This may mean that your current position can no longer be seen on the
visible section of the map.
► Tap on the Centre the position button if your current position can no
longer be seen on the visible section of the map.
Your current position will be shown again on the map.
Recalculate route: Recalculates the route. Use this function if you have
wandered far from the calculated route and would like a new route
proposal.
9.4.3 Navigation in Track mode
This mode becomes active if you have planned a route with a track for
the navigation (see "Tracks and multi-leg routes" on page 52).
After the route was shown in Preview mode, navigation was started.
First the navigation guides you from your current location to the
beginning of the loaded track. This navigation corresponds to the
navigation of the selected route profile (see "Navigation in Vehicle
mode" on page 66 and "Navigation in Pedestrian mode" on page 70).
As soon as the first recorded point of the track is reached, the
navigation switches to Track mode.
Navigation in Track mode works like navigation in Pedestrian mode
(see "Navigation in Pedestrian mode" on page 70).
There are only a few differences:
► The Recalculate route function is not available.
► If more route points follow after the track, the navigation will switch
back to the originally selected mode.
Page 73
User’s manual maps + more
Working with the map - 73 -
9.4.4 Navigation in Offroad mode
Note: This mode does not become active if you have selected a
pedestrian route profile for the navigation. These profiles can be
identified by the (Pedestrian) symbol.
Nor does it become active if you are navigating along a track (see
"Navigation in Track mode" on page 72).
If you enter a destination which lies off the digitalised road system, the
navigation will guide you first in Vehicle mode to the point of the
digitalised road system that lies nearest to the destination. From here
the navigation then continues in Offroad mode.
If the current position at the beginning of navigation lies off the
digitalised road system, the navigation will guide you first in Offroad
mode to the nearest point of the digitalised road system. From here the
navigation then continues in Vehicle mode.
Navigation in Offroad mode works like navigation in Pedestrian mode
(see "Navigation in Pedestrian mode" on page 70).
There are only a few differences:
► The part of the route already covered is not shown.
► The Recalculate route function is not available.
9.4.5 Map options in Navigation mode
► Tap on Options.
A window with several buttons opens.
The most important functions for navigation can be reached via buttons
with symbols.
Other functions are found by tapping on one of the buttons Destination,
Route, Services or General.
A description of all available options can be found in the chapter
"Options, more functions" on page 59.
9.4.6 Quitting navigation
You quit the navigation in the same way in all modes:
► Tap on (Back) in order to quit navigation. A dialog box will
prompt you to confirm.
Page 74
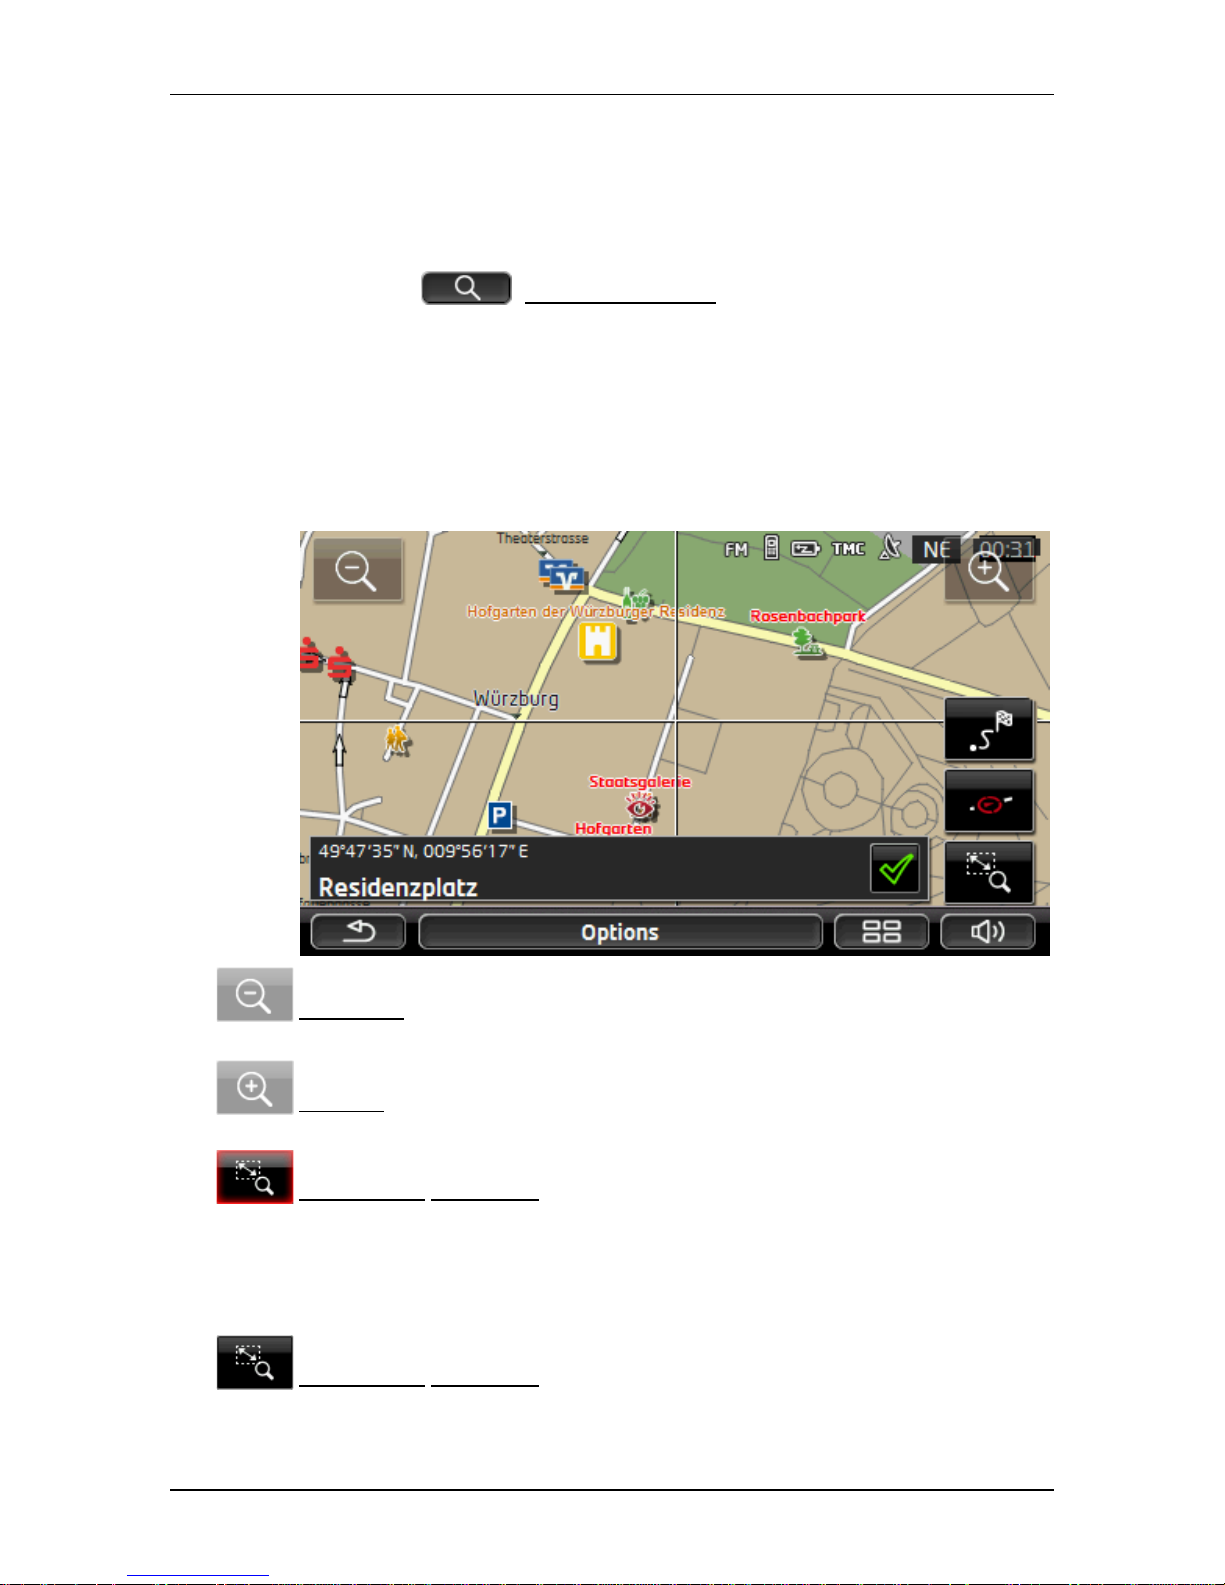
User’s manual maps + more
- 74 - Working with the map
9.5 Map in destination search mode
In destination search mode you can search for a destination or an
interim destination for navigation. If you are in the process of navigation,
you can show the whole route.
► Tap on (destination search) at the bottom edge of the
map.
The map opens in destination search mode.
The map is always in destination search mode, when a pair of cross
hairs are to be seen. Indicated in the address box are the coordinates
and, where applicable, the name of the street under the cross hairs.
When you are driving, the map does not change. It is always orientated
with north at the top.
Zoom Out: The map section shown becomes larger, but you will see
fewer details.
Zoom in: The map section becomes smaller, but you will see more
details.
Zoom mode/Pan mode: When this button is active you can mark out a
section of the map with your finger.
Mark out the section from upper left to bottom right to zoom in until the
section fills the screen.
Mark out the map section from bottom right to top left to zoom out.
Zoom mode/Pan mode: When this button is not active you can change
the section of map shown with your finger. Simply drag the map in the
desired direction.
Page 75
User’s manual maps + more
Working with the map - 75 -
Entire route: Zooms the map so that the entire route is visible.
Current position: Selects the section of map displayed so that the
current location is at the centre.
9.5.1 Operating in destination search mode
1. Tap on the point to which you want to navigate.
The destination that you have selected appears under the cross
hairs.
The geographical coordinates of the destination and the
corresponding address are shown in the bottom third of the screen.
2. Tap on (OK).
Buttons with various functions will be displayed.
Take me there: Starts navigation to the selected point. If you are currently
navigating, this route navigation will be cancelled.
MyReport: Opens the M
YREPORT window. Here you can notify
Garmin Würzburg about any changes to traffic monitoring systems and
routing.
Interim destination: Sets the selected point as interim destination. The
navigation system will first guide you to this interim destination.
Afterwards you can continue navigation to your original destination.
This function is only active during navigation.
Add to route: Adds the selected point to the route planning as the last point.
Navigation will then continue to this point after you have reached the
original destination or the other route points.
Save: Opens the S
AVE DESTINATION AS window. You can enter a name under
which the selected point will be saved in the FAVOURITES list (see
"Saving destinations" on page 49).
Search nearby: Opens the POI
NEARBY window. Here you can search for
destinations near the selected point (see "POI nearby" on page 39).
► Tap on (Back) in order to quit destination search mode.
You will be returned to the window from which you started this
mode.
Page 76
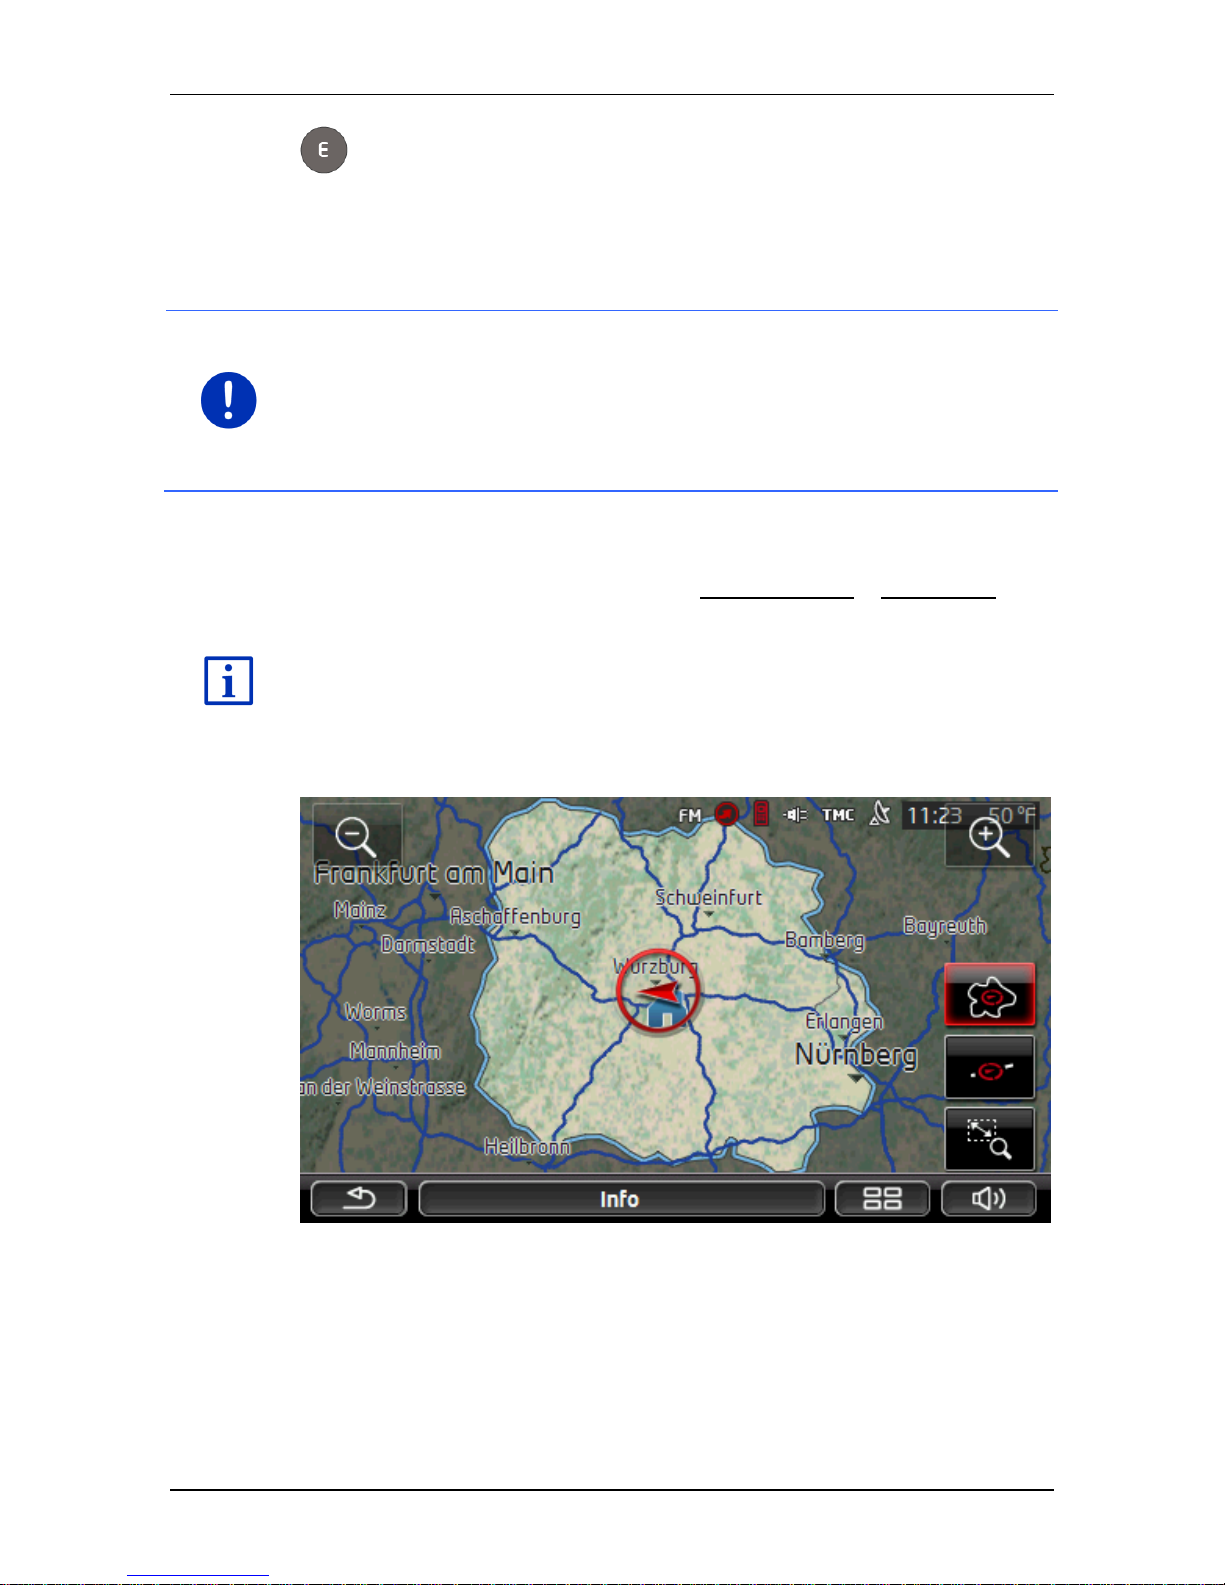
User’s manual maps + more
- 76 - Working with the map
9.6 Range 360 map view
The Range 360 map view shows the possible radius of action on the
map. The current battery charge and the level of consumption are
considered. The area lying within range is highlighted. The display is
continuously updated during travel.
Note: The range is shown only when the following conditions are
fulfilled:
► The navigation device is correctly inserted in its cradle.
► The vehicle ignition is on.
► GPS reception is good enough for positioning purposes.
9.6.1 Showing the range
► In the NAVIGATION window, tap on More functions > Range 360.
There are three types of view to choose from.
The range view can be configured. For more details refer to the chapter
"Configuring the Range 360 map view" on page 78.
One way
The highlighted area shows the maximum distance you can drive from
your current position.
Page 77
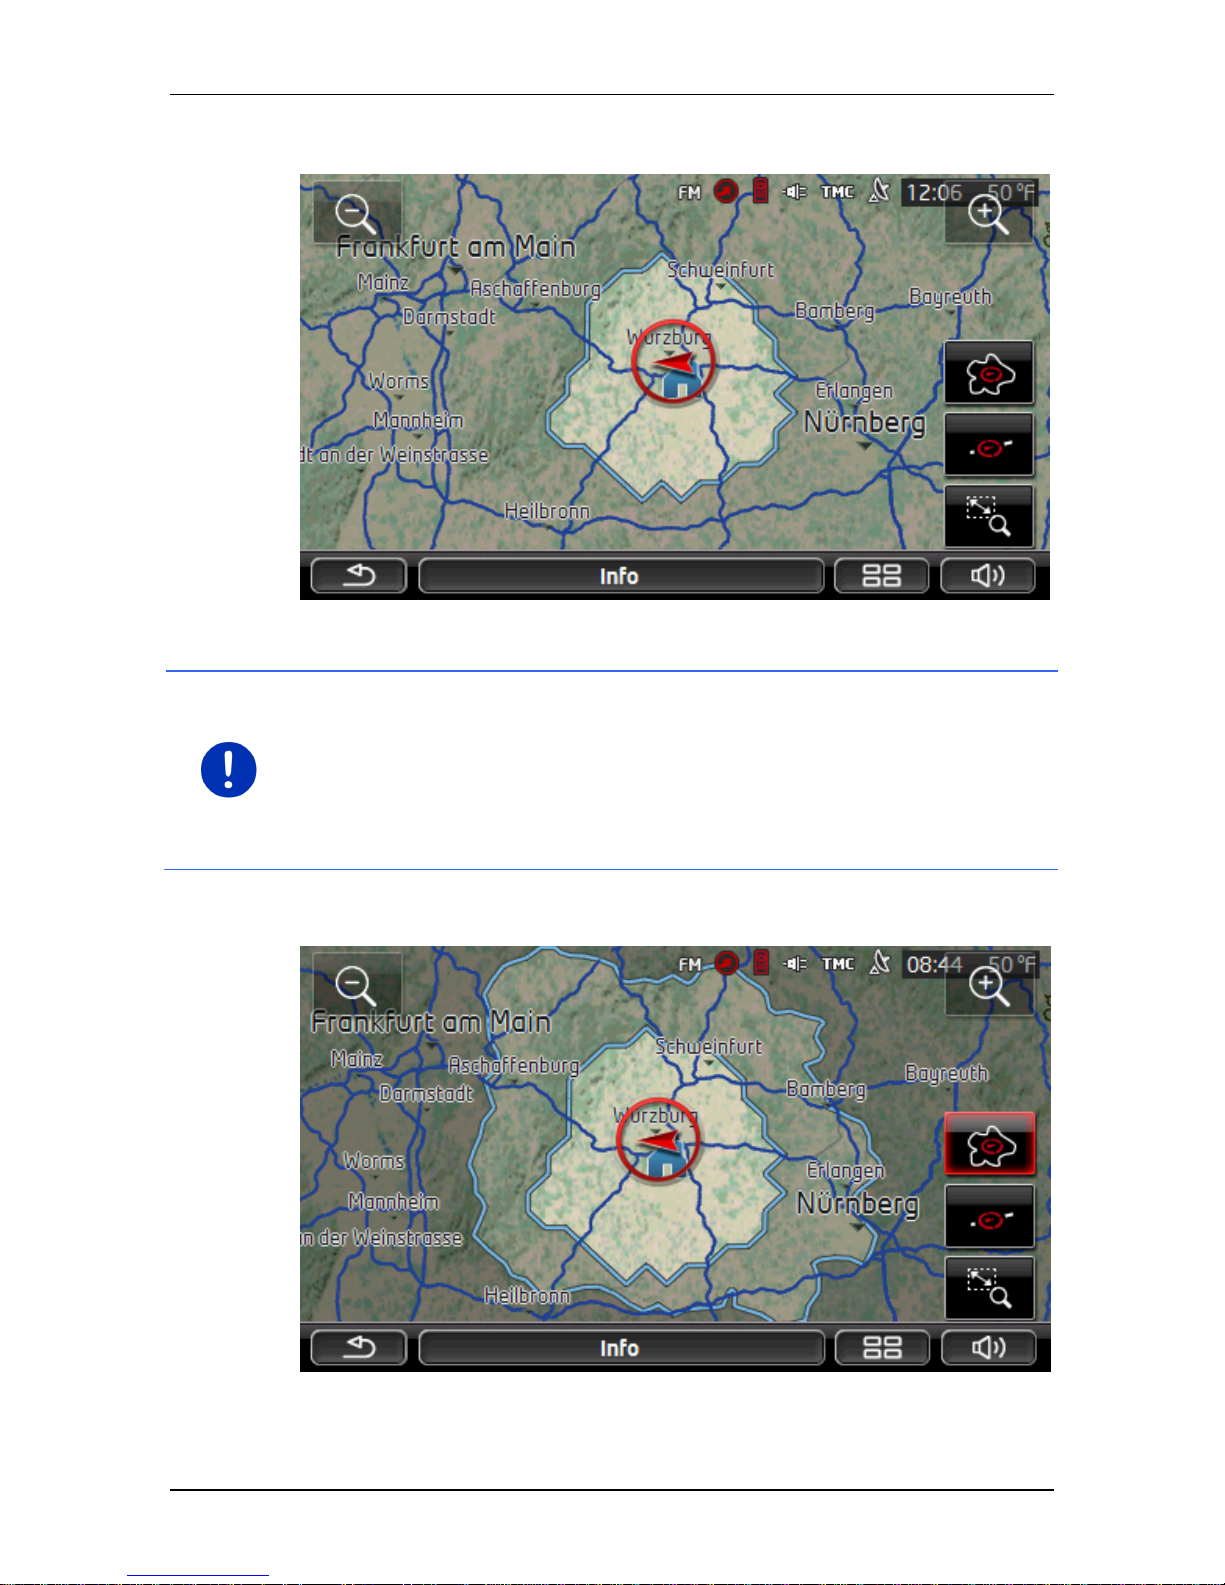
User’s manual maps + more
Working with the map - 77 -
Reliable return
The highlighted area shows the distance you can travel from your
current position and still return reliably to the home address.
Note: The radius of action for the return trip can be shown only if the
indicated home address is still reachable.
Define your personal charging station as the home address so that it
can be considered for the return trip.
If no home address is specified, the current position will be taken as the
return address.
Both
The larger of the two highlighted areas corresponds to the One way
view.
Page 78

User’s manual maps + more
- 78 - Useful functions
The smaller of the two areas indicates the distance you can still drive
from your current position and still reach the home address reliably on
the subsequent return trip.
Note: The radius of action for the return trip can be shown only if the
indicated home address is still reachable.
If no home address is specified, the current position will be taken as the
return address.
9.6.2 Configuring the Range 360 map view
1. In the NAVIGATION window tap on More functions > Settings > Map
display.
2. Use the Range 360 setting to define how you want to present the
range on the map:
► One way: Shows the maximum range.
► Reliable return: Shows the maximum range when the return trip
to the home address is considered.
► Both: Shows both ranges.
10 Useful functions
10.1 Route profiles
Route profiles define the characteristics and special aspects of the
different modes of transport which are to be taken into account when
calculating routes. For example a route profile for bicycles will exclude
motorways from the route calculation but will include roads which other
vehicles are not allowed to use. And different arrival times will be
calculated for a bicycle than for a motorcycle for example.
10.1.1 Route profile settings
A route profile is made up of several settings:
► Speed profile: Defines the mode of transport (e.g. Bicycle,
Pedestrian, Car, ...).
► Type of route: Defines the type of route which is to be calculated
(e.g. Short route, Fast route, ...).
► Consider traffic information: defines whether traffic messages are to
be considered when calculating the route
► Motorways, Ferries, Restricted areas: Defines whether these types
of road are allowed to be used.
► Use of toll roads: defines whether toll roads are allowed to be used
when calculating the route.
Page 79
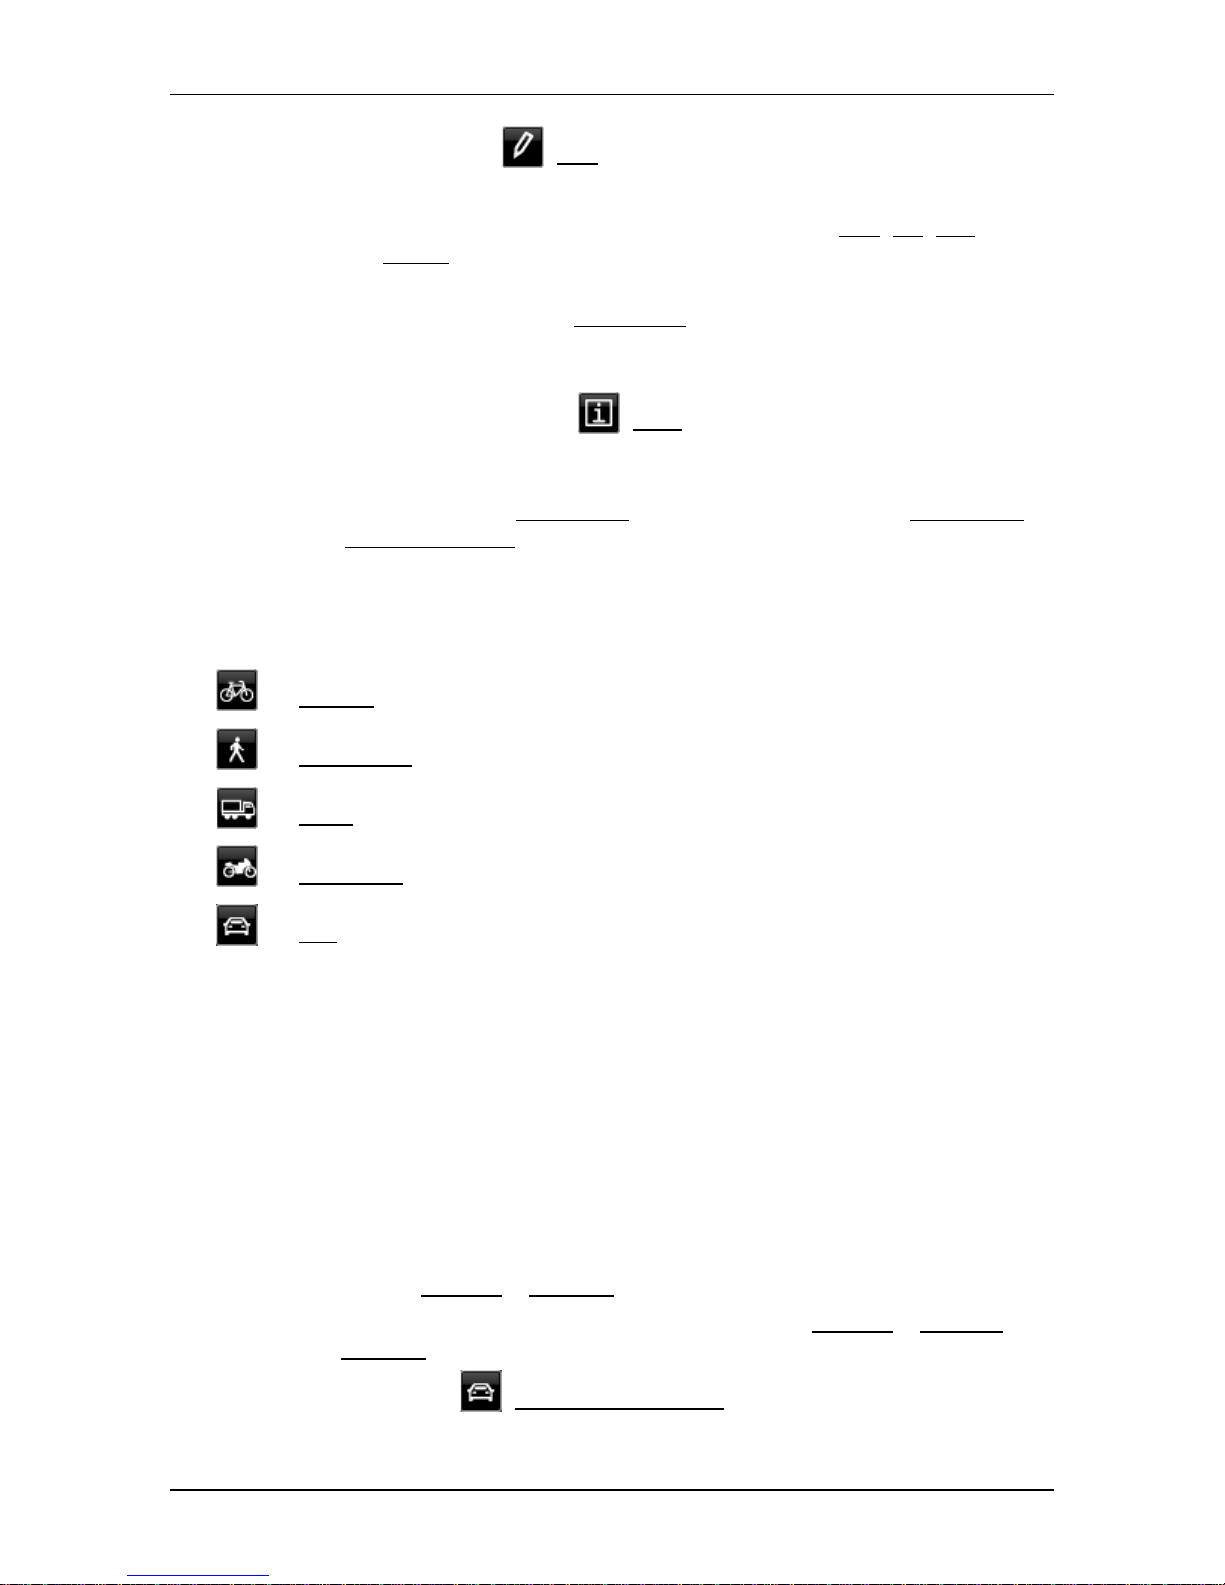
User’s manual maps + more
Useful functions - 79 -
► Tap on the (Edit) button.
The USE OF TOLL ROADS window opens.
► Adapt the individual settings to your needs (Yes, No, Ask
before) (see also "Configuring the navigation system" on
page 161).
If you activate the Ask before setting, every time your route can
take a toll road you will be prompted to make the corresponding
setting(s).
For each setting there is a (Help) button. When you tap on it you
will see an exact definition of the setting in question.
The number of possible settings depends on the selected speed profile.
For example, for the Pedestrian speed profile there are no Motorways
and Use of toll roads settings.
10.1.2 Basic profi les
A basic profile is already defined for each speed profile.
Bicycle
Pedestrian
Lorry
Motorbike
Car
The speed profile of a basic profile cannot be changed. You can adapt
the other settings to your requirements.
Basic profiles cannot be renamed or deleted.
To have a choice of different profiles for example for several cars, you
can create your own route profiles.
10.1.3 Creating a new route profile
You can create your own route profiles. This makes sense for example
if you own two cars and only one has a prepaid toll disc for Austrian
motorways.
1. Tap on Options > Settings.
If the map is open in Standard mode, tap on Options > General >
Settings.
2. Tap on the (Current route profile) button. This button can also
show a different symbol.
Page 80
User’s manual maps + more
- 80 - Useful functions
3. Tap on the name of the route profile which you want to take as
basis for the new profile.
4. Tap on Options > Copy.
5. Enter a name for the route profile.
6. Tap on Save.
7. Adapt the route profile to your requirements.
8. Tap on OK.
The new route profile is shown in the ROUTE PROFILES list.
10.1.4 Selecting a route profile
1. Tap on Options > Settings > (Current route profile).
If the map is open in Standard mode, tap on Options > Route >
Current route profile.
2. Tap on the name of the route profile which you want to use.
3. Tap on (Back).
10.1.5 Managing route profiles
User-defined route profiles can be edited, renamed and deleted.
Editing a route profile
1. Tap on Options > Settings.
If the map is open in Standard mode, tap on Options > General >
Settings.
2. Tap on the (Current route profile) button. This button can also
show a different symbol.
3. Tap on the (Edit) button alongside the route profile that you
want to edit.
4. Make the required settings.
5. Tap on OK.
The Use of toll roads setting is comprised of several individual settings.
For example for each country with toll motorways you can select
whether you want to use these roads for the navigation.
1. Tap on the (Edit) button alongside the Use of toll roads setting.
The USE OF TOLL ROADS window opens.
2. Adapt the individual settings to your requirements (Yes, No, Ask
before).
Page 81
User’s manual maps + more
Useful functions - 81 -
If you activate the Ask before setting, each time the route preview
wants to calculate a route with a toll road you will be asked whether
you want to use the type of toll roads in question. You can then lay
down this setting for future journeys as well.
Renaming a route profile
1. Tap on Options > Settings.
If the map is open in Standard mode, tap on Options > General >
Settings.
2. Tap on the (Current route profile) button. This button can also
show a different symbol.
3. Tap on the name of the route profile which you want to rename.
4. Tap on Options > Rename.
5. Enter the new name for the route profile.
6. Tap on Save.
Note: Basic profiles cannot be renamed.
Deleting a route profile
1. Tap on Options > Settings.
If the map is open in Standard mode, tap on Options > General >
Settings.
2. Tap on the (Current route profile) button. This button can also
show a different symbol.
3. Tap on the name of the route profile which you want to delete.
4. Tap on Options > Delete.
A dialog window prompts you to confirm deletion.
5. Tap on Yes.
Note: Basic profiles cannot be deleted.
10.2 MyPOIs
You can create files with your own POIs. These files have to be made
available to your navigation system in a specific folder.
If you want to choose from your own POIs, you will find them under the
MyPOIs category of POIs. Each file with your own POIs is listed as a
sub-category. Each sub-category can have a personally created symbol
for representing your destinations on the map.
Page 82

User’s manual maps + more
- 82 - Useful functions
The navigation device can import a maximum of 10,000 POIs. These
destinations are allowed to be shared among a maximum of 40 subcategories.
10.2.1 Creating your own destinations
1. Open an empty document in an editor which can save the files in
UTF8 code (e.g. MS Notepad, Microsoft Word).
Note: The following description is based on the use of MS Notepad as
editor. If a different editor is used, the saving of the file and its UTF-8
coding (point 4-9) may differ from this description.
2. For each destination create a data record (one line) with the
following form:
► Longitude. Begin the entry with a minus sign if you want to
enter a western degree of longitude. The longitude must be
entered as a decimal number with a dot as the decimal sign.
► Comma (as list separator)
► Latitude. Begin the entry with a minus sign if you want to enter
a southern degree of latitude. The latitude must be entered as a
decimal number with a dot as the decimal sign.
► Comma (as list separator)
► Name of the destination. Any name is possible, but no commas
are allowed. If the use of a comma is indispensable, precede it
with a backslash ('\').
► Comma (as list separator)
► PHONENUMBER=
► A phone number. This entry can remain empty.
► Tilde ('~')
► Additional information. This entry can remain empty.
► Enter (in order to begin a new data record)
The address does not have to be included in the data record. It is
shown automatically when you select this POI for navigation.
Example:
9.94302,49.79906,Garmin Würzburg GmbH,PHONENUMBER=+4
9 931~Best Navigation Devices
3. Repeat step 2 for each destination you want to save in this file.
4. Click on File > Save.
5. Select a folder in which you want to save the data.
6. In the File type box select the All files option.
Page 83

User’s manual maps + more
Useful functions - 83 -
7. In the file name box enter a name of your choice followed by '.csv',
e.g. 'XYZ.csv'. Please note that the file name will appear in the
navigation system as a sub-category! This means that if you save a
file under the name 'XYZ.csv', the destinations of this file will appear
in the sub-category XYZ.
8. In the Encoding box select the UTF-8 option.
9. Tap on Save.
10.2.2 Symbols for your own POIs
For each sub-category of your own POIs you can create a symbol
which is used to represent the destinations of this sub-category on the
map.
These symbols must be graphic files with the following characteristics:
► File format bmp (Bitmap) or png (Portable Network Graphic)
► Size max. 40x25 pixels
The graphic files must be saved in the same folder as the files with the
POIs.
The file name must be the same as the name of the category.
Example:
Destinations of the XYZ sub-category are saved in the 'XYZ.csv' file.
They are represented on the map by the 'XYZ.bmp' symbol.
10.2.3 POI-Import: Importing your own POIs onto the navigation
device
The files you have created with your own POIs and the related symbols
must still be transferred to the navigation device. This is very easy to do
with the Fresh software which can be downloaded free of charge from
our website www.garmin.com/pid.
10.3 Tracks
You can record any section of a route you take, even if it lies off the
digitalised road system.
You can record for example a bicycle tour and follow the same route
again some time later.
Tracks are saved in KML data format. KML is a widely used data
format. You can also play back your tracks for example in Google Earth
on your PC.
Page 84
User’s manual maps + more
- 84 - Useful functions
Recording a track
You can record a track when the map is open in Navigation mode or in
Standard mode.
1. Tap on Options > Services > Start recording.
The START RECORDING window opens.
2. Enter a name for the planned recording.
Note: Only Latin characters are available for naming tracks.
3. Tap on Start recording.
Starting from your current position, the navigation device will record
the entire route you now take.
The (Record track) symbol appears at the top edge of the
screen throughout the recording.
The recorded route is saved in the S
AVED ROUTES AND TRACKS list
in KML data format. It can be loaded again from there at any time.
Stopping the recording
1. Tap on Options > Services > Stop recording.
The recording is stopped. The recorded route is saved in the SAVED
ROUTES AND TRACKS
list in KML data format. It can be loaded again
from there at any time.
Note: Switching off the navigation device will only interrupt the track
recording. If you want to stop the recording, you must proceed as
described above.
Using a track for navigation
You can load saved tracks as part of planning a route (see "Loading
routes or tracks" on page 55).
Note: All tracks that have been saved in KML data format are suitable
for route planning. Use Fresh in order to load tracks from other
suppliers onto your navigation system.
Note: When you are navigating along a recorded track, any incoming
TMC messages will not be checked to see if they concern the track in
question.
Page 85
User’s manual maps + more
Useful functions - 85 -
10.4 Parking close to the destination
When you get close to your destination, the (Parking) button
will appear on the screen. This button also remains visible after you
have reached your destination as long as you stay close to the
destination and the map is not closed.
Note: In electric vehicles the (Parking) button is
replaced by the (Parking Charging) button.
The following scenarios are imaginable:
10.4.1 Continuing on foot
You see a car park, park your vehicle and want to continue to the
destination on foot.
1. Tap on the (Parking) button.
2. Tap on Pedestrian Mode.
The following message appears: "Your current position has been
saved. You will find it in the 'Favourites' list as 'My vehicle'. This
enables you to easily find the way back to your vehicle."
3. Tap on OK.
The position of your vehicle is marked on the map by a flag with a
star.
The navigation continues to guide you to the destination in
Pedestrian mode.
10.4.2 Searchin g for a car park
You want to be guided to a car park near the destination. From there
you want to walk to the destination.
1. Tap on the (Parking) button.
2. Tap on Parking close to destination.
A list opens. You are shown possible car parks in order of distance
from your destination.
3. Tap on the car park where you want to park your vehicle.
You are shown more information about this car park.
4. Tap on Add.
5. The navigation now guides to the selected car park in the mode
corresponding to the selected route profile.
Page 86
User’s manual maps + more
- 86 - Useful functions
6. Tap on OK.
The position of your vehicle is marked on the map by a flag with a
star.
The navigation continues to guide you to the destination in Pedestrian
mode.
Clever Parking: Current information about parking options
Some parking options are marked by a small asterisk (e.g. ). There
is more information available for these parking options, e.g. opening
times or the number of parking spaces for women or the number of
parking spaces for the handicapped.
Note: Clever Parking information is not available as standard. You can
easily purchase it however via the Fresh software. Regular updates of
this information are also available from there. Fresh can be
downloaded free of charge from the website www.garmin.com/pid.
10.4.3 Back to th e dest ination
You have reached your destination. Navigation has ended. For some
reason, however, you carry on driving, perhaps because you were
unable to find a place to stop. Now you want to be guided back to the
destination.
1. Tap on the (Parking) button.
2. Tap on Last destination.
The navigation now guides you back to the original destination in the
mode corresponding to the selected route profile.
10.4.4 Charging near the destination
You want to be guided to a charging station near the destination. From
there you want to walk to the destination.
1. Tap on the (Parking Charging) button.
2. Tap on Charging near the destination.
A list opens. You are shown possible charging stations in order of
distance from your destination.
3. Tap on the charging station where you want to charge your vehicle.
You will be shown more information about this charging station.
4. Tap on Add.
5. The navigation now guides to the selected charging station in the
mode corresponding to the selected route profile.
Page 87
User’s manual maps + more
Useful functions - 87 -
6. Tap on OK.
The position of your vehicle is marked on the map by a flag with a
star.
The navigation continues to guide you to the destination in Pedestrian
mode.
10.5 Nearby
During the navigation, or after having opened the map using the Show
map button, you can have POIs, Favourites and traffic information of
the current map view shown in a clearly arranged list.
Note: This function is not available if the map was opened in one of the
modes destination search, Preview or Reality View.
1. Tap on the map on a symbol which represents a POI, a favourite or
a traffic message.
The N
EARBY list opens. It contains all the POIs, favourites or traffic
messages to be found in a small radius around the position on
which you have tapped.
2. Tap on an entry in the list in order to receive detailed information
about it.
You have the following options:
► Tap on Interim destination in order to set the selected point as an
interim destination. The navigation system will first guide you to this
interim destination.
Afterwards you can continue navigation to your original destination.
The Interim destination button is available in navigation mode only.
► Tap on Start navigation in order to navigate to the selected point.
► Tap on Cancel in order to close the list again.
10.6 MyBest POI: POIs on your route
Note: This function is available only during navigation in Vehicle mode
(refer to "Navigation in Vehicle mode" on page 66).
You can stipulate 3 categories of POI for the POIs on your route
function. POIs which lie along your route and match one of these
categories can be quickly displayed and selected as an interim
destination during the navigation.
10.6.1 Displaying POIs along the route
1. Tap on the (POIs on your route) button which appears at the
top left of the map (see point 2 in "Navigation in Vehicle mode" on
page 66).
The POIs on your route bar opens .
Page 88
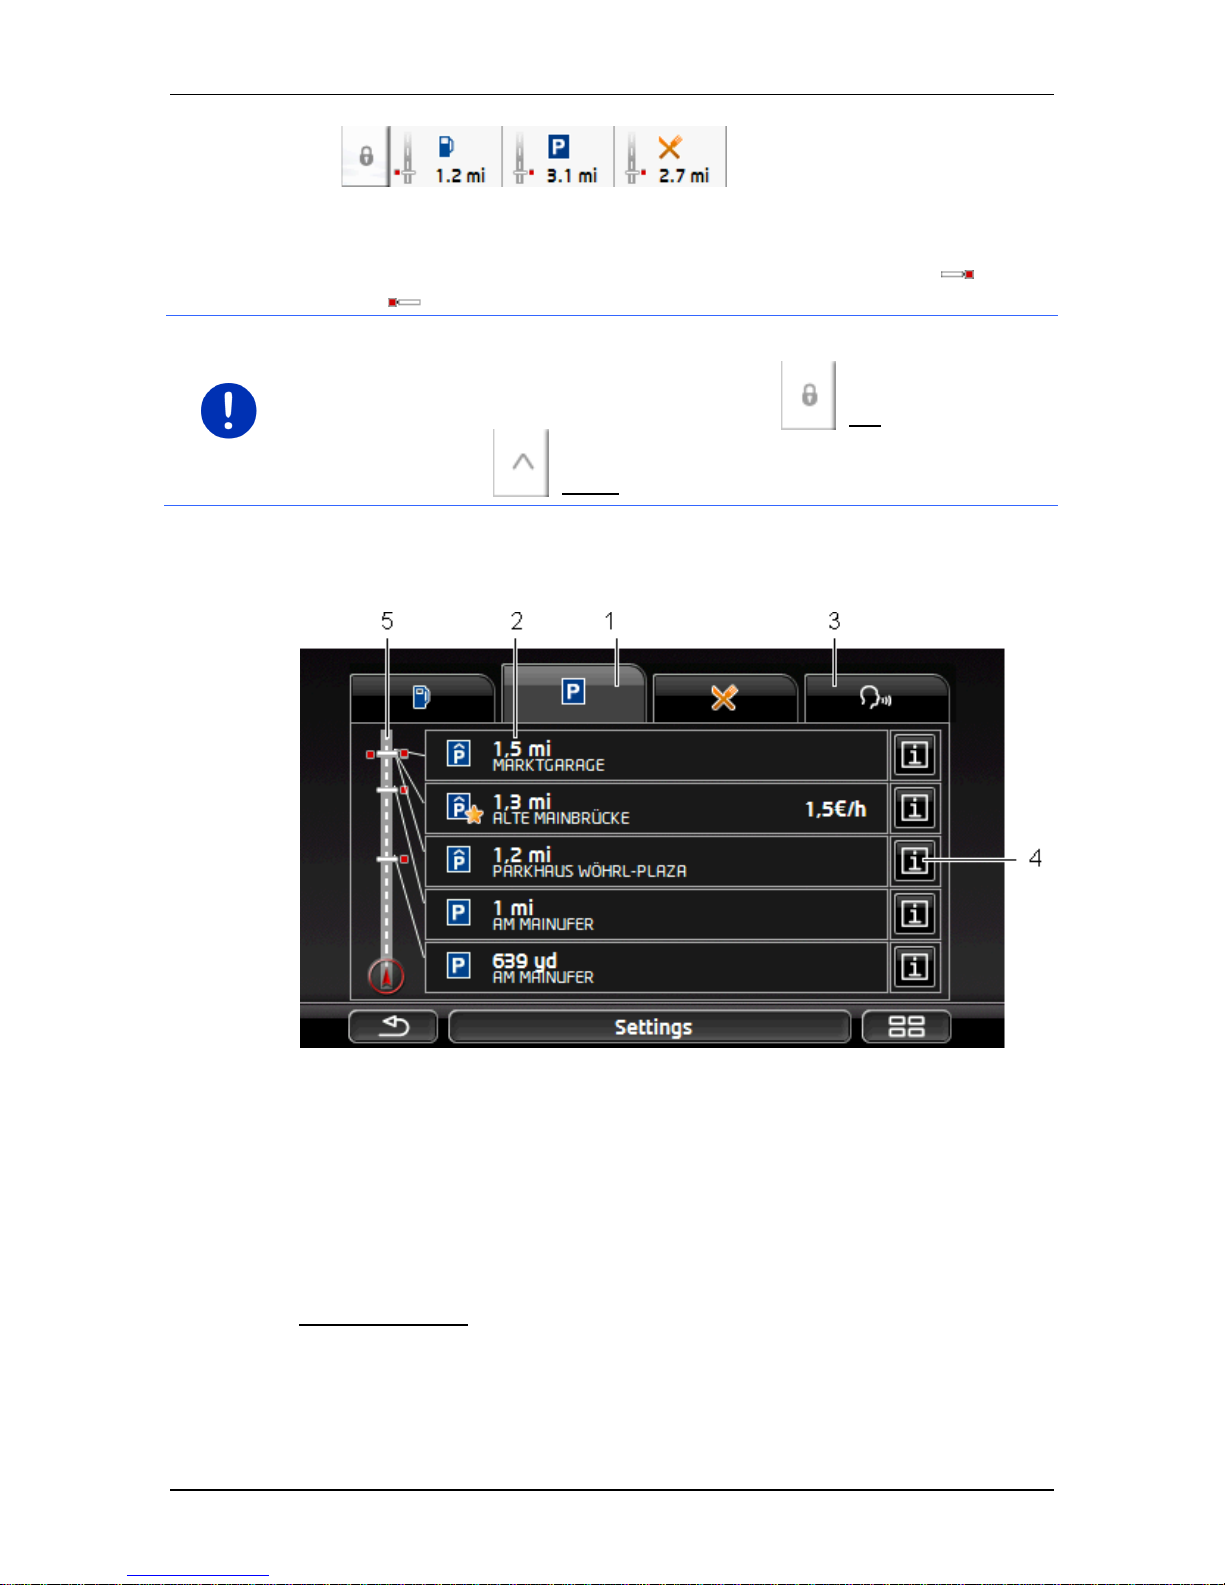
User’s manual maps + more
- 88 - Useful functions
It shows symbols of the 3 stipulated categories of POI. The distance
to the nearest POI in each category is indicated. The marking along
the route also indicates whether the POI lies on the right ( ) or
left ( ) in driving direction.
Note: The POIs on your route bar closes after a few seconds.
If you want the bar to remain open, tap on the (Fix) button. The
button changes to (Fixed).
2. Tap on one of the categories in order to show a list with more POIs
in this category.
The POI
S ON YOUR ROUTE list opens.
1 Symbols of those categories in which POIs are available are shown at
the top edge of the screen. The symbol of the currently selected
category is highlighted.
► Tap on the symbol of the category whose POIs you want to have
displayed.
2 The list contains the next 5 POIs, sorted by distance in descending
order, which lie along your route and are in the stipulated category. The
nearest POI is therefore the lowest entry in the list.
3 Voice command: Opens the V
OICE COMMAND window in which you can
initiate the search for POIs by voice commands (refer also to "Voice
command" on page 30).
Page 89
User’s manual maps + more
Useful functions - 89 -
Note: If the voice commands function is not available for the language
of the user interface, the Voice command button will be deactivated.
4 Additional information about each POI in the list can be displayed.
► Tap on the (Info) button on the right alongside the
corresponding POI (refer also to "Information about the destination"
on page 43).
5 The route and your current position are shown schematically on the left
edge of the screen. The markings along the route indicate the distance
of the listed destinations from your position. The red markings indicate
whether the respective destination is on the right ( ) or on the
left ( ) in driving direction.
10.6.2 Navigating to one of the destinations
► Tap in the list on the destination to which you want to navigate.
The selected destination will be inserted as an interim destination.
The system recalculates the route. Navigation to the original
destination will be continued after reaching the interim destination.
10.6.3 Selecting categories
You can stipulate which 3 categories or sub-categories are to be
available for the POIs along the route.
1. Tap in the POI
S ON YOUR ROUTE list on Settings.
The SETTINGS: POIS ON YOUR ROUTE window opens.
2. Tap on the (List) button alongside the category you want.
The list of POI categories will open.
If any sub-categories exist for a category, the (List) button will
be shown again alongside it. Tap on this button to show the subcategories.
3. Select a category.
4. Tap on OK.
The SETTINGS: POIS ON YOUR ROUTE window opens.
5. Tap on OK.
6. The POIS ON YOUR ROUTE list opens. If there are POIs of the newly
selected category along the route, they will already appear in the
list.
7. Tap on (Back) in order to close the list.
The map opens.
Page 90
User’s manual maps + more
- 90 - Useful functions
10.7 Sightseeing
Sightseeing sights are a special category of POI. You can be pointed
to these sights when you get close to them.
Note: Pointers are possible only during navigation or when the map is
opened in Standard mode.
Activating pointers to Sightseeing sights
You can select whether or how you want to be pointed to Sightseeing
sights.
1. In the N
AVIGATION window tap on More functions > Settings >
Navigation > Info about 'Sightseeing' destinations.
2. Select one of the following settings:
► No: You will not be pointed to Sightseeing sights.
► Only on the screen: When you get close to a Sightseeing sight,
the (Sightseeing) button will appear on the map and
can be used to open the DESTINATION INFO window.
► Audio info for important destinations: For nationally known
sights, a description will be read out as soon as the
(Sightseeing) button appears.
► Audio info for all destinations: For all sights in the category, a
description will be read out as soon as the
(Sightseeing) button appears.
Note: Only a limited number of Sightseeing sights are included in the
delivery package. An update with many additional sights in
18 European countries and particularly in-depth information about each
Sightseeing sight can be easily purchased via the Freshsoftware.
Fresh can be downloaded free of charge from the website
www.garmin.com/pid.
Note: Descriptions cannot be read out in every language. In this case
the two settings Audio info for important destinations and Audio info for
all destinations are not available.
Note: During navigation in Pedestrian mode you will receive a pointer
only when your destination is a Sightseeing destination and you are
getting close to your destination.
Page 91
User’s manual maps + more
Useful functions - 91 -
Displaying information about a Sightseeing sight
► You have chosen to be informed about Sightseeing sights (refer to
"Activating pointers to Sightseeing sights" on page 90).
► The map is open in Navigation or Standard mode.
When you get close to a Sightseeing sight, the
(Sightseeing) button will appear on the map. The distance
indicated on the button tells you how far away the destination is
(beeline). Depending on your settings, a description of the destination
will be read out in addition.
► Tap on the (Sightseeing) button.
The DESTINATION INFO window opens. In addition to a description it
contains information such as the address, phone number or opening
hours.
You have the following options:
► Tap on (Audio info) in order to start or stop the description
being read out.
► Tap on (Show on map) in order to show the sight on the map.
► Tap on (Save destination) in order to save the sight in the
FAVOURITES list.
► Tap on the picture of the sight to show it in full screen mode.
Tap on the picture again in order to close full screen mode.
► During navigation: Tap on Interim destination on order to insert the
sight as an interim destination.
► If there is no navigation in progress: Tap on Start navigation in
order to start the navigation to this sight.
► Tap on Close in order to close the DESTINATION INFO window again
and return to the map view.
10.8 Sightseeing tours
Sightseeing tours are predefined routes with destinations of scenic,
cultural or touristic interest which are sorted according to various
categories.
Note: The navigation software contains only a limited number of
sightseeing tours. An update with more than 100 sightseeing tours can
be purchased via Fresh. You can download the Fresh software free of
charge from the website www.garmin.com/pid.
Page 92

User’s manual maps + more
- 92 - Useful functions
1. In the NAVIGATION window tap on More functions > Sightseeing
tours.
The SIGHTSEEING TOURS window opens.
2. Enter the country in which you want to search for sightseeing tours
(refer to "Specifying a destination" on page 34).
3. Select a category from which you would like to find a route.
The N
AME list opens. It contains routes from the specified category,
sorted alphabetically.
4. Tap on the name of the route.
The D
ETAILS OF THE ROUTE window opens.
It shows the name of the route, the length of the route, the
estimated driving time and a short description of the route.
► Tap on Info to receive a detailed description of the route.
Tap on Close to reopen the DETAILS OF THE ROUTE window.
On the Begin at… button you are told at which route point the route
starts:
► First: You are guided from your current position to the advised
starting point of the sightseeing tour. Navigation on the selected
tour then begins.
► Nearest: You are guided from your current position to the most
favourable starting point for the selected tour. Navigation on the
selected tour then begins.
The most favourable starting point is
► for a round trip: the nearest point on the route.
► for any other trip: the nearest end point (start or destination) of
the route.
5. Tap on Begin at… in order to select the alternative setting.
6. Tap on Plan route.
The ROUTES AND TRACKS window will open (see also "Tracks and
multi-leg routes" on page 52).
Here you can obtain an overview of the various legs of the selected
tour and of the order the legs will follow.
You can also edit the various legs. You can add new legs, delete legs
and change their order. For details of how to edit the route refer to the
chapter "Tracks and multi-leg routes" on page 52.
► Tap on Show route.
The map opens in Preview mode and you can start the navigation
on the route.
Page 93
User’s manual maps + more
Useful functions - 93 -
Detailed information about starting the navigation and about the map in
Preview mode can be found in the chapter "Map in Preview mode" on
page 63.
10.9 Direct help
If you arrive at the scene of an accident or have an accident yourself, it
may be necessary to call for emergency aid and to give the answering
office your current location.
► In the NAVIGATION window, tap on Options > Direct help.
If you are currently in a navigation:
► Tap on More functions > Services > Direct help.
The DIRECT HELP window opens.
If GPS reception is good enough, the address and the geographic
coordinates of your current location will be indicated.
► Tap on (Show on map) if you want to view your current
location on the map.
In the bottom half of the window you will find the buttons for
4 categories: Petrol station, Police station, Hospital, Pharmacy.
► Tap on the corresponding button.
The nearest help point in the selected category will be indicated.
You are shown the name, address, phone number (if known) and
distance of the help point from your current location.
You have the following options:
► Tap on the Map button in order to see your location and the help
point on the map. This gives you an overview of the route to the
help point.
► Tap on Start navigation. You will then be guided directly to the
displayed help point.
► Tap on the Call button to call the phone number indicated.
Note: The Call function is only available when the navigation system is
connected via Bluetooth to a mobile phone.
For details of how to connect to a mobile phone refer to chapter
"Bluetooth connection" on page 141.
► You can use the (Up) and (Down) buttons to select other
help points in the selected category.
The help points are sorted by distance from your current position.
► Use the (Back) button to return to the DIRECT HELP
window.
Page 94
User’s manual maps + more
- 94 - Useful functions
Note: Only those help points are displayed which are situated no further
than than 30 mi from your position.
10.10 GPS status, saving the current location
In the GPS STATUS window you will find an overview of the data the
navigation system calculates from the GPS signals it receives.
The GPS status can be accessed from the options button in many
windows.
► Tap on Options > GPS status.
The current location can be saved in the FAVOURITES list.
1. Tap on Save Position.
The SAVE DESTINATION AS dialog box opens.
2. Enter a name for the destination.
3. Tap on Save.
10.11 Block
You can block a leg of the route at any time during a navigation, i.e. to
re-calculate the route in order to avoid the leg, e.g. if you have heard on
the radio of a traffic jam affecting this section.
Note: The block is valid only for the current navigation. It no longer
exists on a new navigation.
You are currently in a navigation. The map is open in Navigation mode.
1. Tap on Options.
Buttons with various functions will be displayed.
2. Tap on Block.
The BLOCK menu opens. It contains buttons with different distance
values.
3. Select the distance you want to block.
Note: If you are currently driving on a motorway, the alternative route
will begin at the next exit. Indicated on the buttons is the junction up to
which the block extends.
The system recalculates the route. The blocked route section will be
avoided. It is marked on the map in red.
Unblocking a route section
► Tap on Options > Unblock.
The block will be lifted. The system recalculates the route. The unblocked route section can now be integrated into the calculation.
Page 95
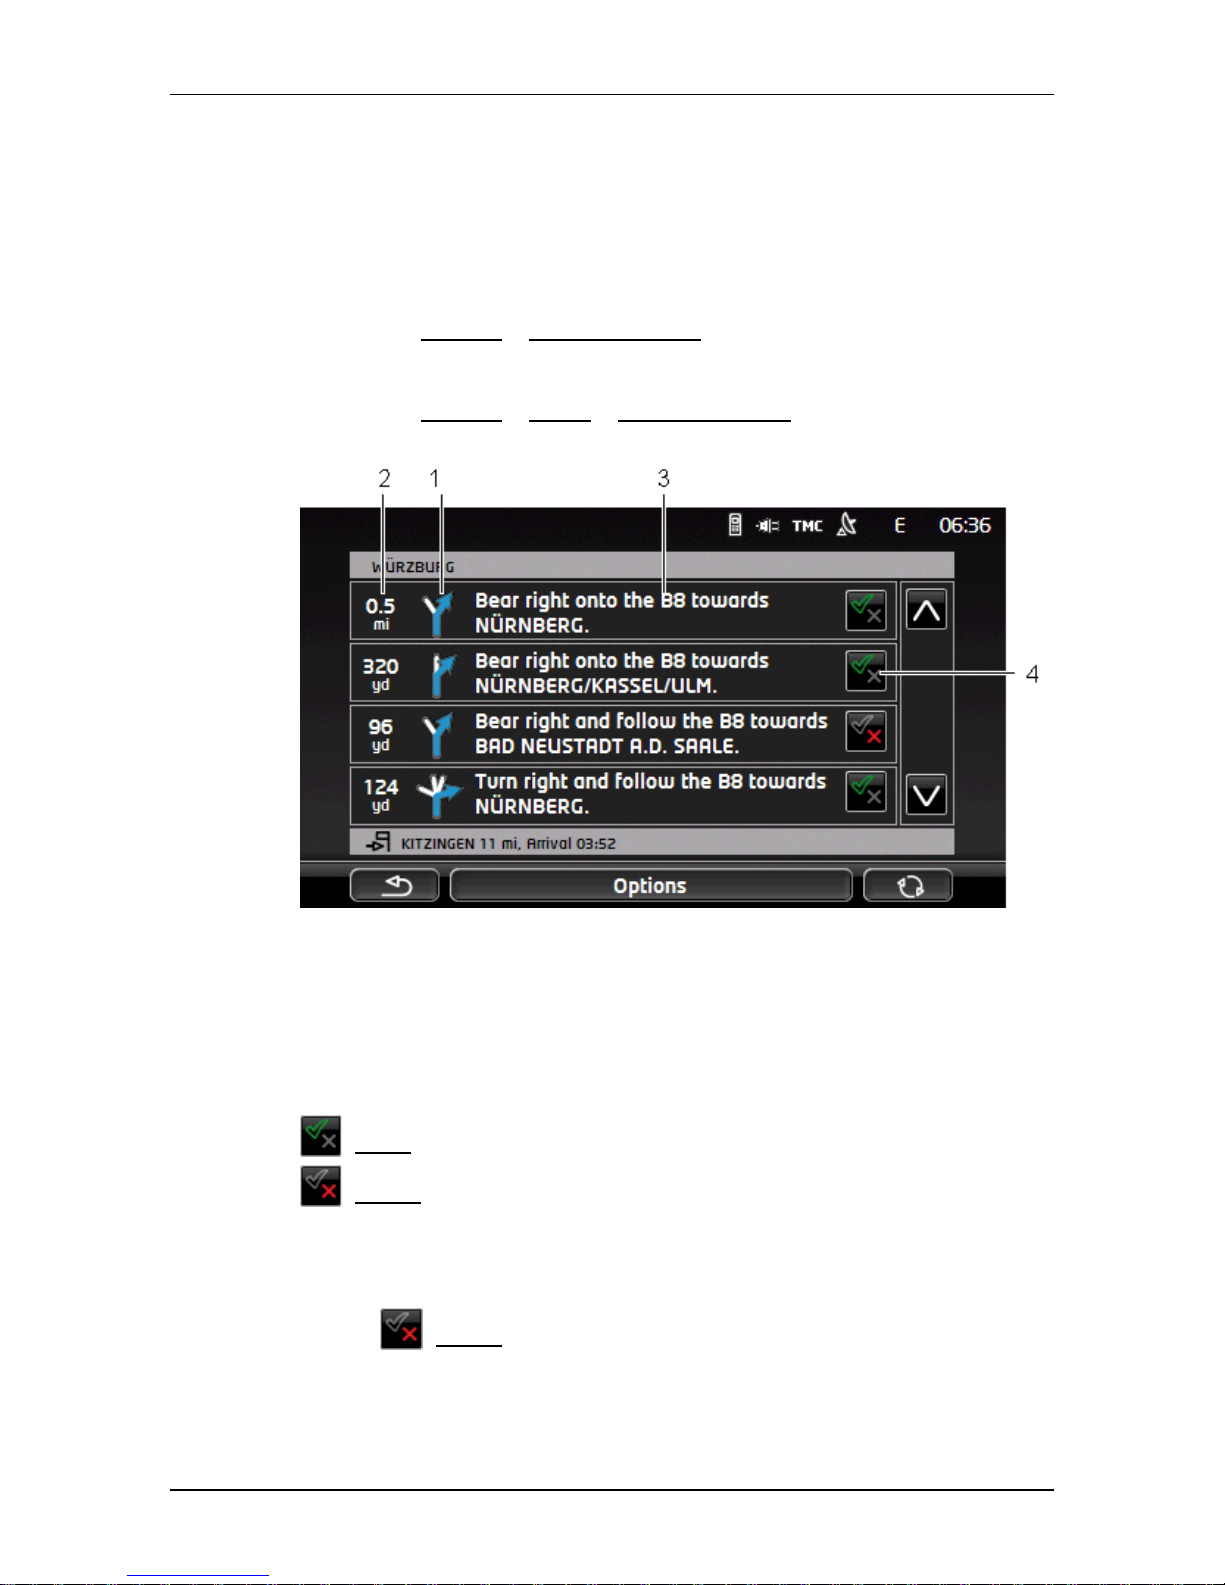
User’s manual maps + more
Useful functions - 95 -
10.12 Turn-by-Turn list
You can display detailed directions of the calculated route before
starting navigation or at any time during navigation. This list displays all
of the driving instructions in table form.
The map is open in Preview mode:
► Tap on Options > Turn-by-Turn list.
The map is open in Navigation mode or in Reality View mode:
► Tap on Options > Route > Turn-by-Turn list.
The TURN-BY-TURN LIST window opens.
1 Schematic depiction of the next junction where you must make a turn.
2 Distance to this junction.
3 Route instruction and if available the name of the street into which you
must turn.
4 Indicates whether you want to drive on the route section in question or
not.
(Allow): The section in question is allowed on the route.
(Forbid): The section in question is not allowed on the route.
Blocking route sections
1. Tap on the route sections that you do not want to travel on so that
the (Forbid) symbol appears next to them.
Page 96
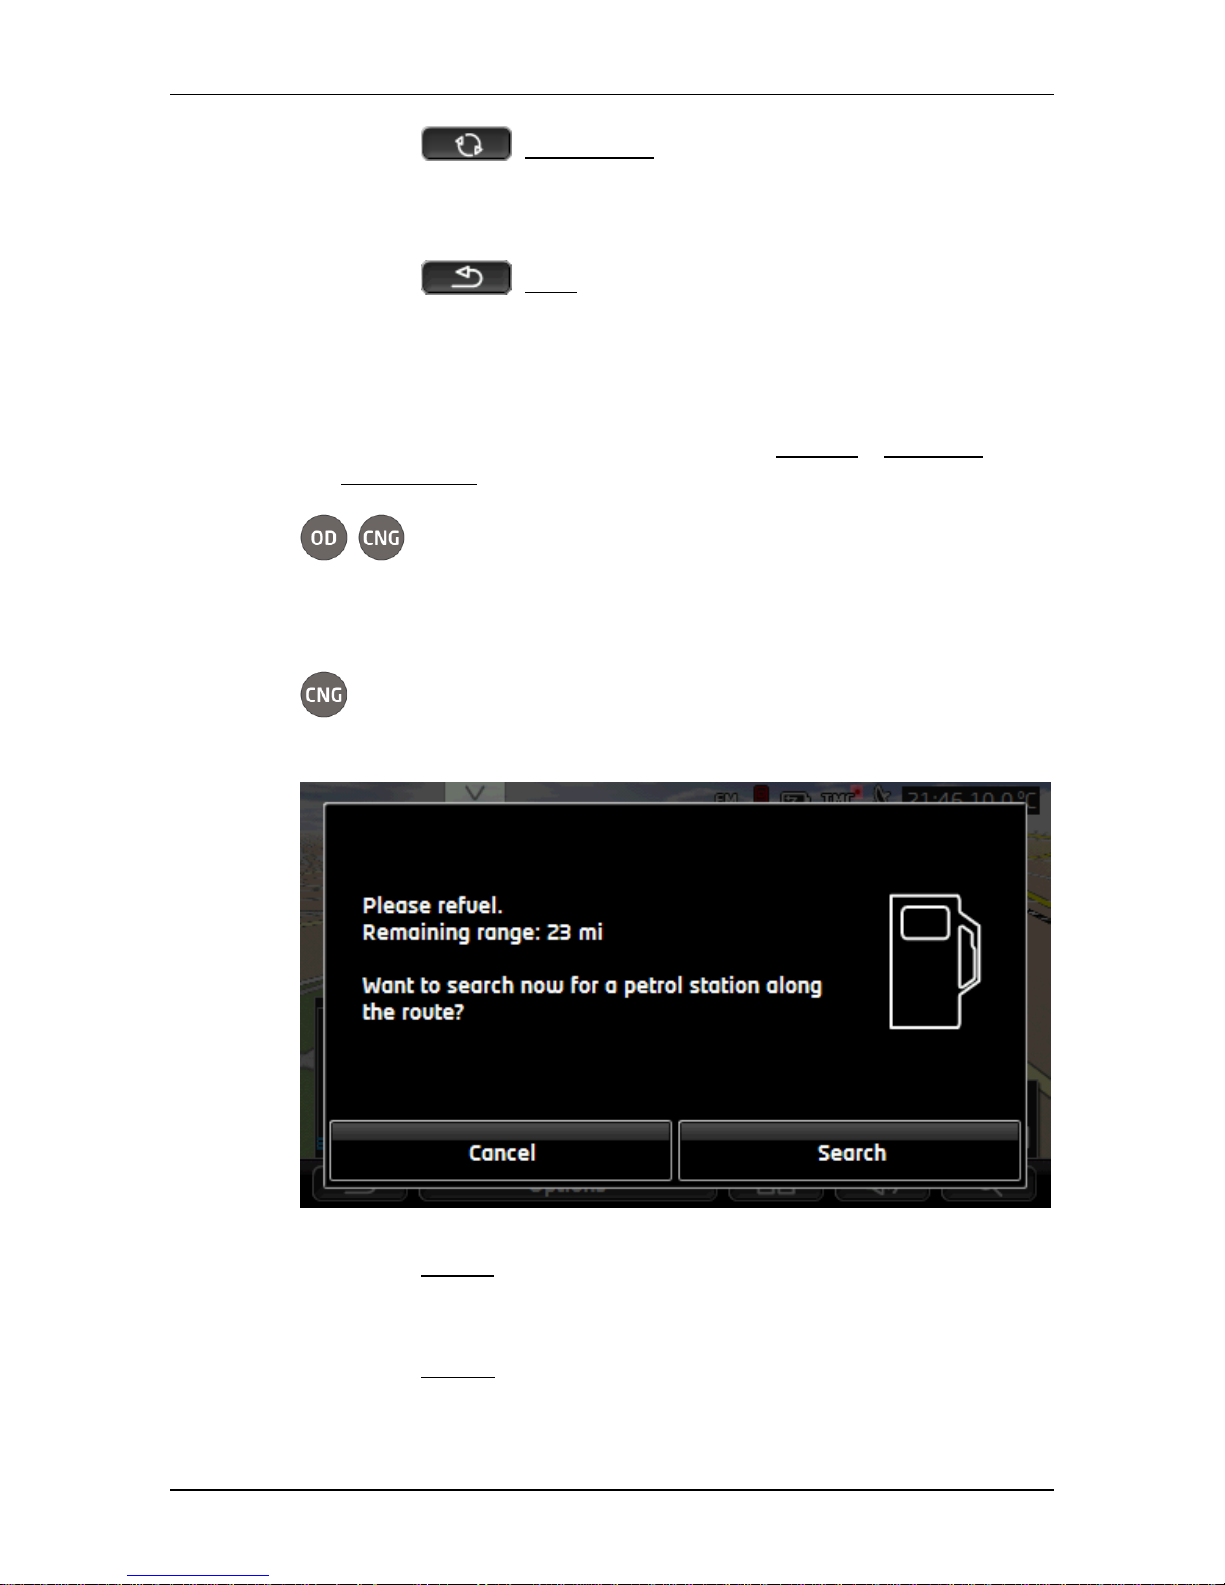
User’s manual maps + more
- 96 - Useful functions
2. Tap on (Modify route).
The navigation system calculates an alternative route avoiding the
route sections selected. The new driving instructions are displayed
in the T
URN-BY-TURN LIST window.
3. Tap on (Back) in order to close the T
URN-BY-TURN LIST
window again.
Removing blocks and using original routes
Section blocks can be removed at any time.
► In the TURN-BY-TURN LIST window, tap on Options > Calculate
original route.
10.13 Low fuel warning
The low fuel warning is active when the map is opened in Standard
mode or in Navigation mode. It appears as soon as the reserve fuel
tank indicator appears on the vehicle's instrument panel.
On CNG vehicles the low fuel warning can appear for the CNG
tank as well as for the petrol tank. The system then searches for a
suitable refuelling station.
The indicated remaining range depends on the current consumption.
► Tap on Cancel if you do not want to buy more fuel until later.
While navigation is in pr o gress (map in Navigation mode)
1. Tap on Search if you want to drive to a petrol station now.
The POIS ON YOUR ROUTE list opens. It shows the nearest petrol
stations along your route.
Page 97
User’s manual maps + more
Useful functions - 97 -
2. Tap on the name of the petrol station you want to drive to.
The petrol station will be inserted as an interim destination.
Navigation to this station will start. Navigation to the original
destination will be continued after you have bought more petrol.
No navigation in progress (map in Standard mode)
1. Tap on Search if you want to drive to a petrol station now.
The POI NEARBY window opens. It shows petrol stations in your
vicinity.
2. Tap on the name of the petrol station you want to drive to.
Navigation to the petrol station starts.
10.14 Optical parking system (OPS), Parking assistant
Note: Parking assistance is available only when the corresponding
sensors are fitted to the vehicle. Some vehicles have sensors only at
the rear, others can divide the space in front of or behind the vehicle
into different numbers of zones. Parking assistance varies from vehicle
to vehicle and can differ therefore from the description used in this
chapter. However, it always works in the way described here.
Note: Information about parking assistance can also be found in the
user manual issued for your vehicle, in section "OPS" or "Optical
parking system".
Parking assistance gives you assurance when manoeuvring,
particularly when parking. It indicates the distance and the position of
obstacles in front of and behind the vehicle.
Parking assistance is activated when you drive very slowly or when you
insert the reverse gear.
The space in front of and behind the vehicle is divided into several
zones. Each zone is monitored by a sensor.
Page 98
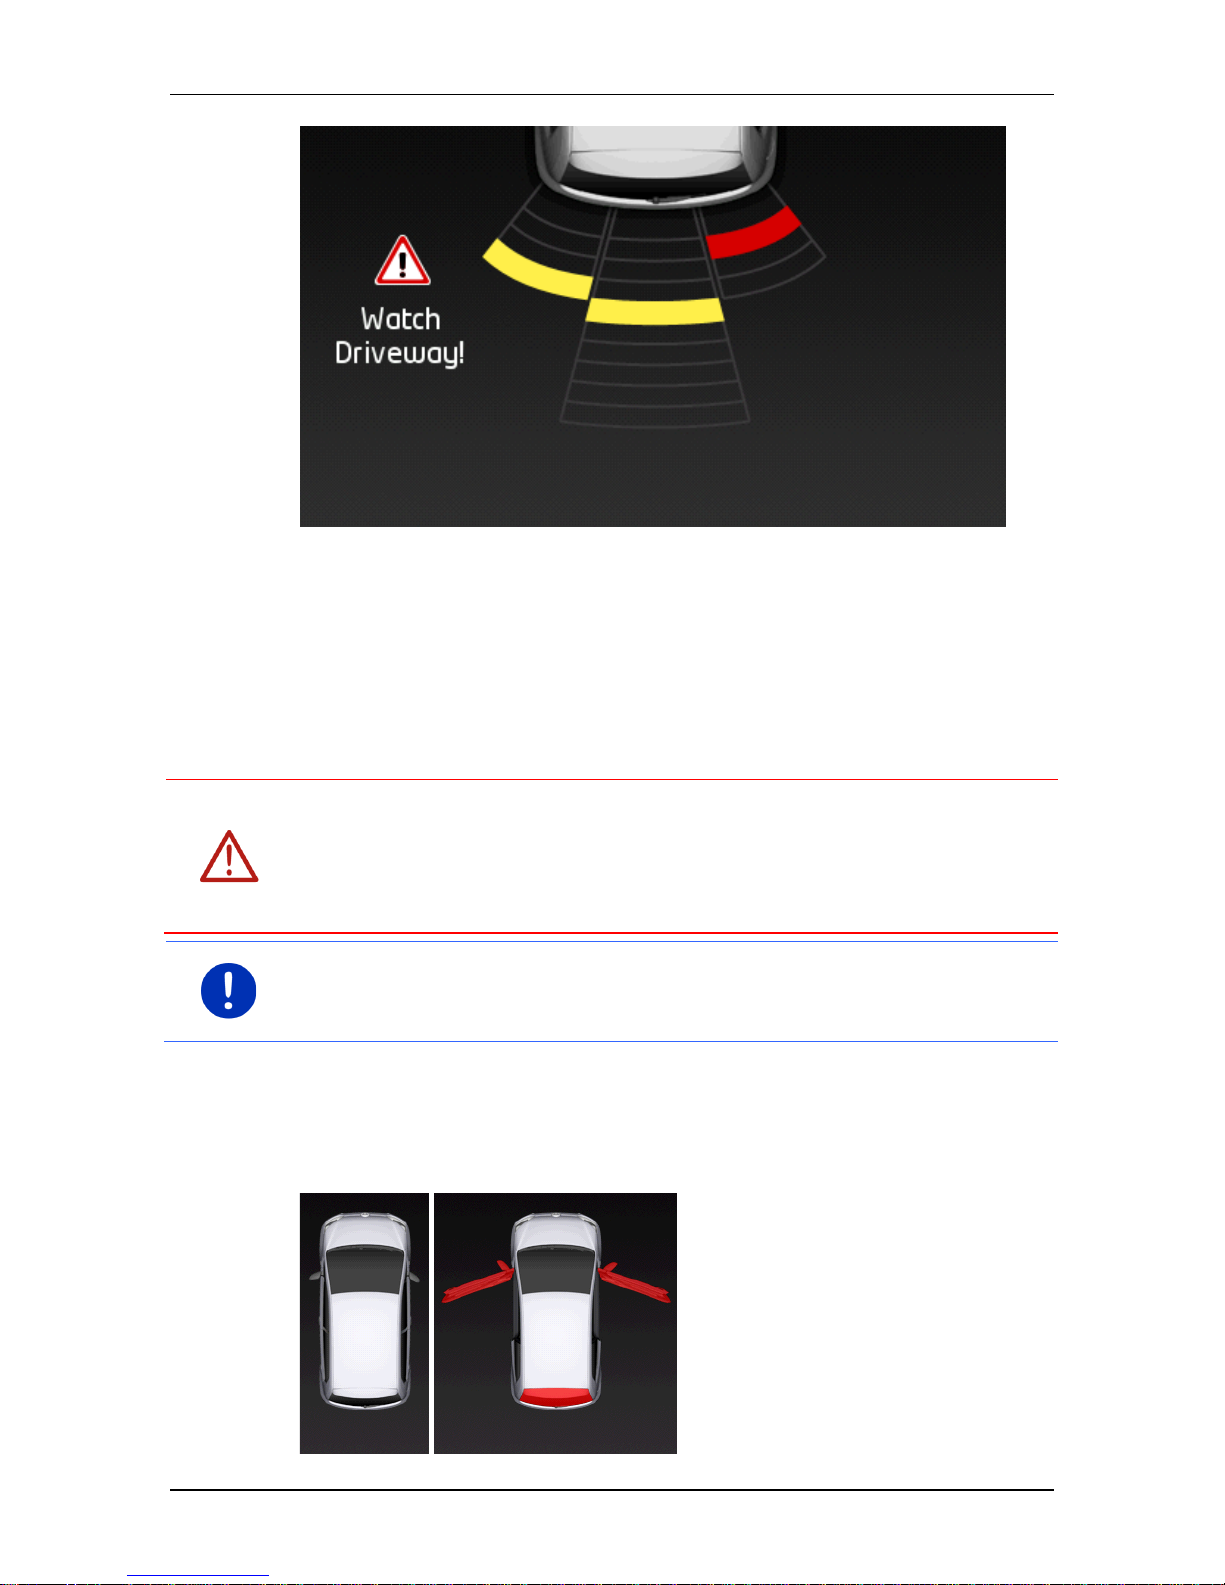
User’s manual maps + more
- 98 - Useful functions
When you approach an obstacle, the distance to each of the sensors is
indicated visually by yellow bars. As soon as you get very close to the
obstacle, the bars turn red.
At the same time an audible warning is given as soon as the first
coloured bar appears. The audible warning comprises a sequence of
high-pitch tones. The closer the obstacle, the faster the sequence of
tones. When the first red bar appears, you will hear a continuous tone.
► Tap on the screen to hide the parking assistance..
Caution! It is possible that the distance from very narrow, pointed or
very low obstacles will not be correctly indicated. Similarly it is possible
that high obstacles such as branches will not be detected. Use of the
parking assistance does not release the driver from his duty to exercise
all due care.
Note: The optical and acoustic parking assistance is interrupted when a
mobile phone is connected to the navigation device and a call is
received.
10.15 Door monitoring
The door monitoring function always warns you when a door in your
vehicle is open.
Page 99
User’s manual maps + more
Useful functions - 99 -
When a door is open, it is pictured as open and highlighted in colour.
► Tap on the screen to hide the door monitoring.
Caution! Door monitoring does not release the driver from his duty to
exercise all due care.
Note: The door monitoring function is interrupted or suppressed
► when a mobile phone is connected to the navigation device and a
call is received,
► when parking assistance is active.
10.16 Special functions for electric vehicles
10.16.1 Multi-Stop route
Note: This function is available only when
► the navigation device is correctly inserted in its cradle.
► the vehicle ignition is on.
► GPS reception is good enough to determine the current position.
The Multi-Stop route considers charging stations along the route and
includes essential charging stops in the route calculation if the
destination is not within range. Consideration is given to all private
charging stations (Favourites) as well as to the public charging stations
recorded in the map.
Calculation of a Multi-Stop route is offered in the following
circumstances:
► With the vehicle's current driving range you cannot reach the
destination.
► With the vehicle's current driving range you can reach the
destination, but from there you cannot reach a charging station.
Before navigation begins you will be presented with a window in which
you can choose between a Multi-Stop route or the current route.
► Tap on Multi-Stop route to have the system calculate a route with
the necessary charging stops.
Note: If the destination of the Multi-Stop route is not saved as a public
or private charging station, you will be asked at the beginning of the
navigation whether you can charge your vehicle there (see "Saving the
destination of a Multi-Stop route as a private charging station" on
page 102).
Note: The calculation of a Multi-Stop route can take far longer than the
calculation of a normal route.
Page 100
User’s manual maps + more
- 100 - Useful functions
Note: If there is only a sparse network of charging stations in the region
in which you are travelling, it may be impossible to calculate a MultiStop route.
If you have entered a complete address or a POI as destination, you
can also define whether your vehicle can be charged there. For more
details refer to the chapter "Private charging stations" on page 101.
Traffic information
If a new traffic message concerning the Multi-Stop route arises while
navigation is in progress, the Traffic information button will appear at
the right edge of the screen. This traffic message will be treated in
automatic mode (see "Preview TMC" in the section "Recalculate route:
Automatically" on page 106).
10.16.2 Driving range warning
Note: This function is available only when:
► GPS reception is good enough for positioning purposes
► the navigation device is correctly inserted in its cradle.
► the vehicle ignition is on.
► range warning was activated in the settings.
The system continuously calculates the current range and warns if there
will be only a small driving range remaining when you arrive at the
destination, at the next interim destination or at the next charging
station.
Note: The remaining driving range can be viewed at any time in the
TRIP COMPUTER window.
► In the START window tap on Car info > Trip computer (see also "Trip
computer" on page 111).
Activating the range warning
1. In the NAVIGATION window tap on Options > Settings > Navigation.
2. Set the Driving range warning setting to Yes.
Range warning during navigatio n
You will be warned if one of the following cases arises:
► There is only one more charging station or the home address within
range
► The next charging station and the home address are out of range
 Loading...