

Page 1
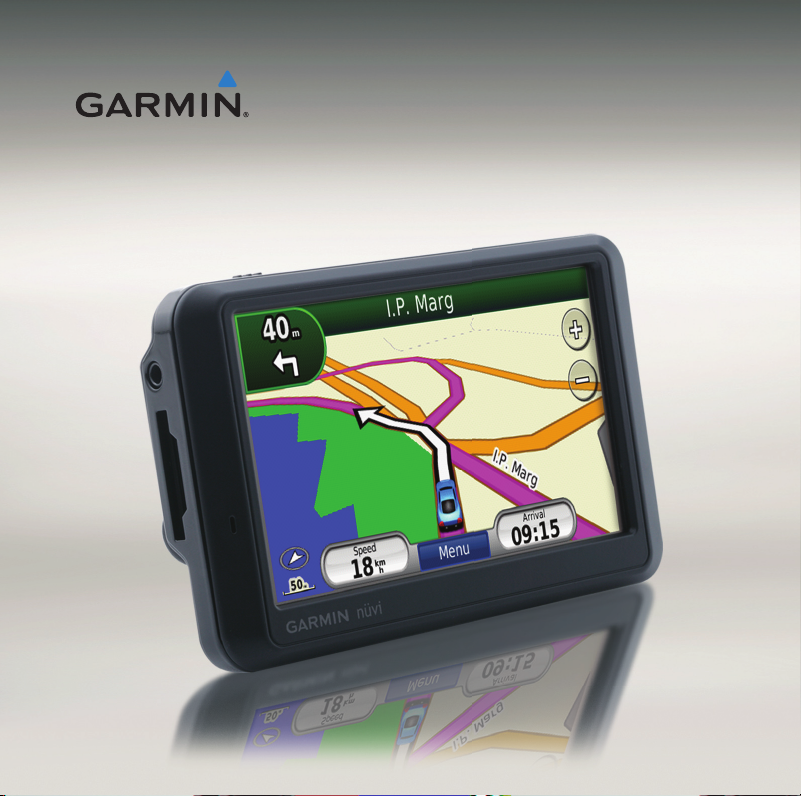
nüvi® 715 series
owner’s manual
Page 2

© 2008–2009 Garmin Ltd. or its subsidiaries
Garmin International, Inc.
1200 East 151st Street,
Olathe, Kansas 66062, USA
Tel. (913) 397.8200 or
(800) 800.1020
Fax (913) 397.8282
Garmin (Europe) Ltd.
Liberty House, Hounsdown Business Park,
Southampton, Hampshire, SO40 9RB, UK
Tel. +44 (0) 870.8501241 (outside the UK)
0808 2380000 (within the UK)
Fax +44 (0) 870.8501251
Garmin Corporation
No. 68, Jangshu 2nd Road,
Shijr, Taipei County, Taiwan
Tel. 886/2.2642.9199
Fax 886/2.2642.9099
All rights reserved. Except as expressly provided herein, no part of this manual may be reproduced, copied,
transmitted, disseminated, downloaded or stored in any storage medium, for any purpose without the express prior
written consent of Garmin. Garmin hereby grants permission to download a single copy of this manual onto a hard
drive or other electronic storage medium to be viewed and to print one copy of this manual or of any revision hereto,
provided that such electronic or printed copy of this manual must contain the complete text of this copyright notice
and provided further that any unauthorized commercial distribution of this manual or any revision hereto is strictly
prohibited.
Information in this document is subject to change without notice. Garmin reserves the right to change or improve its
products and to make changes in the content without obligation to notify any person or organization of such changes
or improvements. Visit the Garmin Web site (www.garmin.co.in) for current updates and supplemental information
concerning the use and operation of this and other Garmin products.
®
Garmin
, the Garmin logo, MapSource®, and nüvi® are trademarks of Garmin Ltd. or its subsidiaries, registered in
the USA and other countries. Garmin Lock™ and myGarmin™ are trademarks of Garmin Ltd. or its subsidiaries. These
trademarks may not be used without the express permission of Garmin.
The Bluetooth® word mark and logos are owned by the Bluetooth SIG, Inc., and any use of such name by Garmin is
under license. Windows® is a registered trademark of Microsoft Corporation in the United States and other countries.
Mac® is a registered trademark of Apple Computer, Inc. Audible.com® is a registered trademark of Audible, Inc. ©
Audible, Inc. 1997–2008. SD™ is a trademark of the SD Card Association. Google and Panoramio are trademarks of
Google Inc. Other trademarks and trade names are those of their respective owners.
March 2009 Part Number 190-00955-25 Rev. A Printed in Taiwan
Page 3

Introduction
Introduction
Manual Conventions
When you are instructed to “touch”
something, use your nger to touch an
item on the screen.
The small arrows (>) used in the text
indicate that you should touch a series
of items. For example, if you see “touch
Where To? > Favourites” you should
touch Where To?, and then touch
Favourites.
Contact Garmin
Contact Garmin if you have any
questions while using your nüvi.
Go to www.garmin.co.in and click
Contact Support for regional support
information.
You may also contact Garmin local
dealer for product support.
myGarmin™
Go to http://my.garmin.com to access the
latest services for your Garmin products:
nüvi Tips and Shortcuts
To quickly return to the Menu page, •
touch and hold Back.
Touch •
choices. Touch and hold to scroll
faster.
and to see more
Register your Garmin unit.•
Unlock optional maps.•
nüvi 715 Series Owner’s Manual i
Page 4

ii nüvi 715 Series Owner’s Manual
Introduction
Table of Contents
Introduction .....................................i
Manual Conventions .......................... i
nüvi Tips and Shortcuts .....................i
Contact Garmin ................................. i
myGarmin™ .......................................i
Getting Started ...............................1
Step 1: Mount the nüvi .....................2
Step 2: Congure the nüvi ................3
Step 3: Acquire Satellites .................3
Step 4: Use the nüvi .........................3
Finding Your Destination ..................4
Following Your Route .......................5
Adjusting the Volume ........................6
Where To? ......................................7
Searching Near Another Location ....7
Go! Page Options .............................7
Finding an Address ...........................8
Finding a Place by Spelling the
Name ...............................................8
Setting a Home Location ..................9
Finding Recently Found Places ......10
Favourites .......................................10
Using Custom Routes ....................12
Finding a Place Using the Map ......13
Entering Coordinates ......................14
Using the Main Pages .................15
Map Page .......................................15
Trip Computer .................................15
Turn List Page ................................16
Next Turn Page ..............................16
Using Hands-free Calling ............ 17
Pairing Your Devices ......................17
Pairing Your Phone Using the
Phone .............................................18
Pairing Your Phone Using the
nüvi .................................................18
Receiving a Call ............................18
In a Call .........................................18
Phone Menu ...................................19
Using the Media Players .............21
Using a Wireless Headset ..............21
Playing Music .................................21
Listening to Audible Books .............24
Managing Files .............................25
Supported File Types......................25
Loading Files ..................................25
Deleting Files .................................25
Using the Tools ............................27
Settings ..........................................27
Page 5

nüvi 715 Series Owner’s Manual iii
Introduction
Where Am I? ...................................27
Help ................................................27
Media Player ..................................27
Picture Viewer ................................28
Custom Routes ...............................28
My Data ..........................................28
World Clock ...................................28
Language Guide .............................28
Calculator ......................................30
Unit Converter ...............................30
Playing Audio Through Your
Vehicle Speakers .........................31
Frequency Selection Tips ...............31
FM Transmitter Information ............31
Customising the nüvi ..................33
Changing the System Settings .......33
Changing the Navigation Settings ..34
Adjusting the Display Settings ........34
Updating the Time Settings ............35
Setting the Languages ...................35
Changing the Map Settings ............35
Adding Security ..............................36
Bluetooth Technology Settings .......36
Changing the Proximity Points
Settings ..........................................37
Restoring All Settings .....................37
Appendix ......................................38
Ways to Charge Your nüvi ..............38
Calibrating the Screen ....................38
Locking Your nüvi ...........................38
Additional Maps ..............................39
Updating the Software ....................39
Extras and Optional Accessories ....39
Battery Information ........................40
Changing the Fuse .........................40
About GPS Satellite Signals ...........41
Mounting on Your Dashboard .........41
Removing the nüvi and Mount ........42
Caring for Your nüvi .......................42
Declaration of Conformity ...............43
Software License Agreement .........44
Specications .................................45
Troubleshooting ..............................46
GPS Beginner’s Guide ................49
Introduction ..................................49
What is GPS .................................49
Space Segment ..............................50
How Does GPS Technology
Work?
........................................... 51
Who Uses GPS? ..........................52
Agriculture ......................................52
Page 6

iv nüvi 715 Series Owner’s Manual
Introduction
Aviation ...........................................52
Environment ..................................52
Ground Transportation ...................52
Marine ............................................52
Military ............................................53
Public Safety .................................53
Rail .................................................53
Recreation ......................................53
Space .............................................53
Surveying .......................................53
Timing .............................................53
How Accurate Is GPS? ...................53
WAAS/EGNOS ...............................54
Sources of Errors ...........................55
Buying a GPS Receiver ............... 55
Complementary Navigation Aids ....55
Page 7
nüvi 715 Series Owner’s Manual 1
Getting Started
Getting Started
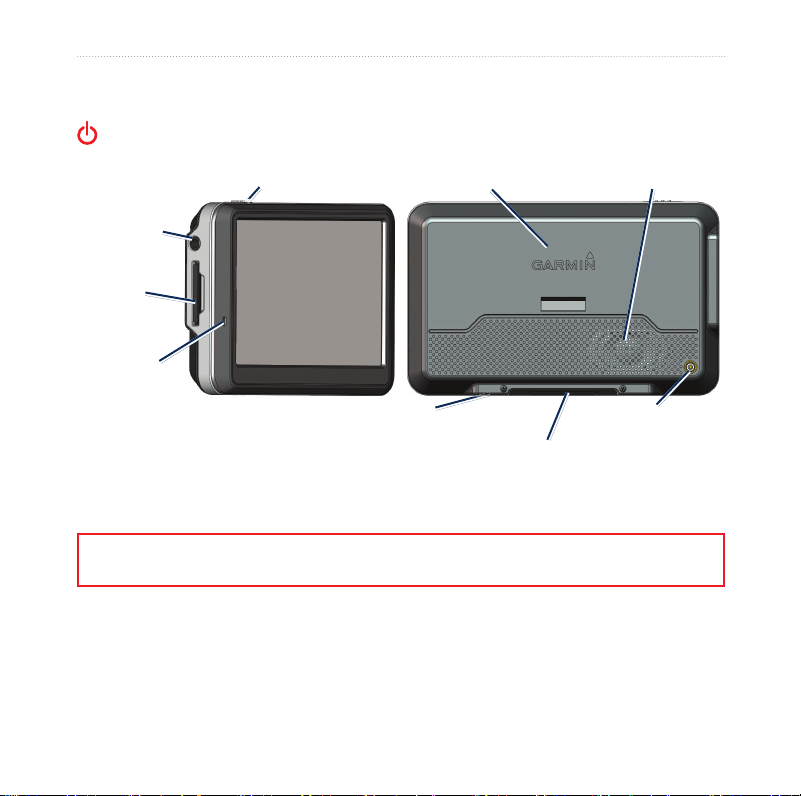
Power key:
slide to the left to turn on/off the unit;
slide to the right to lock the screen
Headphone/
audio out jack
SD™ card
slot
Microphone
SpeakerGPS antenna
Mini-USB
connector
Serial number (remove
cradle to view serial number)
WARNING: This product contains a lithium-ion battery. To prevent damage, remove the unit from the
vehicle when exiting or store it out of direct sunlight.
External antenna
connector
Page 8
2 nüvi 715 Series Owner’s Manual
Getting Started
Step 1: Mount the nüvi
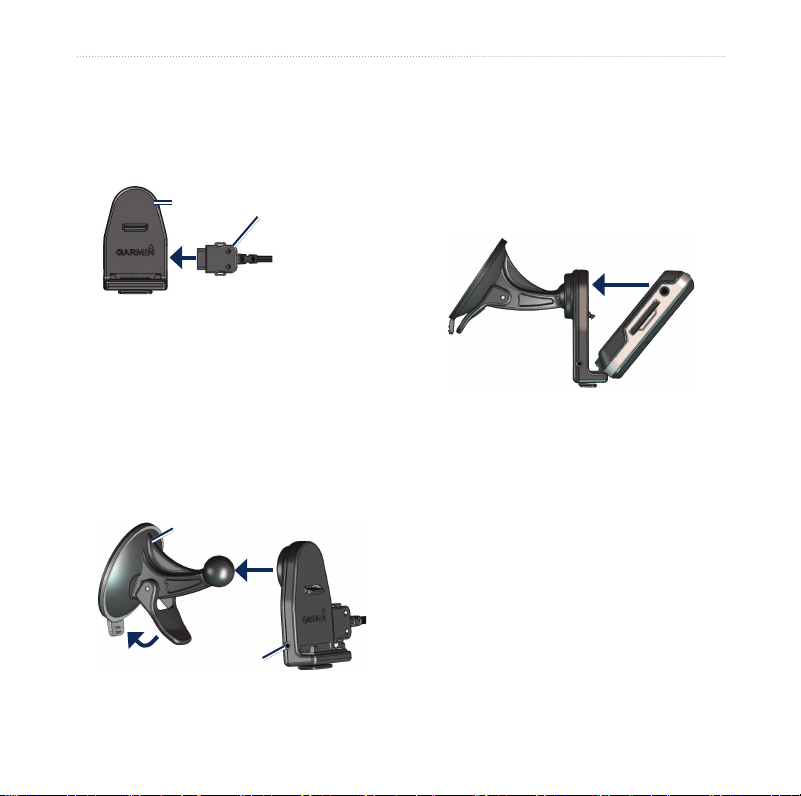
5. Snap the cradle onto the suction cup
1. Plug the vehicle power cable into the
power connector on the right side of
6. Fit the bottom of your nüvi into the
the cradle.
Cradle
Vehicle power
cable
7. Tilt the nüvi back until it snaps into
2. Remove the clear plastic from the
suction cup. Clean and dry your
windshield and the suction cup with a
lint-free cloth.
3. Place the suction cup on the
8. Plug the other end of the vehicle
windshield.
4. Flip the lever back, toward the
windshield.
Suction cup mount
Microphone jack
arm.
cradle.
place.
power cable into a power outlet in
your vehicle.
Page 9
nüvi 715 Series Owner’s Manual 3
Getting Started
Step 2: Congure the
Step 4: Use the nüvi
nüvi
Your unit should turn on automatically
if it is plugged in and your vehicle is
running. To manually turn on your
nüvi, slide the Power key to the left.
Follow the on-screen instructions.
➊
Step 3: Acquire Satellites
1. Go outdoors to an open area, out of
garages, and away from tall buildings.
2. Stop your vehicle, and turn on the
nüvi.
Acquiring satellite signals may take a
few minutes. The bars indicate
GPS satellite strength. When one bar
is green, the nüvi has acquired satellite
signals. Now you can select a destination
and navigate to it.
➋
➌
➍
➎
➏
➐
➑
➒
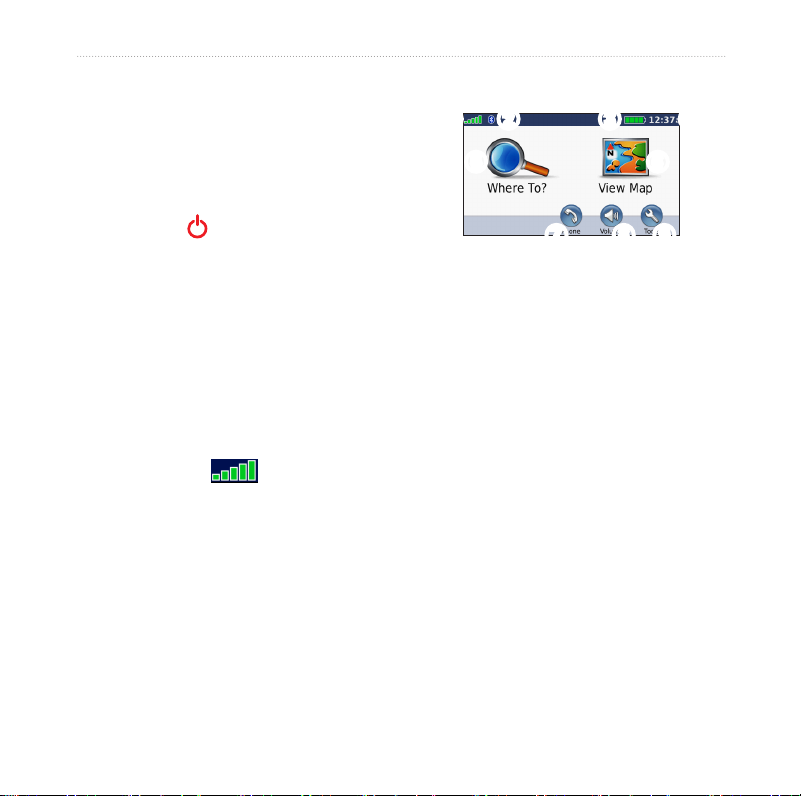
➊ ➋ ➌ ➍
➎
➏
➒➑➐
GPS satellite strength.
Bluetooth® technology status.
Battery status.
Current time.
Touch to nd a destination.
Touch to view the map.
Touch to make a call when
connected to a compatible mobile
phone.
Touch to adjust the volume.
Touch to use the tools such as media
players, settings, and Help.
Page 10
4 nüvi 715 Series Owner’s Manual
Getting Started
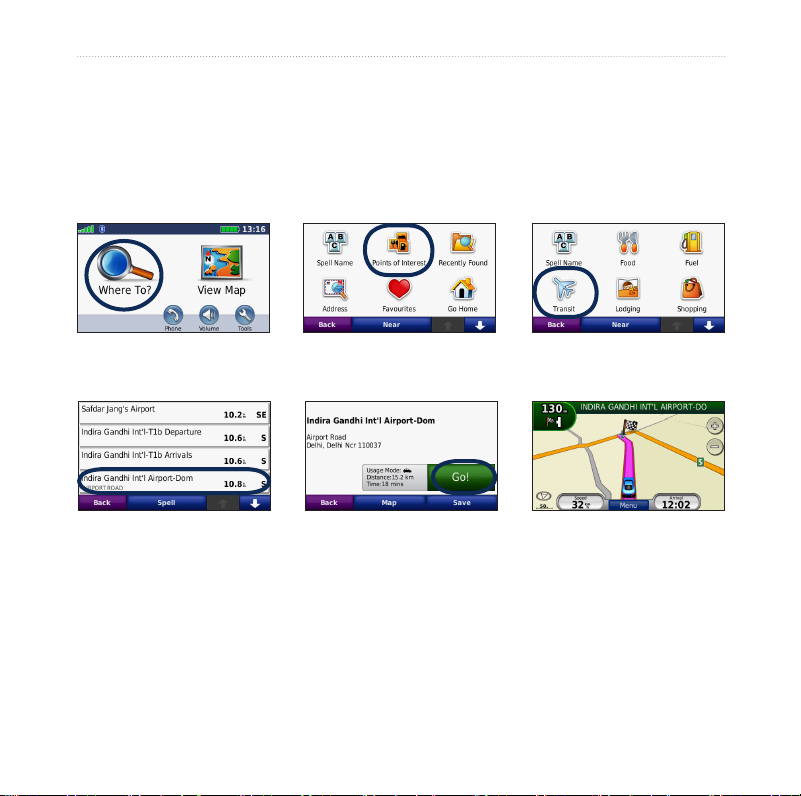
Finding Your Destination
The Where To? menu provides several different categories for you to use when
searching for addresses, cities, and other locations. The detailed map loaded in your
nüvi contains millions of points of interest, such as restaurants, hotels, and auto
services.
➌
➊
Touch Where To?.
➍
Select a destination.
➋
Select a category.
➎
Touch Go!.
Select a subcategory.
➏
Enjoy the route!
Page 11
nüvi 715 Series Owner’s Manual 5
Getting Started
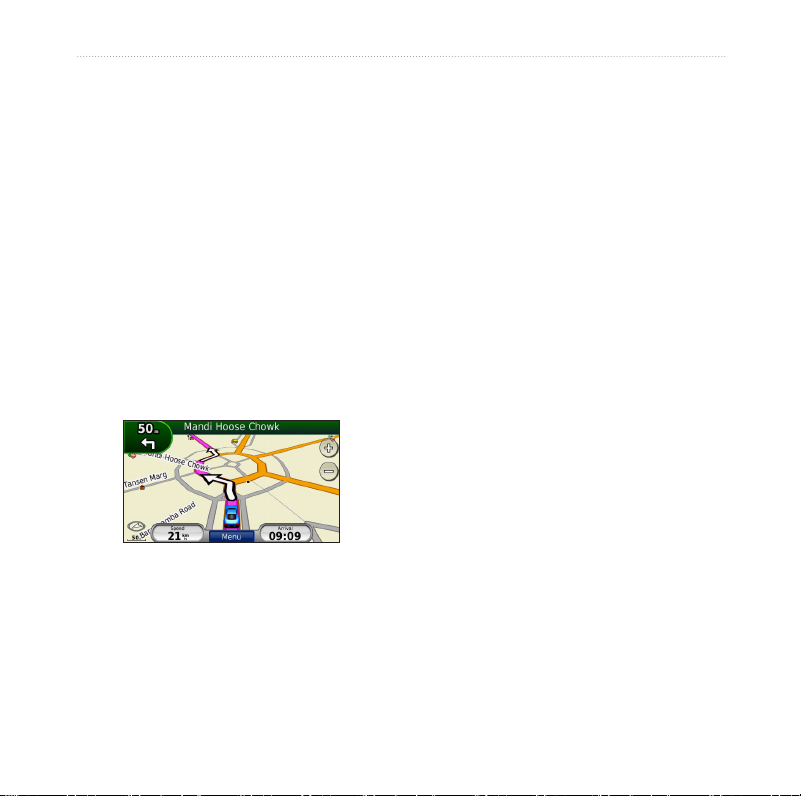
Following Your Route
Your route is marked with a magenta
line. As you travel, your nüvi guides you
to your destination with voice prompts,
arrows on the map, and directions at the
top of the map. The upper-left corner
Adding a Via Point
You can add a stop (Via Point) to your
route. The nüvi gives you directions
to the stop and then to your nal
destination.
1. With a route active, touch Menu >
indicates the distance to your next
maneuver and the lane you should be in
for the maneuver.
If you depart from the original route,
2. Search for the extra stop.
3. Touch Go!.
4. Touch Add As a Via Point to add this
your nüvi recalculates the route and
provides new directions.
If you want to add more than one stop
to the route, edit the current route. See
page 12.
Where To?.
stop before your destination.
Page 12

6 nüvi 715 Series Owner’s Manual
Getting Started
Taking a Detour
If a road on your route is closed, you can
take a detour.
1. With a route active, touch Menu.
2. Touch Detour.
The nüvi attempts to get you back
on your original route as quickly as
possible. If the route you are currently
taking is the only reasonable option, the
nüvi might not calculate a detour.
Stopping the Route
1. With a route active, touch Menu.
2. Touch Stop.
Adjusting the Volume
From the Menu page, touch Volume.
Touch and to adjust the master
volume. Touch Mute to mute all audio.
To adjust the volume levels for the
voice prompts, the media player, and the
phone, touch Mixer. Adjust the levels
as needed. Touch Restore to return the
volume settings to the original levels.
Touch Audio Output to set up the FM
transmitter. See pages 31.
Page 13
nüvi 715 Series Owner’s Manual 7
Where To?
Where To?
The Where To? menu provides
several different categories you can use
to search for locations. To learn how to
perform a standard search, see page 4 .
Searching Near Another
Location
Your nüvi automatically searches for
places near your current location.
1. Touch Where To? > Near.
2. Select an option:
Where I Am Now• —search near
your current location.
A Different City• —search near the
city you enter.
My Current Route• —search along
your route.
My Destination• —search near
your current destination.
3. Touch OK.
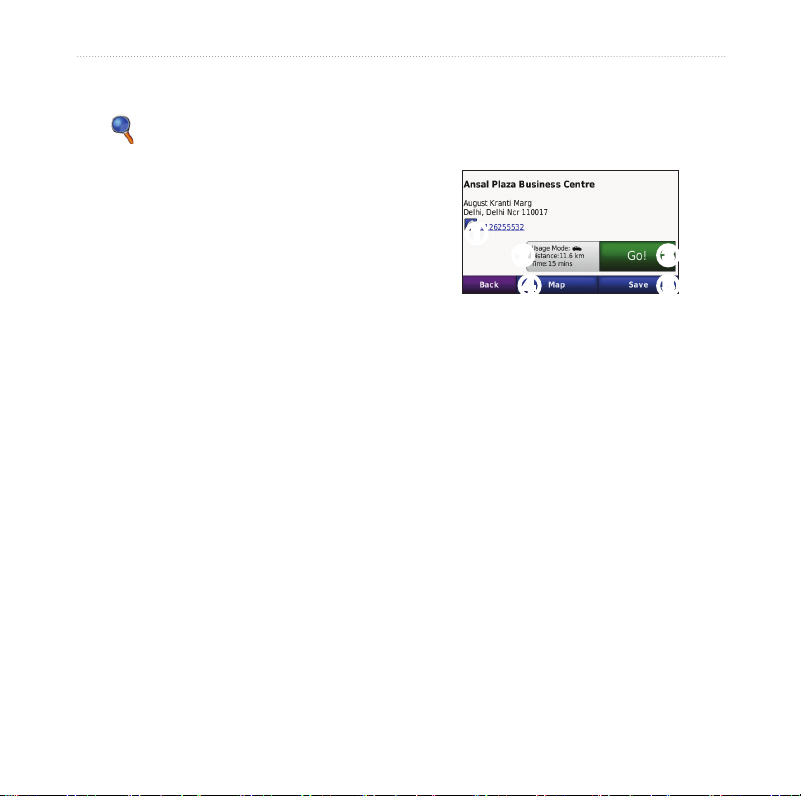
Go! Page Options
Touch an item in the search results list to
view the Go! page.
➊
➌➋
➍
➊
Touch to call this location, if a
mobile phone with Bluetooth
wireless technology is connected
➋
Touch to view the route on a map.
➌
Touch to create a turn-by-turn route
to this location.
➍
Touch to view this location on the
map.
➎
Touch to save this location to your
Favourites. See page 10 .
➎
Page 14

8 nüvi 715 Series Owner’s Manual
Where To?
Finding an Address
The steps to nd an address can vary
depending on the maps that are loaded
on your nüvi.
1. Touch Where To? > Address.
2. Touch Change State or Province, if
necessary.
3. Touch Search All.
OR
Touch Spell City, enter the city, and
touch Done. Select the correct city in
the list.
4. Enter the street name, and touch
Done.
5. Select the correct street in the list, if
necessary.
6. Touch the address, if necessary.
NOTE: The map preloaded does not
support house number search.
Finding a Place by
Spelling the Name
If you know the name of the location you
are looking for, you can spell it using the
on-screen keyboard. You can also enter
letters contained in the name to narrow
the search.
1. Touch Where To? > Points of
Interest > Spell Name.
2. Using the on-screen keyboard, enter
letters in the name.
3. Touch Done.
Page 15
nüvi 715 Series Owner’s Manual 9
Where To?
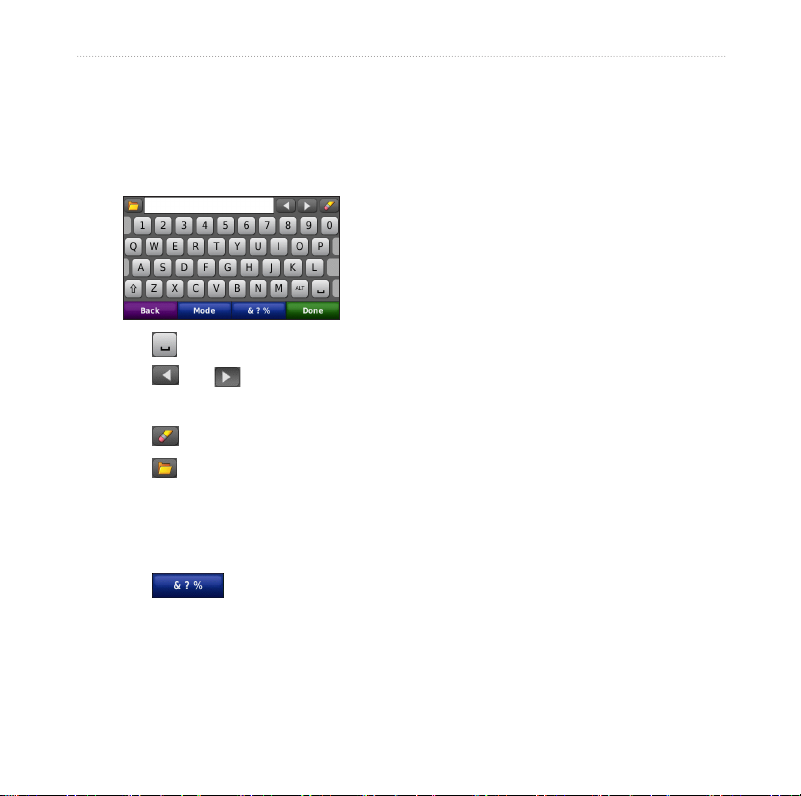
Using the On-Screen
Keyboard
When an on-screen keyboard appears,
touch a letter or number to enter it.
Setting a Home Location
You can set a Home location for the
place you return to most often.
1. Touch Where To? > Go Home.
2. Select an option:
- Enter your address.
- Use your current location.
- Choose from a list of recently
found locations.
Going Home
Touch • to add a space.
Touch •
and to move the
cursor.
Touch •
Touch •
to delete the character.
to select words you have
recently typed and selected.
Touch • Mode to change the keyboard
language mode.
Touch •
to enter special
characters.
After you set your Home location, you
can route to it at any time by touching
Where To? > Go Home.
Changing Your Home
Location
To set a new location as your Home
location, use the Tools menu.
1. Touch Tools > My Data >
Set Home Location.
2. Select an option:
- Enter your address.
- Use your current location.
- Choose from a list of recently
found locations.
Page 16

10 nüvi 715 Series Owner’s Manual
Where To?
Finding Recently Found
Places
Your nüvi stores the last 50 of your
recent nds in the Recently Found list.
The most-recently viewed places appear
at the top of the list. Touch Where To?
> Recently Found to view your recently
found items.
Clearing Recently Found
Places
To remove all places from the Recently
Found list, touch Clear > Ye s . All items
from the list are removed, but this does
not delete the actual place from your
nüvi.
Favourites
You can save places in your Favourites,
so you can quickly nd them and create
routes to them. Your Home location is
also stored in Favourites.
Saving Your Current Location
From the Map page, touch . Touch
Save Location to save your current
location.
Saving Places You Find
1. After you have found a place you
2. Touch OK. The place is saved in
Finding Saved Places
1. Touch Where To?.
2. Touch Favourites.
3. Touch a category. Your saved
want to save, touch Save on the Go!
page.
Favourites.
locations are listed.
Page 17

nüvi 715 Series Owner’s Manual 11
Where To?
Finding Your Last Position
Your Last Position is automatically
saved each time you remove the nüvi
from the cradle when the cradle is
receiving power. Use this feature to nd
your car in a parking lot.
1. Touch Where To?.
2. Touch Favourites > All Favourites >
Last Position.
Your Last Position is overwritten each
time you remove the nüvi from the
cradle when the cradle is receiving
power.
Editing Saved Places
1. Touch Where To? > Favourites.
2. Touch the location you want to edit.
3. Touch Edit.
4. Touch an option to edit the location:
Change Name• —enter a new
name, and touch Done.
• Attach/Change Photo—select a
picture to assign to the location.
To load pictures on your nüvi or
SD card, see pages 25–26.
Change Map Symbol• —touch a
new symbol.
Change Phone Number• —enter a
phone number, and touch Done.
Change Categories• —create and
change the category in which this
location is saved.
• Delete—touch Yes to remove this
item from the Favourites list.
Using Photo Navigation
You can load pictures that include
location information on your nüvi or on
an SD card, and then create routes to
them.
1. Go to http://connect.garmin.com
/photos to download pictures with
location information.
2. Follow the instructions on the Web
site to select and load pictures.
3. Touch Where To? > Favourites >
Panoramio™ Photos. Pictures with
location information are listed.
4. Touch a picture.
Page 18
12 nüvi 715 Series Owner’s Manual
Where To?
Using Custom Routes
Touch Where To? > Custom Routes.
Select the route you want to take, and
touch Go!.
7. Touch Next to calculate your route
and view it on the map.
8. Touch Save to save the route and
exit.
Editing Custom Routes
Creating a Custom Route
Use your nüvi to create and save routes
before your next trip. You can save up to
10 routes.
1. Touch Where To? (or Tools) >
Custom Routes > New.
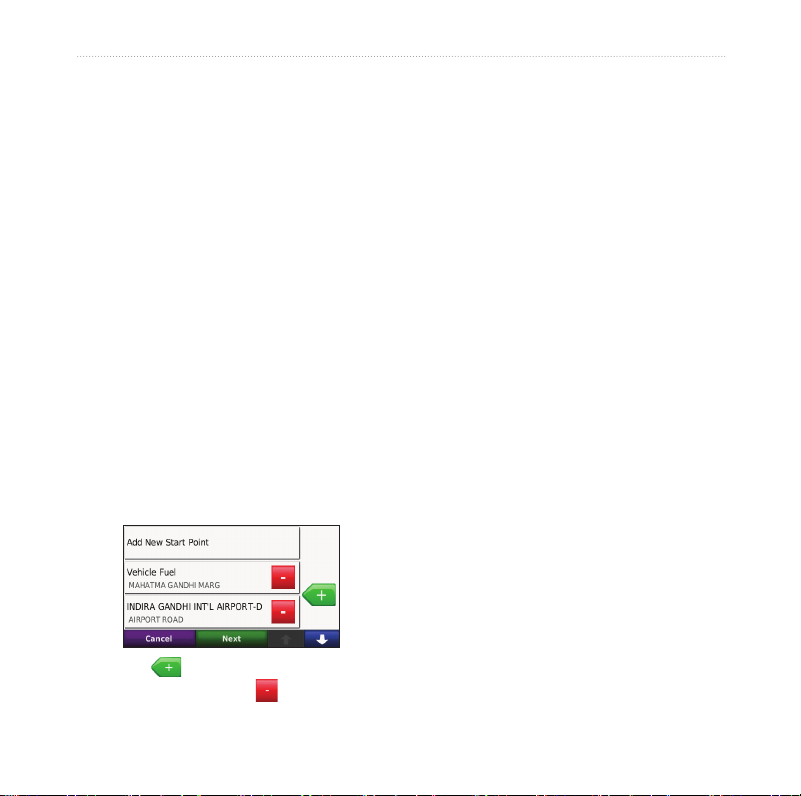
2. Touch Add New Start Point.
3. Find a location for your starting point,
and touch Select.
4. Touch Add New End Point.
5. Find a location for your ending point,
and touch Select.
6. Touch to add another location
to your route. Touch to remove a
location.
1. Touch Where To? (or Tools) >
Custom Routes.
2. Select the route you want to edit.
3. Touch Edit.
4. Touch an option to edit the route:
Change Name• —enter a new
name, and touch Done.
Add or Remove Points• —add or
remove points from the route.
Manually Reorder• Points—
change the order of points along
your route.
Optimally Reorder Points• —
automatically order the points.
Recalculate• —change the route
preference to calculate by faster
time, shorter distance, or off road.
• Delete—remove this route.
Your changes are automatically saved
when you exit any of the route edit
pages.
Page 19
nüvi 715 Series Owner’s Manual 13
Where To?
Finding a Place Using the
Map
To nd a location on the map, touch
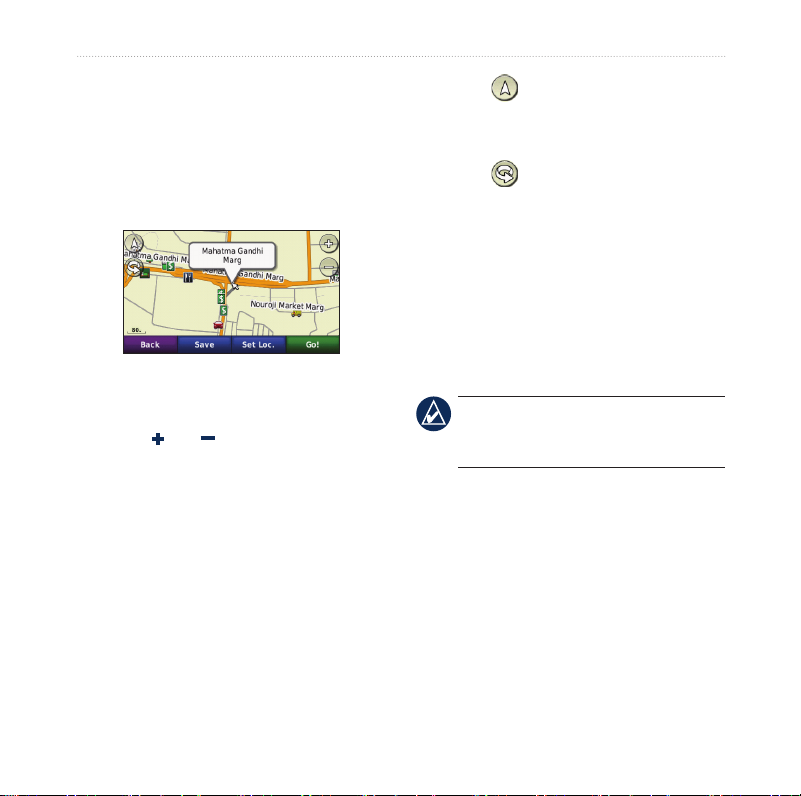
Where To? > Browse Map or touch
anywhere on the map.
Touch and drag to view different •
parts of the map.
Touch •
Touch anywhere on the map. An •
arrow points to the location.
Touch • Save to save this location.
Touch • Go! to navigate to the location.
If the nüvi is in simulator mode, •
touch Set Loc. to set your location to
the selected location. (See page 33 .)
and to zoom in and out.
Touch • to switch between a 3D
( three-dimensional) map and a 2D
( two-dimensional) map.
Touch •
to rotate the viewing angle
in 3D view.
As you zoom out, the map changes to •
a digital elevation map showing the
contours of the area.
Zoom far out to view a globe. Touch •
and spin the globe to quickly nd
different areas of the world.
NOTE: You can only see detailed map
information for areas that you have
maps loaded on your nüvi.
Page 20

14 nüvi 715 Series Owner’s Manual
Where To?
Entering Coordinates
If you know the geographic coordinates
of your destination, you can use your
nüvi to navigate to your destination
using the latitude and longitude
coordinates (or other coordinate
formats). This can be especially helpful
when geocaching.
1. Touch Where To? > Coordinates.
2. Touch Format to select the correct
coordinate format for the type of map
you are using.
3. Touch a direction eld to select a new
direction.
4. Touch a numeric eld to enter the
coordinates, and touch Done.
5. After you have entered the proper
coordinates, touch Next.
Page 21
nüvi 715 Series Owner’s Manual 15
Using the Main Pages
Using the Main Pages
Map Page
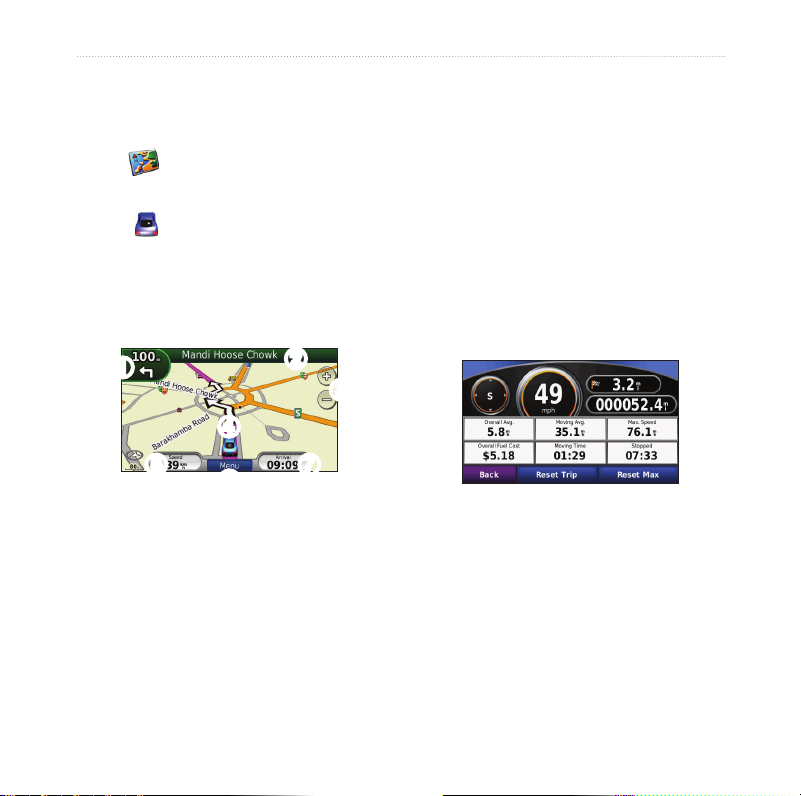
Touch
page.
View Map to view the Map
The • vehicle icon shows your
current location.
Touch and drag the map to view a •
different area of the map (see page
13 ).
Changing the Data Field
You can display different information
when you are driving and routing.
1. While navigating a route, touch the
data eld in the lower right corner of
the Map page.
2. Select the data you want to appear.
3. Repeat steps 1 and 2 while not
navigating a route.
Trip Computer
➊
➋
➌
➍
➎
➊
Touch to view the Next Turn page.
➋
Touch to view the Turn List page.
➌
Touch to zoom in and out.
➍
Touch to view the Where Am I?
page.
➎
Touch to view the Trip Computer.
➏
Touch to return to the Menu page.
➐
Touch to customize this data eld.
➏
➐
The Trip Computer displays your current
speed and provides helpful statistics
about your trip. To view the Trip
Computer, touch the Speed eld on the
Map page.
If you make frequent stops, leave the
nüvi turned on so it can accurately
measure elapsed time during the trip.
Page 22
16 nüvi 715 Series Owner’s Manual
Using the Main Pages
Resetting Trip Information
If you want accurate trip information,
reset the trip information before
beginning a trip. Touch Reset Trip
to reset the information on the Trip
Computer page. Touch Reset Max to
reset the maximum speed.
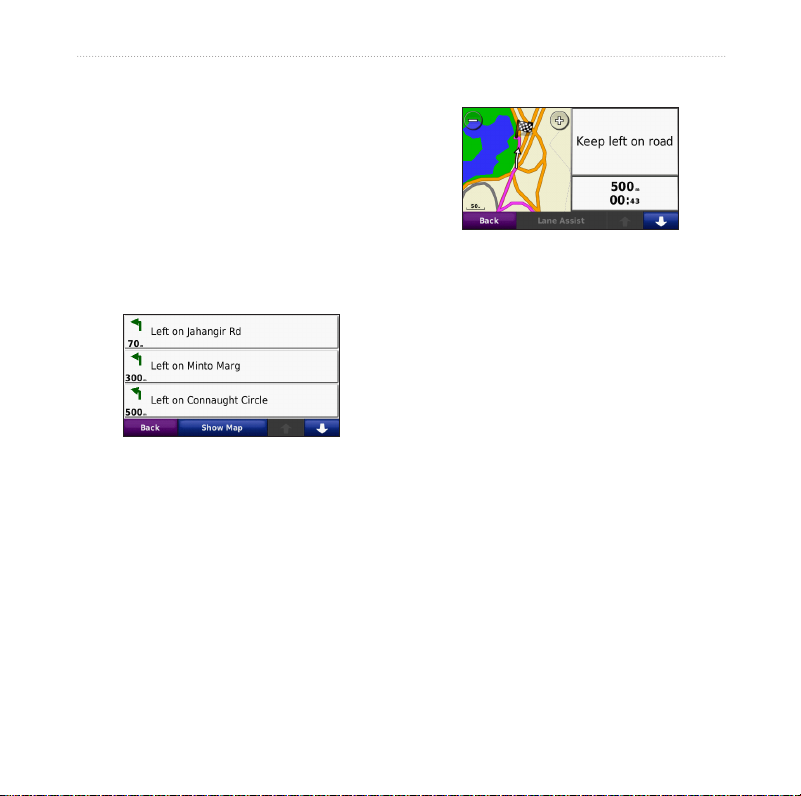
Turn List Page
When you are navigating a route, the
Turn List page displays turn-by-turn
instructions for your entire route and
the distance between turns. Touch the
text bar on the top of the Map page to
view the Turn List page. Touch a turn on
the list to view the Next Turn page for
that turn. Touch Show Map to view the
entire route on the map.
Next Turn Page
When you are navigating a route, the
Next Turn page shows the turn on the
map and the distance and time left before
you reach the turn.
To view an upcoming turn on the map,
touch the upper-left corner of the Map
page, or touch any turn on the Turn List
page.
Page 23

nüvi 715 Series Owner’s Manual 17
Using Hands-free Calling
Using Hands-free
Calling
Using Bluetooth technology, your nüvi
can connect to your mobile phone to
become a hands-free device.
To see if your device with Bluetooth
technology is compatible with the nüvi,
go to www.garmin.com/bluetooth.
Pairing Your Devices
Bluetooth wireless technology
establishes a wireless link between
devices, such as a mobile phone and
the nüvi. The rst time you use two
devices together you must “pair” them
by establishing a relationship using a
PIN/passkey. After the initial pairing, the
two devices can connect automatically
each time you turn them on.
To pair and connect, your device and the
nüvi must be turned on and be within 10
metres of each other. The nüvi can be
connected to a phone and a headset at
the same time.
Initiate pairing from your nüvi or from
your device. Refer to the instructions for
your devices.
When you turn on the nüvi, it tries to
connect to the last device to which
it was connected. You might have to
set your device to connect to the nüvi
automatically when it is turned on.
When your phone is connected to your
nüvi, you are ready to make phone calls.
From the Menu page, touch Phone to
access the Phone menu.
Page 24

18 nüvi 715 Series Owner’s Manual
Using Hands-free Calling
Pairing Your Phone Using
the Phone
1. Enable the Bluetooth component
on your phone. This might be in a
menu called Settings, Bluetooth,
Connections, or Hands-free.
2. Initiate a search for Bluetooth
devices.
3. Select the nüvi from the list of
devices.
4. Enter 1234 into your phone.
Pa iring Your Phone Using
the nüvi
1. From the Menu page, touch Tools >
Settings > Bluetooth.
2. Under Phone, touch Add (or
Change).
3. Enable the Bluetooth component
on your phone. Enable Find Me/
Discoverable/Visible mode. These
settings might be in a Bluetooth,
Connections, or Hands-free menu.
4. Touch OK on the nüvi.
5. Select your phone, and touch OK.
6. Enter 1234 into your phone.
Receiving a Call
When you receive a call, the Incoming
Call window appears. Touch Answer to
answer the call. Touch Ignore to ignore
the call and silence the ring.
The internal microphone is in the front
of the nüvi.
In a Call
To end a call, touch > End Call.
Touch
following options:
> Call Options for the
Touch Tones• —displays a keypad
page so you can use automated
systems, such as voice mail.
Transfer Audio To Phone• —this is
helpful if you want to turn off the
nüvi but stay on the call, or if you
need privacy. To switch back, touch
Transfer Audio To Device.
• Mute Microphone.
Page 25
nüvi 715 Series Owner’s Manual 19
Using Hands-free Calling
Phone Menu
From the Menu page, touch Phone to
view the Phone menu. Touch Status
Dialing a Point of Interest
1. Touch Phone > Points of Interest.
2. Search for the point of interest you
to view the signal strength, the battery
level, and the name of the connected
phone.
NOTE: Not all phones support all
features of the nüvi Phone menu.
Using Your Phone Book
Each time your mobile phone connects
with the nüvi, the phone book is
automatically loaded into the nüvi. It
may take a few minutes for the phone
book to be available.
1. Touch Phone > Phone Book.
2. Touch the phone book entry (contact)
you want to call.
3. Touch Dial to call the contact.
3. Touch Dial or .
Dialing a Number
1. Touch Phone > Dial.
2. Enter the number, and touch Dial.
Viewing Your Call History
Each time your phone connects to the
nüvi, your call history is automatically
transferred to the nüvi. It may take a few
minutes to transfer this data to the nüvi.
1. Touch Phone > Call History.
2. Touch a category to view those calls.
3. Touch an entry, and touch Dial.
want to call.
The calls are listed in chronological
order, with the most recent calls at
the top of the list.
Page 26
20 nüvi 715 Series Owner’s Manual
Using Hands-free Calling
Calling Home
Enter a phone number for your Home
location, so you can quickly call home.
To enter your phone number:
1. Touch Phone > Call Home.
2. Touch Enter Phone Number to use
the keypad page, or touch Select
From Phonebook (only available
if your phone supports phone book
transfer).
3. Touch Done > Yes. The nüvi dials
your home phone number.
To call home:
1. Touch Phone > Call Home.
2. The nüvi dials your home phone
number.
Placing Calls Using Voice Dial
You can place calls by speaking the
contact name.
1. Touch Phone > Voice Dial.
2. Speak the contact name.
NOTE: You may need to “train”
your mobile phone to recognize your
voice dial commands. Refer to the
instructions for your phone.
Page 27

nüvi 715 Series Owner’s Manual 21
Using Media Players
Using the Media
6. Enter the Bluetooth PIN/passkey
Players
7. Touch OK.
Using a Wireless Headset
To listen to high-quality audio, you can
connect an Advanced Audio Distribution
Prole (A2DP) Bluetooth headset.
For more information about Bluetooth
technology, see page 17.
To pair and connect, your device and the
nüvi must be turned on and be within 10
metres of each other.
Pairing Your Headset
1. From the Menu page, touch Tools
> Settings > Bluetooth.
2. Under Audio, touch Add (or
Change).
3. Turn on your headset, and enable
Find Me/Discoverable/Visible
mode, if necessary.
4. Touch OK on the nüvi.
5. Select your headset, and touch
OK.
Playing Music
Load music les to the internal memory
or SD card. See pages 25–26.
1. Touch Tools > Media Player.
2. Touch Source to view the MP3
3. Touch Browse.
4. Touch a category and a
5. To play the entire category from
for your headset, if necessary,
and touch Done.
player.
subcategory, if necessary.
the beginning of the list, touch
Play All. To play a specic song,
touch the title.
Page 28
22 nüvi 715 Series Owner’s Manual
Using Media Players
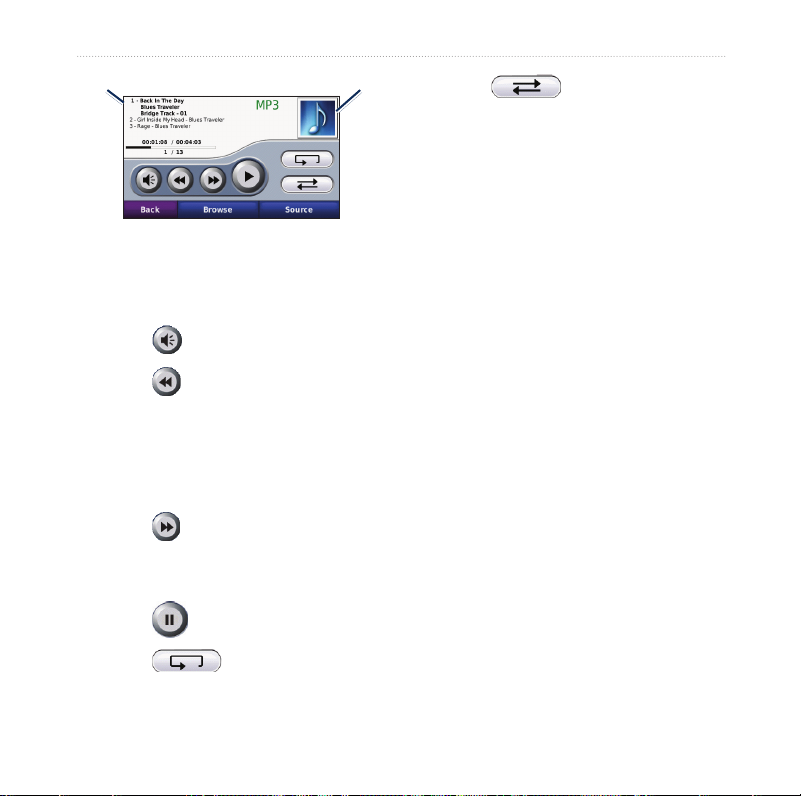
Album artPlaylist
Touch the playlist to add songs, •
remove songs, and skip to another
song in the playlist.
Touch • to adjust the volume.
Touch •
to play the current song
from the beginning; touch again to
play the previous song on the playlist.
Touch and hold to rewind through the
Supported File Types
The nüvi supports MP3 music les, and
M3U and M3U8 playlist les.
Creating and Listening to
Playlists
Using your nüvi, you can listen to
playlists created on your computer. You
can also save playlists using your nüvi.
current song.
Touch •
to skip to the next song.
Touch and hold to fast-forward
through the current song.
Touch • to pause the song.
Touch •
to repeat the current
playlist.
Touch •
to shuf e the
playlist.
Touch the album art to view details •
about the song or to remove this song
from the playlist.
Page 29

nüvi 715 Series Owner’s Manual 23
Using Media Players
To save your current playlist:
1. While listening to music, in the music
To play a playlist:
1. In the music player, touch Browse >
player, touch Browse > Playlist >
Save Current Playlist.
2. Enter a name, and touch Done.
2. Touch a playlist to start playing the
To create a new playlist:
1. In the music player, touch Browse >
Playlist > Create New Playlist.
To edit the current playlist:
1. While listening to music, in the music
2. Select songs.
3. Touch Back when you have nished
2. Edit the playlist:
adding songs to your playlist.
To create a playlist on a computer:
1. Using your computer and an audio
program, create a playlist of music
les. Save the playlist as an M3U or
M3U8 le.
2. If necessary, use a text editor
application to remove the path to the
le names in the M3U le. The M3U
le should only list the music le
names. Refer to the audio program
Help le.
3. Transfer the playlist and the music
les to the nüvi (see pages 25–26).
The M3U le must be in the same
location as the music les.
Playlist > Open Saved Playlist. All
available playlists appear.
music les.
player, touch the playlist.
Touch • Add to add a song to the
end of the playlist.
Touch a song, and then touch •
Remove to remove it from the
playlist.
Page 30
24 nüvi 715 Series Owner’s Manual
Using Media Players
Listening to Audible
Books
To purchase books from Audible.com®,
go to http://garmin.audible.com.
Listening to a Book
1. Touch Tools > Media Player.
2. Touch Source to view the audible
book player.
3. Touch Browse.
4. Touch a category, and then touch a
book title.
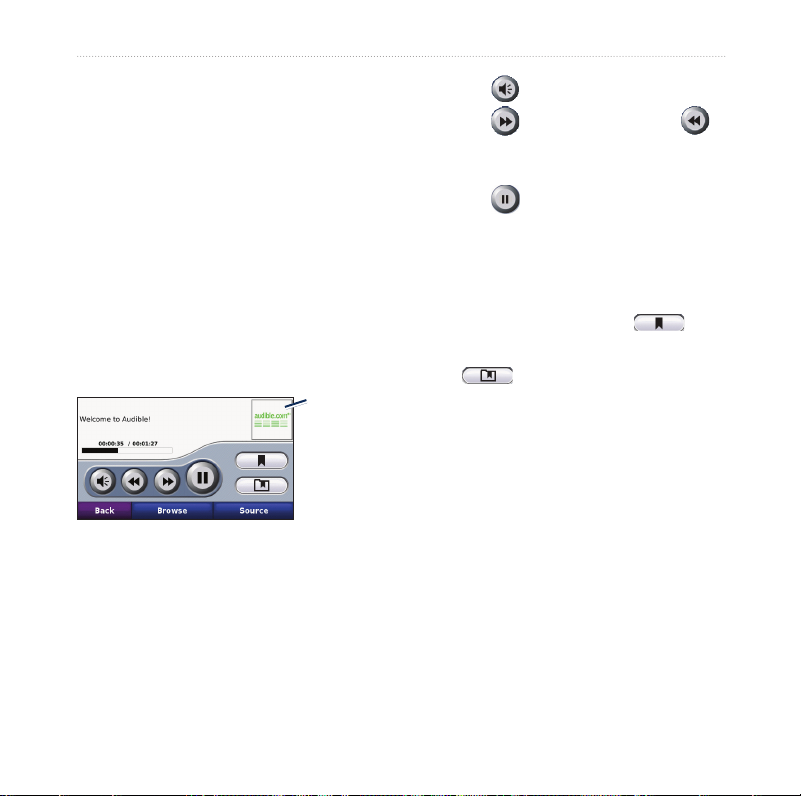
Book cover
art
Touch • to adjust the volume.
Touch •
to skip a section and
to jump back. Touch and hold to
move forward or backward.
Touch •
to pause the book.
Touch the book cover art to view •
more detailed information.
Using Bookmarks
To create a bookmark, touch and
Bookmark. To view your bookmarks,
touch , and then touch a
bookmark. Touch Play to listen to the
book from the bookmark.
Page 31

nüvi 715 Series Owner’s Manual 25
Managing Files
Managing Files
You can store les, such as MP3s and
JPEG image les, in the nüvi internal
memory or on an optional SD card.
NOTE: The nüvi is not compatible
with Windows® 95, 98, Me, or NT. It
is also not compatible with Mac® OS
10.3 and earlier. This is a common
limitation of most USB mass storage
devices.
Supported File Types
MP3 music les•
M3U and M3U8 music playlist les•
AA audio book les•
JPEG and JPG image le•
GPI custom POI les from the POI •
Loader application
Maps, routes, and waypoints from •
MapSource
®
Loading Files
Step 1: Insert an SD Card
(Optional)
To insert or remove the card, press it in
until it clicks.
Step 2: Connect the USB
Cable
Connect the mini-USB connector to the
connector on the bottom of the nüvi.
Connect the larger end of the cable to an
available USB port on your computer.
Your nüvi and SD card appear as
removable drives in My Computer on
Windows computers and as mounted
volumes on Mac computers.
Page 32
26 nüvi 715 Series Owner’s Manual
Managing Files
NOTE: On some operating systems
or computers with multiple network
drives, the nüvi drives may not appear.
See the operating system Help le to
learn how to map the drives.
Step 3: Transfer Files to Your
nüvi
Copy and paste les from your computer
into the nüvi drives/volumes.
1. Browse your computer for the le you
want to copy.
2. Highlight the le, and select Edit >
Copy.
3. Open the “Garmin” or SD card drive/
volume.
4. Select Edit > Paste. The le appears
in the list of les on the nüvi memory
or SD card.
Step 4: Eject and Unplug the
USB Cable
When you are nished transferring les,
click the
eject icon in your system
tray, or drag the volume icon to the
trash can on Mac computers. Unplug
your nüvi from your computer.
Deleting Files
With the nüvi connected to your
computer, open the nüvi or SD card
drive/volume. Highlight the le that you
want to delete, and press the Delete key
on your computer keyboard.
CAUTION: If you are not sure
about the purpose of a le, do NOT
delete the le. Your nüvi memory
contains important system les that
should NOT be deleted. Be especially
cautious of les located in folders
entitled “Garmin.”
Page 33
nüvi 715 Series Owner’s Manual 27
Using the Tools
Using the Tools
The Tools menu provides many features
that are helpful when you are traveling
across town or across the globe.
Help
Touch Tools > Help to get information
about using your nüvi. Touch a category
to view information about a topic. To
search the topics for a keyword, touch
Search.
Settings
For information about the settings, see
pages 33–37.
Media Player
For information about the media player
see pages 21–24.
Where Am I?
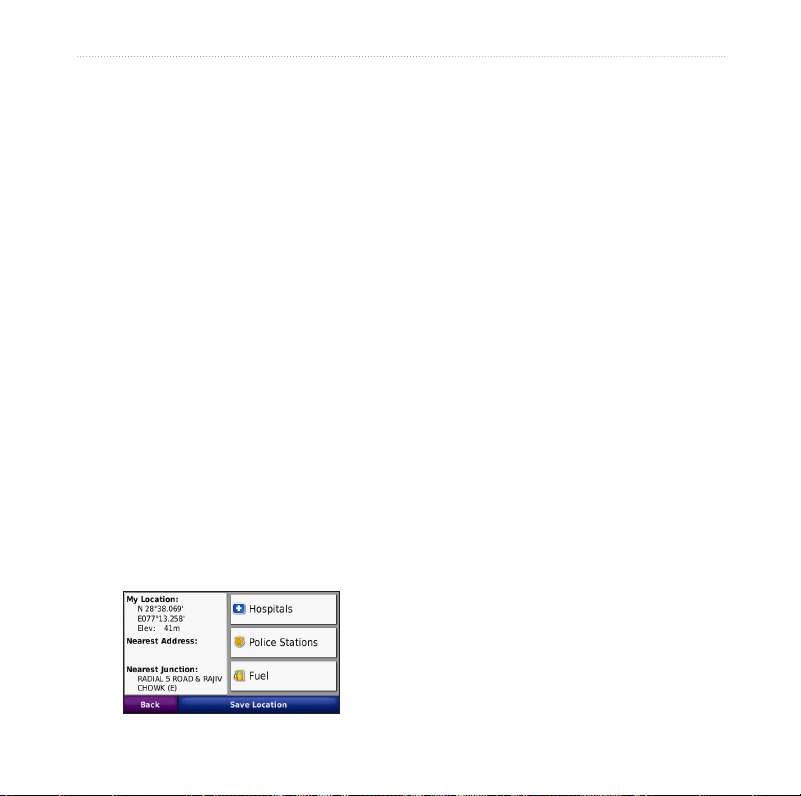
Touch Tools > Where Am I? to view
information about your current location.
This is a helpful feature if you need to
tell emergency personnel your location.
Touch a button on the right to view the
nearest locations in that category. Touch
Save Location to save your current
location.
Page 34

28 nüvi 715 Series Owner’s Manual
Using the Tools
Picture Viewer
View pictures that you have stored in
your nüvi.
1. Touch Tools > Picture Viewer.
2. Touch a picture to view a larger
image of it. Touch Info to view le
information and view this photo when
you turn on the nüvi. Touch Back.
3. Touch the arrows to view all the
images.
Viewing a Slide Show
1. Touch Tools > Picture Viewer >
Slide Show to start a slide show.
2. Touch anywhere on the screen to
stop the slide show.
Custom Routes
For information about routes, see page
12.
My Data
Touch Tools > My Data to manage and
delete your saved data, such as your
Favourites.
If you have transferred a route from
MapSource, touch Import Route from
File to use the route in your nüvi.
World Clock
Touch Tools > World Clock to view the
current time for different cities around
the world. Touch World Map to view a
map.
To change a city:
1. Touch Tools > World Clock.
2. Touch the city you want to change.
3. Enter the new city and touch Done.
4. Touch the new city in the list, and
touch Save.
Language Guide
The Garmin Language Guide puts data
from Oxford’s multilingual resources
and ve bilingual dictionaries in the
palm of your hand.
Page 35

nüvi 715 Series Owner’s Manual 29
Using the Tools
Words and Phrases
1. Touch Tools > Language Guide >
Words and Phrases.
2. Touch Language, select the From
and To languages, and touch Back.
3. Select a category, and search for a
phrase.
4. Touch Search to spell the word or
phrase, if necessary. Touch a phrase
to view the translation.
5. Touch to hear the translation.
Words and Phrases Tips
Use • Search for Keyword in Phrases
to nd all of the phrases that contain
a specic word.
Touch an underlined word to use a •
different word.
Touch • More Variations to change
words in the phrase or get a different
translation.
Bilingual Dictionaries
The Garmin Language Guide provides
ve bilingual dictionaries.
1. Touch Tools > Language Guide.
2. Touch Bilingual Dictionaries.
3. Touch a translation option. If
necessary, touch To English.
4. Search for the word, and touch it.
5. Touch to hear the translation.
Bilingual Tips
Touch • Search to spell the word or the
beginning of the word.
Touch • Legend to view information
on abbreviations, labels, and
pronunciation symbols for the
selected language.
All Dictionary, Word and Phrase content is
© Oxford University Press. Voice les are ©
Scansoft.
Pocket Oxford Spanish Dictionary © Oxford
University Press 2005. Pocket Oxford Italian
Dictionary © Oxford University Press 2004.
Oxford Portuguese Minidictionary © Oxford
Page 36

30 nüvi 715 Series Owner’s Manual
Using the Tools
University Press 2002. Multilingual Wordbank
© Oxford University Press 2001. Multilingual
Phrasebank © Oxford University Press 2001.
Pocket Oxford-Hachette French Dictionary ©
Oxford University Press and Hachette Livre 2005.
Pocket Oxford-Duden German Dictionary ©
Oxford University Press and Bibliographisches
Institut & F.A. Brockhaus 2003.
4. Select a unit of measure, and touch
5. Touch a blank rectangle.
6. Enter a value, and touch Done. The
7. Touch Clear to enter another value.
Updating Conversion Rates
Calculator
1. Touch Tools > Calculator.
2. Enter the rst number of your
calculation.
3. Touch an operator (÷, x, -, or +).
4. Enter the second number of your
calculation.
5. Touch =.
6. Touch C to perform a new calculation.
Unit Converter
1. Touch Tools > Unit Converter.
2. Touch Convers, select a unit to
convert, and touch OK.
3. Touch a unit of measure that you
want to change.
The nüvi allows you to update the
currency conversion rates manually
so that you are always using the most
current rates.
1. Touch Tools > Unit Converter >
2. Touch the rate you want to update.
3. Touch to erase the current rate.
4. Touch Save to nish.
Touch Restore to use the original rate.
OK. Repeat if necessary.
unit is converted.
Conversion > Currency > OK >
Update.
Enter a new rate, and touch Done.
Page 37
nüvi 715 Series Owner’s Manual 31
Playing Audio Through Your Vehicle Speakers
Playing Audio
Through Your Vehicle
Speakers
Check local laws before using the FM
transmitter in your area.
If an FM transmitter is available on your
nüvi, you can listen to the nüvi audio on
an FM stereo.
NOTE: When using the FM
transmitter function on the nüvi,
hands-free phone calls through the
nüvi might be overheard by adjacent
vehicles through the FM stereo.
1. From the Menu page, touch Volume
> Audio Output > FM Transmitter >
OK.
2. Tune your stereo to an FM channel
that has a lot of static and has a low
FM frequency number.
3. Touch the Current FM Frequency
button.
4. Touch and to select the same
frequency to which your stereo is
tuned.
Frequency Selection Tips
For best results, select a frequency below
90.1 FM.
When searching for an appropriate FM
frequency on your FM stereo, look for
an unused frequency that has steady,
consistent static. If you hear slight noises
and sounds in the background of the
static, select a different frequency.
As you travel, you might need to change
the frequency for the FM transmitter.
A frequency not used by a radio station
in your area might be used by a station
elsewhere.
FM Transmitter
Information
The FM transmitter is intended to
transmit the audio from the nüvi to your
FM stereo.
Do not adjust your FM settings while
you are driving your vehicle.
Page 38

32 nüvi 715 Series Owner’s Manual
Playing Audio Through Your Vehicle Speakers
The distance between the vehicle power
cable, the nüvi, and the FM stereo
antenna may also affect the noise level.
Vehicles with antennas located far
away, such as a rear-mounted antenna,
may experience more interference from
outside noise sources than vehicles with
front-mounted antennas.
As you drive, you may notice changes
in the background static even though
there is no FM station using that
channel. You may notice this as you
drive through intersections where certain
kinds of trafc lights or other municipal
electronic systems are operating. You
might also notice this effect when the
terrain changes, allowing distant stations
to be received by your car stereo that
were not received when you made your
initial frequency selection. These and
other sources of electrical interference
may make it necessary to look for
another frequency.
Page 39
nüvi 715 Series Owner’s Manual 33
Customizing the nüvi
Customising the nüvi
1. Touch Tools > Settings.
2. Touch the setting you want to change.
3. Touch the button below the setting
name to change it.
Changing the System
Settings
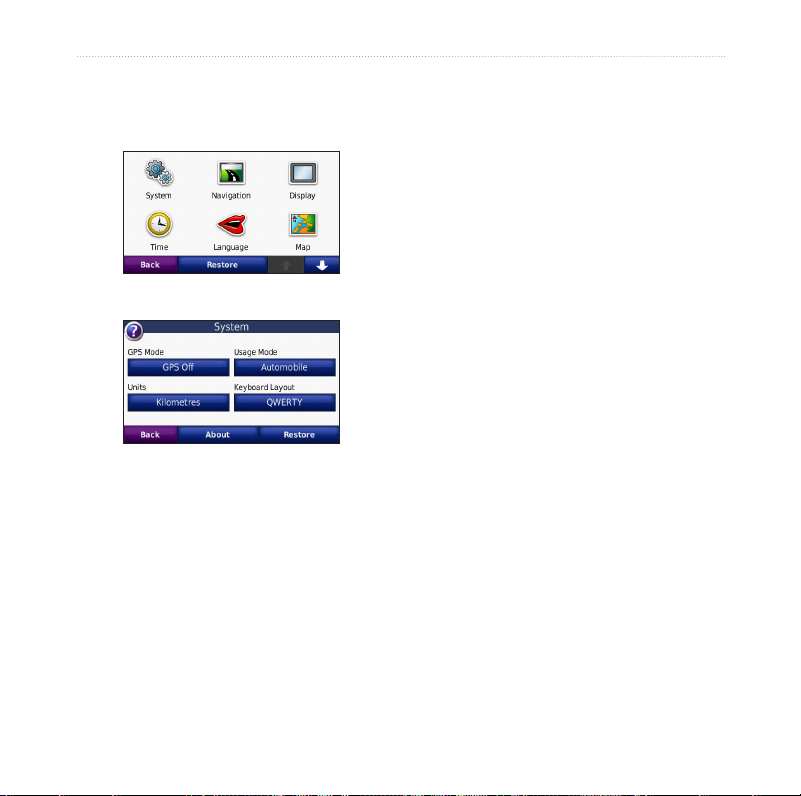
Touch Tools > Settings > System.
GPS Mode—enable the simulator to
turn off the GPS mode and simulate
navigation. This also saves battery
power.
Usage Mode—specify how you will be
navigating to optimize routes: Truck,
Automobile, Bicycle, or Pedestrian.
Units—change units of measure to
Kilometres or Miles.
Keyboard Layout—select QWERTY
for a layout similar to a typewriter,
or select ABCDE for an alphabetical
layout.
About—display the software version
number, unit ID number, and audio
version number for your nüvi. You need
this information when you update the
system software or purchase additional
maps.
Restore—restore the original system
settings.
Page 40

34 nüvi 715 Series Owner’s Manual
Customizing the nüvi
Changing the Navigation
Settings
Touch Tools > Settings > Navigation.
Route Preference—select a preference
for calculating your route:
Faster Time• —to calculate routes that
are faster to drive but can be longer in
distance.
Shorter Distance• —to calculate
routes that are shorter in distance but
can take more time to drive.
• Off Road—to calculate point-to-
point routes (without roads).
Avoidances—select the road types you
want to avoid or you would prefer to
take on your routes.
Restore—restore the original navigation
settings.
Adjusting the Display
Settings
Touch Tools > Settings > Display.
Colour Mode—select Daytime for a
light background, Night-time for a dark
background, or Auto to automatically
switch between the two.
Screen Shot—enable screen shot
mode. Touch
The picture bitmap le is saved in the
Garmin\Screenshot folder on the nüvi
drive.
Brightness—adjust the backlight
brightness level. Reducing the backlight
brightness increases your battery life.
Touch Screen - select Recalibrate to
adjust the sensitivity of the touch screen.
Restore—restore the original display
settings.
to take a screen shot.
Page 41

nüvi 715 Series Owner’s Manual 35
Customizing the nüvi
Updating the Time
Settings
Touch Tools > Settings > Time.
Time Format—select a 12-hour, 24hour, or UTC time format.
Current Time—select Automatic to
update the time automatically. When
Automatic is not selected, you can
adjust the time in 15-minute increments.
Restore—restore the original time
settings.
Setting the Languages
Touch Tools > Settings > Language.
Voice—change the language for voice
prompts.
Text Language—change all on-screen
text to the selected language. Changing
the text language does not change the
language of user-entered data or map
data, such as street names.
Keyboard—select the keyboard for
your language. You can also change
the keyboard language mode from any
keyboard by touching the Mode button.
Restore—restore the original languages.
Changing the Map
Settings
Touch Tools > Settings > Map.
Map Detail—adjust the amount of detail
shown on the map. Showing more detail
may cause the map to redraw slower.
Map View—select a map perspective.
Track Up• —display the map in two
dimensions (2D) with your direction
of travel at the top.
North Up• —display the map in 2D
with North at the top.
3D• —display the map in three
dimensions (3D) in Track Up.
Vehicle—touch Change to change the
icon used to display your position on
Page 42

36 nüvi 715 Series Owner’s Manual
Customizing the nüvi
the map. Touch the icon you want to
use, and then touch OK. Download
additional vehicle icons at
www.garmingarage.com.
Trip Log—show or hide the log of your
travels. To clear your trip log, touch
Tools > My Data > Clear Trip Log.
Map Info—view the maps loaded on
your nüvi and their version. Touch a map
to enable (check mark) or disable (no
check mark) that map.
Restore—restore the original map
settings.
Adding Security
Touch Tools > Settings > Security.
Garmin Lock—turn on Garmin Lock
to lock your nüvi. Enter a 4-digit PIN,
and set a security location. For more
information, see page 38.
Safe Mode—turn on or off safe mode.
When your vehicle is moving, safe
mode disables all functions that require
signicant operator attention and could
become a distraction while driving.
Restore—restore the original security
settings. Restoring the security settings
will not clear your Garmin Lock PIN or
security location.
Bluetooth Technology
Settings
Touch Tools > Settings > Bluetooth.
Phone or Audio—select Add > OK to
pair with a device that has Bluetooth
wireless technology. To listen to
high-quality audio wirelessly, connect
to an A2DP Bluetooth headset. See
pages 17–20. Select Change to pair and
™
connect with a different device. The nüvi
PIN code (or passkey) is 1234.
Drop—select the device you want to
disconnect, and touch Ye s .
Remove—select the device you want
Page 43

nüvi 715 Series Owner’s Manual 37
Customizing the nüvi
to delete from the nüvi memory, and
touch Ye s .
Bluetooth—enable and disable
the Bluetooth component. The
Proximity Points.
Proximity Alerts—touch Change
to turn on or off the alerts when you
approach custom POIs or safety cameras.
Bluetooth icon appears on the Menu
page if the Bluetooth component is
enabled. To prevent a device from
Restore—restore the original proximity
points settings.
automatically connecting, select
Disabled.
Friendly Name—enter a friendly name
that identies your nüvi on devices with
Bluetooth technology. Touch Done.
Restore—restore the original Bluetooth
settings. This does not clear the pairing
information.
Changing the Proximity
Points Settings
You must have proximity points (such
as custom POIs, a safety camera
database, or a TourGuide® le) loaded to
adjust the proximity point settings. See
pages 39–40. Touch Tools > Settings >
Restoring All Settings
1. Touch Tools > Settings.
2. Touch Restore.
3. Touch Yes.
Clearing User Data
CAUTION: This deletes all userentered information.
1. Hold your nger on the lower-right
corner of the nüvi screen while
turning on the nüvi.
2. Keep your nger pressed until the
message appears.
3. Touch Yes to clear all user data.
All original settings are restored. Any
items that you have saved are erased.
Page 44

38 nüvi 715 Series Owner’s Manual
Appendix
Appendix
Ways to Charge Your
nüvi
Use the vehicle power cable.•
Use the USB cable.•
Use an optional AC adapter cable.•
Calibrating the Screen
If the touchscreen is not responding
properly, calibrate the touchscreen.
1. Turn off the nüvi.
2. Hold your nger on the middle of
the screen.
3. Turn on the nüvi, and immediately
slide the power button to the right
(lock).
4. Continue to hold your nger on
the screen for about one minute
until the calibration screen
appears.
5. Follow the on-screen instructions.
6. Slide the power button to the
middle to unlock the screen.
Or you can touch
Tools>Settings>Display>Touch
Screen, and select Recalibrate to
adjust the sensitivity of the screen.
Locking Your nüvi
Garmin Lock is a theft-deterrent system
that locks your nüvi. Each time you turn
on the nüvi, enter the PIN or drive to the
security location.
1. Touch Tools > Settings >
Security.
2. Touch the button below Garmin
Lock.
3. Enter a 4-digit PIN, and drive to a
security location.
What is a Security Location?
Select a location you return to often,
such as your home, for your security
location. If the nüvi has satellite signals
and you are at the security location, you
Page 45
nüvi 715 Series Owner’s Manual 39
Appendix
do not need to enter the PIN.
NOTE: If you forget your PIN and
your security location, you must send
your nüvi to Garmin to get it unlocked.
You must also send a valid product
registration or proof of purchase.
Additional Maps
You can purchase additional maps for
your nüvi. To see a list of maps that
are compatible with your nüvi, go to
your nüvi product page on the Garmin
International Web site (www.garmin.
com), and click the Maps tab.
Updating the Software
1. Go to www.garmin.co.in and click
Software Update.
2. Follow the instructions to
download and install the latest
software.
You may also contact Garmin
authorised dealer for software
update.
Extras and Optional
Accessories
For more information about optional
accessories, go to http://buy.garmin.com,
www.garmin.com/extras, or contact your
Garmin dealer.
Custom Points of Interest
Use the POI Loader to load custom
points of interest (POIs) onto your nüvi.
POI databases are available from various
companies on the Internet. Some custom
databases contain alert information
for points, such as safety cameras and
school zones.
Go to www.garmin.com/extras, and
click POI Loader to install the POI
Loader onto your computer. For more
information, refer to the POI Loader
Help le. Press F1 to view the Help le.
To view your Custom POIs, touch
Where To? > Extras > Custom POIs.
To change the proximity alert settings,
touch Tools > Settings > Proximity
Points > Proximity Alerts.
To delete the Custom POIs from
Page 46
40 nüvi 715 Series Owner’s Manual
Appendix
your nüvi, connect your nüvi to your
computer. Open the Garmin\poi folder
in the nüvi drive or the SD card drive.
Delete the le entitled poi.gpi.
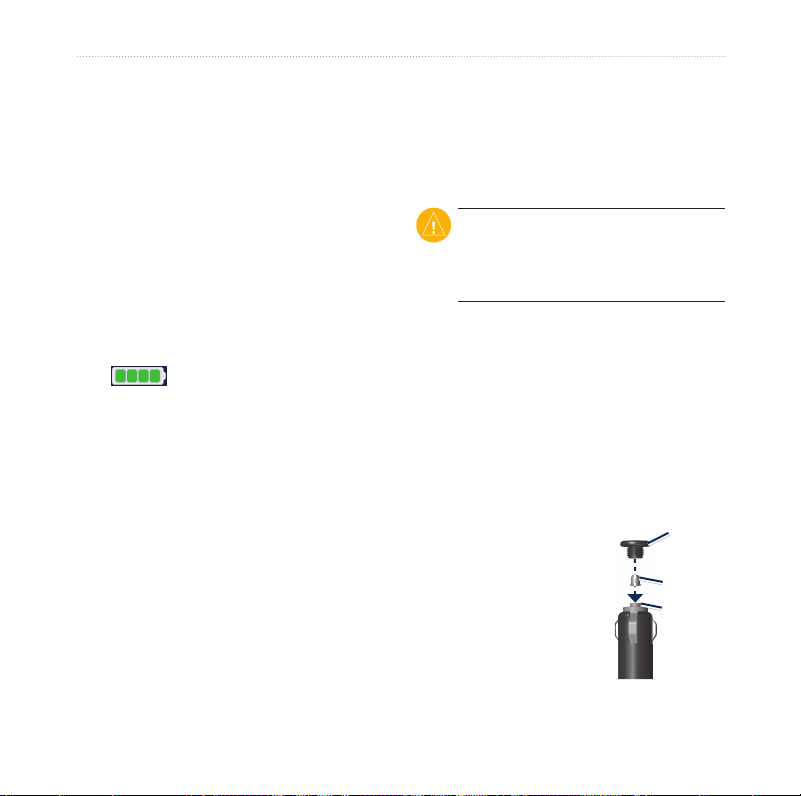
Changing the Fuse
Battery Information
Your nüvi contains an internal, nonreplaceable, lithium-ion battery. Do not
remove or attempt to remove the battery.
Doing so could result in risk of battery
re or damage and injury.
The
battery icon in the corner of
the Menu page indicates the status of the
internal battery. To increase the accuracy
of the battery gauge, fully discharge the
battery and then fully charge it; do not
unplug the nüvi until it is totally charged.
Contact your local waste disposal
department for information on properly
disposing of the unit.
Maximizing the Battery Life
Turn down the backlight (• Tools >
Settings > Display > Brightness).
If your unit will not charge in your
vehicle, you may need to replace the fuse
located at the tip of the vehicle adapter.
1. Unscrew the black, round end piece,
2. Remove the fuse (glass and silver
3. Ensure that the silver
Do not leave your nüvi in direct •
sunlight. Avoid prolonged exposure
to excessive heat.
CAUTION: When replacing the fuse,
do not lose any of the small pieces
and make sure they are put back in the
proper place.
and remove it.
cylinder), and replace with a 3A fast
blow fuse.
tip is placed in the
black end piece.
Screw on the black
end piece.
End
piece
Silver tip
Fuse
Page 47
nüvi 715 Series Owner’s Manual 41
Appendix
About GPS Satellite
Signals
Your nüvi must acquire GPS (Global
Positioning System) satellite signals to
navigate. If you are indoors, near tall
buildings or trees, or in a parking garage,
your nüvi cannot acquire satellites.
Go outside to an area free from tall
obstructions to use your nüvi.
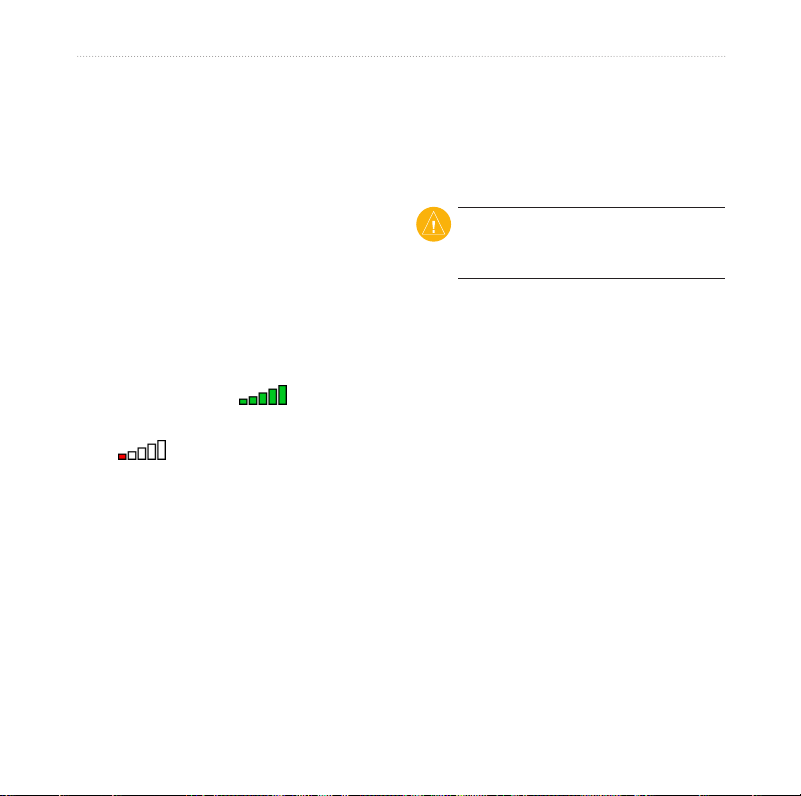
When your nüvi has acquired satellite
signals, the signal strength bars on the
Menu page are green
loses satellite signals, the bars turn red or
clear .
For more information about GPS, refer
to the GPS Guide. (See page 49)
. When it
Mounting on Your
Dashboard
Use the enclosed mounting disk to
mount your unit to the dashboard.
1. Clean and dry the dashboard
2. Remove the backing from the
3. Place the disk on the dashboard.
4. Remove the clear plastic cover
5. Place the suction cup mount on
CAUTION: The permanent
mounting adhesive is extremely
difcult to remove after it is installed.
where you are placing the disk.
adhesive on the bottom of the
disk.
from the top of the disk.
top of the disk. Flip the lever down
(toward the disk).
Page 48

42 nüvi 715 Series Owner’s Manual
Appendix
Removing the nüvi and
Mount
To remove the nüvi from the cradle,
press the button on the bottom of the
cradle up, and tilt the nüvi forward.
To remove the cradle from the mount,
turn the cradle to the right or left. Apply
pressure until the socket on the cradle
releases the ball on the mount.
To remove the suction cup mount from
the windshield, ip the lever toward you.
Pull the tab on the suction cup toward
you.
Cleaning the Casing
The nüvi is constructed of high-quality
materials and does not require user
maintenance other than cleaning. Clean
the outer casing (not the touchscreen)
using a cloth dampened with a mild
detergent solution, and then wipe dry.
Avoid chemical cleaners and solvents
that can damage plastic components.
Cleaning the Touchscreen
Clean the touchscreen with a soft, clean,
lint-free cloth. Use water, isopropyl
alcohol, or eyeglass cleaner, if needed.
Apply the liquid to the cloth, and then
gently wipe the touchscreen.
Caring for Your nüvi
Your nüvi contains sensitive electronic
components that can be permanently
damaged if exposed to excessive shock
or vibration. To minimize the risk of
damage to your nüvi, avoid dropping
your unit and operating it in high-shock
and high-vibration environments.
Page 49

nüvi 715 Series Owner’s Manual 43
Appendix
Protecting Your nüvi
Do not • store the nüvi where
prolonged exposure to extreme
temperatures can occur, because it
can cause permanent damage. Do
not expose the nüvi to water. Contact
with water can cause this unit to
malfunction.
Though a PDA stylus can be used •
to operate the touchscreen, never
attempt this while operating a vehicle.
Never use a hard or sharp object to
operate the touchscreen, or damage
may result.
Avoiding Theft
To help avoid theft, remove the unit •
and mount from sight when not
in use. Remove the residue on the
windshield left by the suction cup.
Do not keep your unit in the glove •
compartment.
• Register your product at
http://my.garmin.com.
Use the Garmin Lock feature. See •
page 38.
Declaration of Conformity
Hereby, Garmin declares that this
nüvi product is in compliance with the
essential requirements and other relevant
provisions of Directive 1999/5/EC. To
view the full Declaration of Conformity,
see the Garmin Web site for your Garmin
product: www.garmin.com.
Page 50

44 nüvi 715 Series Owner’s Manual
Appendix
Software License
Agreement
BY USING THE nüvi, YOU AGREE
TO BE BOUND BY THE TERMS AND
CONDITIONS OF THE FOLLOWING
SOFTWARE LICENSE AGREEMENT.
PLEASE READ THIS AGREEMENT
CAREFULLY.
Garmin grants you a limited license to
use the software embedded in this device
(the “Software”) in binary executable
form in the normal operation of the
product. Title, ownership rights, and
intellectual property rights in and to the
Software remain in Garmin.
You acknowledge that the Software
is the property of Garmin and is
protected under the United States
of America copyright laws and
international copyright treaties. You
further acknowledge that the structure,
organization, and code of the Software
are valuable trade secrets of Garmin
and that the Software in source code
form remains a valuable trade secret of
Garmin. You agree not to decompile,
disassemble, modify, reverse assemble,
reverse engineer, or reduce to human
readable form the Software or any part
thereof or create any derivative works
based on the Software. You agree not to
export or re-export the Software to any
country in violation of the export control
laws of the United States of America.
Page 51

nüvi 715 Series Owner’s Manual 45
Appendix
Specications
Physical size (W × H × D): 121.7 × 75.2
× 19.5 mm (4.79 × 2.96 × 0.77 in.)
Weight: 175 g (6.17 oz.)
Display: (W x H) 4.7 x 5.7 cm , 10.9
cm (4.3”) diagonal, 480 × 272 pixels;
WQVGA TFT landscape display with
white backlight and touchscreen
Case: Not waterproof (IPXO)
Operating Temperature range: from
32°F to 140°F (from 0°C to 60°C)
Charging Temperature range: from
32°F to 113°F (from 0°C to 45°C)
Data storage: Internal memory and
optional removable SD card. Data stored
indenitely.
Computer interface: USB mass storage,
plug-and-play
Headphone jack: Standard 3.5 mm
Power input: DC vehicle power using
included vehicle power cable or AC
power using an optional accessory
Usage: 10 W max.
Battery life: Up to 3 hours depending on
usage and settings
Battery type: Non-replaceable lithiumion battery
GPS receiver: High-sensitivity
Acquisition times*:
Warm: <1 sec.
Cold: <38 sec.
Factory Reset: <45 sec.
*Average acquisition times for a
stationary receiver with a clear view of
the sky.
Charge time: Approximately 4 hours
Page 52

46 nüvi 715 Series Owner’s Manual
Appendix
Troubleshooting
Problem/Question Solution/Answer
My nüvi never gets
satellite signals.
The suction cup will not
stay on my windshield.
My nüvi does not
charge in my vehicle.
How do I clear all my
user data?
The nüvi is locked
up/frozen.
The touchscreen is
not responding to my
touches properly.
Take your nüvi out of parking garages and away from tall buildings
and trees. Remain stationary for several minutes.
Clean the suction cup and windshield with rubbing alcohol. Dry with
a clean, dry cloth. Mount the suction cup as described on page 2.
Check the fuse in the vehicle power cable.
Ensure the vehicle is turned on and is supplying power to the power
outlet.
Your nüvi can only charge between 32°F and 113°F (0°C and 45°C).
If the nüvi is placed in direct sunlight or in a hot environment, it
cannot charge.
Hold your nger on the lower-right corner of the nüvi screen while it
is turning on. Keep your nger pressed until the message appears.
Touch Yes to clear all user data.
If the nüvi screen stops functioning, turn off the nüvi, and then turn
on the nüvi. If this does not help, slide the Power key to the left
and hold it for 8 seconds. Turn on the nüvi again. The nüvi should
operate normally.
1. Turn off the nüvi.
2. Hold your nger in the middle of the screen.
3. Slide the power button to the left then immediately to the right
(lock). Continue to hold your nger on the screen for about one
minute until the calibration screen appears.
4. Follow the on-screen instructions.
5. Slide the power button to the middle to unlock the screen.
Page 53

nüvi 715 Series Owner’s Manual 47
Appendix
Problem/Question Solution/Answer
My battery gauge does
not seem accurate.
My phone will not
connect to the nüvi.
How do I know my nüvi
is in USB mass storage
mode?
My computer never
senses that the nüvi is
connected.
I cannot see any new
removable drives in my
list of drives.
How can I nd
restaurants near the
hotel I will be staying at
the future?
Allow the unit to fully discharge, and then fully charge it (without
interrupting the charge cycle).
Touch Tools > Settings > Bluetooth. Verify that the Bluetooth eld
is set to Enabled.
Make sure your phone is turned on and is less than 10 metres
(about 33 feet) away from your nüvi.
Go to www.garmin.com/bluetooth for more help.
When your nüvi is in USB mass storage mode, a picture of a nüvi
connected to a computer is shown. Also, you should see two new
removable disk drives listed in My Computer.
1. Unplug the USB cable from your computer.
2. Turn the nüvi off.
3. Plug the USB cable into your computer and your nüvi. The nüvi
automatically turns on and goes into USB mass storage mode.
If you have several network drives mapped on your computer,
Windows may have trouble assigning drive letters to your nüvi
drives. See the operating system Help le to learn how to map/
assign drive letters.
1. Touch Where To? > Near > Different City (and enter your
vacation destination).
2. Find the hotel and touch Go!.
3. Touch Menu > Where To? > Near > My Destination.
4. Search for a restaurant. Restaurants nearest your to hotel are
listed rst.
You can also use the GPS Simulator (Tools > Settings > System).
Page 54

Appendix
Problem/Question Solution/Answer
How can I nd my car
in a parking lot?
How can I change the
navigation mode to ride
my bicycle?
How can I walk to
my destination not
following roads?
Touch Tools > Settings > Navigation > Route Preference > Off
Road > OK to put the nüvi in Off Road mode. Touch Where To? >
Favourites > Last Position > Go!. Navigate to your car!
Use Bicycle mode to optimize your route for biking. Touch Tools >
Settings > System > Usage Mode > Bicycle > OK.
Use Off Road mode. Touch Tools > Settings > Navigation > Route
Preference > Off Road > OK. Select a destination and touch Go!
to navigate off road to the destination.
48 nüvi 715 Series Owner’s Manual
Page 55
GPS Beginner’s Guide
The Global Positioning System (GPS) is a
satellite-based navigation system that sends
Introduction
Global Positioning System (GPS) technology
is changing the way we work and play.
You can use GPS technology when you
are driving, ying, shing, sailing, hiking,
running, biking, working, or exploring. With
a GPS receiver, you have an amazing amount
of information at your ngertips. Here are
just a few examples of how you can use GPS
technology.
Know precisely how far you have run and •
at what pace while tracking your path so
you can nd your way home
Pinpoint the perfect shing spot on the •
water and easily relocate it
Get the closest location of your favourite •
restaurant when you are out-of-town
Find the nearest airport or identify the •
type of airspace in which you are ying
GPS Beginner’s Guide 49
and receives radio signals. A GPS receiver
acquires these signals and provides you with
information. Using GPS technology, you can
determine location, velocity, and time, 24
hours a day, in any weather conditions
anywhere in the world—for free.
GPS, formally known as the NAVSTAR
(Navigation Satellite Timing and Ranging)
Global Positioning System, originally was
developed for the military.
Because of its popular
navigation capabilities
and because you can
access GPS technology
using small, inexpensive
equipment, the government
made the system available
for civilian use. The USA
owns GPS technology and
the Department of Defense
maintains it.
GPS technology requires
the following three segments:
What is GPS?
Space segment (• 50)
Control segment (• 50)
User segment (• 51)
Page 56

50 GPS Beginner’s Guide
Space Segment
At least 24 GPS satellites orbit the earth
twice a day in a specic pattern. They travel
at approximately 7,000 miles per hour about
12,000 miles above the earth’s surface.
These satellites are spaced so that a GPS
receiver anywhere in the world can receive
signals from at least four of them.
Each GPS satellite constantly sends coded
radio signals (known as pseudorandom code)
to the earth. These GPS satellite signals
contain the following information:
The particular satellite that is sending the •
information
Where that satellite should be at any •
given time (the precise location of the
satellite is called ephemeris data)
Whether or not the satellite is working •
properly
The date and time that the satellite sent •
the signal
The signals can pass through clouds, glass,
and plastic. Most solid objects such as
buildings attenuate (decrease the power of)
the signals. The signals cannot pass through
objects that contain a lot of metal or objects
that contain water (such as underwater
locations).
The GPS satellites are powered by solar
energy. If solar energy is unavailable, for
example, when the satellite is in the earth’s
shadow, the satellites use backup batteries to
continue running. Each GPS satellite is built
to last about 10 years. The Department of
Defense monitors and replaces the satellites
to ensure that GPS technology continues to
run smoothly for years to come.
Control Segment
The control segment is responsible for
constantly monitoring satellite health, signal
integrity, and orbital conguration from the
ground. The control segment includes the
following sections:
Master control station•
Monitor stations•
Ground antennas•
Monitor Stations
At least six unmanned monitor stations
are located around the world. Each station
constantly monitors and receives information
from the GPS satellites and then sends the
orbital and clock information to the master
control station (MCS).
Page 57

GPS Beginner’s Guide 51
Master Control Station (MCS)
The MCS) is located near Colorado Springs
in Colorado. The MCS constantly receives
GPS satellite orbital and clock information
from the monitor stations. The controllers
in the MCS make precise corrections to the
data as necessary, and send the information
(known as ephemeris data) to the GPS
satellites using the ground antennas.
The following points provide a summary of
the technology at work:
Ground Antennas
Ground antennas receive the corrected
orbital and clock information from the MCS,
and then send the corrected information to
the appropriate satellites.
User Segment
The GPS user segment consists of your
GPS receiver. Your receiver collects and
processes signals from the GPS satellites that
are in view and then uses that information to
determine and display your location, speed,
time, and so forth. Your GPS receiver does
not transmit any information back to the
satellites.
How Does GPS
Technology Work?
The control segment constantly monitors •
the GPS constellation and uploads
information to satellites to provide
maximum user accuracy.
Your GPS receiver collects information •
from the GPS satellites that are in view.
Your GPS receiver accounts for errors. •
For more information, refer to the
Sources of Errors (Page 55) section.
Your GPS receiver determines your •
current location, velocity, and time.
Your GPS receiver can calculate other •
information, such as bearing, track, trip
distance, distance to destination, sunrise
and sunset time, and so forth.
Your GPS receiver displays the •
applicable information on the screen.
Page 58

52 GPS Beginner’s Guide
Who Uses GPS?
GPS technology has many amazing
applications on land, at sea, and in the
air. You might be surprised to learn about
the following examples of how people
or professions are already using GPS
technology:
Environment
GPS technology helps survey disaster areas
and map the movement of environmental
phenomena (such as forest res, oil spills,
or hurricanes). It is even possible to nd
locations that have been submerged or
altered by natural disasters.
Agriculture
In precision farming, GPS technology helps
monitor the application of fertilizer and
pesticides. GPS technology also provides
location information that helps farmers
plow, harvest, map elds, and mark areas of
disease or weed infestation.
Aviation
Aircraft pilots use GPS technology for en
route navigation and airport approaches.
Satellite navigation provides accurate aircraft
location anywhere on or near the earth.
Ground Transportation
GPS technology helps with automatic vehicle
location and in-vehicle navigation systems.
Many navigation systems show the vehicle’s
location on an electronic street map,
allowing drivers to keep track of where they
are and to look up other destinations. Some
systems automatically create a route and give
turn-by-turn directions. GPS technology also
helps monitor and plan routes for delivery
vans and emergency vehicles.
Marine
GPS technology helps with marine
navigation, trafc routing, underwater
surveying, navigational hazard location, and
mapping. Commercial shing eets use it to
navigate to optimum shing locations and to
track sh migrations.
Page 59

GPS Beginner’s Guide 53
Military
Military aircraft, ships, submarines, tanks,
jeeps, and equipment use GPS technology for
many purposes including basic navigation,
target designation, close air support, weapon
technology, and rendezvous.
Space
GPS technology helps track and control
satellites in orbit. Future booster rockets
and reusable launch vehicles will launch,
orbit the earth, return, and land, all under
automatic control. Space shuttles also use
GPS navigation.
Public Safety
Emergency and other specialty eets use
satellite navigation for location and status
information.
Rail
Precise knowledge of train location is
essential to prevent collisions, maintain
smooth trafc ow, and minimize costly
delays. Digital maps and onboard inertial
units allow fully-automated train control.
Surveying
Surveyors use GPS technology for simple
tasks (such as dening property lines)
or for complex tasks (such as building
infrastructures in urban centers). Locating
a precise point of reference used to be very
time consuming. With GPS technology, two
people can survey dozens of control points in
an hour. Surveying and mapping roads and
rail systems can also be accomplished from
mobile platforms to save time and money.
Recreation
Outdoor and exercise enthusiasts use GPS
technology to stay apprised of location,
heading, bearing, speed, distance, and time.
In addition, they can accurately mark and
record any location and return to that precise
spot.
Timing
Delivering precise time to any user is one of
the most important functions of GPS
technology. This technology helps
synchronize clocks and events around the
world. Pager companies depend on GPS
satellites to synchronize the transmission of
Page 60
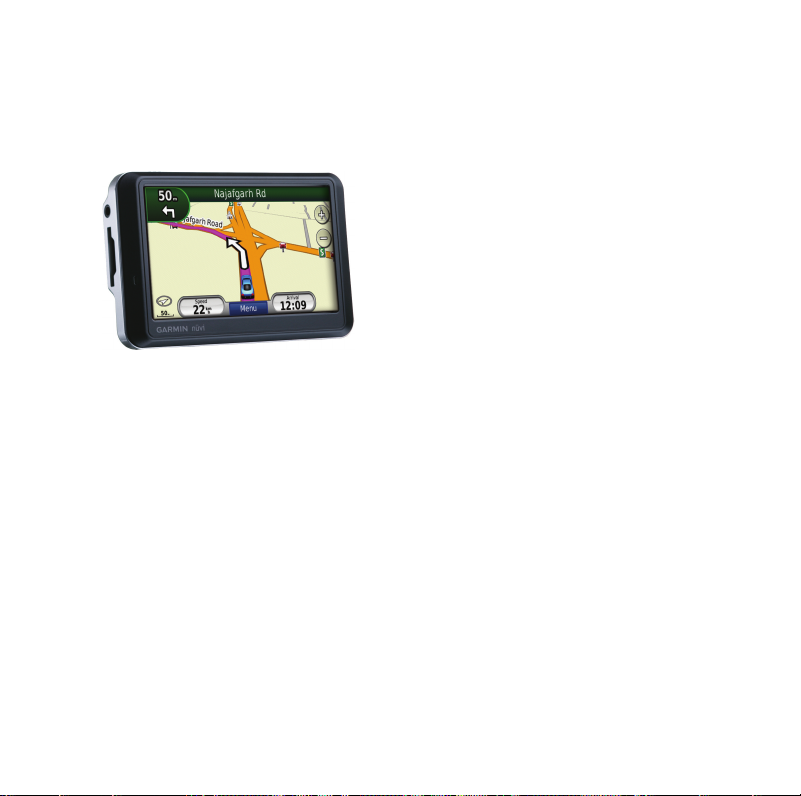
54 GPS Beginner’s Guide
information throughout their systems.
Investment banking rms rely on this service
every day to record international transactions
simultaneously.
receiver on the surface of the earth.
The signals are so accurate that time can be
gured to much less than a millionth of a
second, velocity can be gured to within a
fraction of a mile per hour, and location can
be gured to within a few metres.
WAAS/EGNOS
The Wide Area Augmentation System
(WAAS) is a system of satellites and ground
stations that provides even better position
accuracy than the already highly accurate
GPS. Europe’s version of this system is the
How Accurate Is GPS?
GPS technology depends on the accuracy of
signals that travel from GPS satellites to a
GPS receiver. You can increase accuracy by
ensuring that when you use (or at least when
you turn on) your GPS receiver, you are in
an area with few or no obstacles between
you and the wide open sky. When you rst
turn on your GPS receiver, stand in an open
area for a few moments to allow the unit to
get a good x on the satellites (especially
if you are heading into an obstructed area).
This gives you better accuracy for a longer
period of time (about 4-6 hours).
It takes between 65 and 85 milliseconds for a
signal to travel from a GPS satellite to a GPS
European Geostationary Navigation Overlay
Service (EGNOS).
The Federal Aviation Administration
(FAA) developed the WAAS program.
It makes more airspace usable to pilots,
provides more direct en route paths, and
provides new precision approach services
to runways, resulting in safety and capacity
improvements in all weather conditions at
all locations throughout the U.S. National
Airspace System (NAS).
Although it was designed for aviation users,
WAAS supports a wide variety of other uses,
for example, more precise marine navigation.
To take advantage of WAAS technology, you
must have a WAAS-capable GPS receiver
in an area where WAAS satellite coverage
Page 61

GPS Beginner’s Guide 55
is available such as North America. No
additional equipment or fees are required to
take advantage of WAAS.
Sources of Errors
Errors can affect the accuracy of the GPS
signal. Take your GPS receiver to an area
with a wide and unobstructed view of the sky
to reduce the possibility and impact of some
errors. Here are some of the most common
GPS errors.
Ionosphere and Troposphere •
Delays—the satellite signal slows down
as it passes through the atmosphere.
The system uses a built-in model that
calculates an average delay to partially
correct this type of error.
Orbital Errors• —this terminology refers
to inaccuracies of the satellite’s reported
location.
Receiver Clock Errors• —the GPS
receiver has a built-in clock that can have
small timing errors.
Number of Satellites Visible• —
obstructions can block signal reception,
causing position errors or no position
reading. The more satellites that your
GPS receiver can view, the better the x
is.
Satellite Geometry/Shading• —refers to
the relative position of the satellites at
any given time. Ideal satellite geometry
exists when the satellites are located at
wide angles relative to each other. Poor
geometry results when the satellites are
located in a line or in a tight grouping.
Signal Multipath• —the GPS signal
bounces off of objects, such as tall
buildings or large rock surfaces, before it
reaches the GPS receiver. This increases
the travel time of the signal and,
therefore, causes errors.
Buying a GPS Receiver
Deciding which GPS receiver to buy can be
overwhelming. Think about how you want
to use the unit, for example, traveling or
running. Keep the following considerations
in mind:
Product Level• —do you want the basics,
or do you want all of the bells and
whistles? You can nd a unit that ts
your needs and budget.
Power Source• —will you be using the
unit away from an auxiliary power
source? You might need to carry extra
batteries. With some units, you can use a
vehicle adapter or AC power source.
Page 62
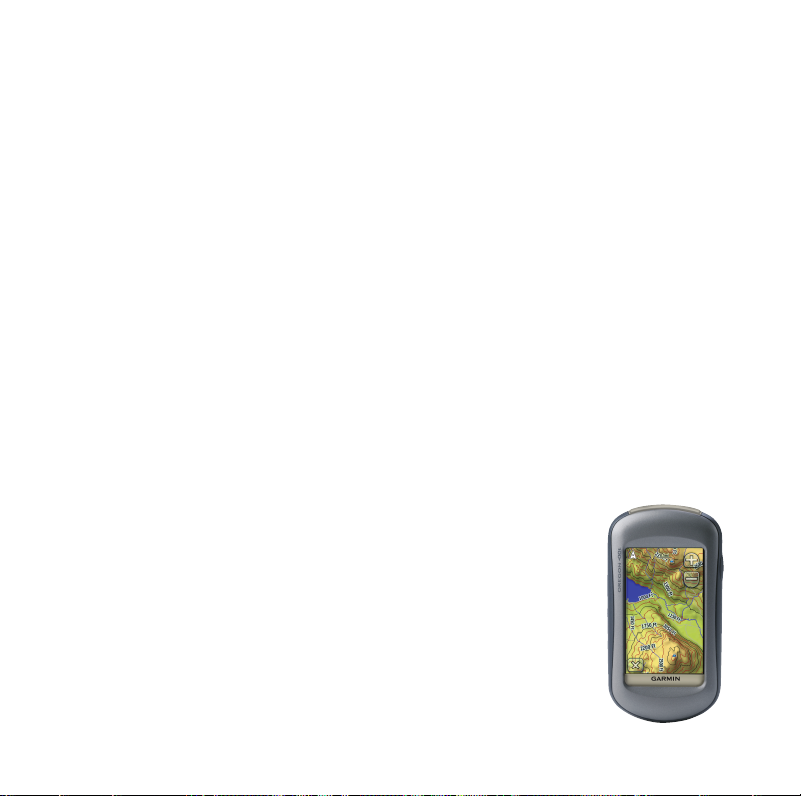
Portability• —do you have a preference
between a portable or a built-in unit?
Some units mount directly in the
dashboard of your boat, car, or aircraft.
Mapping Capability• —do you want to
know the general direction or street-level
details of your chosen path? Map data
can include streets, restaurants, tourist
attractions, marine data, topography, and
so forth.
Mounts• —a mount for your GPS can
be useful to keep your hands free
while navigating your bike, boat, car,
or airplane. Many units come with a
mount, and several additional mounts are
available.
Ease of Use• —some receivers provide
a tutorial or an easy-to-use touchscreen
interface. Some even have turn-by-turn
voice instructions as you are navigating
your route.
Antenna Confi guration• —where are you
going to use the unit? With some units,
you use only the built-in antenna. With
other units, you can attach an external
antenna to give you better reception.
Price• —which units t your price range?
An inexpensive entry-level unit can be a
great way to enter the GPS world.
Software• —whether you want to save
Complementary
Navigation Aids
Remember, a GPS receiver is a complement
to navigation and should not be the only
navigational tool that you use. Using a
paper map, a simple compass, and having
knowledge of manual navigation is a good,
safe practice.
For more detailed information on GPS
technology, refer to the following Web sites:
your favourite locations or plan a trip,
map software can help. You can use your
PC or go directly to
your GPS receiver. Your preference for •
map detail and your speci c activities
determine which software is right for
you.
For more information •
about GPS technology,
visit http://gps.faa.gov.
For more information •
about the current status
of the GPS satellites,
visit http://tycho.usno.
navy.mil/gpscurr.html.
56 GPS Beginner’s Guide
Page 63

For the latest free software updates (excluding map data) throughout the
life of your Garmin products, visit the Garmin Web site at
www.garmin.co.in
© 2008–2009 Garmin Ltd. or its subsidiaries
Garmin International, Inc.
1200 East 151st Street, Olathe, Kansas 66062, USA
Garmin (Europe) Ltd.
Liberty House, Hounsdown Business Park, Southampton,
Hampshire, SO40 9RB, UK
Garmin Corporation
No. 68, Jangshu 2nd Road, Shijr, Taipei County, Taiwan
www.garmin.com
Part Number 190-00955-25 Rev. A
 Loading...