

Page 1

Apollo 360 Map Display
User’s Guide
II Morrow Inc.
2345 Turner Road S.E.
Salem, Oregon 97309
November 1996 P/N 560-0119-00
Page 2

Apollo 360 Map Display
No part of this document may be reproduced in any form or by any
means without the express written consent of II Morrow Inc.
II Morrow is a trademark of II Morrow Inc.
Apollo is a registered trademark of II Morrow Inc.
1996 by II Morrow Inc. All rights reserved.
Printed in the U.S.A.
II Morrow Inc.
Consumer Products Division
2345 Turner Road S.E.
Salem, OR 97302
U.S.A. Toll Free 800-525-6726
Canada Toll Free 800-654-3415
FAX (503) 364-2138
International (503) 391-3411
P/N 560-0119-00
Page 3

Apollo 360 Map Display
History of Revisions
November 1996 Original Release
Ordering Information
To receive additional copies of this publication, order part
#560-0119-00, Apollo 360 Map Display User’s Guide.
P/N 560-0119-00
Page 4

Apollo 360 Map Display About This Manual
About This Manual
This manual is divided into five sections, each contains
information of a specific type. This information is
presented in a logical order such that the best
understanding ofunit operation can be had by reading this
manual in its entirety from front to back. The three
appendices at the back of this manual contain information
helpful, but not critical to operation of the Apollo 360.
Those who are familiar with navigation displays will find
that Sections 1 and 2 impart a good understanding of unit
operation, although it is recommended that a more
thorough knowledge of how to use the Apollo 360 is
gained before using it as a navigation aid.
Here is a brief summary of information presented in each
section and appendix.
Section 1
n
An introduction to operating the Apollo 360 Map
Display with a description of the function keys, knobs,
and useful features
Section 2
n
A listing of the steps necessary to begin using the
Apollo Map Display
Section 3
n
Information on using the unit to assist in navigating a
trip and a description of it’s options
Section 4
Section 5
n
An explanation of each main menu option
n
Adescription of the waypointdatabase and information
it contains
Appendix
A
P/N 560-0119-00 i
n
A glossary of navigation terms
Page 5

About This Manual Apollo 360 Map Display
Appendix
B
n
troubleshooting guide explaining what to do if the
display fails to operate properly
Appendix
C
n
Summary of features
ii P/N 560-0119-00
Page 6

Apollo 360 Map Display About This Manual
Welcome...
Welcome to the ever-growing family of II Morrow
customers using Apollo products around the world to
navigate with a high degree of accuracy. We at II Morrow
are proud of our reputation as a leading manufacturer of
navigation equipment. Your Apollo model 360 Map
display is an advanced navigation display built with
quality and pride. We are certain you will find it to be a
versatile and valuable navigation aid.
Contacting
the
Factory
Our staff of service technicians is available to assist you
with any operational difficulties you may experience or to
answer questions about your Apollo 360. Contact the
factory anytime from 8:00 A.M. until 5:00 P.M. Pacific
time Monday through Friday (excluding holidays).
II Morrow Inc.
Technical Service Department
2345 Turner Road S.E.
Salem, OR 97301
U.S.A.
U.S.A. Toll Free 800-525-6726
Canada Toll Free 800-654-3415
FAX (503) 364-2138
International (503) 391-3411
P/N 560-0119-00 iii
Page 7

About This Manual Apollo 360 Map Display
Caution
The Apollo 360 is a powerful navigation display, but you
should never rely solely on any one piece of navigation
equipment. It is important to maintain a constant
awareness of the navigation picture by using all
appropriate resources.
This device should be installed only by an FAA certified
facility.Certifiedavionics technicians will properly install
and checkout your Apollo 360, ensuring trouble free
operation when you fly with the unit.
FederalAviationAdministrationregulations require pilots
to practice SEE and AVOID. Do not study this manual
while flying. Make your first flight using the Apollo 360
during good weather in a low traffic area. Read at least
Sections 1 and 2 of this manual before you fly.
Itisrecommendedthatyoureadthroughthisentiremanual
and familiarize yourselfwith the controls and operationof
the unit before navigating with the Apollo 360.
Remember, use the Apollo 360 Map Display for VFR
operation only.
iv P/N 560-0119-00
Page 8

Apollo 360 Map Display Table of Contents
Table of Contents
Section Subject Page
1 Introduction to the Apollo Map Display
The Operating Functions . . . . . . . . . . . . . . . . . . . . 1-1
Function Keys . . . . . . . . . . . . . . . . . . . . . . . . . . . . 1-2
Navigation Function. . . . . . . . . . . . . . . . . . . . . . . . 1-2
Menu Function. . . . . . . . . . . . . . . . . . . . . . . . . . . . 1-3
Goto Nearest Function. . . . . . . . . . . . . . . . . . . . . . 1-3
New Waypoint Function . . . . . . . . . . . . . . . . . . . . 1-3
Waypoint Information Function . . . . . . . . . . . . . . 1-3
The Display . . . . . . . . . . . . . . . . . . . . . . . . . . . . . . 1-4
Display Care and Cleaning Instructions . . . . . . 1-4
LCD Backlight Switch . . . . . . . . . . . . . . . . . . . 1-5
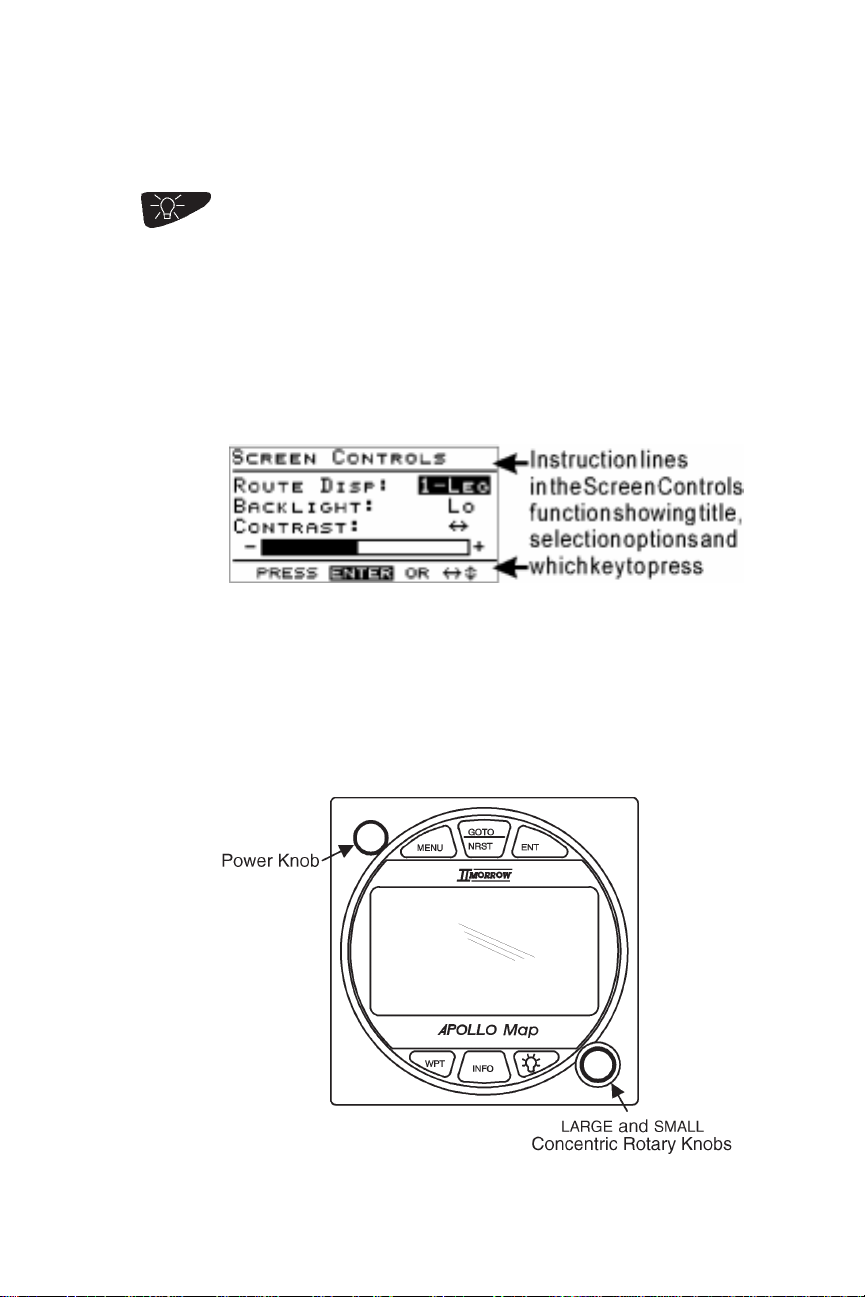
Helpful Instructions on the Display . . . . . . . . . 1-5
Control Knobs . . . . . . . . . . . . . . . . . . . . . . . . . . . . 1-5
The Power Knob. . . . . . . . . . . . . . . . . . . . . . . . 1-6
The Concentric Rotary Knobs . . . . . . . . . . . . . 1-6
The Display Screens . . . . . . . . . . . . . . . . . . . . . . . 1-7
The Startup Screen . . . . . . . . . . . . . . . . . . . . . . 1-7
Route Display Selection . . . . . . . . . . . . . . . . . . 1-7
Navigation Function Screens . . . . . . . . . . . . . . 1-8
Menu Function Screen . . . . . . . . . . . . . . . . . . . 1-9
Goto Nearest Function Screens . . . . . . . . . . . 1-10
New Waypoint Function Screen. . . . . . . . . . . 1-11
Waypoint Information Function Screen . . . . . 1-12
Summary . . . . . . . . . . . . . . . . . . . . . . . . . . . . . . . 1-12
2 Getting Started
Power Up . . . . . . . . . . . . . . . . . . . . . . . . . . . . . . . . 2-1
Check for Host Input . . . . . . . . . . . . . . . . . . . . . . . 2-2
P/N 560-0119-00 v
Page 9

Table of Contents Apollo 360 Map Display
Section Subject Page
3 Navigating a Trip
About the Navigation Function . . . . . . . . . . . . . . . 3-1
About Navigation Function Screens . . . . . . . . . . . 3-1
Current Messages Screen . . . . . . . . . . . . . . . . . 3-2
Present Position Screen. . . . . . . . . . . . . . . . . . . 3-3
Bearing/Range/Ground Speed Screen . . . . . . . 3-4
Moving Map/Nav Window Screen. . . . . . . . . . 3-4
Moving Map Screen . . . . . . . . . . . . . . . . . . . . . 3-5
Zooming In or Out . . . . . . . . . . . . . . . . . . . . . . 3-6
Auto Zoom . . . . . . . . . . . . . . . . . . . . . . . . . . . . 3-7
The Route Screen . . . . . . . . . . . . . . . . . . . . . . . 3-7
Searching for Nearest Waypoints . . . . . . . . . . . . . 3-8
Creating Waypoints . . . . . . . . . . . . . . . . . . . . . . . . 3-9
Getting Waypoint Information. . . . . . . . . . . . . . . 3-10
Destination Waypoint Information. . . . . . . . . 3-10
Information About Other Waypoints . . . . . . . 3-11
Information About Nearest Waypoints. . . . . . 3-11
Scanning Waypoints for Information . . . . . . . 3-11
4 Menu Function Options
The Main Menu . . . . . . . . . . . . . . . . . . . . . . . . . . . 4-3
Changing Menu Option Settings . . . . . . . . . . . 4-3
Return to Nav . . . . . . . . . . . . . . . . . . . . . . . . . . 4-3
Screen Controls. . . . . . . . . . . . . . . . . . . . . . . . . 4-4
Map Setups . . . . . . . . . . . . . . . . . . . . . . . . . . . . 4-4
Declutter Maps . . . . . . . . . . . . . . . . . . . . . . . . . 4-5
Track Point History. . . . . . . . . . . . . . . . . . . . . . 4-6
Arrival Alerts . . . . . . . . . . . . . . . . . . . . . . . . . . 4-7
Airspace Alerts . . . . . . . . . . . . . . . . . . . . . . . . . 4-8
Countdown Time . . . . . . . . . . . . . . . . . . . . . . . 4-9
Display Units . . . . . . . . . . . . . . . . . . . . . . . . . 4-10
User Waypoint Management . . . . . . . . . . . . . 4-10
System Info 1 . . . . . . . . . . . . . . . . . . . . . . . . . 4-12
System Info 2 . . . . . . . . . . . . . . . . . . . . . . . . . 4-12
Default Settings . . . . . . . . . . . . . . . . . . . . . . . . . . 4-13
vi P/N 560-0119-00
Page 10

Apollo 360 Map Display Table of Contents
Section Subject Page
5 The Waypoint Database
Database Structure . . . . . . . . . . . . . . . . . . . . . . . . . 5-1
Available Waypoint Information. . . . . . . . . . . . . . 5-2
ARPT Waypoints . . . . . . . . . . . . . . . . . . . . . . . 5-2
VOR Waypoints . . . . . . . . . . . . . . . . . . . . . . . . 5-3
NDB Waypoints . . . . . . . . . . . . . . . . . . . . . . . . 5-3
INT Waypoints . . . . . . . . . . . . . . . . . . . . . . . . . 5-4
USER Waypoints . . . . . . . . . . . . . . . . . . . . . . . 5-4
REMO Waypoints . . . . . . . . . . . . . . . . . . . . . . 5-4
Appendices
A Glossary of Navigation Terms
B Troubleshooting
Contacting the Factory . . . . . . . . . . . . . . . . . . . . . B-3
C Features
P/N 560-0119-00 vii
Page 11

Table of Contents Apollo 360 Map Display
viii P/N 560-0119-00
Page 12

Apollo 360 Map Display Introduction to the Apollo 360
Section 1
IntroductiontotheApollo360MapDisplay
This section introduces you to the Apollo 360 and explains
howtouseandswitchbetweentheunit’soperatingfunctions.
A description of information that shows on the display when
you use each function is included at the back of this section.
Section 2 builds on the introductory information presented
here as you switch on and begin using the Apollo 360.
The
Operating
Functions
Remember that the Apollo 360 Map is not
a primary
navigation instrument. It works in conjunctionwith a GPSor
Loran that can provide position, bearing, flight plan, and
other useful information. The Apollo 360 Map is a
supplemental navigation display. The quality of the position
information it displaysis dependent on the navigationdevice
providing that information. Do not
attempt to conduct an
approachbasedontheinformationfromtheApollo360Map.
Use a navigation device authorized for flying approaches to
navigate this phase of flight.
There are five main operating functions, each performing a
different and unique task while you navigate. Each function
also provides one or more screens of information on the
display. At leastone of these functions isalways in use when
the unit is on. The functions operate independently of one
another, so you can switch between them.
The five operating functions are:
n
Navigation (always active)
n
Menu
n
Goto nearest
n
New waypoint
n
Waypoint information
P/N 560-0119-00 1-1
Page 13

Introduction to the Apollo 360 Apollo 360 Map Display
As you navigate a course with the Apollo 360, you will
typically use several of these operating functions. During the
trip, you will use the navigation function most of the time to
monitor your progress. To most effectively use the Apollo
360, become well acquainted with each operating function.
Function
Keys
Each of the operating functions is easily accessible from
the front panel by using the function keys. Remember, the
navigation function is always active -pressing a key is not
necessary to enable it.
Navigation
Function This function starts automatically when the unit is
switched on and stays active. You will use this function
most often while flying. The navigation function provides
information about:
n
Your current position and navigation progress to a
destination
n
Your current route, and legs within your current route
n
Events or conditions important to trip navigation
Navigationfunction screens show onthedisplaywhenever
other functions are not in use.
1-2 P/N 560-0119-00
Page 14

Apollo 360 Map Display Introduction to the Apollo 360
Menu
Function
Goto
Nearest
Function
New
Waypoint
Function
Waypoint
Information
Function
Use this function to access a menu of options that modify
the way navigation information shows on the display. In
this way, you may customize the Apollo 360 to best suit
your navigation display requirements. The menu function
alsocontrols many otherimportantwaysthe unit operates.
Press this key once for a list of waypoints nearest to your
present position. This function allows you to quickly and
easily obtain the information that you need to create or
change a flight plan while navigating.
Use the waypoint function to create your own waypoints
and store them in the Apollo 360’s memory. You can
create up to 2,000 of your own waypoints, each with a
name you choose. You can create waypoints based upon
your present position, or you can enter latitude and
longitude coordinates (usually abbreviated lat/lon) to
define the waypoint location.
Use this function toget information aboutany waypoint in
the Apollo 360’s built-in database, including those you
have created and stored. Available information includes:
n
Waypoint identifier and type (airport, VOR, NDB, or
intersection)
n
Bearing and distance to thewaypoint from your current
position
n
Lat/lon coordinates of waypoint
n
For airports, the elevation, fuel availability and type,
radio communication frequencies, runway details,
runway map diagram, and more
P/N 560-0119-00 1-3
Page 15

Introduction to the Apollo 360 Apollo 360 Map Display
The
Display
Display
Care and
Cleaning
Instructions
The display shows information for each operating
function. This information typically includes navigation
progress, waypoint information, and menu options and
selections. Display contrast and the display backlight are
adjustable to best suit viewing conditions in the cockpit.
See “Screen Controls” inSection 4 fordetails on adjusting
the screen.
Your new Apollo 360 Map has a space-age anti-glare film
thathasbeenappliedtothedisplay screen. This is the same
filmthatisusedontheNASA Space Shuttle windows. The
surface of the film has a hard coating that is scratch
resistant. Despite this coating, extreme care must be taken
when cleaning the display screen. To remove stains,
smudges, fingerprints, and so forth, we recommend these
cleaning methods (if the first method fails to remove the
problem, try the next method):
n
Wipe with a clean, dry, non-abrasive fabric (for
example, cotton or Handi-wipes)
n
Blow on the area to condense moisture on the display
and then wipe the area with the clean fabric
n
Moistena clean fabric with asmall amountofwater and
wipe the display area
n
Apply a small amount of glass cleaner (without
ammonia) to the fabric and wipe the area
n
Applyasmall amount of isopropyl alcohol and wipethe
area (this is the last resort)
Note:
Use a clean fabric with each cleaning method to avoid
other contaminates.
1-4 P/N 560-0119-00
Page 16
Apollo 360 Map Display Introduction to the Apollo 360
LCD
Backlight
This key controls the Liquid Crystal Display (LCD)
backlight,enablingyoutoeasilyviewthe display in a wide
variety of cockpitambient light conditions. Five backlight
intensitylevelsareavailable from no intensity (off) to high
intensity.
Helpful
Instructions
on the
Display
While you use most functions, the Apollo 360 shows you
whattodo. Helpful instructions typically appear onthe top
andbottomlinesof the display. A highlighted, or darkened
word in an instruction advises you which key to press to
select an option.
Control
Knobs The control knobs switchthe Apollo 360on and off, select
menu options and make changes. The control knobs
consist of the power knob at the upper left corner of the
front panel and the concentric rotary knobs at the lower
right corner of the front panel.
P/N 560-0119-00 1-5
Page 17
Introduction to the Apollo 360 Apollo 360 Map Display
The
Power
Knob
The
Concentric
Rotary
Knobs
This knob switches the display on and off. Each time you
switch the unit on, it performs internal diagnostics and
activates the navigation display function. This process
takes only a few seconds.
The LARGE and SMALL concentric rotary knobs allow
you to move the highlight cursor around the display to
select menu options and make changes. The highlight
cursor typically shows on the display when you use an
operating function. The cursor indicates that the
highlighted item can be changed.
A vertical and/or horizontal arrow symbol often shows at
the lower right corner of the display. These symbols
indicate that additional options are available and that
changes can be made.
1-6 P/N 560-0119-00
Page 18

Apollo 360 Map Display Introduction to the Apollo 360
The
Display
Screens
The
Startup
Screens
Information you view on the display while using the
Apollo 360 showsone page or “screen” ata time. Many of
the operating functions can show more than one screen of
information. When morethan one screenof information is
available,either the verticalarrowsymbolor an instruction
line shows on the display to inform you that more
information awaits yourview. Follow the instruction, orif
the vertical arrow symbol shows on the display, turn the
LARGE knob to view this additional information.
Information screens available while using each operating
functionare introduced here. Section4 contains additional
details about each operating function.
The startup screens show on the display for several
seconds after you switch on the Apollo 360. While these
screens show on the display, the unit performs internal
diagnostics and activates the navigation display function.
Route
Display
Selection It is worth noting here that the Screen Controls screen
(located under the Main Menu) allows the user to select
either a 1-Leg or 3-Leg route display. The 1-Leg display
provides larger character sizefor easier viewing,while the
3-Leg
display
provides
more route
P/N 560-0119-00 1-7
informati
on in a
single
screen.
Page 19
Introduction to the Apollo 360 Apollo 360 Map Display
Navigation
Function
Screens
TheApollo 360 shows one of sixscreens whileyou usethe
navigation function. Each screen contains useful
information. After the startup screens appear on the
display, the unit shows the route screen. You can “scroll”
or page through the other available screens by turning the
LARGE knob.
1-8 P/N 560-0119-00
Page 20
Apollo 360 Map Display Introduction to the Apollo 360
Menu
Function
Screen
The menu function contains options that control many
ways the Apollo 360 operates and lets you customize the
navigation function to suit your preference. The menu
function screen is a main menu with options selected by
turning the LARGE knob to move the arrow cursor up or
down the list.
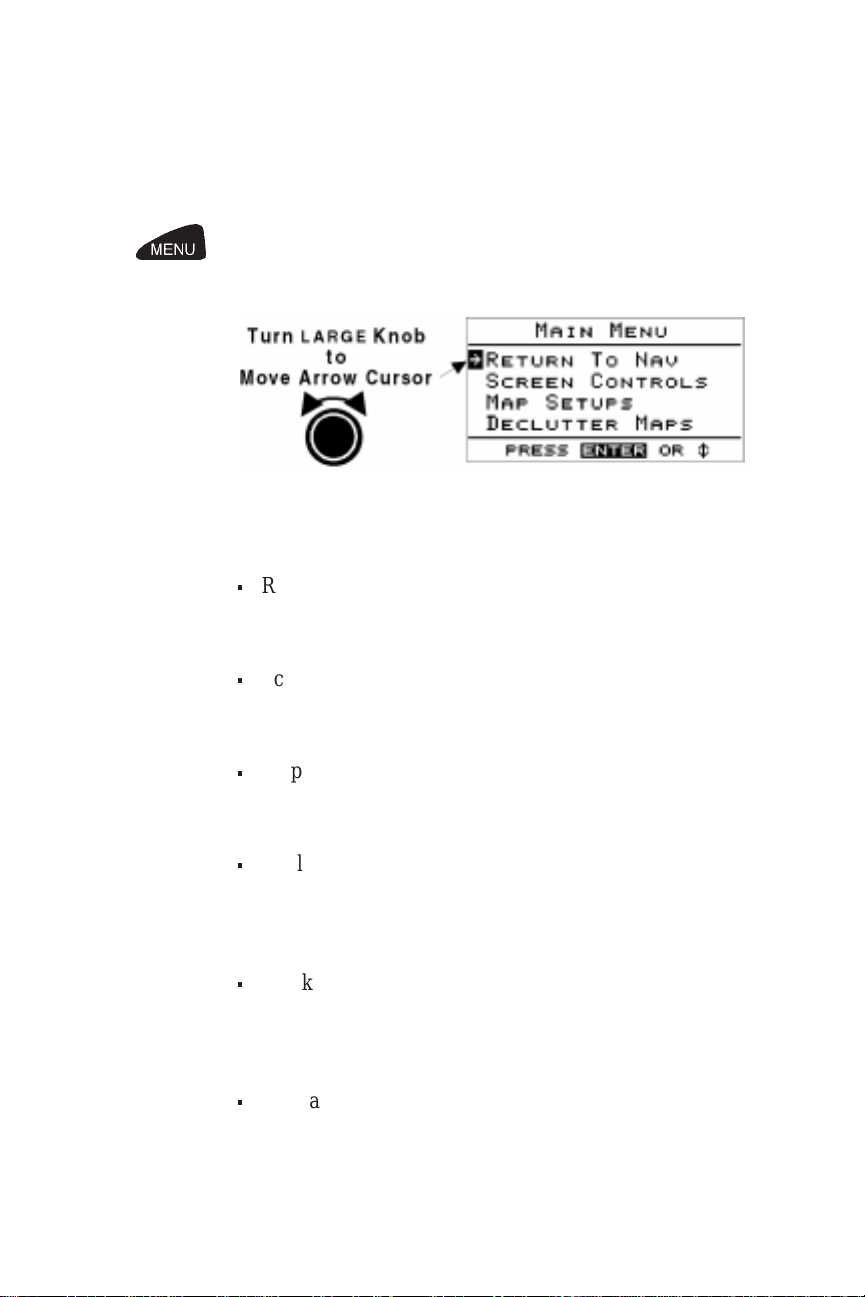
The main menu contains these options:
n
Return to Nav Returns the unit from the menu function to the
navigation display function
n
Screen Controls Containscontrol settings for displaybacklight,contrast,
and 1-leg or 3-leg route screen displays
n
Map Setups Contains control settings for information shown on
moving map screens (navigation function)
n
Declutter Maps Containscontrol settings for types of waypoints toshow
on moving map navigation screens (navigation
function) and in the nearest waypoint list
n
Track Point History Controls navigation “track point” storage in memory
and whether points show on moving map navigation
screens (navigation function)
n
Arrival Alerts Controls alert message at waypoint arrival
P/N 560-0119-00 1-9
Page 21

Introduction to the Apollo 360 Apollo 360 Map Display
n
Airspace Alerts Controls alert message at airspace entry
n
Countdown Time Controls built-in countdown timer
n
Display Units Contains control settings for navigation units of
measure
n
User Wpt Mgmt Controls editing or deletion of waypoints you have
entered in the Apollo 360’s memory
n
System Info 1 Enables showing of unit serial number and current
hardware and software versions on the display
n
System Info 2 Enables showing of current database and operating
system versions on the display
Using the menu function does not interrupt navigation.
Section 4 describes how to use each main menu option.
Goto
Nearest
Function
Thegoto nearest function allows you toquickly andeasily
getinformation on those waypoints nearestto yourpresent
position.
Screen
When you press the GOTO/NRST key, the nearest
function starts. The nearestfunction screen shows alisting
of up to 30 of the waypoints nearest to your present
position and the location ofeach waypoint relative to your
present position. You can get detailed information on any
of the waypoints on the nearest function screen by
selecting the waypoint and pressing the INFO key.
1-10 P/N 560-0119-00
Page 22

Apollo 360 Map Display Introduction to the Apollo 360
Navigation to an assigned waypoint is not interrupted
while using this function.
New
Waypoint
Function
Screen
Thisscreenshows information about waypoints you create
using the new waypoint function. You can use present
position lat/lon coordinates for the new waypoint’s
location, or enter coordinates of your choice from this
screen. Information on the screen includes the created
waypoint’s location and the location of the nearest VOR
relative to your present position.
P/N 560-0119-00 1-11
Page 23

Introduction to the Apollo 360 Apollo 360 Map Display
Waypoint
Information
Function
Screen
Summary
Thewaypoint information function can beused anytimeto
get information about a waypoint without interrupting
navigation. The waypoint information function screen
shows the waypoint identifier, and distance and bearing
from your present position. The vertical arrow symbol at
the bottom right corner of the display indicates that more
information is available by turning the LARGE knob to
scroll through additional screens.
Once you have becomefamiliar with usingthe Apollo 360
to supplement your navigation, you will find that
switchingbetween operating functions is fastand easyand
that you will do this often while navigating a trip. No
matter which operating function you use, the unit allows
you to quickly and easily return to the always active
navigation display function. Your present position
continues to be updated from the primary navigation
device without interruption while you use the other
operating functions.
Here is a quick review of the purpose of each operating
function.
Navigation display function - provides
information about your current position
Always
Active
and navigation progress, multiple leg
trips, and messages showing important
events or conditions while you navigate.
You exit from other functions to return to
this one.
1-12 P/N 560-0119-00
Page 24

Apollo 360 Map Display Introduction to the Apollo 360
Menu function - calls up the main menu
of options to control ways the Apollo360
operates. This function also controls the
MENU
way navigation information shows on the
display.
Nearest function - Calls up a list of up to
30 waypoints nearest to your present
NEAREST
position, and allows you to obtain
information about any of them.
New waypoint function - creates
waypoints and stores them in memory.
Created waypoints can be based upon
WPT
your present position, or lat/lon
coordinates you enter.
Waypoint information function - calls
up information from the Apollo 360’s
built-in waypoint database. You can also
INFO
access information about waypoints you
have created. Information includes the
waypoint identifier and type, waypoint
bearing and distance from your current
position, waypoint lat/lon coordinates,
and more.
LCD backlight - controls whether or not
the backlight is on, and the backlight
Backlight
intensity level.
The next section explains the start up procedures for the
Apollo 360. Once the start up tasks are completed, theunit
is ready to use to assist you in navigating your trip.
P/N 560-0119-00 1-13
Page 25

Introduction to the Apollo 360 Apollo 360 Map Display
Notes:
1-14 P/N 560-0119-00
Page 26

Apollo 360 Map Display Getting Started
Section 2
Getting Started
This section explains how to get started using the
Apollo360. Information in this section explains how to
quickly start the Apollo 360 and check for proper
operation.
n
Power up
n
Check for host input
n
Check for route input
n
Begin navigating
Power Up To switch the unit on, turn the power knob clockwise (the
knob is above and to the left of the display). The startup
screens show on the display for several seconds.
The first screen identifies the procuct. The second screen
provides a reminder that this product is approved for VFR
use only. It also identifies the installed database and gives
theexpiration date. Press Entertoacknowledge the startup
information and proceed to the navigation displays.
P/N 560-0119-00 2-1
Page 27

Getting Started Apollo 360 Map Display
Check for
Host Input
The Apollo 360 Map Display relies on position and route
information inputs from a host navigation device. When
theunit is powered up, it looks first for an input.Iftheinput
is present, it looksfor position and routeinformation. If no
inputis present, the messagealertshownbelowwill appear
and a “No Input” message will be displayed on all other
navigation screens.
Ifnorouteisenteredonthehostdeviceorifthehostdevice
does not have aposition fix, the routescreen on theApollo
360 will be blank, the message screen will display “No
PositionFix”, and a “No Fix”messagewillbe displayed on
all other navigation screens. Dashed lines will appear on
all screens in place of the missing input information.
With route and position input available, the Apollo 360
Mapis ready tobeginassistingin navigating atrip.Referto
Section 3 for information on how to use the navigation
display function while you fly.
2-2 P/N 560-0119-00
Page 28

Apollo 360 Map Display Navigating a Trip
Section 3
Navigating a Trip
This section explores the navigation display function and
describes the powerful features it contains. You will use
this function most frequently while you fly, so it is
important to have a good understanding of this operating
function. Follow the instructions provided in Sections 1
and 2 before you read this section. Leave the uniton, relax
in the cockpit with your aircraft parked, and use the
features this section describes to become familiar with
them. In this way, you can more effectively use this
powerful navigation aid to your advantage when flying.
Even though you may not be actively navigating, you will
be able to gain valuable familiarity with the unit. When
you become thoroughly familiar with the controls and
comfortable operating the unit, you will be better able to
use this powerful tool in the air.
About the
Navigation
Function
About the
Navigation
Function
Screens
P/N 560-0119-00 3-1
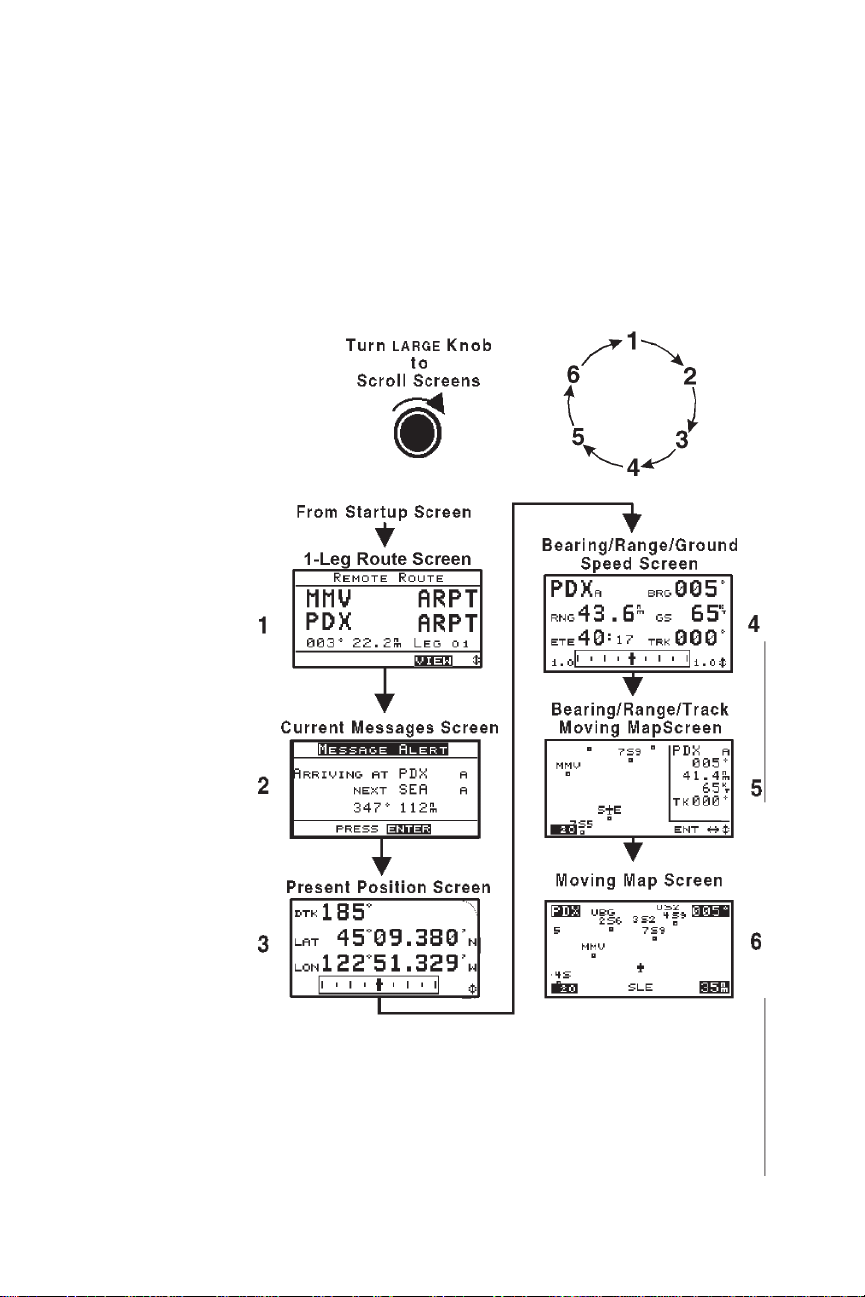
The navigation display function is always active. When
you use other functions, the navigation display function
continues to run “in the background” calculating your
present position, navigating your multiple leg trip (if
active), and alerting you to events or conditions important
to the navigation process. When you finish using other
functions, the unit automatically returns to the navigation
display function, displaying the last navigation screen
used.
While you navigate, the Apollo 360 gives information on
six screens. Each screen contains unique information
useful to the navigation effort.
Page 29

Navigating a Trip Apollo 360 Map Display
The LARGE knob “scrolls” or pages forward or backward
through the screens in the order shown in Section 1. After
you become more familiar with each screen, you may
developa preference for some. This sectiondescribes each
screen.
Current
Messages
Screen
The Apollo 360 helps you navigate by informing you of
important events or conditions while you fly. When an
important event or condition occurs, an alert message
shows on the display to inform you. (Alerts marked with
the * can be controlled by menu options described in
Section 4.) Alerts may show on the display anytime the
unit is operating to alert you of the following conditions:
Airspace penetration*
Arrival at a destination*
Loss of position fix
Low memory back-up battery
3-2 P/N 560-0119-00
Page 30

Apollo 360 Map Display Navigating a Trip
Expiration of countdown time
Magnetic variation
compensation limitation
When you see one of these alerts on the display, follow the
instruction shown to clear it. Clearing the alert removes it
from the display. The screen shown before the alert
appeared returns to the display.
Thecurrent messages screen serves as areview ofany alerts
presentedthis way during the trip. Alert messagesthat show
on the screen must be valid at the time you check them or
they will not show as a current message. Press ENT, as
shown on the current message screen, to view other current
messages (if available).
Present
Position
Screen
This screen shows the lat/long coordinates of your present
position, desired track, and any course deviation from
desired track.
When you fly, this screen can be valuable to check your
position against a chart with close precision.
P/N 560-0119-00 3-3
Page 31

Navigating a Trip Apollo 360 Map Display
Coursedeviation shows in the rectangularCourseDeviation
Indicator (CDI) at the bottom of the display. The airplane
symbolmoves over the graduated CDI to show your relative
distance left or right of desired track. The CDI display
correlateswith the sending navigation deviceCDI output.If
the sending device changes CDI scale it should drive the
CDI “Needle” on the Apollo 360 Map to match the relative
deflection amount to it’s own CDI display.
Bearing/
Range/
Ground
Speed
Screen
Moving
Map/Nav
Window
Screen
The bearing/rang/ground speed screen, displays range,
estimated time enroute(ETE), and ground speed (GS).Since
this screen is viewable by turningthe LARGE knobonly one
detent clockwise from the present position screen, you will
likely find it convenient to switch back and forth between
these two screens often to check your navigation progress.
One of the most attractive features of the Apollo 360 is its
ability to show your navigation progress graphically
against a “moving map” of waypoints. Your present
positionis indicated by the airplanesymbol nearthe center
of the display.
Using the moving map screen, you can easily track your
navigation progress as the aircraft travels over or near
waypoints beneath you. The moving map/nav window
screenshows this information in the boxat theright sideof
the display:
3-4 P/N 560-0119-00
Page 32

Apollo 360 Map Display Navigating a Trip
n
The destination waypoint and type
n
Bearing to the destination waypoint
n
Range to the destination waypoint
n
Ground speed
n
Current track
The map scale shows in the highlight at the lower left
corner of the screen. The scale shows the approximate
distance represented on the map between the airplane
symbol and the top border of the display. You can select
distance units of measure for the map scale and all other
navigation screens using the menu function “Display
Units” option explained in Section 4.
The figure below shows a change in scale caused by
turning the SMALL knob.The scale may bechanged from
.1 nm to 750 nm or set to auto. In this case, the distance
fromthe airplane icontothetop of thescreenis 20 miles.
Moving
Map
This moving map screen is similar to the one just
described, but it fills the entire display.
Screen
The following information shows in highlighted boxes at
each corner of the display:
P/N 560-0119-00 3-5
Page 33

Navigating a Trip Apollo 360 Map Display
n
The destination waypoint
n
Bearing to the destination waypoint
n
Map scale
n
Range to the destination waypoint
The moving map screens represent graphic views of your
navigation progress in a format easy to interpret while
flying.Notethatthedisplayorientationmaybechangedso
thatthetop of the may be north, desiredtrack, or track.The
map setup option, described in Section 4, explains how to
change the orientation.
Zooming
In or Out
Themoving map screens featurea handy zoom functionto
allow you to enhance your view of navigation progress.
Zoom in or out by turning the SMALL knob. Zooming in
changes the view to enlarge map detail, as if the airplane
symbolwas flying ataloweraltitude over themapsurface.
Similarly, zooming out allows a view of greater distance
around the airplane symbol, as if the airplane was flying
higher over the map. As you zoom in or out, the map scale
changes to show thenew distancerepresented between the
airplane symbol and the top border of the display.
Zooming in close to airport waypoints enables you to see
your orientation in relation to available runways.
3-6 P/N 560-0119-00
Page 34

Apollo 360 Map Display Navigating a Trip
Auto
Zoom
The
Route
Screen
The auto zoom feature changes the moving map scale
automatically, adjusting the map scale to zoom in closer
and closer as younear thedestination waypoint. Similarly,
this feature adjusts the map scale to zoom out as your
distance from a waypoint of origin increases.
Enable auto zoom by turning the SMALL knob until
“AUTO” shows as the map scale. Using auto zoom frees
youfrommanuallyadjusting the map scale as you view the
moving map screens.
The Apollo 360 Map has the ability to display the route
informationfromthehostdevice in either a 1-Leg or 3-Leg
route screen..
The preceding and following displays show the 1-Leg and
3-Legroutescreens,respectively.Youcanselecteitherdisplay
using the Screen Control function under the Main Menu.
P/N 560-0119-00 3-7
Page 35

Navigating a Trip Apollo 360 Map Display
The route screen shows either two or four waypoints
(depending on the selected screen) of the current route, as
well as the desired track and distance between the
displayed waypoints. The 1-Leg screen uses larger
characters for easier viewing. The 3-Leg screen provides
more information on a single display.
TheApollo360willnot be able to match all waypoints that
it receives from the host device with those in it’s internal
database. The unmatched waypoints are classified as
“Remote” waypoints and identified by the designator
“REMO” on the 1-Leg screen. On the 3-Leg screen, these
waypoints are identified by an “R” designation.
Searching
for
Nearest
Waypoints
An important feature of the Apollo 360 is its ability to
locate waypoints closest to your position as you fly.
Should you have to land the aircraft quickly, you can use
this feature to locate a nearby waypoint and quickly
navigate to it.
While navigating, press the GOTO/NRST key to activate
the nearest function and search for waypoints closest to
your present position.
The nearest function screen shows up to 30 nearest
waypoints in order of distance from your present position.
The waypoint type, bearing to the waypoint, and range to
the waypoint also shows.
3-8 P/N 560-0119-00
Page 36

Apollo 360 Map Display Navigating a Trip
Turnthe LARGE knobclockwisetomove the arrowcursor
down the list to view a destination. Press the INFO key to
display the information screens for the chosen waypoint.
Press the ENT key to return to the navigation function.
Important
Youcan control the types ofwaypoints thatshowon the
display as the result of a search for nearest waypoints.
The menu function “Declutter Maps” option allows
youtochoosewhetherornottodisplayairports,VORs,
NDBs, and intersections assearched waypoints and on
the moving map screens. Before you fly, make sure to
check this option and confirm that the waypoint types
you wish to show will appear on the display after a
search and while using the moving map screens. The
“Declutter Maps” option is explained in Section 4.
Creating
Waypoints
The Apollo 360 allows you to create up to 2,000 of your
own waypoints, each with a name you choose. As you
navigate, you may wish to create waypoints at locations
that are important to you. You can use your present
position or enter lat/lon coordinates for the waypoint’s
location.
Usethe new waypoint function to createwaypoints. Pressthe
WPT key. The new waypoint function screen allows you to
enter a waypoint name of your choice, or you can use the
default waypoint name that the unit assigns as a number.
P/N 560-0119-00 3-9
Page 37

Navigating a Trip Apollo 360 Map Display
TurntheLARGEknob to move the highlight to the desired
character in the waypoint name to change it. Once you
have entered the desired waypoint name, you can assign
the new waypoint your present position coordinates by
pressingthe ENT key. If you wishyournewwaypointto be
located elsewhere, use the LARGE and SMALL knobs to
move the highlight and change the waypoint lat/long
coordinates. When you are finished, press the ENT key to
enter the new waypoint into memory.
Thefact that you may assign either yourpresentpositionor
lat/lon coordinates of your choice when you create
waypoints is significant. You can create waypoints either
as you fly, or more conveniently, before or after you fly
when you are not busy navigating.
You can always editor delete waypoints youhave created.
The menu function “User Waypoint Management” option
allows you to perform these tasks. The use of this option is
described in Section 4.
Getting
Waypoint
Information
Use the waypoint information function anytime to get
information on waypoints in your route or any waypoints
that appear in the Nearest list.. A complete listing of
available information is included in Section 5, that
explains the built-in waypoint database.
Destination
Waypoint
Press the INFO key to activate the waypoint information
function.
Information
The waypoint information screen introduced in Section1
shows on the display with information about the current
destination waypoint. Turn the LARGEknob to scroll through
additionalscreensofinformation about the waypoint. Press the
INFO key again to return to the navigation function.
3-10 P/N 560-0119-00
Page 38

Apollo 360 Map Display Navigating a Trip
Informatio
n About
Other
Waypoints
Informatio
n About
Nearest
Waypoints
Youcanalso get information about any otherwaypoint in your
current route by using the route screen together with the
waypointinformationfunction.Press the ENT key to select the
View mode then use the LARGE knob to select the waypoint
name. When the arrow cursor points to the desired waypoint
name, press the INFO key to get information about the
waypoint. Press the INFO keyagain to return tothe navigation
function.
Thewaypoint information function also works with the nearest
function.This allows you toquickly get information aboutany
of the waypoints nearest to your present position.
Press the GOTO/NRST key to search for nearest
waypoints. When the list of these waypoints shows on the
display, use the LARGE knob to move the arrow cursor to
the desired waypoint. Press the INFO key to get
information about the waypoint. To return to the
navigation function, press the ENT key.
Scanning
Waypoints
for
You can “scan” waypoints on the moving map screens to
get information quickly. With a moving map screen
showingon the display,presstheENT key severaltimes.
Information
P/N 560-0119-00 3-11
Page 39

Navigating a Trip Apollo 360 Map Display
Notice that the highlight moves from the destination
waypoint to a different waypoint on the screen each time
you press this key. When the highlight has moved to the
desired waypoint, press the INFO key to get information
about the waypoint. This feature makes it fast and
convenient to get information about any waypoint near
your flight path while you navigate.
3-12 P/N 560-0119-00
Page 40

Apollo 360 Map Display Menu Function Options
Section 4
Menu Function Options
This section details options available when you use the
menu function. Use this function to access a menu of
options that modify the way navigation information is
displayed. The menu options allow you to customize the
Apollo 360 to best suit your navigation requirements. The
menu function also controls many other important ways
the unit operates. A list of menu option default settings
(those in effect when the unit is first switched on) for each
option is included at the back of this section. Option
settings are stored in memory and remain in effect until
you change them.
Note
Background navigation calculations are not
interrupted while you use other features.
The menu function makes these options available:
n
Return to Nav
Returns the unit from the menu function to the
navigation function
n
Screen Controls
Contains control settings for display backlight and
contrastas well as1-Leg/3-Legroutedisplay selection
n
Map Setups
Contains control settings for information shown on
moving map screens (navigation function)
n
Declutter Maps
Limits items shown on the moving map screens and in
the nearest waypoints list
n
Track Point History
Controls navigation “track point” storage in memory
P/N 560-0119-00 4-1
Page 41

Menu Function Options Apollo 360 Map Display
and whether points show on moving map screens
(navigation function)
n
Arrival Alerts
Controls alert message at waypoint arrival
n
Airspace Alerts
Controls airspace penetration alert message
n
Countdown Time
Controls built-in countdown timer
n
Display Units
Contains control settings for navigation units of
measure
n
User Wpt Mgmt
Controls editing or deletion of waypoints you have
entered in the Apollo 360’s memory
n
System Info 1
Enables viewing of unit serial number and current
hardware and software version information
n
System Info 2
Shows current database and operating system versions
Takeamomenttobecomefamiliarwitheachmenuoption.
Use the information in this section to explore each option
and understand how it affects the operation of the Apollo
360. This sectioncan also serve as areference for later use
to refresh your memory about options you may use
infrequently.
4-2 P/N 560-0119-00
Page 42

Apollo 360 Map Display Menu Function Options
The
Main
Menu
Changing
Menu
Option
Settings
Return to
Nav
The main menu contains all menu function options. You
cancall up the main menu anytime to use the options. Press
the MENU key. When the main menu shows on the
display, select the desired option by turning the LARGE
knob to move the arrow cursor up or down the list of
options. With the desired option selected, press the ENT
key to activate it.
Changingsettings on any menu option screen isdoneinthe
same way. Use the LARGE knob to move the highlighton
the screen tothe option item you wishto change. Then use
the SMALL knob to change the setting.
Usethisoptionto leave the menu function and return to the
screenshown on the display before youpressedtheMENU
key. This option is typically used when you are ready to
continue navigating after using other menu options to
make changes.
Note
“RETURN TO NAV” is automatically selected when
you call the main menu. If you accidentally select the
wrongmenu option or if youdecideto abandon making
changes, you can easily leave the menu function by
pressing the MENU key to again call the main menu.
With “RETURN TO NAV” selected, press the ENT key
to leave the menu function, or turn the LARGE knob to
select a different option.
P/N 560-0119-00 4-3
Page 43

Menu Function Options Apollo 360 Map Display
Screen
Controls
Thisoption controls operationofthedisplay backlight, and
allows you to adjust display contrast. Turn the SMALL
knob to select backlight Off, Lo, MLo, MHi, or Hi
intensity levels. This option also allows selection of either
1-Leg or 3-Leg Route Display screens.
Note
You can also control the display backlight using the
backlightkeyatthe lower right of the front panel. Press
this key repeatedly to switch the backlight intensity
through the levels described above.
Turn the LARGE knob to select “CONTRAST.” Adjust
display contrast by turning the SMALL knob.
Adjustthe contrast to suit your preference andviewing angle.
As you makeadjustments, the horizontalbar at thebottom of
the display shows the current contrast level. “-” indicates
lowercontrast, while “+” indicateshighercontrast.A contrast
settingnear the middle of the baris satisfactoryin most cases.
The contrast setting you select is stored in memory and
remains in effect until you change it.
Turnthe large knob tohighlight the route displayselection
and the small knob to select between 1-Leg and 3-Leg
RouteDisplay screens. The1-Legdisplayuses large letters
for easier viewing. The 3-Leg display provides more
information on a single screen.
Map
Setups
This option controls what and how information shows on
the moving map screens. Select whether or not the Apollo
360 should show a route path or airspaces in the vicinity.
4-4 P/N 560-0119-00
Page 44

Apollo 360 Map Display Menu Function Options
With route path “ON,” a line representing your intended
flight path shows on the moving map screens to aid you in
navigating to your destination. Zooming in on the moving
map screens, you can clearly see deviation from your
course.
When airspaces are “ON,” airspace boundaries show on
the moving map screens.
“ORIENT UP” allows you to select orientation of the
moving maps, with the top of the screen representing
current track, desired track, or true north.
Declutter
Maps
This option controls the waypoints that show on the
moving map screens and are used for nearest waypoint
search. Types of waypoints you set to “ON” are displayed
while those set to “OFF,” are not visible on the moving
map screens. You can choose whether or not to show the
following types of waypoints:
P/N 560-0119-00 4-5
Page 45

Menu Function Options Apollo 360 Map Display
n
Airports (ARPTS)
n
Very High Frequency Omnirange (VORS)
n
Non-Directional Beacon (NDBS)
n
Intersections (INTS)
n
User Created (USERS)
The“IDENTS ON MAPS” feature controlswhether ornot
waypoint identifiers show on the moving map screens.
With “NO” selected, small symbols represent locations of
waypoints. Only the current To waypoint, and possibly
route waypoints (see Map Setups) show on the moving
map screens.
Note
The destination waypoint identifier always shows on
the moving map screens, regardless of this setting.
Track
Point
History
This option allows you to store a record of navigation
progress in memory. The stored record consists of a series
of track points, each containing your position at the time
the point was stored. You can choose whether or not to
storetrack points, how often to storethem, andmanage the
storage process using this option.
4-6 P/N 560-0119-00
Page 46

Apollo 360 Map Display Menu Function Options
Each stored track point consumes space in memory. You
can store up to 2,000 track points.
When track history is “ON,” points are stored in memory.
Yourtrack history displays on the moving mapscreensasa
series of dots showing your flight path. Each dot indicates
a stored point. When track history is “OFF,” no track
points are stored or shown on the moving map screens.
You can select the track point storage strategy. Select
“FOREVER” to continuously store points, starting again
and writing over existing points when memory becomes
full, or select “UNTIL FULL” to stop storing points when
memory becomes full.
You can also control the storage interval for track points.
Saving points by “DISTANCE” allows you to select a
distance interval to determine when each track point is
stored. Similarly, saving points by “TIME” allows you to
select the minutes and seconds interval for each track
point.
“USED” shows you the percentage of memory space used
fortrackpointstorage.Ifyouwish to empty the memory of
track points, select “CLEAR?” and choose “YES.”
Arrival
Alerts
This option controls whether or not and when the Apollo
360 should alert you of arrival at a destination.
Ifyou choose “YES” for thealertmessage, the arrival alert
will show on the display to advise you of arrival at a
destination waypoint.
P/N 560-0119-00 4-7
Page 47

Menu Function Options Apollo 360 Map Display
You can choose the radius distance around the destination
waypoint where the Apollo 360 alerts you. This distance
can be shown in the unit of measure you choose using the
“DISPLAYUNITS” setting describedlaterinthis section.
Airspace
Alerts
Use this option tocontrol whetheror not and whenthe unit
should alert you when approaching Class B, C, or special
use airspaces.
If you choose “YES” for the alert message, the airspace
alert will show onthe display advisingyou of approaching
airspacepenetration within thedistanceortime you select.
The distance buffer is the distance from the airspace border
whereyou will be alerted.This distance can be shownin the
unit of measure you choose using the “DISPLAY UNITS”
setting described later in this section. The time buffer
contains the travel time (based upon current track and
speed) from the airspace border where you will be alerted.
4-8 P/N 560-0119-00
Page 48

Apollo 360 Map Display Menu Function Options
Count-
down
Time
The Apollo 360 includes a countdown timer. Use this
option to count elapsed time from as long as 60 minutes.
Enter a “TOTAL TIME” ofup to 60 minutes (60:00). You
can select a total time at:
n
1 second intervals from 1 to 10 seconds
n
5 second intervals from 10 to 60 seconds
n
10 second intervals from 1 minute to 10 minutes
n
30 second intervals from 10 minutes to 60 minutes
Select “START” and press the ENT key to begin
countdown from the total time shown. As the countdown
progresses, the screen shows “COUNTING” during the
time you can stop the countdown, and continue it later.
Select “EXIT” to return to the main menu.
Note
The countdown timer can run“in the background” while
you navigate and will not interfere with unit operation.
An alert message shows on the display when the
countdown time has expired.
P/N 560-0119-00 4-9
Page 49

Menu Function Options Apollo 360 Map Display
Display
Units
This option controls the way navigation units of measure
show on the display.The units ofmeasure you select show
consistently throughout all screens in all operating
functions.
You can select the following units of measure for each
navigation parameter:
n
Distance - nm/kts; sm/mph; km/kph
n
Altitude- feet; meters
n
Lat/lon - d-m.mmm; d-m-s.s (where d=degrees,
m=minutes, and s=seconds of latitude or longitude)
n
UTMS - Universal Transverse Mercator System
User
Waypoint
Manage-
This option allows you to manage waypoints you have
created(user waypoints). You can edit ordelete waypoints
as your area of travel or other requirements change.
ment
You can edit created waypoints to change the waypoint
name or lat/lon coordinates. To edit a waypoint, turn the
LARGE knob to move the arrow cursor to the desired
waypoint. Turn the SMALL knob to select “EDIT.”
4-10 P/N 560-0119-00
Page 50

Apollo 360 Map Display Menu Function Options
Move the highlight to the desired name character or
coordinatedigit to make changes. When you finish making
changes, press the ENT key to save changes in memory.
Note
It is important to manage user waypoints wisely. With
the capacity to store up to 2,000 user waypoints in
memory, the Apollo 360 can hold an immense amount
of information. When you edit, use intuitive identifiers
for waypoints you have created. This will help you find
waypoints more easily when you need to navigate to
them.
You can also delete waypoints you no longer need. With
the arrow cursor at the waypoint you wish to delete, move
the highlight at the bottom of the screen to “DEL” and
press the ENT key. The waypoint is removed from
memory.
Important
Waypointsdeleted from memorycannotberecovered.
When you are finished, press the MENU key to return to
the main menu.
P/N 560-0119-00 4-11
Page 51

Menu Function Options Apollo 360 Map Display
System
Info 1
System
Info 2
This option shows your Apollo 360 serial number and
hardware and software version information.
You will needthis information and the informationshown
onthe System Info 2 screen if you contactthefactoryabout
the unit. Record the serial number on your owner’s
warrantyrecord and keep thecard inasafe place with your
avionic instrumentation records.
This option contains more information about the software
and database your Apollo 360 is equipped with. Also
provide this information in correspondence with the
factory about your unit.
4-12 P/N 560-0119-00
Page 52

Apollo 360 Map Display Menu Function Options
Default
Settings
The Apollo 360 is shipped from the factory with menu
optionssetasshownhere.Note that where a range exits for
a setting, the upper and lower boundaries are shown with
the default setting shown as bold.
These menu option settings are stored in memory and
remain in effect until you change them.
Option Description Defualt Alert
Screen
Controls
Map Setups Route Path:
Route Disp:
Backlight:
Contrast:
Airspaces:
Orient Up:
1-Leg
Hi
0 -
50 - 100%
ON
ON
NORTH
N/A
N/A
TRK
DTK
Declutter
Maps
Track Point
History
Arrival Alerts Alert Message:
Airspace
Alerts
ARPTS:
VORS:
NDBS:
INTS:
USERS:
Idents On
Maps:
Track History:
Strategy:
Save By:
Interval:
Used:
Clear?
Distance:
Alert Message:
Dist. Buffer:
Time Buffer:
ON
ON
OFF
OFF
OFF
YES
ON
FOREVER
DIST - TIME
.50 - 10nm
.1 -
0 - 100%
NO
NO
1 - 9.9 nm
.1 YES
2 - 100 nm
0 -
10 - 20 min
0 -
N/A
N/A
YES
YES
P/N 560-0119-00 4-13
Page 53

Menu Function Options Apollo 360 Map Display
Option Description Default Alert
Countdown
Time
Display Units Distance:
User Wpt
Mgmt
System Info 1 No default
Total Time: (User
programmable
1sec. to 60 min.)
NM/KTS
Altitude:
Lat/Lon:
No default
FEET
D-M.MMM
N/A N/A
settings
N/A N/A
When
time
expires
N/A
settings
System Info 2 No default
N/A N/A
settings
4-14 P/N 560-0119-00
Page 54

Apollo 360 Map Display The Waypoint Database
Section 5
The Waypoint Database
Database
Structure
The Apollo 360 provides an extensive built-in database of
waypoint information to aid the navigator.
Waypoints in the database aredivided into 6 categories by
type. This category structure allows you to more easily
search for waypoint information, search for nearest
waypoints, or display waypoints on moving map screens.
The database filters waypoints by these types whenever
you use it, controlling, organizing, and speeding the
delivery of information.
The waypoint types are:
n
Airports (ARPTs)
n
Non-directional beacons (NDBs)
n
Very high frequency omniranges (VORs)
n
Enroute intersections (INTs)
n
User created (USERs)
n
Remote waypoints (REMOs)
The sixth type is Remote (REMO) waypoints. The Apollo
360 will attempt to match received route information with
it’s internal database. It does this by looking for an exact
match with the received identifier and a position match
within 1/100th of a minute of latitude and longitude.
If no match is found,the received identifier and it’s lat/lon
position are stored as a remote waypoint type in the 360
route list.
P/N 560-0119-00 5-1
Page 55

The Waypoint Database Apollo 360 Map Display
Available
Waypoint
Information
The following information is available for each waypoint
type. Use the waypoint INFO function to get this
information as Section 1 describes in “Waypoint
Information Function.”
ARPT Waypoint Information
n
Bearing and distance from present position
n
Airport type
n
Airport elevation
n
Fuel availability by type
n
Runway length(s) and surface type
n
Radio communication frequencies (an asterisk at the
frequency indicates part-time availability; “PCL” at the
frequency indicates pilot controlled lighting, an “R”
indicatesthat Radar serviceisavailableon this frequency.)
n
Lat/lon coordinates
n
Navigation beacon light
n
IFR capability
n
Landing fee
5-2 P/N 560-0119-00
Page 56

Apollo 360 Map Display The Waypoint Database
VOR Waypoint Information
n
Bearing and distance from present position
n
Operating frequency
n
Lat/lon coordinates
n
DME available
n
Class (high/low/terminal)
n
Weather broadcasts
NDB Waypoint Information
n
Bearing and distance from present position
n
Operating frequency
n
Lat/lon coordinates
n
DME available
n
Class (high/low/terminal)
P/N 560-0119-00 5-3
Page 57

The Waypoint Database Apollo 360 Map Display
INT Waypoint Information
n
Country
n
Bearing and distance from present position
n
Bearing from present position
n
Lat/lon coordinates
USER Waypoint Information
n
Bearing and distance from present position
n
Distance from present position
n
Lat/lon coordinates
Remote Waypoint Information
n
Bearing and distance from present position
n
Lat/lon coordinates
5-4 P/N 560-0119-00
Page 58

Apollo 360 Map Display Glossary of Navigation Terms
Appendix A
Glossary of Navigation Terms
A
B
C
Automatic Terminal Information Service (ATIS):
Recorded information about weather and other conditions
at an airport, periodically updated when conditions
change.
Azimuth: Bearing, as measured clockwise from true or
magnetic north.
Bearing (BRG): The direction to any point, usually
measured in degrees relative to true or magnetic north.
Constellation: A group of stars or objects, such as GPS
satellites, in the heavens.
Coordinates: Values for latitude and longitude that
describe a geographical point on the surface of the earth.
Course: The planned direction of travel in a horizontal
plane.
Course Deviation: A measurement of distance left or
right from the desired course of travel.
Course Deviation Indicator (CDI): A graphic indicator
of course deviation typically shown as a graduated
horizontal bar with an icon indicating the deviation
distance left or right of course.
Common Traffic Advisory Frequency (CTAF)
D
P/N 560-0119-00 A-1
Database:A collection of data structured in such a way as
to allow quick and convenient access to any particular
record or records. The Apollo 360 contains a built-in
Page 59

Glossary of Navigation Terms Apollo 360 Map Display
database of waypoints and waypoint information. Users
may add waypoints to this database.
Degree: 1/360th of a circle.
Desired Track (DTK): The desired course of navigation
between a point of origin and a destination waypoint.
Distance: A measure of interval in space. Also referred to
as range.
Distance Measuring Equipment (DME)
Drift: Displacement from the intended course of travel.
E
F
G
Elevation: The altitude above ground.
Estimated Time of Arrival (ETA)
Estimated Time Enroute (ETE)
Fix: A geographical location determined by either visual
reference or by electronic navigation aids.
Ground (GRND): Ground communication frequency
GroundSpeed (GS): Speed of travel across the ground. In
aviation, the relation between ground speed and air speed
is affected by the prevailing winds.
I
Icon: A symbol shown on the display depicting present
position. The icon is shown as a symbol of an airplane on
the Apollo 360’s moving map screens.
Identifier: A name, typically abbreviated, assigned to a
waypoint.Theidentifiermayconsistofnumbersandalpha
characters, up to six in length. For example, the airport
identifier for Los Angeles International Airport is LAX.
A-2 P/N 560-0119-00
Page 60

Apollo 360 Map Display Glossary of Navigation Terms
Instrument Flight Rules (IFR)
Intersection (INT): A point defined by any combination
ofcourses,radials, or bearings of two or more navigational
aids.
K
L
M
Knot (kt): A unit of speed equal to one nautical mile per
hour.
Latitude (lat): Any line circling the earth parallel to the
equator, measured in degrees, minutes, and seconds north
and south of the equator.
Longitude(lon): Any line fromthenorthtothe south pole,
measured in degrees, minutes,and seconds of acircle, east
or west of the Prime Meridian (Greenwich, England).
Magnetic North: The region, some distance from the
geographic north pole where the earth’s magnetic lines
concentrate. A magnetic compass points to the magnetic
north.
Magnetic Variation (Mag Var): The angle between the
magnetic and true north.At various points onthe earth it is
differentduetolocalmagneticdisturbances.Itisshownon
charts as isogonic lines marked with degrees of variation,
either east or west. These degrees must be added to or
subtracted from the true course to get the magnetic course.
(Easterly variations are deducted, and westerly variations
are added.)
Map Datum: A mathematical model of the earth used for
the purpose of creating navigation charts and maps.
Meter(m):A metric distance measurement equalto 39.37
inches.
Minute: 1/60th of a degree.
P/N 560-0119-00 A-3
Page 61

Glossary of Navigation Terms Apollo 360 Map Display
N
Nautical Mile (nm): A distance measurement equal to
6,076 feet, or 1.15 statute mile. One nautical mile is also
equal to one minute of latitude.
Non-directional Beacon (NDB): A low
frequency/medium frequency navigation aid sending
non-directional signals that can be used for navigation.
P
PositionDilutionofPrecision(PDOP): A merit value for
the calculated position based on the geometrical
configuration of the satellites used; 3 is considered good,
greater than 7 is considered poor.
R
Radial: Any of the 360 magnetic courses from a VOR or
similar navigational aid, beginning at the navigational aid
and proceeding outward in a straight line.
Range(RNG): The distance fromthe present position toa
destination waypoint.
S
Second: 1/60th of a minute of a degree.
Statute Mile: Adistance measurement equalto 5,280 feet
or 0.87 of a nautical mile.
T
Three-dimensional (3D) Position Fix: A position fix
defined by latitude, longitude, and altitude.
Track(TRK):Theimaginary line that the flight path of an
airplane makes over the earth.
True North: Geographic north, at the earth’s north pole.
Tower (TWR): Airport tower communication frequency
U
UNICOM:The radio frequencies assigned to aeronautical
advisory stations for communication with aircraft.
A-4 P/N 560-0119-00
Page 62

Apollo 360 Map Display Glossary of Navigation Terms
Unicoms may provide such airport information as active
runway, wind direction and velocity and other conditions
of importance to pilots.
Universal Coordinated Time (UTC): Greenwich Mean
Time, or the time at the Prime Meridian in Greenwich,
England. Also referred to as Zulu time.
UTC Differential: The difference in time between that at
the present position and UTC.
V
W
Very High Frequency Omnirange (VOR): A
navigational aid that transmits signals such that a receiver
can indicate its current radial or bearing from the
transmitter.
Waypoint: A navigational fix used in area navigation and
defined by latitude and longitude coordinates.
P/N 560-0119-00 A-5
Page 63

Glossary of Navigation Terms Apollo 360 Map Display
Notes
A-6 P/N 560-0119-00
Page 64

Apollo 360 Map Display Troubleshooting
Appendix B
Troubleshooting
This appendix contains information to troubleshoot the
Apollo 360 when improper operation is observed. The
table below lists possible problems you could encounter
while operating the unit. Examine the possible causes of
theproblem and take the actionlistedtocorrectthe trouble.
If you cannot correct the problem, contact your dealer. If
yourdealerisunavailable,contacttheIIMorrowfactoryat
the address and phone number listed at the back of this
appendix.
Problem Possible Cause(s) Action
Unit does
not power
on
No Host
signal
input
Display too
dark or too
light characters
hard to see
Open in power
supply circuit
Faulty electrical
wiring or
connection
Host device not
turned on
Faulty wiring or
connection
Change in view
angle or ambient
light conditions
in cockpit
Check circuit breaker reset if necessary
Contact your dealer to
perform electrical
system test
Ensure that host device
is powered up
Contact your dealer to
check wiring ensure
that unit is properly
connected.
Adjust display backlight
(use backlight key) or
adjust display contrast as
Section 5 describes in
“Screen Controls”
option
P/N 560-0119-00 B-1
Page 65

Troubleshooting Apollo 360 Map Display
Problem Possible Cause(s) Action
No position
fix
Host navigation
device hasn’t
acquired fix yet
Ensure that host device
is working properly &
in view of navigation
signal input
No active route
in host navigation
device
Some host devices
won’t supply nav.
information unless an
active route is present.
Configure & activate a
route in host device
Search for
nearest
waypoints
reveals too
few or
Incorrect
selection of
waypoint types to
show after search
Check “Declutter Maps”
option as Section 5
describes to verify that
desired waypoint types
to search are “On”
wrong types
of waypoints
Wrong types
of waypoints
show on
moving map
screens
Incorrect
selection of
waypoint types to
show on moving
map screens
See action above - the
waypoint types you set to
“No” do not show on
moving map screens OR
after nearest waypoint
searches
Airspace
boundaries
missing
from
moving map
Airspace display
on moving map
screens set to
“Off”
Check “Map Setup”
option as Section 5
describes and verify that
“Airspaces” item is set
to “Yes”
screens
Line
representing
route path
on moving
map screens
Route path
display on
moving map
screens set to
“Off”
Check “Map Setup”
option as Section 5
describes and verify that
“Route Path” item is set
to “Yes”
is missing
B-2 P/N 560-0119-00
Page 66

Apollo 360 Map Display Troubleshooting
Contacting
the
Factory
If efforts to resolve theproblem fail, contact yourdealer or
the factory weekdays from 8:00 A.M. until 5:00 P.M.
Pacific time for technical assistance. The II Morrow
technical service staff will gladly assist you.
II Morrow Inc.
Technical Service Department
2345 Turner Road S.E.
Salem, OR 97301 U.S.A.
U.S.A. Toll Free 800-525-6726
Canada Toll Free 800-654-3415
FAX (503) 364-2138
International (503) 391-3411
P/N 560-0119-00 B-3
Page 67

Troubleshooting Apollo 360 Map Display
Notes
B-4 P/N 560-0119-00
Page 68

Apollo 360 Map Display Features
Appendix C
Features
The Apollo 360 is a powerful and versatile, supplemental
navigation display aid designed with the latest technology
to offer you unprecedented ease in navigating your
aircraft. The unit includes:
n
A graphic LCD display with adjustable contrast and
backlight
n
Display contrast automatically compensates to
maintain optimum contrast during shifts in ambient
temperature
n
A moving map display to graphically show your
navigation progress
n
An extensive built-in database of airports, VORs,
NDBs, and Intersections
n
Memory capacity to store up to 2,000 user created
waypoints
n
Low power consumption circuitry
n
A lightweight chassis to minimize instrument weight
n
An internal fuse to protect against damage to electronic
components (not user replaceable)
n
A memory backup batteryto protectagainst loss of user
entered data (typical battery life is 4 to 6 years)
n
A built-in lowbattery alert to advise you when memory
backup battery requires replacement (not user
replaceable)
P/N 560-0119-00 C-1
Page 69

Features Apollo 360 Map Display
Notes:
C-2 P/N 560-0119-00
Page 70

Apollo 360 Map Display
Limited Warranty
1. Scope of Limited Warranty
II Morrow warrants to the original consumer
purchaser only that II Morrow products will be
free of defects in materials and workmanship,
under normal use, for the periods described
below.Thewarranty begins on theoriginalretail
delivery date, or on the date of first use,
whicheveroccurs earlier. Avionics equipmentis
covered for 26 months (12 months
reconditioned) after delivery or first use,
whichever is earlier. Antennas and antenna
preamplifiers are covered for a period of 12
months after delivery or first use, whichever is
earlier. This warranty shall be effective only if
and when (a) II Morrow receives a completed
warranty registration card with respect to the
specific product unit found to be defective,
(b) the unit was installed by personnel certified
by the FAA to install avionic equipment and a
copy of FAA Form 337 documenting the
installation is provided to II Morrow (except
homebuilts), (c) II Morrow receives notice of
such defect during the period of the warranty,
and (d) the consumer purchases the unit in the
United States or Canada. II Morrow’s sole and
exclusive liability, and purchaser’s sole and
exclusive remedy under this Limited Warranty
shall be, at II Morrow’s option, either (a) the
repairor replacement of the defective product or
(b) the return of the price paid for such product.
This Limited Warranty shall apply to a repaired
or replacement product only for the remaining,
unexpired portion of the warranty period
applicable to the original product. In no event
shall II Morrow’s liability exceed the purchase
price of the defective product. This Limited
Warranty gives you specific legal rights. You
may have other rights which vary from state to
state.
2. No Other Warranties
TO THE EXTENT PERMITTED BY
APPLICABLE LAW, AND EXCEPT ONLY
AS PROVIDED IN PARAGRAPH 1 ABOVE,
THE PRODUCTS ARE PROVIDED “AS IS”
AND WITHOUT WARRANTY OF ANY
KIND, EITHER EXPRESS OR IMPLIED,
INCLUDING BUT NOT LIMITED TO, THE
IMPLIED WARRANTIES OF
MERCHANTABILITY AND FITNESS FOR
A PARTICULAR PURPOSE.
3. Exclusion of Liability for Damages
IN NO EVENT SHALL II MORROW, ANY
DISTRIBUTOR, OR THE SELLING
DEALER BE LIABLE FOR ANY DIRECT,
INDIRECT, SPECIAL, INCIDENTAL,
CONSEQUENTIAL, PUNITIVE, OR
EXEMPLARY DAMAGES (INCLUDING
LOSS OF PROFITS, LOSS OF TIME, OR
INCONVENIENCE) WHETHER BASED ON
CONTRACT, TORT, STRICT LIABILITY,
OR ANY OTHER LEGAL THEORY, EVEN
IF II MORROW, SUCH DISTRIBUTOR, OR
THESELLING DEALER WASADVISED OF
THE POSSIBILITY OF SUCH DAMAGES.
Some states do not allow limitations of
incidental or consequential damages, so the
above limitation may not apply to you.
4. Limitation of Warranty
The foregoing warranty is void if any defect to
perform results from (a) improper or inadequate
maintenance, (b) unauthorized modification of
any product, (c) operation of the products outside
of their environmental specifications, (d)
improperinstallation, (e) neglect, misuse,or abuse
of the products, (f) integration with other products
not covered by a II Morrow warranty, or (g)
exposure to corrosive environments. This
warranty shall not apply to any products not
manufactured by II Morrow. No one is authorized
to change or add to this Limited Warranty.
II Morrow makes no warranty with respect to any
installation if II Morrow products, whether such
installation is performed by II Morrow, any
authorized dealer, or any other person.
5. Technical Assistance
The Limited Warranty set forth above shall not
be enlarged, diminished, or affected by, and no
obligation or liability shall arise from
II Morrow, any authorized dealer, or any person
rendering technical advice, assistance, or
service in connection with the selection,
purchase, or use of any II Morrow products.
6. Place of Repair or Replacement
In order to obtain the benefits of this Limited
Warranty, the defective II Morrow products,
along with a copy of your receipt, must be
returned within the applicable warranty period
and with the transportation charges prepaid, to
IIMorrow at its plantat 2345 TurnerRoad, S.E.,
Salem, Oregon 97302 or to any authorized
II Morrow dealer. Products repaired or replaced
by II Morrow under this Limited Warranty will
be returned by surface transportation at
II Morrow’s expense.
Revised September 28, 1994
P/N 560-0119-00
 Loading...