

Page 1
Instructions....................................... 2
Instructions..................................... 12
Istruzioni......................................... 23
Anweisungen.................................. 33
Instrucciones
.................................. 44
Instruções....................................... 54
DRAFT
Page 2
Instructions
DRAFT
Introduction
WARNING
See the Important Safety and Product
Information guide in the product box for product
warnings and other important information.
The device can improve situational awareness.
It is not a replacement for attentiveness
and good judgement. Always use your best
judgment, and operate in a safe
manner.
Getting Started
You can use the rear device with
the display unit or with your
compatible ® device. This list provides an
overview of the installation and setup tasks.
• Charge the device (page 11).
• Install the rear device
using one of the included mounts:
Install the universal mount (page 3).
◦
◦ Install the post mount (page 4).
• If you are using the display, install it on
your product (page 6).
NOTE: When you purchase the rear
and display devices together, they are
already paired.
• If you are using a compatible device,
pair the devices (page 9).
2 Instructions
Page 3
The rear LEDs
DRAFT
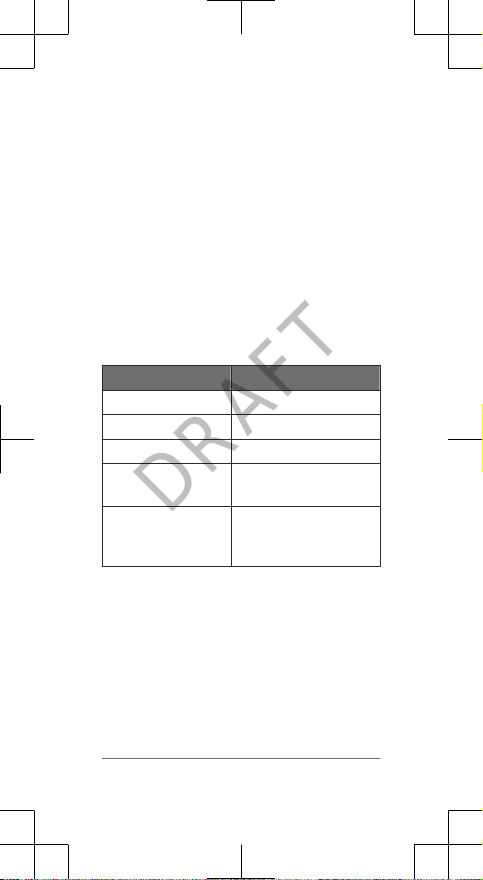
indicate the battery level. The status LED
indicates additional device information.
Â
Status LED
LED Activity Status
Flashing green The device is charging.
Solid green Charging is complete.
Flashing red The battery is low.
Solid red An error occurred while
8 rapid purple
flashes
Installing the display Device
NOTE: If you do not have a display device,
you can skip this task and use a compatible
device (page 9).
You can install the device on your product
.
Select a secure location to mount the
1
device where it does not interfere with the
safe operation of your product.
6 Instructions
fill horizontally to
Á
charging.
The device is uploading
a software update from
Garmin Express™.
Page 4

'LVSOD\ Device Overview
8 Instructions
DRAFT
Device key Turns the device on and
À
Ambient light
Á
sensor
Connection
Â
status LED
FRONT and
Ã
REAR device
status LEDs
off.
Detects available light
and automatically adjusts
the brightness of the
display.
Appears solid blue when
the device is paired with
the rear unit. Flashes blue
when the device is
searching for the rear unit.
Appears solid white when
the device battery is
charged and the device
is operating normally.
Flashes white when the
battery is low.
Page 5

Threat level
DRAFT
Ä
LED
Charging
status LED
(page 11)
Å
position LEDs
Turning On the GLVSOD\ Device
Hold the device key for 1 second to turn on
the device.
The LEDs fill the column to indicate the
battery level.
Changes color based on
the potential level of
threat.
.
.
.
.
.
.
Moves up the column as
the position gets closer to
you.
Pairing the rear with Your Compatible
Device
Before you can pair the devices, you must
update the software.
Bring the compatible device within range (3 m) of
1
the sensor.
NOTE: Stay 10 m away from other
sensors while pairing.
Turn on the device.
2
From the home screen, select >
3
Sensors > Add Sensor > .
Turn on the rear unit.
4
Select your sensor.
5
®
Instructions 9
Page 6

Device Information
Charging the Device
NOTICE
To prevent corrosion, thoroughly dry the USB
port, the weather cap, and the surrounding area
before charging or connecting to a computer.
Instructions 11
DRAFT
The device is powered by a built-in lithium-ion
battery that you can charge using a standard
wall outlet or a USB port on your computer.
NOTE: The device does not charge when
outside the approved temperature range
(page 11).
Pull up the weather cap from the USB port.
1
Plug the small end of the USB cable into
2
the USB port on the device.
Plug the large end of the USB cable into an
3
AC adapter or a computer USB port.
Plug the AC adapter into a standard wall
4
outlet.
Charge the device completely.
5
The status LED flashes green while charging.
The status LED is solid green when charging is
complete.
Specifications
Operating temperature
range
Charging temperature
range
From -20º to 60ºC
(from -4º to
140ºF)
From 0º to 45ºC
(from 32º to
113ºF)
Page 7

Support and Updates
12 Instructions
DRAFT
Garmin Express provides easy access to these
services for Garmin devices.
• Product registration
• Product manuals
• Software updates
Getting the Owner's Manual
You can get the most recent owner's manual
from the web.
Go to www.garmin.com/manuals
1
/
.
View or download the full owner's manual
2
in your preferred format.
.
Instructions
Introduction
WARNING
Consultez le guide Informations importantes
sur le produit et la sécurité inclus dans
l'emballage du produit pour prendre
connaissance des avertissements et autres
informations importantes sur le produit.
Page 8

Garmin®, the Garmin logo,
© 2015 Garmin Ltd. or its subsidiaries
www.garmin.com/support
Printed in Taiwan
May 2015 190-01906-90_0A
DRAFT
trademarks of Garmin Ltd. or its subsidiaries, registered in
the USA and other countries. Garmin Express™
are trademarks of Garmin Ltd. or its subsidiaries. These
trademarks may not be used without the express
permission of Garmin.
M/N: A02806
M/N: A02807
El número de registro COFETEL/IFETEL puede ser
revisado en el manual a través de la siguiente página de
internet.
are
 Loading...