

Page 1

INSTRUCTION
Ed : 03/17 Rev : 00
Page 2
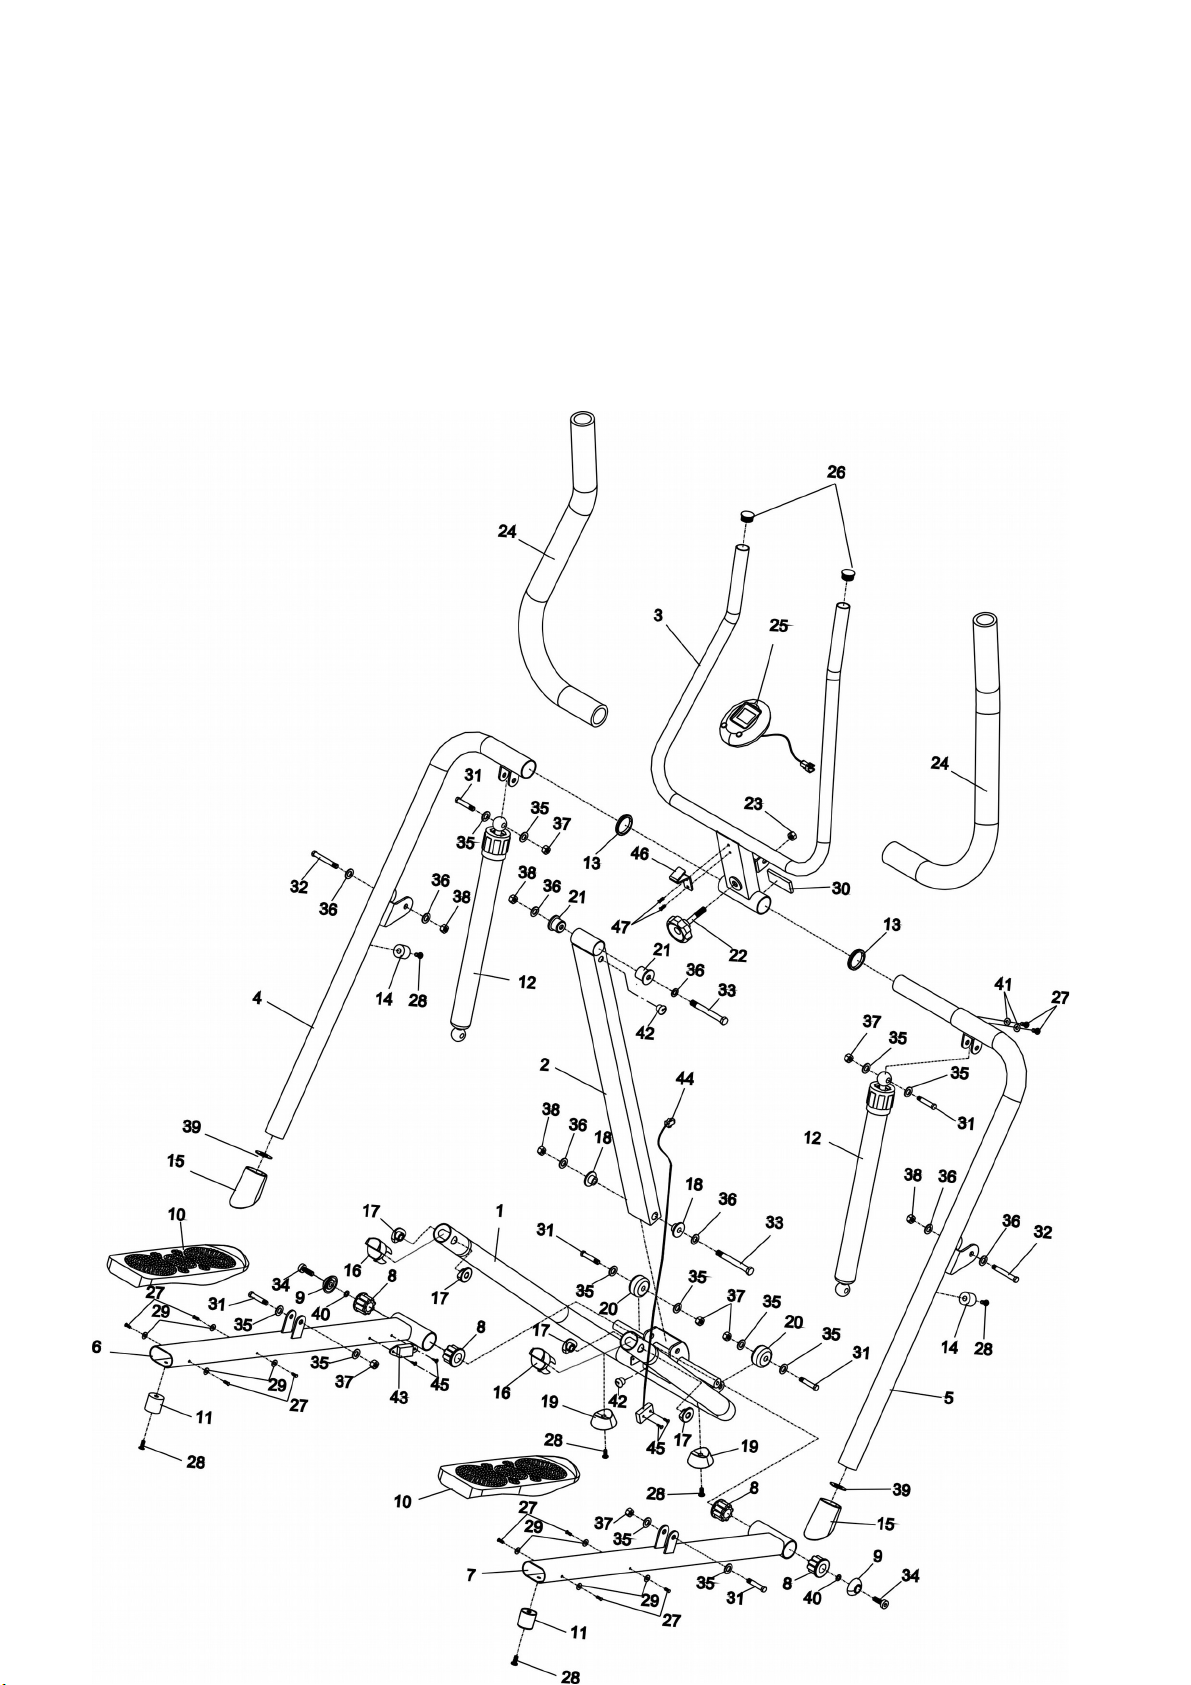
PRODUCT PARTS DRAWING
Page 3

DIAGRAM# PART NAME QTY
1 BASE FRAME 1
2 UPRIGHT SUPPORT 1
3 HANDLEBAR 1
4 LEFT LEG 1
5 RIGHT LEG 1
6 LEFT PEDAL ARM 1
7 RIGHT PEDAL ARM 1
8 PEDAL ARM BUSHING 4
9 SECURING CAP 2
10 PEDAL 2
11 PEDAL BUMPER 2
12 SHOCK 2
13 LEG SPACER 2
14 FRAME BUMPERS 2
15 STAND CAP(38mm) 2
16 SUPPORT BLOCK 2
17 FRONT FRAME BUSHING 4
18 UPRIGHT BUSHING 2
19 FRONT STAND 2
20 TRANSPORT WHEEL 2
21 HANDLEBAR BUSHING 2
22 KNOB 1
23 NUT 1
24 FOAM GRIP 2
25 METER 1
26 ROUND PLUG (25mm) 2
27 BOLT ,ROUND HEAD (M6 x 1 x 15mm) 12
28 BOLT ,ROUND HEAD (M6 x 1 x 20mm) 6
29 WASHER(M6) 8
30 EVA FORM 1
31 BOLT, HEX HEAD(M8 x 1.25 x 42mm) 6
32 BOLT, HEX HEAD (M10 x 1.5 x 70mm 2
33 BOLT, HEX HEAD (M10 x 1.5 x 85mm) 2
34 BOLT, SOCKET HEAD (M8 x 1.25X 15mm) 2
Page 4
35 WASHER (M8) 12
36 WASHER (M10) 8
37 NYLOCK NUT (M8 x 1.25) 6
38 NYLOCK NUT (M10 x 1.5) 4
39 LARGE WASHER 2
40 SPRING WASHER 2
41 ARC WASHER(M6) 2
42 GROMMET PLUG 2
43 MAGNET 1
44 SENSOR WIRE 1
45 SCREW (M3 x 15) 4
46 BRACKET 1
47 SCREW,ROUND HEAD( M5 x0.8x15mm) 2
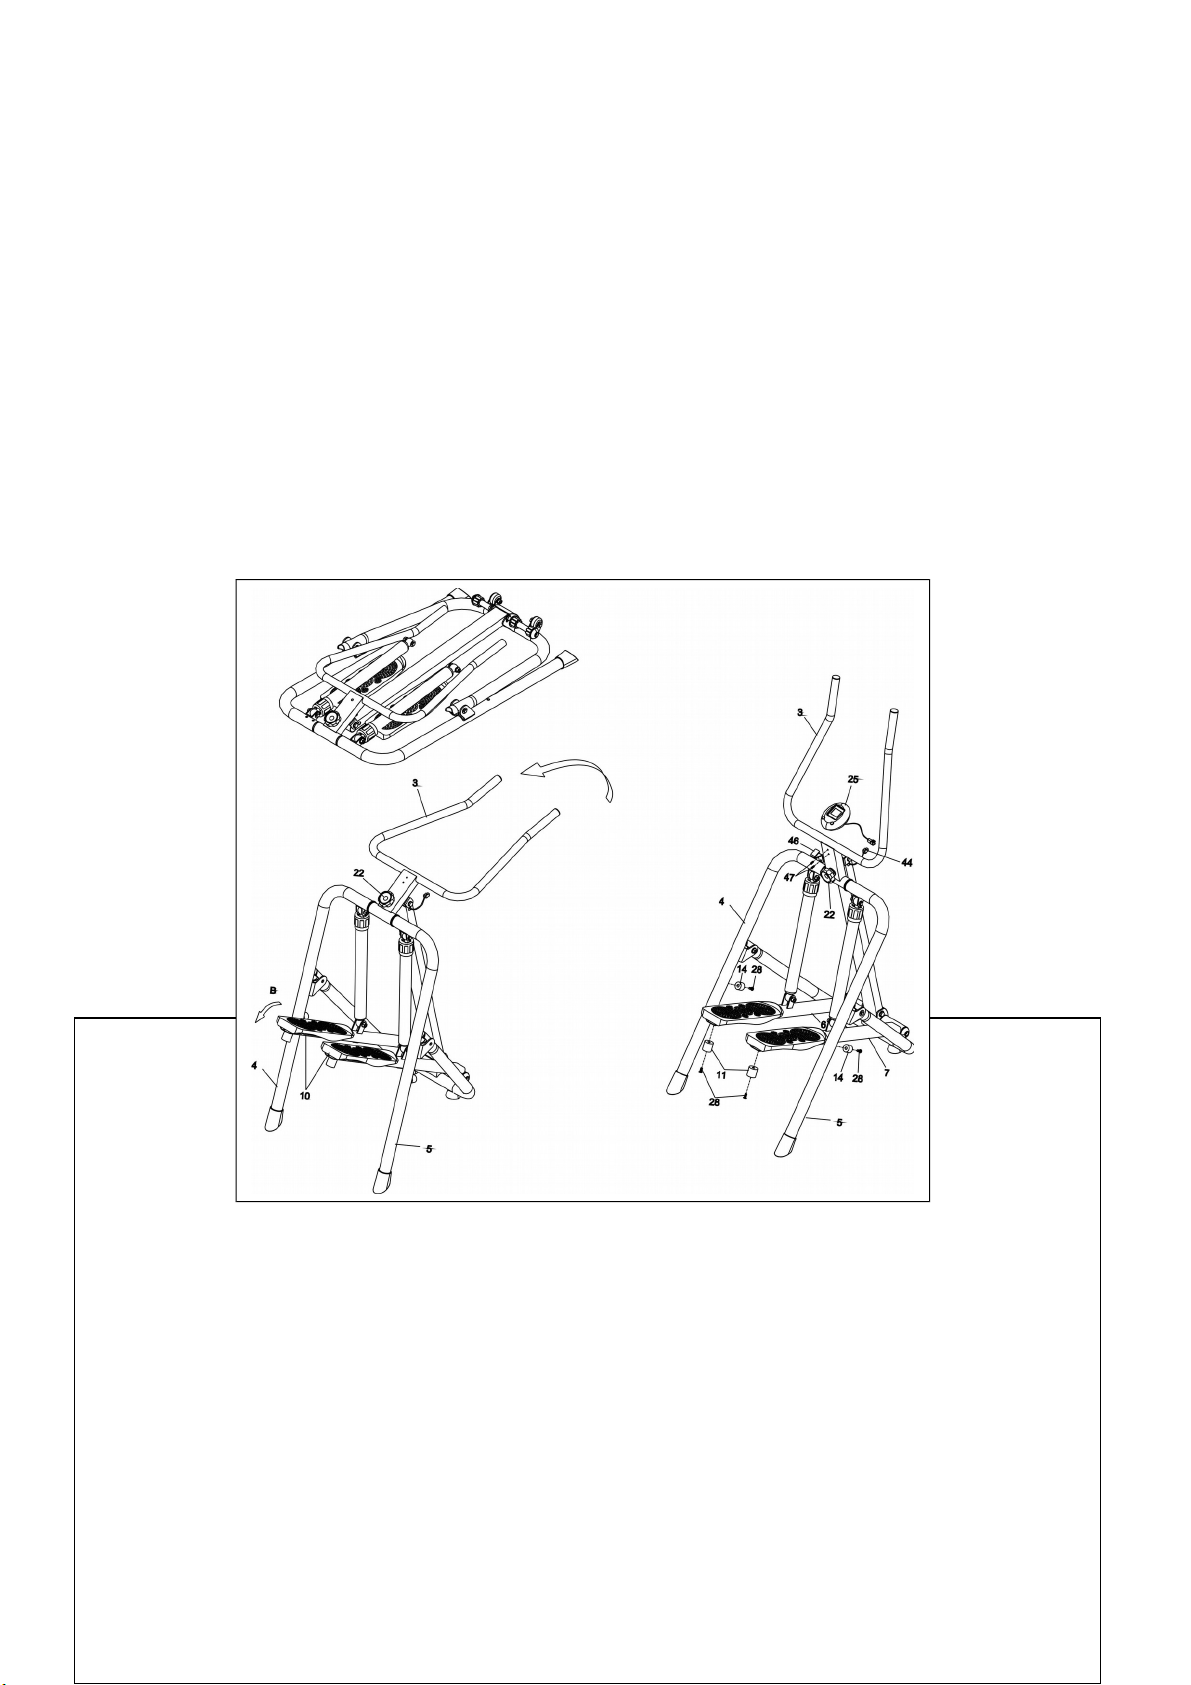
ASSEMBLY INSTRUCTIONS
STEP 1: Raise the STEPPER to an upright position and unfold the STEPPER as
Shown above.
A. Move the bottom of the LEFT and RIGHT LEGS(4,5) away from the STEPPER.
B. Push the PEDALS(10) away from the STEPPER.
C. Unfold the stepper by lifting the handle bar(3),then lock the handlebar (3) to the
uprights support with the Knob(22).
STEP 2: Press the FRAME BUMPERS (14) to the LEFT and RIGHT LEGS(4,5)
with BOLTS(M6x20mm)(28). Attach the PEDAL BUMPERS (11) to the
LEFT and RLGHT PEDAL ARMS(6,7) with BOLTS(M6 x 20mm) (28).
STEP 3: Attach the BRACKET(46) onto the HANDLEBAR (3) with
Page 5
ROUND HEAD SCREWS (M5x15MM)(47)
STEP 4. Install an “AA” battery into the METER(25), one battery included. See page 6
for detailed battery installation instructions. Slide the METER(25) onto the
BRACKET(46). Make sure the SENSOR WIRE(44) is located at the front of the
handlebar (3),then plug the sensor wire (23) into the meter(25).
NOTE: You can turn the position of the METER(25) to make the display clearly.
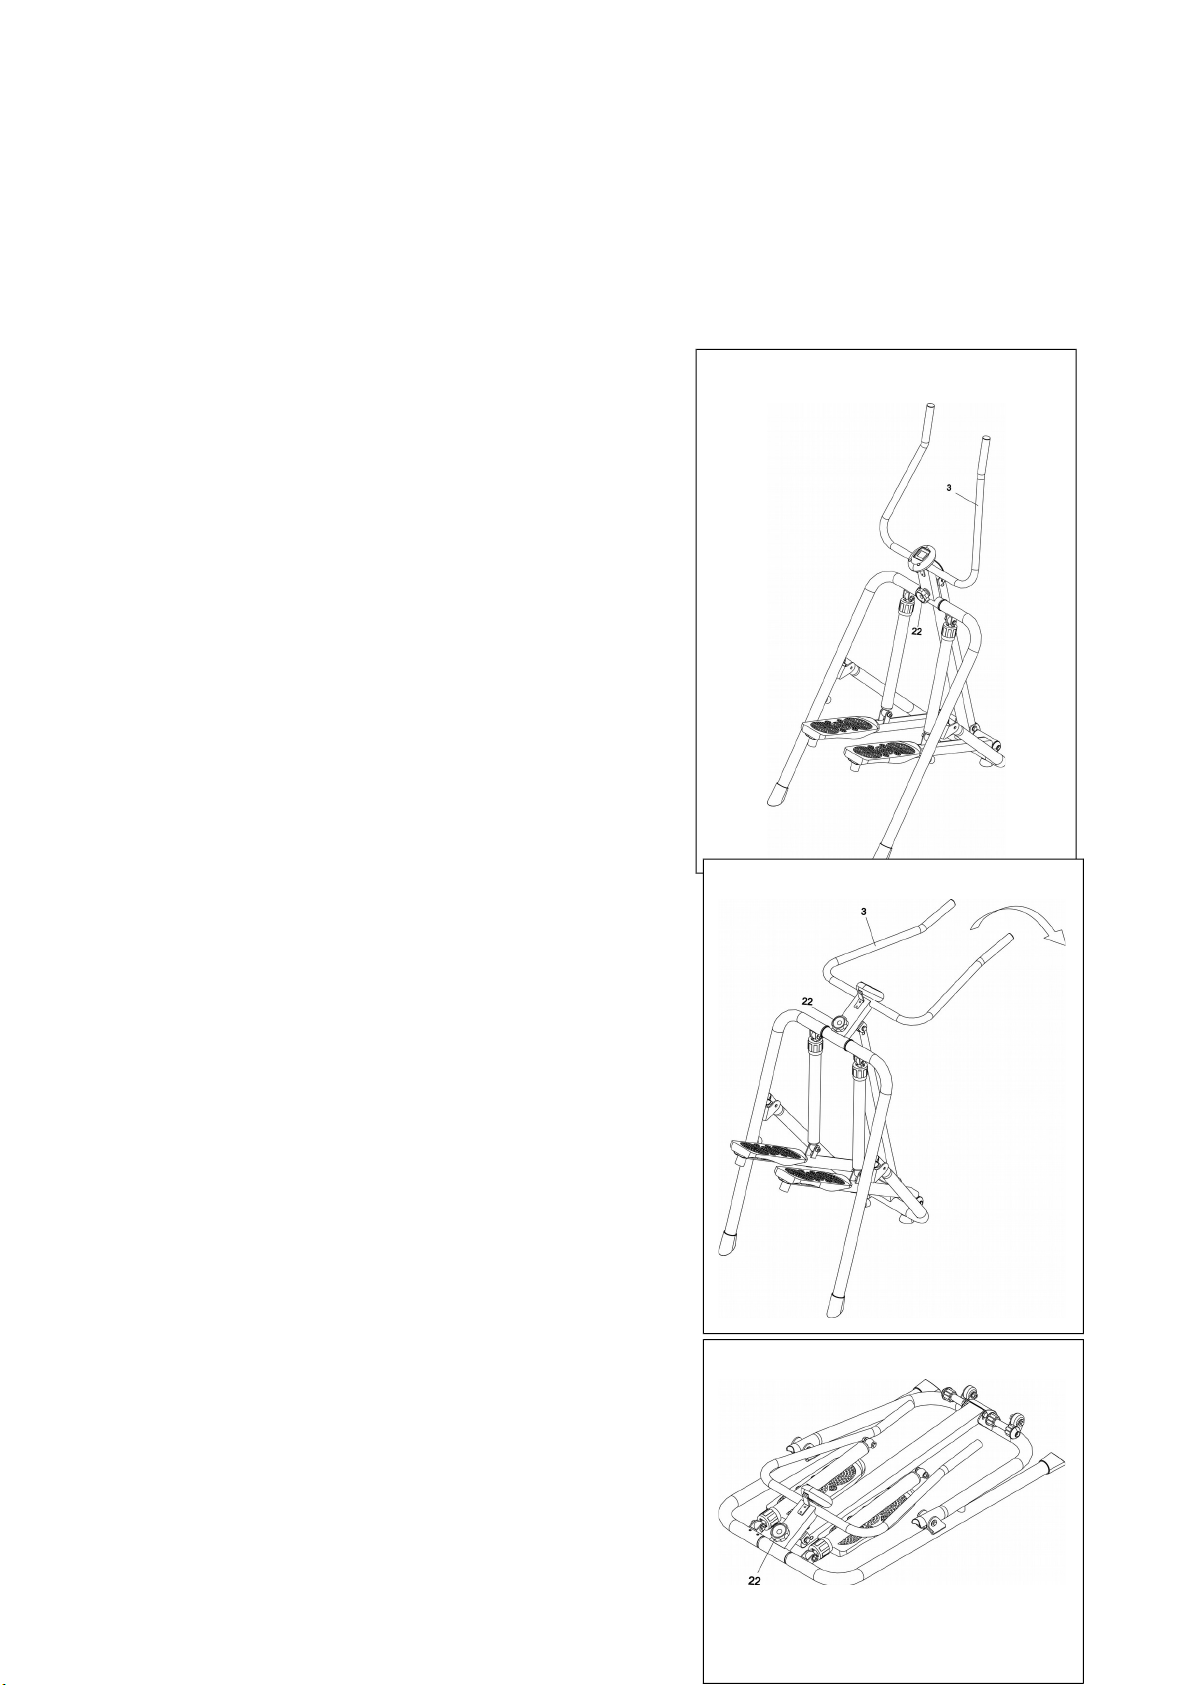
HOW TO STORE YOUR STEPPER
COMPACT
STEP 1
Loosen the KNOB (22) from the HANDLE
BAR(3).
Refer to illustration 1.
STEP 2
Swing the HANDLE BAR(3) down to the front
side to fold the STEPPER.
Refer to illustration 2.
1.
2
STEP 3
Illustration 3 shows the Folding Stepper after folding
WARNING: When folding and unfolding the
Folding Stepper ,keep all children away from the
Folding Stepper and make sure your hands are clear
of any folding or pinch point.
3
Page 6
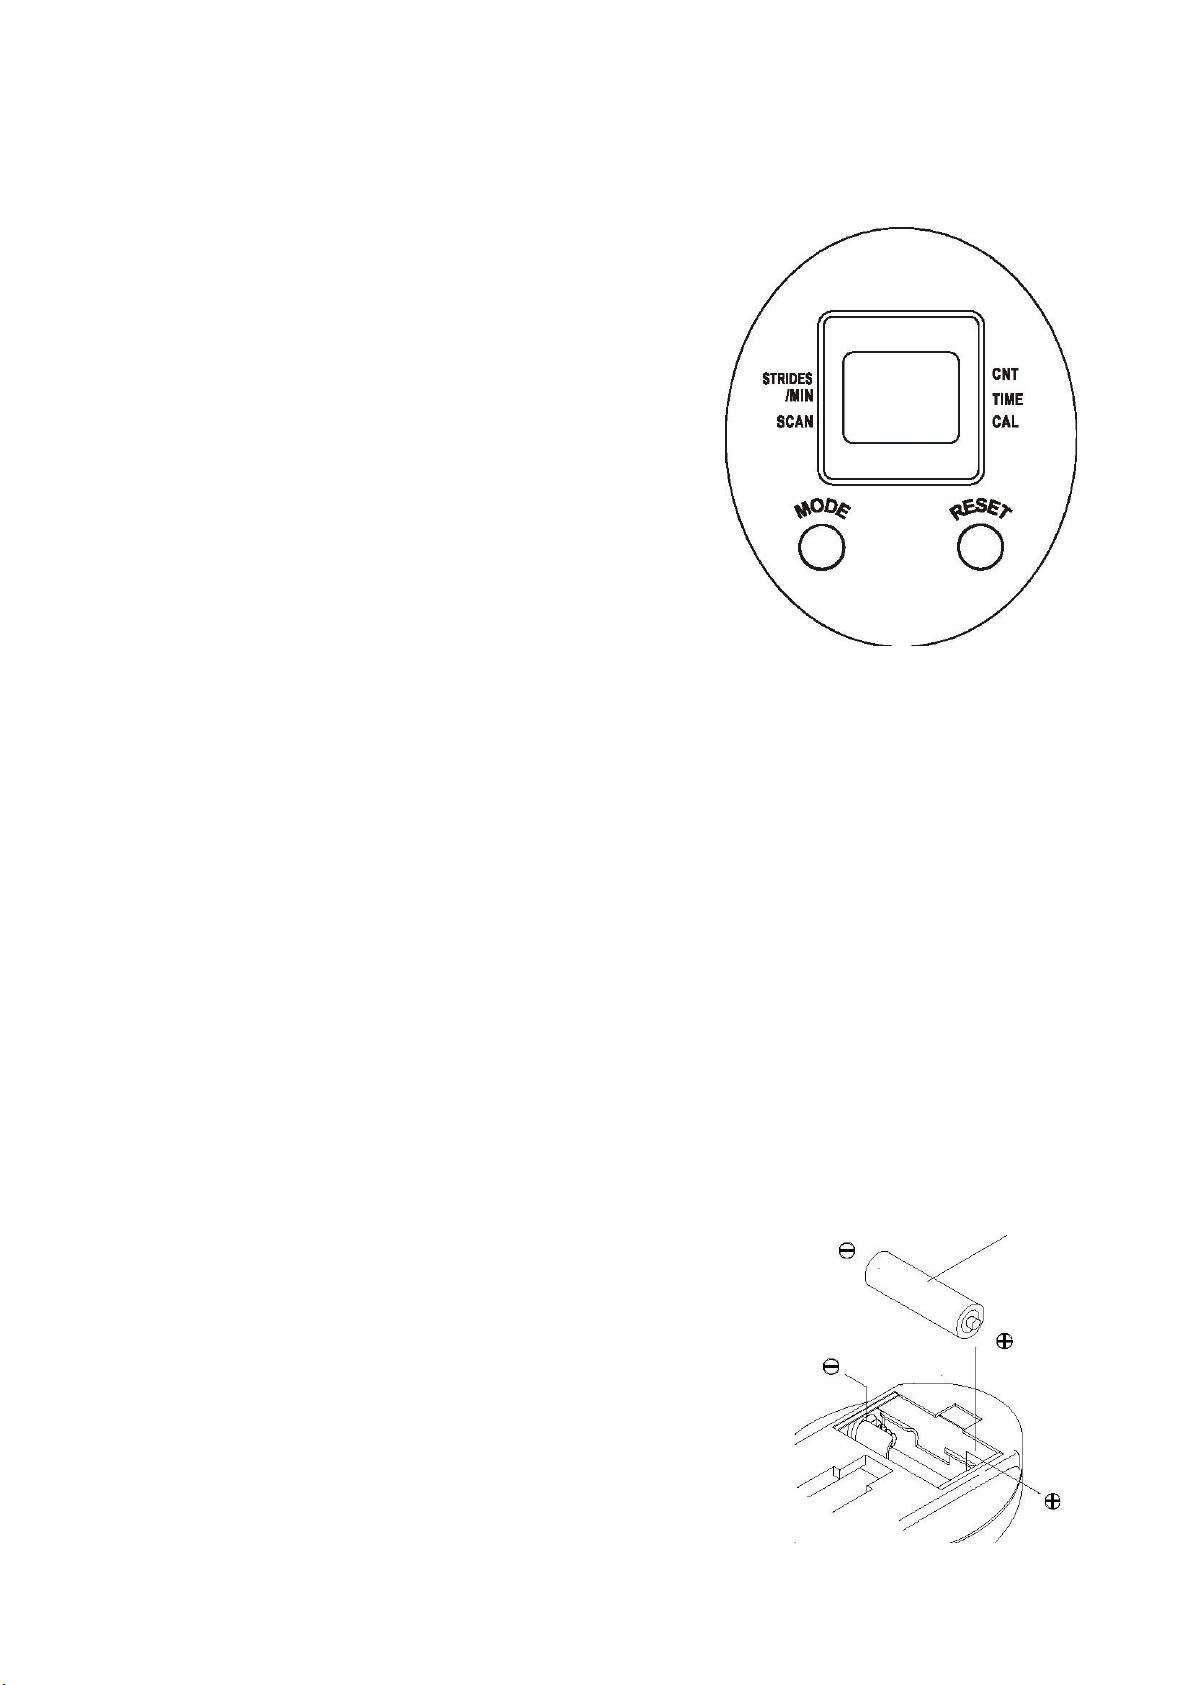
USING THE ELEVTRONIC METER
1. Rechargeable batteries are not recommended.
STRIDES/MIN: Displays the rate of strides per minute.
CALORIE: Displays the calorie consumption, from zero to 9999 cal.
comparison between workouts on this unit.
RESET : To reset all functions to zero.
How to Install and Replace Battery:
2. The meter operates with an AA battery. Refer to the illustration to
install or replace the battery.
POWER ON : Pedal movement or push any
button.
Automatic shut off after 4 minutes
POWER OFF :
FUNCTION BUTTONS:
MODE : Push to select the function of the lower readout.
of inactivity.
FUNCTIONS:
SCAN:
Automatically scans each function of TIME, CALORIE, STRIDES/MIN in sequence
with
change every 6 seconds.
COUNT :
Upper readout displays the total number of strides you have taken, from zero
to 9999 strides
TIME: Displays the riding time, from 1 sec up to 99:59 minutes.
The calorie readout is an estimate for an average user. It should be used only as a
1. Open the Battery Door on the back of the meter.
Page 7

GARLANDO SPA
Via Regione Piemonte, 32 - Zona Industriale D1
15068 - Pozzolo Formigaro (AL) - Italy
www.toorx.it - [email protected]
 Loading...