

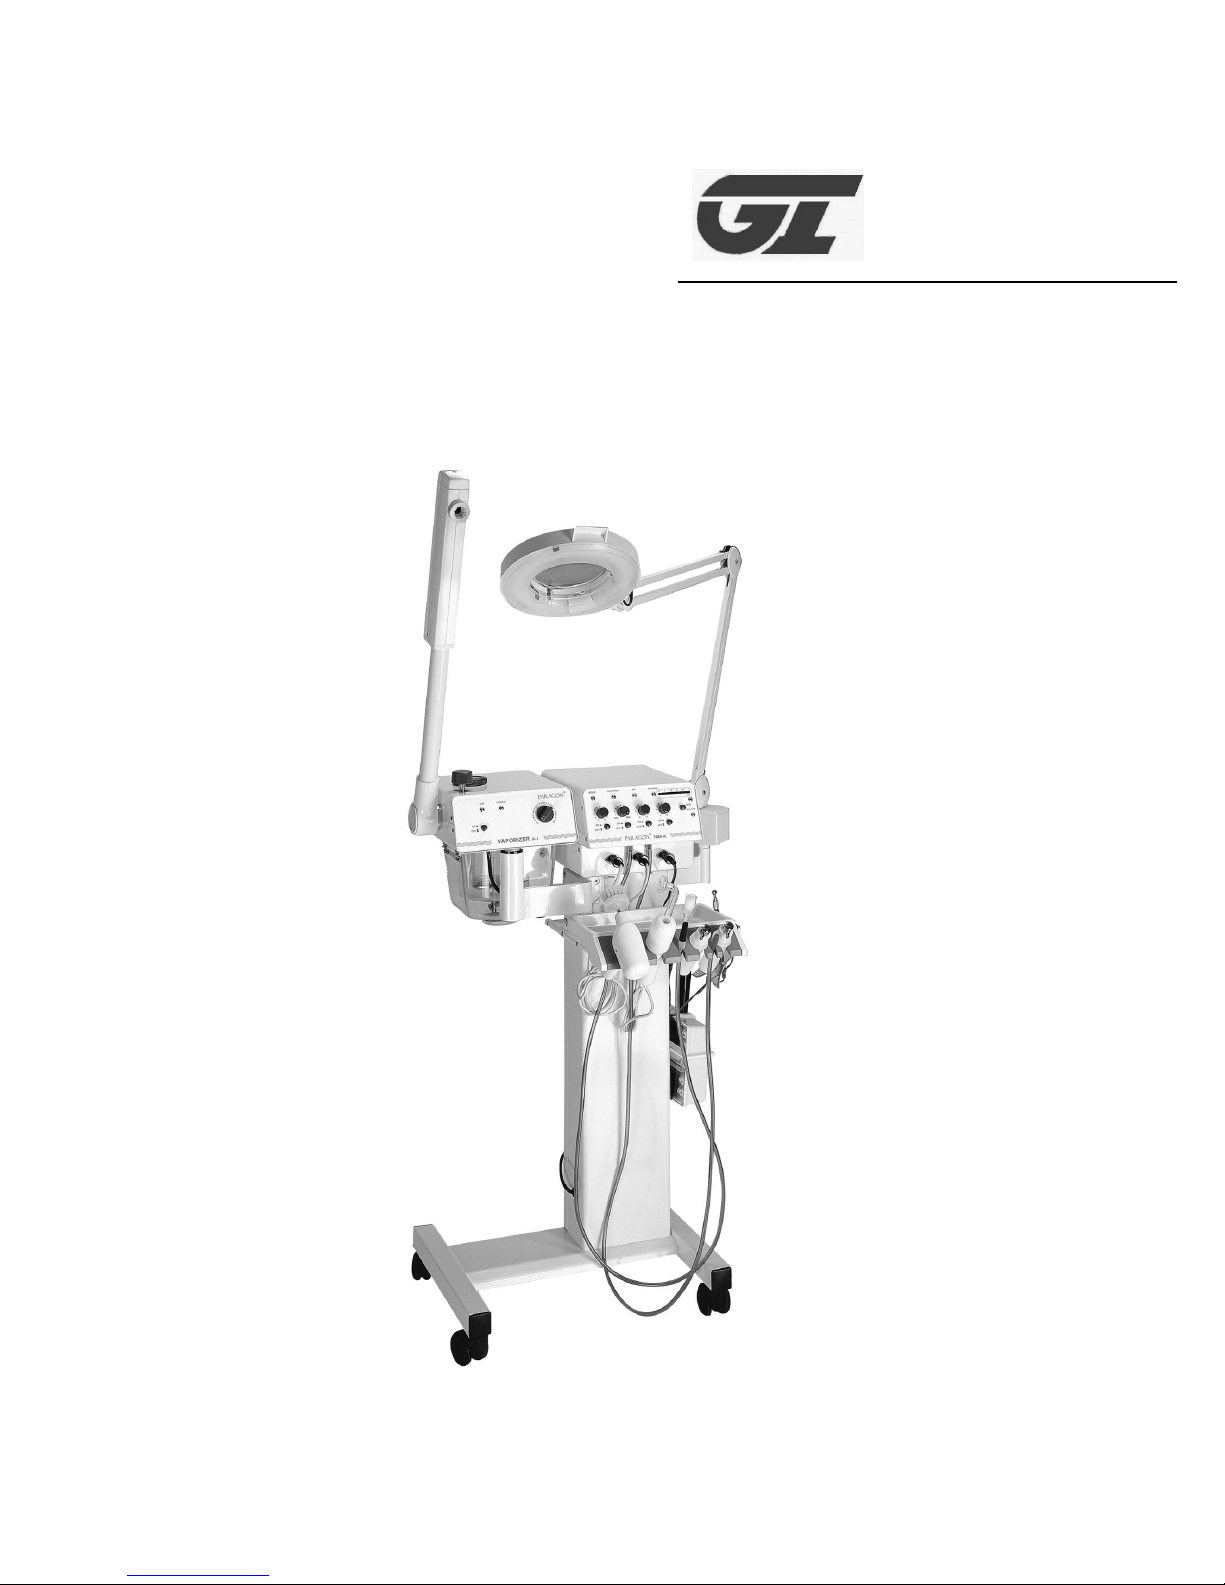
PARAGON®
7000 MULTI-FUNCTION
SKIN CARE UNIT
About this manual
Before installing and using this unit, please read this
manual carefully. Be sure to keep it available for later
reference.
Attention
Only professional, state-licensed estheticians are
allowed to operate this skincare system. Any violations
will void the warranty and operator shall be responsible
for and damages to the machine and/or clients.
INSTRUCTIONS MANUAL

2
IMPORTANT SAFEGUARDS
DANGER - KEEP AWAY FROM WATER
RISK OF ELECTRIC SHOCK, DO NOT OPEN!
RIESGO DE CHOQUE ELECTRICO. ¡NO ABRIR!
CAUTION: TO REDUCE THE RISK OF
ELECTRICAL SHOCK, DO NOT OPEN COVERS.
NO USER SERVICEABLE PARTS INSIDE.
REFER SERVICING TO QUALIFIED SERVICE
PERSONNEL.
PRECAUCION: PARA REDUCIR EL RIESGO DE
CHOQUE ELÉCTRICO, FAVOR NO ABRIR LA
CUBIERTA. ESTE EQUIPO NO CONSTA DE
PIEZAS O PARTES QUE REQUIEREN SERVICIO O
MANTENIMIENTO. PARA REPARACIONES FAVOR
REFERIRSE A
READ ALL INSTRUCTIONS BEFORE USING
Caution and proper procedures must be practiced at all times when using
electrical appliances. As with most electrical appliances, electrical components in
these units are electrically live even when the switch is in the off position.
ATTENTION
To reduce the risk of electrocution:
1. Always unplug after use.
2. Always unplug before cleaning and removing
parts.
3. Do not place or store where unit(s) can fall or be
pulled into a tub, sink, or other water receptacles.
4. Do not use while bathing or immersed in water.
5. Do not use near or place near water.
6. If unit(s) falls into water, unplug immediately. Do
not reach into water.
WARNING
To reduce the risk of burns,
electrocution, fire or injury to persons:
1. This product is for commercial use only.
2. Only connect with an outlet with rating equal to or
exceeding the rating of this appliance.
3. Firmly connect the electric cord to the outlet to
ensure proper grounding.
4. Connect this appliance to a properly grounded
outlet only.
5. Do not permit children to play on or operate
unit(s).
6. Do not permit persons who are unfamiliar with the
proper operation of the unit(s) to operate it.
7. Unit(s) should never be left unattended when
plugged in.
8. Close supervision is necessary when this
appliance is being used by or near children and
persons with special needs.
9. Use this appliance only for its intended use as
described in this manual. Do not use attachments
not recommended by the manufactured.
10. Never operate this appliance if it has a damage
cord or plug; if it is not working properly; if it has
been dropped or damaged; dropped into water.
Return the appliance to an authorized service
center for repair or replacement.
11. Keep cord away from heated surfaces.
12. Never block ventilation openings or place the
appliance on soft surfaces, such as bed or couch,
where the air passage may be blocked.
13. Clean once a week and keep the ventilation
openings free from obstruction.
14. Never use while sleeping.
15. Never drop or insert any object into any opening,
hose, hole, shaft, or duct.
16. Do not use outdoors or operate where aerosol
(spray) products are being used or where oxygen
is being administered
17. Do not direct treatment towards the eyes or other
heat sensitive areas.
MAGNIFYING LAMP . . . . . . . . . . 4
NOTES . . . . . . . . . . . . . . . . . . . . . 10
CONTENTS
UNPACKING . . . . . . . . . . . . . . . . 4
SERVICE . . . . . . . . . . . . . . . . . . . 4
ASSEMBLY . . . . . . . . . . . . . . . . 4
STEAMER/ VAPORIZER . . . . . . . 5
ROTARY BRUSH . . . . . . . . . . . . 6
VACUUM & SPRAY. . . . . . . . 7
HIGH FREQUNCY . . . . . . . . . 8
GALVANIC . . . . . . . . . . . . . . . 9
1 UNPACKING .
FIGURE 3.3
FIGURE 3.4
1 2
3
Unpack carefully. This is an electromechanical
device and should be handled carefully.
BE SURE TO REMOVE ALL FOAM PACKING
FILLER BEFORE APPLYING POWER TO THE
UNIT.
Check to ensure that the following items are
included:
10 screws
Platform base with 4 wheels
Tower Stand w/ metal tray and magnifying
lamp stem mount
Plastic Tray For Instruments
Magnify Lamp
P-1 Facial Steamer & Swinging Arm Bracket
Brush Unit
Pre-assembled handle complete
5 Brushes
Vacuum & Spray Unit
Pre-assembled handle complete
3 Glass Ventricles
2 Spray Bottle Atomizers
2 Connector Tubes (yellow & green)
High Frequency Unit
Pre-assembled handle complete
4 Glass Electrodes
Galvanic Unit
Pre-assembled handle complete
3 Attachments, 1 cotton clamp
Rubber grounding disc w/ pouch
Grounding clamp
Hand-held Wood’s lamp
If an item appears to have been damaged in
shipment, replace it properly in its carton and
notify the shipper. If any items are missing,
contact your distributor.
The shipping carton is the safest container in
which the unit may be transported. Save it for
possible future use.
2 SERVICE .
If the unit ever needs repair service or parts, the
customer should contact the distributor or call
Paragon Technical Support 1(888) 731-6688.
3 ASSEMBLY .
Please use proper care when mounting
instruments onto your Mutli-Function Facial Unit.
A. Carefully lift the steamer and place onto
steamer stem.
B. Carefully lift the lamp and place the lamp
stem into the lamp stem holder.
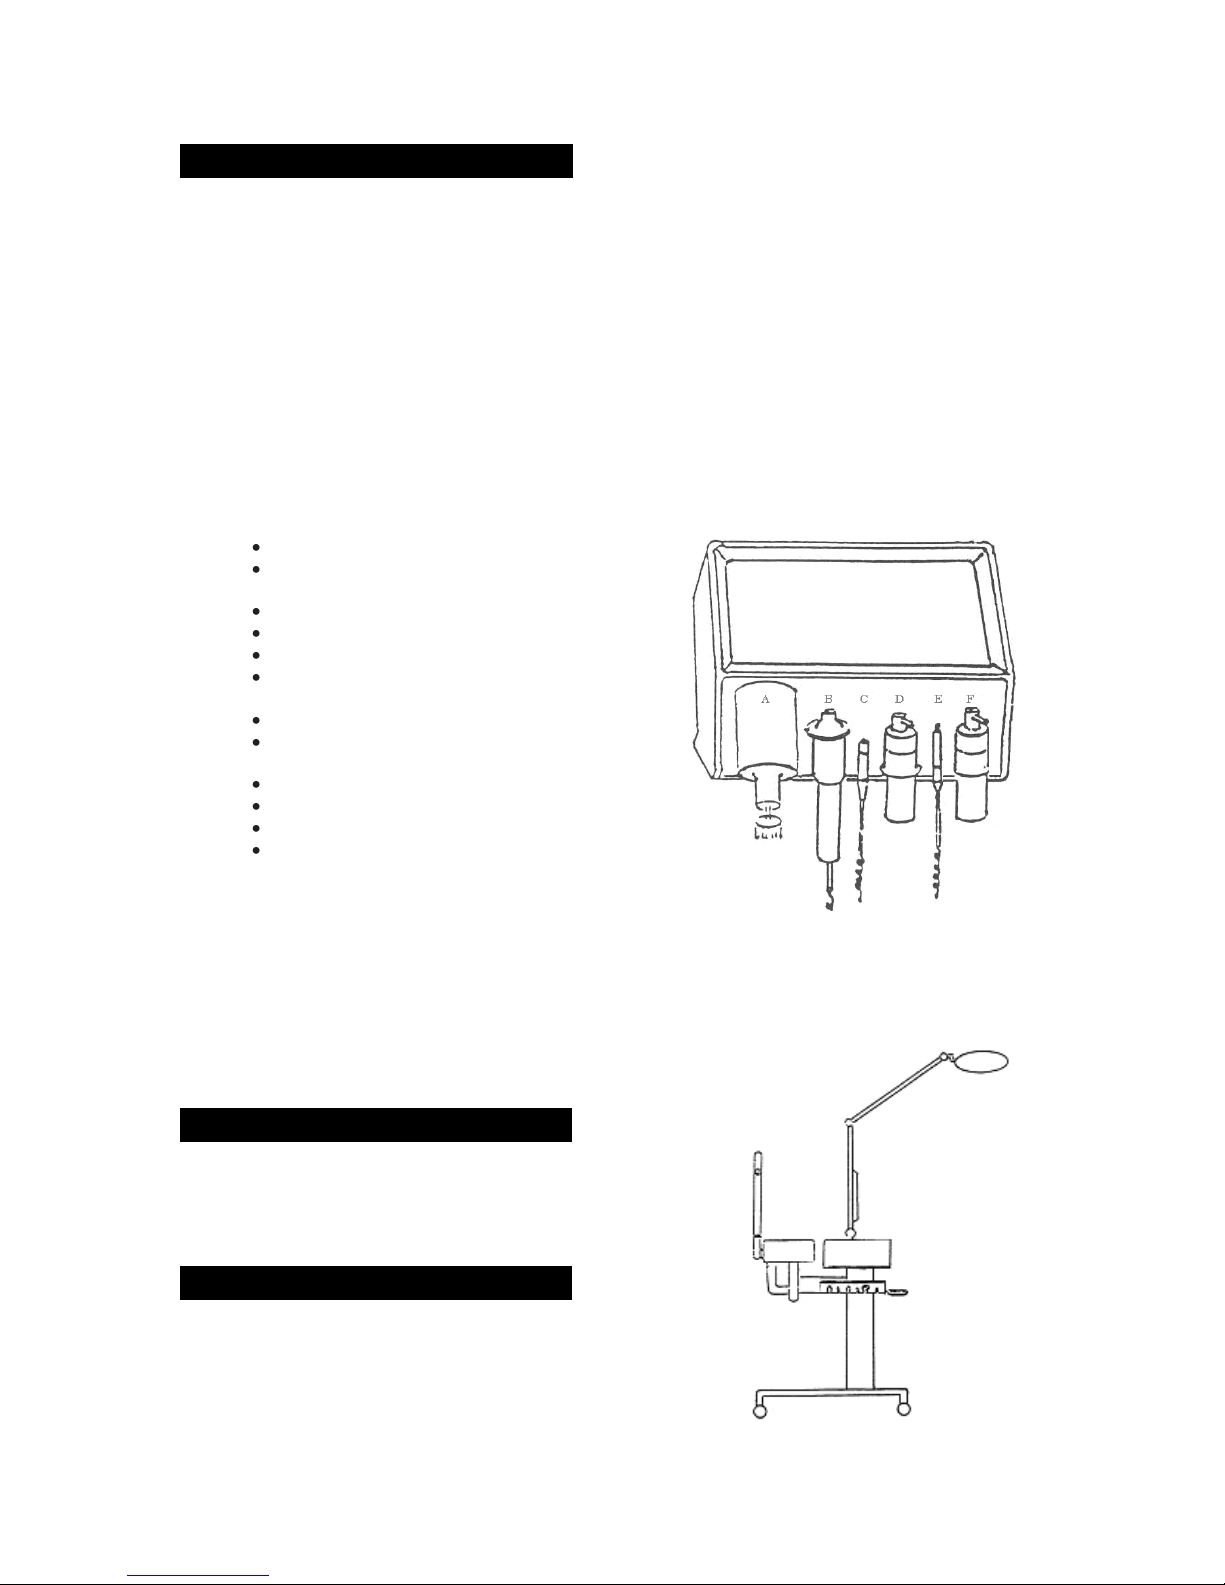
3.3 Hand-Instruments
Place hand instruments in designated slots.
A. Brush
B. High Frequency
C. Vacuum Tubing
D. Spray Bottle
E. Spray Tubing
F. Spray Bottle
G. Galvanic Clamp and wand on side
(not shown in diagram)
3.4 Arranging the Units
#1 Steamer
#2 Facial Functions Box
#3 Mag Lamp

4
4 MAGNIFYING LAMP .
FUNNEL TOP
ARM TENSION OZONE LAMP
ADAPTER
POWER LAMP
ON/OFF
TIMER
OZONE
SWITCH
GLASS JAR
GLASS JAR
SHIELD
WATER JAR
RETAINING KNOB
FIGURE 5
The magnifying lamp is most commonly used
during examination, cleansing, and extraction.
4.1 Bulbs
The magnifying lamp uses a 22W circular cool
white fluorescent bulb protected by a plastic
cover. For replacement bulbs, please visit your
local hardware store or contact your distributor.
The following are instructions for replacing a
broken bulb.
A. CAUTION! Use caution when removing
broken bulbs. There may be broken
glass.
B. Unplug the lamp and carefully remove
from the lamp stem mount.
C. Lay the lamp face up. Unscrew (3
screws) and remove the lamp cover.
D. If necessary, empty the contents of the
lamp case.
E. Remove the broken bulb by gently
tugging on the protected area of the
bulb. Install the new bulb by inserting
the 4-prong plug into its receptacle.
F. Replace the lamp cover by securing the
3 screws.
G. Carefully lift the lamp and replace the
lamp stem into the stem holder.
5 STEAMER / VAPORIZER .
The facial steamer (also referred to as a
vaporizer) is used after cleansing and analyzing
to prepare the skin for treatment. The P-1 is
equipped with a vapor-spraying arm capable of
moving both left-right and up-down. A 30 minute
timer and burn guard is included as a standard
feature.
5.1 WARNINGS!!
A. USE ONLY DISTILLED WATER WITH
THIS MACHINE. DISTILLED WATER
SHOULD BE USED TO HELP
PROLONG THE LIFE OF THE
MACHINE. DO NOT RUN
CHEMICALS THROUGH THE
APPLIANCE SUCH AS CLEANING
AGENTS OR AROMA ADDITIVES.
THESE CLOG THE WATER WAYS BY
LEAVING DEPOSITS.
B. TO AVOID STEAMER BURNOUT DO
NOT TEST DRY THE APPLIANCE BY
LETTING THE WATER LEVEL FALL
BELOW THE BOTTOM RED LINE.
C. TO PREVENT WATER FROM
SPOUTING- ALWAYS MAINTAIN THE
DISTILLED WATER LEVEL BETWEEN
THE UPPER AND LOWER RED
LINES.
D. TO EXTEND THE LIFECYCLE OF THE
HEATING ELEMENT AND TO
PREVENT THE GLASS JAR FROM
CRACKING, DO NOT ADD COLD
WATER WHILE WATER IS HOT. WAIT
FOR WATER TO COOL BEFORE
ADDING MORE WATER.
5.2 Operation
CAUTION: DO NOT ATTEMPT TO REMOVE
OR INSERT THE GLASS JAR WHEN HOT,
DURING USE, OR IMMEDIATELY AFTER USE.
BEFORE TURNING ON THE STEAMER, FILL
THE WATER JAR TO THE TOP RED LINE. DO
NOT OVERFILL ABOVE TOP RED LINE.
A. Remove glass jar. Hold the jar with one
hand and use the other hand to
simultaneously turn the retaining knob
w/ screw. Swing the elbow away and
carefully remove the glass jar.
B. Check for the red rubber ring resting
atop the glass jar. Its function is to help
seal the water jar and to prevent water
leaking.
C. Pour distilled water into the glass jar. To
prevent water from spouting do not to
exceed the red top line.
D. Turn the timer switch to the ON position.
Wait 7-10 minutes for steam to appear.
Wait 1 full minute before use.
E. Turn the ozone switch on as needed.
F. Cover the client’s upper chest area with
towel or cloth to absorb excess
moisture.

5
G. Adjust the steam nozzle to the correct
distance, approximately 1 foot from
face. Let the steam flow out in an
upward direction from the customers
chin and up
5.3 Ozone
Ozone is a form of oxygen sometimes used as a
form of disinfectant. The ozone function in the
facial steamer is an option. Check with
applicable regulatory agencies such as the
Department of Health and the Cosmetology State
Board concerning the use of ozone in your area.
5.1 Aroma Therapy Nozzle
The AT-2 Aroma Therapy Nozzle is an optional
item that can be easily attached to the steamer
nozzle for the use of aromatic therapy oil. This
party allows the client to experience the benefits
of aromatic oils while simultaneously protecting
the appliance from clogging and spouting.
5.2 Maintenance
All appliances should be cleaned once a week.
A. Distilled water should be used in the
Vaporizer. The use of tap water will
eventually cause malfunction of the
machine, due to calcium and mineral
deposits.
B. Do not use harsh chemical to clean the
appliance. Use a soft brush to clean
heating elements.
C. Always maintain the distilled water level
above the lower red line and below the
top red line. In order to protect the
heating element from burning out, the
appliance has a safety feature installed.
The low water level sensor safety fuse
will shut off the appliance if the water is
below the lower red line marked on the
water jar. If the water is constantly
below the lower red line, the low water
level sensor safety fuse may burn out.
5.6 Troubleshooting
When machine fails to work properly, use the
following directions to detect the cause of the
problem:
A. Check the power cord for proper
connection.
B. Make sure the timer switch is in the ON
position.
C. Check the power source by connecting
another electrical appliance to the AC
outlet.
D. Restart the unit. Move the power switch
to its OFF position. Wait 5-10 minutes
before turning the steamer back on.
E. If water is leaking, wait until the jar is
cooled, then try to tighten the retaining
screw located beneath the jar. Check
that the red rubber ring is in the proper
position.
F. Some units are equipped with a heat-
sensing thermostat safety fuse. If your
unit(s) becomes too hot or if the water
level falls below the red line, the
thermostat will shut off the heating
element. After cooling to the proper
temperature, the element will operate
normally. Wait until both the heating
element and glass jar cools before
adding water.
G. If the water level is below the lower red
line, the thermostat may burn out. If the
thermostat has burned out, the power
lamp will not light and the steamer will
not turn on. Please contact an
authorized agent for repair.
H. If the problem persists, please contact
your dealer for assistance. To prevent
an electrical shock, PLEASE DO NOT
REMOVE THE COVER.
5.7 Warranty
A. The glass jar is not a warranty item
B. The low-water level sensor safety-fuse
is not a warranty item.
6 ROTARY BRUSH .
The Rotary Brush is useful when sloughing dead
cells and removing dirt that clings to the surface
of the skin. It is important to brush the skin before
commencing further treatment. Included with this
unit should be a pre-assembled complete handle
and 5 rotary brushes.
6.1 CAUTION!
A. In a skin treatment process, before
brush peeling, the client’s face must be
thoroughly cleansed and steamed.
Peeling should begin from the neckline
or throat, continuing to the jaw, chin,
cheeks, upper lip, nose and forehead;
respecting the more sensitive eye area.
B. The following skin conditions are NOT
recommended for brush peeling:
Varicose Vetas, Adenitis, Wounds, Telan
Giectusia, Eczema, Pustulos acne,
Furunculosis and Tosaces.
6.2 OPERATION
A. Connect brush handle cord to the
machine and tighten by turning
clockwise.
B. Select appropriate brush and insert into
the brush holder. It will automatically
lock in place.
C. Press the power button to its ON
position.

6
D. Turn the SPEED ADJUSTMENT knob
clockwise to the speed desired for
treatment. Turn the knob counter
clockwise to decrease the speed.
E. To change brushes, turn the power
switch to the OFF position. Use a slight
force to pull brush out of the handle.
Insert desired brush.
F. After treatment, turn the speed
adjustment knob to MIN and turn the
power switch to its OFF position.
Maintenance
Attachments should be sanitized after each use.
A. Wash brushes thoroughly with soap and
warm water.
B. Dip the brushes bristles in alcohol for 5
minutes allowing them to sterilize.
Remember to only dip the brush bristles.
Do not dip metal part of brush
attachment.
C. Dry brushes and store in sterilizer
cabinet.
6.3 Troubleshooting
When machine fails to work properly, use the
following directions to detect the cause of the
problem:
A. Check the power cord for proper
connection.
B. Make sure the power switch is in the ON
position.
C. Check the power source by connecting
another electrical appliance to the AC
outlet.
D. The “speed adjustment” knob should be
adjusted clockwise to the speed desired
for treatment use. If the knob is in the
MIN position, the machine will not turn
on.
E. This rotary brush unit has an automatic
shut-off system to protect the IC Board.
The shut off system will be activated
when the brush’s motor is broken or
when the brush handle is pressed too
hard against the skin. The brush unit
will come to an automatic stop. If this
occurs, please turn the power switch to
its OFF position. Wait approximately 1-2
minutes before turning the brush unit
back on.
F. If the rotation switch on the brush
handle is resting in the center position,
the brush unit will not turn on. Move the
switch up or down to begin brush
rotations.
G. If the problem persists, please contact
your dealer for assistance. To prevent
an electrical shock, PLEASE DO NOT
REMOVE THE COVER.
7 VACUUM & SPRAY .
The vacuum system aids deep pore cleansing
and is also referred to as the suction machine.
The suction removes out deeply embedded dirt,
sedum and other impurities. Another benefit is a
deep penetrating massage, drawing blood to the
surface of the skin. Included with this unit should
be a pre-assembled complete handle, 3 glass
ventuoses, and 2 spray bottles.
7.1 CAUTION!
A. Different skin types require different
treatments, vacuum treatment time
varies. Please use at your discretion.
When the skin is thin, dry or aging a
light suction is recommended. For oily
skin, it is recommended that the vacuum
treatment be performed after the
disincrustation treatment with the
galvanic current.
B. Note: the vacuum suction does not
dislodge blackheads.
7.2 Vacuum Operation
A. Select the appropriate ventouse and
insert to the black adapter (a metal
connector w/ a built in filter).
B. Connect the air tubing with the black
adapter to the ventuose.
C. Press the power button to its ON
position.
D. Turn the VACUUM ADJUSTMENT
KNOB knob clockwise.
E. The ventouse control hole should be
covered when after the ventouse has
made contact with the skin and should
be uncovered when taken off the skin.
F. After the vacuum treatment is complete,
use the spray to lightly cover the face
with toner, and pat dry with cotton pads
or a clean towel. This will help remove
any debris left on the skin and close the
pores.
7.3 Spray Operation
The spray bottle can be filled with distilled water
or toner. The spray bottle is not recommended to
be filled with lotion. Lotion is too thick and will
cause the blockage of the very fine spray hole in
the cap.
A. Connect the red adapter to the spray
bottle.
B. Hold the bottle in an upright position.
C. To dispense water, place your finger
over the small hole at the top of the
bottle.
7.4 Maintenance
Attachments should be sanitized after each use.
A. Wash glass ventouses and attachments
thoroughly with soap and warm water.

7
B. Soak the glass ventouses in alcohol for
FIGURE 7.5
ADAPTER CONNECTOR
RUBBER RING
METAL FILTER
5 minutes allowing them to sterilize.
C. Dry ventouses and store in sterilizer
cabinet or autoclave.
7.5 Troubleshooting
When machine fails to work properly, use the
following directions to detect the cause of the
problem:
A. Check the power cord for proper
connection.
B. Make sure the power switch is in the ON
position.
C. Check the power source by connecting
another electrical appliance to the AC
outlet.
D. If the vacuum suction force is not strong
enough, turn the VACUUM
ADJUSTMENT KNOB clockwise to the
maximum setting. If this does not work,
try cleaning the metal filter within the
yellow adapter by detaching the yellow
connecter and removing the filter
(Figure 7.5).
E. If the spray bottle fails to spray, try using
a small wire to clean the small
passageway hole on the spray head.
F. If the problem persists, please contact
your dealer for assistance. To prevent
an electrical shock, PLEASE DO NOT
REMOVE THE COVER.
8 HIGH FREQUENCY .
The High-Frequency machine generates a
current characterized by a high rate of oscillation.
This current is thermal (or heat producing), and
germicidal. Included with this unit should be a
pre-assembled complete handle and 4 glass
electrodes.
8.1 CAUTION
A. High Frequency currently should not be
used when the client is pregnant or on
clients who may have a pacemaker.
B. The client’s skin must not come in
contact with any metal objects and must
remove jewelry from hand, arms and
neck, prior to facial treatment.
C. High Frequency current should never be
used on the areas of the skin moistened
with inflammable liquids (alcohol, ether,
etc…) as the sparks produced, could
cause them to ignite, causing severe
burns. If it is desirable to use this type of
lotion, the High Frequency is used first
and then the lotion can be applied after
the High Frequency treatment.
D. When using the High-Frequency unit
comes with four glass electrodes. The
large mushroom electrode is for facial
treatment; the spoon electrode is for
neck, legs and arms; the straight
electrode is for treatment and face; and
the pointer is for small areas.
8.2 Operation
A. Attach High Frequency electrode holder
cord to machine and tighten by turning
clockwise.
B. Insert the desired electrode into holder.
C. Estheticians should first have the
electrode in contact with the client’s skin
before turning on the power switch.
D. Press the power button to its ON
position, and select the appropriate
power according to your client’s
sensitivity.
E. During the process do not let the
electrode jump then touch the area
being treatment.
F. To increase the power of the electrode,
turn the INTENSITY KNOB clockwise.
To decrease the power of the electrode,
turn the intensity knob counter
clockwise.
G. When changing electrodes, adjust the
intensity knob to MIN then turn power
switch to the OFF position. Remove the
electrode from the holder and insert the
desired electrode into the holder. Turn
the power switch to the ON position.
H. After treatment adjust intensity knob to
MIN and turn the switch off.
8.3 Maintenance
Attachments should be sanitized after each use.
A. Wipe glass electrodes and attachments
with rubbing alcohol and a soft cloth.
B. Dry electrodes and store in sterilizer
cabinet or autoclave.
8.4 Troubleshooting
When machine fails to work properly, use the
following directions to detect the cause of the
problem:
A. Check the power cord for proper
connection.
B. Make sure the power switch is in the ON
position.

8
C. Check the power source by connecting
another electrical appliance to the AC
outlet.
D. When a glass electrode does not glow,
use another electrode to charge the dull
electrode. Cross the two like an “X”
charging for 1 minute. After this process,
both electrodes should glow. If the
electrode(s) still do not glow, the
electrode(s) may need to be replaced.
E. If the problem persists, please contact
your dealer for assistance. To prevent
an electrical shock, PLEASE DO NOT
REMOVE THE COVER.
9 GALVANIC .
The galvanic current is a low level and direct
current. Chemical changes are produced when
this current is passed through certain containing
acids and salts: (1) to soften grease and sebum
deposits (2) to introduce water soluble treatment
products into the skin. Included with this unit
should be a pre-assembled complete handle, 3
attachments, a rubber grounding clamp, and
grounding pouch.
9.1 CAUTION!
A. DO NOT USE THIS UNIT ON PEOPLE
WITH PACEMAKERS OR CONTACT
LENSES.
B. PREGNANT WOMEN SHOULD
CONDUSLT THEIR DOCTORS FIRST.
C. DO NOT USE THE GALVANIC
CURRENT OVER AN AREA HAVING
MANY BROKEN CAPILLARIES.
D. CLIENTS SHOULD REMOVE
JEWELRY AND ALL METAL OBJECTS
FROM BODY BEFORE TREATMENT
BEGINS.
9.2 Introduction
There are two poles or terminals, a negative (-)
and a positive (+). Polarity determines the flow of
galvanic current.
A. Positive Pole (Anode)
a. Close the follicles (pores) after the
facial treatment.
b. To decrease redness, as in mild
acne.
c. To prevent inflammation after
comedone and blemish treatment.
d. To force acid PH solution such as
astringent into the skin.
B. Negative Pole (Cathode)
a. Stimulate the circulation of blood.
b. Force disincrustation lotion into the
skin.
9.3 Operation
A. Wet the black galvanic pouch with tap
water (distilled water is not as
conducive) and slip the black pouch
onto the grounding clamp.
B. Secure grounding clamp and pouch to
client.
C. Wet the area of skin to be treated with
lotion or toner.
D. Select the polarity to be used.
E. Press the power button to its ON
position, and select the appropriate
power according to your client’s
sensitivity. The current should be
turned on to its lowest amperage to
start.
F. Note: the client may experience a
metallic taste in the mouth. A slight
prickling sensation may indicate that the
current is too strong. Adjust the power
to the client’s sensitivity.
9.4 Maintenance
Attachments should be sanitized after each use.
A. Wipe attachments with rubbing alcohol
and a soft cloth.
B. Dry attachments and store in sterilizer
cabinet or autoclave.
9.5 Troubleshooting
When machine fails to work properly, use the
following directions to detect the cause of the
problem:
A. Check the power cord for proper
connection.
B. Make sure the power switch is in the ON
position.
C. Check the power source by connecting
another electrical appliance to the AC
outlet.
D. If the power lamp is not on, this may
indicate that there is poor conductivity.
Wet the grounding pouch with tap water
and the skin to be treated with lotion or
toner. (Refer to 9.3)
E. If the problem persists, please contact
your dealer for assistance. To prevent
an electrical shock, PLEASE DO NOT
REMOVE THE COVER.

9
10 WOOD’S LAMP .
The wood’s lamp is used to help analyze skin
conditions. Skin conditions reflect different colors
when viewed under the deep ultra-violet light.
10.1 CAUTION!
A. AVOID LOOKING DIRECTLY INTO
THE LIGHT SOURCE WHILE THE
LAMP IS
B. DO NOT ALLOW THE LAMP TO
OVERHEAT.
C. AVOID DIRECT CONTACT BETWEEN
THE BULB AND SKIN.
10.2 Operation
A. Cover the clients eyes with a thick
cotton pad
B. Press the power button to its ON
position.
11 NOTES .
11.1 Service
This is a commercial use appliance, and all
servicing should be performed by an authorized
representative.
11.2 Obligation
In order to obtain warranty service, the product
must be delivered to and picked up from the
manufacturer at the user’s expense, unless
specifically stated otherwise in this warranty.
11.3 Prolonged Storage
If the appliance will not be used for a period of
time, please empty all water/ lotion/ toners from
containers and wrap the cord around the tower
stand, store in a cool/dry area.

10
Facial Steamer 120V, 780W, 6.5000amps
Rotating Brush 120V, 96W, 0.8000amps
High Frequency 120V, 1.5W, 0.0125amps
Vacuum & Spray 120V, 45W, 0.375amps
Galvanic 120V, 7W, 0.0583amps
Mag Lamp 120V, 48W, 0.4000amps
Wood’s Lamp 120V, 20W, 0.1667amps
GARFIELD INTL. CO., INC.
15977 HERON AVE.
LA MIRADA, CA 90638
PARAGON® is a trademark of Garfield International.
Questions or Comments? Please call 1-888-731-6688
Visit us at http://www.garfieldint.com
ATTENTION
For your protection in the event of theft or loss of this product, please fill in the information below for you own personal records.
Model No _____________________________Serial No. _____________________________________
(Located on back or bottom side of unit.)
Date of Purchase ______________________ Purchase Price ________________________________
Purchased From ____________________________________________________________________
 Loading...