

Garelick 19700 User Manual

Instructions for: 19700 SERIES
INVISIBLE LADDER
Thank you for selecting our superior quality Garelick
EEz-In Brand Boarding Ladder. Your ladder is
designed and manufactured using the finest material
available to provide long product life. Choosing the
proper size ladder for location and correct fit is
important to assure safe, convenient, and reliable use.
Although mounting hardware is not provided due to
the wide variety of applications and diversity of boat
shapes and sizes mounting holes have been provided
and it is recommended to use at a minimum 5/16"
diameter fasteners. These fasteners should be through
bolted with a backing plate.
SAFETY GUIDELINES
No jumping or diving!
Do not use when motor is running
This ladder designed for boat use only
Face ladder when entering boat or water
Only one person on ladder at a time
Check all steps and hardware before using
Never operate your boat with the ladder in
“down” position. Serious injury or damage to
your boat or ladder may result.
When underway, fold ladder up and
insert back into tube ensuring locking
pin snaps into place.
MAINTENANCE
Safety tip
Periodically check mounting hardware and retighten (due to normal boat operation.)
Keep that bright finish!
Local weather conditions may contribute to
minor corrosion. Stainless, like other metals, is
not completely free from corrosion attack.
Regular fresh water rinsing and periodic cleaning
with a mild abrasive cleaner will help to retain
luster.
12.627
Installation Instructions:
Note: Read all instructions completely before
starting installation.
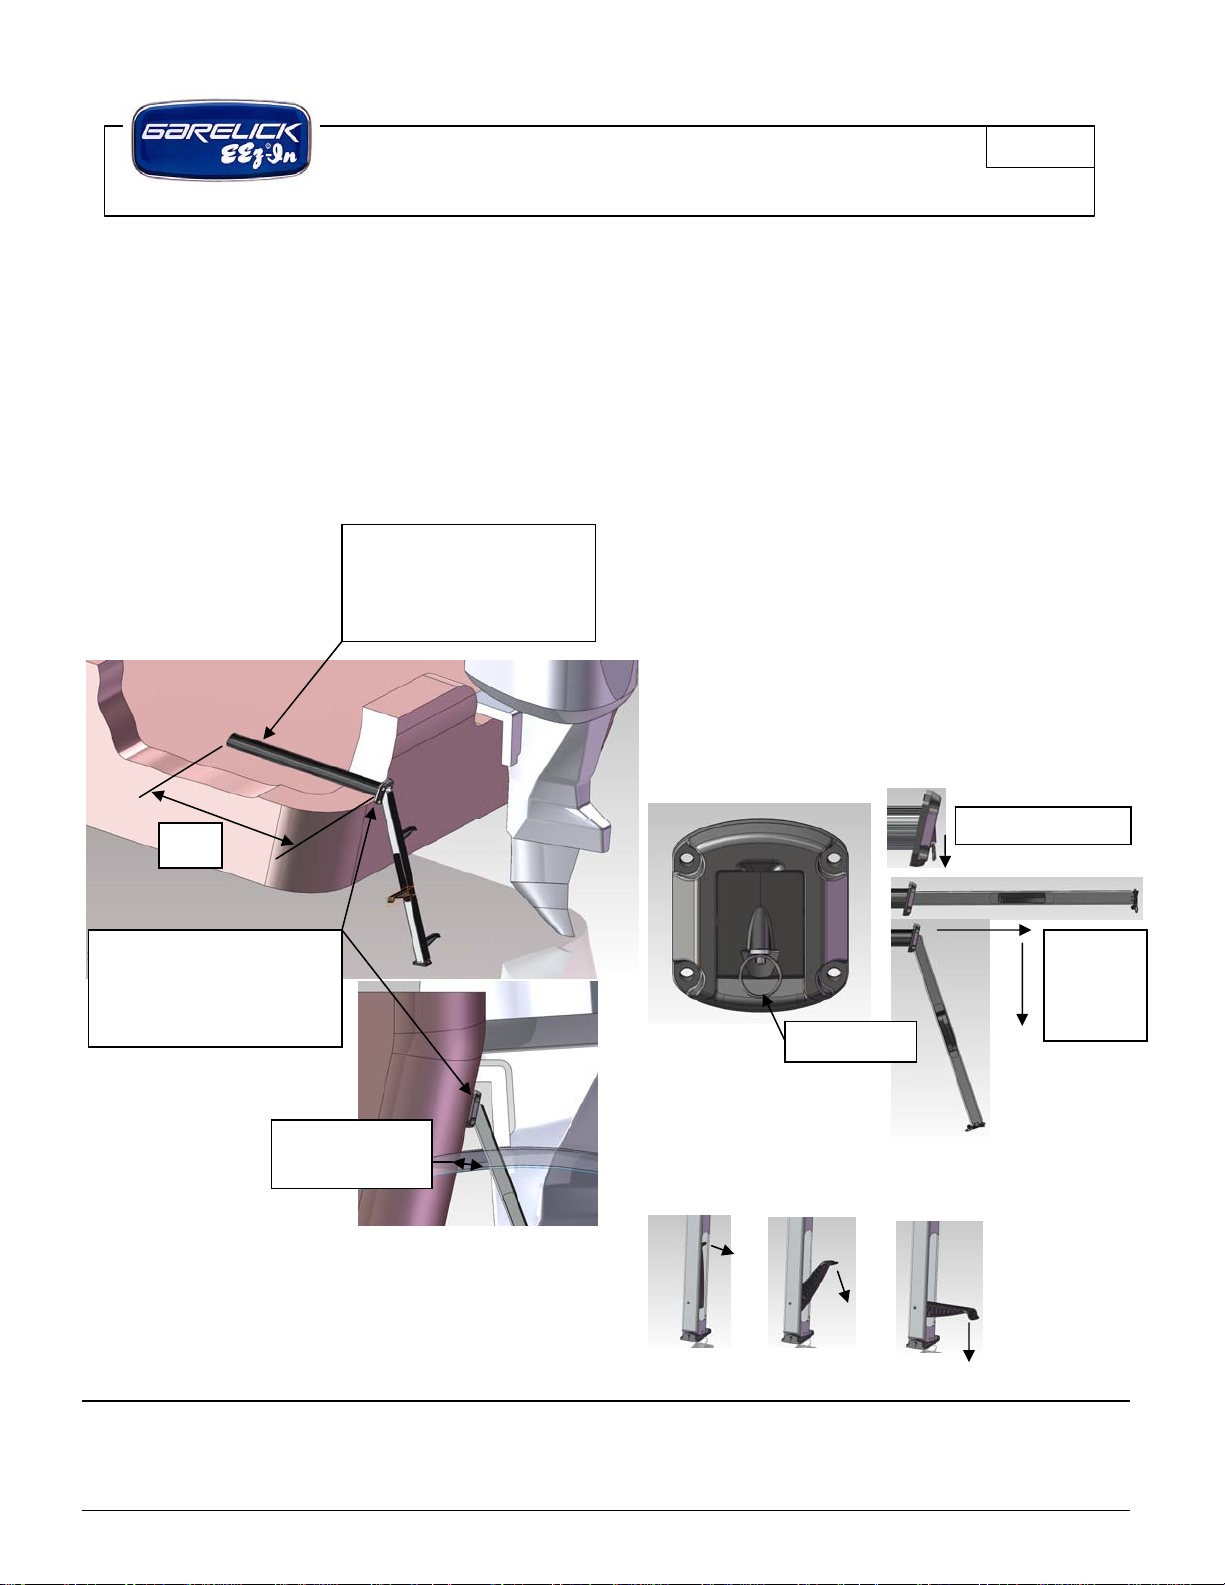
Step 1: Determine the correct location
Choose the most suitable side of your transom for
mounting the ladder. Locate a flat surface [4 ½” wide
x 5” high] where the ladder will not interfere with the
turning of the motor or be excessively close to the
propeller of your boat. Make sure that the location will
be a minimum of 4” ABOVE the waterline at the
bottom of the faceplate/assembly (see figure 1) and in
an area where there are NO electrical wires, hydraulic
hoses, water hoses or steering cables in the selected
mounting location. In addition, check to see that the
transom area is sufficiently strong enough to support
the ladder while it is in use. If necessary, a backing
plate may need to be installed to reinforce the area
where the ladder is to be located [minimum thickness
¾”].
WARNING: If you have questions to the integrity of
your boat or to the location of unseen equipment such
as wiring or hoses then it is imperative that you contact
the boat manufacturer prior cutting into your boat.
Figure 1: Location of ladder relative to actual water
line.
4”
Mount ladder
as far away of
motor as
possible.
Write for Garelick Mfg. Co. Phone: 651-459-9795
A complete 644 2ND Street, P.O. Box 8 E-mail: mail@garelick.com
EEz-In Catalog St. Paul Park, Minnesota 55071 Website: www.garelick.com
Rev A 08/11
Instructions for: 19700 SERIES
INVISIBLE LADDER
The location to be used for mounting should be
sufficiently flat and at a 13 degree angle in order to
allow the ladder housing and ladder to function
properly or a mounting shim may need to be fabricated
and placed behind the ladder tube on the transom.
Make sure that the boat will allow for a 3” hole to be
bored into the transom at the desired mounting location
PARALLEL to the waterline and that there is enough
free length [35”] in the boat to receive the ladder tube.
Figure 2: Ladder Details
35”
Secure tube in place with
strap, bracing, or
alternative means to
mitigate swaying.
12.627
Step 2: Mounting Instructions
Once the location has been determined, drill a 3”
diameter hole in the transom; making sure that it is
parallel to the waterline. Place the ladder assembly
into the hole and mark the four faceplate mounting
hole’s locations. Drill the holes for appropriate 5/16”
diameter hardware [not included]. It is preferred to
through-bolt the assembly for a secure installation [use
lock nuts and backing washers].
Caulk the entire area to be mounted [surfaces and hole
sides] and insert the ladder, secure in place with the
selected mounting hardware.
Secure the far end of the ladder to the boat with a strap
or some other means to keep the ladder tube in place
[not provided as all installations may vary].
Operating Instructions:
Grasp pull ring and pull down to release locking pin while
pulling ladder assembly out until it stops. Then swing ladder
down.
Pull Ring Downward
Pull out till
fully
extended
then rotate
down.
Bore 3” diameter hole
parallel to waterline.
.
Ladder must be parallel
to water line.
13 Degree
Transom Area
Pull out steps on the left and right and rotate them downward
until they deploy fully.
Reverse process to store.
Pull Ring
Write for Garelick Mfg. Co. Phone: 651-459-9795
A complete 644 2ND Street, P.O. Box 8 E-mail: mail@garelick.com
EEz-In Catalog St. Paul Park, Minnesota 55071 Website: www.garelick.com
Rev A 08/11
 Loading...