

Page 1
OPERATING INSTRUCTIONS
Power Meter
Model PM3000
Read this owners manual thoroughly before use and save.
PM3000
Power Meter
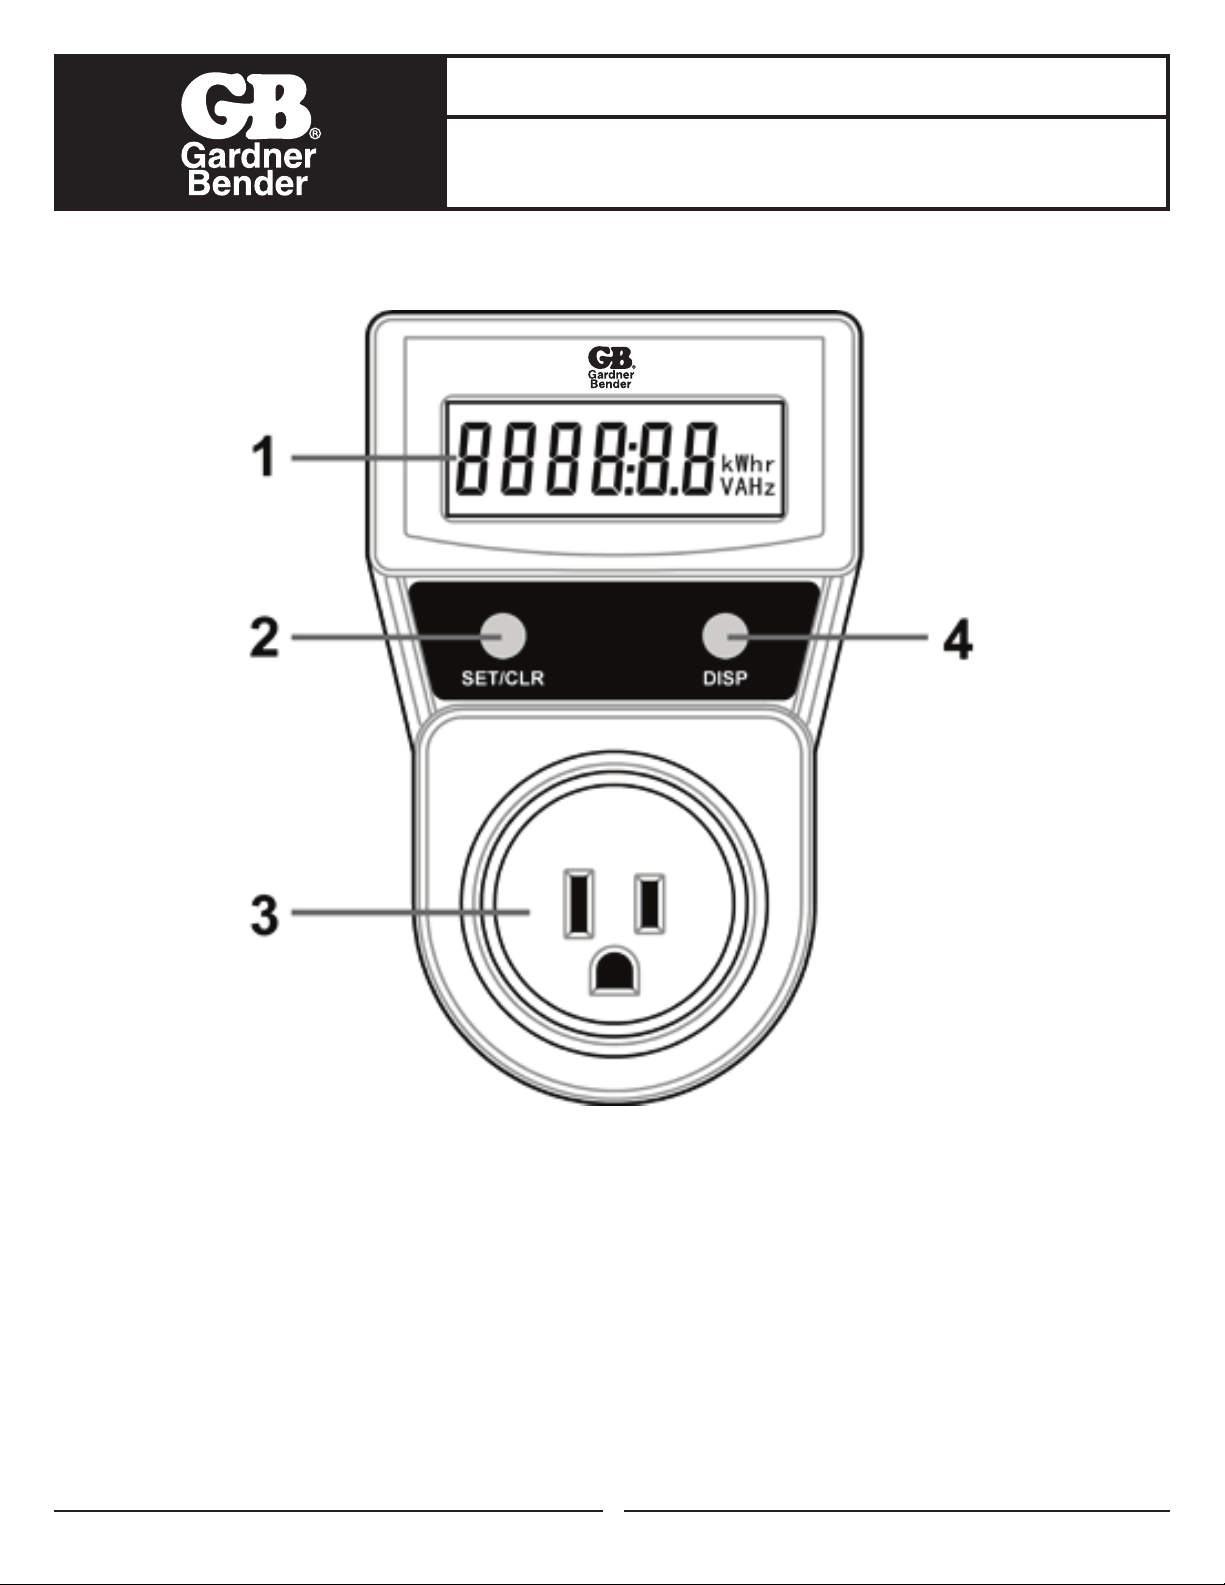
1. Screen
2. "SET/CLR" Button
Used to erase the accumulative total energy consumption
or the accumulative power-on time data from memory.
I. INTRODUCTION
This Power Meter can be used to measure the average power and energy consumption of electrical appliance and can be
used for energy saving evaluation. It is easy to use and is an ideal test tool for home and industrial enterprises.
To use the Power Meter, plug the instrument into a standard AC outlet. Then insert the plug of the appliance to be
monitored into the socket of the instrument.
3. Socket
Used to connect the electrical appliance to be monitored.
4. "DISP" Button
Used to cycle through different data.
1
Page 2
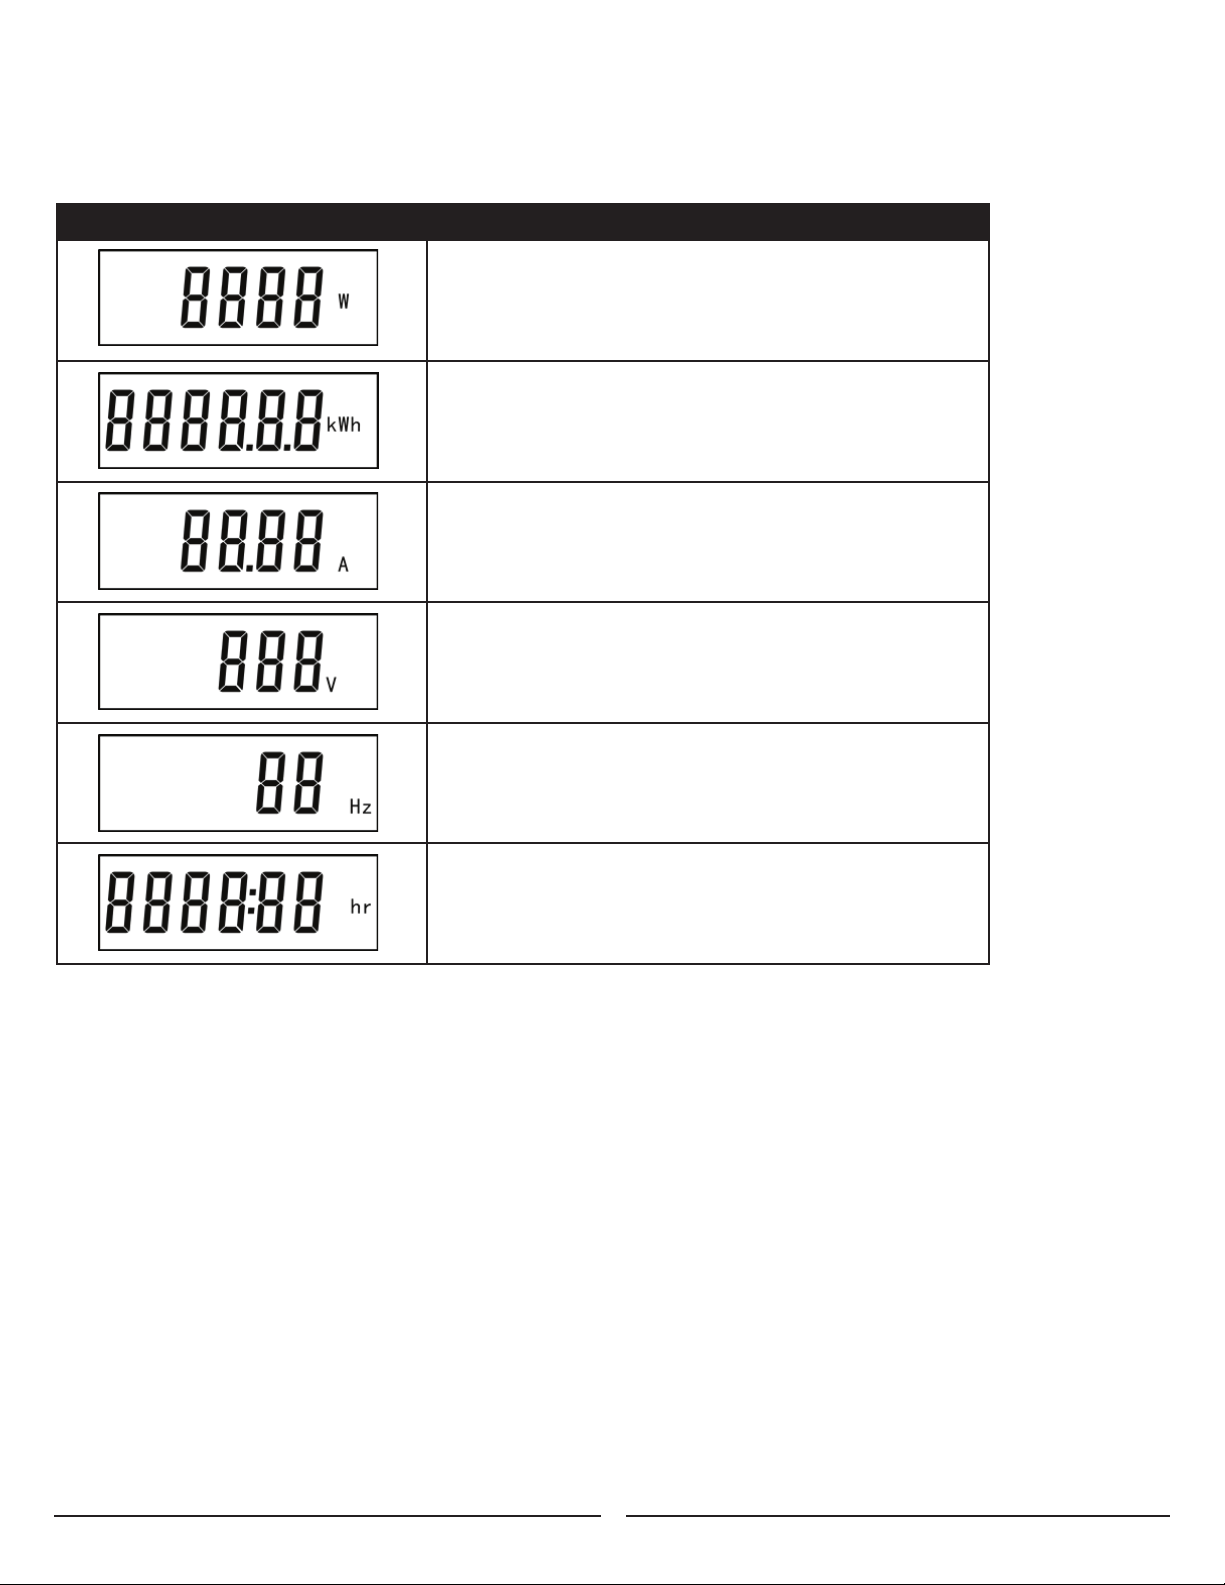
I I. DISPLAY
After the Power Meter is plugged into ac outlet, its screen will show the dynamic average power of the appliance
connected. You can press the "DISP" button repeatedly to cycle through different data. See the following table:
DISPLAY ITEM DESCRIPTION
Default item, the display shows the dynamic average
power of the appliance being monitored.
Press the "DISP" button once to display the
accumulative total energy consumption.
Press the "DISP" button a second time to display the current
presently consumed by the appliance being monitored.
Press the "DISP" button a third time to display the
voltage of the power supply.
Press the "DISP" button a fourth time to display the
frequency of the voltage of the power supply.
Press the "DISP" button a fifth time to display the
accumulative power-on time of the Power Meter.
III. OPERATING INSTRUCTION
DATA ERASURE
When the display shows the accumulative total energy consumption or the Power Meter’s accumulative
power-on time, you can press and hold down the "SET/CLR" button for more than 5 secs to erase this
presently displayed value from memory.
DISPLAY AND READ OPERATION
Pressing the "DISP" button repeatedly will cycle through the following recorded data on the screen:
dynamic average power (default) of the appliance, the accumulative total energy consumption, the current
presently consumed by the appliance, the voltage of the power supply, the frequency of the voltage of the
power supply, and the accumulative power-on time of the Power Meter.
2
Page 3

IV. TECHNICAL SPECIFICATIONS
1. General Specification
Rated Current: 10A
Operating Voltage: 90 - 125V AC, CAT II
IP Degree: IP20
Operating Environment: Temperature: 0 - 50˚C Relative Humidity: 10 - 95%
2. Design Parameters
Power
Measuring Range: 0 - 1250W; Resolution: 1W; Accuracy: 1% ± 1 digits
Accumulative Energy Consumption
Measuring Range: 0 - 99999.9kWh; Accuracy: 1% ± 1 digits
LCD Display: For readings < 10000.00 kWh, the LCD display reads 0.00 - 9999.99kWh; for readings > 10000.00 kWh,
the LCD display reads 10000.0 - 99999.9kWh. If the accumulative energy consumption value exceeds 99999.9kWh,
the LCD display shows 99999.9kWh until you erase it from the memory.
Current
Measuring Range: 0 - 10A; Resolution: 0.01A; Accuracy: 1% ± 5 digits
Min. Start-Up Current: 20mA
Voltage
Measuring Range: 90 - 125V; Resolution: 1V; Accuracy: 1% ± 1 digits
Frequency
Measuring Range: 45 - 65Hz; Resolution: 1Hz; Accuracy: ±1Hz
Accumulative Power-On Time
Measuring Range: 0 - 9999 hours and 59 minutes
Overload Indication
If the current exceeds 10A for more than 2 seconds, the Power Meter will enter Overload Indication mode and the
display will show "OL". After the Power Meter enters Overload Indication mode, it will stay in this mode if you do not
press any button. If you press a button, the Power Meter will return to normal operation.
Note: Within the first two seconds after the display just shows “ OL ”, the Power Meter does not respond to any
press of button. The Power Meter will respond if you press a button after the first two seconds.
NOTE
• The Power Meter is not waterproof.
• The Power Meter is designed only for indoor use.
• To avoid electric shock, do not touch any metal part of the Power Meter with finger or skin,
and do not touch any live conductor.
• The Power Meter has memory function, the recorded data will remain when you disconnect the
Power Meter from the power supply.
• To avoid electric shock, prevent children from inserting metal object into the socket of the Power Meter.
• It is recommended to use the Power Meter in a ventilated place.
• To avoid inaccurate reading, do not read the display of the Power Meter within the first 10 second after you plug the
Power Meter into a power socket.
• Do not use the Power Meter if it is damaged or if it operates abnormally. Before you use the Power Meter,
inspect the case. Look for cracks or missing plastic. Pay particular attention to the insulation surrounding the connectors.
• Do not use the Power Meter where explosive gas, vapor, or dust is present.
• Do not exceed the specifications.
• Before use, verify the Power Meter’s operation by measuring a known voltage.
• Make sure all relevant ground connections are good and secure.
• Do not position the Power Meter so that it is difficult to operate the disconnecting device.
• Never attempt to repair or service the Power Meter.
• To clean the Power Meter, use dry soft cloth. Do not use abrasives or solvents.
• If the Power Meter is used in a manner not specified by the manufacturer, the protection provided by the
Power Meter may be impaired.
• Do not use the Power Meter if label is damaged or part of label upwarps.
• CAT II - Measurement Category II is for measurements performed on circuits directly connected to low voltage installation.
(Examples are measurements on household appliances, portable tools and similar equipments.)
• Do not use the Power Meter for measurements within Measurement Categories III and IV.
3
Page 4

CARE & STORAGE: Unit should be kept clean at all times. Clean using only a soft cloth or cotton swab with medical alcohol. Do not submerge
any part of the Power Meter. The Power Meter should be stored at room temperature.
WARRANTY: Gardner Bender warrants its product against defects in workmanship and materials for 1 year from date of delivery to user. Chain
is not warranted. Warranty does not cover ordinary wear and tear, abuse, misuse, overloading, altered products or use of improper fluid.
WARRANTY RETURN PROCEDURE: When question of warranty claim arises, send the unit to the nearest Gardner Bender Authorized Service
Center for inspection, transportation prepaid. Furnish evidence of purchase date. If the claim comes under the terms of our warranty the
Authorized Service Center will REPAIR OR REPLACE PARTS AFFECTED and return the unit prepaid.
* Note:
• The warranty is not applicable if the instrument has been: misused, abused, subjected to loads in
excess of specifications, has had unauthorized repair or has been improperly assembled or used.
• Gardner Bender is not liable or responsible for any loss.
800.822.9220
Milwaukee, WI 53209
gardnerbender.com
4
GAR_TL_055_0316_PM3000
 Loading...