

Page 1
Lo que significan los símbolos:
Cumple los estándares europeos de salud, seguridad y
medio ambiente.
Restricción de sustancias peligrosas: el símbolo
confirma que el producto cumple con esta importante
legislación medioambiental.
Reglamento sobre la eliminación de equipos
electrónicos y eléctricos. Importante: este producto
no debe ser desechado junto con residuos domésticos
normales. Por favor, proteja el medio ambiente
entregando este producto y cualquier componente
a un centro de reciclaje: su autoridad competente
local tendrá información al respecto. Gardman está
afiliada al consorcio de reciclaje eléctrico REPIC, nº de
referencia WEE/BJ0058TS.
18235
EN
PARTY LANTERNS
STRING SET (12)
Important
Check the pack contents before assembly.
Please read these instructions carefully before installation.
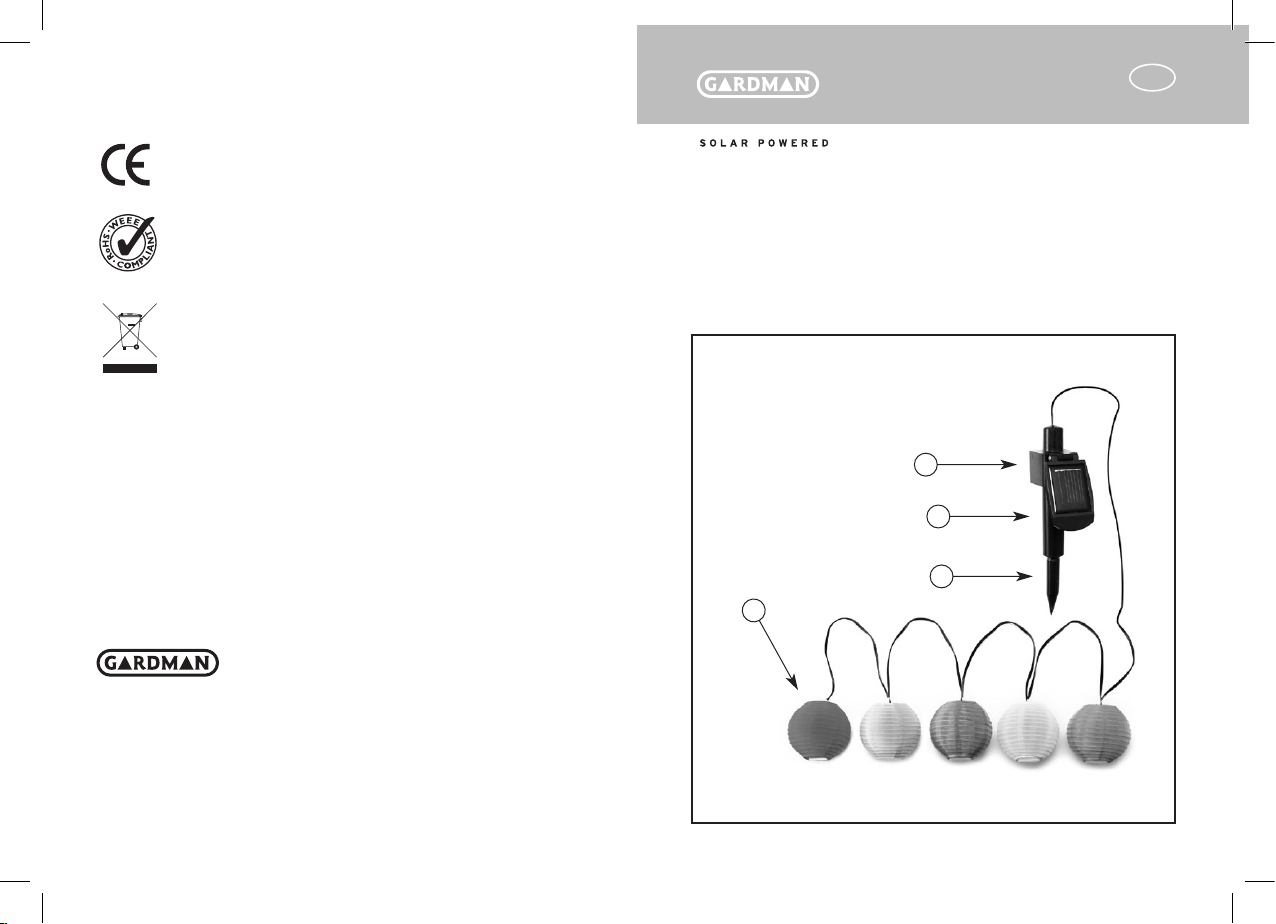
Contents:
A. Party lanterns x 12 connected to solar panel
B. Solar panel leg mounting
C. Solar panel stem
D. Spike
B
C
D
A
Gardman Ltd, High Street, Moulton,
Spalding, Lincolnshire PE12 6QD.
Fax: +44 (0)1406 372233
www.gardman.co.uk
Línea de asistencia al cliente: +44 (0)1406 372227
Page 2

Assembly:
n
Remove the parts carefully from the packaging to avoid
tangling the wires.
n
Connect the mounting to the underside of the solar panel by
locating it into the available lugs.
n
Add the stem and ground spike.
n
Move the ‘On/Off’ switch to ‘On’.
Installation:
n
It is important to position the solar panel where it will receive
maximum sunlight. The position needs to be where it is free from
cover or shade and, ideally, in a position that receives full sun
throughout the day.
n
Avoid other light sources which may cause solar lights
to flicker on and off. Also allow a space of approx. 1.5m (5ft)
between this and other solar lights.
n
Lay out the lights where they are intended to be sited:
good sites are in amongst foliage and trellis or twined
around garden features. Adjust as necessary until the lights and
the panel are in the desired positions.
n
Secure the lights carefully so that they cannot be easily
dislodged and damaged.
n
Insert the solar panel spike in the ground or otherwise
make it secure, ensuring that it is angled towards the sun.
n
Solar lights will not be very bright or long lasting until a
full day’s sunlight has been received. Alternatively, batteries can be
charged to full capacity in a battery
charger before use.
Maintenance:
n
If solar panels get dirty, the charging capacity will be
reduced. Clean panels occasionally with a damp cloth – avoid
harsh detergents or solvents as these can damage the panel.
n
Batteries can be given a temporary boost in a battery
charger if there has been limited sun or extra light is
needed for a special occasion.
n
Batteries may need replacing after 1-2 years, depending on
the conditions they have had to endure. The
batteries are housed on the reverse of the solar panel
and can be accessed by removing the panel.
n
The battery (1 x AA) can be replaced with any 1.2v
rechargeable ones available in retail outlets: choose a low
power output (mAh). Gardman replacement batteries are ideal
for the purpose.
n
Low winter light levels or harsh weather in your locality may
lead you to decide to store your solar lights indoors until
conditions improve. If so, clean and dry the lights, turn off or
remove the batteries: store in a dry spot and reassemble in
spring as described in ‘installation’.
Troubleshooting:
If your solar light does not operate properly at night it may be
caused by one of the following:
n
Ensure the switch, if present, is in the on position and any bat-
tery tabs removed.
n
Low light levels caused by the position of the light, lack of sun
or short daylight hours will shorten the light duration.
n
Other lighting can cause flickering in a solar light or even
prevent it operating.
n
Check the batteries in case they need replacing:
see ‘maintenance’ above.
Page 3
What the symbols mean:
18235
DE
Conforms to European standards on health,
safety and the environment.
Restrictions on Hazardous Substances: the
symbol confirms that the product complies
with this important environmental legislation.
Waste Electrical and Electrical Equipment
regulations. Important: this product must not
be disposed of along with normal household waste.
Please protect the environment by
handing this item and any components to a recycling
centre: your local authority will have details of these.
Gardman are members of
REPIC electrical recycling consortium
ref number WEE/BJ0058TS.
Gardman Ltd, High Street, Moulton,
Spalding, Lincolnshire PE12 6QD.
Fax: +44 (0)1406 372233
www.gardman.co.uk
SOLAR-LICHTERKETTE
“PARTYLATERNE” (12)
Achtung
Bitte überprüfen Sie den Inhalt vor dem Zusammenbau.
Bitte lesen Sie die Bedienungsanleitung vor dem Zusammenbau.
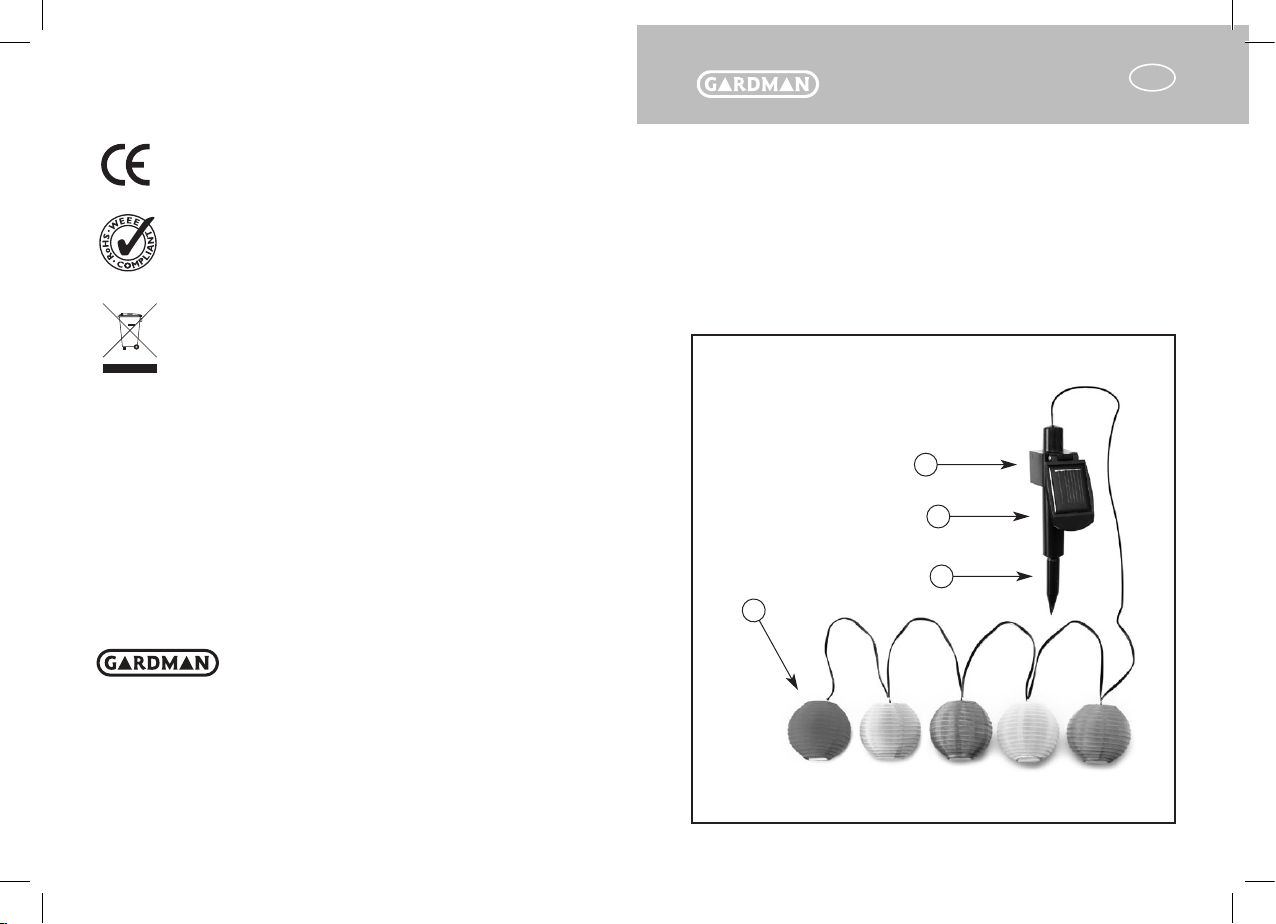
Inhalt:
A 12 Partylaternen verkabelt
mit der Solarzelle
B Solarzellenfassung
C Solarzellenhalter
D Bodenverankerung
A
B
C
D
Customer helpline: 01406 372227
Page 4

Aufbau:
n
Entfernen Sie sorgfältig die Verpackung ohne die Kabel zu
verdrehen.
n
Befestigen Sie die Solarzellenfassung an der Unterseite der
Solarzelle mit Hilfe der vorhandenen Laschen.
n
Befestigen Sie den Solarzellenhalter und die Bodenverankerung:
n
Stellen Sie den ’AN/AUS’ Schalter auf ’AN’
Installation:
n
Maximum an Sonnenlicht gibt der Batterie genug Aufladung und
somit beste Ergebnisse.
n
Stellen Sie die Solar-Zelle an einen sehr sonnigen Standort,
möglichst frei von Schatten oder anderen Abdeckungen.
n
Vermeiden Sie andere Lichtquellen, die die Solar-Leuchte AN und
AUS gehen lassen. Halten Sie einen Abstand von ca. 1,5 Metern
zwischen den Solar-Leuchten ein.
n
Legen Sie die Kette an den Ort, an dem sie angebracht werden
soll: mögliche Stellen sind unter Grünpflanzen, Rankgitter oder
gewunden um andere Gartendekorationen.
n
Befestigen Sie die Lichter so, das sie nicht leicht abfallen und
beschädigt werden können.
n
Befestigen Sie die Solarzelle im Boden oder an einem anderen Platz.
Stellen Sie sicher, das die Solarzelle genügend Sonne bekommt.
n
Solar-Leuchten werden nicht sehr hell oder ausdauernd leuchten, bis
sie einen vollen Tag Sonnenlicht erhalten haben.
n
Alternativ können die Batterien in einem dafür vorgesehenen
Ladegerät geladen werden.
Wartung:
n
Wenn die Solarzelle verschmutzt ist, reduziert sich die Ladekapazität.
Reinigen Sie die Solarzelle regelmäßig mit einem feuchten Tuch –
verwenden Sie keine harten Reinigungs- oder Lösungsmittel, da diese
die Solarzelle beschädigen.
n
Batterien können in einem Ladegerät geladen werden, wenn sie
nicht genug Sonnenlicht erhalten haben, oder Extralicht für eine
spezielle Gelegenheit erforderlich ist.
n
Batterien sollten alle 1-2 Jahre erneuert werden, je nach
Nutzungsbedingungen. Die Batterien sitzen hinter der
Solarzelle und können leicht entnommen werden, indem Sie die
Leuchte abschrauben und den Batteriedeckel abnehmen.
n
Die Batterien (1xAA pro Leuchte) können durch jede 1,2 V
aufladbare Batterie ersetzt werden: nehmen Sie eine niedrige
Leistung (mAh). Gardman Batterien sind Ideal für den
Gebrauch.
n
Wenig Licht im Winter, oder harte Wetterbedingungen
können dazu führen, das Sie die Leuchten abbauen und sicher
aufbewahren wollen. Reinigen und trocknen Sie hierzu die
Leuchten und entnehmen die Batterien. Bewahren Sie die
Leuchten an einem trockenen Ort auf und stellen diese im
Frühling wie unter “Installation“ beschrieben wieder auf.
Fehlerbehebung:
Sollte Ihre Solar-Leuchte in der Nacht nicht richtig funktionieren, kann
es durch folgende Gründe verursacht worden sein:
n
Stellen Sie sicher, das der Schalter, soweit vorhanden, auf “AN”
steht und die Folie von der Batterie entfernt wurde.
n
Schlechte Lichtbedingungen, verursacht durch zu wenig
Sonnenlicht, verkürzen die Leuchtdauer.
n
Andere Leuchten in der Nähe der Solar-Leuchte können dafür
verantwortlich sein, das die Leuchte flackert, oder garnicht
leuchtet.
n
Überprüfen Sie die Batterien, für den Fall das die Batterien ersetzt
werden müssen: siehe oben “Wartung“.
Page 5

Symbolbedeutung:
18235
FR
Konform zu Europäischen Standards wie
Gesundheit, Sicherheit und Umwelt.
Beschränkung gefährlicher Substanzen: das Symbol
bestätigt, das dieses Produkt diese Umweltgesetzgebung
erfüllt.
Achtung:
Sondermüll. Dieses Produkt darf nicht im normalen
Hausmüll entsorgt werden.
Schützen Sie die Umwelt indem Sie dieses Produkt in
den Sondermüll geben.
Informationen hierzu erhalten Sie in der für Sie
zuständigen Behörde. Gardman ist Mitglied bei REPIC
elektrisches Wiederverwertungskonsortium Nr. WEE/
BJ0058TS.
Gardman Ltd, High Street, Moulton,
Spalding, Lincolnshire PE12 6QD.
Fax: +44 (0)1406 372233
www.gardman.co.uk
ENSEMBLE GUIRLANDE SOLAIRE
DE LAMPIONS (12)
Important
Vérifier le contenu de l’emballage avant de procéder au montage.
Lire attentivement la notice avant toute installation.
Contenu :
A Lampions x 12 reliés au panneau solaire
B Monture de pied du panneau solaire
C Tige de panneau solaire
D Piquet
B
C
D
A
Customer helpline: +44 (0)1406 372227
Page 6

Montage :
n
Sortir avec précaution les différentes pièces de leur emballage en
évitant d’enchevêtrer les fils.
n
Fixer la monture sur la face inférieure du panneau solaire en la
positionnant dans les cosses d’attache disponibles.
n
Enfoncer la tige avec le piquet.
n
Mettre l’interrupteur « On/Off » sur « ON » (marche).
Installation :
n
Un ensoleillement maximal permet à la pile interne de mieux se
charger, et donne donc de meilleurs résultats.
n
Ne pas placer les lampes solaires dans un endroit couvert ou à
l’ombre ; les exposer de préférence à la lumière directe du soleil
pendant une journée entière.
n
Eviter toute autre source de lumière qui pourrait faire clignoter
les lampes solaires. Laisser également un espace d’environ 1,5 m
entre cette lampe et d’autres lampes solaires.
n
La guirlande peut être montée dans le feuillage et sur les treillis
ou enroulée autour d’accessoires de jardin. Régler selon les
besoins jusqu’à ce que les lampions et le panneau soient dans les
positions voulues.
n
Fixer solidement les lampions pour qu’ils ne puissent pas se
décrocher facilement et s’endommager.
n
Enfoncer le piquet avec précaution dans le sol : si le sol est dur,
faire d’abord un trou pour éviter d’endommager l’ensemble tige
en forçant.
n
Les lampes solaires n’atteindront pas leur intensité maximale
ou ne resteront pas allumées pendant une durée maximale tant
qu’elles n’ont pas été totalement chargées durant une journée
entière.
n
Comme autre solution, on peut charger complètement les piles
avec un chargeur de piles avant utilisation.
Entretien :
n
Si les panneaux solaires ne sont pas propres, ils ne peuvent pas
se charger au maximum de leur capacité. Nettoyer les panneaux
solaires de temps à autre avec un chiffon humide pour enlever les
saletés - éviter d’utiliser des détergents et solvants abrasifs qui
pourraient endommager les panneaux.
n
On peut charger temporairement les piles avec un chargeur
s’il n’y a pas eu suffisamment de soleil ou si l’on a besoin de
lumière supplémentaire pour une occasion spéciale.
n
Les piles peuvent devoir être changées après 1 ou 2 ans,
suivant les conditions dans lesquelles elles ont dû fonctionner.
Pour accéder aux piles, il sufffit d’enlever le panneau sur le
dessous de la lampe.
n
Les piles (1 x AA) peuvent être remplacées par n’importe quelle
pile rechargeable de 1,2 V disponible dans les commerces de
détail : choisir une faible intensité (mAh). Les piles de rechange
Gardman conviennent parfaitement pour cet usage.
n
De faibles niveaux d’ensoleillement en hiver ou de mauvaises
conditions météorologiques locales peuvent amener à la
décision de ranger les lampes solaires jusqu’à de meilleures
conditions. Dans ce cas, nettoyer les lampes et les essuyer,
déconnecter les piles ou les enlever : ranger les lampes dans
un endroit sec et les préparer à leur remise en marche au
printemps comme décrit dans la section « Installation ».
Diagnostic de pannes :
Si la lampe solaire ne fonctionne pas correctement la nuit, vérifier
les points suivants :
n
S’assurer que l’interrupteur, s’il y en a un, est mis sur la position
« ON » (marche) et que les languettes d’isolation des piles ont
été enlevées.
n
De faibles niveaux de lumière dus à la position de la lampe, un
faible ensoleillement ou des journées d’ensoleillement courtes
raccourcissent la durée d’éclairage de la lampe.
n
D’autres lampes peuvent faire clignoter une lampe solaire, ou
même, l’empêcher de fonctionner.
n
Vérifier que les piles n’ont pas besoin d’être remplacées - Voir «
Entretien » plus haut.
Page 7

Signification des symboles :
18235
NL
Conforme aux normes européennes relatives à la santé,
la sécurité et l’environnement.
Restrictions relatives aux substances dangereuses : le
symbole confirme que le produit est conforme à cette
législation environnementale importante.
Réglementations relatives aux déchets d’équipements
électriques et électroniques. Important : ne pas jeter
ce produit avec les déchets ménagers ordinaires. Pour
se débarrasser de ce produit en toute sécurité et de
manière responsable, déposer tous les éléments usagés
dans un centre de recyclage : pour des informations plus
détaillées sur le centre approprié, s’adresser aux autorités
locales. La société Gardman est affiliée au « Recycling
Electrical Producers’ Industry Consortium » (consortium
britannique de recyclage des produits électriques) ou «
Repic », numéro de référence WEE/BJ0058TS.
Gardman Ltd, High Street, Moulton,
Spalding, Lincolnshire PE12 6QD, Royaume-Uni.
Fax: +44 (0)1406 372233
www.gardman.co.uk
FEESTLANTAARNSET
MET ZONNE-ENERGIE (12)
Belangrijk
Controleer de inhoud van de verpakking voordat u de lamp in
elkaar zet.
Lees deze instructies vóór de installatie.
Inhoud:
A Feestlantaarns x 12, aangesloten op
een zonnepaneel
B Bevestiging voor de zonnepaneelpoot
C Zonnepaneelsteel
D Prikker
A
B
C
D
Service d’assistance client : +44(0)1406 372227
Page 8

Assemblage:
n
Haal de onderdelen voorzichtig uit de verpakking zodat de draden
niet in de knoop raken.
n
Sluit de bevestiging op de onderkant van het zonnepaneel aan
door hem in de beschikbare uitsteeksels te draaien.
n
Voeg de steel en grondprikker toe.
n
Zet de schakelaar in de stand ON (aan).
Installatie:
n
De batterij wordt het beste opgeladen met maximaal zonlicht. Dit
geeft de beste resultaten.
n
Plaats de zonnelampen uit de buurt van afdekking of schaduw, bij
voorkeur de hele dag in de zon.
n
Vermijd andere lichtbronnen, omdat de zonnelichten daardoor
aan en uit gaan. Houd ongeveer 1,5 meter (5 voet) ruimte tussen
deze en andere zonnelichten vrij.
n
In gebladerte of latwerk of om tuinmeubilair gevlochten. Pas zo
nodig aan totdat de lampen en het paneel zich in de gewenste
posities bevinden.
n
Maak de lampjes voorzichtig maar goed vast, zodat ze niet
gemakkelijk per ongeluk loskomen of beschadigd raken.
n
Duw de prikker voorzichtig in de grond. Als de grond hard is, maakt
u eerst een gat zodat de prikker niet beschadigd raakt.
n
In gebladerte of latwerk of om tuinmeubilair gevlochten. Pas zo
nodig aan totdat de lampen en het paneel zich in de gewenste
posities bevinden.
n
Maak de lampjes voorzichtig maar goed vast, zodat ze niet
gemakkelijk per ongeluk loskomen of beschadigd raken.
n
Zonnelampen zijn niet erg helder of lichten niet lang op als ze niet
de hele dag in de zon hebben gestaan.
n
U kunt de batterijen vóór het gebruik ook eerst in een oplader
opladen.
Onderhoud:
n
Als de zonnepanelen vies worden, reduceert dit de
oplaadcapaciteit ervan. Maak de panelen af en toe met een
vochtige doek schoon. Vermijd ruwe reinigings- of oplosmiddelen,
aangezien het paneel hiermee beschadigd kan raken.
n
U kunt de batterijen tijdelijk extra opladen met behulp van een
batterijoplader als er weinig zonlicht is geweest of als u voor
een speciale gelegenheid extra licht nodig hebt.
n
De batterijen moeten om de 1-2 jaar worden vervangen,
afhankelijk van de omstandigheden waarin ze zijn geplaatst.
U kunt gemakkelijk bij de batterijen door het paneel aan de
onderkant van de lamp te verwijderen.
n
De batterijen (1 x AA) kunnen worden vervangen met een
nieuwe oplaadbare batterij van 1,2 volt, beschikbaar in winkels.
Kies een batterij met een lage uitvoer (mAh). De batterijen van
Gardman zijn ideaal voor dit doel.
n
Weinig zonlicht in de winter of onder zware
weersomstandigheden waar u woont, kan ertoe leiden dat
u besluit uw zonnelampen binnen te bewaren, totdat de
weersomstandigheden verbeteren. Als dat het geval is, maakt u
de lampen schoon en droog, schakelt u ze uit of verwijdert u de
batterijen. Bewaar de lampen op een droge plek en zet ze in de
lente weer in elkaar volgens de beschrijving in ‘Installatie’.
Problemen oplossen:
Als uw zonnelamp ‘s nachts niet goed werkt, kan dit een van de
volgende oorzaken hebben:
n
Zorg dat de schakelaar, indien aanwezig, in de stand ON (aan)
staat en dat eventuele batterijtabs zijn verwijderd.
n
Als de lamp op een plek staat waar weinig zonlicht komt, als er
weinig zonlicht is of als de dagen kort zijn, wordt de lamp minder
lang verlicht.
n
Andere verlichting kan zorgen dat de zonnelamp gaat knipperen
of zelfs helemaal niet meer werkt.
n
Controleer of de batterijen moeten worden vervangen.
Zie ‘Onderhoud’ hierboven.
Page 9

Betekenis van de symbolen:
18235
IT
Conformeert aan de Europese norm voor gezondheid,
veiligheid en milieu.
Beperkingen op gevaarlijke stoffen. Het symbool
bevestigt dat het product voldoet aan deze belangrijke
milieuwetgeving.
Regelgeving met betrekking tot het wegdoen van
elektrische en elektronische apparatuur. Belangrijk:
dit product mag niet met het normale huisvuil worden
weggedaan. Bescherm het milieu door dit artikel en
eventuele onderdelen ervan, bij een recyclingpunt af
te geven. De gegevens hiervan zijn bij uw gemeente
verkrijgbaar. Gardman is lid van het REPIC elektrische
recyclingconsortium, ref.nummer WEE/BJ0058TS.
Gardman Ltd, High Street, Moulton,
Spalding, Lincolnshire PE12 6QD.
Fax: +44 (0)1406 372233
www.gardman.co.uk
SET GHIRLANDA LANTERNE PARTY
A ENERGIA SOLARE (12)
Importante
Controllare il contenuto della confezione prima di assemblare.
Leggere attentamente queste istruzioni prima
dell’installazione.
Contenuto:
A Lanterne da party x 12, collegate
a pannello solare
B Supporto per pannello solare
C Stelo per pannello solare
D Picchetto
A
B
C
D
Klantentelefoon: +44 (0)1406 372227
Page 10

Assemblaggio:
n
Rimuovere delicatamente le parti dall’imballaggio per evitare di
aggrovigliare i fili.
n
Connettere il supporto alla base del panello solare tramite le
apposite alette.
n
Aggiungere lo stelo e il picchetto.
n
Impostare l’interruttore “On/Off” su “On”.
Installazione:
n
La massima esposizione alla luce solare consentirà di caricare
completamente la batteria.
n
Posizionare le lampada lontane da aree ombreggiate o coperte, in
un luogo particolarmente soleggiato.
n
Evitare altre sorgenti luminose, che potrebbero causare il tremolio
della luce. Lasciare una distanza di circa 1,5 m fra la lampada e
altre lampade a energia solare.
n
Fra i rami delle piante, graticci o altri elementi decorativi del
giardino. Regolare fino a quando le luci e il pannello non sono
nella posizione desiderata.
n
Fissare le luci con cura, controllando che non possano essere
facilmente spostate o danneggiate.
n
Spingere il picchetto nel suolo: se il terreno è particolarmente
duro, scavare prima una piccola buca per evitare di danneggiare il
picchetto.
n
La lampada a energia solare non sarà particolarmente luminosa e
la sua autonomia sarà limitata fino a quando la batteria non sarà
stata esposta alla luce del sole per un’intera giornata.
n
In alternativa, le batterie possono essere caricate in un
caricabatterie prima del loro uso.
Manutenzione:
n
Se i pannelli solari dovessero sporcarsi, la capacità di ricarica si
ridurrà. Pulire di tanto in tanto i pannelli con un panno umido,
ma evitare detergenti o solventi per non danneggiare la
superficie del pannello.
n
Le batterie possono essere ricaricate in un caricabatterie in caso
di esposizione limitata alla luce del sole o se un’illuminazione
particolarmente brillante è necessaria per un’occasione speciale.
n
Le batterie vanno in genere sostituite ogni 1-2 anni, a seconda
delle condizioni ambientali. È possibile accedere alle batterie
smontando il pannello sulla base della lampada.
n
Le batterie (1 x AA ) possono essere sostituite con batterie
ricaricabili da 1,2 V: si raccomanda di selezionare una potenza
ridotta (mAh). Le batterie sostitutive Gardman sono ideali a
questo scopo.
n
In inverno, o in caso di condizioni atmosferiche particolarmente
avverse, si può decidere di immagazzinare il prodotto. In questo
caso, pulire e asciugare le lampade e rimuovere le batterie:
immagazzinare in un luogo asciutto e riassemblare in primavera,
come descritto in “Installazione”.
Risoluzione dei problemi:
Se la lampada solare non funziona correttamente di notte, la causa
potrebbe essere una delle seguenti:
n
Assicurarsi che l’interruttore, se presente, sia sulla posizione di “ON”
e che le linguette della batteria siano state rimosse.
n
Livelli di esposizione ridotti, causati dalla posizione della lampada,
l’assenza di luce solare o giornate particolarmente brevi, ridurranno
l’autonomia della lampada.
n
Altre luci possono causare la disattivazione della lampada o
possono prevenirne il funzionamento.
n
Controllare se le batterie necessitino di essere sostituite: vedere
“Manutenzione”, sopra.
Page 11

Significato dei simboli:
18235
ES
Conforme agli standard europei sulla salute, la
sicurezza e l’ambiente.
Restrizioni concernenti le sostanze pericolose: il simbolo
conferma che il prodotto è conforme a questa importante
legislazione sull’ambiente.
Regolamenti rifiuti apparecchiature elettriche ed
elettroniche. Importante: questo prodotto non
deve essere smaltito con i normali rifiuti domestici.
Proteggere l’ambiente portando questo prodotto
e i suoi componenti a un centro di riciclaggio: per
informazioni rivolgersi alle autorità locali. Gardman
è membro del consorzio per il riciclaggio dei
componenti elettrici “REPIC”, numero di riferimento
WEE/BJ0058TS.
Gardman Ltd, High Street, Moulton,
Spalding, Lincolnshire PE12 6QD.
Fax: +44 (0)1406 372233
www.gardman.co.uk
JUEGO DE LINTERNAS DE FIESTA ALIMENTADAS POR ENERGÍA SOLAR (12)
Importante
Antes de realizar el montaje compruebe el contenido del paquete.
Antes de realizar la instalación, lea estas instrucciones cuidadosamente.
Contenido:
A 12 Farolillos de fiesta conectados a panel solar
B Montaje de pata de panel solar
C Vástago de panel solar
D Espiga
B
C
D
A
Helpline clienti: +44 (0)1406 372227
Page 12

Montaje:
n
Retire las piezas cuidadosamente del paquete para evitar enredar
los cables.
n
Conecte el conjunto a la parte de debajo del panel solar ubicán-
dolo en los salientes disponibles.
n
Coloque el vástago y la espiga de puesta tierra.
n
Ponga el interruptor ‘On/Off’ (activación/desactivación) a ‘On’.
Instalación:
n
En follaje y espaldera o enroscado alrededor de elementos de
jardín. Ajuste las luces y el panel según requiera hasta que estén
en las posiciones deseadas.
n
Sujete las luces con cuidado para que no puedan salirse de sitio
fácilmente y dañarse.
Instalación:
n
La recepción máxima de sol proporcionará la mejor carga a la pila
interna y por lo tanto producirá los resultados óptimos.
n
Coloque las luces solares en un lugar donde no haya sombra e
idealmente en una posición en la que reciba el sol directamente todo
el día.
n
Evitar otras fuentes de luz que puedan causar que las luces solares
parpadeen. Además deje una distancia de aproximadamente 1,5 m
entre esta luz solar y otras luces solares.
n
en follaje y espaldera o enroscado alrededor de elementos de jardín.
Ajuste las luces y el panel según requiera hasta que estén en las
posiciones deseadas.
n
Sujete las luces con cuidado para que no puedan salirse de sitio
fácilmente y dañarse.
n
Hinque la espiga cuidadosamente en el suelo: si el suelo es duro,
antes haga un agujero en el mismo para evitar dañar la espiga.
n
Las luces solares no serán muy brillantes ni duraderas hasta que
hayan estado expuestas al sol un día entero.
n
De forma alternativa, las pilas pueden cargarse a su capacidad
completa en un cargador de pilas.
Mantenimiento:
n
Si los paneles solares ensucian, la capacidad de carga se re-
duce. Limpie los paneles ocasionalmente con un paño húmedo
– no utilice detergentes fuertes o solventes ya que pueden
dañar el panel.
n
Las pilas pueden recibir una carga de refuerzo temporal en un
cargador de pilas si el sol ha sido limitado o si se requiere luz
extra para una ocasión especial.
n
Las pilas pueden necesitar cambiarse después de 1-2 años,
según las condiciones a las que estén sometidas. Es posible
acceder fácilmente a las pilas retirando el panel situado en la
parte de debajo de la luz.
n
Las pilas (1 x AA) pueden ser sustituidas por cualquier pila
recargable de 1,2 v disponible en establecimientos minoristas:
Seleccione una potencia de salida baja (mAh). Las pilas de
repuesto Gardman son ideales para ese fin.
n
Los bajos niveles de luz invernal o el mal tiempo en su localidad
puede hacer que usted decida guardar sus luces solares en el
interior hasta que las condiciones mejoren. En este caso, limpie
y seque las luces, y desactive o retire las pilas: guárdelas en
un lugar seco y vuelva montarlas en la primavera de la forma
descrita en ‘instalación’.
Resolución de problemas:
Si su luz solar no funciona correctamente por la noche, esto
puede ser debido a:
n
Compruebe que el interruptor, si está presente, está en la
posición de activación y las lengüetas de la pila han sido
retiradas.
n
Los bajos niveles de luz causados por la posición de la luz, la
falta de sol o pocas horas de luz diurna reducen la duración de
la luz.
n
Otros aparatos de iluminación pueden causar parpadeo en una
luz solar o incluso impedir su funcionamiento.
n
Compruebe las pilas en caso de que necesiten cambiarse:
véase ‘mantenimiento’ más arriba.
 Loading...