

Page 1

Owner’s
Manual
MODEL: HSS-A-SS
IMPORTANT
Read this manual carefully before
assembling, using or servicing this
PATIO HEATER
ANSI Z83.26-2007/CSA 2.37-2007 Gas-Fired Outdoor Infrared Patio Heaters
heater. Keep this manual for future
reference.
RR
Page 2
Contents
.
.
.
.
.
DANGER
General Safety Information....................................... 1
snoitcurtsnIylbmessA
Components & Hardware.......................................
Additional Requirements ........................................ 3
ssecorPnoitallatsnI
Step 1 –Attach Support Brackets to Base..............
Step 2 – Attach Pole to Support Brackets............... 5
Step 3 – Load Cylinder Housing onto Pole............. 5
Step 4 – Attach Reflector Studs to Screen Cover... 5
Step 5 – Attach Head Assembly to Pole.................
Step 6 – Install Reflector.........................................
Step 7 – Attach Reflector Assembly to Studs.........
Step 8 – Connect Hose & Regulator to Cylinder...... 7
Leak Check............................................................. 8
Operation................................................................ 9
Troubleshooting...................................................... 11
Maintenance........................................................... 11
Storage...................................................................
Service.................................................................... 12
Warranty ................................................................
12
12
General Safety Information
This manual contains important information about the
assembly, operation and maintenance of this patio heater.
General safety information is presented in these first few
pages and is also located throughout the manual.
Keep this manual for future reference and to educate
new users of this product. This manual should be read in
conjunction with the labeling on the product.
Safety precautions are essential when any mechanical
or propane fueled equipment is involved. These
precautions are necessary when using, storing, and
servicing. Using this equipment with the respect and
caution demanded will reduce the possibilities of personal
injury or property damage.
The following symbols shown below are used extensively
throughout this manual. Always heed these precautions,
as they are essential when using any mechanical or
fueled equipment.
DANGER indicates an imminently hazardous situation
which, if not avoided, will result in death or serious injury.
3
WARNING
WARNING indicates an imminently hazardous situation
which, if not avoided, could result in death or serious injury.
4
CAUTION indicates an imminently hazardous situation which,
if not avoided, may result in minor or moderate personal injury,
or property damage.
5
6
7
01tsilkcehCnoitarepO
If you smell gas:
1. Shut off gas to the appliance.
([WLQJXLVKDQ\RSHQÀDPH
3. If odor continues, keep away from the appliance and
immediately call you gas supplier or fire department.
Do not store or use gasoline or other flammable
vapors and liquids in the vicinity of this or any
other appliance.
An LP-cylinder not connected for use shall not be
stored in the vicinity of this or any other appliance.
WARNING:
DANGER
CAUTION
DANGER
FOR YOUR SAFETY
WARNING
For Outdoor Use Only
CARBON MONOXIDE HAZARD
This appliance can produce carbon
monoxide which has no odor.
Using it in an enclosed space can kill you.
Never use this appliance in an enclosed
space such as a camper, tent or home.
WARNING
Improper installation, adjustment, alteration, service or maintenance
can cause property damage, injury or death. Read the installation,
operation and maintenance instructions thoroughly before installing
or servicing this equipment.
DANGER
Failure to comply with the precautions and instructions
provided with this heater can result in death, serious bodily injury
and property loss or damage from hazards of fire,explosion,
burn, asphyxiation, and/or carbon monoxide poisoning.
Only persons who can understand and follow the instructions
should use or service this heater.
1
Page 3
DANGER
• EXPLOSION - FIRE HAZARD
• Keep solid combustibles, such as building materials,
paper or cardboard, a safe distance away from the heater
as recommended by the instructions.
• Provide adequate clearances around air openings into
the combustion chamber.
• Never use the heater in spaces which do or may contain
volatile or airborne combustibles, or products such as
gasoline, solvents, paint thinner, dust particles or unknown
chemicals.
• During operation, this product can be a source of
ignition. Keep heater area clear and free from combustible
materials, gasoline, paint thinner, cleaning solvents and
other flammable vapors and liquids. Do not use heater in
areas with high dust content. Minimum heater clearances
from combustible materials: 36” from the sides & 36” from
the top.
DANGER
• CARBON MONOXIDE HAZARD
• This heater is a combustion appliance. All combustion
appliances produce carbon monoxide (CO) during the
combustion process. This product is designed to produce
extremely minute, non-hazardous amounts of CO if used
and maintained in accordance with all warnings and
instructions. Do not block air flow into or out of the heater.
• Carbon Monoxide (CO) poisoning produces flu-like
symptoms, watery eyes, headaches, dizziness, fatigue and
possibly death. You can't see it and you can't smell it. It's
an invisible killer. If these symptoms are present during
operation of this product get fresh air immediately!
• For outdoor use only .
• Never use inside house, or other unventilated or
enclosed areas.
• This heater consumes air (oxygen). Do not use in
unventilated or enclosed areas to avoid endangering
your life.
WARNING
We cannot foresee every use which may be made of our
heaters.
Check with your local fire safety authority if you have
questions about heater use.
Other standards govern the use of fuel gases and heat
producing products for specific uses. Your local authorities
can advise you about these.
If no local codes exist, follow National Fuel Gas Code,
ANSI Z223.1. In Canada, installation must conform to local
codes. If no local codes exist, follow the current National
standards of CANADA CAN/CGA-B 149.2.
CAUTION
• SERVICE SAFETY
• Keep all connections and fittings clean. Make sure
propane cylinder valve outlet is clean.
• Inspect hose before use. Replace if there is evidence of
abrasion or wear.
• During set up, check all connections and fittings for leaks
using soapy water. Never use a flame.
• Use as a heating appliance only. Never alter in any way or
use with any device.
• Check entire hose at least annually.
WARNING
• BURN HAZARD
• Never leave heater unattended when hot or in use.
• Keep out of reach of children.
2
Page 4
WARNING
Assembly Instructions
• This product is fueled by propane gas. Propane gas is
invisible, odorless, and flammable. An odorant is normally
added to help detect leaks and can be described as a
“rotten egg” smell. The odorant can fade over time so
leaking gas is not always detectable by smell alone.
• Propane gas is heavier than air and leaking propane will
sink to the lowest level possible. It can ignite by ignition
sources including matches, lighters, sparks or open flames
ofanykindmanyfeetawayfromtheoriginalleak.Useonly
propane gas set up for vapor withdrawal.
• Propane gas should be stored or used in compliance with
local ordinances and codes or with ANSI/NFPA 58. Turn off
propane when not in use.
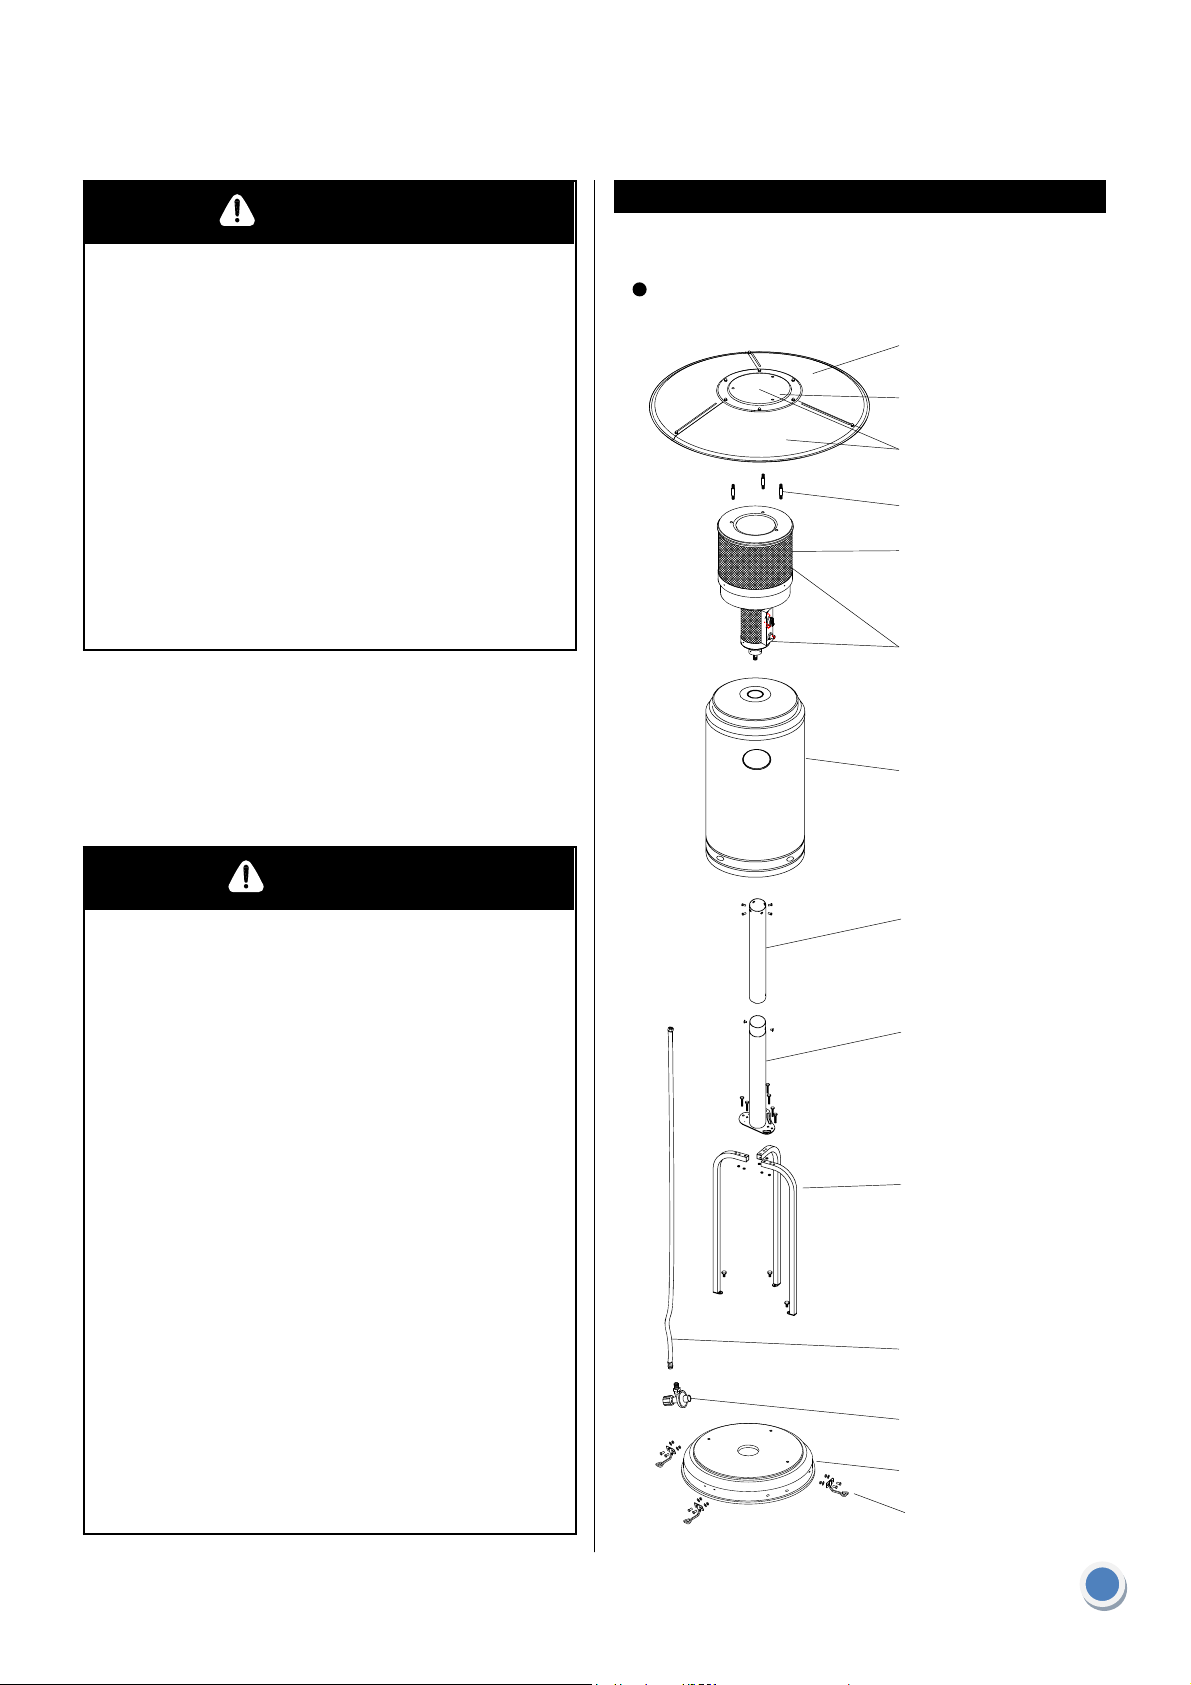
Components
Remove all components from package.
Reflector Panel(3)
Reflector Plate
Reflector Assembly
Reflector Stud(3)
Heater Burner
Screen
Head Assembly
Cylinder Housing
DANGER
• EXPLOSION - FIRE HAZARD
• Never store propane near high heat, open flames, pilot
lights, direct sunlight, other ignition sources or where
temperatures exceed 120 degrees F (49°C).
• Propane vapors are heavier than air and can accumulate
in low places. If you smell gas, leave the area immediately.
• Never install or remove propane cylinder while heater is
lighted, near flame, pilot lights, other ignition sources or
while heater is hot to touch.
• This heater is red hot during use and can ignite
flammables too close to the burner. Keep flammables at
least 36” from sides & 36” from top. Keep gasoline and
other flammable liquids and vapors well away from heater.
• The propane cylinder must always be stored outdoors in a
well ventilated space. Never store propane cylinder in an
enclosed area (house, garage, etc.). If heater is to be
stored indoors, disconnect the propane cylinder for outdoor
storage.
Upper Pole
Lower Pole
Support Bracket(3)
Gas Hose
Regulator
Base
Ground Fixer
3
Page 5
WARNING
California Proposition 65
Combustion by products produced when using
this product contain chemicals known to the state
of California to cause cancer, birth defects, and
other reproductive harm.
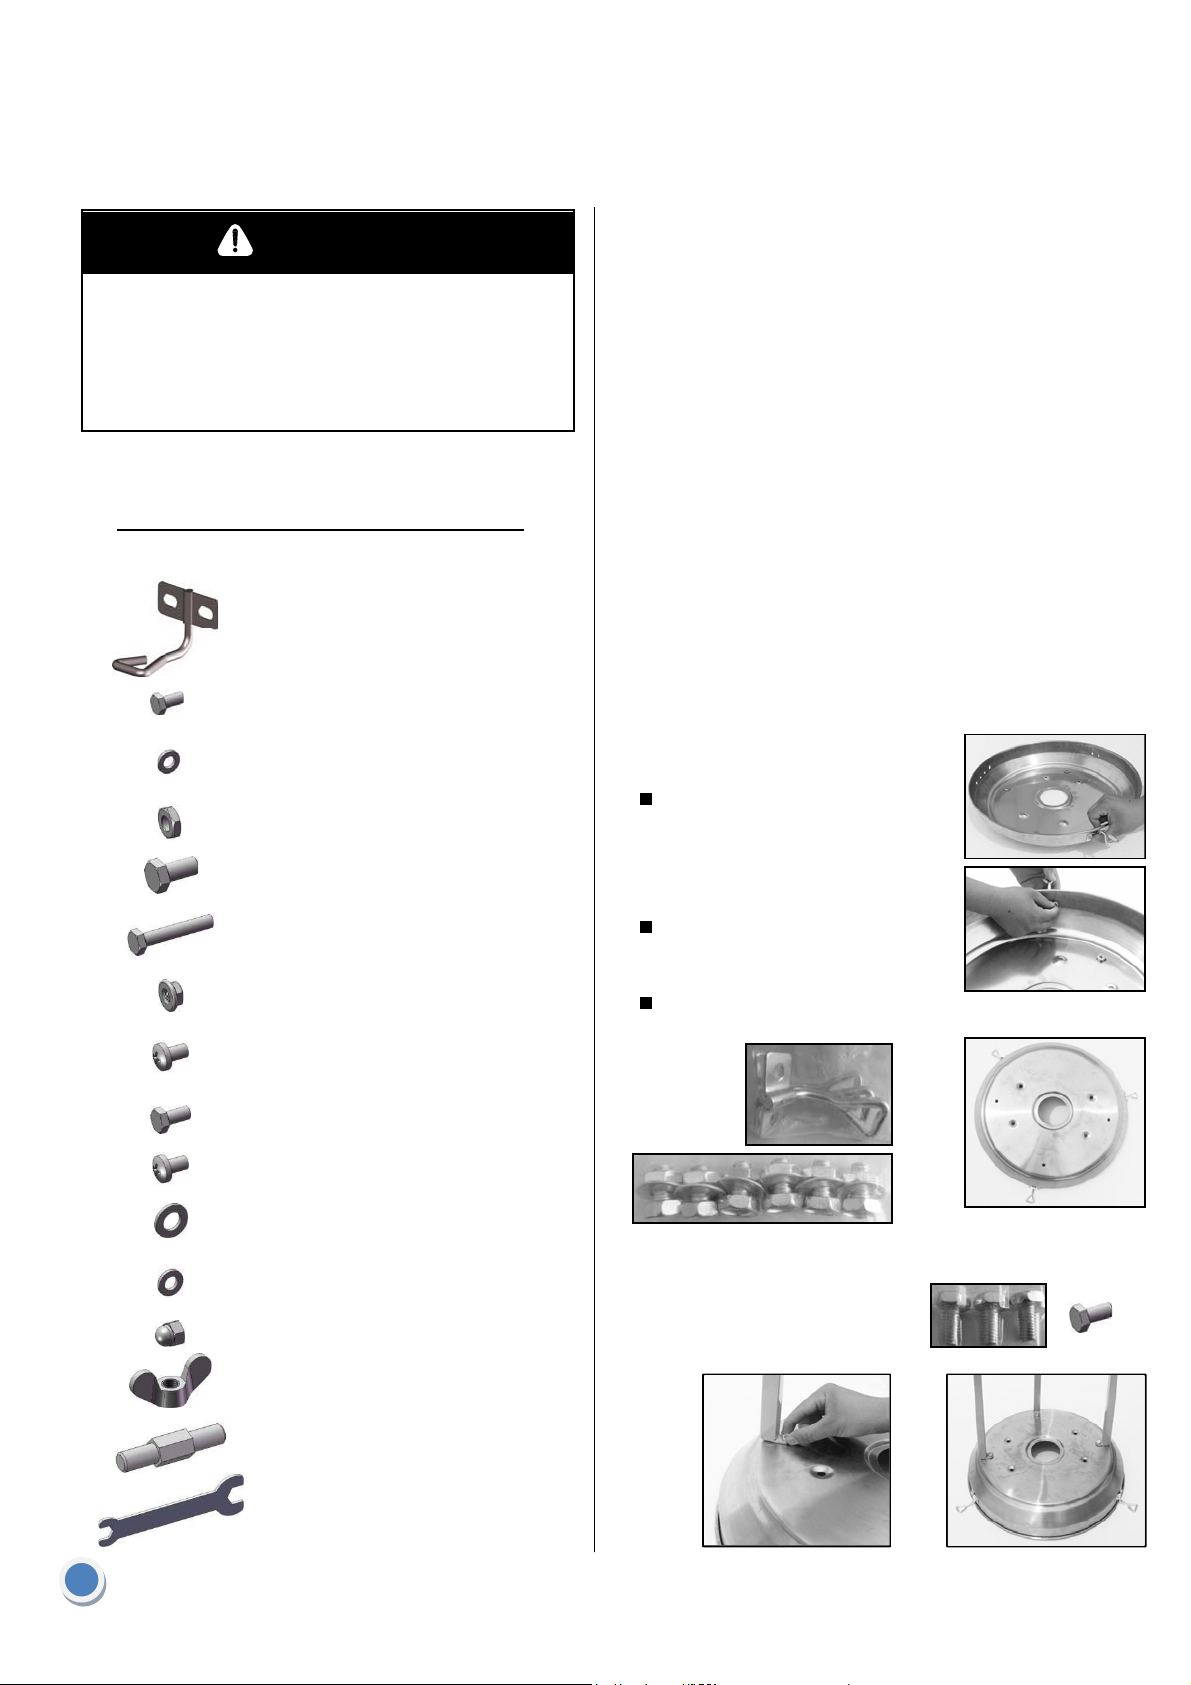
Hardware
Picture Qty Description
Ground Fixer
Used in
Step(s)
Additional Requirements
The following items are not included, but are necessary for
the proper assembly of your heater. Do NOT attempt to
assemble without proper tools.
.
.
Philips screwdriver w/ medium blade.
.
Adjustable opening wrench.
.
Leak Detection Solution(Instructions on how to make
solution are included in step )
Note: You must follow all steps to properly assemble
heater.
For additional assistance or service,
13
please call: 888-775-1330.
Installation process
6 Small Bolt
Small Flat
6
6
3
6
6
2 3/16” Screw
4 Small Bolt
9 Small Screw 6
9
9
9 Cap Nut 6
3Wing Nut 7
Washer
Nut
Medium Bolt 1
Large Bolt
Small Flange
Nut
Large Flat
Washer
Small Flat
Washer
1
1
1
2
2
2
5
4 / 7
6
Step 1 – Attach Support Brackets to Base
To protect heater from strong wind, anchor
the base securely to the ground
with screws.
Reverse the base, fix the ground
fixer to the base with bolts and
washers like picture shows.
Secure the ground fixer with nuts.
Fix another two ground fixer with bolts and nuts,
and reverse the base.
.Attach three Support Brackets loosely to Base with
three medium bolts downward through Support
Brackets into the Base.
3 Req’d Medium Bolts
3 Reflector Stud 4
1Wrench
4
1/2/5/ 6
Page 6
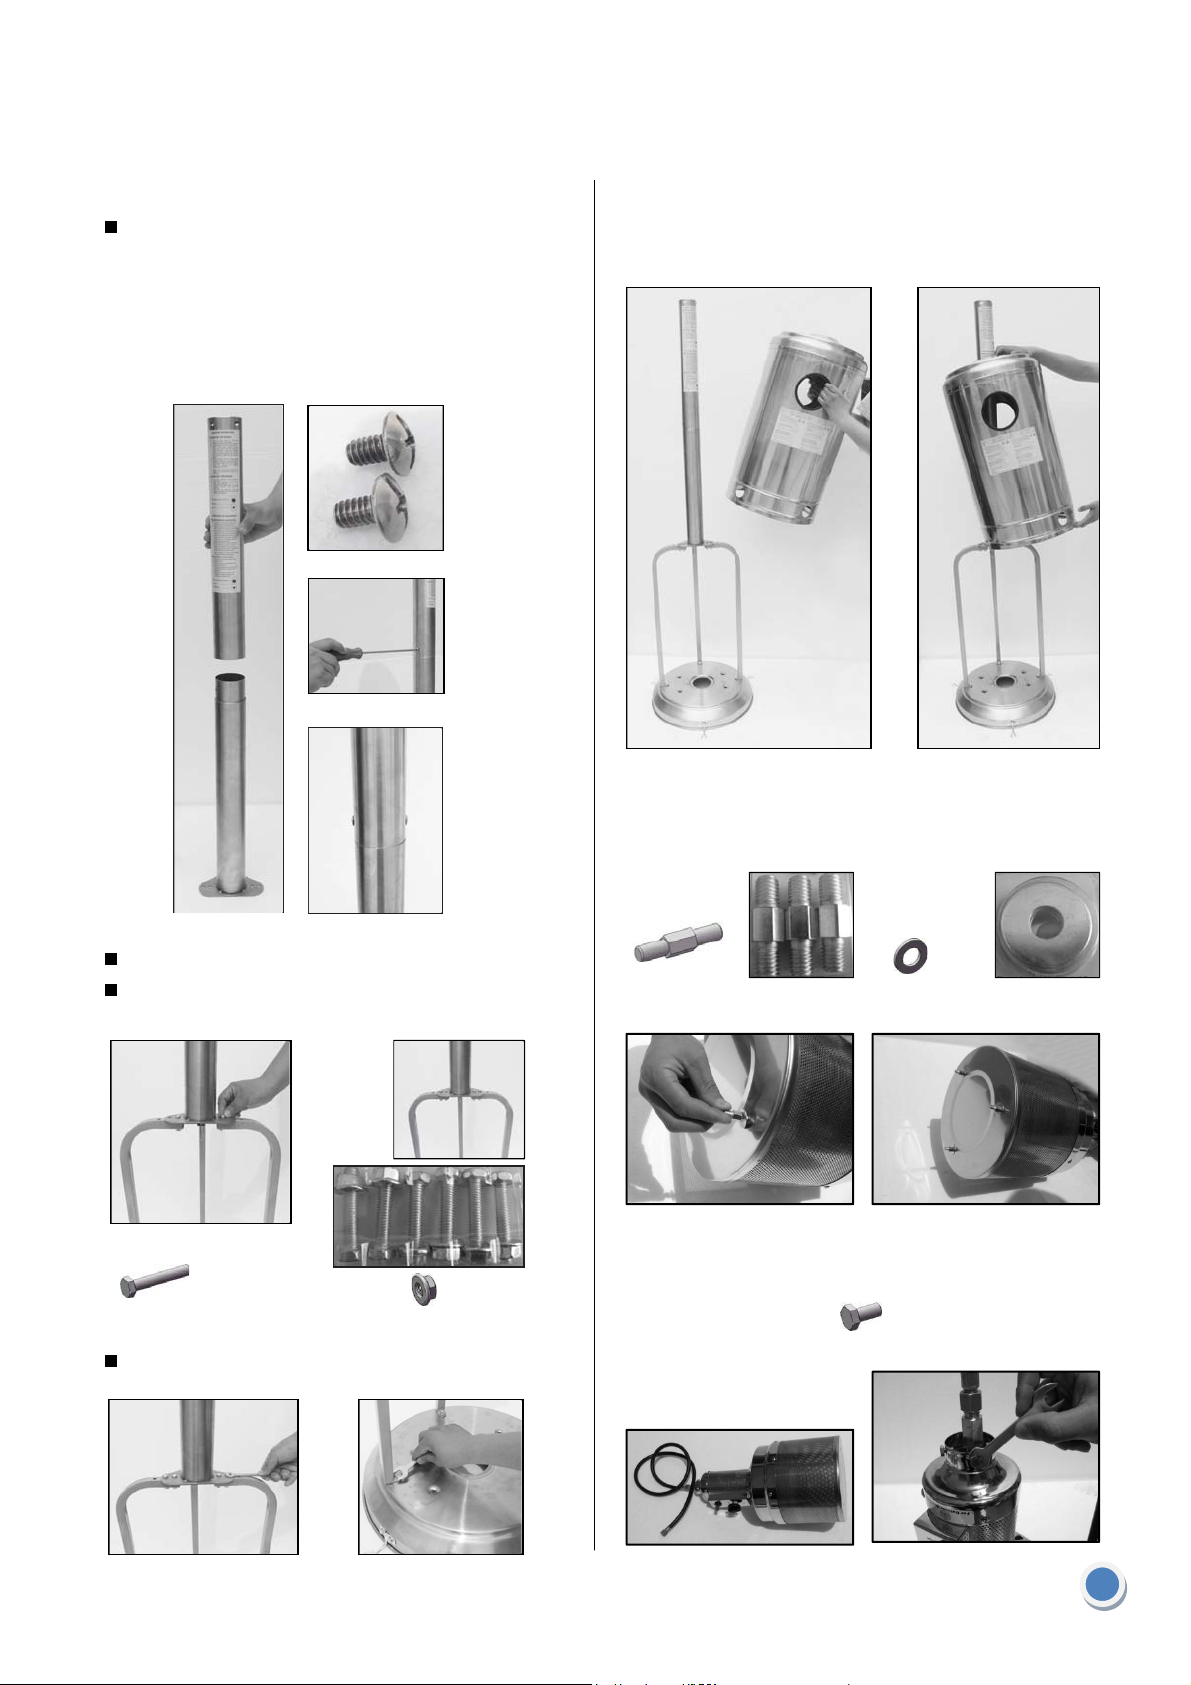
Step 2 – Attach Pole to Support Brackets
Put the upper pole onto the lower pole, using 2pcs
3/16” screws to firmly secure 2pcs pole.The warning
label on the upper pole should be on the same side as
the flat plate of the lower pole.
Step 3 – Load Cylinder Housing onto Pole
.Load Cylinder Housing onto Pole.
.Slide Cylinder Housing down.
Install Pole onto three Support Brackets.
Attach Pole to Support Brackets using six large bolts
& six flange nuts.
6 Req’d Large Bolts
Fully tighten all of the screws.
6 Req’d Small Flange Nut
Step 4 – Attach Reflector Studs to Screen Cover
.Insert 3 Reflector Studs & 3 Flat Washers.
.Tighten studs securely.
3 Req’d Reflector Studs
Step 5 – Attach Head Assembly to Pole
3 Req’d Large Flat Washers
.Screw off 4 small bolts.
4 Req’d Small Bolts
Head Assembly
5
Page 7
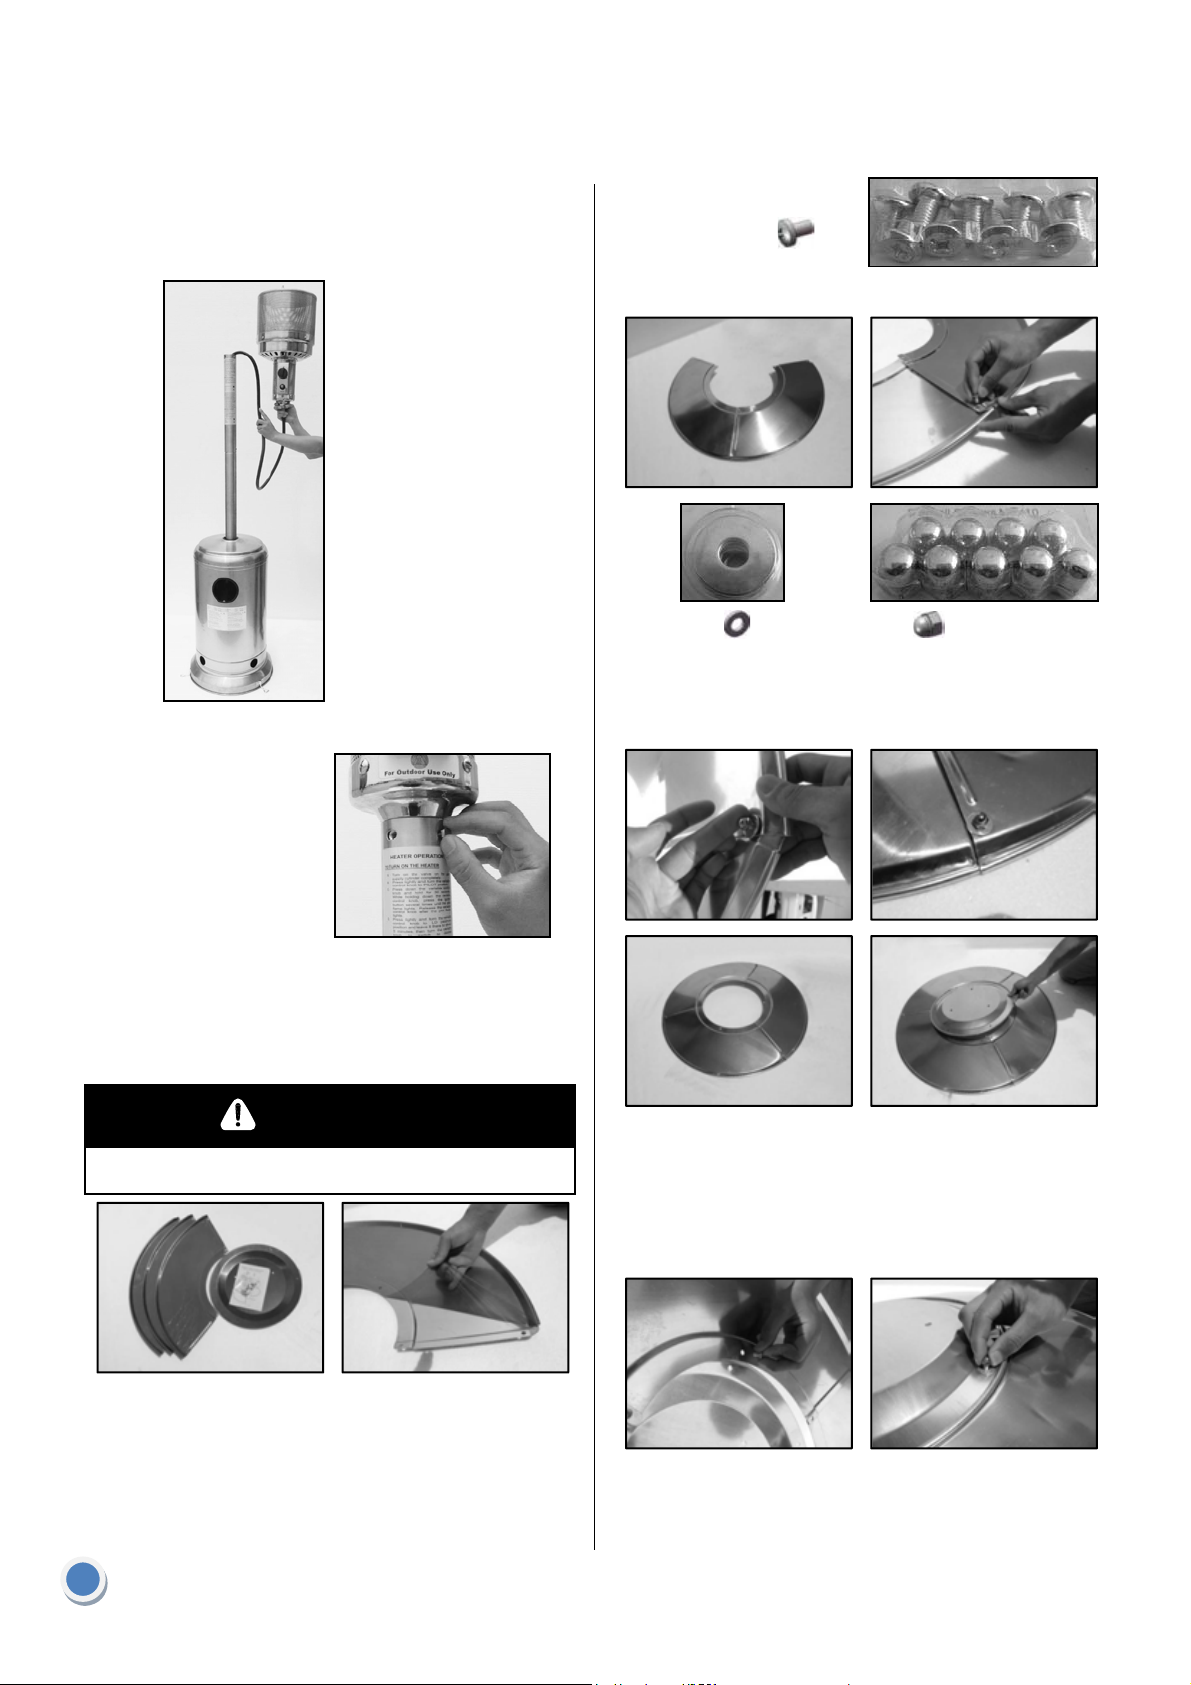
.Load Head Assembly by inserting hose into pole.
.Insert Head Assembly into pole.
.Control knob should be above decal on pole.
9 Req’d Small Screw s
.Attach Head Assembly to pole, and loosely install four
small bolts.
.Tighten bolts securely.
Step 6 – Install Reflector
WARNING
Remove protective cover before assemble.
9 Req’d Small Flat Washers
9 Req’d Cap Nuts
.Slide one Small Flat Washer over threaded end of
screw and screw on Cap Nut loosely.
.Slide Reflector Plate
onto Reflector Panels.
.Insert one Small
Screw.
.Slide one Small Flat
Washer over threaded
end of screw and
screw on Cap Nut
loosely.
Note: If necessary for proper alignment of reflector
sections, loose each screw prior to further assembly and
retighten after sections are aligned.
.Slide two Reflector
Panels together.
6
.Insert one Small
Screw.
.Repeat procedure to complete the assembly of all four
sections.
.Fully tighten all of the screws in the rolled edge.
Page 8
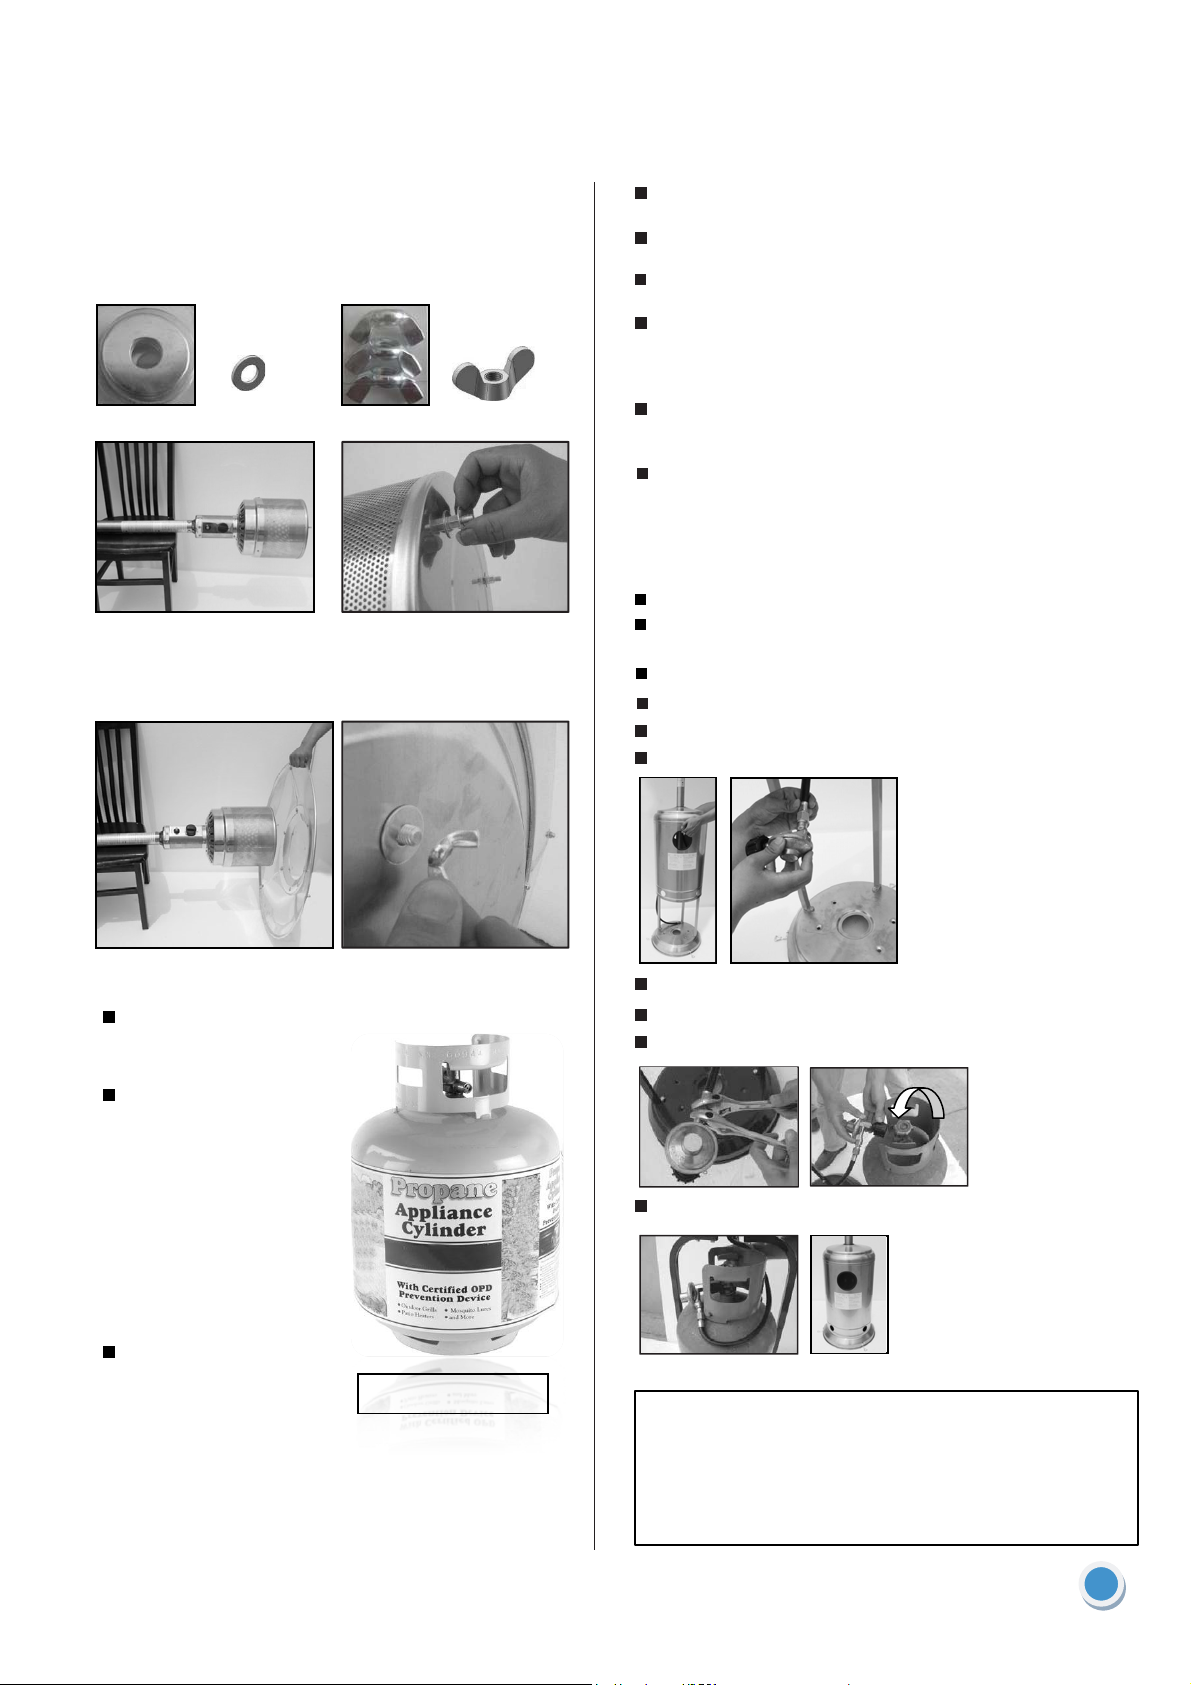
Step 7 – Attach Reflector Assembly to Studs
.Support Heater.
.Slide 3 Large Flat Washers over threaded end of
Studs.
6 Req’d Large Flat Washers
3 Req’d Wing Nuts
.Locate Reflector Assembly on 3 studs.
.Install large flat washers on studs & securely tighten
wing nuts but do not over-tighten!
The minimum permissible gas supply pressure of 10 W.C.
is required for purpose of input adjustment.
The minimum hourly of 17000 Btu is required input rating for a
heater for automatic operation at ratings less than full input rating.
The pressure regulator and hose assembly supplied with the
appliance must be used.
The installation must conform with local codes, or in the absence
of local codes,with National Fuel Gas Code, ANSI Z223.1/NFPA54,
Natural Gas and Propane Installation Code, CSA B149.1, or Propane
Storage and Handling Code, B149.2.
A dented, rusted or damaged propane cylinder may be hazardous
and should be checked by your cylinder supplier. Never use a
propane cylinder with a damaged valve connection.
The propane cylinder must be constructed and marked in
accordance with the specifications for LP gas cylinders of the
U.S. Department of Transportation (DOT).
or the Standard for Cylinders, Spheres and Tubes for
Transportation of Dangerous Goods and Commission,
CAN/CSA-B339.
Provided with a listed overfilling prevention device.
Provided with a cylinder connection device compatible with the
connection for the appliance.
The cylinder used must include a collar to protect the cylinder valve.
Never connect an unregulated propane cylinder to the heater.
Lift Cylinder Housing.
Screw regulator onto gas hose. Do not cross-thread.
Step 8 – Connect Hose & Regulator to Cylinder
You must provide propane gas and propane cylinder .
Use a standard 20 lb. propane
cylinder only.
Use this heater only with a
propane vapor withdrawal
supply system.See
Chapter 5 of the Standard
for Storage and Handling
of Liquefied Petroleum
Gas, ANSI/NFPA 58.Your
local library or fire
department should have
this book.
A minimum supply pressure
of 0.4 p.s.i. is r equire d fo r
the purpose of input
adjustment for propane
gas.Storage of an appliance indoors is permissible only
if the cylinder is disconnected and removed from the
appliance. A cylinder must be stored outdoors in a
well-ventilated area out of the reach of children. A
disconnected cylinder must have dust caps tightly
installed and must not be stored in a building, garage
or any other enclosed area.
Standard 20 lb. tank
Tighten securely.
Attach regulator to cylinder.
Complete attachment.
Install cylinder.
(a) Do not store a spare LP-gas cylinder under or near this appliance;
(b) Never fill the cylinder beyond 80 percent full;
(c) “Place the dust cap on the cylinder valve outlet whenever the
cylinder is not in use. Only install the type of dust cape on the
cylinder valve that provided with the cylinder valve. Other type of
caps or plugs may result in leakage of propane.”
7
Page 9

Leak Check
Operation
WARNING
• Perform all leak tests outdoors.
• Extinguish all open flames.
• NEVER leak test when smoking.
• Do not use the heater until all connections have been leak
tested and do not leak.
Hose / Regulator
Connection
Make 2-3 oz. of leak check solution (one part liquid
dishwashing detergent and three parts water).
Apply several drops of solution where hose attaches
to regulator.
Apply several drops of solution where regulator
connects to Cylinder.
Make sure all Patio Heater & Light valves are OFF.
Turn Cylinder Valve ON.
If bubbles appear at any connection, there is a leak.
Regulator / Cylinder
Connection
DANGER
• CARBON MONOXIDE HAZARD
• For outdoor use only. Never use inside house, or other
unventilated or enclosed areas. This heater consumes air
(oxygen). Do not use in unventilated or enclosed areas to
avoid endangering your life.
Turn Cylinder Valve OFF.
If leak is at Hose/Regulator connection: tighten
connection and perform another leak test. If bubbles
continue appearing should be returned to Hose’s place
of purchase.
If leak is at Regulator/Cylinder Valve connection:
disconnect, reconnect, and perform another leak
check. If you continue to see bubbles after several
attempts, cylinder valve is defective and should be
returned to cylinder’s place of purchase.
If NO bubbles appear at any connection, the
connections are secure.
.Turn Cylinder Valve OFF.
NOTE: Whenever gas connections are loosened or
removed, you must perform a complete leak test.
.Complete installation.
8
Caution: Do not attempt to operate until you have read
& understand all General Safety Information in this
manual and all assembly is complete & leak checks
have been performed.
Page 10

Before Turning Gas Supply ON:
.Your heater was designed and approved for outdoor
use only. Do NOT use it inside a building, garage, or
any other enclosed area.
.Make sure surrounding areas are free of combustible
materials, gasoline, and other flammable vapors or
liquids.
.Ensure that there is no obstruction to air ventilation.
.Be sure all gas connections are tight and there are no
leaks.
.Be sure the cylinder cover is clear of debris.
.Be sure any component removed during assembly or
servicing is replaced and fastened prior to starting.
Before Lighting:
.Heater should be thoroughly inspected before each-
use, and by a qualified service person at least
annually.
.If relighting a hot heater, always wait at least 5
minutes.
.Inspect the hose assembly for evidence of excessive
abrasion, cuts, or wear. Suspected areas should be
leak tested. If the hose leaks, it must be replaced prior
to operation. Only use the replacement hose
assembly specified by manufacturer.
5 Push and release the igniter button until pilot flame is
visible through Viewing Hole.
6
Once the pilot is lit, continue to depress the control
Knob for 30 seconds.
7 If the pilot dose not stay lit, repeat steps 4 to 6.
8
If after repeating steps 4 to 6 unit does not light, then
-Push in Control Knob and turn counterclockwise to
“PILOT”.
-As you are depressing the Control Knob, place long
stem lighter into the ignition hole on the Emitter
Screen to light the pilot.
-Repeat step 6.
Lighting:
Note: This heater is equipped with a Pilot Light that allows
for safer startups and shutdowns. Pilot must be lit before
Main Burner can be started.
1 Turn the Control Knob to the “OFF” position.
2 Fully open LP cylinder valve.
3 Open Viewing Hole by sliding cover to either side.
4 Push Control Knob IN and rotate to Pilot position.
Note: For initial start or after any cylinder change, hold
Control Knob IN for 2 minutes to purge air from gas lines
before proceeding.
Push in and turn the Control Knob to the “LOW” position,
9
then release Control Knob. If you want a higher temperature,
push in the Control Knob and turn counterclockwise to the
“HIGH” position.
Note: If pilot fails to remain lit, all valves should be closed
and waiiting period of at least 5 minutes should pass before
attempting to light.
Normal Abnormal
9
Page 11

If you experience any ignition problem please
consult “Troubleshooting” on page 11.
Caution: Avoid inhaling fumes emitted from the
heater’s first use. Smoke and odor from the burning of
oils used in manufacturing will appear. Both smoke
and odor will dissipate after approximately 30 minutes.
The heater should NOT produce thick black smoke.
Note: The burner may be noisy when initially turned on. To
eliminate excessive noise from the burner, turn the Control
Knob to the Pilot position. Then, turn the knob to the level
of heat desired.
WARNING
FOR YOUR SAFETY
Be careful when attempting to manually ignite this heater.
Holding in the control know for more than 10 seconds
before igniting the gas will cause a ball of flame upon
ignition.
When heater is ON:
Emitter screen will become bright red due to intense heat.
The color is more visible at night.
Burner will display tongues of blue and yellow flame. These
flames should not be yellow or produce thick black smoke,
indicating an obstruction of airflow through the burners. The
flame should be blue with straight yellow tops.
If excessive yellow flame is detected, turn off heater and
consult “Troubleshooting” on page 11.
Re-lighting:
Note: For your safety, Control Knob cannot be turned OFF
without first depressing Control Knob in PILOT position and
then rotating it to OFF.
.Turn Control Knob to OFF.
.Wait at least 5 minutes, to let gas dissipate, before
attempting to relight Pilot.
.Repeat the “Lighting” steps on prior page.
WARNING
FOR YOUR SAFETY
Heater will be hot after use. Handle with extreme care.
Shut Down:
.Turn Control Knob clockwise to Pilot. (Normally,
burner will make a slight popping sound when
extinguished.) Burner will extinguish but Pilot will
remain ON.
.To extinguish Pilot, depress Control Knob and
continue to turn it clockwise to OFF.
.Turn Cylinder Valve clockwise to OFF and disconnect
Regulator when heater is not in use.
Note: After use, some discoloration of the emitter screen is
normal.
Operation Checklist
For a safe and pleasurable heating experience, perform
this check before each use.
Before Operating:
I am familiar with entire owner’s manual and understand all
precautions noted.
All components are properly assembled, intact and operable.
No alterations have been made.
All gas connections are secure and do not leak.
Wind velocity is below 10 mph.
Unit will operate at reduced efficiency below 40°F.
Heater is outdoors (outside any enclosure).
There is adequate fresh air ventilation.
Heater is away from gasoline or other flammable
liquids or vapors.
Heater is away from windows, air intake openings,
sprinklers and other water sources.
Heater is at least 36" on top and at least 36" on sides
from combustible materials.
Heater is on a hard and level surface.
There are no signs of spider or insect nests.
All burner passages are clear.
All air circulation passages are clear.
Children and adults should be alerted to the hazards
of high surface temperatures and should stay away to
avoid burns or clothing ignition.
Young children should be carefully supervised when
they are in the area of the heater.
Clothing or other protective material should not be hung
from the heater, or placed on or near the heater.
Any guard or other protective device removed for servicing
the heater must be replaced prior to operating the heater
Installation and repair should be done by a qualified service
person. The heater should be inspected before use and ate
least annually by a qualified service person.
More frequent cleaning may be required as necessary. It is
imperative that control compartment, burner and circulating
air passageways of the heater be kept clean.
After Operation
Gas control is in OFF position.
Gas Tank valve is OFF.
Disconnect Gas line.
10
Page 12

Troubleshooting
If the problem is: And this condition exists: Then do this
Cylinder valve is closed Open valve
Blockage in orifice or pilot tube Clean or replace orifice or pilot tube
Pilot won’t light
Note: Heater operates at
reduced efficiency below 40ºF
(5ºC)
Pilot won’t stay lit
Burner won’t light
Burner flame is low
Open gas line and bleed it (pressing control
Air in gas line
Low gas pressure with cylinder valve
fully open
Igniter fails
Dirt built up around pilot Clean dirt from around pilot
Connection between gas valve and
pilot assembly is loose
Thermocouple is not operating correctly Replace thermocouple
Gas pressure is low Turn cylinder valve OFF and replace cylinder
Blockage in orifice Clear blockage
Control knob is not in ON position
Gas pressure is low Turn cylinder valve OFF and replace cylinder
Outdoor temperature is less than 40ºF
and tank is less than 1/4 full
Supply hose is bent or kinked Straighten hose
Control knob fully ON Check burner and orifices for blockage
knob in) for not more than 1 - 2 minutes or until
you smell gas
Turn cylinder valve OFF and replace cylinder
Use match to light pilot; obtain new igniter and
replace
Tighten connection and perform leak check
Turn control knob to ON
Use a full cylinder
Carbon build-up
Thick black smoke
Dirt or film on reflector and burner screen Clean reflector and burner screen
Blockage in burner
Maintenance
WARNING
FOR YOUR SAFETY:
• Do NOT touch or move heater for at least 45 minutes
after use.
• Reflector is hot to the touch.
• Allow reflector to cool before touching.
To enjoy years of outstanding performance from your
heater, make sure you perform the following maintenance
activities on a regular basis:
Remove blockage and clean burner inside and
outside
Keep exterior surfaces clean.
Use warm soapy water for cleaning. Never use
flammable or corrosive cleaning agents.
While cleaning your unit, be sure to keep the area around the
burner and pilot assembly dry at all times. Do not submerge the
control valve assembly. If the gas control is submerged in water,
do NOT use it. It must be replaced.
a. Keeping the appliance area clear and free from combustible
materials , gasoline and other flammable vapors and liquids.
b. Not obstructing the flow of combustion and ventilation air.
c.Keeping the ventilation opening(s) of the cylinder enclosure
free and clear from debris.
Air flow must be unobstructed. Keep controls, burner,
and circulating air passageways clean. Signs of possible
blockage include:
11
Page 13

.Gas odor with extreme yellow tipping of flame.
.Heater does NOT reach the desired temperature.
.Heater glow is excessively uneven.
.Heater makes popping noises.
.Spiders and insects can nest in burner or orifices.
This dangerous condition can damage heater and
render it unsafe for use. Clean burner holes by using
a heavy-duty pipe cleaner. Compressed air may help
clear away smaller particles.
.Carbon deposits may create a fire hazard. Clean
dome and burner screen with warm soapy water if
any carbon deposits develop.
Note: In a salt-air environment (such as near an ocean),
corrosion occurs more quickly than normal. Frequently
check for corroded areas and repair them promptly.
TIP:
Use high-quality automobile wax to help maintain the
appearance of your heater. Apply to exterior surfaces from
the pole down. Do not apply to emitter screen or domes.
Storage
Between uses:
.Turn Control Knob OFF.
.Disconnect LP source.
.Store heater upright in an area sheltered from direct
contact with inclement weather (such as rain, sleet,
hail, snow, dust and debris).
.If desired, cover heater to protect exterior surfaces
and to help prevent build up in air passages.
Note: Wait until heater is cool before covering.
During periods of extended inactivity or when
transporting:
.Turn Control Knob OFF.
.Disconnect LP source and move to a secure,
well-ventilated location outdoors.
.Store heater upright in an area sheltered from direct
contact with inclement weather (such as rain, sleet,
hail, snow, dust and debris).
.If desired, cover heater to protect exterior surfaces
andtohelppreventbuildupinairpassages.
.Never leave LP cylinder exposed to direct sunlight or
excessive heat.
Note: Wait until heater is cool before covering.
Service
Repair to gas passages and associated components
should be done only by a qualified service person.
Caution: Always allow heater to cool before
attempting service.
Warranty
Heater’s warranty extends for 1 years from date of
purchase by original purchaser.
Manufactured by:
Changzhou Gardensun Furnace Co., Ltd. No. 1, Boyi Town,
Changzhou City, Jiangsu Province P.R. China.
Manufacturer will cover:
All parts found to be defective due to materials or
workmanship for 1 years from the date of original
purchase. Proof of purchase is required before warranty
performance will be rendered. Sales receipt and
validation of product registration are valid forms of proof
of purchase.
Warranty Exclusion
Manufacturer will NOT cover:
Assembly or start-up
Normal adjustment to burner
Cleaning and/or general maintenance
Legal Rights
No one else is authorized to make any warranties on behalf
of manufacturer.
THIS WARRANTY IS IN LIEU OF ANY OTHER WARRANTY,
EXPRESS OR IMPLIED, ORAL OR WRITTEN,
INCLUDING, BUT NOT LIMITED TO, ANY WARRANTY OF
MERCHANTABILITY OR FITNESS FOR A PARTICULAR
PURPOSE.
Manufactured by:
Changzhou Gardensun Furnace Co., Ltd.
No. 1, Boyi Town, Changzhou City,
Jiangsu Province P.R. China
Tel: 86-519-83317471
Fax: 86-519-83315116
Http: www.jiadeshun.com
For additional assistance or service, please call: 888-775-1330.
12
Page 14

Manual
del Usuario
MODELO: HSS-A-SS
IMPORTANTE
Lea este manual minuciosamente
antes de ensamblar, encender o
dar servicio al calentador.
Conserve este manual para
referencias futuras.
CALENTADOR DE PATIO
RR
ANSI Z83.26-2007/CSA 2.37-2007 de Gas Externo infrarrojo Calefactor para el patio
Page 15

Contenidos
.
.
PELIGRO
Información General de Seguridad .............................. 1
Instrucciones de Montaje
Componentes & Hardware
Requisitos Adicionales ............................................. 3
Proceso de Instalación
Paso 1 –Fijar Soportes a la base
Paso 2 –Fijar Poste a los Soportes ........................... 5
Paso 3 –Cargar Carcasa de Cilindro sobre Poste ........ 5
Paso 4 –Fijar Pernos del Reflector a la Tapa Pantalla ... 5
Paso 5 –Fijar Conjunto de cabezas al Poste.................
Paso 6 – Instalar Reflector ......................................... 6
Paso 7 –Fijar Conjunto de Reflector a los Pernos .........
Paso 8 –Conectar Manguera & Regulador al Cilindro ... 7
Chequeo de Fuga ..................................................... 8
Operación ................................................................ 9
Lista de comprobación de operación 10
Resolución de problemas .............................................
Mantenimiento........................................................... 11
Almacenamiento ....................................................... 12
Servicio .................................................................... 12
Garantía ...........................................................................
......................................... 3
............................... 4
5
7
11
12
Información General de Seguridad
Este manual contiene la información importante sobre el
ensamblaje, la operación y mantenimiento del calentador
de patio. La información general de seguridad que aparece
en estas primeras paginas se encuentra a lo largo del
manual.
Conserve este manual para referencias futuras en caso
de que los que vayan a usar el aparato puedan tener la
información que necesiten.
PELIGRO indica una situación de peligro inminente la cuál,
al no evitar, podría causar la muerte o lesiones graves.
ADVERTENCIA
ADVERTENCIA indica una situación peligrosa inminentemente la
cuál, si no evitada, podría dar lugar a muerte o a lesión seria.
PRECAUCIÓN
PRECAUCIÓN indica una situación peligrosainminentemente la
cuál, si no evitada, puede dar lugar a daños materiales o daños
corporales menor o moderado.
PELIGRO
Si usted huele el gas:
1. Corte gas al aparato.
2. Extinga la llama abierta.
3. Si el olor continúa, llame inmediatamente a
su proveedor de gas o cuerpo de bomberos.
PARA SU SEGURIDAD
ADVERTENCIA
No almacene ni utilice la gasolina u otra vapor
y líquidos inflamables alrededor de esto o
cualquier otro aparato.
En el momento de que el LP-cilindro no esté connectado con el
aparato, no se debe almacenar cerca de el aparato o los otros.
ADVERTENCIA: Para el uso al aire libre
solamente.
PELIGRO
Intoxicación DEL MONÓXIDO DE
CARBONO
Este equipo puede producer el monóxido
de carbono que no tiene nigun olor.
Nunca utilizen este equipo en espacios
cerrados, tales como campista, tienda y
casa, puede causar intoxicación.
ADVERTENCIA
Las precauciones de seguridad son esenciales en cuanto
un equipo mecánico o de abastecimiento de propano está
implicado. Estas precauciones son necesarias al usar,
almacenar y dar servicio al calentador. Manipular este
equipo con las cautelas requiridas reduce las posibilidades
de perjudiciar a las personas o daños a la propiedad.
Los símbolos siguientes demostrados abajo se utilizan
extensamente durante todo el manual. Preste atención
siempre a estas precauciones, pues son esenciales al usar
cualquier equipo mecánico o equipo de abastecimiento.
La instalación, ajuste, modificación,
mantenimiento o servicio puede causar daño, lesión o muerte,
Lea la instrucción de instalación, operación y mantenimiento
enteramente antes de instalar o dar servicio a este aparato.
PELIGRO
El inclumplimiento de las precauciones y las instrucciones
proveidas con este calentador dará lugar a muerte, lesión
corporal seria y daños materiales o daños de riesgo de
incendios, explosión, quemadura, asfixia, y/o intoxicación
de monóxido de carbono.
Sólo las personas quiénes pueden entender y seguir las
instrucciones deben utilizar o mantener este calentador.
1
Page 16

PELIGRO
PELIGRO
• EXPLOSIÓN - RIESGO DE INCENDIOS • PELIGRO DE MONÓXIDO DE CARBONO
• Mantenga los combustibles sólidos, tales como
materiales de construcción, papel o cartulina, una
distancia de seguridad alejado del calentador según
lo recomendado por las instrucciones.
• Nunca utilice el calentador en los espacios que pueden
contener combustibles volátiles o aerotransportados, o
los productos tales como gasolina, solventes, disolvente
para pinturas, partículas de polvo o productos químicos
desconocidos.
•
Nunca utilice el calentador en los espacios que pueden
contener combustibles volátiles o aerotransportados, o
los productos tales como gasolina, solventes, disolvente
para pinturas, partículas de polvo o productos químicos
desconocidos.
• Durante la operación, este producto puede ser una
fuente de ignición. Mantenga el área de calentador
limpio y libre de los materiales combustibles, gasolina,
disolvente para pinturas, disolventes limpiadores y otros
vapores y líquidos inflamables. No utilice el calentador
en áreas con el alto contenido de polvo. Especios
mínimos del calentador de los materiales combustibles:
36” de los lados & 36” de la tapa.
• Este calentador es un aparato de combustión. Todos los
aparatos de combustión producen el monóxido de
carbono (CO) durante proceso de combustión. Este
producto se diseña para producir gran cantidad de CO
extremadamente minucioso y no-peligroso si está
utilizado y mantenido de acuerdo con todas las
advertencias y instrucciones. No bloquear el flujo del aire
adentro o afuera del calentador.
• La intoxicación de Monóxido de Carbono (CO) produce
síntomas gripales, ojos llorosos, dolores de cabeza,
vértigo, fatiga y posiblemente muerte. Usted no puede
verlo ni puede olerlo. Es un asesino invisible. ¡Si estos
síntomas están presentes durante la operación de este
producto consiga el aire fresco inmediatamente!
• Para el uso al aire libre solamente.
• Nunca utilice en la casa, u otras áreas cerradas sin
ventilación.
• Este calentador consume aire (oxígeno). No utilice en
áreas cerradas sin ventilación para evitar de poner su
vida en peligro.
ADVERTENCIA
No podemos prever cada uso que se pueda hacer de
nuestros calentadores.
Compruebe con su autoridad de seguridad de fuego local
si usted tiene preguntas sobre uso del calentador.
Otros estándares gobiernan el uso de gases y calor de
combustible produciendo los productos para los usos
específicos. Su autoridades locales pueden aconsejarte
sobre éstos.
Si no existen códigos locales, siga el código nacional de
gas de combustible, ANSI Z223.1. En Canadá, la
instalación debe conformarse con los códigos locales. Si
no existen códigos locales, siga los estándares
nacionales actuales de CANADÁ CAN/CGA-B 149.2
PRECAUCIÓN
• SEGURIDAD DE SERVICIO
• Mantenga limpias todas las conexiones y uniones.
Cerciórarse de que enchufe de válvula de cilindro de
propano esté limpio.
• Examine la manguera antes de usar. Substituya si hay
evidencia de abrasión o desgaste.
• Durante la instalación, compruebe todas las conexiones
y uniones para ver si tiene fugas usando el agua jabonosa.
Nunca utilice una llama.
• Use como aparato de calefacción solamente. Nunca altere
de cualquier manera o utilice con cualquier dispositivo.
• Compruebe la manguera entera anualmente por lo menos.
ADVERTENCIA
• PELIGRO DE QUEMADURA
• Nunca deje el calentador desatendido cuando es caliente
o en uso.
• Mantenga el calentador fuera del alcance de los niños.
2
Page 17

ADVERTENCIA
Instrucciones de Montaje
• Este producto es aprovisionado de combustible por gas
de propano. Gas de propano es invisible, inodoro, e
inflamable. Un odorante se agrega normalmente a la ayuda
en la detección de escapes y se puede describir como olor
de “huevo podrido”. El odorante puede descolorar en un
cierto plazo así que el gas escapado no es siempre
perceptible por el olor solo
• Gas de propano es más pesado que aire y propano
escapado se hundirán al nivel más bajo posible. Puede
encender por fuentes de ignición incluyendo fósforos,
mecheros, chispas o llamas abiertas de cualquier tipo a
unos pies lejos del escape original. Utilice solamente gas
de propano instalado para retirada de vapor.
• Gas de propano debe ser almacenado o utilizado de
acuerdo con ordenanzas y códigos locales o con
ANSI/NFPA 58. Corte propano cuando no en uso.
Componentes
Sacar todos los componentes del paquete.
Panel de Reflector (3)
Reflector Chapa
Conjunto de Reflector
Perno de Reflector (3)
Quemador de
calentador
Pantalla
Conjunto de cabezas
Carcasa de Cilindro
PELIGRO
• EXPLOSIÓN - RIESGO DE INCENDIOS
• Nunca almacene el propano cerca de alta temperatura,
llamas abiertas, luces testigos, luz de sol directa, otras
fuentes de ignición o donde las temperaturas exceden 120
grados F (49°C).
• Los vapores de propano son más pesados que aire y
pueden acumular en lugares bajos. Si hueles el gas,
salga del área inmediatamente.
• Nunca instale o quite el cilindro de propano mientras se
enciende calentador, cerca de llama, luz testigo, otras
fuentes de ignición o mientras que el calentador es
demasiado para tocar.
• Este calentador es candente durante uso y puede
encender tan cerca del quemador. Mantenga los inflamables
por lo menos 36” de lados & 36” de la tapa. Mantenga
la gasolina y otros líquidos inflamables y vapores alejado del
calentador.
• El cilindro de propano se debe almacenar siempre al aire
libre en un espacio bien ventilado. Nunca almacene el
cilindro de propano en un área cerrado (casa, garage, etc.).
Si se va a almacenar interior el calentador, desconecte el
cilindro de propano para el almacenaje al aire libre.
Poste superior sobre
Poste más bajo
Soporte(3)
Manguera de Gas
Regulador
Base
Fijador de Tierra
3
Page 18

Requisitos Adicionales
ADVERTENCIA
Propuesta de California 65
Los subproductos de combustión producidos al
utilizar este producto contiene los productos
químicos conocidos al estado de California para
causar cáncer, defectos de nacimiento, y otro
daño reproductivo.
Hardware
Imagen Cant. Descripción
Fijador de Tierra
6 Perno Pequeñ o
Plana Pequeña
6
6
3
6
Arandela
Tuerca
Perno medio 1
Perno grande
Utilizado en
Paso(s)
13
1
1
1
2
Los siguientes elementos no están incluidos, pero son
necesarios para el correcto ensamblaje de su calentador.
No intente el ensamblaje del equipo sin las herramientas
adecuadas.
.
Destornillador Phillips con lámina media.
.
llave de boca ajustable.
Solución de detección de fugas (Instrucciones sobre
.
cómo realizar la solución son incluidass en paso).
Nota: Deba seguir todos los pasos para ensamblar el
calentador de un modo adecuado.
Para obterner ayuda adicional o servicio,
por favor llame al: 888-775-1330
Proceso de Instalación
Paso 1–Fijar Soportes a la base
Para proteger el calentador del viento fuerte, ancle
con seguridad la base a la tierra
mediante los tornillos.
Invierta la base, fije el fijador de
tierra a la base mediante pernos
y arandelas como se indica en
el cuadro.
Tuerca de brida
6
Pequeña
2 3/16” Tornillo
4 Perno Pequeñ o
9 Tornillo Pequeño 6
Arandela Grande
9
9
9 Tuerca ciega 6
3 Tuerca de mariposa 7
3 Perno de Reflector 4
1Llave
Arandela
Plana Pequeña
Arandela
4 / 7
1/2/5/6
Fije el fijador de tierra mediante
2
2
5
tuercas.
Fije otros dos fijadores de tierra mediante pernos y
tuercas, y invierta la base.
.Fijar sin apretar tres Soportes a la Base con
6
tres pernos medios hacia abajo por Soportes
en la Base.
3 Pernos Medios de Req’d
4
Page 19

Paso 2 –Fijar Poste a los Soportes
Ponga el poste superior sobre el poste inferior, usando
dos tornillos de 3/16” para conjuntar los dos postes. La
etiqueta de advertencia en la parte superior del poste
debe estar en el mismo lado del plato llano de polo
inferior.
Paso 3 –Cargar Carcasa de Cilindro
.Cargar Carcasa de Cilindro.
.Deslizar Carcasa de Cilindro hacia abajo.
Paso 4 –Fijar Pernos del Reflector
.Insertar 3 pernos de reflector & 3 Arandelas planas.
.Apretar con seguridad los pernos.
Instalar el poste sobre tres soportes.
Fijar Poste a los Soportes mediante seis pernos
grandes & seis tuercas de pestaña.
6 Pernos grandes Req’d
6 tuercas de pestaña pequeñas Req’d
Apretar todos los tornillos hasta el fondo.
3 pernos de reflector Req’d
Paso 5 – Fijar Conjunto de cabezas al Poste
3 Arandelas Planas
Grandes Req’d
.Desenroscar 4 pernos pequeños.
4 pernos pequeños Req’d
Reunión de cabezas
5
Page 20

.Cargar Conjunto de Cabezas por insertar en el poste.
s
p
.Insertar Conjunto de Cabezas en el poste.
.Botón de control debe estar sobre etiqueta en poste.
9 Req’d Tornillo Pequeñ o
.Fijar Conjunto de Cabezas al poste, y instalar cuatro
pernos pequeños sin apretar.
.Apretar con seguridad
pernos.
Paso 6 – Instalar Reflector
WARNING
Suprima cubierta protectora antes reúnase.
9 Req’d Arandelas planas peq
.
Deslizar una Arandela Plana pequeña sobre la cabeza
ensanchada de tornillo y tornillo en Tuerca de
Cabeza sin a
retar.
.Deslizar Reflector
Chapa sobre Panel de
Reflector
.Insertar un tornillo
pequeño.
9 Tuercas de Cabeza Req’d
.Deslizar una arandela
plana pequeña sobre
la cabeza ensanchada
de tornillo y tornillo en
Tuerca de Cabeza sin
apretar.
Nota: Si es necesario para la alineación adecuada de
secciones de reflector, suelte cada tornillo antes del
montaje adicional y volverlo a apretar luego de alinear
las secciones.
.Deslizar dos Reflectore
junto.
6
.Insertar uno panel
pequeño tornillo..
.Repetir el procedimiento para acabar el montaje de
las cuatro secciones.
.Apretar todos los tornillos en el border hasta el fondo.
Page 21

Paso 7 – Fijar Unión de Reflector a los Pernos
p
.Soportar Calentador.
.Deslizar 3 Arandelas Planas Grandes sobre la
cabeza ensanchada de pernos.
6 Arandelas Planas
Grandes Req’d
3 Req’d Tuerca de mariposa
.Colocar la Conjunto de Reflector 3 pernos .
Instalar arandelas planas grandes sobre pernos &
.
apretar con seguridad las tuercas de ala sino no las
a
riete demasiado!
La presión permitida mínima de suministro de gas de
10 W.C. es requerida para ajustar la entrada.
El mínimo cada hora de 17000 Btu es requerido por rango
de entrada para un calentador por la operación automática
en el rango menos que rango de entrada completo.
El regulador de presión y la reunión de manguera proveídos
con el aparato deben ser utilizados.
La instalación debe conformar con códigos locales, o en la ausencia
de códigos locales, con código nacional del gas de combustible,
ANSI Z223.1/NFPA54, Código de Instalación del gas natural y del
propano, CSA B149.1, o código del almacenaje y manejo de propano,
B149.2.
Un cilindro de propano abollado, aherrumbrado o dañado
puede ser peligroso y ser comprobado por su proveedor de
cilindro. Nunca utilice un cilindro de propano con una conexión
dañada de válvula.
El cilindro de propano debe ser construido y marcado de
acuerdo con las especificaciones para cilindros de gas
bustano del departamento de los E.E.U.U. de transporte (DOT).
o la Norma para Cilindros, esferas y tubos para el transporte de
Mercancías peligrosas y Comisión, CAN/CSA-B339.
Provisto de un dispositivo de prevención de sobrellenado.
Provisto de un dispositivo de conexión compatible con el conexión
del aparato.
El cilindro debe usar con un collar para proteger la válvula del cilindro.
Nunca conecte un cilindro de propano no regulado con el calentador.
Levantar Carcasa de Cilindro.
Atornillar regulador en la manguera de gas. No lo trasrosque.
Paso 8 – Conectar Manguera & Regulador al Cilindro
Usted tiene que proveer gas de propano y cilindro de
propano. Utilice un cilindro de propano estándar de
20 libras solamente.
Utilice este calentador solo
con un sistema de fuente
de retirada de vapor de
propano. Vease el capítulo
5 del estándar para
almacenaje y manipulación
de petróleo licuefecho gas,
ANSI/NFPA 58. Tu biblioteca
local o cuerpo de bomberos
debe tener este libro.
Debe alimentar una presión
mínima de 0.4 p.s.i. con el fin
de suministrar ajuste de entrada
de gas propano. Cuando el aprarato
almacena al interno es permisible,
debe desconectar con el cilindro
o desmontar el cilindro.
El cilindro de propano
siempre debe almacenar
al aire libre bien ventilado y fuera al alcance de los niños.
El cilindro que desconectado con el aparato debe montar
una cubieta de antipolvo, y no se debe almacenar en un
edificio, un garaje o los otros lugares cerrados.
Tanque estándar 20 lbs
.
Apretar con seguridad.
Fijar regulador al cilindro.
Terminar la unión.
Instalar Cilindro.
(a) No guarde cilindro del LP-gas de repuesto debajo ni acerque
al aparato.
(b) Nunca llene el cilindro más del 80 por ciento de su capacidad;
(c) Ponga una cubierta de antipolvo a la salida de la válvula del
cilindro cuando el aparato no se usa. Debe usar el tipo de cubierta
de antipolvo que provisto con la válvula, los otros tipos de cubierta
o tapón puede causar un fuga de propano.
7
Page 22

Chequeo de fuga
Operación
ADVERTENCIA
• Realizar todas las pruebas de fuga al aire libre.
• Extinga todas las llamas abiertas.
• NO prueba de fuga al fumar.
• No utilice el calentador hasta que todas las conexiones
hayan realizados prueba de fuga y no se fuguen.
Manguera/
la Conexión del
regulador
Regulador /
Conexión del
Cilindro
.Hace 2-3 onzas. de solución de chequeo de fuga (una
porción de detergente líquido para lavar lavavajillas y
tres porciones de agua)
.Aplique unas gotas de solución a donde mangueras
unen al regulador.
.Aplique unas gotas de solución a donde regulador
conecta al Cilindro.
.Cerciórese de que todo el calentador de patio &
válvulas de luz estén APAGADOS.
Encienda la Válvula de Cilindro.
.
Si burbujas aparecen en cualquiera conexión, hay una
fuga.
Apague la Válvula de Cilindro.
.
.
si la fuga está en la conexión de Manguera/Regulador:
Apriete la conexión y realice otra prueba de fuga.
Si las burbujas continúan apareciendo se la vuelven al
vendedor de la manguera.
.si la fuga está en la conexión de Regulador/Válvula de
Cilindro: Apriete la conexión y realice otra prueba de
fuga: Desconecte, reconecte y realice otro chequeo
de fuga. Si usted continua viendo luego de varias
pruebas, Válvula de cilindro es defectuosa y debe
volver al lugar de compra de cilindro.
Si NO burbujas aparecen en cualquiera conexión, las
conexiones son seguras.
Apague la Válvula de Cilindro.
.
NOTA: Siempre que se aflojen o se quiten las conexione
s de gas, debe realizar una prueba de fuga completa.
.Instalación completa.
PELIGRO
• PELIGRO DE MON ÓXIDO DE CA RBONO
• Para el uso al aire libre solamente.
• Nunca utilice en la casa, u otras áreas cerradas sin
ventilación.
• Este calentador consume aire (oxígeno). No utilice en
áreas cerradas sin ventilación para evitar de poner su
vida en peligro.
Precaución: No intente funcionar hasta que usted
haya leído y entienda toda la información general
de seguridad en este manual y todo el montaje es
completo & chequeos de fuga se han realizados.
8
Page 23

Antes de activar la alimentación de gas (ON):
.
Su calentador ha sido diseñado y autorizado
ÚNICAMENTE PARA SU USO EN EXTERIORES.
NO lo utilice en el interior de un edificio, garaje,
o cualquier otra zona cerrada.
.Asegúrese de que el área circundante está libre de
materiales combustibles, gasolina o cualquier otro vapor
o líquido inflamable.
.Asegúrese que no hay ninguna obstrucción en la
ventilación del aire.
.Asegúrese de que todas las conexiones de gas están
apretadas y de que no hay fugas.
Asegúrese de que el panel de acceso está libre de
.
suciedad.
Asegúrese de que todos los componentes retirados
.
durante el montaje o reparación vuelven a colocarse
en su sitio antes de la puesta en marcha.
Antes del encendido:
.
.El calentador debería ser revisado meticulosamente
antes de cada uso, así como una vez al año por parte
de un técnico cualificado.
5 Empuje y suelte el botón del encendedor hasta que la
llama experimental es visible a través del agujero para
mirar.
6 Cuando el piloto se enciende, continúa presionando la perilla
de control por 30 segundos.
7 Si la llama de piloto no se puede permanecer, repita los pasos de 4 a 6.
8 Después de repetir los pasos de 4 a 6, no se puede encender la llama
piloto tampoco, presione la perilla de control a la izquierda a la posicion
de “PILOT”. Mientras presionando la perilla de control, use un
encendedor con un mango largo a meter en el agujero en la patalla
del emisor a encender el piloto.
.Para volver a encender un calentador caliente,
espere siempre cinco minutos como mínimo para que
se disipe el gas.
.Examine el montaje de manguera para evidencia de
abrasión excesiva, cortes, o desgaste. Los áreas
sospechados deben ser probado. Si la manguera
tiene fuga, debe ser substituida antes de la operación.
Utilice solamente el montaje de manguera de
reemplazo especificado por el fabricante.
Encendido:
Nota: Este calentador se equipa de una luz testigo que
permita arranques y paradas más seguros. Luz debe ser
encendida antes de arrancar QUEMADOR PRINCIPAL.
Gire la perilla de control a la posición de “OFF”
1
Abre la válvula de LP cilindro completamente.
2
3 Abra Agujero para mirar por deslizar la tapa a cualquier lado.
4 Empuje botón de Control HACIA ADENTRO y lo gire a la
posición experimental.
Nota: Para arranque inicial o luego de cambio de cualquier
cilindro, mantenga botón de Control HACIA ADENTRO por
2 minutos para purgar el aire de líneas de gas antes de
proceder.
9
Presione y gire la perilla de control a la posición de “LOW”, luego
suelte la perilla de control. Si usted prefiere la temperatura mas alta,
presione la perilla de control a la izquierda a la posición de “HIGH”.
Nota: Si el piloto no puede permanecer encendido, todas
las válvulas deben ser cerradas y espere por lo menos 5
minutos antes de intentar encender.
Normal Anormal
9
Page 24

Si usted experimenta cualquier problema de ignición por
favor consulte “resolución de problemas” en página 11.
Precaución: Evitar de inhalar los humos emitidos del
calentador de primer uso. Humo y olor de la quema de los
aceites usados en fabricación aparecerán. Humo y olor
disiparán después de aproximadamente 30 minutos. El
calentador NO debe producir humo negro grueso.
Nota: El quemador puede ser ruidoso cuando está encendid
o inicialmente. Para eliminar ruido excesivo del quemador,
gire el botón de Control a la posición Experimental.
Entonces, gire el botón al nivel de calor deseado.
ADVERTENCIA
PARA SU SEGURIDAD
Tenga cuidado al encender manualmente este calentador.
Si mantiene el botón de control apretado por más de
10 segundos, antes de prender el gas, se creará una
bola de fuego al encenderse.
Cuando el calentador está encendido (ON):
La pantalla del emisor tendrá un color rojo brillante debido al
intenso calor. El color es más visible por la noche.
El quemador mostrará lenguas de llama azules y amarillas.
Estas llamas no deberían ser todas amarillas o producirían
un humo espeso y negro, lo que indicaría la presencia de una
obstrucción del flujo de aire en los quemadores. La llama
debe ser azul con las tapas amarillas rectas.
Si se detecta la llama amarilla excesiva, apague el
calentador y consulte a la “resolución de problemas” en la
página 11.
Reencendido:
Nota: Para su seguridad, no puede APAGAR sin pulsar el
botón de control primero en la posición EXPERIMENTAL y
luego lo gire al APAGADO.
.Gire el botón de control al APAGADO.
.Espere por lo menos 5 minutos, para disipar el gas,
antes de intentar reencender Piloto.
.Repita los pasos de“Encender” en la página anterior.
ADVERTENCIA
PARA SU SEGURIDAD
El calentador no será caliente tras uso. Maneje con cuidado
10
Apagado:
Gire el botón de control en el sentido horario al Piloto.
(Normalmente, quemador hará un chasquido ligero cuando
está extinguido.) Quemador extinguirá sino el piloto quedará
ENCENDIDO.
Para extinguir Piloto, pulse botón de Control y continue
girandolo en el sentido horario para APAGAR.
Gire Válvula de Cilindro en el sentido horario para
APAGAR y desconecte Regulador cuando el
calentador no es en uso.
Nota: Tras el uso, una descoloración de la pantalla del
emisor es normal.
Lista de Control de Operaciones
Para que la experiencia con su calentador sea segura y
agradable, lleve a cabo la siguiente comprobación antes de
cada uso.
Antes de la puesta en marcha:
Estoy familiarizado con el entero manual del dueño y
entiendo todas las precauciones conocidas.
Todos los componentes están montados correctamente,
intactos y listos para su funcionamiento.
No se ha realizado ninguna alteración.
Todas las conexiones de gas están seguras y no hay ninguna fuga.
La velocidad del viento es inferior a los 16 km/h (10 mph).
Equipo funcionará de eficacia reducida bajo 40°F.
El calentador está situado en el exterior (fuera de cualquier
recinto).
Hay una ventilación de aire adecuada.
El calentador está lejos de gasolina o de cualquier otro líquido
o vapor inflamable.
El calentador está lejos de ventanas, aperturas de admisión de
aire, aspersores y cualquier otra salida de agua.
Calentador es por lo menos 36" de arriba y por lo menos
36" a los lados.
El calentador está sobre una superficie dura y nivelada.
No hay señales de nidos de arañas o insectos.
Todos los conductos del quemador están libres.
Todos los conductos de circulación de aire están libres.
Niños y adultos deben ser advertidos de los peligros
de las temperaturas altas de la superficie y debe mantenerse
alejado para evitar quemaduras o encendido de la ropa.
Deben supervisar los niños pequeños con muchos cuidados
cuando se encuentran en la zona con calefactor.
La ropa o los materiales protectores no debería colocar al
calefactor o poner en o cerca del calefactor.
Desmonta cualquier guardia o otro dispositivo de protección
para el mantenimiento o reparar el calefactor, se debe ser
sustituido antes de operarlo.
Instalación y reparación del calefactor deben ser realizadas
por un técnico calificado. El calefactor debe ser inspeccionado
antes de su uso y tambien siga inspeccinando anualmente.
Limpieza puede ser mas frecuente en caso que necesario.
Es imperativo que el compartimento de control, el quemador
y pasillo de circulación de aire del calefactor se mantendrán
limpios.
Tras su funcionamiento:
El control del gas está en la posición OFF.
La válvula del depósito de gas está en la posición OFF.
Desconecte la línea de gas.
El calentador está de pie en una ubicación segura.
Page 25

Resolución de problemas
p
Si el problema es: Y esta condición existe: Entonces hacer esto
Válvula de cilindro es cerrada Abra Válvula
Obstrucción en orificio o tubo de piloto Limpie o substituya orificio o tubo de piloto
El piloto no se encenderá
NOTA: El calentador ofrece un
rendimiento menor cuando la
temperatura no alcanza
los 5 ºC (40 ºF)
El piloto no permanecerá
encendido.
El quemador no se enciende
La llama del quemador es
baja
Acumulación del carbón
Humo negro grueso
Abra línea de gas y la sangre (pulsando botón
Aire en línea de gas
de control) por no más que 1 - 2 minutos o hasta
usted huele el gas.
Presión de gas baja con válvula de
cilindro completamente abierta
Gire la válvula de la bombona hasta la
posición OFF y sustituya la bombona
Utilice una cerilla para encender la
El dispositivo de encendido falla
llama piloto; consiga un nuevo
dispositivo de encendido y colóquelo
El dispositivo de encendido falla Limpie la suciedad de piloto
La conexión entre válvula de gas y
conjunto de piloto está floja.
El termopar no está funcionando
correctamente
La presión del gas es baja
Apriete la conexión y realice el cheque de fuga
Substituya el termopar
Gire la válvula de la bombona hasta la
posición OFF y sustituya la bombona
Obstrucción en el orificio Quite la obstrucción
El botón de control no está en la
osición ON
La presión de gas es baja
La temperatura al aire libre es inferior al
40ºF y el depósito es menos de 1/4 de
llenado
La manguera de suministro está doblada
o enroscada
Botón de Contro ENCENDIDO hasta el
fondo
Suciedad o capa sobre la pantalla de
reflector y quemador
Obstrucción en quemador
Gire el botón de control a la posición
ON
Gire la válvula de la bombona hasta la
posición OFF y sustituya la bombona
Utilice un cilindro lleno.
Enderece la manguera
Compruebe quemador y orificios por obstrucción
Limpie el reflector y el emisor
Elimine la obstrucción y limpie el
interior y el exterior del quemador
Mantenimiento
Utilice el agua jabonosa caliente para limpiar. Nunca utilice los
agentes de limpieza inflamables o corrosivos.
Al limpiar su equipo, cerciórese de que mantenga seco el área
alrededor del montaje de quemador y piloto siempre. No sumerja
Mantenga limpias las superficies exteriores.
ADVERTENCIA
PARA SU SEGURIDAD:
• No toque ni mueva el calentador por lo menos 45
minutos tras el uso.
• Reflector es demasiado calente para tocar.
• Deje el reflector a refrescar antes de tocarlo.
la conjunto de válvula de control. Si el control de gas está
sumergido en agua, NO lo utilice. Debe ser substituido.
a.Mentengan el aparato en un aréa sin los materiales combustibles,
gasolina u otros líquidos o vapores inflamables.
b.No obstruzca el flujo de aire de la combustión y de la ventilación.
c.Mengtenga el recinto ventilado del cilindro libres y claras de la
basuras.
Para gozar de años del funcionamiento excepcional de su
calentador, cerciórese de que realice las actividades
siguientes del mantenimiento sobre una base regular:
El flujo de aire debe sin obstáculo. Mantenga limpios
controles, quemador, y pasillos de circulacion de aire.
Huellas de la obstrucción posible incluyen:
11
Page 26

.Olor de gas con Punta Amarilla de llama.
.El calentador NO alcanza la temperatura deseada.
.El resplandor del calentador es excesivamente
desigual.
.Calentador tiene chasquidos.
.Arañas y insectos pueden anidar en quemador u
orificios. Esta condición peligrosa puede dañar el
calentador y hacerlo inseguro para el uso. Limpie
los agujeros del quemador usando limpiapipas
duradero. El aire comprimido puede ayudar a quitar
partículas más pequeñas.
.Los depósitos de carbón pueden crear un riesgo
de incendios. Limpie la pantalla de bóveda y
quemador con agua jabonosa caliente si algunos
depósitos de carbón se convierten.
Nota: En un ambiente de aire salado(por ejemplo cerca
de un océano), la corrosión ocurre más rápidamente que
normal. Compruebe áreas corroídas con frecuencia y las
repare puntualmente.
PUNTA:
Utilice la cera de alta calidad de automóvil para ayudar a
mantener la aparencia de su calentador. Aplique a las
superficies exteriores del poste abajo. No aplique a la
pantalla del emisor o a las bóvedas.
Almacenaje
Entre usos:
.Apague el Botón de Control.
.Disconecte fuente de LP.
.Almacene el calentador en un área abrigada de
contacto directo con el tiempo inclemente (tal como
lluvia, aguanieve, granizo, nieve, polvo y ruina).icies
exteriores y ayudar a impedir la acumulación en
pasillos de aire.
.Si es necesario, cubra el calentador para proteger
superficies exteriores y ayudar a impedir la
acumulación en pasillos de aire.
Nota: Espere hasta que el calentador esté fresco antes de
cubrir.
Durante períodos de inactividad extendida o al
transportar:
.Apague el Botón de Control
.Disconecte fuente de LP y mueva a una localización
segura, bien-ventilada al aire libre.
.Almacene el calentador en un área abrigada de
contacto directo con el tiempo inclemente (tal como
lluvia, aguanieve, granizo, nieve, polvo y ruina).
.Si es necesario, cubra el calentador para proteger
superficies exteriores y ayudar a impedir la
acumulación en pasillos de aire.
.Nunca dejar el cilindro de LP expuesto a la luz del
sol directa o al calor excesivo.
Nota: Espere hasta que el calentador esté fresco antes de
cubrir.
Servicio
La reparación a los pasillos de gas y componentes
asociados debe ser hecha solamente por una persona
cualificada del servicio.
Precaución: Permitir siempre que el calentador se
refresque antes de realizar servicio.
Garantía
Período de Garantía
La garantía del calentador tiene una duración de 1 año a partir
de la fecha de adquisición por parte del comprador original.
Fabricado por:
Changzhou Gardensun Furnace Co., Ltd. No. 1, Boyi Town,
Changzhou City, Jiangsu Province P.R. China.
El fabricante cubrirá: Todas las piezas que resulten ser
defectuosas debido a los materiales empleados o a la calidad
del trabajo durante 1 año a partir de la fecha de adquisición
por parte del comprador original.
Se requerirá una prueba de compra antes de dar por efectiva
la garantía. El recibo de venta y la validación del registro del
producto son formas válidas de prueba de compra.
Exclusión de la Garantía
El fabricante NO cubrirá:
El montaje o puesta en marcha
Ajustes normales al quemador
Limpieza y/o mantenimiento general
Derechos Legales
Nadie más está autorizado a ofrecer ninguna otra garantía en
nombre del fabricante.
ESTA GARANTÍA SUSTITUYE CUALQUIER OTRA GARANTÍA,
EXPRESA O IMPLÍCITA, ORAL O POR ESCRITO,
INCLUYENDO, AUNQUE NO LIMITÁNDOSE A ELLO,
CUALQUIER GARANTÍA DE COMERCIABILIDAD O
ADECUACIÓN PARA UN PROPÓSITO EN PARTICULAR.
Fabricado por:
Changzhou Gardensun Furnace Co., Ltd.
No. 1, Boyi Town, Changzhou City,
Jiangsu Province P.R. China
Tel: 86-519-83317471
Fax: 86-519-83315116
Http: www.jiadeshun.com
Para obterner ayuda adicional o servicio,
por favor llame al: 888-775-1330
12
 Loading...