

Page 1

GARDENA
®
D Gebrauchsanweisung
Accu-Motormäher
GB Operating Instructions
Accu Cordless Motor Mower
F Mode d’emploi
Tondeuse hélicoïdale sur accu
NL Gebruiksaanwijzing
Accu kooimesmaaier
S Bruksanvisning
Accu Cylinderklippare
I Istruzioni per l’uso
Rasaprato a batteria
E Manual de instrucciones
Cortacésped accu
P Instruções de utilização
Corta-relva cilíndrico com acumulador
DK Brugsanvisning
Accu Cylinderklipper
RM 380 Art. 4040
Page 2

Beachten Sie die Sicherheitshinweise auf dem Gerät:
Please adhere to the following safety instructions on the casing:
Veuillez respecter les consignes de sécurité figurant sur l’appareil :
Houdt rekening met de veiligheidsaanwijzingen op het apparaat:
Följ säkerhetsanvisningarna nedan:
Attenzione ai simboli di sicurezza riportati sull’attrezzo :
Observen las indicaciones de seguridad en el aparato:
Por favor siga atentamente as instruções de segurança fornecidas no aparelho:
Iagttag sikkerhedshenvisningerne på apparatet:
Achtung! Vor Inbetriebnahme
Gebrauchsanweisung lesen!
Warning!
Read instruction handbook!
Attention ! Merci de lire attentivement le mode d’emploi
avant d’utiliser cet appareil !
Let op ! Voor ingebruikname
gebruiksaanwijzing lezen !
OBS! Läs bruksanvisningen
före bruk.
Attenzione! Prima di mettere
in funzione l’attrezzo, leggere
attentamente le istruzioni per
l’uso!
¡Atención! Antes de la puesta
en marcha, lea el manual de
instrucciones.
Atenção! Leia atentamente
este manual de instruções
antes de usar o aparelho.
Advarsel! Før igangsætning
skal brugsanvisningen læses.
Dritte aus dem Gefahrenbereich
fernhalten!
Keep bystanders away!
Maintenez tout tiers hors de
la zone de travail !
Zorg ervoor dat derden buiten
de gevarenzone blijven!
Håll säkerhetsavstånd till andra
personer.
Tenere lontano i terzi dalla zona
di lavoro!
¡Mantener alejados a terceros
del área de trabajo!
Mantenha terceiros fora da área
de perigo!
Andre personer må ikke komme
ind i fareområdet.
Achtung! Kontakte dürfen mit
Metallteilen nicht überbrückt
werden!
Kurzschluss – Brandgefahr!
Warning! Contacts should
never be bridged with metal!
Short-circuit – fire risk!
Attention ! Les éléments de
contact ne doivent jamais
être reliés par du métal.
Risque de court-circuit –
danger d’incendie !
Let op! Contacten mogen niet
overbrugd worden met metalen
onderdelen!
Kortsluiting – brandgevaar!
Varning! Kontakterna får ej
kortslutas med metalldelar!
Kortslutning – Brandfara!
Attenzione! Evitare che parti
metalliche tocchino i contatti:
ciò potrebbe causare un cortocircuito con conseguente pericolo d’incendio!
¡Atención! ¡No deben puentear
los contactos con piezas metálicas!
¡Peligro de corto circuito –
incendio!
Atenção! Nunca deverá ligar
os contactos com peças metálicas!
Perigo de incêndio por curtocircuito!
Advarsel! Kontakter må ikke
omgås ved hjælp af metaldele
– brandrisiko ved kortslutning.
Wegen Gefahr von Schäden am
Gerät: Reinigen Sie den Motormäher nicht unter fließendem
Wasser, insbesondere nic
ht
unter Hochdruck.
To avoid damage on the unit:
Ne
ver clean your Cordless Accu
Motor Mower with running water,
in particular with water under
high pressure.
Pour éviter d’endommager l’appareil : ne
le lavez pas à l’eau,
et surtout pas ou nettoyeur
haute pression.
Om schade aan het apparaat
te voorkomen: Maak de accu
kooimesmaaier nooit schoon
onder stromend water en zeker
niet
onder hoge druk.
För att undvika skador på människor eller materiella skador:
Rengör aldrig Accu Cylinderklippare med rinnande vatten,
speciellt inte
med högtryck.
Per evitare danni all’attrezzo,
non
lavarlo mai sotto l’acqua
corrente o con un getto d’acqua,
tanto meno se ad alta pressione.
Debido al peligro de daños
personales y materiales, no
se debe limpiar el cortacésped
bajo agua corriente, y en especial con equipos a presión.
Para evitar causar danos ao
material: Nunca
deve limpar
esta unidade com água corrente,
especialmente se fôr com alta
pressão.
For at undgå skader på maskinen eller andre materielle dele
må Accu cylinderklipper aldri
g
rengøres med rindende vand
eller højtryksrenser.
Achtung! Verletzungsgefahr
durch scharfes Schneidwerkzeug – Finger und Füße entfernt halten!
Warning! Risk of injury.
Keep fingers and feet away
from sharp cutting tool!
Attention ! Risque de blessures
par le cylindre de coupe – ne
mettez ni mains ni pieds à proximité !
Let op! Verwondingsgevaar
door scherp snijgereedschap –
vingers en voeten weghouden!
Varning! Risk för skada p.g.a.
skärverktyg med skarp egg –
Håll fingrar och fötter borta!
Attenzione ! Tenere sempre
mani e piedi a distanza di sicurezza dalle lame. Pericolo
di lesioni!
¡Atención! ¡Peligro de lesiones
con las cuchillas de corte afiladas! ¡Mantenga alejados los
dedos y los pies!
Atenção! Perigo de danos
pessoais devido a ferramentas
de corte afiadas – manter afastados os dedos e pés!
Advarsel! Ved nærkontakt med
den roterende knivcylinder, kan
den forvolde skade. Hold fingre
og fødder væk fra knivcylinderen.
Achtung! Vor allen Wartungsarbeiten Schlüsselschalter
ziehen!
Warning! Remove the key from
the socket before carrying out
all maintenance work!
Attention ! Avant tout travail
d’entretien, retirez la fiche-clé !
Let op! Voor alle onderhoudswerkzaamheden de sleutelschakelaar eruit trekken!
Varning! Dra ur nyckelströmbrytaren före allt underhållsarbete!
Attenzione! Rimuovere sempre
la chiavetta d’accensione
quando si spegne l’attrezzo!
¡Atención! ¡Quite el interruptor
de llave antes de todos los
trabajos de mantenimiento!
Atenção! Antes de qualquer
trabalho de manutenção, retirar
a chave do interruptor de chave!
Advarsel! Fjern nøglen før
enhver form for vedligeholdelse
udføres.
Page 3
close open
Page 4

16 17
GG
K
Plug for charger
L
Charging socket in housing
M
Mains plug for charger
N
Turning knob for Accu cover
O
Receptacle for tabs
P
Tabs on Accu
Q
Key
R
Thickness gauge
S
Hexagon thread bolt
(to adjust cutting tool)
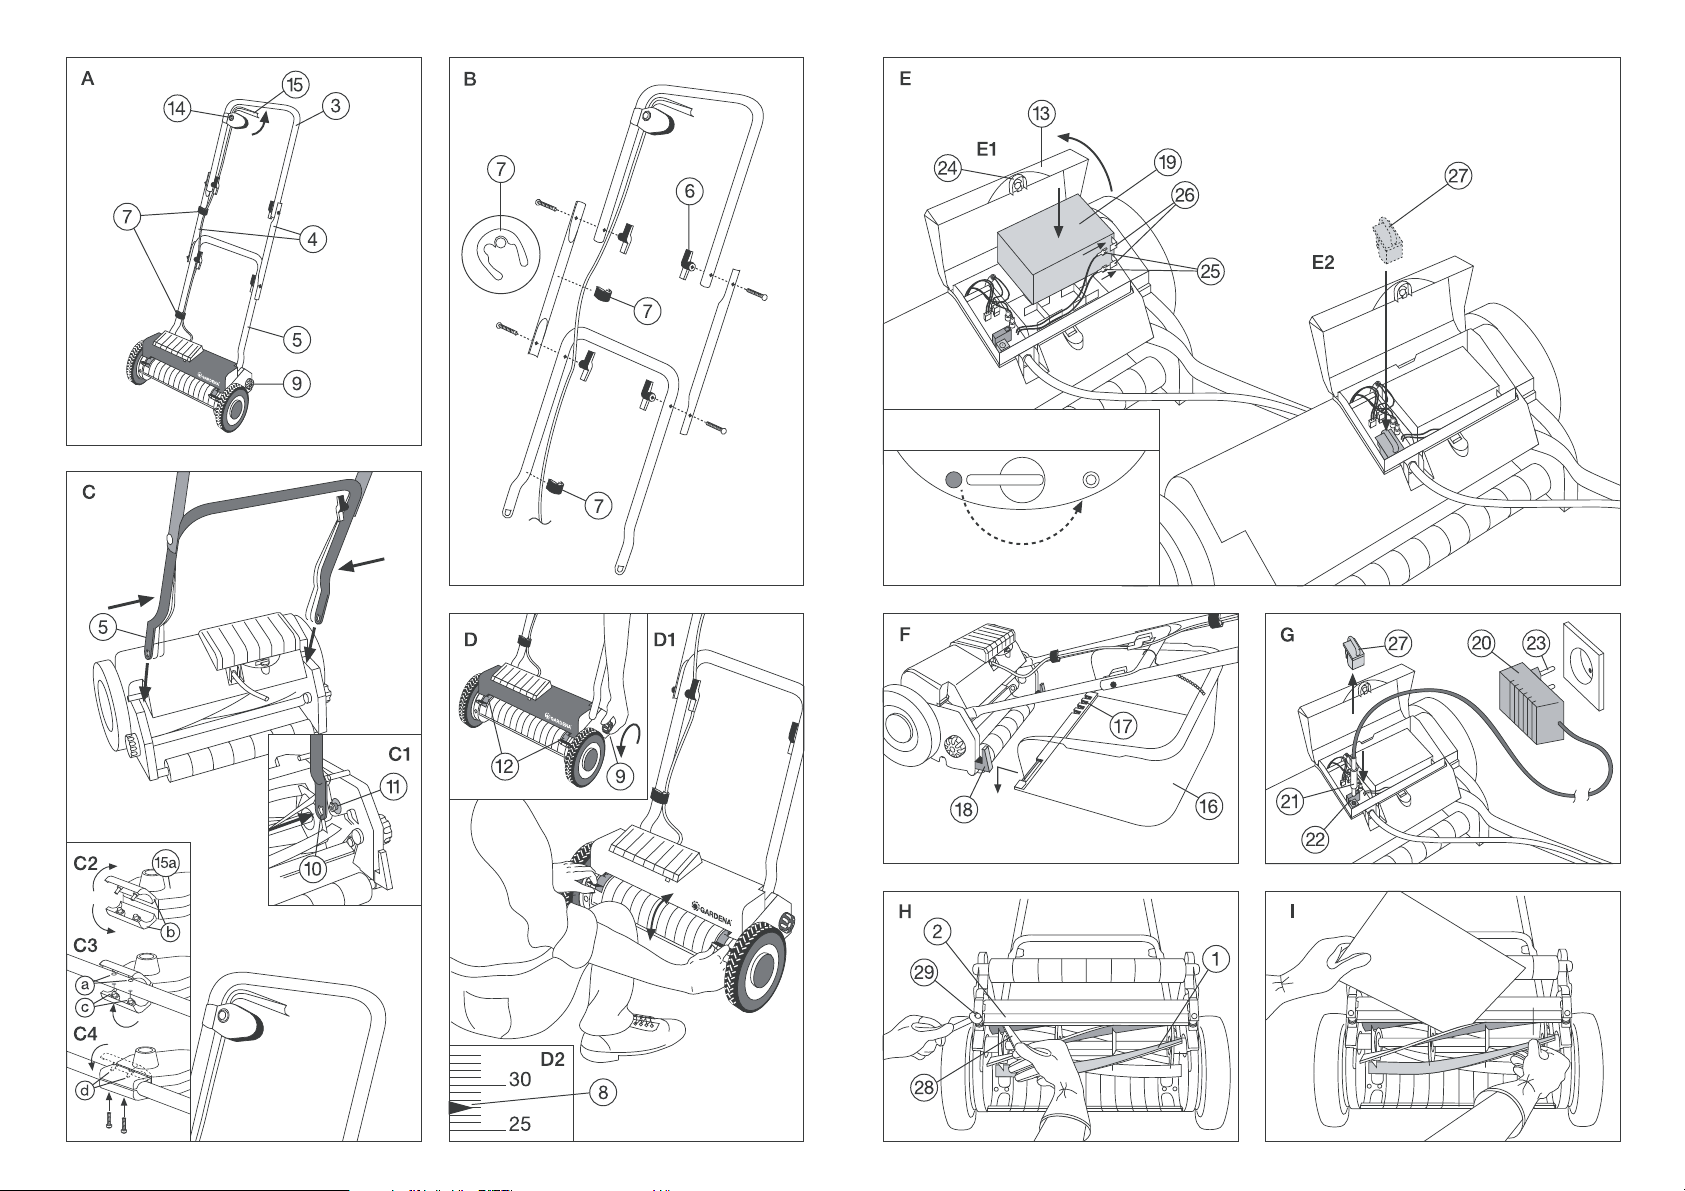
4.3 Assembling the Guide
Handle (Fig. A/B/C)
Assemble the guide handle as
follows:
1. Guide the upper section of
the guide handle
3
into the
grooves of the two middle
sections of the guide handle
4
(Fig. B)
2. Screw the upper section
3
to both middle sections of the
guide handle 4using the bolts
and wing nuts provided
6
.
3. Guide the lower part of the
guide handle 5into the
grooves of the middle sections
of the guide handle 4(Fig. B)
and screw together with the
bolts and wing nuts provided
6
.
4. Push both sides of the guide
handle with the opening
0
over the handle bolts Aas
shown in Fig. C1.
Note: Make sure that the
groove in the drilled hole and
the safety pin of the handle
bolt
A
meet.
Warning! Do not use excessive force. First ensure that
the opening 0and bolt
A
are aligned and then fix
together.
4.4 Assembling the Starting
Device (Fig. C2-C4)
To assemble the starting device,
both holes (a) must be on your
right hand side when standing
behind the mower (in the direction of movement).
1. Pull open the clamps (b) of the
starting device (15a) (Fig. C2).
2. Guide the two pin receptacles
(c) of the lower clamp into the
holes (a) and
3. insert the two pins (d) of the
upper clamp into the holes
(Fig. C 3).
4. Press the two clamps back
together.
5. Screw the assembled clamps
onto the guide handle using
the two Phillips screws provided (Fig. C 4).
6. Secure the cable to the handle
using the cable clips
7
.
Warning! The cable must not
hang down near the cutting
cylinder.
4.5 Setting the Cutting Height
(Fig. D / D1)
A
Warning! To prevent
injury, never set the cutting height when the motor
is running.
Set the cutting height on the Accu
Cordless Motor Mower as follows:
1. Stand the Accu Cordless Motor
Mower on a flat, solid surface.
2. Position yourself in front of the
cutting height scale of the Cordless Motor Mower (Fig. D1).
3. Loosen both fixing nuts
9
(Fig. D).
4. With both hands on the adjust-
ing handles
B
set the cutting
height you require (Fig. D1):
Highest cutting height: 45 mm
Lowest cutting height: 20 mm
Note: Make sure that the
arrows marking the cutting
height
8
show the same
cutting height on both sides
of the scale (Fig. D 2).
5. Re-tighten both fixing nuts
9
(Fig. D).
Note: When setting the Cordless Motor Mower to a low
cutting height, ensure that
the lower blade and cutting
cylinder do not touch the
ground if the ground is
uneven.
Accu
Design maintenance-free lead battery
Voltage/ capacity 12 V / 7.2 Ah
Weight approx. 2.4 kg
Cordless Motor Mower
Width of the cutting cylinder 38 cm
Weight approx. 12 kg
Working area related emission
characteristic value L
pA
1)
70 dB (A)
Noise level L
WA
2)
84 dB (A) Measuring method acording to
Vibrations a
vhw
1)
< 2.5 ms
-2
1)
EN 836 2)directive 2000/ 14/ EC
GARDENA Accu Cordless Motor Mower RM 380
1. Technical Data
Please read and follow these
operating instructions carefully.
Familiarise yourself with the unit’s
features, its proper use and the
safety instructions included.
A
For safety reasons chil-
dren under the age of
16 or people not familiar with
these operating instructions
must not use this Accu Cordless Motor Mower.
Please keep these instructions
in a safe place.
2. Operating Instructions Information
The GARDENA Accu Cordless
Motor Mower RM 380 is designed
for cutting and aerating lawns in
and around the garden.
It is not designed for use in public
facilities, parks, sporting grounds,
on roads, in agriculture or forestry.
It is essential to observe the
manufacturer’s operating instructions to ensure the unit’s proper
functioning. The operating instructions also contain advice for
service, maintenance and repair.
A
Attention ! To prevent
injury, the Accu Cordless
Motor Mower must not be used
for trimming bushes, hedges,
shrubs, for cutting and pruning
of climbers or grass on roofs
or in balcony boxes.
A
Attention! For risks of in-
jury the Accu must not be
used as power source for other
devices.
3. Product Use
4.1 Checking all Parts are
Included
The Accu Cordless Motor Mower
box contains the following parts:
.
Cordless Motor mower
.
1 Accu
.
1 upper section of the guide
handle
.
1 lower section of the guide
handle
.
2 middle sections of the guide
handle
.
Assembly parts for the guide
handle (plastic bag)
.
1 key (battery compartment)
.
1 Accu charger
.
1 thickness gauge
.
Operating instructions
4.2 Operating Parts
1
Cutting cylinder
2
Lower blade
3
Upper section of the guide
handle
4
Middle sections of the guide
handle
5
Lower section of the guide
handle
6
Wing nuts with bolts
7
Cable clip
8
Cutting height marking arrows
9
Fixing nuts
0
Opening for snug and
handle bolts
A
Handle bolts
B
Adjusting handles
C
Cover for the Accu
D
Release knob
E
Starting handle
F
Grass catcher
G
Grass catcher holders
H
Hooks for grass catcher
I
Accu
J
Charger
4. Assembling the Accu Cordless Motor Mower
5.1 Preparation for Initial
Operation (Fig. E)
Assemble the Accu
I
as described in section 7.2 „The Accu
– Changing the Accu“.
Note: the Accu is charged at the
factory but may loose its capacity
if it has been stored for a long
time. If the Accu is flat when you
purchase your Cordless Motor
Mower or immediately after use,
you must recharge the Accu as
described in section “Charging
the Accu”.
5.2 Starting your Mower
(Fig. A/ E)
Warning! Before starting your
Cordless Motor Mower check
for foreign bodies in the cutting
cylinder and remove if necessary.
Start your Cordless Motor Mower
as follows:
1. Stand your mower on a level
part of the lawn.
2. Open the accu cover
N
.
3. Insert the key Q(supplied
in the battery compartment)
the right way round into the
socket of the Motor Mower
(Fig. E).
4. Close the accu cover.
5. To start the motor, press and
hold down the release knob
D
and with the other hand, simultaneously pull the starting handle Etowards the cross bar
(Fig. A).
6. If you release the starting
handle Ethe motor switches
off again.
Important ! Always keep the
accu cover closed when working with the Motor Mower!
A
The switches installed
by the manufacturer must
not be removed or be bridged
eg: by taping down the starting
handle
E
to the guide handle.
5. Putting into Operation
Page 5

6.1 General Remarks
on the Care of Lawns
At the beginning of the grasscutting season and with newly
laid lawns, we recommend you
select a relatively high cutting
height (e.g. 45 mm) then gradually
decrease the cutting height over
time. To maintain a well kept lawn
you should set the cutting height
to approximately 20 mm.
If possible, mow your lawn once
a week. When you mow your lawn
frequently the short roots of the
grass grow making your lawn
more resistant. Always mow your
lawn when it is relatively dry.
To obtain a clean cut guide the
Accu Cordless Motor Mower in
lanes as straight as possible at
a walking pace.
Ensure that the lanes overlap
by a few centimetres so that no
uncut strips are left behind.
Cut the lawn for the first time in
spring when the grass begins to
grow and the lawn can be walked
on. If the grass has grown too
long first cut it length-wise with
a high cutting height setting
(approx. 45 mm) and then cut
at right angles with the desired
lower cutting height setting (e.g.
25 mm).
The area of lawn you can mow
with one charged accu depends
on the height and thickness of
the lawn, i.e. the taller and thicker
the lawn, the smaller the area of
lawn you can mow with one fully
charged Accu.
6.2 Mowing
Tip: Only cut with a sharp cutting cylinder so that the grass
is not bruised and turn yellow.
For a clean cut guide the Cordless Motor Mower at an appropriate speed in lanes as straight
as possible.
Note: The Cordless Motor Mower
can be operated with the Accu
or without as a hand mower.
Warning: The revolving cutting
cylinder can cause injuries.
Always maintain the distance
between the cutting cylinder
and user suggested by the
guide handle.
When working on inclines
always stand diagonally to the
incline in a sturdy, safe stance.
To prevent tripping, take particular care when moving backwards and when pulling the
Cordless Motor Mower.
For information on how to set
the cutting height see section
“Setting the Cutting Height”.
Blockage Protection
If the mower is blocked by a foreign body or if the motor is overloaded, the motor is automatically
switched off by the blockage protection. Remove the key from the
socket. Remove the foreign body
or the cause for the overload and
after a few seconds restart the
mower.
If the motor switches off although
there are no foreign bodies in the
cutting tool it is possible that the
cutting height you have selected
is too low. Select a higher cutting
height, e.g. 45 mm and then
select a lower cutting height for
the second cut.
Circuit Breaker
If the Cordless Motor Mower is
overloaded over a longer period of
time the motor may become hot.
To protect the motor from overheating the circuit breaker switches the motor off.You can switch
the mower on again after approximately 5-10 minutes.
Automatic Cut-Off
(discharge protection)
The mower switches off automatically as soon as the capacity
of the Accu has been exhausted
(discharge protection). We recommend recharging the battery
straight away.
Key
To prevent switching on the Motor
Mower unintentionally, remove
the key
Q
from the socket.
6.3 Mowing with the Grass
Catcher (optional) (Fig. F)
A
Only attach the grass
catcher when the motor
is switched off and the cutting
tool has stopped moving.
Using the GARDENA grass
catcher saves you having to rake
together the grass cuttings.
To attach the grass catcher:
1. Hook the grass catcher holders
G
over the hooks Hof the
Cordless Motor Mower and
2. Hook the carrying chain onto
the lower part of the guiding
handle.
Note: The height of the grass
catcher can be adjusted using
the latch-in hook on the chain.
For the best grass-catching
results, push your mower at a
walking pace.
6. Information Concerning Correct Mowing
7.1 Maintenance
Maintenance includes all jobs
which keep your Accu Cordless
Motor Mower in perfect working
order. By regularly checking the
unit (firm seating of screw connections, cracks, damage) and
replacing defective or worn parts
you can prevent accidents and
failure.
Repairs may only be carried
out by GARDENA service
centres or dealers authorised
by GARDENA.
A
Before cleaning and set-
ting the Motor Mower,
switch off the motor and
remove the key Qto prevent
starting the motor unintentionally.
7.2 The Accu (Fig. E/G)
Charging the Accu
A
Note: Only charge the
Accu with the charger
supplied! Using other charging
units could lead to damage and
injury. Using a charger other
than the GARDENA charger
supplied releases GARDENA
from all liability and warranty
claims.
A
Warning! The mower
cannot be started as long
as the charger is plugged in!
We recommend charging the
Accu immediately after using
your mower using the supplied
charger
J
for 24 hours.
Important ! If you do not use
the Accu for a longer period of
time it will get its full efficiency
after several charging cycles.
If the Accu is completely flat,
e.g. due to too long storage
without any recharge, it will
get its full efficiency again after
several charging cycles.
A
Attention! Never charge
the Accu after having
been heated up by operation
or sun. Let cool down first.
Never expose the Accu to
direct sunlight while charging.
Never charge the Accu anywhere near acids and easily
inflammable materials.
Danger of fire!
Note: Do not wait until the Accu is
completely flat before recharging.
Charge the Accu in a dry place
as follows (Fig. G):
1. Open the accu cover
N
.
2. Remove the key Qfrom the
socket.
3. Plug the plug Kof the charger
into the charging socket
L
.
4. Then plug the mains plug
M
of the charger into the mains
socket.
5. To resume mowing after charging the accu, replace the key in
the socket and close the accu
cover.
Important :
.
Protect the charging socket
against dirt and moisture.
.
If the Accu capacity is so
low that the Cordless Motor
Mower switches off automatically (discharge protection)
then the charging time is
24 hours.
Charging the Accu directly with
the GARDENA Charging Cable
(Art. No. 4040-00.900.01 –
available from GARDENA
Service)
1. Take off the Accu (see
“Changing the Accu”).
2. Put the socket of the charging
cable into the plug of charger
K
.
3. Connect the plus pole (+) of
the battery with the red clip
and the minus pole (–) with
the black clip.
4. Then plug the mains plug of
the charger into the mains
socket.
5. Loosen all connections in
reverse after charging.
6. Insert the Accu (see
“Changing the Accu”).
Care
Important ! If you do not use the
Accu for longer periods of time,
it must be re-charged every
6 months to maintain its full efficiency.
Changing the Accu (Fig. E)
If the Accu capacity is completely
exhausted or if the Accu can no
longer be recharged it must be
exchanged. New Accus are available from your GARDENA dealer
or directly from GARDENA Service, Art. No. 4040-00.600.20.
Exchange the Accu as follows:
1. Switch off the Motor Mower.
2. Open the accu cover
N
.
3. Remove the key from the
socket to prevent starting the
Motor Mower unintentionally.
4. Remove the Accu. Pay attention to the position of the Accu
in the housing.
5. Pull the receptacle for the tabs
O
from the tabs P.
6. Insert the new Accu in the
holder in the correct position
as shown in Fig. E1.
7. Important ! Pay atten-
A tion to the + / – markings
and the colour markings of
the receptacle for the tabs.
Push the red tab receptacle
on the tab labelled with a plus
sign (+) and the black tab
receptacle on the tab labelled
with a minus sign (–).
8. Please dispose of the Accu
according to the information in
the chapter entitled “Disposing
of and Recycling Accus”.
7.3 The Cordless Motor Mower
Cleaning
A
To avoid injury to persons
and material damage:
Never clean your Cordless
Motor Mower with running
water, in particular with water
under high pressure.
After using the mower clean with
a moist cloth. Spray the cutting
cylinder and lower blade with an
oil of low viscosity (e.g. spray oil).
7. Maintenance, Care, Storage
18 19
GG
This will prevent the mower
switching off automatically,
and could cause fatal injury.
Attention! Cutting cylinder continue to run for a few seconds
after the motor is switched off.
When working with the Cordless Motor Mower the Accu
heats up; this is normal and
does not affect its performance.
Page 6

20 21
GG
The
Accu
contains
lead cells.
After their lifetime have expired,
they may not be disposed of as
normal house rubbish, but must
be disposed of properly.
Please return the Accu to a
GARDENA dealer or send them
directly to one of the GARDENA
Service Centres listed on the
rear.
8. Disposing of and Recycling Accus
Familiarise yourself with the
surroundings of your working area. Check for possible
risks which might be not
audible due to the noise of
the machine.
Wear sturdy shoes and long
trousers to protect your legs.
Keep fingers and feet away
from the cutting tool.
Make sure that there are no
other people (especially children) or animals anywhere
near the working area.
Ensure that you have a secure foothold when working.
Attention! Take extra care
when walking backwards.
You may stumble!
If, in spite of this, you come
into contact with any obstruction when cutting, turn off the
mower. Remove the key from
the socket. Remove the object
then check the mower for
damage and have it repaired
if necessary.
A Interruptions of work
Never leave the Cordless motor
Mower unattended at the working area.
If you interrupt your work store
the mower in a safe place.
When you interrupt work to
move to another working area,
always switch off your Cordless
Motor Mower and remove the
key from the socket.
A Check the environment
Never use the unit when it is
raining or in damp or wet areas.
Do not operate your Cordless
Motor Mower near swimming
pools or garden ponds.
Please observe the prescribed
local quiet times.
Keep the charger in a dry
place.
A
Notes on Safety
Regarding Accu /
Danger of Fire
Never charge the Accu after
having been heated up by
operation or sun. Let cool
down first.
Never expose the Accu to
direct sunlight while charging.
Never charge the Accu anywhere near acids and easily
inflammable materials.
Danger of fire!
Only use the Accu for the
appliances intended.
Do not throw the used Accu
into fire under any circumstances. Danger of fire!
Never bridge the contacts
in the Accu. Danger of short
circuits and fire.
A
Checks before
each operation
Inspect the unit before each
use. Do not use the Accu
Cordless Motor Mower if safety
devices (safety handle; safety
cover) and/or the cutting
cylinder are damaged or worn.
Never operate the unit with
the safety devices by-passed
or missing.
Inspect the area to be cut
before beginning work.
Remove any foreign objects
(e.g. stones) from the area.
Check the working area for
foreign objects (e.g. stones)
during work.
The cutting cylinder and the
lower blade must be checked
regularly for damage and properly repaired if necessary.
Cutting tools must only be exchanged by GARDENA Service
or an authorised specialist
dealer.
A
Proper use /
responsibility
This Accu Cordless Motor
Mower can cause serious
injuries!
You are responsible for the
safety of the working area.
To prevent injuries, never start
the motor when the Mower is
tipped.
Only use the Cordless Motor
Mower for the purposes specified in these instructions.
Only work when visibility is
good.
Guide the mower at a walking
pace only.
Only insert the key into the
socket when you plan to start
working with the Motor Mower.
9. Advice for Proper Use / Safety Instructions
Pb
Maintenance
Note: Ensure that all nuts, bolts
and screws are tight and that
the mower is in good working
order. For safety reasons, allow
all worn out and damaged parts
to be exchanged by GARDENA
Service or authorised specialist
dealers.
To avoid injury and damage to
the mower we recommend you
have your mower checked in
autumn so that it is ready and
safe to use next season.
Storage
Store your Accu Cordless
Motor Mower in a dry, cool
place where it is protected
from frost.
The mower should be stored
out of the reach of children.
Tip: The Accu discharges less
when stored at cooler temperatures.
7.4 Adjusting the Cutting Tool
at a Later Stage (Fig. H)
The cutting tool of your Cordless
Motor Mower was set at an optimum setting before leaving our
factory. However, if the cut is not
clean after using your mower for
a longer period of time, please
correct the setting of the lower
blade as follows:
1. Switch off the Motor Mower
and remove the key from the
socket to prevent starting the
Motor Mower unintentionally.
2. Push the supplied thickness
gauge
R
on the left hand side
between one blade of the
cutting cylinder and the lower
blade.
3. Turn the hexagon thread bolt
S
with a 10 mm fork wrench
to the right until the thickness
gauge closes slightly. Repeat
this on the right hand side of
the mower.
4. Turn the cutting cylinder to
test the setting. None of the
5 blades of the cylinder must
touch the lower blade.
Warning! Handle the
A cutting tool carefully
to avoid cutting yourself.
Wear appropriate gloves to
protect your hands.
5. When you have adjusted the
cutting tool test it using a piece
of newspaper (Fig. I).
6. Important ! Pay atten-
A tion to the + / – markings
and the colour markings of
the receptacle for the tabs.
Push the red tab receptacle
on the tab labelled with a plus
sign (+) and the black tab
receptacle on the tab labelled
with a minus sign (–).
Ensure the tab receptacles
are fitted correctly.
The following table contains the problems most frequently occurring and shows how to remedy them.
Problem Possible cause Remedy
Abnormal noise. Motor fixing screws or Tighten screws.
Clattering in the unit. mower casing loose.
Metal-like hammering noises. Foreign body blocking the Turn off the mower.
cutting cylinder. Remove the key from the socket.
Remove the foreign body.
Motor will not start. Tab on Accu loose. Open the cover
C
and push
the tab receptacle onto the tab.
Key not inserted. Insert the key into the socket.
Circuit breaker has been Wait approx. 5-10 minutes then
triggered. turn on the motor again.
Motor turns off. Blocked by foreign body. Switch off the motor.
Blocking protection activated. Remove the key from the socket.
Remove the foreign body.
10. Faults
Page 7

22
G
Description of the unit:
Accu Cordless Motor Mower
Type:
RM 380
Art. No.:
4040
EU directives:
Machinery Directive 98/37/ EC
Electromagnetic Compatibility
89/336/EC
Low Voltage Directive 73/23 /EC
Directive 93/68 / EC
Directive 2000/14/ EC
Harmonised European
standards:
EN 292-1
EN 292-2
EN 836
EN 60335-1
prEN 60335-2-77
Noise level:
measured: 84 dB(A)
guaranteed: 86 dB (A)
Year of CE marking:
1998
Ulm, 06.05.2002
Thomas Heinl
Technical director
The undersigned
GARDENA Kress + Kastner GmbH · Hans-Lorenser-Str. 40 · D - 89079 Ulm
hereby certifies that, when leaving our factory, the unit indicated below is in accordance with the
harmonised EU guidelines, EU standards of safety and product specific standards.
This certificate becomes void if the unit is modified without our approval.
EU Certificate of Conformity
Problem Possible cause Remedy
Motor turns off. The cutting height you have Let the motor cool for 5-10 min-
selected is too low; utes, then use the mower with
you are pushing the mower a higher cutting height and
too quickly. reduce the cutting height in
Circuit breaker has been stages until you reach the lower
activated. cutting height you require.
Push the Motor Mower more
slowly across the lawn.
Battery power too low for Increase the cutting height and
cutting height. cut the lawn in stages or charge
the accu (see Chapter 7.2 “The
Accu”).
Yellow lawn. Cutting height too low. Increase the cutting height.
Cut not clean.
Blades are blunt or damaged. Have the blade replaced at a
GARDENA Service Centre or
by an authorised specialist.
If you have any problem with
your Accu Cordless Motor Mower,
please contact our Customer Service, or return the defective unit
together with a short description
of the problem and, if covered
under guarantee, with a copy of
the receipt, directly to one of the
GARDENA Service Centres
listed on the back of this leaflet.
We expressly point out that,
according to the product liability law, we are not liable for
any damage caused by our
units if, in case of repair or
exchange, other than original
GARDENA parts are used and
repair is not carried out by a
GARDENA service centre or
an authorised specialist.
The same also applies to spare
parts and accessories.
Page 8

77
D
Garantie
GARDENA gewährt für dieses
Produkt 2 Jahre Garantie (ab
Kaufdatum). Diese Garantieleistung bezieht sich auf alle
wesentlichen Mängel des Gerätes, die nachweislich auf Materialoder Fabrikationsfehler zurückzuführen sind. Sie erfolgt durch
die Ersatzlieferung eines einwandfreien Gerätes oder durch
die kostenlose Reparatur des
eingesandten Gerätes nach unserer Wahl, wenn folgende Voraussetzungen gewährleistet sind:
.Das Gerät wurde sachgemäß
und laut den Empfehlungen
in der Gebrauchsanweisung
behandelt.
.Es wurde weder vom Käufer
noch von einem Dritten versucht, das Gerät zu reparieren.
Die Verschleißteile Messerwalze
und Untermesser sind von der
Garantie ausgeschlossen.
Diese Hersteller-Garantie berührt
die gegenüber dem Händler/
Verkäufer bestehenden Gewährleistungsansprüche nicht.
Im Servicefall schicken Sie bitte
das defekte Gerät zusammen
mit einer Kopie des Kaufbelegs
und einer Fehlerbeschreibung
frankiert an die auf der Rückseite
angegebene Serviceadresse.
G
Guarantee
GARDENA guarantees this
product for 2 years (from date
of purchase). This guarantee
covers all serious defects of the
unit that can be proved to be
material or manufacturing faults.
Under warranty we will either
replace the unit or repair it free
of charge if the following conditions apply:
.The unit must have been
handled properly and in keep-
ing with the requirements of
the operating instructions.
.Neither the purchaser or a
non-authorised third party have
attempted to repair the unit.
The cutting cylinder and lower
blade are wearing parts and are
not covered by the guarantee.
This manufacturer’s guarantee
does not affect the user’s existing warranty claims against the
dealer/seller.
In case of claim, please return
the faulty unit together with a copy
of the receipt and a description
of the fault, with postage paid to
one of the GARDENA Service
Centres listed on the back of
these operating instructions.
F
Garantie
GARDENA accorde pour cet
appareil une garantie contractuelle de 2 ans à comp-ter du
jour de l’achat. Elle est assurée
par le remplacement gratuit des
pièces défectueuses ou de
l’appareil. Le choix en étant laissé
à la libre initiative de GARDENA.
En tout état de cause s’applique
la garantie légale couvrant toutes
les conséquences des défauts
ou vices cachés (article 1641 et
suivants du Code Civil).
Pour que ces garanties soient
valables, les conditions suivantes
doivent être remplies :
.L’appareil a été manipulé de
manière adéquate, suivant les
instructions du mode d’emploi.
.Il n’y a eu aucun essai de
réparation, ni par le client, ni
par un tiers.
Le cylindre de coupe et le couteau inférieur sont des pièces
d’usure et sont par conséquent
exclus de la garantie.
Une intervention sous garantie
ne prolonge pas la durée initiale
de la garantie contractuelle.
Toutes les revendications dépassant le contenu de ce texte
ne sont pas couvertes par la
garantie, quel que soit le motif
de droit.
Pendant la période de garantie,
le Service Après-Vente et les
Centres SAV agréés effectueront, à titre payant, les réparations nécessaires par suite
de manipulations erronées.
En cas de réclamation, veuillez
envoyer le produit en port payé
avec le bon d’achat et une
description du problème, à l’adresse du Service Après-Vente
figurant au verso.
N
Garantie
GARDENA geeft op dit product
2 jaar garantie (vanaf de aankoopdatum). Deze garantie heeft
betrekking op alle wezenlijke
defecten aan het toestel, die aanwijsbaar op materiaal- of fabricagefouten berusten. Garantie
vindt plaats door de levering
van een vervangend apparaat
of door de gratis reparatie van
het ingestuurde apparaat, naar
onze keuze, indien aan de volgende voorwaarden is voldaan:
.Het apparaat werd vakkundig
en volgens de adviezen in de
gebruiksaanwijzing behandeld.
.Noch de koper, noch een
derde persoon heeft getracht
het apparaat te repareren.
De aan slijtage onderhevige kooimes en de ondermes vallen niet
onder de garantie.
Deze garantie van de producent
heeft geen betrekking op de ten
aanzien van de handelaar/verkoper bestaande aansprakelijkheid.
In geval van reclamatie het defecte apparaat samen met de
kassabon en een beschrijving
van de storing gefrankeerd op
naar het op de achterzijde aangegeven serviceadres opsturen.
Page 9

Deutschland
GARDENA Kress + Kastner GmbH
GARDENA Service
Hans-Lorenser-Straße 40
D-89079 Ulm
Produktfragen: (07 31) 490 -123
Reparaturen: (07 31) 490 -290
Argentina
Argensem S.A.
Venezuela 1075
(1618) El Talar - Buenos Aires
Australia
NYLEX Corporation Ltd.
25-29 Nepean Highway
P.O.Box 68
Mentone, Victoria 3194
Austria
GARDENA Österreich Ges. m.b.H.
Stettnerweg 11-15
2100 Korneuburg
Belgium
MARKT (Belgium) NV/SA
Sterrebeekstraat 163
1930 Zaventem
Brazil
M. Cassab
Av. das Nações Unidas, 20.882
Santo Amaro, CEP 04795-000
São Paulo - S.P.
Bulgaria / България
ДЕНЕКС ООД
Бул. ”Г.М.Димитров” 16 ет.4
София 1797
Canada
GARDENA Canada Ltd.
100, Summerlea Road
Brampton, Ontario
Canada L6T 4X3
Chile
Antonio Martinic Y CIA. LTDA.
Gilberto Fuenzalida 185 Loc.
Las Condes - Santiago de Chile
Costa Rica
Compania Exim
Euroiberoamericana S.A.
350 Sur del Automercado
Los Yoses
San Pedro
Cyprus
FARMOKIPIKI LTD
P.O. Box 7098
74, Digeni Akrita Ave.
1641 Nicosia
Czech Republic
GARDENA spol. s.r.o.
Шнpskб 20a, и.p. 1153
62700 Brno
Denmark
GARDENA Danmark A/S
Naverland 8
2600 Glostrup
Finland
Habitec Oy
Martinkyläntie 52
01720 Vantaa
France
GARDENA France
Service Après-Vente
BP 50080
95948 ROISSY CDG Cedex
Great Britain
GARDENA UK Ltd.
27- 28 Brenkley Way
Blezard Business Park
Seaton Burn
Newcastle upon Tyne
NE13 6DS
Greece
Agrokip G. Psomadopoulos & Co.
20, Lykourgou str.
Kallithea - Athens
Hungary
GARDENA Magyarország Kft.
Késmárk utca 22
1158 Budapest
Iceland
Heimilistaeki hf
Saetun 8
P.O. Box 5340
125 Reykjavik
Republic of Ireland
Michael McLoughlin & Sons
Hardware Limited
Long Mile Road
Dublin 12
Italy
GARDENA Italia S.r.l.
Via Donizetti 22
20020 Lainate (Mi)
Japan
KAKUDAI Mfg. Co. Ltd.
1-4-4, Itachibori Nishi-ku
Osaka 550
Luxembourg
Magasins Jules Neuberg
Grand Rue 30
Case Postale No. 12
Luxembourg 2010
Netherlands
GARDENA Nederland B.V.
Postbus 50176
1305 AD ALMERE
Neth. Antilles
Jonka Enterprises N.V.
Sta. Rosa Weg 196
P.O. Box 8200
Curaçao
New Zealand
NYLEX New Zealand Limited
Private Bag 94001
South Auckland Mail Centre
10 Offenhauser Drive
East Tamaki, Manukau
Norway
GARDENA Norge A/S
Postboks 214
2013 Skjetten
Poland
GARDENA Polska Sp.z o.o.
Szymanów 9 d
05-532 Baniocha
Portugal
MARKT (Portugal), Lda.
Recta da Granja do Marquês
Edif. GARDENA
Algueirão
2725-596 Mem Martins
Russia / Россия
АО АМИДА ТТЦ
ул. Моcфилмовcкая 66
117330 Моcква
Singapore
Variware
Holland Road Shopping Centre
227-A 1st Fl., Unit 29
Holland Avenue
Singapore 1027
Slowenia / Croatia
Silk d.o.o. Trgovina
Brodišče 15
1236 Trzin
South Africa
GARDENA South Africa (Pty.) Ltd.
P.O. Box 11534
Vorna Valley 1686
Spain
ANMI Andreu y Miriam S.A.
Calle Pere IV, 111
08018 Barcelona
Sweden
GARDENA Svenska AB
Box 9003
20039 Malmö
Switzerland
GARDENA Kress + Kastner AG
Bitziberg 1
8184 Bachenbülach
Ukraine / Украина
АОЗТ АЛЬЦЕСТ
ул. Гайдара 50
г. Киев 01033
Turkey
Dost Diþ Ticaret Mümessillik A.Þ.
Yeþilbaðlar Mah. Baþkent
Cad. No. 26
Pendik - Ýstanbul
USA
GARDENA
3085 Shawnee Drive
Winchester, VA 22604
4040- 20.960.06/0021
©
GARDENA Kress + Kastner GmbH
Postfach 27 47, D- 89070 Ulm
http: //www.gardena.com
 Loading...