

Gardena EasyCut 400, EasyCut 480, ComfortCut 450, ComfortCut 500, PowerCut 500 Operating Instructions Manual
...Page 1
GARDENA
®
D
GBFNLSDKFIN
N
IE
PPL
H
CZSKGRRUS
SLOHR
SRB
BIH
UAROTRBGAL
EST
LTLV
D Betriebsanleitung
Turbotrimmer
GB Operating Instructions
Turbotrimmer
F Mode d’emploi
Coupe bordures
NL Instructies voor gebruik
Turbotrimmer
S Bruksanvisning
Turbotrimmer
DK Brugsanvisning
Turbotrimmer
FIN Käyttöohje
Turbotrimmeri
N Bruksanvisning
Turbotrimmer
I Istruzioni per l’uso
Turbotrimmer
E Manual de instrucciones
Turbotrimmer
P Instruções de utilização
Turbotrimmer
PL Instrukcja obsługi
Podkaszarka їyіkowa
H Használati utasítás
Damilos fыszegйlynyнrу
CZ Návod k použití
Turbotrimmer
SK Návod na použitie
Turbotrimmer
GR Οδηγίες χρήσεως
Κουρευτικό πετονιάς
RUS Инструкция по эксплуатации
Турботриммер
SLO Navodilo za uporabo
Kosilnica z nitko
HR Upute za uporabu
Turbo nitne kosilice
SRB Uputstvo za rad
BIH Turbo trimer-kosilica
UA Інструкція з експлуатації
Турботример
RO Instrucţiuni de utilizare
Turbotrimmer
TR Kullanım Klavuzu
Misinalı Ot Kesici
BG Инструкция за експлоатация
Турбо-тример
AL Manual përdorimi
Prerëse bari
EST Kasutusjuhend
Turbotrimmer
LT Eksploatavimo instrukcija
Turbo žoliapjovė
LV Lietošanas instrukcija
Turbo trimmeris
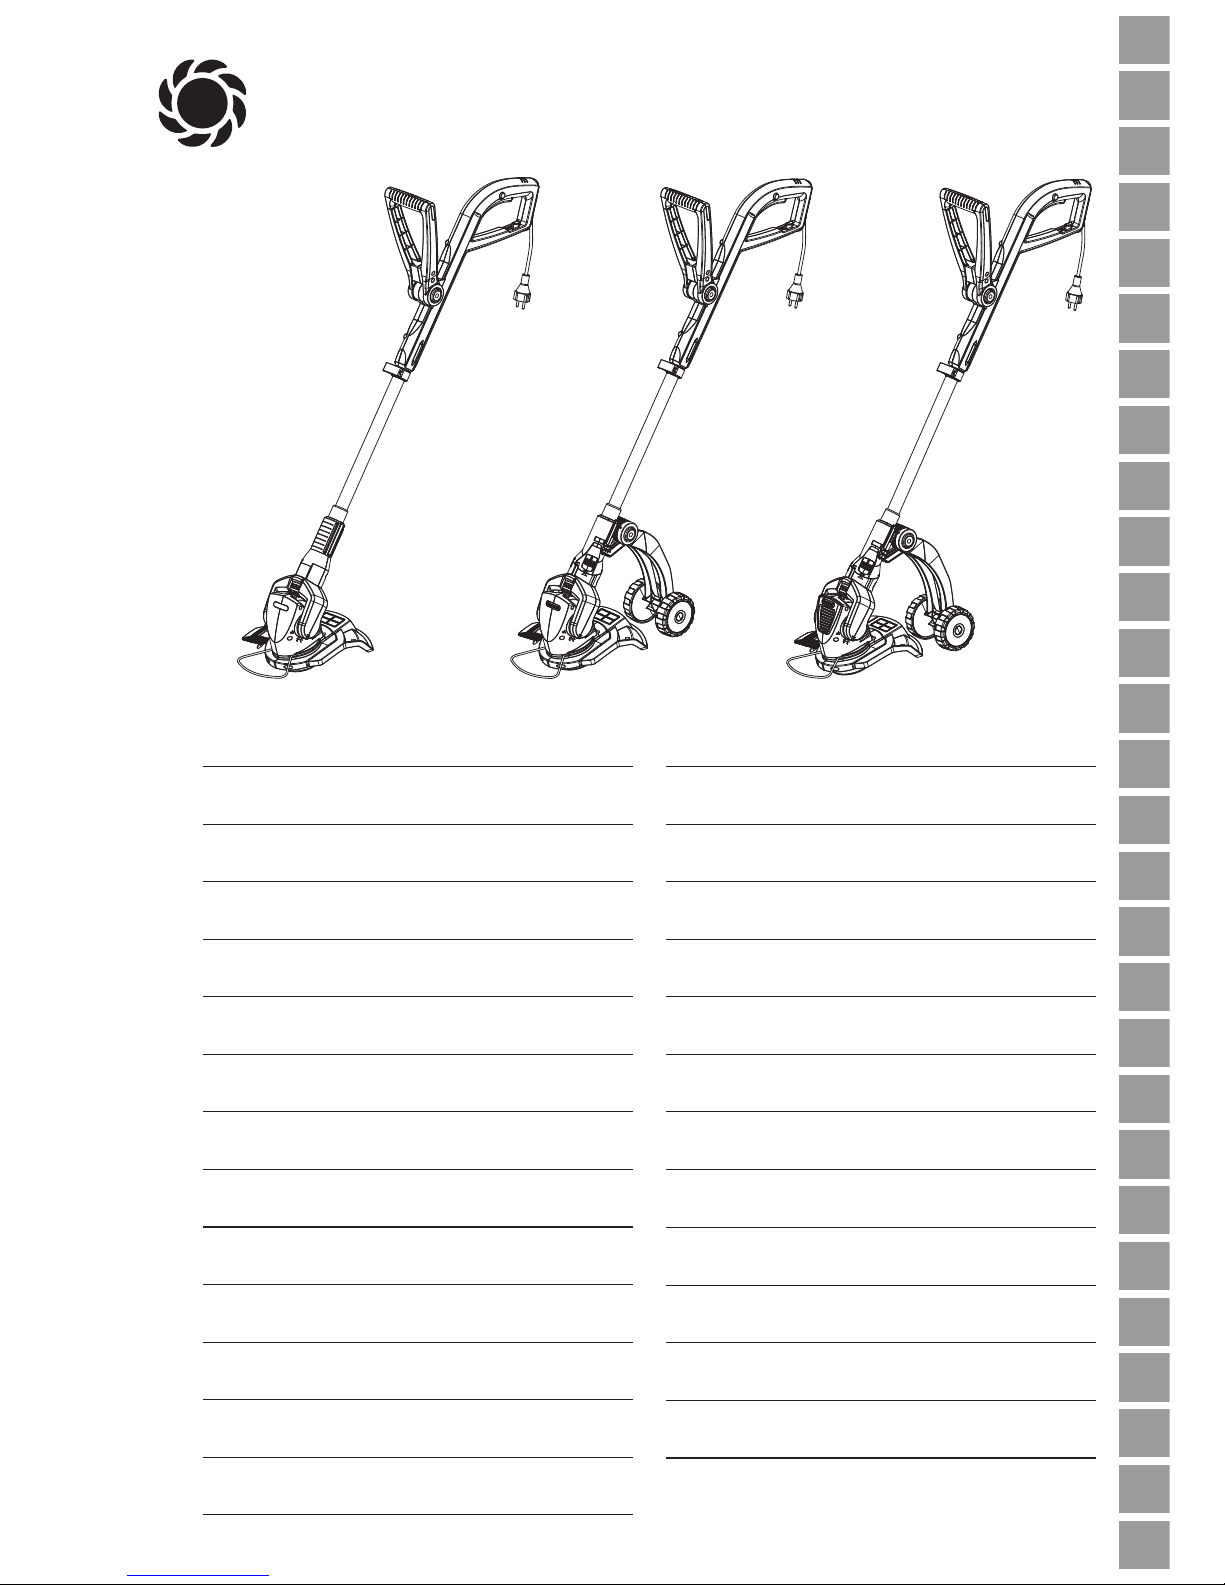
EasyCut 400
Art. 8846
EasyCut 480
Art. 8846-40
ComfortCut 450
Art. 8847
PowerCut 500
Art. 8848
Page 2
11
GB
Proper use
Please note
GARDENA Turbotrimmer EasyCut 400 / 480 /
ComfortCut 450 / PowerCut 500
Welcome to the Garden of GARDENA...
Translation of the original instructions from German.
Please read these operating instructions carefully and observe the information they contain. Use these operating instructions to familiarise yourself with the GARDENA
Turbotrimmer, its proper use and the notes on safety.
A
For safety reasons, children under the age of 16 as well as people who are not familiar
with the operating instructions, should not use the Turbotrimmer. Persons with reduced
physical or mental abilities may use the product only if they are supervised or instructed
by a responsible person.
v Please keep these operating instructions in a safe place.
1. Where to Use Your GARDENA Turbotrimmer
. . . . . . . . . . . . . . . . 11
2. Safety Instructions . . . . . . . . . . . . . . . . . . . . . . . . . . . . . . . . . . . . . . . . . . . 11
3. Assembly . . . . . . . . . . . . . . . . . . . . . . . . . . . . . . . . . . . . . . . . . . . . . . . . . . . . . 13
4. Operation . . . . . . . . . . . . . . . . . . . . . . . . . . . . . . . . . . . . . . . . . . . . . . . . . . . . . 13
5. Storage . . . . . . . . . . . . . . . . . . . . . . . . . . . . . . . . . . . . . . . . . . . . . . . . . . . . . . . 16
6. Maintenance . . . . . . . . . . . . . . . . . . . . . . . . . . . . . . . . . . . . . . . . . . . . . . . . . 16
7. Troubleshooting . . . . . . . . . . . . . . . . . . . . . . . . . . . . . . . . . . . . . . . . . . . . . . 17
8. Accessories . . . . . . . . . . . . . . . . . . . . . . . . . . . . . . . . . . . . . . . . . . . . . . . . . . 18
9. Technical Data . . . . . . . . . . . . . . . . . . . . . . . . . . . . . . . . . . . . . . . . . . . . . . . 18
10. Service /Warranty . . . . . . . . . . . . . . . . . . . . . . . . . . . . . . . . . . . . . . . . . . . . 19
1. Where to Use Your GARDENA Turbotrimmer
The GARDENA Turbotrimmer is designed for trimming and cutting
areas of grass and lawns in private house and hobby gardens.
The Turbotrimmer must not be used in public facilities, parks,
sports grounds, next to roads or in agriculture or forestry.
For safety reasons, the GARDENA Turbotrimmer must
not be used for hedge trimming or for shredding for
composting.
Contents
2. Safety Instructions
v Please read the notes on safety on the Trimmer.
CAUTION !
V Always read the
operating instructions
before using your
Turbotrimmer.
DANGER !
Risk of electric shock!
V Keep your Turbotrimmer
away from water and rain!
DANGER ! Tool does not
stop immediately when
turned off!
V Keep your hands and feet out of the area
where you are working until the cutting
filament is stationary!
DANGER !
Risk of injury to eyes!
V Always wear eye
protection!
Page 3

12
GB
DANGER !
Risk of injury to other
people!
V Keep other people out of the area where
you are working.
Check your Trimmer before each use
v Always visually inspect your Trimmer before
each use.
v Check that the ventilation slots are not
obstructed in any way.
Do not use your Trimmer if the safety devices
(push button, safety cover) and/or the filament
cassette are damaged or worn.
v Never bypass the safety devices.
v Inspect the area to be cut before you begin
work. Remove any foreign objects and look
out for foreign objects (such as stones,
pieces of wood, strings and wires) while
you are working.
v If you should come across an obstacle
while cutting, turn off the Trimmer and
unplug the mains plug. Remove the object
and check the Trimmer for any damage.
If necessary have your Trimmer repaired.
Use / responsibility
The Trimmer can cause serious injuries.
v Use the Trimmer only for the purpose
specified in these operating instructions.
You are responsible for the safety in the area
where you are working.
v Ensure that there are no other people
(especially children) or animals within or
near the area where you are working.
v Never use the Trimmer if the safety devices
are damaged or defective.
Unplug the mains plug after use and check
your Trimmer, especially the filament cassette,
regularly for damage. Have your Trimmer
repaired and /or replace the filament cassette
if necessary.
v Always wear an eye shield or safety
goggles!
v Wear sturdy shoes and long trousers to
protect your legs. Keep your fingers and
feet away from the cutting filament –
above all when starting work.
v Always ensure that you have a secure
foothold whilst working.
v Keep the extension cable away from the
area you are cutting.
Take extra care when walking backwards.
You may stumble!
v Only work in the daylight or when visibility
is good.
Interrupting work
v Never leave the Trimmer unattended where
you are working.
v If you stop work, unplug the mains plug
and store your Trimmer in a safe place.
v If you stop work in order to move to
another part of the garden, always switch
off the Trimmer, wait until the tool stops
and then unplug the mains plug.
Familiarise yourself with the surroundings
v Familiarise yourself with the surroundings
and look out for possible dangers which
you may not hear due to machine noise.
v Never use the Trimmer when it is raining
or in damp, wet areas.
v Do not operate your Trimmer directly next
to swimming pools or garden ponds.
Electrical safety
Check the power cord regularly for damage
and signs of wear and tear.
Do not use your Trimmer if the power cord is
damaged.
v If the mains cord or extension cable is
damaged while you are working, unplug
the mains plug immediately.
Do not touch the cable until the mains plug
is switched off.
The socket of the extension cable you are
using must be waterproof.
v Only use permitted extension cables.
v Ask your electrician.
For all portable units that are operated outdoors we recommend using a fault circuit
breaker.
In Switzerland the use of a residual-current
device is obligatory.
Page 4
13
GB
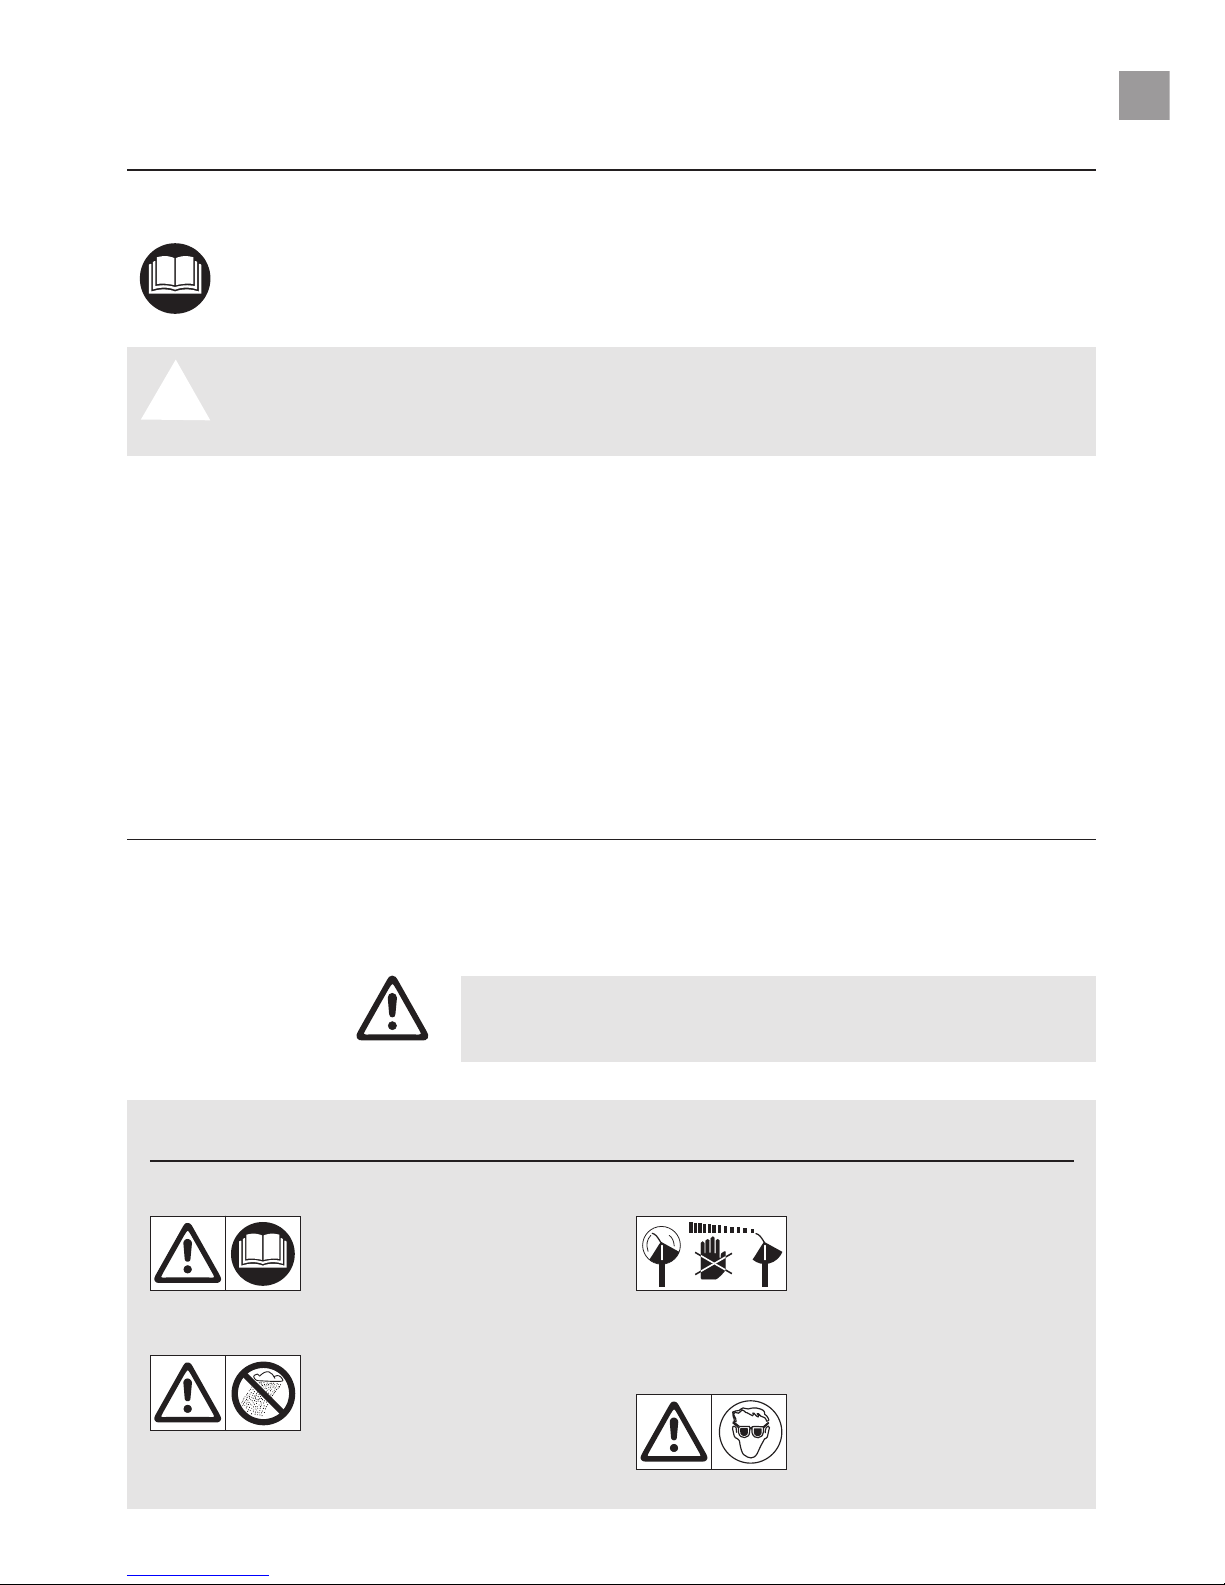
3. Assembly
1. Push the cover3into the guide of the cutting head from
behind2until the connection locks into place on both sides.
2. Push plant guard
1
onto the cutting head from the front
2
until it locks into place.
The additional wheel is available as an optional extra for the
EasyCut 400 / 480. The additional wheel is already fitted on the
ComfortCut 450 / PowerCut 500.
Fit additional wheel:
v Fit additional wheel
4
onto the
guides of the handle holder
5
until you hear the connection
lock into place on both sides.
Remove additional wheel:
v Pull both catches
6
out to the
side and remove the additional
wheel
4
from the guides of the
handle holder5.
Fold additional wheel up / down:
v Press adjusting buttons
z
T
on both
sides, fold additional wheel up / down
4
and release the adjustment buttons
z
T
again.
4. Operation
Risk of injury if the Turbotrimmer does not switch off when
you release the start button.
V Never bypass the safety devices or switches (e.g. by
tying the safety lock to the handle).
1. Insert the loop of the extension cable
7
into the cable strain
relief9from below through the upper part of the handle
8
and pull tight.
2. Plug the plug
0
of the trimmer into the socket Aof the
extension cable
7
.
3. Plug the extension cable into a 230 V mains power supply.
Assembling the trimmer:
Fit additional wheel:
2
1
3
5
4
4
z
T
6
9
8
7
0
A
RISK OF INJURY !
Connecting the trimmer:
Page 5

14
GB
Setting the working position:
Setting the trimmer
to body height:
Adjusting the plant guard:
ATTENTION !
A
Overloading of the motor.
V When trimming with wheels, working position 2
must be set.
The angle of the handle can be set to 3 working positions.
1. Push slider
B
up and set the handleCto the required
working position (see scaleD).
2. Let the sliderBlock into the required working position.
Setting the handle length:
v Open clamping lever
E
, extend upper part of handle8to
required handle length and close clamping leverEagain.
ATTENTION ! With EasyCut 400 /480, ensure that when
adjusting the handle length the upper part of the handle
8
is not twisted.
Adjusting the additional handle:
v Press adjusting buttons in
F
on both sides, set additional
handleGto required angle and release the adjusting buttons
F
again.
When the trimmer is set to the correct body size, the body
is upright and the cutting head is angled slightly forwards in
working position.
v Hold the trimmer on the upper part of the handle
8
and
additional handleGin such a way that the cutting head is
angled forwards slightly.
Working position Parking position
v Turn plant guardHthrough 180° into the required position until
it locks into place.
C
B
Working position 1:
Trimming without
wheels
Working position 2:
Trimming with
wheels
Working position 3:
Trimming under
obstacles
D
G
F
8
E
H
H
Page 6

15
GB
ComfortCut 450 / PowerCut 500 :
1. Setting the plant guard
H
to parking position (see
“Adjusting the plant guard”
).
2. Set handle angle to position 3
(see
“Setting the working
position”
).
3. Push sliderIupwards,
turn handleJthrough 90°
and let sliderIlock into
place (see arrows
z
P
on
articulated fork and handle
holder).
EasyCut 400 /480 :
v Open clamping leverE,
turn upper part of handle
8
through 180° and close
clamping leverEagain.
Switching the trimmer on:
1. Press and hold the safety lock
K
and then press
the start button
L
on the handle.
2. Release the safety lock
K
again.
Switching the trimmer off:
v Release the start button
L
on the handle.
The tip mechanism works when the motor is running. A clean
cut is only achieved with the maximum filament length.
1. Start the trimmer.
2. Hold the cutting head
2
parallel to the ground and
tap the trimmer with the
cutting head 2on the
ground (avoid sustained
pressure).
The cutting filament
M
is automatically lengthened with an audible
switching process and adjusted to the correct length with the filament limiterN. If necessary tap several times one after the other.
Starting the trimmer:
Filament feed
(Tip mechanism):
Trimming overhanging
lawn edges:
J
z
P
I
H
K
L
N
M
2
E
8
Page 7

16
GB
RISK OF INJURY !
RISK OF INJURY !
Cleaning the cover and the
ventilation slots:
Storage:
Disposal:
(in accordance with
RL2002/96/EC)
R
Q
5. Storage
The Turbotrimmer must be stored out of the reach of children.
v Store your Turbotrimmer in a dry place where it is protected
from frost.
Recommendation: The trimmer can be hung up by the handle.
The cutting head is not put under any unnecessary strain if the
trimmer is stored hanging up.
The product must not be added to normal household waste. It
must be disposed of in line with local environmental regulations.
v Important: Make sure that the unit is disposed of via your
municipal recycling collection centre.
6. Maintenance
There is a risk of injury from the cutting filament!
V Always unplug the mains plug of the Turbotrimmer be-
fore carrying out maintenance work!
Risk of injury and risk of damage to property!
V Never clean the Turbotrimmer under running water or
with a water jet (in particular a high pressure water jet).
The ventilation slots must always be free of dirt.
v After each use remove grass and dirt residue from the cover
O
and the ventilation slotsP.
(PowerCut 500 has ventilation slots on the front
P
).
RISK OF INJURY !
A
V Never use metallic cutting elements or
replacement parts and accessories not
provided by GARDENA.
Only use original GARDENA Filament Cassettes. You can
order Replacement Filament Cassettes from your GARDENA
dealer or directly from the GARDENA Customer Service.
• Filament Cassette for EasyCut 400 / 480 / ComfortCut 450 /
PowerCut 500 : Art. No. 5307
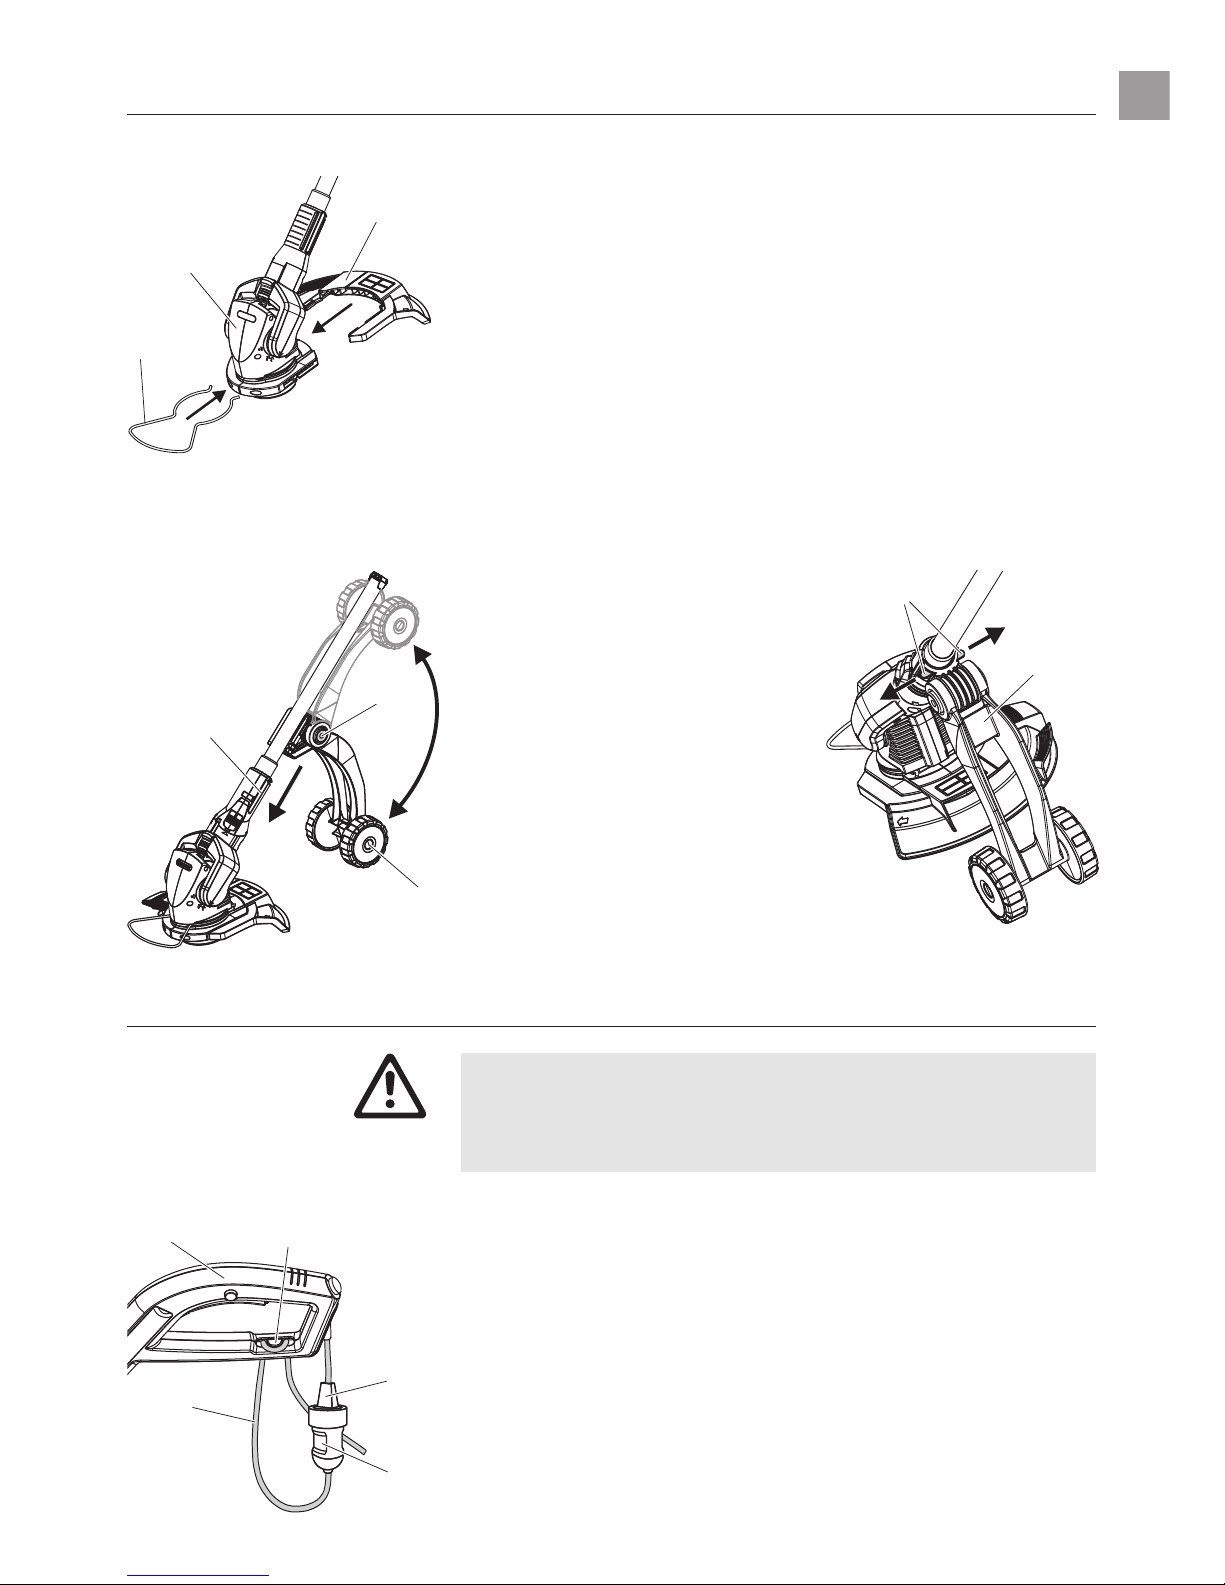
1. Unplug the mains plug.
2. Turn over the Turbotrimmer and rest it on the rubber buffer
of the handle.
3. Press in cassette cover
Q
on the two catches Rat the same
time and remove.
4. Remove the filament cassette
S
.
P
P
O
Replacing the filament cassette:
R
V
S
Page 8

17
GB
5. Remove any dirt.
6. Pull approximately 15 cm of the filaments
T
out of the new
filament cassette
S
through the hole in the plastic ring U.
7. First thread the filament
T
through the metal sleeve Xand
then around the guide pin
W
.
8. Insert the filament cassette
S
into the filament cassette
holder
V
.
9. Fit the cassette cover
Q
on the filament cassette holder
V
so that you hear both locking clips Rclick into place.
When fitting the cassette cover,
Q
the filament Tmust be
placed around the guide pin Wand must not be trapped.
v If the cassette cover
Q
cannot be touched down, turn the
filament cassette Sto and fro, until the filament cassette
S
is completely in the filament cassette holder V.
7. Troubleshooting
Risk of injury from the cutting filament!
V Always unplug the mains plug of the Turbotrimmer
before troubleshooting.
If a filament is drawn into the filament cassette you can pull it
out again as described below.
1. Unplug the mains plug.
2. Remove the filament cassette
S
as described under
6. Maintenance
“Replacing the filament cassette”.
3. Press together the plastic ring Uon the filament cassette
S
between your thumb and forefinger.
4. Draw the plastic ring
U
over the side part of the filament
cassette (use a screwdriver if necessary).
You can now access the filament that was drawn into the
filament cassette.
5. Unwind the filament Tapproximately 15 cm and thread it
through the eye of the plastic ring U. If necessary, loosen
the filament beforehand using a screwdriver.
6. Pull the plastic ring
U
back over the filament cassette S.
7. Reinstall the filament cassette as described under
6. Maintenance
“Replacing the filament cassette”.
RISK OF INJURY !
Pulling the filament out
of the filament cassette:
T
U
U
S
S
T
W
U
S
X
V
Page 9

18
GB
Fault Possible cause Remedy
The Turbotrimmer Filament worn or too short. v Lengthen the filament –
no longer cuts see 4. Operation
“Filament
feed (Tip mechanism for
automatic filament feed
)”.
Filament cassette empty. v Replace the filament cassette
– see 6. Maintenance
“Replacing the filament
cassette”
).
Filament drawn into the v Pull the filament out of the
cassette or stuck together. filament cassette (see above).
A
In the event of other faults please contact GARDENA Service.
Repairs should only be carried out by GARDENA service centres or dealers
authorised by GARDENA.
8. Accessories
GARDENA Replacement Art. No. 5307
Filament Cassette
GARDENA for EasyCut 400 /480 Art. No. 5310
Additional wheel
9. Technical Data
Turbotrimmer EasyCut 400 EasyCut 480 ComfortCut 450 PowerCut 500
(Art. 8846) (Art. 8846-40) (Art. 8847) (Art. 8848)
Motor power consumption 400 W 480 W 450 W 500 W
Mains voltage / 230 V/ 50 Hz 230 V/ 50 Hz 230 V/ 50 Hz 230 V/ 50 Hz
mains frequency
Filament thickness 1.6 mm 1.6 mm 1.6 mm 1.6 mm
Cutting width 250 mm 250 mm 250 mm 270 mm
Filament supply 6 m 6 m 6 m 6 m
Filament feed Tipp-Automatik Tipp-Automatik Tipp-Automatik Tipp-Automatik
Weight ca. 2.4 kg ca. 2.4 kg ca. 2.8 kg ca. 3.0 kg
Rpm of filament cassette ca. ca. ca. ca.
12,700 U/ min 12,700 U/min 12,700 U/ min 12,300 U/ min
Work area related emission 85 dB (A) 85 dB (A) 85 dB (A) 85 dB (A)
characteristic value L
pA
1)
Noise level L
WA
2)
measured measured measured measured
95 dB (A) 95 dB (A) 95 dB (A) 95 dB (A)
guaranteed guaranteed guaranteed guaranteed
96 dB (A) 96 dB (A) 96 dB (A) 96 dB(A)
Hand /arm vibration a
vhw
1)
< 2.5 m/s2 < 2.5 m /s2 < 2.5 m /s
2
Measuring method according to 1) EN 786 2) directive 2000/14/EC
Page 10

19
GB
10. Service / Warranty
GARDENA guarantees this product for 2 years (from date of
purchase). This guarantee covers all serious defects of the unit
that can be proved to be material or manufacturing faults. Under
warranty we will either replace the unit or repair it free of charge
if the following conditions apply:
• The unit must have been handled properly and in keeping with
the requirements of the operating instructions.
• Neither the purchaser or a non-authorised third party have
attempted to repair the unit.
The filament cassette and cassette cover are consumables and
are not covered by the guarantee.
This manufacturer’s guarantee does not affect the user’s existing
warranty claims against the dealer/seller.
If a fault occurs with your Turbotrimmer, please return the faulty
unit together with a copy of the receipt and a description of
the fault, with postage paid to one of the GARDENA Service
Centres listed on the back of these operating instructions.
Page 11

254
D
Produkthaftung
Wir weisen ausdrücklich darauf hin, dass wir nach dem Produkthaftungsgesetz nicht für durch unsere Geräte
hervorgerufene Schäden einzustehen haben, sofern diese durch unsachgemäße Reparatur verursacht oder bei
einem Teileaustausch nicht unsere Original GARDENA Teile oder von uns freigegebene Teile verwendet werden
und die Reparatur nicht vom GARDENA Service oder dem autorisierten Fachmann durchgeführt wird.
Entsprechendes gilt für Ergänzungsteile und Zubehör.
GB
Product Liability
We expressly point out that, in accordance with the product liability law, we are not liable for any damage caused
by our units if it is due to improper repair or if parts exchanged are not original GARDENA parts or parts approved
by us, and, if the repairs were not carried out by a GARDENA Service Centre or an authorised specialist.
The same applies to spare parts and accessories.
F
Responsabilité
Nous vous signalons expressément que GARDENA n’est pas responsable des dommages causés par ses appareils, dans la mesure où ces dommages seraient causés suite à une réparation non conforme, dans la mesure
où, lors d’un échange de pièces, les pièces d’origine GARDENA n’auraient pas été utilisées, ou si la réparation
n’a pas été effectuée par le Service Après-Vente GARDENA ou l’un des Centres SAV agréés GARDENA. Ceci
est également valable pour tout ajout de pièces et d’accessoires autres que ceux préconisés par GARDENA.
NL
Productaansprakelijkheid
Wij wijzen er nadrukkelijk op, dat wij op grond van de wet aansprakelijkheid voor producten niet aansprakelijk zijn
voor schade ontstaan door onze apparaten, indien deze door onvakkundige reparatie veroorzaakt zijn, of er bij
het uitwisselen van onderdelen geen gebruik gemaakt werd van onze originele GARDENA onderdelen of door
ons vrijgegeven onderdelen en de reparatie niet door de GARDENA technische dienst of de bevoegde vakman
uitgevoerd werd. Ditzelfde geldt voor extra-onderdelen en accessoires.
S
Produktansvar
Tillverkaren är inte ansvarig för skada som orsakats av produkten om skadan beror på att produkten har reparerats felaktigt eller om, vid reparation eller utbyte, andra än Original GARDENA reservdelar har använts. Samma
sak gäller för kompletteringsdelar och tillbehör.
DK
Produktansvar
Vi gør udtrykkeligt opmærksom på at i henhold til produktansvarsloven er vi ikke ansvarlige for skader forårsaget
af vores udstyr, hvis det skyldes uautoriserede reparationer eller hvis dele er skiftet ud og der ikke er anvendt
originale GARDENA dele eller dele godkendt af os, eller hvis reparationerne ikke er udført af GARDENA-service
eller en autoriseret fagmand. Det samme gælder for ekstra udstyr og tilbehør.
FIN
Tuotevastuu
Korostamme nimenomaan, että tuotevastuulain nojalla emme ole vastuussa laitteistamme johtuneista vahingoista,
mikäli nämä ovat aiheutuneet epäasianmukaisesta korjauksesta tai osia vaihdettaessa ei ole käytetty alkuperäisiä
GARDENA- varaosia tai hyväksymiämme osia ja korjauksen on suorittanut muu kuin GARDENA -huoltokeskus tai
valtuuttamamme ammattihenkilö. Tämä pätee myös lisäosiin ja lisävarusteisiin.
I
Responsabilità del prodotto
Si rende espressamente noto che, conformemente alla legislazione sulla responsabilità del prodotto, non si
risponde di danni causati da nostri articoli se originati da riparazioni eseguite non correttamente o da sostituzioni
di parti effettuate con materiale non originale GARDENA o comunque da noi non approvato e, in ogni caso,
qualora l’intervento non venga eseguito da un centro assistenza GARDENA o da personale specializzato autorizzato. Lo stesso vale per le parti complementari e gli accessori.
E
Responsabilidad de productos
Advertimos que conforme a la ley de responsabilidad de productos no nos responsabilizamos de daños causados
por nuestros aparatos, siempre y cuando dichos daños hayan sido originados por arreglos o reparaciones indebidas, por recambios con piezas que no sean piezas originales GARDENA o bien piezas autorizadas por nosotros,
así como en aquellos casos en que la reparación no haya sido efectuada por un Servicio Técnico GARDENA o
por un técnico autorizado. Lo mismo es aplicable para las piezas complementarias y accesorios.
P
Responsabilidade sobre o produto
Queremos salientar que segundo a lei da responsabilidade do fabricante, nós não nos responsabilizaremos por
danos causados pelo nosso equipamento, quando estes ocorram em decorrência de reparações inadequadas ou
da substituição de peças por peças não originais da GARDENA, ou peças não autorizadas. A responsabilidade
tornar-se-à nula também depois de reparações realizadas por oficinas não autorizadas pela GARDENA. Esta
restrição valerá também para peças adicionais e acessórios.
Page 12

256
D
EG-Konformitätserklärung
Der Unterzeichnete Husqvarna AB, 561 82 Huskvarna, Sweden bestätigt, dass die
nachfolgend bezeichneten Geräte in der von uns in Verkehr gebrachten Ausführung
die Anforderungen der harmonisierten EU-Richtlinien, EU-Sicherheitsstandards
und produktspezifischen Standards erfüllen. Bei einer nicht mit uns abgestimmten
Änderung der Geräte verliert diese Erklärung ihre Gültigkeit.
GB
EU Declaration of Conformity
The undersigned Husqvarna AB, 561 82 Huskvarna, Sweden, hereby certifies that,
when leaving our factory, the units indicated below are in accordance with the
harmonised EU guidelines, EU standards of safety and product specific standards.
This certificate becomes void if the units are modified without our approval.
F
Certificat de conformité aux directives européennes
Le constructeur, soussigné : Husqvarna AB, 561 82 Huskvarna, Sweden, déclare
qu’à la sortie de ses usines le matériel neuf désigné ci-dessous était conforme
aux prescriptions des directives européennes énoncées ci-après et conforme aux
règles de sécurité et autres règles qui lui sont applicables dans le cadre de l’Union
européenne. Toute modification portée sur ce produit sans l’accord express de
Husqvarna supprime la validité de ce certificat.
NL
EU-overeenstemmingsverklaring
Ondergetekende Husqvarna AB, 561 82 Huskvarna, Sweden, bevestigt, dat het
volgende genoemde apparaat in de door ons in de handel gebrachte uitvoering
voldoet aan de eis van, en in overeenstemming is met de EU-richtlijnen, de
EU-veiligheidsstandaard en de voor het product specifieke standaard. Bij een niet
met ons afgestemde verandering aan het apparaat verliest deze verklaring haar
geldigheid.
S
EU Tillverkarintyg
Undertecknad firma Husqvarna AB, 561 82 Huskvarna, Sweden, intygar härmed
att nedan nämnda produkter överensstämmer med EU:s direktiv, EU:s säkerhetsstandard och produktspecifikation. Detta intyg upphör att gälla om produkten ändras utan vårt tillstånd.
DK
EU Overensstemmelse certificat
Undertegnede Husqvarna AB, 561 82 Huskvarna, Sweden bekræfter hermed, at
enheder listet herunder, ved afsendelse fra fabrikken, er i overensstemmelse med
harmoniserede EU retningslinier, EU sikkerhedsstandarder og produkt-specifikationsstandarder. Dette certifikat træder ud af kraft hvis enhederne er ændret uden
vor god kendelse.
FIN
EY-vaatimustenmukaisuusvakuutus
Allekirjoittanut Husqvarna AB, 561 82 Huskvarna, Sweden vakuuttaa, että allamainitut laitteet täyttävät tehtaaltamme lähtiessään yhdenmukaistettujen EY-direktiivien,
EY-turvallisuusstandardien ja tuotekohtaisten standardien vaatimukset. Laitteisiin
tehdyt muutokset, joista ei ole sovittu kanssamme, johtavat tämän vakuutuksen
raukeamiseen.
I
Dichiarazione di conformità alle norme UE
La sottoscritta Husqvarna AB, 561 82 Huskvarna, Sweden, certifica che il prodotto
qui di seguito indicato, nei modelli da noi commercializzati, è conforme alle direttive
armonizzate UE nonché agli standard di sicurezza e agli standard specifici di prodotto. Qualunque modifica apportata al prodotto senza nostra specifica autorizzazione
invalida la presente dichiarazione.
E
Declaración de conformidad de la UE
El que subscribe Husqvarna AB, 561 82 Huskvarna, Sweden, declara que la presente mercancía, objeto de la presente declaración, cumple con todas las normas
de la UE, en lo que a normas técnicas, de homologación y de seguridad se refiere.
En caso de realizar cualquier modificación en la presente mercancía sin nuestra
previa autorización, esta declaración pierde su validez.
P
Certificado de conformidade da UE
Os abaixo mencionados Husqvarna AB, 561 82 Huskvarna, Sweden, por este meio
certificam que ao sair da fábrica o aparelho abaixo mencionado está de acordo
com as directrizes harmonizadas da UE, padrões de segurança e de produtos
específicos. Este certificado ficará nulo se a unidade for modificada sem a nossa
aprovação.
PL
Deklaracja zgodnoњci Unii Europejskiej
Niїej podpisany Husqvarna AB, 561 82 Huskvarna, Sweden, potwierdza, їe poniїej
opisane urz№dzenie w wykonaniu wprowadzonym przez nas do obrotu speіnia wymogi zharmonizowanych wytycznych Unii Europejskiej, standardуw bezpieczeсstwa
Unii Europejskiej i standardуw specyficznych dla danego produktu. W przypadku
wprowadzenia zmian nie uzgodnionych z nami wyjaњnienie to traci swoj№ waїnoњж.
H
EU azonossбgi nyilatkozat
Alulнrott, Husqvarna AB, 561 82 Huskvarna, Sweden, igazolja, hogy az alбbb felsorolt, бltalunk forgalomba hozott termйkek megfelelnek az EU elvбrбsoknak, EU
biztonsбgi normбknak йs a termйkspecifikus szabvбnyoknak egyarбnt. A kйszьlйk
velьnk nem egyeztetett vбltoztatбsa esetйn ez a nyilatkozat йrvйnyйt
veszti.
CZ
ES Prohlášení o shodě
Níže podepsaná společnost Husqvarna AB, 561 82 Huskvarna, Sweden, potvrzuje,
že níže označený přístroj v provedení, který jsme uvedli na trh, splňuje požadavky
uvedené v harmonizovaných směrnicích EU, v bezpečnostních standardech EU a
ve standardech pro daný produkt. V případě změny přístroje, která námi nebyla
odsouhlasena, ztrácí toto prohlášení platnost.
SK
ES Vyhlásenie o zhode
Dolu podpísaná spoločnosť Husqvarna AB, 56182 Huskvarna, Sweden, potvrdzuje,
že ďalej označený prístroj vo vyhotovení nami uvedenom do prevádzky spĺňa
požiadavky harmonizovaných smerníc EU, bezpečnostných štandardov EU a
štandardov špecifických pre produkt. V prípade zmeny prístroja, ktorá nebola nami
odsúhlasená, stráca toto vyhlásenie platnosť.
GR
Πιστoπoιητικό συμφωνίας EK
Η υπoγεγραµµένη:
Husqvarna AB, 561 82 Huskvarna, Sweden
πιστoπoιεί
ότι τα µηχανήµατα πoυ υπoδεικνύoνται κάτωθι, όταν φεύγoυν από
τo εργoστάσιo, είναι κατασκευασµένα σύφωνα µε τις oδηγίες της
Ευρωπαϊκής Κoινότητας, τα Κoινoτικά πρότυπα ασφαλείας και τις
πρoδιαγραφές. Αυτό το πιστοποιητικό δεν ισχύει σε περίπτωση που
τα προϊόντα τροποποιηθούν χωρίς την έγκρισή ας.
SLO
Izjava o skladnosti s pravili EU
Podpisano podjetje, Husqvarna AB, 561 82 Huskvarna, Sweden, potrjuje, da v
nadaljevanju navedena naprava v razliиici, ki smo jo poslali na trg, izpolnjuje
zahteve smernic EU, varnostnih standardov EU in standardov tovrstnih proizvodov.
Izjava ne velja za spremembe na napravi, ki niso opravljene v soglasju z nami.
RO
UE - Certificat de conformitate
Prin prezenta Husqvarna AB, 561 82 Huskvarna, Sweden, certifica faptul ca, in
momentul in care produsele menюionate mai jos ies din fabrica sunt in concordanta
cu directivele UE, standardele de siguranюa UE si standardele specifice ale produsului UE. Acest certificat devine nul in cazul modificгrii aparatului fгrг aprobarea
noastrг.
BG
EС-Декларация за съответствие
Подписаната фирма Husqvarna AB, 561 82 Huskvarna, Sweden декларира, че
описаните подолу уреди, пуснати в продажба съгласно нашата спецификация,
изпълняват изискванията на хармонизираните ЕС-директиви, ЕС-стандарти
за безопасност и специфичните производствени стандарти. При промяна на
уреда, която не е съгласувана с нас, тази декларация губи своята валидност.
EST
ELi vastavusdeklaratsioon
Allakirjutanu Husqvarna AB, 561 82 Huskvarna, Sweden kinnitab, et kirjeldatud
seade vastab meie poolt ringlusse viidud kujul ELi harmoniseeritud direktiividele,
ELi ohutusstandarditele ja tootega seotud standarditele. Meiega kooskõlastamata
muudatuse tegemise korral seadmel kaotab see deklaratsioon kehtivuse.
LT
ES Atitikties deklaracija
Pasirašanti Husqvarna AB, 561 82 Huskvarna, Sweden patvirtina, kad žemiau
nurodyti prietaisai ir jų modeliai, kuriuos paleidome į apyvartą, patenkina harmonizuotas ES direktyvas, ES saugumo standartus ir specifinius gaminio standartus.
Atlikus bet kokį prietaiso pakeitimą, kuris nėra suderintas su mumis, ši deklaracija
praranda galiojimą.
LV
ES-atbilstības deklarācija
Parakstījusies Husqvarna AB, 561 82 Huskvarna, Sweden, Vācija apstiprina, ka
sekojoši apzīmētās iekārtas, kuras mēs izplatām, savā izpildījumā atbilst harmonizētajām ES direktīvām, ES drošības standartiem un produkta specifiskajiem
standartiem. Ar mūsu neapstiprinātām izmaiņām iekārtā šī deklarācija zaudē
savu derīgumu.
Page 13

257
Schall-Leistungspegel: gemessen /garantiert
Noise level: measured / guaranteed
Puissance acoustique : mesurée /garantie
Geluidsniveau: gemeten / gegarandeerd
Ljudnivå: uppmätt / garanterad
Lydtryksniveau: afmålt / garanti
Melun tehotaso: mitattu /taattu
Livello rumorosità: testato /garantito
Nivel sonoro: medido / garantizado
Nível de ruido : medido /garantido
Poziom haіasu: zmierzony /gwarantowany
Zajszint: mйrt / garantбlt
Hladina hluku: namмшeno / zaruиeno
Vэkonovб ъroveт hluku: meranб / zaruиenб
Στάθη ηχητικής πίεσης : ετρηθείσα / εγγυηένη
Glasnost: izmerjeno /garantirano
Nivelul de zgomot: mгsurat / garantat
Ниво на шума и мощността: измерено / гарантирано
Helivõimsuse tase: mõõdetud / tagatud
Garso galios lygis : išmatuotas / garantuotas
Skaņas jaudas līmenis : izmērītais / garantētais
8846 / 8846-40 95 dB (A) / 96 dB (A)
8847 / 8848 95 dB (A) / 96 dB (A)
2008
Ulm, den 01.07.2008 Der Bevollmächtigte
Ulm, 01.07.2008 Authorised representative
Fait à Ulm, le 01.07.2008 Représentant légal
Ulm, 01-07-2008 Gemachtigde
Ulm, 2008.07.01. Behörig Firmatecknare
Ulm, 01.07.2008 Teknisk direktør
Ulmissa, 01.07.2008 Valtuutettu edustaja
Ulm, 01.07.2008 Rappresentante autorizzato
Ulm, 01.07.2008 Representante autorizado
Ulm, 01.07.2008 Representante autorizado
Ulm, 01.07.2008r. Uprawniony do reprezentacji
Ulm, 01.07.2008 Meghatalmazott
V Ulmu, dne 01.07.2008 Zplnomocnмnec
Ulm, 01.07.2008 Splnomocnenec
Ulm, 01.07.2008
Νμιμος εκπρσωπος της εταιρας
Ulm, 01.07.2008 Vodja tehniиnega oddelka
Ulm, 01.07.2008 Conducerea tehnicг
Улм, 01.07.2008 Упълномощен
Ulm, 01.07.2008 Volitatud esindaja
Ulm, 2008.07.01 Įgaliotasis atstovas
Ulma, 01.07.2008 Pilnvarotā persona
Peter Lameli
Vice President
Bezeichnung des Gerätes: Turbotrimmer
Description of the unit: Turbotrimmer
Désignation du matériel : Taille-haies électrique
Omschrijving van het apparaat: Turbotrimmer
Produktbeskrivning: Turbotrimmer
Beskrivelse af enhederne : Turbotrimmer
Laitteiden nimitys: Turbotrimmeri
Descrizione del prodotto : Turbotrimmer
Descripción de la mercancía: Turbotrimmer
Descrição do aparelho : Turbotrimmer
Opis urz№dzenia: Podkaszarka їyіkowa
A kйszьlйk megnevezйse: Damilos fыszegйlynyнrу
Oznaиenн pшнstroje: Turbotrimmer
Označenie prístroja: Turbotrimmer
Oνομασα της συσκευς : Κουρευτικό πετονιάς
Oznaka naprave: Kosilnica z nitko
Descrierea articolelor: Turbotrimmeri
Обозначение на уредите: Турбо-тример
Seadmete nimetus: Turbotrimmeri
Gaminio pavadinimas: Turbo žoliapjovė
Iekārtu apzīmējums: Turbo trimmeris
Typ : Tнpusok: Art.-Nr.: Cikkszбm:
Type : Typ: Art. No.: И.vэr:
Type : Typ: Référence : И.vэr :
Typ : Τπος : Art. nr.: Κωδ. Νο. :
Typ : Tip: Art.nr. : Љt. art.:
Type : Tipuri: Varenr. : Nr art.:
Tyypit : Типове: Art.-n:o. : Aрт.-№ :
Modello: Tüübid: Art. : Toote nr :
Tipo: Tipas: Art. Nº: Gaminio Nr.:
Tipo: Tipi: Art. Nº: Art.-Nr.:
Typ : Nr art.:
EasyCut 400 8846
EasyCut 480 8846-40
ComfortCut 450 8847
PowerCut 500 8848
EU-Richtlinien: EU szabvбnyok:
EU directives: Smмrnice EU:
Directives européennes : Smernice EU:
EU-richtlijnen: Προδιαγραφς ΕΚ:
EU direktiv: Smernice EU:
EU Retningslinier : Directive UE:
EY-direktiivit: EС-директиви:
Direttive UE: ELi direktiivid :
Normativa UE: ES direktyvos:
Directrizes da UE : ES-direktīvas :
Dyrektywy UE:
Harmonisierte EN :
Hinterlegte Dokumentation: GARDENA Technische Dokumentation
E. Renn 89079 Ulm
Deposited Documentation: GARDENA Technical Documentation
E. Renn 89079 Ulm
Documentation déposée : Documentation technique GARDENA
E. Renn 89079 Ulm
Konformitätsbewertungsverfahren: Nach 2000 /14/ EG Art.14 Anhang V
Conformity Assessment Procedure: according to 2000/ 14/ EC
Art. 14 Annex V
Procédure d’évaluation de la Selon 2000 /14 /CE art. 14 Annexe V
conformité :
2006/42/EC
2006/95 / EC
2004/108 / EC
2000/ 14 /EC
93/ 68 /EC
EN ISO 12100-1
EN ISO 12100-2
EN 786
EN 60335-1
EN 60335- 2-91
ISO 4871
Anbringungsjahr der
CE-Kennzeichnung:
Year of CE marking :
Date d’apposition du
marquage CE :
Installatiejaar van de
CE-aanduiding:
CE-Märkningsår :
CE-Mærkningsår :
CE-merkin kiinnitysvuosi:
Anno di rilascio della
certificazione CE :
Colocación del distintivo CE:
Ano de marcação pela CE:
Rok nadania znaku CE:
CE bejegyzйs kelte:
Rok pшidмlenн znaиky CE:
Rok pridelenia oznaиenia CE:
τος πιστοποιητικο
ποιτητας CE:
Leto namestitve oznake CE:
Anul de marcare CE:
Година на поставяне на
CE-маркировка:
CE-märgistuse paigaldamise
aasta:
CE- marķējuma uzlikšanas gads:
Metai, kuriais paženklinta
CE-ženklu:
Page 14

258
Deutschland /Germany
GARDENA GmbH
Central Service
Hans-Lorenser-Straße 40
D-89079 Ulm
Produktfragen:
(+49) 731 490 - 123
Reparaturen:
(+49) 731 490 - 290
service
@gardena.com
Albania
COBALT Sh.p.k.
Rr. Siri Kodra
1000 Tirana
Argentina
Husqvarna Argentina S.A.
Av.del Libertador 5954
Piso 11 -Torre B
(C1428ARP) Buenos Aires
Phone: (+54) 11 5194 5000
info.gardena
@
ar.husqvarna.com
Armenia
Garden Land Ltd.
61 Tigran Mets
0005 Yerevan
Australia
Husqvarna Australia Pty. Ltd.
Locked Bag 5
Central Coast BC
NSW 2252
Phone: (+61) (0) 2 4352 7400
customer.service
@
husqvarna.com.au
Austria /Österreich
Husqvarna Austria GmbH
Consumer Products
Industriezeile 36
4010 Linz
Tel. : (+43) 732 77 01 01- 90
consumer.service
@
husqvarna.at
Azerbaijan
Firm Progress
a. Aliyev Str. 26A
1052 Baku
Belgium
GARDENA Belgium NV/SA
Sterrebeekstraat 163
1930 Zaventem
Phone: (+32) 2 7 209212
Mail: info
@gardena.be
Bosnia / Herzegovina
SILK TRADE d.o.o.
Industrijska zona Bukva bb
74260 Tešanj
Brazil
Husqvarna do Brasil Ltda
Av. Francisco Matarazzo,
1400 – 19º andar
São Paulo
-
SP
CEP: 05001-903
Tel: 0800-112252
marketing.br.husqvarna
@
husqvarna.com.br
Bulgaria
Хускварна България ЕООД
Бул. „Андрей Ляпчев” Nº 72
1799 София
Тел.: (+ 359)02/9753076
www.husqvarna.bg
Canada /USA
GARDENA Canada Ltd.
100 Summerlea Road
Brampton, Ontario L6T 4X3
Phone: (+1) 905 792 93 30
info
@gardenacanada.com
Chile
Maquinarias Agroforestales
Ltda. (Maga Ltda.)
Santiago, Chile
Avda. Chesterton
# 8355 comuna Las Condes
Phone: (+56) 2 202 4417
Dalton
@maga.cl
Zipcode: 7560330
Temuco, Chile
Avda. Valparaíso # 01466
Phone: (+56) 45 222 126
Zipcode: 4780441
China
Husqvarna (China) Machinery
Manufacturing Co., Ltd.
No. 1355, Jia Xin Rd.,
Ma Lu Zhen, Jia Ding Dist.,
Shanghai
201801
Phone: (+86) 21 59159629
Domestic Sales
www.gardena.com.cn
Colombia
Husqvarna Colombia S.A.
Calle 18 No. 68 D-31, zona
Industrial de Montevideo
Bogotá, Cundinamarca
Tel. 571 2922700 ext. 105
jairo.salazar
@
husqvarna.com.co
Costa Rica
Compania Exim
Euroiberoamericana S.A.
Los Colegios, Moravia,
200 metros al Sur del Colegio
Saint Francis - San José
Phone: (+506) 297 68 83
exim_euro
@racsa.co.cr
Croatia
SILK ADRIA d.o.o.
Josipa Lončara 3
10090 Zagreb
Phone: (+385) 1 3794 580
silk.adria
@zg.t-com.hr
Cyprus
Med Marketing
17 Digeni Akrita Ave
P.O. Box 27017
1641 Nicosia
Czech Republic
Husqvarna Česko s.r.o.
Türkova 2319/5 b
149 00 Praha 4 – Chodov
Bezplatná infolinka:
800 100425
servis
@cz.husqvarna.com
Denmark
GARDENA / Husqvarna
Consumer Outdoor Products
Salgsafdelning Danmark
Box 9003
S-200 39 Malmö
info
@gardena.dk
Dominican Republic
BOSQUESA, S.R.L
Carretera Santiago Licey
Km. 5 ½
Esquina Copal II.
Santiago, Dominican Republic
Phone: (+809) 736- 0333
joserbosquesa
@claro.net.do
Ecuador
Husqvarna Ecuador S.A.
Arupos E1-181 y 10 de Agosto
Quito, Pichincha
Tel. (+593) 22800739
francisco.jacome
@
husqvarna.com.ec
Estonia
Husqvarna Eesti OÜ
Consumer Outdoor Products
Kesk tee 10, Aaviku küla
Rae vald
Harju maakond
75305 Estonia
kontakt.etj
@husqvarna.ee
Finland
Oy Husqvarna Ab
Consumer Outdoor Products
Lautatarhankatu 8 B / PL 3
00581 HELSINKI
info
@gardena.fi
France
GARDENA France
Immeuble Exposial
9-11 allée des Pierres Mayettes
ZAC des Barbanniers, B.P. 99
-F- 92232 GENNEVILLIERS
cedex
Tél. (+33) 01 4085 3040
service.consommateurs
@
gardena.fr
Georgia
ALD Group
Beliashvili 8
1159 Tleilisi
Great Britain
Husqvarna UK Ltd
Preston Road
Aycliffe Industrial Park
Newton Aycliffe
County Durham
DL5 6UP
info.gardena@
husqvarna.co.uk
Greece
HUSQVARNA ΕΛΛΑΣ Α.Ε.Β.Ε.
Υπ / μα Ηφαίστου 33Α
Βι. Πε. Κορωπίου
194 00 Κορωπί Αττικής
V.A.T. EL094094640
Phone: (+30) 210 66 20 225
info@husqvarna-consumer.gr
Hungary
Husqvarna Magyarország Kft.
Ezred u. 1- 3
1044 Budapest
Telefon: (+ 36) 1 251-4161
vevoszolgalat.husqvarna@
husqvarna.hu
Iceland
Ó. Johnson & Kaaber
Tunguhalsi 1
110 Reykjavik
ooj@ojk.is
Ireland
Husqvarna UK Ltd
Preston Road
Aycliffe Industrial Park
Newton Aycliffe
County Durham
DL5 6UP
info.gardena@
husqvarna.co.uk
Italy
Husqvarna Italia S.p.A.
Via Como 72
23868 VALMADRERA (LC)
Phone: (+39) 0341.203.111
info@gardenaitalia.it
Japan
KAKUICHI Co. Ltd.
Sumitomo Realty &
Development Kojimachi
BLDG., 8F
5-1 Nibanncyo
Chiyoda-ku
Tokyo 102-0084
Phone: (+81) 33 264 4721
m_ishihara@kaku-ichi.co.jp
Kazakhstan
LAMED Ltd.
155/1, Tazhibayevoi Str.
050060 Almaty
IP Schmidt
Abayavenue 3B
110 005 Kostanay
Kyrgyzstan
Alye Maki
av. Moladaya Guardir J 3
720014
Bishkek
Latvia
Husqvarna Latvija
Consumer Outdoor Products
Bakužu iela 6
LV-1024 Riga
info@husqvarna.lv
Lithuania
UAB Husqvarna Lietuva
Consumer Outdoor Products
Ateities pl. 77C
LT-52104 Kaunas
centras@husqvarna.lt
Luxembourg
Magasins Jules Neuberg
39, rue Jacques Stas
Luxembourg-Gasperich 2549
Case Postale No. 12
Luxembourg 2010
Phone: (+352) 40 14 01
api@neuberg.lu
Mexico
AFOSA
Av. Lopez Mateos Sur # 5019
Col. La Calma 45070
Zapopan, Jalisco
Mexico
Phone: (+52) 33 3818-3434
icornejo
@afosa.com.mx
Moldova
Convel S.R.L.
290A Muncesti Str.
2002 Chisinau
Netherlands
GARDENA Nederland B.V.
Postbus 50176
1305 AD ALMERE
Phone: (+31) 36 521 0000
info@gardena.nl
Neth. Antilles
Jonka Enterprises N.V.
Sta. Rosa Weg 196
P.O. Box 8200
Curaçao
Phone: (+599) 9 767 6655
pgm@jonka.com
New Zealand
Husqvarna New Zealand Ltd.
PO Box 76-437
Manukau City 2241
Phone: (+64) (0) 9 9202410
support.nz@husqvarna.co.nz
Norway
GARDENA
Husqvarna Consumer
Outdoor Products
Salgskontor Norge
Kleverveien 6
1540 Vestby
info@gardena.no
Peru
Husqvarna Perú S.A.
Jr. Ramón Cárcamo 710
Lima 1
Te l : (+ 51) 1 3320400 ext.416
juan.remuzgo@
husqvarna.com
Poland
Husqvarna
Poland Spółka zo.o.
ul. Wysockiego 15 b
03-371 Warszawa
Phone: (+ 48) 22 33096 00
gardena@gardena.pl
Portugal
Husqvarna Portugal, SA
Lagoa - Albarraque
2635 - 595 Rio de Mouro
Tel.: (+351) 21 922 85 30
Fax : (+ 351) 21 922 85 36
info@gardena.pt
Romania
Madex International Srl
Soseaua Odaii 117-123,
RO 013603
Bucureєti, S1
Phone: (+ 40) 21 352.76.03
madex@ines.ro
Russia
ООО „Хускварна“
141400, Московская обл.,
г. Химки,
улица Ленинградская,
владение 39, стр.6
Бизнес Центр
„Химки Бизнес Парк“,
помещение ОВ02_04
Serbia
Domel d.o.o.
Autoput za Novi Sad bb
11273 Belgrade
Phone: (+381) 118488812
miroslav.jejina@domel.rs
Singapore
Hy- Ray PRIVATE LIMITED
40 Jalan Pemimpin
#02-08 Tat Ann Building
Singapore 577185
Phone: (+65) 6253 2277
shiying
@hyray.com.sg
Slovak Republic
Husqvarna Česko s.r.o.
Türkova 2319/5 b
149 00 Praha 4 – Chodov
Bezplatná infolinka:
800 154044
servis
@sk.husqvarna.com
Slovenia
Husqvarna Austria GmbH
Consumer Products
Industriezeile 36
4010 Linz
Tel. : (+43) 732 77 01 01- 90
consumer.service@
husqvarna.at
South Africa
Husqvarna
South Africa (Pty) Ltd
Postnet Suite 250
Private Bag X6,
Cascades, 3202
South Africa
Phone: (+27) 33 846 9700
info@gardena.co.za
Spain
Husqvarna España S.A.
C/ Basauri, nº 6
La Florida
28023 Madrid
Phone: (+34) 91 708 0500
atencioncliente@gardena.es
Suriname
Agrofix n.v.
Verlengde Hogestraat #22
Phone: (+597) 472426
agrofix@sr.net
Pobox : 2006
Paramaribo
Suriname-South America
Sweden
Husqvarna AB
S-561 82 Huskvarna
info@gardena.se
Switzerland /Schweiz
Husqvarna Schweiz AG
Consumer Products
Industriestrasse 10
5506 Mägenwil
Phone: (+41) (0) 848 800464
info@gardena.ch
Turkey
GARDENA Dost Diþ Ticaret
Mümessillik A.Þ.
Sanayi Çad. Adil Sokak
No: 1/ B Kartal
34873 Istanbul
Phone: (+90) 216 38 93939
info@gardena-dost.com.tr
Ukraine / Україна
ТОВ «Хусварна Україна»
вул. Васильківська, 34,
офіс 204-г
03022, Київ
Тел. (+38) 044 498 39 02
info@gardena.ua
Uruguay
FELI SA
Entre Ríos 1083 CP 11800
Montevideo - Uruguay
Tel : (+598) 2203 18 44
info@felisa.com.uy
Venezuela
C
orporación Casa y Jardín C.A.
Av. Caroní, Edif. Trezmen, PB.
Colinas de Bello Monte.
1050 Caracas.
Tlf: (+58) 212 992 33 22
info@casayjardin.net.ve
8846-20.960.05 / 1211
©
GARDENA
Manufacturing GmbH
D-89070 Ulm
http: //www.gardena.com
 Loading...