

Page 1
GARDENA
®
D Gebrauchsanweisung
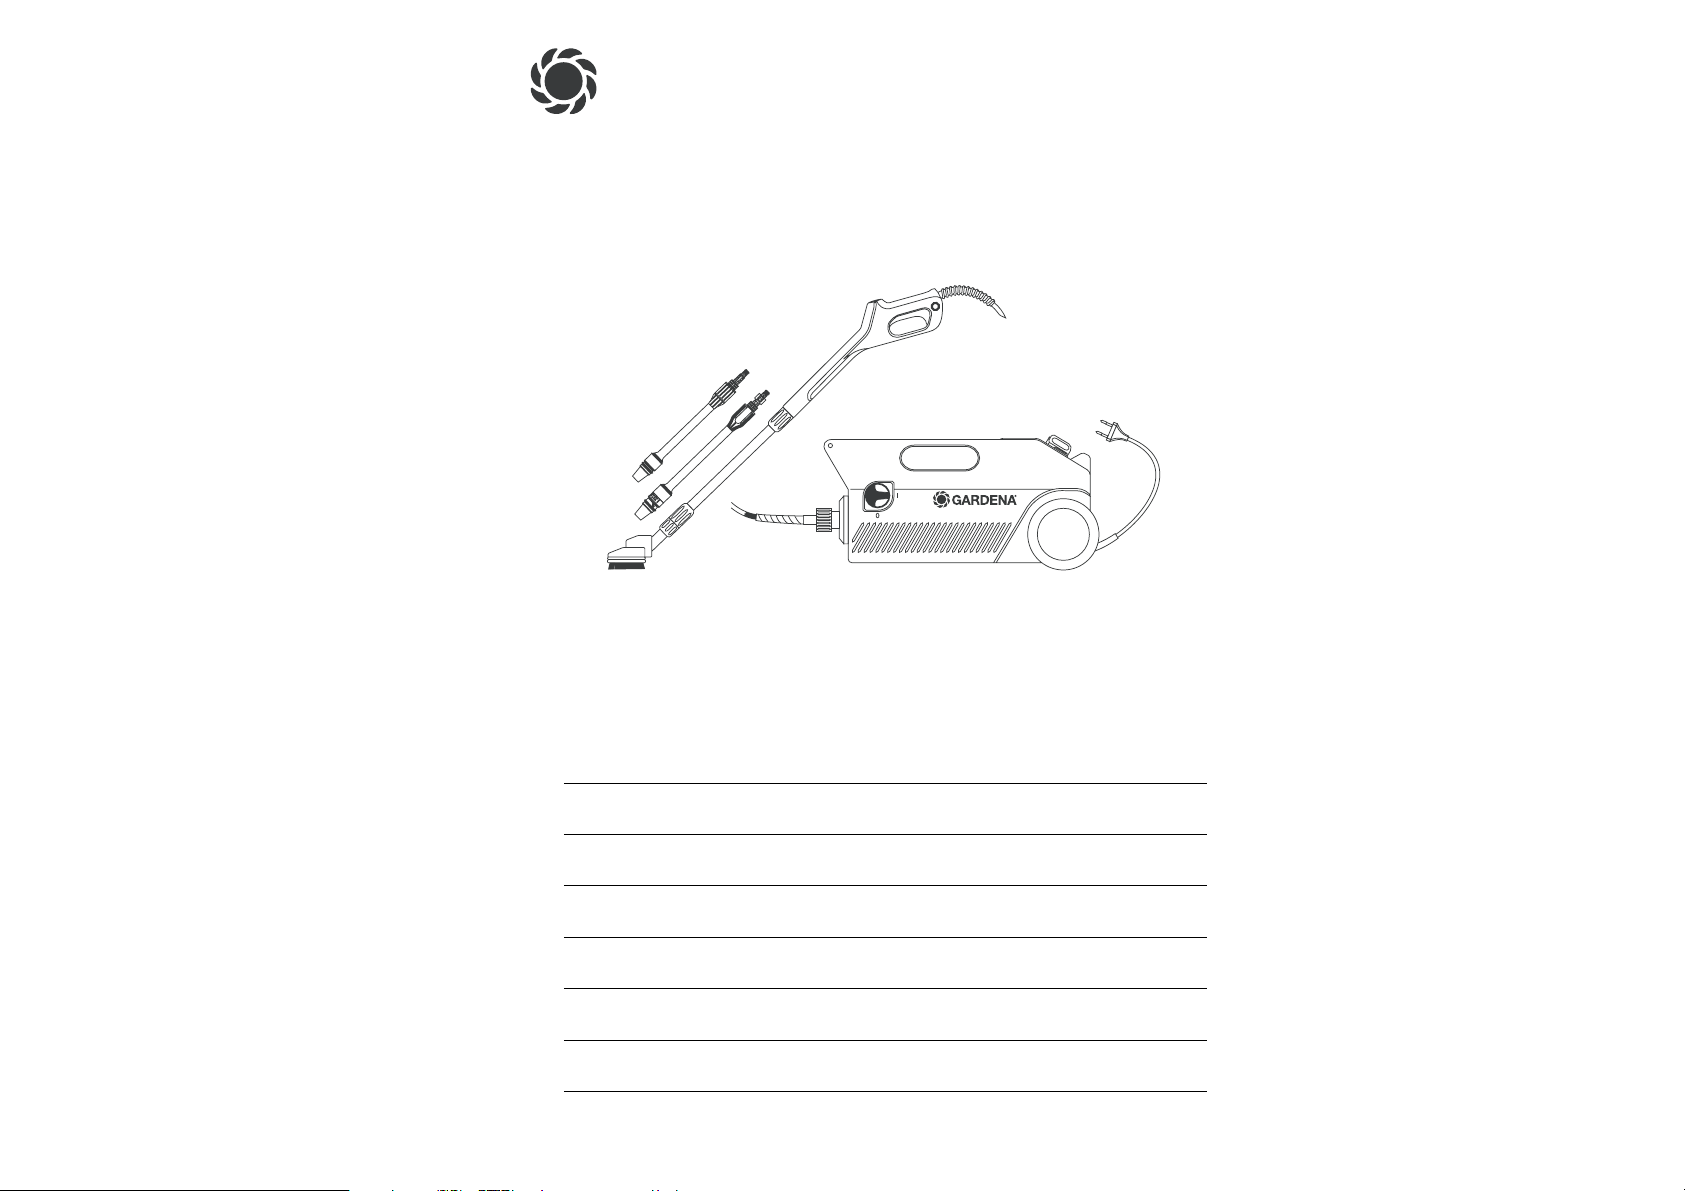
Powerschrubber
GB Operating Instructions
Power Scrubbing Brush
F Mode d’emploi
Nettoyeur- Brosseur haute pression
NL Gebruiksaanwijzing
Powerschrobber
S Bruksanvisning
Elektrisk Skurmaskin
I Istruzioni per l’uso
Idropulitrice con Rotocleaner
E Manual de instrucciones
Cepillo desincrustante
P Instruções de utilização
Escova Rotativa
Art. 5700
Page 2
D
Bitte lesen Sie diese Gebrauchsanweisung vor Montage und
Inbetriebnahme Ihres Gerätes
sorgfältig.
Beim Lesen der Gebrauchsanweisung bitte die Umschlagseiten herausklappen.
Inhaltsverzeichnis Seite
1. Technische Daten 7
2. Hinweise zur
Gebrauchsanweisung 7
3. Ordnungsgemäßer Gebrauch 7
4. Funktion des Gerätes 8
5. Montage des Powerschrubbers 8
6. Inbetriebnahme 9
7. Störungen 10
8. Wartung, Pflege und
Aufbewahrung 11
9. Hinweise zur ordnungsgemäßen
Benutzung, Sicherheitshinweise 11
Garantie 63
G
Please read these operating
instructions carefully before assembling and using your Power
Scrubbing Brush.
Unfold inside cover pages to read
the operating instructions.
Contents Page
1. Technical data 14
2. Notes on operating instructions 14
3. Proper use 14
4. Function of the unit 15
5. Assembly of the Power
Scrubbing Brush 15
6. Putting into operation 16
7. Trouble-shooting 17
8. Maintenance, care and storage 18
9. Notes on proper use and safety 18
Guarantee 63
F
Nous vous remercions de bien
vouloir lire attentivement ce mode
d’emploi avant le montage et l’utilisation de votre nettoyeur-brosseur
haute pression.
Dépliez le 2ème volet de la couverture pour avoir les illustrations
sous les yeux pendant la lecture
du mode d’emploi.
Contenu Page
1. Caractéristiques techniques 21
2. Informations sur le mode
d’emploi 21
3. Domaine d’utilisation 21
4. Descriptif 22
5. Montage 22
6. Utilisation 23
7. Incidents de fonctionnement 24
8. Entretien et rangement 25
9. Conseils de sécurité et
précautions d’emploi 25
Garantie 63
N
Lees deze gebruiksaanwijzing voor
montage en ingebruikname van
het apparaat zorgvuldig door.
Bij het lezen van de gebruiksaanwijzing de bladzijden met de afbeeldingen openslaan.
Inhoudsopgave Pagina
1. Technische gegevens 28
2. Aanwijzingen bij de gebruiksaanwijzing 28
3. Juist gebruik 28
4. Functie van het apparaat 29
5. Montage van de Powerschrobber 29
6. Ingebruikname 30
7. Storingen 31
8. Onderhoud en opslag 32
9. Aanwijzingen voor een juist gebruik, veiligheidsaanwijzingen 32
Garantie 63
S
Läs omsorgsfullt igenom bruksanvisningen och säkerhetsföreskrifterna innan Du tar Elektrisk
Skurmaskin i bruk.
Ha omslaget utvikt när Du läser
bruksanvisningen.
Innehåll Sida
1. Tekniska data 35
2. Anvisningar till bruksanvisningen 35
3. Rätt användning 35
4. Maskinens funktion 36
5. Montering av Elektrisk
Skurmaskin 36
6. Start 37
7. Störningar 38
8. Underhåll, skötsel och förvaring 38
9. Anvisningar för riktigt användning, säkerhetsanvisningar 39
Garanti 64
I
Prima di montare e mettere in uso
l’attrezzo, leggere attentamente le
istruzioni tenendo aperto il pieghevole per avere sott’occhio i disegni
esplicativi.
Indice Pagina
1. Dati tecnici 42
2. Avvertenze 42
3. Uso corretto 42
4. Modalità funzionali 43
5. Montaggio 43
6. Messa in uso 44
7. Anomalie di funzionamento 45
8. Manutenzione 46
9. Norme d’uso e di sicurezza 46
Garanzia 64
E
Antes del montaje y de la puesta
en marcha del aparato, aconsejamos una atenta lectura del presente
manual de instrucciones.
Para facilitar la lectura, desdoble
la cubierta.
Índice Página
1. Datos técnicos 49
2. Indicaciones al manual
de instrucciones 49
3. Uso correcto 49
4. Función del aparato 50
5. Montaje del cepillo
desincrustante 50
6. Puesta en servicio 51
7. Perturbaciones 52
8. Mantenimiento, cuidados y
almacenamiento 53
9. Indicaciones para el uso
adecuado / indicaciones de
seguridad 53
Garantía 64
P
Por favor leia atentamente estas
instruções de utilização antes
de montar e utilizar esta Escova
Rotativa.
Desdobre as páginas na capa
interior para ler as instruções de
utilização.
Conteúdo Página
1. Dados técnicos 56
2. Observações sobre as
Instruções de utilização 56
3. Utilização correcta 56
4. Função do aparelho 57
5. Montagem da Escova Rotativa 57
6. Colocação em funcionamento 58
7. Falhas 59
8. Manutenção, conservação
e armazenamento 60
9. Considerações sobre o uso
correcto do aparelho, regras
de segurança 60
Garantia 64
Page 3
Page 4
6
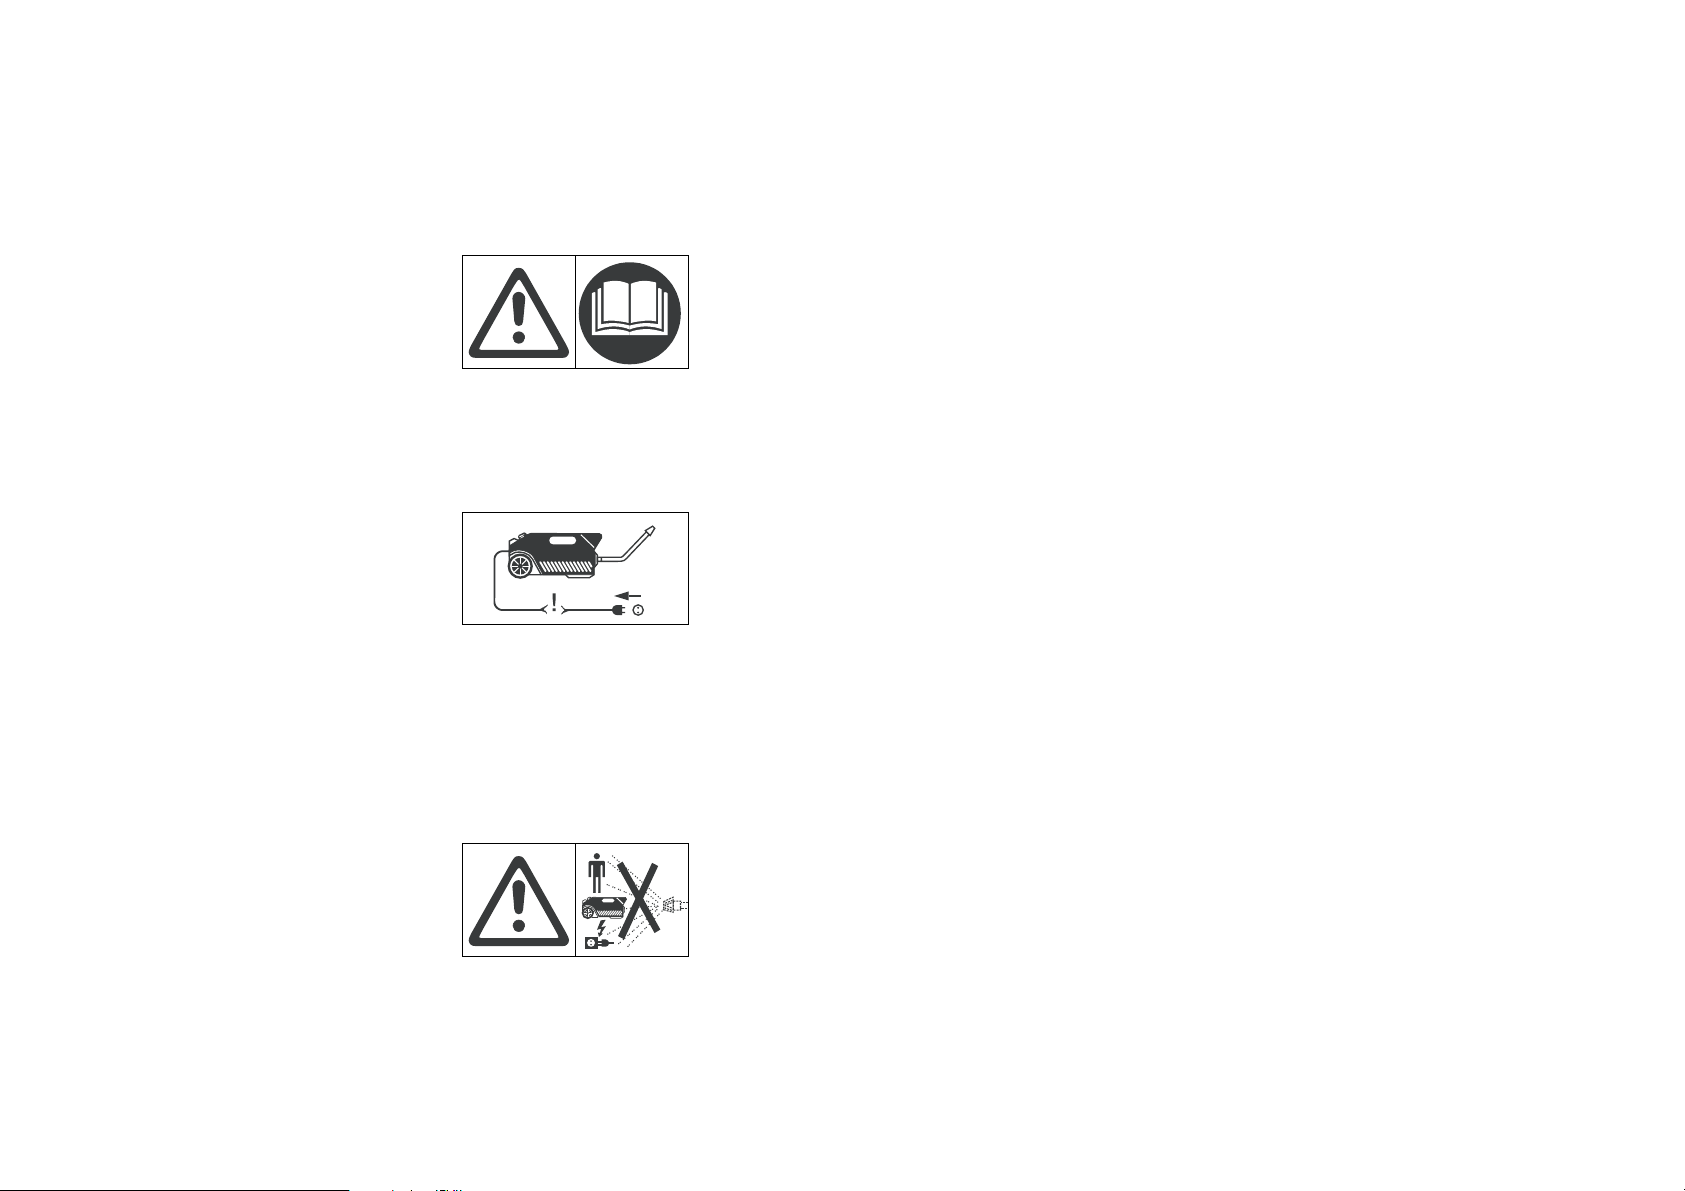
Beachten Sie die Sicherheitshinweise auf dem Gerät:
Please comply with the following safety instructions on the casing:
Veuillez observer les instructions de sécurité figurant sur l’appareil :
Houdt u zich aan de veiligheidsvoorschriften op het apparaat:
Följ följande säkerhetsanvisningar:
Attenzione ai simboli di sicurezza riportati sull’attrezzo:
Observen las indicaciones de seguridad en el aparato:
Por favor siga atentamente as instruções de segurança fornecidas no aparelho:
Achtung! Vor Inbetriebnahme
Gebrauchsanweisung lesen!
Warning! Read instruction
handbook!
Merci de lire attentivement le
mode d’emploi avant d’utiliser
cet appareil !
Let op! Voor ingebruikname
de gebruiksaanwijzing lezen!
Observera! Läs bruksanvisningen innan start!
Bei Beschädigung oder Durchschneiden der Anschlussleitung sofort Netzstecker
ziehen!
If cable is damaged disconnect
the plug from the mains before
examining!
Retirez immédiatement la
fiche de la prise de courant
si le câble électrique a été
endommagé !
Als het aansluitsnoer beschadigd of doorgesneden
is direct de stekker uit het
stopcontact trekken!
Niemals Wasserstrahl auf
Menschen, Tiere, das Gerät
oder elektrische Teile richten!
Never direct the water jet at
persons, animals, the equipment or electrical components!
Ne dirigez jamais le jet d’eau
vers des êtres humains, des
animaux, l’appareil ou des
éléments électriques !
Nooit de waterstraal op
mensen, dieren, op het
apparaat of op elektrische
onderdelen richten!
Attenzione! Prima di mettere
in funzione l’attrezzo, leggere
attentamente le istruzioni per
l’uso!
¡Atención! Leer las instrucciones de servicio antes de
la puesta en marcha.
Atenção! Leia as instruções
de utilização antes de utilizar
o aparelho!
Dra omedelbart ur stickkontakten vid skador på sladden
eller när den är avskuren!
Qualora il cavo di alimentazione venga danneggiato o reciso,
staccare subito la spina dalla
presa di corrente!
En caso de daños o corte del
cable de conexión desenchufar
enseguida el enchufe de la
red.
Em caso de danos ou corte
do cabo de ligação, puxe imediatamente a ficha da tomada!
Rikta aldrig vattenstrålen
på människor, djur, maskiner
eller elektriska delar!
Non dirigere mai il getto d’acqua verso persone, animali,
attrezzi e apparecchi elettrici
o contro la stessa idropulitrice!
No dirigir nunca el chorro de
agua sobre personas, animales,
el aparato o partes eléctricas.
Nunca aponte o jacto de água
para pessoas, animais, aparelhos ou componentes eléctricos!
Page 5

1514
GG
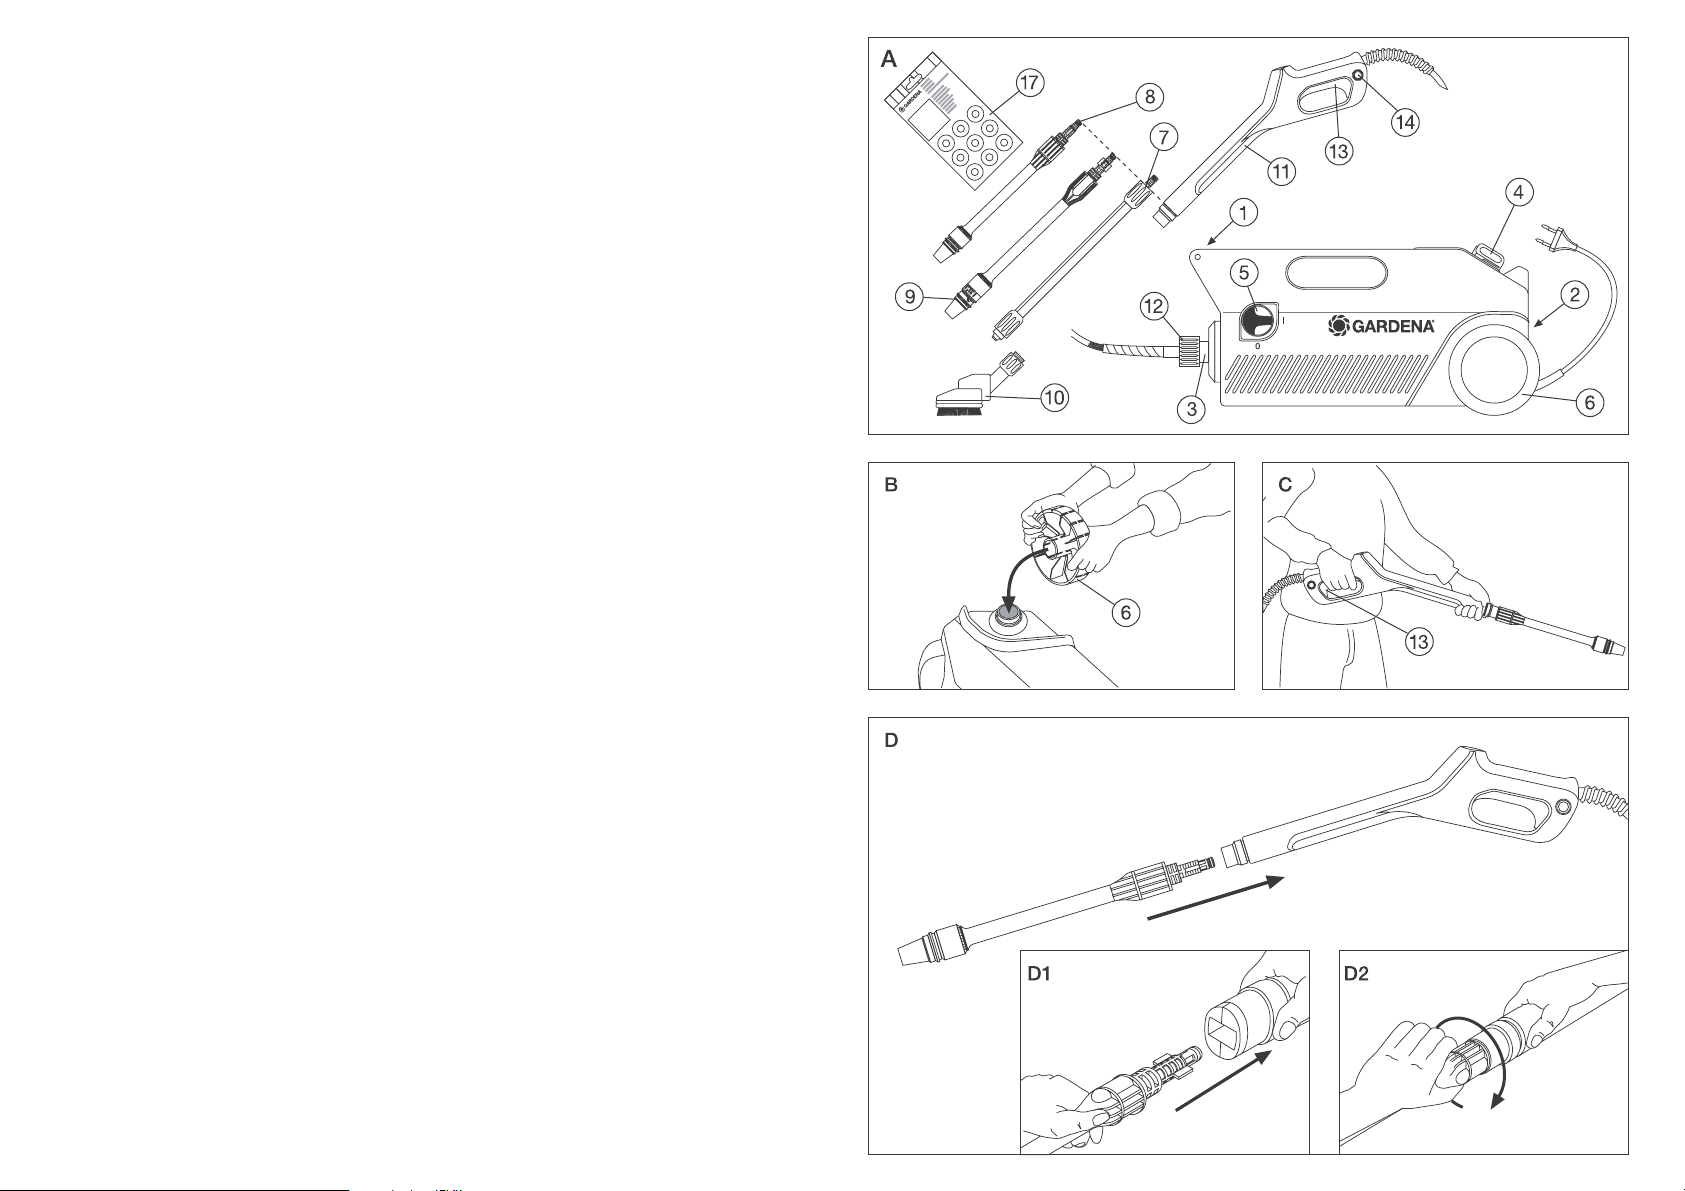
5.1 Mounting the runner
wheels (fig. B)
The runner wheels are included
in the package and have to be
mounted as follows:
1. Insert the wheel axle pin
in the hole as illustrated.
2. Press the wheel into the hole
until it audibly snaps into
position.
3. Check that the wheel is freewheeling (mounted correctly).
5.2 Preparation before putting
into operation
Rotary and Vario nozzle as-
sembly and water connection
1. Select the nozzle required
for the work to be performed,
refer also to section 4.3.
2. Insert the nozzle firmly into
the high-pressure gun
!
until
it meets resistance (fig. D1).
3. Apply more pressure to insert
the nozzle into the bayonet
lock and turn clockwise until it
snaps into position (fig. D 2).
4. Connect the water inlet hose
onto the tap connector of the
Power Scrubbing Brush (fig. E).
The hose connector must
audibly snap into position.
Impor
tant: The Power Scrub-
bing Brush is fitted with an original GARDENA-System Tap
Connector. When using a 1/2
””
hose (∅ 13 mm), this must
be fitted with a GARDENA
Water Stop, Art. No. 913 or
the GARDENA Water Stop
plus, Art. No. 2013, for attaching to the Tap Connector.
A GARDENA Water Stop
(eg: Art. No. 914/2014/2814)
is needed when using a 3/4
””
hose (∅ 19 mm).
5. Connect the end of the hose
to the water supply (e.g. water
tap). We recommend fitting
the other end of the 13 mm
hose with the GARDENA Hose
Connector, Art. No. 915 or
2015 or 2915. Alternatively,
for the 19 mm hose with a
GARDENA Hose Connector,
Art. No. 916 or 2016 and fitting
the shut-off fixture (tap) with
a matching GARDENA Tap
Connector (eg: Art. No. 900/
901/902).
6. Attach the union nut
B
on
the end of the high-pressure
gun hose to the high-pressure
connection fitting
3
and
screw up tightly
B
(fig. F).
Assembling the power
scrubbing brush (fig. A/F/G)
Please have the high-pressure
gun
!
, the extension pipe for
the power scrubbing brush
7
and the power scrubbing brush
0
at hand in order to assemble the
power scrubbing brush (fig. A).
1. If not already mounted, attach
the high-pressure hose to the
high-pressure connection fitting
3
and screw up the connection tightly with the union nut
(fig. F).
2. Insert the extension pipe
7
with the bayonet into the bayonet connection for the highpressure gun and screw up
the connection tightly with
the union nut (fig. G1).
3. Insert the other end of the extension pipe
7
with the guiding
grooves into the connection
for the power scrubbing brush
(fig. G 2) and screw the connection together using the
union nut (fig. G 3).
5. Assembly of the Power Scrubbing Brush (fig. A / B/D-G)
4.1 Functional components
(fig. A/F/ E)
1
Carrying handle
2
GARDENA Tap connector
3
Connection for high-pressure
hose
4
Adjusting knob for the
dispensing unit
5
ON/OFF switch
6
Runner wheels
4.2 Items supplied (fig. A)
The following accessories
are supplied with the Power
Scrubbing Brush:
7
Extension pipe for Power
Scrubbing Brush
8
High-pressure Rotary nozzle
9
High-pressure Vario nozzle
0
Power scrubbing brush
!
High-pressure gun
G
Universal cleaning rings
4.3 Function of the product
.High-pressure Rotary nozzle
(dirt remover)
For loosening persistent dirt.
.High-pressure Vario nozzle
– Hard jet for spot cleaning
– Cleaning of sensitive sur-
faces (fan jet setting), or
washing away dirt (hard jet).
.Power scrubbing brush
Powerful, splash-free surface
cleaning by two counterrotating brushes.
.Integrated dispensing unit
Dispensing of the GARDENA
cleaning rings (Shampoo
Art. No. 1680, Universal
Cleaner Art. No. 1684,
Glass Cleaner Art. No. 5730,
Polish Art.-No 1682).
The amount of cleaner added
to the water is constantly adjustable.
4. Function of the unit
Power connection
Mains voltage 230 V
a
Frequency 50-60 Hz
Fuse rating required 10 A
Protection class II
Water connection
Max. admission temperature 40 °C
Feed pressure min. 2 bar, max. 12 bar
Weight (without accessories ) 5 kg
Output data
Delivery capacity 6 l/min
Nominal pressure 85 bar
Max. pressure 100 bar
Max. power consumption 1600 W
Recoil power of the high-pressure
gun at working pressure 13 N
Working area related emission
characteristic value L
pA
1)
78 dB (A)
Noise level L
WA
2)
94 dB (A)
Hand-arm vibrations
Measuring method according to
on the high-pressure pistol a
vhw
1)
< 2.5 ms
-2
1) DIN 45635 2) directive 2000/ 14/EC
GARDENA Power Scrubbing Brush
1. Technical data
Please read these operating instructions carefully and observe
the notes given.
Use the instructions to familiarise
yourself with the operating controls, their correct use and the
notes on safety.
A
For safety reasons, child-
ren under 16 as well as
persons not familiar with these
operating instructions should
not use this Power Scrubbing
Brush.
Keep these operating instructions in a safe place.
2. Notes on operating instructions
The GARDENA Power Scrubbing
Brush is intended for private use
around the house and garden,
such as the cleaning of patios,
drives, paths, walls and equipment (only with the unit placed
on the intended surfaces and
with the necessary waste disposal facilities).
Tools for private households and
gardens are not designed for use
for public grounds, parks, sports
centres, roads, agriculture or
forestry.
Compliance with the instructions
provided by the manufacturer
is a prerequisite for using the tool
correctly.
The operating instructions also
include the conditions for operation, repair and maintenance.
The GARDENA Power Scrubbing
Brush is not suitable for constant
running operations.
Attention! Because of the
danger of physical injuries,
the Power Scrubbing Brush
and accessories may not be
used for cleaning persons
or animals.
3. Proper use
Page 6

1716
GG
Fault Possible causes Remedy
Motor does not run Check that the voltage given on
when switched on. the nameplate is consistent with
the mains voltage.
Connecting cable damaged. Check the connecting cable
for damage.
Connector plug not plugged Check the connector plugs and
in correctly. cable, have the switch checked by
Intermittence in the power an authorised GARDENA Service
supply. agent.
The Power Scrubbing Brush Mixing unit adjust- Mixing unit ad-
does not build up sufficient ment knob set justment knob
pressure. to position: in position:
Air in the system. Run the pump without the
high-pressure hose until water
exits the high-pressure outlet
without any bubbles.
Then connect the high-pressure
hose again.
Sieve in the water connection Unscrew the tap connector,
blocked. take out the sieve and clean.
Insufficient water admitted. Check the amount of water
being admitted.
Leaks/blockage in the inlet line. Check all inlet lines for blockage
and leaks.
Fluctuations in the working High-pressure nozzle blocked. Clean the high-pressure nozzle
pressure. by removing any dirt in the
nozzle with a needles and flush
out with running water.
Pump draws in air. Check the suction lines for leaks.
Pump leaks. It is usual that the pump leaks Please consult GARDENA
to a small degree. Service if the leak is large.
No cleaning agent dispensed. Dispensing unit incorrectly set. Open the dispensing unit by
setting the switch to the “MIX”
position.
No cleaning rings in the Place cleaning rings in the
dispensing unit. dispensing unit (see 6.3 for this).
7. Trouble-shooting
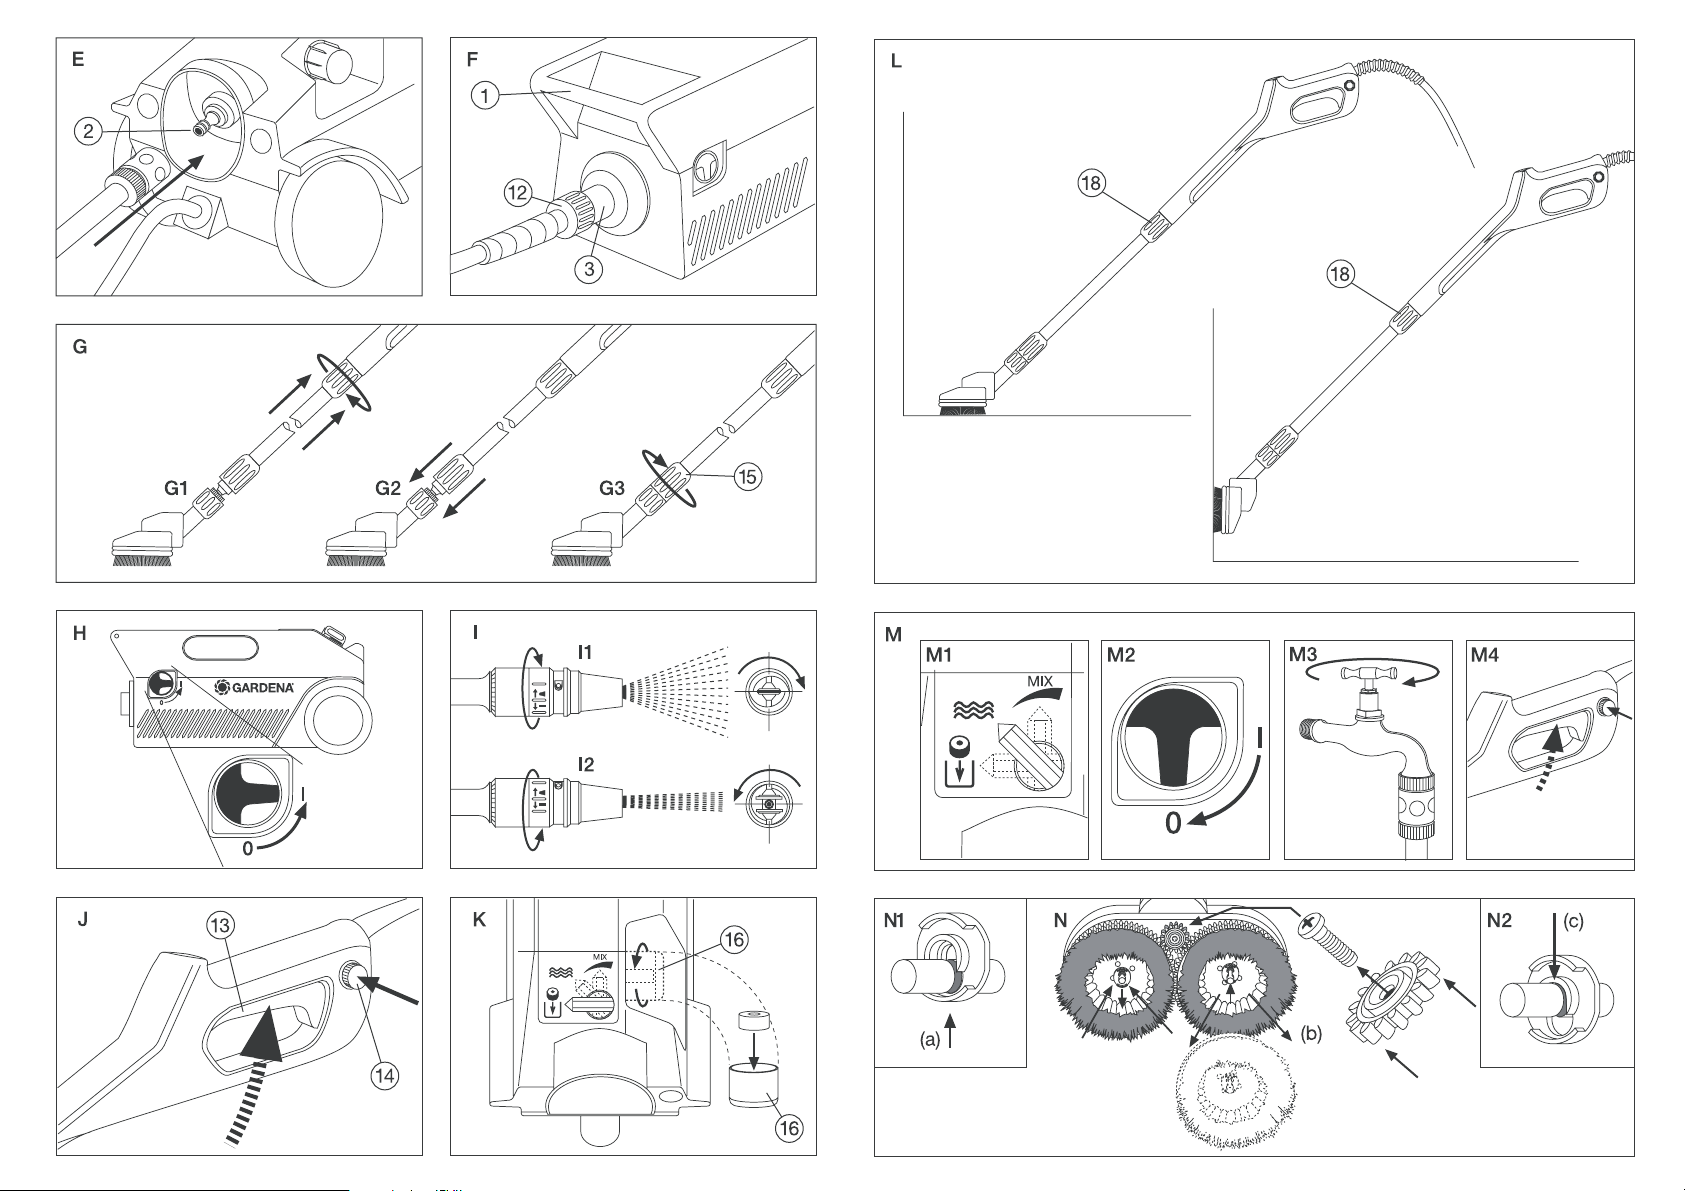
2. Flush the unit for approx.
1 minute with clear water.
3. Turn the tool off (ON/ OFF
switch to position 0, figure M2).
4. Turn off the water supply
(fig. M 3).
5. Actuate the high-pressure gun
using the operating lever
C
until emptied of all water and
is at ambient pressure, and
then press the safety button
$
to lock the gun so as to prevent any accidental opening
(fig. M 4).
6. Unplug the mains connector
plug from the outlet socket.
Attention!
Working with high pressure!
A
For safety reasons, the
motor starts only when
the operating lever
C
for the
gun is pressed down. The
safety knob Dis exclusively
for prevention of unintentional
use, and not to be used to lock
the operating lever
C
during
operation.
6.1 Operation using one of
the nozzles (fig. H / J)
1. Plug the mains connector
into a 230-V a/c socket outlet.
2. Open the water tap.
3. Set the dispensing
unit adjustment knob to
this position:
4. Switch the equipment on:
Turn the ON/OFF switch
to position I (fig. H).
5. Unlock the high-pressure pistol
(press safety knob
D
) and
press the high-pressure pistol
operating lever
C
(fig. J).
6.2 Adjusting the Vario nozzle
(fig. I)
The Vario nozzle can be adjusted
to any position, from a hard jet
to a flat jet of water. Turn the
nozzle to set the jet required, as
indicated by the direction of the
arrow shown in figure I:
Flat jet in the clockwise direction
(fig. I 1)
Hard jet in the anticlockwise
direction (fig. I 2)
Please read section 6.6 on terminating work.
6.3 Working with cleaning
rings
Operating the dispensing unit
(fig. K)
The dispensing unit has 3 main
positions which can be set as
follows:
Delivery condition
from the manufacturer
Water throughput
without the addition
of cleaner.
Position “MIX”
This position will
dispense cleaning
agent.
The concentration of cleaning
agent can be regulated as
required.
Replacing cleaning rings
The cleaning rings
can be replaced
in this position.
Setting the mix ratio (fig. K)
The mixing ratio
cleaner/water can
be adjusted as
required within the range of this
symbol (fig. K). The cleaning rings
can be used with all of the tools
supplied and mixed into the water
at any working pressure. The
mixing pot is transparent so that
the cleaning ring consumption
is visable.
Inserting cleaning rings (fig. K)
The GARDENA Power Scrubbing
Brush is fitted with a dispensing
unit. Cleaning rings can be inserted as follows:
1. Turn the adjusting
knob on the dispensing unit to
this position:
A
The Power Scrubbing
Brush must not be used
in this position! There is a
danger of damaging the unit.
2. Unscrew the dispensing cup
from the dispensing unit.
3. Place cleaning rings in the
dispensing cup.
4. Screw the dispensing cup
back onto the dispensing unit.
5. Turn the adjusting knob
on the dispensing unit to
this position:
6.4 Switching on for working
(fig. C)
Hold the high-pressure gun, preferably with both hands as shown
in figure C. Hold the handle with
the operating lever
C
of the highpressure gun with one hand and
guide the direction of the highpressure gun with the other hand.
6.5 Working with the power
scrubbing brush
The power scrubbing brush is
suitable for cleaning dirty surfaces
such as e.g. tiles, natural stone
slabs, concrete slabs etc. without
the use of water jets. For easier
handling there are 2 working
positions possible (each turnable
180°).
Adjusting the working
positions (fig. L)
To change the working position
proceed as follows:
1. Unscrew the upper nut
H
of
extension handle.
2. Pull the power scrubbing brush
with adaptor out of the bayonet
socket and turn it 180°.
3. Push the bayonet of the power
scrubbing brush back into
the bayonet socket and secure
connection by tightening the
upper nut
H
.
Advantage: The two working
positions allow horizontal and
vertical areas to be easily cleaned
(fig. L).
6.6 Terminating work (fig. M)
Attention! When using cleaning
rings, flush the unit thoroughly
with water after use to rinse
out the residual cleaning agent
as sediment will otherwise cause
interference with subsequent
operations:
1. Set the adjusting knob
of the dispensing unit to
this position:
The dispensing function
is shut off and clear water
is delivered (fig. M 1).
6. Putting into operation
Page 7

1918
A
Checks before
each use
Carry out a check of the equipment and the working fixtures
for their proper condition and
operational safety before using.
Do not put the unit into operation if a po
wer cable or major
parts of the equipment, e.g.
fuses, high-pressure hoses,
high-pressure gun, are damaged. Never disable the safety
devices.
A Water connection
In compliance with DIN 1988,
Part 4/12.88, the Power Scrub-
bing Brush may not be connected directly to the public
drinking water system in Germany. It is permissible however,
for the short-term connection
of a pipe interrupter with moving part (A 2 according to section 4.2.2 of the referenced DIN
standard), which is available
from sanitation retailers if not
already installed internally as
standard.
Short-term connection is understood as the contact between the drinking water supply and the Power Scrubbing
Brush being possible only for
the duration of the connection.
The connection must be under
surveillance by personnel at
all times. This means that the
equipment must be subsequently disconnected from the
drinking water network after
completion of the cleaning
work.
A
Use clear and fresh water
only.
A
If water is to be pumped
from a tank, brook or
stream, we recommend the
using of GARDENA Pump
Preliminary Filter, art. no. 1731,
to avoid damages.
9. Notes on proper use and safety
8.1 Storage
Store the equipment during the
frost period in a location not
endangered by frost, as the formation of ice in a unit not entirely
empty of water can cause damage to the equipment.
8.2 Replacing the rotation
brushes (fig. N)
Proceed as follows to replace the
brushes on the power scrubbing
brush:
1. Unplug the mains connector
of the Power Scrubbing
Brush.
2. Unscrew the power scrubbing brush from the extension
pipe.
3. Loosen both retaining rings
holding the brushes in place
on the axles (fig. N 1/a).
4. Lift off the brushes by removing
in the forward direction (b).
5. Fit the new brushes and secure in position by replacing
the retainer rings over the axle,
as shown in figure N 2 (c).
Important: Check that the
brushes are properly held in
position on the axles.
8. Maintenance, care and storage
GG
If you have any problem with your
Power Scrubbing Brush please
contact our Customer Service or
return the defective unit together
with a short description of the
problem and, if covered under
guarantee, with a copy of the
receipt, directly to one of the
GARDENA Service Centres
listed on the back of this leaflet.
We expressly point out that,
in accordance with the product
liability law, we are not liable
for any damage caused by our
units if it is due to improper
repair or if parts exchanged are
not original GARDENA parts
or parts approved by us, and,
if the repairs were not carried
out by a GARDENA Service
Centre or an authorised specialist. The same applies to
spare parts and accessories.
A Use/ Responsibility
Use the Power Scrubbing
Brush only for the purpose described in these operating
instructions.
Do not use the rotating power
scrubbing brush
0
on sensitive surfaces, for example
car paint or other varnish.
You are responsible for the
safety the area of work.
Pay attention that no other
persons (especially children),
or animals are near to the
area of work.
The Power Scrubbing Brush
may not be operated by children under 16 years of age or
by persons not familiar with
these operating instructions.
The high-pressure hose
should not be driven over, be
buckled, twisted or subject to
any other types of mechanical
stress.
Only original GARDENA HighPressure Hoses may be used.
These hoses are approved
according to the “Directives
for jets of liquid” (DIN VDE
0700-2-79). Fittings and hose
are identified accordingly.
Attention!
High-pressure jets can be
dangerous if not used properly.
The jet of liquid should not
be directed towards persons,
connected electrical equipment or towards the unit
itself.
A
Wear suitable protective
clothing for protection
from parts which splash back
water.
A
Do not point the jet to-
wards yourself or in the
direction of others, for the
purpose of cleaning clothing
or shoes.
A
The equipment must be
set up on firm ground.
A
A minimum safety dis-
tance of 30 cm must be
maintained when cleaning
car wheel rims and type valves
as these can be damaged by
the high-pressure jet. The first
sign of damage can be a discoloration of the tyre. Damaged
car tyres / tyre valves can be
fatally dangerous.
A
Materials containing sub-
stances which constitute
a health hazard (eg. asbestos)
must not be treated.
A
Only GARDENA Cleaning
Rings should be used.
Keep the Cleaning Rings out
of the reach of children. If in
contact with the eyes, rinse
immediately and thoroughly
with water, if swallowed seek
medical advice immediately.
A
High-pressure hoses,
fittings and couplings
are important parts for the
safety of the equipment. Use
only high-pressure hoses, fittings and couplings which are
recommended by GARDENA.
A
Never use the unit for
drawing liquids containing solvents, undiluted acids
or solvents such as petrol,
paint thinners or heating oil.
A Interruptions to work
The equipment must never
be left unattended when the
engine is running.
A
Pay attention to environ-
mental influences
Operation in environments
endangered by explosion is
prohibited.
Do not cover the equipment
or operate in rooms which are
not adequately ventilated.
Familiarise yourself with your
surroundings and pay attention
to possible hazards which
you may not audibly perceive
because of the noise from
the equipment.
The unit is to be used by persons operating the equipment
in accordance with the intended application. Prevailing local
conditions should be taken
into account and when working
with the equipment, attention
should be paid to third parties,
especially children.
A Electrical safety
A
All parts conducting elec-
tricity in the area of work
must be protected from the jet
of water.
The connecting / extension
cables must be inspected at
regular intervals of time for
signs of damage and ageing.
The mains voltage and the
voltage given on the nameplate
must be consistent.
It is recommended that this
equipment is only connected
to a mains supply outlet
socket which is fitted with a
residual-current device having
a residual-current rating
≤ 30 mA.
In Switzerland use of a
residual-current device is
obligatory.
When using an extension cable,
this shall always be unreeled
completely from the drum and
be of adequate cross-section in
accordance with DIN VDE 0620.
Connector plug and couplings
must be of waterproof design
and meet the requirements for
outdoor use. Consult an electrician.
A
Attention! Extension
cables which are not
suitable can be dangerous.
Transport
Always turn the motor off and
secure the equipment properly
before transporting.
Fault Possible causes Remedy
Rattling noise or blockage Objects (e.g. stones) between Remove the brushes according
of brush rotation. brush teeth and pinion (fig. N). to fig. N; then remove the objects
(e.g. stones) and replace the
pinion if worn. The pinion may
be ordered at a GARDENA
Service Centre using the spare
part no. 5700-00.610.31.
Page 8
20
G
The undersigned
GARDENA Kress + Kastner GmbH · Hans-Lorenser-Str. 40 · D- 89079 Ulm
hereby certifies that, when leaving our factory, the unit indicated below is in accordance with the
harmonised EU guidelines, EU standards of safety and product specific standards.
This certificate becomes void if the unit is modified without our approval.
Description of the unit:
Power Scrubbing Brush
Type:
1600
Art. No.:
5700
EU directives:
Machinery Directive 98/37/EC
Electromagnetic Compatibility
89/336/EC
Low Voltage Directive 73/23/ EC
Directive 93/68 / EC
Directive 2000/14/EC
Harmonised European
standards:
EN 292-1
EN 292-2
IEC 335-1/ 2 -79
Noise level:
measured: 94 dB (A)
guaranteed : 95 dB(A)
Year of CE marking:
1997
Ulm, 27.03.2002
Thomas Heinl
Technical dept. Manager
EU Certificate of Conformity
Maintenance
The equipment should be
turned off and the mains connector unplugged before performing maintenance work,
cleaning or replacing any parts.
Repair work may only be performed by GARDENA Service
or by an authorised dealer
who is familiar with the relevant safety regulations.
Accessories
Only original GARDENA ac-
cessories or parts, and spare
parts approved by GARDENA,
may be used.
Page 9

63
D
Garantie
GARDENA gewährt für dieses
Produkt 3 Jahre Garantie (ab
Kaufdatum). Diese Garantieleistung bezieht sich auf alle
wesentlichen Mängel des Gerätes, die nachweislich auf Materialoder Fabrikationsfehler zurückzuführen sind. Sie erfolgt durch
die Ersatzlieferung eines einwandfreien Gerätes oder durch
die kostenlose Reparatur des eingesandten Gerätes nach unserer
Wahl, wenn folgende Voraussetzungen gewährleistet sind:
.Das Gerät wurde sachgemäß
und laut den Empfehlungen
in der Gebrauchsanweisung
behandelt.
.Es wurde weder vom Käufer
noch von einem Dritten versucht, das Gerät zu reparieren.
Die Verschleißteile Borstenkörper
des Powerschrubbers sind von
der Garantie ausgeschlossen.
Diese Hersteller-Garantie berührt
die gegenüber dem Händler/
Verkäufer bestehenden Gewährleistungsansprüche nicht.
Im Reklamationsfall schicken Sie
bitte das defekte Gerät zusammen mit einer Kopie des Kaufbelegs und einer Fehlerbeschreibung frankiert an die auf der
Rückseite angegebene Serviceadresse.
Nach erfolgter Reparatur senden
wir das Gerät frei an Sie zurück.
G
Guarantee
GARDENA guarantees this
product for 2 years (from date of
purchase). This guarantee covers
all serious defects of the unit
that can be proved to be material
or manufacturing faults. Under
warranty we will either replace
the unit or repair it free of charge
if the following conditions apply:
.The unit must have been
handled properly and in keep-
ing with the requirements of
the operating instructions.
.Neither the purchaser or a
non-authorised third party have
attempted to repair the unit.
The brush bodies of the Power
Scrubbing Brush are wearing
parts and are not covered by
the guarantee.
This manufacturer’s guarantee
does not affect the user’s existing warranty claims against the
dealer/seller.
In case of claim, please return
the faulty unit together with a copy
of the receipt and a description
of the fault, with postage paid to
one of the GARDENA Service
Centres listed on the back of
these operating instructions.
F
Garantie
Pour mieux vous servir,
GARDENA accorde pour cet
appareil une garantie contractuelle de 2 ans à compter du
jour de l’achat. Elle est assurée
par le remplacement gratuit des
pièces défectueuses ou de l’appareil. Le choix en étant laissé
à la libre initiative de GARDENA.
En tout état de cause s’applique
la garantie légale couvrant toutes
les conséquences des défauts
ou vices cachés (article 1641 et
suivants du Code Civil).
Pour que ces garanties soient
valables, les conditions suivantes
doivent être remplies :
.L’appareil a été manipulé de
manière adéquate, suivant les
instructions du mode d’emploi.
.Il n’y a eu aucun essai de
réparation, ni par le client, ni
par un tiers.
Les blocs de brosse du nettoyeurbrosseur sont des pièces d’usure
et sont par conséquent exclus
de la garantie.
Une intervention sous garantie
ne prolonge pas la durée initiale
de la garantie contractuelle.
Toutes les revendications dépassant le contenu de ce texte
ne sont pas couvertes par la
garantie, quel que soit le motif
de droit.
Pendant la période de garantie,
le Service Après-Vente et les
Centres SAV agréés effectueront, à titre payant, les réparations nécessaires par suite de
manipulations erronées.
En cas de réclamation, veuillez
envoyer le produit en port payé
avec le bon d’achat et une description du problème, à l’adresse
du Service Après-Vente figurant
au verso.
N
Garantie
GARDENA geeft op dit product
2 jaar garantie (vanaf de aankoopdatum). Deze garantie heeft
betrekking op alle wezenlijke defecten aan het toestel, die aanwijsbaar op materiaal- of fabricagefouten berusten. Garantie
vindt plaats door de levering van
een vervangend apparaat of door
de gratis reparatie van het ingestuurde apparaat, naar onze
keuze, indien aan de volgende
voorwaarden is voldaan:
.Het apparaat werd vakkundig
en volgens de adviezen in de
gebruiksaanwijzing behandeld.
.Noch de koper, noch een
derde persoon heeft getracht
het apparaat te repareren.
De aan slijtage onderhevige
borstellichamen van de powerschrobber vallen niet onder
de garantie.
Deze garantie van de producent
heeft geen betrekking op de ten
aanzien van de handelaar/verkoper bestaande aansprakelijkheid.
In geval van reclamatie het defecte apparaat samen met de
kassabon en een beschrijving
van de storing gefrankeerd op
naar het op de achterzijde aangegeven serviceadres opsturen.
Page 10

Deutschland
GARDENA Kress + Kastner GmbH
GARDENA Service
Hans-Lorenser-Straße 40
D-89079 Ulm
Produktfragen: (07 31) 490- 123
Reparaturen: (0731) 490-290
Argentina
Argensem S.A.
Venezuela 1075
(1618) El Talar - Buenos Aires
Australia
NYLEX Corporation Ltd.
25-29 Nepean Highway
P.O. Box 68
Mentone, Victoria 3194
Austria
GARDENA Österreich Ges. m.b.H.
Stettnerweg 11-15
2100 Korneuburg
Belgium
MARKT (Belgium) NV/SA
Sterrebeekstraat 163
1930 Zaventem
Brazil
M. Cassab
Av. das Nações Unidas, 20.882
Santo Amaro, CEP 04795-000
São Paulo - S.P.
Bulgaria / България
ДЕНЕКС ООД
Бул. ”Г.М.Димитров” 16 ет.4
София 1797
Canada
GARDENA Canada Ltd.
100, Summerlea Road
Brampton, Ontario
Canada L6T 4X3
Chile
Antonio Martinic Y CIA. LTDA.
Gilberto Fuenzalida 185 Loc.
Las Condes - Santiago de Chile
Costa Rica
Compania Exim
Euroiberoamericana S.A.
350 Sur del Automercado
Los Yoses
San Pedro
Cyprus
FARMOKIPIKI LTD
P.O. Box 7098
74, Digeni Akrita Ave.
1641 Nicosia
Czech Republic
GARDENA spol. s.r.o.
Шнpskб 20a, и.p. 1153
62700 Brno
Denmark
GARDENA Danmark A/S
Naverland 8
2600 Glostrup
Finland
Habitec Oy
Martinkyläntie 52
01720 Vantaa
France
GARDENA France
Service Après-Vente
BP 50080
95948 ROISSY CDG Cedex
Great Britain
GARDENA UK Ltd.
27- 28 Brenkley Way
Blezard Business Park
Seaton Burn
Newcastle upon Tyne
NE13 6DS
Greece
Agrokip G. Psomadopoulos & Co.
20, Lykourgou str.
Kallithea - Athens
Hungary
GARDENA Magyarország Kft.
Késmárk utca 22
1158 Budapest
Iceland
Heimilistaeki hf
Saetun 8
P.O. Box 5340
125 Reykjavik
Republic of Ireland
Michael McLoughlin & Sons
Hardware Limited
Long Mile Road
Dublin 12
Italy
GARDENA Italia S.r.l.
Via Donizetti 22
20020 Lainate (Mi)
Japan
KAKUDAI Mfg. Co. Ltd.
1-4- 4, Itachibori Nishi-ku
Osaka 550
Luxembourg
Magasins Jules Neuberg
Grand Rue 30
Case Postale No. 12
Luxembourg 2010
Netherlands
GARDENA Nederland B.V.
Postbus 50176
1305 AD ALMERE
Neth. Antilles
Jonka Enterprises N.V.
Sta. Rosa Weg 196
P.O. Box 8200
Curaçao
New Zealand
NYLEX New Zealand Limited
Private Bag 94001
South Auckland Mail Centre
10 Offenhauser Drive
East Tamaki, Manukau
Norway
GARDENA Norge A/S
Postboks 214
2013 Skjetten
Poland
GARDENA Polska Sp. z o.o.
Szymanów 9 d
05-532 Baniocha
Portugal
MARKT (Portugal), Lda.
Recta da Granja do Marquês
Edif. GARDENA
Algueirão
2725-596 Mem Martins
Russia / Россия
АО АМИДА ТТЦ
ул. Моcфилмовcкая 66
117330 Моcква
Singapore
Variware
Holland Road Shopping Centre
227-A 1st Fl., Unit 29
Holland Avenue
Singapore 1027
Slowenia / Croatia
Silk d.o.o. Trgovina
Brodišče 15
1236 Trzin
South Africa
GARDENA South Africa (Pty.) Ltd.
P.O. Box 11534
Vorna Valley 1686
Spain
ANMI Andreu y Miriam S.A.
Calle Pere IV, 111
08018 Barcelona
Sweden
GARDENA Svenska AB
Box 9003
20039 Malmö
Switzerland
GARDENA Kress + Kastner AG
Bitziberg 1
8184 Bachenbülach
Ukraine / Украина
АОЗТ АЛЬЦЕСТ
ул. Гайдара 50
г. Киев 01033
Turkey
Dost Diþ Ticaret Mümessillik A.Þ.
Yeþilbaðlar Mah. Baþkent
Cad. No. 26
Pendik - Ýstanbul
USA
GARDENA
3085 Shawnee Drive
Winchester, VA 22604
5700-20.960 .06 /0021
GARDENA Kress + Kastner GmbH
Postfach 27 47, D- 89070 Ulm
http: //www.gardena.com
 Loading...