

Page 1
lightline
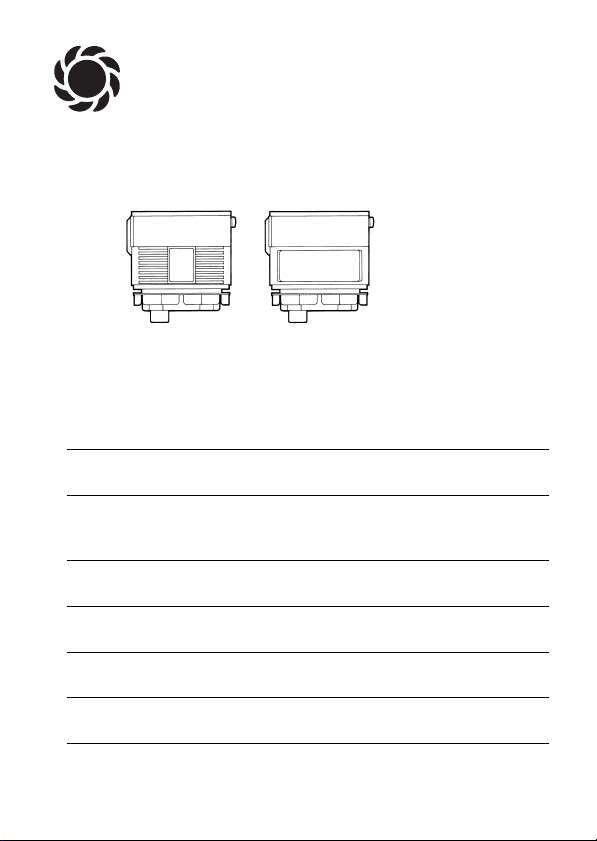
Art. 4233 Art. 4235
D Gebrauchsanweisung
Dämmerungssensor, Bewegungsmelder
GB Operating Instructions
Dusk Sensor with Timer, Motion Detector
F Mode d’emploi
Contacteur crépusculaire programmable, Contacteur
à détection de mouvement programmable
NL Gebruiksaanwijzing
Lichtgevoeligheidssensor, bewegingsmelder
SCAN Bruksanvisning
Skumringssensor, bevegelsessensor
I Istruzioni per l’uso
Crepuscolare, rilevatore di movimento
E Manual de instrucciones
Sensor crepuscular, detector de movimientos
P Instruções de manejo
Sensor de Crepúsculo, Aviso de movimentação
GARDENA
®
Page 2
A B
C
Page 3
D F
1
F
2
E
G
Page 4

4
D
Inhalt Seite
Gebrauchsanweisung 5 - 12
Garantie 65
G
Contents Page
Operating Instructions 13 - 20
Guarantee 65
F
Contenu Page
Mode d’emploi 21 - 28
Garantie 65
N
Inhoud Pagina
Gebruiksaanwijzing 29 - 35
Garantie 66
Z
Innhold Side
Bruksanvisning 36 - 42
Garanti 67
I
Indice Pagina
Istruzioni per l’uso 43 - 49
Garanzia 67
E
Índice Página
Manual de instrucciones 50 - 57
Garantía 68
P
Conteúdo Página
Instruções de manejo 58 - 64
Garantia 68
Page 5

13
GARDENA
lightline
Dusk Sensor with Timer,
Motion Detector
1. Information Concerning the Instructions
Please read these instructions carefully before operating your system. Observe
the notes included in the operating instructions. Use the operating instructions
to get acquainted with the products, their proper use and the safety hints.
2. Applications
The GARDENA
lightline
system is a 12 Volt low-voltage system which makes
your garden and your terrace come alive.You can choose, combine and install
lamps according to your individual wishes and ideas. As the GARDENA
lightline
system is operated at 12 Volt low-voltage, it is safe and harmless.
3. Proper Use
The GARDENA
lightline
system has been manufactured for lighting gardens
and terraces at low-voltage. Lamps must not be installed indoors.
Keeping to the operating instructions supplied by the manufacturer is absolutely
required for proper use of the devices.
A
Attention ! The GARDENA
lightline
controllers have been manufac-
tured exclusively for 12 V low-voltage. Do not attempt to connect
them to 220/230 volt, as this would prove very dangerous and cause fatal
injury.
4. Technical Data
Dusk Sensor Motion Detector
Art. 4233 Art. 4235
Voltage: 12 Volt low voltage 12 Volt low voltage
Switching current max.: 10 A AC 10 A AC
Breaking capacity max.: 100 W 100 W
Switch-on level: 3 -100 Lux 3 - 80 Lux
Lighting duration: 40 min. - 8 hrs 1- 30 min.
Operating temperature: – 20°C - + 50°C – 20 °C - + 50 °C
Range: max. 9 m
Detection angle: 0 - 120°
G
Page 6

14
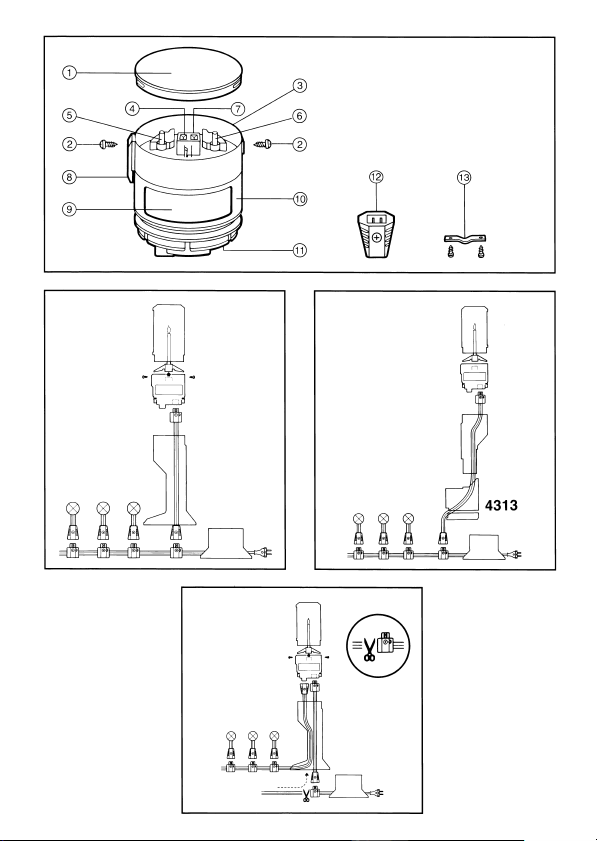
5. Operating Parts
1
Cover
2
Screws for fixing the cover or the lamp shade
3
Receptacle for securing the lamp shade
4
Socket for lamp holder
5
Adjustment for time setting
6
Adjustment for brightness level
7
Screw for fixing the upper part of the casing
8
Solenoid switch for automatic or manual operation
9
Window (Art. No. 4233 only) or sensor foil with lens (Art. No. 4235 only)
0
Adjustment ring for lens of motion detector (Art. No. 4235 only)
A
Receptacle for socket of the lamp connection cable
B
Free plug for connecting to the installation cable when several lamps are
controlled
C
Cable lock for fastening the installation cable at the lamp stand or
at the lamp wall-holder (when several lamps are controlled)
6. Installation
The GARDENA
lightline
controllers can be used for controlling one individual
or several lamps. Please consider the following hints.
6.1. Controlling an Individual Lamp
When the controllers are installed in the lamp, only the corresponding lamp is
activated (ill. A). Those lamps connected behind the controller are not activated.
A Avoid ring-like installation.
A
Install the controllers at a place where they are not fully exposed
to the sun.
Installation in the Lamp (ill. A)
.Loosen the lamp shade by releasing both screws
2
.
.Remove the lamp shade.
.Remove the lamp holder.
.Remove the socket from the lamp holder
4
.
.Plug the socket into the receptacle of the controller
A
.
.Remove the cover from the controller
1
.
.Use the adjustments on the top of the controller to set the lighting duration
and the brightness level (if applicable).
For details, see point 7 of these operating instructions.
.Plug the controller into the shade receptacle and fasten.
.Plug the lamp holder onto the controller.
.Put the lamp shade onto the controller and tighten both screws.
Page 7

15
Within one installation cable you can control several individual lamps with several
controllers. For this, you have to install in each lamp a controller as described
above.
Installation in the Lamp Wall-holder, Art. No. 4313
For the lamps, a wall-holder is available (Art. No. 4313). In this wall-holder you
can also integrate a controller (ill. B).
The lamp is supplied with approx. 2.5 feet of cable. If you mount the wall-holder
at a higher place, use Art. No. 4302 extension cable.
The procedure is the same as for installation in the lamp.The controller is
installed between shade receptacle and lamp shade (ill. B). The wall-holder
can be mounted with 5 x 45 mm screws and 6 mm plugs on the wall.
6.2. Controlling Several Lamps via one Controller
A
lf several lamps are to be activated by the controller, only one
controller per cable loom and transformer exit may be used.
When choosing this installation method, take care that the controller is always
installed in the first lamp directly behind the transformer.
Only this way you can ensure that all lamps behind the controller (ill. C)
are activated.
Installation in the first Lamp (ill. C)
.Remove the lamp shade and the lamp holder from the lamp as described
under 6.1.
.Cut the cable as show in picture C.
.Loosen the shade receptacle from the lamp stand.
.Lead the cut installation cable through the lamp stand and the shade
receptacle.
.Pull off the plug
B
from the controller.
.Loosen the cover of the plug and put the installation cable on the cutting
contacts so that the end of the cable touches the thread bush of the screw.
.Press the cover firmly onto the bottom part of the plug and secure.
.Remove the lamp holder from the shade receptacle.
.Put the lamp connection cable into the receptacle on the controller
A
.
.Put the plug
B
with the installation cable into the socket of the controller.
.Put the controller into the shade receptacle and secure.
.Remove the cover
1
from the controller and put the lamp holder on to the
controller so that the plug of the lamp holder fits the socket of the controller.
.Lighting duration and switch-on brightness level (if applicable) can be set
via the adjustments. For more details see point 7 – Starting the Controllers.
.Put the lamp shade on to the controller and secure.
.Fasten the installation cable with the cable lock
C
at the cable outlet of
the lamp stand.
.After having attached the installation cable to the controller you can connect
further lamps to it. Consider the maximum connection capacity.
Page 8

16
You can install the controller without the lamp in the lamp stand, if necessary.
For this, put the cover 1on the controller.
Installation in the Lamp Wall-holder Art. No. 4313
You can integrate the controller also directly into the lamp wall-holder (ill. D).
.Loosen the cable lock at the lamp stand.
.Remove the shade receptacle with the cable and the lamp shade from the
lamp stand.
.Remove the bottom part of the lamp wall-holder.
.Put the shade receptacle with the cable and the lamp shade onto the
wall-holder.
.Cut the cable as show in picture C.
.Attach the plug with the controller to the free cable end as described above.
.Remove the lamp shade from the shade receptacle.
.Remove the lamp holder and loosen the connection cable from the lamp
holder.
.Then put the connection cable into the receptacle on the controller.
.Lead the end of the installation cable with the plug through the wall-holder
and the shade receptacle.
.Put the bottom part of the wall-holder onto the wall-holder and fasten both
with the shade receptacle.
.Put the plug
B
on to the controller.
.Put the controller into the shade receptacle and fasten together.
.Fix the cable with the cable lock at the cable outlet of the lamp wall-holder.
.Put the lamp holder into the controller.
.Use the adjustments of the controller to set the lighting duration and the
switch-on brightness (if applicable). See point 7 – Starting the Controllers.
.Then put the lamp shade onto the controller and secure it.
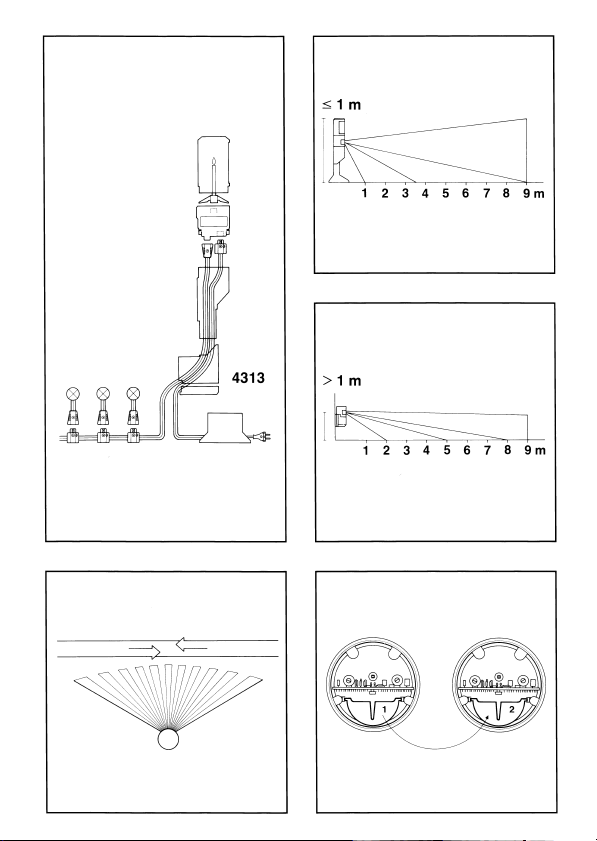
.See ill. D for connecting additional lamps to the installation cable. These
lamps are to be activated by the pre-switched controller. Consider the maximum permitted connection taking care not to exceed capacity.
7. Starting the Controllers
All GARDENA
lightline
controllers (Art. No. 4233, 4235) are equipped with a
solenoid switch
8
. To de-activate the controllers push the switch (man.) downwards. This way you can switch your system to permanent lighting (if the
transformer is connected to the power mains).
All GARDENA
lightline
controllers (Art. No. 4233, 4235) are activated automatically as soon as the transformer is connected to the power supply. The lights
are activated until the set duration (1- 30 min. for Motion Detector, 40 - 480 min.
for Dusk Sensor) is terminated. This allows you to check whether the controllers
have been properly installed.
Therefore, before operating the transformer, please check that the adjustment
lever
5
has been set to min. (turn counterclockwise).
For starting the controllers, please remove the lamp shade and the cover
of the controller.
Page 9

Dusk Sensor
The Dusk Sensor switches your GARDENA
lightline
system automatically on
and switches it off after termination of the lighting duration you have set. Install
the Dusk Sensor in such a way that no external light is aimed at (street lamps,
car head-lights) the window.
.Set the time adjustment to the desired lighting duration:
min. = approx. 40 minutes max. = approx. 8 hours
(left end stop) (right end stop)
Intermediate position = approx. 4 hours.
.Use the adjustment
6
to set the desired brightness level:
min. (left end stop) max. (right end stop)
= darkness (3 Lux) = dusk (100 Lux)
We recommend to set the adjustment for the brightness level
6
in Central
Europe not higher than to an intermediate position.
Motion Detector
The Motion Detector switches your GARDENA
lightline
system on in the dark
as soon as the infra-red sensor registers motion (thermal changes) in the
detection area.
Via the adjustment ring
0
you can set the detection angle from 0° to 120°.
For this loosen the screw
7
.
We recommend you to install the Motion Detector crosswise to the moving
direction (ill. E) to optimise the detection area.
The Motion Detector is equipped with a lens for two different detection areas.
When supplied from the factory the lens is mounted for a detection area as
shown in ill. F1 (figure 1 on the top of the lens holder).
We recommend this detection area when the Motion Detector is installed in
the lamps up to a height of approx. 1 metre / 3 ft.
When installing the Motion Detector in the lamp wall-holder (Art. No. 4313)
in a height of more than one metre we recommend you to turn the lens in the
Motion Detector by 180° (ill. G).
For this, proceed as follows:
.Loosen the cover with both screws
2
from the Motion Detector.
.Then loosen the screw
7
from the top of the casing.
.Remove the lens holder from the guiding device, turn it by 180° and put
back on its place (figure 2 on the top of the lens holder).
If the detection area is changed this way (ill. F2) motions below the detector
are registered.
Adjust the window of the Motion Detector so that the desired detection area
is covered.
17
Page 10

18
A
Take care that the Motion Detector is not directed to water surfaces
or other objects which are subject to heavy variation in temperature
(e.g. trees, bushes, etc.).
Adjustment
.Set the time adjustment
5
to min. (left end stop)
.Set the brightness adjustment
6
to max. (right end stop)
.Enter the detection area. The motion detector switches the lamp(s) on.
.Correct the detection area, if necessary.
.Set the time adjustment 5to the desired lighting duration: 1- 30 min.
.Set the brightness adjustment
6
to the desired brightness level:
min. (left end stop) max. (right end stop)
= 3 Lux (darkness) = 80 Lux (dusk)
8. Trouble Shooting
Problem Remedy
Individual lamps Defective lamps. Replace them with new 12 V,
do not light up. 10 W Halogen lamps.
Faulty switching of Interfering objects like water, trees, etc.
the Motion Detector. within the range of the Motion Detector.
Adjust the detection angle within the ring so
that these objects are not detected.
Motion detector Damp weather or fog reduce the range since
responds too late. damp air absorbs parts of the thermal radiation.
Faulty switching. Extremely unfavourable weather conditions
(snow, hail, storm) can cause faulty switching
(switching on) of the Motion Detector.
External light (street-lamps etc.) can defect the
operation of the Dusk Sensor.This is to be taken
into consideration when adjusting the window
of the Dusk Sensor.
Dusk Sensor does The daylight is below the set brightness level.
not switch on. Turn the adjustment for the brightness level
6
towards min. until light switches on.
Dusk Sensor does Permanent variations in brightness (clouds moving
not switch off. past). Turn the adjustment for the brightness level
6
towards min. until light switches off.
Should you have any further functional defects, please contact one of the
GARDENA Service Centres or an authorised specialist.
Page 11

19
We expressly point out that, in accordance with the product liability law,
we are not liable for any damage caused by our units if it is due to improper repair or if parts exchanged are not original GARDENA parts
or parts approved by us, and, if the repairs were not carried out by a
GARDENA Service Centre or an authorised specialist. The same applies
to spare parts and accessories.
9. Maintenance and Care
The GARDENA
lightline
controllers are maintenance-free.
The sensor foil of the Motion Detector can be cleaned from time to time with
a moist rag (without using any detergents).
10. Safety and Operation Tips
A
Use the GARDENA
lightline
controllers and all other GARDENA
lightline
products exclusively for 12 volt low-voltage installations.
Do not attempt to connect them to 220/230 volts – this would be very
dangerous and may cause fatal injuries.
A
Take care that you do not touch lighted halogen lamps as they
can inflict serious burns.
A
Before working on the GARDENA
lightline
installation, always
disconnect the power plug of the transformer from the mains.
Disposal
(in accordance with RL2002 /96/EC)
Device must not be added to normal household refuse but must be
disposed of in the technically correct way.
Page 12

65
D
Garantie
GARDENA gewährt für diese Produkte 3 Jahre Garantie (ab Kaufdatum). Diese Garantieleistung bezieht sich auf alle wesentlichen
Mängel, die nachweislich auf Materialoder Fabrikationsfehler zurückzuführen sind. Die Leuchtmittel
(Lampen) sind von dieser Garantieregelung ausgenommen. Wir weisen
darauf hin, daß es bei den GARDENA
lightline
Artikeln aufgrund intensiver
Sonneneinstrahlung zu farblichen
Aufhellungen der Oberfläche kommen
kann. Diese Veränderungen haben
keine Auswirkung auf die Funktion
und sind somit auch nicht Bestandteil
unserer Garantieleistungen.
Die Garantieleistung erfolgt durch die
Ersatzlieferung eines einwandfreien
Gerätes oder durch die kostenlose
Reparatur des eingesandten Gerätes
nach unserer Wahl, wenn folgende
Voraussetzungen gewährleistet sind:
.Das Gerät wurde sachgemäß
und laut den Empfehlungen in der
Gebrauchsanweisung behandelt.
Es wurde weder vom Käufer noch
von einem Dritten versucht, das
Gerät zu reparieren.
.Das Gerät wurde ausreichend fran-
kiert direkt an eine der GARDENA
Servicestellen gesandt, unter Beifügung der vollständig ausgefüllten
Garantiekarte bzw. des Rechnungsbeleges.
Diese Hersteller-Garantie berührt die
gegenüber dem Händler/ Verkäufer
bestehenden Gewährleistungsansprüche nicht.
Im Reklamationsfall die Garantiekarte
ausschneiden und mit dem Gerät
einsenden.
G
Guarantee
GARDENA guarantees these products
for 3 years (from date of purchase).
This guarantee covers all serious
defects of the unit that can be proved
to be material or manufacturing faults.
We would like to point out that the
GARDENA
lightline
products may fade
if exposed to intense sunlight. This
in no way affects the function of the
products and is, therefore, not part
of the standard warranty.
Under warranty we will either replace
the unit or repair it free of charge if
the following conditions apply:
.The unit must have been handled
properly and in keeping with the
requirements of the operating
instructions.
Neither the purchaser nor a
non-authorised third party have
attempted to repair the unit.
.The unit has been returned directly
to a GARDENA Service Centre,
postage paid, together with the
completed and signed warranty
card and proof of purchase.
This manufacturer’s guarantee does
not affect the user’s existing warranty
claims against the dealer/ seller.
In case of claim cut out the warranty
card and send it together with the unit
to the GARDENA Service Centre.
F
Garantie
Pour mieux vous servir, GARDENA
accorde pour cet appareil une garantie contractuelle de 3 ans à compter
du jour de l’achat. Elle est assurée
par le remplacement gratuit des
pièces défectueuses ou de l’appareil.
Page 13
69
EU-Konformitätserklärung
Der Unterzeichnete,
GARDENA Manufacturing GmbH, Hans-Lorenser-Str. 40, D-89079 Ulm,
bestätigt, daß die nachfolgend bezeichneten Geräte in der von uns in
Verkehr gebrachten Ausführung die Anforderungen der harmonisierten
EU-Richtlinien, EU-Sicherheitsstandards und produktspezifischen Standards
erfüllen.
Bei einer nicht mit uns abgestimmten Änderung der Geräte verliert diese
Erklärung ihre Gültigkeit.
Bezeichnung der Geräte:
lightline
Dämmerungssensor
lightline
Bewegungsmelder
Art.-Nr.: 4233 / 4235
EU-Richtlinien:
Elektromagn. Verträglichkeit
89/336/EG
Richtlinie 93/68/ EG
Ulm, den 11.08.1998
Thomas Heinl
Technische Leitung
EU Certificate of Conformity
The undersigned
GARDENA Manufacturing GmbH · Hans-Lorenser-Str. 40 · D-89079 Ulm
hereby certifies that, when leaving our factory, the units indicated below are
in accordance with the harmonised EU guidelines, EU standards of safety and
product specific standards.
This certificate becomes void if the units are modified without our approval.
Description of the units:
lightline
Dusk Sensor with Timer
lightline
Motion Detector
Art. no.: 4233 / 4235
EU directives:
Electromagnetic Compatibility
89/336/EC
Directive 93/ 68/EC
Ulm, 11.08.1998
Thomas Heinl
Technical Dept. Manager
D
G
Page 14

73
Deutschland / Germany
GARDENA
Manufacturing GmbH
Service Center
Hans-Lorenser-Straße 40
D-89079 Ulm
Produktfragen:
(+49) 7 31 490 - 123
Reparaturen:
(+49) 7 31 490 - 290
service
@
gardena.com
Argentina
Argensem
®
S.A.
Calle Colonia Japonesa s/ n
(1625) LomaVerde
Escobar, Buenos Aires
Phone: (+54) 34 88 4940 40
info
@
argensem.com.ar
Australia
Nylex Consumer Products
50-70 Stanley Drive
Somerton, Victoria, 3062
Phone: (+61) 1800 658 276
spareparts
@
nylex.com.au
Austria /Österreich
GARDENA
Österreich Ges.m.b.H.
Stettnerweg 11-15
2100 Korneuburg
Tel.: (+43) 22 62 7 4545 36
kundendienst
@
gardena.at
Belgium
GARDENA Belgium NV/SA
Sterrebeekstraat 163
1930 Zaventem
Phone: (+32) 2 720 9212
Mail: info
@
gardena.be
Brazil
Palash Comércio e
Importação Ltda.
Rua Américo Brasiliense,
2414 - Chácara Sto Antonio
São Paulo - SP - Brasil CEP 04715-005
Phone: (+ 55) 11 5181-0909
eduardo
@
palash.com.br
Bulgaria
DENEX LTD.
2 Luis Ahalier Str.- 7th floor
Sofia 1404
Phone: (+359) 2 95818 21
office
@
denex-bg.com
Canada
GARDENA Canada Ltd.
100 Summerlea Road
Brampton, Ontario
Canada L6T 4X3
Phone: (+1) 905 792 9330
info
@
gardenacanada.com
Chile
Antonio Martinic y Cia Ltda.
Cassillas 272
Centro de Cassillas
Santiago de Chile
Phone: (+56) 2 2010 708
garfar_cl
@
yahoo.com
Costa Rica
Compania Exim
Euroiberoamericana S.A.
Los Colegios, Moravia,
200 metros al Sur del Colegio
Saint Francis - San José
Phone: (+ 506) 297 6883
exim_euro
@
racsa.co.cr
Croatia
KLIS d.o.o.
Stanciceva 79
10419 Vukovina
Phone: (+ 385) 1 622777 0
gardena
@
klis-trgovina.hr
Cyprus
FARMOKIPIKI LTD
P.O. Box 7098
74, Digeni Akrita Ave.
CY-1641 Nicosia
Phone: (+357) 22 75 4762
condam
@
spidernet.com.cy
Czech Republic
GARDENA spol. s r.o.
Шнpskб 20a, и.p. 1153
627 00 Brno
Phone: (+ 420) 800 100 425
gardena
@
gardenabrno.cz
Denmark
GARDENA Norden AB
Salgsafdeling Danmark
Box 9003
S-200 39 Malmö
info
@
gardena.dk
Finland
Habitec Oy
Martinkyläntie 52
01720 Vantaa
France
GARDENA
PARIS NORD 2
69, rue de la Belle Etoile
BP 57080
ROISSY EN FRANCE
95948 ROISSY CDG
CEDEX
Tél. (+33) 0826 101455
service.consommateurs
@
gardena.fr
Great Britain
GARDENA UK Ltd.
27- 28 Brenkley Way
Blezard Business Park
Seaton Burn
Newcastle upon Tyne
NE13 6DS
info
@
gardena.co.uk
Greece
Agrokip
G. Psomadopoulos & Co.
33 A, Ifestou str. –
Industrial Area
194 00 Koropi, Athens
Phone: (+30) 210 66 20 225
service
@
agrokip.gr
www.agrokip.gr
Hungary
GARDENA
Magyarország Kft.
Késmárk utca 22
1158 Budapest
Phone: (+36) 80 20 4033
gardena
@
gardena.hu
Iceland
Ó. Johnson & Kaaber
Tunguhalsi 1
110 Reykjavik
ooj
@
ojk.is
Ireland
Michael McLoughlin & Sons
Hardware Limited
Long Mile Road
Dublin 12
Italy
GARDENA Italia S.p.A.
Via Donizetti 22
20020 Lainate (Mi)
Phone: (+39) 02.93.94.79.1
info
@
gardenaitalia.it
Page 15

Japan
KAKUICHI Co. Ltd.
Sumitomo Realty &
Development Kojimachi
BLDG., 8F
5-1 Nibanncyo, Chiyoda-ku
Tokyo 102-0084
Phone: (+81) 33 2644721
[email protected]
Luxembourg
Magasins Jules Neuberg
Grand Rue 30
Boîte postale 12
L-2010 Luxembourg
Phone: (+352) 40 14 01
info
@
neuberg.lu
Netherlands
GARDENA Nederland B.V.
Postbus 50176
1305 AD ALMERE
Phone: (+31) 36 52100 00
info
@
gardena.nl
Neth. Antilles
Jonka Enterprises N.V.
Sta. Rosa Weg 196
P.O. Box 8200
Curaçao
Phone: (+599) 9 76766 55
pgm
@
jonka.com
New Zealand
NYLEX New Zealand Limited
Building 2
118 Savill Drive
Mangere, Auckland
Phone: (+64) 9 2701806
lena.chapman
@
nylex.com.au
Norway
GARDENA Norden AB
Salgskontor Norge
Karihaugveien 89
1086 Oslo
info
@
gardena.no
Poland
GARDENA Polska Sp. z o.o.
Szymanów 9 d
05- 532 Baniocha
Phone: (+48) 22 727 5690
gardena
@
gardena.pl
Portugal
GARDENA Portugal Lda.
Recta da Granja do Marquês
Edif. GARDENA Algueirão
2725-596 Mem Martins
Phone: (+351) 21 922 8530
info
@
gardena.pt
Romania
MADEX INTERNATIONAL SRL
Soseaua Odaii 117-123
Sector 1,
Bucureєti, RO 013603
Phone: (+ 40) 21 352 76 03
[email protected]
Russia / Россия
АО АМИДА ТТЦ
ул. Моcфилмовcкая 66
117330 Моcква
Phone: (+ 7) 095956 99 00
amida
@
col.ru
Singapore
Hy -Ray PRIVATE LIMITED
40 Jalan Pemimpin
#02-08 Tat Ann Building
Singapore 577185
Phone: (+65) 6253 2277
hyray
@
singnet.com.sg
Slovak Republic
GARDENA Slovensko, s.r.o.
Panónska cesta 17
851 04 Bratislava
Phone: (+421) 263 453 722
info
@
gardena.sk
Slovenia
Silk d.o.o.
Brodišče 15
1236 Trzin
Phone: (+ 386) 1 580 9300
gardena
@
silk.si
South Africa
GARDENA
South Africa (Pty.) Ltd.
P.O. Box 11534
Vorna Valley 1686
Phone: (+27) 11 315 02 23
sales
@
gardena.co.za
Spain
GARDENA IBÉRICA S.L.U.
C/ Basauri, nº 6
La Florida
28023 Madrid
Phone: (+34) 91 70805 00
(4 líneas)
atencioncliente
@
gardena.es
Sweden
GARDENA Norden AB
Försäljningskontor Sverige
Box 9003
200 39 Malmö
info
@
gardena.se
Switzerland / Schweiz
GARDENA (Schweiz) AG
Bitziberg 1
8184 Bachenbülach
Phone: (+41) 848 800 464
info
@
gardena.ch
Turkey
GARDENA /
Dost Diþ Ticaret
Mümessillik A.Þ. Sanayi
Çad. Adil Sokak No.1
Kartal - Ýstanbul
Phone: (+ 90) 21638 93 939
info
@
gardena-dost.com.tr
Ukraine / Украина
ALTSEST JSC
4 Petropavlivska Street
Petropavlivska
Borschahivka Town
Kyivo Svyatoshyn Region
08130, Ukraine
Phone: (+380) 44 459 57 03
upyr
@
altsest.kiev.ua
USA
Melnor Inc.
3085 Shawnee Drive
Winchester, VA 22604
Phone: (+1) 540 722-9080
service_us
@
melnor.com
4233- 20.960 .02 /0606
©
GARDENA
Manufacturing GmbH
D- 89070 Ulm
http: // www.gardena.com
 Loading...