

Page 1
GARDENA
®
GS 1500 Art. 2575
D Gebrauchsanweisung
Gartensauger mit Häcksel- und Blasfunktion
GB Operating Instructions
Garden Vac with shredding and blowing facility
F Mode d’emploi
Aspirateur-souffleur
NL Gebruiksaanwijzing
Tuinruimer met versnipper- en blaasfunctie
SCAN Bruksanvisning
Løvsuger/-blåser med løvkutter og blåsefunksjon
I Istruzioni per l’uso
Soffia& Aspira con tritafoglie
E Manual de instrucciones
Aspirador de jardín con funciones de triturar y expulsar
P Instruções de utilização
Aspirador de jardim com retalhador e sopro
Page 2

D
Bitte lesen Sie diese Gebrauchsanweisung vor Montage und
Inbetriebnahme Ihres Gerätes
sorgfältig.
Beim Lesen der Gebrauchsanweisung bitte die Umschlagseiten herausklappen.
Inhaltsverzeichnis Seite
1. Technische Daten 6
2. Hinweise zur
Gebrauchsanweisung 6
3. Ordnungsgemäßer Gebrauch 6
4. Montage des Gartensaugers 6
5. Inbetriebnahme 7
6. Wartung, Pflege und
Aufbewahrung 8
7. Hinweise zur ordnungsgemäßen
Benutzung/Sicherheitshinweise 9
Garantie 42
G
Please read these operating instructions carefully before assembling and using the Garden Vac.
Unfold inside cover pages to read
the operating instructions.
Contents Page
1. Technical data 12
2. Operating instructions
information 12
3. Product use 12
4. Assembly 12
5. Using the product 13
6. Maintenance, service, storage 14
7. Advice for proper use /
Safety instructions 14
Guarantee 42
F
Nous vous remercions de bien
vouloir lire attentivement ce mode
d’emploi avant le montage et
l’utilisation de votre appareil.
En dépliant les volets de la couverture, vous aurez sous les yeux
une série d’illustrations permettant une meilleure compréhension
de ce mode d’emploi.
Contenu Page
1. Caractéristiques techniques 16
2. Informations sur le mode
d’emploi 16
3. Domaine d’utilisation 16
4. Montage de l’aspirateur
souffleur 16
5. Utilisation 17
6. Entretien et rangement 18
7. Précautions d’emploi et
conseils de sécurité 19
Garantie 42
N
Lees deze gebruiksaanwijzing voor
de montage en ingebruikname van
het apparaat zorgvuldig door.
Bij het lezen van de gebruiksaanwijzing de omslagzijden openslaan.
Inhoudsopgave Pagina
1. Technische gegevens 21
2. Aanwijzingen bij de gebruiksaanwijzingen 21
3. Juiste gebruik 21
4. Montage van de tuinruimer 21
5. Ingebruikname 22
6. Verzorging, onderhoud
en opslag 23
7. Aanwijzingen voor het juiste
gebruik, veiligheidstips 24
Garantie 42
Z
Les nøye gjennom denne bruksanvisningen før du monterer og
bruker maskinen. Brett ut utbrettsiden når du leser bruksanvisningen.
Innholdsbeskrivelse Sida
1. Tekniske data 26
2. Merknader om bruksanvisningen 26
3. Forskriftsmessig bruk 26
4. Montering av løvsugeren/
-blåseren 26
5. Bruk 27
6. Vedlikehold, pleie og
oppbevaring 28
7. Merknader om forskriftsmessig
bruk, sikkerhetsinstruks 28
Garanti 43
I
Prima di montare e mettere in uso
l’attrezzo, leggere attentamente le
istruzioni tenendo aperto il pieghevole per avere sott’occhio i disegni
esplicativi.
Indice Pagina
1. Dati tecnici 30
2. Avvertenze 30
3. Uso corretto 30
4. Montaggio 30
5. Messa in uso 31
6. Manutenzione 32
7. Norme d’uso e di sicurezza 32
Garanzia 43
E
Rogamos una atenta lectura del
presente manual antes del montaje
y la puesta en servicio.
Para la lectura, desdoble la portada.
Contenido Página
1. Datos técnicos 34
2. Indicaciones para el maual
de instrucciones 34
3. Uso correcto 34
4. Montaje del aspirador 34
5. Puesta en servicio 35
6. Mantenimiento, limpieza
y conservación 36
7. Indicaciones para un correcto
uso / Indicaciones de seguridad 36
Garantía 43
P
Leia atentamente estas instruções
antes de montar ou utilizar este
aspirador de jardim.
Para ler este manual de instruções,
desdobre a capa.
Indice Página
1. Dados técnicos 38
2. Informação sobre as
instruções de operação 38
3. Utilização do produto 38
4. Montagem 38
5. Como operar com o produto 39
6. Manutenção, serviço,
armazenamento 40
7. Conselhos para um uso
correcto / Instruções de
segurança 40
Garantia 43
Page 3
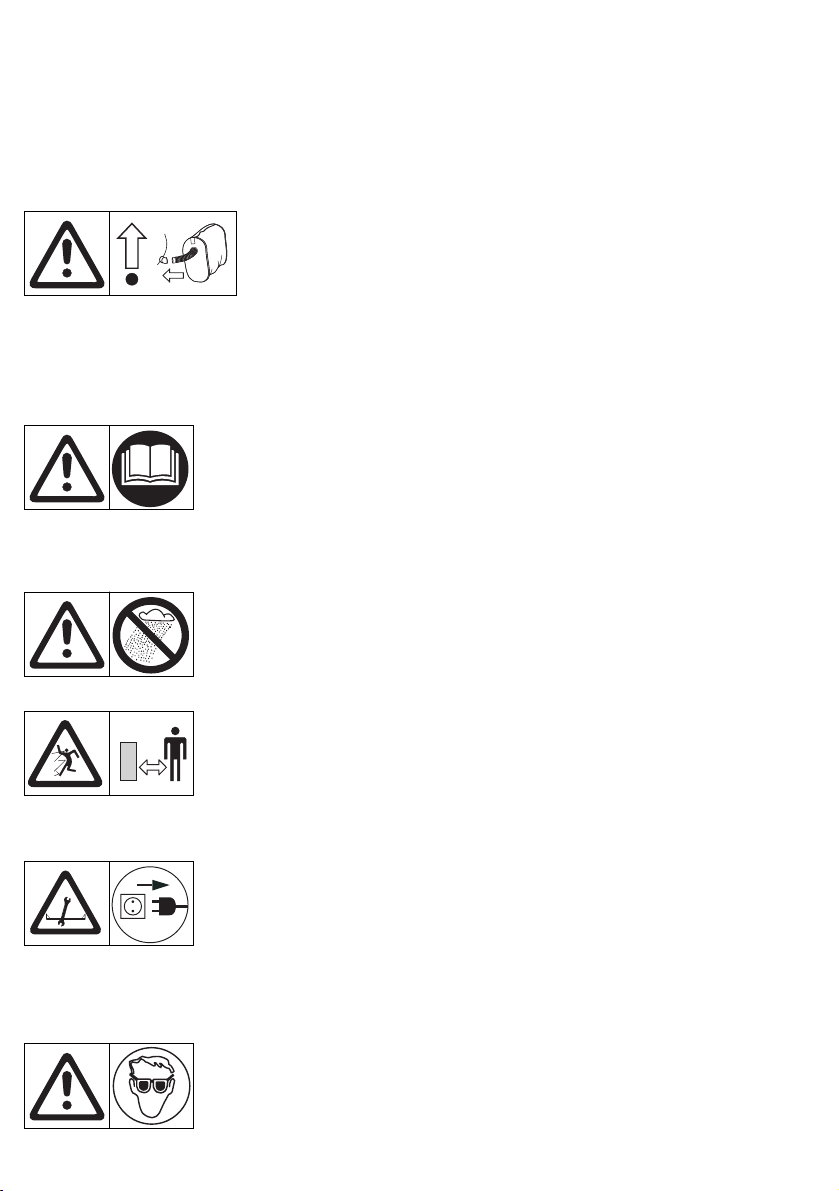
Beachten Sie die Sicherheitshinweise auf dem Gerät:
Please adhere to the following safety instructions:
Veuillez observer les instructions de sécurité figurant sur l’appareil :
Houdt u zich aan de veiligheidsvoorschriften op het apparaat:
Følg de sikkerhetsinstruksjoner som står på maskinen:
Attenzione ai simboli di sicurezza sull’attrezzo:
Observen las indicaciones de seguridad en el aparato:
Por favor siga atentamente as instruções de segurança fornecidas no aparelho:
Achtung! Im Modus Saugen darf
der Gartensauger nie ohne Fangsack betrieben werden.
Attention! In vacuum mode never
use the Garden Vac without
catcher.
Attention ! N’utilisez jamais l’aspirateursouffleur en fonction aspirateur sans
son sac de ramassage.
Let op! In de zuigtoestand mag de tuinruimer nooit zonder opvangzak gebruikt
worden!
Achtung! Vor Inbetriebnahme Gebrauchsanweisung lesen!
Warning! Read instruction handbook!
Attention ! Merci de lire attentivement
le mode d’emploi avant d’utiliser cet
appareil !
Let op! Voor ingebruikname gebruiksaanwijzing doorlezen!
Vor Regen und Nässe schützen!
Do not use in rain or wet conditions!
Protégez l’appareil de la pluie et de
l’humidité !
Niet aan vocht blootstellen!
Skal ikke utsettes for regn og fuktighet!
Dritte aus dem Gefahrenbereich fernhalten!
Keep bystanders away!
Maintenez tout tiers hors de la zone de
travail !
Zorg ervoor dat derden buiten de gevarenzone blijven!
Bei Reinigungs-, Prüf- und Pflegearbeiten Netzstecker ziehen!
Before maintenance, disconnect the
plug from the mains!
Lors du nettoyage, de la vérification
et de l’entretien, débranchez l’appareil !
Voor alle werkzaamheden aan de tuinruimer, de stekker uit het stopcontact
halen!
Augen- und Gehörschutz tragen!
Wear ear- and eye-protection!
Portez des lunettes de protection et
protégez-vous du bruit !
Draag oog- en gehoorbescherming!
OBS! I sugestilling skal løvsuger/-blåser
aldri benyttes uten oppsamler.
Attenzione! Prima di usare l’attrezzo in
modalità ”aspira”, montare sempre il
sacco di raccolta.
¡Atención ! En la modalidad de aspiración
nunca utilizar el aparato sin el sacorecogedor.
Atenção! No modo aspiração, não utilizar
nunca a aspirador de jardim sem o respectivo saco.
Advarsel! Les bruksanvisningen før
maskinen tas i bruk!
Attenzione ! Prima di mettere in funzione
l’attrezzo, leggere attentamente le istruzioni per l’uso!
¡Atención! Antes de la puesta en marcha,
lea el presente manual de instrucciones.
Atenção! Leia o Manual de instruções
antes do uso!
Non esporre l’attrezzo all’umidità o alla
pioggia!
¡Proteja el aparato de la lluvia y la humedad!
Proteja o aparelho da chuva e da humidade!
Hold uvedkommende personer på avstand fra faresonen!
Tenere lontano i terzi dalla zona di
lavoro!
¡Mantenga a terceros fuera del área de
trabajo!
Mantenha terceiros fora da área de
perigo!
Trekk ut nettstøpslet når det skal utføres rengjørings-, kontroll- og tilsynsarbeider!
Prima di qualsiasi intervento di manutenzione, staccare la spina dalla corrente!
Para ejecutar trabajos de limpieza, control o de mantenimiento desenchufe el
aparato.
Antes de qualquer operação de reparação desligue a ficha da tomada.
Bruk vernebriller og hørselsvern!
Indossare protezioni per occhi ed
orecchie!
Mientras que utilice el aparato protégese los ojos y el oido.
Use protecção para os ouvidos e olhos.
Page 4
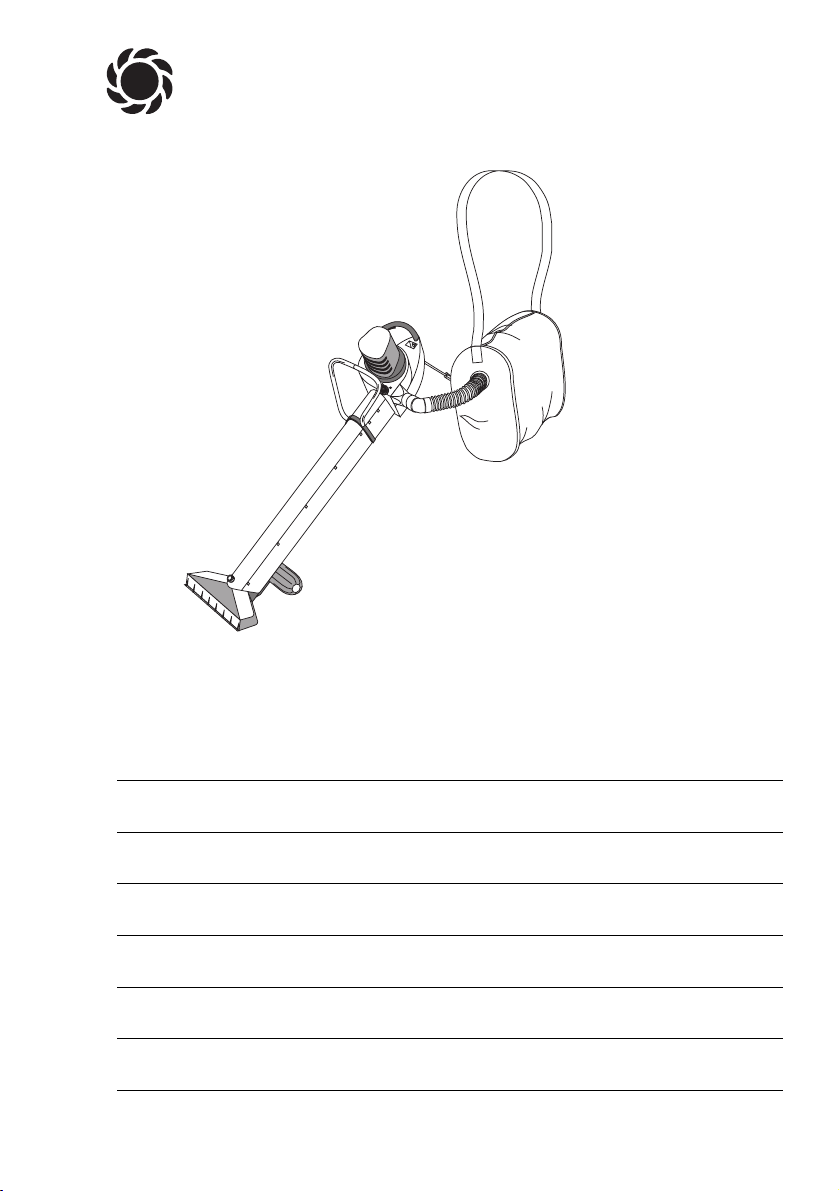
A
3
16
10
17
C
5
6
D
8
7
9
2
1a
1
2
4
3
B
2
15 a
15 a
15
15 b
Page 5

Page 6

12
G
Motor – power consumption 1400 W (max. 1500 W)
Mains voltage 230 V
Frequency 50/ 60 Hz
Vacuum power max. 12.5 m3/min.
Blow power max. 260 km/h
Weight approx. 4.5 kg
Contents of the catcher 70 l
Workplace related sound
pressure level L
pA
1)
92 dB (A)
Noise emission value L
WA
2)
measured 100 dB (A) / guaranteed 102 dB (A)
Hand / arm vibration a
vhw
1)
< 2.5 ms
-2
Measuring method according to 1)EN 50144-1 2)directive 2000/ 14/EC
GARDENA Garden Vac
with shredding and blowing facility
1. Technical data
Please read and follow these
operating instructions carefully.
Familiarise yourself with the unit’s
features, its proper use and the
safety instructions included.
A
For safety reasons child-
ren under the age of 16
or people who are not familiar
with these operating instruc-
tions should not use this
Garden Vac.
Please keep these operating
instructions in a safe place.
2. Operating instructions information
Contents check
The carton contains the
following items:
.motor part of the Garden Vac
.vacuum tube
.connection angle
.tube runner
.surface vacuum tube
.catcher
.vacuum hose
.additional handle
(two handle halves)
.1 dust filter
.fixing parts (screws, nuts,
caps)
.operating instructions
.counter ring
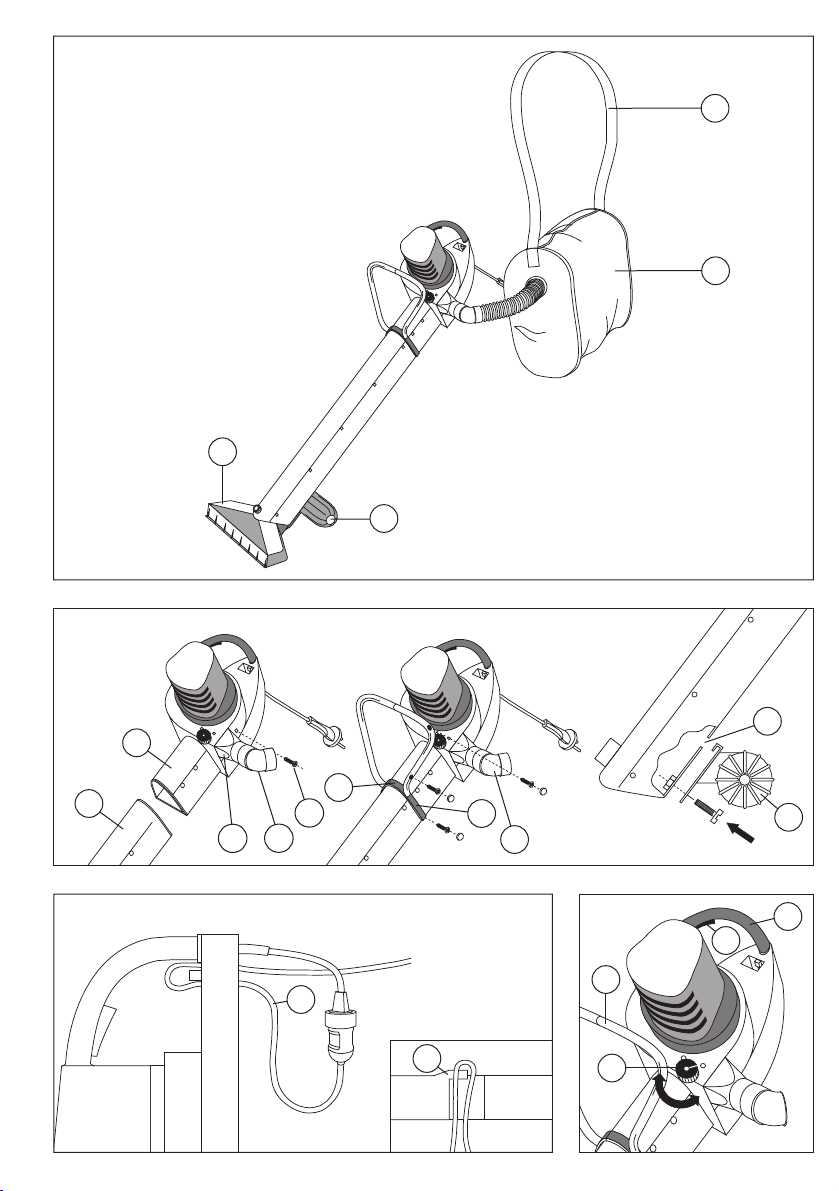
Fitting the vacuum tube
Before starting work, fit the
vacuum tube (1) provided onto
the vacuum tube connector of
the unit (1a). Now slide the two
handle halves of the additional
handle (2) over the junction point
of the vacuum tube (1) and
vacuum tube connector (1a).
Take care that the angled additional handle (2) faces towards
the motor casing.
Secure the additional handle (2),
using the three screws provided.
Cover the bore holes with the
caps.
Attention!
For safety reasons you should
not disassemble the vacuum
tube once assembled!
Fitting the tube runner
Lock the tube runner (3) provided
by inserting it into the recess (4)
of the vacuum tube (1). Secure it
with the screw and nut provided.
4. Assembly (ill. B)
The GARDENA Garden Vac
is designed for vacuuming and
blowing leaves and dirt as well
as for vacuum cleaning together
with the dust filter in private
gardens.
This Garden Vac is not designed
for use in public facilities, parks,
sporting grounds, on roads, in
agriculture or forestry.
It is essential to observe the
manufacturer’s operating instructions to ensure the unit’s proper
functioning. These instructions
also contain advice for service,
maintenance and repair.
A
Attention! For health
and safety reasons the
Garden Vac must not
be used
in areas with health-endangering dusts or for vacuuming
wet materials.
3. Product use
Page 7

13
G
5.1 Connecting the Garden Vac
– cable lock / extension cable
(ill. C)
Loop the extension cable (5) and
insert it into the cable lock (6).
This prevents unintentional separation of the electrical connection.
Then connect it to the mains
cable.
5.2 Blow mode (ill. D /E)
With one hand hold the handle
(7), with the other hand hold the
additional handle (2). Select the
blowing symbol (
➡
) on the control knob for mode selection (8).
Push down and rotate the control
knob. Ensure that it locks into
the blow mode position.
To ensure best results in the
blow mode, move the Garden
Vac at a distance of 5-10 cm
(2 -4 in.) between vacuum tube
and ground.
In the blow mode it is not necessary to mount the catcher.
Start the Garden Vac by squeezing the trigger (9) located inside
the handle (7). Release the trigger (9) to stop the Garden Vac.
5.3 Vacuum mode (ill. D - I )
Fitting the catcher (ill. F /G)
To work in the vacuum mode,
firstly fit the catcher (10).
Insert the connecting piece (11)
of the vacuum hose (12) from the
outside into the round opening
of the catcher (10). Then push
the cellular ring (11a) onto the
connecting piece (11) inside the
catcher (ill. F). Push the counter
ring (13) provided (with the broad
collar first) from the inside of the
catcher (10) onto the connecting
piece (11) of the vacuum hose.
Listen for an audible snap-in!
To connect the connecting sleeve
(14) with the connecting angle
(15a), push the marking point of
the connecting sleeve over the
marking point of the connecting
angle until it stops. Then turn
the connecting sleeve of the hose
until it snaps in.
To remove it again, turn the hose
anti-clockwise and pull off the
hose.
Hang the catcher with the shoulder strap (16) on the left part
of your body. Adjust the shoulder
strap to comfortable length.
Ensure the catcher to be carried
at around waist level.
Using the Garden Vac (ill. D/H)
Select the vacuum symbol ( )
on the control knob for mode
selection (8). Push down and
rotate the control knob. Ensure
that it locks into the vacuum
mode position.
The tube runner (3) at the base
of the vacuum tube (1) allows
easy guidance of the vacuum
tube (1) on the ground.
The surface vacuum tube (17)
makes vacuuming of leaves and
dirt on larger areas possible.
The surface vacuum tube (17)
is equipped with a roller at the
bottom too, so that the Garden
Vac can be e.g. easily moved
over flagstones.
Fitting the surface vacuum
tube (ill. H 1)
Attach the connector for the surface vacuum tube (18) to the
vacuum tube (1).
Secure the surface vacuum tube
(17) with the orange locking screw
(19).
Start the Garden Vac by squeezing the trigger (9) located inside
the handle (7). Release the trigger (9) to stop the Garden Vac.
Emptying the catcher (ill. G /I)
If the vacuum power decreases,
empty the catcher (10).
Remove the vacuum hose (12)
from the unit’s connection
angle (15a) and unzip (20) the
upper part of the catcher. Thus
the catcher (10) can be easily
emptied.
Note: Do not dispose compostable material together with
your household rubbish.
5.4 Vacuum cleaning (ill. K)
For using the Garden Vac as
a vacuum cleaner, please fit
the dust filter (21) provided.
Unzip (20) the catcher (10)
and insert the dust filter (21).
Push the cardboard collar (22)
onto the counter ring (13) inside the catcher (10).
Note: Insert the dust filter only
in a dry catcher!
Zip up the catcher (10). Then
connect the vacuum hose (12)
to the connection angle (15a)
(see point 5.3).
To use of the surface vacuum
tube, follow the instructions given
under point 5.3.
If the vacuum power decreases,
empty or replace the dust filter
(21), if necessary (see point 5.3,
“Emptying the catcher”).
Remove the dust filter (21).
A
When using the Garden
Vac together with the dust
filter, pick up only fine and dry
materials.
Make sure that the dust filter
does not get damaged.
5. Using the product (ill. C- K)
➡
Fitting the connection angle
Fit the connection angle (15a)
onto the blow-off connecting piece
(15) of the casing until it snaps in.
Attention!
For safety reasons the Garden
Vac must not be operated without connection angle.
Page 8

14
G
6.1 Cleaning
Ensure regular cleaning of
the Garden Vac!
To clean the vacuum tube (1),
we recommend the use of
a bottle brush, or similar.
Clean the casing of the Garden
Vac with a soft dry cloth. Never
clean it under running water.
Brush the catcher (10) of the
Garden Vac after use.
6.2 Blockage (ill. L /M)
Deposits of leaves and fresh
plant clippings may block up the
Garden Vac. The Garden Vac
may become blocked due to a
bulky object picked up.
In this case the Garden Vac
shuts off automatically.
To clear clogging or blockage,
proceed as follows:
1. Disconnect the mains plug!
2. Unscrew the maintenance
cover (23) and remove it.
3. Clean the vacuum chamber
with a bottle brush, or similar.
4. If the Garden Vac becomes
blocked within the blow-off
connecting piece (15), unscrew
it using screw (15b) and clear
the blockage.
6.3 Replacement dust filter
Please use only genuine
GARDENA Dust Filters,
Art. No. 5375 (each packaging
includes two items).
Dust filters can be purchased
from your GARDENA dealer or
directly from the GARDENA
Customer Service.
Never use spare parts or accessories which are not authorised
by the manufacturer.
A
Attention! Always dis-
connect the mains plug
before working on the Garden
Vac (checking, cleaning, maintenance). Risk of injury!
To avoid injury to persons and
material damage: Ne
ver clean
the Garden Vac with running
water, in particular with water
under high pressure.
Store the Garden Vac in a dry
place where it is protected
from frost.
The Garden Vac should be
stored out of the reach of
children.
If you have any problem with your
Garden Vac, please contact our
Customer Service or return the
defective unit together with a
short description of the problem
and, if covered under guarantee,
with a copy of the receipt, directly
to one of the GARDENA Service
Centres listed on the back of this
leaflet.
We expressly point out that,
in accordance with the product
liability law, we are not liable
for any damage caused by our
units if it is due to improper
repair or if parts exchanged are
not original GARDENA parts
or parts approved by us, and,
if the repairs were not carried
out by a GARDENA Service
Centre or an authorised specialist. The same applies to
spare parts and accessories.
6. Maintenance, service, storage
A
Inspect the unit
before each use
Do not use the unit, if safety
devices (trigger; safety cover)
are damaged or worn. Never
bypass safety devices.
Make sure that there are no
other people (especially children) or animals within/near
the working area.
Inspect materials to be picked
up before starting work.
Look out for foreign objects
(e.g. stones) during work
(blow mode).
Check the power cable regularly for damage and signs of
wear and tear.
A
Use/Responsibility
You are responsible for the
safety in the working area.
Only use the Garden Vac for
purposes specified in these
operating instructions.
Take the precaution of wearing eye- and ear protection.
Wear sturdy shoes and long
trousers to protect your legs.
7. Advice for proper use / Safety instructions
A
The safety devices installed onto the unit by
the manufacturer must not
be removed or bypassed, e.g.
by tying the trigger down to
the handle. Otherwise you may
run the risk of serious injury
as the unit will not stop automatically.
The equipment may not be disposed of as normal household
refuse but must be disposed of in the technically correct manner.
Disposal:
(in accordance with
EU-directive 2002/96/EC)
Page 9

15
G
Keep fingers and feet away
from the opening of the
vacuum tube!
Ensure that you have secure
foothold whilst working.
Attention! Take extra care
when walking backwards.
You may stumble.
Check the catcher regularly
for damages and replace it
properly, if necessary.
A Interrupting work
Never leave the Garden Vac unattended in the working place.
If you interrupt your work, store
the Garden Vac in a safe place.
Disconnect the mains plug!
If you interrupt work to get
to another working area
always switch off the Garden
Vac during transport.
A
Environmental protection
Observe the local rest periods.
Never use the Garden Vac when
it rains or in damp/wet areas.
Do not operate the Garden Vac
in or near swimming pools as
well as garden ponds.
A Electrical safety
The Garden Vac must only
be operated with undamaged
power cable. If the power-/
extension cable is damaged
or cut, disconnect the mains
plug immediately.
The socket of an extension
cable should be waterproof.
Only use permitted extension
cables. (For outdoor use:
H07 RN-F; 3 -1.5 mm
2
extension cable.) Ask your electrician.
For portable equipment used
outdoors, we recommend the
use of a residual-current device
having a residual-current rating
≤ 30 mA.
In Switzerland use of a residual-current device is obligatory.
The undersigned
GARDENA Manufacturing GmbH · Hans-Lorenser-Str. 40 · D- 89079 Ulm
hereby certifies that, when leaving our factory, the unit indicated below is in accordance with the
harmonised EU guidelines, EU standards of safety and product specific standards.
This certificate becomes void if the unit is modified without our approval.
EU Certificate of Conformity
Description of the unit:
Garden Vac
Type: GS 1500
Art. No.: 2575
EU directives:
Machinery Directive 98/37/EC
Electromagnetic Compatibility
89/336/EC
Low Voltage Directive 73/23/ EC
Directive 93/68 /EC
Directive 2000/14/EC
Harmonised
European standards:
EN 292-1
EN 292-2
EN 60335-1
EN 60335-2-2
Noise level:
measured 100 dB (A)
guaranteed 102 dB (A)
Year of CE marking:
1996
Ulm, 12.09.2002
Thomas Heinl
Technical Dept. Manager
Page 10

42
D
Garantie
GARDENA gewährt für dieses
Produkt 2 Jahre Garantie (ab
Kaufdatum). Diese Garantieleistung bezieht sich auf alle wesentlichen Mängel des Gerätes,
die nachweislich auf Materialoder Fabrikationsfehler zurückzuführen sind. Sie erfolgt durch
die Ersatzlieferung eines einwandfreien Gerätes oder durch
die kostenlose Reparatur des
eingesandten Gerätes nach unserer Wahl, wenn folgende Voraussetzungen gewährleistet sind:
.Das Gerät wurde sachgemäß
und laut den Empfehlungen
in der Gebrauchsanweisung
behandelt.
.Es wurde weder vom Käufer
noch von einem Dritten versucht, das Gerät zu reparieren.
Die Verschleißteile Staubfilter
und Häckselrad sind von der
Garantie ausgeschlossen.
Diese Hersteller-Garantie berührt
die gegenüber dem Händler/
Verkäufer bestehenden Gewährleistungsansprüche nicht.
Im Servicefall schicken Sie bitte
das defekte Gerät zusammen
mit einer Kopie des Kaufbelegs
und einer Fehlerbeschreibung
frankiert an die auf der Rückseite
angegebene Serviceadresse.
G
Guarantee
GARDENA guarantees this product for 2 years (from date of purchase). This guarantee covers
all serious defects of the unit that
can be proved to be material or
manufacturing faults. Under warranty we will either replace the
unit or repair it free of charge if
the following conditions apply:
.The unit must have been
handled properly and in keeping with the requirements of
the operating instructions.
.Neither the purchaser or a
non-authorised third party have
attempted to repair the unit.
The dust filter and shredding
wheel are wearing parts and are
not covered by the guarantee.
This manufacturer’s guarantee
does not affect the user’s existing warranty claims against the
dealer/seller.
In case of claim, please return
the faulty unit together with a copy
of the receipt and a description
of the fault, with postage paid
to one of the GARDENA Service
Centres listed on the back of
these operating instructions.
F
Garantie
GARDENA accorde pour cet
appareil une garantie contractuelle de 2 ans à comp-ter du
jour de l’achat. Elle est assurée
par le remplacement gratuit des
pièces défectueuses ou de
l’appareil. Le choix en étant laissé
à la libre initiative de GARDENA.
En tout état de cause s’applique
la garantie légale couvrant toutes
les conséquences des défauts
ou vices cachés (article 1641 et
suivants du Code Civil).
Pour que ces garanties soient
valables, les conditions suivantes
doivent être remplies :
.L’appareil a été manipulé de
manière adéquate, suivant les
instructions du mode d’emploi.
.Il n’y a eu aucun essai de
réparation, ni par le client, ni
par un tiers.
Le filtre-papier et la turbine
broyeuse, qui sont des pièces
d'usure, sont exclus de la garantie.
Une intervention sous garantie
ne prolonge pas la durée initiale
de la garantie contractuelle.
Toutes les revendications dépassant le contenu de ce texte
ne sont pas couvertes par la
garantie, quel que soit le motif
de droit.
Pendant la période de garantie,
le Service Après-Vente et les
Centres SAV agréés effectueront, à titre payant, les réparations nécessaires par suite
de manipulations erronées.
En cas de réclamation, veuillez
envoyer le produit en port payé
avec le bon d’achat et une description du problème, à l’adresse
du Service Après-Vente figurant
au verso.
N
Garantie
GARDENA geeft op dit product
2 jaar garantie (vanaf de aankoopdatum). Deze garantie heeft
betrekking op alle wezenlijke defecten aan het toestel, die aanwijsbaar op materiaal- of fabricagefouten berusten. Garantie
vindt plaats door de levering
van een vervangend apparaat
of door de gratis reparatie van
het ingestuurde apparaat, naar
onze keuze, indien aan de volgende voorwaarden is voldaan:
.Het apparaat werd vakkundig
en volgens de adviezen in de
gebruiksaanwijzing behandeld.
.Noch de koper, noch een
derde persoon heeft getracht
het apparaat te repareren.
De aan slijtage onderhevige
onderdelen stoffilter en hakselaarwiel vallen niet onder de garantie.
Deze garantie van de producent
heeft geen betrekking op de ten
aanzien van de handelaar/verkoper bestaande aansprakelijkheid.
In geval van reclamatie het defecte apparaat samen met de
kassabon en een beschrijving
van de storing gefrankeerd op
naar het op de achterzijde aangegeven serviceadres opsturen.
Page 11

Deutschland /Germany
GARDENA
Manufacturing GmbH
Service Center
Hans-Lorenser-Straße 40
D-89079 Ulm
Produktfragen:
(+49) 731 490-123
Reparaturen:
(+49) 731 490-290
service
@
gardena.com
Argentina
Argensem
®
S.A.
Calle Colonia Japonesa s/ n
(1625) Loma Verde
Escobar, Buenos Aires
Phone: (+ 54) 34 88 49 40 40
info
@
argensem.com.ar
Australia
Nylex Consumer Products
50-70 Stanley Drive
Somerton, Victoria, 3062
Phone: (+ 61) 1800 658 276
spare.parts
@
nylex.com.au
Austria / Österreich
GARDENA
Österreich Ges.m.b.H.
Stettnerweg 11-15
2100 Korneuburg
Tel.: (+43) 22 62 7 45 4536
kundendienst
@
gardena.at
Belgium
GARDENA Belgium NV/SA
Sterrebeekstraat 163
1930 Zaventem
Phone: (+ 32) 2 7209212
Mail: info
@
gardena.be
Brazil
Palash Comércio e
Importação Ltda.
Rua Américo Brasiliense,
2414 - Chácara Sto Antonio
São Paulo - SP - Brasil CEP 04715-005
Phone: (+ 55) 11 5181-0909
eduardo
@
palash.com.br
Bulgaria
DENEX LTD.
2 Luis Ahalier Str. - 7th floor
Sofia 1404
Phone: (+ 359) 2 9581821
office
@
denex-bg.com
Canada
GARDENA Canada Ltd.
100 Summerlea Road
Brampton, Ontario L6T 4X3
Phone: (+1) 905 7929330
info
@
gardenacanada.com
Chile
Antonio Martinic y Cia Ltda.
Cassillas 272
Centro de Cassillas
Santiago de Chile
Phone: (+ 56) 22010708
garfar_cl
@
yahoo.com
Costa Rica
Compania Exim
Euroiberoamericana S.A.
Los Colegios, Moravia,
200 metros al Sur del Colegio
Saint Francis - San José
Phone: (+ 506) 297 6883
exim_euro
@
racsa.co.cr
Croatia
KLIS d.o.o.
Stanciceva 79
10419 Vukovina
Phone: (+ 385) 1 622 777 0
gardena
@
klis-trgovina.hr
Cyprus
FARMOKIPIKI LTD
P.O. Box 7098
74, Digeni Akrita Ave.
1641 Nicosia
Phone: (+ 357) 22 75 47 62
condam
@
spidernet.com.cy
Czech Republic
GARDENA spol. s r.o.
Шнpskб 20a, и.p. 1153
627 00 Brno
Phone: (+ 420) 800 100 425
gardena
@
gardenabrno.cz
Denmark
GARDENA Norden AB
Salgsafdeling Danmark
Box 9003
S-200 39 Malmö
info
@
gardena.dk
Finland
Habitec Oy
Martinkyläntie 52
01720 Vantaa
France
GARDENA
PARIS NORD 2
69, rue de la Belle Etoile
BP 57080
ROISSY EN FRANCE
95948 ROISSY CDG CEDEX
Tél. (+33) 0826101455
service.consommateurs
@
gardena.fr
Great Britain
GARDENA UK Ltd.
27- 28 Brenkley Way
Blezard Business Park
Seaton Burn
Newcastle upon Tyne
NE13 6DS
info
@
gardena.co.uk
Greece
Agrokip
G. Psomadopoulos & Co.
33 A, Ifestou str. –
Industrial Area
194 00 Koropi, Athens
Phone: (+30) 210 66 20 225
service
@
agrokip.gr
www.agrokip.gr
Hungary
GARDENA
Magyarország Kft.
Késmárk utca 22
1158 Budapest
Phone: (+ 36) 80 20 40 33
gardena
@
gardena.hu
Iceland
Ó. Johnson & Kaaber
Tunguhalsi 1
110 Reykjavik
ooj
@
ojk.is
Ireland
Michael McLoughlin & Sons
Hardware Limited
Long Mile Road
Dublin 12
Italy
GARDENA Italia S.p.A.
Via Donizetti 22
20020 Lainate (Mi)
Phone: (+ 39) 02.93.94.79.1
info
@
gardenaitalia.it
Japan
KAKUICHI Co. Ltd.
Sumitomo Realty &
Development Kojimachi
BLDG., 8F
5-1 Nibanncyo, Chiyoda-ku
Tokyo 102-0084
Phone: (+ 81) 33 264 4721
m_ishihara
@
kaku-ichi.co.jp
Luxembourg
Magasins Jules Neuberg
Grand Rue 30
Boîte postale 12
L-2010 Luxembourg
Phone: (+ 352) 40 14 01
info
@
neuberg.lu
Netherlands
GARDENA Nederland B.V.
Postbus 50176
1305 AD ALMERE
Phone: (+ 31) 36 5210000
info
@
gardena.nl
Neth. Antilles
Jonka Enterprises N.V.
Sta. Rosa Weg 196
P.O. Box 8200
Curaçao
Phone: (+ 599) 9 7676655
pgm
@
jonka.com
New Zealand
NYLEX New Zealand Limited
Building 2, 118 Savill Drive
Mangere, Auckland
Phone: (+ 64) 9 2701806
lena.chapman
@
nylex.com.au
Norway
GARDENA Norden AB
Salgskontor Norge
Karihaugveien 89
1086 Oslo
info
@
gardena.no
Poland
GARDENA Polska Sp. z o.o.
Szymanów 9 d
05-532 Baniocha
Phone: (+ 48) 22 727 56 90
gardena
@
gardena.pl
Portugal
GARDENA Portugal Lda.
Recta da Granja doMarquês
Edif. GARDENA Algueirão
2725-596 Mem Martins
Phone: (+ 351) 21 922 85 30
info
@
gardena.pt
Romania
MADEX INTERNATIONAL SRL
Soseaua Odaii 117-123,
Sector 1,
Bucureєti, RO 013603
Phone: (+ 40) 21 352 76 03
madex
@
ines.ro
Russia / Россия
АО АМИДА ТТЦ
ул. Моcфилмовcкая 66
117330 Моcква
Phone: (+ 7) 095 9569900
amida
@
col.ru
Singapore
Hy - Ray PRIVATE LIMITED
40 Jalan Pemimpin
#02-08 Tat Ann Building
Singapore 577185
Phone: (+ 65) 6253 2277
hyray
@
singnet.com.sg
Slovak Republic
GARDENA Slovensko, s.r.o.
Panónska cesta 17
851 04 Bratislava
Phone: (+ 421) 263 453 722
info
@
gardena.sk
Slovenia
Silk d.o.o.
Brodiљиe 15
1236 Trzin
Phone: (+ 386) 1 580 93 00
gardena
@
silk.si
South Africa
GARDENA
South Africa (Pty.) Ltd.
P.O. Box 11534
Vorna Valley 1686
Phone: (+ 27) 11 315 02 23
sales
@
gardena.co.za
Spain
GARDENA IBERICA S.L.U.
C/ Basauri, nº 6
La Florida
28023 Madrid
Phone: (+ 34) 91 7080500
atencioncliente
@
gardena.es
Sweden
GARDENA Norden AB
Försäljningskontor Sverige
Box 9003
200 39 Malmö
info
@
gardena.se
Switzerland / Schweiz
GARDENA (Schweiz) AG
Bitziberg 1
8184 Bachenbülach
Phone: (+ 41) 848 800 464
info
@
gardena.ch
Turkey
GARDENA / Dost Diþ Ticaret
Mümessillik A.Þ. Sanayi
Çad. Adil Sokak No. 1
Kartal - Ýstanbul
Phone: (+ 90) 216 3893939
info
@
gardena-dost.com.tr
Ukraine / Украина
ALTSEST JSC
4 Petropavlivska Street
Petropavlivska
Borschahivka Town
Kyivo Svyatoshyn Region
08130, Ukraine
Phone: (+ 380) 44 459 57 03
upyr
@
altsest.kiev.ua
USA
Melnor Inc.
3085 Shawnee Drive
Winchester, VA 22604
Phone: (+1) 540 722-9080
service_us
@
melnor.com
2575-20.960.07 /0606
©
GARDENA
Manufacturing GmbH
D-89070 Ulm
http: //www.gardena.com
 Loading...