

Page 1
GARDENA
®
D Gebrauchsanweisung
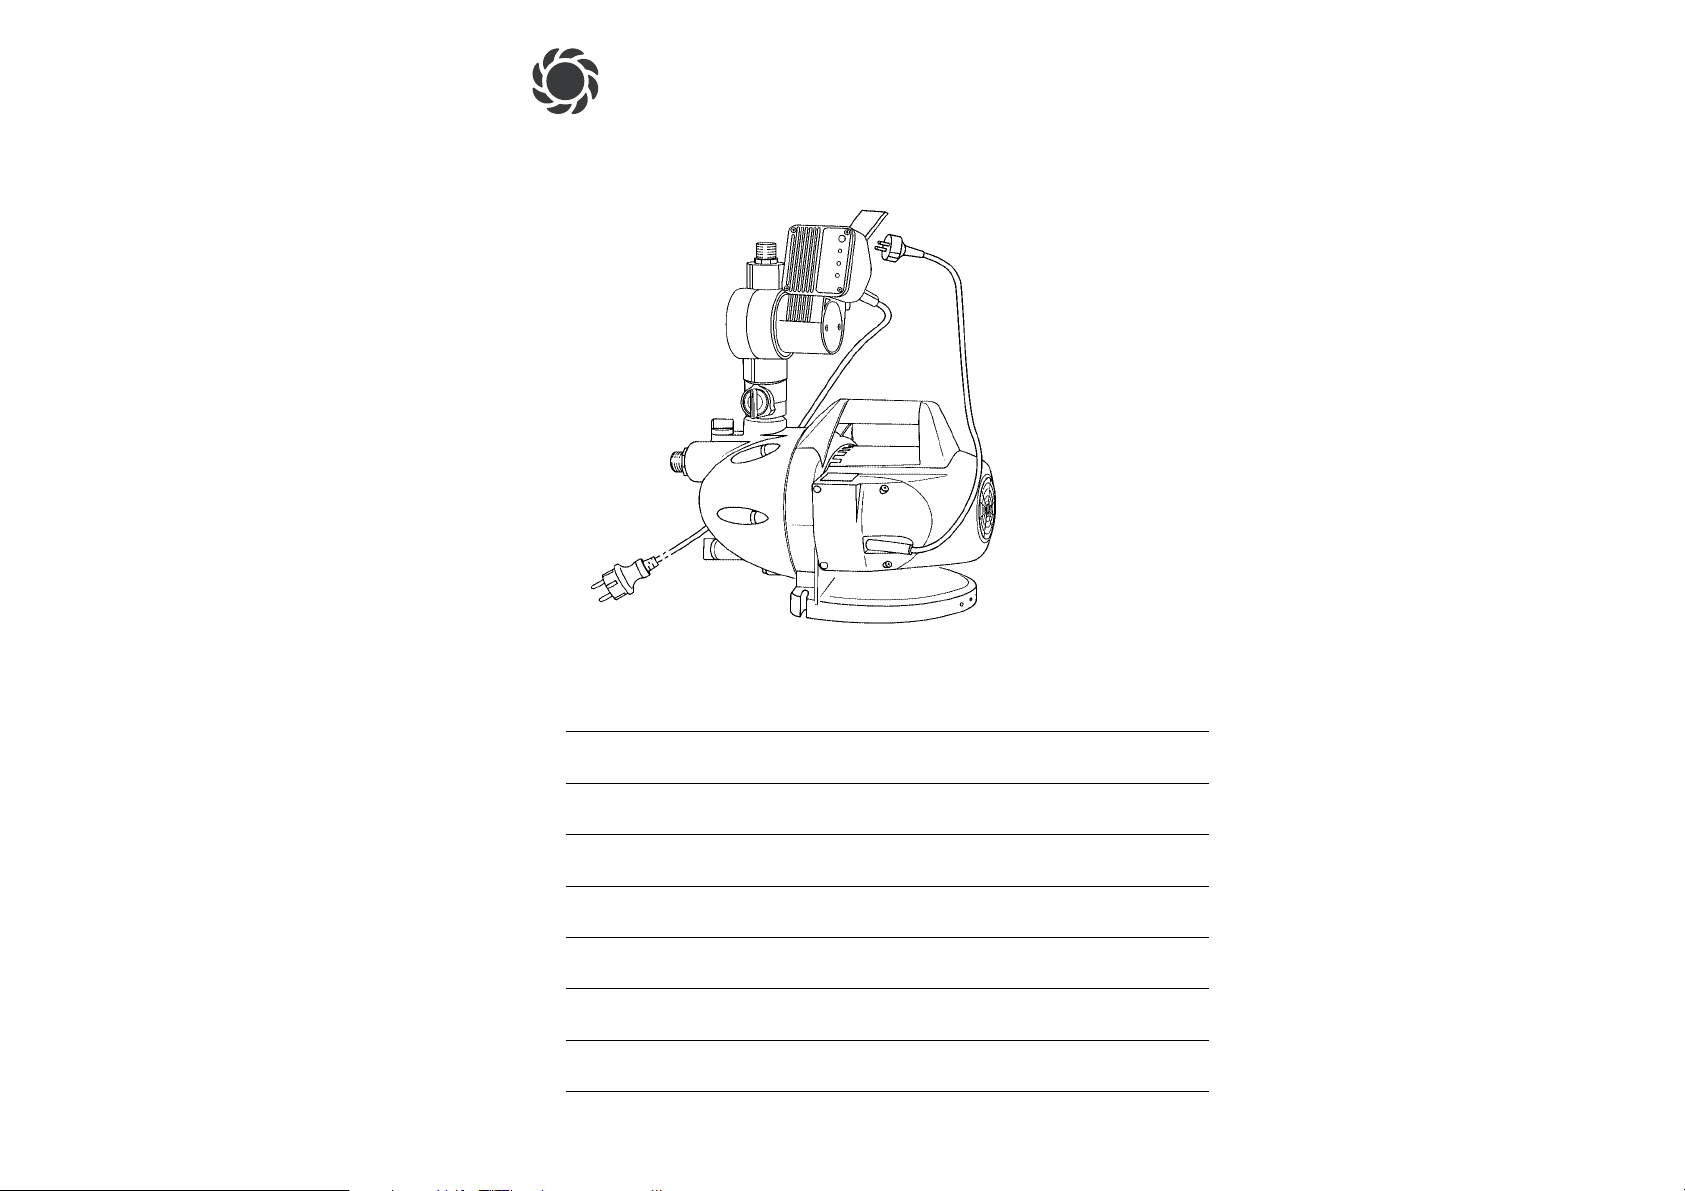
Hauswasserautomat
GB Operating Instructions
Pressure Tank Unit
F Mode d’emploi
Pompe d’arrosage automatique
NL Gebruiksaanwijzing
Pomp met hydrofoor
S Bruksanvisning
Pumpautomat
I Istruzioni per l’uso
Pompa ad intervento automatico per uso domestico
E Manual de instrucciones
Bomba doméstico
P Instruções de utilização
Bomba de Pressão
DK Brugsanvisning
Husvandværk
4000/4 electronic plus
Art. 1482
4000/5 electronic plus
Art. 1484
Page 2
E
B
3
G
5
C
4
2
13
D
C
9
0
A
D
D
E F
5
6D
7
F
8
B
3
13 a
A
0 1000 2000 3000 4000 l/h
m
50
40
30
20
10
0
bar
5
4
3
2
1
4000/5 electronic plus
4000/4 electronic plus
F1
F6
F2
F7
F3
F8
F4
F9
F5
Page 3

4
D
Bitte lesen Sie diese
Gebrauchsanweisung vor
Montage und Inbetriebnahme Ihres
Gerätes sorgfältig. Beim Lesen
der Gebrauchsanweisung bitte
die Umschlagseite herausklappen.
Inhaltsverzeichnis Seite
1. Hinweise zur Gebrauchsanweisung 5
2. Ordnungsgemäßer Gebrauch 5
3. Technische Daten 5
4. Funktionsteile 6
5. Maßnahmen vor der
Inbetriebnahme 6
6. Inbetriebnahme 7
7. Sicherheitshinweise zur
Inbetriebnahme 7
8. Funktion und Display des
Elektronischen Druckschalters 8
9. Benutzungshinweise 9
10. Wartung, Pflege, Aufbewahrung 9
11. Empfehlenswertes Zubehör 10
12. Störungen 10
Garantie 74
G
Please read these operating
instructions carefully before
assembling and using the unit.
Unfold inside cover pages to read
the operating instructions.
Contents Page
1. Information concerning
the Operating Instructions 14
2. Product Use 14
3. Technical Data 14
4. Functional Parts 15
5. Preparations prior to Operation 15
6. Starting Operation 16
7. Safety Hints before Operation 16
8. Function and Display of the
Electronic Manometric Switch 17
9. Operation Hints 18
10. Maintenance, Care, Storage 18
11. Recommended Accessories 19
12. Trouble-Shooting 19
Guarantee 74
F
Nous vous remercions de bien
vouloir lire attentivement ce
mode d’emploi avant d’utiliser votre
pompe. Pour une meilleure compréhension, dépliez le 2ème volet
de la couverture de manière à faire
apparaître les schémas de montage.
Contenu Page
1. Informations sur le mode
d’emploi 22
2. Domaine d’utilisation 22
3. Caractéristiques techniques 22
4. Description du produit 23
5. Préparation de la mise en service 23
6. Mise en service 24
7. Précautions d’emploi 24
8. Fonctionnement et affichage
de l’interrupteur manométrique 25
9. Conseils d’utilisation 26
10. Entretien et rangement 27
11. Accessoires recommandés 27
12. Incidents 27
Garantie 74
N
Lees deze gebruiksaanwijzing
voor montage en ingebruikname van het apparaat zorgvuldig
door. Bij het lezen van de gebruiksaanwijzing de bladzijden met de afbeeldingen openslaan.
Inhoudsopgave Pagina
1. Aanwijzingen bij de
gebruiksaanwijzing 30
2. Juist gebruik 30
3. Technische gegevens 30
4. Bedieningsonderdelen 31
5. Maatregelen vóór de
ingebruikname 31
6. Ingebruikname 32
7. Veiligheidstips voor ingebruikname 32
8. Funktie en display van
de elektronische besturing 33
9. Gebruikstips 34
10. Verzorging, onderhoud, opslag 34
11. Aanbevolen accessoires 35
12. Storingen 35
Garantie 74
S
Läs igenom bruksanvsiningen
noggrant innan Du tar Din
pump i bruk. Ha omslaget utvikt när
Du läser bruksanvisningen.
Innehåll Sida
1. Information 38
2. Användningsområde 38
3. Tekniska data 38
4. Beskrivning 38
5. Åtgärder innan automaten
tas i bruk 39
6. Drift 40
7. Säkerhetsråd vid drift 40
8. Den elektroniska styrningens
funktion och display 40
9. Viktiga råd 42
10. Underhåll, skötsel och förvaring 42
11. Rekommenderade tillbehör 42
12. Felsökning 42
Garanti 75
I
Prima di mettere in uso la
nuova pompa, leggere attentamente le istruzioni tenendo aperto
il pieghevole per avere sott’occhio
i disegni esplicativi.
Indice pagina
1. Avvertenze 45
2. Uso corretto 45
3. Caratteristiche tecniche 45
4. Parti funzionali 45
5. Operazioni preliminari 46
6. Messa in uso 47
7. Norme di sicurezza 47
8. Pressostato elettronico 47
9. Norme operative 48
10. Manutenzione 49
11. Accessori 49
12. Anomalie di funzionamento 49
Garanzia 75
E
Antes del montaje y de la
puesta en marcha del aparato,
aconsejamos una atenta lectura del
presente manual de instrucciones.
Para facilitar la lectura, desdoble la
cubierta.
Índice Página
1. Indicaciones del manual
de instrucciones 52
2. Uso correcto 52
3. Datos técnicos de la bomba 52
4. Piezas funcionales 52
5. Operaciones antes de la puesta
en servicio 53
6. Puesta en servicio 54
7. Medidas de seguridad para
la puesta en funcionamiento 54
8. Función y display del interruptor
electrónico 54
9. Instrucciones de uso 56
10. Mantenimiento, cuidados,
almacenamiento 56
11. Accesorios recomendados 56
12. Averías 57
Garantía 75
P
Por favor leia atentamente
estas instruções de utilização
antes de utilizar esta bomba.
Desdobre as páginas na capa interior
para ler as instruções de utilização.
Conteúdo Página
1. Informações acerca das
instruções 59
2. Utilização do produto 59
3. Dados técnicos 59
4. Componentes funcionais 60
5. Providências a serem tomadas
antes da colocação em funcionamento 60
6. Colocação em funcionamento 61
7. Medidas de segurança antes
do funcionamento 61
8. Funcionamento e indicações
do display do interruptor
manométrico electrónico 62
9. Conselhos de utilização 63
10. Manutenção, conservação
e armazenagem 64
11. Acessórios recomendados 64
12. Falhas 65
Garantia 75
K
Læs denne brugsanvisning
omhyggeligt igennem før montering og igangsætning af apparatet.
Klap brugsanvisningens omslagsside
ud under læsningen.
Inhold Side
1. Henvisninger til brugsanvisningen 67
2. Korrekt anvendelse 67
3. Tekniske data 67
4. Funktionsdele 67
5. Foranstaltninger før igangsætning 68
6. Igangsætning 69
7. Sikkerhedshenvisninger
i forbindelse med igangsætning 69
8. Det elektroniske manometer
kontakts funktion og display 69
9. Anvendelseshenvisninger 71
10. Vedligeholdelse, pleje, opbevaring 71
11. Anbefalelsesværdigt tilbehør 71
12. Fejl 72
Garanti 75
Page 4

15
G
14
G
1
Water drain screw
2
Suction side
3
Pump fitting 33.3 mm (G1)
4
Filler cap with screw plug
5
Electronic Manometric Switch
6
Inlet, delivery side
7
RESET button
8
Light-emitting diodes
9
Screws for casing attachment
0
Casing cover
A
Turbine
B
Turbine axle
C
Rotary switch for non-return
valve
D
Mains connector for the
Manometric Switch
E
Connector socket for
pump connector plug
F
Mains plug for pump
G
Outlet, delivery side
4. Functional Parts (ill. B/C/E)
5.1 Mounting the Electronic
Manometric Switch
The Electronic Manometric Switch
5
is fitted with a 33.3 mm (G1)
outer thread at the inlet side6.
To mount the Electronic Manometric Switch proceed as follows:
1. Hold the top of the Electronic
Manometric Switch with one
hand and with the other, screw
the lower rotating part into the
inner thread of the pump.
Screw up to the limit.
Note: When the limit has been
reached, the non-return valve
(13a) can be turned in the
counter-clockwise direction
– a maximum of one turn
however – into any position
which is the most convenient
for you.The display can also be
turned into any desired position
before the connection on the
pressure side
3/ G
is tight-
ened up.
2. Plug the mains plug for the
pump Finto the connector
socket Eat the back of the
display for the Electronic
Manometric Switch (ill. E).
5.2 Location and Filling of
the Pump before Operation
1. Locate the pump at safe
distance of the liquid.
Take care that the site is firm
and solid, in order to ensure
safe location of the pump.
2. Before operation, fill the
pump either a) through the
filler cap, or b) through the
outlet nozzle of the Electronic Manometric Switch
with at least 2 I of the liquid
to be pumped:
a) To fill the pump through
the filler cap
4
: Undo the
screw plug at the filling
nozzle and tighten up again
after filling the pump (do
not use a wrench).
b) To fill the pump through the
outlet nozzle on the delivery
side
G
of the Electronic
Manometric Switch:
1. Set the rotary switch/ non-
return valve to position 2
(non-return valve open).
2. Open the screw plug
of the filler cap
4
(for
bleeding).
3. Fill the pump with liquid
through the outlet on the
delivery side
G
of the
Electronic Manometric
Switch until liquid exits
the pump on the suction
side
2
.
4. Tightly close the screw
plug again.
As well as the pump itself,
the suction hose with backflow preventer shall be filled
in order to ensure troublefree drawing (refer to the
section “Suction hose connection”).
5.3 Suction hose connection
Suction Side
2
1. Screw one of the two supplied
pump fittings 3onto the
suction side 2of the pump
and tighten it by hand until
the washer fits closely.
Note: For the suction side use
a vacuum-resistant suction
hose with back-flow preventer (e.g. GARDENA Suc
tion Unit, art.no. 1411). Only
this way, the suction hose can
be filled up before initial operation. Additionally, the liquid to
be pumped stays in the suction
hose, when the pump cuts
out. Thus easy priming is
made possible when starting
the pump again. For suction
heights exceeding 4 m, we
recommend to fix additionally
the suction hose, e.g. by fastening it to a wooden peg, thus
the pump is relieved of load.
2. Before connection, equip the
union nut of the suction hose
with the supplied dirt filter (ill.
D). First of all remove the flat
packing which may be in the
union nut.
Note: Alternatively, you can
also use the GARDENA Pump
Preliminary Filter, art. no.1730/
1731. It is especially recommended for use with highly
contaminated or with a very
sandy liquid. Filtration of water
is essential to prevent the Electronic Manometric Switch from
internal contamination, thus
avoiding malfunction of the unit.
3. In case of permanent, indoor
installation of the pump for
domestic water supply, in order
to reduce noise and to avoid
damages at the Manometric
Switch caused by vibration,
it is recommended to connect
the Pressure Tank Unit via
flexible suction lines, e.g.in
conjunction with the GARDENA
Bore Hole Suction Hose,
art.no. 1729, to the pipe network but not firmly via rigid
pipes.
5. Preparations prior to Operation
Please read these operating
instructions thoroughly. Follow
the information given. Use the
operating instructions to get
acquainted with the operating
parts and the proper use of
the Pressure Tank Unit.
A
For safety reasons,
people who are not
familiar with these operating
instructions should not use
this Pressure Tank Unit.
Following the operating instructions supplied by the manufacturer is a prerequisite for the
proper use of the pump.
The operating instructions include
all necessary instructions concerning operation, maintenance
and service.
GARDENA Pressure Tank Units
4000/4 electronic plus, 4000/ 5 electronic plus
1. Information concerning the Operating Instructions
GARDENA Pressure Tank Units
have been designed for private
use around house and garden.
Pressure Tank Units are predominantly used for operating
watering implements and systems
in private gardens.
Besides, the GARDENA Pressure Tank Units can be used for
domestic water supply, e.g. when
taking rainwater for domestic
use.
A
GARDENA Pressure Tank
Units are not designed for
continuous operation (e.g. industrial application, continuous
circulating operation).
Corrosive, easily combustible,
aggressive or explosive substances (e.g. petrol, petroleum,
nitro thinner) as well as food
must not be pumped.
The temperature of the liquid to
be pumped should not exceed
35 °C.
2. Product Use
4000/4e plus 4000/ 5e plus
Rated power 800 W 1,000 W
Max. delivery capacity 3,600 l /h 3,600 l / h
Max. delivery head 42 m 50 m
Max. pressure
(= cut-out pressure) 4.2 bar 5.0 bar
Cut-in pressure approx. 2.2 ± 0,2 bar 2.2 ± 0,2 bar
Max. suction head 9 m 9 m
Perm. internal pressure
(delivery side) 6 bar 6 bar
Voltage 230 V 230 V
Frequency 50 Hz 50 Hz
Noise level L
WA
1)
77 dB (A) 79 dB (A)
1) Measuring method according to directive 2000/ 14/EC
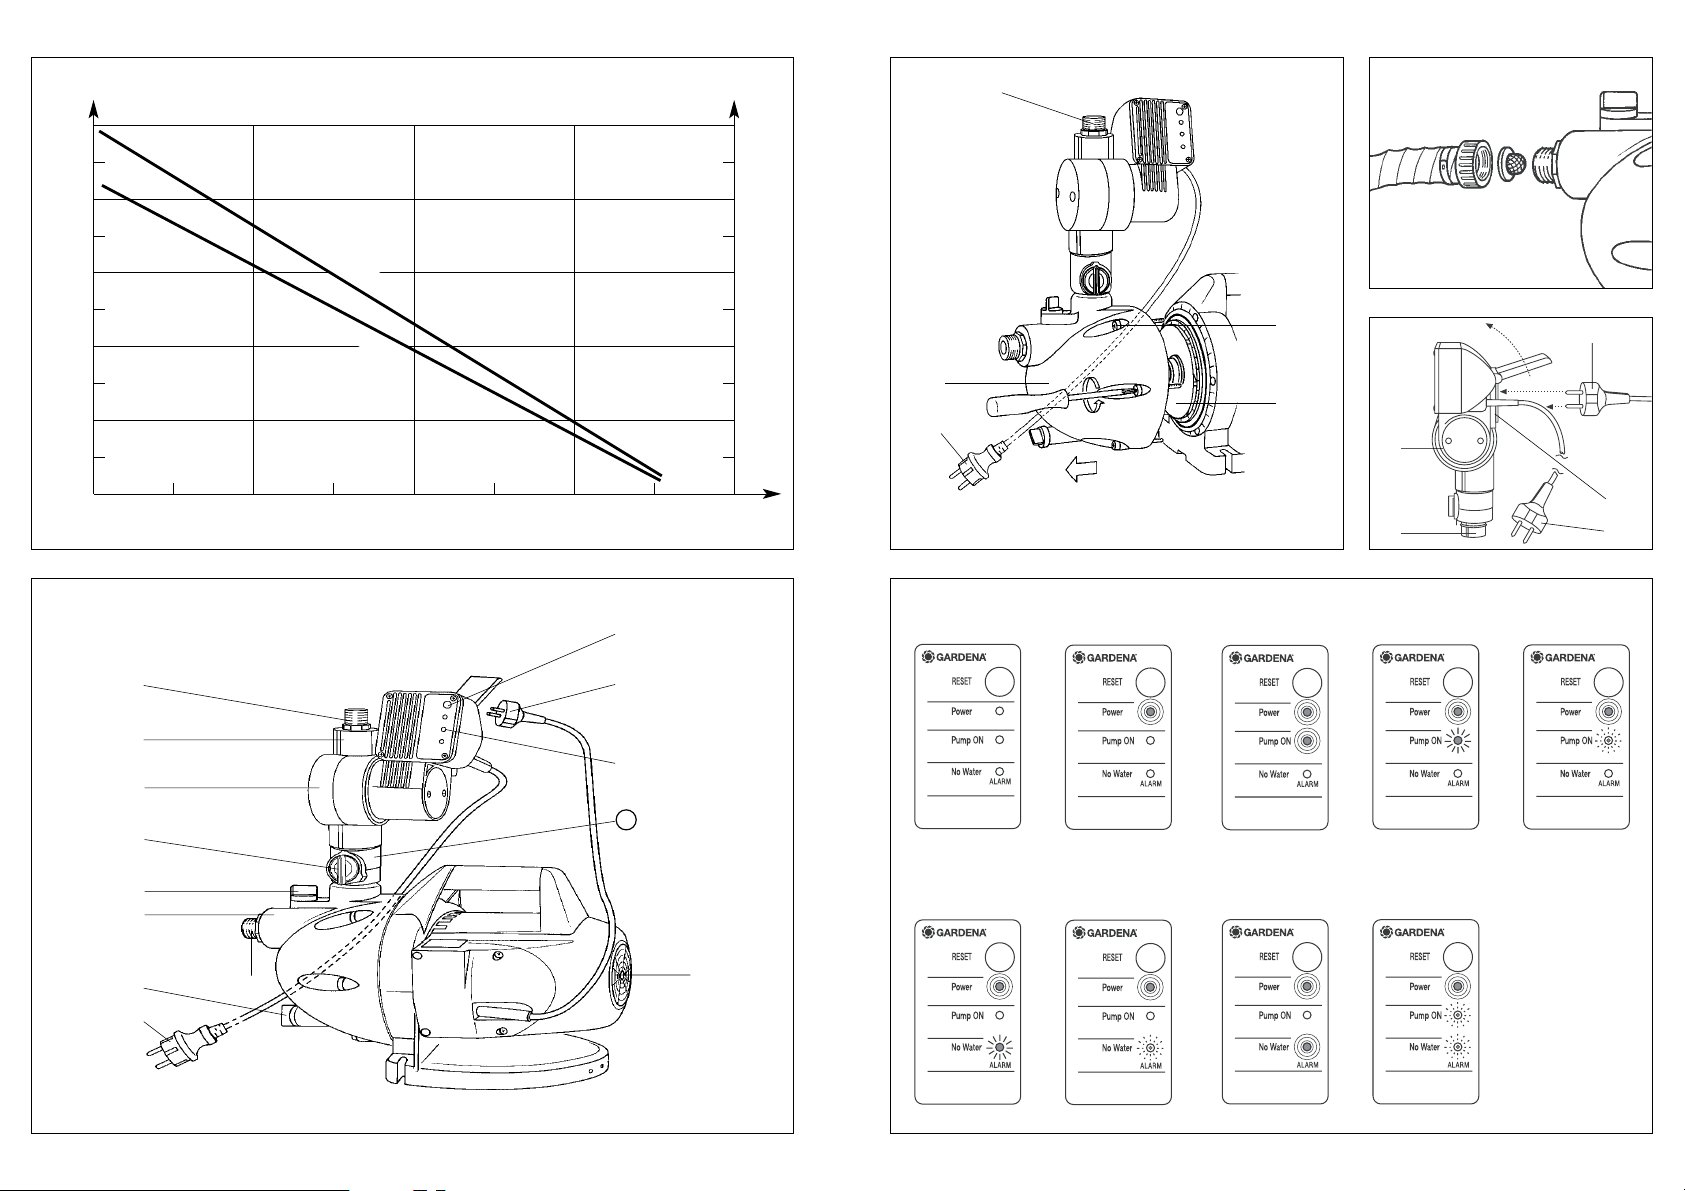
Performance Characteristics (ill. A)
Technical data of the above performance characteristics is measured at a suction height of 0.5 m,
using a 25 mm (1”) suction hose.
3.Technical Data
Page 5

17
G
16
G
The Electronic Manometric Switch
is equipped with an electronic
control unit with fixed programs.
The electronic control unit is activated by pulses from the manometric switch and the flow recognition of the dry-running safety
feature.
The manometric switch is set
at the factory to a switching
pressure of approx. 2.2 bar.
This setting cannot be changed.
The dry-running safety mechanism protects the pump
against damage and controls
the time the pump continues to
run against the closed delivery
side.
The LEDs (light emitting diodes)
display the operating status
(➔ see “Electronic Control Display”).
Explanation of Terms
..
Priming cycle
The pump attempts to restore
normal operation in 4 minutes.
..
Automatic self-priming mode
(➔➔yellow Alarm LED flashes)
After a fault, the pump’s electronic control unit makes three
automatic self-priming attempts
at different time intervals (after
1 hour, after 5 hours and after
20 hours) to restore normal
operation.
The priming cycle (see above)
is used for each of these attempts.
..
Re-plugging
(removing the mains plug
and then plugging it
back in the socket again)
Important ! Remove the plug
from the socket! Check the
unit and pump for any faults
(see section “Finding Faults”).
Rectify any faults and restart
the pump by plugging the
mains plug into a socket supplying 230 V AC.
Electronic Control Display
Operating Status
lit flashing flashing
quickly
..
RESET Button (ill. F 1)
The RESET button is used
to reset and restart the pump
after a fault.
..
Red Power LED is lit (ill. F2)
The pump is connected to
the mains power.
The pump functions in the
normal operating mode.
..
Green LED is lit (ill. F 3)
The pump is connected to the
mains and the pump is running.
Once the pump has reached
the max. pump pressure, the
pump switches off (the green
LED extinguishes) and the
pump functions in the normal
operating mode.
..
Green LED flashing slowly
(once a second) (ill. F 4)
➔ The flow rate on the deliv-
ery side is too low (below
90 l/h).
The pump continues to run
and then switches off. It
turns on again as soon as
the switching pressure of
approx. 2.2 bar has been
reached (e.g. in the case
of a leak).
➔ The pump must be switched
off just before you finish
draining water from the unit.
..
Green LED flashing quickly
(four times a second) (ill. F5)
➔ The flow rate on the inlet
side is too low (below
400 l/h).
The pump continues to
run for approx. 40 seconds.
If normal operation is not
achieved during this time,
the pump switches off and
the control unit changes
to the “automatic self-
priming mode”.
Not
e: The pump can be
switched on again at any
time by pressing the
RESET button.
..
Yellow LED flashing slowly
(once a second) (ill. F 6)
➔ The amount of water is
too low when restarting
the pump.
The pump runs through
the first “priming cycle”.
If the normal operating
mode is not achieved, the
pump switches off and
the control unit changes
to the “automatic self-
priming mode”.
Not
e: The pump can be
restarted at any time by
pressing the RESET button.
..
Yellow LED flashing quickly
(four times a second) (ill. F7)
➔ Alarm which indicates if the
amount of water is too low
when the pump is operating
in the normal mode. The
control unit changes to the
“automatic self-priming
mode”.
Not
e: The pump can be
restarted at any time by
pressing the RESET button.
..
Yellow LED is lit (ill. F 8)
➔ The “automatic self-
priming mode” is no longer
active and the unit is no
longer supplying water
(e.g. no water in the container or borse or the filter
is dirty).
Not
e: The pump can be
restarted at any time by
pressing the RESET button
or by “re-plugging”.
..
Green and yellow LEDs
flashing quickly and alternately
(four times a second) (ill. F9)
➔ Warning:There is a leak
in the pipe system.
8. Function and Display of the Electronic Manometric Switch
Important! Don’t use any hose
connection system fittings on
the suction side!
Delivery Side
G
4. Screw the second pump fitting
3
into the outlet nozzle of the
delivery side Gof Electronic
Manometric Switch, and tighten
up by hand. Take care that the
washer of the pump fitting fits
closely to the delivery side.
Note 1: The pump fitting is
equipped with a 33.3 mm (G 1)
thread to which 13 mm (1/2” ),
19 mm (3/ 4”) and 16 mm
(5/8”) hoses can be connected by using GARDENA hose
connection system fittings.
Note 2: Best results regarding
the delivery capacity of the
pump are achieved when connecting 19 mm (3/ 4”) hoses
in conjunction with GARDENA
“Profi ” Maxi-Flow System fittings (e.g. art.no.1752) or
when using 25 mm (1”) hoses
with fittings available from
your sanitary dealer.
When connecting simultane-
ously several hoses / watering
accessories, we recommend
application of our GARDENA
Twin-Tap Connector (art.no. 1210)
or Four Channel Water Distributor
(art.no. 1194) which can be
screwed directly onto the pump
fitting on the delivery side
G
.
Using the pump for the
first time
1.Set the switch of the backflow
valve to Position 2.
2.Slightly open the release
points in the delivery pipe (e.g.
spray lance, tap) ➔ air must
be allowed to escape during
the suction process.
3.Plug the mains plug
D
for the
Electronic Manometric Switch
into an outlet socket supplying
230 V alternating current.
Caution! The pump immediately starts to run!
4.As soon as the pump begins
to pump, turn the switch to
Position 1 (normal operation)
➔ ensures fault-free operation
of the pump.
6. Starting Operation
A
..
Caution: Pursuant to
DIN VDE 0100 -702 and
0100-738 use of the pump
nearby swimming pools and
garden ponds and other
similar places is only permissible, if the pump is operated
with a residual-current device with a residual-current
rating ≤≤30 mA. Please ask
your electrician for his advice.
..
The pump must be located
on solid, even ground, protected from flooding.Take
care that the pump cannot
fall into water.
..
Mains power cables should
not have a smaller crosssection than a rubber
sheathed cable of the designation H07 RNF. Extension
cables must meet the requirements of DIN VDE 0620.
..
In Austria, the electrical
connections must be made
according to ÖVE-EM 42,
T2 (2000)/ 1979 § 22 based
on § 2022.1. Pursuant to this
regulation it’s imperative to
operate pumps for swimming
pools and garden ponds
exclusively via an isolating
transformer. Please ask
your electrician.
..
In Switzerland mobile appliances which are used outdoors, must be connected
via a residual-current device.
..
When using the pump for
domestic water supply,
please adhere to the local
water and sewerage regulations. In addition observe
the regulations of DIN 1988.
If necessary, contact your
sanitary expert.
..
Children under the age of 16
are not allowed to operate
the pump. Keep them away
from the connected unit.
..
Protect the pump from rain.
Don’t use the pump in wet
or moist area.
..
Before operating the pump,
first make a visual check, if
there is any damage of the
pump (esp. regarding power
cable and plug). A damaged
pump must not be used. In
case of damage, please have
the pump checked by our
GARDENA Service Centre or
by an authorised electrician.
..
Check line voltage. Data
indicated on the type plate
must match technical data
of the mains supply.
7. Safety Hints before Operation
Page 6

19
G
A
Attention! Disconnect
the plug from the mains
before carrying out any work
on the pump!
A turbine clogged by contamination can be released by using
a screwdriver to turn over the
turbine axle
B
(observe the arrow
on the casing indicating the direction of rotation). If this is not possible any more, the turbine space
can be cleaned by opening the
screws
9
and removing the
casing cover0.
The turbine Acan be removed
if necessary, by using a screwdriver to hold the turbine axle
B
in place while loosening the
turbine Awith a ring spanner
at the same time.
When assembling, take care that
the parts are re-assembled corresponding to the sequence of
the disassembly.
Before the first frost sets in,
the pump should be drained
via the water drain screw
1
.
Store it protected from frost.
To empty the Electronic Mano-
metric Switch
5
put the rotary
switch Cin position 2 and
open the water drain screw 1.
10. Maintenance, Care, Storage (ill. B/C)
..
GARDENA Suction Hoses
Kink- and vacuum-resistant,
sold by the metre with 19 mm
(3/4”) or 25 mm (1” ) diameter
without fittings or in fixed
length, complete with fittings.
..
GARDENA Suction Hose
Fittings (art. no. 1723/1724)/
Suction Filter with Backflow
Preventer (art. no. 1726 /
1727/1728)
To equip suction hoses sold
by the metre.
..
GARDENA Pump
Preliminary Filter,
art. no. 1731
Recommended for pumping
sandy liquids.
art. no. 1730, recommended
for pumping sandy liquids
and higher water quantities.
..
GARDENA Bore Hole
Suction Hose, art. no. 1729
For vacuum-resistant connection of the pump to boreholes
or pipe networks. Length 0.5 m.
With 33.3 mm (G 1) female
thread at both ends.
11. Recommended Accessories
Problem Probable cause Remedy
Pump motor runs, Leaks at suction side. Eliminate leak.
Suction filter at the suction hose To adjust the flow rate of the
but delivery capacity is totally or partly sucked free. suction side to the delivery side,
or pressure suddenly reduce the flow rate at the pump’s
decreases. delivery side
G
. Observe min.
flow rate (see section 9).
Suction filter or backflow Clean filter or backflow preventer.
preventer clogged.
Turbine clogged. Unplug and clean the turbine
(see point 10).
Pump doesn’t deliver water. Leaks at suction side. Eliminate leak.
Pump switches on and off Dirt has collected on the 1. Remove manometric switch
continuously if liquid is impeller. from pump.
drawn at a rate greater than 2. Return valve set to position 2.
400 l/h. 3. Rinse manometric switch
Pump doesn’t start or No power. Check fuses and electric connec-
suddenly stops during tions.
operation.
Circuit breaker has cut out the Disconnect at the mains and clean
pump because of overloading. the turbine (refer to “Maintenance,
Care and Storage”). Observe
max. liquid temperature (35°C).
Electric failure. Send the pump to one of our
GARDENA Service Centres.
Electronic Manometric Switch First disconnect the plug
calcified.
A at the mains ! Then lower
the pressure, e. g. by opening
a consumer.
Decalcify the Electronic Manometric Switch. Unplug it, disconnect the pressure hose / pressure
12. Trouble-Shooting
18
G
..
Don’t use the power cable
for carrying the pump or for
plugging off. Protect the
power cable from heat, oil
and sharp edges.
..
Please unplug the pump
after operation and before
carrying out any maintenance works.
..
In order to avoid dry-running
of the pump, take care that
the end of the suction hose
is always submerged into
the liquid.
..
The temperature of the liquid
to be pumped must not exceed
35 °C.
..
Sand and other abrasive substances in the liquid cause
increased wear and reduce
the pump’s output.
..
The pump is not designed for
continuous operation (e.g.
industrial application, continuous circulating operation).
..
The minimum flow rate is
90 I/h (= 1.5 I/min).Watering
accessories with lower rate
must not be operated.
..
When using the pump for pressure intensification, the max.
permissible internal pressure
of 6 bar (on the delivery side)
must not be exceeded.
The to be increased delivery
pressure and the pump pressure sum up.
Example: pressure at the
water tap 1.5 bar, max.
pressure of the GARDENA
Pressure Tank Unit 4000 /4
electronic plus 4.2 bar,
total pressure 5.7 bar.
9. Operation Hints
The pump switches on and
off because of a leak. If the
pump switches on and off
more than 7 times within 2
minutes, the
control unit issues a warning
via flashing LEDs and the
motor switches itself off.
Not
e: The pump can only be
restarted by “re-plugging”.
Finding Faults
Important ! Unplug the pump.
Check the pump for possible
faults such as:
➔ Faulty or leaking back-flow
preventer at the end of the
suction hose
➔ Pump and suction hose
are not filled up with the
liquid to be pumped
➔ Backflow valve switch set
to position 2 and was not set
to position 1 once the pump
began pumping
➔ Suction hose end is not sub-
merged into the liquid
➔ Outlet too low
➔ Suction hose or connections
are not water-tight
➔ Suction filter clogged
➔ Air cannot escape on delivery
side since release points are
closed etc.
➔ Delivery pipe or consumer are
not water-tight
➔ The pump switches on and
off because of a leak. If the
pump switches on and off more
than 7 times within 2 minutes,
the control unit issues a warning via flashing LEDs and the
motor switches itself off.
Clear the fault. Plug in the pump
in order to start again operation
of the pump.
Shouldn’t the pump start priming, although you have repeatedly pressed the RESET button,
please contact one of our
GARDENA Service Centres
(addresses you will find on the
rear side).
Page 7

21
G
20
G
The undersigned
GARDENA Kress + Kastner GmbH · Hans-Lorenser-Str. 40 · D-89079 Ulm
hereby certifies that, when leaving our factory, the units indicated below are in accordance with the
harmonised EU guidelines, EU standards of safety and product specific standards.
This certificate becomes void if the units are modified without our approval.
EU Certificate of Conformity
If you have any problems with
your Pressure Tank Unit, please
contact our Service or return
the defective unit together with a
short description of the problem –
in case of guarantee, with a copy
of the receipt – postage paid to
one of the GARDENA Service
Centres listed on the back of this
leaflet.
Note: The pump can also be
operated without the Electronic
Manometric Switch 5by plugging the mains plug for the pump
F
into the mains socket. If the
fault is caused by the Electronic
Manometric Switch, then it is
sufficient to forward this to the
appropriate servicing office.
We expressly point out that,
in accordance with the product
liability law, we are not liable
for any damage caused by our
units if it is due to improper
repair or if parts exchanged are
not original GARDENA parts
or parts approved by us, and if
the repairs were not carried out
by a GARDENA Service Centre
or an authorised electrician.
The same applies to spare
parts and accessories.
line and fill antiliming agent or a
mixture of water and vinegar into
the pump using the delivery outlet
6
. Afterwards rinse thoroughly.
Pump constantly cuts in Leak on the pressure side. Check the pressure line and
and out without drawing connected consumers for leaks.
water. The non-return valve shall be at
position 1 when localising faults.
Note: Even the smallest leak
(loss of a few mls) can cause the
pressure in the pump to drop.
The cause of this is often small
leaks at taps and toilet flushing
cisterns.
There being deposits of dirt in Loosen the Electronic Manoin Electronic Manometric Switch. metric Switch from the pump.
Turn the non-return valve
C
to
position 2.
Clean the non-return valve, e.g.
by flushing in the direction of flow.
Pump does not cut out. Rotary switch / non-return Set the rotary switch to posi-
valve is set to position 2. tion 1.
Non-return valve of the Electronic Clean the non-return valve, e.g.
Manometric Switch is blocked. by flushing in the direction of flow.
Larger leaks on the pressure side. Rectify leaks.
Pump doesn’t start Outlet end (e.g. water accessory) Open the outlet end.
working. is closed. There is sufficient water
pressure in the pressure line.
Description of the units:
Pressure Tank Unit
Types:
4000/4 electronic plus
4000/5 electronic plus
Art. nos.:
1482 / 1484
EU directives:
Machinery Directive 98/37/ EC
Electromagnetic Compatibility
89/336/EC
Low Voltage Directive 73/ 23/ EC
Directive 93/68 /EC
Directive 2000/14/EC
Harmonised
European standards:
EN 292-1
EN 292-2
EN 60335-1
EN 60335-2-41
Noise level:
measured / guaranteed
1482 77 / 78 dB(A)
1484 79 / 80 dB(A)
Year of CE marking:
1996
Ulm, 21.02.2002
Thomas Heinl
Technical Dept. Manager
Page 8

74
D
Garantie
GARDENA gewährt für dieses
Produkt die gesetzliche Garantie
(ab Kaufdatum). Diese Garantieleistung bezieht sich auf alle
wesentlichen Mängel des Gerätes, die nachweislich auf Materialoder Fabrikationsfehler zurückzuführen sind. Sie erfolgt durch
die Ersatzlieferung eines einwandfreien Gerätes oder durch
die kostenlose Reparatur des eingesandten Gerätes nach unserer
Wahl, wenn folgende Voraussetzungen gewährleistet sind:
.Das Gerät wurde sachgemäß
und laut den Empfehlungen
in der Gebrauchsanweisung
behandelt.
.Es wurde weder vom Käufer
noch von einem Dritten versucht, das Gerät zu reparieren.
Die Verschleißteile Turbine und
Filter sind von der Garantie ausgeschlossen.
Diese Hersteller-Garantie berührt
die gegenüber dem Händler/
Verkäufer bestehenden Gewährleistungsansprüche nicht.
G
Guarantee
GARDENA honours the guarantee legally required for this product (starting from the date of
purchase). This guarantee covers
all serious defects of the unit
that can be proved to be material
or manufacturing faults. Under
guarantee we will either replace
the unit or repair it free of charge
if following conditions apply:
.The unit must have been
handled properly and in keeping with the requirements of
the operating instructions.
.Neither the purchaser or a
non-authorised third party
have attempted to repair
the unit.
The turbine and the filter are
wearing parts and are not covered by the guarantee.
This manufacturer’s guarantee
does not affect the user’s
existing warranty claims against
the dealer/seller.
F
Garantie
GARDENA accorde pour cet
appareil la garantie légale à
compter du jour de l’achat. Elle
comprend le remplacement gratuit des pièces défectueuses
ou de l’appareil, le choix en étant
laissé à la libre initiative de
GARDENA. En tout état de cause
s’applique la garantie légale couvrant toutes les conséquences
des défauts ou vices cachés
(article 1641 et suivants du Code
Civil).
Pour que ces garanties soient
valables, les conditions suivantes
doivent être remplies :
.L’appareil a été manipulé de
manière adéquate, suivant les
instructions du mode d’emploi.
.Il n’y a eu aucun essai de
réparation, ni par le client, ni
par un tiers.
La turbine et le filtre sont des
pièces d’usure et sont par conséquent exclus de la garantie.
Une intervention sous garantie
ne prolonge pas la durée initiale
de la garantie contractuelle.
Toutes les revendications dépassant le contenu de ce texte
ne sont pas couvertes par la
garantie, quel que soit le motif
de droit.
Pendant la période de garantie,
le Service Après-Vente effectuera, à titre payant, les réparations nécessaires par suite
de manipulations erronées.
N
Garantie
GARDENA geeft op dit product
de wettelijke garantie (vanaf de
aankoopdatum). Deze garantie
heeft betrekking op alle wezenlijke defecten aan het toestel,
die aanwijsbaar op materiaal- of
fabricagefouten berusten.
Garantie vindt plaats door de levering van een vervangend apparaat of door de gratis reparatie
van het ingestuurde apparaat,
naar onze keuze, indien aan de
volgende voorwaarden is voldaan:
.Het apparaat werd vakkundig
en volgens de adviezen in
de gebruiksaanwijzing behandeld.
.Noch de koper, noch een
derde persoon heeft getracht
het apparaat te repareren.
De aan slijtage onderhevige turbine en het filter vallen niet onder
de garantie.
Deze garantie van de producent
heeft geen betrekking op de ten
aanzien van de handelaar/ verkoper bestaande aansprakelijkheid.
S
Garanti
GARDENA lämnar garanti enligt
gällande lag för denna produkt
(gällande från inköpsdatum).
Denna garanti täcker alla allvarliga defekter på maskinen som
kan bevisas vara materiella
fel eller tillverkningsfel. Under
garantitiden repareras eller utbytes enheten utan kostnad
under följande förutsättningar:
.Enheten måste ha skötts och
använts i enlighet med bruksanvisningen.
.Varken köparen eller en icke
auktoriserad tredje part får
ha försökt reparera enheten.
Page 9

Deutschland
GARDENA Kress + Kastner GmbH
GARDENA Service
Hans-Lorenser-Straße 40
D-89079 Ulm
Produktfragen: (07 31) 490-123
Reparaturen: (07 31) 490-290
Argentina
Argensem S.A.
Venezuela 1075
(1618) El Talar - Buenos Aires
Australia
NYLEX Corporation Ltd.
25-29 Nepean Highway
P.O. Box 68
Mentone, Victoria 3194
Austria
GARDENA Österreich Ges. m.b.H.
Stettnerweg 11-15
2100 Korneuburg
Belgium
MARKT (Belgium) NV/SA
Sterrebeekstraat 163
1930 Zaventem
Brazil
M. Cassab
Av. das Nações Unidas, 20.882
Santo Amaro, CEP 04795-000
São Paulo - S.P.
Bulgaria / България
ДЕНЕКС ООД
Бул. ”Г.М.Димитров” 16 ет.4
София 1797
Canada
GARDENA Canada Ltd.
100, Summerlea Road
Brampton, Ontario
Canada L6T 4X3
Chile
Antonio Martinic Y CIA. LTDA.
Gilberto Fuenzalida 185 Loc.
Las Condes - Santiago de Chile
Costa Rica
Compania Exim
Euroiberoamericana S.A.
350 Sur del Automercado
Los Yoses
San Pedro
Cyprus
FARMOKIPIKI LTD
P.O. Box 7098
74, Digeni Akrita Ave.
1641 Nicosia
Czech Republic
GARDENA spol. s.r.o.
Řípská 20
62700 Brno
Denmark
GARDENA Danmark A/S
Naverland 8
2600 Glostrup
Finland
Habitec Oy
Martinkyläntie 52
01720 Vantaa
France
GARDENA France
Service Après-Vente
BP 50080
95948 ROISSY CDG Cedex
Great Britain
GARDENA UK Ltd.
27- 28 Brenkley Way
Blezard Business Park
Seaton Burn
Newcastle upon Tyne
NE13 6DS
Greece
Agrokip G. Psomadopoulos & Co.
20, Lykourgou str.
Kallithea - Athens
Hungary
GARDENA Magyarország Kft.
Késmárk utca 22
1158 Budapest
Iceland
Heimilistaeki hf
Saetun 8
P.O. Box 5340
125 Reykjavik
Republic of Ireland
Michael McLoughlin & Sons
Hardware Limited
Long Mile Road
Dublin 12
Italy
GARDENA Italia S.r.l.
Via Donizetti 22
20020 Lainate (Mi)
Japan
KAKUDAI Mfg. Co. Ltd.
1-4- 4, Itachibori Nishi-ku
Osaka 550
Luxembourg
Magasins Jules Neuberg
Grand Rue 30
Case Postale No. 12
Luxembourg 2010
Netherlands
GARDENA Nederland B.V.
Postbus 50176
1305 AD ALMERE
Neth. Antilles
Jonka Enterprises N.V.
Sta. Rosa Weg 196
P.O. Box 8200
Curaçao
New Zealand
NYLEX New Zealand Limited
Private Bag 94001
South Auckland Mail Centre
10 Offenhauser Drive
East Tamaki, Manukau
Norway
GARDENA Norge A/S
Postboks 214
2013 Skjetten
Poland
GARDENA Polska Sp.z o.o.
Szymanów 9 d
05-532 Baniocha
Portugal
MARKT (Portugal), Lda.
Recta da Granja do Marquês
Edif. GARDENA
Algueirão
2725-596 Mem Martins
Russia / Россия
АО АМИДА ТТЦ
ул. Моcфилмовcкая 66
117330 Моcква
Singapore
Variware
Holland Road Shopping Centre
227-A 1st Fl., Unit 29
Holland Avenue
Singapore 1027
Slowenia / Croatia
Silk d.o.o. Trgovina
Brodišče 15
1236 Trzin
South Africa
GARDENA South Africa (Pty.) Ltd.
P.O. Box 11534
Vorna Valley 1686
Spain
ANMI Andreu y Miriam S.A.
Calle Pere IV, 111
08018 Barcelona
Sweden
GARDENA Svenska AB
Box 9003
20039 Malmö
Switzerland
GARDENA Kress + Kastner AG
Bitziberg 1
8184 Bachenbülach
Ukraine / Украина
АОЗТ АЛЬЦЕСТ
ул. Гайдара 50
г. Киев 01033
Turkey
Dost Diþ Ticaret Mümessillik A.Þ.
Yeþilbaðlar Mah. Baþkent
Cad. No. 26
Pendik - Ýstanbul
USA
GARDENA
3085 Shawnee Drive
Winchester, VA 22604
1482- 20.960. 08/ 0021
GARDENA Kress + Kastner GmbH
Postfach 2747, D- 89070 Ulm
http: //www.gardena.com
 Loading...