

Gardena 1188 Operating Instructions Manual
GARDENA
®
D
GBFNLS
I
E
P
DK
D Betriebsanleitung
Bodenfeuchtesensor
GB Operating Instructions
Soil Moisture Sensor
F Mode d’emploi
Sonde d’humidité
NL Instructies voor gebruik
Bodemvochtigheidssensor
S Bruksanvisning
Fuktighetsmätare
I Istruzioni per l’uso
Tester di umidità
E Manual de instrucciones
Sensor de humedad
P Instruções de manejo
Sensor de humidade do solo
DK Brugsanvisning
Fugtighedssensor
Art. 1188
10
GB
Intended use:
Please note:
Contents:
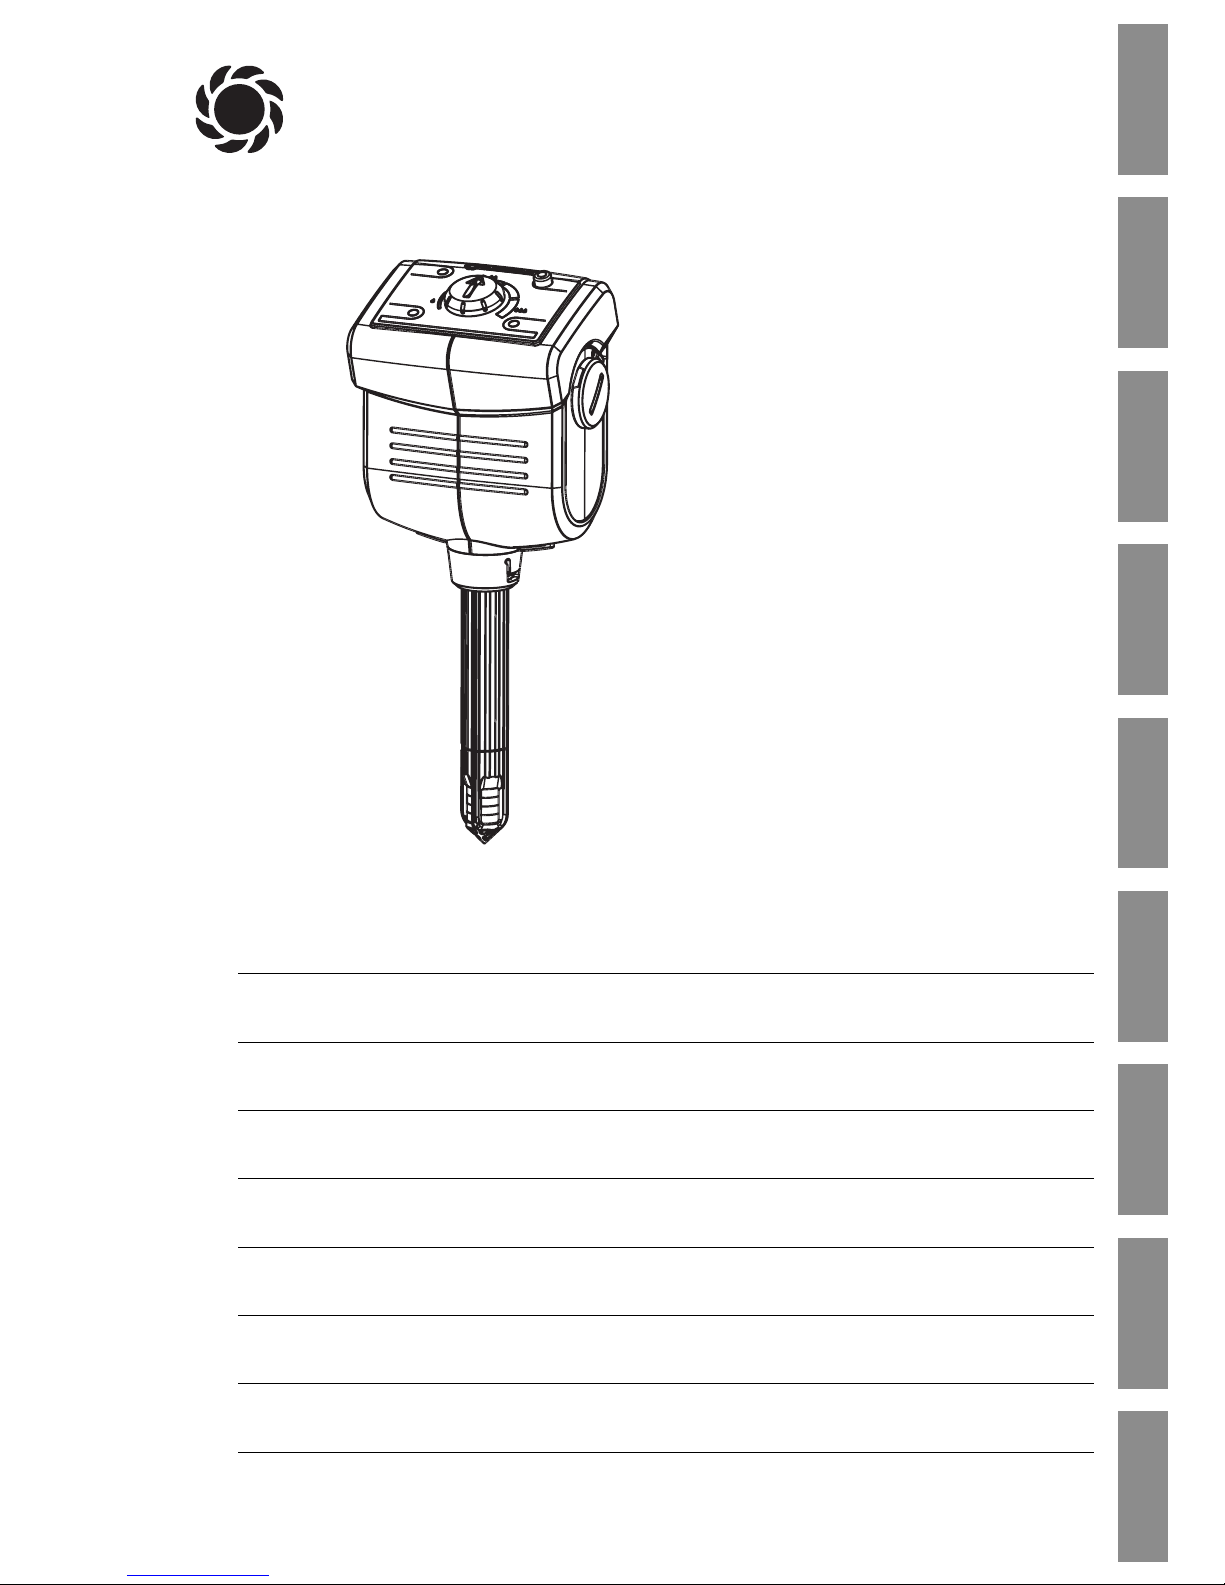
GARDENA Soil Moisture Sensor
Welcome to the Garden of GARDENA...
Translation of the original instructions from German.
Please read these operating instructions carefully and observe the information they contain.
Use these operating instructions to familiarise yourself with the GARDENA Soil Moisture
Sensor, its proper use and the notes on safety.
A
For safety reasons, children under the age of 16 as people, who are not familiar with the
operating instructions should not use the Soil Moisture Sensor. Persons with reduced
physical or mental abilities may use the product only if they are supervised or instructed
by a responsible person.
v Please keep these instructions in a safe place.
1. Where to use Your GARDENA Soil Moisture Sensor
. . . . . . . . 10
2. Safety instructions
. . . . . . . . . . . . . . . . . . . . . . . . . . . . . . . . . . . . . . . . . . . . 10
3. Function
. . . . . . . . . . . . . . . . . . . . . . . . . . . . . . . . . . . . . . . . . . . . . . . . . . . . . . 11
4. Initial Operation
. . . . . . . . . . . . . . . . . . . . . . . . . . . . . . . . . . . . . . . . . . . . . . . 11
5. Operation
. . . . . . . . . . . . . . . . . . . . . . . . . . . . . . . . . . . . . . . . . . . . . . . . . . . . . 13
6. Putting into Storage
. . . . . . . . . . . . . . . . . . . . . . . . . . . . . . . . . . . . . . . . . . . 14
7. Maintenance
. . . . . . . . . . . . . . . . . . . . . . . . . . . . . . . . . . . . . . . . . . . . . . . . . . 14
8. Troubleshooting
. . . . . . . . . . . . . . . . . . . . . . . . . . . . . . . . . . . . . . . . . . . . . . . 15
9. Accessories
. . . . . . . . . . . . . . . . . . . . . . . . . . . . . . . . . . . . . . . . . . . . . . . . . . . 15
10. Technical Data
. . . . . . . . . . . . . . . . . . . . . . . . . . . . . . . . . . . . . . . . . . . . . . . . 16
11. Service /Warranty
. . . . . . . . . . . . . . . . . . . . . . . . . . . . . . . . . . . . . . . . . . . . . 16
1. Where to use Your GARDENA Soil Moisture Sensor
The GARDENA Soil Moisture Sensor is designed to be used solely
outdoors in domestic and private gardens and in greenhouses to
control sprinklers and watering systems via a GARDENA Water
Computer and multi-channel control systems taking account the
soil moisture level.
The Soil Moisture Sensor can also be used together with the
GARDENA Fully Automatic Flower Box Watering Set Art. 1407.
It is not permitted to use the Soil Moisture Sensor for
industrial or commercial applications and in conjunction
with chemicals, foodstuffs, highly combustible or explosive
substances.
2. Safety instructions
Batteries:
For reasons of operational reliability the Soil
Moisture Sensor should only be operated with
two 1.5 V (alkaline) round cells type IEC LR14.
To prevent failure of the Soil Moisture Sensor
due to weak batteries in conjunction with a
lengthy absence, batteries should be replaced
in due course.
This will depend on the previous operating
life of the batteries and the probable length
of absence, which should not exceed a year
in total.
11
GB
Information regarding use:
The Soil Moisture Sensor is equipped with a
safety switch. If the sensor cable is damaged or
the batteries flat, the selected watering time of
the Water Computer will be used for watering.
The spread of moisture in the soil after
watering or rainfall is rather slow.
In the worst-case scenario it may happen that
irrigation and a rain shower overlap until the
required soil moisture is attained.
3. Function
With the GARDENA Soil Moisture Sensor the soil moisture level
is taken into consideration for watering.
The Soil Moisture Sensor measures the soil moisture at the root
level of the plants automatically approximately every 10 minutes
and sends the measured results to the Water Computer.
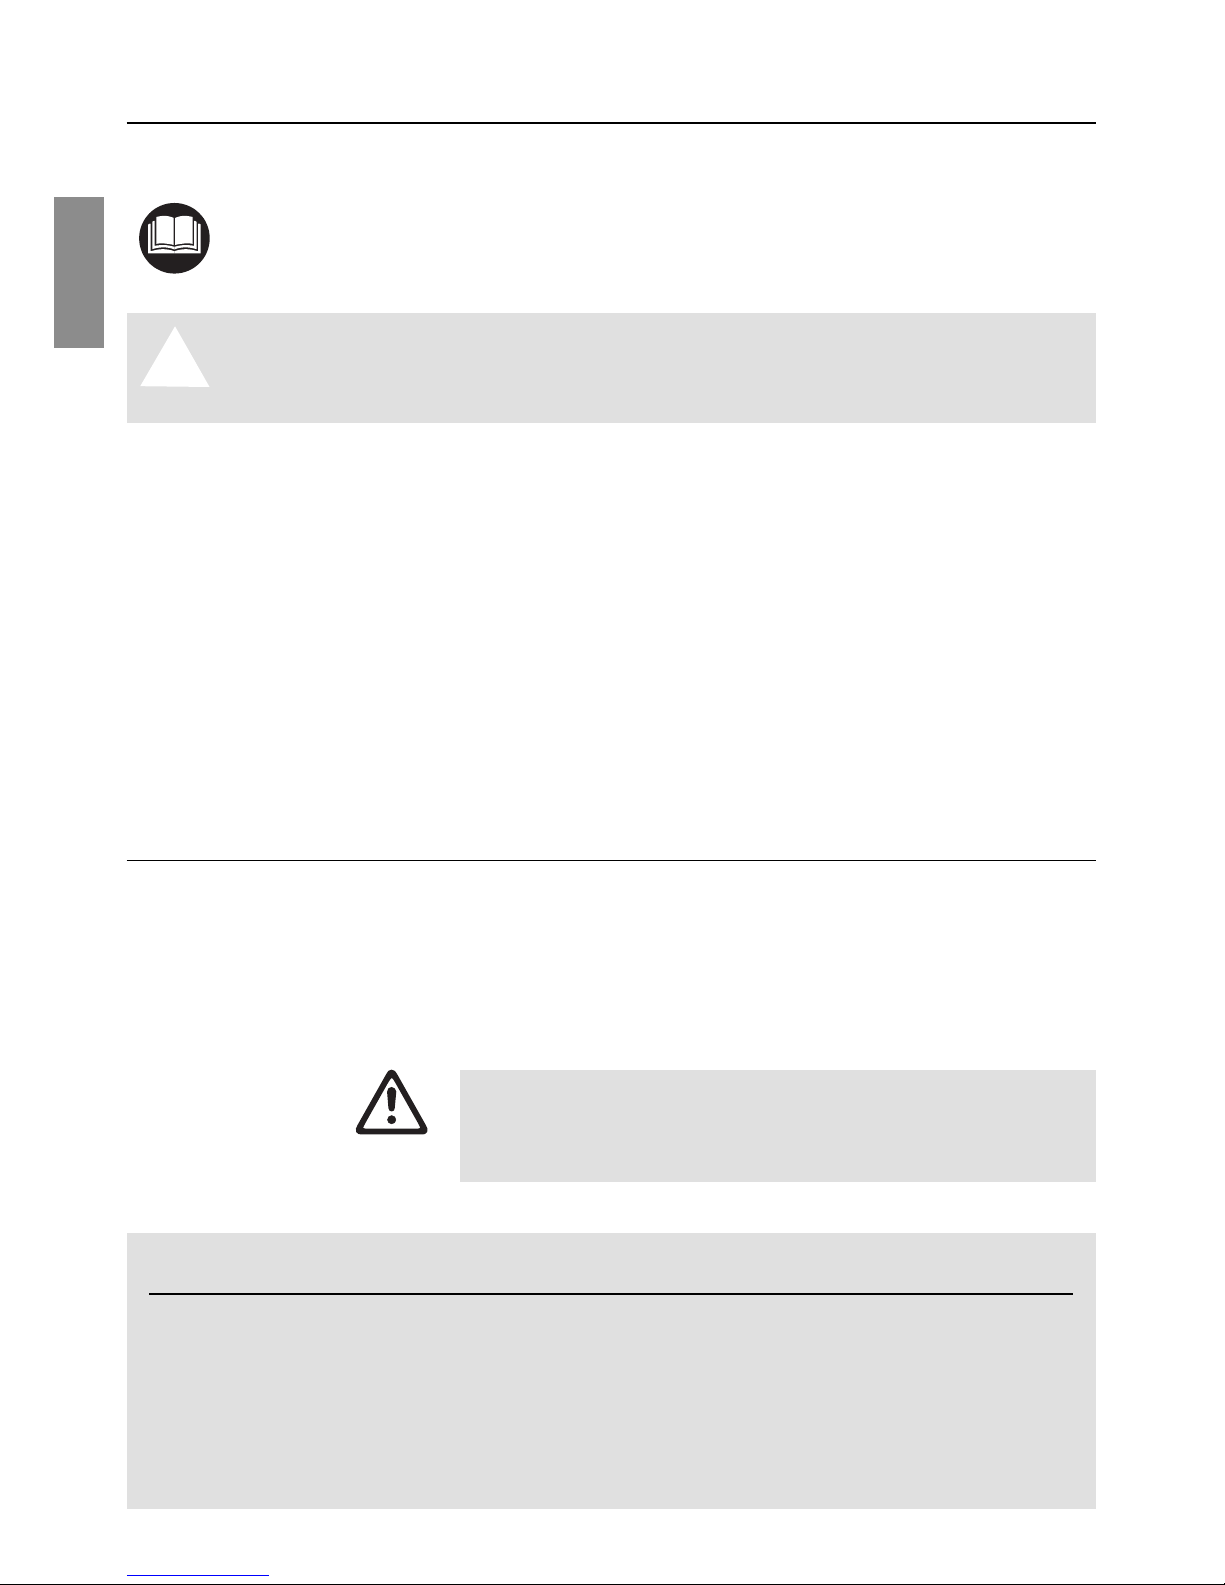
1
Indicator Activates display of moisture level last
button: measured.
2
“Dry” LED Indicates that the Soil Moisture Sensor is
measuring dry in relation to the switching
controller 4.
3
“Damp” LED: Indicates that the Soil Moisture Sensor is
measuring damp in relation to the switching
controller 4.
4
Switching Sets the soil moisture level at which
controller: watering is to take place.
5 If the battery LED flashes the batteries
Battery LED: have to be replaced.
If the batteries are flat and are not replaced, the connected
Water Computer will function with the watering program
selected.
v Replace batteries (see 7. Maintenance
“Replace batteries”
).
4. Initial Operation
v To insert batteries (see 7. Maintenance
“Replace batteries”
).
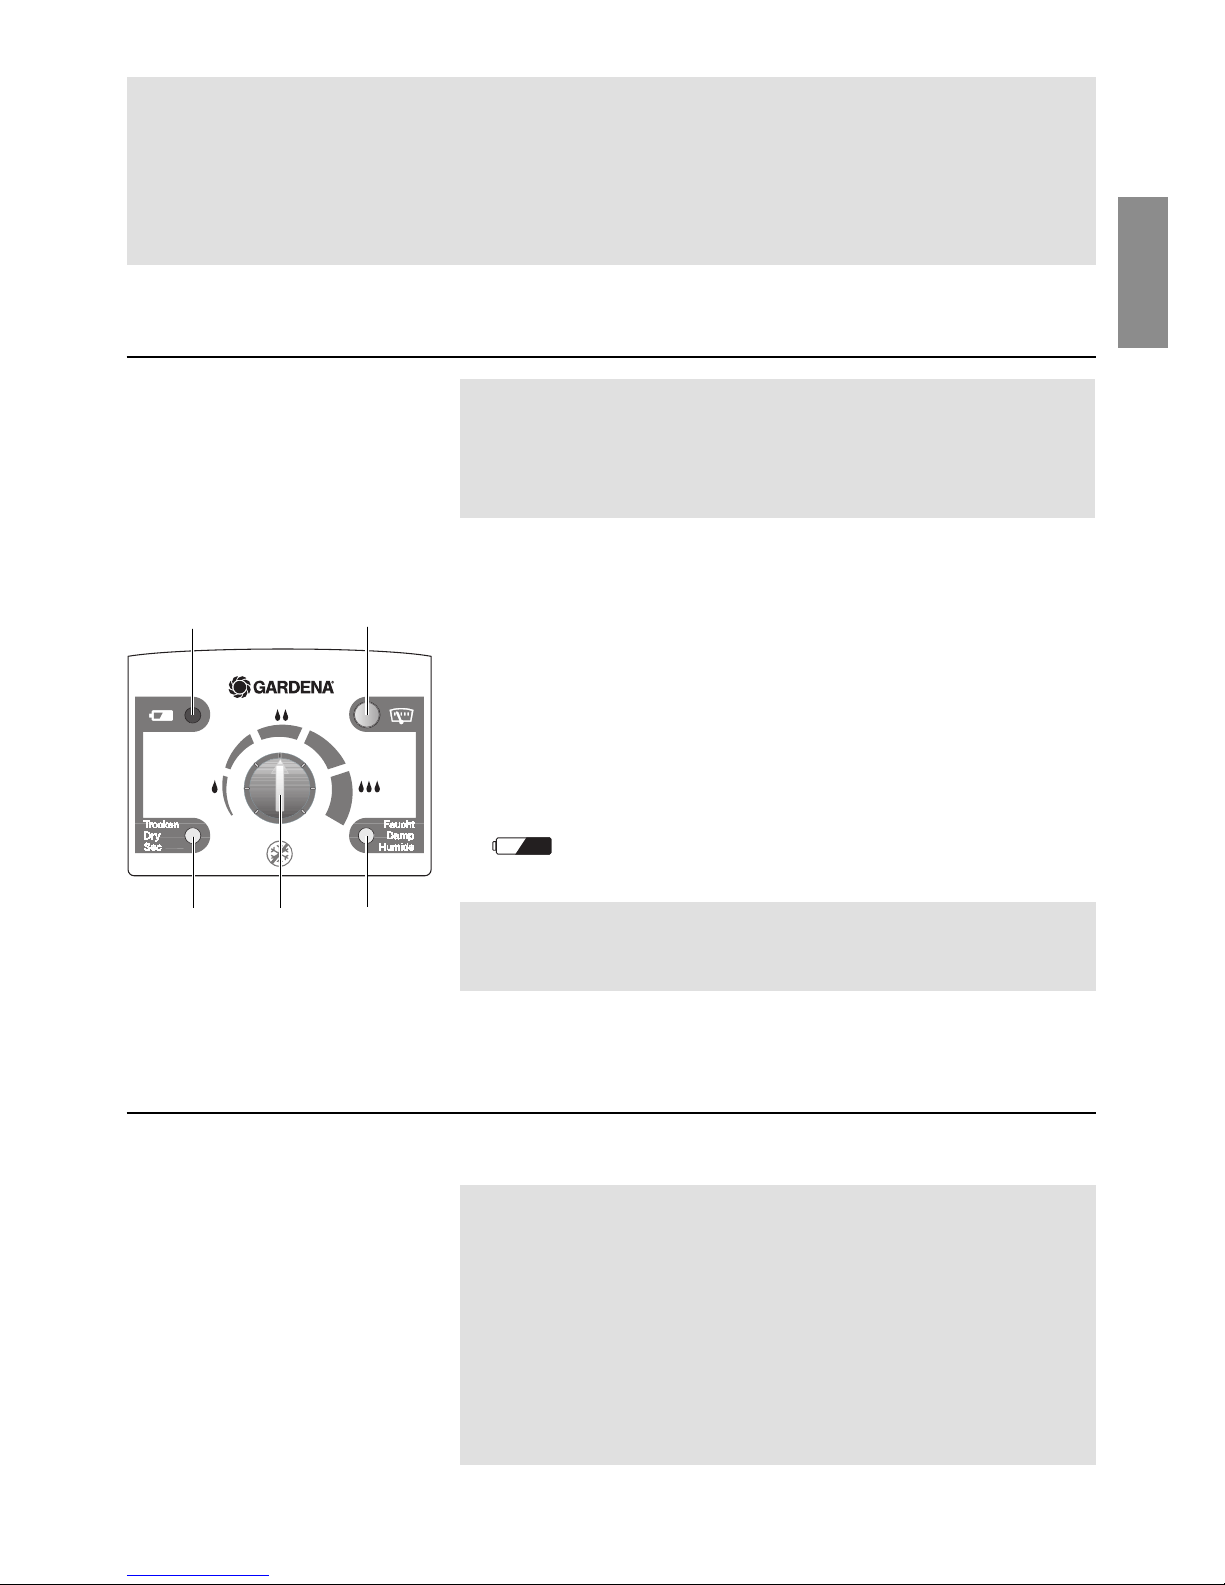
Correct location:
The Soil Moisture Sensor must be positioned at a location
in the watering area which is exposed to the same climatic
conditions as the plants (sun, wind, rain, etc.).
Incorrect location:
The Soil Moisture Sensor should not be covered by
neighbouring plants. Areas of shade should be avoided.
To rule out erroneous reaction results caused by waterlogging,
the Soil Moisture Sensor should not be positioned in dips in the
ground.
Control panel of
Soil Moisture Sensor:
Insert batteries:
Select correct location for
Soil Moisture Sensor:
5 1
2 4 3
12
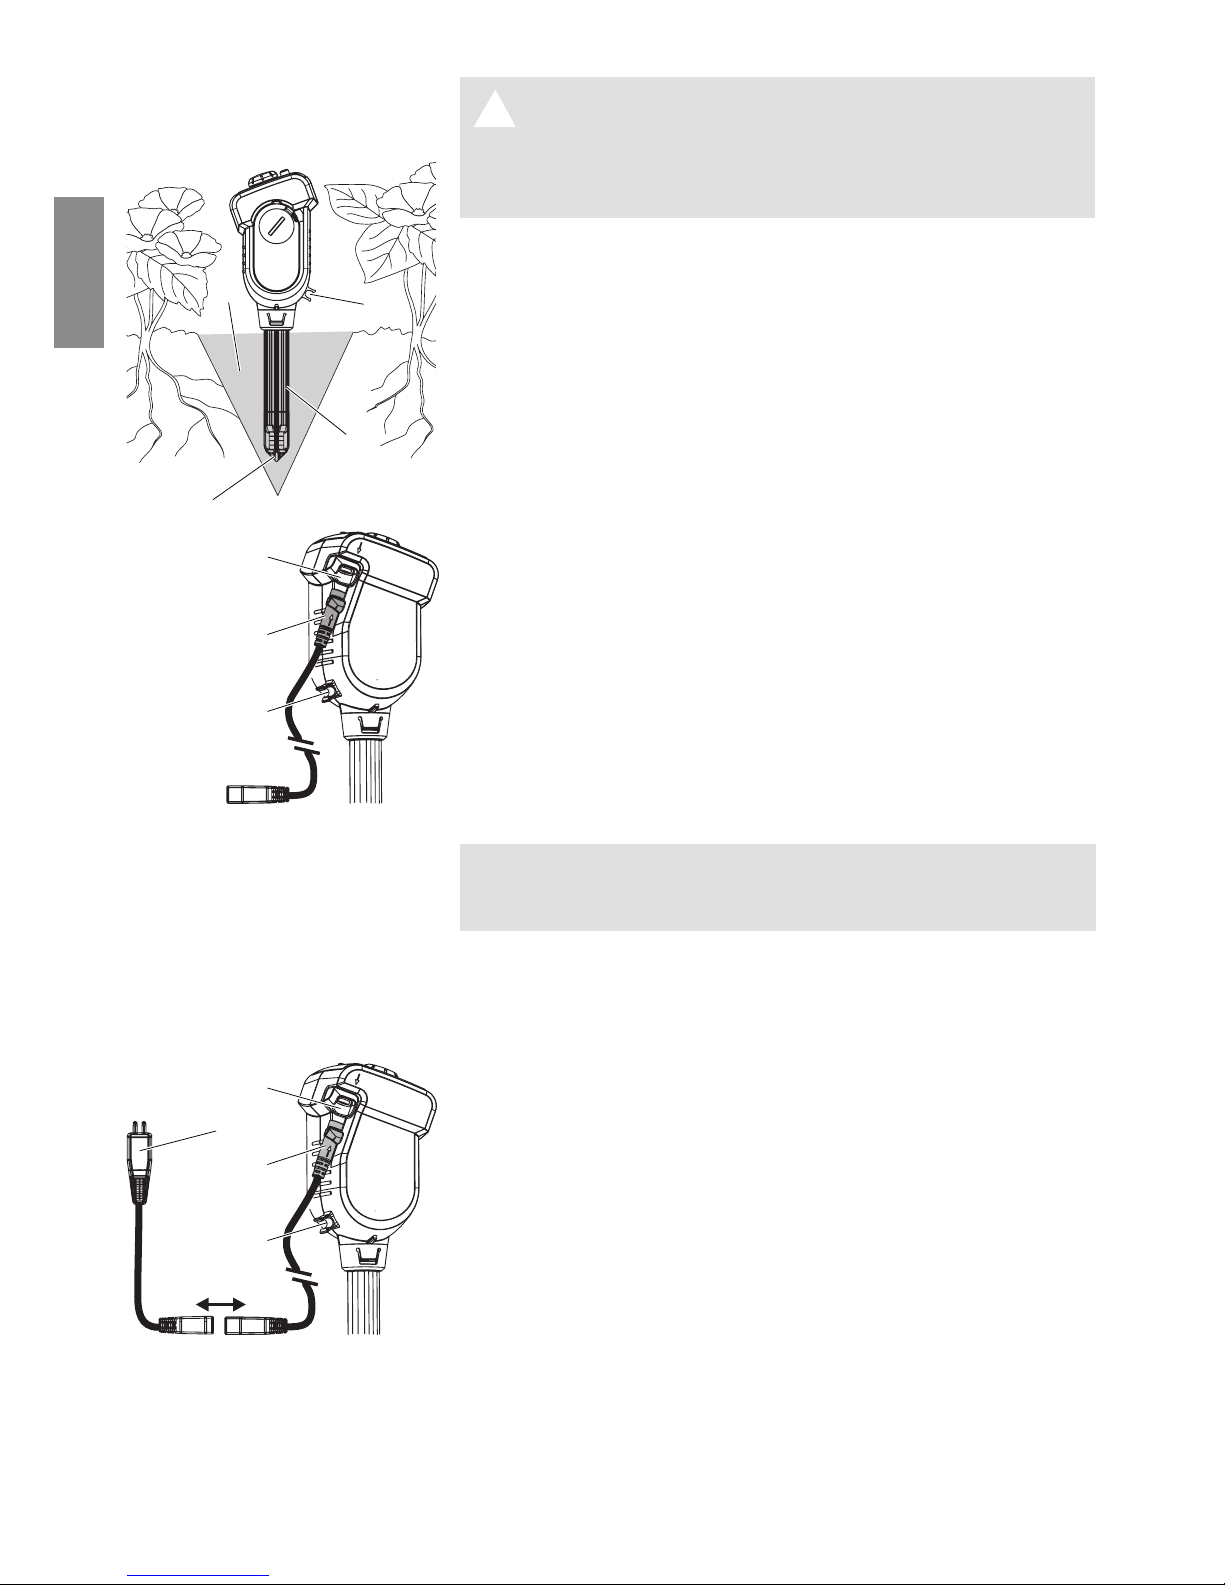
Connect GARDENA
Micro-Drip-System :
Connect adapter cable:
WARNING!
A The tip of the sensor will only measure the soil
moisture correctly if the sensor tip is in full contact
with the ground on all sides ! No air should be
trapped at the sensor tip in the ground.
1. Dig a funnel-shaped hole in the ground
1
at least 12 cm
deep.
2. Break up the soil
1
removed and take out any stones.
3. If the soil is dry, moisten.
4. Replace the damp broken-up soil
1
in the funnel-shaped hole
without packing tight.
5. Immerse entire sensor tip
2
in water (felt must be wet).
6. Insert sensor cable (long)
5
in the sensor socket 6of the Soil
Moisture Sensor (on purchase this is already inserted).
7. Insert the Soil Moisture Sensor to the upper edge of the
sensor
3
in the broken-up soil 1.
Here the sensor tip2must be in full contact with the damp
soil on all sides.
8. Press down the soil 1around the sensor 3lightly.
The Soil Moisture Sensor should not stand loose in the ground.
9. Water the area around the Soil Moisture Sensor with approx.
1 litre water.
Depending on the ground it may take several hours until the
Soil Moisture Sensor measures the actual soil moisture.
To ensure that the quantity of water delivered is registered by
the sensor tip when using the GARDENA Micro-Drip-System,
a drip head must be installed directly above the sensor.
v Fit a Supply Pipe 4.6 mm (3 /16 ”) with drip head to the drip
head holder
4
of the Soil Moisture Sensor.
1. Lay the sensor cable
5
in / on the ground so that it cannot be
damaged or trip people up. The cable should be laid in the
ground in a bed of sand to prevent any damage being caused
by stones.
2. Fit adapter cable (short)
7
to sensor cable 5(on purchase
this is already fitted).
3. Insert adapter cable
7
in sensor connection of GARDENA
Water Computer.
If the sensor cable is not long enough, it can be extended with
the GARDENA Extension Cable Art. 1186 (up to 105 m).
“Plant” Soil Moisture Sensor:
1
4
3
2
GB
7
4
6
5
4
6
5
 Loading...