

Page 1

Bodenfeuchtesensor
Soil Moisture Sensor
Jordfuktighetsføler
Kosteusanturi
Sensor de humedad
Sensor de humidade no solo
Υγρασιµετρο εδφους
Merilec vlaћnosti tal
Gebrauchsanweisung
Operating Instructions
Bruksanvisning
Käyttöohjeet
Manual de instrucciones
Instruções de manejo
Οδηγες χρσης
Navodila za uporabo
GARDENA
®
Page 2
Page 3

9
G
8
G
5.1 Choosing the Installation
Position
The Soil Moisture Sensor must
be positioned in the area which is
watered with the same climatic
conditions (sun, wind, rain etc.)
as the plants. The Soil Moisture
Sensor must not be covered
by neighbouring plants. Avoid
shaded areas. To prevent the
moisture sensor reacting incorrectly due to water logging, it
must not be placed in dips in
the ground.
When using the GARDENA
micro-drip system, a 4.6 mm
(3/ 16 ”) supply pipe with drip
head must be installed on the
driphead holder
8
of the soil
moisture sensor.The water from
this drip head is measured by
the ceramic sensor
7
.
5.2 Setting-up and Filling
the Sensor
Note: To prevent the Soil Mois-
ture Sensor reacting incorrectly
after installation, it should only be
installed in dry weather and when
the soil is dry.
1. After you have chosen a suit-
able position, you must prepare
the soil ready to install the
Soil Moisture Sensor. Loosen
an area of soil approx. 10 cm
across and 10 cm deep.
Remove any stones to prevent
damaging or breaking the
sensitive ceramic sensor
7
.
2. Before pushing the GARDENA
Soil Moisture Sensor into the
ground, fill the water container
6
with water.To do this, unscrew the lid with the lowpressure controller 5and
fill the water container 6with
clean water to where the
thread begins.
3. Replace the lid
5
on the water
container 6and slowly screw
tight until the stop.
Note: When closing the Soil
Moisture Sensor, ensure that
the thread and sealing ring
are free from particles of dirt.
4. Push the Soil Moisture Sensor,
filled with water approx. 10 cm
into the ground (Fig. C). Push
the soil down around the Soil
Moisture Sensor and water
(the ceramic tip must not be
exposed to the air after installation).
5. Connect the soil moisture
sensor to the GARDENA water
controller with the supplied
cable
1
.
Important : The cable must be
laid such that it cannot be damaged or tripped over.When laying
the cable underground, we recommend using a bed of sand.
Warning: The Soil Moisture
Sensor must be fixed firmly in the
ground. Therefore, after plugging
the cable into the water controller
and setting the moisture level
(see point 5.3), firmly press down
the soil again around the Soil
Moisture Sensor.
5.3 Setting the
Soil Moisture Sensor
General
The amount of water plants consume depends on many factors:
the amount of water the plant
requires, the type of soil, amount
of sunshine, wind and many other
factors.
To find a suitable switching point
(= suitable moisture level to supply your plants with the optimum
amount of water) you must ob-
serve the Soil Moisture Sensor
over a certain period of time
(1- 2 weeks) and if necessary,
adjust the settings.
Setting the Watering Time
The watering time can be set using a control knob
3
. The control
knob 3can be adjusted using
a screw driver or coin as follows:
Turn the knob towards the minus
sign (–) to reduce the moisture
level and watering time.Turn the
knob towards the plus sign (+)
to increase the moisture level
and watering time.
Setting the Type of Watering
Control
Position 1
Set the control knob
4
on the
top of the unit to position 1 when
using the Soil Moisture Sensor together with one of the GARDENA
water computers or programs
1- 13 of the GARDENA flower box
watering set.
Position 2
Set the control knob
4
to position 2 when using the Soil Moisture Sensor together with the
GARDENA flower box watering
set and when selecting automatic
program 14.
5. Putting into Operation
Please read these operating instructions carefully and observe
the notes given. Use these operating instructions to familiarise
yourself with the Soil Moisture
Sensor, the unit’s features and
proper use as well as with the
notes on safety.
A
For safety reasons, chil-
dren and young people
under 16 as well as anyone
who is not familiar with these
operating instructions may not
use the Soil Moisture Sensor.
The Soil Moisture Sensor must
only be used to control the
components recommended
by the manufacturer.
Keep these operating instructions in a safe place.
GARDENA Soil Moisture Sensor
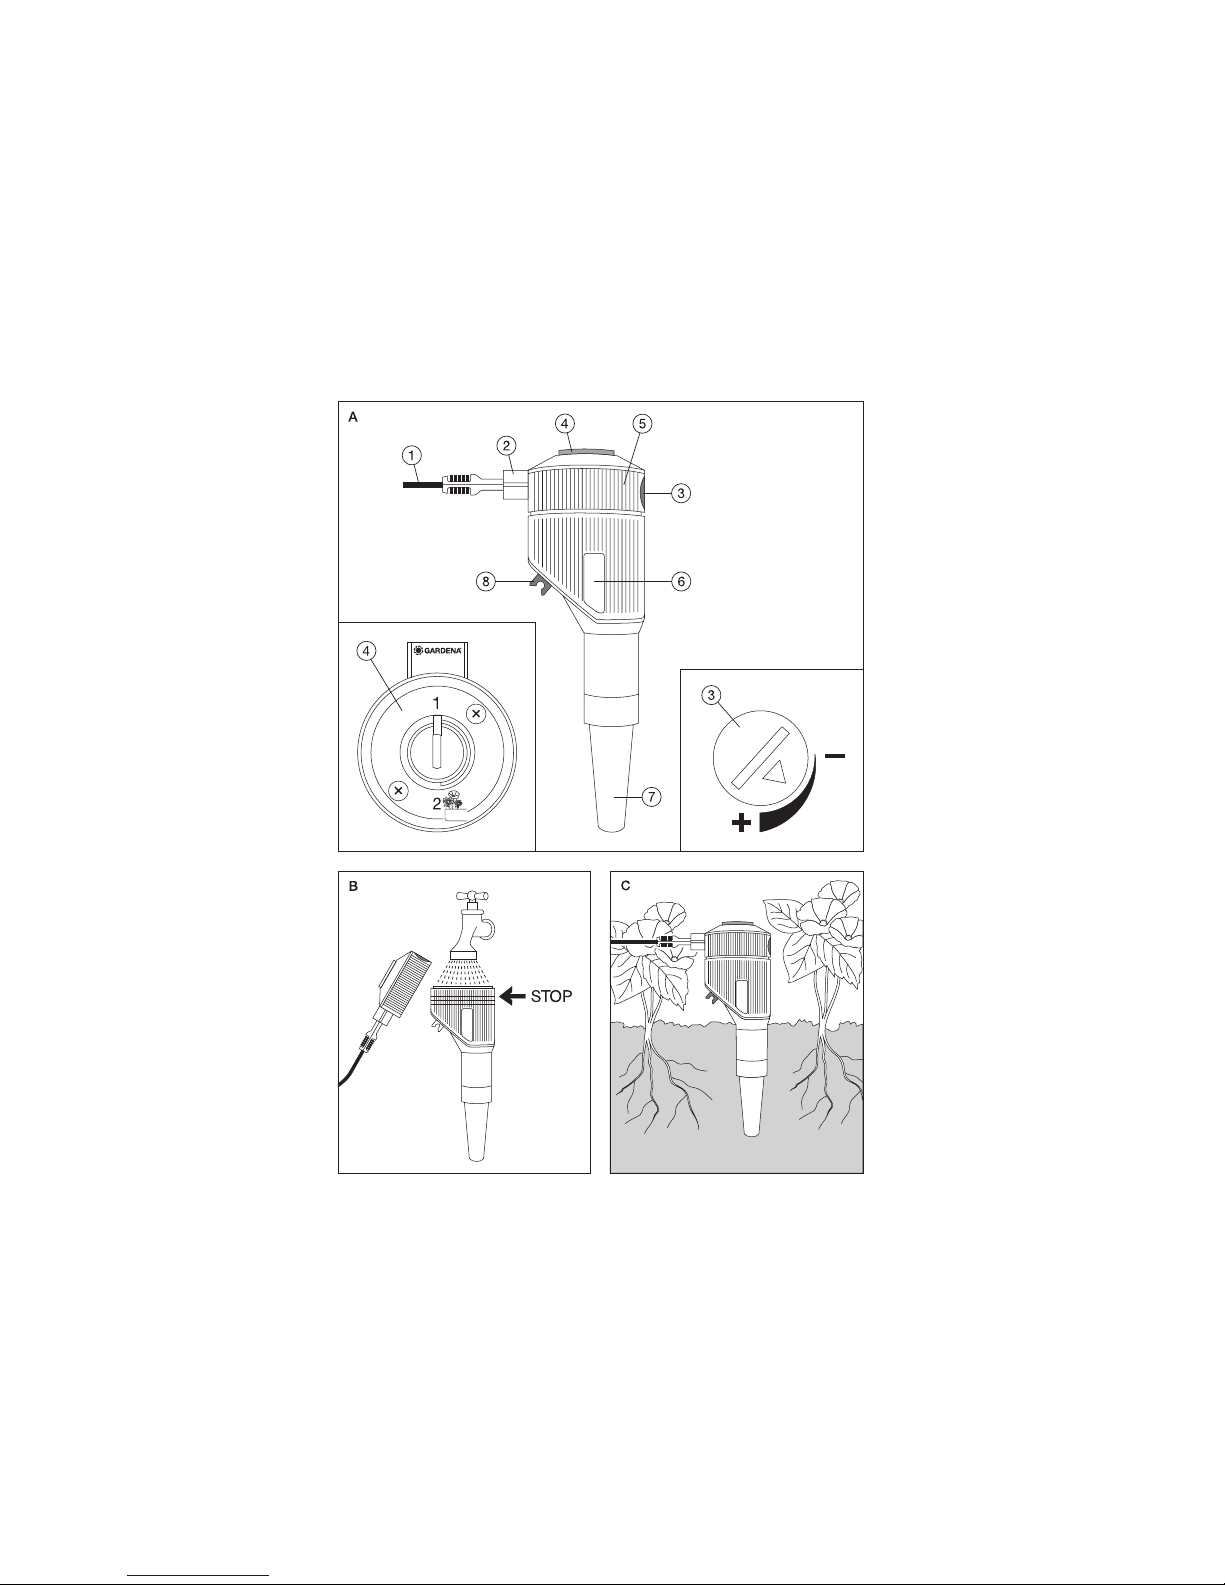
1. Notes on these Operating Instructions
1
Connection cable
2
Cable socket
3
Control knob with scale
4
Control knob
positions 1 and 2
5
Lid with low-pressure
controller
6
Water container with
inspection window
7
Ceramic sensor
8
Holder for GARDENA microdrip system endline drip head
3. Operating Parts (Fig. A)
The GARDENA Soil Moisture
Sensor is intended for private use
in domestic and hobby gardens,
exclusively for outdoor use, to
control sprinklers and watering
systems by means of water
computers
1)
taking the soil
moisture into account.
A
The Soil Moisture Sensor
must not be used for industrial purposes or in conjunction with chemicals, foodstuffs, easily flammable and
explosive materials.
Compliance with the operating
instructions provided by the
manufacturer is a prerequisite
to ensure proper use of the
GARDENA Soil Moisture Sensor.
The operating instructions also
contain operating, servicing and
maintenance conditions.
2. Proper Use
1) Water Computer 1030 and 1060, Water Timer Electronic T 14 and T 1030, Water Computer Plus C 1030 and Profi C 1060,
GARDENA Solenoid Valve Boxes, GARDENA Automatic Valves, GARDENA Pump Relay, and GARDENA Flower Box
Watering Set
The GARDENA Soil moisture
sensor takes the soil moisture
into account during controlled
watering.
4.1 Control knob
4
Set to Position 1
The Soil Moisture Sensor measures the amount of moisture in
the soil and closes the valve of
the respective water computer
if the soil moisture reaches the
set soil moisture level.
If the required soil moisture level
is not reached, watering is allowed to proceed at the next
programmed starting time. If the
pre-set moisture level is reached
during the watering program,
the watering program is stopped.
Note: The Soil Moisture Sensor
can also re-activate watering
during a programmed watering
time when it is dry in conjunction
with the solenoid valve boxes
of the water controller 6030.
4.2 Control knob
4
Set to Position 2
If the Soil Moisture Sensor is used
together with GARDENA flower
box watering and if automatic
program 14 is selected, watering
is switched on and off automatically according to the soil moisture level.
Note: The automatic on /off
function is only possible with
GARDENA flower box watering
and by selecting watering program 14.
4. How the Soil Moisture Sensor Works
Page 4

11
G
10
G
If you have any problems with
your Soil Moisture Sensor, please
contact our Customer Service or
return the defective unit together
with a short description of the
problem directly to one of the
GARDENA Service Centres
listed on the back of this leaflet.
If covered under warranty, please
include the completed and signed
warranty card.
We expressly point out that,
in accordance with the product
liability law, we are not liable
for any damage caused by our
units if it is due to improper
repair or if parts exchanged are
not original GARDENA parts
or parts approved by us, and,
if the repairs were not carried
out by a GARDENA Service
Centre or an authorised specialist. The same applies to
spare parts and accessories.
Watering starts operation Ceramic sensor
7
has not Press down and water the soil
although soil is wet. sufficient soil contact. around the Soil Moisture Sensor
(see point 5.2.).
Watering not switched on Switching point is not set Correct setting using control
although it is dry. correctly. knob 3(see point 5.3).
Unsuitable position for sensor, Change the location.
depression in ground, waterlogging, too much shade etc.
No water in Soil Moisture Fill housing with water ( Fig. B)
Sensor and control and close the lid properly.
knob 4set at position 2.
Control unit battery power Exchange the battery in the
is too low. control unit.
Soil Moisture Sensor O-ring in lid
5
is dirty. Clean O-ring.
losing water.
Soil Moisture Sensor
Seal is damaged. Send the Soil Moisture Sensor
losing water despite to GARDENA Service.
having cleaned O-ring.
Flower box watering set
Soil Moisture Sensor control Set the control
running constantly in prog. 14 knob
4
set at position 1. knob 4to position 2.
although the soil is moist.
7.1 Storage
The Soil Moisture Sensor must be
disconnected from the connection
cable
1
and removed from the
ground before the frosty season
begins. If you leave the cable outside or under ground, close the
cable socket with the cover (on
the cable). After removing the Soil
Moisture Sensor from the ground
rinse with clean water, thoroughly
clean the inside and outside of
the water container
6
.
Store the Soil Moisture Sensor
over the winter in a dry, dust-free
place away from frost.
The self-tapping screws inside
the housing and lid must not be
unscrewed.
7.2 Care
The Soil Moisture Sensor should
be cleaned approx. every 4 months
and replaced in the soil as described in point 5.2.
Note: Do not use harsh household cleaning agents or scouring
powder. Handle the ceramic
sensor
7
carefully.
7. Maintenance, Care and Storage
The Soil Moisture Sensor is
fitted with a “safety switch”.
When the moisture sensor is
set in position 1, a switching
point is set ensuring the set
watering programs run, in case
the water container no longer
contains any water (e.g. if the
ceramic sensor is damaged).
When set in position 2, watering is not continued if the
water container no longer
contains any water.
The Soil Moisture Sensor measures the moisture level of the
soil in the roots of the plants. The
time it takes until the soil is sufficiently moist or until the water
flow is stopped by the water computer, depends on the intensity
of rain fall and the artificial watering. In the worst case, a watering
program and a rain shower may
overlap until the required soil
moisture is reached.
You can shorten the time it takes
for the moisture sensor to react
by reducing the installation depth
of the moisture sensor. However,
it must be ensured that the ceramic sensor
7
still has sufficient
contact with the soil (the ceramic sensor must not be exposed
to the air – see point 5.2).
6. Notes on Use
Should the connection cable of
the Moisture Sensor be not long
enough it can be extended up
to a length of max. 105 m by
using the 10 m Extension Cable,
Art. no. 1186.
8. Accessory
Fault Possible Cause Remedy
Watering starts operation Disadvantageous location Locate the Soil Moisture Sensor
although soil is wet. (Soil Moisture Sensor is not in the area to be watered.
supplied with water).
Switching point has not been Readjust the setting via the
set correctly. turning knob 3(see point 5.3.).
Defective or loose connec- Check the plug-in connection for
tion cable. damage and replace it, if neces-
sary (spare cable can be ordered
from the GARDENA Service).
No water in the Soil Moisture Fill the Soil Moisture Sensor with
Sensor. clean water. Screw on the cover
correctly (see point 5.2).
9. Faults
Page 5

35
D
Garantie
GARDENA gewährt für dieses
Produkt 1 Jahr Garantie (ab Kaufdatum). Diese Garantieleistung
bezieht sich auf alle wesentlichen
Mängel des Gerätes, die nachweislich auf Material- oder Fabrikationsfehler zurückzuführen sind.
Sie erfolgt durch die Ersatzlieferung eines einwandfreien Gerätes
oder durch die kostenlose Reparatur des eingesandten Gerätes
nach unserer Wahl, wenn folgende Voraussetzungen gewährleistet sind:
.Das Gerät wurde sachgemäß
und laut den Empfehlungen
in der Gebrauchsanweisung
behandelt. Es wurde weder
vom Käufer noch von einem
Dritten versucht, das Gerät zu
reparieren.
.Das Gerät wurde ausreichend
frankiert direkt an eine der
GARDENA Servicestellen
gesandt, unter Beifügung
der vollständig ausgefüllten
Garantiekarte bzw. des
Rechnungsbeleges.
Diese Hersteller-Garantie berührt
die gegenüber dem Händler/
Ver käufer bestehenden Gewährleistungsansprüche nicht.
G
Guarantee
GARDENA guarantees this product for 1 year (from date of
purchase). This guarantee covers
all serious defects of the unit
that can be proved to be material
or manufacturing faults. Under
warranty we will either replace
the unit or repair it free of charge
if the following conditions apply:
.The unit must have been
handled properly and in keeping with the requirements of
the operating instructions.
Neither the purchaser nor a
non-authorised third party have
attempted to repair the unit.
.The unit has been returned
directly to a GARDENA
Service Centre, postage paid,
together with the completed
and signed warranty card and
proof of purchase.
This manufacturer’s guarantee
does not affect the user’s
existing warranty claims against
the dealer/ seller.
Z
Garanti
GARDENA
gir ett års garanti for
dette produktet (fra kjøpsdato).
Denne garantiytelsen refererer
seg til alle vesentlige mangler
ved produktet som beviselig kan
tilbakeføres til material- eller
fabrikasjonsfeil. Garantien ytes
ved levering av et feilfritt produkt
i erstatning eller ved en gratis
reparasjon av det innsendte
produkt. Vi velger i hvert enkelt
tilfelle hvilken ytelse som er
aktuell – hvis følgende betingelser er oppfylt:
.Produktet har fått en sakkyn-
dig behandling i samsvar med
anbefalingene i bruksanvisningen. Verken kjøper eller
tredjemann har gjort noe forsøk på å reparere produktet.
.Produktet er blitt sendt
korrekt frankert direkte til et
GARDENA serviceverksted;
et fullstendig utfylt garantikort
eller kvittering for betalt regning ble vedlagt.
Denne produsent-garantien
berører ikke eventuelle garantikrav som måtte finnes overfor
forhandler/ selger.
f
Takuu
GARDENA myöntää tälle tuotteelle yhden (1) vuoden takuun
ostopäivästä lukien. Takuu kattaa
materiaali- ja valmistusviat.
Takuuajan puitteissa korjaamme
tai korvaamme tuotteen uudella
vastaavalla tuotteella veloituksetta, edellyttäen että tuotetta on
käsitelty asianmukaisesti käyttöohjeiden mukaan tai että tuotetta
ei ole korjannut asiakas itse tai
joku muu kuin GARDENA-huolto.
Takuutuote tulee palauttaa
jälleenmyyjälle takuukortin ja/tai
ostokuitin kanssa. Valmistajan
takuu ei koske asiakkaan ja
myyjän välillä tehtyjä erityissopimuksia. Kuluvat osat eivät
kuulu takuun piiriin.
E
Garantía
Para este producto GARDENA
concede una garantía de 1 año
(a partir de la fecha de compra).
Esta garantía se refiere a todos
los defectos esenciales del
producto que tengan de origen
defectos de materiales o de fabricación. La garantía se efectúa
mediante intercambio por un artí-
culo en perfectas condiciones
o mediante la reparación gratuita
de la pieza enviada, según
nuestro criterio, sólo en el caso
de que se hayan cumplido los
siguientes requisitos:
.El aparato fue manipulado
correctamente y según la
indicaciones del manual de
instrucciones. Ni el cliente ni
terceros intentaron repararlo.
.El aparato fue enviado directa-
mente al Servicio Técnico de
GARDENA, adjuntando la
tarjeta de garantía o la factura
de compra.
Esta garantía del fabricante
no afectará la existente entre el
distribuidor/ vendedor.
Page 6

37
Garantiekarte
Warranty Card
Garantikort
Takuukortti
Tarjeta de garantía
Carta de garantia
Κρτα Εγγησης
Garancijski list
GARDENA Bodenfeuchtesensor Art.-Nr.1187
Soil Moisture Sensor GARDENA Art. No. 1187
GARDENA Jordfuktighetsføler art.nr. 1187
GARDENA-kosteusanturi Tuoteno. 1187
Sensor de humedad GARDENA art. nº 118 7
Sensor de humidade no solo GARDENA art. nº 118 7
Υγρασιµετρο εδφους τις GARDENA κωδ 118 7
GARDENA Merilec vlaћnosti tal art. љt. 118 7
wurde gekauft am:
Purchase date:
Ble kjøpt hos:
Ostopäivä:
Fecha de compra:
Comprado em:
Αγορστηκε την:
Datum nakupa:
Händlerstempel:
Dealer’s stamp/Receipt:
Forhandlerstempel:
Myyjän leima / nimi ja yhteystiedot.
Sello del comerciante:
Carimbo do vendedor:
Σφραγδα καταστµατος:
Peиat trgovca:
Beanstandung:
Reasons for complaint:
Reklamasjonsgrunn:
Syy palautukseen:
Avería:
Motivo de reclamação:
Πρβληµα:
Opis napake:
✃
Page 7

Deutschland
GARDENA
Kress + Kastner GmbH
GARDENA Service
Hans-Lorenser-Straße 40
D-89079 Ulm
Produktfragen: (07 31) 490-246
Reparaturen: (07 31) 490-290
Argentina
Unitán s.a.i.c.a.
Paseo Colón 221 – P. 1 0°
1399 Buenos Aires
Australia
NYLEX Corporation Ltd.
25- 29 Nepean Highway
P.O. Box 68
Mentone, Victoria 3194
Austria
GARDENA Österreich
Gesellschaft m.b.H.
Stettnerweg 11 -15
2100 Korneuburg
Belgium
MARKT (Belgium) NV/SA
Sterrebeekstraat 163
1930 Zaventem
Canada
Continental Industries
100, Summerlea Road
Brampton, Ontario
Canada L6T 4X3
Chile
Comercial Maquinex
Nueva Panamericana Sur,
Nº 1050
San Bernardo
Santiago de Chile
Cyprus
FARMOKIPIKI LTD
P.O. Box 7098
74, Digeni Akrita Ave.
1641 Nicosia
Czech Republic
GARDENA spol. s.r.o.
Brn`´enská 634
66442 Brno-Mod`´rice
Denmark
GARDENA Danmark A/S
Bejlerholm 10
9400 Nørresundby
Finland
Habitec Oy
Martinkyläntie 52
01720 Vantaa
France
GARDENA France
Service Après-Vente
BP 50080
95948 ROISSY CDG Cedex
Great Britain
GARDENA UK Ltd.
27- 28 Brenkley Way
Blezard Business Park
Seaton Burn
Newcastle upon Tyne
NE13 6DS
Greece
Agrokip
G. Psomadopoulos & Co.
20, Lykourgou str.
Kallithea
Athens
Hungary
GARDENA Magyarország Kft.
Késmárk utca 22
1158 Budapest
Iceland
Heimilistaeki hf
Saetun 8
P.O. Box 5340
125 Reykjavik
Italy
GARDENA Italia S.r.l.
Via Donizetti 22
20020 Lainate (Mi)
Japan
KAKUDAI Mfg. Co. Ltd.
1-4 -4, Itachibori Nishi-ku
Osaka 550
Luxembourg
Magasins Jules Neuberg
Grand Rue 30
Case Postale No.12
Luxembourg 2010
Netherlands
MARKT (Holland) BV
Postbus 219
1380 AE Weesp
New Zealand
NYLEX
New Zealand Limited
Head Office
22, Ormiston Road
Private Bag
South Auckland Mail Centre
Auckland
Norway
GARDENA Norge A/ S
Postboks 214
2013 Skjetten
Poland
GARDENA Polska Sp.z o.o.
Orzeszyn 35a
k/ Piaseczna
05- 532 Baniocha
Portugal
MARKT (Portugal), Lda.
Recta da Granja do Marquês
Algueirão
2725 Mem Martins
Russia / Россия
АО АМИДА
ул. Моcфилмовcкая 66
117330 Моcква
Singapore
Variware
Holland Road Shopping Centre
227-A 1st Fl., Unit 29
Holland Avenue
Singapore 1027
Slowenia
Silk d.o.o.Trgovina
Brodiљиe 15
1236 Trzin
South Africa
GARDENA
South Africa (Pty.) Ltd.
P.O. Box 11534
Vorna Valley 1686
Spain
ANMI Andreu y Miriam S.A.
Calle Pere IV, 111
08018 Barcelona
Sweden
GARDENA Svenska AB
Box 9003
20039 Malmö
Switzerland
GARDENA Kress + Kastner AG
Bitziberg 1
8184 Bachenbülach
Turkey
Bahçe Tarim ve Sulama
Araçlari Ticaret A.Þ.
Soðanlik Yolu, Yalniz
Selvi Sok. No: 21
81440 Kartal-Ýstanbul
USA
GARDENA
3085 Shawnee Drive
Winchester, VA 22604
1187 -20.960 .05/ 0982
GARDENA Kress + Kastner GmbH
Postfach 2747, D -89070 Ulm
http: //www.gardena.de
 Loading...