

Ganz ZN-CM1, ZN-C1, ZN-CM2 User Manual
1

2
Contents
1. Product Features .................................................................................................4
2. Accessing the Camera..........................................................................................7
2.1 Access from a browser ...................................................................................7
2.2 Accessing the camera from the Internet.............................................................7
2.3 Adjusting the image and focus .........................................................................8
2.4 Back focus adjustment...................................... ..............................................8
2.5 The Live View page......................................... ................................................9
2.6 Video stream types .........................................................................................9
2.7 How to stream H.264 ....................................................................................10
3. The Setup......................................................................................................... 11
4. Installation........................................................................................................ 11
4.1 Installation Setup.......................................................................................... 12
5. Camera and Image............................................................................................. 12
5.1 Codec.........................................................................................................12
5.2 Camera picture needs to fit on page properly...................................................15
5.2.1 Exposure Control ............................................................................................15
5.2.2 Day & Night Control ........................................................................................16
5.2.3 White Balance Control .....................................................................................16
5.2.4 Image Property Control....................................................................................17
6. Audio............................................................................................................... 17
7. Live ................................................................................................................. 18
8. SD Card ........................................................................................................... 19
8.1 SD Card > Config .........................................................................................19
8.2 SD Card > Event........................................................................................... 20
8.3 SD Card > Periodical..................................................................................... 21
9. FTP .................................................................................................................22
9.1 FTP > Config ...............................................................................................22
9.2 FTP > Event................................................................................................. 22
9.3 FTP > Periodical........................................................................................... 23
10. Event .............................................................................................................24
10.1 Event > Alarm Port ...................................................................................... 24
10.2 Event > Motion ...........................................................................................25
10.3 Event > Mapping......................................................................................... 26
11. Network..........................................................................................................27
11.1 Network > IP Setup .....................................................................................27
11.2 Network > Service Port .................................... ............................................29
11.3 Network > RTP ...........................................................................................30
11.4 Network > E-mail........................................................................................ 30
11.5 Network > DDNS.........................................................................................31
11.6 Network > UPnP .........................................................................................32

3
12. System........................................................................................................... 34
12.1 System > User............................................................................................34
12.2 System > Date & Time................................................................................. 34
12.3 System > Maintenance ................................................................................35
12.4 System > Information ..................................................................................37

4
1. Product Features
The GANZ ZN-C Series camera (ZN-Cx) is a high performance H.264 network
camera, designed for demanding security installations. It delivers crisp, clear
images, disclosing every detail, thanks to its top quality 5.0 Megapixel progressive
CMOS sensor, Megapixel lens and advanced image processing. GANZ ZN-Cx
features a removable infrared cut filter, which enables color video in high and low
light conditions, as well as IR sensitive black/white video at night.
Supported by the industry’s largest base of video management software, the GANZ
ZN-Cx provides the perfect solution for securing bank offices, airports and other
facilities, and for traffic surveillance, over IP based networks.
The optimal Power over Ethernet (IEEE 802.3af) supports power to the camera to
be delivered via the network, eliminating the need for a power outlet and reducing
installation costs. Steady power could be guaranteed with a central Uninterruptible
Power Supply (UPS).
The GANZ ZN-Cx offers a comprehensive set of network security and
management features.
This includes support for port based network control (IEEE802.1X), which allows
the camera to be connected to a network secured with this control and HTTPS
encryption, which provides a secure channel between camera and application. It
also enables authentication of the video source. GANZ video products are
efficiently managed with the powerful GANZ Camera Management tool provided
with the GANZ ZN-Cx.
5
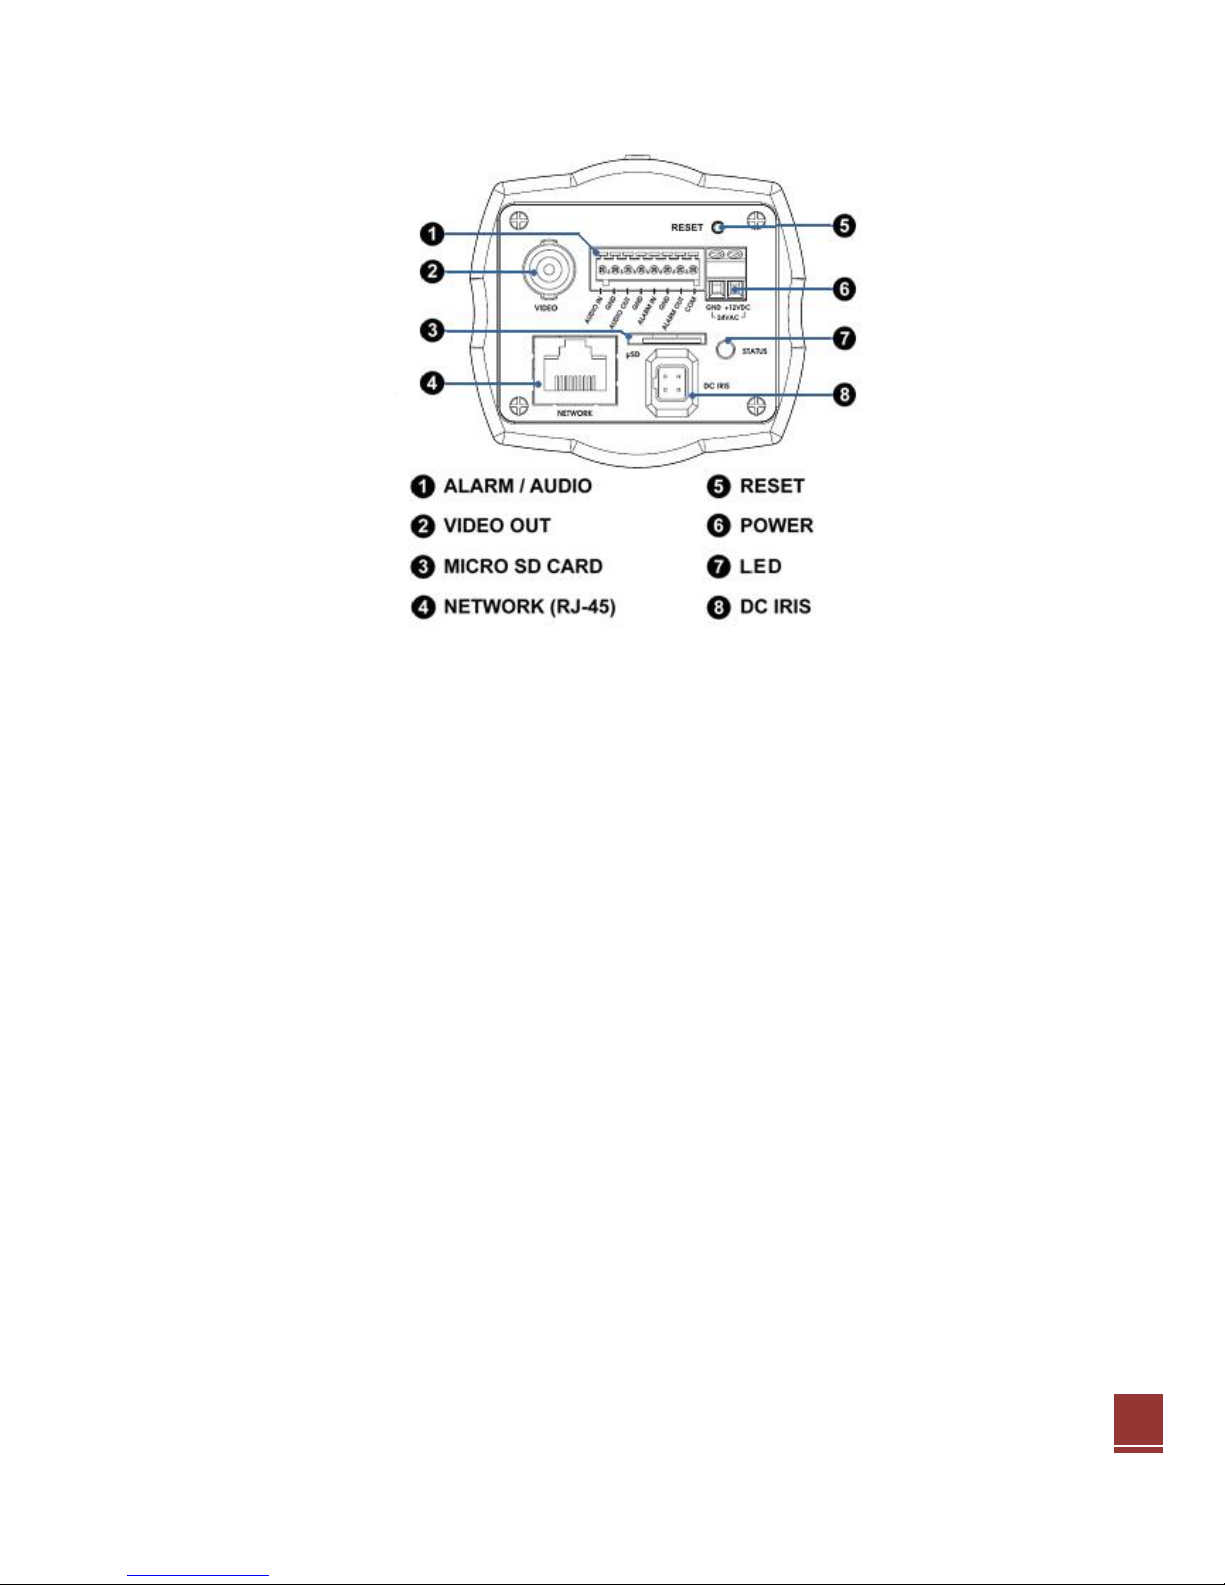
1. Alarm / Audio IO (8 pin Terminal connector)
Audio in
Audio in (line level), for line-in mono signal (only the left channel is used
from a stereo signal)
Audio out
The Audio output (line level), which could be connected to a public address
(PA) system or an active speaker with a built-in amplifier. A pair of
headphones could also be attached.
Alarm in
One digital photo-coupled input
Alarm out
One digital photo-coupled output (200mA)
2. VIDEO OUT
Analog video output
3. MICRO SD CARD
Save still shot on Micro SD card.
4. Network connector
The GANZ ZN-Cx connects to the network via a standard network cable, and
automatically detects the speed of the local network segment
(10BaseT/100BaseTX Ethernet). This socket could also be used to power the
GANZ ZN-Cx via Power over Ethernet (PoE). The camera also negotiates the
correct power level while using PoE. (Class 2)
5. Factory default/Control button
Press this button to install the camera using the GANZ Internet Dynamic DNS
(DDNS) Service, or to restore the camera to its factory default settings, as
described.

6
6. Power connector
DC IRIS12Vdc or 24Vac power connector
7. LED indicator
LED Color Description
Green Steady for connection to 10/100 Mbit/s network.
Amber Flashes for network activity.
Network
Unlit No network connection.
Green On if network connection is established
Flashes during boot process Status
Red Flashes one per second during F/W upload.
8.
DC Auto Iris connection
7
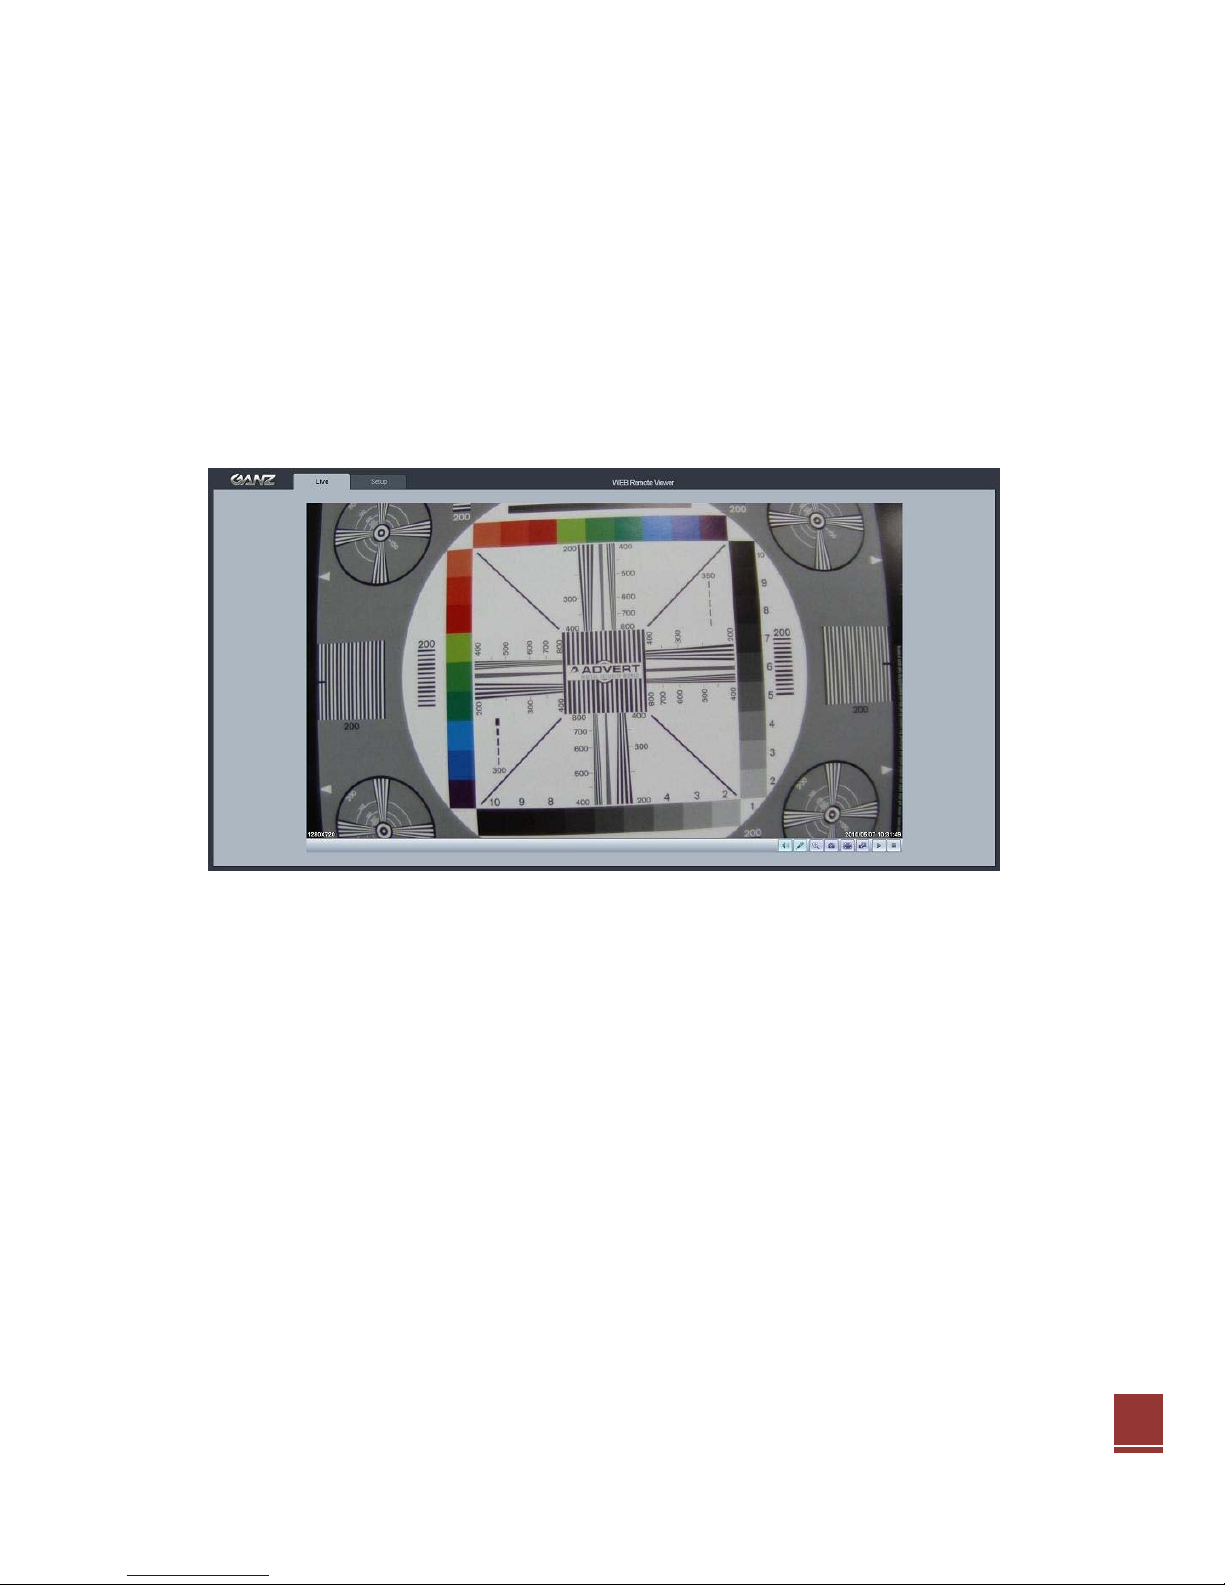
2. Accessing the Camera
Follow the instructions in the GANZ ZN-Cx Installation Guide to install the camera.
The GANZ ZN-Cx can be accessed with most standard operating systems and
browsers. The recommended browser is Internet Explorer for Windows.
2.1 Access from a browser
1. Launch a browser (Internet Explorer)
2. Enter the IP address or host name of the camera in the Location/Address field of
your browser. Press Enter.
3. Login dialog will appear when the camera is accessed for the first time. The
default user name is ADMIN and password is 1234.
4. The camera’s Live View page is now displayed in your browser.
Note: The layout of the live view page in the camera may have been customized to meet
specific requirements. Consequently, some of the examples and functions featured here may
differ from those displayed on your own Live View page.
2.2 Accessing the camera from the Internet
Once installed, the camera is accessible on the local network (LAN). Configure the
router/firewall to allow incoming data traffic to access the camera from the Internet.
For security reasons this is usually done on a specific port. Please refer to the
documentation for router/firewall for further instructions.

8
2.3 Adjusting the image and focus
To adjust the position of the lens:
1. Open the Live View page in your web browser.
- Select Setup tab, and open the Installation page.
- Set “Installation Mode” ON and select the “Video Format”.
2. Connect analog monitor to VIDEO OUT on rear panel of camera.
- Unscrew the zoom puller on the lens by turning it anti-clockwise.
Adjust the zoom setting and re-tighten the zoom puller.
- Unscrew the focus puller on the lens to adjust the focus, and re-tighten the focus
puller.
3. Check the image in the Live View page in your web browser,
and set “Installation Mode” OFF In Installation page in Setup tab.
Note:
The DC-Iris should always be disabled while focusing the camera. This opens the iris to its
maximum, which gives the smallest depth of field, thus the best conditions for correct focusing.
When the focus is set with this method, it will then be maintained in any light conditions.
2.4 Back focus adjustment
When the lens is changed to a non-standard lens or when the focus achieved using
the instructions above is not satisfactory, perform back focus adjustment as
follows:
1. Loosen the flange back locking screw that holds the C/CS-mount ring. CS-mount is
standard on GANZ ZN-XXX. In case your lens is C-mount type, please mount C-mount
adaptor ring already given in the box.
2. Direct the camera towards an object at least 3 meters away, set the zoom puller to wideend
and adjust back focus by rotating C/CS-mount ring.
3. Set the zoom puller to tele-end and ensure that it is still in focus.
4. Direct the camera towards a close object, about 30cm away,
set the zoom puller to wide-end and ensure that it is still in focus.
5. Set the zoom puller to tele-end and again ensure that it is still in focus.
6. Tighten the screw that holds the C/CS-ring again.
7. After making the back focus adjustment as explained above, adjust the zoom and focus
position.
9
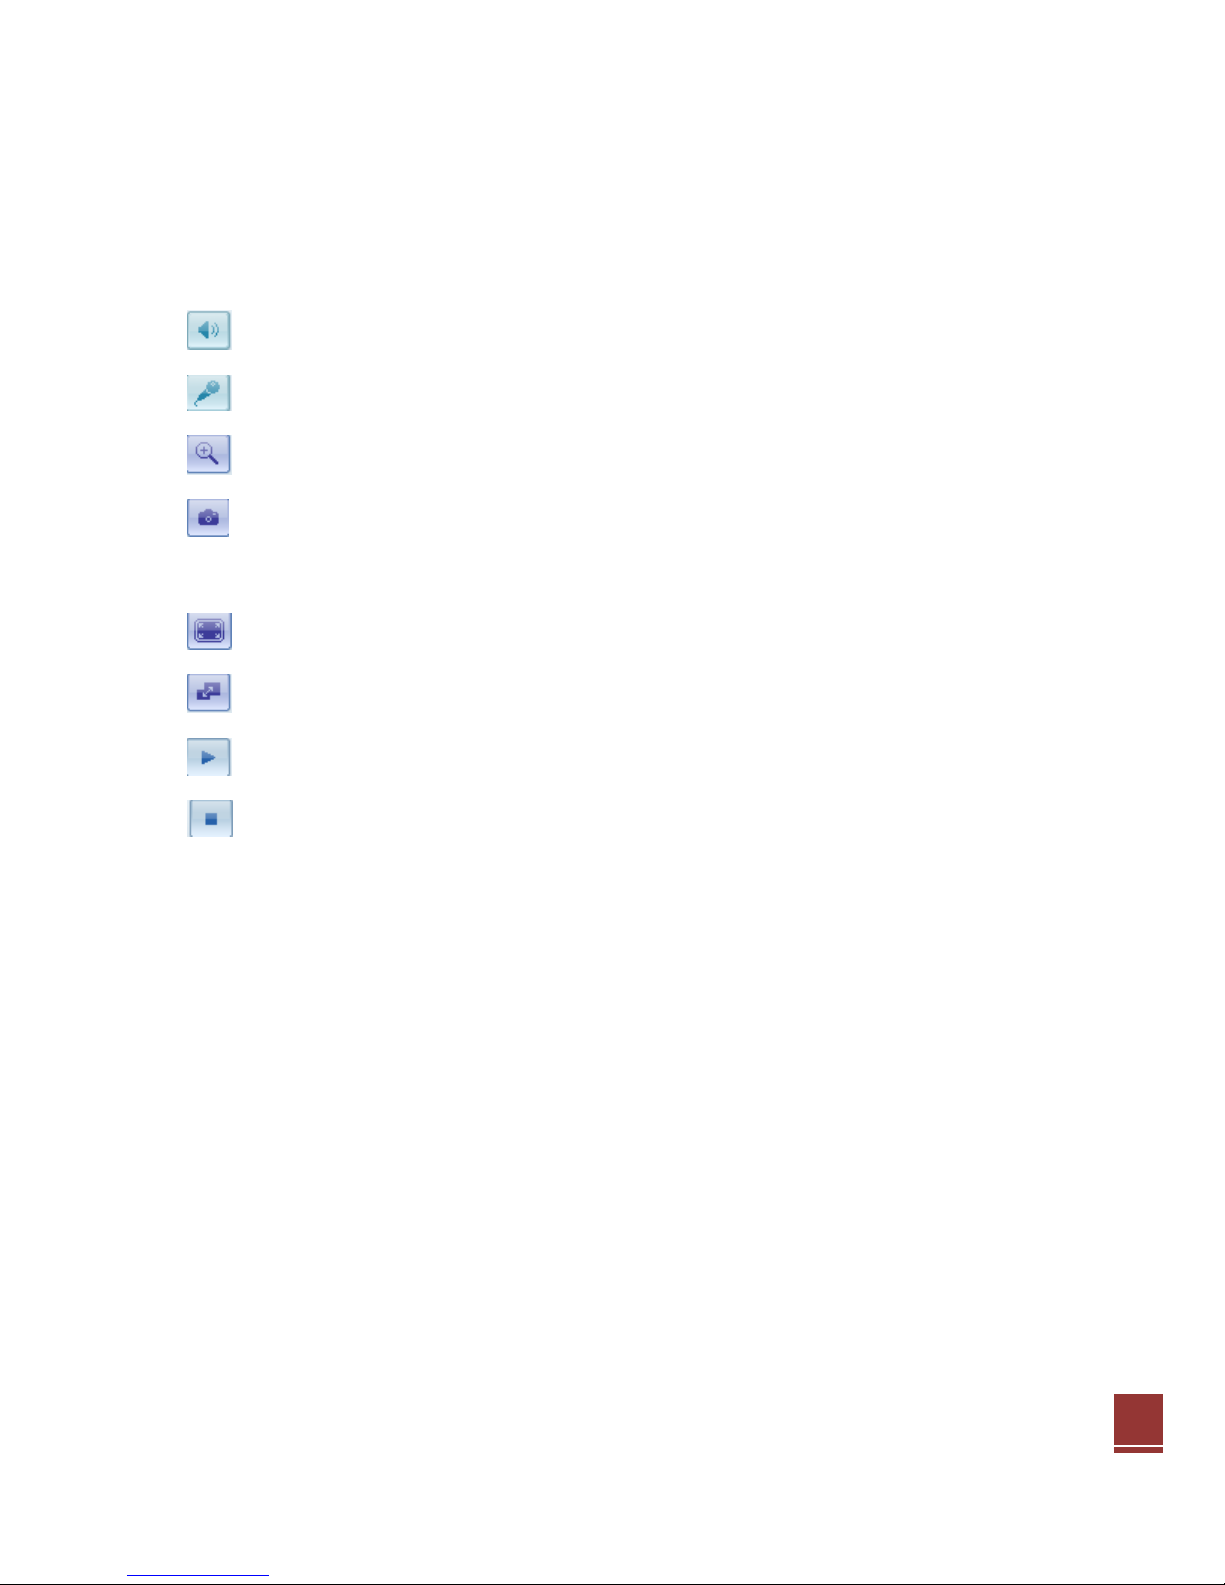
2.5 The Live View page
Not all the buttons described below will be visible unless the Live View page has
been customized to display them.
PC(Client) Speaker
PC(Client) Mic
Digital Zoom
Snap Shot
The Snapshot button saves a still image which is currently displayed.
Full Screen
Stream change: First stream Ù Secon d stream
Play: Click this button to start the stream
Stop: Click this button to stop streaming
2.6 Video stream types
Motion JPEG
This format uses standard JPEG still images in the video stream. These images
are then displayed and updated at a rate sufficient to create a stream that shows
constantly updated motion.
The Motion JPEG stream uses considerable amounts of bandwidth, but also
provides excellent image quality and access to every individual image contained in
the stream.
H.264 protocols and communication methods
• RTP (Realtime Transport Protocol) is a protocol that allows programs to manage
the real-time transmission of multimedia data, via unicast or multicast.
• RTSP (Real Time Streaming Protocol) serves as a control protocol, to negotiate
the type of transport protocol used for the stream. RTSP is used by a viewing
client to start a unicast session
• UDP (User Datagram Protocol) is a communications protocol that offers limited

10
service for exchanging data in a network which uses the Internet Protocol (IP).
UDP is an alternative to the Transmission Control Protocol (TCP). The advantage
of UDP is that it is not required to deliver all data and may drop network packets
when there is network congestion. This is suitable for live video, as there is no
point in re-transmitting old information that will not be displayed anyway.
• Unicasting is communication between a single sender and a single receiver over
a network. This means that the video stream goes independently to each user,
and each user gets their own stream. A benefit of unicasting is in case one stream
fails, it only affects one user.
• Multicast is bandwidth-conserving technology that reduces bandwidth usage by
simultaneously delivering a single stream of information to multiple network
recipients. This technology is used primarily on delimited networks (intranets), as
each user needs an uninterrupted data flow and should not rely on network
routers.
2.7 How to stream H.264
Deciding on the combination of protocols and methods to use depends on your
viewing requirements and on the properties of your network. Setting the preferred
method(s) is done in the control applet for AMC, which is found in the Windows
Control Panel. When this has been set, AMC will test all the selected methods in
the specified order, until the first functioning one is found.
RTP+RTSP
This method (actually RTP over UDP and RTSP over TCP) should be your first
consideration for live video, especially when it is important to always have an up-todate video stream, even if some images are lost due to network problems. This
could be configured as multicast or unicast.
Multicasting provides the most efficient usage of bandwidth, especially when there
are large numbers of clients viewing simultaneously. Note however, that a multicast
broadcast could not pass a network router unless the router is configured to allow
this. For example, it is not possible to multicast over the Internet.
Unicasting should be used for video-on-demand broadcasting, so that there is no
video traffic on the network until a client connects and requests the stream.
However, as more and more unicast clients get connected, the traffic on the
network will increase and may cause congestion. Although there is a maximum of
20 unicast viewers, note that all multicast users combined count as 1 unicast
viewer.
RTP/RTSP
This unicast method is RTP tunneled over RTSP. This could be used to exploit the
fact that it is relatively simple to configure firewalls to allow RTSP traffic.
RTP/RTSP/HTTP or RTP/RTSP/HTTPS
These two methods could also be used to traverse firewalls. Firewalls are
commonly configured to allow the HTTP protocol, allowing RTP to be tunneled.
11
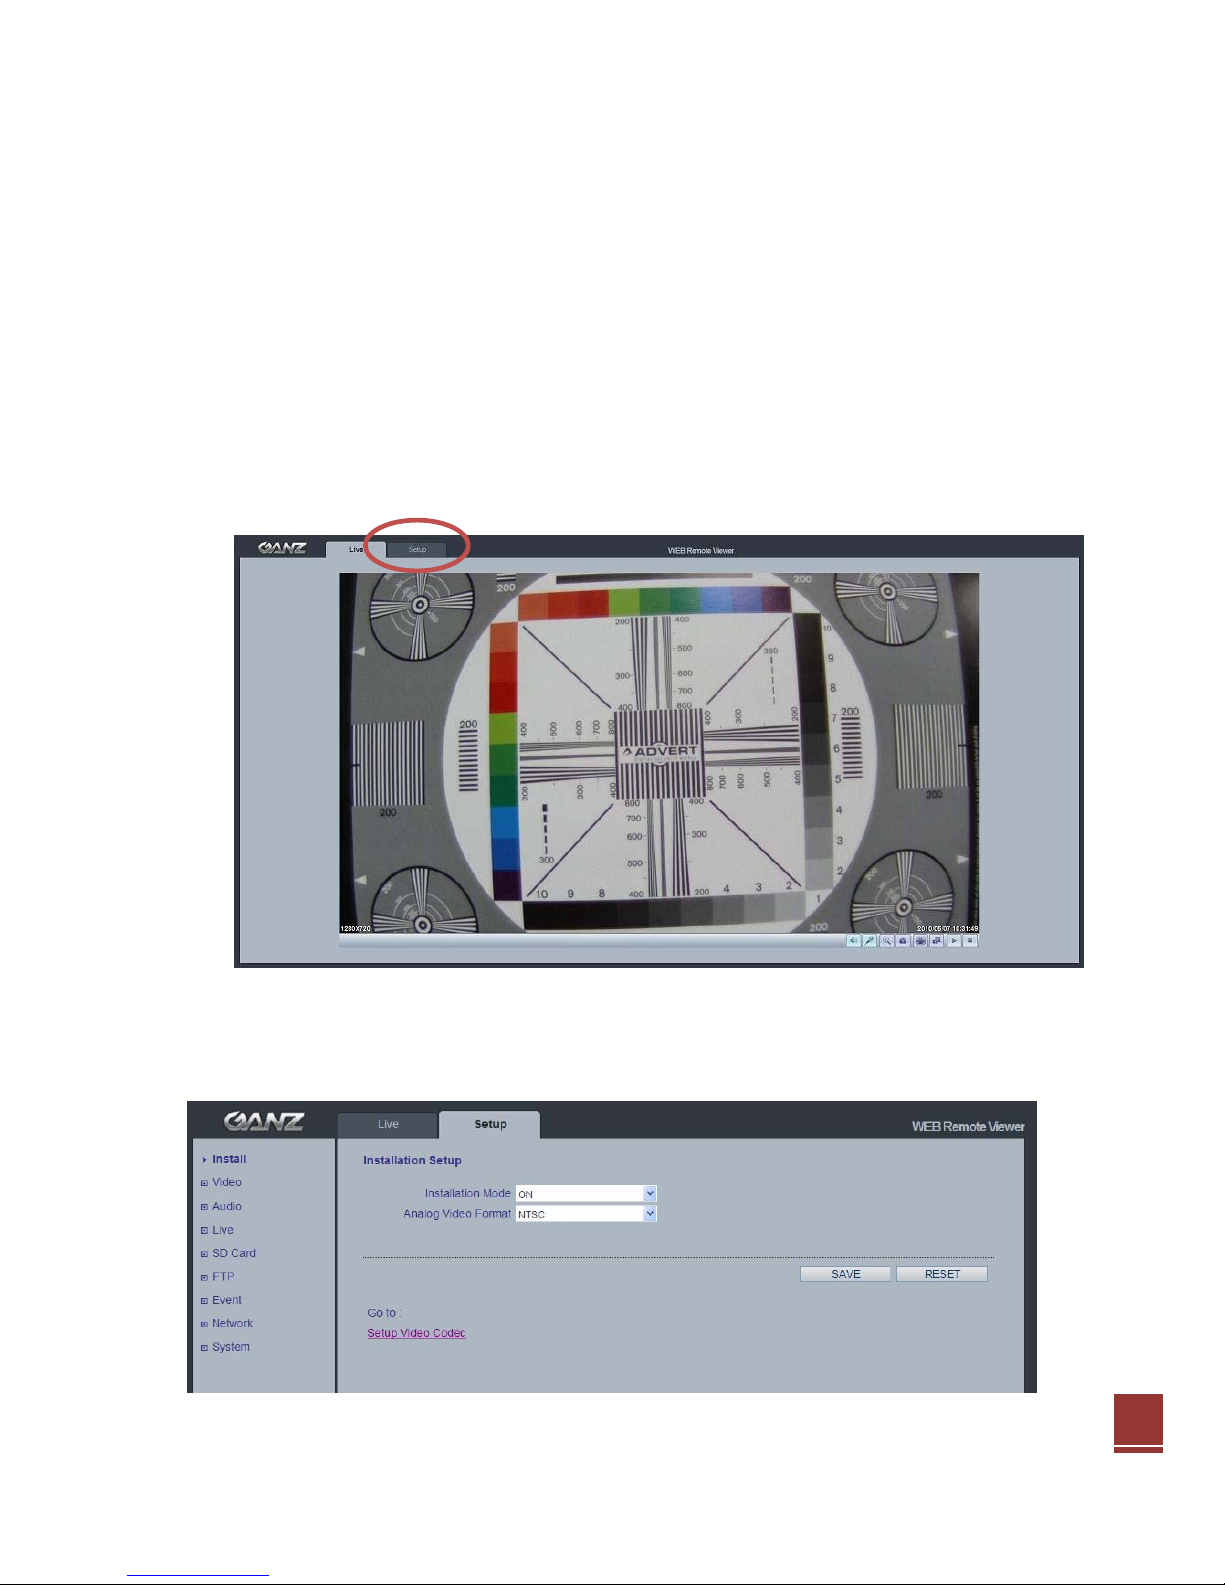
3. The Setup
The GANZ ZN-Cx is configured from the Setup tab, which is available on the top
left hand side in the web interface. This configuration could be done by:
• Administrators, who have unrestricted access to all settings under the Setup link
• User, who have access to the Video & Image, Live View Config and Event
Configuration settings.
Accessing the Setup link from a browser
1. Start your browser and enter the IP address or host name of the camera in the
location/address field.
2.The Live View page is now displayed. Click Setup to see options.
4. Installation
The following descriptions show examples of some of the features available in the
GANZ ZN-Cx.

12
4.1 Installation Setup
Installation mode is for using the analog output to set the lens focus.
After connecting the analog monitor output, User can set the focus easily.
Please refer to Chapter 2.3.
ON : Analog Output is enabled.
OFF : Analog output will be disabled. Please turn installation mode off to use
720p or 1080p streaming.
5. Camera and Image
The following descriptions show examples of some of the features available in the
GANZ ZN-Cx.
5.1 Codec
These are the tools for adjusting the H.264, MJPEG settings and controlling the video bit
rate.
Motion JPEG
This format uses standard JPEG still images in the video stream. These images then are
displayed and updated at a rate sufficient to create a stream that shows constantly
updated motion.
The Motion JPEG stream uses considerable amounts of bandwidth, but also provides
excellent image quality and access to every individual image contained in the stream.
 Loading...