

Page 1
Page 2

2 - User's Manual
Table of Contents
Overview.......................................................................................................................................................3
Read Before Use �������������������������������������������������������������������������������������������������������������������������������������3
Package Contents ����������������������������������������������������������������������������������������������������������������������������������� 3
Physical Description �������������������������������������������������������������������������������������������������������������������������������� 4
Installation ....................................................................................................................................................6
Hardware Installation ������������������������������������������������������������������������������������������������������������������������������� 6
Network Deployment ������������������������������������������������������������������������������������������������������������������������������� 8
Software Installation ������������������������������������������������������������������������������������������������������������������������������ 11
Accessing the Network Camera .................................................................................................................12
Using Web Browsers �����������������������������������������������������������������������������������������������������������������������������12
Using RTSP Players ������������������������������������������������������������������������������������������������������������������������������14
Main Page ..................................................................................................................................................15
Client Settings ............................................................................................................................................18
Conguration ..............................................................................................................................................20
System ��������������������������������������������������������������������������������������������������������������������������������������������������20
Security �������������������������������������������������������������������������������������������������������������������������������������������������22
HTTPS ���������������������������������������������������������������������������������������������������������������������������������������������������23
Network �������������������������������������������������������������������������������������������������������������������������������������������������26
DDNS ����������������������������������������������������������������������������������������������������������������������������������������������������32
Access List ��������������������������������������������������������������������������������������������������������������������������������������������34
Audio and Video ������������������������������������������������������������������������������������������������������������������������������������ 35
Motion Detection �����������������������������������������������������������������������������������������������������������������������������������41
Camera Control ������������������������������������������������������������������������������������������������������������������������������������� 43
Application ��������������������������������������������������������������������������������������������������������������������������������������������� 46
Recording ���������������������������������������������������������������������������������������������������������������������������������������������� 53
System Log �������������������������������������������������������������������������������������������������������������������������������������������55
Maintenance ������������������������������������������������������������������������������������������������������������������������������������������ 56
Technical Specications ������������������������������������������������������������������������������������������������������������������������60
Technology License Notice �������������������������������������������������������������������������������������������������������������������� 61
Electromagnetic Compatibility (EMC) ����������������������������������������������������������������������������������������������������62
Page 3

User's Manual - 3
Overview
GANZ’s outdoor day/night network camera ZN-BT3312 is equipped with a wide dynamic range
CMOS sensor to cope with any challenging lighting conditions�
Designed for outdoor 24-hour surveillance, ZN-BT3312 features the basics of day and night
and vandal-proof functions that users can easily build up a cost-effective IP surveillance system
without additional accessories� With a removable IR-cut filter and built-in IR illuminators, up to
15m, it can automatically remove the lter and turn on the IR illuminators during the nighttime to
accept IR illumination for low light sensitivity� Meanwhile, the IP66-rated integrated housing shields
this camera from dust and water, allowing it to be applied in harsh weather conditions of outdoor
environments�
ZN-BT3312 with WDR (Wide dynamic range) feature can be very helpful to cope with very
challenging lighting conditions� It is capable of capturing both of the dark part and bright part and
combining the differences into a scene to generate a highly realistic image as the original scene�
Because it preserves as much information in the video as possible, ZN-BT3312 helps provide
video quality closer to the capabilities of the human eye� Consequently, it is largely applied in highly
contrast environments such as lobby entrances, parking lots, ATM, loading areas and much more�
Incorporating numbers of advanced features including simultaneous dual streams, 802�3af
compliant PoE, two-way audio by SIP protocol, RS-485 interface for scanners or pan/tilts driver
connection, and HTTPS encrypted data transmission, GANZ ZN-BT3312 allows users to boost
your robust IP surveillance system by reproducing clear images in proper color in extreme highcontrast environments for your indoor/outdoor security and monitoring applications�
Read Before Use
The use of surveillance devices may be prohibited by law in your country� The Network Camera
is not only a high-performance web-ready camera but also can be part of a exible surveillance
system� It is the user’s responsibility to ensure that the operation of such devices is legal before
installing this unit for its intended use�
It is important to rst verify that all contents received are complete according to the Package
contents listed below� Take notice of the warnings in Quick Installation Guide before the Network
Camera is installed; then carefully read and follow the instructions in the Installation chapter to
avoid damages due to faulty assembly and installation� This also ensures the product is used
properly as intended�
The Network Camera is a network device and its use should be straightforward for those who
have basic network knowledge� It is designed for various applications including video sharing,
general security/surveillance, etc. The Conguration chapter suggests ways to best utilize the
Network Camera and ensure proper operations� For the creative and professional developers,
the URL Commands of the Network Camera section serves to be a helpful reference to
customize existing homepages or integrating with the current web server.
Package Contents
■ ZN-BT3312
■ Sun Shield
■ Screws / RJ45 Female/Female Coupler
■ Camera Stand
■ Power Adapter
■ Silica Gel
■ Spanner
■ Quick Installation Guide
■ Warranty Card
■ Software CD
Page 4
4 - User's Manual
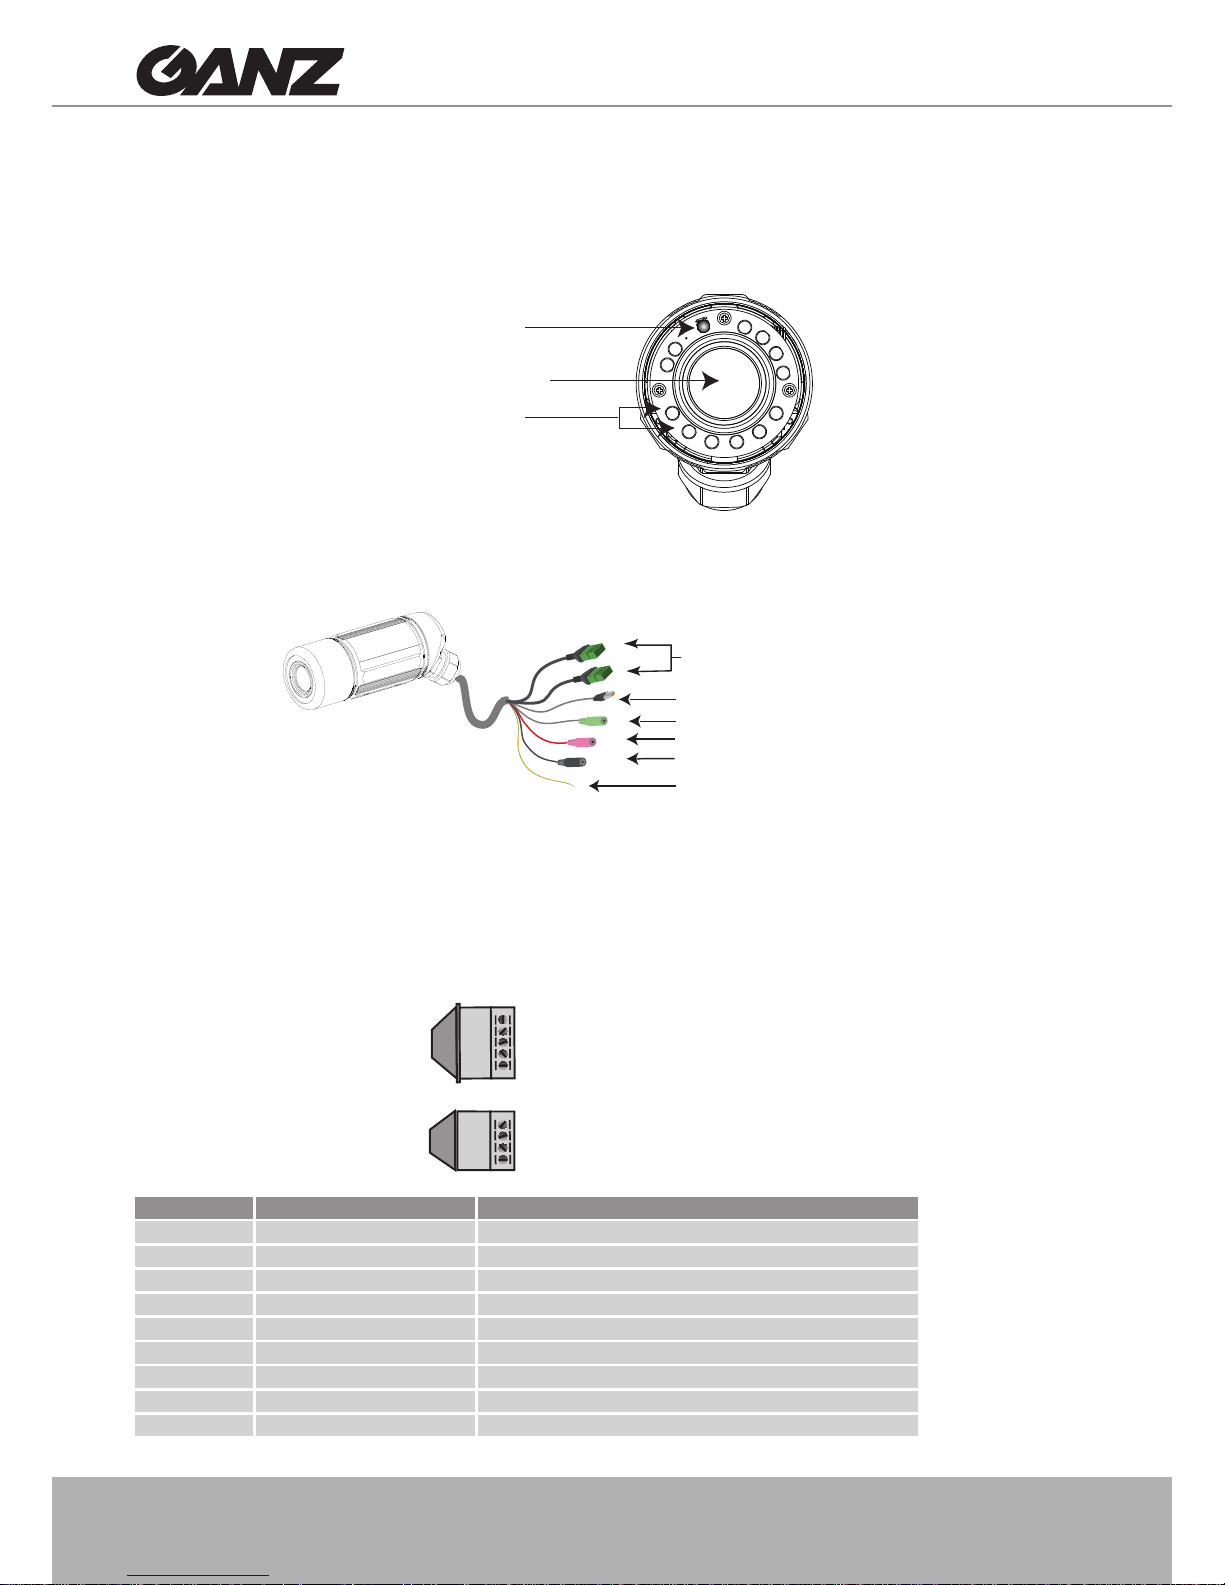
Physical Description
Front Panel
Connectors
General I/O Terminal Block
This Network Camera provides a general I/O terminal block which is used to connect external
input / output devices. The pin denitions are described below.
Pin Name Specification
N�C� No Connector
485B RS485- 3�3V
485A RS485+ 3�3V
AC24V Power in AC 24V AC 24V ± 5%
AC24V Power in AC 24V AC 24V ± 5%
GND Ground
DI Digital Iutput OPEN/Short-to-GND, isolation 2kV
DO Digital Output Max� 40VDC, max� 400mA, isolation 2kV
+12V Power +12V 12VDC ± 10%, max� 0�4A
N.C.
485B
485A
AC24V
AC24V
N�C�: No Connector
485B: RS485485A: RS485+
AC24V: Power in AC 24V
AC24V: Power in AC 24V
GND: Ground
DI : Digital Input
DO : Digital Output
+12V : Power, 12V DC
GND
DI
DO
+12V
IR LED
Lens
Light Sensor
Ethernet 10/100 RJ45 plug
Audio out (green)
Microphone in (pink)
Power cord socket (black)
General I/O terminal block
Ground
Page 5
User's Manual - 5
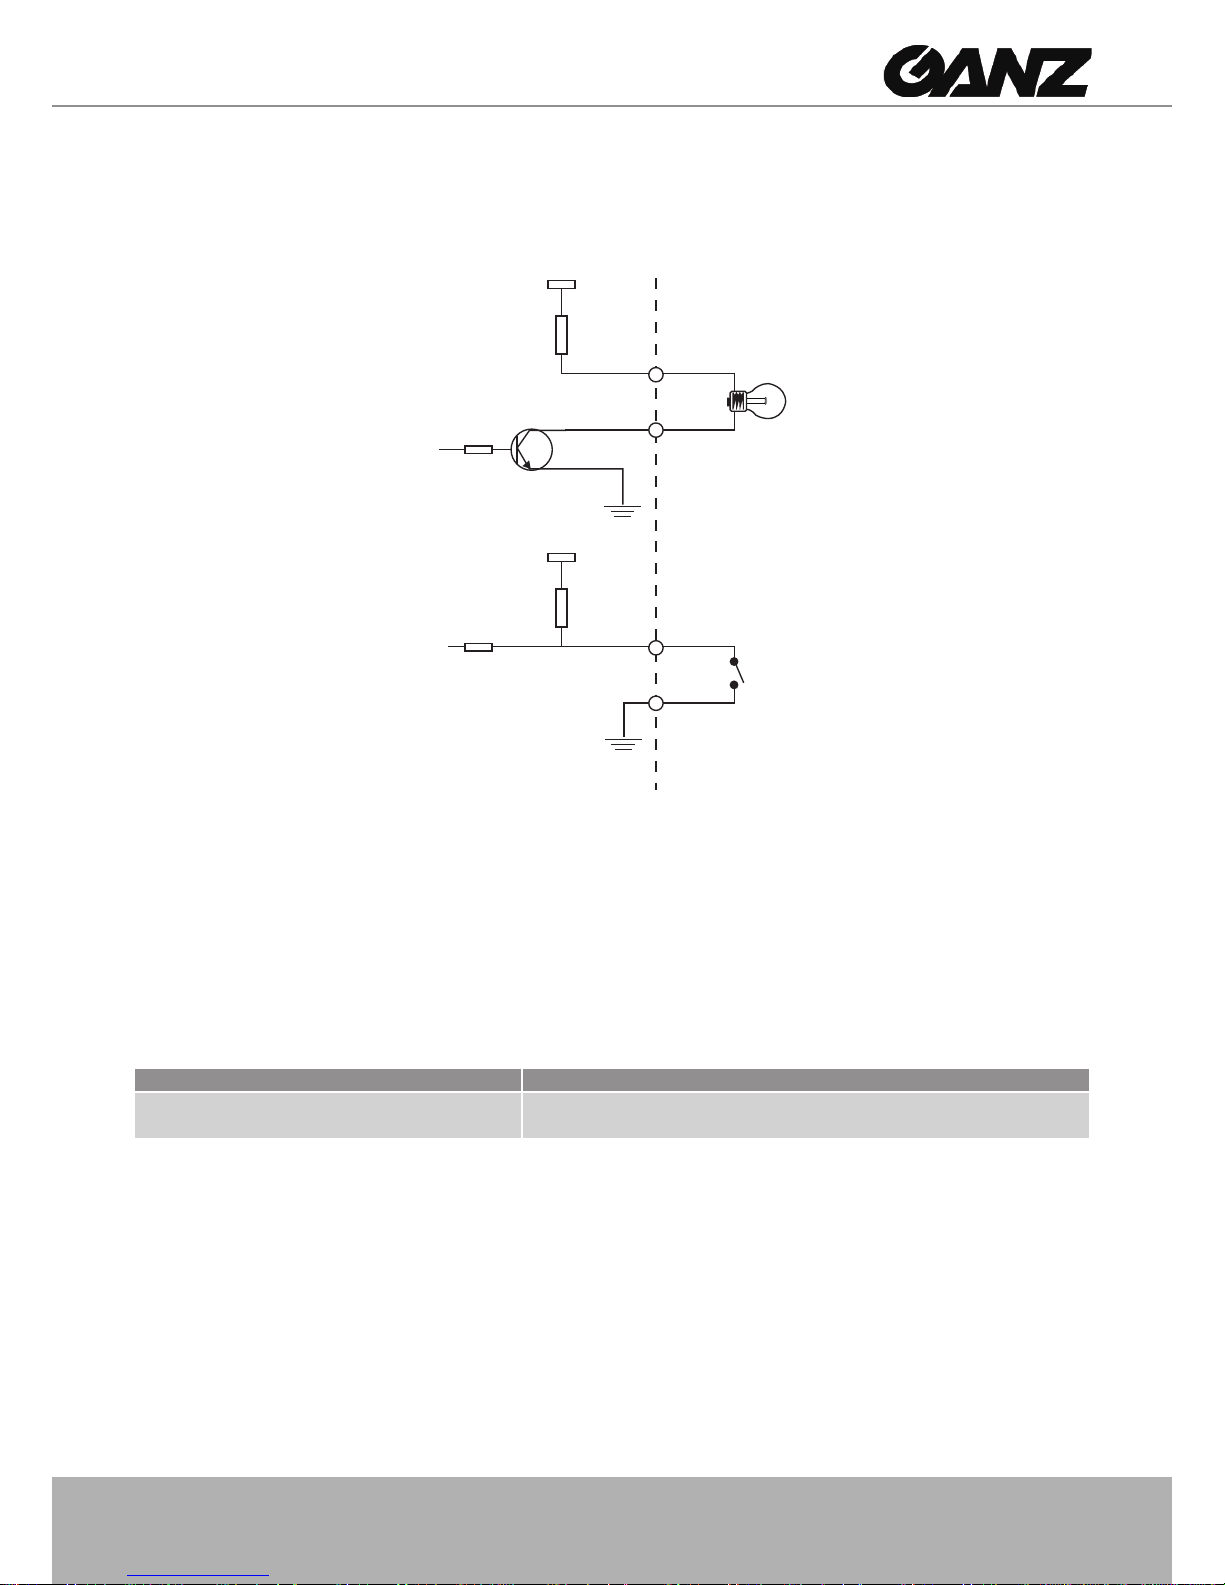
DI/DO Diagram
Refer to the following illustration for connection method�
12V
+12V
Digital output
PIN 1
Power+12V
PIN 2
Digital input
PIN 3
Ground
PIN 4
Status LED
The LED indicates the status of the Network Camera�
Status LED Description
Blinking red (two short, one long)
1� Power is being supplied to the Network Camera
2� Restore, or reboot the Network Camera
Page 6
6 - User's Manual
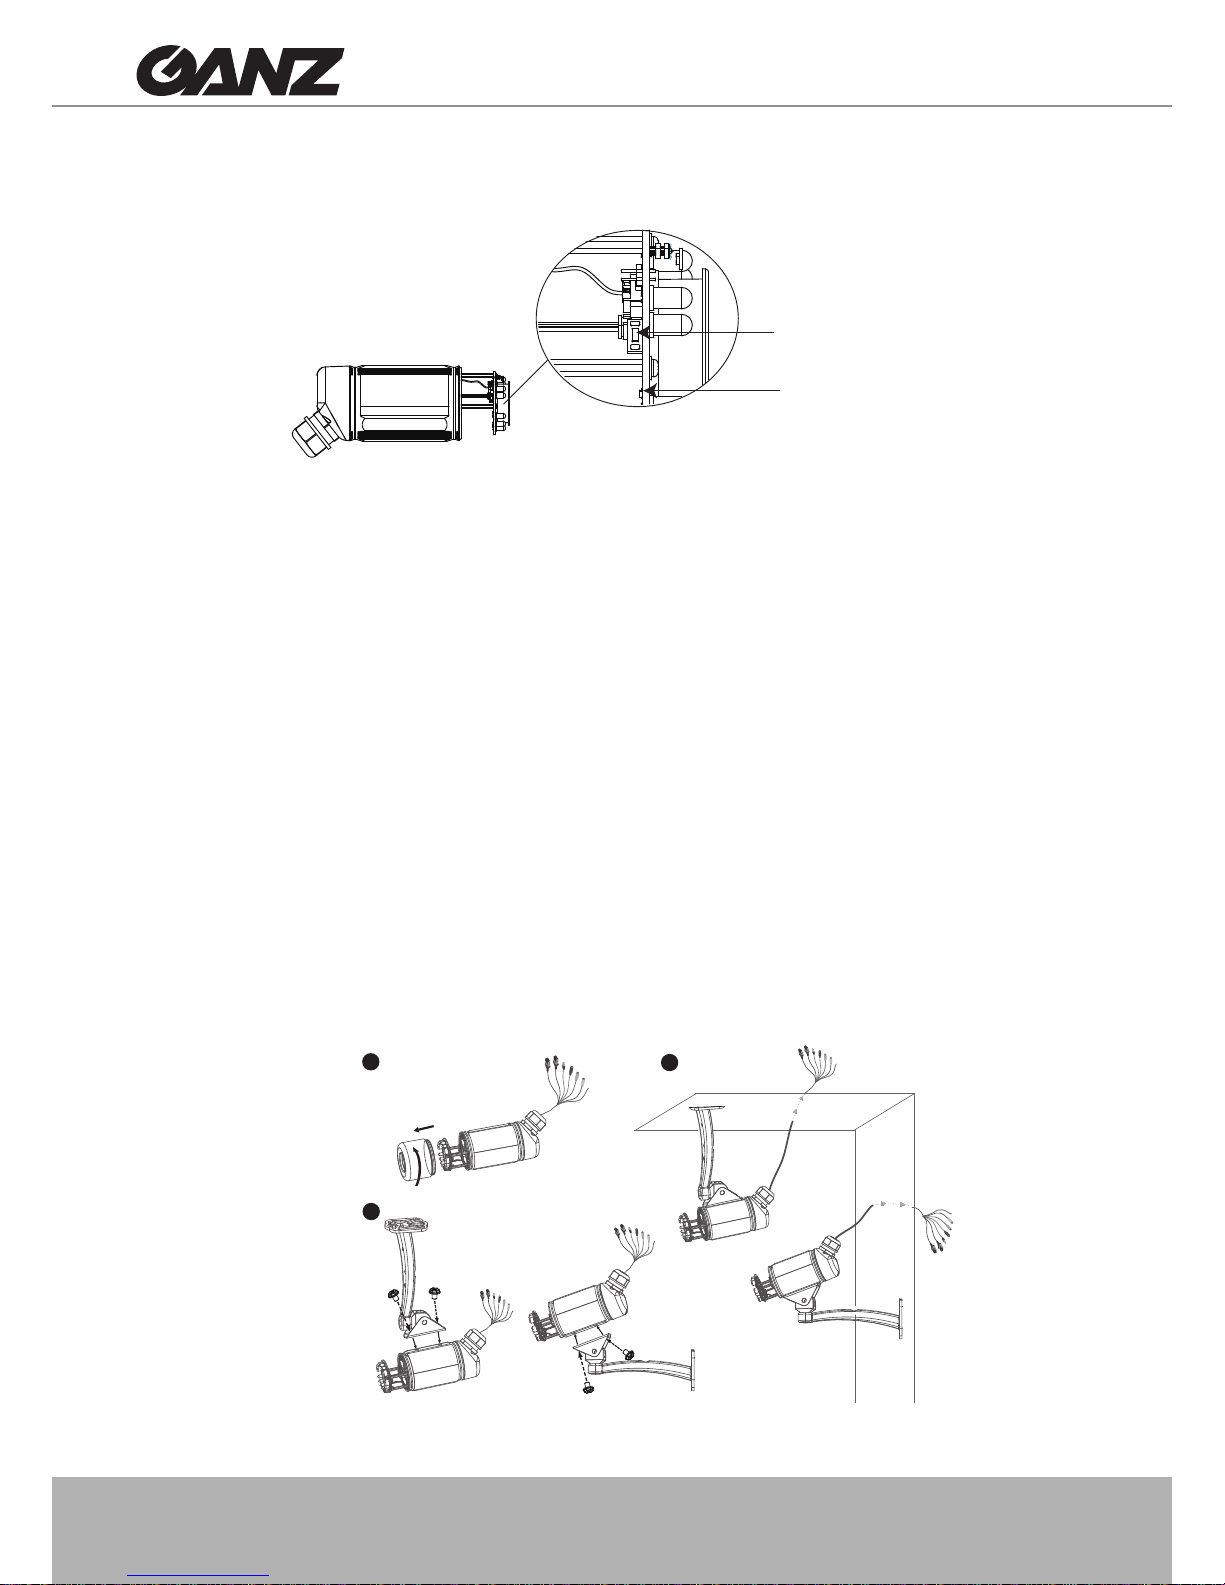
Hardware Reset
There is a reset button on the inner side of the Network Camera� It is used to reboot the Network
Camera or restore the Network Camera to factory default� Sometimes rebooting the Network
Camera could set the Network Camera back to normal state� If the problems remain after
rebooted, restore the Network Camera to factory default and install again�
Reboot: Press and release the reset button� The status LED will blinks two short one long in red�
Restore: Press the reset button continuously for over 5 seconds until the status LED blinks two
short one long in red� Note that all settings will be restored to factory default�
Installation
Hardware Installation
Follow the steps below to install the Network Camera:
1� Open the lens cover�
2� Secure the Network Camera to the wall/ceiling by the supplied camera stand�
3� Feed power to the Network Camera and connect it to the Internet� For more information,
please refer to Network deployment on page 8 for details�
1
2
3
Reset Button
Status LED
Page 7

User's Manual - 7
4� Install the “GANZ Installation Tool“ to assign an IP address to the Network Camera� For more
information, please refer to Software installation on page 11 for details�
5� Access to the Network Camera from the Internet� For more information, please refer to
Accessing the Network Camera on page 12 for details�
6. Unscrew the zoom controller to adjust the zoom factor. Upon completion, tighten the zoom
controller. Unscrew the focus controller to adjust the focus range. Upon completion, tighten
the focus controller�
7� Tear down the aluminum foil vacuum bag and take out the silica gel� Attach the silica gel to
the inner side of the Network Camera, then tighten the lens cover� (Please replace the silica
gel with a new one if you open the back cover after installation�)
Note
If you want to use the supplied sun shield for outdoor environments, please follow the steps below to
install:
1. Tighten the supplied two screws.
2. Attach the supplied sun shield to the Network Camera and slide it to the desired position.
3. Fix the sun shield with the supplied two screws. (Please use different screws for ceiling mount.)
4. Secure the Network Camera to the wall/ceiling by the supplied camera stand.
T
W
∞
N
W
∞
N
T
1
2
3
4
Ceiling MountWall Mount
Page 8
8 - User's Manual
Network Deployment
Setup the Network Camera over the Internet
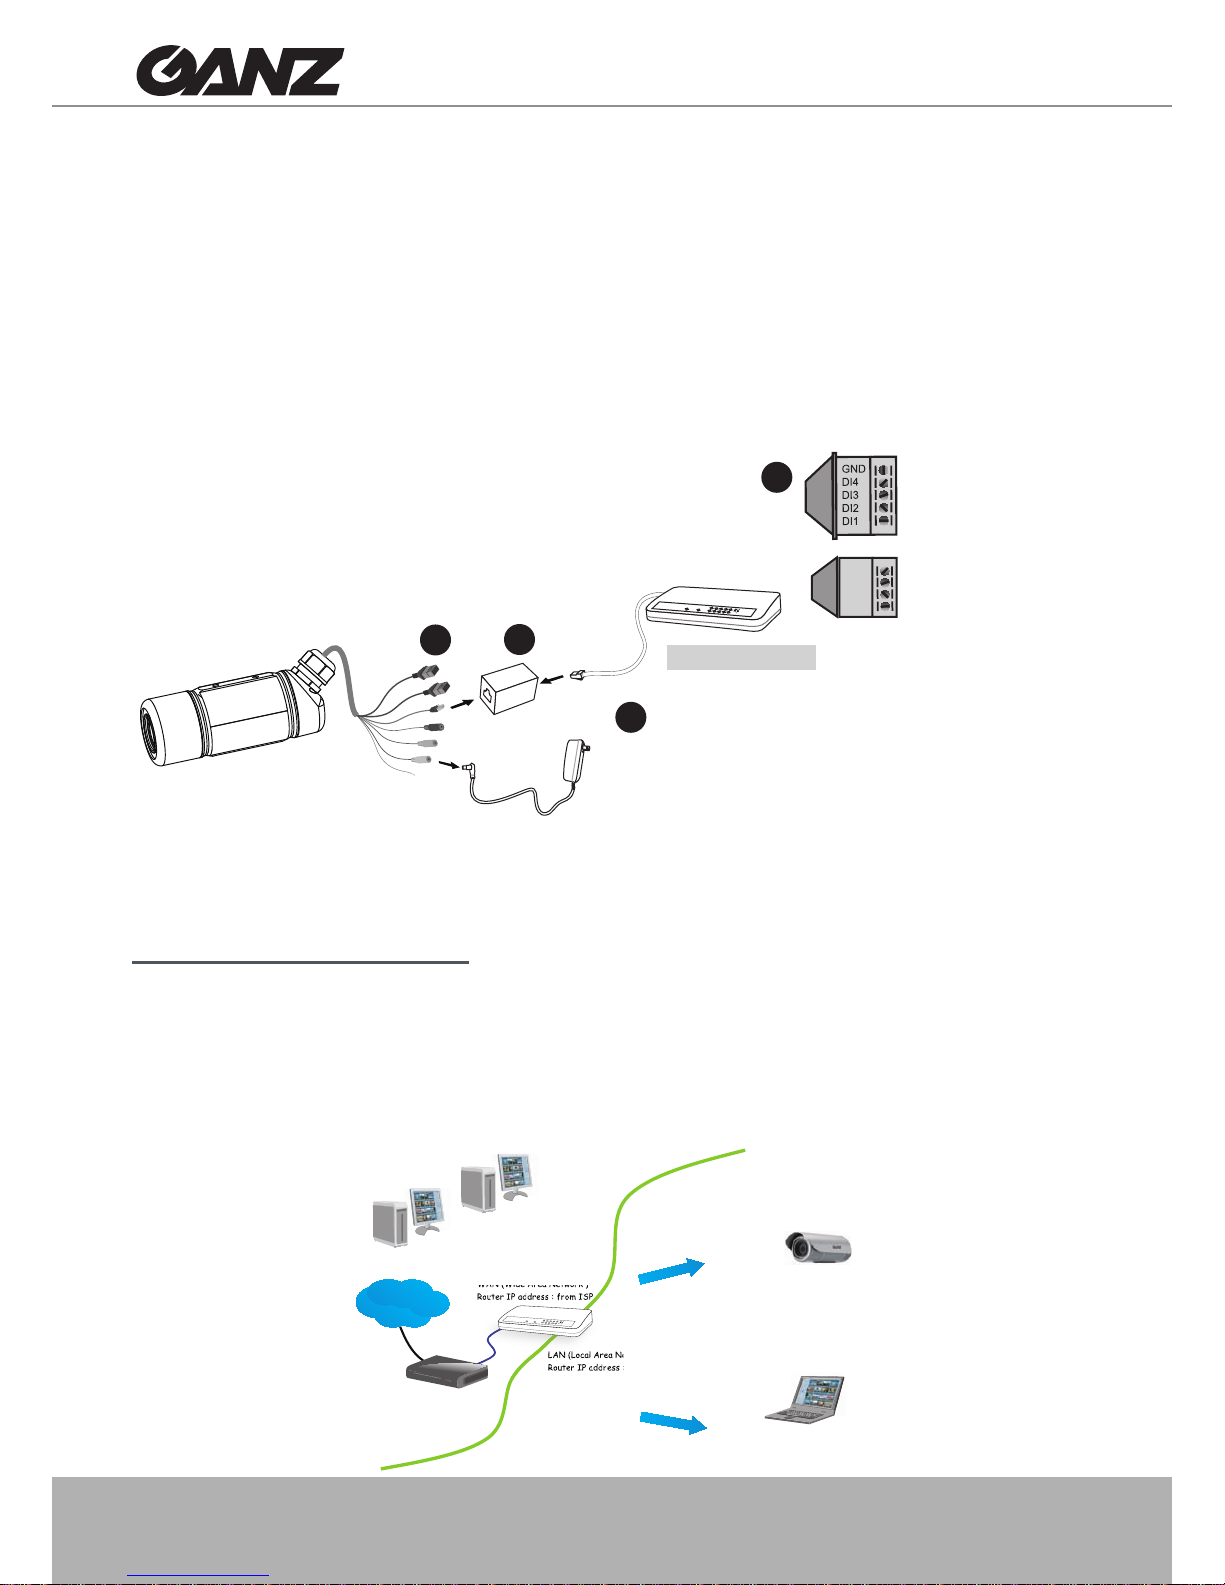
This section explains how to congure the Network Camera to Internet connection.
1� If you have external devices such as sensors and alarms, connect them to the general I/O
terminal block�
2� Use the supplied RJ45 female/female coupler to connect the Network Camera to a switch�
Use Category 5 Cross Cable when Network Camera is directly connected to PC�
3� Connect the power cable from the Network Camera to a power outlet�
There are several ways to setup the Network Camera over the Internet� The rst way is to setup
the Network Camera behind a router� The second way is to utilize a static IP� The third way is to
use PPPoE�
Internet connection via a router
Before setting up the Network Camera over the Internet, make sure you have a router and follow
the steps below�
1� Connect your Network Camera behind a router, the Internet environment is illustrated as
below� About how to get your IP address, please refer to Software installation on page 11 for
details�
IP address : 192.168.0.3
Subnet mask : 255.255.255.0
Default router : 192.168.0.1
IP address : 192.168.0.2
Subnet mask : 255.255.255.0
Default router : 192.168.0.1
LAN (Local Area Network)
Router IP address : 192.168.0.1
WAN (Wide Area Network )
Router IP address : from IS P
Cable or DSL Modem
L
A
N (
Local Area Network)
R
o
u
t
e
r
I
P
a
d
dre
s
s
W
A
N (Wide Area Network )
R
o
u
t
e
r
I
P
a
d
dre
s
s
f
r
o
m
I
S
P
POWER
COLLISION
LINK
RECEIVE
PARTITION
1
2
3
4
5
Internet
1
N�C�: No Connector
485B: RS485485A: RS485+
AC24V: Power in AC 24V
AC24V: Power in AC 24V
GND: Ground
DI : Digital Input
DO : Digital Output
+12V : Power, 12V DC
GND
DI
DO
+12V
POW
ER
C
O
LL
I
S
ION
L
I
N
K
RE
CEIVE
PARTITIO
N
1
2
3
4
5
Ethernet switch
3
2
1
Page 9
User's Manual - 9
2� In this case, if the Local Area Network (LAN) IP address of your Network Camera is
192�168�0�3, please forward the following ports for the Network Camera on the router�
■ HTTP port
■ RTSP port
■ RTP port for audio
■ RTCP port for audio
■ RTP port for video
■ RTCP port for video
If you have changed the port numbers on the Network page, please open the ports accordingly
on your router� For information on how to forward ports on the router, please refer to the user’s
manual of your router�
3� Find out the public IP address of your router provided by your ISP (Internet Service Provider)�
Use the public IP and the secondary HTTP port to access the Network Camera from the
Internet� Please refer to Network Type on page 26 for details�
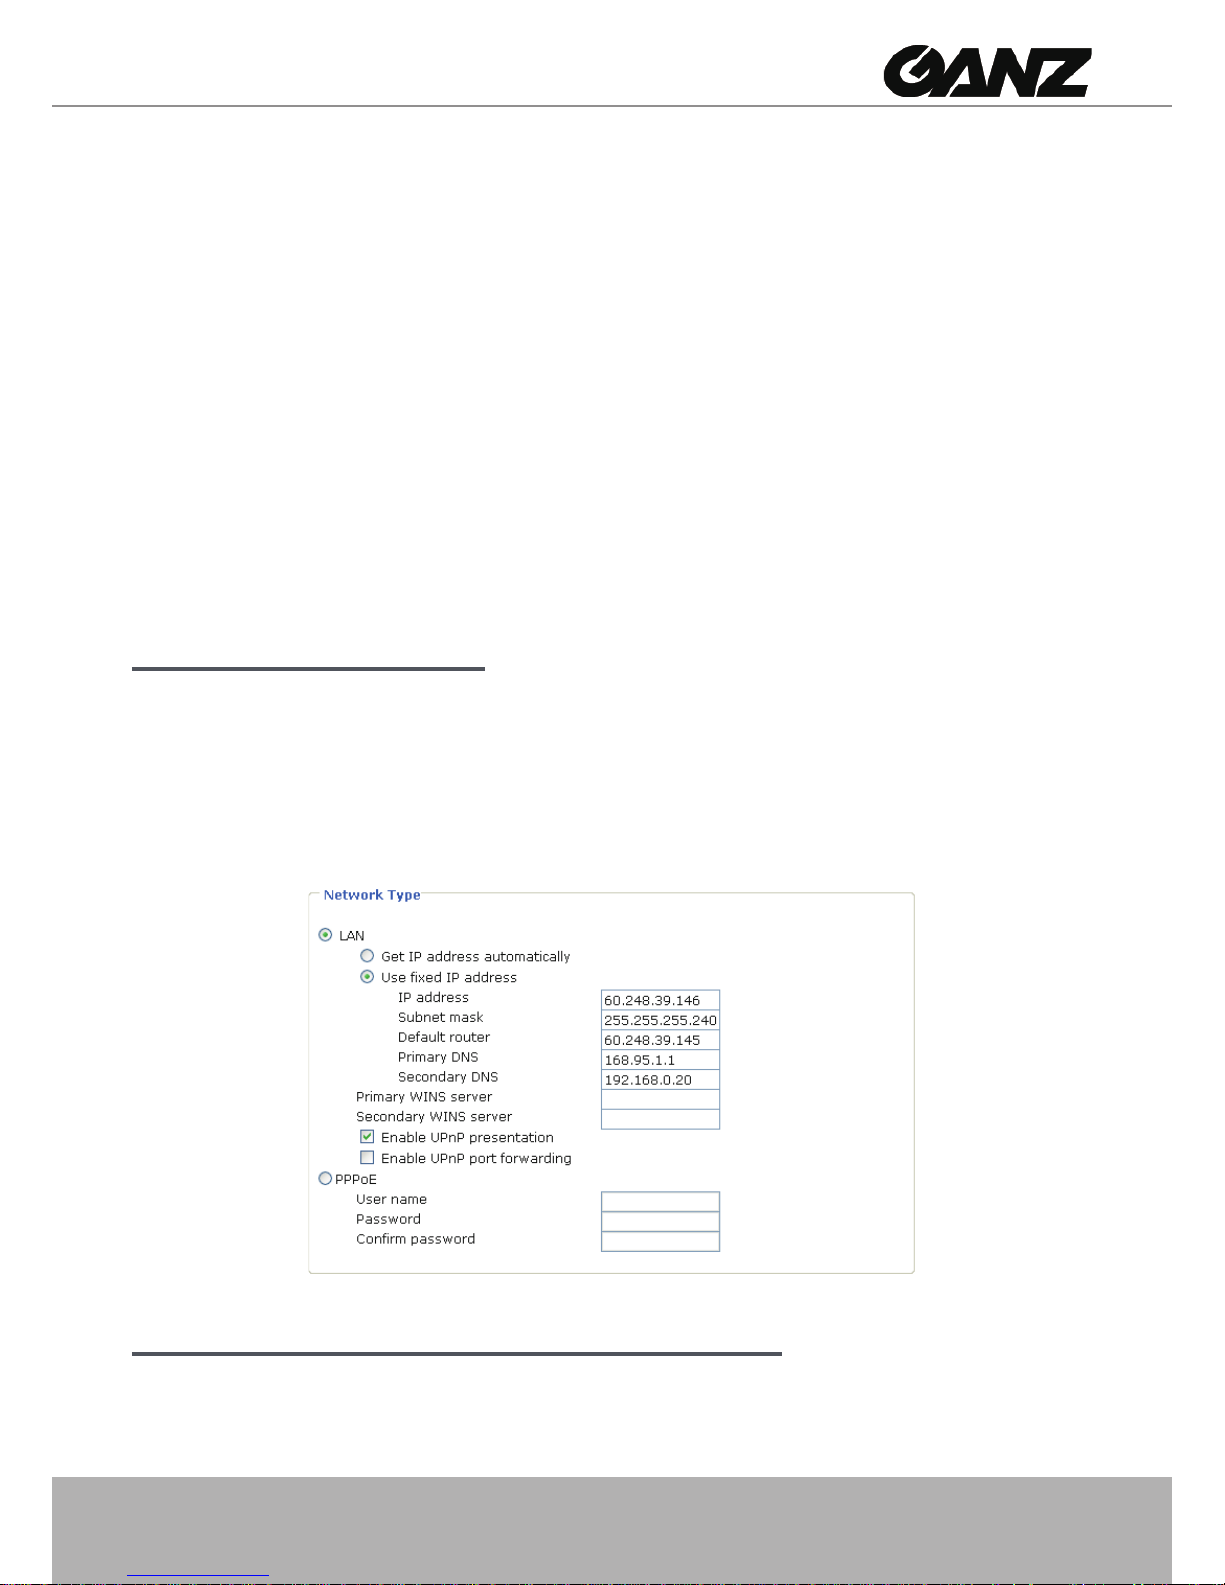
Internet connection with static IP
Choose this connection type if you are required to use a static IP for the Network Camera and
follow the steps below�
1� Set up the Network Camera on the LAN� Please refer to Software Installation on page 11 for
details�
2. Go to Conguration > Network > Network Type. Select LAN > Use xed IP address.
3� Enter the static IP, Subnet mask, Default router, Primary DNS provided by your ISP�
Internet connection via PPPoE (Point-to-Point over Ethernet)
Choose this connection type if you are connected to the Internet via a DSL Line� Please refer to
PPPoE on page 27 for details�
Page 10
10 - User's Manual
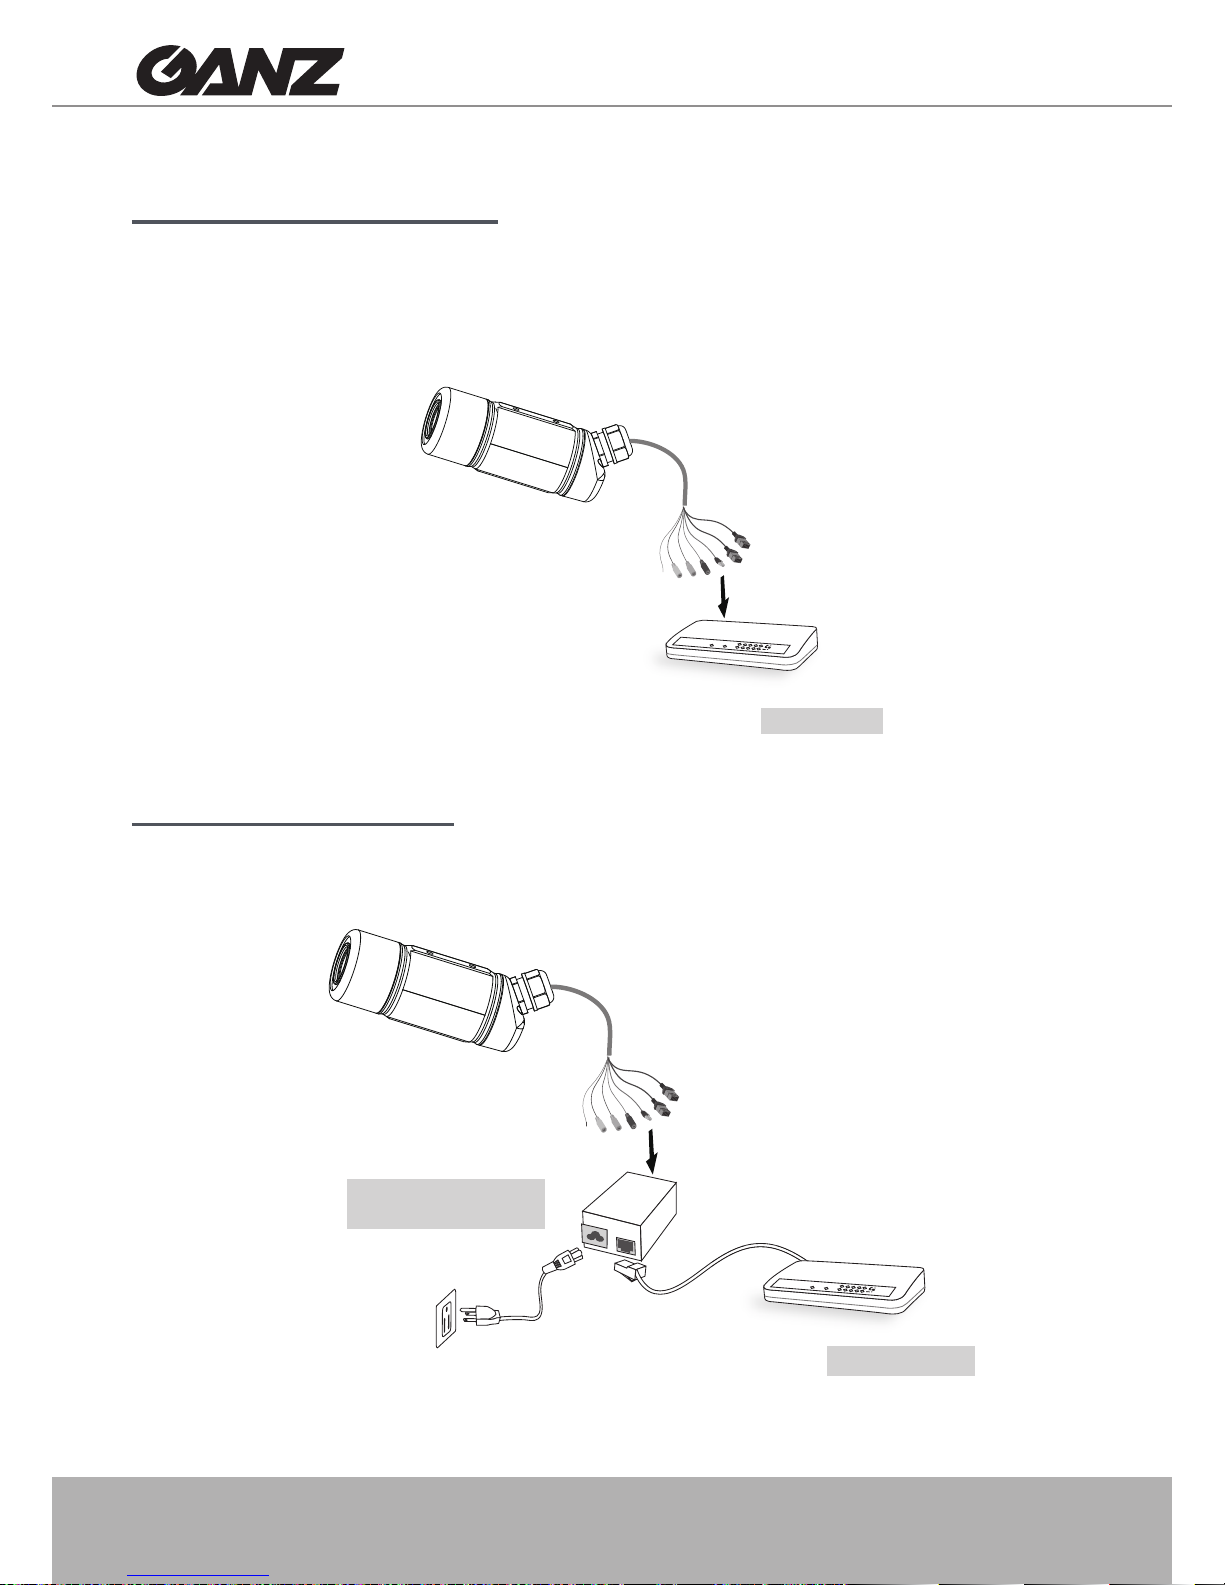
Set up the Network Camera through Power over Ethernet (PoE)
When using a PoE-enabled switch
The Network Camera is PoE-compliant, allowing transmission of power and data via avsingle
Ethernet cable� Follow the below illustration to connect the Network Camera to a PoE-enabled
switch via Ethernet cable�
POWER
COLLISION
LINK
RECEIVE
PARTITION
1
2
3
4
5
When using a non-PoE switch
If your switch/router does not support PoE, use a PoE power injector (optional) to connect
between the Network Camera and a non-PoE switch�
PoE switch
POWER
COLLISION
LINK
RECEIVE
PARTITION
1
2
3
4
5
non-PoE switch
PoE power injector
(optional)
Page 11
User's Manual - 11
Software Installation
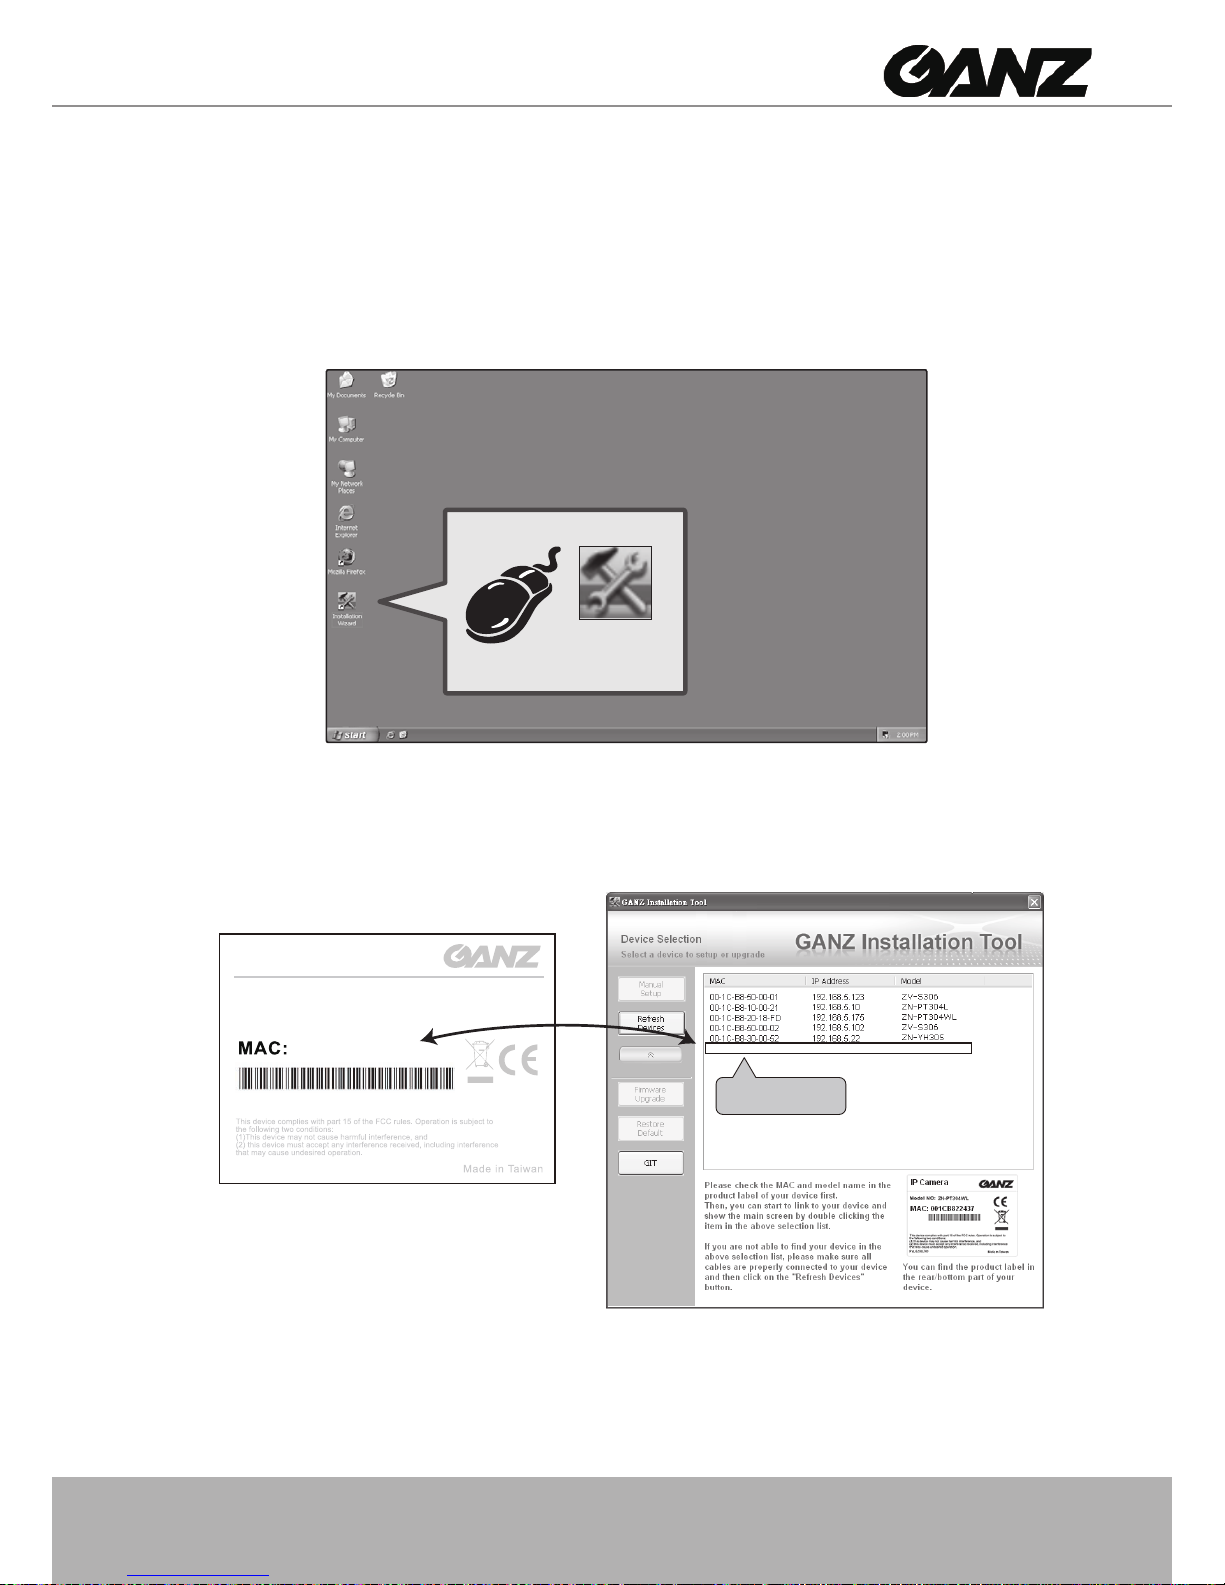
1�
Install the “GANZ Installation Tool”
from the Software Utility directory on the software CD�
2� The program will conduct an analysis of your network environment�
After your network environment is analyzed, please click Next to continue the program�
3� From the “GANZ Installation Tool” window, click on the MAC that matches the one labeled
on the side of the camera lens or S/N number on the label of carton to connect the Internet
Explorer to the Network Camera�
GANZ
Installation Tool
00-1C-B8-60-00-52
00-1C-B8-60-00-52 192.168.5.134 ZN-BT3312
001CB8600052
RoHS
Pat. 6,930,709
IP Camera
Model No: ZN-BT3312
Page 12
12 - User's Manual
Accessing the Network Camera
This chapter explains how to access the Network Camera through web browsers or RTSP
players�
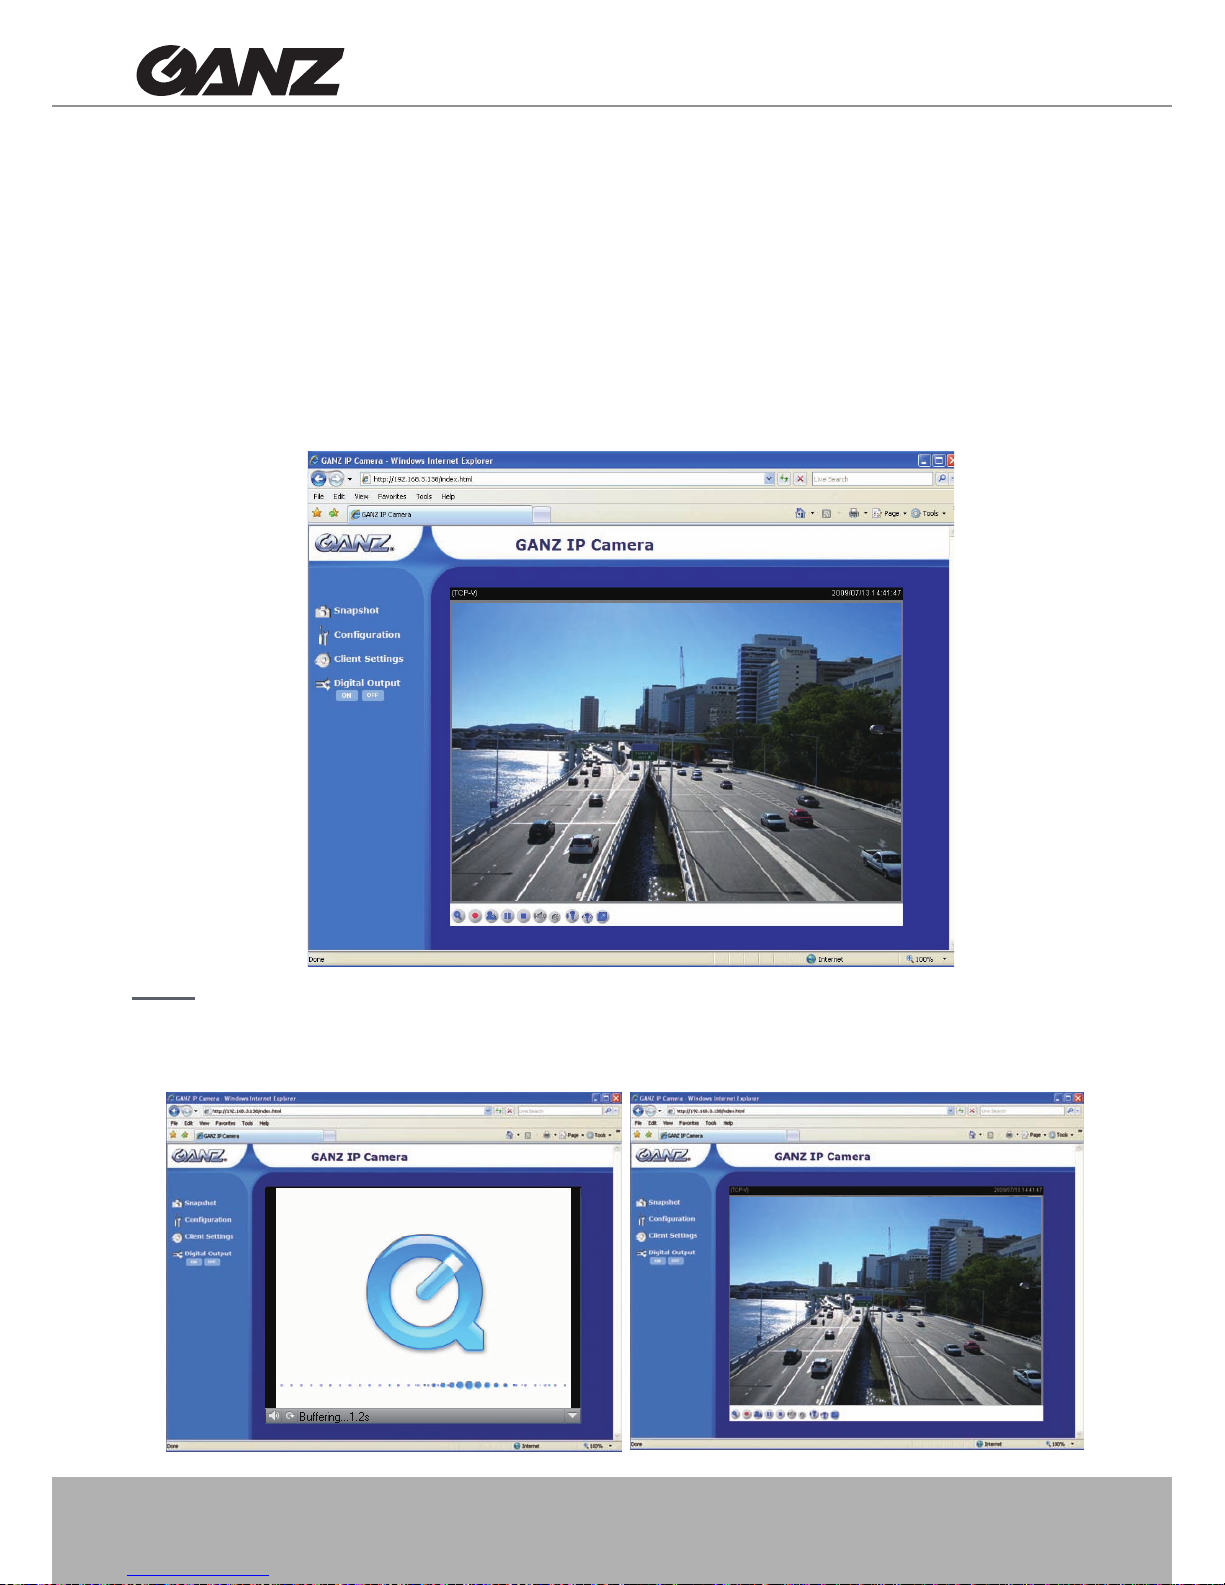
Using Web Browsers
1� Launch your web browser (ex� Microsoft® Internet Explorer, Mozilla Firefox or Netscape).
2. Enter the IP address of the Network Camera in the address eld. Press Enter�
3� The live video will be displayed in your web browser�
NOTE
► For Mozilla Firefox or Netscape users, your browser will use Quick Time to stream the live
video�
Page 13
User's Manual - 13
► By default, the Network Camera is not password-protected. To prevent unauthorized
accesses, it is highly recommended to set a password for the Network Camera�
For more information about how to enable password protection, please refer to Security on
page 22�
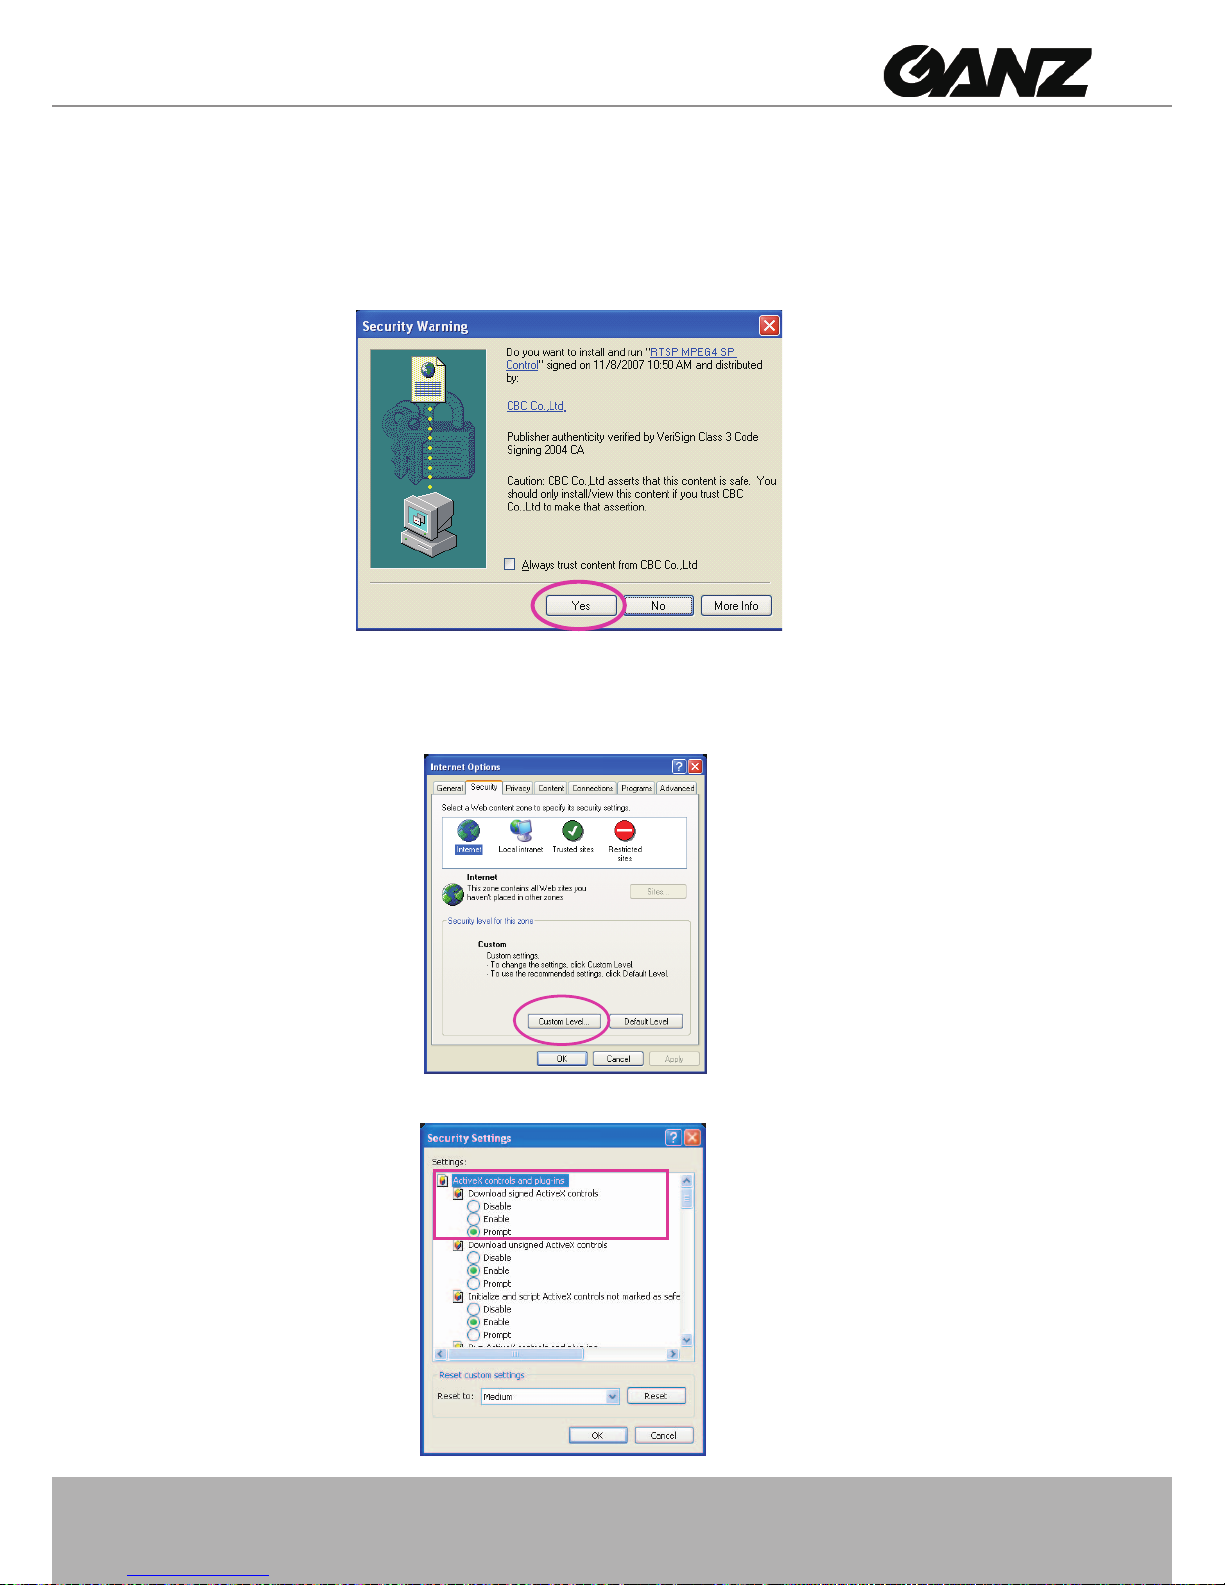
► If you see a warning message at initial access, click Yes to install an ActiveX
®
control on your
computer�
► If you see a dialog box indicating that your security settings prohibit running ActiveX
®
Controls, please enable your ActiveX
®
Controls for your browser�
1. Choose Tools > Internet Options > Security > Custom Level.
2� Look for Download signed ActiveX
®
controls; select Enable or Prompt� Click OK�
.
.
.
Page 14
14 - User's Manual
Using RTSP Players
To view the MPEG-4 streaming media using RTSP players, you can use one of the following
players that support RTSP streaming�
Quick Time Player
Real Player
VLC media player
mpegable Player
pvPlayer
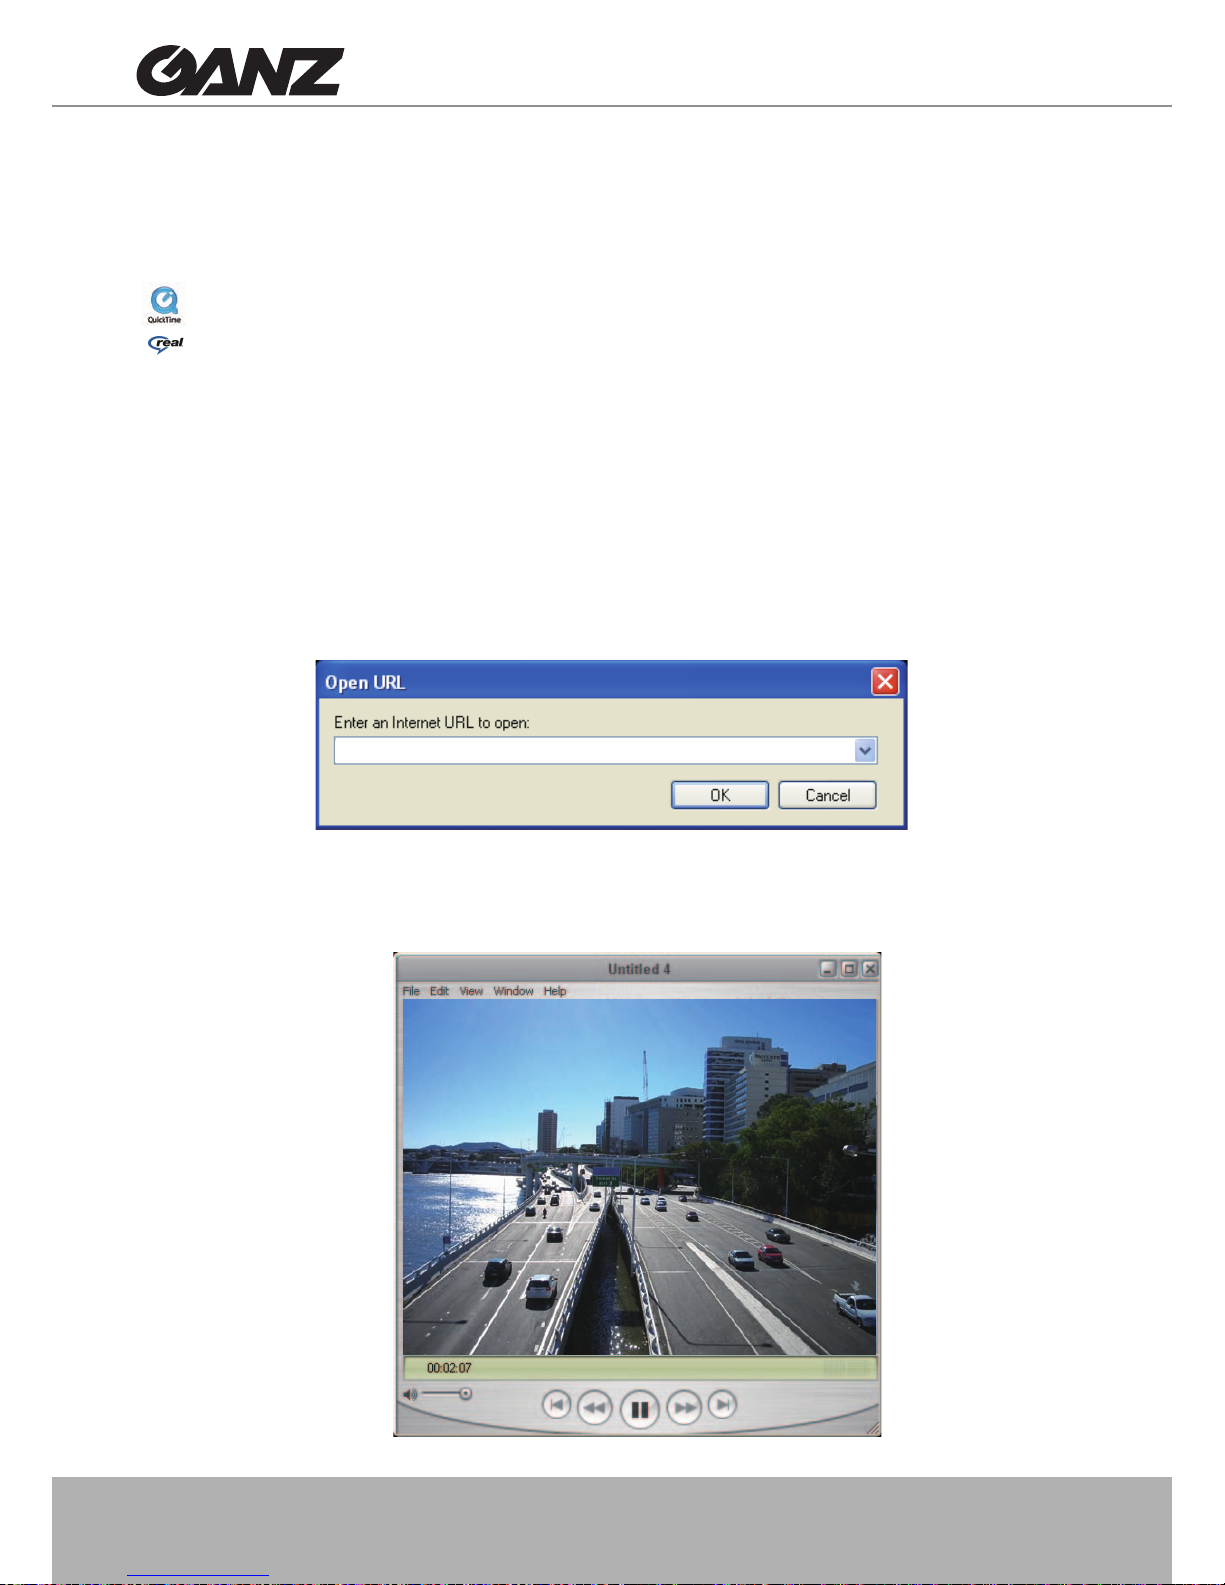
1� Launch a RTSP player�
2. Choose File > Open URL. An URL dialog box will pop up.
3� Type the URL command in the text box�
The format is rtsp://<ip address>:<rtsp port>/<access name for stream1 or stream2>
For example:
4� The live video will be displayed in your player�
For more information on how to configure RTSP access name, please refer to RTSP
Streaming on page 30 for details�
rtsp://192.168.5.132:554/live.sdp
Page 15
User's Manual - 15
Main Page
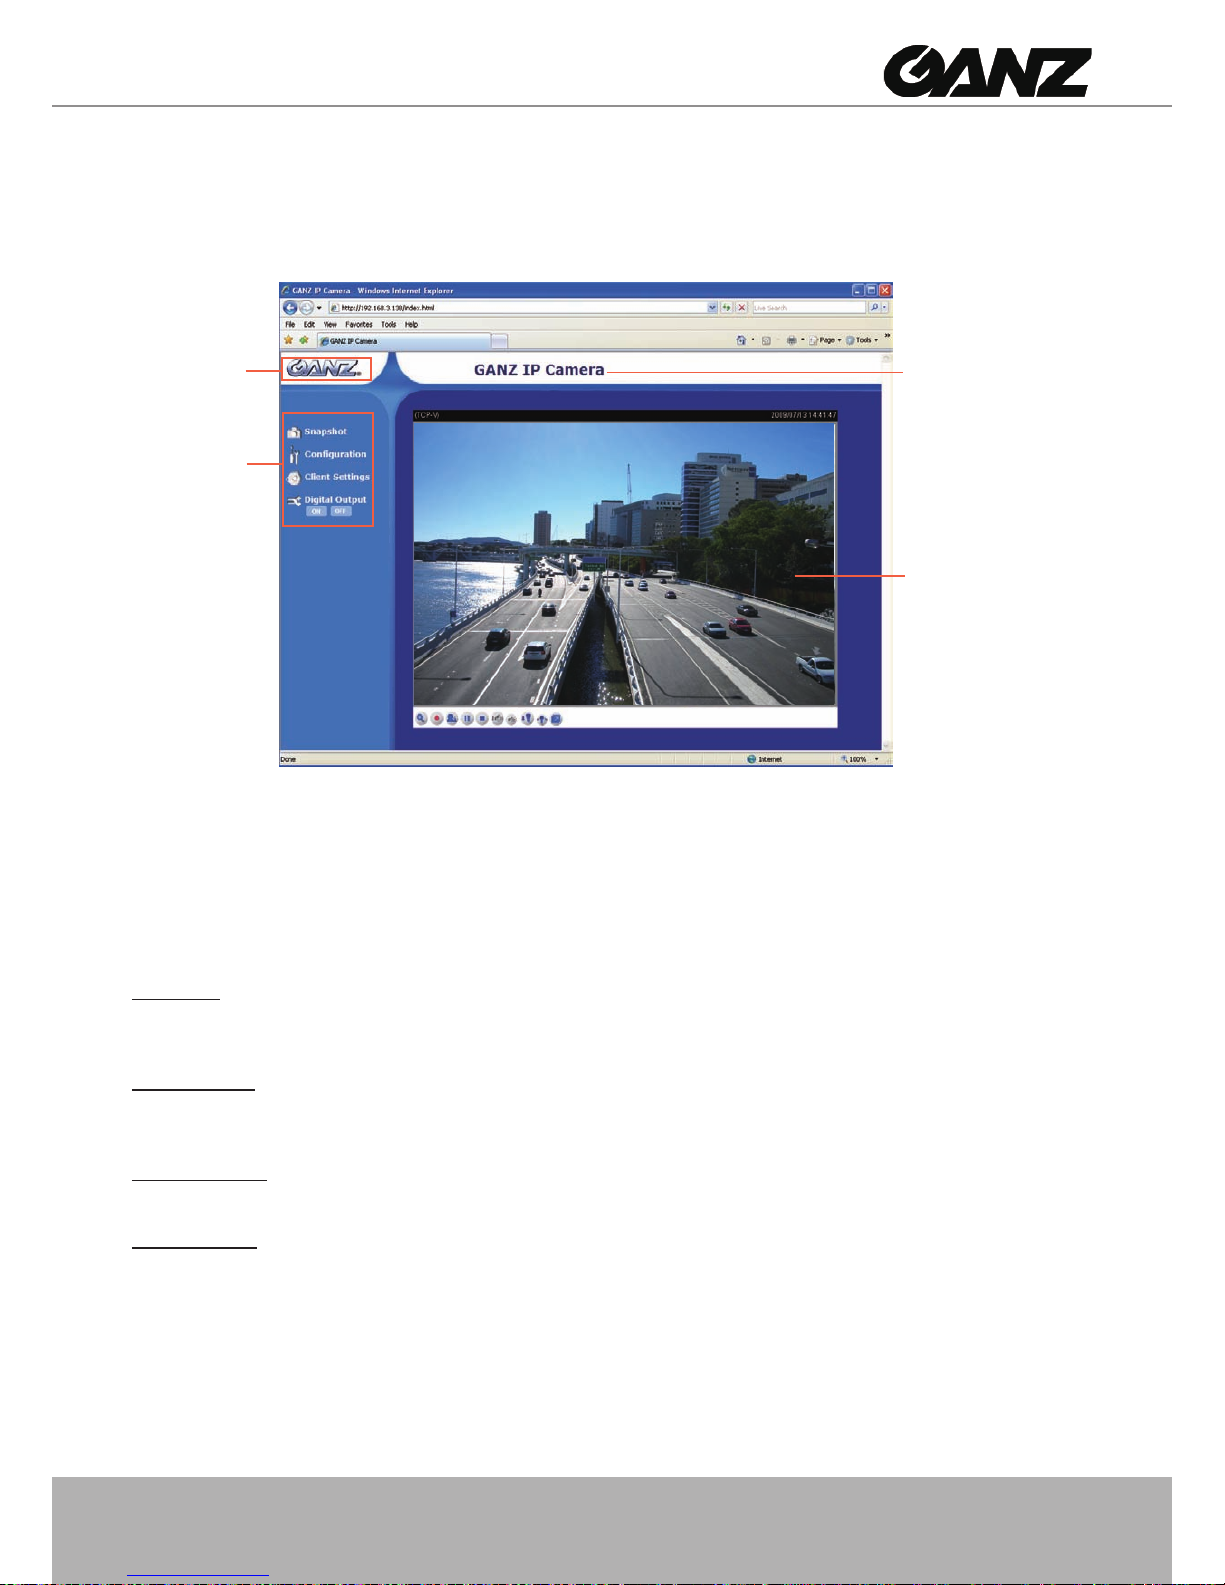
This chapter explains the layout of the main page� It is composed of the following four sections:
GANZ Logo, Menu, Host Name, and Live Video Window�
GANZ Logo
Click this logo to visit GANZ website�
Menu
Snapshot: Click this button to capture and save still images� The captured images will be displayed in
a pop-up window� Right-click the image and choose Save Picture As to save it in JPEG (*.jpg) or BMP
(*�bmp) format�
Conguration: Click this button to access the conguration page of Network Camera. It is suggested that
a password is applied to the Network Camera so that only the administrator can congure the Network
Camera� For more information, please refer to Conguration on page 20�
Client Settings: Click this button to access the client setting page� For more information, please refer to
Client Settings on page 18�
Digital Output: Click this button to turn on or off the digital output device�
Host Name
The host name can be customized to t your needs. For more information,
please refer to
System
on page 20�
Host Name
Live View Window
Menu
GANZ Logo
Page 16
16 - User's Manual
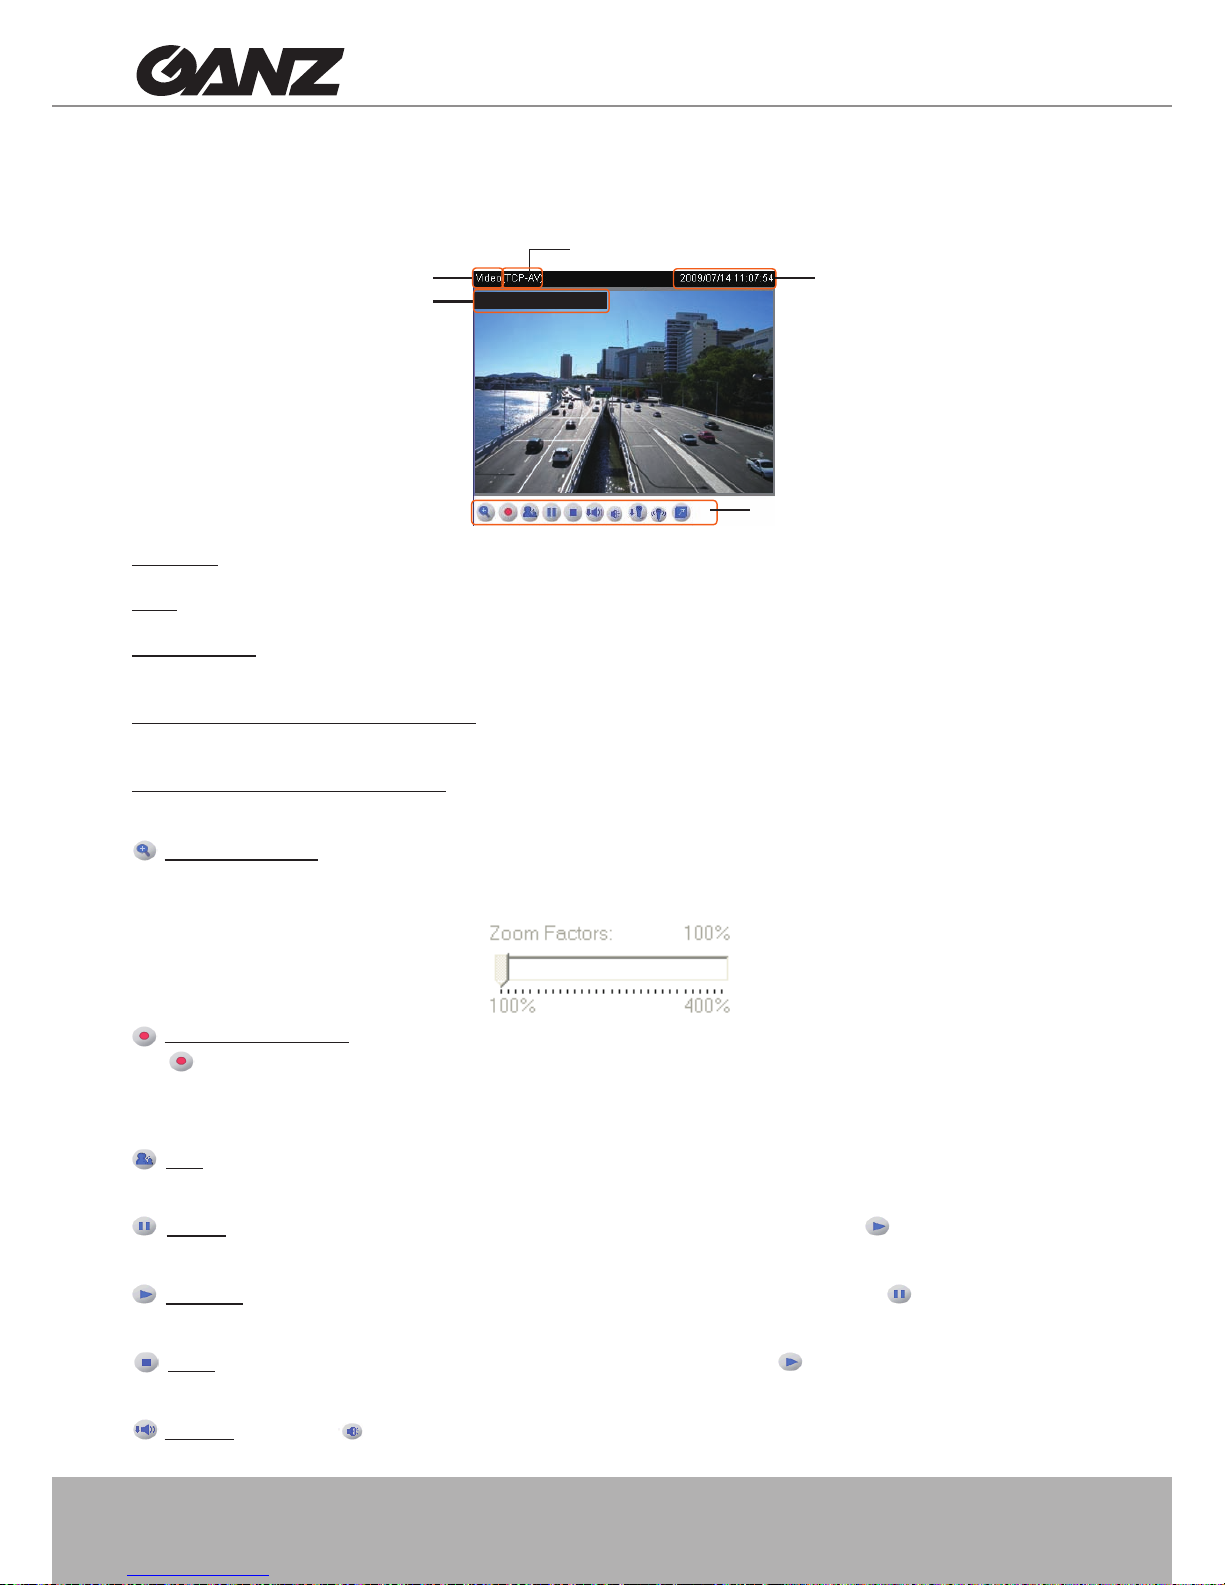
Live Video Window
The following window is displayed when the video mode is set to MPEG-4:
Video title: The video title can be congured. For more information, please refer to Video Settings on page 35�
Time: Display the current time� For more information, please refer to Video Settings on page 35�
Title and time: Video title and time can be stamped on the streaming video� For more information, please
refer to Video Settings on page 35�
MPEG-4 protocol and media options: The transmission protocol and media options for MPEG-4 video
streaming� For more information, please refer to Client Settings on page 18�
Video and audio control buttons: Depending on the Network Camera model and Network Camera
conguration, some buttons may not be available.
Digital zoom edit: Deselect Disable digital zoom to enable the zoom operation. The navigation screen
indicates which part of the image is being magnied. To control the zoom level, drag the slider bar. To
move to a different area you want to magnify, drag the navigation screen�
Start MP4 recording: Click this button to record video clips in MP4 le format to your computer. Press
the
Stop MP4 recording button to end recording� When you quit the web browser, video recording
stops accordingly� To specify the storage destination and the file name, please refer to MP4 Saving
Options on page 19 for details�
Talk: Click this button to talk to people around the Network Camera� Audio will come out from the
external speaker connected to the Network Camera�
Pause: Pause the transmission of streaming media� The button becomes Resume button after
clicking the Pause button�
Resume: Resume the transmission of streaming media� The button becomes Pause button after
clicking the Resume button�
Stop: Stop the transmission of streaming media� Click the Resume button to continue
transmission�
Volume: When the mute function is not activated, move the slider bar to adjust the volume at local
computer�
Video and audio
control buttons
Time
Video title
Title and time
MPEG-4 protocol and media options
Video 16:00:46 2009/07/13
Page 17
User's Manual - 17
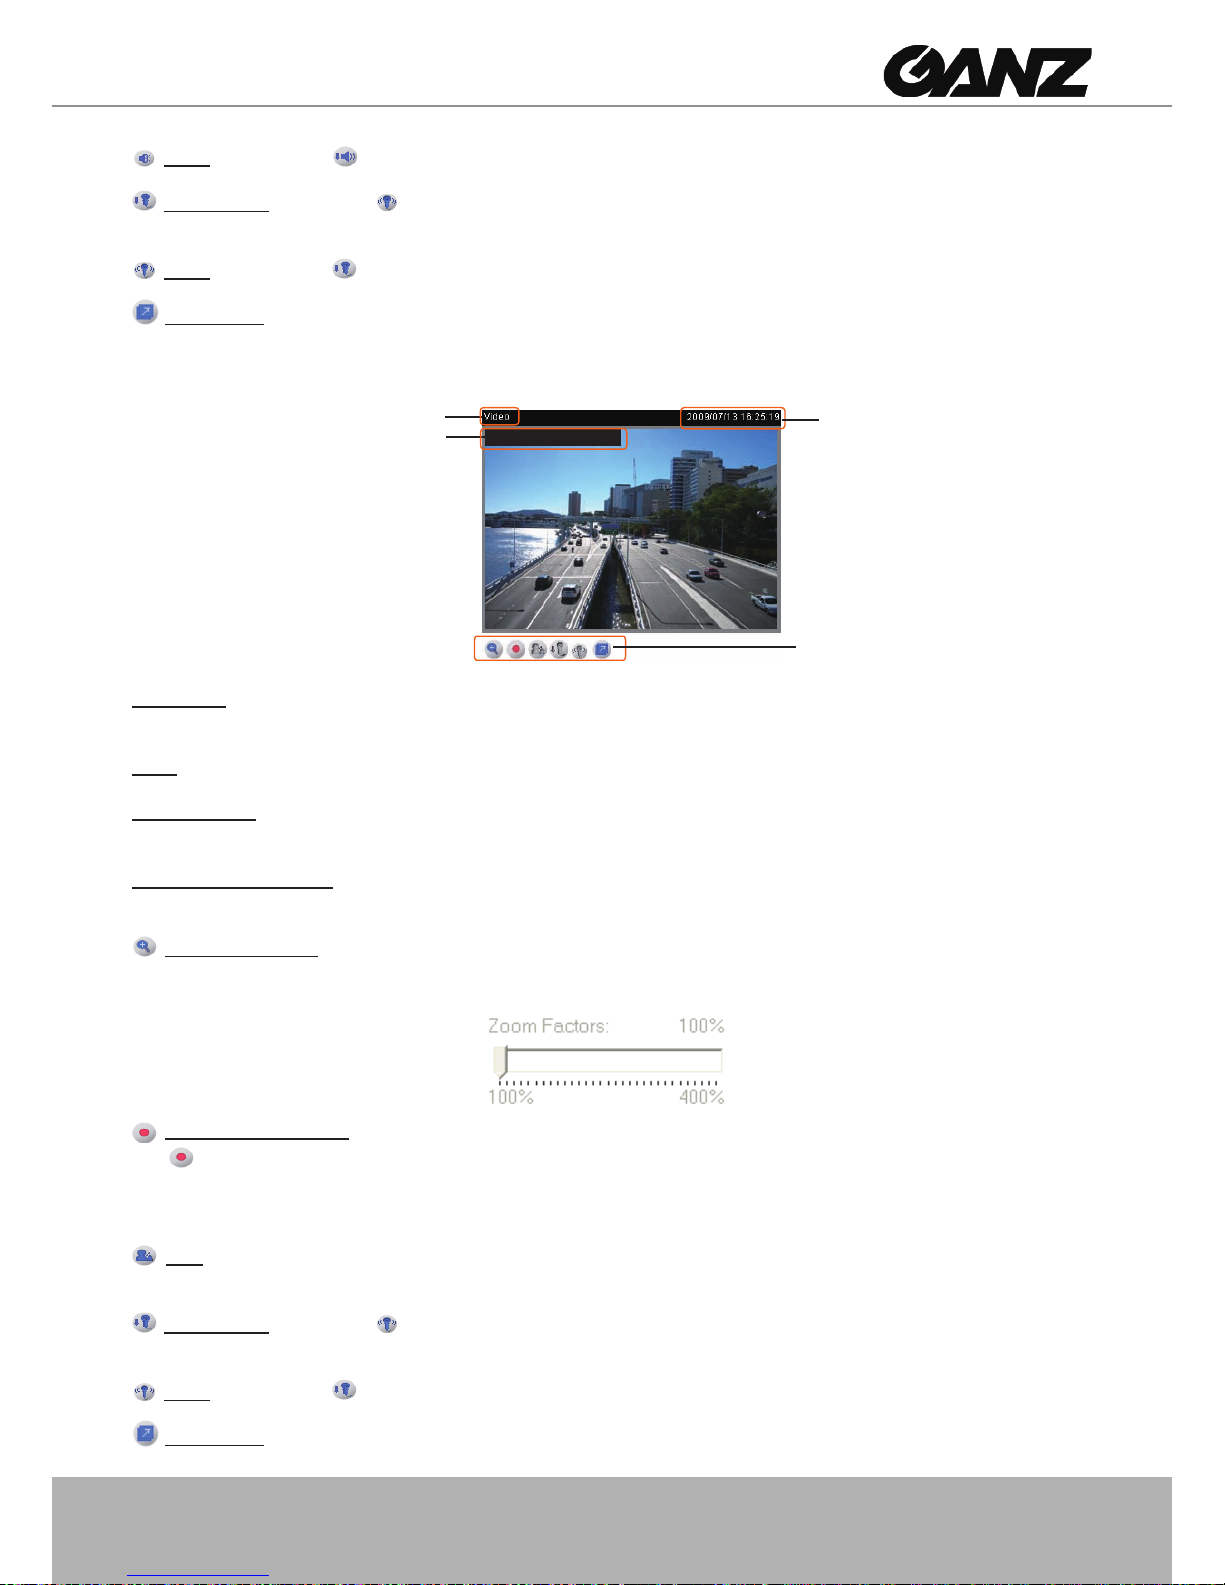
Mute: Turn off the volume at local computer�
Mic volume: When the mute function is not activated, move the slider bar to adjust the microphone
volume at local computer�
Mute: Turn off the microphone volume at local computer�
Full screen: Click this button to switch to full screen mode� Press the “Esc” key to switch back to normal
mode�
The following window is displayed when the video mode is set to MJPEG:
Video title: The video title can be congured. For more information, please refer to Video Settings on
page 35�
Time: Display the current time� For more information, please refer to
Video Settings on page 35�
Title and time: Video title and time can be stamped on the streaming video� For more information, please
refer to
Video Settings on page 35�
Video control buttons: Depending on the Network Camera model and Network Camera conguration,
some buttons may not be available�
Digital zoom edit: Deselect Disable digital zoom to enable the zoom operation. The navigation screen
indicates which part of the image is being magnied. To control the zoom level, drag the slider bar. To
move to a different area you want to magnify, drag the navigation screen�
Start MP4 recording: Click this button to record video clips in MP4 le format to your computer. Press
the
Stop MP4 recording button to end recording� When you exit the web browser, video recording
stops accordingly� To specify the storage destination and the file name, please refer to MP4 Saving
Options on page 19 for details�
Talk: Click this button to talk to people around the Network Camera� Audio will come out from the
external speaker connected to the Network Camera�
Mic volume: When the mute function is not activated, move the slider bar to adjust the microphone
volume at local computer�
Mute: Turn off the microphone volume at local computer�
Full screen: Click this button to switch to full screen mode� Press the “Esc” key to switch back to normal
mode�
Video control
buttons
Time
Video title
Title and time
Video 16:25:19 2009/07/13
Page 18
18 - User's Manual
Client Settings
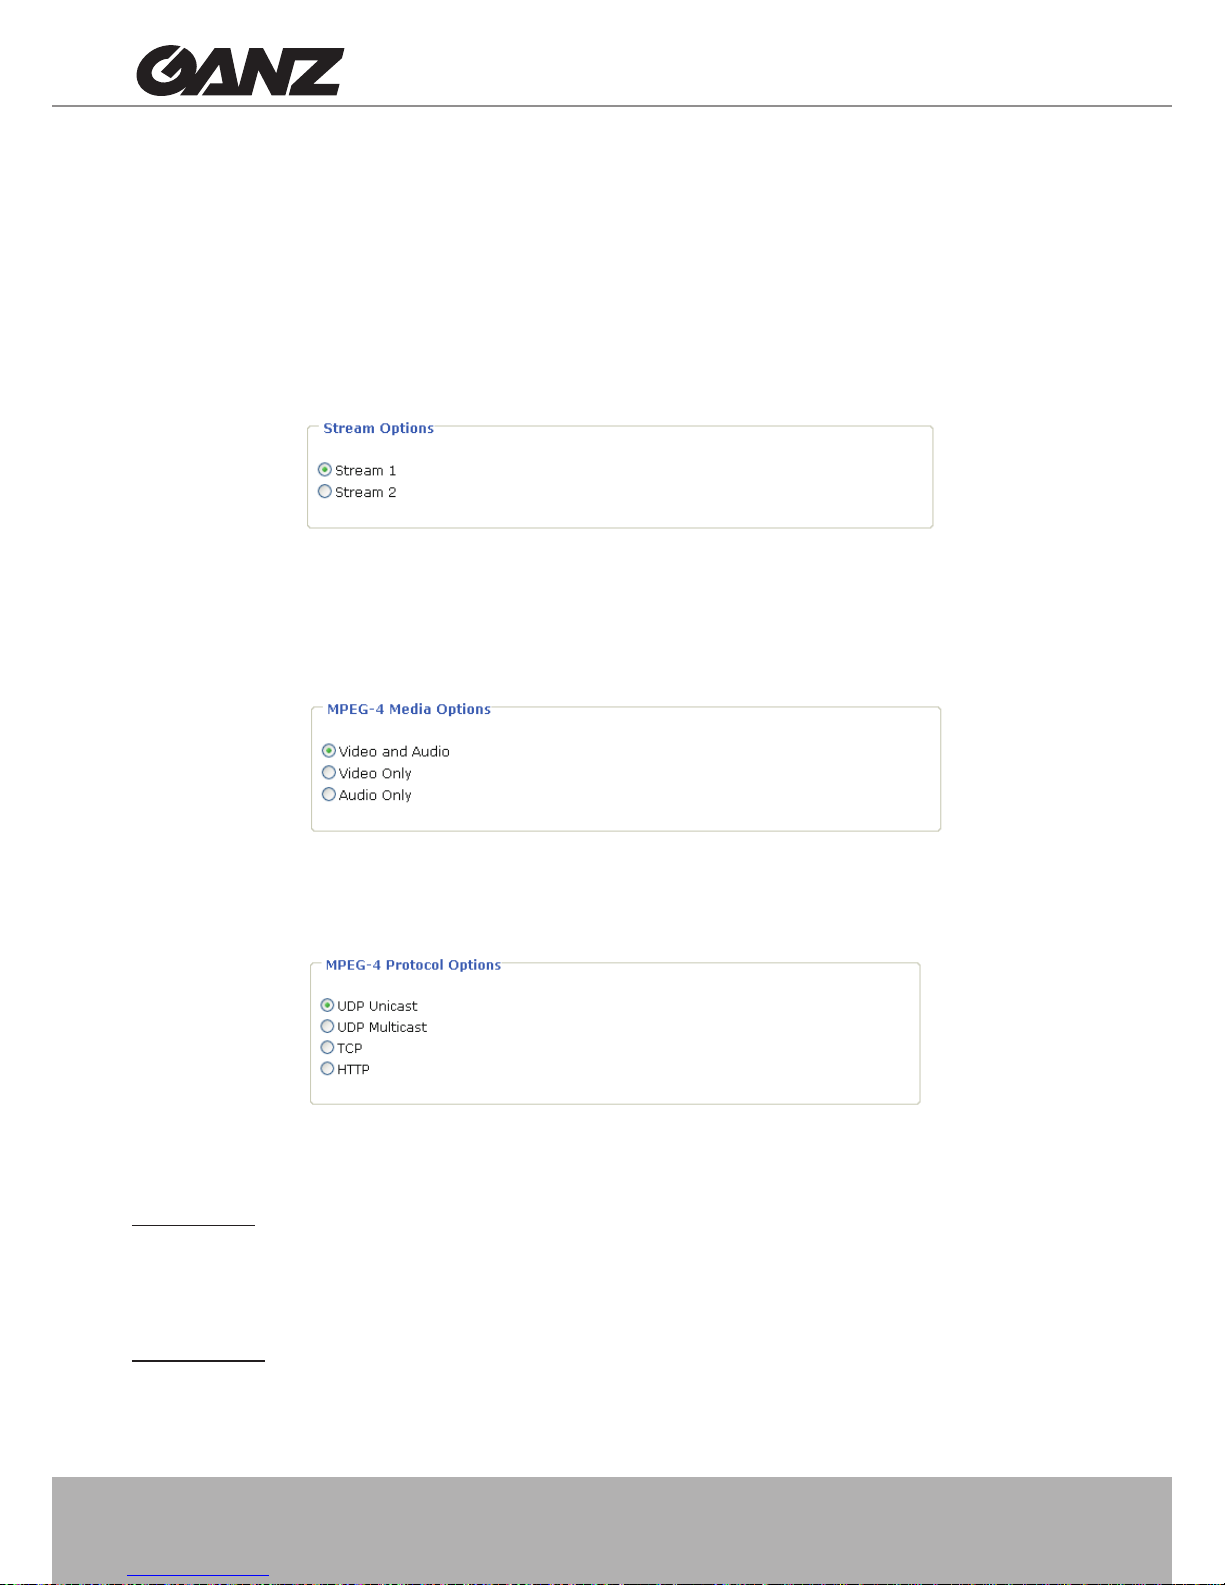
This chapter explains how to select the streaming source, transmission mode and saving
options at local computer� It is composed of the following four sections: Stream Options, MPEG4 Media Options, MPEG-4 Protocol Options and MP4 Saving Options� When completed with the
settings on this page, click Save on the page bottom to enable the settings�
Stream Options
The Network Camera supports MPEG-4 and MJPEG dual streams� For more information,
please refer to Video Settings on page 35�
MPEG-4 Media Options
Select to stream video or audio data� This works only when the video mode is set to MPEG-4�
MPEG-4 Protocol Options
Depending on your network environment, there are four transmission modes of MPEG-4
streaming:
UDP unicast: This protocol allows for more real-time audio and video streams� However, network
packets may be lost due to network burst trafc and images may be broken. Activate UDP connection
when occasions require time-sensitive responses and the video quality is less important� Note that each
unicast client connecting to the server takes up additional bandwidth and the Network Camera allows up
to ten simultaneous accesses�
UDP multicast: This protocol allows multicast-enabled routers to forward network packets to all clients
requesting streaming media� This helps to reduce the network transmission load of the Network Camera
while serving multiple clients at the same time. Note that to utilize this feature, the Network Camera must
be configured to enable multicast streaming at the same time� For more information, please refer to
RTSP Streaming on page 30�
Page 19
User's Manual - 19
TCP: This protocol guarantees the complete delivery of streaming data and thus provides better video
quality� Nevertheless, the downside with this protocol is that its real-time effect is not as good as that of
the UDP protocol�
HTTP: This protocol allows the same quality as TCP protocol and you don’t need to open specic port
for streaming under some network environments. Users inside a rewall can utilize this protocol to allow
streaming data to come through�
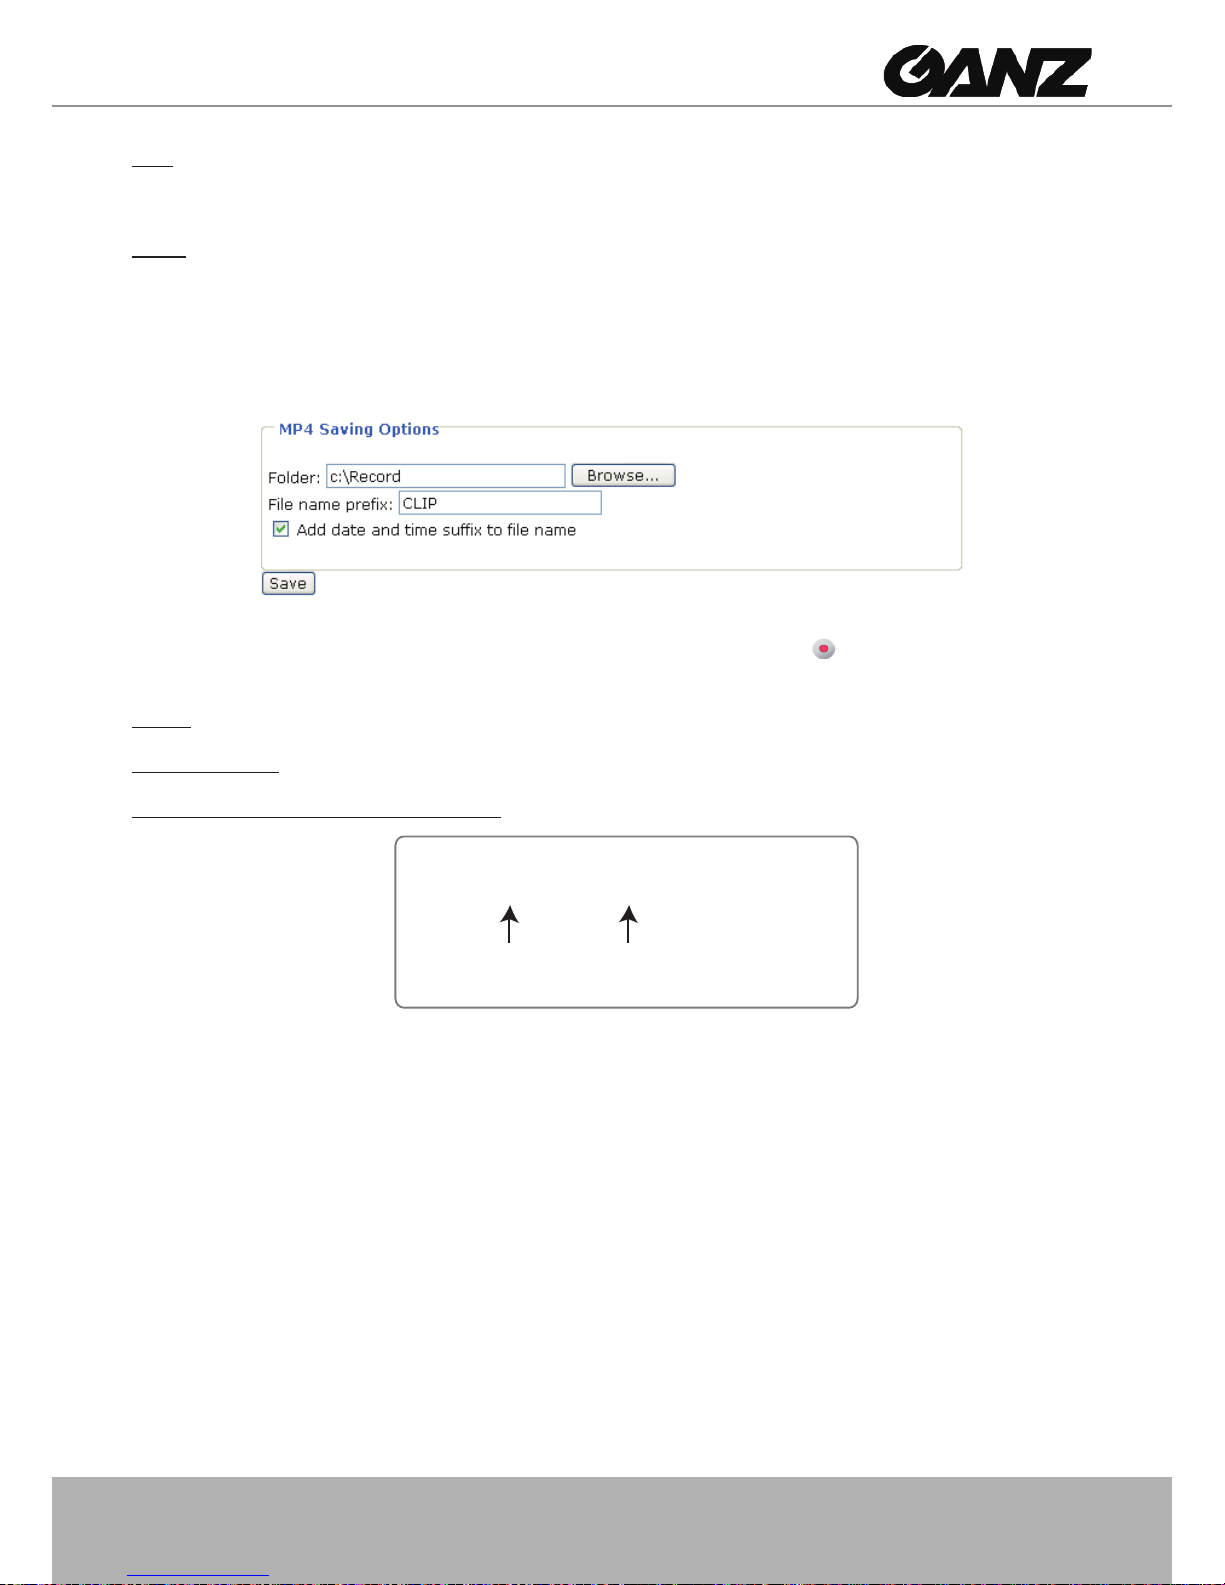
MP4 Saving Options
Users can record the live video as they are watching it by clicking Start MP4 Recording on
the main page. Here, you can specify the storage destination and le name.
Folder: Specify a storage destination for the recorded video les.
File name prex: Enter the text that will be put in front of the video le name.
Add date and time sufx to the le name: Select this option to add date and time to the le name sufx.
CLIP_20080108-180853
Date and time suffix
The format is: YYYYMMDD_HHMMSS
File name prefix
Page 20
20 - User's Manual
Conguration
Only Administrators can access the system conguration page. Each category in the left menu
will be explained in the following sections�
System
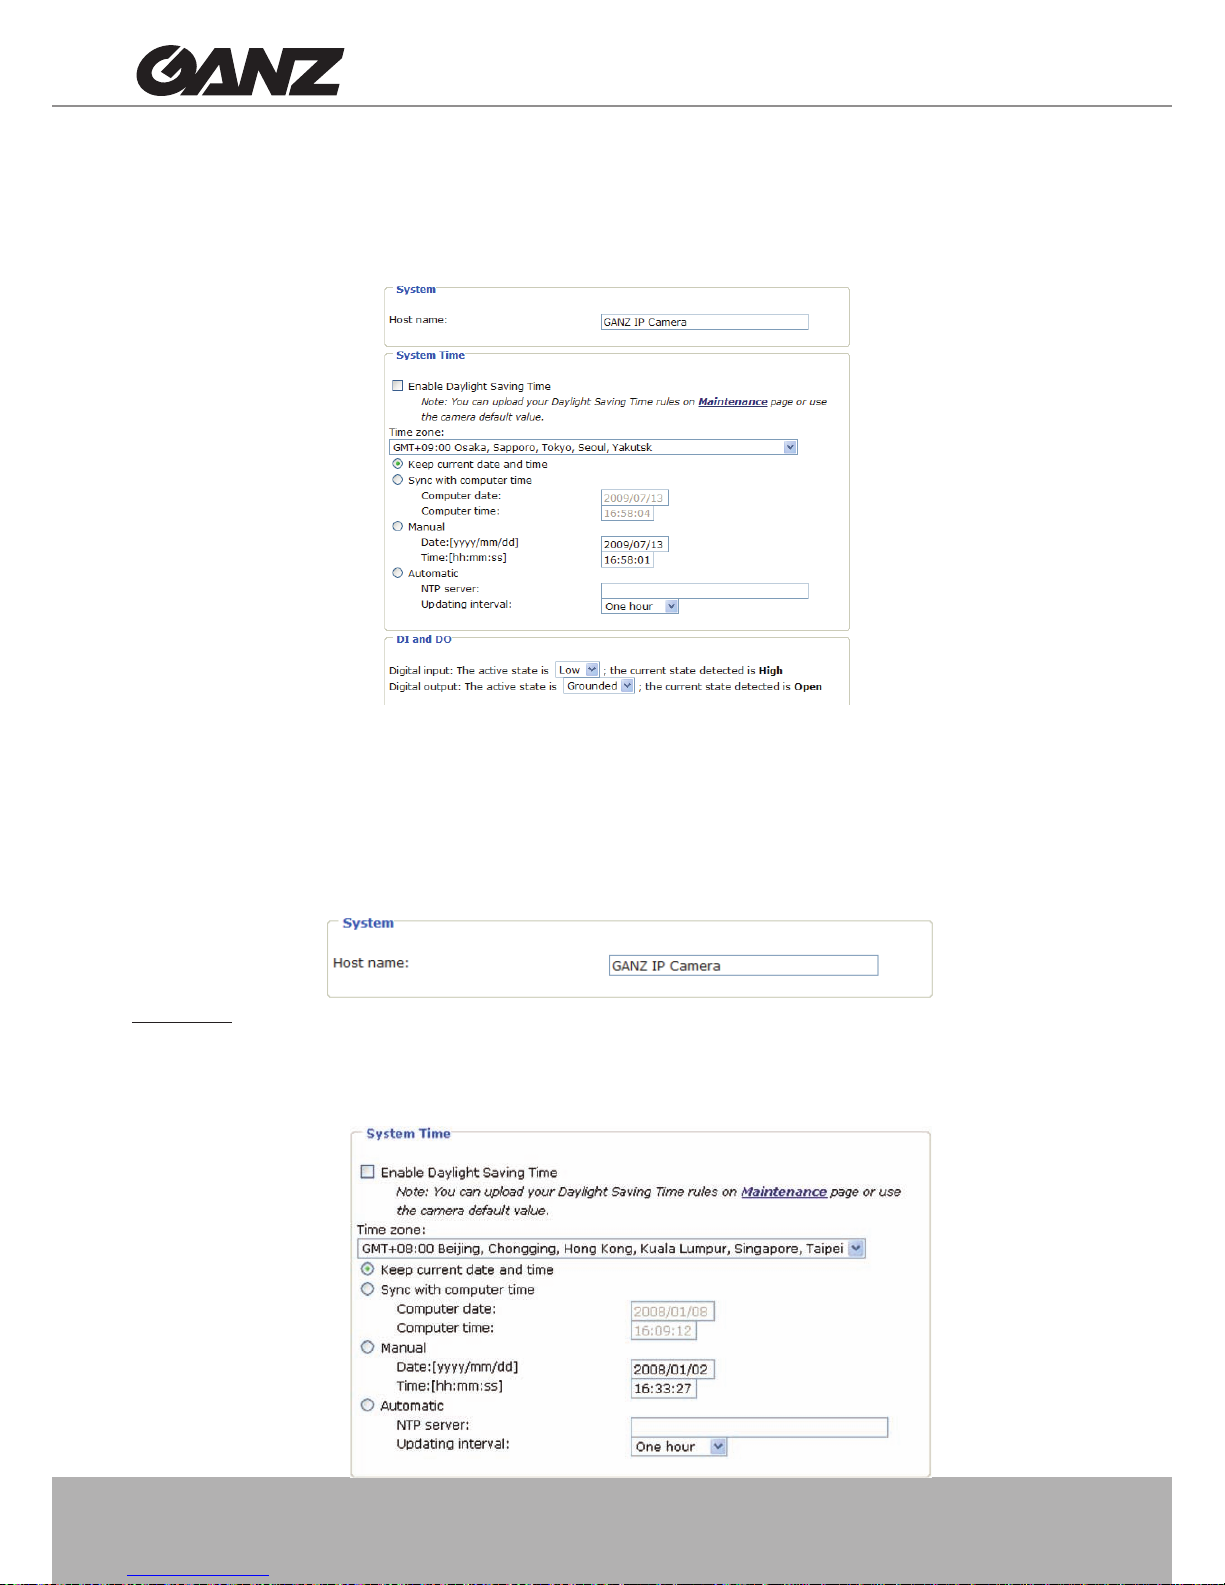
This section explains how to congure the basic settings for the Network Camera, such as the
host name and system time� It is composed of the following three columns: System, System
Time and DI and DO� When completed with the settings on this page, click Save on the page
bottom to enable the settings�
System
Host name: Set a desired name for the Network Camera� The text will be displayed at the top of the main
page�
System Time
Page 21
User's Manual - 21
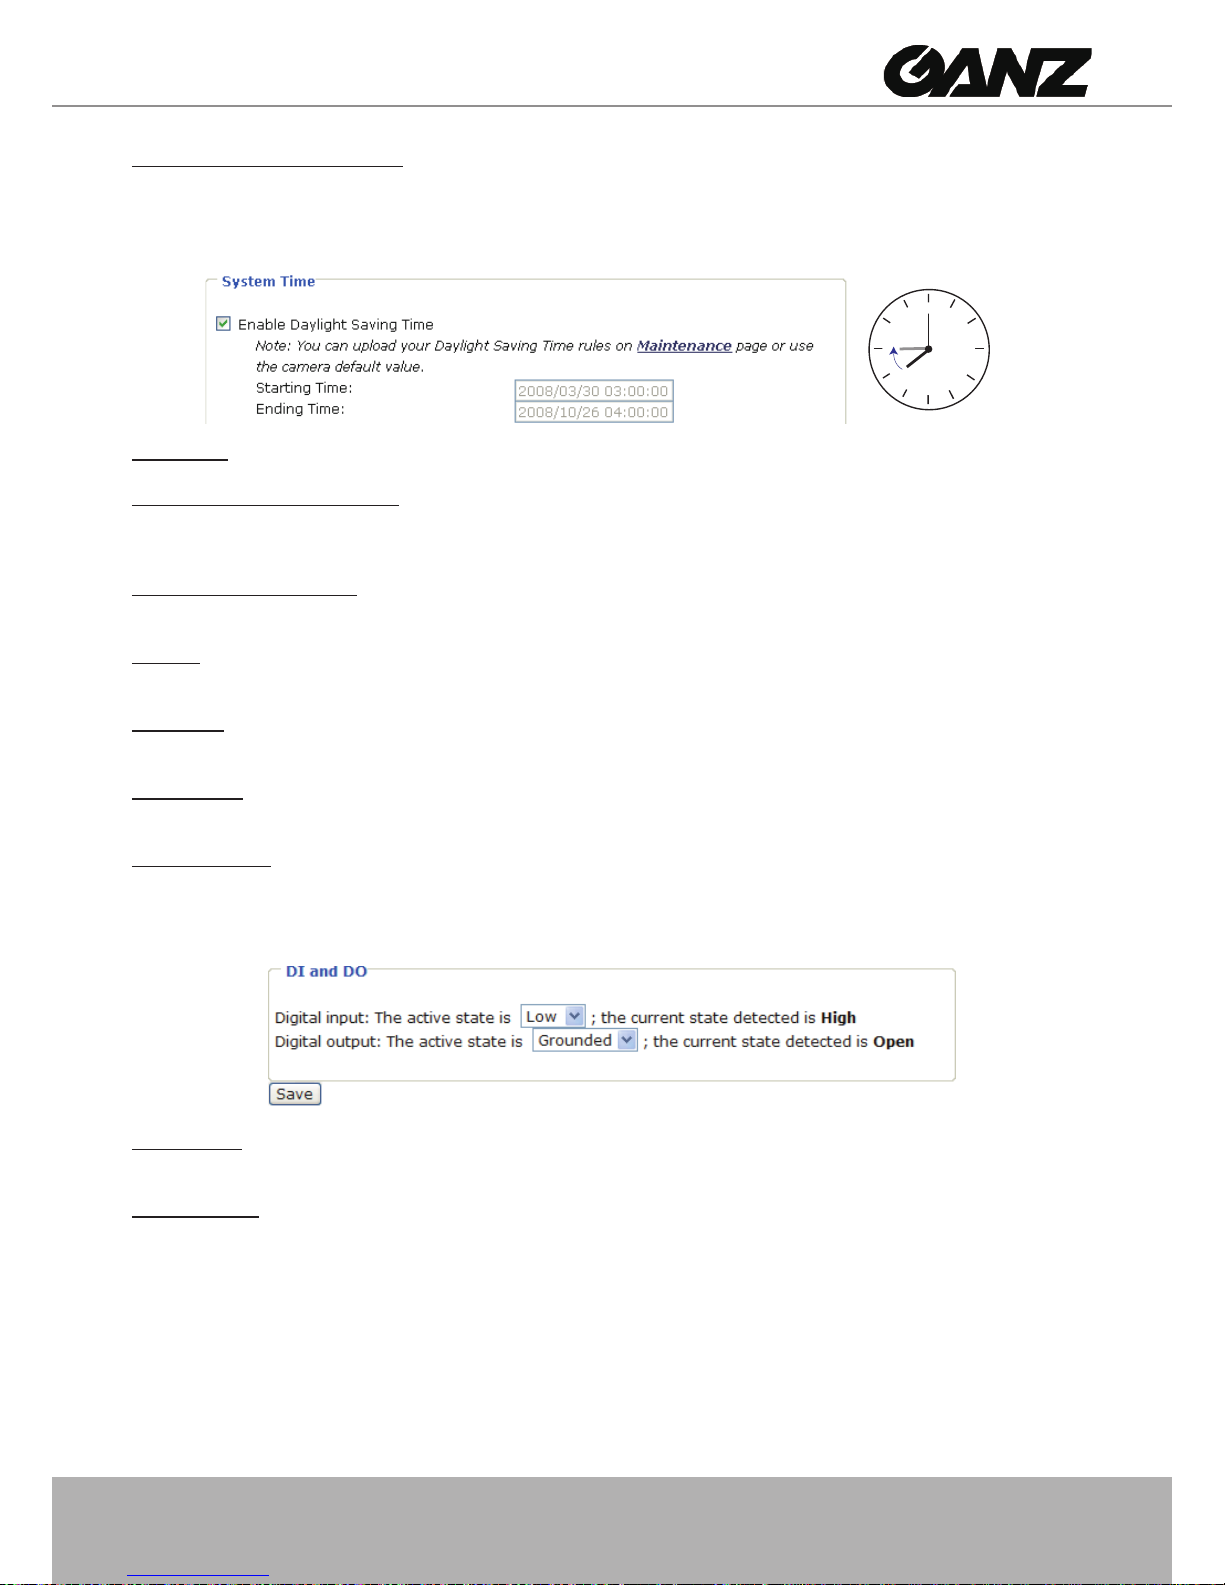
Enable Daylight Saving Time: Select this option to enable daylight saving time (DST)� During DST, the
system clock moves one hour ahead. Note that to utilize this feature, please set the time zone for your
Network Camera rst. Then, the starting time and ending time of the DST is displayed upon selecting
this option. To manually congure the daylight saving time rules, please refer to Upload / Export Daylight
Saving Time Conguration File on page 57 for details�
Time zone: According to your local time zone, select one from the drop-down list.
Keep current date and time: Select this option to reserve the current date and time of the Network
Camera� The Network Camera’s internal real-time clock maintains the date and time even when the
power of the system is turned off�
Sync with computer time: Select this option to synchronize the date and time of the Network Camera with
the local computer� The read-only date and time of the PC is displayed as updated�
Manual: The administrator can enter the date and time manually� Note that the date and time format are
[yyyy/mm/dd] and [hh:mm:ss]�
Automatic: The Network Time Protocol is a protocol serves synchronize computer clocks by periodically
querying an NTP Server�
NTP server: Assign the IP address or domain name of the time-server� Leaving the text box blank
connects the Network Camera to the default time-servers�
Update interval: Select to update the time with the NTP server on hourly, daily, weekly, or monthly basis�
DI and DO
Digital input: Select High or Low to dene normal status of the digital input. The Network Camera will
report the current status�
Digital output: Select Grounded or Open to define normal status of the digital output� The Network
Camera will show whether the trigger is activated or not�
Page 22
22 - User's Manual
Security
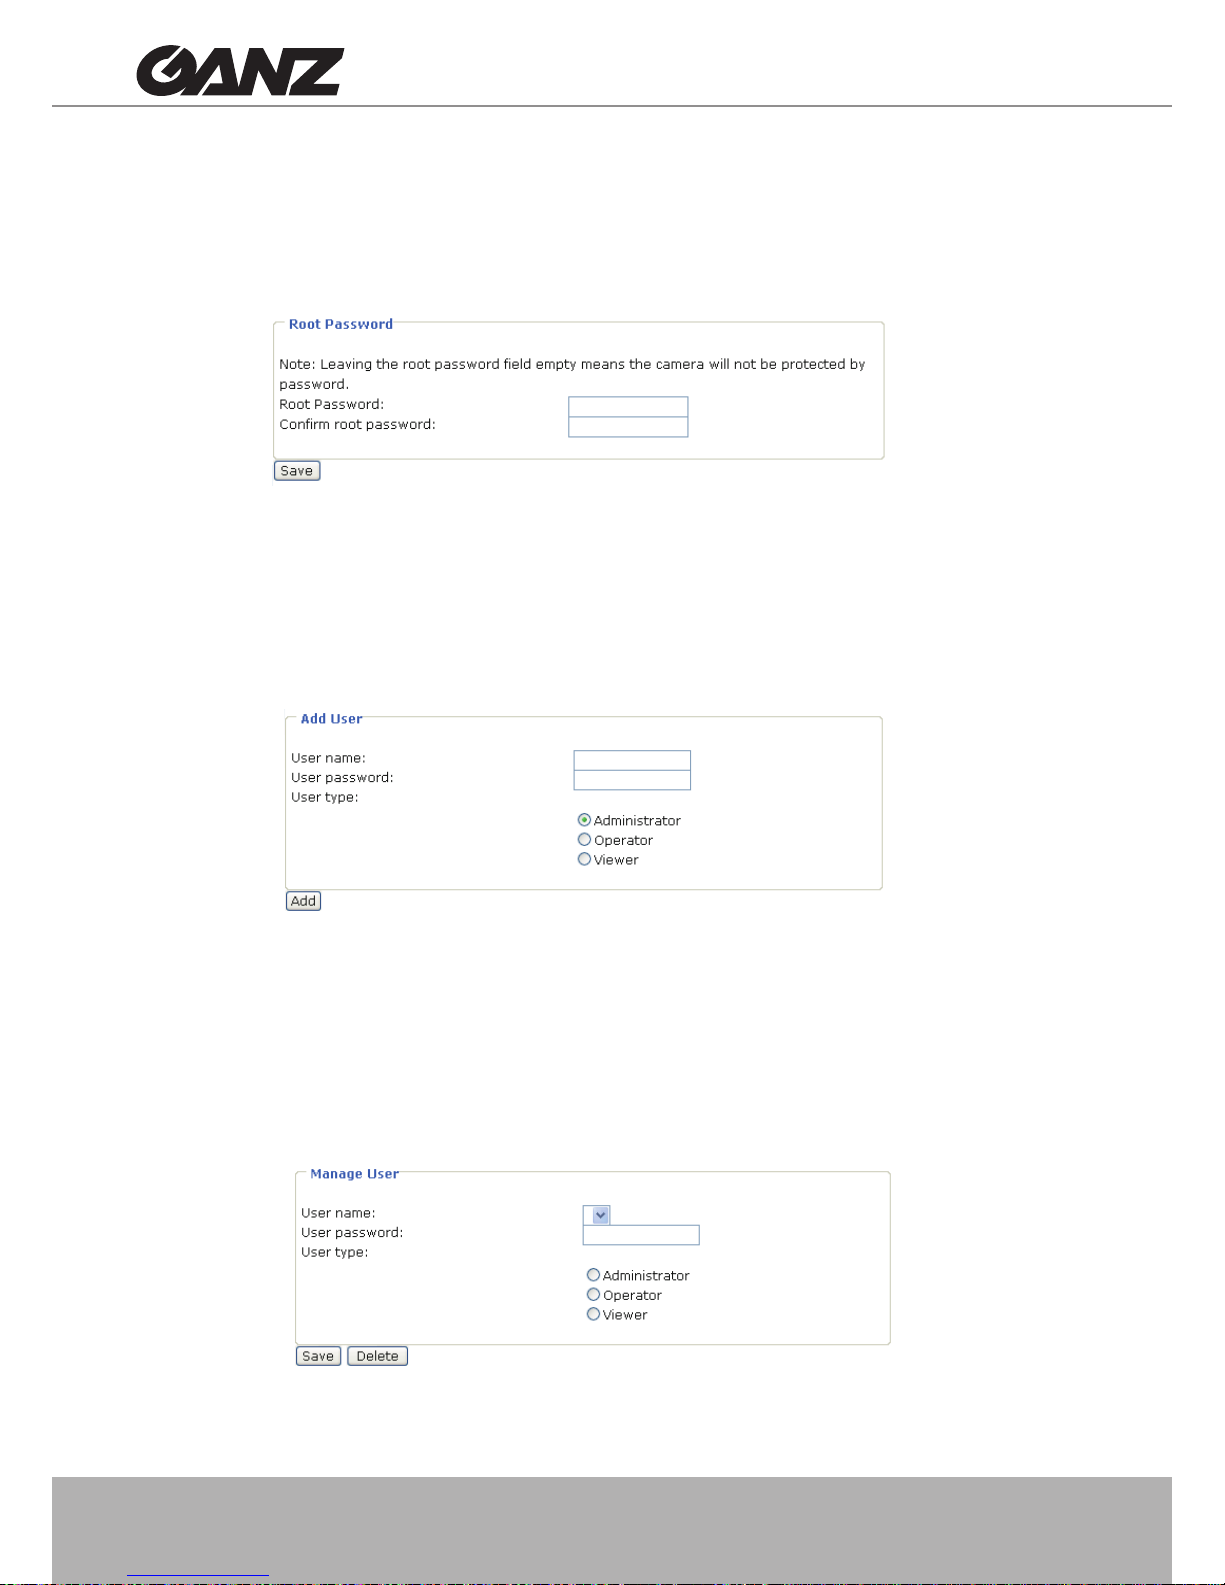
This section explains how to enable password protection and create multiple accounts� It is
composed of the following three columns: Root Password, Add User, and Manage User�
Root Password
The administrator account “root” is permanent and can not be deleted� Please note that if you
want to add more accounts, you must apply a password for the “root” account rst.
1� Type the password identically in both text boxes�
2� Click Save to enable password protection�
3� A window will be prompted for authentication; type the correct user’s name and password in related
elds to access the Network Camera.
Add User
Administrators can add up to twenty user accounts�
1� Input the new user’s name and password�
2� Select the desired security level� Click Add to enable the settings�
Access rights are sorted by user types� There are three kinds of user types� Only administrators
can access the Configuration page� Operators and viewers can not access the configuration
page� Viewers can only access the main page�
Manage User
Here you can change user’s access rights or delete user accounts�
1. Pull down the user list to nd an account.
2� Make necessary changes and then click Save or Delete to enable the settings�
Page 23
User's Manual - 23
HTTPS
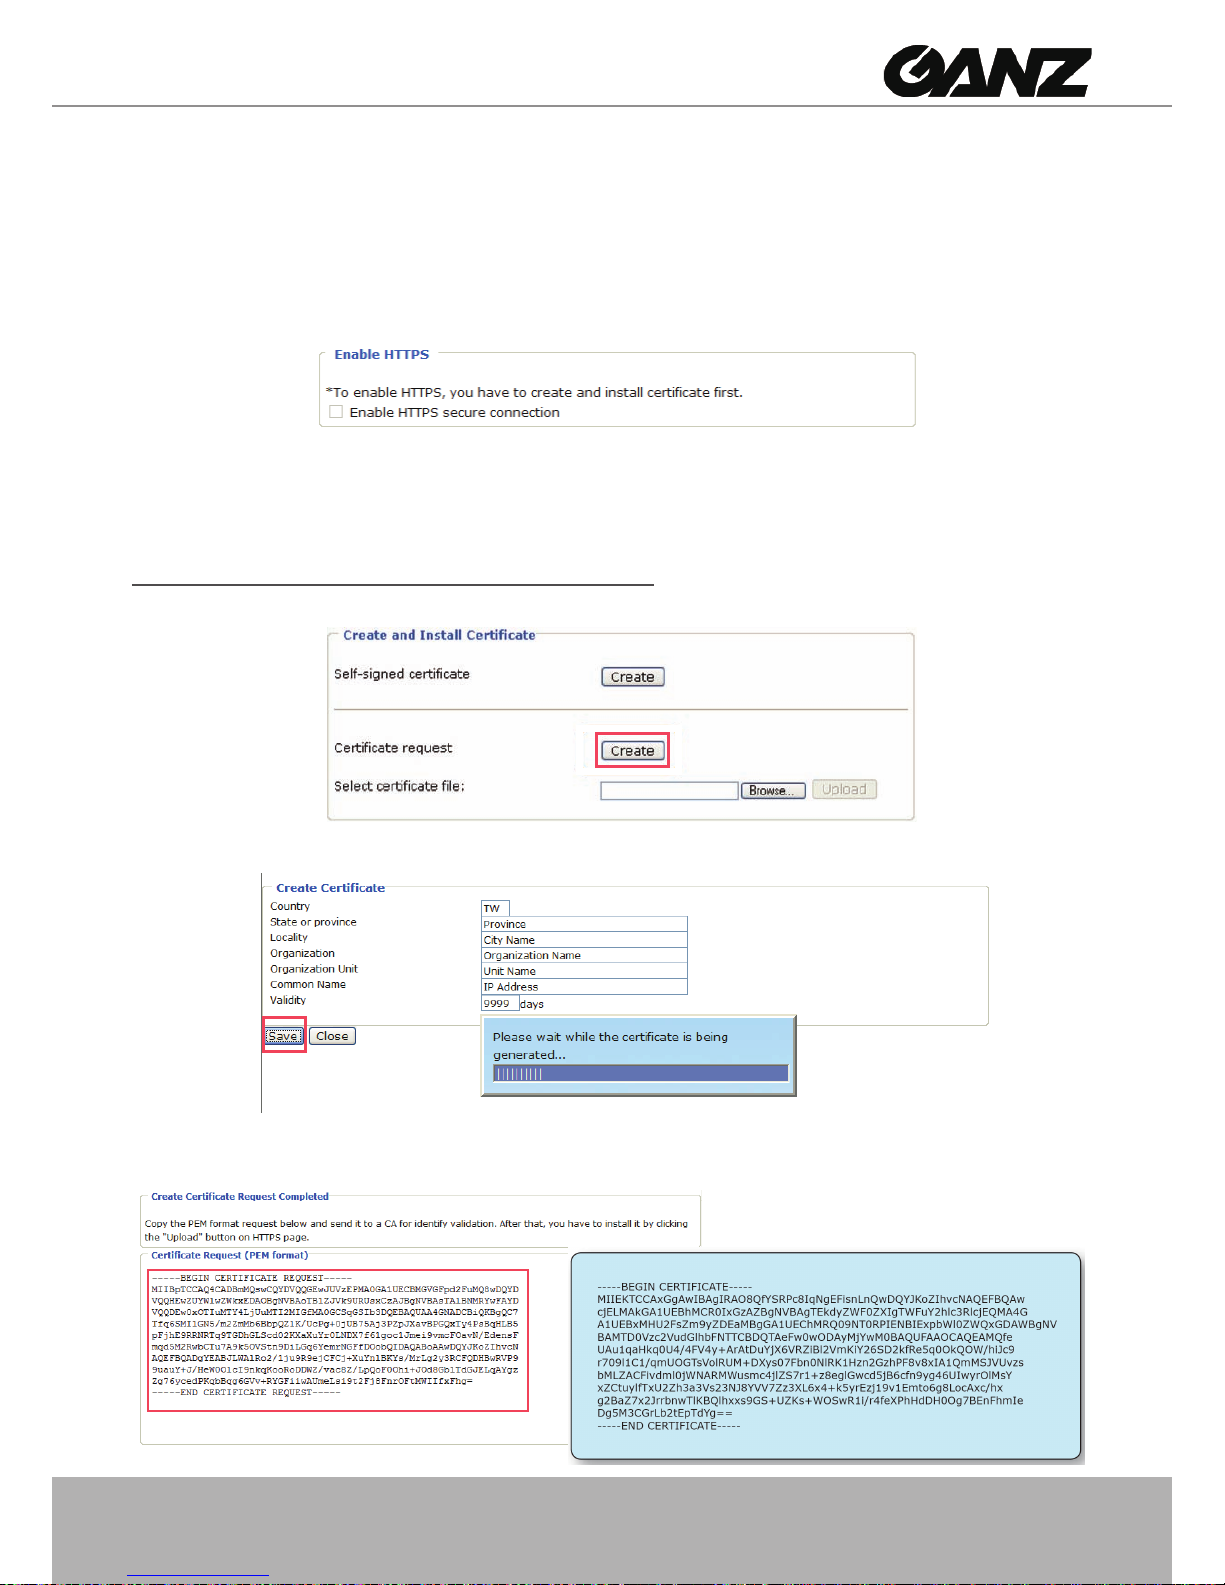
This section explains how to enable
authentication and encrypted communication over
SSL.
Enable HTTPS
Select this option to turn on the HTTPS communication�
Create and Install Certicate
Select either to create a self-signed certicate or a signed certicate.
To create a certificate from a certificate authority
1� Click Create for Certicate request. The Create Certicate window will pop up.
2. Fill in the information required for generating a Certicate Signing Request (CSR) and click Save�
3� Here is an example of a CSR:
192.168.5.132
Page 24
24 - User's Manual
4. Look for a trusted certicate authority that issues digital certicates. Enroll the Network Camera.
Wait for the certificate authority to issue a SSL certificate; then upload the issued certificate to the
Network Camera�
5� Browsing the Network Camera using HTTPS helps to protect streaming data over the Internet�
To create a self-signed certificate
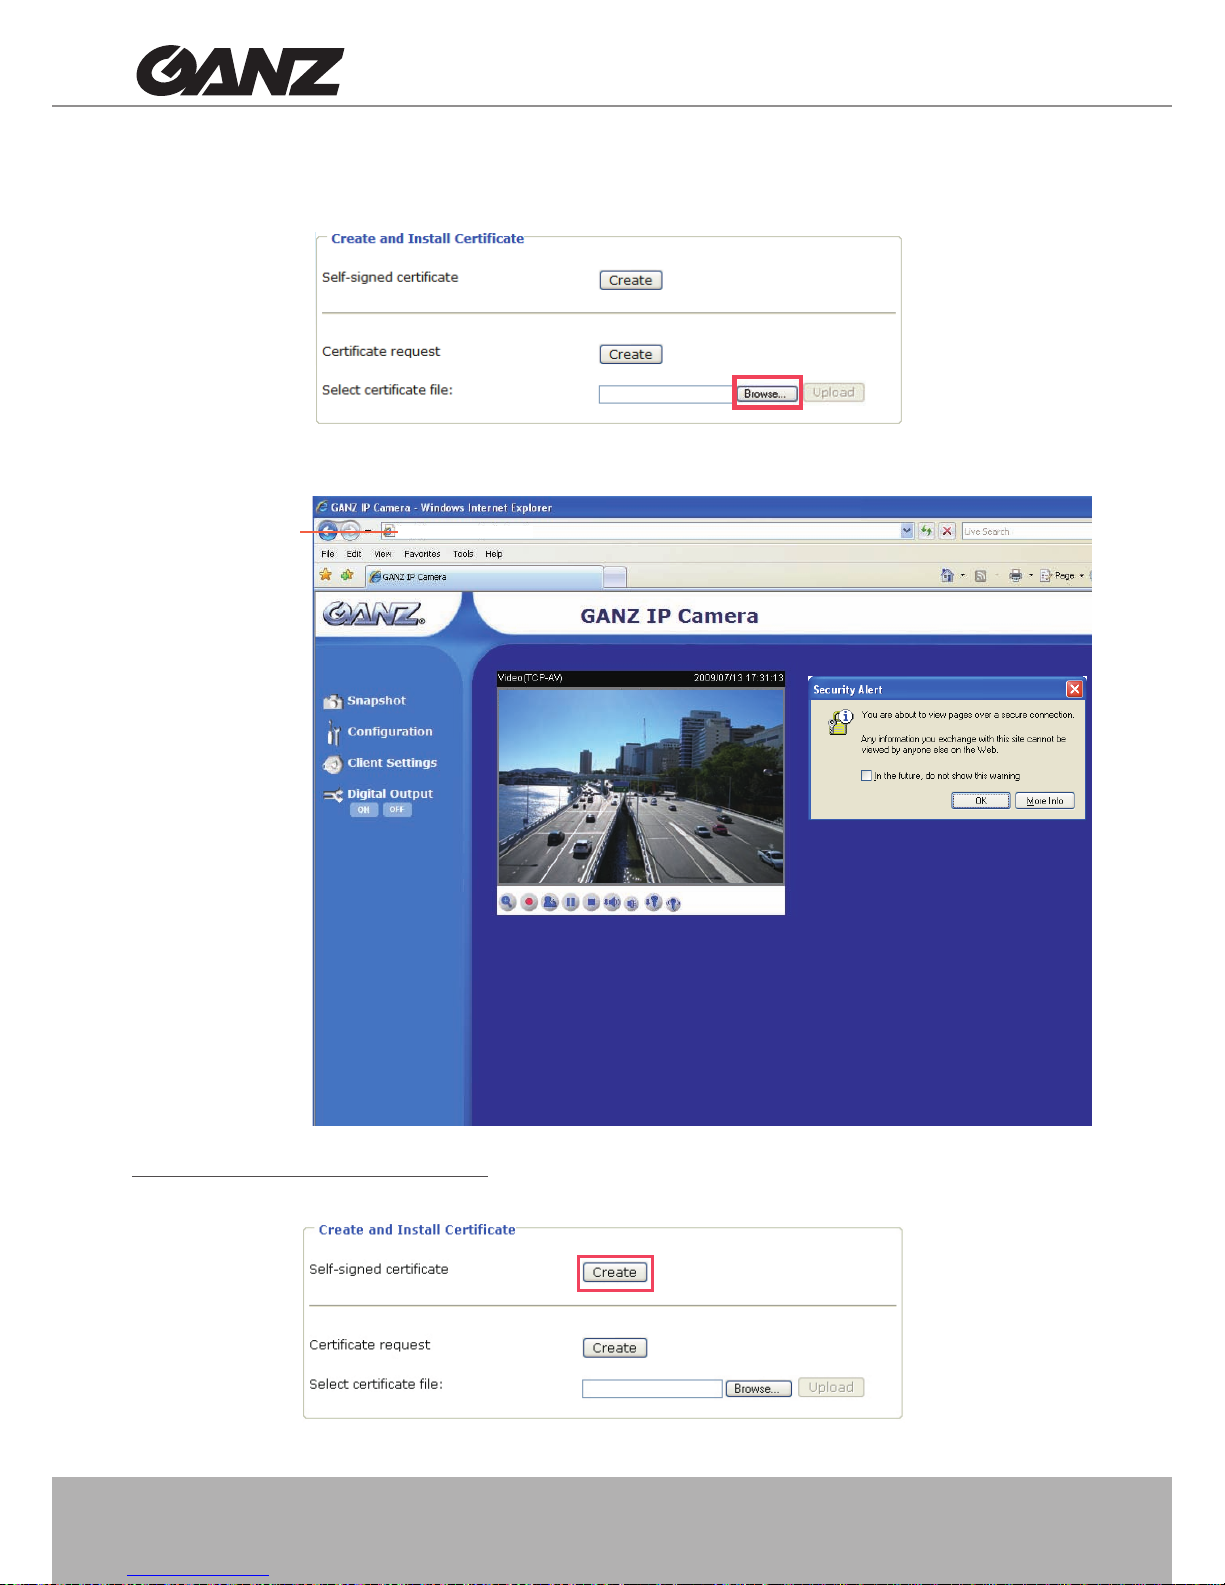
1� Click Create for Create and Install Certicate. This pops up the Create Certicate window.
https://192.168.5.132/index.html
https://xxx.xxx.x.xxx
Page 25
User's Manual - 25
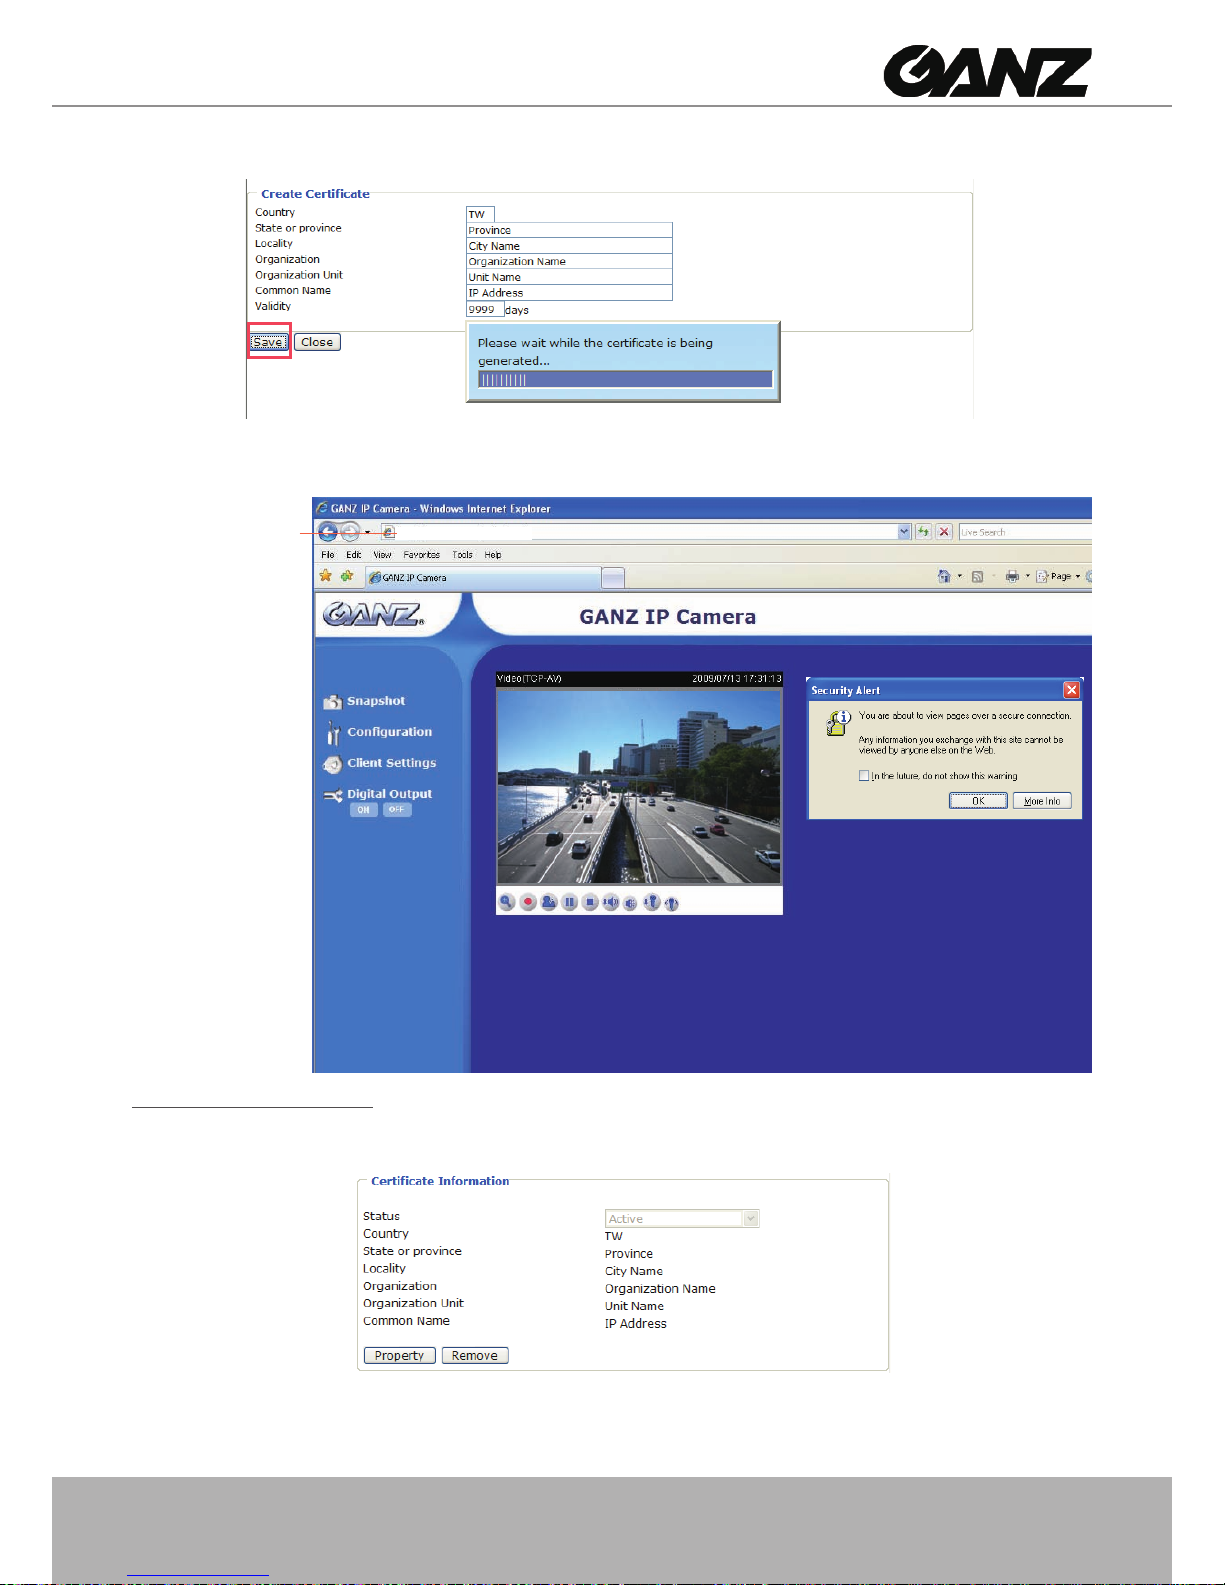
2. Fill in the information required for generating a Certicate Signing Request (CSR) and click Save�
3� Browsing the Network Camera using HTTPS helps to protect streaming data over the Internet�
Certificate Information
Here display the certication information. Users may click Property for details� To remove the signed
certicated, uncheck the Enable HTTPS secure connection and click Remove�
https://192.168.5.132/index.html
https://xxx.xxx.x.xxx
192.168.5.132
Page 26
26 - User's Manual
Network
This section explains how to congure wired network connection for the Network Camera. It is
composed of the following five columns: Network Type, HTTP, HTTPS, Two way audio, FTP
and RTSP Streaming� When completed with the settings on this page, click Save to enable the
settings�
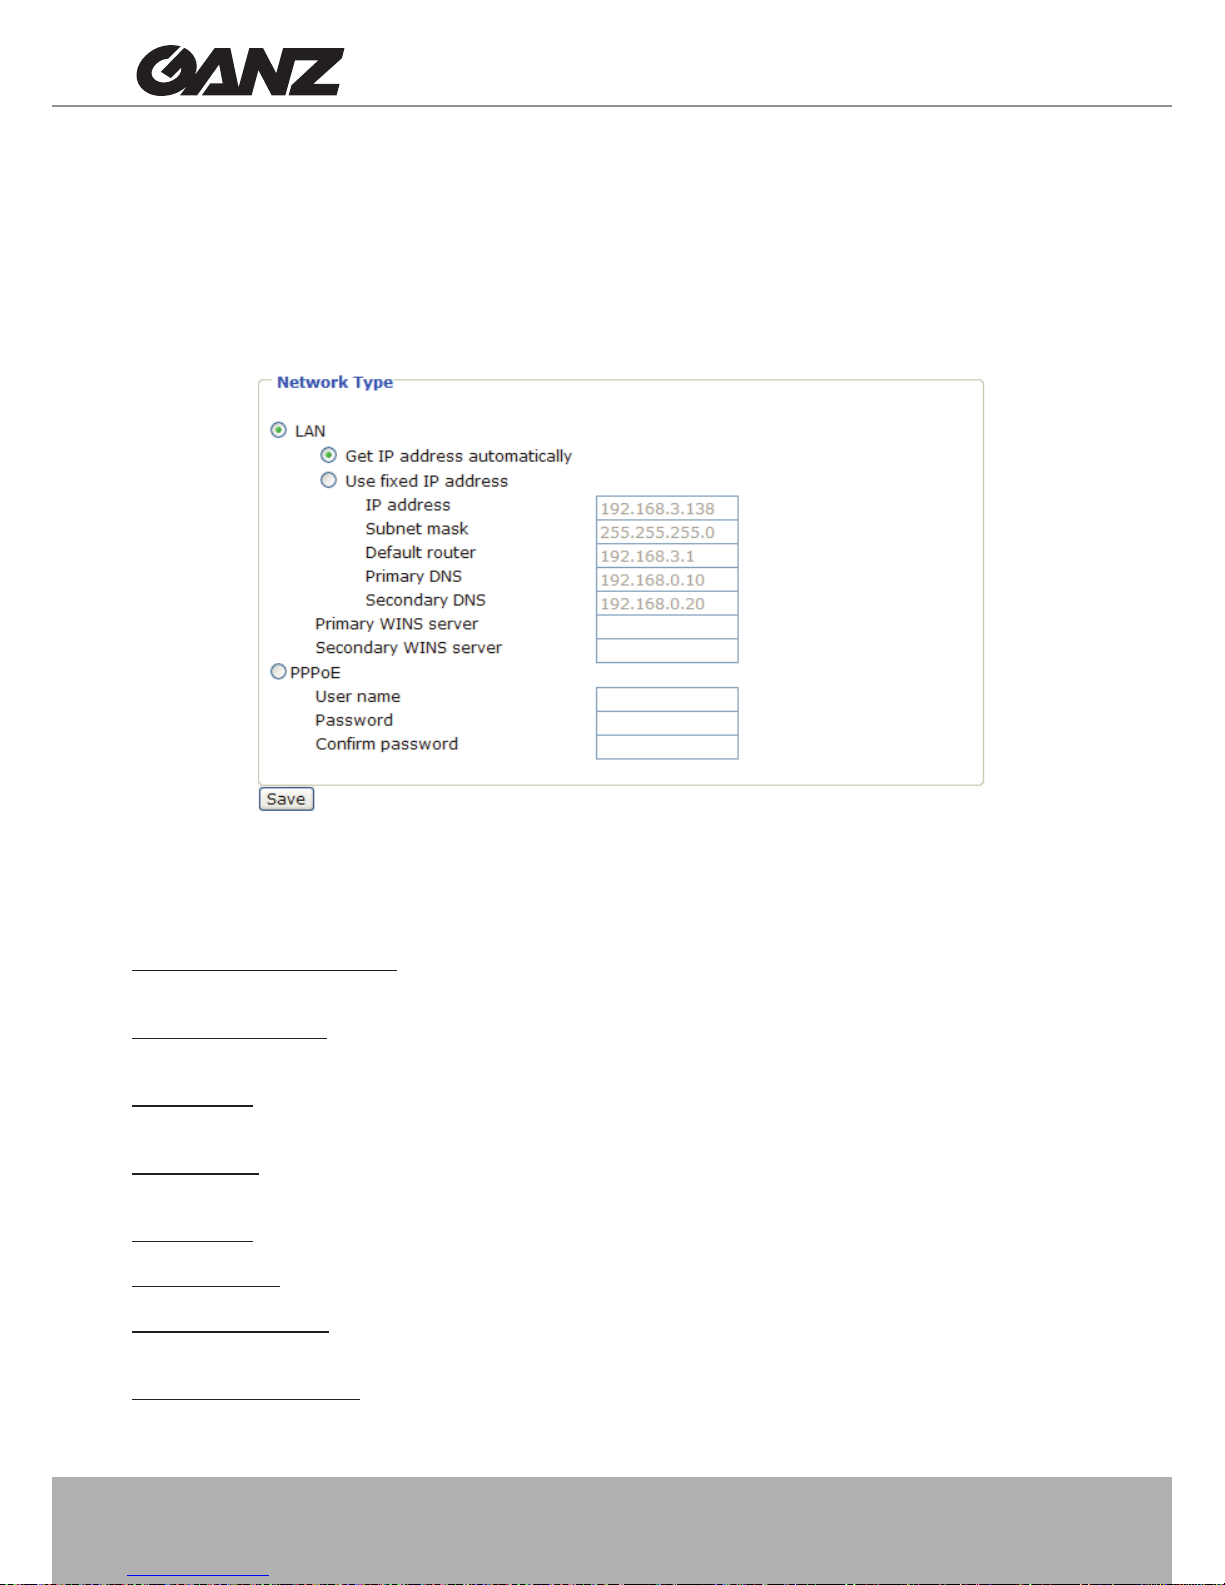
Network Type
LAN
Select this option when the Network Camera is deployed on a local area network (LAN) and is
intended to be accessed by local computers�
Get IP address automatically: Select this option to obtain an available dynamic IP address assigned by a
DHCP server each time the camera is connected to the LAN�
Use xed IP address: Select this option to manually assign a static IP address to the Network Camera�
Please refer to Internet connection with static IP on page 9 for details�
Subnet mask: This is used to determine if the destination is in the same subnet� The default value is
“255�255�255�0”�
Default router: This is the gateway used to forward frames to destinations in a different subnet� Invalid
router setting will fail the transmission to destinations in different subnet�
Primary DNS: The primary domain name server that translates hostnames into IP addresses�
Secondary DNS: Secondary domain name server that backups the Primary DNS�
Primary WINS server: The primary WINS server that maintains the database of computer name and IP
address�
Secondary WINS server: The secondary WINS server that maintains the database of computer name
and IP address�
Page 27
User's Manual - 27
PPPoE (Point-to-point over Ethernet)
Select this option to congure your Network Camera to make it accessible from anywhere with
an Internet connection. Note that to utilize this feature, it requires an account provided by your
ISP�
Follow the steps below to acquire your Network Camera’s public IP address�
1� Set up the Network Camera in a LAN�
2. Go to Conguration > Application > Server Settings (please refer to Server Settings on page 48) to
add a new server -- email or FTP server�
3. Go to Conguration > Application > Media Settings (please refer to Media Settings on page 46)� Select
System log so that you will receive a list of system log in TXT le format which contains the Network
Camera’s public IP address in your email or on the FTP server�
4. Go to Conguration > Network > Network Type. Select PPPoE and enter the user name and password
provided by your ISP� Click Save to enable the settings�
5� The Network Camera starts to reboot�
6� Disconnect the power source of the Network Camera; move it from the LAN environment to the
Internet�
NOTE
► If the default ports are already used by other devices connected to the same router, the Network
Camera will select other ports for the Network Camera�
► If the PPPoE settings are incorrectly configured or the Internet access is not working, restore the
Network Camera to factory default; please refer to Restore on page 56 for details� After the Network
Camera is reset to factory default, it will be accessible on the LAN�
HTTP
To utilize HTTP authentication, make sure that your have set a password for the Network Camera rst;
please refer to Security on page 22 for details�
Authentication: Depending on your network security requirements, the Network Camera provides two
types of security settings for an HTTP transaction: basic and digest�
If basic authentication is selected, the password is sent in plain text format, where there is a potential
risk of being intercepted� If digest authentication is selected, user credentials are encrypted using MD5
algorithm and thus provide better protection against unauthorized access.
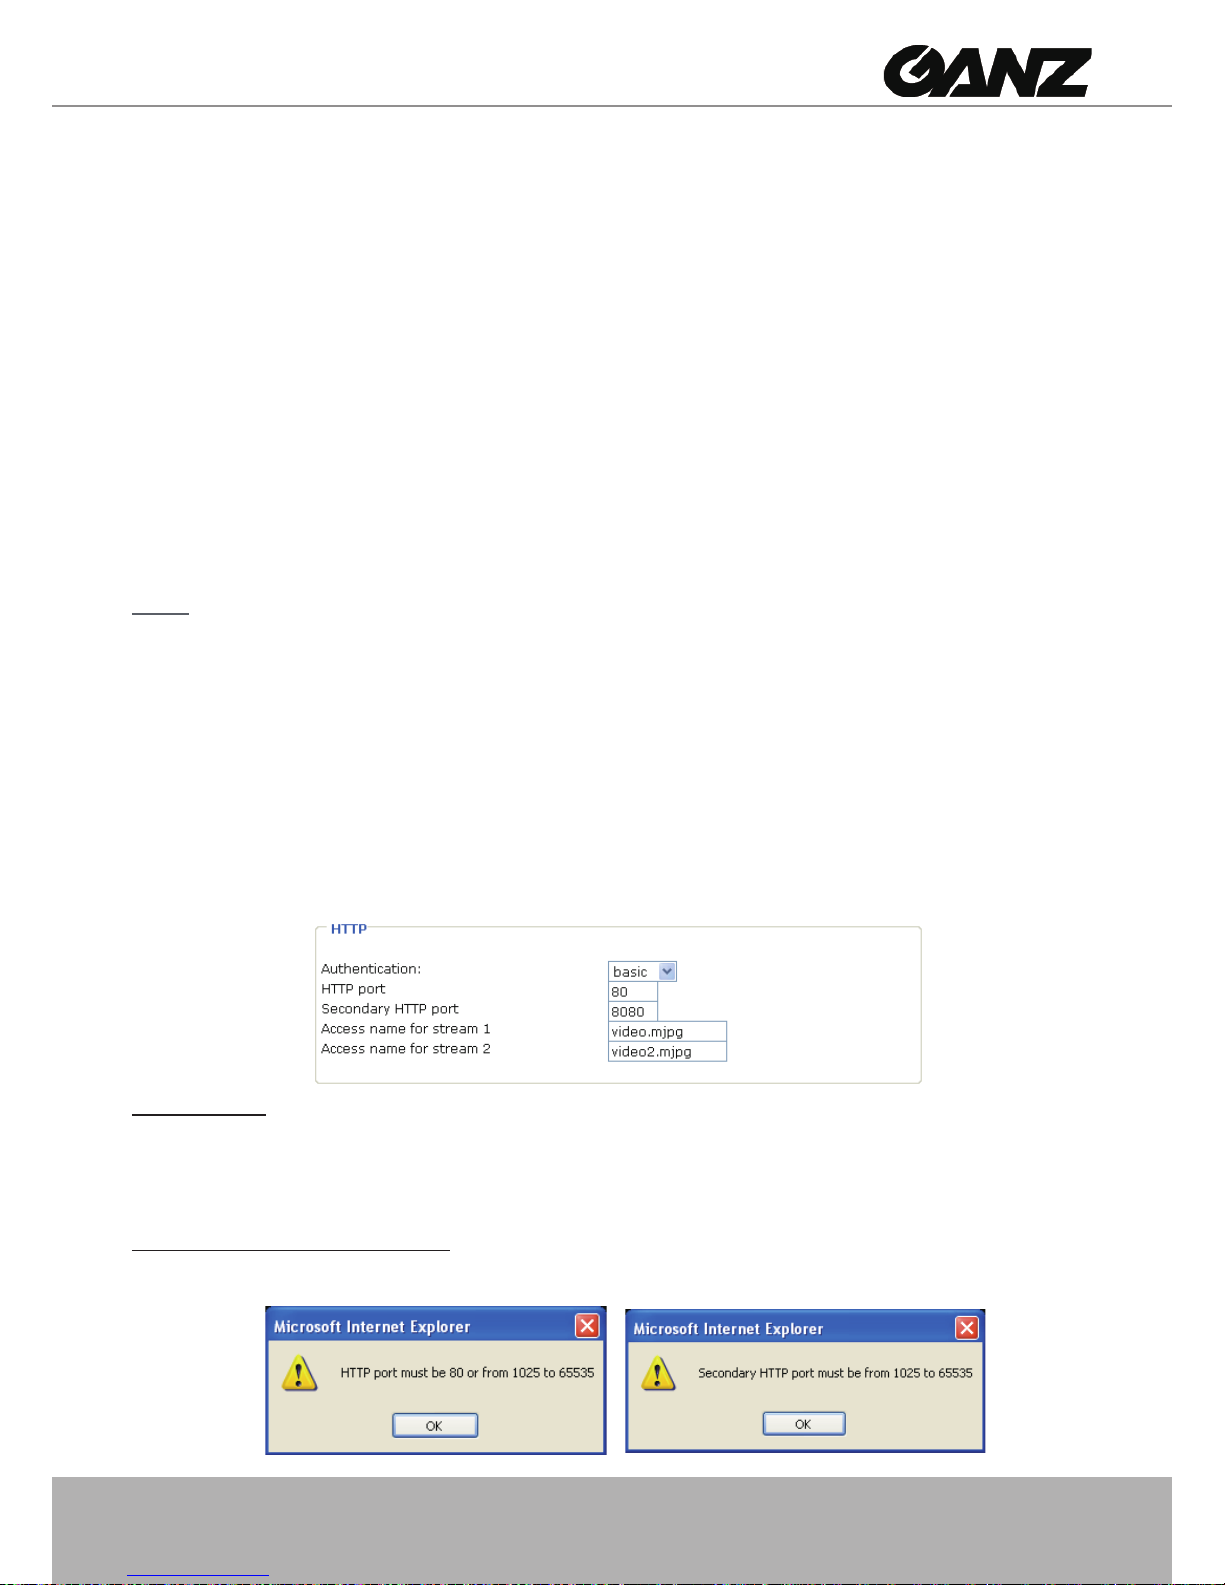
HTTP port / Secondary HTTP port: By default, the HTTP port is set to 80 and the secondary HTTP port
is set to 8080� There can be assigned to another port number between 1025 and 65535� If the ports are
incorrectly assigned, the following warning messages will be displayed:
Page 28
28 - User's Manual
To access the Network Camera on the LAN, both the HTTP port and secondary HTTP port can be used
to access the Network Camera� For example, when the HTTP port is set to 80 and the secondary HTTP
port is set to 8080, refer to the list below for the Network Camera’s IP address�
LAN
http://192.168.4.160 or
http://192.168.4.160:8080
Access name for stream 1 / Access name for stream 2: The access name is used to differentiate the
streaming source�
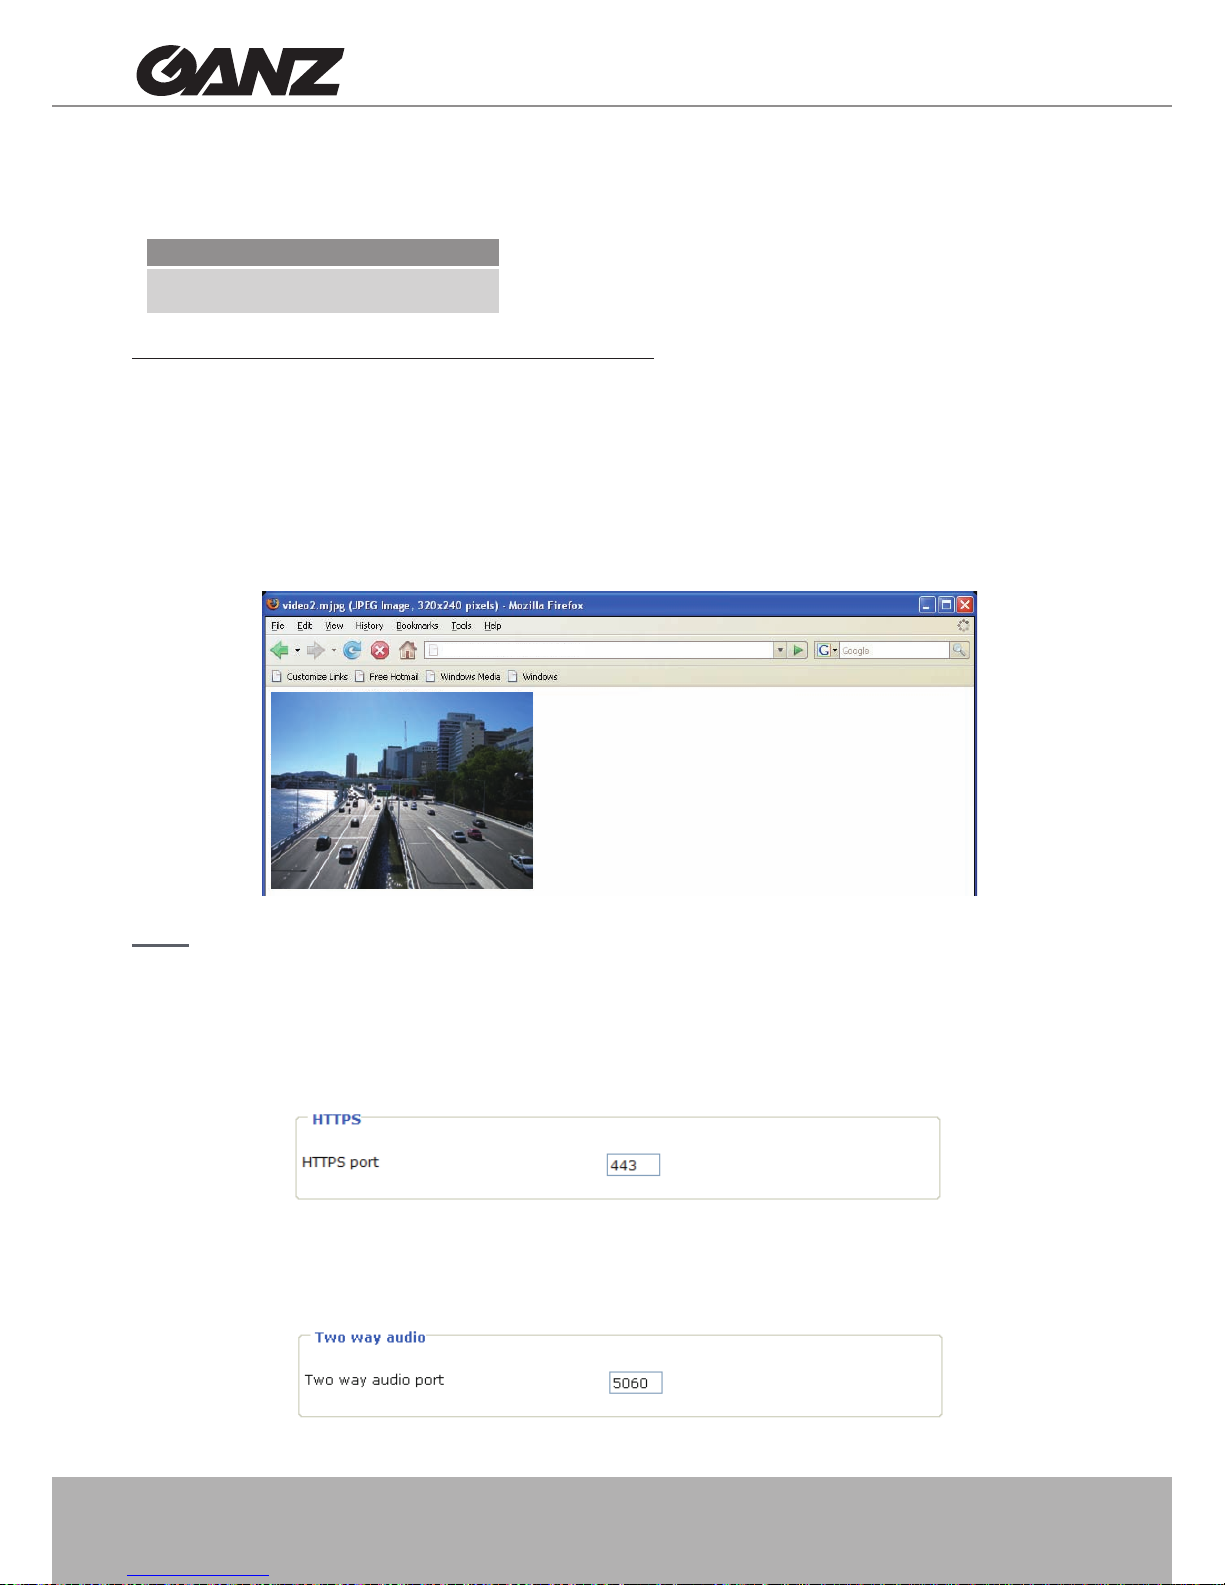
When using Mozilla Firefox or Netscape to access the Network Camera, and the video mode is set to
JPEG, users will receive continuous JPEG pictures� This technology, known as “server push”, allows the
Network Camera to feed live pictures to Mozilla Firefox and Netscape.
Use http://<ip address>:<http port>/<access name for stream1 or stream2> to make connection.
For example, when the access name for stream 1 is set to video.mjpg:
1. Launch Mozilla Firefox or Netscape.
2. Type the URL command in the address eld. Press Enter.
3� The JPEG images will be displayed in your web browser�
NOTE
► Microsoft
®
Internet Explorer does not support server push technology; therefore, using http://<ip
address>:<http port>/<access name for stream1 or stream2> will fail to access the Network Camera.
HTTPS
By default, the HTTPS port is set to 443� Also, it can be assigned with another port number between
1025 and 65535�
Two way audio
By default, the two way audio port is set to 5060� Also, it can be assigned with another port number
between 1025 and 65535�
http://192.168.5.132/video2.mjpg
Page 29
User's Manual - 29
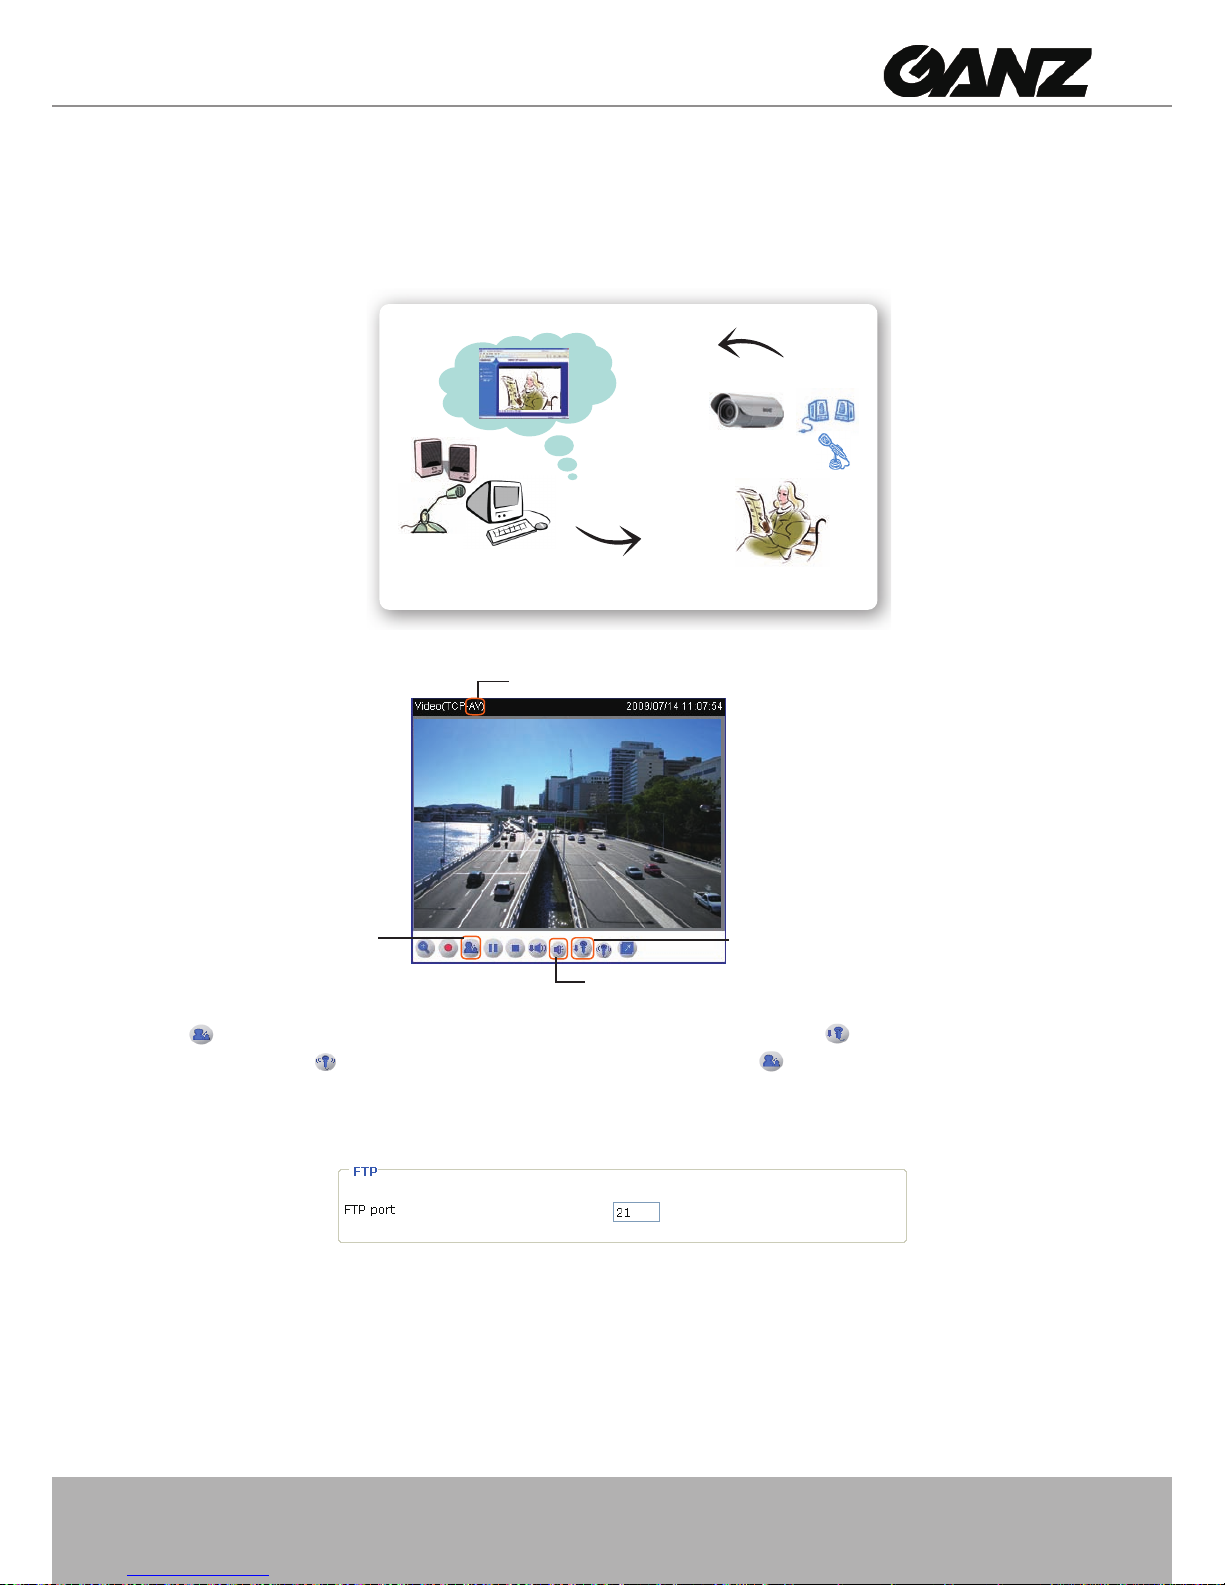
The Network Camera supports two way audio communication so that operators can transmit and receive
audio simultaneously� By using the Network Camera’s built-in microphone and an external speaker, you
can communicate with people around the Network Camera�
Note that as JPEG only transmits a series of JPEG images to the client, to utilize this feature, make sure
the video mode is set to “MPEG-4” and the media option is set to “Video and Audio”�
Click to enable audio transmission to the Network Camera; click to adjust the volume of
microphone; click
to turn off the audio� To stop talking, click again�
FTP
The FTP server allows the Network Camera to utilize GANZ Installation Tool to upgrade
firmware via an FTP server� By default, the FTP port is set to 21� It also can be assigned to
another port number between 1025 and 65535�
Audio is being transmitted to the Network Camera
Microphone volume
Mute
Talk button
Audio send from operators
Audio send to operators
America
Taiwan
Page 30
30 - User's Manual
RTSP Streaming
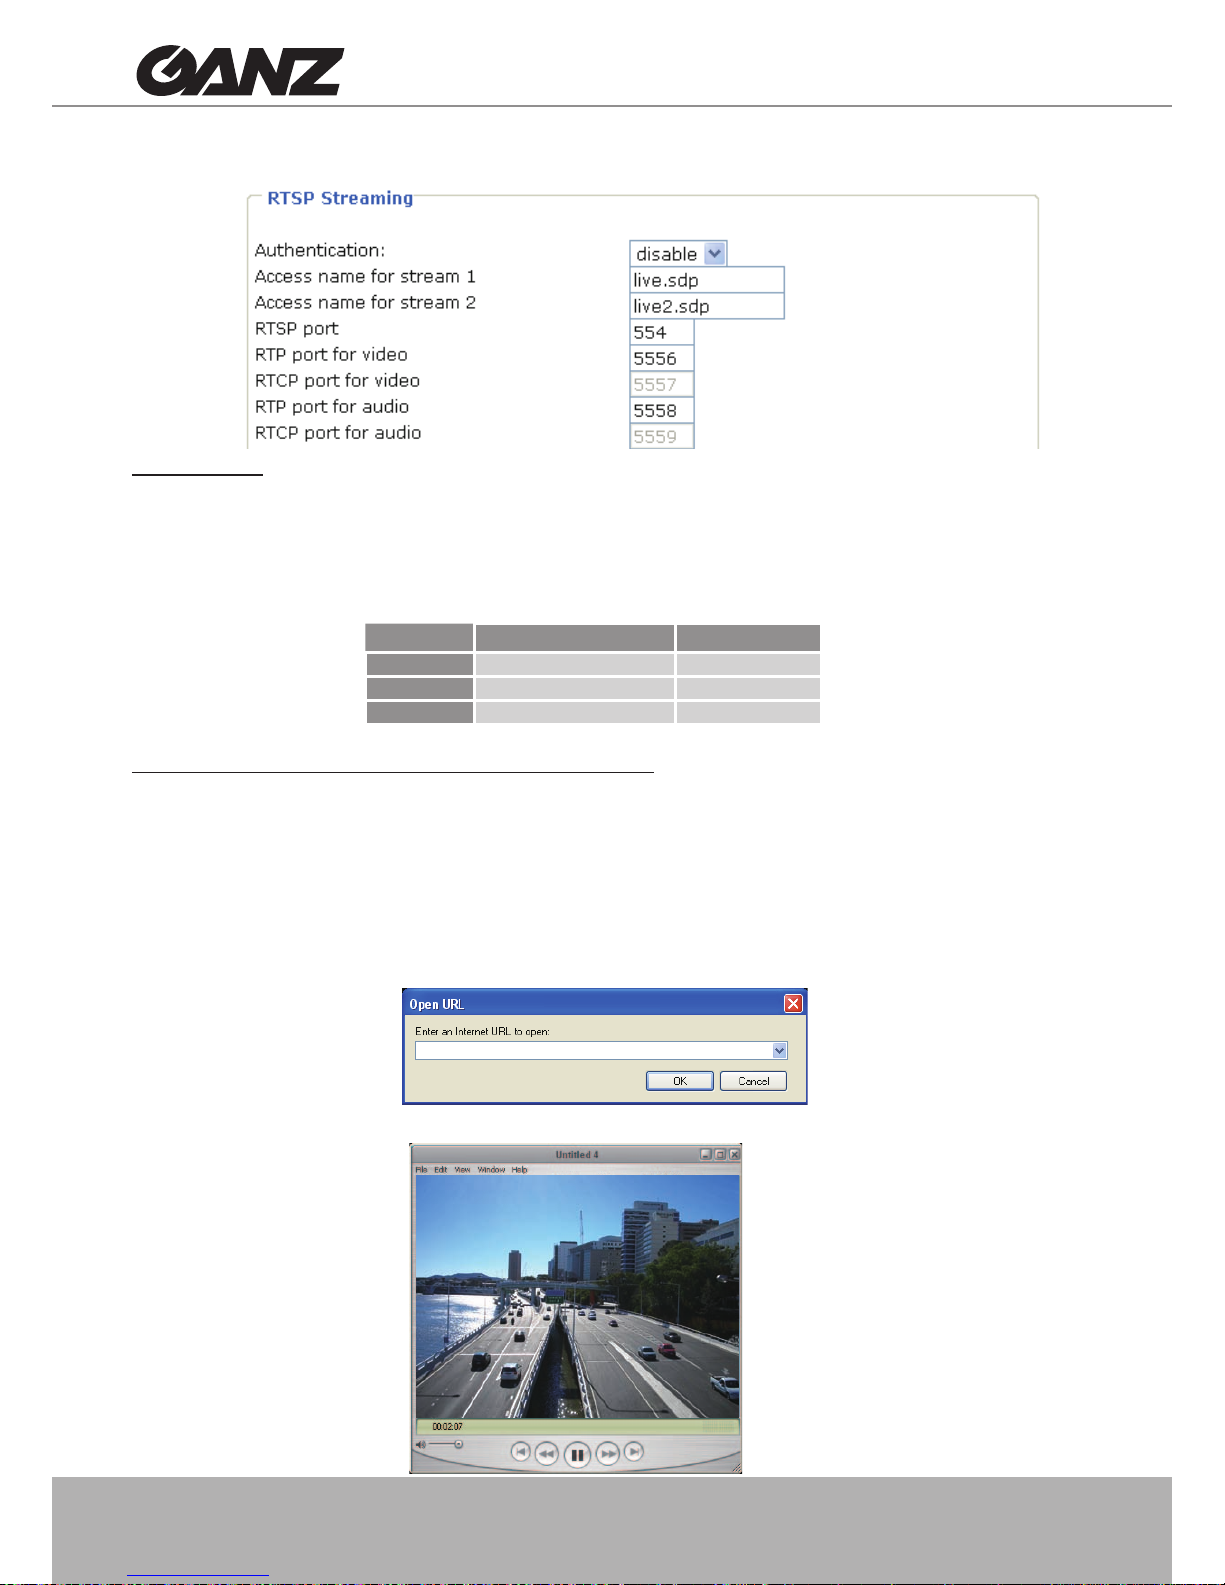
Authentication: Depending on your network security requirements, the Network Camera provides three
types of security settings for streaming via RTSP protocol: disable, basic, and digest�
If basic authentication is selected, the password is sent in plain text format, but there can be potential
risks of it being intercepted� If digest authentication is selected, user credentials are encrypted using
MD5 algorithm, thus providing better protection against unauthorized access.
The availability of the RTSP streaming for the three authentication modes is listed in the following table:
Access name for stream 1 / Access name for stream 2: The access name is used to differentiate the
streaming source�
If you want to use an RTSP player to access the Network Camera, you have to set the video mode to
MPEG-4 and use the following RTSP URL command to request transmission of the streaming data�
rtsp://<ip address>:<rtsp port>/<access name for stream1 or stream2>
For example, when the access name for stream 1 is set to live�sdp:
1� Launch an RTSP player�
2. Choose File > Open URL. An URL dialog box will pop up.
3� Type the URL command in the text box� For example:
4� The live video will be displayed in your player as shown below�
rtsp://192.168.5.132:554/live.sdp
Quick Time player Real Player
Disable O O
Basic O O
Digest O X
Page 31
User's Manual - 31
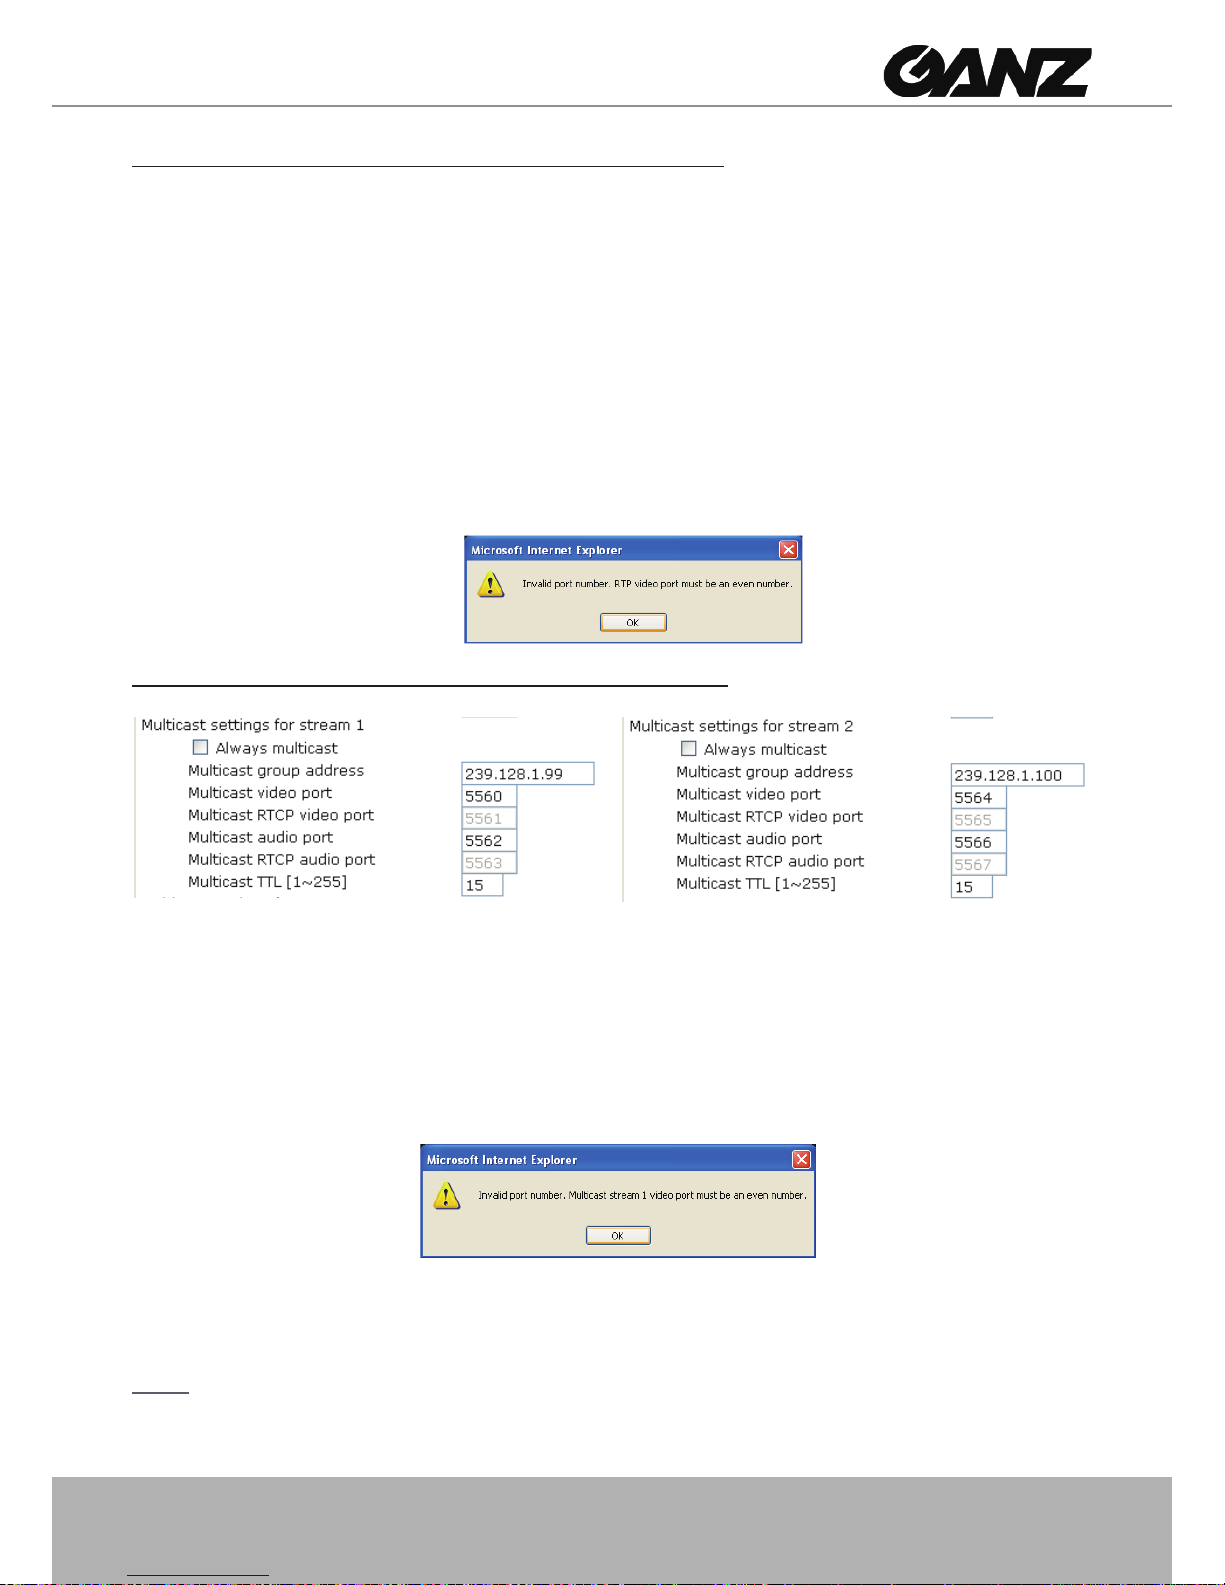
RTSP port /RTP port for video, audio/ RTCP port for video, audio
The RTSP (Real-Time Streaming Protocol) controls the delivery of streaming media� By default, the port
number is set to 554�
The RTP (Real-time Transport Protocol) is used to deliver video and audio data to the clients� By default,
the RTP port for video is set to 5556 and the RTP port for audio is set to 5558�
The RTCP (Real-time Transport Control Protocol) allows the Network Camera to transmit the data by
monitoring Internet trafc volume. By default, the RTCP port for video is set to 5557 and the RTCP port
for audio is set to 5559�
The ve ports can be changed between 1025 and 65535. The RTP port must be an even number and
the RTCP port is RTP port number plus one, and thus always be odd� When the RTP port changes, the
RTCP port will change accordingly�
If the RTP ports are incorrectly assigned, the following warning message is displayed:
Multicast settings for stream 1 / Multicast settings for stream 2: Select the Always multicast option to
enable multicast for stream 1 or stream 2�
Unicast video transmission delivers a stream through point-to-point transmission; multicast, on the other
hand, sends a stream to the multicast group address and allows multiple clients to acquire the stream at
the same time by requesting a copy from the multicast group address� Therefore, enabling multicast can
effectively save Internet bandwith�
The five ports can be changed between 1025 and 65535� The multicast RTP port must be an even
number and the multicast RTCP port number is the multicast RTP port number plus one, and thus it is
always be odd� When the multicast RTP port changes, the multicast RTCP port will change accordingly�
If the multicast RTP video ports are incorrectly assigned, the following warning message is displayed:
Multicast TTL [1~255]:The multicast TTL (Time to live) is the value that tells the router the range a packet
can be forwarded�
NOTE
► To utilize the RTSP streaming authentication, make sure that your have set a password for the
Network Camera rst; please refer to Security on page 22 for details�
Page 32
32 - User's Manual
DDNS
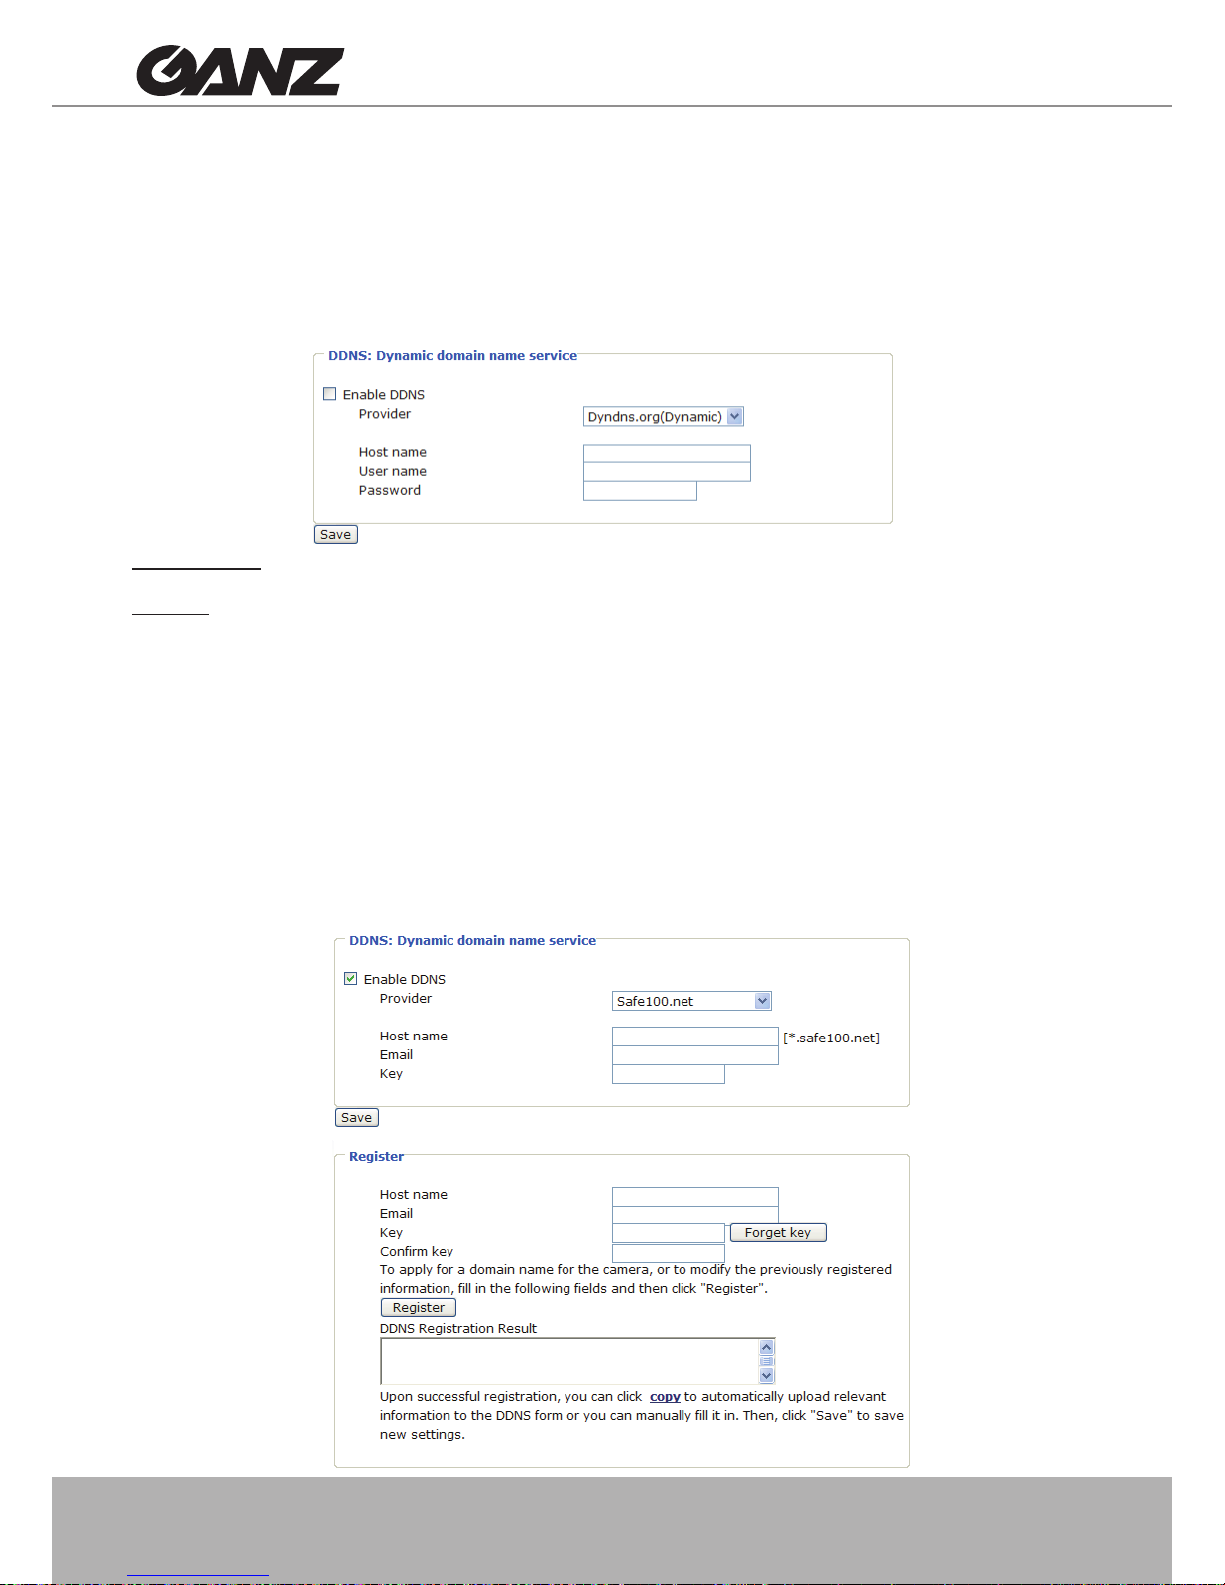
This section explains how to congure dynamic domain name service for the Network Camera.
DDNS is a service that allows your Network Camera, especially when assigned with a dynamic
IP address, to have a xed host and domain name.
DDNS: Dynamic domain name service
Enable DDNS: Select this option to enable the DDNS setting�
Provider: Select a DDNS provider of your choice from the Provider drop-down list�
GANZ offers safe100, a free dynamic domain name service to GANZ customers� It is recommended
that you register with the safe100 to access the Network Camera from the Internet� Additionally, we
offer other DDNS providers, such as Dyndns�org(Dynamic), Dyndns�org(Custom), TZO�com, DHS�org,
CustomSafe100, dyn-interfree.it. Note that to utilize this feature, please apply a dynamic domain account
rst.
■ Safe100�net
1� In the DDNS column, select Safe100 from the Provider drop-down list� Click Agree when you agree
with the terms of the Service Agreement�
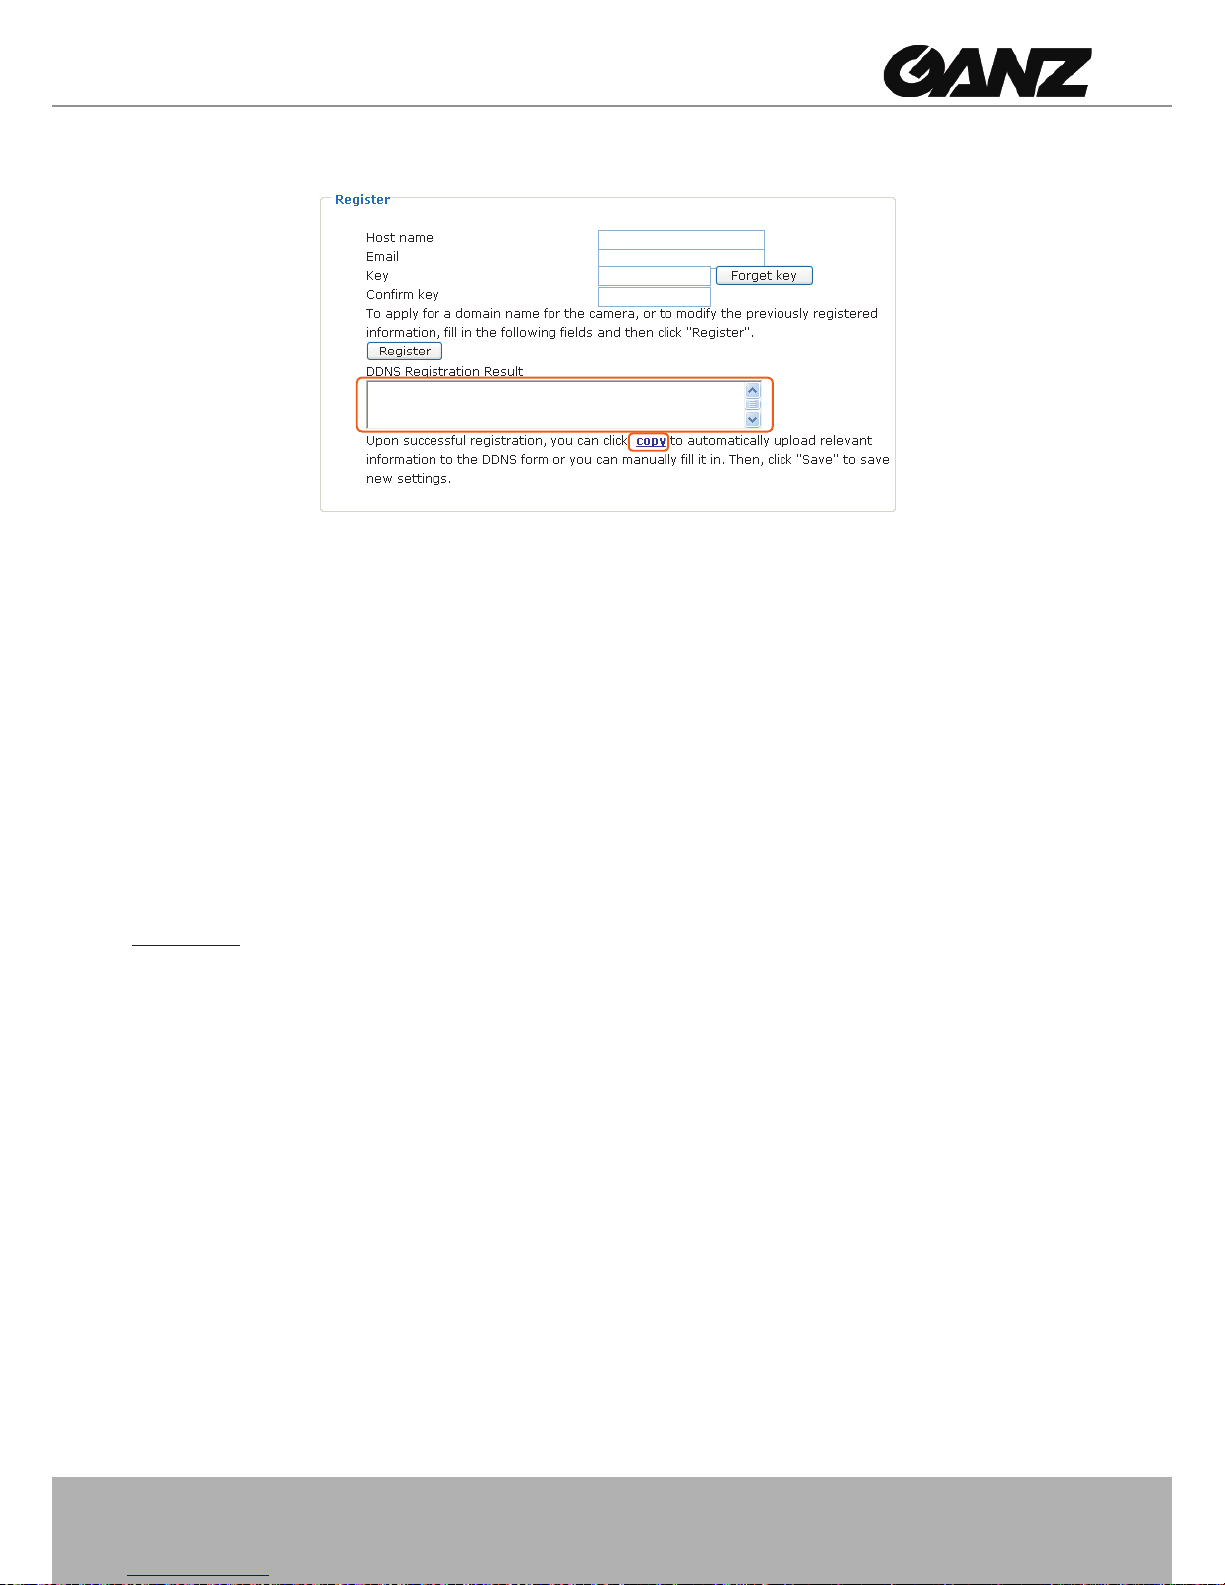
2. In the Register column, ll in the Host name, Email, Key and Conrm Key and then click Register.
After a host name has been successfully created, you will see a successful message in the DDNS
Registration Result column, indicating that you have successfully applied a domain name on
Safe100�net�
Page 33
User's Manual - 33
3� Click Copy and all the registered information will be uploaded to the corresponding elds in the
DDNS column�
4� Select Enable DDNS and then click Save to enable the settings�
■ CustomSafe100
GANZ offers documents to establish CustomSafe100 DDNS server for distributors and system
integrators� You can use CustomSafe100 to register a dynamic domain name if your distributor or system
integrators offer such services�
1� In the DDNS column, select CustomSafe100 from the Provider drop-down list�
2. In the Register column, ll in the Host name, Email, Key and Conrm Key; then click Register.
After a host name has been successfully created, you will see a successful message in the
DDNS Registration Result column, indicating that you have successfully registered a domain
name on CustomSafe100�
3. Click Copy and all the registered information will be uploaded to the corresponding elds in
the DDNS column�
4� Select Enable DDNS and then click Save to enable the settings�
Forget key: Click this button if you forget the key of Safe100 or CustomSafe100� Your account
information will be sent to your email address�
Refer to the following links to apply a dynamic domain account when selecting other DDNS
providers:
■ Dyndns�org(Dynamic) / Dyndns�org(Custom): visit http://www�dyndns�com/
■ TZO�com: visit http://www.tzo.com/
■ DHS�org: visit http://www�dhs�org/
■ dyn-interfree�it: visit http://dyn-interfree�it/
[Register] Successfully. Your account information has
been mailed to registered e-mail address.
Page 34
34 - User's Manual
Access List
This section explains how to control the access permission by checking the client PC’s IP
addresses� It is composed of the following four columns: Allowed list, Denied list, Delete allowed
list, and Delete denied list�
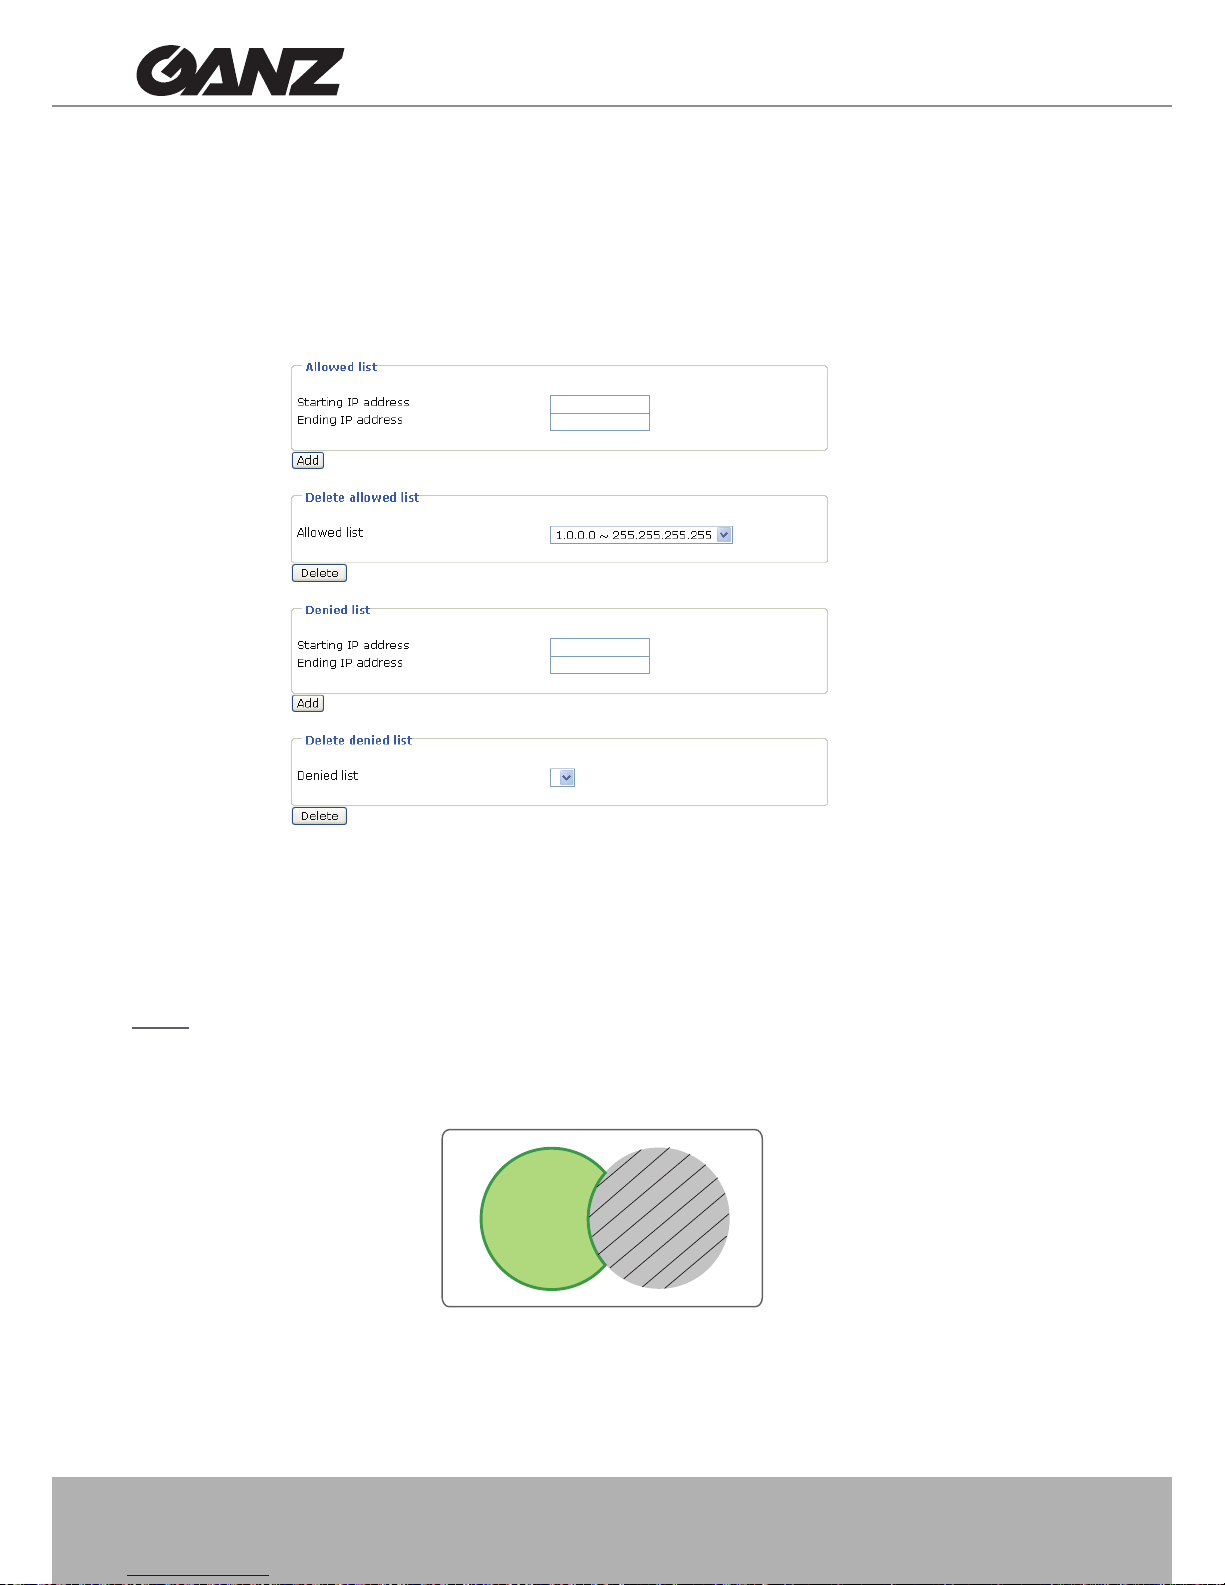
Allowed list / Denied list
There are two lists for permission control: Allowed list and Denied list� Only those clients whose IP
addresses are in the Allowed list and not in the Denied list can access the Network Camera�
1� In the Allowed list or Denied list column, type the starting IP address and ending IP address in the text
boxes. A total of ten lists can be congured for both columns.
2� Click Add to enable the settings�
NOTE
► For example, when the range of IP addresses on the allowed list is set from 1.1.1.0 to
192�255�255�255 and the range in the denied list is set from 1�1�1�0 to 170�255�255�255, only users’
IPs between 171�0�0�0 and 192�255�255�255 can access the Network Camera�
Delete allowed list / Delete denied list
1� In the Delete allowed list or Delete denied list, select a list from the drop-down list�
2� Click Delete to enable the settings�
Allowed
List
Denied
List
Page 35
User's Manual - 35
Audio and Video
This section explains how to cogure audio and video performances of the Network Camera. It
is composed of the following two columns: Video Settings and Audio Settings�
Video Settings
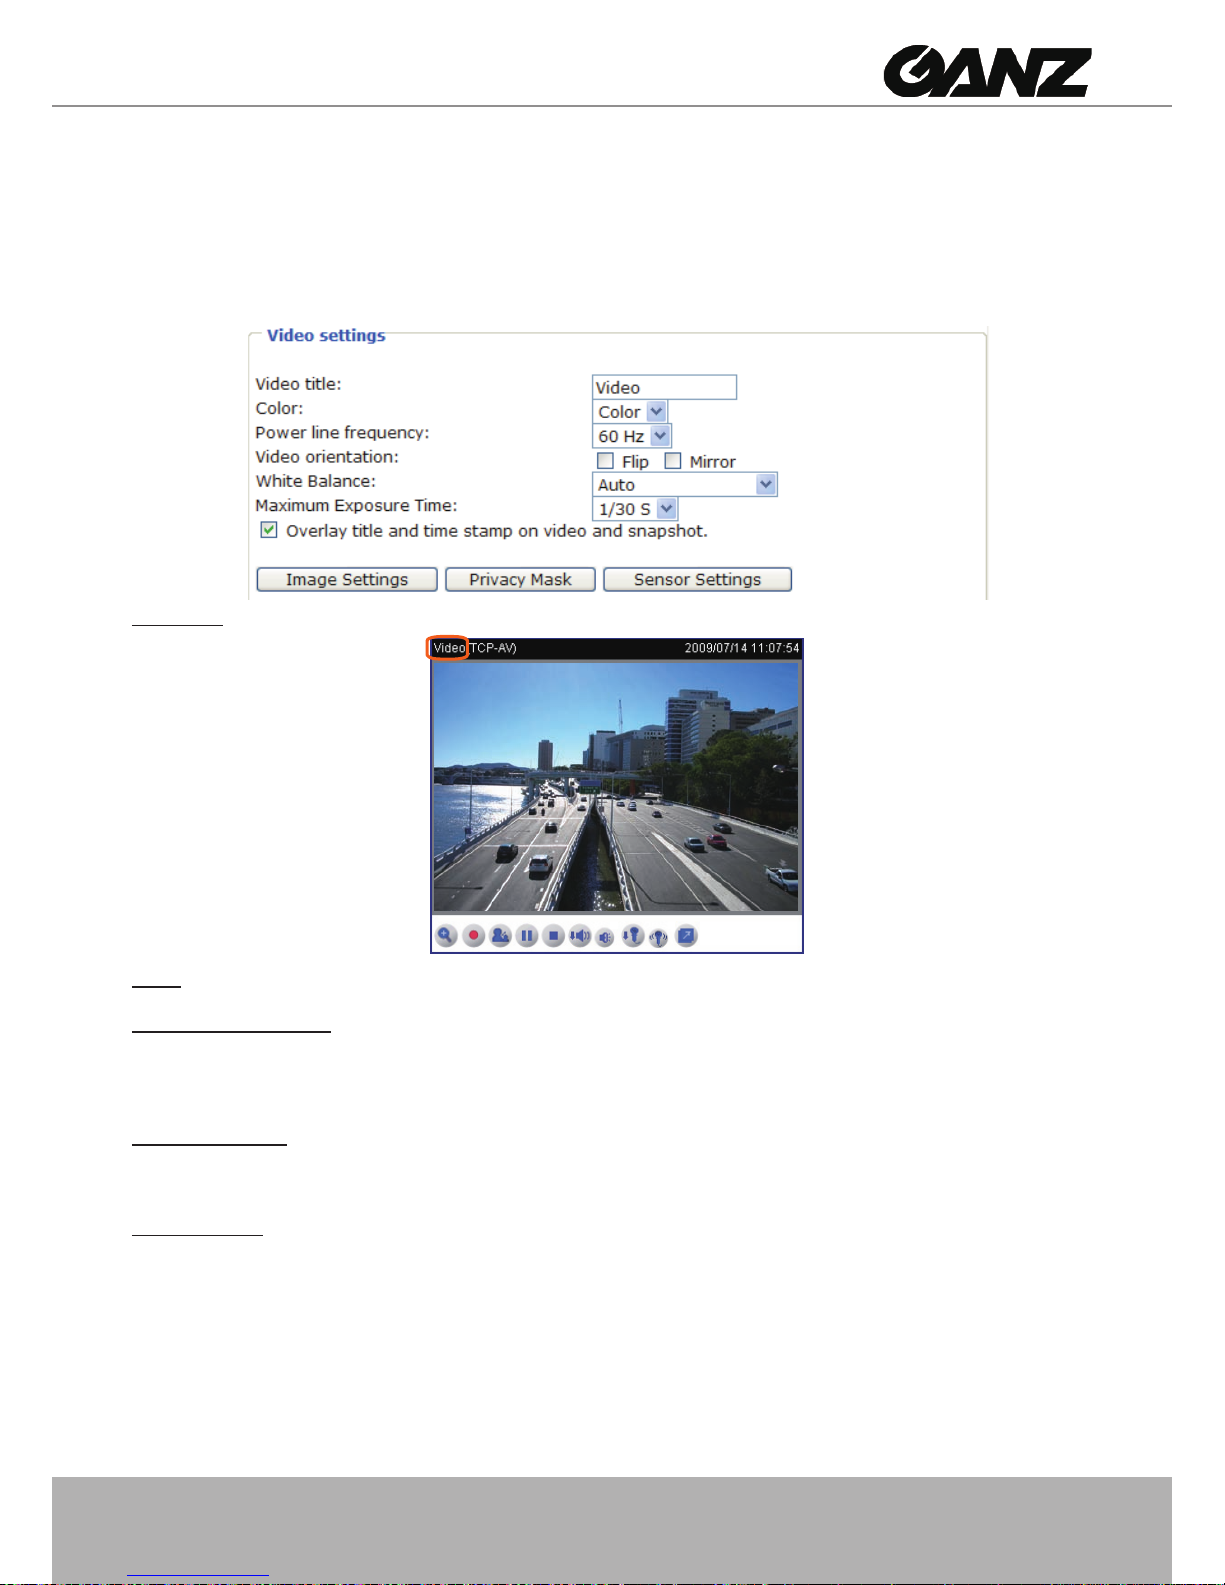
Video title: Enter a name that will be displayed on the title bar of the live video�
Color: Select to display color or black/white video streams�
Power line frequency: Set the power line frequency in consistent with local utility settings to eliminate
uncomfortable image ickering associated with uorescent lights. Note that after the power line frequency
is changed, it is required to disconnect and reconnect the power cord of the Network Camera in order for
the new setting to take effect�
Video orientation: Flip--vertically reect the display of the live video; Mirror--horizontally reect the display
of the live video� Select both options if the Network Camera is installed upside-down (ex� on the ceiling)
to correct the image orientation�
White balance: Adjust the value for best color temperature.
■ Auto
The Network Camera automatically adjusts the color temperature of light in response to different light
sources� The white balance setting defaults to Auto and works well in most situations�
■ Keep current value
Follow the steps below to manually set the white balance to compensate for the ambient lighting
conditions�
1� Set the White balance to Auto�
2. Place a sheet of white paper in front of the lens; then allow the Network Camera to adjust the color
temperature automatically�
Page 36
36 - User's Manual
Maximum Exposure Time: 1/30 S, 1/15 S, and 1/5 S�
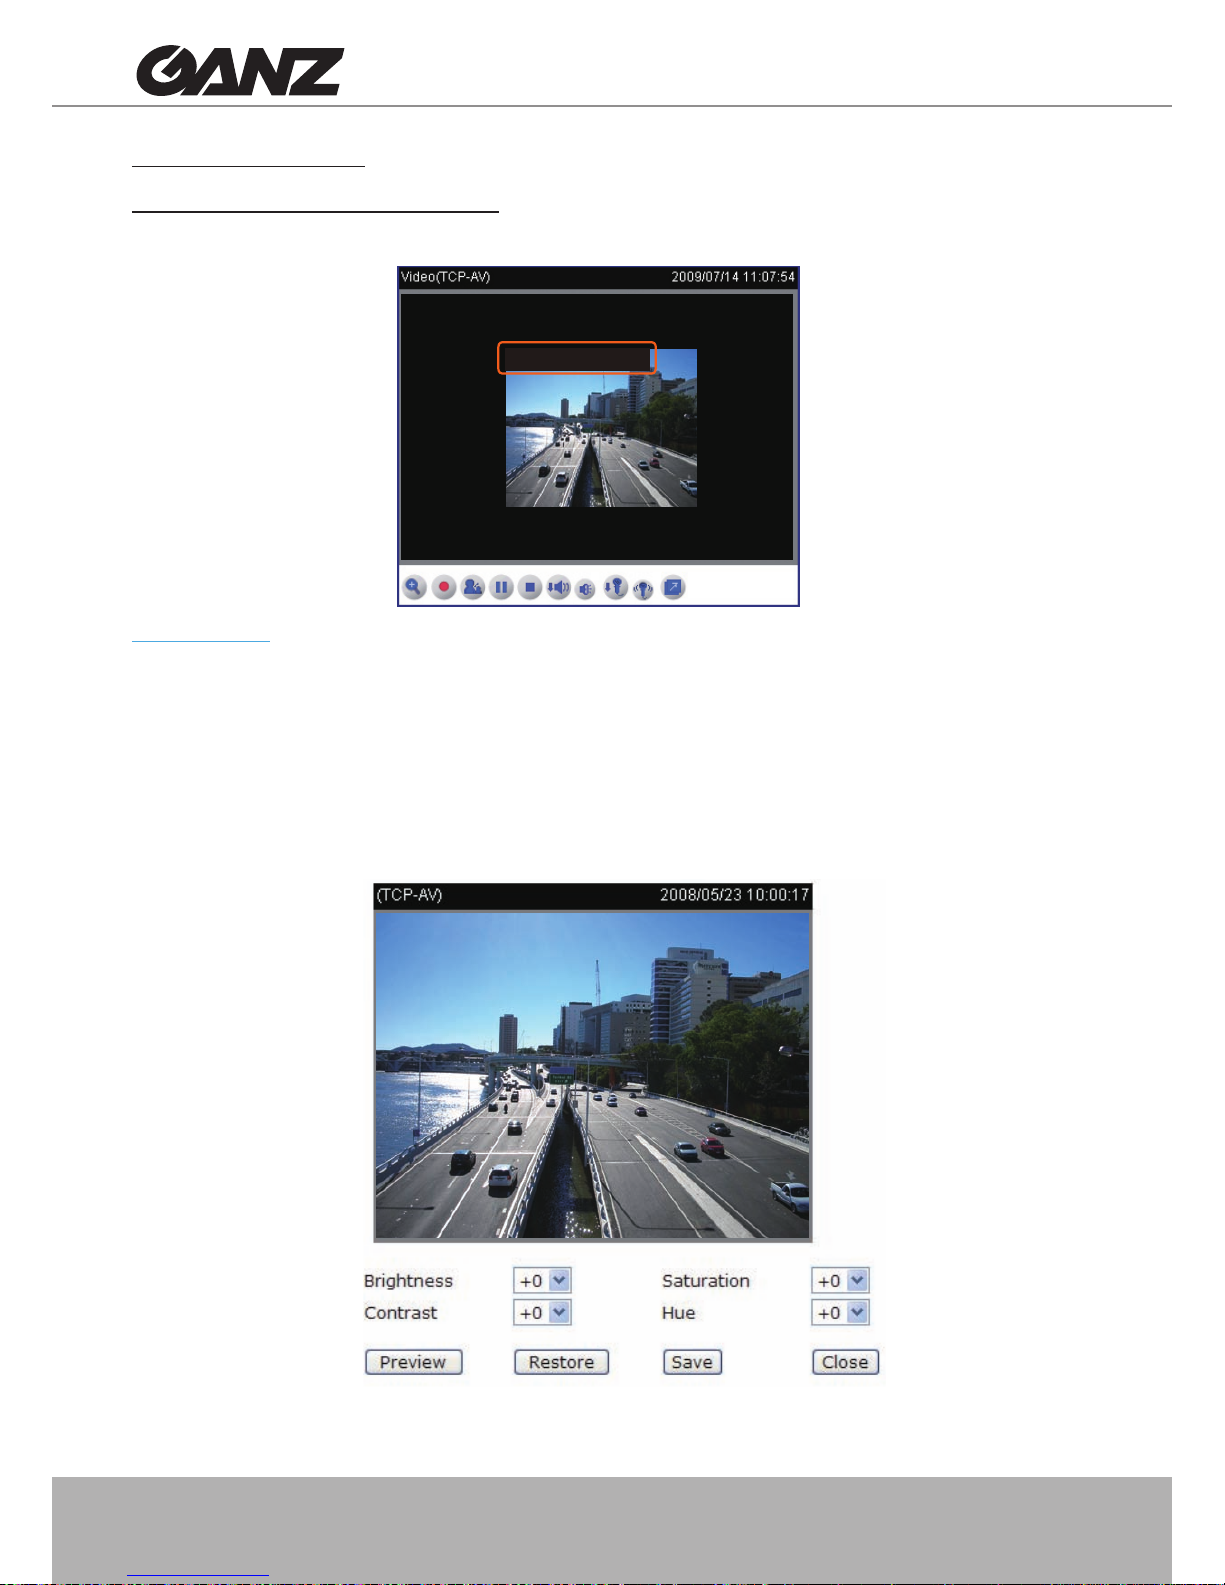
Overlay title and time stamp on video: Select this option to place the video title and time on video
streams�
Note that when the frame size is set to 176 x 144 as the right picture below, only time will be stamped on
video streams�
Image Settings
Click Image settings to open the Image Settings page� On this page, you can tune Brightness,
Saturation, Contrast, and Hue for video compensation�
■ Brightness: Adjust the image brightness level, which ranges from -5 to +5. The default value is set to 0.
■ Saturation: Adjust the image saturation level, which ranges from -5 to +5. The default value is set to 0.
■ Contrast: Adjust the image contrast level, which ranges from -5 to +5. The default value is set to 0.
■ Sharpness: Adjust the image sharpness level, which ranges from -5 to +5. The default value is set to 0.
You can click Preview to fine-tune the image, or click Restore to recall the original settings without
incorporating the changes� When completed with the settings on this page, click Save to enable the
settings and click Close to exit the page�
11:07:54 2009/07/14
Page 37
User's Manual - 37
Privacy mask
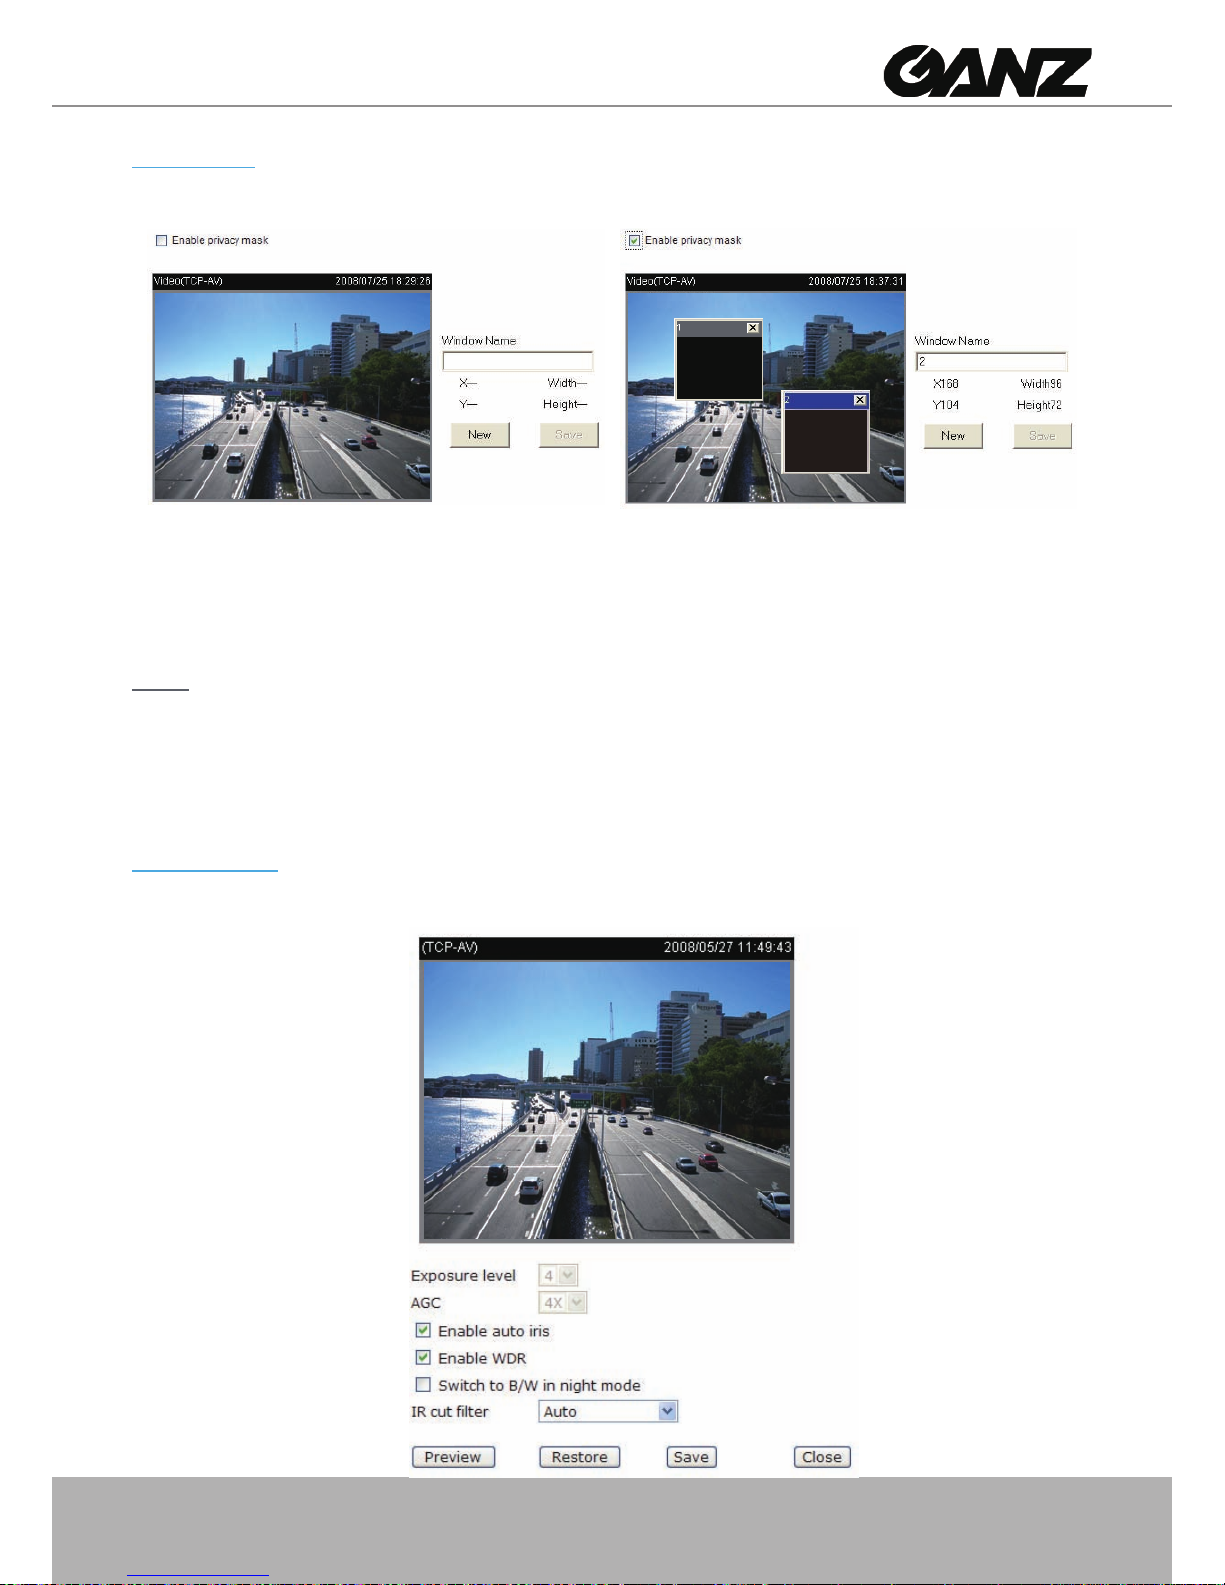
Click Privacy Mask to open the Privacy Mask page� On this page, you can block out some sensitive
zones to address privacy concerns.
■ To set the privacy mask windows, follow the steps below:
1� Click New to add a new window�
2. Use the mouse to size and drag-drop the window, which is recommended to be at least twice the size
of the object (height and width) you want to cover.
3� Enter a Window Name and click Save to enable the settings�
4� Select Enable privacy mask to enable this function�
NOTE
►
Up to 5 privacy mask windows can be set up on the same screen�
► If you want to delete the privacy mask window, please click the ‘x’ on the upper right-hand corner of
the window�
Sensor Settings
Click Sensor Settings to open the Sensor Settings page� On this page, you can set the exposure level,
AGC (Auto Gain Control), auto iris, WDR (Wide Dynamic Range), night mode, and IR cut lter.
Page 38

38 - User's Manual
Exposure level: You can manually set up the Exposure level, which ranges from 1 to 8� The default value
is 4�
AGC (Auto Gain Control): Automatic Gain Control, an electronic circuit which amplies the video signal
when the signal strength falls below a given value due to the lack of light� You can manually set up the
AGC level (2X, 4X, or 8X)� The default value is 4X�
Enable auto iris: Select it to enable the auto iris function�
Enable WDR (Wide Dynamic Range): Select it to enable the WDR function� This
Network Camera with
WDR feature can cope with very challenging lighting conditions� It is capable of capturing both of the dark
part and bright part of a target and combining the differences into a scene to generate a highly realistic
image as the human eyes can see� Note that if you select this function, Exposure level and AGC function
will be disabled�
Switch to B/W in night mode: Select it to enable the Network Camera to automatically switch to B/W in
night mode�
IR cut lter:
With a removable IR-cut lter and built-in IR illuminators, up to 15m, this Network Camera can
automatically remove the lter and turn on the IR illuminators during the nighttime to accept IR illumination
for low light sensitivity�
■ Auto
The Network Camera automatically
removes the lter
by judging the level of ambient light.
■ Schedule mode
The Network Camera switches between day mode and night mode based on specified schedule�
Enter the starting time and ending time for the day mode� Note that the time format is [hh:mm] and is
expressed in 24-hour clock time� By default, the starting time and ending time of day mode are set to
07:00 and 18:00�
■ Day mode
In day mode, the Network Camera switches on the IR cut lter at all times to block the infrared light
from reaching the sensor so that the colors will not be distorted�
■ Night mode
In night mode, the Network Camera switches off (remove) the IR cut lter to allow the infrared light to
pass through� This improves the sensitivity of the Network Camera in low-light conditions�
You can click Preview to fine-tune the image, or click Restore to recall the original settings without
incorporating the changes� When completed with the settings on this page, click Save to enable the
settings and click Close to exit the page�
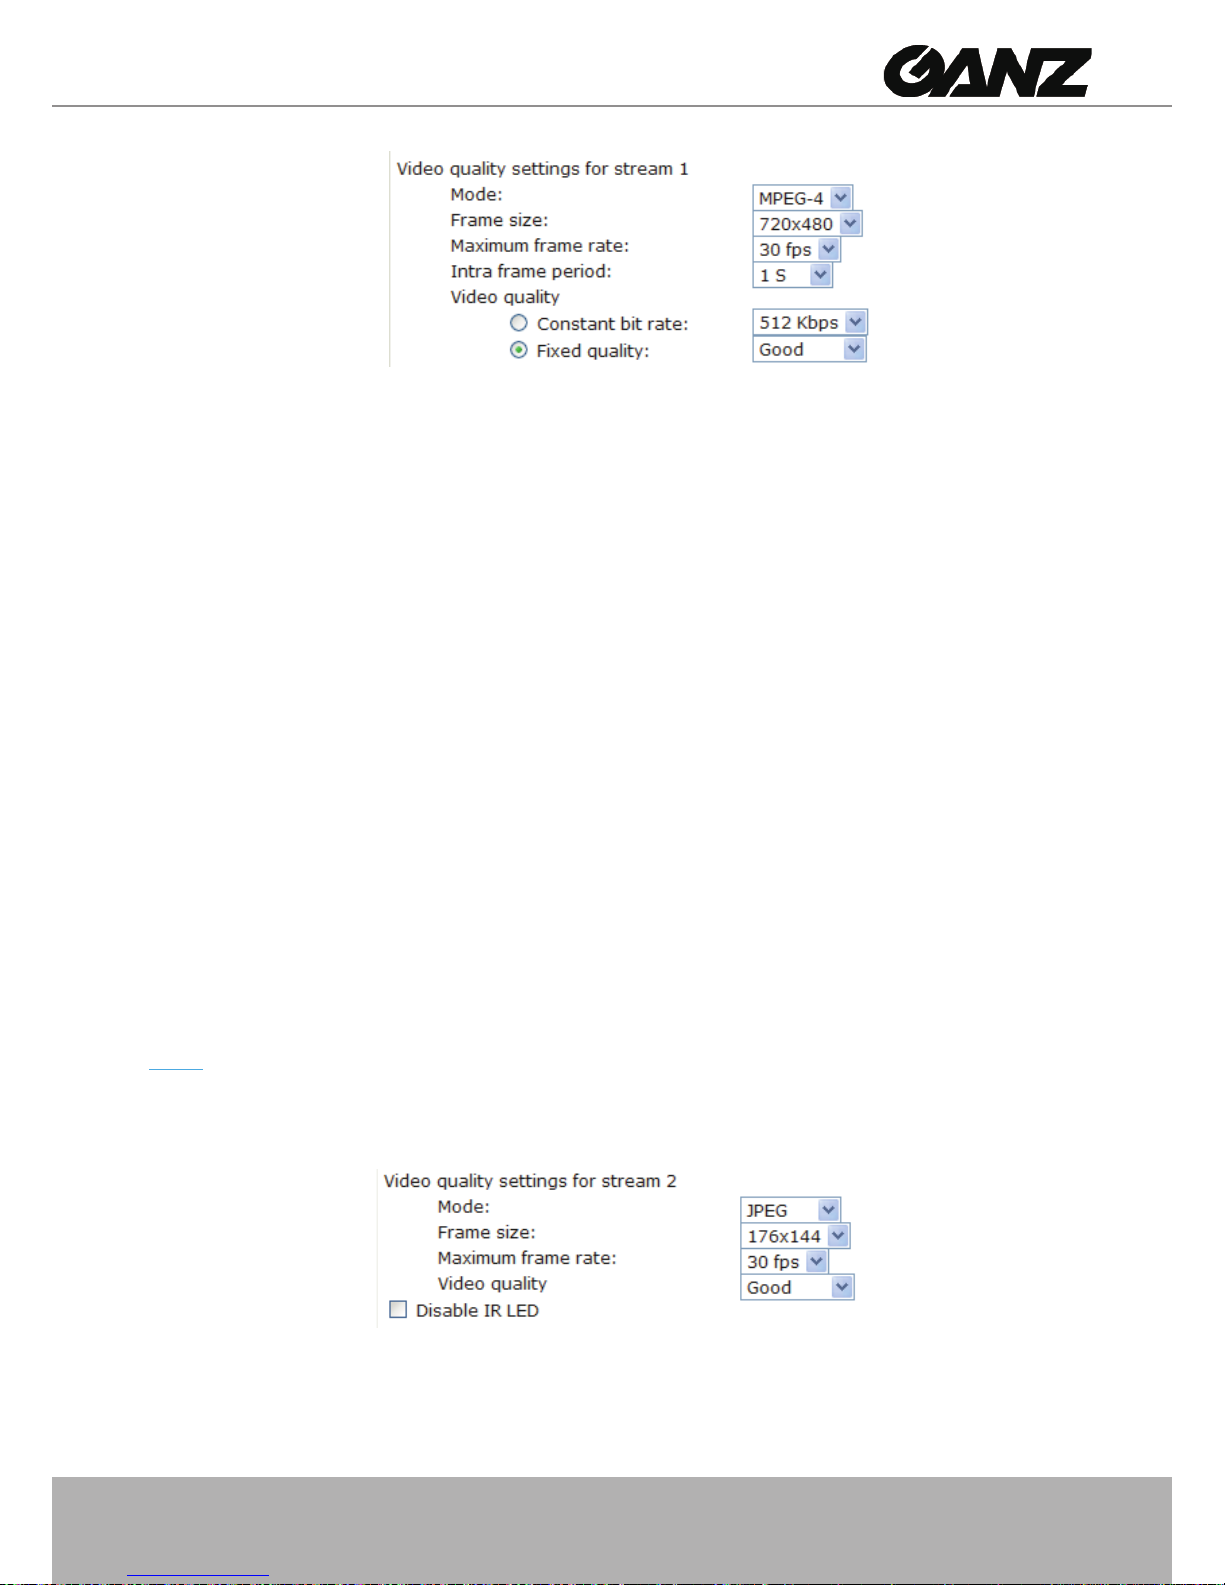
Video quality settings for stream 1 / stream 2: You can set up two seperate streams for the Network
Camera for different viewing devices. For example, set the Network Camera to a smaller frame size and
a lower bit rate for remote viewing on mobile phones. Or, set the Network Camera to a larger video size
and a higher bit rate for live viewing on web browsers�
■ Mode
This Network Camera offers two choices of video compression standards for real-time viewing: MPEG-4
and MJPEG�
If MPEG-4 is selected, it is streamed in RTSP protocol� There are four dependent parameters provided
in MPEG-4 mode for video performance adjustment.
Page 39
User's Manual - 39
■ Frame size
Select the video size. Note that a larger frame size takes up more bandwidth. The frame sizes are
selectable in the following resolutions: 176 x 144, 352 x 240, and 720 x 480�
■ Maximum frame rate
This limits the maximum refresh frame rate per second� Set the frame rate higher for a smoother
video quality�
If the power line frequency is set to 50Hz, the frame rates are selectable at 1fps, 2fps, 3fps, 5fps,
8fps, 10fps, 15fps, 20fps, and 25fps. If the power line frequency is set to 60Hz, the frame rates are
selectable at 1fps, 2fps, 3fps, 5fps, 8fps, 10fps, 15fps, 20fps, 25fps, and 30fps�
■ Intra frame period
Determine how often to plant an I frame� The shorter the duration, the more likely you will get better
video quality, but at the cost of higher network bandwidth consumption� Select the intra frame
period from the following durations: 1/4 second, 1/2 second, 1 second, 2 seconds, 3 seconds, and 4
seconds�
■ Video quality
A complex scene generally produces a larger le size, meaning that higher bandwidth will be needed
for data transmission� Therefore, if Constant bit rate is selected, the bandwidth utilization is xed at
a selected level, resulting in mutable video quality performance� The bit rates are selectable at the
following rates: 20Kbps, 30Kbps, 40Kbps, 50Kbps, 64Kbps, 128Kbps, 256Kbps, 512Kbps, 768Kbps,
1Mbps, 2Mbps, 3Mbps, and 4Mbps�
On the other hand, if Fixed quality is selected, all frames are transmitted with the same quality;
bandwidth utilization is therefore unpredictable. The video quality can be adjusted to the following
settings: Medium, Standard, Good, Detailed, and Excellent�
If JPEG mode is selected, the Network Camera continuously sends JPEG images to the client, producing
a moving effect similar to a lmstrip. Every single JPEG image transmitted guarantees the same image
quality, which in turn comes at the expense of variable bandwidth usage� Because the media contents
are a combination of JPEG images, no audio data is transmitted to the client� There are three parameters
provided in MJPEG mode to control the video performance:
■ Frame size
Select the video size. Note that a larger frame size takes up more bandwidth. The frame sizes are
selectable in the following resolutions: 176 x 144, 352 x 240, and 720 x 480�
■ Maximum frame rate
This limits the maximum refresh frame rate per second� Set the frame rate higher for smoother video
quality�
Page 40
40 - User's Manual
If the power line frequency is set to 50Hz, the frame rates are selectable at 1fps, 2fps, 3fps, 5fps,
8fps, 10fps, 15fps, 20fps, and 25fps. If the power line frequency is set to 60Hz, the frame rates are
selectable at 1fps, 2fps, 3fps, 5fps, 8fps, 10fps, 15fps, 20fps, 25fps, and 30fps�
■ Video quality
The video qualities are selectable at the following settings: Medium, Standard, Good, Detailed, and
Excellent�
Disable IR LED: If you don’t want use the IR illuminators, you can select this option to turn it off�
Audio Settings
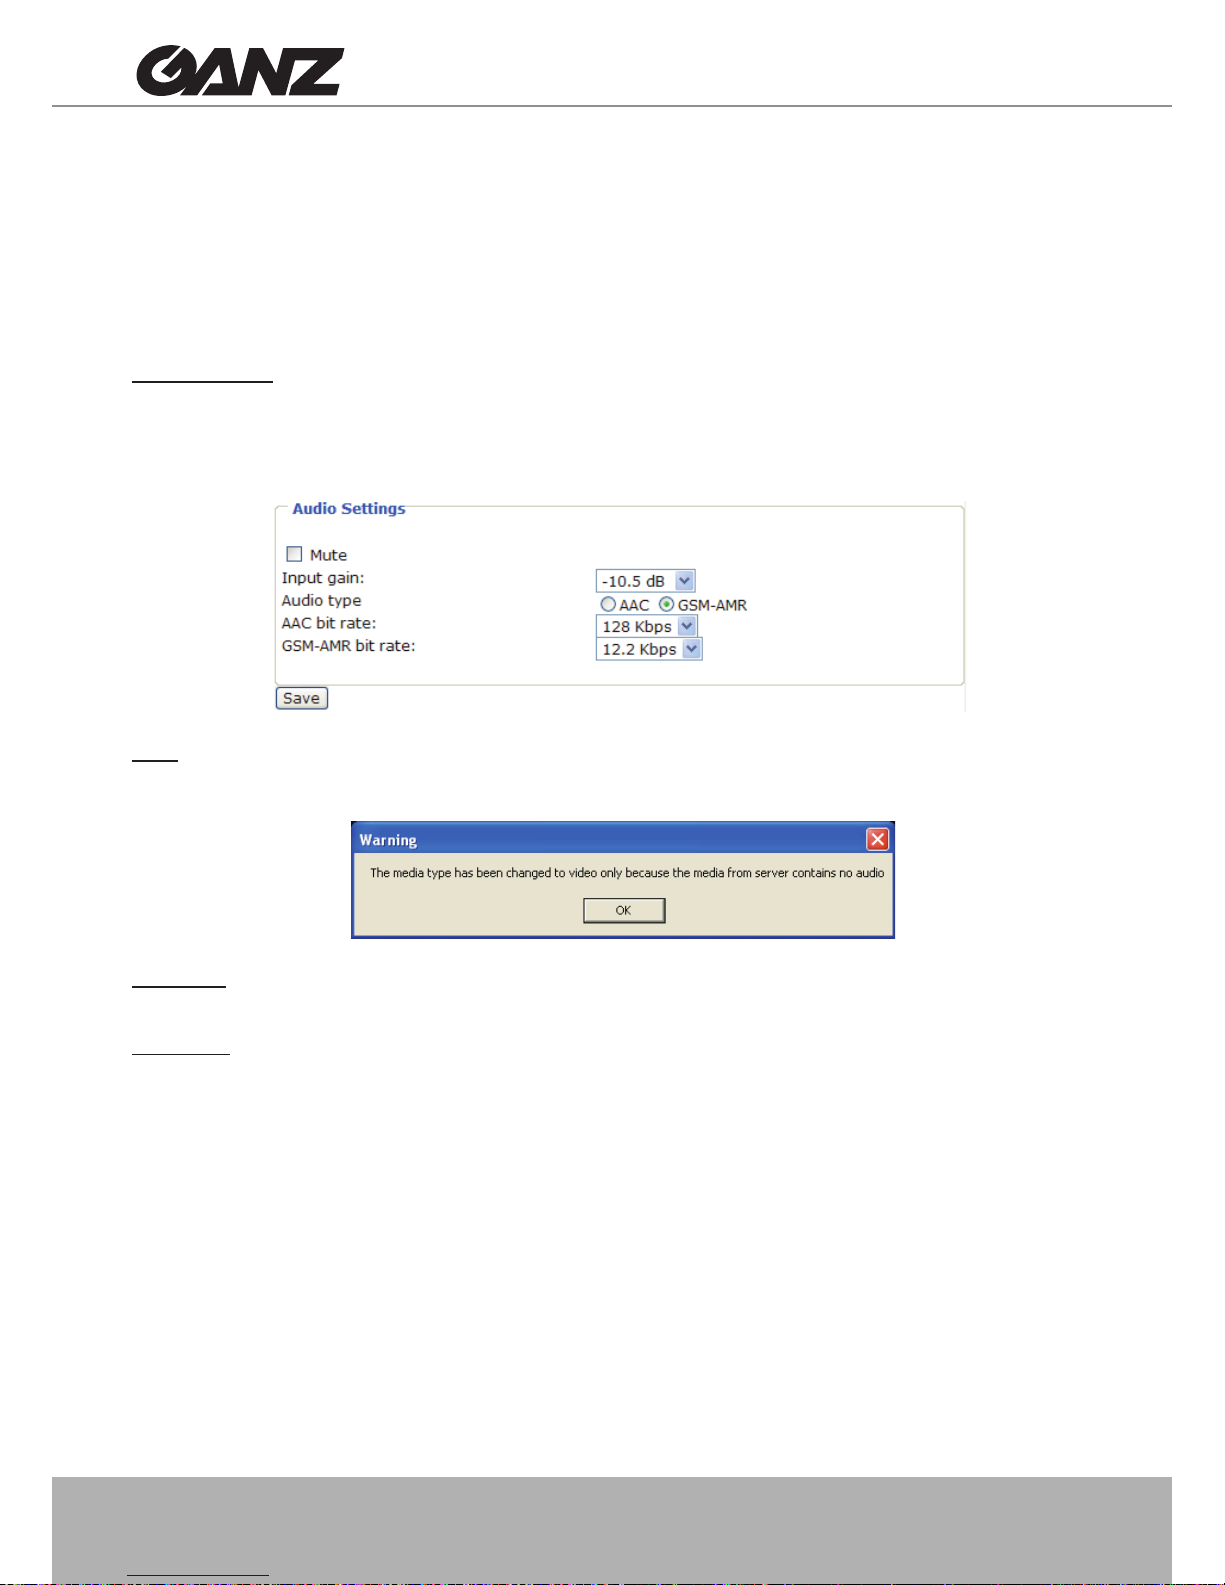
Mute: Select this option to disable audio transmission from the Network Camera to all clients� Note that
if mute mode is turned on, no audio data will be transmitted even if audio transmission is enabled on the
Client Settings page� In that case, the following message is displayed:
Input gain: Select the gain of the internal audio input according to ambient conditions. Adjust the gain
from +12 db (most sensitive) ~ -33�5 db (least sensitive)�
Audio type: Select audio codec AAC or GSM-AMR and the bit rate�
■ AAC provides good sound quality at the cost of higher bandwidth consumption. The bit rates are
selectable from: 16Kbps, 32Kbps, 48Kbps, 64Kbps, 96Kbps, and 128Kbps�
■ GSM-ARM is designed to optimize speech quality and requires less bandwidth. The bit rates are
selectable from: 4�75Kbps, 5�15Kbps, 5�90Kbps, 6�7Kbps, 7�4Kbps, 7�95Kbps, 10�2Kbps, and
12�2Kbps�
When completed with the settings on this page, click Save to enable the settings�
Page 41
User's Manual - 41
Motion Detection
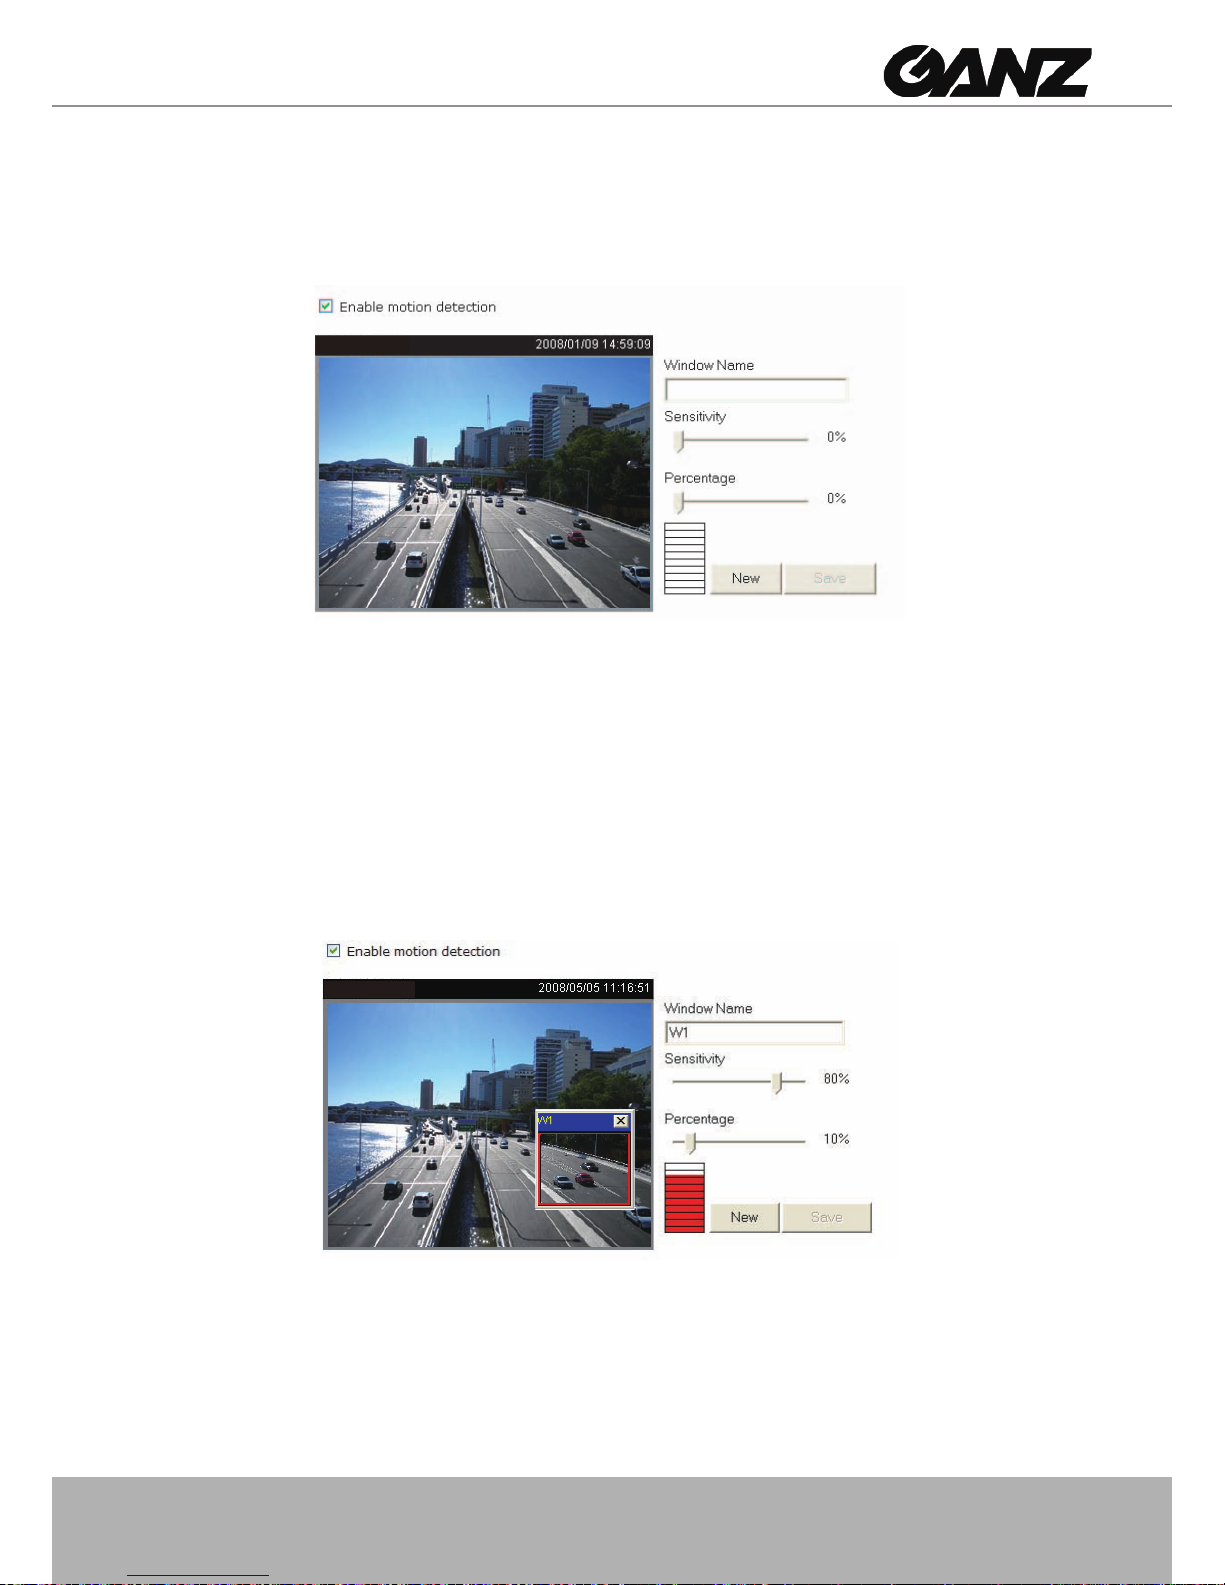
This section explains how to congure the Network Camera to enable motion detection. A total
of three motion detection windows can be congured.
To enable motion detection, follow the steps below:
Follow the steps below to enable motion detection:
1� Click New to add a new motion detection window�
2� In the Window Name text box, enter a name for the motion detection window�
■ To move and resize the window, drag and drop your mouse on the window.
■ To delete window, click X on the top right corner of the window.
3. Define the sensitivity to moving objects and the space ratio of all alerted pixels by moving the
Sensitivity and Percentage slider bar�
4� Click Save to enable the settings�
5� Select Enable motion detection to enable this function�
For example:
The Percentage Indicator will rise or fall depending on the variation between sequential images�
When motions are detected by the Network Camera and are judged to exceed the defined
threshold, the red bar rises� Meanwhile, the motion detection window will be outlined in red�
Photos or videos can be captured instantly and congured to be sent to a remote server (Email,
FTP) by utilizing this feature as a trigger source. For more information on how to plot an event,
please refer to Application on page 46�
(TCP-AV)
(TCP-AV)
Page 42
42 - User's Manual
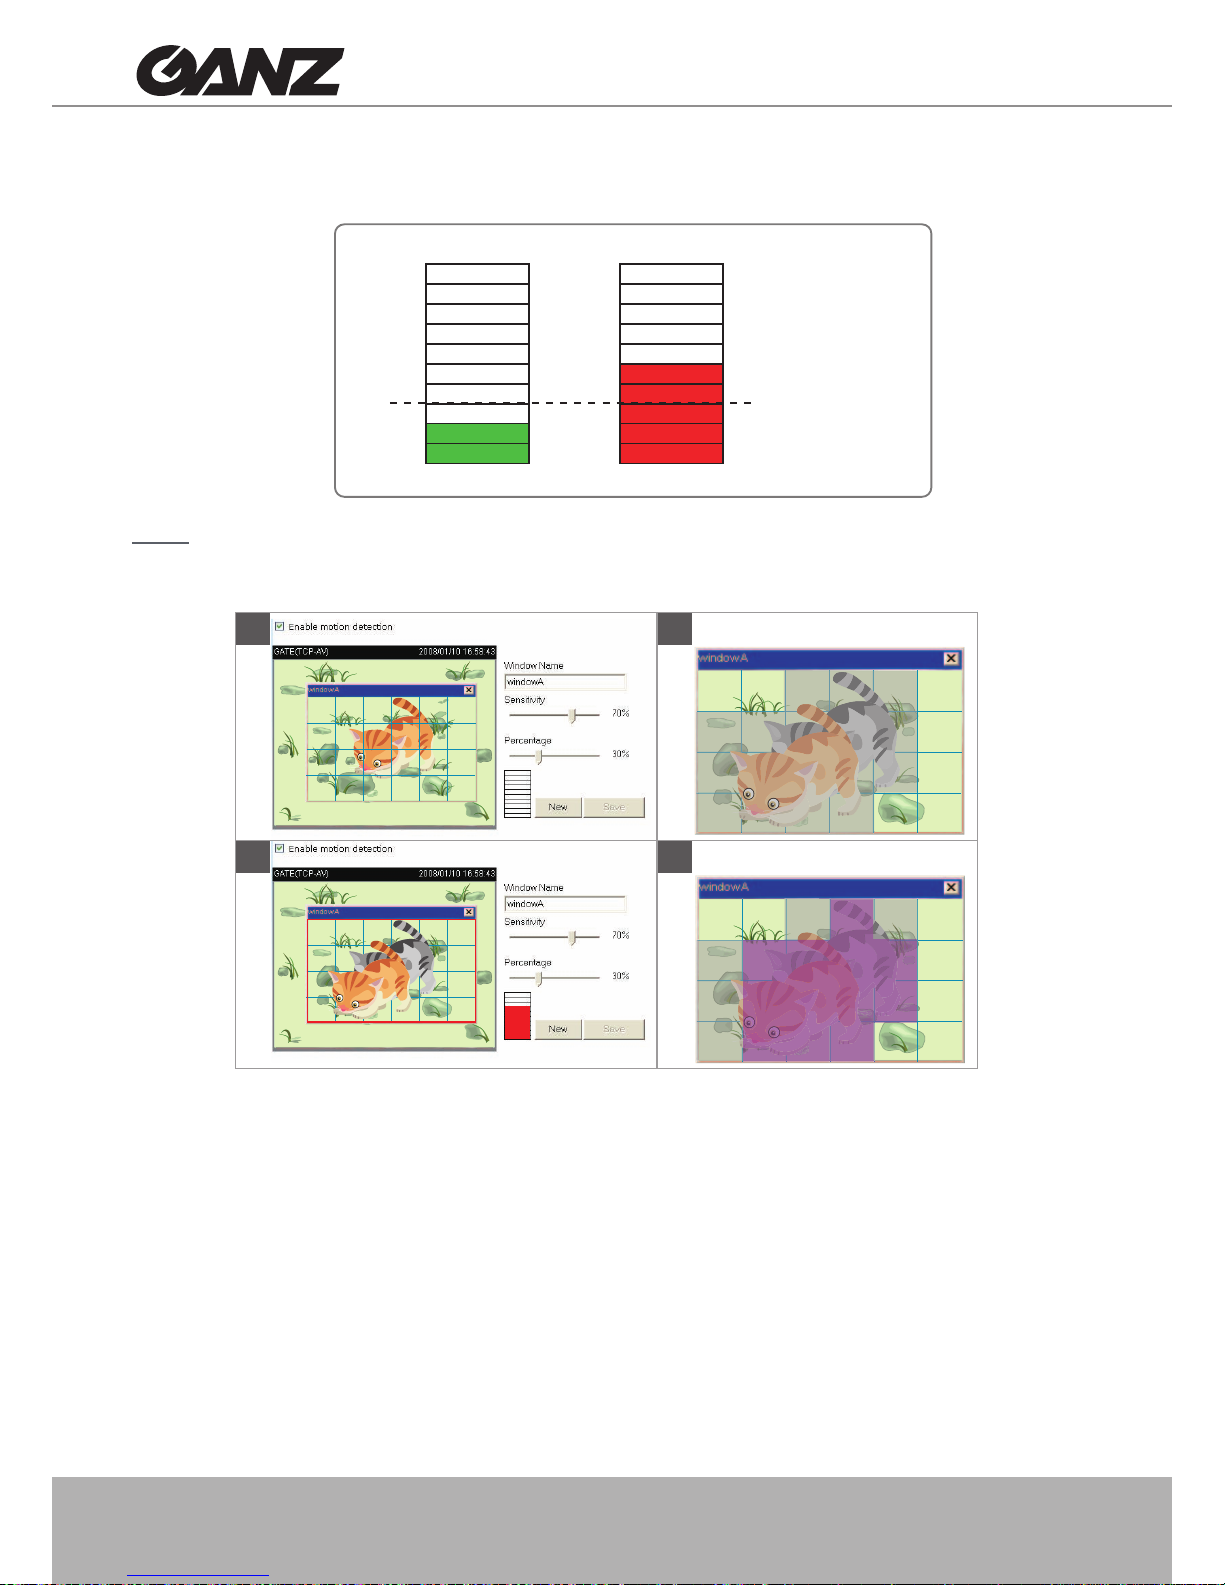
A green bar indicates that even though motions have been detected, the event has not been
triggered because the image variations still fall under the dened threshold.
NOTE
► How does motion detection work?
There are two motion detection parameters: Sensitivity and Percentage� In the illustration above,
frame A and frame B are two sequential images� Pixel differences between the two frames are
detected and highlighted in gray (frame C) and will be compared with the sensitivity setting� Sensitivity
is a value that expresses the sensitivity to moving objects. Higher sensitivity settings are expected to
detect slight movements while smaller sensitivity settings will neglect them� When the sensitivity is set
to 70%, the Network Camera denes the pixels in the purple areas as “alerted pixels” (frame D).
Percentage is a value that expresses the proportion of “alerted pixels” to all pixels in the motion
detection window. In this case, 50% of pixels are identied as “alerted pixels”. When the percentage is
set to 30%, the motions are judged to exceed the dened threshold; therefore, the motion window will
be outlined in red�
For applications that require a high level of security management, it is suggested to use higher
sensitivity settings and smaller percentage values�
A
B D
C
Percentage = 30%
Page 43
User's Manual - 43
Camera Control
This section explains how to control the Network Camera’s Pan/Tilt/Zoom operation by connecting with a
PTZ driver or scanner via RS485 interface�
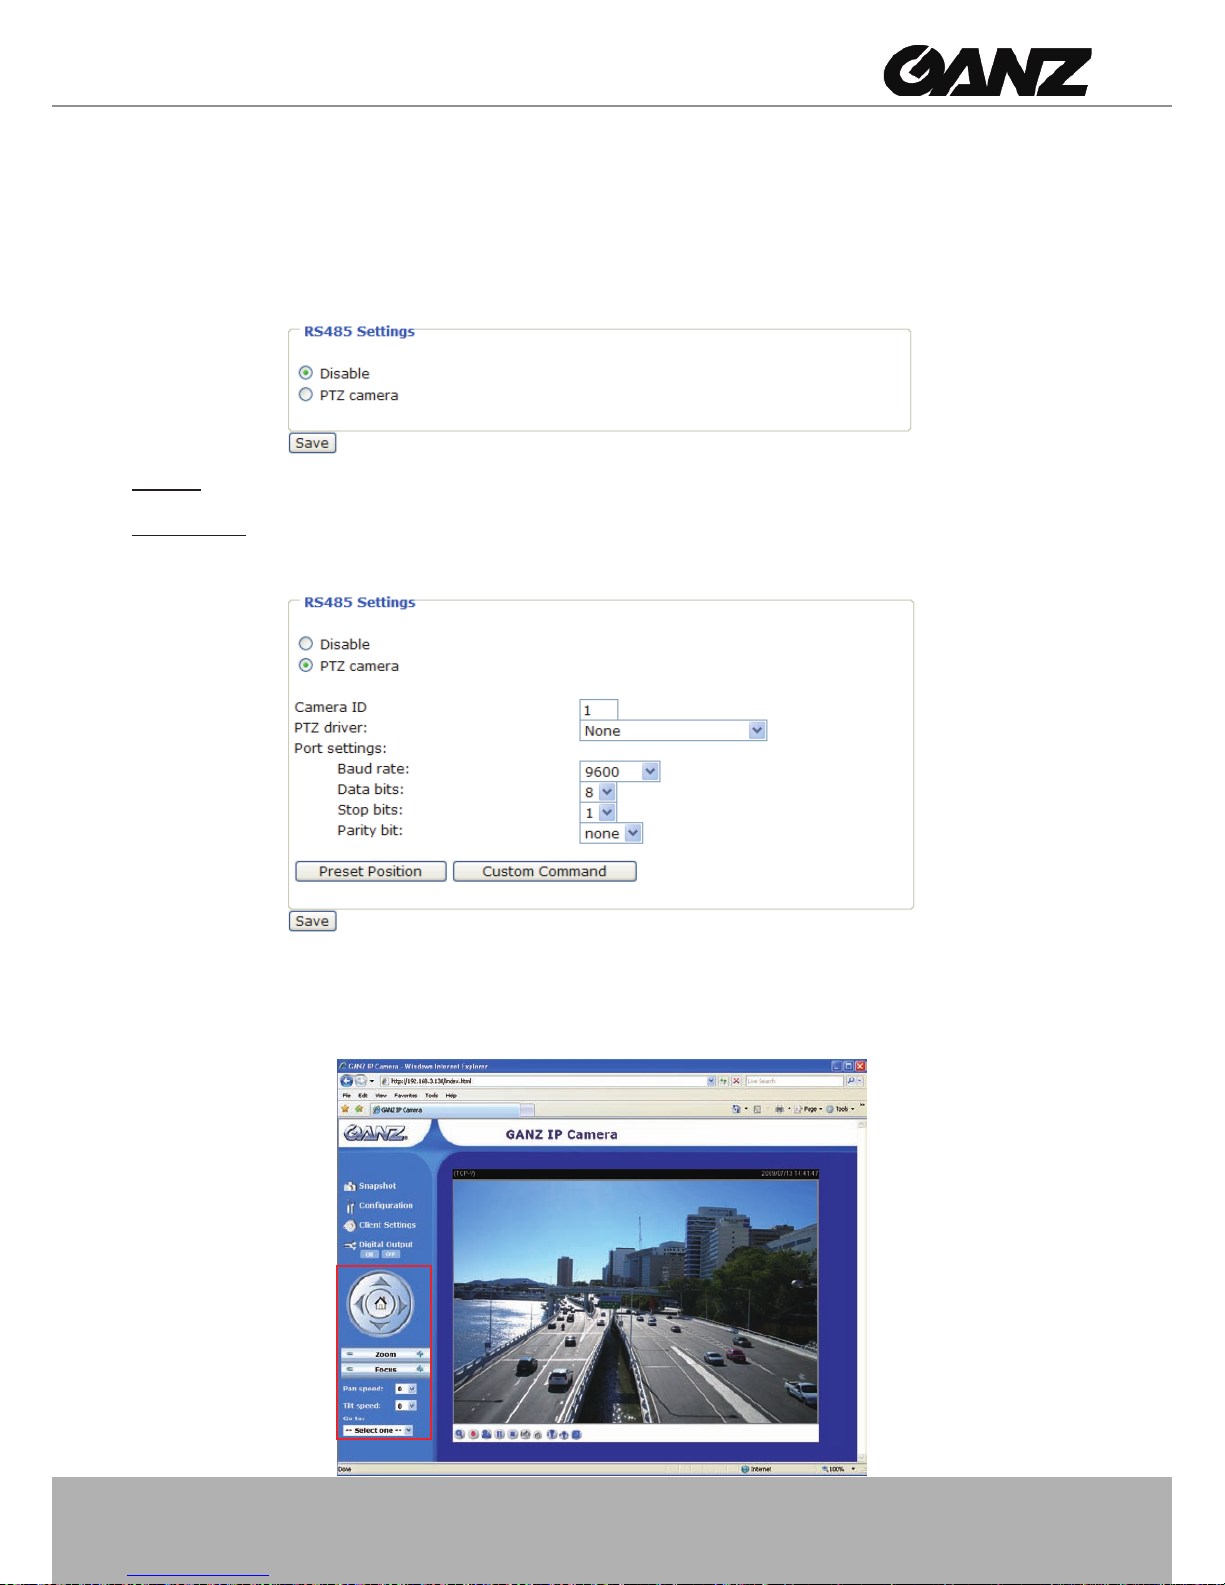
RS485 Settings
Disable: Select this option to disable this function�
PTZ camera: Select this option to enable PTZ operation�
To utilize this feature, please connect the Network Camera to a PTZ driver or scanner via RS485
interface rst. Then you can congure the PTZ driver and RS485 port with the following settings.
GANZ offers three PTZ drivers: DynaDome/SmartDOME, Lilin PIH-7x00, and Pelco D protocol� If none
of the above PTZ drivers is supported by your PTZ scanner, please select Custom camera (scanner)�
Please refer to the user’s manual of your PTZ scanner to determine the Camera ID, PTZ driver, and
Port settings� The Camera ID is necessary to control multiple cameras� If you click Save to enable this
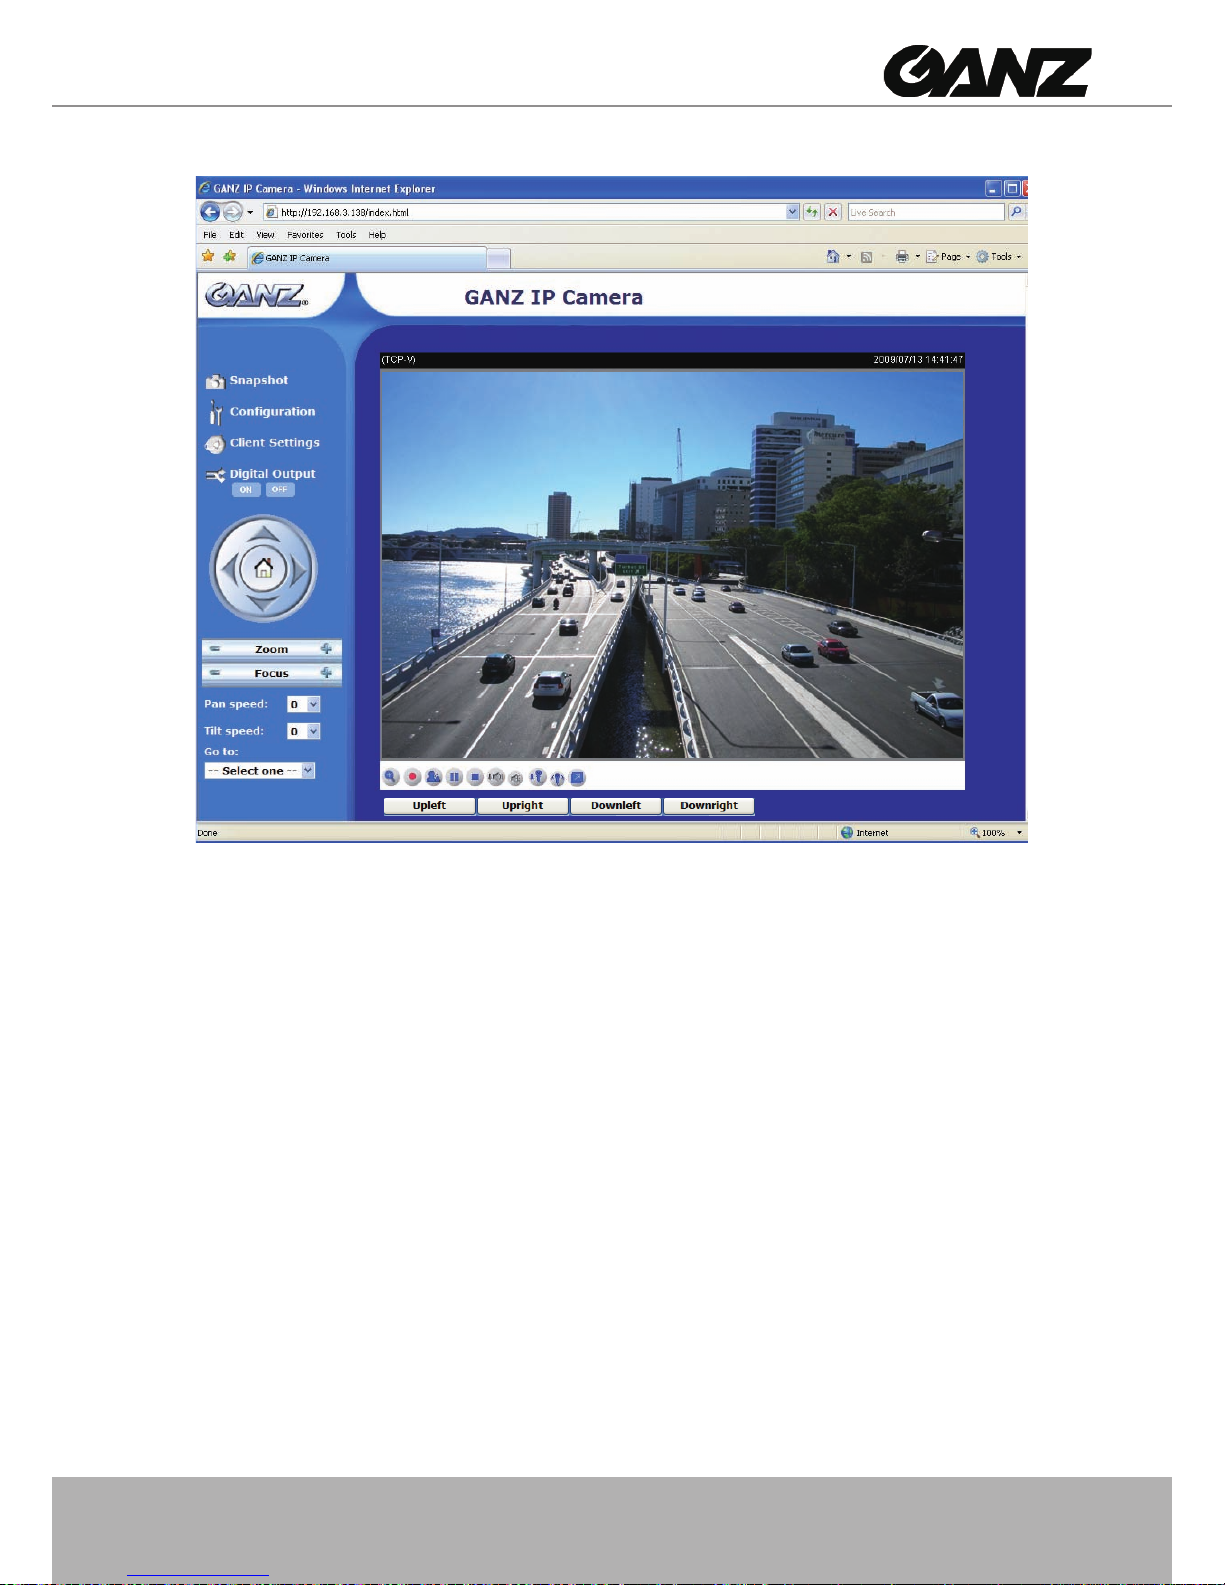
function, the camera control panel will be displayed on the home page:
Page 44
44 - User's Manual
Preset Position
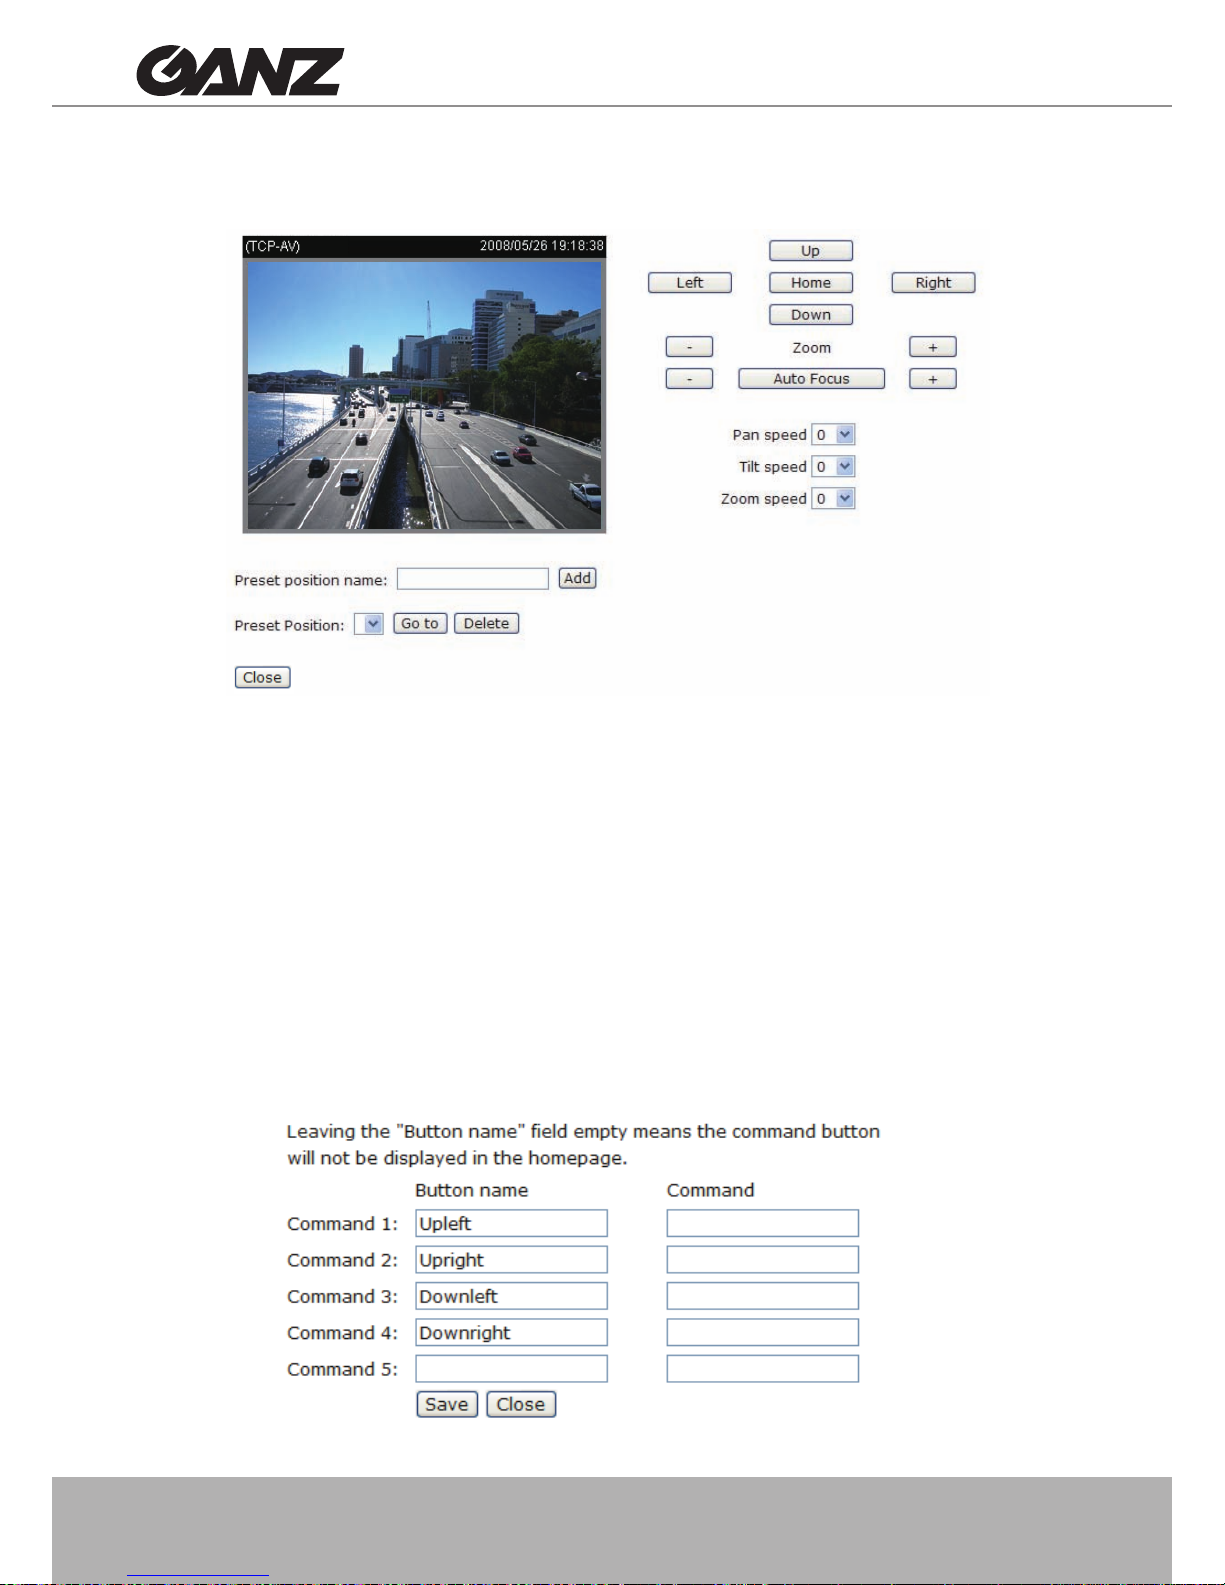
Click Preset Position to open the Preset Position page� You can also select preset positions for
the camera to patrol. A total of 20 preset positions can be congured.
Please follow the steps below to set preset positions:
1. Adjust the Network Camera to a desired position with the buttons on the right side of the window.
2� Enter a name for the preset position� The preset position name allows up to forty characters� Click Add
to enable the settings� The preset position name will appear in the Preset Positions drop-down list� To
remove a preset position from the list, select a preset position name from the drop-down list and click
Delete�
3� You can click “Go to” to aim at preset positions, which will also displayed on the home page�
4� Click Save to enable the settings�
Custom Command
If Custom Camera (scanner) is selected as the PTZ driver, the Preset Position and PTZ
Control Panel on the main page will be disabled. You will need to congure command buttons
to control the PTZ scanner� Click Custom Command to open the Custom Command page to
set the commands in the Control Settings session� Please refer to your PTZ scanner user's
manual to enter the commands in the following elds. Click Save to enable the settings and click
Close to exit the page�
Click Save to enable the settings and click Close to exit the page�
Page 45
User's Manual - 45
►The command buttons will be displayed on the main page:
Page 46
46 - User's Manual
Application
This section explains how to congure the Network Camera to responds to particular situations
(event)� A typical application is that when a motion is detected, the Network Camera sends
buffered images to an FTP server or e-mail address as notications.
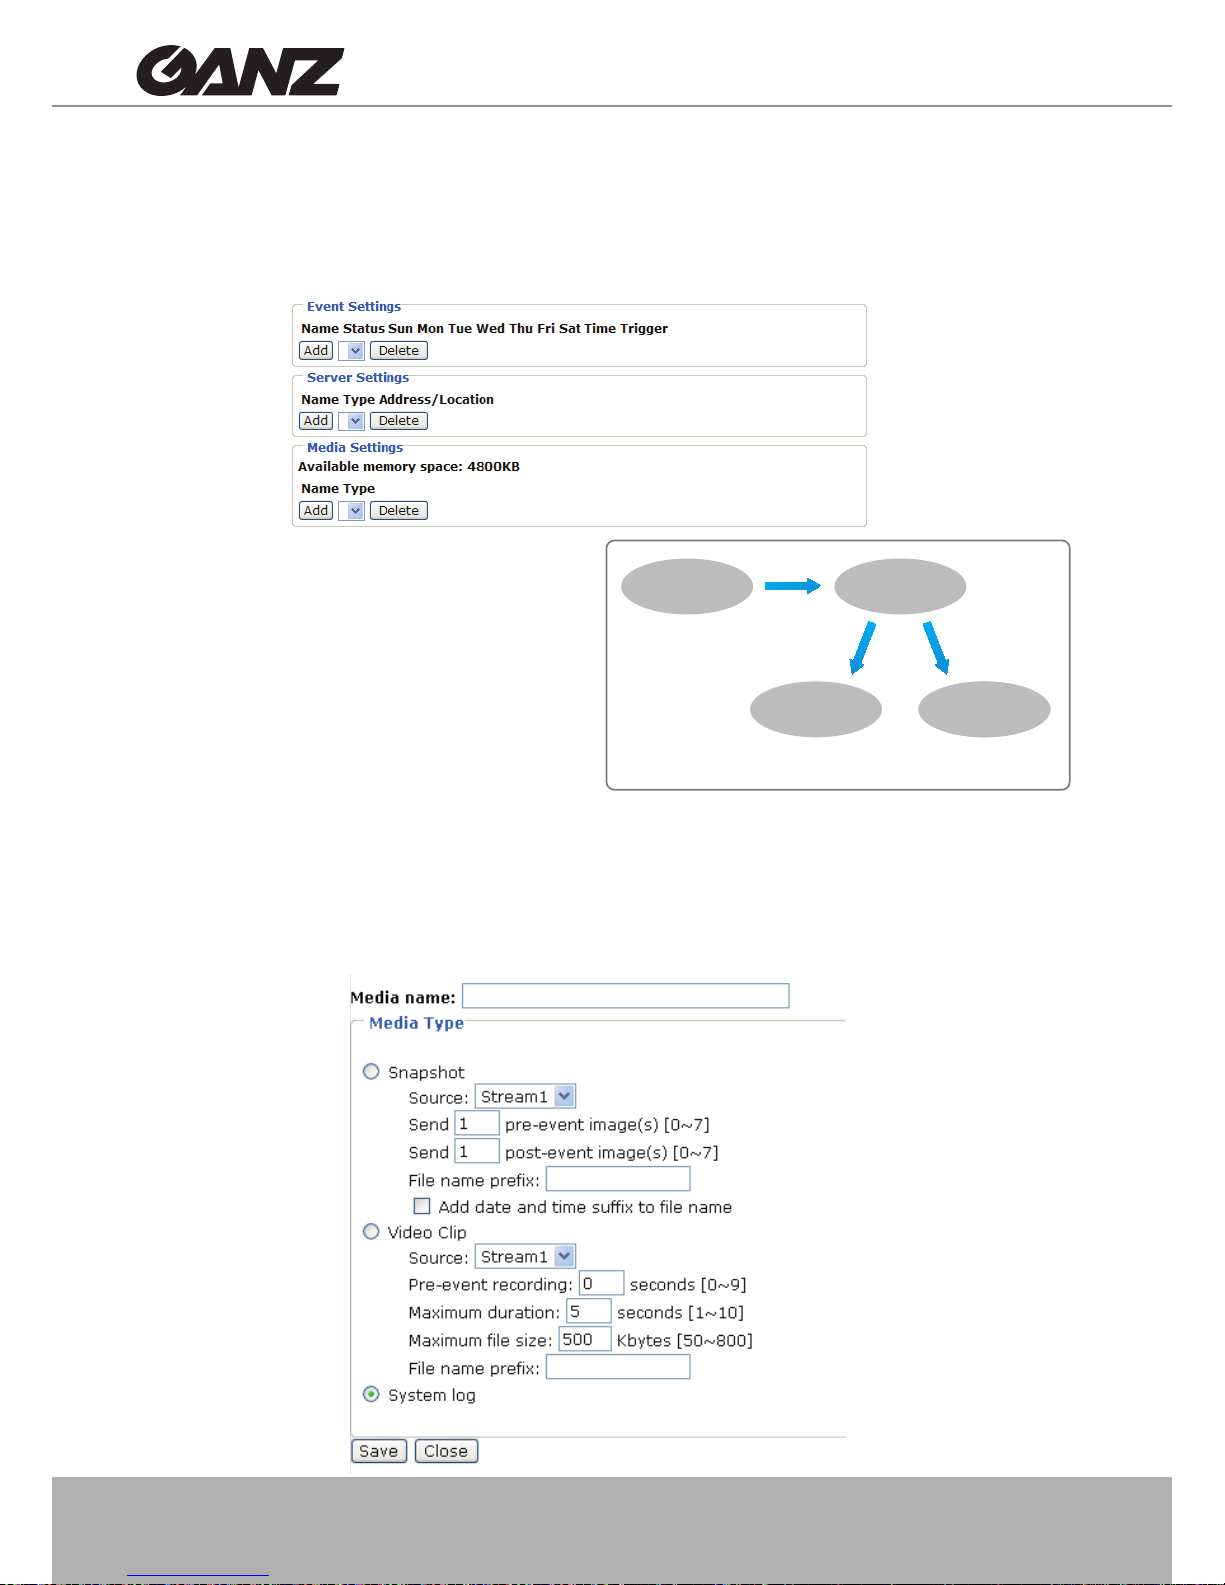
To start plotting an event, it is suggested to congure server and media columns rst so that the
Network Camera will know what action shall be performed when a trigger is activated�
Media Settings
In Media Settings column, click Add to open the media setting page� On this page, you can
specify the type of media that will be sent when a trigger is activated� A total of 5 media settings
can be congured.
ex. Motion Detection,
Digital Input,
System Reboot
Event Trigger
ex. Snapshot, Video Clips,
System Log, Digital Output
ex. Email, FTP, HTTP Server,
Network Storage
Media
(what to send)
Server
(where to send)
Action
In the illustration on the right, an event can
be triggered by many sources, such as
motion detection or external digital input
devices� When an event is triggered, you
can specify what type of action that will be
performed� You can configure the Network
Camera to send snapshots or videos to your
email address or FTP site�
Page 47
User's Manual - 47
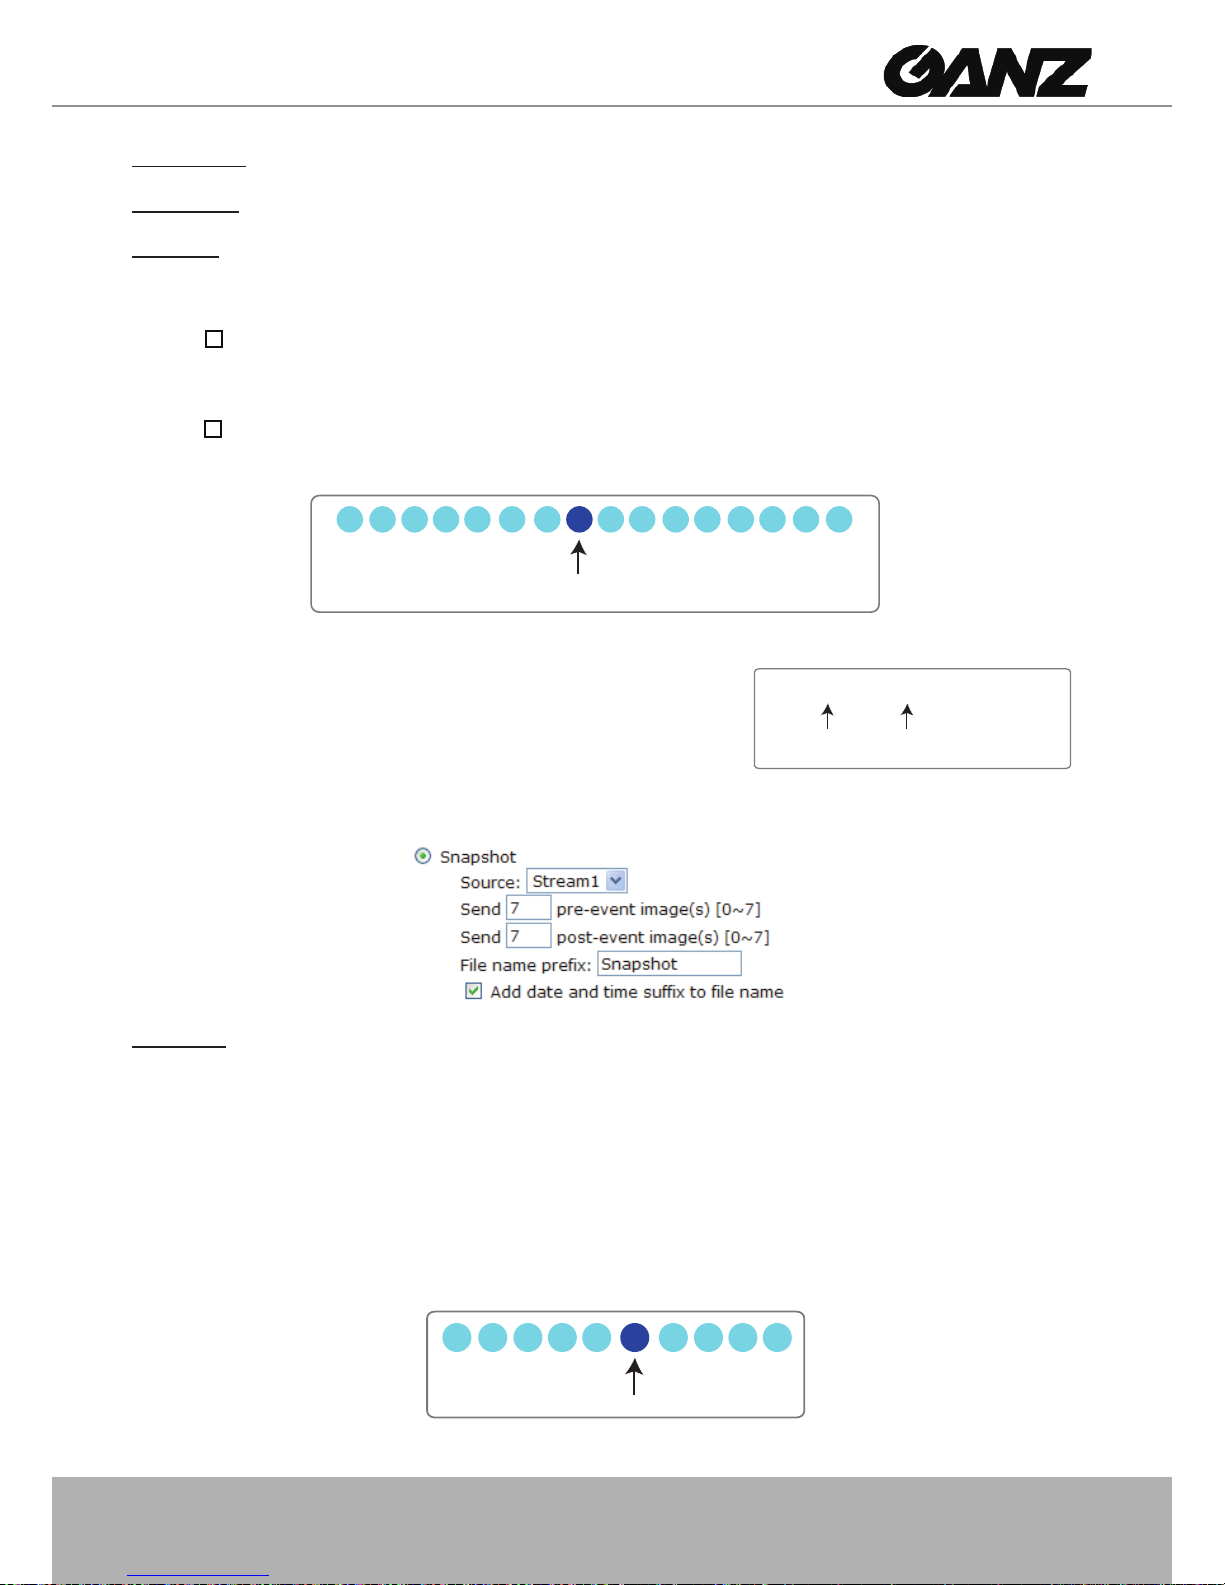
Media name: Enter a name for the media setting�
Media Type: There are three choices of media types available: Snapshot, Video Clip, and System log�
Snapshot: Select to send snapshots when a trigger is activated�
■ Source: Select to take snapshots from stream 1 or stream 2.
■ Send pre-event images
The Network Camera has a buffer area; it temporarily holds data up to a certain limit� Enter a number
to decide how many images to capture before a trigger is activated� Up to 7 images can be generated�
■ Send
post-event images
Enter a number to decide how many images to capture after a trigger is activated� Up to 7 images can
be generated�
■ File name prex
Enter the text that will be appended to the front of the le name.
■ Add date and time sufx to the le name
Select this option to add a date/time sufx to the le name.
For example, if both the Send pre-event images and Send post-event images are set to 7, a total of 15
images are generated after a trigger is activated�
Video Clip: Select to send video clips when a trigger is activated�
■ Source: Select to record video clips from stream 1 or stream 2.
■ Pre-event recording
The Network Camera has a buffer area; it temporarily holds data up to a certain limit� Enter a number
to decide the duration of recording before a trigger is activated� Up to 9 seconds can be set�
■ Maximum duration
Specify the maximum recording duration in seconds� Up to 10 seconds can be set�
For example, if pre-event recording is set to five seconds and the maximum duration is set to ten
seconds, the Network Camera continues to record for another 4 seconds after a trigger is activated�
1 pic. 2 pic. 3 pic. 4 pic. 5 pic. 6 pic. 7 pic. 8 pic. 9 pic.
10 pic. 11 pic. 10 pic. 12 pic. 13 pic. 14 pic. 15 pic.
The moment the trigger
is activated.
Snapshot20080104_100341
Date and time suffix
The format is: YYYYMMDD_HHMMSS
File name prefix
1 sec. 2 sec. 3 sec. 4 sec. 5 sec. 6 sec. 7 sec. 8 sec. 9 sec. 10 sec.
Trigger Activation
Page 48
48 - User's Manual
■ Maximum le size
Specify the maximum le size allowed.
■ File name prex
Enter the text that will be appended to the front of the le name.
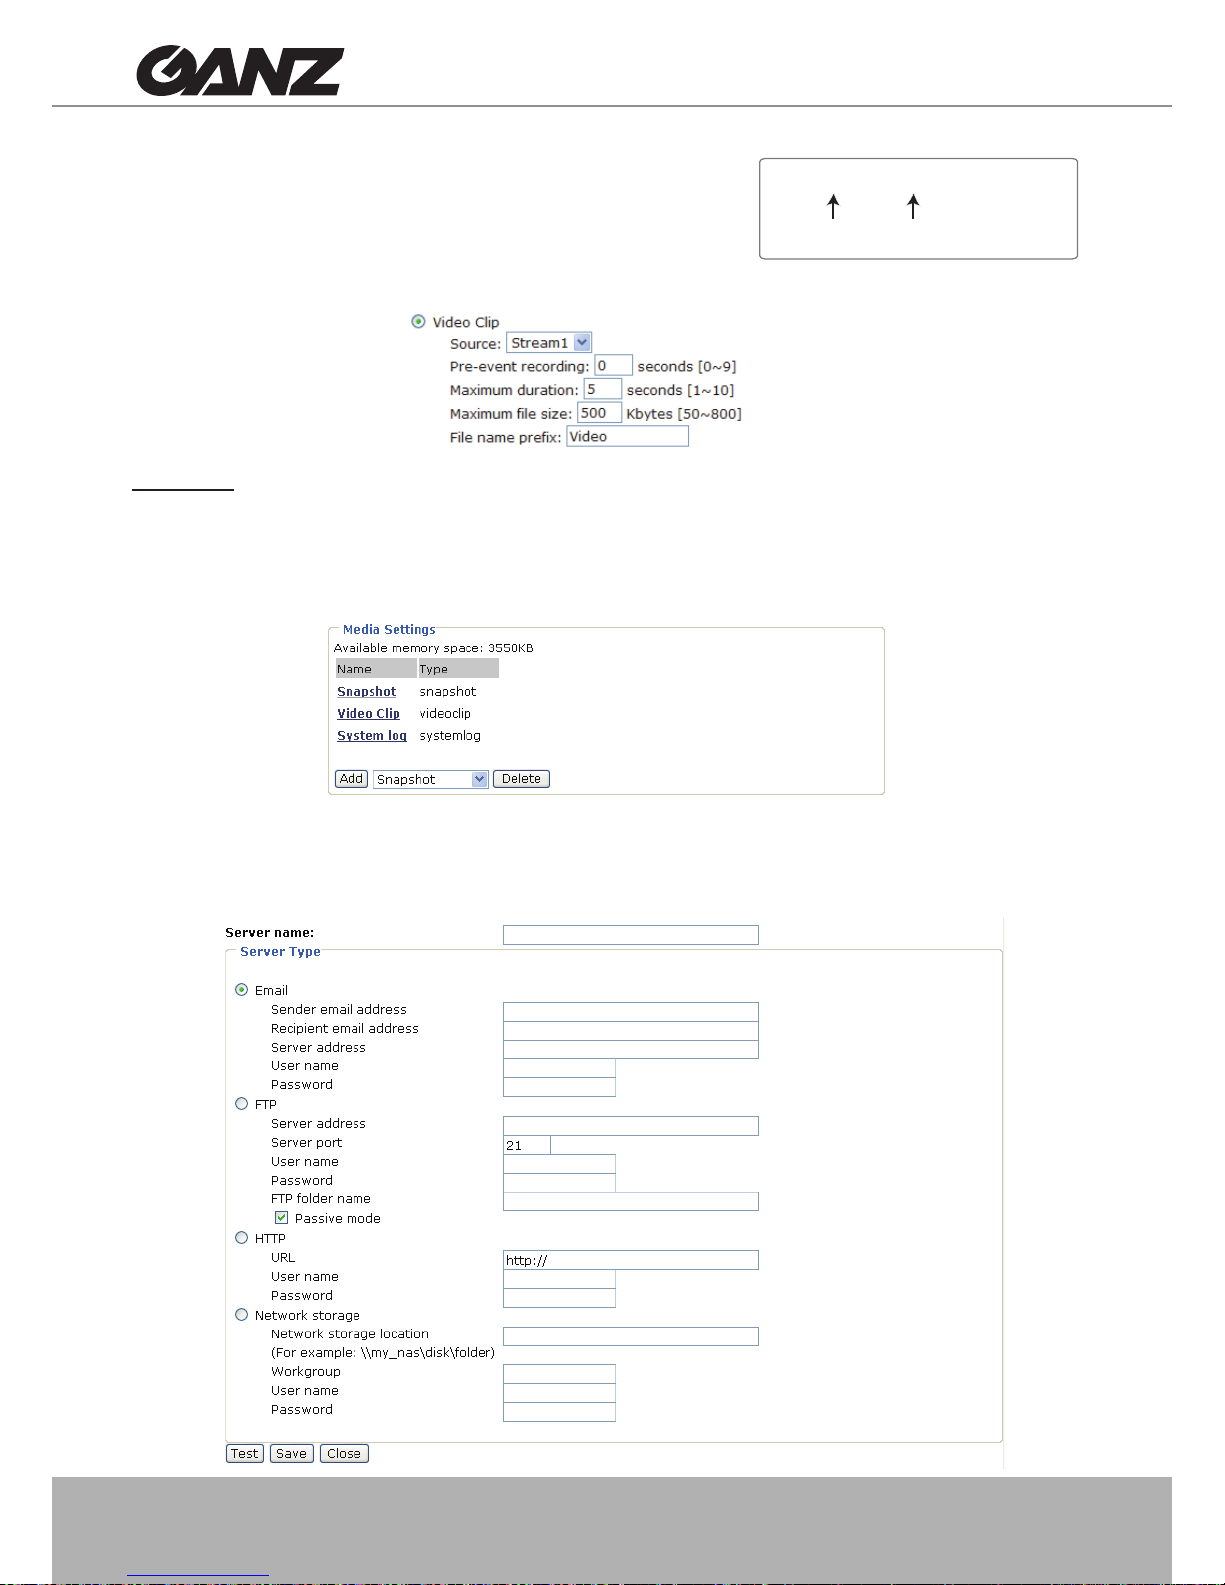
For example:
System log: Select to send a system log when a trigger is activated�
When completed, click Save to enable the settings then click Close to exit this page� The new media
name will appear in the media drop-down list on the Application page as below� To remove a media
setting from the list, select a media name from the drop-down list then click Delete� Note that only when
the media setting is not being applied to an event setting can it be deleted�
Server Settings
In the Server column, click Add to open the server setting page� On this page, you can specify
where the notication messages are sent when a trigger is activated. A total of 5 server settings
can be congured.
Video20080104_100341
Date and time suffix
The format is: YYYYMMDD_HHMMSS
File name prefix
Page 49
User's Manual - 49
Server name: Enter a name for the server setting�
Server Type: There are four choices of server types available: Email, FTP, HTTP, and Network storage�
Email: Select to send the media via email when a trigger is activated�
■ Sender email address: Enter the email address of the sender.
■ Recipient email address: Enter the email address of the recipient.
■ Server address: Enter the domain name or IP address of the email server.
■ User name: Enter the user name of the email account if necessary.
■ Password: Enter the password of the email account if necessary.
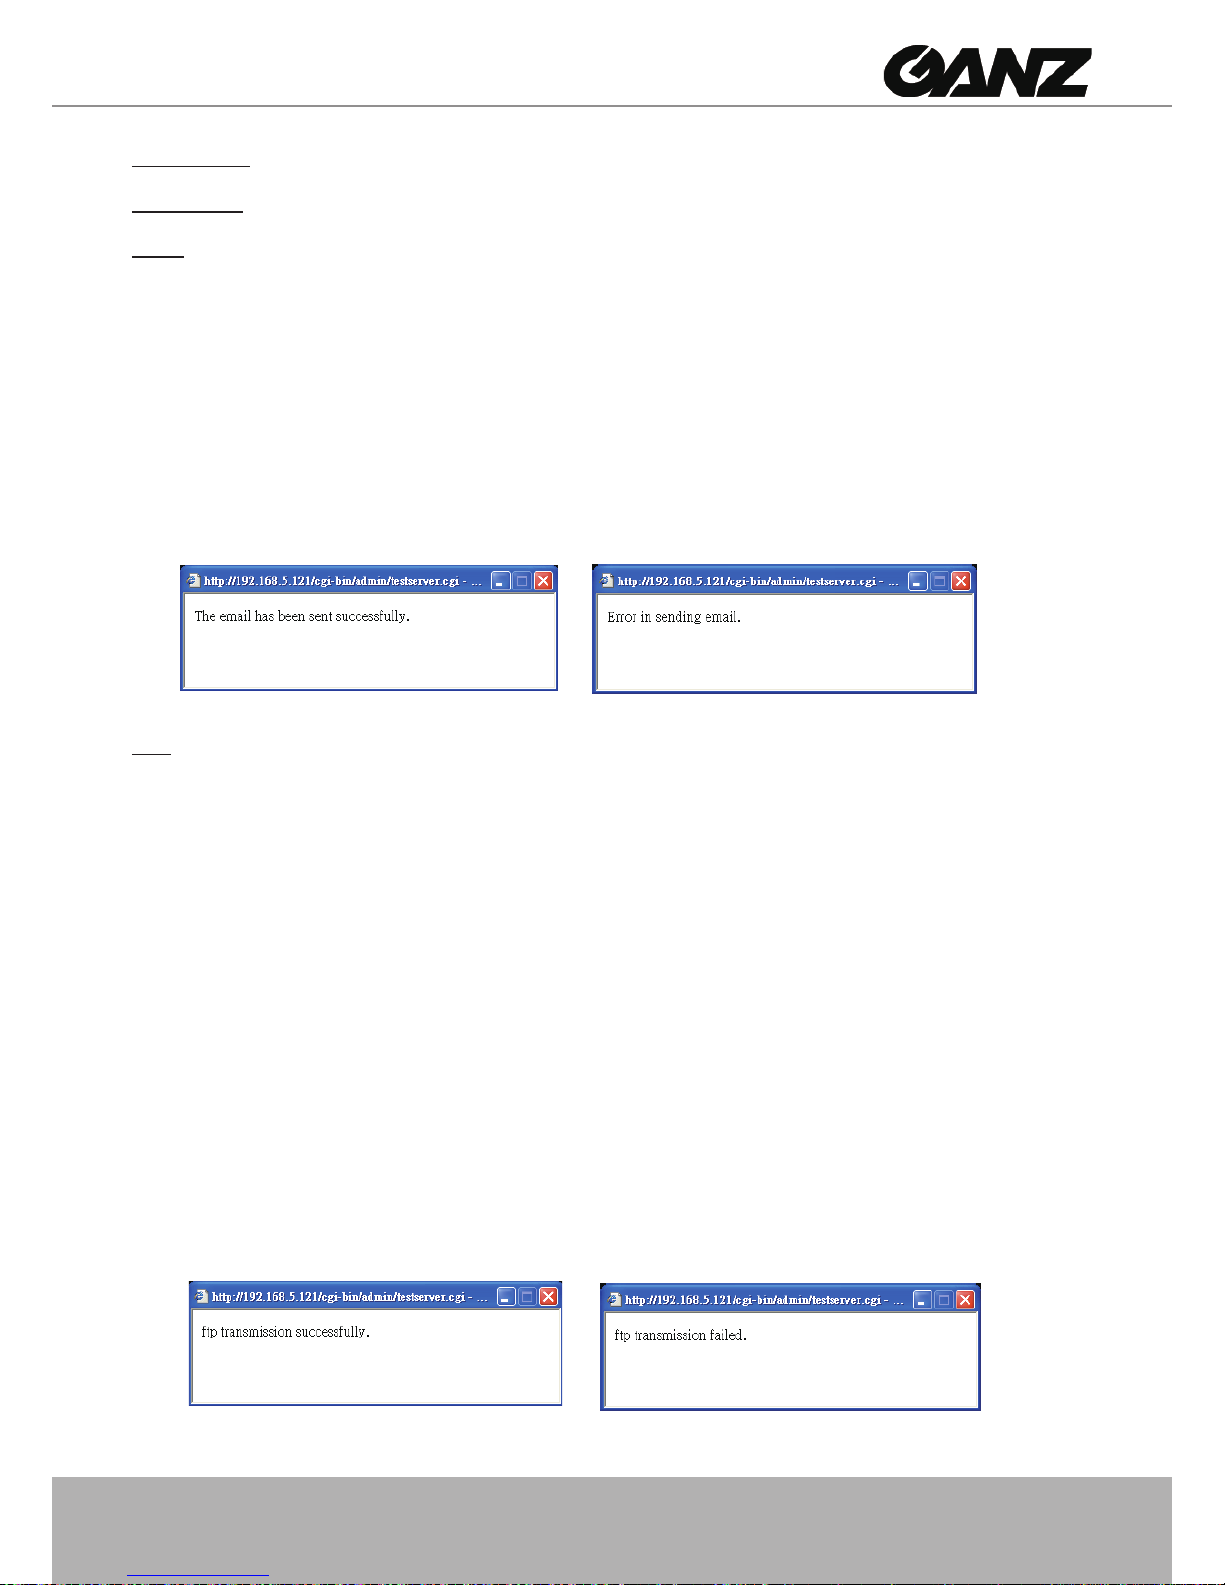
To verify if the email settings are correctly congured, click Test� The result will be shown in a pop-up
window� If successful, you will also receive an email indicating the result�
FTP: Select to send the media les to an FTP server when a trigger is activated.
■ Server address: Enter the domain name or IP address of the FTP server.
■ Server port
By default, the FTP server port is set to 21� It can also be assigned to another port number between
1025 and 65535�
■ User name: Enter the login name of the FTP account.
■ Password: Enter the password of the FTP account.
■ Remote folder name
Enter the folder where the media le will be placed. If the folder name does not exist, the Network
Camera will create one on the FTP server�
■ Passive mode
Most firewalls do not accept new connections initiated from external requests� If the FTP server
supports passive mode, select this option to enable passive mode FTP and allow data transmission to
pass through the rewall.
To verify if the FTP settings are correctly congured, click Test� The result will be shown in a pop-up
window as shown below. If successful, you will also receive a test.txt le on the FTP server.
Page 50
50 - User's Manual
HTTP: Select to send the media les to an HTTP server when a trigger is activated.
■ URL: Enter the URL of the HTTP server.
■ User name: Enter the user name if necessary.
■ Password: Enter the password if necessary.
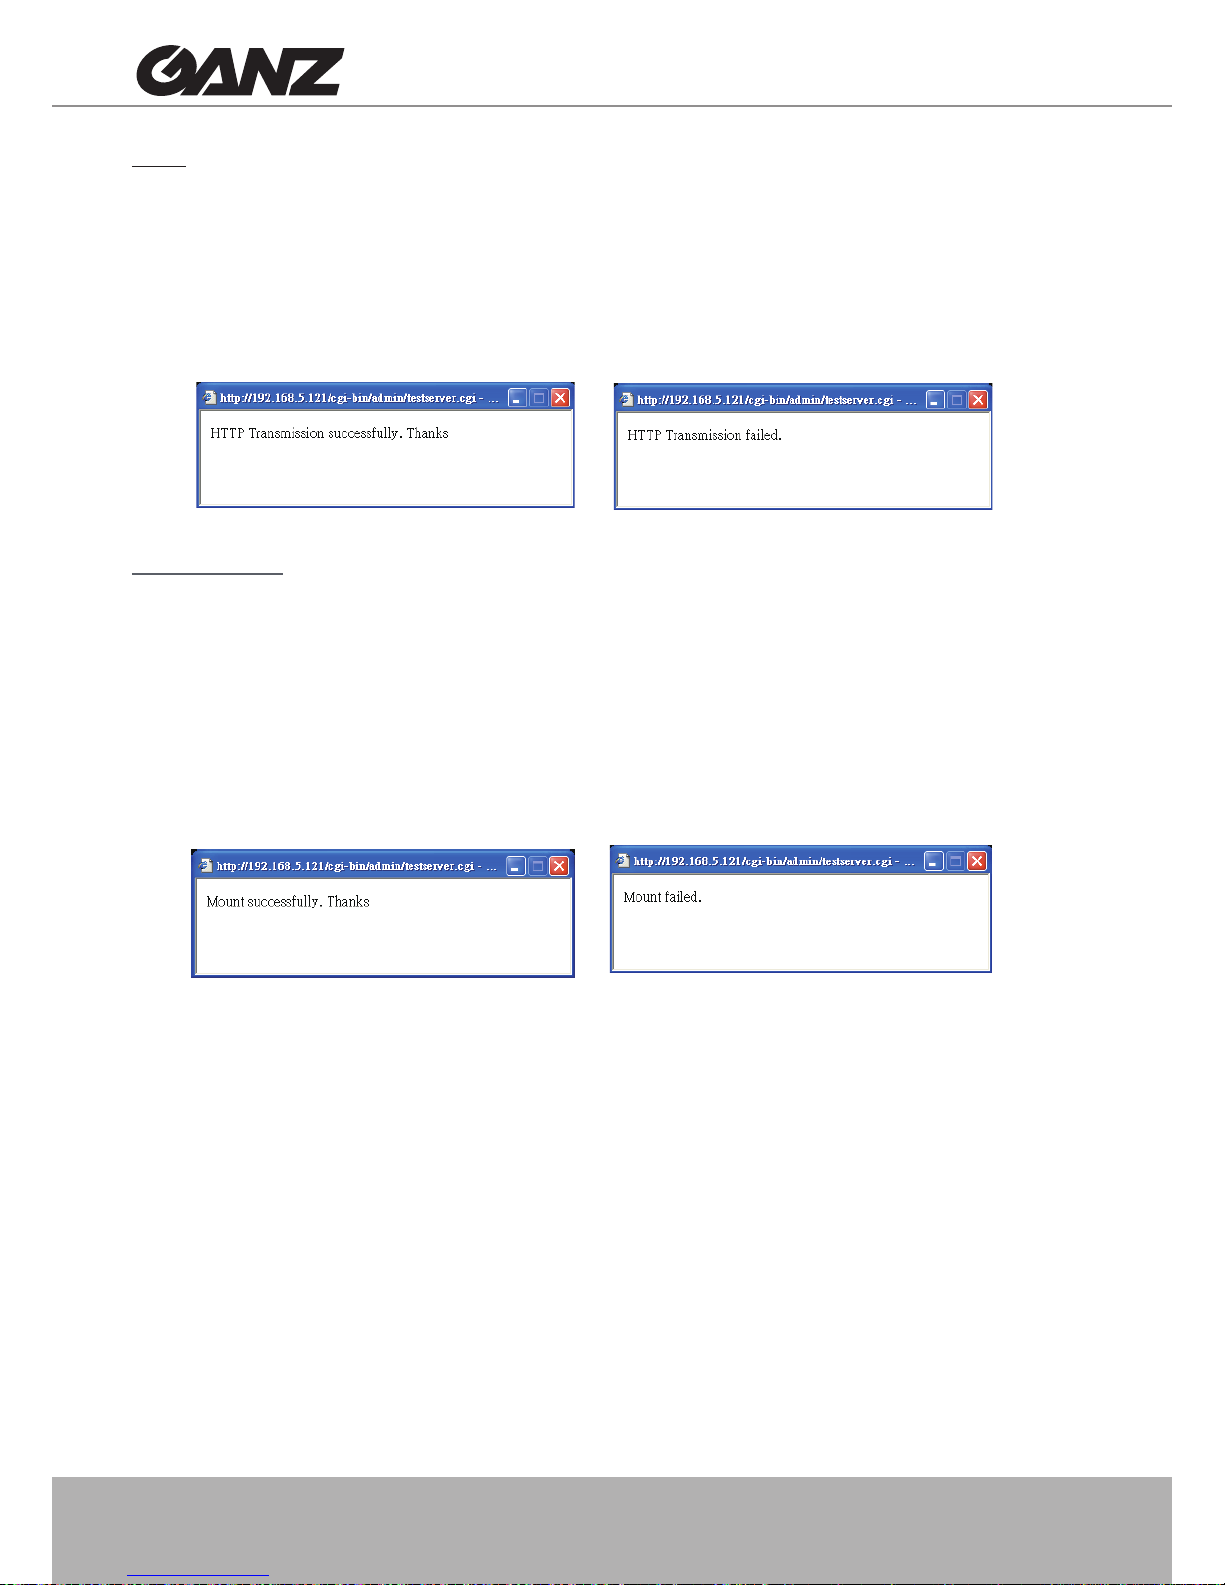
To verify if the HTTP settings are correctly congured, click Test� The result will be shown in a pop-up
window as below. If successful, you will receive a test.txt le on the HTTP server.
Network storage: Select to send the media les to a network storage location when a trigger is activated.
■ Network storage location: Enter the path of the network storage.
■ Workgroup: Enter the workgroup for network storage.
■ User name: Enter the user name.
■ Password: Enter the password.
To verify if the network storage settings are correctly congured, click Test� The result will be shown in a
pop-up window. If successful, you will receive a test.txt le on the network storage server.
When completed, click Save to enable the settings then click Close to exit this page� The new server
name will be displayed on the list on the application page� To remove a server setting from the list, select
a server name from the list and click Delete� Note that only when the server setting is not being applied
to an event setting can it be deleted�
Page 51
User's Manual - 51
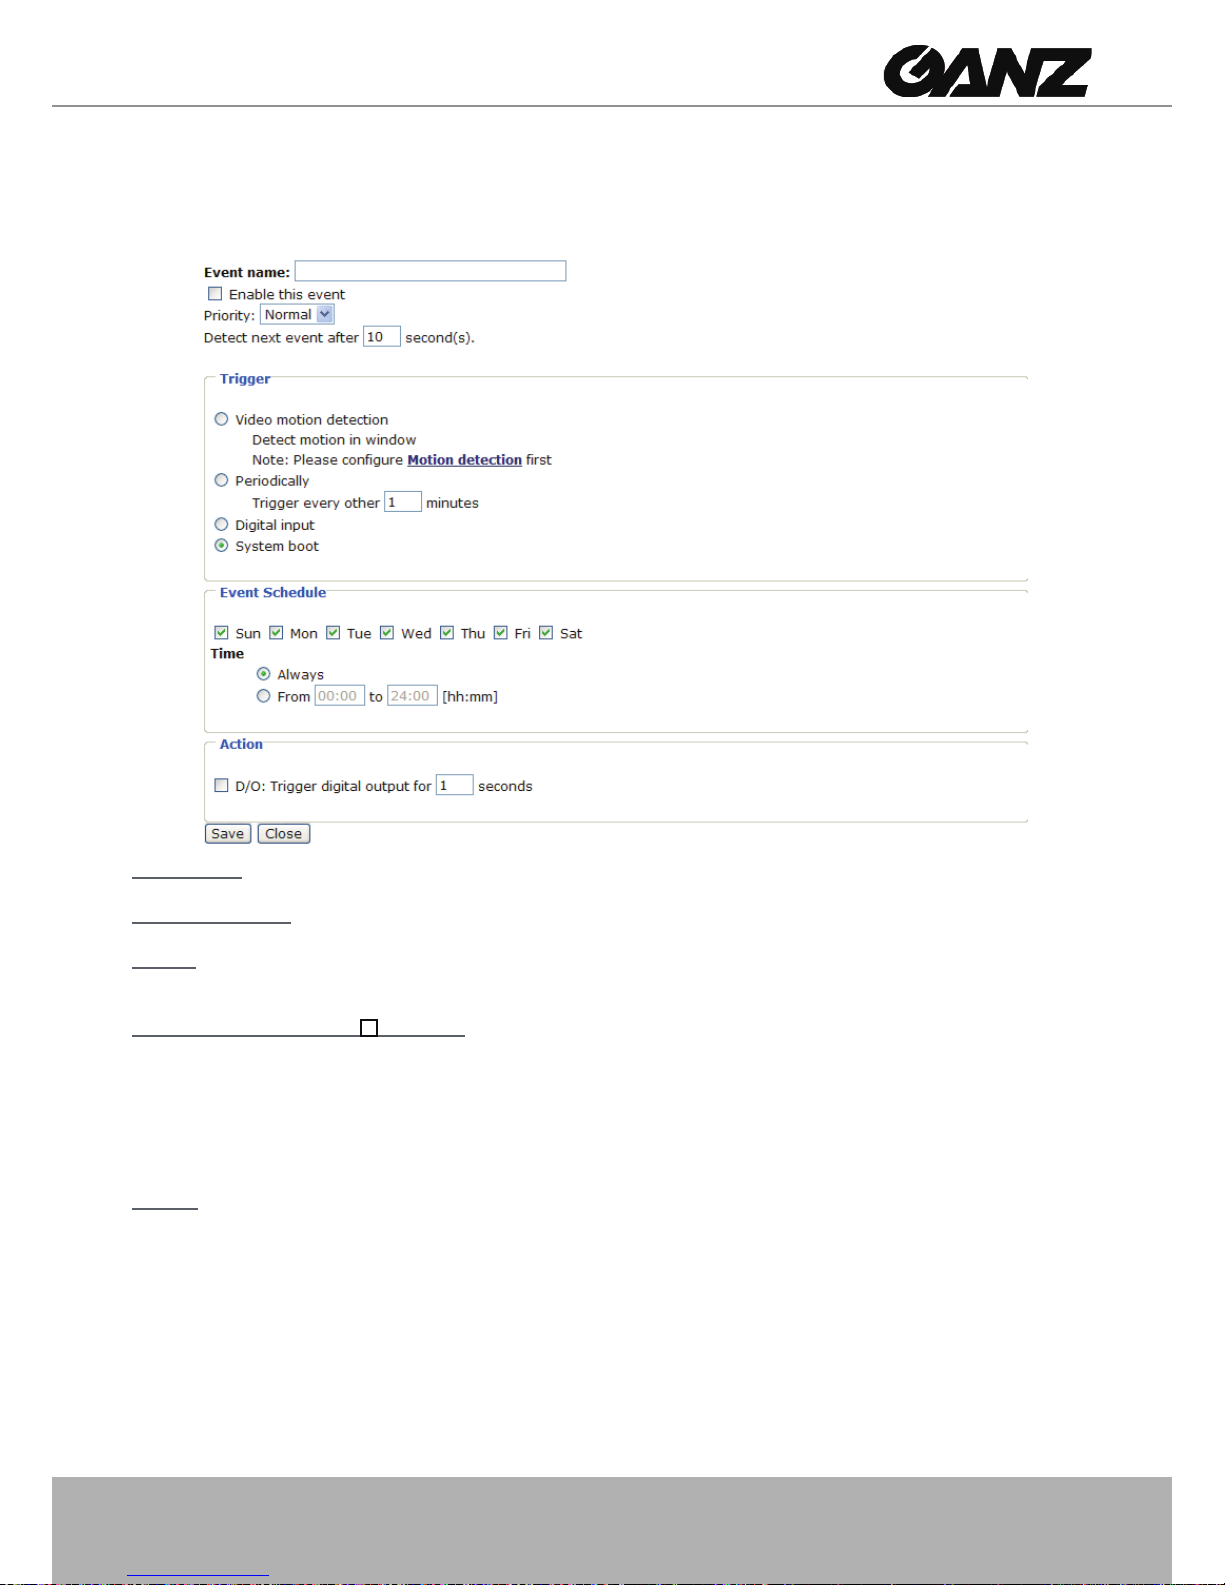
Event Settings
In the Event column, click Add to open the event setting page� On this page, you can arrange
the three elements -- Trigger, Schedule, and Action to set an event� A total of 3 event settings
can be congured.
Event name: Enter a name for the event setting�
Enable this event: Select this option to enable the event setting�
Priority: Select the relative importance of this event (High, Normal, or Low)� Events with a higher priority
setting will be executed rst.
Detect next event after
seconds: Enter the duration in seconds to pause motion detection after a
motion is detected�
An event is an action initiated by a user-dened trigger source; it is the causal arrangement of
the following three elements: Trigger, Event Schedule, and Action�
Trigger: This is the cause or stimulus which denes when to trigger the Network Camera. The trigger
source can be congured to use the Network Camera’s built-in motion detection mechanism or external
digital input devices� There are several choices of trigger sources as shown below:
■ Video motion detection
This option makes use of the built-in motion detection mechanism as a trigger source� To enable this
function, you need to congure a Motion Detection Window rst. For more information, please refer to
Motion detection on page 41 for details�
■ Periodically
This option allows the Network Camera to trigger periodically for every other dened minute. Up to 999
minutes are allowed�
Page 52
52 - User's Manual
■ Digital input
This option allows the Network Camera to use an external digital input device or sensor as a trigger
source� Depending on your application, there are many choices of digital input devices on the market
which helps to detect changes in temperature, vibration, sound, and light, etc�
■ System boot
This option triggers the Network Camera when the power to the Network Camera is disconnected�
Event Schedule: The effective period in which the event stays active� Specify the effective period for the
event�
■ Select the days on weekly basis.
■ Select the time for recording in 24-hr time format.
Action: Dene the actions to be performed by the Network Camera when a trigger is activated.
■ Trigger D/O for
seconds
Select this option to turn on the external digital output device when a trigger is activated� Specify the
length of the trigger interval in the text box�
■
Server name / Media name
Select the server and media name to allow the Network Camera to send the media files to the server
when a trigger is activated�
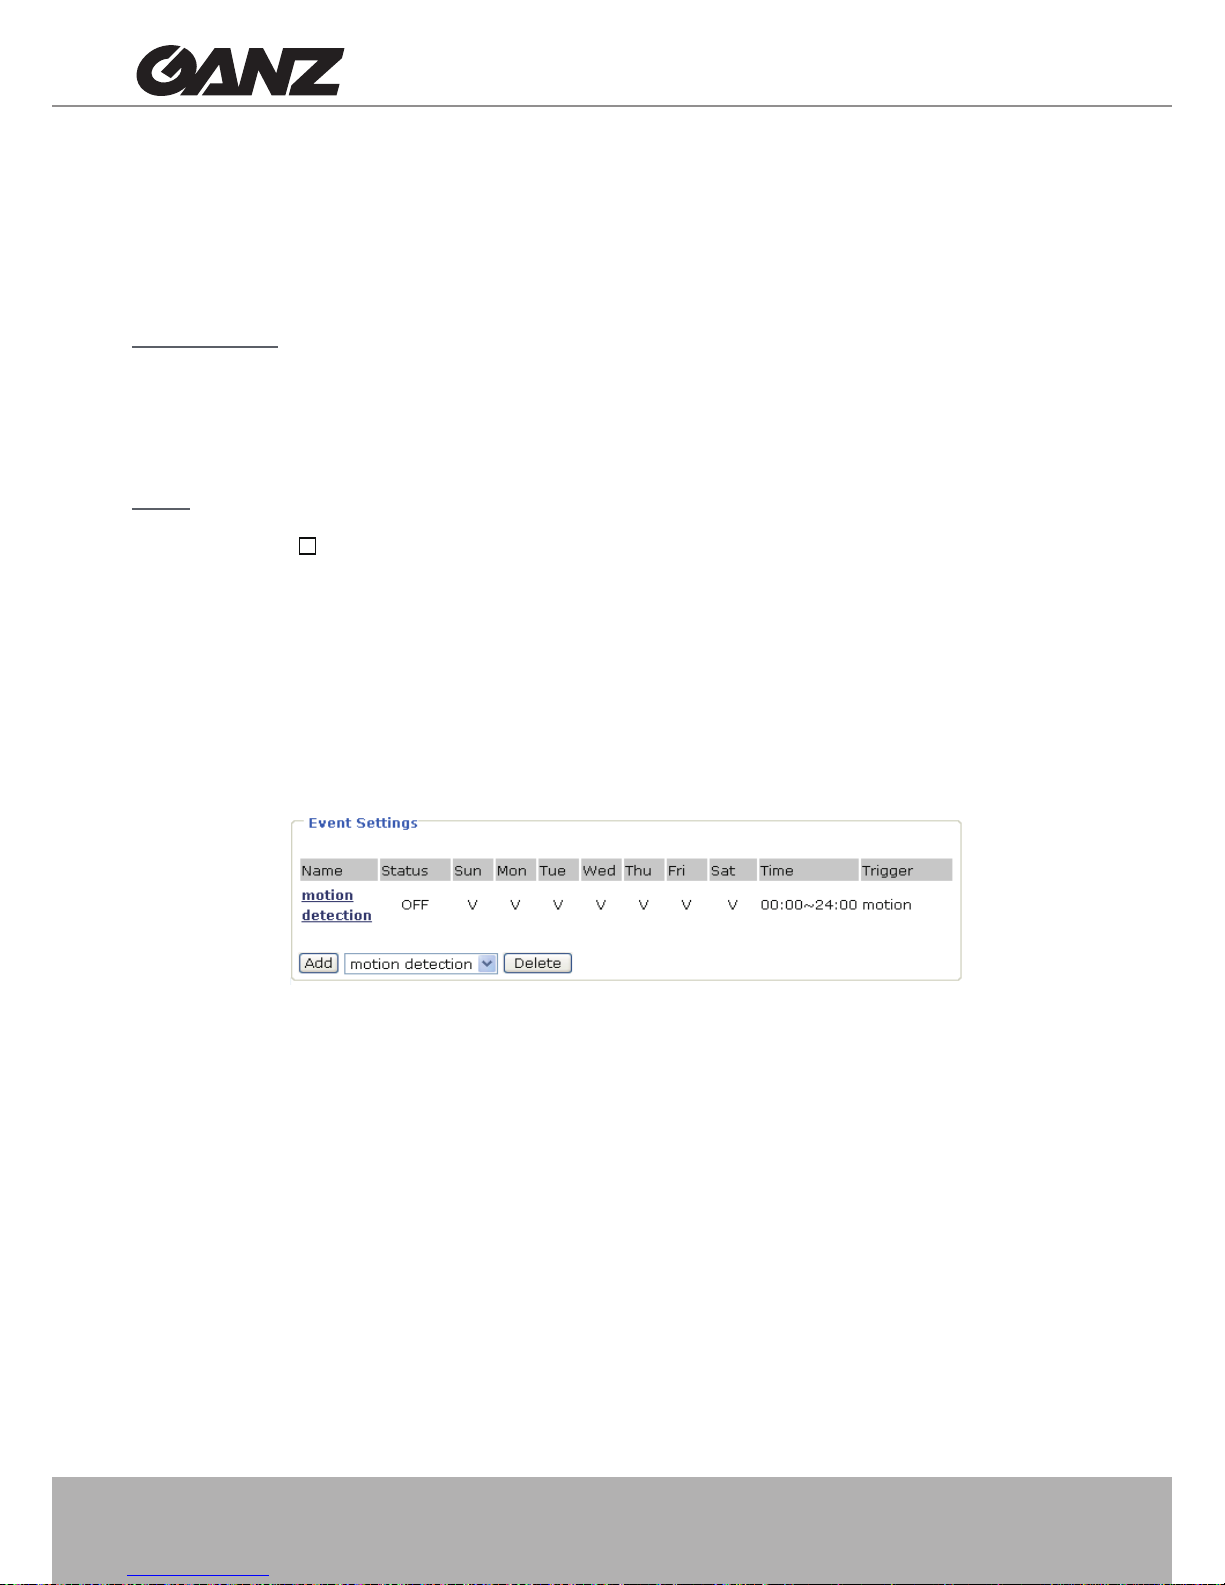
When completed, select Enable this event� Click Save to enable the settings and then click Close to
exit this page� The new event name will appear in the event drop-down list on the Application page� To
remove an event setting from the list, select an event name then click Delete�
Page 53
User's Manual - 53
Recording
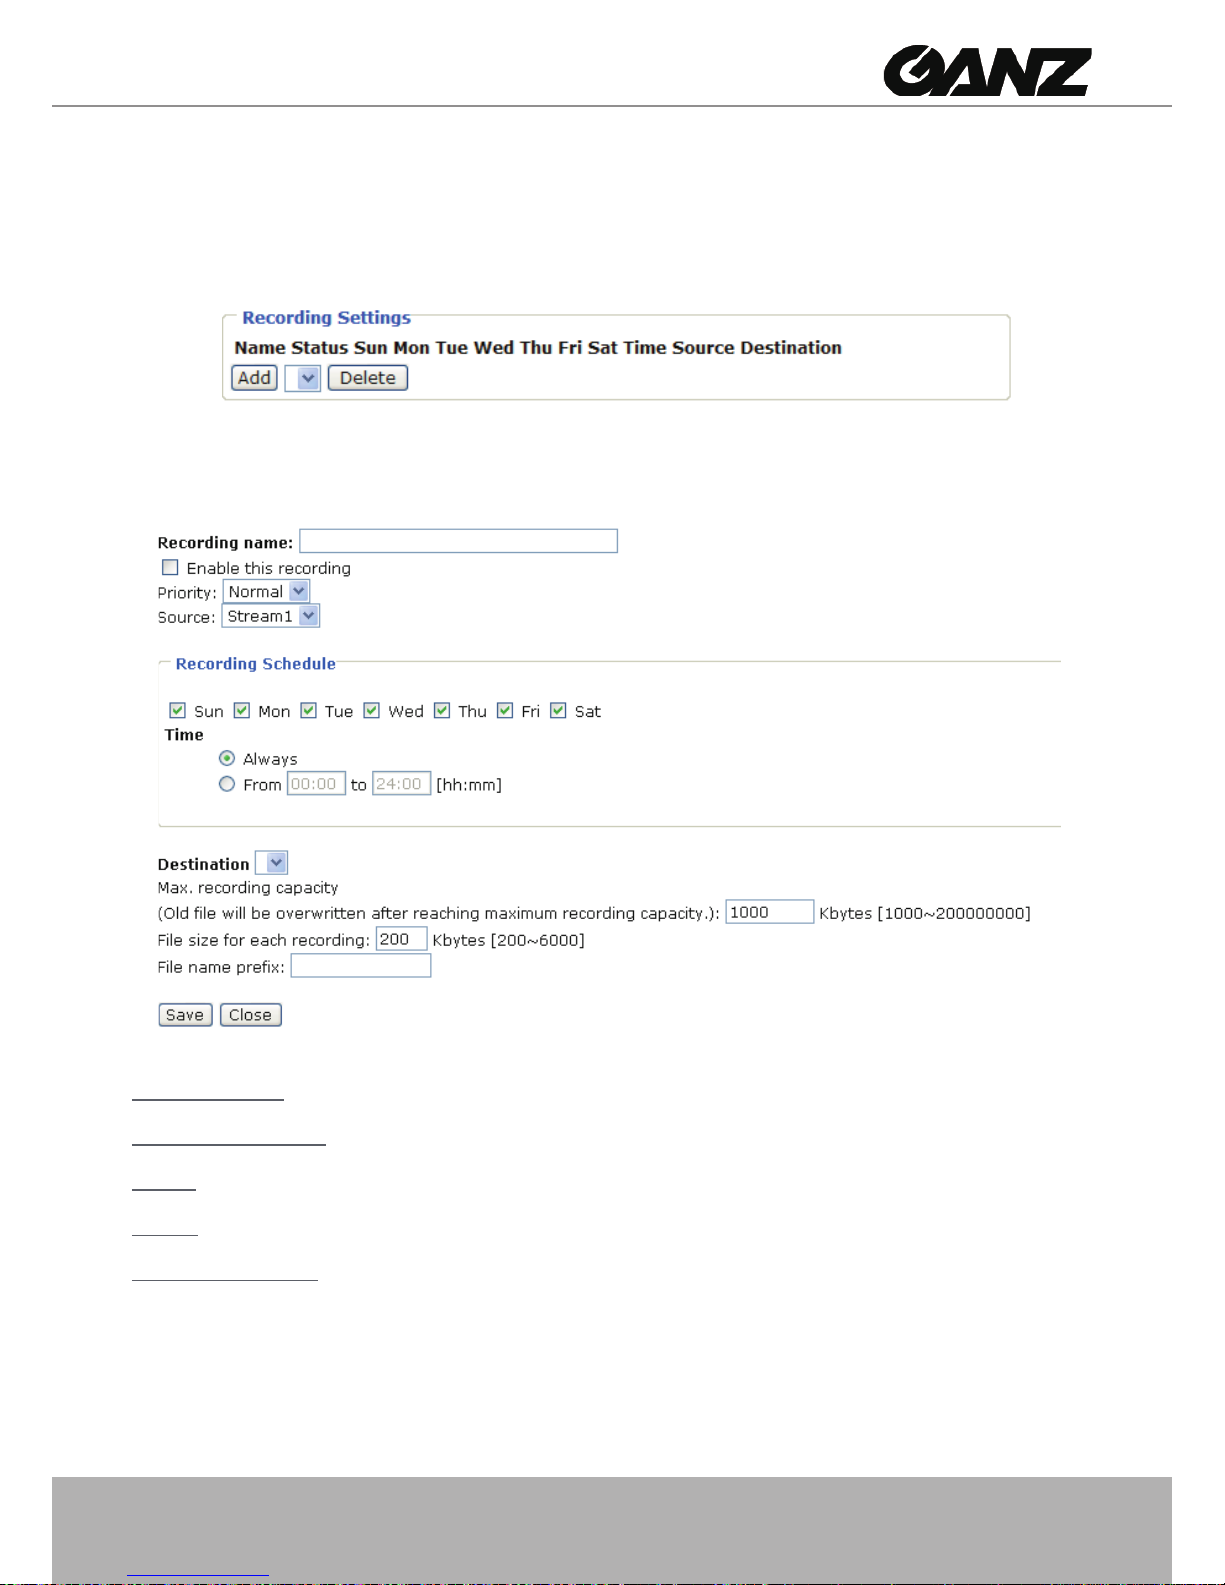
This section explains how to congure the recording settings for the Network Camera.
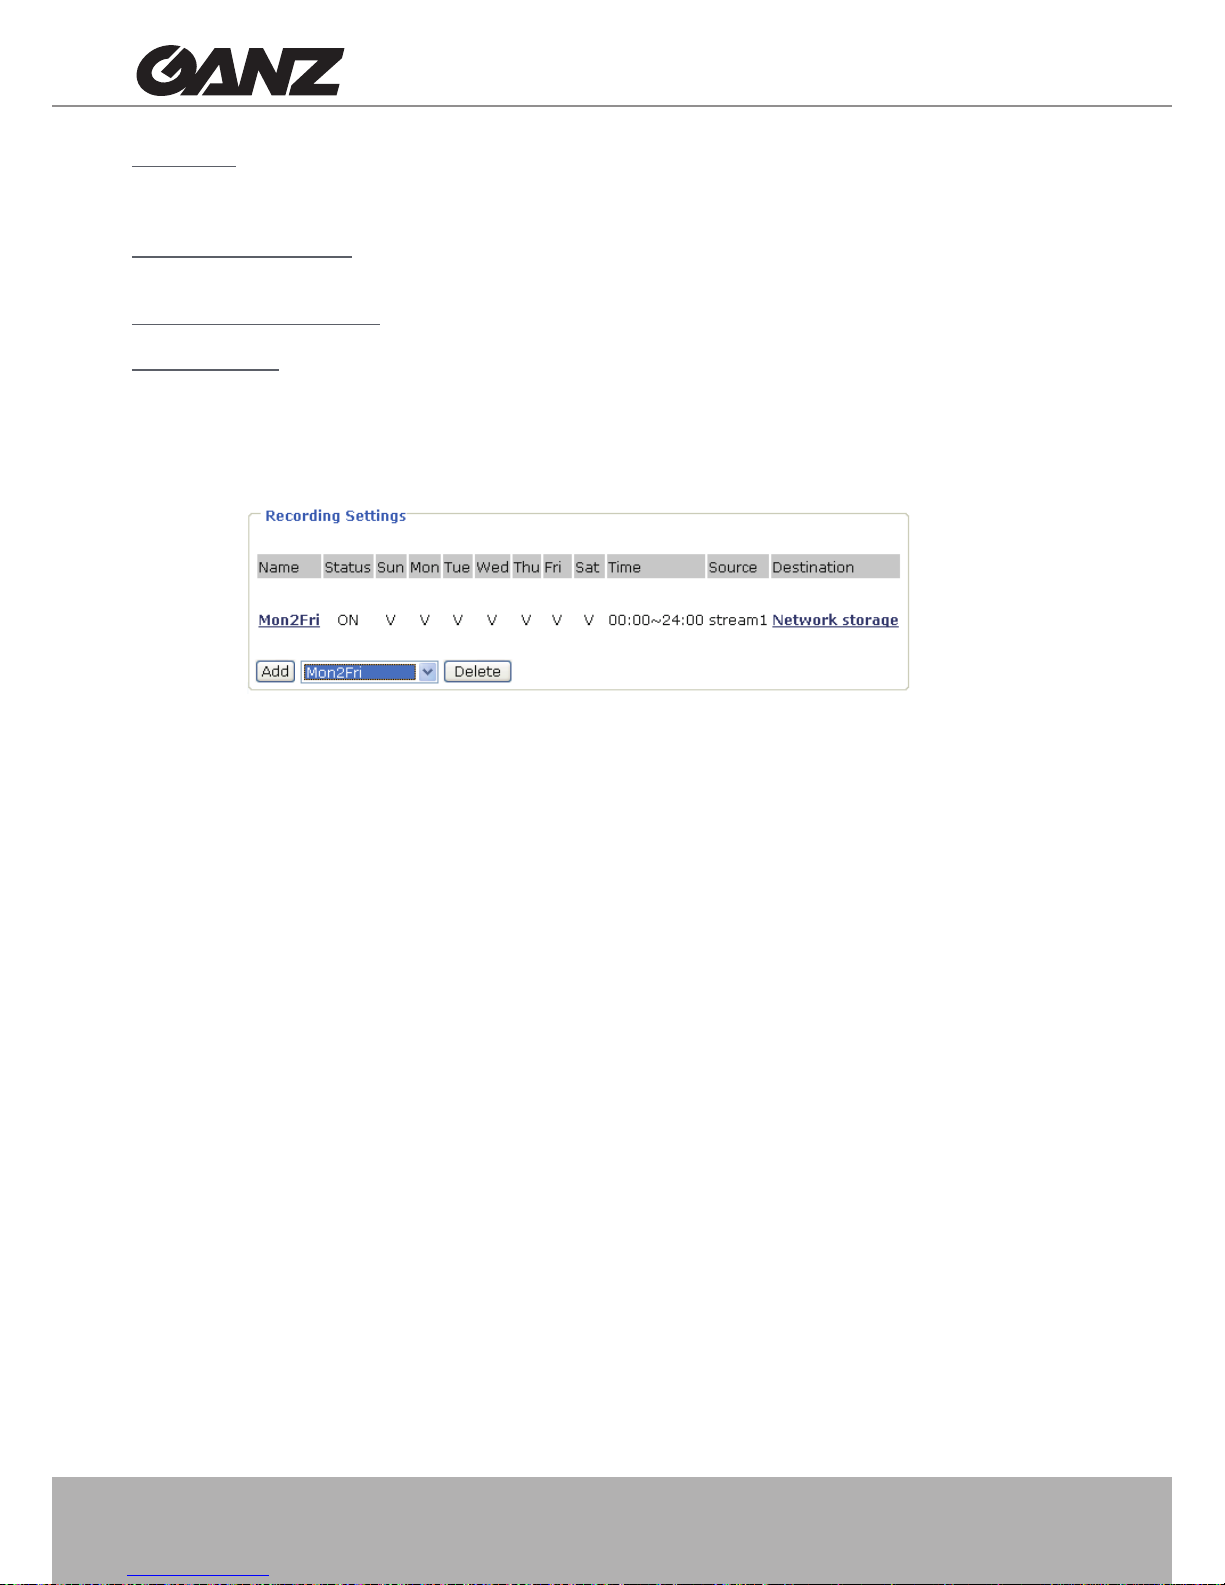
Recording Settings
Click Add to open the recording setting page� On this page, you can define the recording
source, recording schedule and recording capacity� A total of 2 recording settings can be
congured.
Recording name: Enter a name for the recording setting�
Enable this recording: Select this option to enable video recording�
Priority: Select the relative importance of this recording setting (High, Normal, and Low)�
Source: Select the recording source (stream 1 or stream 2)�
Recording Schedule: Specify the recording duration�
■ Select the days of the week.
■ Select the recording start and end times in 24-hr time format.
Page 54
54 - User's Manual
Destination: Specify a storage destination for the recorded video les. Note that the destination eld is
empty by default. Please go to Conguration > Application > Server Settings to set a Network storage
server; please refer to Server Settings on page 48�
Max� recording capacity: Please note that when the maximum capacity is reached, the oldest le will be
overwritten by the latest one�
File size for each recording: Specify the le size for each recording media.
File name prex: Enter the text that will be put in front of the le name.
When completed, select Enable this recording� Click Save to enable the settings and then click Close
to exit this page� The new recording name will appear in the recording drop-down list on the recording
page� To remove a recording setting from the list, select a recording name from the drop-down list then
click Delete�
Page 55
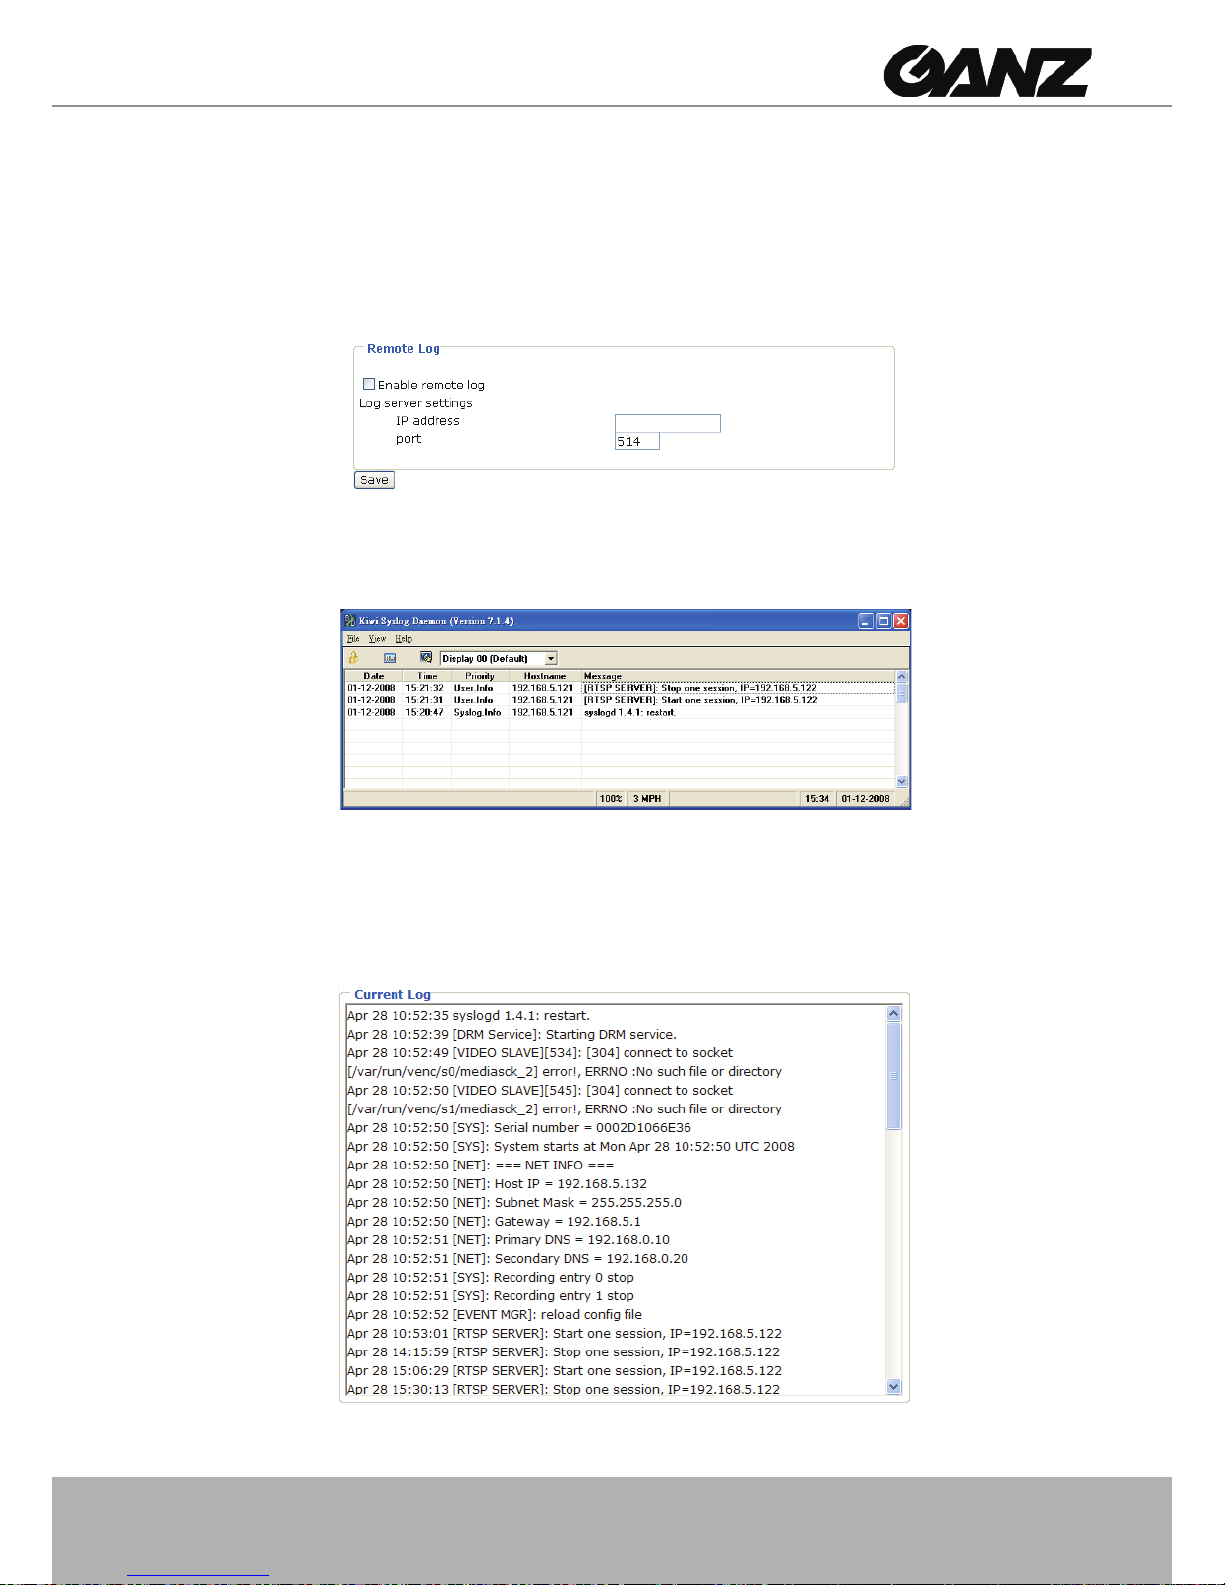
User's Manual - 55
System Log
This section explains how to configure the Network Camera to send the system log to the
remote server as backup� It is composed of the following two columns: Remote Log and Current
Log�
Remote Log
You can congure the Network Camera to send the system log le to a remote server as a log
backup. Before utilizing this feature, it is suggested that the user install a log-recording tool to
receive system log messages from the Network Camera� An example is Kiwi Syslog Daemon�
Visit http://www�kiwisyslog�com/kiwi-syslog-daemon-overview/�
Follow the steps below to set up the remote log:
1� In the IP address text box, enter the IP address of the remote server�
2� In the port text box, enter the port number of the remote server�
3� When completed, select Enable remote log and click Save to enable the settings�
Current Log
This column displays the system log in chronological order� The system log is stored in the
Network Camera’s buffer area and will be overwritten when reaching a certain limit�
Page 56
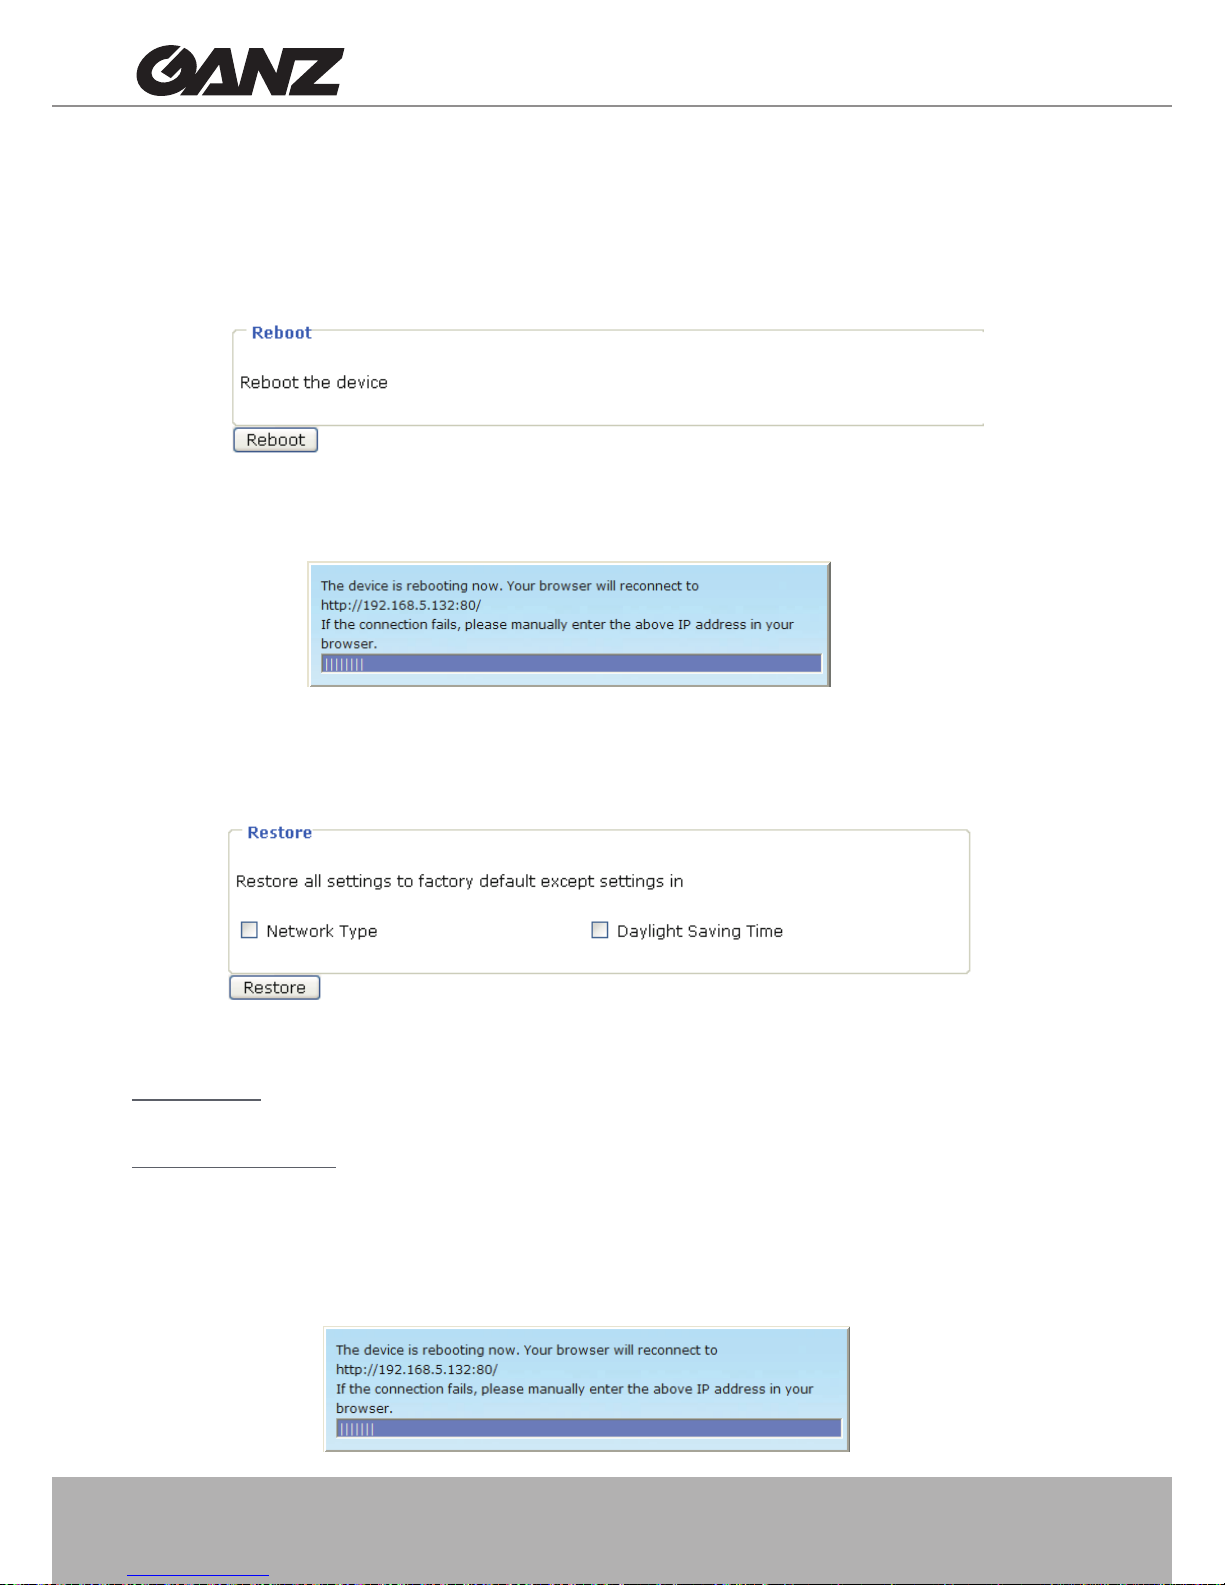
56 - User's Manual
Maintenance
This chapter explains how to restore the Network Camera to factory default, upgrade rmware
version, etc�
Reboot
This feature allows you to reboot the Network Camera, which takes about one minute to
complete� When completed, the live video page will be displayed in your browser� The following
message will be displayed during the reboot process�
If the connection fails after rebooting, manually enter the IP address of the Network Camera in
the address eld to resume the connection.
Restore
This feature allows you to restore the Network Camera to factory default settings�
Network Type: Select this option to retain the Network Type settings (please refer to Network Type on
page 26)�
Daylight Saving Time: Select this option to retain the Daylight Saving Time settings (please refer to
System on page 20)
If none of the options is selected, all settings will be restored to factory default�
The following message is displayed during the restoring process�
Page 57
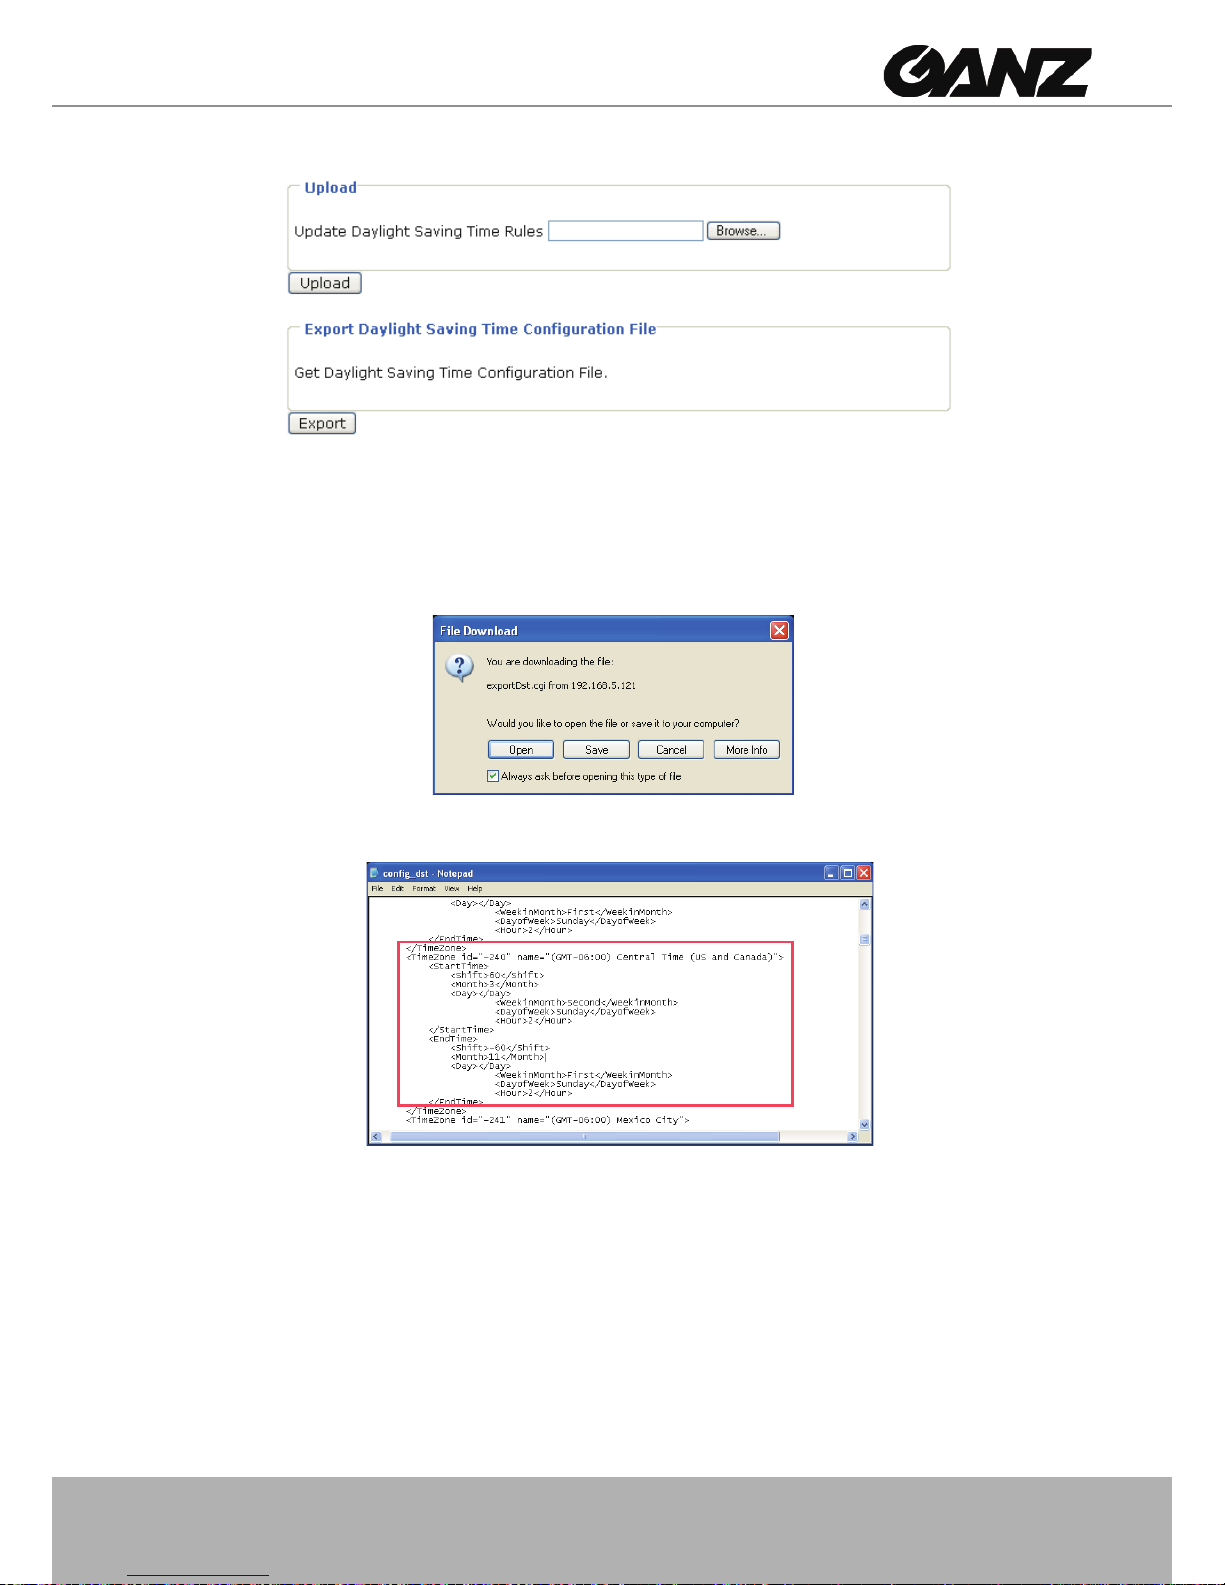
User's Manual - 57
Upload / Export Daylight Saving Time Conguration File
This feature allows you to set the starting time and ending time of DST�
Follow the steps below to set up:
1. In the Export Daylight Saving Time Conguration File Column, click Export to export an Extensible
Markup Language (*.xml) le from the Network Camera.
2. Open the XML le using Microsoft
®
Notepad and locate your time zone; set the start time and end time
of DST. When completed, save the le.
In the example below, DST begins each year at 2:00 a�m� on the second Sunday in March and ends
at 2:00 a.m. on the rst Sunday in November.
Page 58
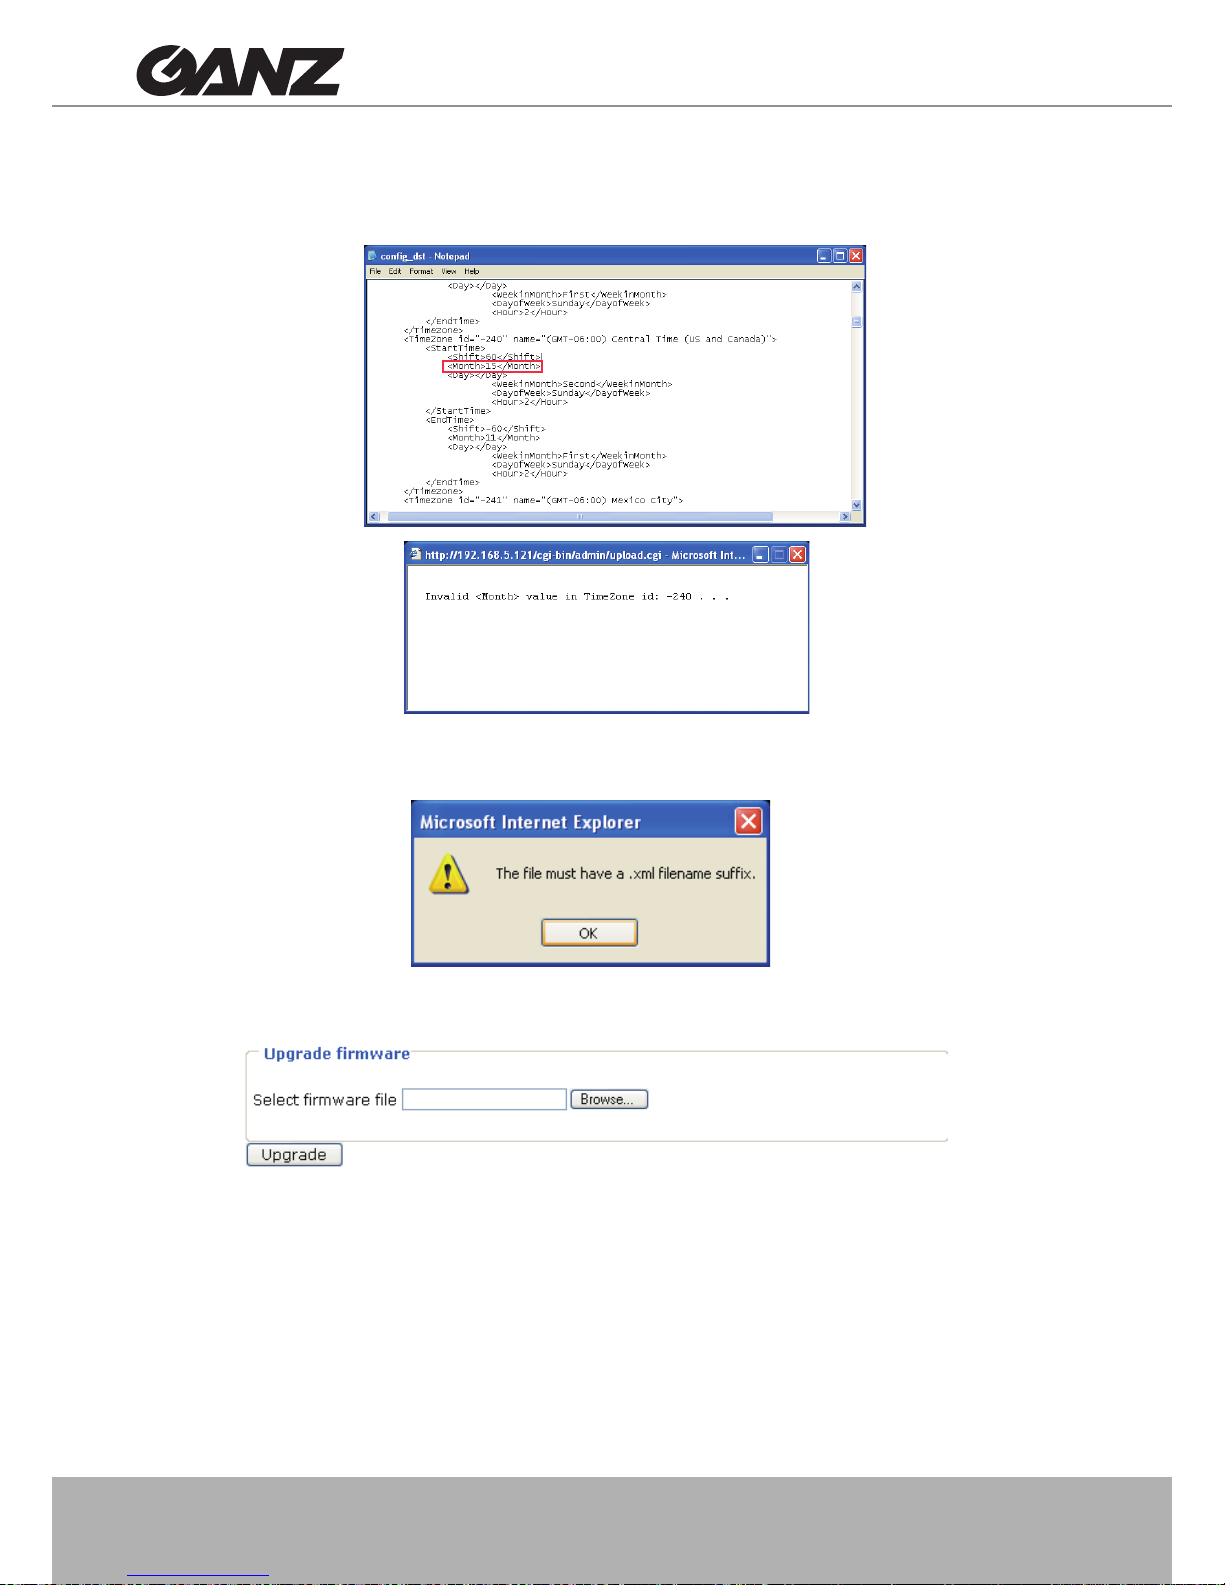
58 - User's Manual
3� In the Upload Column, click Browse… and specify the XML le.
If the incorrect date and time are assigned, you will see the following warning message when
uploading the le to the Network Camera.
4� Click Upload� To enable DST, see System Time on page 22�
The following message is displayed when attempting to upload an incorrect le format.
Upgrade Firmware
This feature allows you to upgrade the rmware of your Network Camera. It takes a few minutes
to complete the process�
Note: Do not power off the Network Camera during the upgrade!
Follow the steps below to upgrade rmware:
1� Click Browse… and specify the rmware le.
2� Click Upgrade� The Network Camera starts to upgrade and will reboot automatically when the upgrade
completes�
Page 59

User's Manual - 59
If the upgrade is successful, you will see “Reboot system now!! This connection will close”� After
that, reaccess the Network Camera�
The following message is displayed when the upgrade has succeeded�
The following message is displayed when you have selected an incorrect rmware le.
Reboot system now!!
This connection will close.
Starting firmware upgrade...
Do not power down the server during the upgrade.
The server will restart automatically after the upgrade is
completed.
It will takes about 1 - 5 minutes.
Wrong PKG file format
Unpack fail
Page 60

60 - User's Manual
Technical Specications
Specifications
.CE, LVD, FCC, VCCI, C-Tick
.Weather-proof IP66-rated housing
.CPU: CBC-1000 SoC
.Flash: 8MB
.RAM: 64MB
.Embedded OS: Linux 2.4
.Board lens, vari-focal, f = 3.3 ~ 12 mm,
F1.4 (wide), F2.9 (tele), focus range: 50 cm to
infinity
.Removable IR-cut filter for day & night function
.23.9° ~ 89.8° (horizontal)
.17.9° ~ 63.6° (vertical)
.1/5 sec. to 1/15000 sec.
.1/3.3” Wide Dynamic Range CMOS sensor
in 720x480 resolution
.0.68 Lux / F1.4
.0 Lux / F1.4 (IR LED on)
.Built-in IR illuminators, effective up to 15 meters
Networking
Alarm and
Event Management
Security
Users
Dimension
Weight
LED Indicator
Power
Approvals
Housing
Operating Environments
System
Lens
Angle of View
Shutter Time
Image Sensor
Minimum
Illumination
IR Illuminators
Video
Image Settings
Audio
Viewing System
Requirements
Installation, Management,
and Maintenance
Applications
.10/100 Mbps Ethernet, RJ-45
.Protocols: IPv4, TCP/IP, HTTP, UPnP, RTSP/
RTP/RTCP, IGMP,SMTP, FTP, DHCP, NTP,
DNS, DDNS and PPPoE
.Triple-window video motion detection
.One D/I and one D/O for external sensor and alarm
.Event notification using HTTP, SMTP or FTP
.Local recording of MP4 file
.Muilti-level user access with password protection
.IP address filtering
.Live viewing for up to 10 clients
.Ø70 mm x 182 mm
.Net: 969 g
.System restore status indicator
.12V DC
.24V AC
.Power consumption: Max. 6 W
.802.3af compliant Power-over-Ethernet
.Temperature: -20 ~ 60 °C (-4 ~ 140 °F)
.Humidity: 20% ~ 80% RH
.Compression:
GSM-AMR speech encoding, bit rate:
4.75 kbps to 12.2 kbps
MPEG-4 AAC audio encoding, bit rate:
16 kbps to 128 kbps
.Interface:
External microphone input
Audio output
.Supports two-way audio via SIP protocol
.Supports audio mute
.Compression: MJPEG & MPEG-4
.Streaming:
Simultaneous dual streams
MPEG-4 streaming over UDP, TCP or HTTP
MPEG-4 multicast streaming
MJPEG streaming over HTTP
.Frame rates:
MPEG-4: Up to 25 fps at 720x480
MJPEG: Up to 25 fps at 720x480
.Adjustable image size, quality and bit rate
.Time stamp and text caption overlay
.Flip & mirror
.Configurable brightness, contrast, saturation,
and hue
.AGC, AWB, AEC (Automatic Exposure
Control), WDR
.Automatic or manual day/night mode
.Supports privacy masks
.OS: Microsoft Windows 2000/XP/Vista
.Browser: Internet Explorer 6.x or above
.Cell phone: 3GPP player
.Real Player: 10.5 or above
.Quick Time: 6.5 or above
.SDK available for application development
and system integration
.RS-485 interface for scanners, pan/tilts
.Installation Wizard 2
.16-CH recording software
.Supports firmware upgrade
Page 61

User's Manual - 61
Technology License Notice
MPEG-4 AAC Technology
THIS PRODUCT IS LICENSED UNDER THE MPEG-4 AAC AUDIO PATENT LICENSE� THIS PRODUCT MAY
NOT BE DECOMPILED, REVERSE-ENGINEERED OR COPIED, EXCEPT WITH REGARD TO PC SOFTWARE,
OF WHICH YOU MAY MAKE SINGLE COPIES FOR ARCHIVAL PURPOSES� FOR MORE INFORMATION,
PLEASE REFER TO HTTP://WWW�VIALICENSING�COM�
MPEG-4 Visual Technology
THIS PRODUCT IS LICENSED UNDER THE MPEG-4 VISUAL PATENT PORTFOLIO LICENSE FOR THE
PERSONAL AND NON-COMMERCIAL USE OF A CONSUMER FOR (i) ENCODING VIDEO IN COMPLIANCE
WITH THE MPEG-4 VISUAL STANDARD ("MPEG-4 VIDEO") AND/OR (ii) DECODING MPEG-4 VIDEO THAT
WAS ENCODED BY A CONSUMER ENGAGED IN A PERSONAL AND NON-COMMERCIAL ACTIVITY AND/
OR WAS OBTAINED FROM A VIDEO PROVIDER LICENSED BY MPEG LA TO PROVIDE MPEG-4 VIDEO�
NO LICENSE IS GRANTED OR SHALL BE IMPLIED FOR ANY OTHER USE� ADDITIONAL INFORMATION
INCLUDING THAT RELATING TO PROMOTIONAL, INTERNAL AND COMMERCIAL USES AND LICENSING MAY
BE OBTAINED FROM MPEG LA, LLC� PLEASE REFER TO HTTP://WWW�MPEGLA�COM�
AMR-NB Standard
THIS PRODUCT IS LICENSED UNDER THE AMR-NB STANDARD PATENT LICENSE AGREEMENT� WITH
RESPECT TO THE USE OF THIS PRODUCT, THE FOLLOWING LICENSORS’ PATENTS MAY APPLY:
TELEFONAKIEBOLAGET ERICSSON AB: US PAT� 6192335; 6275798; 6029125; 6424938; 6058359� NOKIA
CORPORATION: US PAT� 5946651; 6199035� VOICEAGE CORPORATION: AT PAT� 0516621; BE PAT� 0516621;
CA PAT� 2010830; CH PAT� 0516621; DE PAT� 0516621; DK PAT� 0516621; ES PAT� 0516621; FR PAT� 0516621;
GB PAT� 0516621; GR PAT� 0516621; IT PAT� 0516621; LI PAT� 0516621; LU PAT� 0516621; NL PAT� 0516621;
SE PAT 0516621; US PAT 5444816; AT PAT� 819303/AT E 198805T1; AU PAT� 697256; BE PAT� 819303; BR PAT�
9604838-7; CA PAT� 2216315; CH PAT� 819303; CN PAT� ZL96193827�7; DE PAT� 819303/DE69611607T2; DK
PAT� 819303; ES PAT� 819303; EP PAT� 819303; FR PAT� 819303; GB PAT� 819303; IT PAT� 819303; JP PAT� APP�
8-529817; NL PAT� 819303; SE PAT� 819303; US PAT� 5664053� THE LIST MAY BE UPDATED FROM TIME TO
TIME BY LICENSORS AND A CURRENT VERSION OF WHICH IS AVAILABLE ON LICENSOR’S WEBSITE AT
HTTP://WWW�VOICEAGE�COM�
Page 62

62 - User's Manual
Electromagnetic Compatibility (EMC)
FCC Statement
This device compiles with FCC Rules Part 15. Operation is subject to the following two conditions.
■ This device may not cause harmful interference, and
■ This device must accept any interference received, including interference that may cause undesired
operation�
This equipment has been tested and found to comply with the limits for a Class A digital device, pursuant
to Part 15 of the FCC Rules� These limits are designed to provide reasonable protection against
harmful interference when the equipment is operated in a commercial environment� This equipment
generates, uses, and can radiate radio frequency energy and, if not installed and used in accordance
with the installation manual, may cause harmful interference to radio communications� Operation of this
equipment in a residential area is likely to cause harmful interference, in which case the user will be
required to correct the interference at his own expense�
CE Mark Warning
This is a Class A product� In a domestic environment, this product may cause radio interference, in which
case the user may be required to take adequate measures�
Liability
CBC Co�, Ltd� cannot be held responsible for any technical or typographical errors and reserves the right
to make changes to the product and manuals without prior notice� CBC Co�, Ltd� makes no warranty
of any kind with regard to the material contained within this document, including, but not limited to, the
implied warranties of merchantability and fitness for any particular purpose�
 Loading...