

Page 1

Quick User Guide ZN-B Series Network Camera
Warning before installation
-Power off the Network camera if it is found to be smoking or smells unusual.
-Keep the Network camera away from water. If the Network camera gets wet, power
off immediately.
-Do not place the Network camera near heat sources, such as a television or oven.
-Refer to your instruction manual for the operating temperature.
-Keep the Network camera away from direct sunlight.
-Do not place the Network camera in high humidity environments.
-Do not place the Network camera on unsteady surfaces.
-Do not touch the Network camera when there is lightning present.
-Do not disassemble the Network camera.
-Do not drop the Network camera.
-Do not insert any object into the Network camera, such as a screwdriver.
For other safety and regulation information, please refer to “User’s manual”.
1. Check Contents
No. Item Description
1 Network Camera ZN-B Series (ZN-B2MAP / ZN-B1MAP / ZN-B1A)
2 Software CD User’s Manual, Utility software
3 Quick User Guide This document
4 Accessories Template for installation
Silica-Gel sheet 1pcs
Anchor : 4pcs
Tapping Screw 4x30 : 4pcs
Hexalobular L-key Wrench
Alarm I/O extension cable
Video monitor cable
2. Physical Description
Alarm In/Out connector
Ver1.20 EN
1
Page 2
Quick User Guide ZN-B Series Network Camera
1. Network (RJ-45 PoE supported)
2. Audio In (Line in)
3. Audio Out (Line Out)
4. Alarm In / Out connector (Dry contact / Relay out [2A:AC120V/DC60V])
5. Power (DC12V / AC24V)
6. Micro SD card (SDHC supported)
7. Reset Button
8. Status LED
9. Reset LED
10. Video output for service monitor
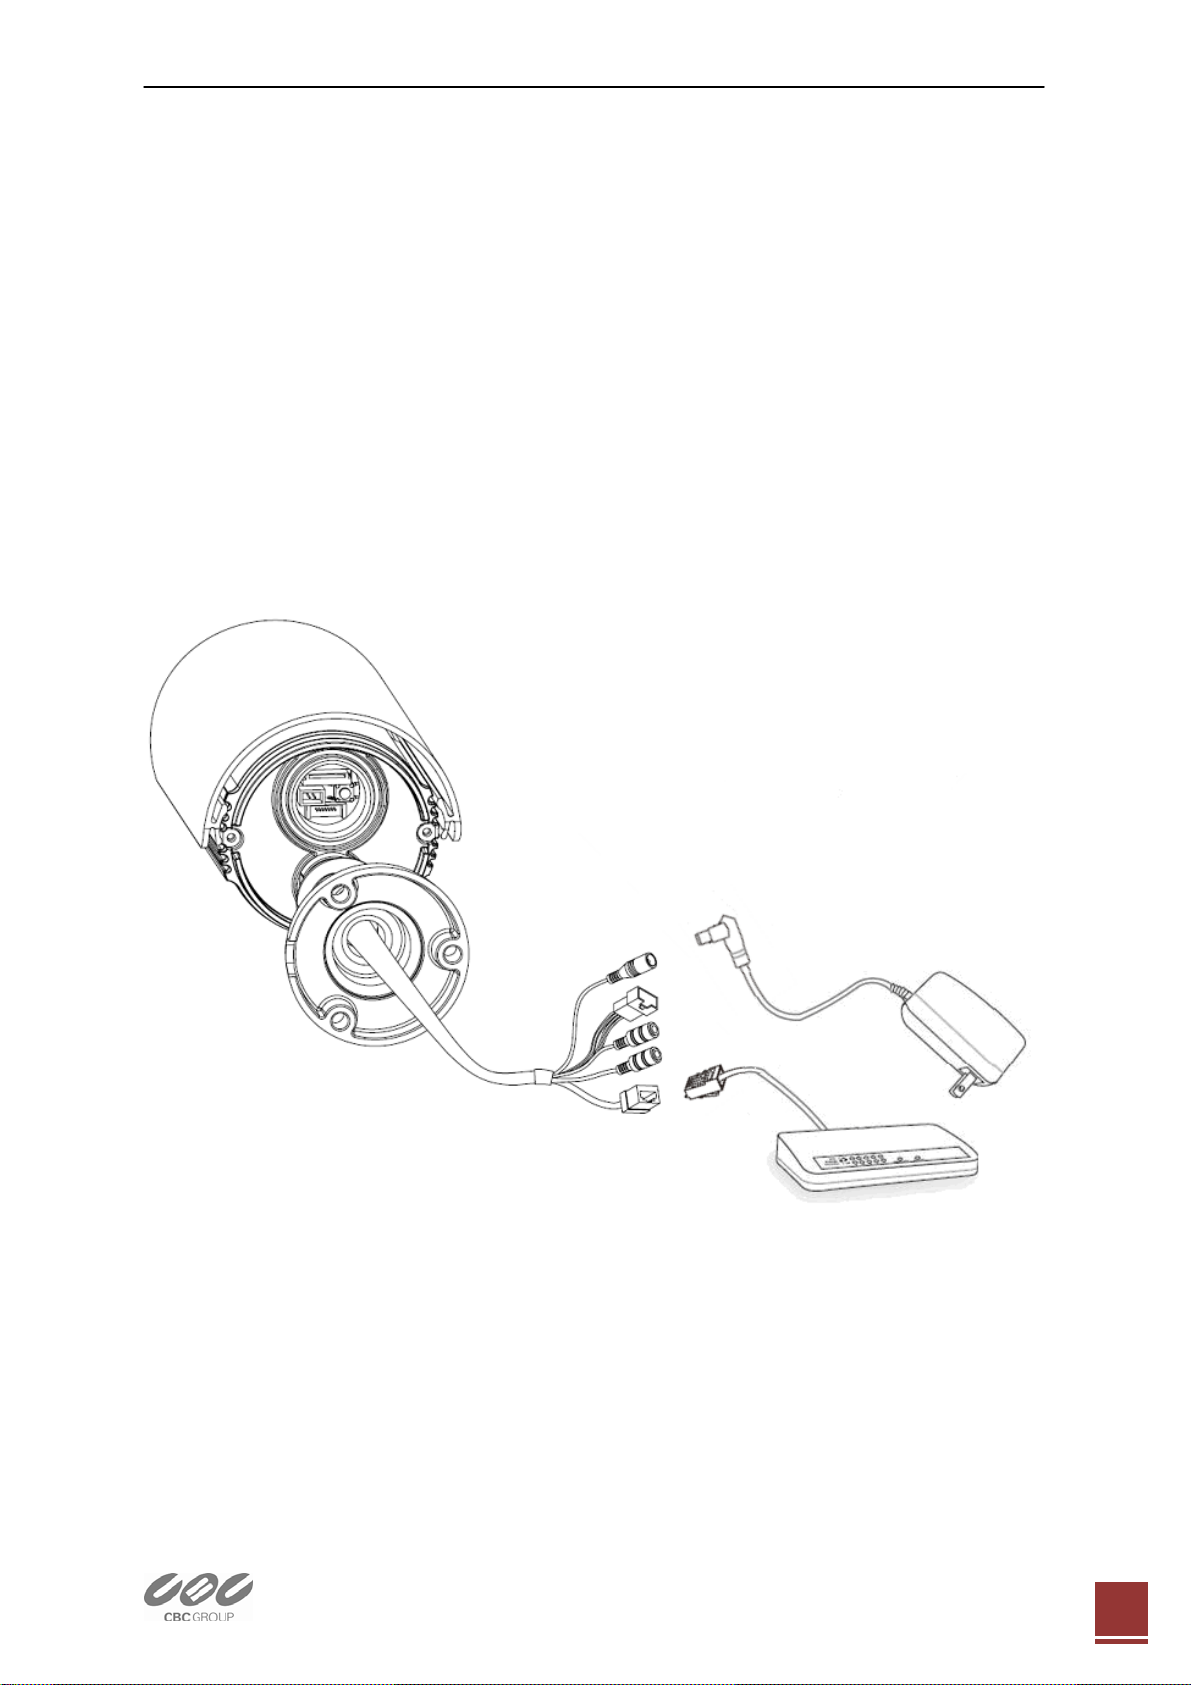
3. Making Connection
1. If you have external devices such
as sensor or alarms, make connection
from connectors
3. Connect power cable to the camera.
When you use PoE function, you don’t
2. Connect Ethernet cable to make connection
to the network hub.
need to connect power.
Ver1.20 EN
2
Page 3
Quick User Guide ZN-B Series Network Camera
4. Assign IP address
The default setting of the camera is set to “DHCP” and “UPnP” function is
set to ON. If you have a DHCP server on your network and UPnP function is
enabled on your PC you can find the network camera in “My network”.
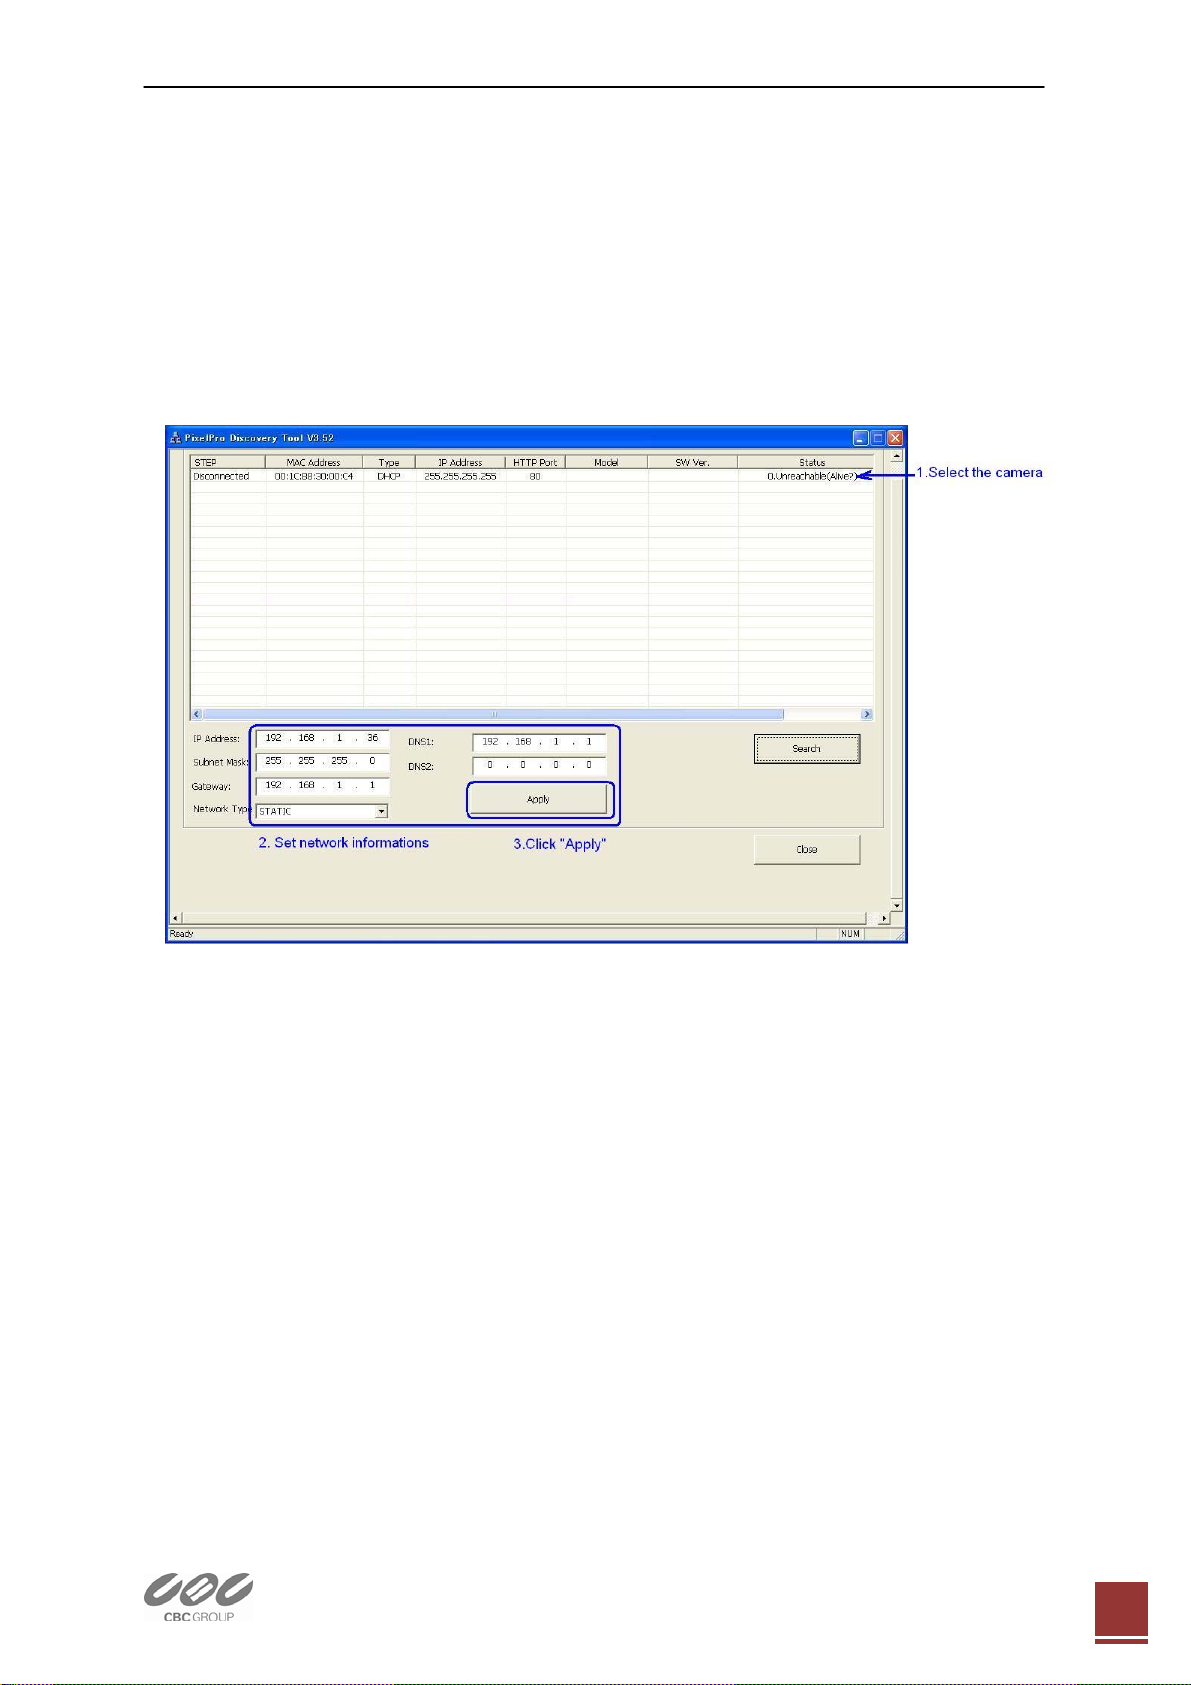
If a DHCP server is not available on your network, please assign IP address
by the following process. Default IP address will be shown as 255.255.255.255.
Execute PixelPro_Discovery_Tool.exe. It will search cameras on the network
automatically.
1) After the camera is listed in camera list, select the camera.
2) Type in the all network information.
3) Click “Apply” button, the setting will be showed in the list.
Then double click the camera in the list, Internet explorer will open
automatically.
5. Web browser connection
Note : The Network camera supports Internet Explorer 7 or above.
Please check version of your browser and update it if necessary.
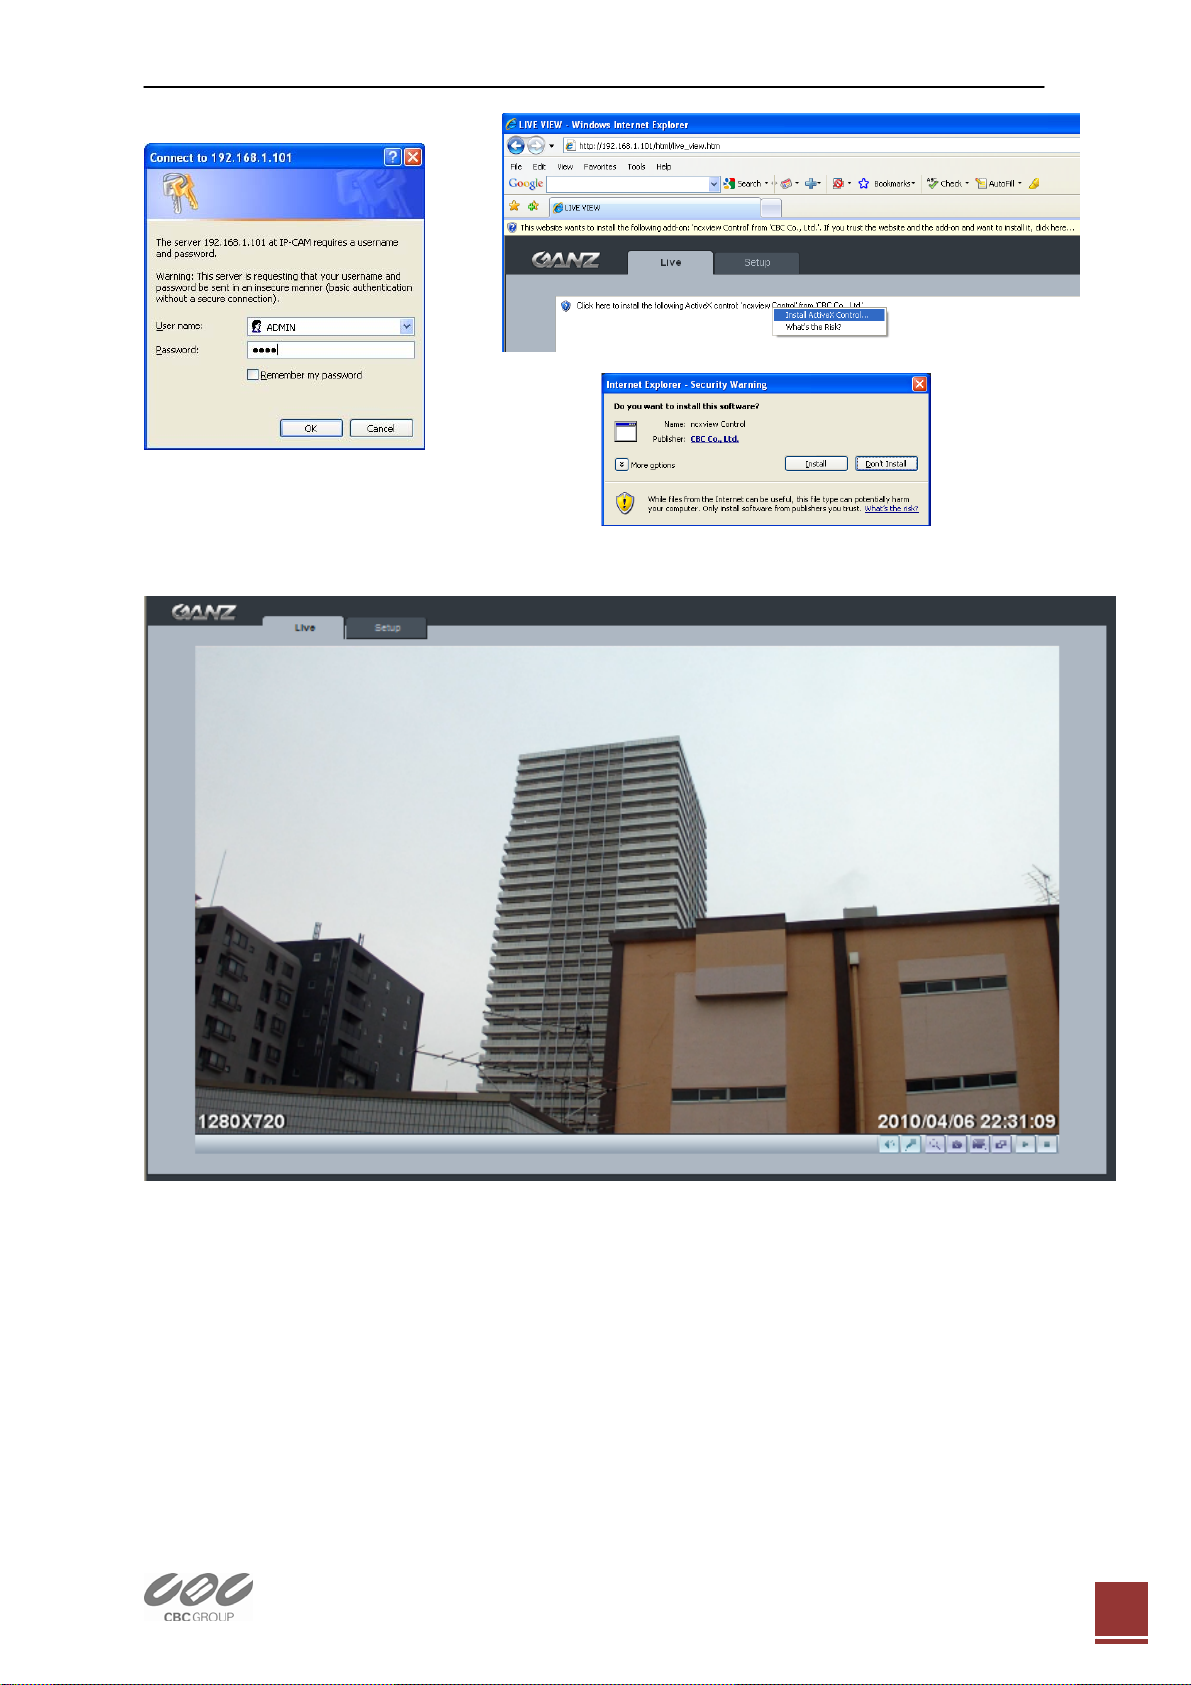
When you first access the camera you need to download and install an
Active X control from the camera to display a Live image.
Default User and Password are set to “ADMIN” and “1234”. Please type in
the user ID and password to connect the network camera.
Ver1.20 EN
3
Page 4
Quick User Guide ZN-B Series Network Camera
Note: By Default the cameras come with “Installation Mode” set to “ON” to
enable Analog output. You must turn installation mode off to use 720p
or 1080p streaming.
For further information for setup, please refer to User’s manual
in software CD.
Ver1.20 EN
4
 Loading...