

Ganz ZN8 Series User Manual
ZN8 Series NVR
IP network recorder
User manual
Version:
1.0
Date:
20-01-2016

About This Document
Network Video Recorder
User Manual
Issue: V1.0 (2016-01-20) i
About This Document
Purpose
This document describes the features, hardware installation, network access, network
configuration, routine maintenance, fault analysis, and troubleshooting of the Network
Video Recorder (NVR).
Intended Audience
This document is intended for:
Technical support engineers
Maintenance engineers
Symbol Conventions
The symbols that may be found in this document are defined as follows.
Symbol
Description
Alerts you to a high risk hazard that could, if not avoided,
result in serious injury or death.
Alerts you to a medium or low risk hazard that could, if
not avoided, result in moderate or minor injury.
Alerts you to a potentially hazardous situation that could,
if not avoided, result in equipment damage, data loss,
performance deterioration, or unanticipated results.
Provides a tip that may help you solve a problem or save
time.
Provides additional information to emphasize or
supplement important points in the main text.
Important Statement
Users are required to enable and maintain the lawful interception (LI) interfaces of
video surveillance products in strict compliance with relevant laws and regulations.
Installation of surveillance devices in an office area by an enterprise or individual to
monitor employee behavior and working efficiency outside the permitted scope of the
local law and use of video surveillance devices for eavesdropping of illegal purposes
constitute behaviors of unlawful interception.

Network Video Recorder
User Manual
Contents
ii Issue: V1.0 (2016-01-20)
Contents
About This Document ................................................................................................ i
Contents ......................................................................................................................... ii
1 Preface ........................................................................................................................ 1
1.1 Important Notes .............................................................................................................. 1
1.2 About This User Manual ................................................................................................ 1
1.3 Installation Environment and Precautions ................................................................ ...... 1
2 Basic Operations ...................................................................................................... 3
2.1 Startup ............................................................................................................................ 3
2.2 Shutdown ....................................................................................................................... 4
2.3 Adjusting the Screen Resolution of the Monitor............................................................. 4
2.4 Login ................................ ................................................................ .............................. 6
2.5 Adding Webcams ............................................................................................................ 7
3 Quick Setup .............................................................................................................. 9
4 Live Video ............................................................................................................... 13
5 Video Playback....................................................................................................... 17
5.1 Video Playback ............................................................................................................. 17
5.2 Video Backup ................................................................................................ ............... 18
6 Alarm Search .......................................................................................................... 22
7 Setup ........................................................................................................................ 24
7.1 NVR Setup ................................................................................................................... 24
7.1.1 Device Information .......................................................................................... 24
7.1.2 Manage Channel .............................................................................................. 25
7.1.3 Network............................................................................................................ 25
7.1.4 Device Port ....................................................................................................... 27
7.1.5 Live Video Layout ............................................................................................ 29
7.1.6 Date and Time .................................................................................................. 30
7.1.7 Recording ......................................................................................................... 32
7.1.8 Network Service ............................................................................................... 35
7.1.9 Alarm ............................................................................................................... 40
7.1.10 ADSL Network ............................................................................................... 43

Contents
Network Video Recorder
User Manual
Issue: V1.0 (2016-01-20) iii
7.1.11 Accounts ......................................................................................................... 43
7.1.12 Device Log ..................................................................................................... 46
7.1.13 Scheduled Reboot........................................................................................... 47
7.1.14 System ............................................................................................................ 47
7.1.15 Maintenance ................................................................................................... 48
7.2 Camera Setup ............................................................................................................... 48
7.2.1 Camera Information ......................................................................................... 49
7.2.2 Stream .............................................................................................................. 49
7.2.3 Network............................................................................................................ 53
7.2.4 OSD ................................................................................................................. 55
7.2.5 Alarm ............................................................................................................... 57
7.2.6 Privacy Masking .............................................................................................. 60
8 Accessing NVR Through Web ............................................................................ 62
8.1 Login ............................................................................................................................ 62
8.2 Live Video .................................................................................................................... 63
8.3 Video Playback ............................................................................................................. 63
8.4 Alarm Search ................................................................................................................ 64
8.5 NVR Setup ................................................................................................................... 65
8.6 Camera Setup ............................................................................................................... 66


Network Video Recorder
User Manual
Issue: V1.0 (2016-01-20) 1
1 Preface
1.1 Important Notes
Thank you for choosing the NVR. Please read the user manual carefully before
using this product.
The NVR is a complex system-based device. To avoid misoperations and malfunctions
caused by environmental factors and human factors during installation, commissioning,
and application, note the following points when installing and using this product:
Read the user manual carefully before installing and using this product.
Use Seagate or Western Digital hard disks as the storage devices of the NVR with
high stability and competitive price/performance ratios (the quality of hard disks
sold on markets varies greatly with different brands and models).
Do not open the enclosure of this product unless performed by a professional
person to avoid damage and electric shock.
We are not liable for any video data loss caused by improper installation,
configuration, operation, and hard disk errors.
1.2 About This User Manual
Please note the following points before using this user manual:
This user manual is intended for persons who operate and use the NVR.
The information in this user manual applies to the NVR.
Read this user manual carefully before using the NVR and follow the methods
described in this manual when using the NVR.
If you have any doubts when using the NVR, contact your product seller.
In the case of product upgrade, the information in this document is subject to
change without notice.
1.3 Installation Environment and Precautions
Installation environment
Table 1-1 defines the installation environment of the NVR.

Network Video Recorder
User Manual
Contents
2 Issue: V1.0 (2016-01-20)
Table 1-1 Installation environment
Item
Description
Electromagnetism
The NVR meets the national standards of electromagnetic
radiation and does not cause harm to the human body.
Temperature
–10oC to +45oC
Humidity
20% to 80%
Atmospheric pressure
86 kPa to 106 kPa
Power supply
DC12V, DC48V, AC220V
Power consumption
<15W (excluding the hard disk)
Installation precautions
Note the following points when installing and operating the NVR:
The power adapter of the NVR uses DC12V±10%, DC48V±10%, AC220V±
20% input. Do not use the NVR when voltage is too high or too low.
Install the NVR horizontally.
Avoid direct sunlight on the NVR and keep away from any heat sources and hot
environments.
Connect the NVR to other devices correctly during installation.
The NVR is not configured with any hard disk upon delivery. Install one or more
hard disks when using the NVR for the first time.
The NVR identifies hard disk capacity automatically and supports mainstream hard
disk models. You are advised to use good brands of hard disk so that the NVR can
operate stably and reliably.
Other precautions
Clean the NVR with a piece of soft and dry cloth. Do not use chemical solvents.
Do not place objects on the NVR.
The NVR meets the national standards of electromagnetic radiation and does not cause
electromagnetic radiation to the human body.
Network Video Recorder
User Manual
Issue: V1.0 (2016-01-20) 3
2 Basic Operations
2.1 Startup
Ensure that a power supply is connected to the NVR correctly.
Before starting the NVR, ensure that a monitor is connected to the HDMI or VGA
interface of the NVR correctly.
The NVR may not operate normally when a power supply exception occurs, likely
causing damage to the NVR in serious conditions. In such a circumstance, you are
advised to use a regulated power supply.
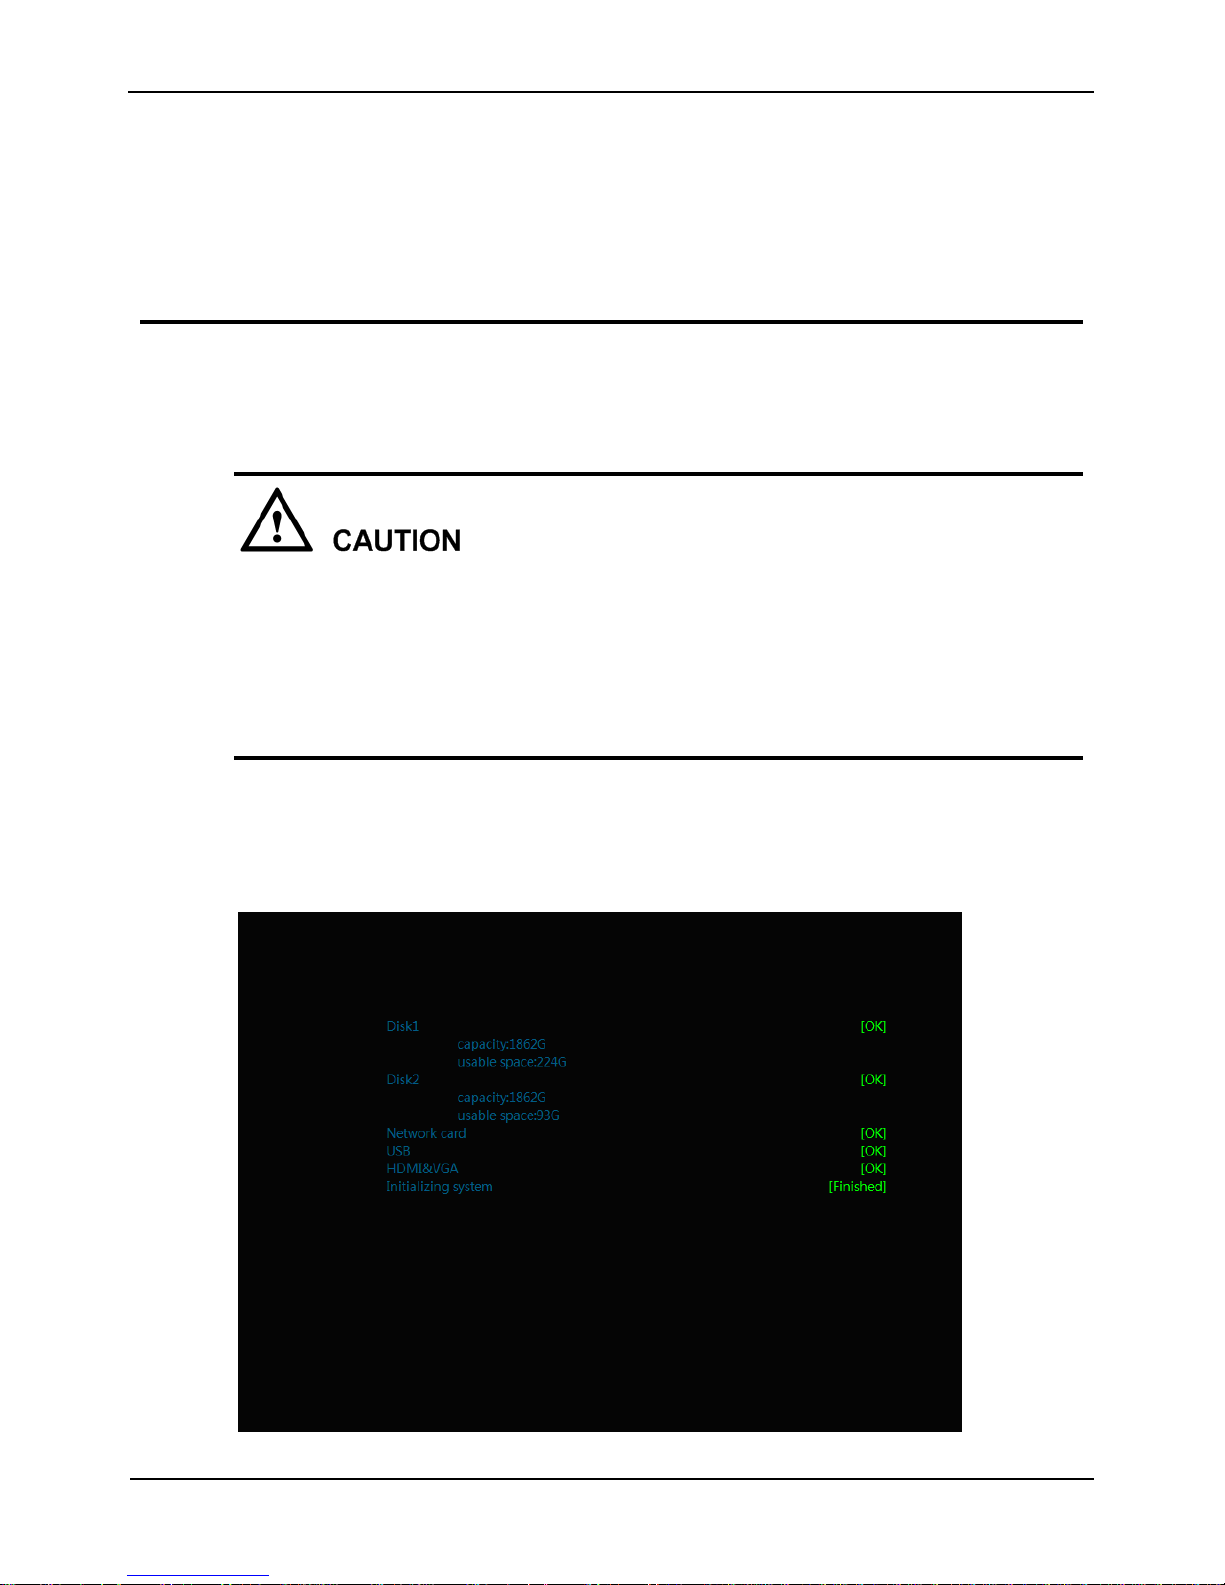
The power indicator is steady on when the NVR is started. Then the NVR conducts a
self-test and then displays the result on the screen, as shown in Figure 2-1. The startup
process takes about 2 minutes.
Figure 2-1 NVR self-test
Network Video Recorder
User Manual
Contents
4 Issue: V1.0 (2016-01-20)
When an abnormality is detected and the self-test screen stays on, choose to continue or
shut down in the lower right corner of the screen. If you choose to continue, the NVR
enters the login interface.
The hard disk(s) required by the NVR must be provided by users. Hard disk detection is
performed during startup. If the detection fails, check whether it is caused by the following
causes:
The hard disks are new and unformatted. In this case, format the hard disks based on
Chapter 3 "Quick Setup".
The hard disks are formatted, but the file system is inconsistent with the one supported by
the NVR.
The hard disks are damaged.
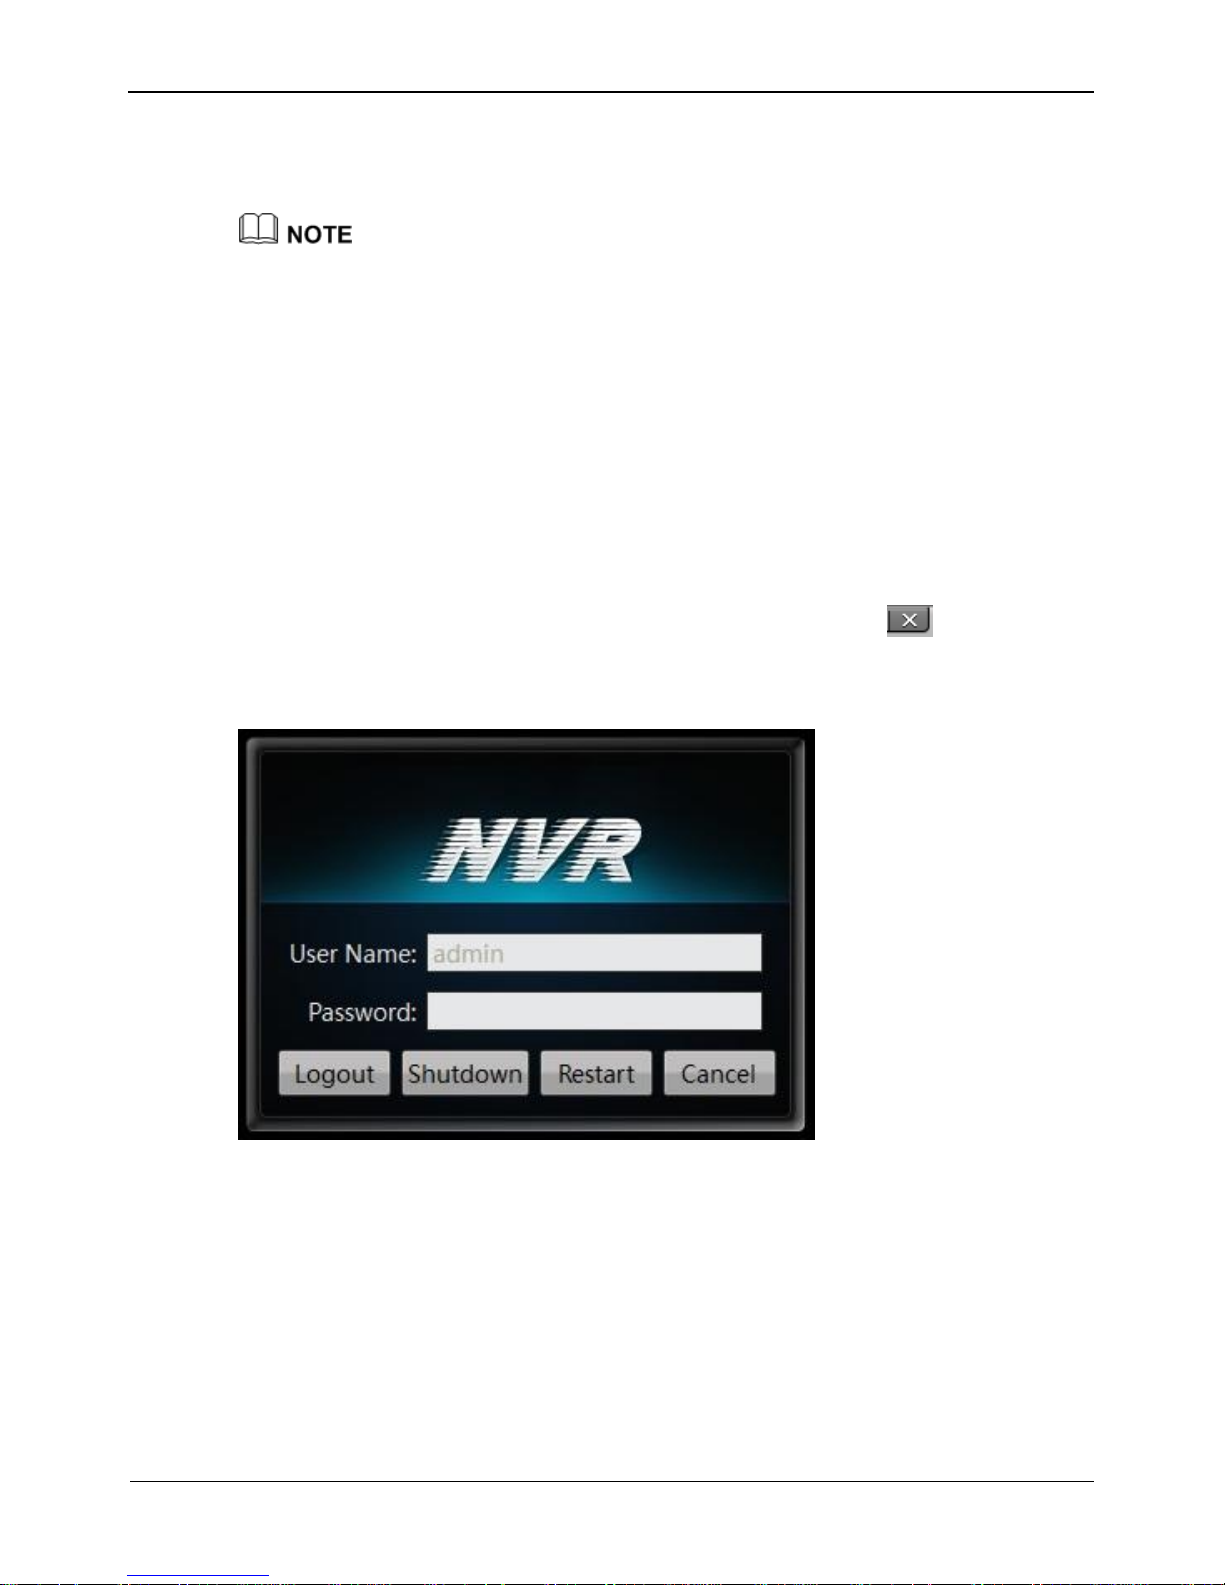
2.2 Shutdown
To shut down the NVR after logging in to the main interface, click in the upper
right corner. The shutdown interface appears, as shown in Figure 2-2.
Figure 2-2 Shutdown interface
Enter a valid password and click Shutdown. When authentication is successful, the
shutdown successful page is displayed, then cut off the power.
2.3 Adjusting the Screen Resolution of the Monitor
The NVR supports VGA and HDMI outputs and provides the screen resolutions of
1024×768, 720P, and 1080P. Select a resolution suitable for the external monitor.
Network Video Recorder
User Manual
Issue: V1.0 (2016-01-20) 5
Take the following steps to adjust the screen resolution of the monitor:
Step 1 Click Change on the login interface.
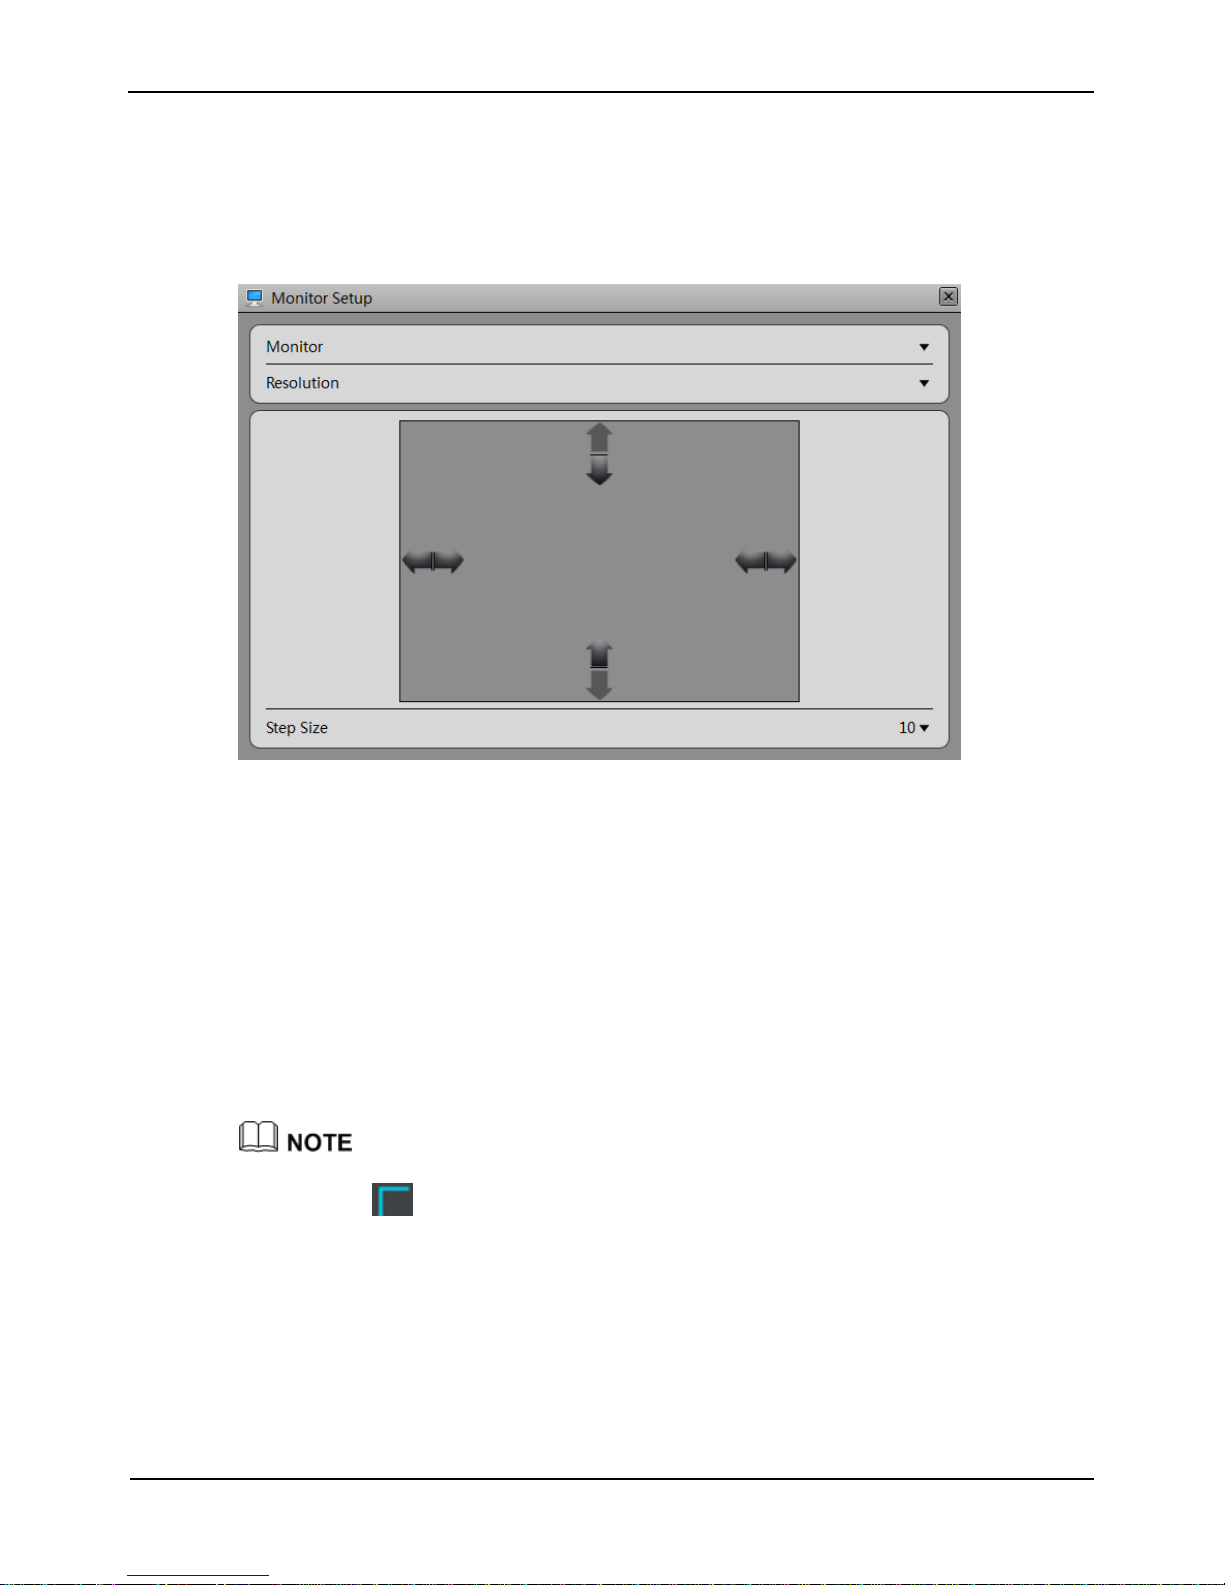
The Monitor Setup interface appears, as shown in Figure 2-3.
Figure 2-3 Monitor Setup interface
Step 2 Select a resolution from the Resolution dropdown list.
The monitor switches to the selected resolution automatically and displays a dialog box
prompting you to confirm or cancel the setting.
If no operation is performed within 10s, the monitor switches back to the original
resolution.
If you click Yes, the monitor switches to the selected resolution successfully.
If you click Cancel, the setting is not saved and the monitor switches back to the
original resolution.
Step 3 Adjust the display of the monitor.
You need to adjust the display of the monitor in the case of incomplete or skewed display
(the icon in the four corners of the screen is out of view). (You are advised to use the
automatic adjustment function of the monitor first.)
1. Click Adjust in the lower right corner.
2. Select a step from the Step dropdown list.
Step: is the distance the screen moves during each adjustment. The greater the
value, the longer the distance of movement. First select a large step for rough
adjustment and then select a small step for fine adjustment.
3. Use the up, down, left, and right arrows on the interface to adjust the screen.
Network Video Recorder
User Manual
Contents
6 Issue: V1.0 (2016-01-20)
Step 4 Click in the upper right corner of the Monitor Setup interface to exit the
Monitor Setup interface and return to the login interface.
2.4 Login
Take the following steps to log in to the NVR:
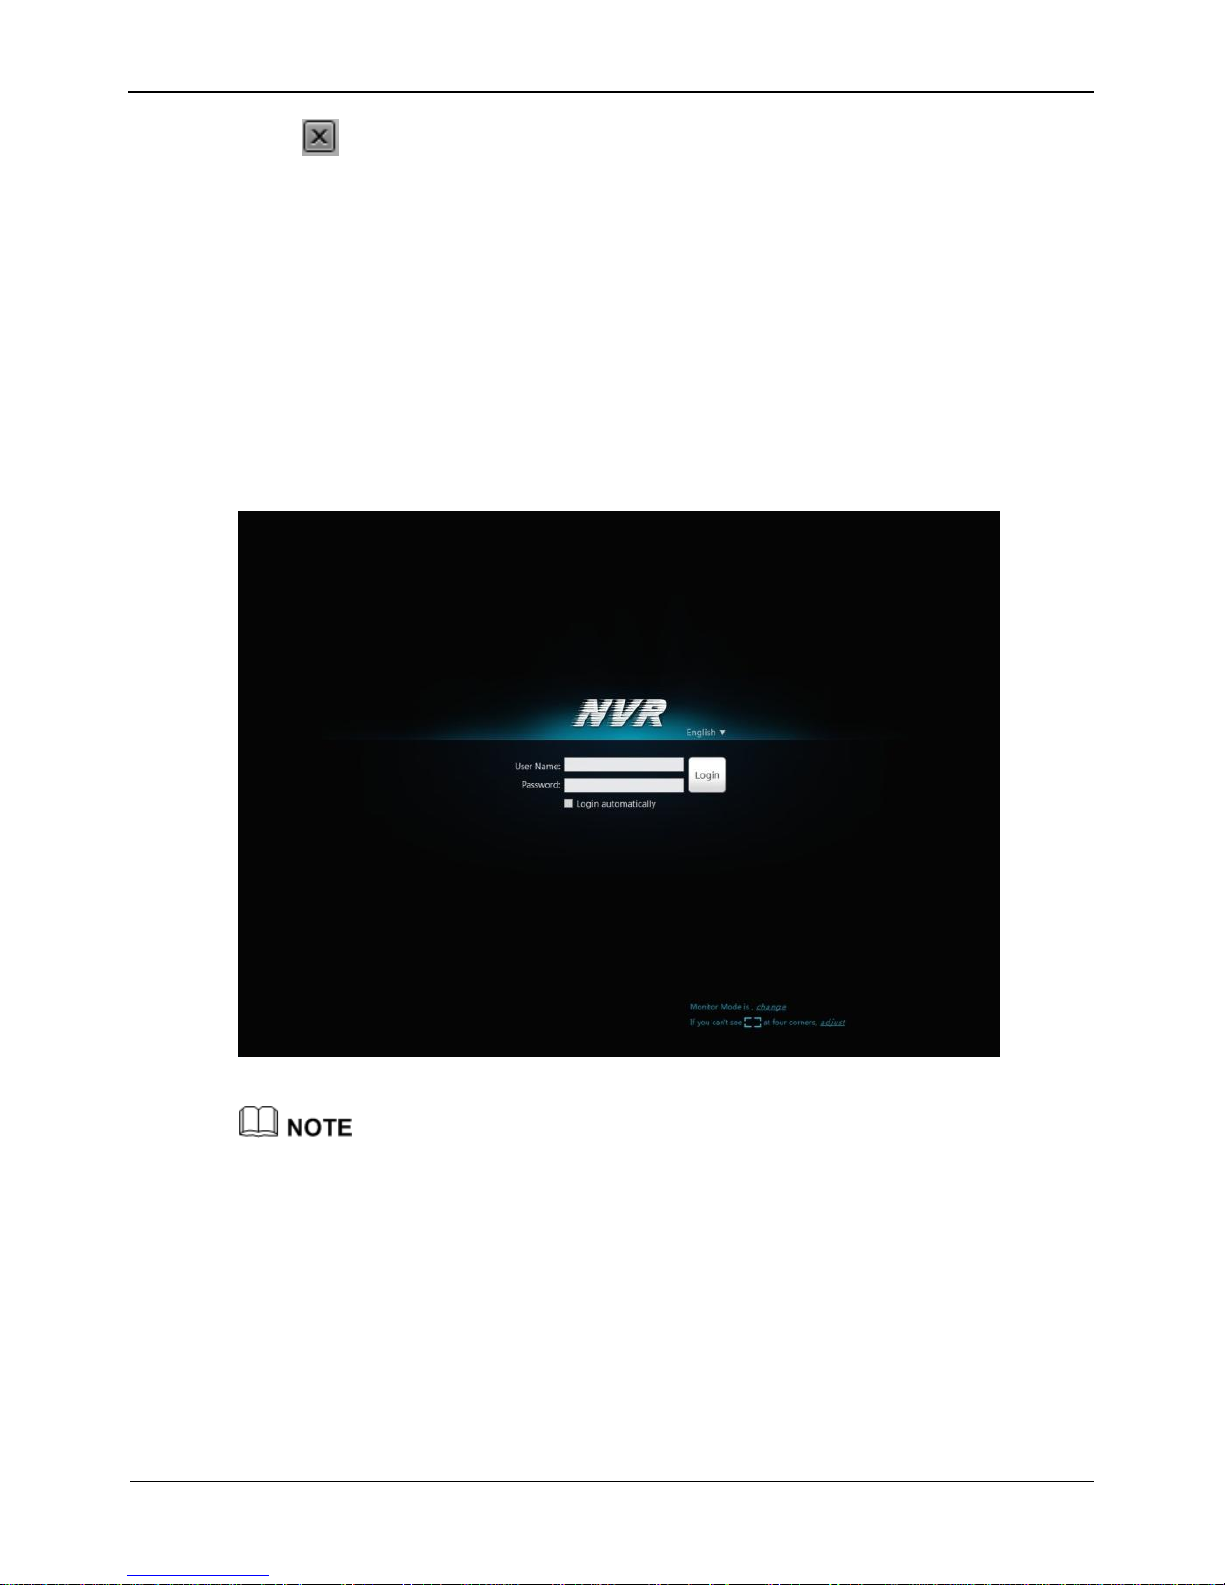
Step 1 Enter your user name and password on the login interface of the NVR, as shown in
Figure 2-4.
Figure 2-4 Login interface of the NVR
The superuser is ADMIN and the password is also 1234, both of which are casesensitive. Change the password after logging in to the NVR for the first time.
When a user enters incorrect passwords three times within an hour during login, the
account is locked. For how to unlock the account, see section 0.0.0.0 "Accounts".
The superuser ADMIN cannot be locked.
Step 2 Click Login to enter the main interface.
Network Video Recorder
User Manual
Issue: V1.0 (2016-01-20) 7
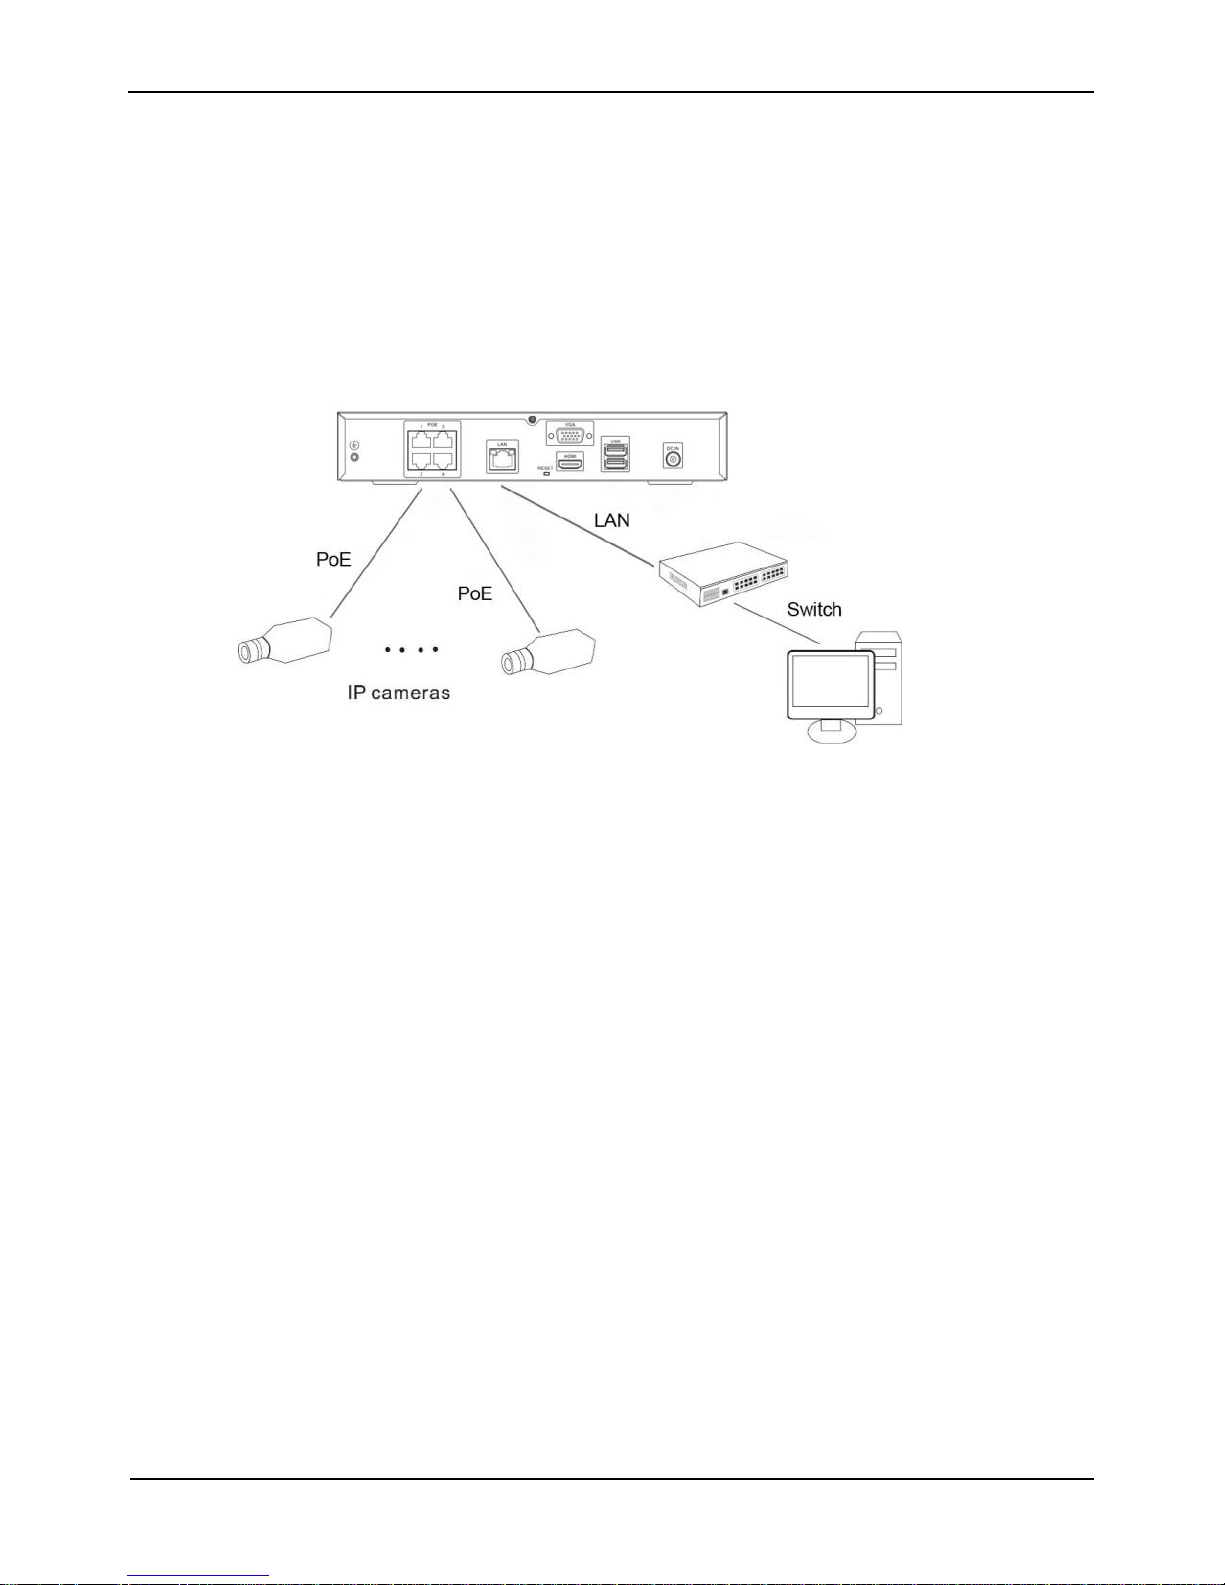
2.5 Adding Webcams
PoE
After the PoE network interfaces are connected to IP cameras, the NVR automatically
adds the IP cameras and enables 7*24 recording.
Figure 2-5 shows the network topology of the NVR.
Figure 2-5 Network topology of the NVR
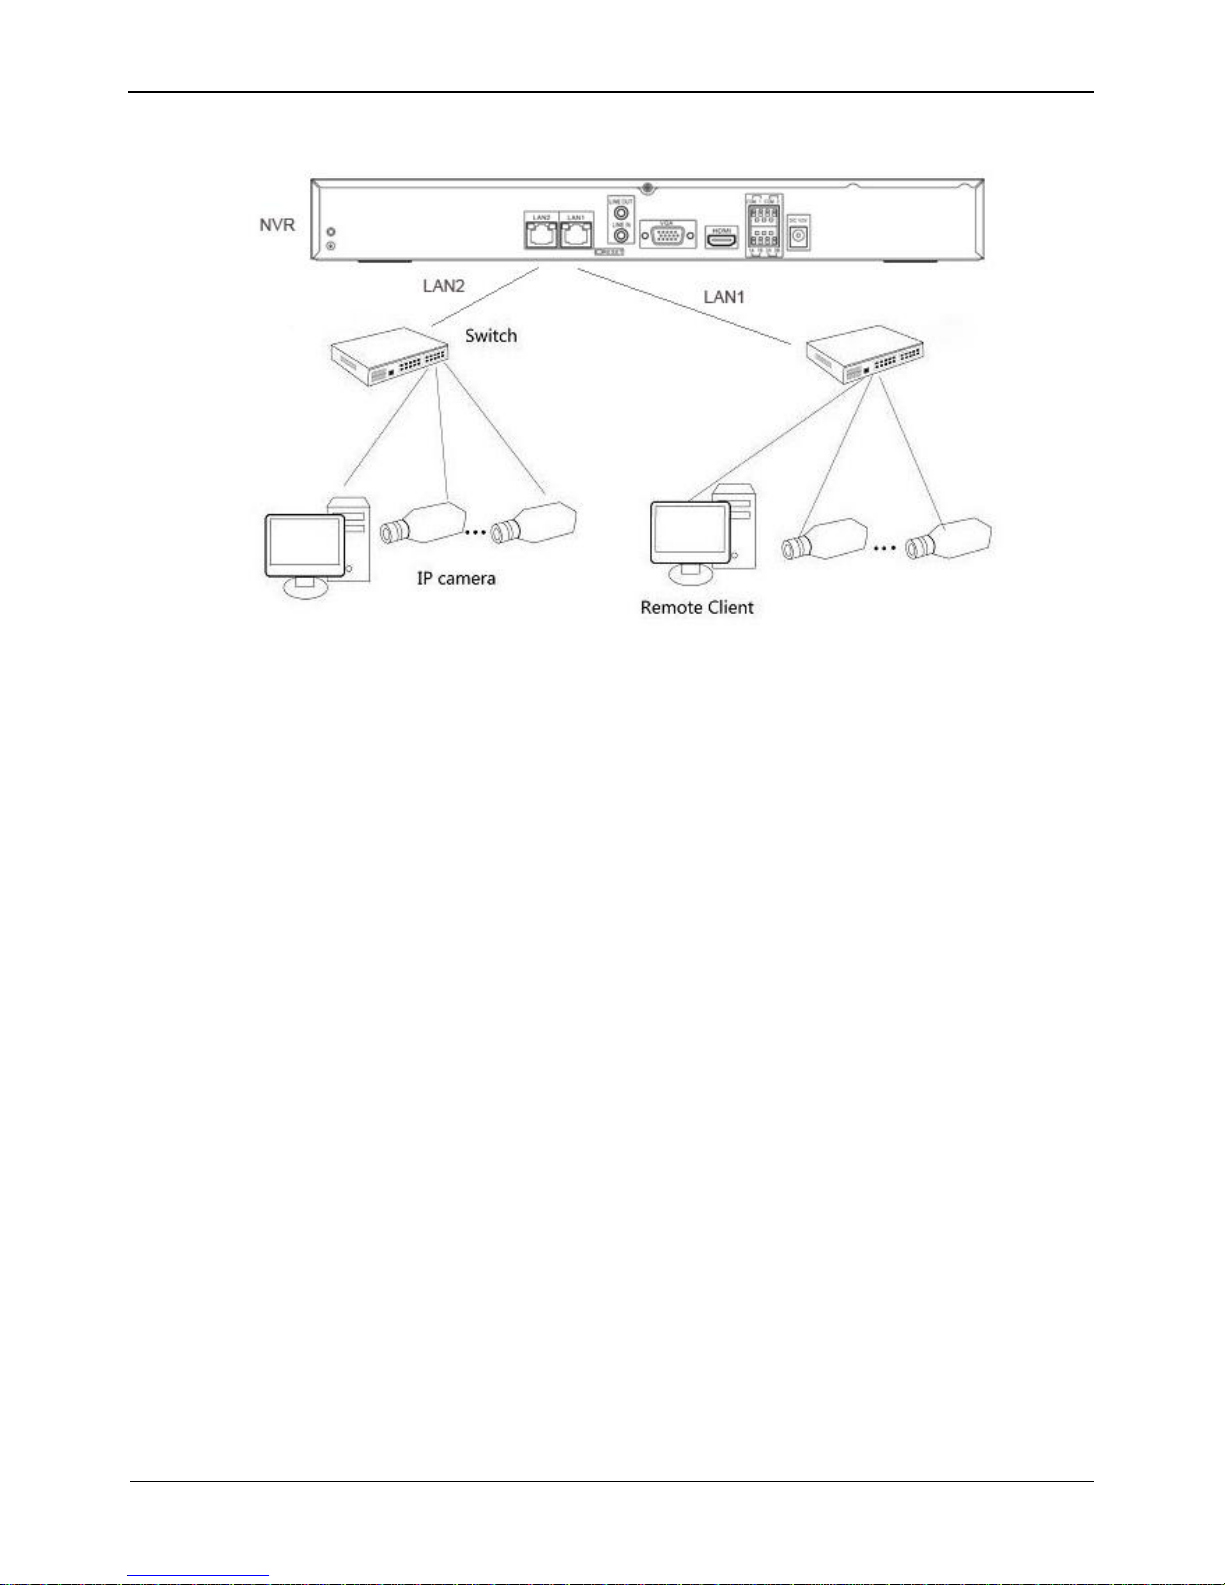
Non-PoE
A free network includes other network devices in addition to IP cameras and NVRs.
The topology of a free network can be organized freely so long as NVRs and IP
cameras can communicate with each other smoothly.
When a free network is used, the user needs to manually search for and add IP cameras.
For details, see Chapter 3 "Quick Setup".
Figure 2-6 shows the topology of a free network.
Network Video Recorder
User Manual
Contents
8 Issue: V1.0 (2016-01-20)
Figure 2-6 Topology of a free network
Network Video Recorder
User Manual
Issue: V1.0 (2016-01-20) 9
3 Quick Setup
Quick setup provide NVR network configuration, disk management, time setting, IP
camera search, video configuration, camera network configuration, stream
configuration, and mobile detection configuration.
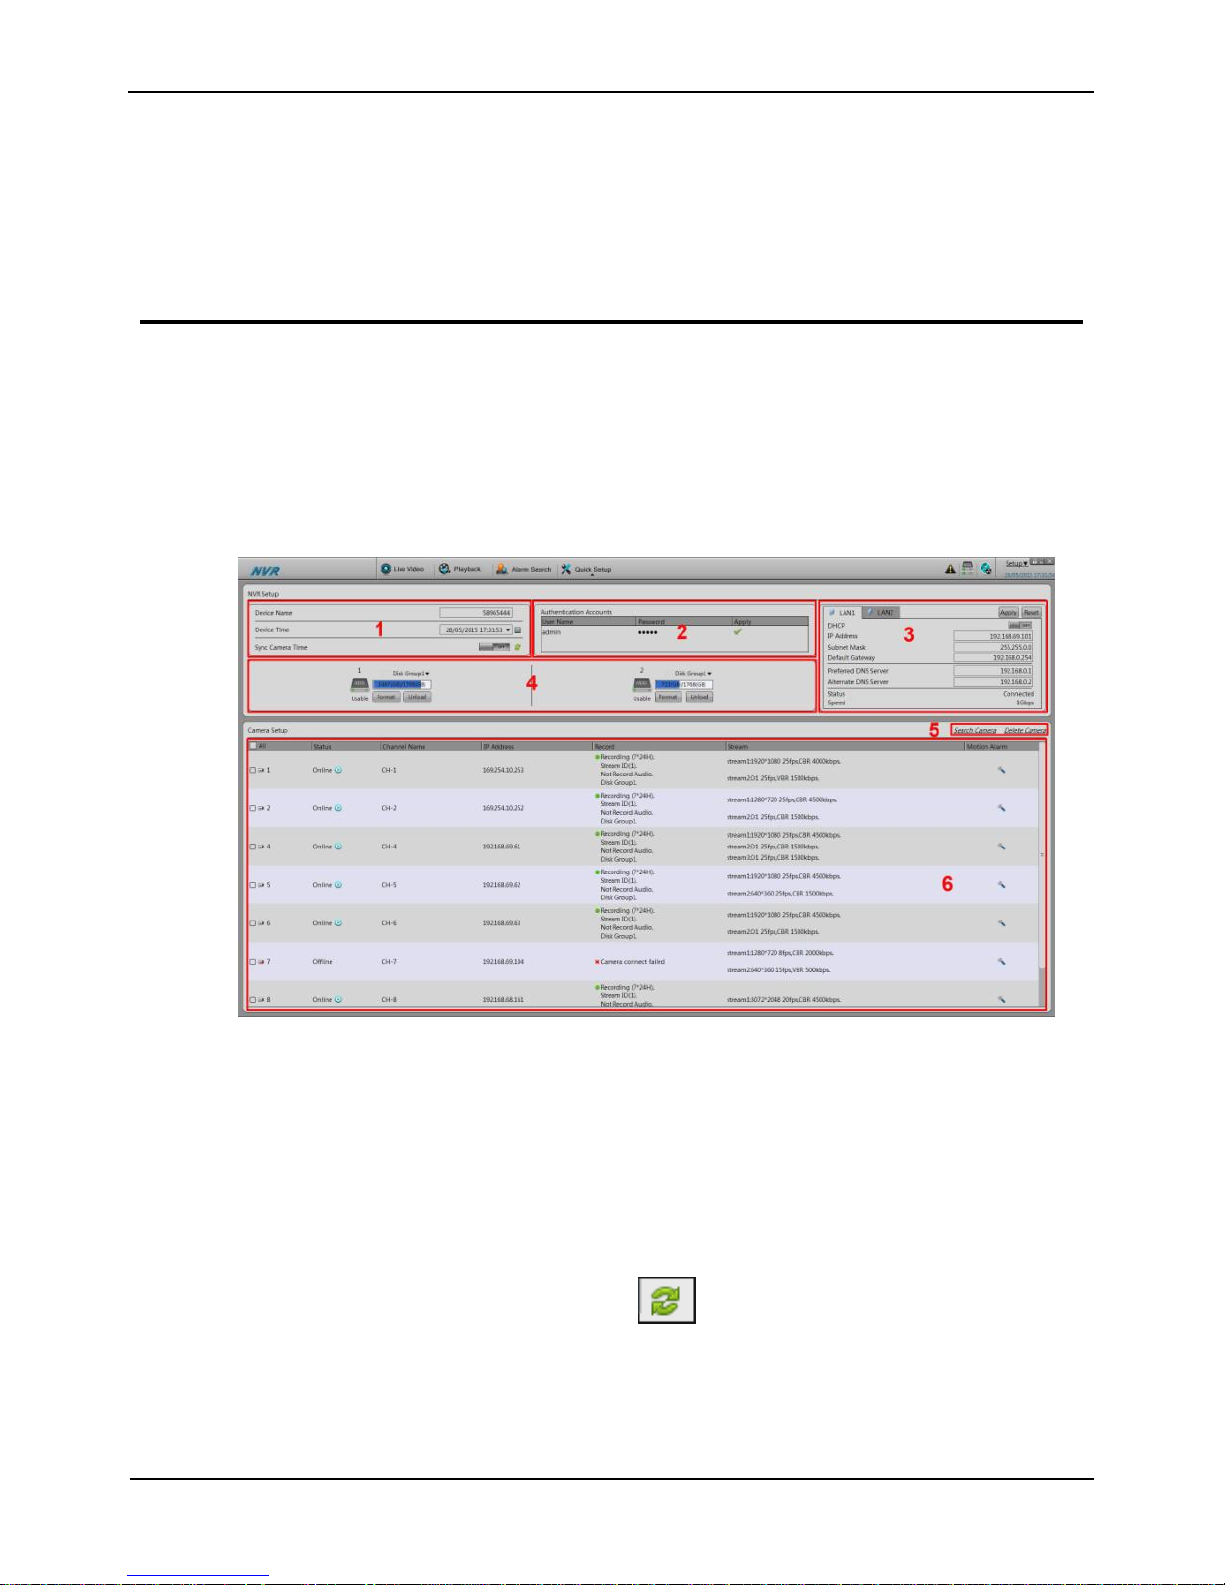
Figure 3-1 shows the quick setup screen.
Figure 3-1 Quick setup screen
Description
1. NVR basic information and time synchronization
Basic information of the NVR
You can set the name and system time of the NVR.
Time synchronization of IP cameras: It can be done manually or automatically.
If the manual mode is selected, click to synchronize the time of IP cameras.
If the auto mode is selected, the NVR synchronizes the time of IP cameras
automatically.
2. Authentication accounts of managed cameras
Network Video Recorder
User Manual
Contents
10 Issue: V1.0 (2016-01-20)
Only successfully authenticated cameras can be used normally. Before adding a camera,
add the authentication account and password of the camera to the list.
To log in to an IP camera, you need to enter the correct authentication account. Only
successfully authenticated IP cameras can be managed. Double-click the user name and
password text field to modify the user name and password.
3. NVR network configuration
The default IP address of the NVR is: 192.168.1.167.
You can enable automatic IP address acquisition and set the IP address, subnet
mask, default gateway, DNS address of the NVR, and display the network
connection status and speed.
4. Hard disk management
Formatting will clear all video data on the hard disk. Use this function only when
necessary.
Be sure to uninstall the hard disk before removing it from the NVR during runtime;
otherwise, the hard disk may be damaged or data may be lost.
The NVR must be connected to a stable power supply during runtime; otherwise,
the hard disk may be damaged or data may be lost.
You can manage the hard disk of the NVR as follows:
Format the hard disk. Click Format. In the displayed dialog box, click Yes.
Check the status of the hard disk (usable, abnormal, unformatted, and unavailable).
Check the used space and total space of the hard disk.
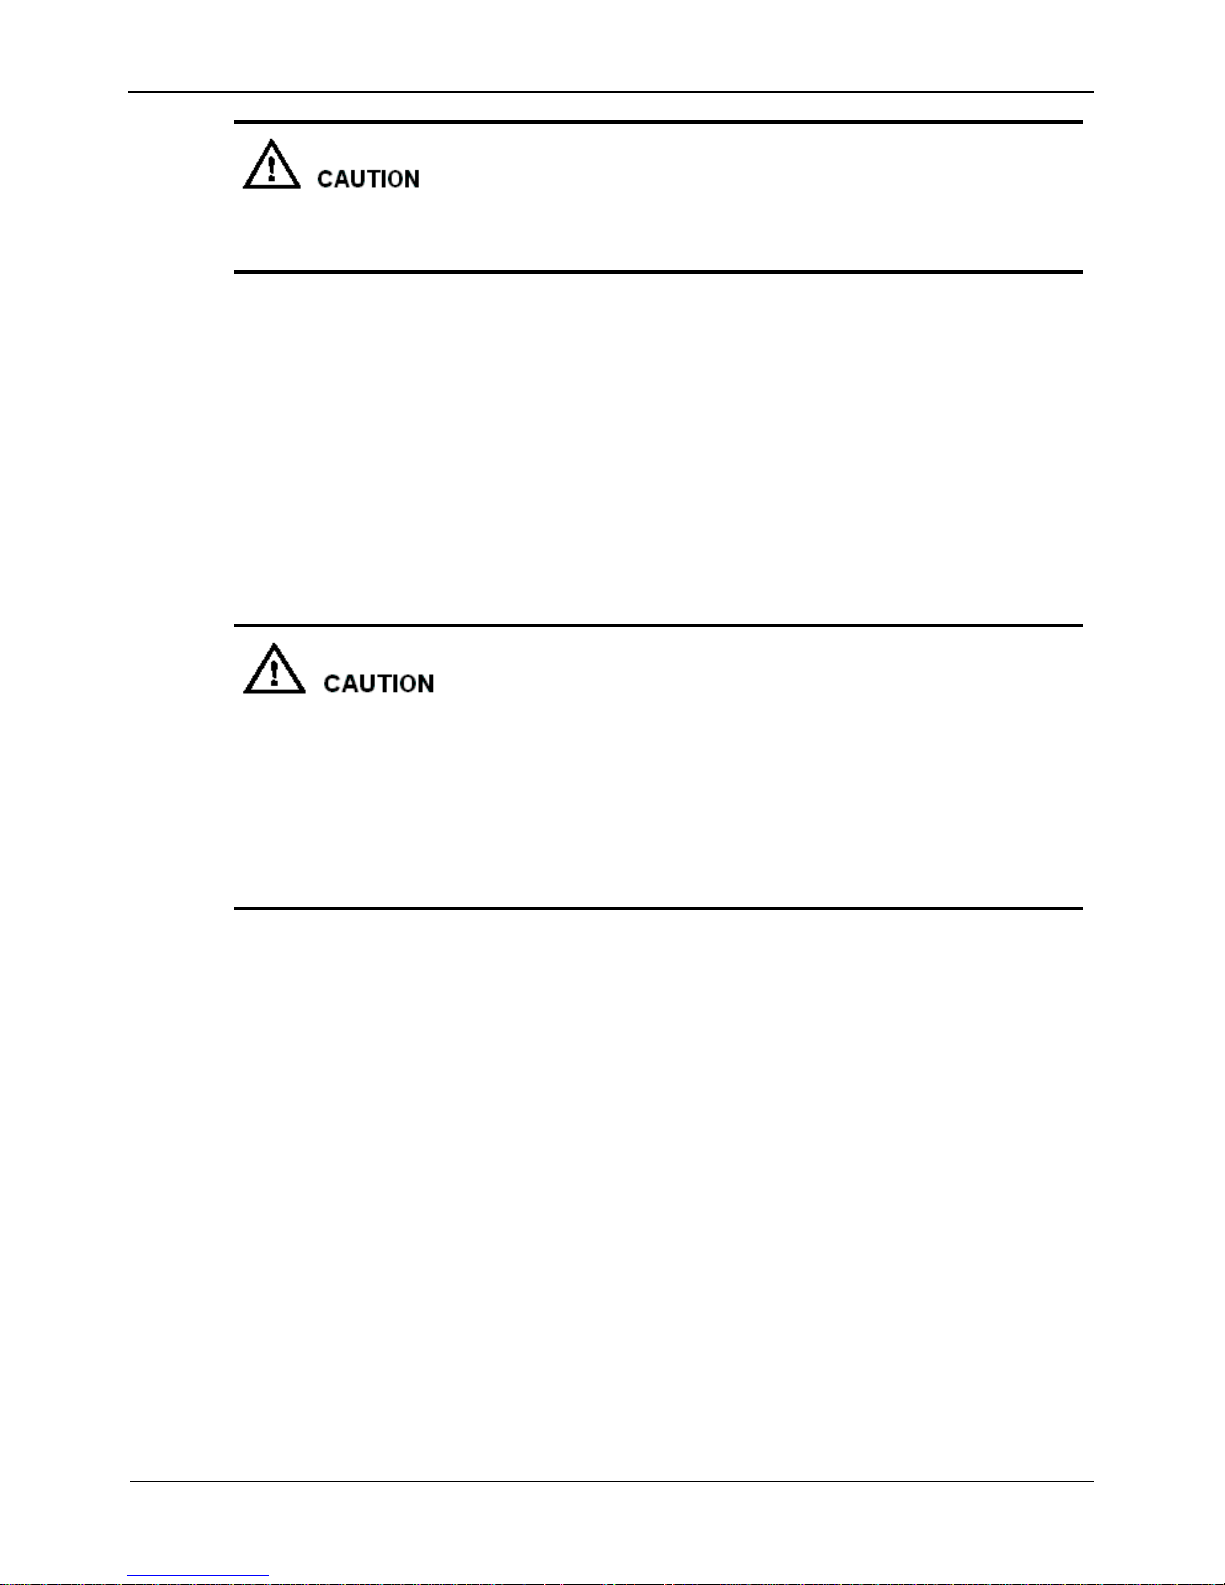
5. Camera search and deletion
When you need to search camera for management, click Search Camera, the Camera
Search page is displayed, then click Scan, it will scan for the camera automatically, as
shown in Figure 3-2.
Network Video Recorder
User Manual
Issue: V1.0 (2016-01-20) 11
Figure 3-2 Camera searching page
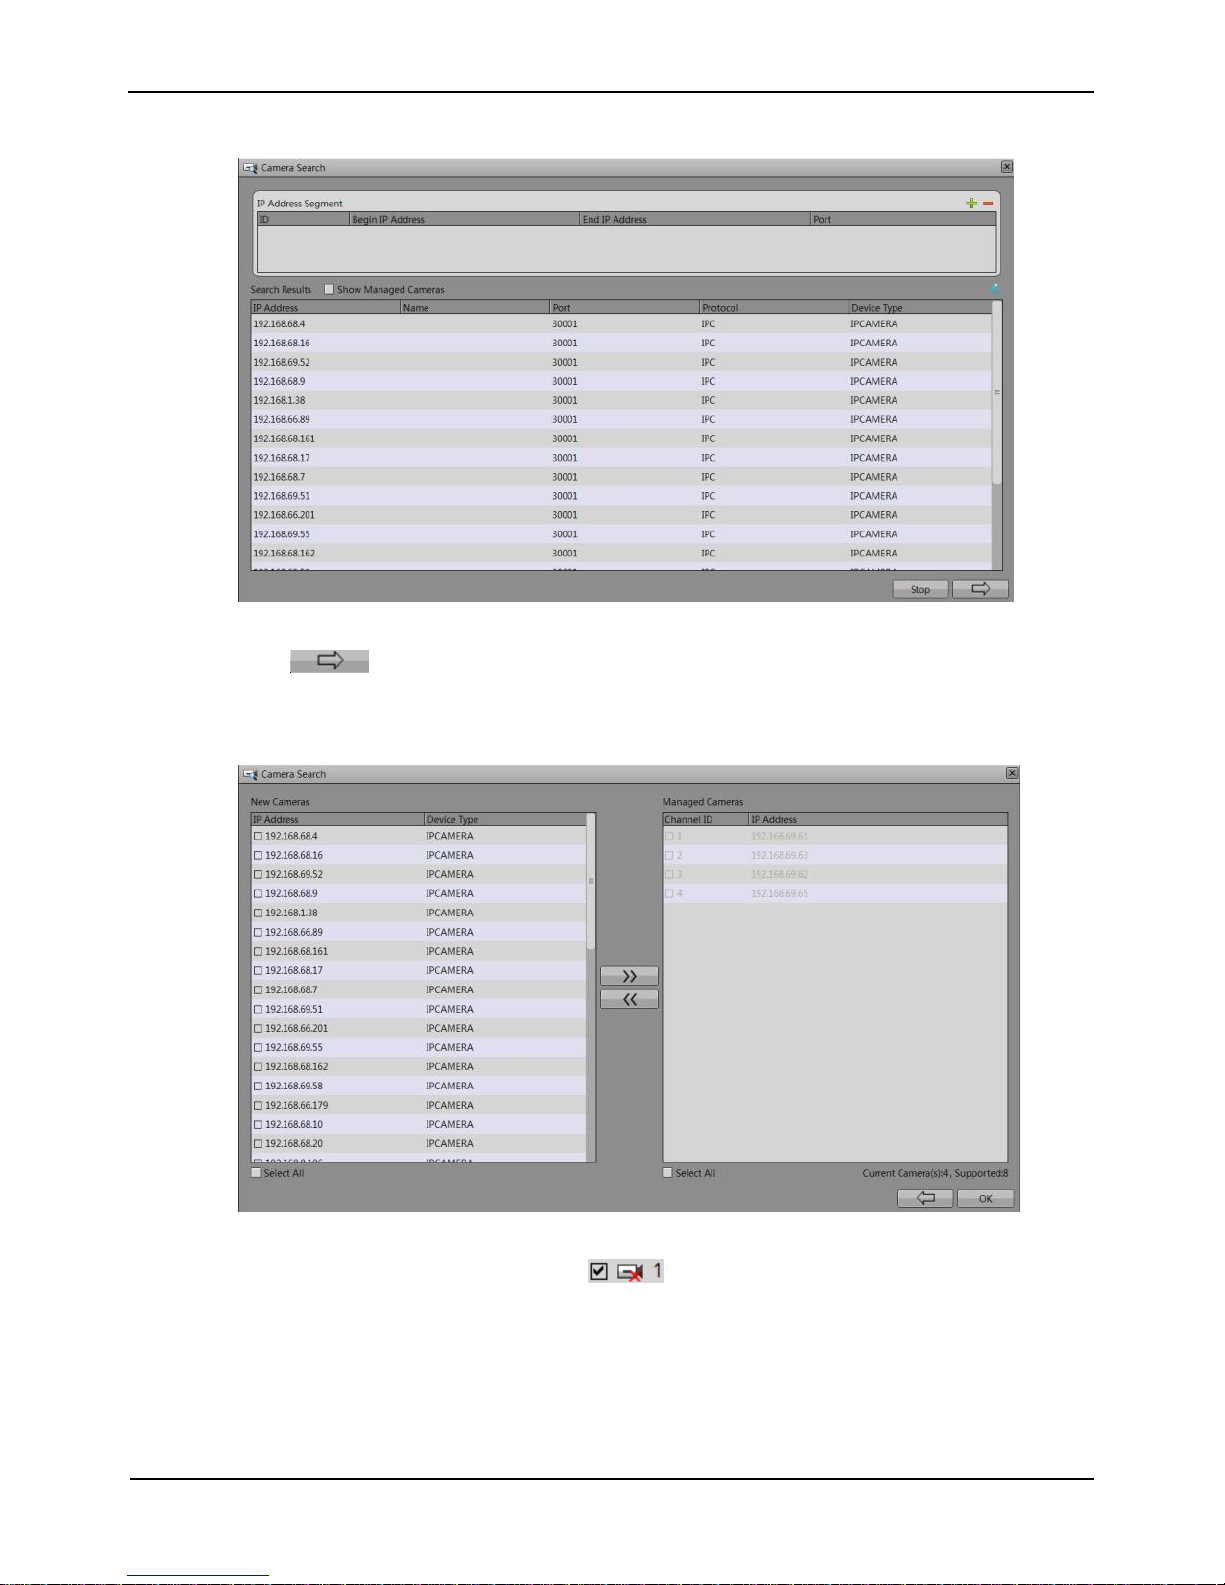
Click , the camera selecting page is displayed as shown in Figure 3-3. Select the
cameras you want and then click Ok to complete selection of IP cameras.
Figure 3-3 Camera selecting page
To remove managed cameras, click in the camera list, select the cameras to
be removed, and click Delete Camera.
6. IP camera setup
You can view the status of an IP camera and set the name, IP address, recording policy,
stream parameter, and motion detection parameter of the IP camera.
Viewing the status of an IP camera
Network Video Recorder
User Manual
Contents
12 Issue: V1.0 (2016-01-20)
The camera status may be Online, Offline, and Incorrect account. For an online IP
camera, click to view live video.
Changing the channel name
Enter a channel name in the Name text field.
Setting a recording policy
Click the recording policy to be modified. The Recording Policy Configuration
page is displayed. For how to set a recording policy, see the 7.1.7 Recording of
Network Video Recorder (NVR) User Guide.
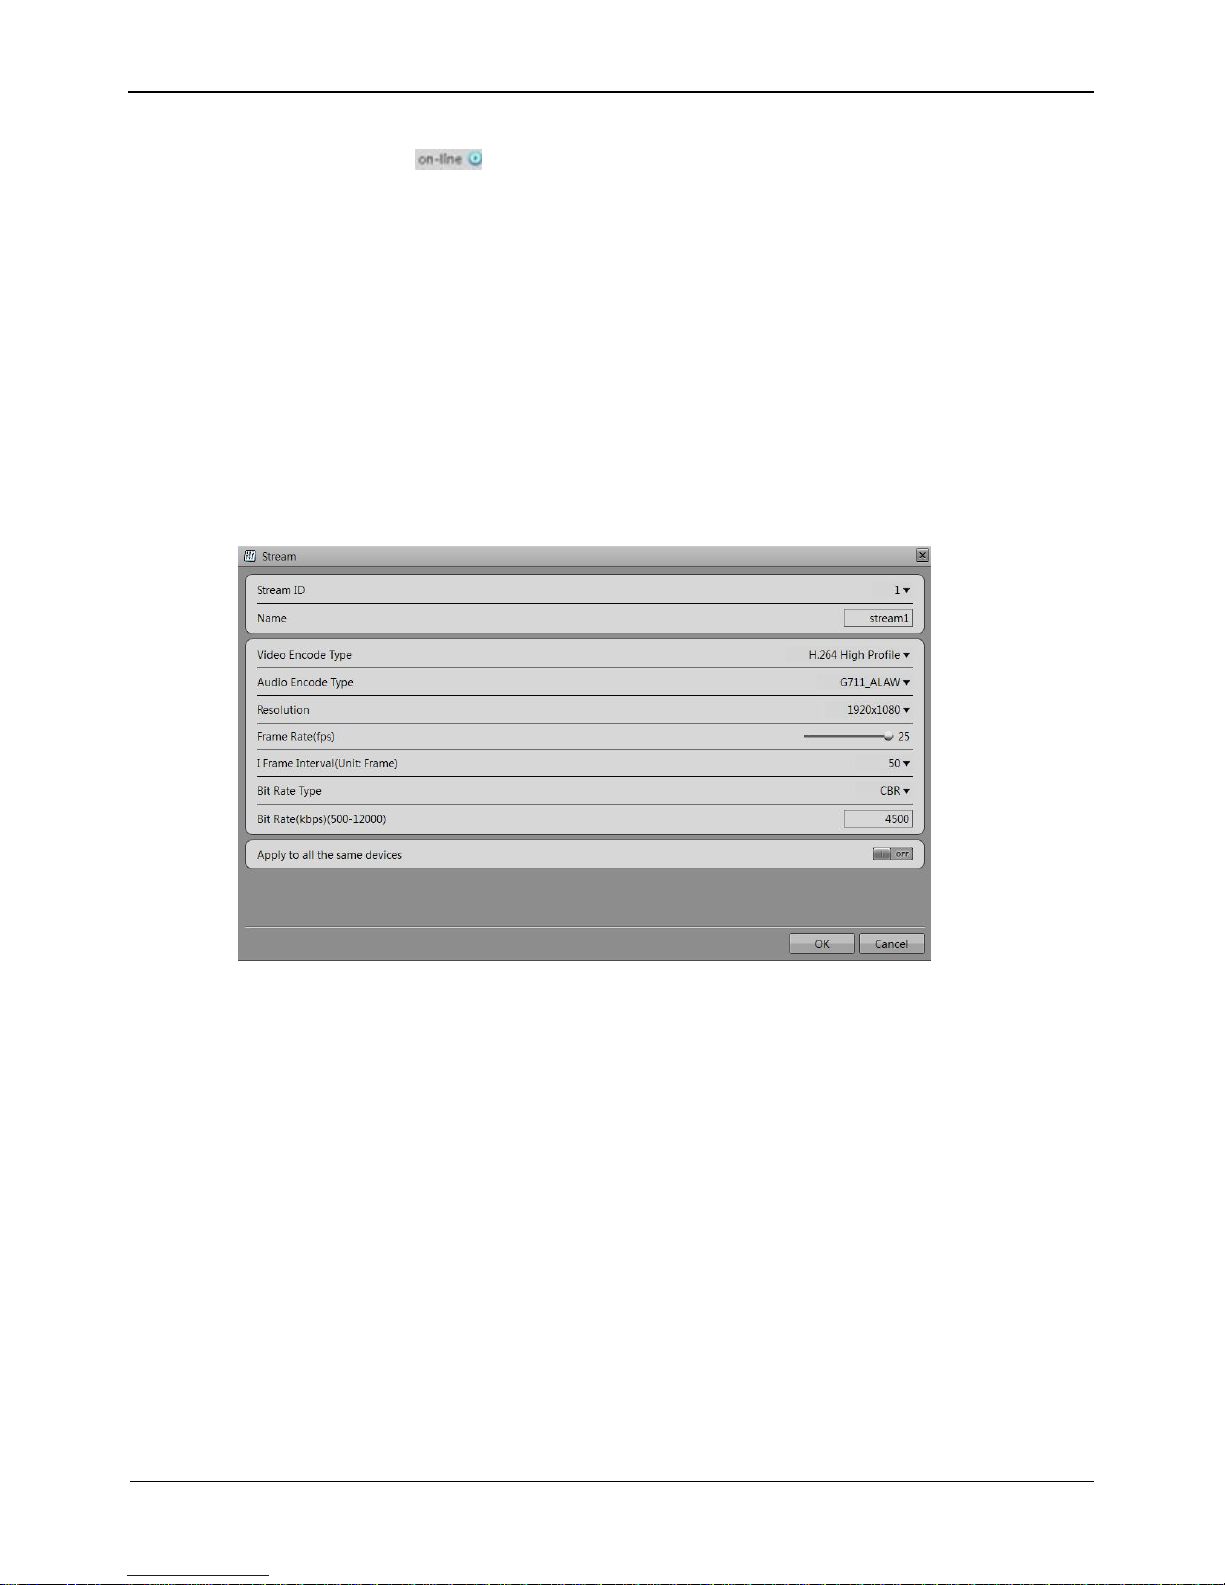
Setting a stream
Click the stream to be modified. The Stream page is displayed, as shown in Figure
3-4.
Figure 3-4 Stream page
Set stream parameters, select On for Apply to all the same devices, and click OK.
The parameter settings are applied to all IP cameras that have the same resolution
as the configured resolution.
Setting a motion detection alarm
Click the motion detection information to be modified. The Motion Alarm page is
displayed. Set the arming time and detection zone when the motion detection alarm
function is enabled.
Network Video Recorder
User Manual
Issue: V1.0 (2016-01-20) 13
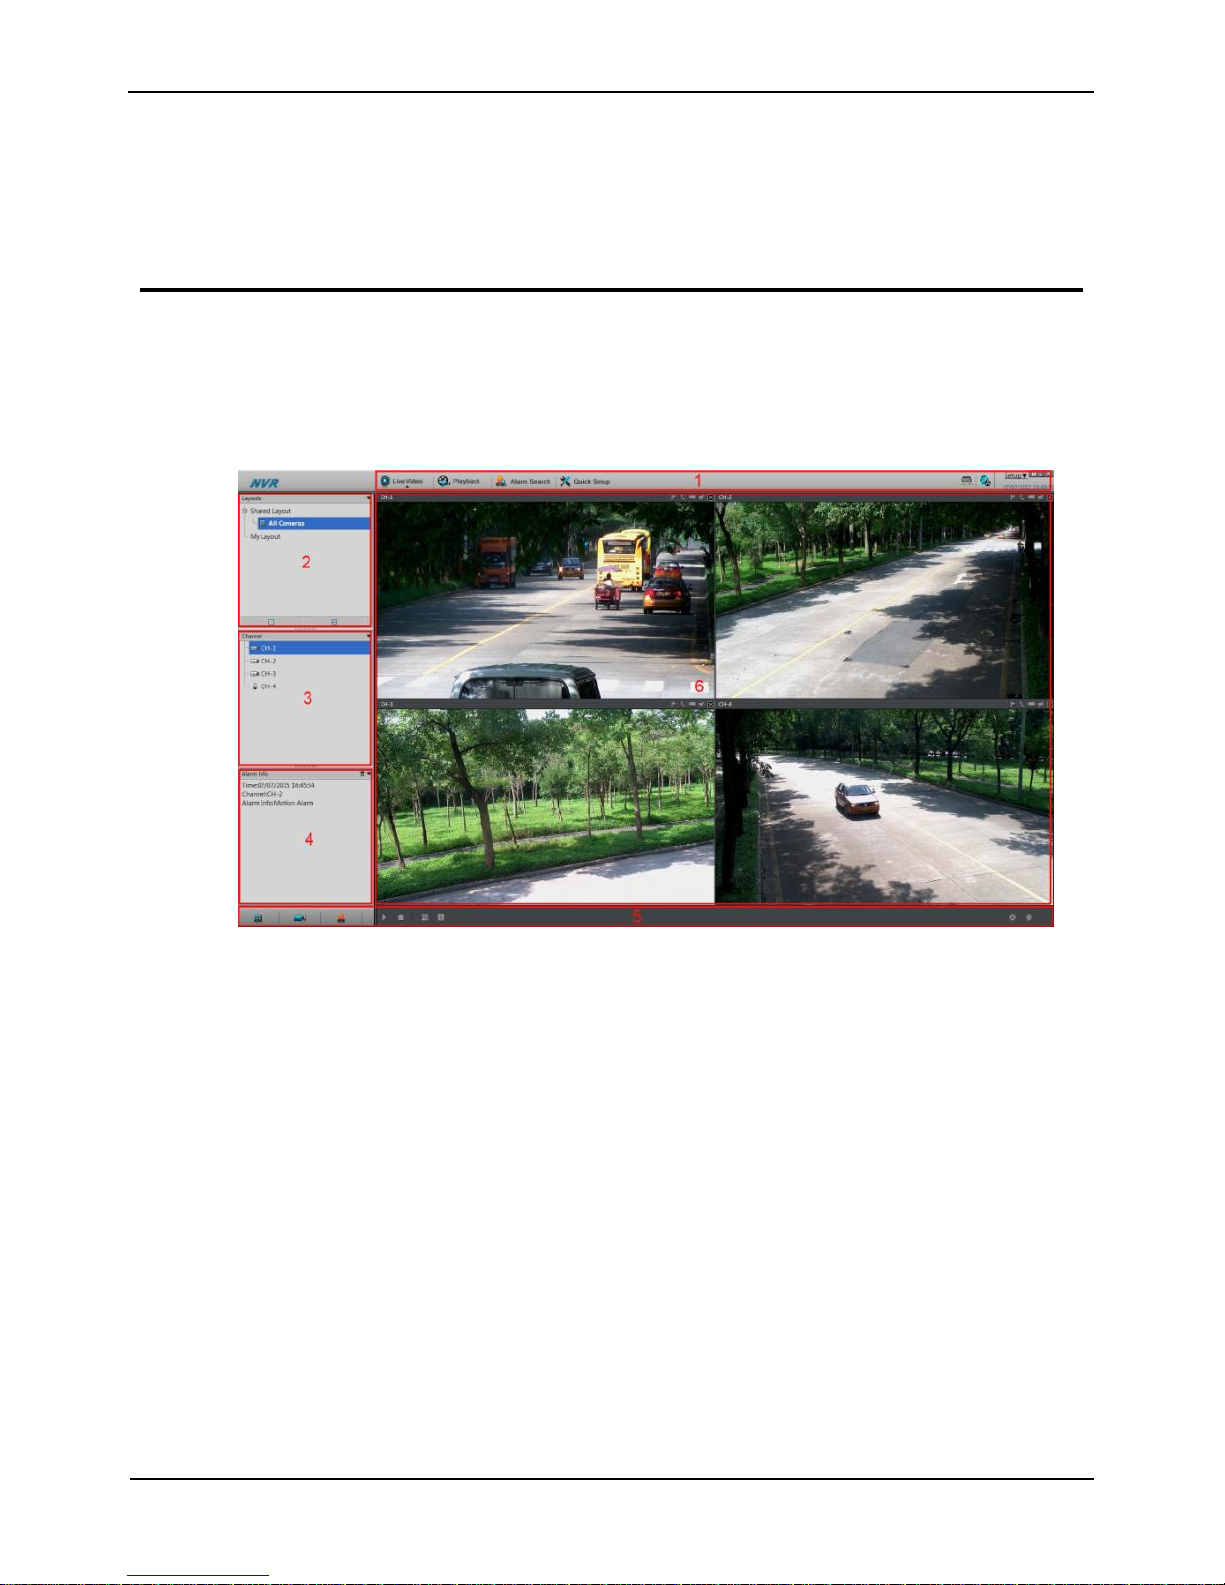
4 Live Video
Enter your user name and password on the login interface and click Login.
The Live Video interface appears, as shown in Figure 4-1.
Figure 4-1 Live Video interface
On the Live Video interface, drag a camera in the Cameras pane on the left to the live
channel and perform the following operations:
Live video playing
Alarm viewing
Record status viewing
PTZ control
Audio listening
Automatic full screen
Video bookmark
Front-end parameter setting
Decoding capability
When the video to be played exceeds the supported decoding capability, the video pane
prompts insufficient decoding capability.

Network Video Recorder
User Manual
Contents
14 Issue: V1.0 (2016-01-20)
Intelligent code stream adaptation
The system provides an intelligent code stream adaptation mechanism.
When a video is played, the system selects a proper code stream based on the sizes and
number of video windows and its own decoding capability to achieve optimal real-time
surveillance effect.
To change a code stream manually, right-click and select a new code stream among the
ones supported by the video device from the Stream option in the shortcut menu. Code
stream information is displayed at the bottom of the video pane.
Figure 4-1Table 4-1 lists the elements of the Live Video interface.
Table 4-1 Elements of the Live Video interface
No.
Name
Description
1
Top menu
The top menu includes Live Video, Playback, Alarm
Search, and Quick Setup. Click each one to enter the
corresponding operation interface.
Click to view the hard disk information of the NVR.
Click to enter the record backup interface.
Click to lock the interface.
2
Layouts
pane
To play a live video, select the one-screen, four-screen, or
six-screen layout and drag a camera in the Cameras pane to
the layout window. To save a layout, click Save in the
control bar at the bottom of the interface and select Shared
Layout or My Layout as the save location. The camera
sequencing layout is supported and can be set in Layouts of
NVR Setup.
3
Cameras
pane
The Cameras pane shows all cameras managed by the
system. To play a live video, drag a camera to the layout
window. Online cameras are marked with ; offline
cameras are marked with ; non-authenticated cameras
are marked with (the entered user name or password is
incorrect).
4
Alarm
Info pane
The Alarm Info pane displays the latest 20 camera alarms,
including motion detection alarms and I/O alarms. To clear
alarms, click .
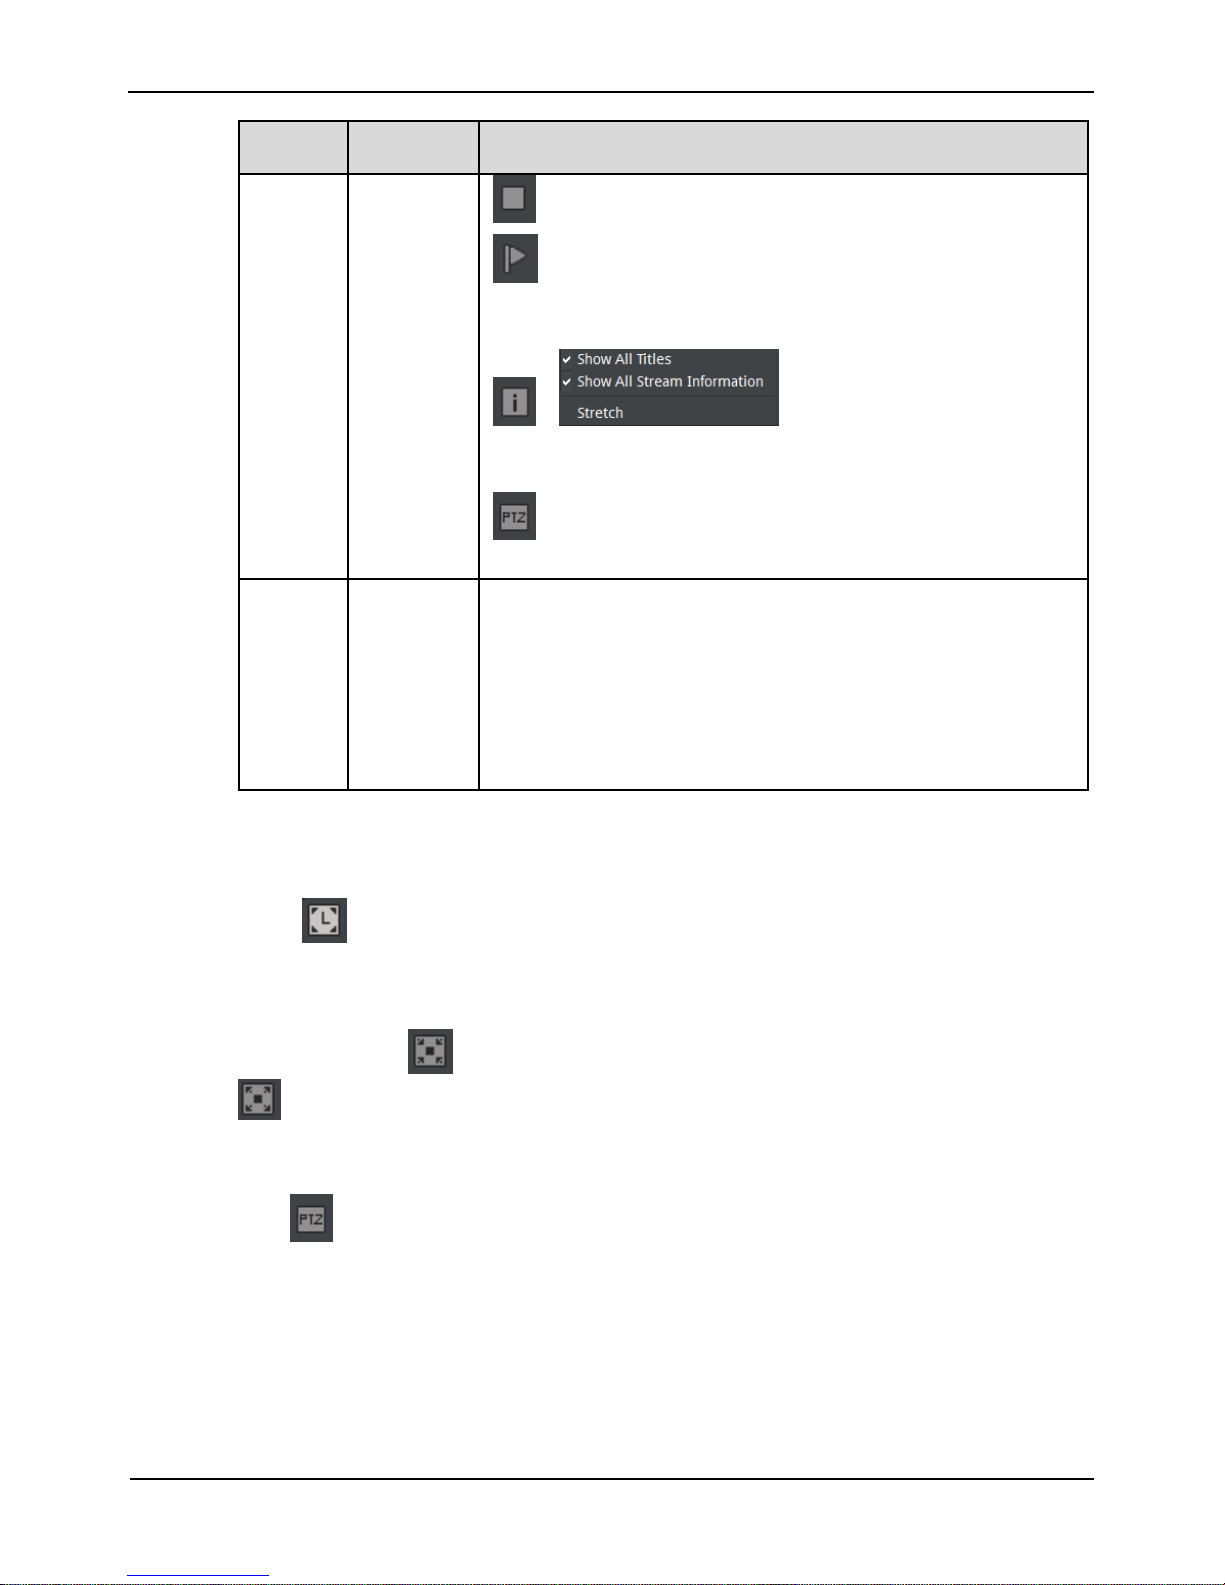
5
Bottom
menu
Click , , and to hide or show the
Layouts, Cameras, and Alarm Info panes.
: used to play a live video.
Network Video Recorder
User Manual
Issue: V1.0 (2016-01-20) 15
No.
Name
Description
: used to close a live video.
: used to bookmark a live video in the current channel
so that the corresponding file can be located during video
playback.
: is displayed when you click
this button. Select an option to adjust the display of the live
video pane based on requirements.
: The PTZ control menu appears when you click this
button.
6
Live
Video
pane
This pane plays live videos and provides the front-end
parameter setting function.
To change a code stream manually, right-click and select a
new code stream among the ones supported by the video
device from the Stream option in the shortcut menu. Code
stream information is displayed at the bottom of the video
pane.
Automatic full screen
Click and choose whether to enable automatic full screen and the delay time to
enable automatic full screen in the shortcut menu. If automatic full screen is enabled,
the full screen is displayed when no operation is performed during the delay time. A
toolbar appears when you move the cursor to the bottom of the full screen. To exit the
full screen, click in the toolbar. To enter the full screen mode manually, click
.
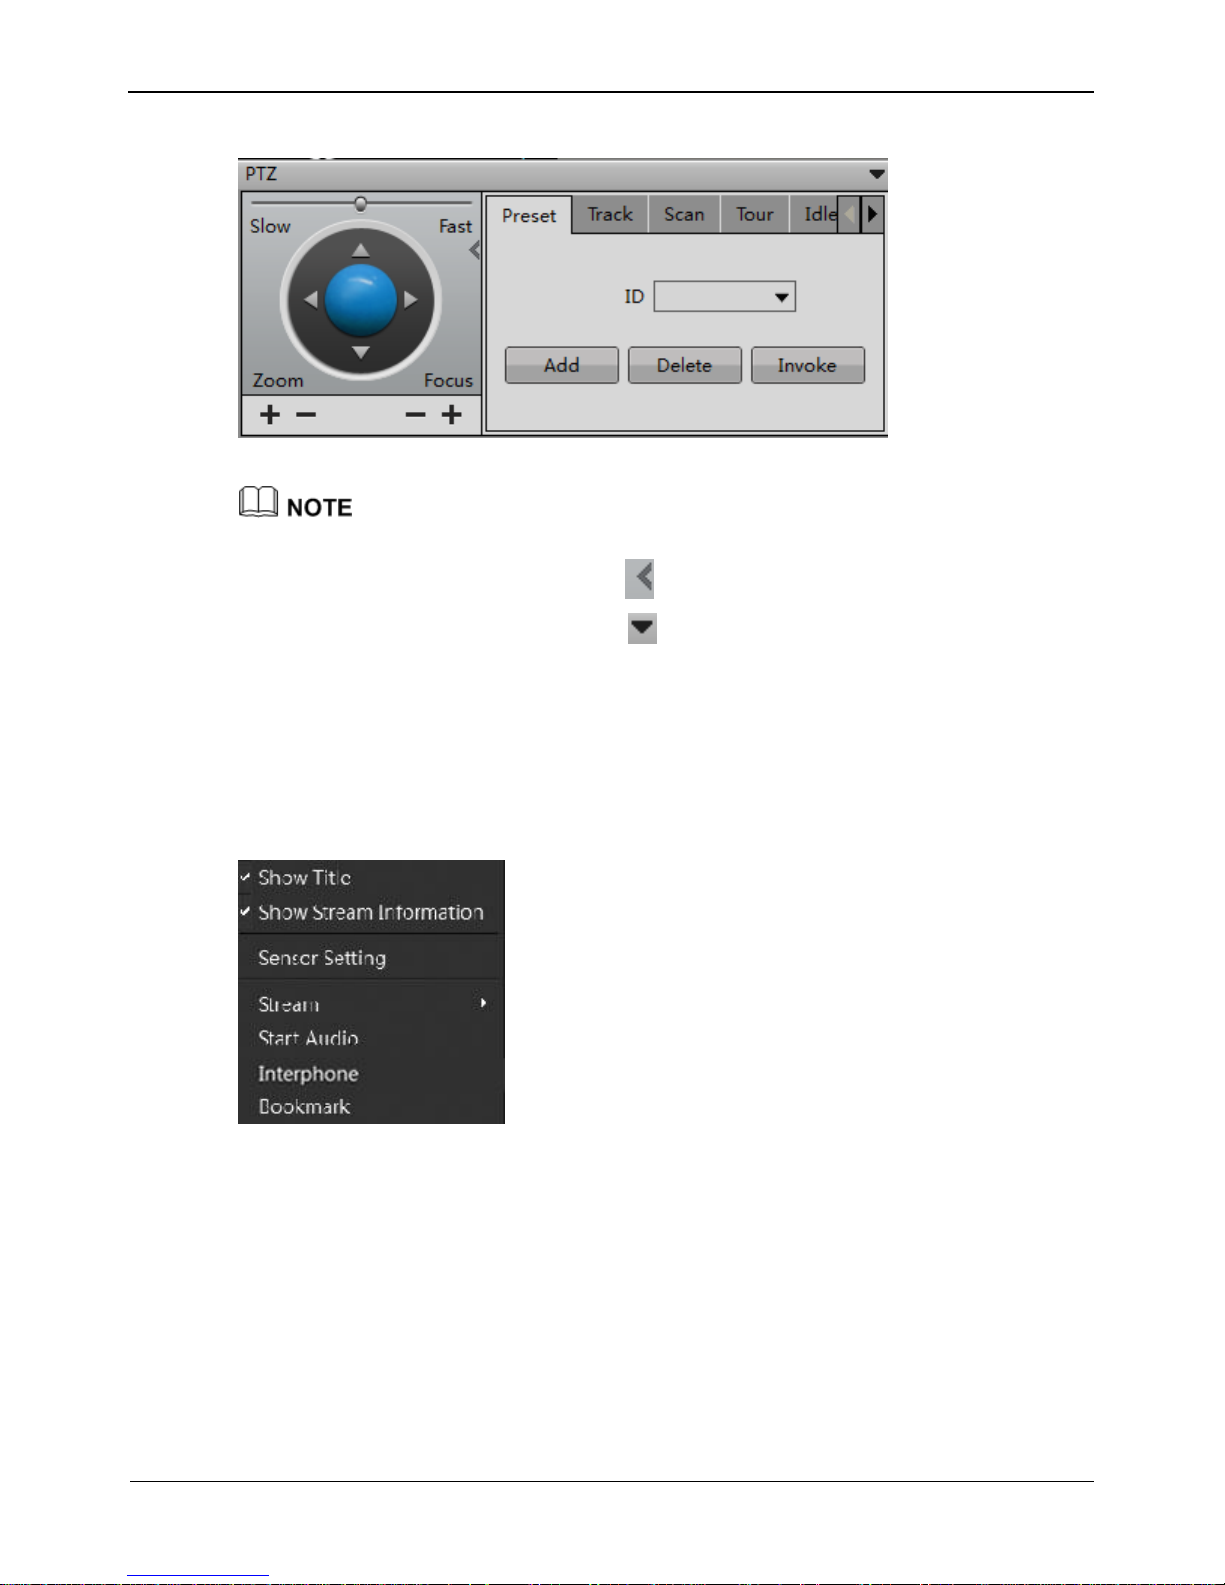
PTZ operation
Click . The PTZ operation menu appears, as shown in Figure 4-2. The following
items can be configured: PTZ direction, zoom, preset position, track, scanning, home
position, infrared lamp, true north, and timer.
Network Video Recorder
User Manual
Contents
16 Issue: V1.0 (2016-01-20)
Figure 4-2 PTZ control menu
The PTZ control menu takes effect only for high-speed domes and external PTZ cameras.
To close the PTZ setup menu, click on the PTZ control interface.
To exit the PTZ control menu, click on the PTZ control interface.
Quick operation on the Live Video interface
Right-click the mouse button and the Live Video menu appears (shown in Figure 4-3),
where you can choose to show the title and code stream information, turn on/off audio,
and select code streams.
Figure 4-3 Live Video menu
 Loading...