

Ganz ZN1A-D4NMZ43L, ZN1-D4NMZ43L Installation Guide
PixelPro GXi Series ZN1-D4NMZ43L Installation Guide
03-2014-B 1

PixelPro GXi Series ZN1-D4NMZ43L Installation Guide
Precaution
Please read this manual carefully before installing the unit.
Never disassemble the camera. Unauthorized disassembly may cause equipment
failure or damage to the unit.
Please do not install the camera in a place exposed to direct sunlight.
Do not operate the camera in environments beyond the specified temperature.
Refer to “Environment Condition” on “APPENDIX (A) : SPECIFICATIONS” in this manual.
Before applying power to the camera, check the power source to ensure that it is
within the specifications. Refer to “Electrical Characteristics” on “APPENDIX (A) :
SPECIFICATIONS”
03-2014-B 2

PixelPro GXi Series ZN1-D4NMZ43L Installation Guide
Table of Contents
Precaution ................................................................................................................ 2
1. FEATURES ............................................................................................................. 4
2. PACKAGE CONTENTS............................................................................................. 5
3. PART NAMES ........................................................................................................ 6
4. INSTALLATION ...................................................................................................... 7
4.1. Installing the camera .......................................................................................................... 7
4.2. Adjusting angle of the camera ......................................................................................... 10
4.3. Adjusting Zoom and Focus ............................................................................................... 11
4.4. Setting the Image Attribute ............................................................................................. 12
5. CONNECTIONS .................................................................................................... 13
6. CONFIGURATION ................................................................................................ 15
6.1. Set up network environment ........................................................................................... 15
6.1.1. Generic IP Environment ............................................................................................ 15
6.1.2. Custom IP Environment............................................................................................. 16
6.2. View video on web page .................................................................................................. 17
6.2.1. ActiveX Installation .................................................................................................... 17
6.2.2. View video using IPAdmin Tool ................................................................................. 18
6.3. Reboot .............................................................................................................................. 19
6.4. Factory Default ................................................................................................................. 19
6.5. Safe Mode ........................................................................................................................ 20
APPENDIX (A): SPECIFICATIONS .............................................................................. 22
Summary ................................................................................................................................. 22
Electrical Characteristics ......................................................................................................... 23
Environment Condition ........................................................................................................... 23
Mechanical Condition ............................................................................................................. 23
APPENDIX (B): POWER OVER ETHERNET ................................................................. 24
PoE compatibility .................................................................................................................... 24
Power Comparison .................................................................................................................. 24
APPENDIX (C): DIMENSIONS ................................................................................... 25
APPENDIX (D): HEXADECIMAL-DECIMAL CONVERSION TABLE ................................. 26
REVISION HISTORY ................................................................................................. 27
03-2014-B 3

PixelPro GXi Series ZN1-D4NMZ43L Installation Guide
1. FEATURES
Camera
SONY EXMOR 1/2.9” 1080p CMOS Image Sensor
True Day / Night
DC Auto Iris Lens
WDR
Embedded IR Illuminator
Remote Zoom/Focus Control (One Click Focus)
Video
H.264 Baseline, Main, High Profile(MPEG-4 Part 10/AVC), MJPEG(Motion JPEG)
Max 30fps in 1080p
Text Overlay
Analog Video Output for 3 minutes (only for installation purpose)
Network
10 / 100 Base-T Ethernet
Integration
Software Development Kit (SDK) available
ONVIF Compliant (Profile S)
General
microSD slot
Power Over Ethernet (PoE)
Video Contents Analytics (VCA)
VCA Presence (Standard)
VCA Surveillance(Optional)
03-2014-B 4

PixelPro GXi Series ZN1-D4NMZ43L Installation Guide
Camera
DC Power Adaptor
Universal Plugs
Screws and anchor blocks
Quick Installation Guide
Camera Opener
Ferrite Core
DC Power Jack Cable
Installation Template
Cable Hole Cap
Note
i
The contents above are subject to change without prior notice.
2. PACKAGE CONTENTS
Please unpack the package carefully and handle the equipment with care.
The package contains:
03-2014-B 5

PixelPro GXi Series ZN1-D4NMZ43L Installation Guide
④
②
③
⑤
⑥
* Models herein and their appearance are subject to change without any prior notice.
3. PART NAMES
① Reset button
Use the button to restart the device or to reset it to Factory Default.
Refer to 6.3. Reboot and 6.4. Factory Default for more details.
② PAL/NTSC button
Pressing the button cycles through PAL, NTSC, and no video output mode: NO video > PAL >
NTSC
③ microSD slot
Supports up to 64GB. Recommend Class 4 and higher for HD recordings.
④ Power Cable socket
Socket for the DC Power Jack Cable included in the package (Use DC12V adaptor for power
supply)
⑤ LAN connector
RJ45 LAN connector for 10/100 Base-T Ethernet (PoE supported)
⑥ Video Output connector
CVBS : 1.0Vp-p / 75 Ω BNC
Once the PAL/NTSC button is pressed, the video displays for 3 minutes before returns back to
‘no video output’ status.
03-2014-B 6

PixelPro GXi Series ZN1-D4NMZ43L Installation Guide
Opener
How to remove the dome cover
Remove the dome cover with the opener included in the package like the image
below.
Caution
!
To prevent products from damage, place the camera on stable and non-vibrating
surfaces If the stability is in doubt, consult safety personnel for reinforcements,
and then proceed with the installation.
1) Place the installation template (outline
shown on the next page) included in the
package on the desired installation surface.
2) Drill holes in correct positions based on
the template paper, and insert anchor
blocks into the holes.
3) Remove the dome cover with the opener
included in the package.
4) Make sure the necessary cables including
a LAN cable and a power cable are properly
connected to the camera.
*It is recommended to install the ferrite
core provided in the package on the MCX
cable to minimize high frequency noise
level. Please refer to the note on the next
page for the detail.
5) Place the camera on the surface and
match the alignment holes with the inserted
anchor blocks.
6) Tighten the anchor blocks with screws.
7) Adjust the angle of the camera. Refer to
4.2.Adjusting angle of the camera for the
detail.
8) Attach the dome cover on main body and
push it toward main body till a “tick” sound
is heard.
Note
i
1) Insert the tip of the opener in the groove.
2) Give a little snap on the opener toward the upper right
direction. Then, the dome cover will be easily detached.
4. INSTALLATION
4.1. Installing the camera
03-2014-B 7
PixelPro GXi Series ZN1-D4NMZ43L Installation Guide
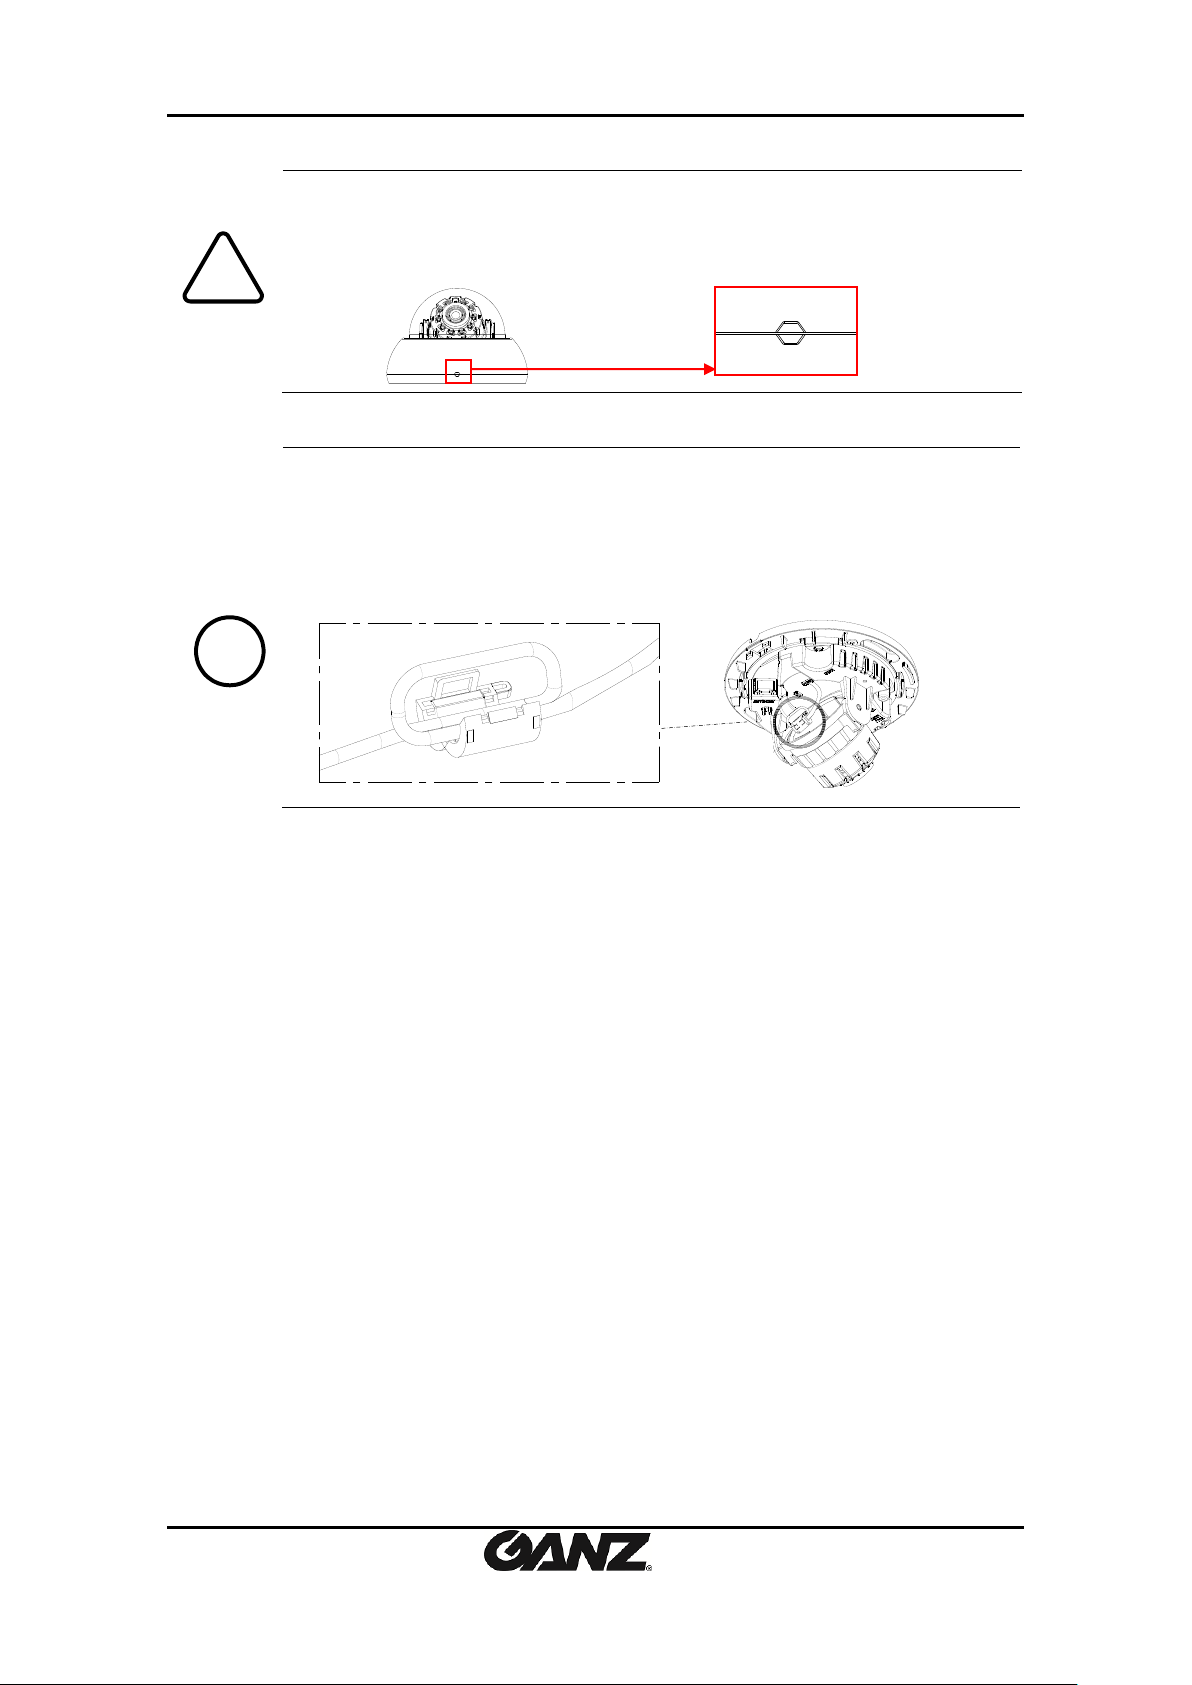
Caution
!
How to close the dome cover
When placing the dome cover, look for carved trapezoid mark on both dome
cover and main body. Both trapezoids should be aligned together when placing
the cover like the image below.
MCX cable is the cable already linked inside the camera. The method to install
the ferrite core is as follows.
1. Open the ferrite core by lifting the clip.
2. Make one loop with the cable through the ferrite core. (See the image
below.)
3. Close the ferrite core to hold the cable loop into place.
Note
i
03-2014-B 8
PixelPro GXi Series ZN1-D4NMZ43L Installation Guide
Caution
!
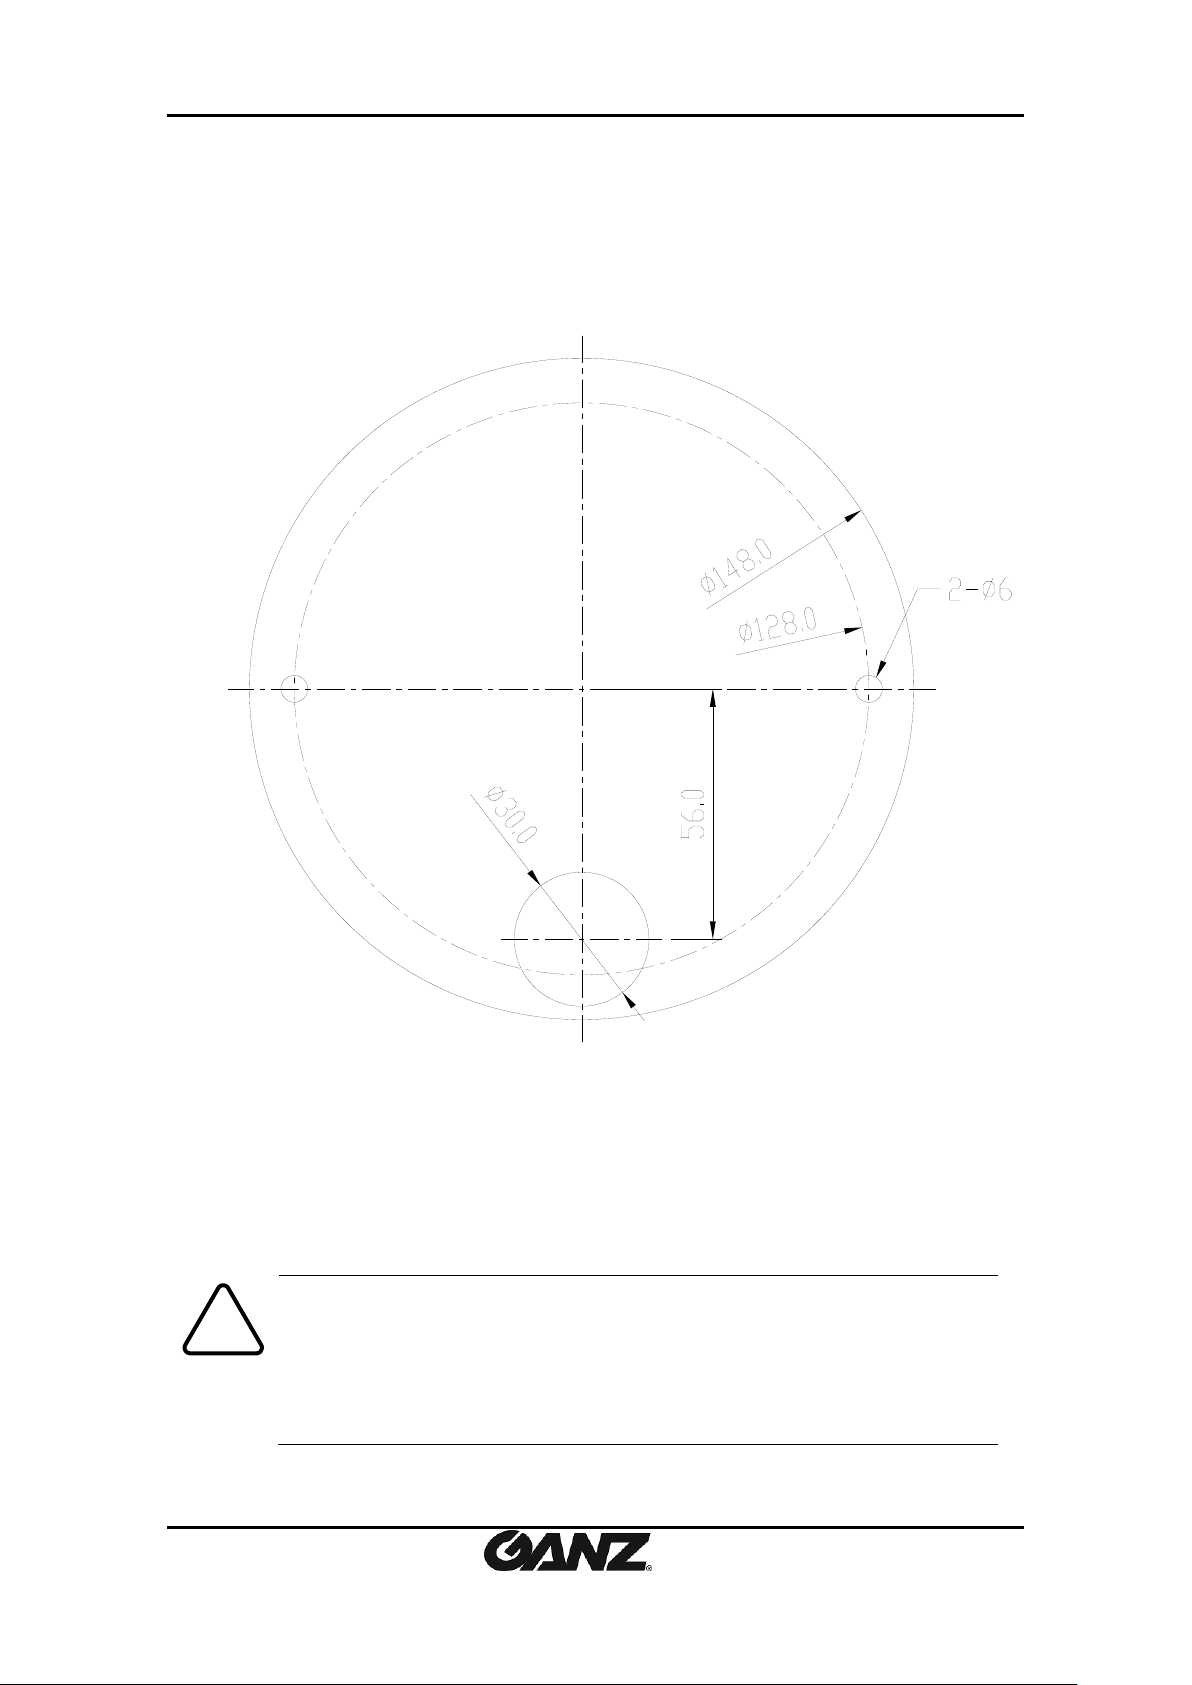
Installation template’s image size scale in this installation guide is not 1:1.
The correct-size template design paper can be found inside the package
separately.
Installation Template
03-2014-B 9
(Unit: mm)
 Loading...