

Page 1
ZC-FM3 Series
Recessed Mount Kit
Installation Book
Page 2
SAFETY PRECAUTIONS
ZC-D4000
ZC-D5000
ZN-D2024
he exclamation point within an equilateral triangle is
T
intended to alert the user to presence of important
operating and maintenance (servicing) instructions in
the literature accompanying the appliance.
SECURITE
e point d'exclamation à l'intérieur d'un triangle
L
équilatéral avertit l'utilisateur de la présence
d'instructions importantes d'utilisation et de
maintenance dans la documentation accompagnant
l'appareil.
1 UNPACKING
npack carefully. Check to ensure that the following items are
U
included for the applicable modules ordered:
• ZC-FM3 Series Recessed Mount Kit
• Hardware Kit
• Template for 6.3” diameter hole
This kit should be used with the following products:
• ZC-D5000 Series Domes
• ZC-D4000 Series Domes
• ZN-D2024 Series Domes
SICHERHEITSVORKENHRUNGEN
Das Ausrufezeichen in dem gleichseitigen Dreieck ist
dazu da, den Benutzer auf wich-tige
Inbetriebnahme- und Instandhaltungs-vorschriften
hinzuweisen, die dem Gerät in Form einer Broschüre
beigelegt sind.
The recessed mount kit can be installed in the wall or ceiling.
If an item appears to have been damaged in shipment, replace it
properly in its carton and notify the shipper. If any items are missing, contact the company from which the unit was purchased.
The shipping carton is the safest container in which the unit may be
transported. Save it for possible future use.
PRECAUCIONES DE SEGURIDAD
El símbolo de exclamación dentro de un triángulo equilátero, se muestra con el objetivo de alertar al ususario
de que instrucciones de operación y
mantenimiento importantes acompañan al equipo.
2 SERVICE
If the unit ever needs repair service, the customer should
contact the company from which the unit was purchased for
authorization to return and shipping instructions.
3 INSTALLATION
Attention: Installation should be performed by qualified service personnel only, in accordance with the National
Electrical Code or applicable local codes.
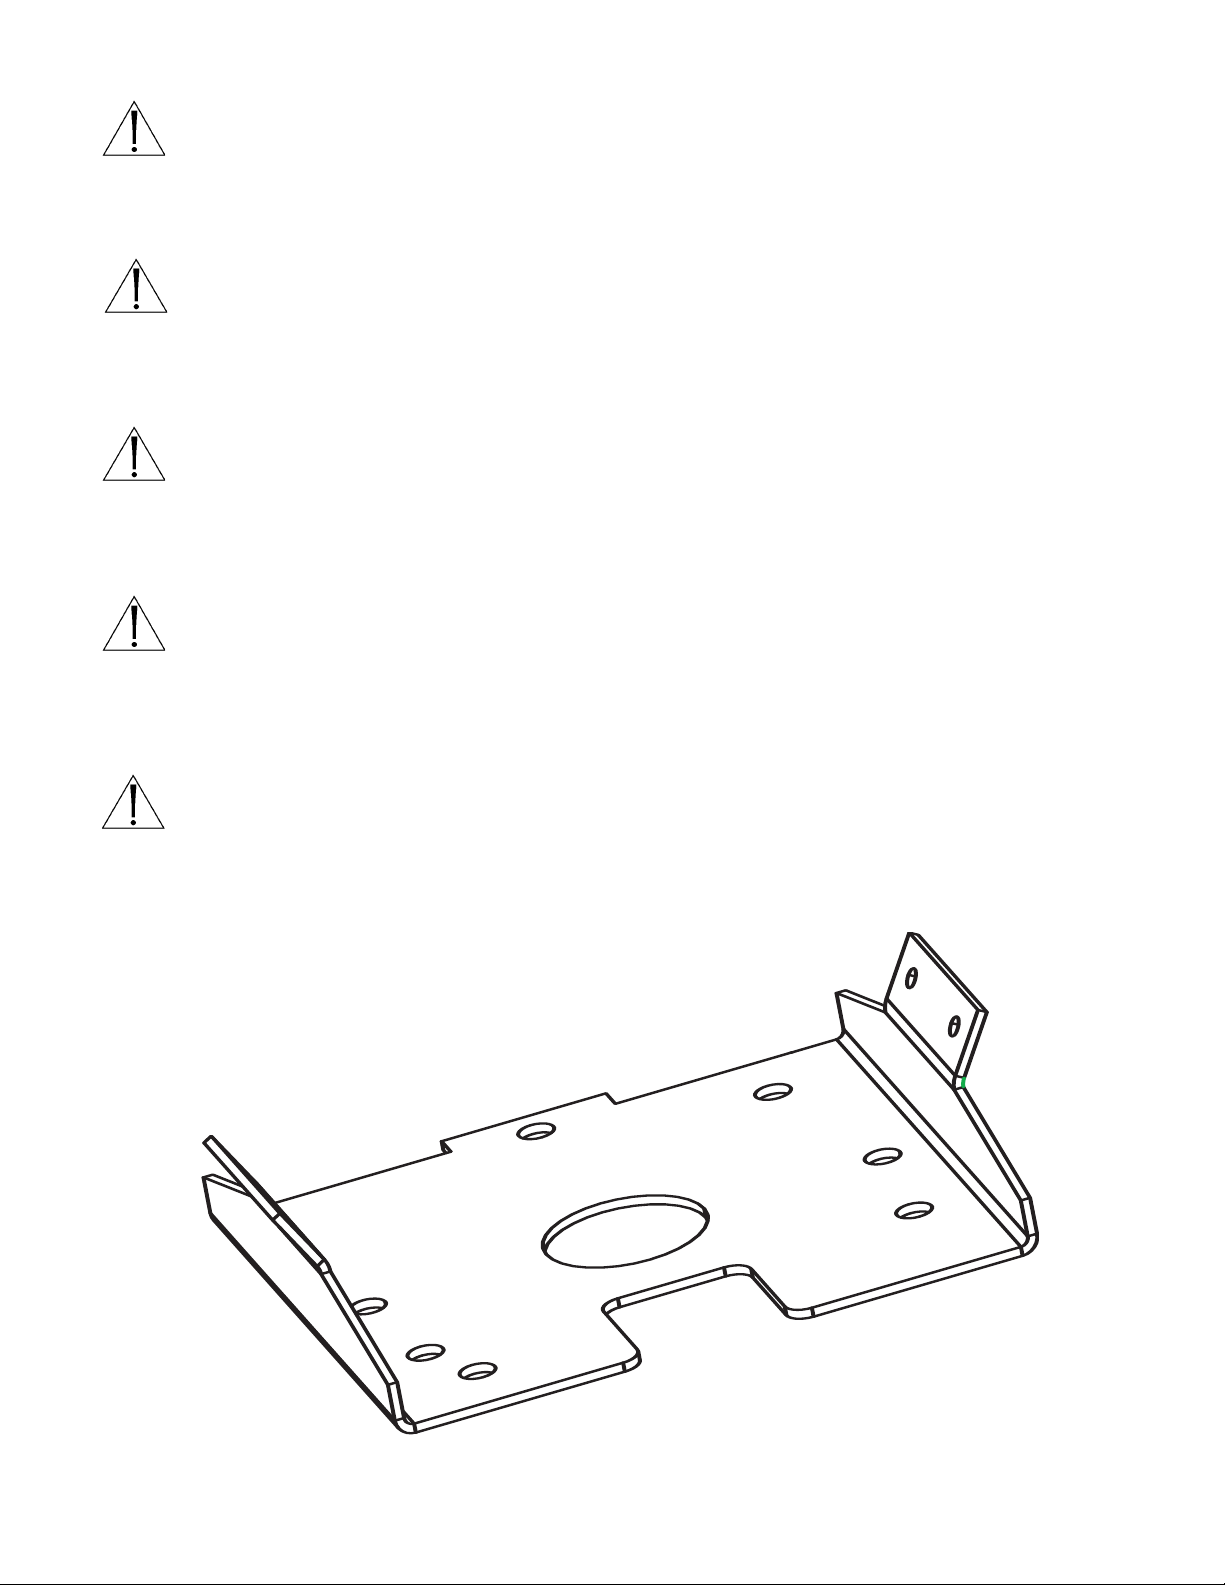
Determine the correct hole-pattern for installation by using the following drawing.
Match the hole pattern labeled on the diagram to the corresponding model number to be installed.
D2024
D4000
D5000
D4000
D5000
D4000
D2024
Fig. 1 Hole Patterns
Page 3

6.
Attach camera base to bracket
using two #8-32 x 1-1/2"
pan head screws.
-Toggle Bolts
#10-24 (2x)-
Cut hole in the
Wall or Ceiling Tile
using included template
4.
Install Recessed
Mount Bracket
in ceiling or wall and
tighten toggle bolts.
5.
Remove Dome cover.
Let land on retaining wire.
7.
Connect power and video
cables, make necessary zoom
and focus adjustments to
the camera, then reinstall
dome cover.
Push dome up into ceiling
and secure trim ring to
Recessed Mount Bracket using
the trim ring's captive screws.
3.
8.
ZC-D5000 Models Only
Cut Tabs
ZC-D5000
1. When installing the ZC-D5000
detach the inner trim ring by
cutting the four tabs with a utility knife.
2. Shave down any remaining tabs until
flush.
Cut Tabs
Cut Tabs
Cut Tabs
5.
Push dome up into ceiling and secure trim ring
to flush mount adapter with trim ring's captive
flat head screws.
Cut hole using
included template.
4.
With the dome suspended,
connect power and video cables,
make necessary zoom
and focus adjustments,
and reinstall dome cover.
1.
2.
Remove dome cover,
install camera base to
bracket using three (3)
#8-32 x 5/8" pan head
screws.
To disassemble the camera unit,
unscrew two flat head screws,
and remove trim ring to drop down
the mounting adapter
and camera unit for service.
3.
Install flush mount adapter
bracket to ceiling or
wall and tighten toggle bolts.
Fig. 2 Installing Recessed Mount Kit ZC-D4000 Series Dome
Fig. 3 Installing Recessed Mount Kit ZC-D5000 Series Dome
Page 4

6.
Attach camera base to bracket
using two #8-32 x 5/8"
pan head screws.
8.
Push dome up into ceiling g
and secure trim ring to
Recessed Mount Bracket using
the trim ring's captive screws.
-Toggle Bolts
#10-24 (2x)-
3
.
Cut hole in the Wall or Ceiling Tile
using included template.
4.
Install Recessed
Mount Bracket
in ceiling or wall
and tighten toggle bolts.
5.
Remove Dome cover.
7.
Connect power and video
cables, make necessary zoom
and focus adjustments to
the camera, then reinstall
dome cover.
ZN-D2024 Models Only
1 When installing the ZN-D2024
detach the inner trim ring by
cutting the four tabs with a utility knife.
2. Shave down any remaining tabs until
flush.
Cut Tabs
ZN-D2024
Cut Tabs
Cut Tabs
Cut Tabs
©2008 CBC (America) Corp.
New York: 55 Mall Drive, Commack, NY 11725 Tel: 800 422 6707 or 631 864 9700 Fax: 631 543 5426
California: 20521 Earl Street, Torrance, CA 90503 Tel: 800 888 0131 or 310 793 1500 Fax: 310 793 1506
.computar
www
ganz.com
Data subject to change without notice
Fig. 4 Installing Recessed Mount Kit ZN-D2024 Series Dome
100 0208 001 CBC
05/08 Printed in China.
 Loading...