

Ganz PixeIPro Series zn-md2xxm User Manual

PixelPro Series User’s Manual
06-2014-A
0

PixelPro Series User’s Manual
06-2014-A
1
SAFETY INSTRUCTIONS
1) Read these instructions.
2) Keep these instructions.
3) Heed all warnings.
4) Follow all instructions.
5) Do not use this apparatus near water.
6) Clean only with a dry cloth.
7) Do not block any of the ventilation openings. Install in accordance with the manufacturer's
instructions.
8) Do not install near any heat sources such as radiators, heat registers, stoves, or other apparatus
that produce heat.
9) Only use the attachments/accessories specified by the manufacturer.
10) Use only with a cart, stand, tripod or bracket specified by the manufacturer, or sold with the
apparatus. When a cart is used, use caution when moving the cart/apparatus combination to avoid
injury from tip-over.
12) Unplug this apparatus during lightning storms or when unused for long periods of time.
13) Refer all servicing to qualified service personnel. Servicing is required when the apparatus has be
en damaged in any way, such as power supply cord or plug is damaged, liquid has been spilled o
r objects have fallen into the apparatus, the apparatus has been exposed to rain or moisture, doe
s not operate normally, or has been dropped.
Caution
Danger of explosion if battery is incorrectly replaced.
Replace only with the same or equivalent type.
These servicing instructions are for use by qualified service personnel only. To reduce the risk of
electric shock does not perform any servicing other than that contained in the operating instructions
unless you are qualified to do so.
In USA and Canada, Use Class 2 Power Supply Only

PixelPro Series User’s Manual
06-2014-A
2
Contents
1. PRODUCT FEATURES ............................................................................................................................ 4
2. INSTALLATION ......................................................................................................................................... 6
2.1 INSTALLATION PREPARATION ........................................................................................................................ 6
3. ACCESSING THE CAMERA ................................................................................................................... 8
3.1 ACCESS FROM A BROWSER .......................................................................................................................... 8
3.2 ACCESSING THE CAMERA FROM THE INTERNET ........................................................................................... 9
3.3 ADJUSTING THE CAMERA ANGLE .................................................................................................................. 9
3.4 THE LIVE VIEW PAGE .................................................................................................................................... 9
3.5 VIDEO STREAM TYPES ................................................................................................................................ 10
2.6 HOW TO STREAM H.264............................................................................................................................. 10
4. THE SETUP ............................................................................................................................................. 11
5. ANALOG OUTPUT ................................................................................................................................ 12
5.1 ANALOG OUTPUT SETUP ........................................................................................................................... 12
6. VIDEO ...................................................................................................................................................... 12
6.1 CODEC ........................................................................................................................................................ 12
6.2 CAMERA ..................................................................................................................................................... 15
6.2.1 Exposure Control ............................................................................................................................. 15
6.2.2 Day & Night Control ......................................................................................................................... 16
6.2.3 White Balance Control ..................................................................................................................... 16
6.2.4 Image Property Control ................................................................................................................... 16
7. LIVE .......................................................................................................................................................... 17
7.1 SETUP ...................................................................................................................................................... 17
7.2 PRIVACY MASKING .................................................................................................................................. 18
8. FTP ........................................................................................................................................................... 19
8.1 FTP > CONFIG ........................................................................................................................................... 19
8.2 FTP > EVENT ............................................................................................................................................. 19
8.3 FTP > PERIODICAL .................................................................................................................................... 20
9. EVENT ..................................................................................................................................................... 21
9.1 EVENT > MOTION ....................................................................................................................................... 21
9.2 EVENT > MAPPING ..................................................................................................................................... 22
10. NETWORK ............................................................................................................................................ 23
10.1 NETWORK > IP SETUP ............................................................................................................................. 23
10.2 NETWORK > SERVICE PORT .................................................................................................................... 25
10.3 NETWORK > RTP ..................................................................................................................................... 25
10.4 NETWORK > E-MAIL ................................................................................................................................. 26
10.5 NETWORK > DDNS ................................................................................................................................. 26
10.6 NETWORK > UPNP .................................................................................................................................. 27
11. SYSTEM .................................................................................................................................................... 28
11.1 SYSTEM > USER ....................................................................................................................................... 28
11.2 SYSTEM > DATE & TIME ........................................................................................................................... 29
11.3 SYSTEM > MAINTENANCE ........................................................................................................................ 30
11.4 SYSTEM > INFORMATION .......................................................................................................................... 32

PixelPro Series User’s Manual
06-2014-A
3
12. DIMENSIONS ....................................................................................................................................... 33
13. SPECIFICATIONS ................................................................................................................................ 34

PixelPro Series User’s Manual
06-2014-A
4
1. Product Features
The GANZ PixelPro Series (ZN-MD2xxM) is a high performance H.264 network
camera, designed for demanding security installations. It delivers crisp, clear images,
disclosing every detail, thanks to its top quality Megapixel progressive CMOS sensor
and advanced image processing.
Supported by the industry’s largest base of video management software, the GANZ
PixelPro provides the perfect solution for securing bank offices, airports and other
facilities, and for traffic surveillance, over IP based networks.
The optimal Power over Ethernet (IEEE 802.3af) support power to the camera to be
delivered via the network, eliminating the need for a power outlet and reducing
installation costs. Steady power could be guaranteed with a central Uninterruptible
Power Supply (UPS).
The GANZ PixelPro offers a comprehensive set of network security and
management features. This includes support for port based network control
(IEEE802.1X), which allows the camera to be connected to a network secured with
this control, and HTTPS encryption, which provides a secure channel between
camera and application. It also enables authentication of the video source. Video
products are efficiently managed with the powerful GANZ PixelPro Camera
Management tool, which is provided on the Installation CD which comes with each
GANZ PixelPro camera.
PixelPro Series User’s Manual
06-2014-A
5
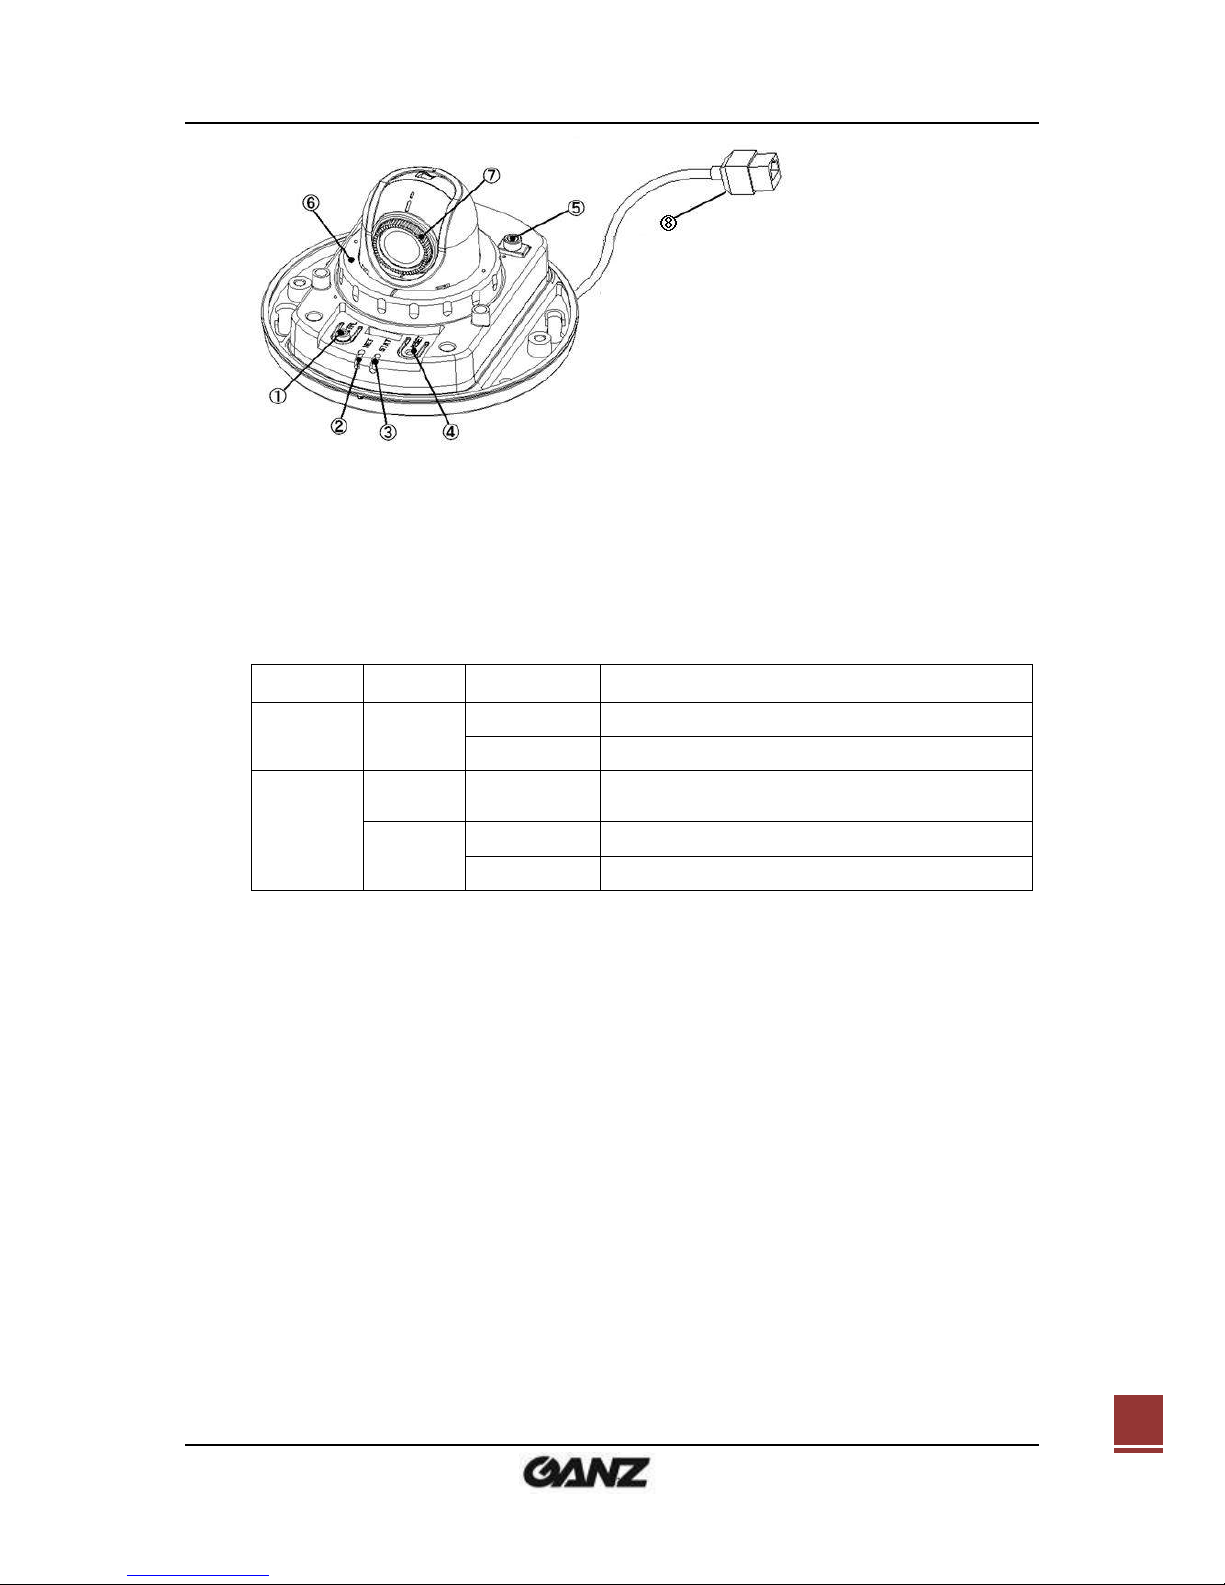
1. Control Button
Control button has two functions.
1) Control Video output format either NTSC or PAL.
2) Factory Default (Keep hold more than 10 seconds)
2. Network LED
3. Status LED
LED
Color
Indication
System Status
Network
Blue
On
Power On.
Flash
Network is active
Status
RED
Flash
Firmware Upload in progress.
HW Factory Default in progress
Green
Flash
Booting up
On
Normal
4. Reset Button
Press this button to reset the camera.
5. Video output for service monitor
This analog video output is available when installation mode is set to ON. Use
accessory cable to video output.
6. Lock nut
When you set lens position, relese it and adjust the position.
7. Focus adjustment
Use “fucus adjust ring“ for lens adjustment
8. Network (RJ-45 PoE required)
The ZN-MD2xxM series connects to the network via a standard network cable,
and automatically detects the speed of the local network segment
(10BaseT/100BaseTX Ethernet). This socket must be used to power the
ZN-MD2XX SERIES via Power over Ethernet (PoE). The camera auto-senses
the correct power level when using a PoE switch, router or injector.

PixelPro Series User’s Manual
06-2014-A
6
2. Installation
2.1 Installation Preparation
1) Remove Dome Cover
- Loosen two Hexlobe (T20) screws by supplied L-key wrench and remove Dome
cover.
2) LOCK NUT
- In order to change the lens direction, locknut should be unlocked as counter
clockwise.
LOCK NUT

PixelPro Series User’s Manual
06-2014-A
7
3) Mounting to a ceiling / wall
3-1) IN CEILING MOUNT
3-2) SURFACE MOUNT
4) Lens Adjustment
-Adjust the lens position and set FOCUS with Focus adjustment ring.
-After controlling the direction, lock the locknut again.
5) Attach Dome Cover
- Attach Dome cover and tighten two Hexlobe (T20) screws by supplied L-key
wrench.

PixelPro Series User’s Manual
06-2014-A
8
3. Accessing the Camera
Follow the instructions in the GANZ PixelPro Installation Guide to install the camera.
The GANZ PixelPro could be accessed with most standard operating systems and
browsers. The recommended browser is Internet Explorer for Windows with other
operating systems.
3.1 Access from a browser
1. Start a browser (Internet Explorer)
2. Enter the IP address or host name of the camera in the Location/Address field of
your browser. Press Enter.
3. Login dialog will appear when the camera is accessed for the first time.
4. The default user name is ADMIN, and password is 1234.
5. The camera’s Live View page is now displayed in your browser.
Note: The layout of the live view page in the camera may have been customized to
meet specific requirements. Consequently, some of the examples and
functions featured here may differ from those displayed on your own Live View
page.

PixelPro Series User’s Manual
06-2014-A
9
3.2 Accessing the camera from the Internet
Once installed, the camera is accessible on the local network (LAN). Configure the
router/firewall to allow incoming data traffic to access the camera from the Internet.
For security reasons this is usually done on a specific port. Please refer to the
documentation for router/firewall for further instructions.
3.3 Adjusting the Camera angle
To adjust the camera angle.
1. Open the Live View page in your web browser.
- Select the Setup tab, and open the Analog output page.
- Select the ‘Video Format'.
2. Connect analog monitor to the VIDEO OUT (BNC) with coaxial cable.
- Adjust camera angle.
Or otherwise check the image from the Live View page on your web browser.
- Adjust camera angle.
3.4 The Live View page
Digital Zoom
Snap Shot
Full Screen
Video Stream change: First stream Second stream
Play: Click this button by manually to start the stream
Stop: Click this button by manually to stop streaming
NOTE: It is possible that not all the buttons described below will be visible unless the
Live View page has been customized to display them.

PixelPro Series User’s Manual
06-2014-A
10
3.5 Video stream types
H.264 protocols and communication methods
• RTP (Real-time Transport Protocol) is a protocol that allows programs to manage
the real-time transmission of multimedia data, via unicast or multicast.
• RTSP (Real Time Streaming Protocol) serves as a control protocol, to negotiate the
type of transport protocol to use for the stream. RTSP is used by a viewing client to
start a unicast session.
• UDP (User Datagram Protocol) is a communications protocol that offers limited
service for exchanging data in a network which uses the Internet Protocol (IP).
UDP is an alternative to the Transmission Control Protocol (TCP). The advantage of
UDP is that, it is not required to deliver all data and may drop network packets when
there is network congestion. This is suitable for live video, as there is no point in retransmitting old information that will not be displayed anyway.
• Unicasting is communication between a single sender and a single receiver over a
network. This means that the video stream goes independently to each user, and
each user gets own stream. A benefit of unicasting is, in case one stream fails, it
only affects one user.
• Multicasting(Will be supported)is bandwidth-conserving technology that reduces
bandwidth usage by simultaneously delivering a single stream of information to
multiple network recipients. This technology is used primarily on delimited networks
(intranets), as each user needs an uninterrupted data flow and should not rely on
network routers.
2.6 How to stream H.264
Deciding on the combination of protocols and methods to use depends on your
viewing requirements, and on the properties of your network. Setting the preferred
method(s) is done in webpage.
RTP+RTSP
This method (actually RTP over UDP and RTSP over TCP) should be your first
consideration for live video, especially when it is important to always have an up-todate video stream, even if some images are lost due to network problems. This could
be configured as multicast or unicast.
RTP/RTSP/Multicasting (Will be supported) provides the most efficient usage of
bandwidth, especially when there are large numbers of clients viewing
simultaneously. Note however, that a multicast broadcast could not pass a network
router unless the router is configured to allow this. For example, It is impossible to
multicast over the Internet.

PixelPro Series User’s Manual
06-2014-A
11
RTP/RTSP/Unicasting should be used for video-on-demand broadcasting, so that
there is no video traffic on the network until a client connects and requests the
stream. However, as more and more unicast clients get connected, the traffic on the
network will increase and may cause congestion. Although there is a maximum of 10
unicast viewers, note that all multicast users combined count as 1 unicast viewer.
RTP/RTSP
This unicast method is RTP tunneled over RTSP. This could be used to exploit the
fact that it is relatively simple to configure firewalls to allow RTSP traffic.
4. The Setup
The GANZ PixelPro is configured from the Setup link, which is available on the top
left hand side in the web interface. This configuration could be done by:
• Administrators, who have unrestricted access to all settings under the Setup tab.
Accessing the Setup link from a browser
1. Start your web browser and enter the IP address or host name of the camera into
the address bar.
2. The Live View page is now displayed. Click on the Setup tap.
 Loading...