

Ganz NR1-4F23, NR1-8F26, NR1-16F26, NR1-4F23S, NR1-8F26S User Manual
...
PixelMASTER GXi Series NVR User’s Manual
05-2014-A 1
1

PixelMASTER GXi Series NVR User’s Manual
05-2014-A 2
2
TABLE OF CONTENTS
1. BEFORE INSTALLATION ................................................................................................................ 4
1.1 UPDATING SYSTEM F/W ................................................................................................. 5
1.1.1 WITH THE USB THUMB DRIVE .............................................................................. 5
1.1.2 UPDATING FROM THE WEB MENU ....................................................................... 7
1.2 DESCRIPTION OF FRONT PANEL .................................................................................. 9
1.3 DESCRIPTION OF REAR PANEL ................................................................................... 10
1.4 DESCRIPTION OF PIN ASSIGNMENT ........................................................................... 11
2. GETTING STARTED ..................................................................................................................... 13
2.1 CONNECT AND SWITCH ON ......................................................................................... 13
2.2 START SETUP................................................................................................................. 13
2.3 LOADING ......................................................................................................................... 14
3. Live View ....................................................................................................................................... 15
3.1 TOOL BAR ...................................................................................................................... 15
3.1.1 STATUS DISPLAY .................................................................................................. 16
3.1.2 LOG OFF ................................................................................................................ 16
3.1.3 SETUP .................................................................................................................... 17
3.1.4 VA (Video Analytics) ............................................................................................... 17
3.1.5 QUICK COPY ......................................................................................................... 18
3.1.6 SEARCH ................................................................................................................. 18
3.1.7 DISPLAY ................................................................................................................. 18
3.1.8 PTZ ......................................................................................................................... 19
3.1.9 DIGITAL ZOOM ...................................................................................................... 19
3.1.10 LOG LIST ............................................................................................................... 21
4. SEARCH & PLAYBACK ................................................................................................................. 22
4.1 TIME / CALENDAR SEARCH .......................................................................................... 22
4.2 PANORAMA SEARCH ..................................................................................................... 24
4.2.1 BASIC OPERATION ............................................................................................... 24
4.3 EVENT SEARCH ............................................................................................................. 25
4.4 COPY ............................................................................................................................... 27
5. QUICK MENU ................................................................................................................................ 28
6. HOW TO CONFIGURE .................................................................................................................. 31
6.1 CONFIGURING CAMERA ............................................................................................... 31
6.1.1 TITLE ...................................................................................................................... 31
6.1.2 ADJUST .................................................................................................................. 32
6.1.3 PTZ ......................................................................................................................... 33
6.1.4 CAM PORT ............................................................................................................. 33
6.1.5 VIRTUAL PORT ...................................................................................................... 36
6.2 CONFIGURING DISPLAY ............................................................................................... 37
6.2.1 OSD ........................................................................................................................ 37
6.2.2 MONITOR ............................................................................................................... 38
6.2.3 SEQUENCE ............................................................................................................ 39
6.3 CONFIGURING DISK ...................................................................................................... 40
6.3.1 SETUP .................................................................................................................... 40
6.3.2 FORMAT ................................................................................................................. 42
6.4 CONFIGURING SYSTEM ............................................................................................... 43
6.4.1 DATE TIME ............................................................................................................ 43
6.4.2 MANAGEMENT ...................................................................................................... 43
6.4.3 SOUND ................................................................................................................... 45
6.5 CONFIGURING EVENT / SENSOR ................................................................................ 46
6.5.1 SENSOR INPUT ..................................................................................................... 46
6.5.2 ALARM OUTPUT SETUP ....................................................................................... 46
6.5.3 BUZZER OUTPUT SETUP ..................................................................................... 47
6.5.4 E-MAIL SETUP ....................................................................................................... 48
6.6 CONFIGURING USER .................................................................................................... 49
6.6.1 USER REGISTER .................................................................................................. 49
6.6.2 USER AUTHORITY ................................................................................................ 50
6.6.3 LOG-OUT................................................................................................................ 50
6.7 CONFIGURING RECORD ............................................................................................... 51
6.7.1 MAIN STREAM ....................................................................................................... 51
6.7.2 SUB STREAM ........................................................................................................ 52

PixelMASTER GXi Series NVR User’s Manual
05-2014-A 3
3
6.7.3 SCHEDULE ............................................................................................................ 53
6.7.4 OPTION .................................................................................................................. 54
6.8 CONFIGURING NETWORK ............................................................................................ 56
6.8.1 ETHERNET PORT .................................................................................................. 56
6.8.2 LOCAL PORT ......................................................................................................... 57
6.8.3 DDNS ...................................................................................................................... 57
6.8.4 E-MAIL .................................................................................................................... 58
7. REMOTE ........................................................................................................................................ 59
7.1 WEB SERVER ................................................................................................................. 59
7.1.1 CONNECT TO WEB SERVER ............................................................................... 59
7.1.2 WEB CONFIGURATION PAGE .............................................................................. 61
7.1.3 WEB VIEWER (Active-X) ........................................................................................ 62
7.2 Android Viewer / iOS Viewer ........................................................................................... 71
7.2.1 How to use .............................................................................................................. 71
7.3 DDNS SERVER ............................................................................................................... 74
7.3.1 HOW TO REGISTER .............................................................................................. 74
7.3.2 REGISTER.............................................................................................................. 74
7.3.3 Input NVR information. ........................................................................................... 75
7.4 DVR MANAGER .............................................................................................................. 76
7.4.1 INSTALLATION ....................................................................................................... 76
7.4.2 EXECUTION ........................................................................................................... 77
7.4.3 LIVE VIDEO MONITORING ................................................................................... 77
7.4.4 CONNECTION MANAGER .................................................................................... 78
7.4.5 LIVE VIDEO WINDOW ........................................................................................... 80
7.4.6 PLAYER .................................................................................................................. 84
7.5 FILE PLAYER .................................................................................................................. 92
8. Appendix A .................................................................................................................................... 95

PixelMASTER GXi Series NVR User’s Manual
05-2014-A 4
4
1. BEFORE INSTALLATION
The Company shall not have any responsibility for any accident or damage that may incur
during the use of the product.
For your safety, we provide a few instructions about installation, manipulation, cleaning,
assembly/disassembly of the product as below.
So please read carefully and comply with the instructions.
Before installation
Comply with the following instructions to prevent a fire, explosion, system failure or electric shock.
Remove the power supply module before proceeding.
Check the input voltage (AC100V–AC240V) to the power supply module before connecting it.
Keep the product away from humidity.
Ensure that all devices connected to the product should be properly earth-grounded.
In operation mode
Comply with the following instructions to prevent a fire, explosion, system failure or electric shock.
If you need to open the cover, consult with a service person who could help you do what you want
to do.
Do not connect multiple devices to a single power socket.
Keep the product away from dust or too much combustible substances (ex: propane gas).
Do not touch it with wet hand.
Do not insert a conductor in the vent of the ventilation system.
Do not apply excessive force to unplug the power cord.
Disassembly & Cleaning
When cleaning on the surface, use a dry cloth.
Do not wipe the product using water, paint thinner or organic solvents.
Do never dismantle, repair or modify the product by your own.
During installation
To prevent an accident or physical injury and to operate NVR properly, please comply with
the followings.
Secure at least 18 centimeter of distance between cooling fan and wall for a proper ventilation.
Install the product on a flat surface.
Keep it away from direct sunlight or excessive temperature.
While in use
Do not apply force to or shake it while using it.
Do not move, throw away or put excessive force to it.
Using any un-recommended HDD may cause a system failure. Check the compatibility list and
use only compatible HDDs.
{A system failure or data loss caused by an incompatible HDD will void your warranty.}

PixelMASTER GXi Series NVR User’s Manual
05-2014-A 5
5
1.1 UPDATING SYSTEM F/W
1.1.1 WITH THE USB THUMB DRIVE
User can upgrade the system firmware by himself if required. F/W upgrading could be required to
increase the stability and the reliability or apply the new updated features. The following steps are a
progress to upgrade the f/w.
Verify the current F/W version
Prepare new F/W in the USB thumb drive
Do the upgrading process
1.1.1.1 How to verify the F/W version
You may need to check the F/W version provided and the F/W version currently used in the system.
From the Setup=>SYSTEM=>MANAGEMENT , you can see the current version of F/W.
F/W version of new provided one: From the filename of the provided F/W file, you can see
the version number.
Check the F/W version.
The ‘v1.0.0’ in the file name means the F/W version.
Do not update F/W if the version number of F/W file is lower than the current F/W version.

PixelMASTER GXi Series NVR User’s Manual
05-2014-A 6
6
1.1.1.2 Preparing new F/W in the USB thumb driver
1) Unzip firmware file.
After unzip, you can see above system file.
According to Upgrade field, number of downloaded file would be different.
2) Make the ‘dvr’ folder at the root of the USB thumb drive.
The characters, ‘d’,’v’,’r’, in the folder name have to be a lower case not a capital.
3) Copy the released F/W zip file into the ‘dvr’ folder in the USB thumb drive.
1.1.1.3 Upgrading System from the System Menu
Following steps will guide you into the way to upgrade the system with the new F/W.
1) Plug the prepared USB thumb drive in the USB port of NVR.
2) Open Setup=>SYSTEM=>MANAGEMENT menu.
3) Press ‘UPGRADE’ button.
The whole upgrading process may take about ten minutes.
DO NOT remove the USB thumb driver during upgrading.
DO NOT turn off power of system during upgrading.
4) If the firmware upgrade is finished, system will be rebooted automatically.

PixelMASTER GXi Series NVR User’s Manual
05-2014-A 7
7
1.1.2 UPDATING FROM THE WEB MENU
The web menu service prepared in the NVR provides the way to update the system F/W remotely. The
following steps explain how to do this.
To know the way how to access the internal web menu service, refer the section 7.1, ‘WEB
SERVER’ of this user’s guide.
1) Login the NVR through the web server.
2) Enter the ‘SYSTEM MANAGEMENT’ page under the ‘SYSTEM’ menu page. Refer to the below
picture.
3) Click the button ‘UPGRADE’ and open the update page.
4) In the update page, click the ‘BROWSE’ button and call the file open window.
5) Choose the provided F/W files which has the file extension ‘tar.gz or tgz’.
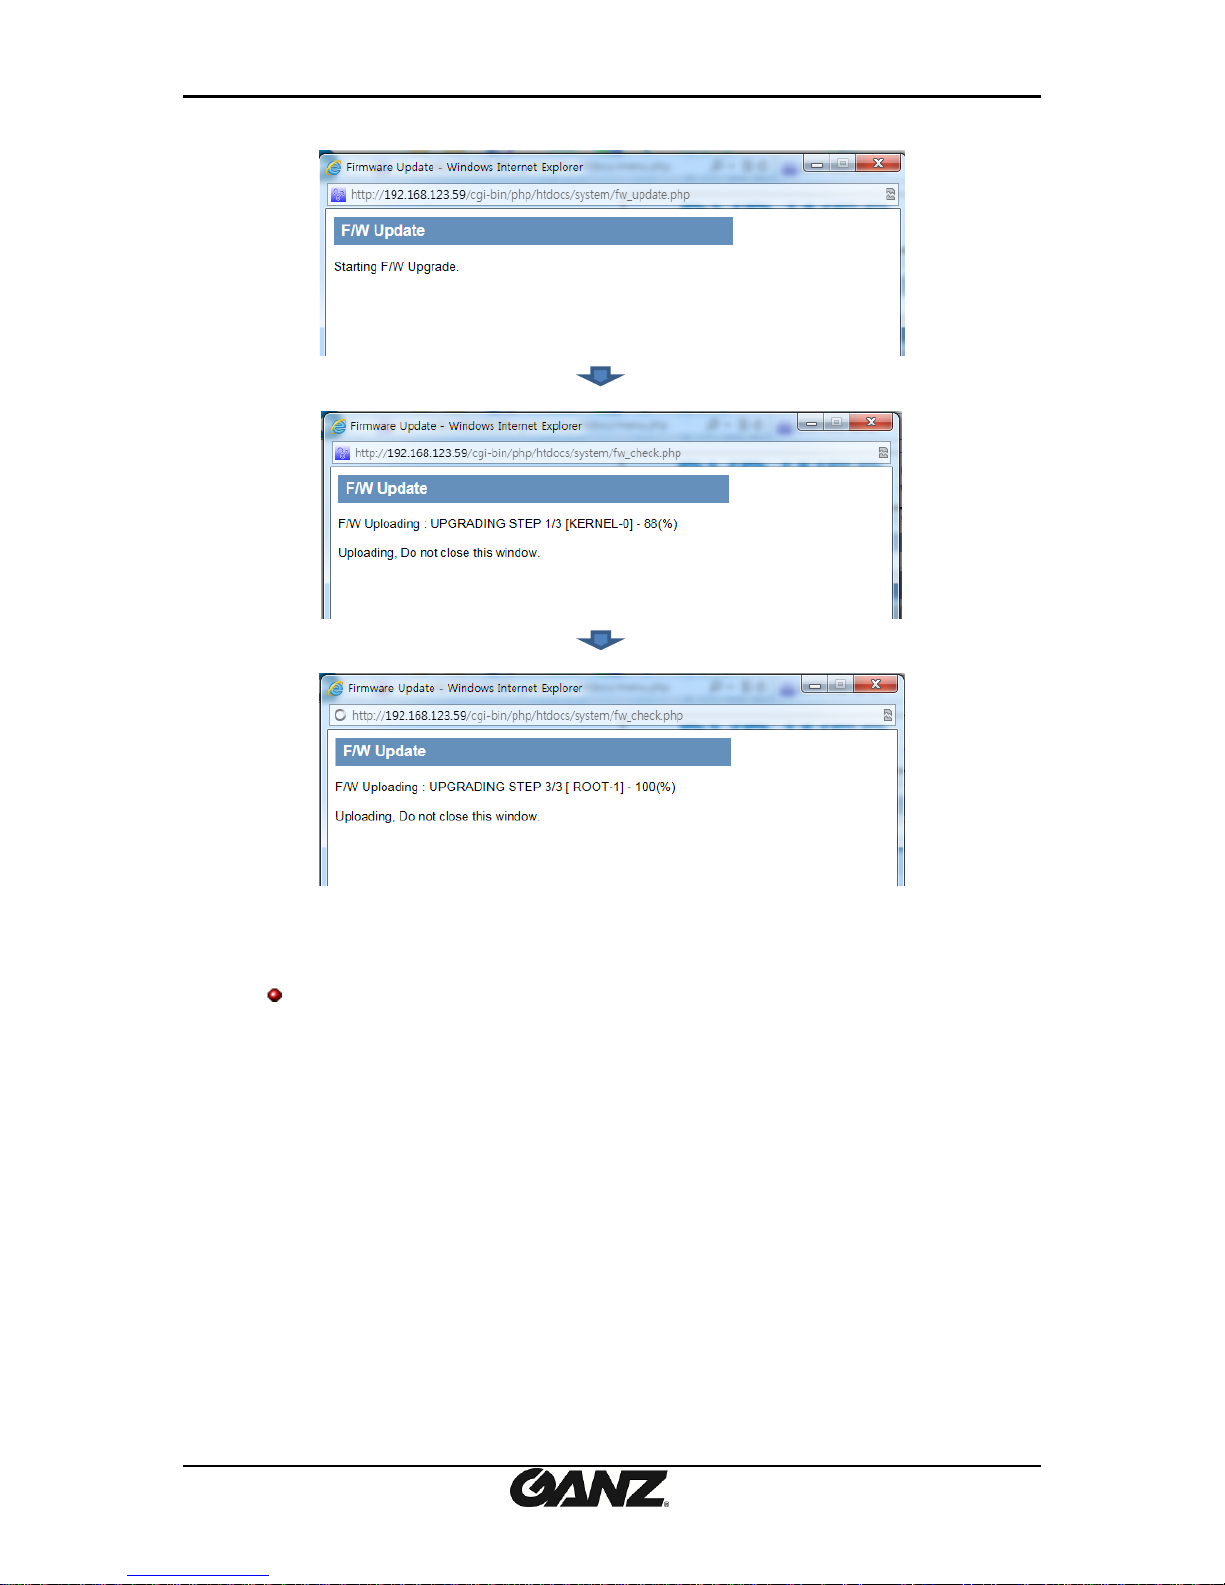
6) Click the ‘F/W UPLOAD’ button and let the system uploading the F/W into the system.
7) When uploading is finished successfully, the system is going to be ready to update and wait to
start. Click the ‘START’ button triggers the updating processes.
PixelMASTER GXi Series NVR User’s Manual
05-2014-A 8
8
8) While the update is on, the progress steps will appears such as below.
9) System shows the [COMPLETE] when update finished and reboot automatically.
10) When the whole update is completed, the NVR will restart.
Turning off the power in any process of F/W updating cause the damage of the system.

PixelMASTER GXi Series NVR User’s Manual
05-2014-A 9
9
1.2 DESCRIPTION OF FRONT PANEL
[Front panel 4ch NVR]
1.STATUS LED
Displays the information of the NVR (Stand –
By), Record / HDD read/write and Network transmission.
2.IR RECEIVER
Infrared signal receiver for the IR remote control.
3.FRONT USB 2.0 PORT
USB 2.0 ports. Provides functions like ‘Copy to USB
storage’, ‘F/W Upgrade’ and ‘mouse’ operation.
[Front panel of 8 & 16CH NVR]
1.IR RECEIVER
Infrared signal receiver for the IR remote
control.
2.STATUS LED
Displays the information of the NVR
(Stand –By), Record and Network transmission.
3.FRONT USB 1/2 2.0 PORT
USB 2.0 ports. Provides functions like ‘Copy to USB
storage’, ‘F/W Upgrade’, ‘mouse’ operation.
1 2 3 1 2
3

PixelMASTER GXi Series NVR User’s Manual
05-2014-A 10
10
1.3 DESCRIPTION OF REAR PANEL
1
2
8
7
3
56 9
1011
1213
2
4
[Rear panel of 4CH NVR]
[Rear panel of 8 & 16CH NVR]
1.Power Switch
Switch to turn the NVR ON & OFF.
2.VGA Output (Video Graphic Array)
15-pin D-sub connector for the analogue VGA output.
3.Audio Inputs
RCA connectors for the audio signal inputs. (Line In)
4.Power In
12V DC Power socket.
5.Alarm(Sensor) Inputs, RS-485, and Relay Output
Alarm inputs x 4
RS-485 Signals. (G: Ground, D+: RX/TX + signal, D-:
RX/TX- signal)
4CH NVR: Relay output for the relay 1 (NO: Normal
Open, NC: Normal Closed, CM: Common)
8&16CH NVR: Relay output for the relay 2 (NO:
Normal Open, NC: Normal Closed, CM: Common)
6.Rear USB 2.0 (Only the 4CH NVR)
USB 2.0 ports. Provides functions like ‘Copy to
USB storage’, ‘Mouse’ and Etc.
7.DIGITAL VIDEO OUT (HDMI)
Digital video output for the main monitor.
8. CVBS Monitor Output
Composite video output for the main live screen or
the spot screen. (BNC)
9.RJ-45 Network Port( 1G Base-T)
Network port is used to 1G base-T, PC application
software or Mobile application.
10.RJ-45 Local Port( 1G Base-T)
User can make a connection between IP camera
and NVR through this port in case of using local
network already installed. IP address will be
automatically assigned as 192.168.172.100.
11.RJ-45 Cam(PoE) Port (100M Base-T)
User can make a connection between IP camera
and NVR as peer to peer mode(direct connection).
IP addess will be assigned in the range of
192.168.172.101 ~ 8, automatically.
(4CH NVR: 4ports / 8&16 NVR: 8ports)
12.Audio Outputs
RCA connectors for the audio signal outputs. (Line out)
13.PoE Power In (48V)
DC Power socket for POE Power.
14.eSATA Connection Port(Option)
connect e-SATA storage to expand HDD

PixelMASTER GXi Series NVR User’s Manual
05-2014-A 11
11
1.4 DESCRIPTION OF PIN ASSIGNMENT
[Terminal block of 4CH NVR]
Pin
I/O
Description
D- I 485 – data signal
D+ I 485 + data signal
NO O Relay output (Normal Open)
CM - Relay Ground
NC O Relay output (Normal Close)
GND
-
Sensor Ground
S4 I Sensor 4
S3 I Sensor 3
S2 I Sensor 2
S1 I Sensor 1
[Terminal block of 8CH NVR]
Pin
I/O
Description
S1 I Sensor 1
S2 I Sensor 2
S3 I Sensor 3
S4 I Sensor 4
S5 I Sensor 5
S6 I Sensor 6
S7 I Sensor 7
S8 I Sensor 8
GND - Sensor Ground
NC1 O Relay 1 output (Normal Close)
CM1 - Relay 1 Ground
NO1 O Relay 1 output (Normal Open)
NC2 O Relay 2 output (Normal Close)
CM2 - Relay 2 Ground
NO2 O Relay 2 output (Normal Open)
ENG - Reserved
GND - 485 Ground
D+ I 485 + data signal
D- I 485 – data signal

PixelMASTER GXi Series NVR User’s Manual
05-2014-A 12
12
[Terminal block of 16CH NVR]
Pin
I/O
Description
S1 I Sensor 1
S2 I Sensor 2
S3 I Sensor 3
S4 I Sensor 4
S5 I Sensor 5
S6 I Sensor 6
S7 I Sensor 7
S8 I Sensor 8
GND - Sensor Ground
S9 I Sensor 9
S10 I Sensor 10
S11 I Sensor 11
S12 I Sensor 12
S13 I Sensor 13
S14 I Sensor 14
S15 I Sensor 15
S16 I Sensor 16
GND I Sensor Ground
NC1 O Relay 1 output (Normal Close)
CM1 - Relay 1 Ground
NO1 O Relay 1 output (Normal Open)
NC2 O Relay 2 output (Normal Close)
CM2 - Relay 2 Ground
NO2 O Relay 2 output (Normal Open)
ENG - Reserved
GND - 485 Ground
D+ I 485 + data signal
D- I 485 – data signal

PixelMASTER GXi Series NVR User’s Manual
05-2014-A 13
13
2. GETTING STARTED
Controlling and setting NVR by remote control is limited to some of function, recommend you to use
mouse operation of NVR for using all the function.
2.1 CONNECT AND SWITCH ON
Please check if power of IP camera is turn on.
Connect one or more monitors to NVR using Digital Video output or VGA.
Connect power to NVR. Press the power button on the back panel of NVR to begin operation.
When you make system boot up, you can view following system loading process after boot up logo image.
[Logo Image]
Depending on Monitor which you connect to NVR, initial logo is not displayed because your
monitor is not support low resolution, so it is not a defect.
Initial set resolution is 1024 x 768, so you should use monitor higher than 1024x768
2.2 START SETUP
When you turn on at first time you can see the below menu.
SYSTEM LANGUAGE: Select the system language.
SYSTEM TIMEZONE: Select the system time-zone.
DATE FORMAT: Select the date format
VIDEO SIGNAL FORMAT: Select the video signal type
VIDEO OUTPUT RESOLUTION: Select the video output resolution.
Preview : You can check the preview of video resolution
The items which is defined in the 'START SETUP' would not be initialized after the factory default.
The settings in the 'START SETUP will replace the factory default value of each setting. After the
factory default in the setup menu, the items defined in 'START SETUP' will have the values
selected here.

PixelMASTER GXi Series NVR User’s Manual
05-2014-A 14
14
2.3 LOADING
[Loading….]
When NVR is prepared for initial operation, display system preparing screen as above and show
booting progress.
From loading screen display, recording starts according to pre-set condition.
When loading, screen could be flashed, happening odd color while NVR is processed to optimize
display.
When NVR is ready, Live view screen will be shown as below.
If start-up diagnostics are complete, the operator must log-in to the system.
You need to type the default user name as “ADMIN” and the default password as “1234” and
press the enter button
[Log-In]

PixelMASTER GXi Series NVR User’s Manual
05-2014-A 15
15
3. Live View
[live mode of 4 channels]
[live mode of 16 channels]
Recommend you to connect camera first before NVR starts.
3.1 TOOL BAR
You can view following Tool Bar when you move the mouse to the bottom of Live Screen.
The Tool-box display when mouse pointer move to bottom of screen, disappear after pre-defined
menu setting time or exit with exit button ( ). In the menu you can set with all-time display.

PixelMASTER GXi Series NVR User’s Manual
05-2014-A 16
16
3.1.1 STATUS DISPLAY
You can check current time / Network connection / USB storage connection/ Auto sequence/ HDD
location currently recorded / Audio.
: Display current time.
: Shows User connection
: Shows Network connection.
: Shows USB Storage connection
: Shows Auto sequence
: Shows HDD location which is currently recorded.
: Shows HDD location which is currently recorded.
3.1.2 LOG OFF
There are two way for log off.
One is manual log off and the other one is automatic log off after configured time passed.
[Log-Off by using TOOL BAR]
Once Log off selected as above, current account can be log off.
You can set up auto log off in SETUP/USER/LOGOUT menu. Refer to 6.6.3 LOGOUT.

PixelMASTER GXi Series NVR User’s Manual
05-2014-A 17
17
3.1.3 SETUP
If you press main menu button, main menu will be POP-UP.
3.1.4 VA (Video Analytics)
This menu is for using IP camera which supports Video Content Analytics.
NVR doesn't support VA configuration of IP camera. Following menu is for NVR which can handle
VA meta data coming from VA supported IP camera.
[VA MENU]
VCA EVENT RECORD: You can configure record schedule once VA event activated from IP
camera.
VCA ONLY: NVR records only VA event.
VCA OFF: NVR doesn't recognize VA event as real event.
VCA+MD: NVR recognize VA event and motion event both as an event.
SEND E-MAIL: NVR sends email once VA event recognized.
ATTACH SNAPSHOT: You can select ether attaching snapshot onto notification email or not.
VCA POPUP : When VCA event happen, event channel will be changed to full screen.
VCA POPUP DWELL: You can configure the duration for VCA POPUP.
VCA ICON DISPLAY: NVR display VA icon on live screen.
VCA BOX DISPLAY: NVR display VA box on live screen.
VCA ZONE DISPLAY: NVR display VCA zone on live screen.
BUZZER: You can configure buzzer on /off when VA event triggered.
RELAY: You can configure relay on/off when VA event triggered.

PixelMASTER GXi Series NVR User’s Manual
05-2014-A 18
18
3.1.5 QUICK COPY
If you click following icon, instant Backup menu will be pop up. You can save the data 10 minutes from
the current time.
3.1.6 SEARCH
To search a particular section of recorded footage, press the SEARCH button.
To protect unauthorized viewing of footage, only authorized users can playback footage.
3.1.7 DISPLAY
You can configure display mode by pressing display button of Tool bar.
You can select Quad / Single/ Auto sequence by selecting item in pop-up menu.
: Single Screen Mode
: Quad Screen Mode.
: 9-split Mode.
: 16-split Mode.
: Auto Sequence Mode.

PixelMASTER GXi Series NVR User’s Manual
05-2014-A 19
19
3.1.8 PTZ
You can move to the PTZ control mode.
When the display mode is split screen, the PTZ control panel will be opened for the selected camera
which is previously highlighted by mouse click. If there is no highlighted camera, the PTZ control panel
is opened for controlling the camera 1. In single display mode, the PTZ control panel is opened for the
currently displayed camera.
[PTZ Controller Screen]
①
⑥
② ③
④
⑤
⑦
⑧
1: Select channel for PTZ control.
2: Number to configure Preset.
3: Select the tour function start or end.
4: Control the PTZ.
5: Change the size of control box.
6: Display PTZ control parameters which are set under the ‘DETAIL’ of PTZ menu settings
7: execute the automatic focus.
8: execute the auto scan.
3.1.9 DIGITAL ZOOM
[Zoom by using TOOL BAR]
At Full screen mode, you can enter Digital Zoom mode with this button.
In case opening digital zoom at Split screen mode, if there were pre-selected channel using mouse,
then move to that channel’s camera, if there were no pre-selected camera, goes 1ch camera for digital
zoom

PixelMASTER GXi Series NVR User’s Manual
05-2014-A 20
20
: You can move Zoom area with arrow buttons.
: If you press this button, zoom ratio will be changed for 1x to x5
[Zoom by using Mouse]
At full screen mode, you can select the area to zoom in by clicking left button of Mouse. (Drag),
Clicking on the zoomed screen, the display returns to the original full screen mode.
Digital Zoom supported at Live / Play mode
Digital Zoom supported at only Full screen mode.

PixelMASTER GXi Series NVR User’s Manual
05-2014-A 21
21
3.1.10 LOG LIST
You can view the log list by selecting log list button in Tool bar.
1
2 3
1 : Display number from currently triggered ( Max 10,000 list can be recorded)
2 : Date / Time
3 : Log list
Items listed in log list. (Please refer to appendix:A)

PixelMASTER GXi Series NVR User’s Manual
05-2014-A 22
22
4. SEARCH & PLAYBACK
4.1 TIME / CALENDAR SEARCH
You can search the recorded data by a calendar and timeline for quick access to recorded footage.
1
2
3
4
5
6
7
8
9
10
11
12
13
1 : Search Mode : You can select the search mode.
TIME: The recorded data can be searched using the calendar.
PANORAMA: If you select the channel for panorama view, search mode will be
changed to PANORAMA Mode
EVENT: The recorded data can be searched using the event list.
2 : SEARCH HDD : You can select the HDD to search
RECORD: You can search HDD which is selected as Record.
MIRRORING: You can search HDD which is selected as Mirroring.
3: CALENDAR: If the data recorded in each date, orange color will be displayed.
If you select the date having the recorded data, you can make a display of recorded
data by hour.
4. Select Split screen
: 1/4/9/16-split screen mode
: You can make a playback at full screen mode

PixelMASTER GXi Series NVR User’s Manual
05-2014-A 23
23
In full screen mode, playback control can be performed by control box.
In single screen mode, digital zoom function will be available.
: Return to Search menu.
: Close playback screen and return to live screen
5: PLAY CONTROL: Playback speed and direction control.
: Reverse Fast Play
: Reverse Slow Play
: Reverse Play
: Pause
: Play (x1)
: Slow Play
: Fast Play
6: COPY: You can copy the data to external device.
7: VIDEO WINDOW: Playback video will be displayed
8: EXIT : Exit search menu and return to live menu.
9: HOUR SELECT LINE: You can select the data by hour. If certain time has recorded data,
GREEN (Continuous) or RED (Event) color will be displayed.
10: CLASS / Minutes range display (10 minutes order).
11: MINUTE SELECT LINE: You can specify the minutes range to search recording data.
12: RECORD DATA STATUS: Recording data status of each channels.
GREEN (Continuous recording), RED (Event Recording), YELLOW(Selected time)
13: SECOND SELECT LINE: You can select the recording data in second.

PixelMASTER GXi Series NVR User’s Manual
05-2014-A 24
24
4.2 PANORAMA SEARCH
Panorama search supports hour/minute/second based search in 16ch view mode.
4.2.1 BASIC OPERATION
1) Select Channel form dropdown list to do panorama search.
2) Select the date of Calendar, thumbnail image by hour will be shown in display window.
(It will be shown from first recorded data in selected date.)
3) Select one of the thumbnail images when you want to search by minute.
4) Select one of the thumbnail images when you want to search by second.
5) Click “PLAY” to start playback in single screen mode for selected channel.
: Start playback with selected time.
: To display thumbnail image by hour.
: To display thumbnail image by minute.
: To display thumbnail image by second.
: Shows previous time range.
(ex: if currently playback 17~33 sec, then move to playback by 1~16sec)
: Shows next time range.
(ex: if currently playback by 1~16sec, then move to playback by 17~33sec)
: Select channel you want to search.

PixelMASTER GXi Series NVR User’s Manual
05-2014-A 25
25
4.3 EVENT SEARCH
You can search recording data by Event. When you selected date of calendar, event
search will be started automatically in the specified day.
Event list shows 20 event per page from the latest event, maximum 25page can be searched.
( 500 event)
Event list exceed 500 events, please re-search by adjusting event search period by time slider bar.
1 2
475
9
3
6
8
1. Select date which you want to search event.
2: Preview: Events selected in the list displays a preview of the record.
3. Search result: event list displayed.
Maximum 500 events will be shown in the list.
No: Number of event display, recent event display with No.1
DATE/TIME: Display Event triggered time.
CHANNEL: Display Event channel
EVENT TYPE: Display Event type.

PixelMASTER GXi Series NVR User’s Manual
05-2014-A 26
26
VCA function supported only for PixelPro GXi camera with auto connection mode.
STATUS (VA only) : Display VA event’s “begin” or “end”.
ZONE (VA only) : Display zone number of VA event.
VALUE (VA only) : In VA event, display event information requiring value.
NAME (VA only) : Display registered name of VA event
4: You can select Event Type will be displayed in Event list.
ALL: Display all events.
SENSOR: Display Sensor Event.
VIDEO LOSS: Display Video loss Event.
MOTION DETECTION: Display Motion Event.
VCA: Display VCA Event (Available for PixelPro GXi camera).
5. VCA set up in detail: Search condition of VCA event set up in detail.
1 : TYPE : You can select which Type of VA will be displayed in VA list.
2 : STATUS : You can select start/end time of VA events.
3 : ZONE : You can select the zone of VA events.
4 : INEQUALITY : You can select the range of the value of VA events.
5 : VALUE : You can select the value of VA events.
6 : NAME : You can input ID of VA events which is " Object classifier" possible..
6: Search for events by hours / minutes can be selected.
: Event search by hour
: Event search by minute
7: You can select channel which will be displayed in Event list.
8: Switch Events List page. A total 500 events are shown on page 25.
9 : You can configure a search condition again by stepping above 4 ~ 7.

PixelMASTER GXi Series NVR User’s Manual
05-2014-A 27
27
4.4 COPY
FROM: Specify the stat time to copy.
TO: Specify the end time to copy.
TAG NAME: Please enter Tag name. Tag name will be used to Folder and File name.
AVI format
Folder : “TAG”_”CH”
File Name : “TAG”_”CH”_”Resolution”_”FrameRate”_”StartTime”_”EndTime”.avi
(Example) : \test11_CH1\ test11_CH1_1920_1080_15fps_140512_130103_140512_130500
DVR format
File Name : “TAG”_”StartTime”_”EndTime”.dvr
(Example) : test11_140512_130103_140512_130500.dvr
TYPE: You can select the copy format.
*.avi: Format that can be played on standard AV player.
*dvr: Original recorder format. It can be played in multiple screen mode.
on unique file player.
CHANNEL: You can select the channel to copy.
: You can select Start/ End Time at Calendar search
on Time line to copy.
Copy start: copy start with selected time and condition. Since start copy, display copy
progress status, you can select ‘copy stop’ for stopping copy.

PixelMASTER GXi Series NVR User’s Manual
05-2014-A 28
28
5. QUICK MENU
If you are using USB mouse to control the NVR, pressing the right button of mouse will bring up the
Quick Menu.
Here you can use display pause, pan tilt control, zoom control, IP camera scan.
FREEZE ON : If you press Freeze button, all screen will be stopped.
FREEZE OFF : You can release Freeze mode by pressing Freeze Off.

PixelMASTER GXi Series NVR User’s Manual
05-2014-A 29
29
PTZ: Selecting PTZ will bring up PTZ control screen. PTZ can only be controlled by an
authorized user. PTZ mode will be activated in the channel you selected by mouse.
ZOOM : This execute digital zoom control screen. Zoom mode will be activated in the
channel you selected by mouse.
IP SCAN: You can scan the IP camera currently connected to NVR. The IP camera
connected to NVR through peer to peer connection or local / Ethernet port both can be
scanned.
IP cameras connected to peer to peer port will be assigned channels automatically. The cameras
connected to Ethernet or Local port can be scanned, but not assigned channels automatically.
You have to assign by manually.
 Loading...