

Page 1
The GamuT “L”
loudspeakers
User manual
Page 2
1
Page 3
Indhold
Every musical note… . . . . . . . . . . . . . . . . . . . . . . . . . . . . . . . . . . . . . . . . . . . . . . . . . . . . . . . . . page 3
An introduction
1.What’s in the box?. page 4
• Unpacking
• Mount the spikes
2. Mounting instruction . . . . . . . . . . . . . . . . . . . . . . . . . . . . . . . . . . . . . . . . . . . . . . . . . . . . . . . . page 5
• Mounting & using the spikes
3. Stay connected . . . page 6
• Connecting to your amplifier(s)
• Single wiring
• Bi-wiring
• Bi-amping
4. Bringing them to life . . . . . . . . . . . . . . . . . . . . . . . . . . . . . . . . . . . . . . . . . . . . . . . . . . . . . . . . page 7
• Running in
• WHY RUNNING IN?
• Run-in instruction
5. How to drive them . . . . . . . . . . . . . . . . . . . . . . . . . . . . . . . . . . . . . . . . . . . . . . . . . . . . . . . . . page 7
• Caution on choosing and
using the electronic equipment
• Choosing your amp
• Using your amp
6. Location, location . . . . . . . . . . . . . . . . . . . . . . . . . . . . . . . . . . . . . . . . . . . . . . . . . . . . . . page 7-8
• Why is location critical?
• Toe-in (or NOT to toe-in)
• Tilting (Optimizing to your listening height)
• Minimum recommendations for positioning
• NOW START TO PLACE YOUR SPEAKERS using:
• How to calculate a good speaker & listening position
• Fine tuning the sound character
7.Technical specifications . . . . . . . . . . . . . . . . . . . . . . . . . . . . . . . . . . . . . . . . . page 9
8. Many years of enjoyment . . . . . . . . . . . . . . . . . . . . . . . . . . . . . . . . . . . . . . . . . . . . page 10
• Maintenance
9. How we do business . . . . . . . . . . . . . . . . . . . . . . . . . . . . . . . . . . . . . . . . . . . . . . . . . . . . . . . . page 10
• The famous GamuT quality
2
Page 4

Every musical note…
An introduction
Congratulations you have just invested in one of the finest
loudspeakers available!
Years back we chose the word “GamuT”
for our products, because “GamuT” in Latin means
"the entire range of musical notes”.
The GamuT name is therefore the perfect fit to our philosophy
of missing out on none of the tiny bits of information that
creates a realistic sound experience.
There are many more things to reproducing music than just reproducing the individual musical tones,
but it is the complex spectrum of multiple individual tones created by the musicians
operating their instruments and voices, and the reflected signals thereof, that creates the sounds we detect
with our ears and send to our brain to give us the wonderful sensations only music is capable of.
These unique musical sensations are what we see as The GamuT mission to give to you!
As in every GamuT product our speakers are designed with the capability of getting
you the best possible musical experience, which is synonymous
with reproducing all of the essential information in the recordings to create the illusion of
“being there”.
To assure this we use only the best “raw materials” trimmed
and crafted to perfection by the best engineers and sound
enthusiasts in the industry.
Following the guidance lines in this manual will assure you
an exquisite sound experience, so be ready for "the entire range
of musical notes”.
We wish you years of proud ownership and happy listening
and feel confident that you will cherish these speakers
for both their amazingly clear reproduction as well as for their splendid
craftsmanship and beautiful appearance.
The best of wishes from all of us at
GamuT International A/S
3
Page 5

What’s in the “box”?
Unpacking
You have at this point successfully unscrewed the cover of the
wooden transportation box, because you are now reading this
manual!
L3, L5 & L7 Turn the wooden box upside-down so the
opening is facing downwards and gently pull the wooden box
upwards, so the inner cardboard box slides free.
Alternatively for L5 & L7: lay the wooden box on its side or
back and pull out the inner cardboard box, you may need to be
2 people to do this!
L5 & L7: these two speakers also contain a small carton with
the following parts:
• 2 stainless steel rails with six small holes and
two large holes
• 4 spikes
• 4 adjustment knobs
• 4 small diameter positioning lock rings
(to lock the position of the spike)
Mount the spikes (see instruction page 5)
After mounting of the spikes take each speaker out of its bag, so
it is ready to place in its position after you have read the sections
“How to connect” and “Location, location, location”.
To avoid harming your wooden floors or other delicate surfaces
we supply 4 small stainless steel disks with each speaker to position underneath each spike. use those if needed.
Even for softer surfaces or less delicate surfaces, these disks may
prove beneficial, as they assure an even coupling to the surface,
and allow for easier adjustment of the spikes.
Remember to keep all packing materials in a safe place in case you
need them for transportation at a later time.
• 4 large diameter counter screw rings
(to lock the adjustment knob)
• 4 support discs
• 12 screws
Gently cut open the large cardboard box with a small sharp
knife. Be very careful not to cut too deep so the speaker’s
hand-polished surface is damaged.
L3: Pull up the top foam lid, so you have access to the speakers
that are packed inside cotton bags. Lift the speakers out of the
box one by one. Now take each speaker out of its bag so it is
ready to place on a stand or your bookshelf after you have read
“How to connect” and “Location, location, location”.
L5 & L7: Twist all four cardboard flaps outwards away from the
opening. Place the carton vertically with the opening downwards
on a thick carpet or other soft surface. Carefully slide the speaker
out while pulling the carton upwards, but be careful that you do
not hit anything, e.g. lamps or the ceiling.Also take care that the
speaker does not fall.
Alternatively for L5 & L7: place the carton on the side,
twist all four cardboard flaps outwards.Gently pull out the
speaker making sure none of the polystyrene rings are moving
and harming terminals etc.
Place the speaker so the bag opening is facing upwards.
Carefully slide the thick polystyrene rings off,make sure the
speaker terminals are not harmed.
4
Page 6

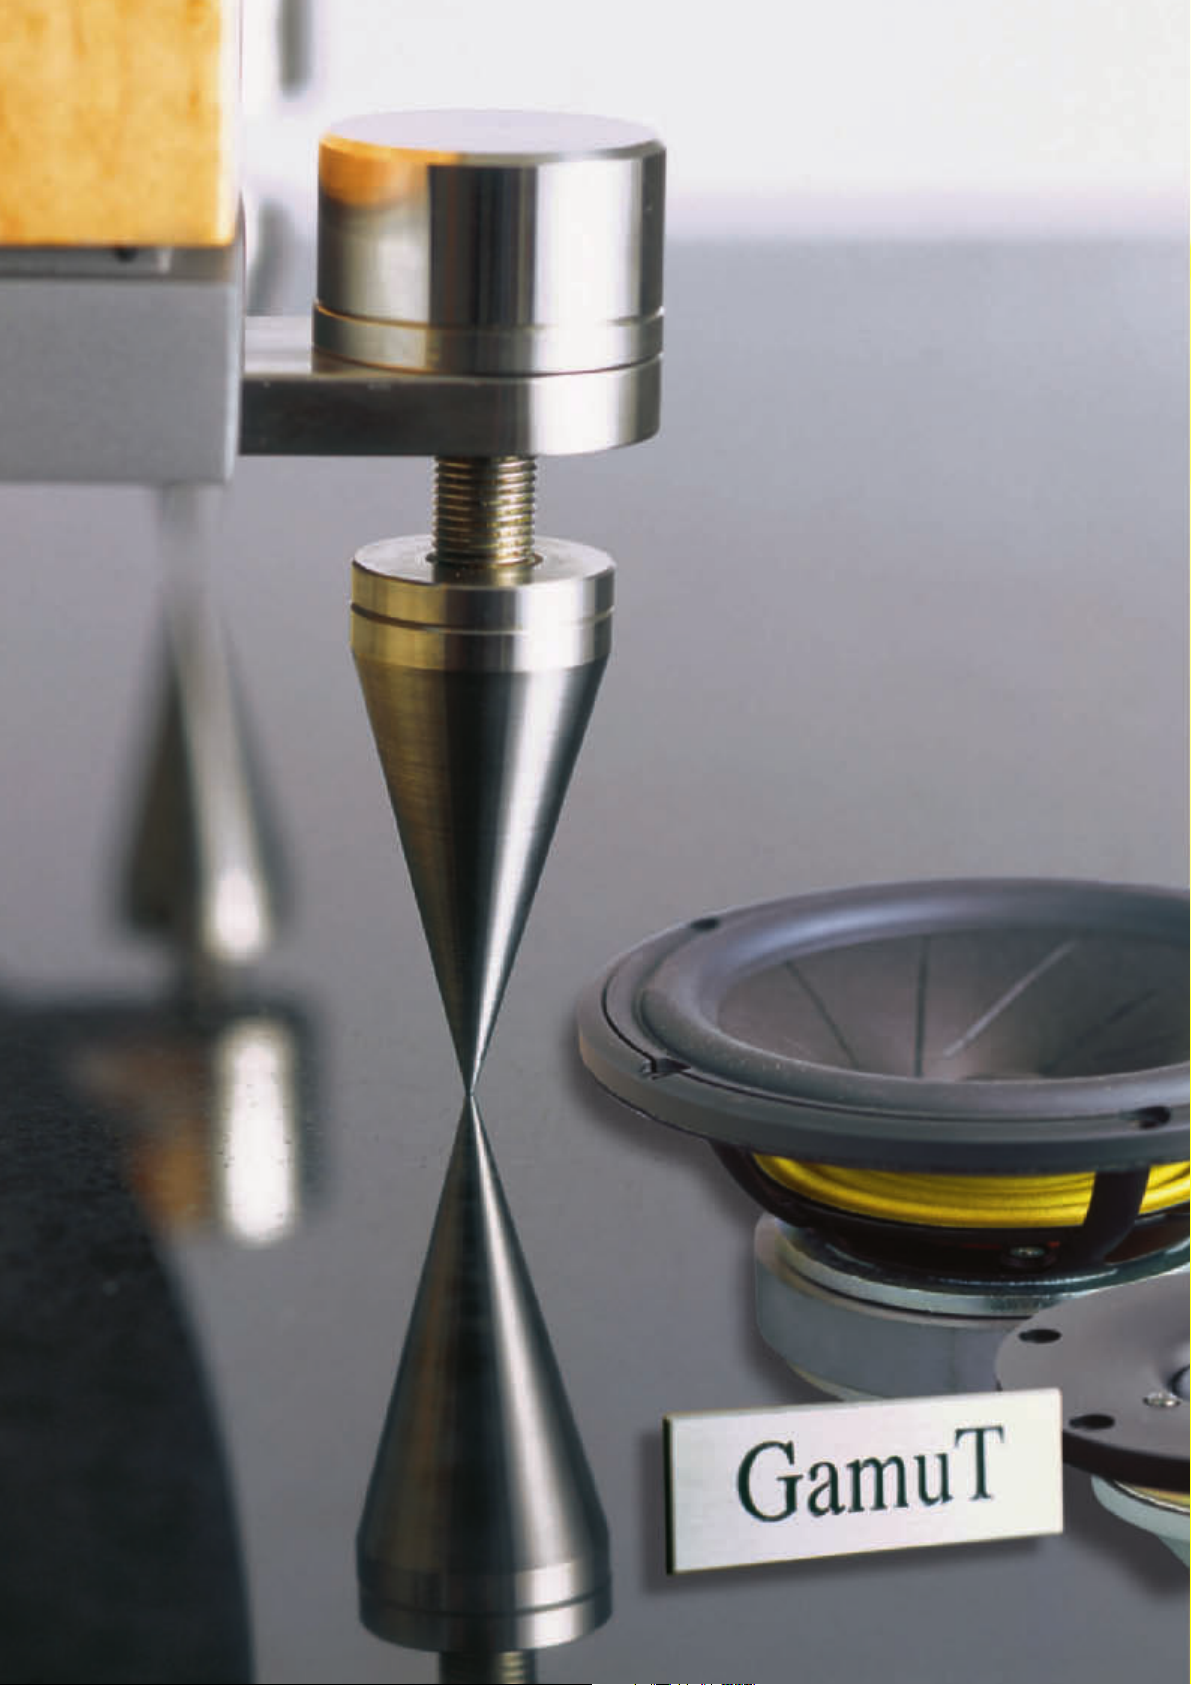
Mounting Instruction
Mounting & using the spikes: (L5 & L7)
Open the bag enough to attach the
front and rear stainless steel rails as
shown in picture (1) below and
screw them tightly to the base of
the speakers with six screws for
each rail.
3.
1.
4.
5.
• Take a spike and screw on the
small adjustment ring (2)
2.
• Screw the spike onto the rail (3)
• Add the large counter screw ring
and the adjustment knob (4).
Screw knob firmly in place and lock
with the counter screw ring (5)
• Repeat process for all four spikes
6.
5
on each speaker
• Adjust the height of the spikes by
turning the adjustment knob,
so the speaker is resting on all
four spikes.
• Tighten the small diameter rings
on each spike against the rail,
so the spike’s position is locked
in place (6)
Page 7

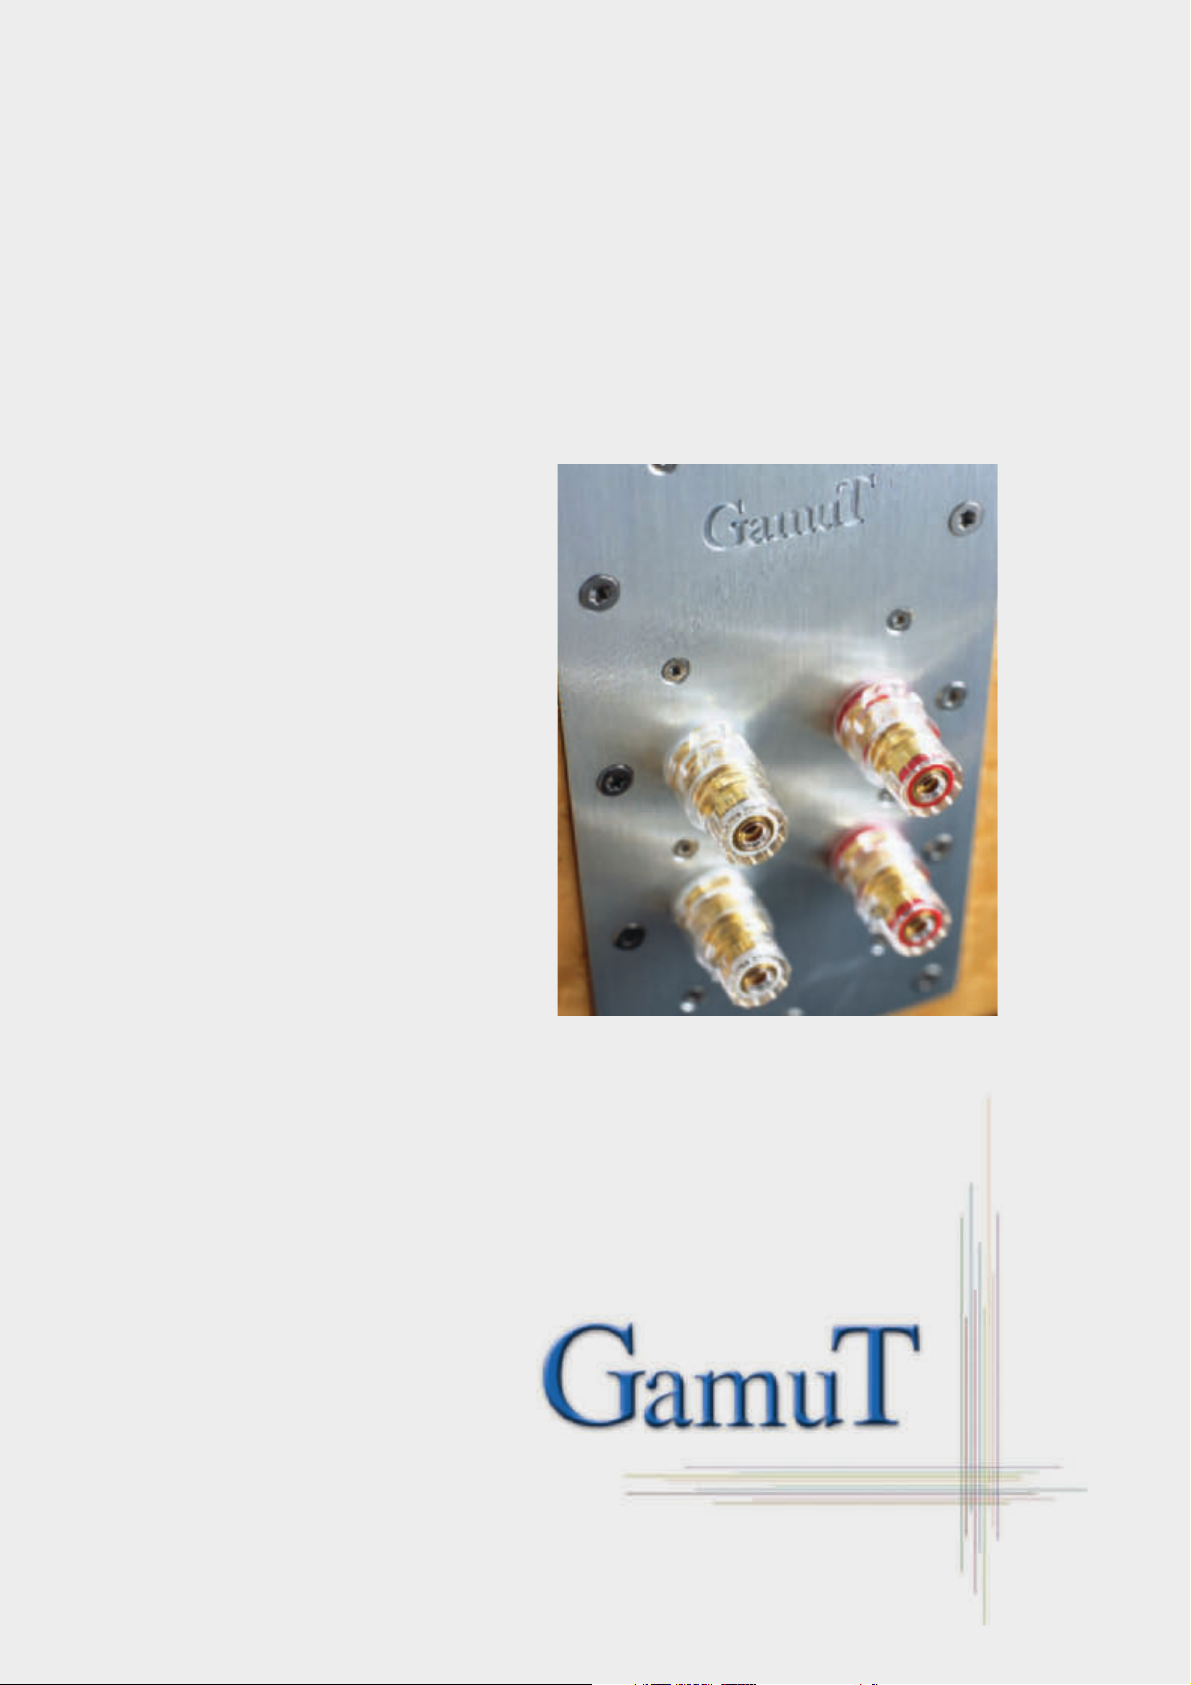
Stay Connected
Connecting to your amplifier
The Gamut L series speakers are equipped with two pairs of
terminals placed on the aluminium panel on the rear side of the
speaker.
The lower pair is for low frequency input,and the higher pair is
for the high frequency input.
Red is the positive input and White the negative input.
It is very important that both speakers are connected
in phase, meaning the positive input from each channel
on the amplifier must be connected to the same input
terminal on the speakers, and preferably the positive
terminal, this will assure you the right sound quality from your
sound system.
The terminals on your amplifier are normally colour coded.
If in doubt check your amplifier’s user manual to make
sure which terminal is the positive/negative output terminal.
Your GamuT speakers can be connected in three different ways:
Single-wiring (one cable for each channel)
Using one cable for each speaker, you will have to make a
connection between the high frequency input terminal, and the
low frequency input terminal.
Preferably you can use a part of the same cable you use from the
amplifier to the speaker.
We recommend you use the same cable type for both the high
frequency input and the low frequency input, to avoid changing
the delicate balance these speaker are designed to have.
Instruction: Connect the two sets of cables to your speaker
terminals, one cable to the high frequency input terminal and one
cable to the low frequency input terminal.
Make sure the marked wire is connected to the positive
input terminals, and the unmarked wire to the negative
input terminals.
Connect the two cables to the amplifier making sure both marked
wires are connected to the positive output terminal,and both
unmarked wires are connected to the negative output terminal.
If your amplifier has two sets of output terminals, use one set for
one of the cables and the second set of output terminals for the
second pair of cables.
Bi-amping (separate amplifiers (with separate cables) for
each pair of input terminals)
Using Separate amplifiers for each input terminal is the optimum
solution if you want to assure the maximum performance of the
speakers.
None of the high frequency signals will then be harmed by the
high currents needed to drive the low frequency section, and an
absolute maximum of performance is obtained.
Instruction: Connect the two sets of cables to your speaker
terminals, one cable to the high frequency input terminal and one
cable to the low frequency input terminal.
If this is not possible, and you will have to use a lower quality
cable between the inputs, we recommend you connect the cable
from the amp to the tweeter input terminals.
Instruction: Cut an appropriate piece of cable app. 5” or 12-15 cm.
Separate the marked wire and the unmarked wire to get two separate pieces of wire, and strip app.1” or 12-15 mm of the insulation at each end (4 ends).
Now connect the positive Low frequency input terminal to the
positive High frequency input terminal using one of the premade
wires.
With the second piece of pre-made wire, connect the negative
Low frequency input terminal to the negative High frequency
input terminal
Bi-wiring
(one separate cable for each input terminal)
Using separate cables for each pair of input terminals you have
the option of lowering the coloration/smearing between the
high and low frequencies that happens in transferring the signals
from the amplifier to the speaker.
Make sure the marked wire is connected to the positive
input terminals, and the unmarked wire to the negative
input terminals.
Connect one of the two cables to one of the amplifiers making
sure the marked wire is connected to the positive output
terminal, and the unmarked wire is connected to the negative
output terminal.
Now connect the second cable to the second amplifier in the
same way.
We strongly recommend using two identical amplifiers
to ensure perfect time and phase coherence between
the high and low frequency drivers.
6
Page 8

Bringing them to life
How to drive them
Running in
WHY RUNNING IN?
In the first hours of operation the characteristics of the materials
used in your loudspeakers will change dramatically, so actually
when you get your speakers they are off spec!
A run in period therefore is essential before you evaluate
the performance of your speakers.
Letting your speakers operate at high level with a full spectrum
input will get them within specifications in app. 12 hours time.
(See instructions on how to do this later in this section).
Full performance of your speakers will happen after app. 2-400
Hours of use depending on the power level you drive them with.
Also time/aging is of importance as the materials used will change
over time.
Under normal circumstances full performance will be met after
app. 6-12 months of aging where the final condition of the
materials used will be met.
After this period they will continue to perform optimally for
decades, assuming the speakers are not abused or overloaded.
Run-in Instruction:
To not disturb you neighbours or other sensitive creatures you
can do the following:
• Connect the speakers in opposing phase.
(one speaker being connected with the positive output
from the amp going to the negative input and the
negative output going to the positive input, while the
other speaker is connected correctly + to + and - to -)
Caution on choosing and using
the electronic equipment:
Choosing your amp:
Loudspeakers are current driven devices, so under
normal circumstances you should choose and get the best performance from amplifiers with high current capability.
To give you the performance we designed the GamuT speakers
to have, you will need a power amp with frequency linear and
low output impedance, which normally means using well designed
high power solid state amps.
We have used the GamuT D200MKIII & M200MKIII in
combination with the D3 Pre-amp during the design process of
the L speakers. Using the D200 MKIII/M200MKII & the D3 amps
in combination with the L Speakers will give you the ultimate
GamuT sound experience.
Some high quality valve amps will probably be capable of driving
the GamuT speakers with excellent performance, but we will
leave that for you to find out.
Using your amp:
Loudspeakers are rarely damaged by high-power signals, but by
clipped signals.
Therefore, it is always preferable to use a large and powerful
amplifier with lots of headroom rather than a small amplifier,
which will start distorting at much lower output levels.
A distorted signal will multiply the input to your high frequency
section and cause damage to your high frequency drive unit and
high frequency crossover network, so never play your loudspeaker at higher levels than where the sound is clear and undistorted.
• Move them close together, facing each other
(head to head).This will assure the bass output is
almost eliminated!
• Use a piece of music with a broad spectrum of energy.
(lows & mids & higs) Special recordings for this purpose
are available through hi-fi magazines or record shops
specializing in specialty recordings etc...
• Turn up the volume until normal to high setting, while
watching the excursion of the bass drivers & making
sure the speakers are not overloaded.
• Leave the speakers like this for half a day or more
(while at work...) and you will have a set of speakers
ready to enjoy when you come home at night.
During the next period of time the speakers will improve further
while being used.
In the next 6-12 moths the material used in the drive units and
the cabinet will go through an aging process that basically never
stops, but the materials will be close to their final specification
after app. 12 months of aging,so there will be lot of good things
coming worth waiting for!
The D200 MK II & M200 MK III has all the power you need to
drive the L speakers to their optimum
Location, location!
Why is location critical?
Placing your speakers correctly in your listening room is
extremely essential to get the optimum sound experience.
Main reason is that the listening room is an acoustic resonator
and reflector, and these resonances and reflections (off the
walls/floors and ceiling), vastly influences your listening
experience.
By positioning your speaker correctly relative to the boundaries
of the room assures you a listening “window” where you will
receive as much undisturbed sound as possible, thereby allowing
your hearing to sort out the good signals from the distorted
reflected signals.
Minimum recommendations for positioning:
• Please note:The minimum distance between the speakers and
the minimum listening distance is the same.
7
Page 9

• We recommend the following minimum listening distances:
L3: 8’ or 2,5 m. L5:10’ or 3 m. and the L7: 12’ or 3,5 m
• Distance from the side wall should be as big as possible,
and a minimum of app. 30" or 75 cm.
(measured from the centre of the tweeter)
• Distance from the rear wall must be a minimum of app. 25" or
65 cm again measured from the centre of the tweeter
Toe-in (Or NOT to toe-in):
We have designed our speakers to be listened to off axis.There
are a few good reasons for that.
• On the axis of a speaker you will find most diffraction effects
of the cabinet and drivers, as most diffractions (the really bad
ones) originate from symmetric structures around the drivers
(cabinets, frames etc.)
• On axis the drive units will have the highest distortion
numbers.The reason is that the driver is directional and that
distortion is at higher frequencies, so the directivity kills most
of the distortion of the drivers if you go off axis…so why not?
• The only reason for toeing the speakers towards the listening
position is if you have problems with too many reflections off
the sidewalls, then a moderate toe-in can help
Tilting (Optimizing to your listening height):
All our GamuT Speakers are designed to have a listening window
that is pointing a little upwards.
(We assume you are either sitting in a chair listening or walking
around in your living room while listening….)
This means you should always be at a listening height where your
ears are at least on the same height as the tweeter or a little
above, again assuming the speaker is not tilted.
If your listening position is relatively low, you should use your
spikes to tilt the speaker a little forward.
Only if you are standing up listening, or have a very high listening
position, the speakers will need to be angled backwards.
NOW START TO PLACE YOUR SPEAKERS
by using the instructions below!
How to calculate your speakers & listening position:
In the following example we assume you will position you
speakers on the short wall in the room.
This is not always the best choice, but the guide lines can be
used in the same way if you choose to set up your speakers on
the longest wall of your room.
1. Measure your room dimensions (Width and Length) and
write down the measures Example:W: 5,20 & L: 6,40
2. Divide the W & L measures with 5 and write that number
down.This example:W5=1,04 & L5=1,28
3. Divide the W & L measures with 7 and write that number
down.This example:W7=0,74 & L7=0,91
4. Divide the W & L measures with 9 and write that number
down.This example:W9=0,58 & L9=0,71
Now with the recommendations for minimum distances
to side & rear walls in mind you can derive a good starting
position for you speaker.
We assume you have bought the L5, so the minimum listening
distance is 3,0m.
The distance from sidewalls must be minimum 0.75m so the
maximum spacing is W - 2 x "minimum wall distance"
= 5,20-2x0.75 = 3,70 and minimum 3m. which is the same
as the minimum listening distance.
5. Now find the calculated figures of W5/W7/W9 closest to or
bigger than 0.75m W7:0,74m or W5:1,04m meters from the
wall
6. Now calculate the minimum listening distance & spacing using
W7&W5:W(5,20)-2xW5(1,04)= 3,12 Or W(5,20)-2xW7
(0,74)=3,72. Choose the wider position, and if this causes
problems with the 3D imaging use the guidelines in the
"tuning the sound character" section.
7. You can now choose the speaker distance from the rear wall,
and as all the measures of L5/L7/L9 are bigger than the
recommended minimum distance from the back wall, we
recommend you start out with the minimum distance possible,
in this case L9(0,71 cm), (measured from the centre of the
tweeter).
8. Now calculate your listening position using the following
formula:
Distance from the back wall(L9) + spacing x 0.866= 0.71
+ 3,72 x 0.866= 3,93.The listening position will then be the
first multi plum of L5/L7/L9 that is closest to and larger than
3,93m.
In this case: 6x0.71=4,26, or the second option 5x0.91=4,55,
or the third option 7x0.71=4,97.
(measured from the wall behind the speakers.)
9. If you prefer to sit farther away just keep on multiplying
L5/L7/L9, to find the "optimum" listening positions
10.
Now setup your speakers (without toe-in) and tilt them to fit
you listening height (see instruction above)
Tuning the sound character (Optimizing the listening
position and speaker positioning)
After you have run in the speakers, you can use the following guide
lines to find the optimum positions.
• By listening to the speakers you should be able to determine
if the overall performance and frequency balance is ok.
If not use the following guidelines to correct the sound
character:
• If the bass character is too weak move the speaker closer
to either the back wall or the side walls. If you have too much
bass move the speakers away from the side walls / back wall.
4” or 10 cm. will make quite a difference.
• If you want to optimize on the 3D-imaging (height depth
width) you will need to work on limiting the high frequency
energy being reflected.There are two possibilities:
• 1: Move the speakers away from the side walls and the
back wall
• 2: If moving the speakers away from the walls/ back wall
ruins the bass performance a solution can be to dampen or
diffuse the reflections of the side walls and the back wall,
suited materials can probably be bought at your dealer or
at specialist shops.
• If you can not find the perfect compromise a new listening
position is probably a solution.Try moving your head a little
back or a little forward, to determine if the sound changes,
if so you should move your listening position and start over
with the positioning of the speakers if needed.
• As you have probably found out by now this process can be
relatively time consuming, but we assure you it is worth the
effort! HAPPY HUNTING.
8
Page 10

Technical Specifications:
L3:
High frequency driver 38mm (1,5”) ring radiator, SD-2 neodymium motor, non-resonant aluminium chamber, multiple chamber low
compression design, machined aluminum faceplate and stainless steel phase plug
Low/mid frequency driver Two 180mm (7”) bass/midrange, powerful vented SD-1 motor,sliced paper cone, low loss linear suspension,
low compression aerodynamic aluminium chassis, spike-mounted in cabinet
Crossover network Multi order Non-Resonant Linked Impulse (NRLI) technology by GamuT,
Electromagnetic and circuit optimized bi-level board layout
Cabinet High density fiber board featuring internal skeleton braces and dampened with bitumen.
Realwood veneer with eleven layers of hand polished high-gloss lacquer
Frequency response 42 – 60.000Hz
Sensitivity 88dB @ 2,83V
Impedance 6 ohms nominal, minimum 4,6 ohms @ 200Hz
Recommended power 50-300W
Input connections High-quality,gold plated WBT binding posts with 4mm plugs. Bi-wire and bi-amp capability
Cabinet dimensions (HxWxD) 380 x 200 x 380mm (15 x 7.9 x 15”)
Weight 15 kg (34lbs)
L5:
High frequency driver 38mm (1,5”) ring radiator, SD-2 neodymium motor, non-resonant aluminium chamber, multiple chamber low compression
design, machined aluminum faceplate and stainless steel phase plug
Low/mid frequency driver Two 180mm (7”) bass/midrange, powerful vented SD-1 motor,sliced paper cone, low loss linear suspension,
low compression aerodynamic aluminium chassis, spike-mounted in cabinet
Crossover network Multi order Non-Resonant Linked Impulse (NRLI) technology by GamuT,
Electromagnetic and circuit optimized bi-level board layout
Cabinet High density fiber board featuring internal skeleton braces and dampened with bitumen.
Realwood veneer with eleven layers of hand polished high-gloss lacquer
Frequency response 32 – 60.000Hz
Sensitivity 89dB @ 2,83V
Nominal impedance 4 ohms nominal, minimum 2,8 ohms at 200Hz
Recommended power 50-300W
Input connections High-quality,gold plated WBT binding posts with 4mm plugs. Bi-wire and bi-amp capability
Cabinet dimensions (HxWxD) 1150 x 200 x 430mm (45.3 x 7.9 x 16.9”)
Weight 39 kg (88.4lbs)
Stands Stainless steel spikes
L7:
High frequency driver 38mm (1,5”) ring radiator, SD-2 neodymium motor, non-resonant aluminium chamber, multiple chamber low compression
design, machined aluminum faceplate and stainless steel phase plug
Mid frequency driver 180mm (7”) bass/midrange, powerful vented SD-1 motor, sliced paper cone, low loss linear suspension,low compression
aerodynamic aluminium chassis, spike-mounted in cabinet
Low frequency driver 2 pcs 180mm (7”) bass/midrange, powerful vented SD-1 motor, sliced paper cone, low loss linear suspension,low com
pression aerodynamic aluminium chassis, spike-mounted in cabinet
Crossover network Interlinked multi order Non-Resonant Linked Impulse (NRLI) technology by GamuT, electromagnetic and circuit optimized
electrically separated board layout
Cabinet High density fiber board featuring internal skeleton braces and dampened with bitumen.
Realwood veneer with eleven layers of hand polished high-gloss lacquer
Frequency response 27 – 60.000Hz
Sensitivity 90dB @ 2,83V
Nominal impedance 4 ohms nominal, minimum 2,6ohms at 220 Hz
Recommended power 50-300W
Input connections High-quality,gold plated WBT binding posts with 4mm plugs. Bi-wire and bi-amp capability
Cabinet dimensions (HxWxD) 1280 x 200 x 430mm (50.4 x 7.9 x 16.9”)
Weight 44 kg (99,7lbs)
Stands Stainless steel spikes
9
Page 11

Many years of enjoyment
Maintenance:
Clean the cabinet by using a soft and dry cloth. If the cabinet
is very dirty, use a small amount of all-purpose cleaner like
washing-up liquid diluted with water. Use as little fluid as possible to avoid the risk of
spilling on the membranes.
Do not clean the speaker units’ membranes; they are very
sensitive to liquid.You can remove dust carefully with a soft
dry cloth.
The speaker grille can be vacuum-cleaned when it has been
removed from the cabinet.
How we do business
The famous GamuT quality:
GamuT originally started by selling amplifier equipment
to recording studios where everything has to turned on day and night,
year after year, while performing flawlessly.
The amplifiers are built with hard professional use in mind,
and the development of your new speakers has followed this
rigid rule of thinking.As long as you don’t overload the speakers or subject
them to dampness or other physical damage, they
will perform without complaining.
Many hours of development work and intensive
listening have gone into these speakers even before
they were produced.
Skilled craftsmen have carefully fettled the cabinets,
so they are acoustically tuned and have the same silky mirror surface
as a grand piano.
Only the highest quality materials and components
have been used to ensure the best possible sound will be available in
your home for many, many years.
10
Page 12

Your comments are
always welcome
We welcome any opinions that you may have, both positive and negative;
this helps us to produce even better products in the future.
Therefore, if you do have anything you wish to tell us,
please write to your national GamuT distributor or to us at the following address:
Oesterled 28 A · DK 4300 Holbaek, Denmark
Phone Int. +45 70 20 22 68 · Fax Int. +45 59 43 97 26
E-mail: gamut@gamutaudio.com · www.gamutaudio.com
 Loading...