

Page 1

СТАРАЕТСЯ ДЛЯ МЕНЯ
Каталог тонометров
Page 2
Automatic blood
pressure monitor
Model Plus
Automatic blood pressure monitor
EN
Model Plus
User’s manual
Автоматический измеритель артериального давления
RU
Модель Plus
Руководство по эксплуатации
Автоматичний вимірювач артеріального тиску
UA
Модель Plus
Настанова з експлуатації
Автоматичен апарат за измерване на кръвното налягане
BG
за горната част на ръката
Модел Plus
Инструкция за употреба
Tensiometru automat
RO
MD
Model Plus
Manual de utilizare
Page 3

Page 4

EN
AUTOMATIC BLOOD PRESSURE MONITOR
Model PLUS
User’s manual (4-21)
АВТОМАТИЧЕСКИЙ ИЗМЕРИТЕЛЬ
RU
АРТЕРИАЛЬНОГО ДАВЛЕНИЯ
Модель PLUS
Руководство по эксплуатации (22-40)
UA
АВТОМАТИЧНИЙ ВИМІРЮВАЧ
АРТЕРІАЛЬНОГО ТИСКУ
Модель PLUS
Настанова з експлуатації (41-58)
BG
АВТОМАТИЧЕН АПАРАТ ЗА ИЗМЕРВАНЕ НА КРЪВНОТО
НАЛЯГАНЕ ЗА ГОРНАТА ЧАСТ НА РЪКАТА
Модел PLUS
Инструкция за употреба (59-77)
RO
TENSIOMETRU AUTOMAT
MD
Model PLUS
Manual de utilizare (78-95)
Page 5

DEAR GAMMA AUTOMATIC BLOOD
PRESSURE MONITOR OWNER
Thank you for choosing Automatic Blood Pressure Monitor Gamma® TM
model Plus. We are sure that having appraised worthily the high quality
and reliability of this device you will become a regular user of the products
of Trademark Gamma®.
This system is a fully automatic, digital blood-pressure measuring device
for use on the upper arm, it enables very fast and reliable measurement
of the systolic and diastolic blood-pressure as well as the pulse frequency
by way of the oscillometric method of measuring.This monitor features
Blood Pressure Level Indicator, Irregular Heartbeat Detection, as well as
90 memory cells.
Before starting to use this device please study the user’s manual carefully.
The user’s manual offers all information you need to measure your blood
pressure and pulse correctly. For all questions concerning the device
please contact your local distributor or Gamma® service center in your
country.
ATTENTION
This blood pressure monitor is designed to carry out self-control over blood
pressure but NOT to make self-diagnosis of hypertension/hypotension.
Please DO NOT diagnose by yourselves basing on the measurement
results obtained with the blood pressure monitor. Please DO NOT execute
self-treatment of high/low blood pressure and DO NOT change the
methods prescribed without consulting your doctor.
Type BF applied part.
Read the instructions carefully before using this device.
4
Page 6

EN
TABLE OF CONTENTS
IMPORTANT INFORMATION ON BLOOD PRESSURE AND ITS
MEASUREMENT .................................................................................... 6
What Is Blood Pressure? ......................................................................... 6
Which Values Are Normal? ...................................................................... 7
ADVANTAGES OF AUTOMATIC BLOOD PRESSURE MONITOR
MODEL Plus ........................................................................................... 9
Blood Pressure Level Indicator................................................................ 9
Irregular Heartbeat Detection .................................................................. 9
Fuzzy Logic Measuring Technology ............. ........................................ 10
GETTING READY FOR MEASUREMENT ........................................... 10
Safety Precautions ................................................................................ 10
Description of the Blood Pressure Monitor .............................................11
Inserting the Batteries............................................................................ 12
Using a Mains Adaptor .......................................................................... 13
Setting the Date and Time ..................................................................... 13
MEASUREMENT PROCEDURE .......................................................... 14
Fitting the Cuff ....................................................................................... 14
Taking a Single Measurement ............................................................... 15
MEMORY FUNCTION ........................................................................... 17
Viewing the Stored Values .....................................................................17
Delete Memories ................................................................................... 17
ERROR MESSAGES/TROUBLESHOOTING ....................................... 17
CARE AND MAINTENANCE ................................................................ 18
SYMBOL INFORMATION .....................................................................19
TECHNICAL SPECIFICATIONS ...........................................................20
WARRANTY .......................................................................................... 21
5
Page 7
IMPORTANT INFORMATION
ON BLOOD PRESSURE
AND ITS MEASUREMENT
What Is Blood Pressure?
Systolic Pressure
Diastolic Pressure
Pulse
SET
M/
D
M
E
M
ON/OFF
MEM
H/D
S
Y
S
kPa
DIA
kPa
P
U
L
/
m
in
6V
Blood pressure is the pressure that your blood extends to the vascular
walls. Blood pressure is necessary to provide for constant blood ow
inside the body. Thanks to it the cells get oxygen that provides for their
normal functioning. The heart performs the function of a «pump», sending
blood to the blood vessels. Each heart beat creates a certain level of the
blood pressure.
There are 2 kinds of blood pressure: a systolic (upper) one, which
corresponds to the heartbeat pushing blood into the arteriae; and a
diastolic (lower) one, which means the blood pressure between two
heartbeats.
Blood pressure is subject to uctuations during the day even in healthy
people. The uctuations are inuenced by a number of factors - time of
day, person’s condition, physical or mental activity, environment, etc.
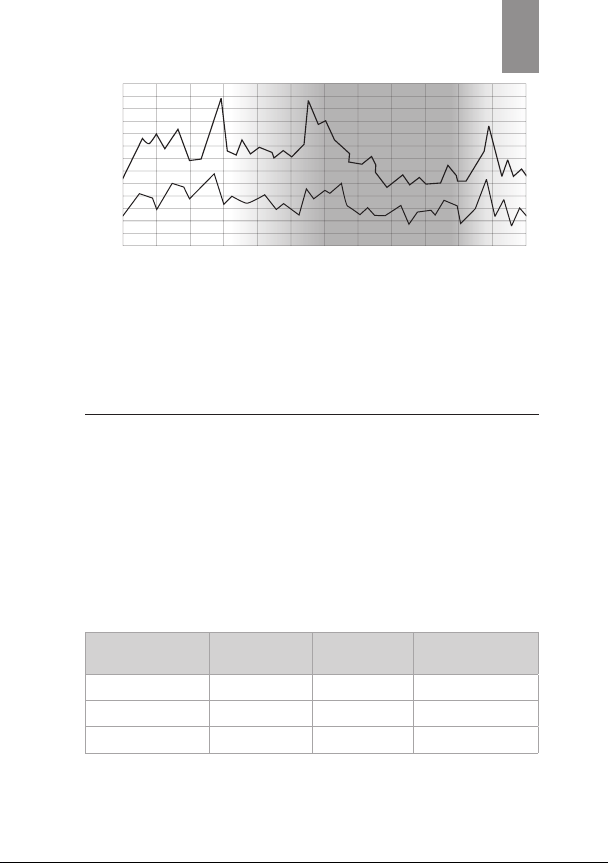
Day-Night Fluctuations of the Blood Pressure
An increase of blood pressure increases the burden onto the heart, affects
blood vessels making their walls thick and less elastic.
One of the features of the hypertension is its ability to remain unnoticed
for the patient at its early stages. That’s why the self control of the blood
6
Page 8
EN
170
8.00 10.00 12.00 14.00 16.00 18.00 20.00 22.00 24.00 2.00 4.00 6.00 8.00
mmHg
160
150
140
130
120
110
100
90
80
70
60
DIA blood pressure
50
40
pressure is so important. With the illness progressing, headaches and
SYS blood pressure
Time (hours)
regular dizziness appear, the sight declines, the functioning of vitalses
(encephalon, heart, kidneys, blood vessels) breaks down. Without special
treatment the complications of hypertension might be kidney damages,
breast-pang, paralytic stroke, aphasia, dementia, heart attack and stroke.
Which Values are Normal?
Monitoring your routine blood pressure trend helps you to know your
body condition. Human blood pressure naturally increases after reaching
middle age.
This symptom is a result of continuous ageing of the blood vessels. Further
causes include obesity, lack of exercise and cholesterol (LDL) adhering to
the blood vessels, diabetes. Rising blood pressure accelerates hardening
of the arteries, and the body becomes more susceptible to apoplexy and
coronary infarction.
Denitions and Classication of blood pressure levels according to
2007 ESH-ESC Practice Guidelines for the Management of Arterial
Hypertension: Data in mmHg.
Category
Optimal < 120 and < 80
Normal*3 120-129 and/or 80-84
High normal 130-139 and/or 85-89
Systolic
(mmHg)
Diastolic (mmHg)
7
Page 9

Grade 1
hypertension
Grade 2
hypertension
Grade 3
hypertension
Isolated systolic
hypertension
Isolated systolic hypertension should be graded (1, 2, 3) according to
systolic blood pressure values in the ranges indicated, provided that
diastolic values are < 90mmHg.
Source: The European Society of Hypertension and European Society of
Cardiology Task Force Members. 2007 ESH-ESC Practice Guidelines for
the Management of Arterial Hypertension. J Hypertens 2007; 25:1751-
1762.
• The diagnosis of hypertension requires from the patient to combine
medical treatment prescribed by the doctor and mode of life correction.
• People with normal pressure and high normal pressure are recommended to carry out self-control of their tension in order to timely take
measures to decrease the blood pressure level down to the optimal one
without using any medications.
• For people more than 50 years old high level of systolic blood pressure
(higher than 140 mmHg) is more crucial than diastolic pressure.
• Even with blood pressure being normal, people run the bigger risk of
hypertension development with advancing age.
ATTENTION
If you have normal results of blood pressure measured under calm
conditions but your results are excessively high when measured under
the conditions of physical or mental exhaustion, this might be a sign of so
called brittle (that is unstable) hypertension. If you suspect that, please
consult your doctor.
When measured correctly, if diastolic blood pressure is more than 120 mmHg,
it is necessary to call the doctor immediately.
140-159 and/or 90-99
160-179 and/or 100-109
≥ 180 and/or ≥ 110
≥ 140 and < 90
8
Page 10

EN
ADVANTAGES OF AUTOMATIC
BLOOD PRESSURE MONITOR
MODEL PLUS
Blood Pressure Level Indicator
Blood pressure level indicator is located along the left side in the
display. The classication corresponds to ESH (European Society of
Hypertension) ranges described in the table of the section «Which values
are normal?». After the measurement there appears the bars in the left
part of the display: green zone - optimal blood pressure, yellow - elevated,
orange - too high, red - dangerously high. This function helps you to selforient in the measurement results.
Irregular Heartbeat Detection
This function indicates allorhythmic heartbeating. If the symbol of IHD
appears on the display that means that certain abnormality in heart beat
frequency was detected during the measurement.
In this case, the result may deviate from your normal blood pressure repeat the measurement. In most cases, this is no cause for concern.
However, if the symbol appears on a regular basis (e.g. several times
a week with measurements taken daily) we advise you to tell your doctor.
Please show your doctor the following explanation:
Information for the doctor on frequent appearance of the Irregular
Heartbeat Detector.
This instrument is an oscillometric blood pressure monitor that also
analyses pulse frequency during measurement. The instrument is
clinically tested.
The symbol is displayed after the measurement, if pulse irregularities
occur during measurement. If the symbol appears more frequently
(e.g. several times per week on measurements performed daily) we
recommend the patient to seek medical advice. The instrument does not
replace a cardiac examination, but serves to detect pulse irregularities at
an early stage.
9
Page 11

Fuzzy Logic Measuring Technology
This unit uses the oscillometric method to detect your blood pressure.
Before the cuff starts inating, the device will establish a baseline cuff
pressure equivalent to the air pressure. This unit will determine the
appropriate ination level based on pressure oscillations, followed by cuff
deation.
During the deation, the device will detect the amplitude and slope of the
pressure oscillations and thereby determine for you the systolic blood
pressure, diastolic blood pressure, and pulse.
GETTING READY
FOR MEASUREMENT
Safety Precautions
1. Use this device ONLY for the intended use described in this manual.
2. Do NOT use accessories which are not specied by the manufacturer.
3. Do NOT use the device if it is not working properly or damaged.
4. Do NOT use the equipment where aerosol sprays are being used, or
where oxygen is being administered.
5. Do NOT use under any circumstances on newborns.
6. This device does NOT serve as a cure for any symptoms or diseases.
The data measured are for reference only. Always consult your doctor
to have the results interpreted.
7. Keep the equipment and its exible cord away from hot surfaces.
8. Do NOT apply the cuff to areas other than the place directed.
9. Proper maintenance and periodically calibration are essential to the
longevity of your device. If you are concerned about your accuracy of
measurement, please contact local customer service for help.
10. This system is intended for individuals age 18 or above.
11. Do not use it for diagnosis of hypertension or testing on newborns,
babies, young children or persons who cannot express their consent.
12. If you have been diagnosed with a severe arrhythmia or irregular
10
Page 12
EN
heartbeat, atrial or ventricular premature beats or atrial brillation,
measurements made with this instrument should only be evaluated
after consultation with the doctor or your healthcare professionals.
KEEP THIS MANUAL DURING THE WHOLE LIFETIME OF THE DEVICE
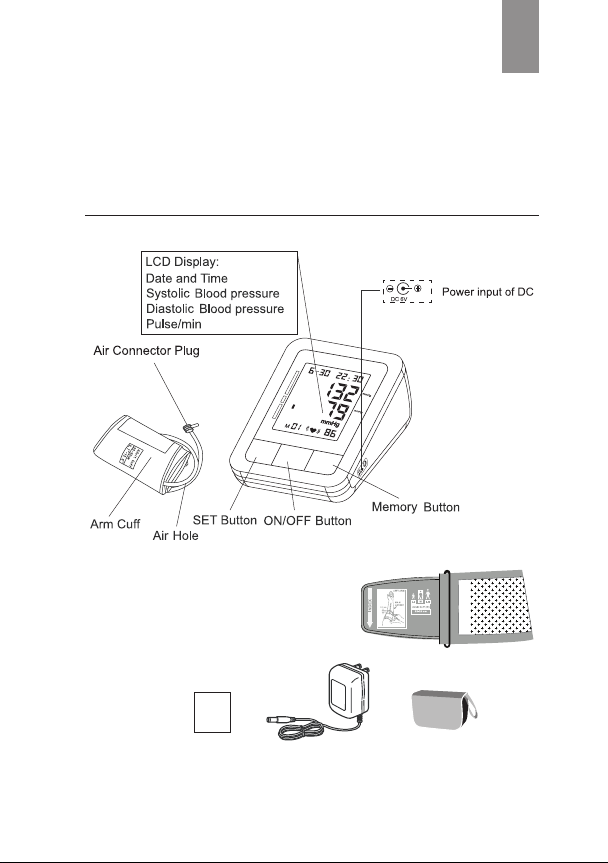
Description of the Blood Pressure Monitor
M
/D
M
E
M
SE
T
O
N
/O
F
F
Cuff:
Plus offers a wide range cuff with D-ring,
measuring size: 22~32cm, suitable for
most of arm circumferences.
H
/
D
SYS
k
P
a
D
IA
k
P
a
PUL
/
m
i
n
M
E
M
V
6
Accessory:
Manual Adapter
Bag
11
Page 13
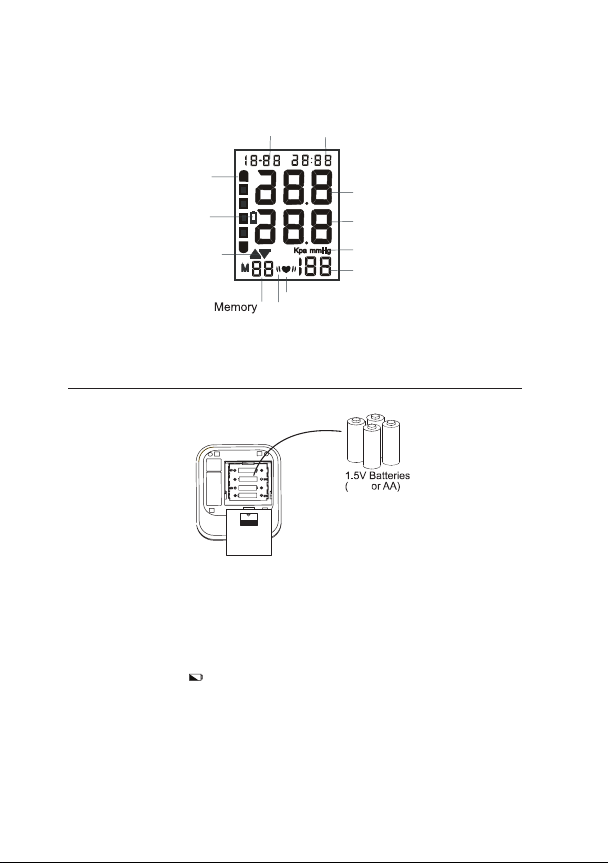
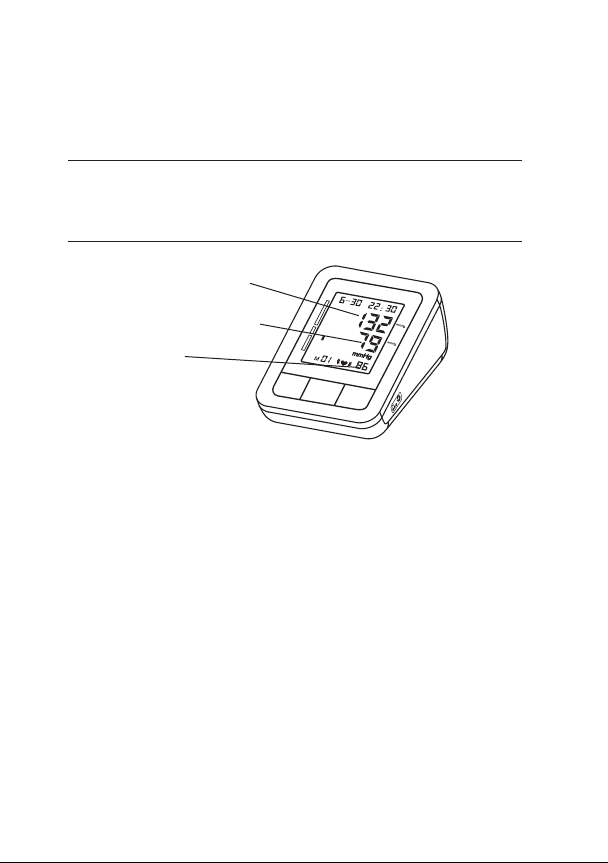
Display screen:
SYMBOLS ON DISPLAY
Hour/Minute
Value of systolic
Value of diastolic
Unit of pressure
Value of pulse per minute
Heart beat
WHO blood pressure
classication
Battery
Ination
Deation
Month/Date
Irregular heartbeat
detection
Inserting the Batteries
To insert batteries:
1.5V R6
LR AA
1.5V R6
LR AA
OPEN
1. Remove the cover of the battery compartment, which is located in the
back side of the device (see the illustration).
2. Insert the batteries (4 AA, 1.5 V), following the indicated polarity. (+ -)
ATTENTION
• After the warning appears, device is blocked till the batteries have
been replaced.
• If the blood pressure monitor is not used for long periods, remove the
batteries from the device.
• Please use «AA» Long-Life or Alkaline 1.5V Batteries. Do not use
rechargeable batteries.
LR6
12
Page 14
EN
Using a Mains Adaptor
It is possible to operate Automatic Blood Pressure Monitor Model Plus with
a mains adaptor (output 6 V DC/ 500 mA).
1. Connect the micro plug to the socket at the device right side.
2. Plug the mains adapter (output 6 V DC/ 500 mA) to a 100-240 V
electrical power socket.
NOTE:
• Please use the adaptor of Trademark Gamma®. Any other adaptor being
used, the service center is not considered responsible for the warranty
servicing/repair of the monitor.
• No power is taken from the batteries while the mains adaptor is con-
nected to the device.
• Please consult service center if you have questions relating to the mains
adaptor.
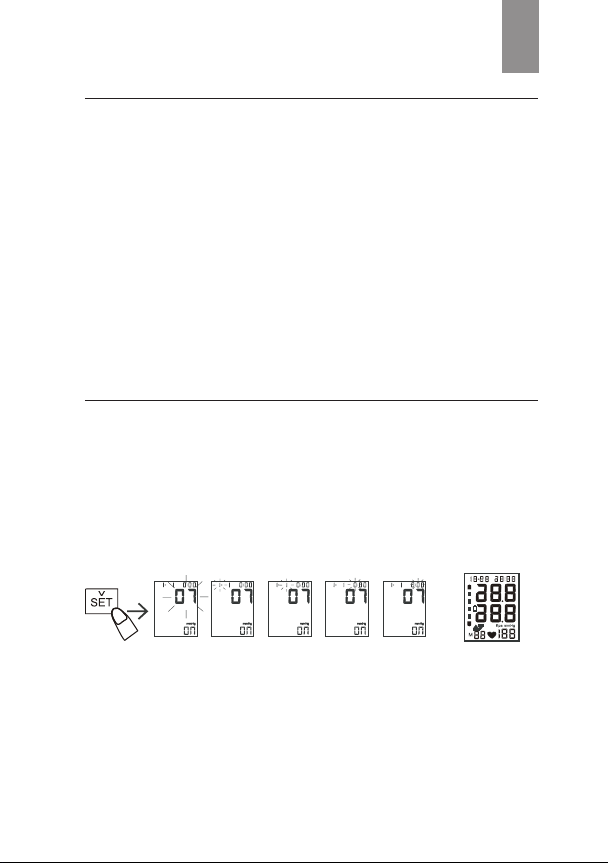
Setting the Date and Time
1. Press and hold “SET” key until the year number displays and ashes on
LCD to enter setting mode.
2. Press “MEM” key to adjust the year, then press “SET” key again to save
your setting and enter the month setting mode.
3. Press “MEM” key to adjust the month. Follow the same steps to adjust
date/hour/minute until setting completed.
NOTE: If the meter is idle for 1.5 minutes during the setting mode, it will
switch off automatically.
13
Page 15
MEASUREMENT PROCEDURE
ATTENTION
• Find time to relax by sitting in a quiet atmosphere for some time before
measurement.
• Efforts by the patient to support the arm can increase the blood pressure. Make sure you are in a comfortable, relaxed position and do not
activate any muscles in the arm during measurement.
• Always measure on the same arm (normally left).
• Remove any garment that ts closely to your upper arm. Do not roll the
sleeve since it can squeeze your hand and this can lead to false results.
• Use only clinically approved original cuff.
• If you want to follow the results of your blood pressure measurements,
always perform measurements at the same time of day, since blood
pressure changes during the course of the day.
• Measurements should be done after a 5 minute rest to ensure accuracy.
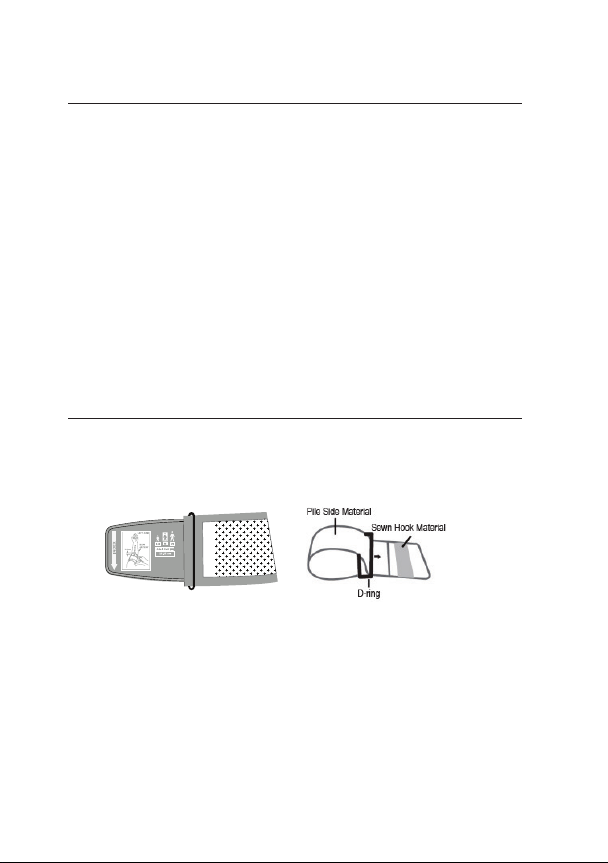
Fitting the Cuff
a. Plug the cuff connector to the cuff socket on the device left side.
b. Assemble the cuff as shown below. The smooth surface should be
inside of the cuff loop and the metal D-ring should not touch your skin.
c. Stretch your left (right) arm in front of you with your palm facing up.
Slide and place the cuff onto your arm to let the air tube and artery
mark region toward the lower arm.
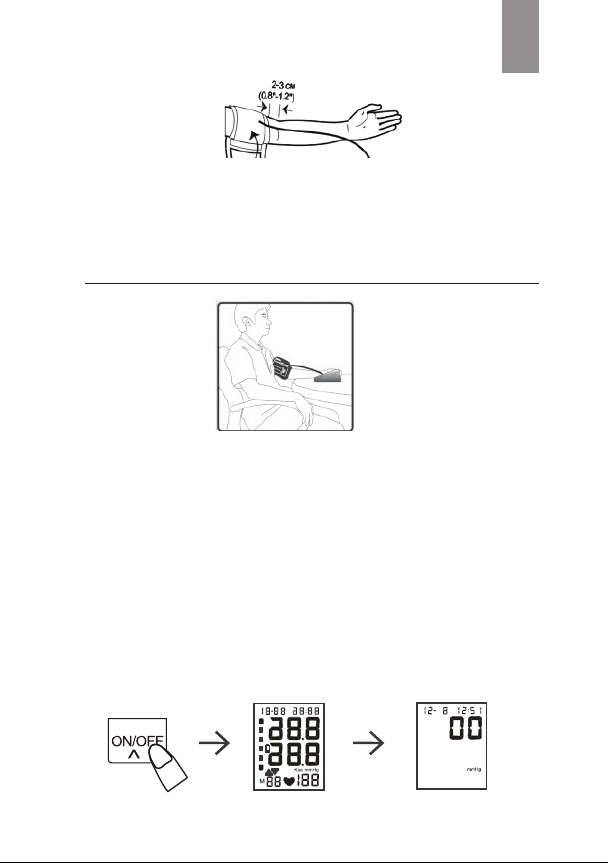
Wrap and tighten the cuff above your elbow. The artery mark on the
edge of the cuff should be approx. 0.8ʺ to 1.2ʺ (2 cm to 3 cm) above
your elbow. Align the tube over the main arteries on the inside.
d. Leave a little free space between the arm and the cuff: you should be
able to t two ngers between them. Remove all clothing covering or
constricting the measurement arm.
14
Page 16
EN
e. Press the hook material rmly against the pile material. The top and
bottom edges of the cuff should be tightened evenly around your
upper arm.
Taking a Single Measurement
ATTENTION
1. Sit down for at least 10 minutes before measuring.
2. Place your elbow on a at surface. Relax your hand with the palm facing
up.
3. Make sure the cuff is about the same height as the location of your
heart.
4. Remain still and do not talk or move during the measurement.
WARNING:
If the cuff is relatively lower (higher) than the heart, the obtained blood
pressure value could be higher (lower) than the actual value.
Always apply the pressure cuff before turning on the monitor.
a. Press ON/OFF button, pump begins to inate the cuff. The rising
pressure in the cuff is shown on the display.
15
Page 17
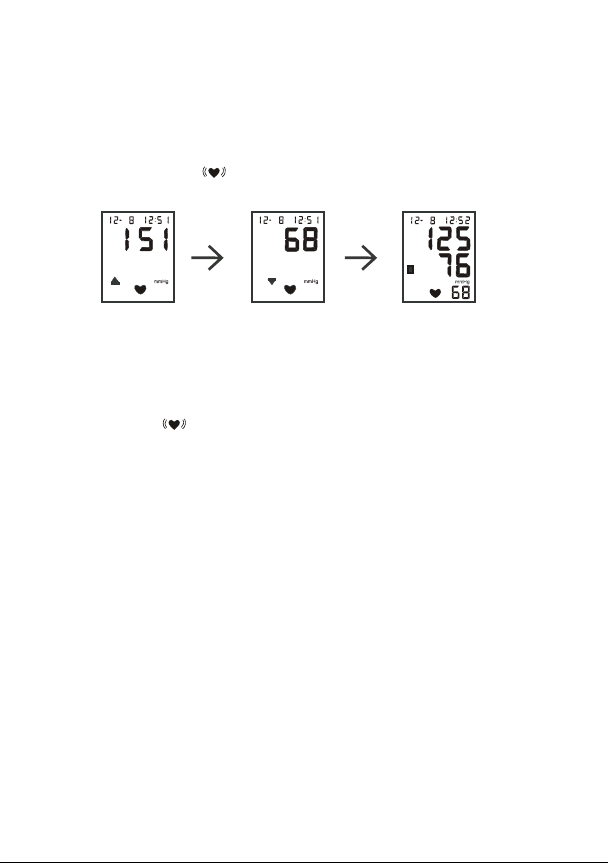
b. Pressure in cuff increases to working pressure. Then pump stops and
pressure falls.
NOTE: In case the ination pressure is not sufcient to determine
measurement result, the monitor automatically re-inates to a higher level.
c. The heart symbol starts to ash every heart beat once pulse is
detected.
d. After the measurement, systolic pressure, diastolic pressure, pulse rate
and color bars classied from ESH (European Society of Hypertension)
standards shows on the display.
e. If irregular heartbeat was detected during the measurement, LCD
displays the icon to remind users of heartbeat irregularity.
DISCONTINUING A MEASUREMENT
If it is necessary to interrupt a blood pressure measurement for any reason
(e.g the patient feels unwell), the ON/OFF button can be pressed at any
time. The device then immediately lowers the cuff pressure automatically.
16
Page 18
EN
MEMORY FUNCTION
Viewing the Stored Values
The device stores 90 most recent blood pressure test results along with
respective dates and times in the monitor memory for each user.
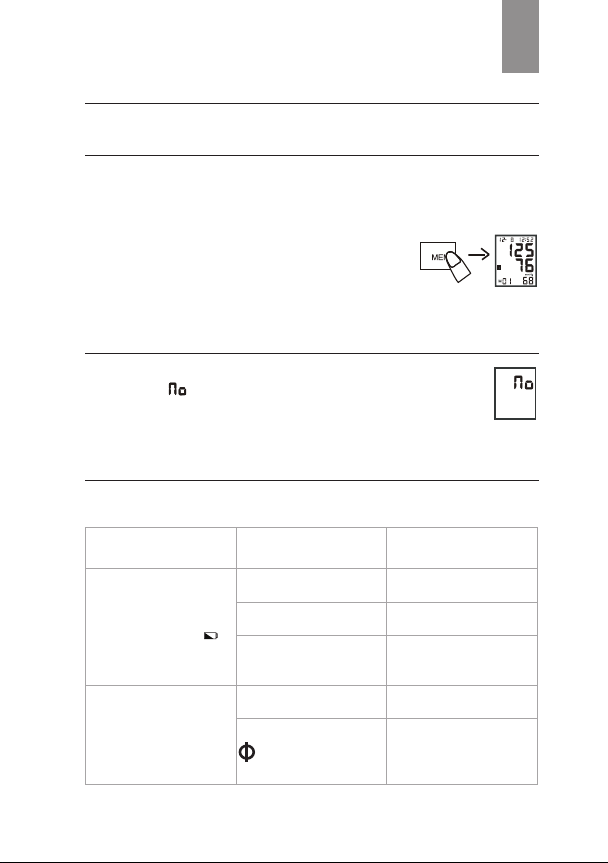
When the monitor is turned off, press «MEM»
button, a memory reading of the latest
measurement will display. To see the next page
(old measurements) press «SET».
Delete Memories
To delete memory, hold «MEM» button for ve seconds, the LCD
will display « » - this means that all the memory has been
deleted.
TROUBLESHOOTING
lf you have trouble in using the unit please check the following points rst.
ERROR DISPLAY
Nothing is displayed.
When you push the
POWER button or
battery icon ash
E0
POSSIBLE
CAUSE
No battery installation Insert batteries
Battery worn out
The polarities of
batteries placed
wrongly
Testing pressure with
Clothes
The marker of arm cuff
is not in alignment
with the arm’s artery.
HOW TO
CORRECT
Replace with new
batteries
Insert battery in the
correct polarities
Take off the clothes
and test it gain
Align the marker of
arm cuff with the arm’s
artery, and measure
again.
17
Page 19

E1: Can’t normally
increase pressure
E3: Inate pressure
too high
E2 E4: Hand shak-
ing while measurement
Battery icon on
The systolic pressure Value or
diastolic Pressure
value too high
The systolic
pressure value or
diastolic pressure
value too low
Check your wrist cuff
for air leakage
Hand or body shaking
while measurement
Battery low power
1.The cuff was held
lower than your heart
2.The cuff was not
attached properly
3.You moved your
body or spoke during
measurement
1.The cuff was held
higher than your heart
2.You moved your
body or spoke during
measurement
Replace wrist cuff with
new one
Remeasure or send
back to dealer to
recalibrate
Keep static position
and
measure again
Replace battery and
measure again
Keep correct position
and
measure again
CARE AND MAINTENANCE
To avoid the monitor attracting dirt, dust or other contaminants, wash and
dry your hands thoroughly before use.
Cleaning
• To clean the monitor exterior, wipe it with a cloth moistened with tap
water or a mild cleaning agent, then dry the device with a soft dry cloth.
Do NOT ush with water.
• Do NOT use organic solvents to clean the monitor.
• Do NOT wash the pressure cuff.
• Do NOT iron the pressure cuff.
Monitor Storage
• Storage condition: -20°C to 55°C (-4°F to 131°F), below 95% relative
humidity.
18
Page 20

• Always store or transport the monitor in its original storage case.
• Avoid dropping or heavy impact.
• Avoid direct sunlight and high humidity.
SYMBOL INFORMATION
SYMBOL REFERENT
Consult instructions for use
Manufacturer
Serial number
Caution, consult accompanying documents
Dispose of in accordance with the requirements
of your country
Type BF Equipment
Class II
CE mark
EN
19
Page 21

SPECIFICATIONS
Measuring Method Oscillometric Measurement
Indication Digital LCD display
Measuring Range: Pressure: (30~280) mmHg
Accuracy: Static Pressure: ±3 mmHg
Memory: 90 Memories
Cuff Size 22-32 cm
Power supply: 4x1.5V Batteries(LR6 or AA)
Operating condition: +5°C~+40°C. 30% RH~80% RH
Storage condition: -20°C~+55°C. 10% RH~93% RH
Dimensions: Approx: 130(W) X 96(H) X 60(D) mm
Weight: Approx: 380 g, excluding batteries
Classication Type BF
* Technical alterations are possible!
This device has been tested to meet the electrical and safety requirements
of:
IEC/EN 60601-1,
IEC/EN 60601-1-2
Reference to Standards:
Pulse: (40~199) Beat/min
Pulse: ±5%
Atmospheric pressure: 80 kPa~106
kPa
Atmospheric pressure: 50 kPa~106
kPa
20
Page 22

EN
• EN 1060-1/-3, NIBP-requirements
• IEC60601-1 General requirement for safety
• IEC60601-1-2 Requirements for EMC
• EN1060-4, NIBP clinical investigation
• AAMI/ANSI/IEC 80601-2-30, ANSI/AAMI/ISO 81060-2, NIBP require-
ments
WARRANTY
Your Automatic Blood Pressure Monitor Model Plus is warranted for 5
years from date of purchase. Warranty for the cuff is 1 year from the date
of purchase. The warranty does not apply to damage caused by improper
handling, accidents, not following the operating instructions or
selfmaintained alterations made to the device. The warranty is only valid
upon presentation of the warranty card which was correctly lled in and
sealed.
21
Page 23

УВАЖАЕМЫЙ ПОЛЬЗОВАТЕЛЬ АВТОМАТИЧЕСКОГО
ИЗМЕРИТЕЛЯ АРТЕРИАЛЬНОГО ДАВЛЕНИЯ ТМ GAMMA
Благодарим Вас за выбор автоматического измерителя артериального давления ТМ Gamma® модели PLUS. Мы уверены, что по достоинству оценив качество и надежность этого прибора, Вы станете
постоянным пользователем продукции торговой марки Gamma®.
Данная модель представляет собой автоматический, цифровой измеритель артериального давления на плечо, который обеспечивает
быстрое и качественное получение результатов систолического и диастолического давлений, также пульса с помощью осциллометрического метода измерения.
Преимуществами данного прибора являются:
• индикатор уровня артериального давления,
• технология «IHD» - определение нерегулярного сердцебиения,
• память на 90 измерений с сохранением даты и времени.
Перед тем как начать пользоваться данным прибором, внимательно
прочитайте инструкцию. В ней Вы найдете всю информацию, необходимую Вам для правильного проведения измерения артериального
давления и пульса. По всем вопросам относительно данного продукта, пожалуйста, обращайтесь к официальному представителю или в
сервисный центр ТМ Gamma® в Вашей стране.
ВНИМАНИЕ
Данный измеритель артериального давления предназначен для осуществления самостоятельного контроля артериального давления, а
не для самодиагностики гипертонии/гипотонии. Ни в коем случае не
ставьте диагноз самостоятельно на основе результатов, полученных
с помощью измерителя артериального давления. Не занимайтесь
самолечением отклонений артериального давления от нормы и не
меняйте самостоятельно прописанные методы лечения, не проконсультировавшись предварительно с врачом.
Класс защиты BF.
Перед использованием прибора внимательно прочтите данную
инструкцию.
22
Page 24

RU
СОДЕРЖАНИЕ
ЧТО НЕОБХОДИМО ЗНАТЬ ОБ АРТЕРИАЛЬНОМ ДАВЛЕНИИ ... 24
Что такое артериальное давление ..................................................... 24
Нормы артериального давления ........................................................ 25
ПРЕИМУЩЕСТВА АВТОМАТИЧЕСКОГО ИЗМЕРИТЕЛЯ
АРТЕРИАЛЬНОГО ДАВЛЕНИЯ МОДЕЛЬ PLUS ............................. 27
Индикатор уровня АД .......................................................................... 27
Функция обнаружения нарушений частоты сердечных
сокращений (IHD) ................................................................................. 27
Технология Fuzzy Logic .......................................................................28
ПОДГОТОВКА К ИЗМЕРЕНИЮ .........................................................29
Важная информация ........................................................................... 29
Внешний вид и описание прибора ..................................................... 30
Установка батареек ............................................................................. 31
Подключение сетевого адаптера ........................................................ 31
Установка даты/времени ..................................................................... 32
ПРОВЕДЕНИЕ ИЗМЕРЕНИЯ ............................................................. 32
Наложение манжеты ........................................................................... 33
Выполнение измерения....................................................................... 33
ФУНКЦИЯ «ПАМЯТЬ» ........................................................................ 35
Просмотр сохраненных значений ....................................................... 35
Удаление всех значений...................................................................... 35
УСТРАНЕНИЕ НЕИСПРАВНОСТЕЙ .................................................. 36
ХРАНЕНИЕ И УХОД ............................................................................ 37
ОПИСАНИЕ СИМВОЛОВ ....................................................................38
ТЕХНИЧЕСКИЕ ХАРАКТЕРИСТИКИ .................................................38
ГАРАНТИЯ ........................................................................................... 40
23
Page 25

ЧТО НЕОБХОДИМО ЗНАТЬ
ОБ АРТЕРИАЛЬНОМ ДАВЛЕНИИ
Что такое артериальное давление
Систолическое
давление
Диастолическое
давление
Пульс
Артериальное давление - это давление крови на стенки артерий.
Артериальное давление (АД) необходимо для обеспечения постоянной циркуляции крови в организме. Благодаря ему клетки организма
получают кислород, который обеспечивает их нормальное функционирование. «Насосом», выталкивающим кровь в сосуды, выступает
сердце. Каждый удар сердца обеспечивает определенный уровень
АД.
Различают 2 вида АД: систолическое (верхнее) давление, которое
соответствует сокращению сердца, при котором происходит выталкивание крови в артерии; и диастолическое (нижнее) давление, которое
соответствует давлению крови между двумя сокращениями сердца.
Суточный ритм артериального давления человека
Повышение артериального давления увеличивает нагрузку на сердце, влияет на кровеносные сосуды, делая их стенки толстыми и менее эластичными.
Одной из характеристик гипертонии является то, что на начальном
этапе она может протекать незаметно для самого больного. Именно
поэтому самоконтроль АД играет такую важную роль. С прогрессированием болезни возникают головные боли, постоянные головокружения, ухудшается зрение, функционирование жизненно важных органов – головного мозга, сердца, почек, кровеносных сосудов.
SET
M/
D
M
E
M
ON/OFF
MEM
H/D
S
Y
S
kPa
DIA
kPa
P
U
L
/
m
in
6V
24
Page 26

170
0
Время (час)
мм рт. ст.
RU
160
150
140
130
120
110
100
90
80
70
60
Диастолическое (нижнее) давление
50
40
8.00 10.00 12.00 14.00 16.00 18.00 20.00 22.00 24.00 2.00 4.00 6.00 8.0
При отсутствии соответствующей терапии возможны такие последствия, как поражения почек, стенокардия, паралич, потеря речи, слабоумие, инфаркт миокарда и инсульт головного мозга.
Систолическое (верхнее) давление
Нормы артериального давления
Важно регулярно измерять уровень артериального давления для
контроля состояния Вашего здоровья. Артериальное давление естественным образом повышается у людей старше среднего возраста.
Это результат постоянного старения кровеносных сосудов, что впоследствии приводит к ожирению, снижения активности, скоплению
холестерина в кровеносных сосудах, диабета. Повышенное артериальное давление ускоряет уплотнение артерий, что в свою очередь
повышает вероятность инсультов и инфарктов миокарда.
Данная таблица приводит определения и классификацию уровней
артериального давления в соответствии с практическими рекомендациями по контролю артериального давления ESH-ESC 2007 года.
Категория
Систолическое
(мм рт. ст.)
Оптимальное < 120 и < 80
Нормальное 120–129 и/или 80–84
Высокое
130–139 и/или 85–89
нормальное
Диастолическое
(мм рт. ст.)
25
Page 27

Гипертония
Степень 1
Гипертония
Степень 2
Гипертония
Степень 3
Изолированная
систолическая
гипертония
Изолированная систолическая гипертония ранжируется также по степеням (1, 2, 3) в соответствии со значениями систолического давления, при условии, что диастолическое давление < 90 мм рт. ст.
Источник: The European Society of Hypertension and European Society
of Cardiology Task Force Members. 2007 ESH - ESC Practice Guidelines
for the Management of Arterial Hypertension. J Hypertens 2007, 25:1751-
1762 (Европейская Ассоциация по гипертонии и Европейская Ассоциация членов целевой группы кардиологии. 2007 ESH - ESC Практические рекомендации по борьбе с гипертонией. Дж. Хипертенс 2007,
25:1751-1762).
При диагнозе ГИПЕРТОНИЯ необходимо сочетание медикаментозного лечения, назначенного врачом, и коррекции образа жизни.
• При повышенном нормальном и нормальном АД рекомендуется
осуществление самоконтроля для того, чтобы вовремя принять
меры по снижению АД до оптимального без применения
лекарственных средств.
• В возрасте старше 50 лет высокое (более 140 мм рт. ст.)
систолическое давление играет более важную роль, чем
диастолическое давление.
• Даже при нормальном АД, риск развития гипертонии
увеличивается с возрастом.
ВНИМАНИЕ
Если измеренные в состоянии покоя показатели АД не являются необычными, однако в состоянии физического или душевного утомления
Вы наблюдаете чрезмерно повышенные результаты, то это может
указывать на наличие так называемой лабильной (т. е. неустойчивой)
гипертонии. Если Вы подозреваете у себя это явление, рекомендуем
140 – 159 и/или 90 – 99
160–179 и/или 100–109
≥ 180 и/или ≥ 110
≥ 140 и < 90
26
Page 28

RU
обратиться к врачу.
Если при правильном измерении артериального давления диастолическое артериальное давление составляет более 120 мм рт. ст.,
необходимо немедленно вызвать врача.
ПРЕИМУЩЕСТВА
АВТОМАТИЧЕСКОГО ИЗМЕРИТЕЛЯ
АРТЕРИАЛЬНОГО ДАВЛЕНИЯ
МОДЕЛЬ PLUS
Индикатор уровня АД
Индикатор уровня давления расположен вдоль левого края дисплея.
Классификация соответствует диапазонам, описанным в таблице
раздела «Нормы артериального давления». После измерения АД
пунктир высветится в левой части дисплея: зеленая зона - оптимальное давление, желтая - повышенное, оранжевая - слишком высокое,
красная - угрожающе высокое. Данная функция позволит Вам самостоятельно ориентироваться в полученных результатах АД.
Функция обнаружения нарушений частоты
сердечных сокращений (IHD)
Эта функция позволяет определить нерегулярное биение сердца.
Если на дисплее прибора появляется символ технологии IHD , это
означает, что во время измерения артериального давления прибор
обнаружил какие-то нарушения частоты сердечных сокращений.
Возможно, что в каком-то конкретном случае такой результат обусловлен изменением Вашего обычного артериального давления, просто
повторите измерение еще раз. В большинстве случаев поводов для
беспокойства нет. Однако, если символ появляется постоянно
(например, несколько раз в неделю при ежедневных измерениях),
мы рекомендуем Вам сообщить об этом врачу. Пожалуйста, покажите
27
Page 29

своему врачу следующее объяснение:
Информация для медиков по функции выявления нарушений
частоты сердечных сокращений (IHD).
Данный прибор представляет собой осциллометрический измеритель артериального давления с функцией анализа частоты пульса
одновременно с проведением измерения. Прибор клинически одобрен. По окончании измерения на дисплее прибора появляется символ технологии IHD , если во время измерения артериального
давления прибор обнаружил какие-то нарушения частоты пульса.
Если символ появляется достаточно часто (например, несколько
раз в неделю при ежедневных измерениях), мы рекомендуем пройти
медицинское обследование. Этот прибор ни в коем случае не заменяет кардиологического обследования, однако, он позволяет выявлять нарушения частоты сердечных сокращений на ранней стадии.
Технология Fuzzy Logic
Для определения артериального давления в данном приборе используется осциллометрический метод. Перед началом подачи воздуха в
манжету прибор определяет отправное значения давления в манжете, равное давлению воздуха. Прибор определяет уровень давления
в манжете, необходжимый для измерения, учитывая осцилляции
(колебания) давления. После достижения максимального давления
воздух из манжеты стравливается.
Во время стравливания воздуха прибор определяет амплитуду и наклон осцилляций давления и вычисляет значения систолического и
диастолического артериального давления, а также частоту пульса.
28
Page 30

RU
ПОДГОТОВКА К ИЗМЕРЕНИЮ
Важная информация
1. Используйте прибор ТОЛЬКО по назначению, как описано в этой
инструкции.
2. НЕ ИСПОЛЬЗУЙТЕ аксессуары, не указанные изготовителем.
3. НЕ ИСПОЛЬЗУЙТЕ прибор, если он работает неисправно, либо
поврежден.
4. НЕ ИСПОЛЬЗУЙТЕ прибор в местах, где присутствуют распыленные аэрозоли, и в местах, где происходит подача кислорода.
5. Ни в коем случае НЕ ИСПОЛЬЗУЙТЕ прибор для новорожденных
или маленьких детей.
6. Этот прибор НЕ ЯВЛЯЕТСЯ средством лечения каких-либо симптомов или заболеваний. Результаты измерений служат только
для информации. Обратитесь к врачу за консультацией.
7. НЕЛЬЗЯ хранить прибор и гибкий шнур на горячих поверхностях.
8. НЕ ОДЕВАЙТЕ манжету на другие участки тела, кроме плеча.
9. ВАЖНО правильно использовать и периодически проводить
поверки прибора для продления его срока службы. Если Вы не
уверены в точности показаний прибора, обратитесь в сервисный
центр в Вашей стране.
10. Данный прибор предназначен для использования лицами старше
18 лет.
11. Не используйте прибор для постановки диагноза гипертонии
и для измерения артериального давления у новорожденных,
маленьких детей или лиц, не давших на это свое согласие.
12. Результаты измерений, полученные при использовании данного
прибора, должен оценить ТОЛЬКО врач, если Вам поставлен
диагноз сильной аритмии или нерегулярного сердцебиения,
предсердной или желудочковой экстрасистолии, мерцательной
аритмии.
СОХРАНИТЕ ДАННУЮ ИНСТРУКЦИЮ В ТЕЧЕНИЕ ВСЕГО СРОКА
СЛУЖБЫ ПРИБОРА
29
Page 31

Внешний вид и описание прибора
ЖК дисплей:
Дата/Время
Систолическое давление
Диастолическое давление
Пульс/мин
Конектор для
подключения
манжеты
M
/D
M
E
M
SE
T
O
N
/O
F
F
H
/
D
SYS
k
P
a
D
IA
k
P
a
PUL
/
m
i
n
M
E
M
V
6
Разъем для
подключения
сетевого адаптера
Манжета
Манжета:
Модель PLUS укомплектована широкой мягкой манжетой с металлическим кольцом на
плечо окружностью 22~32 см.
Воздушная
трубка
Кнопка SET
Кнопка
ВКЛ/ВЫКЛ
В комплекте:
Инструкция Адаптер
30
Кнопка Memory
Сумка
Page 32

RU
Символы на дисплее
Месяц/Число Часы/Минуты
Индикатор уровня артериального давления
Индикатор разряда батареек
Индикатор
нагнетания/
спуска
воздуха в
манжету
Память
Индикатор пульса
Систолическое
давление
Диастолическое
давление
Единицы измерения
давления
Частота пульса
Индикатор нерегулярного сердцебиения
Установка батареек
Для установки батареек:
1.5V R6
LR AA
1.5V R6
LR AA
OPEN
1. Снимите крышку отсека для батареек, который находится на зад-
ней части прибора (см. рисунок).
2. Установите батарейки (4 AA 1,5 В), соблюдая полярность (+ -).
ВНИМАНИЕ
• Если появится символ , немедленно замените батарейки.
• Если прибор не используется в течение длительного времени,
рекомендуется извлечь из него батарейки.
• Рекомендуется использовать батарейки типа АА (1,5 В).
LR6
31
Page 33

Подключение сетевого адаптера
Автоматический тонометр PLUS может работать при подключении к
электросети с помощью сетевого адаптера (постоянный ток 6В/500 мА).
1. Подсоедините микроразъем кабеля к гнезду на правой стороне
прибора.
2. Подсоедините сетевой адаптер (постоянный ток 6В/500 мА) к электрической розетке 100-240В.
ПРИМЕЧАНИЕ:
• Используйте только адаптер торговой марки Gamma®. При
использовании любого другого адаптера сервисный центр снимает
с себя обязательства по гарантийному обслуживанию прибора.
• Батарейки не расходуются, когда адаптер переменного тока
подключен к прибору.
• Пожалуйста, обратитесь в сервисный центр, если у Вас имеются
вопросы относительно работы устройства от переменного тока.
Установка даты/времени
1. Нажмите и удерживайте кнопку «SET» до тех пор,
пока на дисплее не появится мигающее значение года.
2. Нажимайте кнопку МЕМ для подбора нужного значе-
ния года, затем нажмите кнопку «SET” для его установки и перехода в режим выбора месяца.
3. Нажимайте кнопку «МЕМ» для подбора нужного значения месяца.
Повторите те же шаги для установки даты, часов и минут.
год месяц число часы минуты
ПРИМЕЧАНИЕ: Прибор выключится автоматически, если не выполнять никаких действий в режиме настройки в течение 1,5 минуты.
32
Page 34

RU
ПРОВЕДЕНИЕ ИЗМЕРЕНИЯ
ВНИМАНИЕ
• Избегайте употребления кофеина, чая, алкоголя и табака, по
крайней мере, за 30 минут до выполнения измерения.
• Отдохните в течение 30 минут после физических нагрузок или
купания перед измерением.
• Отдохните в течение, по крайней мере, 10 минут перед измерением
в сидячем или лежачем положении.
• Не выполняйте измерения в напряженном или тревожном
состоянии.
• Между измерениями необходимо сделать перерыв на 5-10 минут.
При необходимости этот перерыв можно продлить в зависимости
от Вашего физического состояния.
• Записывайте результаты Ваших измерений для справки у врача.
• Артериальное давление отличается на разных руках. Измеряйте
давление всегда на одной и той же руке.
Наложение манжеты
1. Подсоедините манжету к прибору, вставив соединитель манжеты в
гнездо для манжеты слева на приборе.
2. Соберите манжету, как показано на рисунке, гладкой стороной
внутрь так, чтобы металлическое кольцо не соприкасалось с Вашей кожей.
3. Расправьте и расположите левую (правую) руку перед собой ладо-
нью вверх. Закрепите манжету на руке выше локтя. Метка артерии
на краю манжеты должна быть расположена на 2-3 см выше локте-
33
Page 35

вого сгиба, воздушная трубка – с внутренней стороны руки.
4. Между манжетой и рукой должно остаться небольшое пространство так, чтобы можно было просунуть два пальца. Снимите одежду, покрывающую или сжимающую руку, на которой выполняется
измерение.
5. Закрепите манжету на липучку плотно. Убедитесь, что верхний и
нижний край манжеты расположены ровно.
Выполнение измерения
ВНИМАНИЕ
1. Займите сидячее положение как минимум на 10 минут перед измерением.
2. Положите локоть на ровную поверхность. Расслабьте руку. Ладонь
кверху.
3. Манжета должна быть расположена на уровне сердца.
4. Сидите спокойно, не разговаривайте и не двигайтесь во время из-
мерения.
ПРЕДУПРЕЖДЕНИЕ:
Если манжета расположена ниже (выше) уровня сердца, полученные
результаты измерения могут быть ниже (выше) фактических.
Всегда включайте прибор только после того, как надета манжета.
1. Нажмите кнопку ON/OFF, теперь будет произведена автоматическая накачка манжеты. Уровень давления в манжете будет отображаться на дисплее.
34
Page 36

RU
2. Давление в манжете будет накачиваться до рабочего значения, за-
тем накачка прекратится, и давление начнет падать.
ПРИМЕЧАНИЕ: Если давления в манжете недостаточно, чтобы выдать результаты измерения, прибор автоматически произведет дополнительное нагнетание воздуха в манжету.
3. Индикатор пульса мигает на дисплее во время измерения каж-
дый раз, когда происходит сердечное сокращение.
4. После измерения на дисплее отображаются систолическое и ди-
астолическое давление, частота пульса и индикатор уровня артериального давления, соответствующий стандартам ESH (Европейского Общества по артериальной гипертензии).
5. Если во время измерения было выявлено нерегулярное сердцеби-
ение, на дисплее будет мигать индикатор .
ФУНКЦИЯ «ПАМЯТЬ»
Просмотр сохраненных значений
Память прибора сохраняет 90 последних результатов измерений с
датой и временем.
При выключенном приборе нажмите кнопку
«МЕМ», на экране отобразится результат последнего измерения. Чтобы просмотреть результаты более ранних измерений нажимайте кнопку
«SET».
35
Page 37

Удаление всех значений
Нажмите и удерживайте кнопку «МЕМ» на протяжении 5 секунд. На экране появится символ « » - это значит, что все
сохраненные значения памяти удалены.
Перед удалением результатов, убедитесь, что они Вам не
понадобятся в дальнейшем.
УСТРАНЕНИЕ НЕИСПРАВНОСТЕЙ
Если Вы выполняете указанные действия, но ошибка появляется снова либо появляется ошибка, которая не указана в нижеследующей таблице, обратитесь в сервисный центр. Ни в коем случае не пытайтесь
ремонтировать прибор самостоятельно.
Сообщение на
экране
Когда Вы нажимаете на кнопку ON/
OFF на экране ничего не появляется
или появляется
мигающий символ
разряженных
батареек .
E0
36
Возможная причина
Батарейки не вставлены
Батарейки истощились
Нарушена полярность батареек
Манжета одета на
плотную одежду
Манжета одета
неправильно. Метка
артерии располагается не над
артерией.
Устранение
Вставьте батарейки
Замените батарейки
на новые
Вставьте батарейки,
соблюдая полярность
Снимите плотную
одежду
Метка артерии на
краю манжеты должна быть расположена
на 2-3 см выше
локтевого сгиба,
воздушная трубка – с
внутренней стороны
руки.
Page 38

Е1
Не происходит
нормальное накачивание манжеты
Е3
Прибор накачивает
слишком высокое
давление в манжете
Е2 Е4
Произошли движения руки во время
измерения
Cимвол бата-
рейки
Показатель систолического или
диастолического
давления слишком
высокий
Показатель систолического или
диастолического
давления слишком
низкий
Проверьте манжету
на герметичность
Рука или тело
двигались во время
измерения
Низкий заряд батареек
Манжета располагается ниже уровня
сердца
Манжета одета
неправильно
Вы двигались или
разговаривали во
время измерения
Манжета располагается выше уровня
сердца
Вы двигались или
разговаривали во
время измерения
RU
Замените манжету
на новую
Проведите повторное измерение или
отправьте прибор в
сервисный центр для
проверки
Не двигайтесь во
время измерения и
произведите повторное измерение
Замените батарейки
и повторите измерение
Соблюдайте правильное положение и
повторите измерение
37
Page 39

ХРАНЕНИЕ И УХОД
Уход за прибором
Во избежание загрязнения использовать прибор следует вымытыми
и сухими руками.
Очистка
• Используйте влажную ткань или мягкое моющее средство, затем
протрите прибор сухой тканью.
• НЕ используйте органические растворители для очистки прибора.
• НЕ стирайте манжету.
• НЕ гладьте манжету.
Хранение прибора
• Условия хранения: от -20°С до 55°С, при относительной влажности
менее 95%.
• Всегда храните и транспортируйте прибор в сумочке для хранения,
которая входит в комплект.
• Оберегайте прибор от ударов и падений.
• Оберегайте прибор от попадания прямых солнечных лучей и
высокой влажности воздуха.
ОПИСАНИЕ СИМВОЛОВ
СИМВОЛ ОПИСАНИЕ
Смотрите инструкцию пользователя
Производитель
Серийный номер
38
Внимание, см. сопроводительные документы
Утилизируйте в соответствии с требованиями в
Вашей стране
Page 40

RU
Оборудование типа BF
Класс защиты II
Маркировка СЕ
ТЕХНИЧЕСКИЕ ХАРАКТЕРИСТИКИ
Метод измерения Осциллометрический
Индикация Цифровой ЖК-дисплей
Диапазон измерений: Давление: 30 - 280 мм рт.ст.
Точность измерения: Давление: ± 3 мм рт.ст.
Память: 90 измерений
Источник питания: Батарейки 4x1.5V (LR6 или AA)
Диапазон рабочих температур:
Условия хранения: -20 - +55 °С, относительная влаж-
Размеры прибора: 130мм (длина) х 96мм (ширина) х
Вес: 380 г без батареек
Классификация Тип BF
Размер манжеты 22 - 32 см
Пульс: 40 - 199 уд/мин.
Пульс: ± 5%
+5 - +40 °С, относительная влажность: 30% - 80%
ность: 10% - 93%
60мм (высота) мм
* Возможны технические изменения и изменения дизайна без предварительного уведомления.
39
Page 41

Данный прибор соответствует требованиям Международной электротехнической комиссии:
IEC/EN 60601-1,
IEC/EN 60601-1-2
Соответствие требованиям:
EN 1060-1/-3, NIBP- соответствие Европейским стандартам,
• IEC60601-1 Общие требования по безопасности,
• IEC60601-1-2 Требования по электромагнитной совместимости,
• EN1060-4, NIBP клинические исследования, соответствующие
Европейским стандартам,
• AAMI/ANSI/IEC 80601-2-30, ANSI/AAMI/ISO 81060-2, NIBP
требования Ассоциации по совершенствованию медицинских
приборов, требования Американского национального института
стандартов; требования Международной организации по
стандартизации.
ГАРАНТИЯ
На автоматический измеритель артериального давления модели Plus
распространяется гарантия сроком 5 лет со дня приобретения. Гарантия на манжету - 1 год со дня приобретения. Гарантия действует
только в случае предъявления в сервисный центр правильно заполненного гарантийного талона с печатью предприятия-продавца (или
штампом гарантийной мастерской) c датой продажи (ремонта), при
наличии чека предприятия-продавца, инструкции пользователя, неповрежденной оригинальной упаковки прибора.
• Гарантия не распространяется на износ манжеты, батареек,
резиновых трубок и упаковки прибора.
• Гарантия не распространяется на повреждения, возникшие в
результате неправильного обращения, несчастных случаев,
несоблюдения инструкции по эксплуатации или самостоятельных
попыток вскрыть и/или отремонтировать прибор.
• Возврату не подлежат приборы без оригинальной упаковки и при
наличии механических повреждений (царапин, пятен и т.д.), а также
в неполной комплектации.
• Если прибор находился в эксплуатации, и подлежит ремонту, он не
может быть заменен на новый.
В случае, когда в течение гарантийного срока товар эксплуатировался
с нарушением правил, ремонт осуществляется за счет потребителя.
40
Page 42

UA
ШАНОВНИЙ КОРИСТУВАЧ АВТОМАТИЧНОГО
ВИМІРЮВАЧА АРТЕРІАЛЬНОГО ТИСКУ ТМ Gamma
Дякуємо Вам за вибір автоматичного вимірювача артеріального тиску
Gamma® моделі Plus. Ми впевнені, що гідно оцінивши якість і надій-
ність цього приладу, Ви станете постійним користувачем продукції
торгової марки Gamma®.
Дана модель представляє собою повністю автоматичний, цифровий
вимірювач артеріального тиску на плечі, який дозволяє дуже швидке
і якісне отримання результатів систолічного та діастолічного тисків,
також пульса за допомогою осцилометричного методу вимірювання.
Перевагами даного приладу є:
• індикатор рівня артеріального тиску,
• технологія «IHD» - визначення нерегулярного серцебиття
• память на 90 вимірювань.
Перед тим як почати користуватися даним приладом, уважно прочитайте інструкцію. У ній Ви знайдете всю інформацію, необхідну Вам
для правильного проведення вимірювання артеріального тиску і пульсу. За всіма питаннями щодо даного продукту, будь ласка, звертайтесь до офіційного представника або у сервісний центр ТМ Gamma
у Вашій країні.
УВАГА
Даний вимірювач артеріального тиску призначений для здійснення
самостійного контролю артеріального тиску, а не для самодіагностики
гіпертонії/гіпотонії. Ні в якому разі не ставте діагноз самостійно на основі результатів, отриманих за допомогою вимірювача артеріального
тиску. Не займайтеся самолікуванням відхилень артеріального тиску
від норми і не змінюйте самостійно прописані методи лікування, не
проконсультувавшись попередньо з лікарем.
Клас захисту типу BF.
Перед використанням приладу уважно прочитайте дану інструкцію.
®
41
Page 43

ЗМІСТ
ЩО НЕОБХІДНО ЗНАТИ ПРО АРТЕРІАЛЬНИЙ ТИСК .................... 43
Що таке артеріальний тиск .................................................................. 43
Норми артеріального тиску ................................................................. 44
ПЕРЕВАГИ АВТОМАТИЧНОГО ВИМІРЮВАЧА АРТЕРІАЛЬНОГО
ТИСКУ МОДЕЛЬ PLUS ....................................................................... 46
Індикатор рівня артеріального тиску .................................................. 46
Функція виявлення порушень частоти серцевих скорочень (IHD) ...46
Технологія вимірювання Fuzzy Logic...................................................47
ПІДГОТОВКА ДО ВИМІРЮВАННЯ ...................................................47
Важлива інформація ............................................................................ 47
Зовнішній вигляд і опис приладу ........................................................ 48
Встановлення батарейок .....................................................................49
Підключення мережевого адаптера ................................................... 50
Встановлення дати/часу ...................................................................... 50
ПРОВЕДЕННЯ ВИМІРЮВАННЯ ........................................................ 51
Накладення манжети ........................................................................... 51
Виконання вимірювання ...................................................................... 52
ФУНКЦІЯ «ПАМ’ЯТЬ» ......................................................................... 53
Перегляд збережених значень ...........................................................53
Видалення усіх значень ....................................................................... 54
УСУНЕННЯ НЕСПРАВНОСТЕЙ ......................................................... 54
ЗБЕРІГАННЯ І ДОГЛЯД .....................................................................55
ОПИС СИМВОЛІВ ...............................................................................56
ТЕХНІЧНІ ХАРАКТЕРИСТИКИ ...........................................................56
ГАРАНТІЯ ............................................................................................. 58
42
Page 44

UA
ЩО НЕОБХІДНО ЗНАТИ
ПРО АРТЕРІАЛЬНИЙ ТИСК
Що таке артеріальний тиск
Систолічний тиск
Діастолічний тиск
Пульс
Артеріальний тиск - це тиск крові на стінки артерій. Артеріальний тиск
(АТ) необхідний для забезпечення постійної циркуляції крові в організмі.
Завдяки йому клітини організму одержують кисень, що забезпечує
їхнє нормальне функціонування. «Насосом», що виштовхує кров у
судини, виступає серце. Кожен удар серця забезпечує визначений рівень АТ. Розрізняють 2 види АТ: систолічний (верхній) тиск, що відповідає скороченню серця, при якому відбувається виштовхування крові
в артерії; та діастолічний (нижній) тиск, що відповідає тиску крові між
двома скороченнями серця.
Добовий ритм артеріального тиску людини
Рівень артеріального тиску має властивість коливатися протягом дня
навіть у здорових людей. На ці зміни впливає цілий ряд факторів - час
доби, стан людини, фізична чи розумова діяльність, умови навколишнього середовища і т.ін.
Підвищення артеріального тиску збільшує навантаження на серце,
впливає на кровоносні судини, роблячи їхні стінки товстими і менш
еластичними. Однією з характеристик гіпертонії є те, що на початковому етапі вона може протікати непомітно для самого хворого. Саме
тому самоконтроль АТ грає таку важливу роль. З прогресуванням
хвороби виникають головні болі, постійні запаморочення, погіршуєть-
SET
M/
D
M
E
M
ON/OFF
MEM
H/D
S
Y
S
kPa
DIA
kPa
P
U
L
/
m
in
6V
43
Page 45

170
160
0
Час (години)
мм рт. ст.
150
140
130
120
110
100
90
80
70
60
Діастолічний (нижній) тиск
50
40
8.00 10.00 12.00 14.00 16.00 18.00 20.00 22.00 24.00 2.00 4.00 6.00 8.0
Систолічний (верхній) тиск
ся зір, функціонування життєво важливих органів - головного мозку,
серця, нирок, кровоносних судин. При відсутності відповідної терапії
можливі такі наслідки підвищеного артеріального тиску, як ураження
нирок, стенокардія, параліч, утрата мови, слабоумство, інфаркт міокарда й інсульт головного мозку.
Норми артеріального тиску
Важливо регулярно вимірювати рівень артеріального тиску для контролю стану Вашого здоров’я. Артеріальний тиск природним чином
підвищується у людей старше середнього віку. Це результат постійного старіння кровоносних судин, що згодом призводить до ожиріння,
зниження активності, скупченню холестерину в кровоносних судинах,
діабету. Підвищений артеріальний тиск прискорює ущільнення артерій, що в свою чергу підвищує ймовірність інсультів та інфарктів
міокарда.
Дана таблиця наводить визначення і класифікацію рівнів артеріального тиску у відповідності з практичними рекомендаціями з контролю
артеріального тиску ESH - ESC 2007 року.
Систолічне
(мм рт. ст.)
130-139 або/і 85-89
Категорія
Оптимальне < 120 і < 80
Нормальне*3 120-129 або/і 80-84
Підвищене
нормальне
Діастолічне
(мм рт. ст.)
44
Page 46

UA
Гіпертонія
Ступінь 1
Гіпертонія
Ступінь 2
Гіпертонія
Ступінь 3
Ізольована
систолічна
гіпертонія
Ізольована систолічна гіпертонія ранжується також за ступенями (1,
2, 3) у відповідності зі значеннями систолічного тиску, за умови, що
діастолічний тиск < 90 мм рт. ст.
Джерело: The European Society of Hypertension and European Society
of Cardiology Task Force Members. 2007 ESH - ESC Practice Guidelines
for the Management of Arterial Hypertension. J Hypertens 2007; 25:1751-
1762 (Європейська Асоціація з гіпертонії та Європейська Асоціація
членів цільової групи кардіології. 2007 ESH - ESC Практичні рекомендації з боротьби з гіпертонією. Дж. Хіпертенс 2007; 25:1751-1762).
При діагнозі ГІПЕРТОНІЯ необхідно поєднання медикаментозного
лікування, призначеного лікарем, і корекції способу життя.
• При підвищеному нормальному і нормальному АТ рекомендується
здійснення самоконтролю для того, щоб вчасно вжити заходів
щодо зниження рівня АТ до оптимального без застосування
лікарських засобів.
• У віці старше 50 років високий (більше 140 мм рт. ст.) систолічний
тиск грає більш важливу роль, ніж діастолічний тиск.
• Навіть при нормальному АТ, ризик розвитку гіпертонії збільшується
з віком.
УВАГА
Якщо обмірювані в стані спокою показники АТ не є незвичайними, однак у стані фізичного чи душевного стомлення Ви спостерігаєте надмірно підвищені результати, то це може вказувати на наявність так
званої лабільної (тобто нестійкої) гіпертонії. Якщо Ви маєте підозри
на це явище, рекомендуємо звернутися до лікаря. Якщо при правильному вимірюванні артеріального тиску діастолічний артеріальний тиск
складає більш 120 мм рт. ст., необхідно негайно викликати лікаря.
140-159 або/і 90-99
160-179 або/і 100-109
≥ 180 або/і ≥ 110
≥ 140 і < 90
45
Page 47

ПЕРЕВАГИ АВТОМАТИЧНОГО
ВИМІРЮВАЧА АРТЕРІАЛЬНОГО
ТИСКУ МОДЕЛЬ PLUS
Індикатор рівня артеріального тиску
Індикатор рівня тиску розташований уздовж лівого краю дисплея. Класифікація відповідає діапазонами, описаним у таблиці розділу «Норми артеріального тиску». Після вимірювання АТ пунктир висвітиться в лівій частині дисплея: зелена зона - оптимальний тиск, жовта
- підвищений, помаранчева - занадто високий, червона - загрозливо
високий. Дана функція дозволить Вам самостійно зорієнтуватися в
отриманих результатах АТ.
Функція виявлення порушень частоти
серцевих скорочень (IHD)
Ця функція дозволяє визначити нерегулярне биття серця. Якщо на
дисплеї приладу з’являється символ технології IHD , це означає,
що під час вимірювання артеріального тиску прилад виявив якісь порушення частоти серцевих скорочень.
Можливо, що в якомусь конкретному випадку такий результат обумовлений зміною Вашого звичайного артеріального тиску; просто
повторіть вимірювання ще раз. У більшості випадків приводів для
занепокоєння немає. Проте, якщо символ з’являється постійно
(наприклад, кілька разів на тиждень при щоденних вимірюваннях),
ми рекомендуємо Вам сповістити про це лікаря. Будь ласка, покажіть
своєму лікарю наступне пояснення:
Інформація для медиків щодо функції виявлення порушень частоти серцевих скорочень (IHD)
Даний прилад являє собою осцилометричний вимірювач артеріального тиску з функцією аналізу частоти пульсу одночасно з проведенням вимірювання. Прилад клінічно схвалено.
По закінченні вимірювання на дисплеї приладу з’являється символ
технології IHD , якщо під час вимірювання артеріального тиску
прилад виявив якісь порушення частоти пульсу.
46
Page 48

UA
Якщо символ з’являється досить часто (наприклад, кілька разів
на тиждень при щоденних вимірюваннях), ми рекомендуємо пройти
медичне обстеження. Цей прилад ні в якому разі не замінює кардіологічного обстеження, проте, він дозволяє виявляти порушення частоти
серцевих скорочень на ранній стадії.
Технологія вимірювання Fuzzy Logic
Для визначення артеріального тиску в даному приладі використовується осцилометричний метод. Перед початком подачі повітря в
манжету прилад визначає початкове значення тиску в манжеті, рівне
тиску повітря. Прилад визначає рівень тиску в манжеті, необхідний
для вимірювання, враховуючи осциляції (коливання) тиску, після чого
повітря випускається з манжети.
Під час випуску повітря прилад визначає амплітуду і нахил осциляцій
тиску й обчислює значення систолічного та діастолічного артеріального тиску, а також частоту пульсу.
ПІДГОТОВКА ДО ВИМІРЮВАННЯ
Важлива інформація
1. Використовуйте прилад ТІЛЬКИ за призначенням, як описано в цій
інструкції.
2. НЕ ВИКОРИСТОВУЙТЕ аксесуари, не вказані виробником.
3. НЕ ВИКОРИСТОВУЙТЕ прилад, якщо він працює несправно, або
пошкоджений.
4. НЕ ВИКОРИСТОВУЙТЕ прилад у місцях, де присутні розпорошені
аерозолі, і в місцях, де відбувається подача кисню.
5. Ні в якому разі НЕ ВИКОРИСТОВУЙТЕ прилад для новонародже-
них або маленьких дітей.
6. Цей прилад НЕ Є засобом лікування ніяких симптомів або захво-
рювань. Результати вимірювань служать тільки для інформації.
Зверніться до лікаря за консультацією.
7. НЕ МОЖНА зберігати прилад і гнучкий шнур на гарячих поверхнях.
8. НЕ одягайте манжету на інші ділянки тіла, крім плеча.
9. ВАЖЛИВО правильно використовувати і періодично проводити
47
Page 49

повірки приладу для продовження його терміну служби. Якщо Ви
не впевнені в точності показань приладу, зверніться до сервісного
центру у Вашій країні.
10. Даний прилад призначений для використання особами старше 18
років.
11. Не використовуйте прилад для постановки діагнозу гіпертонії і для
вимірювання артеріального тиску у новонароджених, маленьких
дітей або осіб, які не дали на це свою згоду.
12. Результати вимірювань, отримані при використанні даного приладу, повинен оцінити ТІЛЬКИ лікар, якщо Вам поставлений діагноз
сильної аритмії або нерегулярного серцебиття, передсердної або
шлуночкової екстрасистолії, миготливої аритмії.
ЗБЕРІГАЙТЕ ЦЮ ІНСТРУКЦІЮ ПІД ЧАС ВСЬОГО СТРОКУ СЛУЖБИ
ПРИЛАДУ
Зовнішній вигляд та опис
вимірювального приладу
ЖК дисплей:
Дата/Час
Систолічний тиск
Діастолічний тиск
Пульс/хв
Конектор для підключення манжети
Манжета
Манжета:
Модель PLUS вкомплектована широкою м’якою
манжетою з металевим кільцем на плече окружністю 22 ~ 32 см.
Повітряна
трубка
Кнопка SET
M
E
M
SE
T
O
M
/D
N
/O
F
F
M
E
Кнопка
ВМИК/ВИМК
48
PUL
/
m
M
H
/
D
SYS
k
P
a
D
IA
kP
a
i
n
V
6
Кнопка Memory
Роз’єм для
підключення
мережевого
адаптера
Page 50

В комплекті:
UA
АдаптерІнструкція
Сумка для
зберігання
Символи на дисплеї
Місяць/Число Години/Хвилини
Індикатор рівня
артеріального
тиску
Індикатор розряду батарейок
Індикатор
нагнітання/спуску
повітря в манжету
Пам’ять
Індикатор пульсу
Систолічний тиск
Діастолічний тиск
Одиниці вимірювання
тиску
Частота пульсу
Індикатор нерегулярного серцебиття
Встановлення батарейок
Для встановлення батарейок:
1.5V R6
LR AA
1.5V R6
LR AA
OPEN
1. Зніміть кришку відсіку для батарейок, який знаходиться на задній
частині приладу (див. малюнок).
2. Встановіть батарейки (4 AA, 1.5 В), дотримуючись полярності (+ -).
LR6
49
Page 51

УВАГА
• Якщо на дисплеї з’явиться символ , негайно замініть батарейки.
• Якщо прилад не використовується протягом тривалого часу, рекомендується витягти з нього батарейки.
• Рекомендується використовувати батарейки типу АА (1,5В).
Використання мережевого адаптера
Автоматичний тонометр Plus може працювати при підключенні до
електромережі за допомогою мережевого адаптера (постійний струм
6B/500mA).
1. Підключіть мікророз’єм кабелю до гнізда на правій стороні приладу.
2. Підключіть мережевий адаптер (постійний струм 6B/500mA) до
електричної розетки 100-240В.
ПРИМІТКА:
• Використовуйте тільки адаптер торгової марки Gamma®. При використанні будь-якого іншого адаптера сервісний центр знімає із себе
зобов’язання по гарантійному обслуговуванню приладу.
• Батарейки не витрачаються, коли адаптер змінного струму підключений до приладу.
• Будь ласка, зверніться в сервісний центр, якщо у Вас є питання
щодо роботи пристрою від змінного струму.
Встановлення дати/часу
1. Натисніть і утримуйте кнопку «SET» до тих пір, поки на
дисплеї не з’явиться миготливе значення року.
2. Натискайте кнопку МЕМ для підбору потрібного значення року, потім натисніть кнопку «SET» для його
установки і переходу в режим вибору місяця.
3. Натискайте кнопку «МЕМ» для підбору потрібного значення місяця.
Повторіть ті ж кроки для установки дати, годин і хвилин.
50
рік місяць число години хвилини
Page 52

UA
ПРИМІТКА: Прилад вимкнеться автоматично, якщо не виконувати
жодних дій у режимі налаштування протягом 1,5 хвилини.
ПРОВЕДЕННЯ ВИМІРЮВАННЯ
УВАГА
• Перед вимірюванням бажано деякий час посидіти в спокійному,
розслабленому стані.
• Кожне напруження пацієнта, наприклад, опір на руку, може
підвищити артеріальний тиск. Приділіть увагу тому, щоб тіло було
приємно розслаблене, і не напружуйте під час вимірювання ніякі
мускули на руці, на якій Ви здійснюєте вимірювання.
• Вимірюйте тиск завжди на одній і тій самій руці (зазвичай лівій).
• Звільніть ліву руку від одягу. Не закочуйте рукав, тому що він
здавить Вашу руку, і це призведе до неточності при вимірюванні.
• Використовуйте тільки клінічно апробовану оригінальну манжету!
• Якщо Ви хочете вести облік свого артеріального тиску, намагайтеся
проводити вимірювання в один й той самий час, оскільки
артеріальний тиск міняється в залежності від часу доби.
• Для того щоб вимірювання відбувалися коректно, повторне
вимірювання треба виконувати лише після 5-хвилинної перерви.
Накладення манжети
1. Приєднайте манжету до приладу, вставивши з’єднувач манжети в
гніздо для манжети зліва на приладі.
2. Зберіть манжету, як показано на малюнку, гладкою стороною все-
редину так, щоб металеве кільце не стикалося з Вашою шкірою.
3. Розправте і розташуйте ліву (праву) руку перед собою долонею
вгору. Закріпіть манжету на руці вище ліктя. Мітка артерії на краю
манжети повинна бути розташована на 2-3 см вище ліктьового зги-
51
Page 53

ну, повітряна трубка - з внутрішньої сторони руки.
4. Між манжетою і рукою повинно залишитися невеликий простір так,
щоб можна було просунути два пальці. Зніміть одяг, що покриває
або стискає руку, на якій виконується вимірювання.
5. Закріпіть манжету на липучку щільно. Переконайтеся, що верхній і
нижній край манжети розташовані рівно.
Виконання вимірювання
1. Займіть сидяче положення як мінімум на 10 хвилин перед вимірюванням.
2. Покладіть лікоть на рівну поверхню. Розслабте руку. Долоню догори.
3. Манжета повинна бути розташована на рівні серця.
4. Сидіть спокійно, не розмовляйте і не рухайтеся під час вимірювання.
ПРИМІТКА: Якщо манжета буде розташована нижче (вище) рівня серця, отриманий результат вимірювання може бути заниженим.
Завжди включайте прилад тільки після того, як надіта манжета.
1. Натисніть кнопку ON/OFF, тепер буде проведена автоматична накачування манжети. Рівень тиску в манжеті буде відображатися на
дисплеї.
52
Page 54

UA
2. Тиск у манжеті буде накачуватися до робочого значення, потім на-
качування припиниться, і тиск почне падати.
ПРИМІТКА: Якщо тиску в манжеті недостатньо, щоб видати результати вимірювання, прилад автоматично проведе додаткове нагнітання
повітря в манжету.
3. Індикатор пульсу блимає на дисплеї під час вимірювання кожно-
го разу, коли відбувається серцеве скорочення.
4. Після вимірювання на дисплеї відображаються систолічний та
діастолічний тиск, частота пульсу і індикатор рівня тиску, відповідний стандартам ESH (Європейського Товариства з артеріальної
гіпертензії).
5. Якщо під час вимірювання було виявлено нерегулярне серцебиття,
на дисплеї буде блимати індикатор .
ФУНКЦІЯ «ПАМ’ЯТЬ»
Перегляд збережених значень
Пам’ять приладу зберігає 90 останніх результатів вимірювань з датою
і часом.
При вимкненому приладі натисніть кнопку “МЕМ”,
на екрані відобразиться результат останнього
вимірювання. Щоб переглянути результати більш
ранніх вимірювань натискайте кнопку “SET”.
53
Page 55

Видалення усіх значень
Натисніть і утримуйте кнопку «МЕМ» впродовж 5 секунд. На
екрані з’явиться символ « » - це означає, що всі збережені
значення пам’яті видалені.
Перед видаленням результатів, переконайтеся, що вони Вам
не знадобляться надалі.
УСУНЕННЯ НЕСПРАВНОСТЕЙ
Якщо Ви виконуєте зазначені дії, але помилка з’являється знову або
з’являється помилка, яка не вказана в таблиці, зверніться до сервісного центру ТМ Gamma. Ні в якому разі не намагайтеся ремонтувати
прилад самостійно.
Повідомлення на
екрані
Коли Ви натискаєте
на кнопку ON / OFF
на екрані нічого
не з'являється
або з'являється
миготливий символ
розряджених батарейок
Е0
54
Можлива причина
Батарейки не
вставлені
Батарейки виснажилися
Порушена полярність батарейок
Манжета одягнута
на зайвий одяг
Манжета одягнута
неправильно.
Мітка артерії
знаходиться не
над артерією.
Усунення
Вставте батарейки
Замініть батарейки
на нові
Вставте батарейки, дотримуючись
полярності
Зніміть зайвий одяг
Мітка артерії на
краю манжети
повинна бути
розташована на 2-3
см вище ліктьового
згину, повітряна
трубка - з внутрішньої сторони руки.
Page 56

Е1 Не відбувається
нормальне накачування манжети
Е3 Прилад накачує
занадто високий
тиск в манжеті
Е2 Е4
Сталися руху руки
під час вимірювання
Cимвол бата-
рейки
Показник систолічного або діастолічного тиску занадто
високий
Показник систолічного або діастолічного тиску занадто
низький
Перевірте манжету
на герметичність
Рука або тіло
рухалися під час
вимірювання
Низкий заряд
батарейок
Манжета розташовується нижче
рівня серця
Манжета одягнена
неправильно
Ви рухалися або
розмовляли під
час вимірювання
Манжета розташовується вище
рівня серця
UA
Замініть манжету
на нову
Проведіть повторне
вимірювання або
відправте прилад в
сервісний центр для
перевірки
Не рухайтеся під
час вимірювання і
зробіть повторне
вимірювання
Замініть батарейки і
повторіть вимірювання
Дотримуйтесь
правильного положення і повторіть
вимірювання
55
Page 57

ЗБЕРІГАННЯ І ДОГЛЯД
Догляд за приладом
Щоб уникнути забруднення використовувати прилад слід вимитими і
сухими руками.
Очищення
• Використовуйте вологу тканину або м’який миючий засіб, потім про-
тріть прилад сухою тканиною.
• НЕ МОЖНА використовувати органічні розчинники для очищення
приладу.
• НЕ МОЖНА прати манжету.
• НЕ МОЖНА прасувати манжету.
Зберігання приладу
• Умови зберігання: від -20°С до +55°С, при відносній вологості мен-
ше 95 %.
• Завжди зберігайте та транспортуйте прилад у футлярі для зберіган-
ня, який входить у комплект.
• Оберігайте прилад від ударів і падінь.
• Оберігайте прилад від потрапляння прямих сонячних променів і ви-
сокої вологості повітря.
ОПИС СИМВОЛІВ
СИМВОЛ ОПИСАНИЕ
Дивіться інструкцію користувача
Виробник
Серійний номер
56
Увага, дивіться супровідні документи
Утилізуйте відповідно до вимог у Вашій країні
Page 58

UA
Обладнання типу BF
Клас захисту II
Маркування СЕ
ТЕХНІЧНІ ХАРАКТЕРИСТИКИ
Метод вимірювання Осциллометричний
Індикація Цифровий РК-дисплей
Діапазон вимірювань: Тиск: 30 - 280 мм рт. ст.
Точність вимірювання: Тиск: ± 3 мм рт.ст.
Пам’ять: 90 вимірювань
Джерело живлення: Батарейки 4x1.5V (LR6 or AA)
Діапазон робочих температур +5 - +40°С,
Умови зберігання: -20 - +55°С,
Розміри приладу: 130мм (довжина) х 96мм (ширина)
Вага: 380 г без батарейок
Класифікація Тип BF
Розмір манжети 22 - 32 см
Пульс: 40 - 199 уд /хв.
Пульс: ± 5%
відносна вологість: 30% - 80%
відносна вологість: 10% - 93%
х 60мм (висота) мм
* Можливі технічні зміни і зміни дизайну без попереднього повідомлення.
57
Page 59

Даний прилад пройшов перевірку на відповідність вимогам щодо
електричних приладів і стандартам з безпеки:
IEC/EN 60601-1,
IEC/EN 60601-1-2
Перелік стандартів:
• EN 1060-1 /-3, NIBP-вимоги
• IEC60601-1 Загальні вимоги з безпеки
• IEC60601-1-2 Вимоги для ЕМС
• EN1060-4, NIBP клінічні дослідження
• AAMI / ANSI / IEC 80601-2-30, ANSI/AAMI/ISO 81060-2, NIBP вимоги.
ГАРАНТІЯ
На автоматичний вимірювач артеріального тиску модель Plus поширюється гарантія терміном 5 років з дня придбання. Гарантія
на манжету - 1 рік від дня придбання. Гарантія діє тільки у випадку
пред’явлення в сервісний центр правильно заповненого гарантійного
талона з печаткою підприємства-продавця (або штампом гарантійної
майстерні) з датою продажу (ремонту), при наявності чека підприємства-продавця, інструкції користувача, непошкодженої оригінальної
упаковки приладу.
• Гарантія не поширюється на знос манжети, батарейок, гумових
трубок і упаковки приладу.
• Гарантія не поширюється на пошкодження, що виникли в результаті
неправильного поводження, нещасних випадків, недотримання
інструкції з експлуатації або самостійних спроб розкрити і / або
відремонтувати прилад.
• Поверненню не підлягають прилади без оригінальної упаковки і за
наявності механічних ушкоджень (подряпин, плям і т.д.), а також в
неповній комплектації.
• Якщо прилад знаходився в експлуатації і підлягає ремонту, він не
може бути замінений на новий.
У випадку, коли протягом гарантійного терміну товар експлуатувався
з порушенням правил, ремонт здійснюється за рахунок споживача.
58
Page 60

Бандажи
Ингаляторы
Беруши
Термометры
СТАРАЕТСЯ ДЛЯ МЕНЯ
Массажное
оборудование
Инфракрасные
лампы
 Loading...