

Page 1

INSTRUCTION MANUAL
ANERIOD BLOOD PRESSURE KIT (p. 2-11)
²НСТРУКЦ²Я КОРИСТУВАЧА
Прилад для вим³рювання
артер³ального тиску (ñòîð. 12-21)
model 700
модель 700
Page 2
2
3
INSTRUCTION MANUAL
PROFESSIONAL ANERIOD BLOOD
PRESSURE KIT
MODEL 700
CAUTION:
Please read all instructions before using this instrument to
take blood ressure. Follow all CAUTIONS to avoid damaging
the instrument or hurting the patient.
TABLE OF CONTENTS
Unit Assembly 3
How to Take a Reading 4
Quick Reference Guide 8
Care and Maintenance 9
Warranty 10
Technical specifications 10
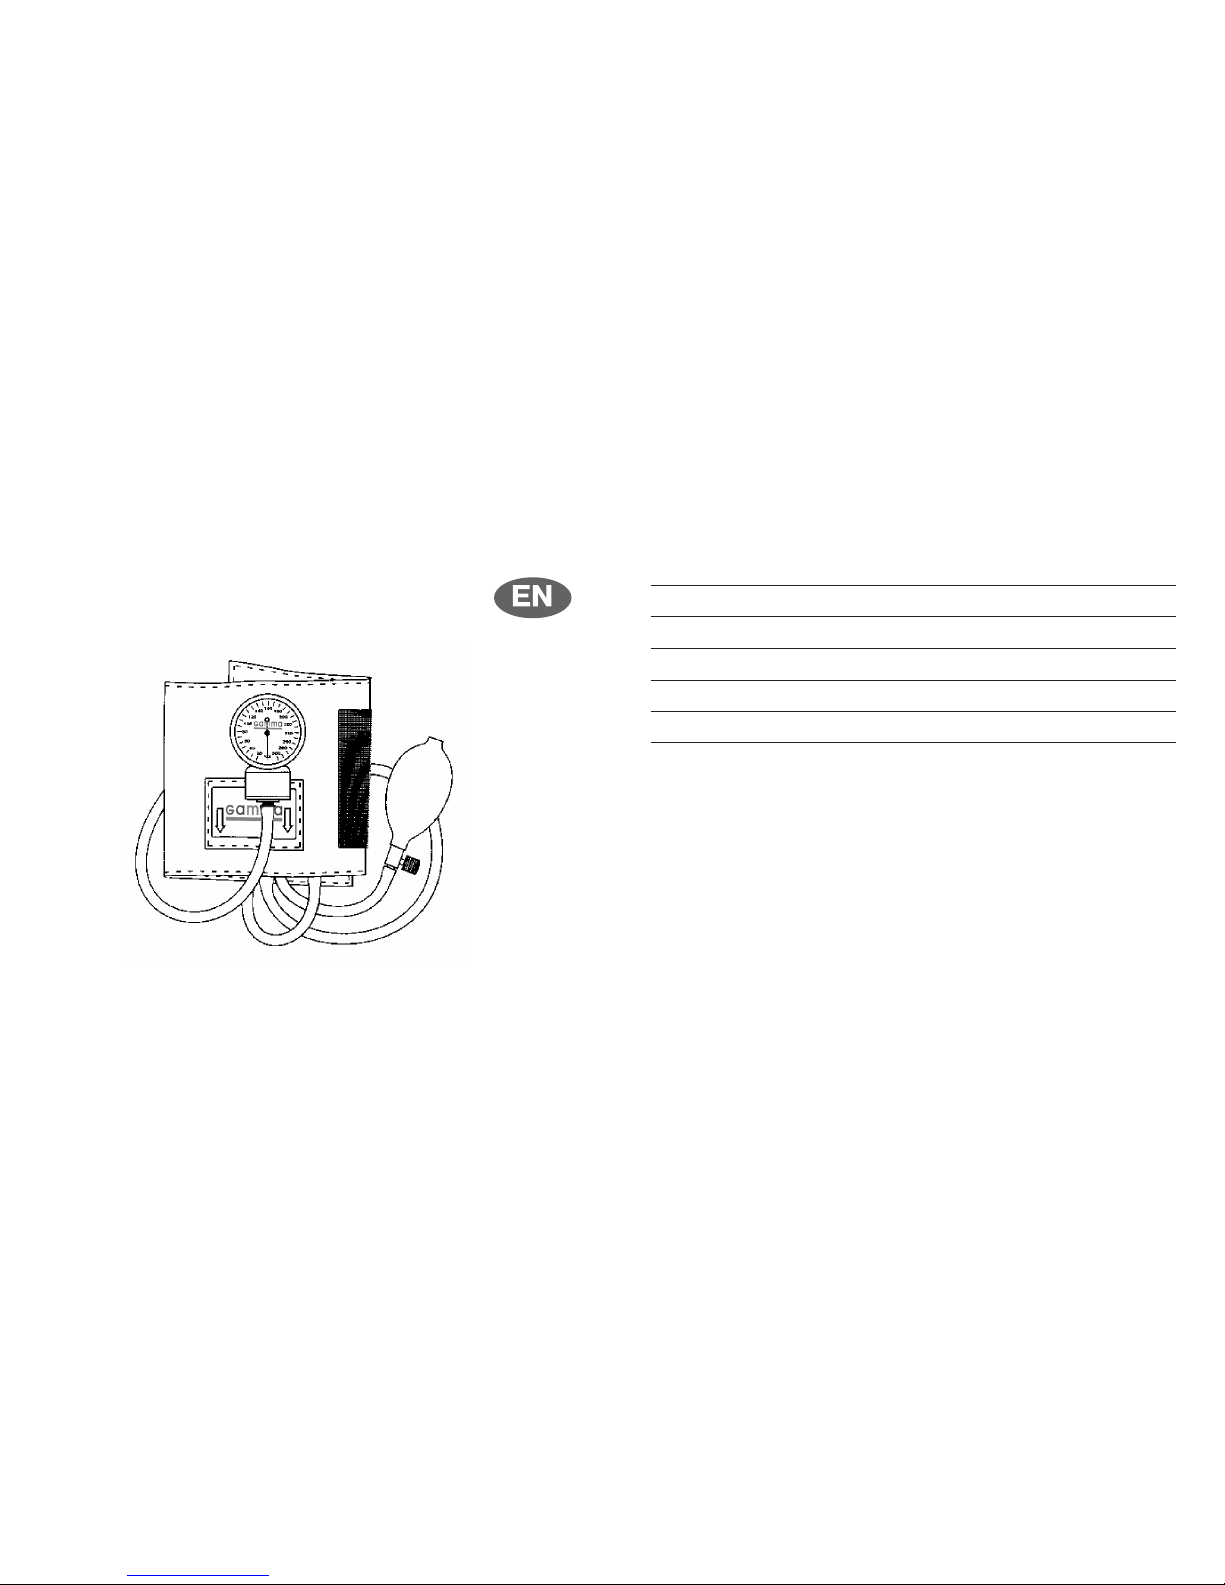
UNIT ASSEMBLY
Lay out the parts as pictured on the next page.
Look at the drawing to help you put the unit together.
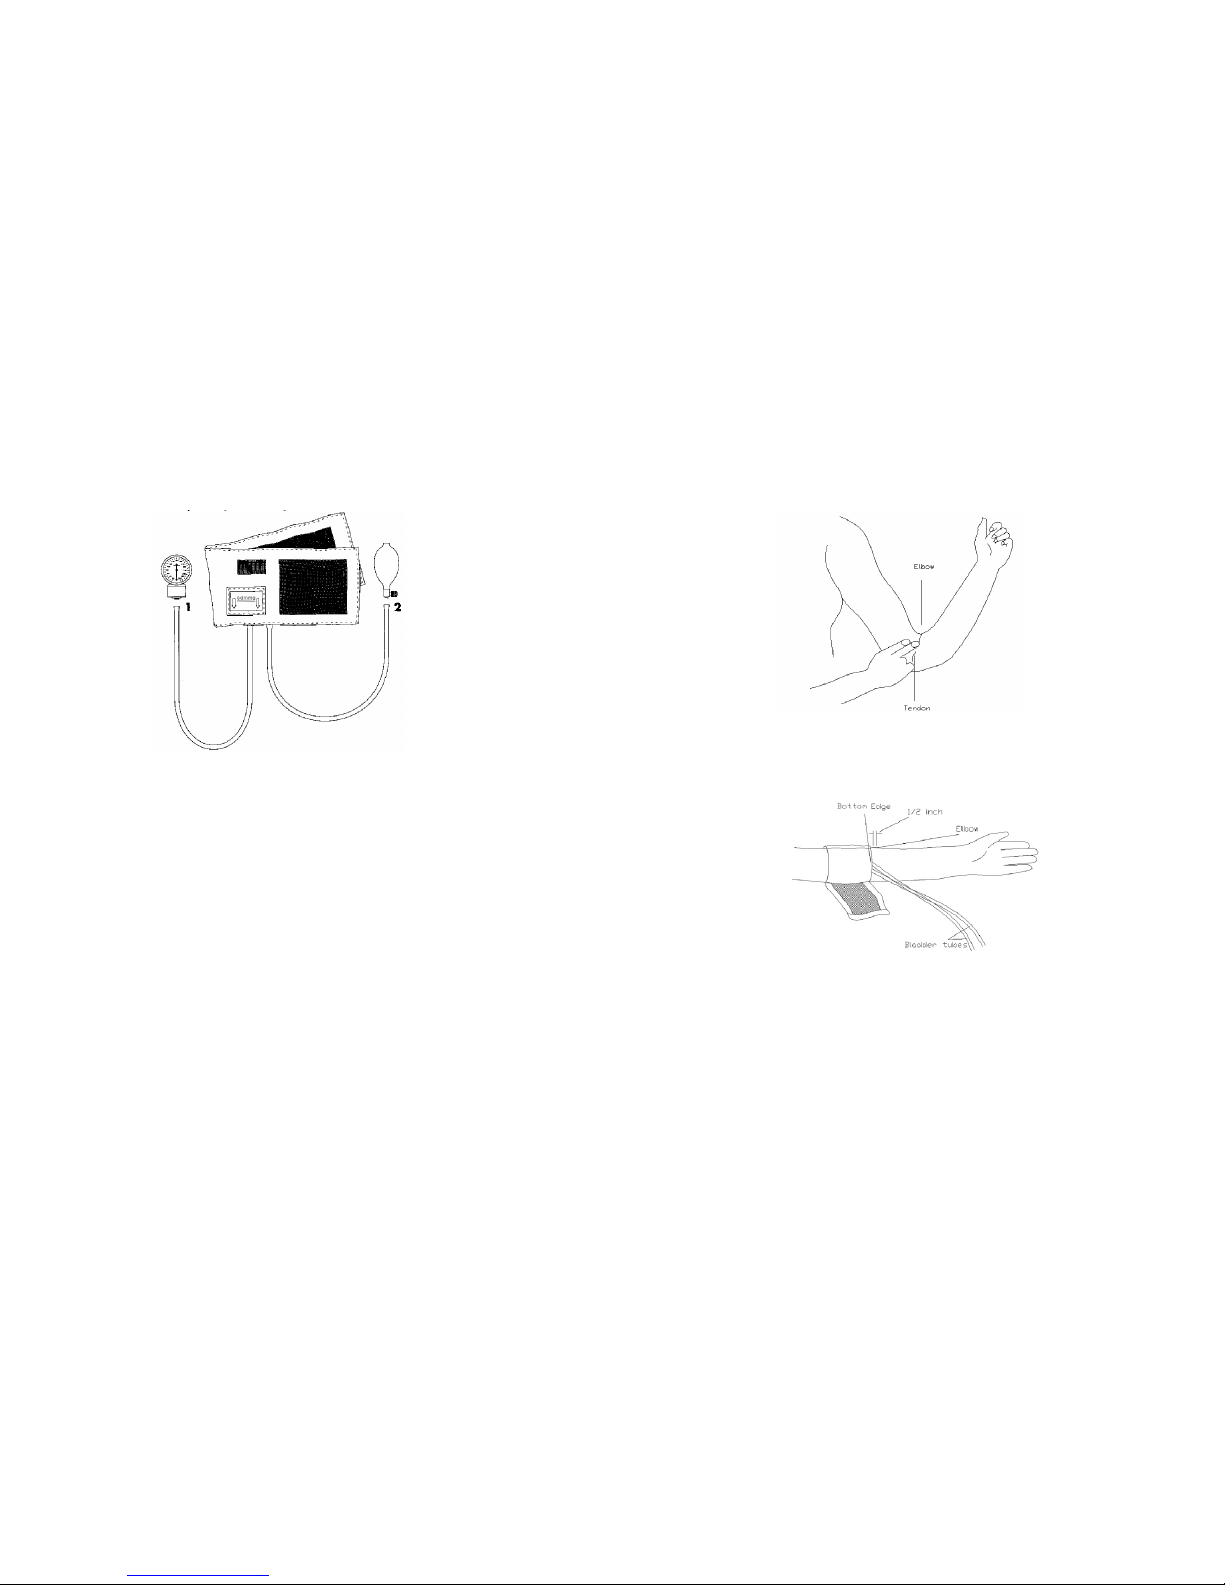
1. Attach the gauge to the tubing on the left.
2. Attach the inflation bulb to the tubing on the right.
Model 700 cuff fits arm circumference 25.4-40.6 cm.
For easy assembly follow the diagram.
Page 3
4
5
Connect each component securely to avoid injury and
instrument damage.
HOW TO TAKE A READING
1. Make sure the person is seated with their feet flat and
back and arm supported. Resting the arm at heart level.
CAUTION:
MAKE SURE ALL COMPONENTS ARE ASSEMBLED CORRECTLY AND SECURELY. FAILURE TO DO SO MAY RESULT
IN INJURY OR AN INCORRECT READING
2. Locate brachial artery by placing two fingers 2 cm above
the bend of the elbow on the inside of the arm.
3. Place the bottom edge of the cuff approximately 1-2 cm
above the elbow.
4. The cuff should be wrapped so that it fits snugly and
stays in place. Fasten the cuff by pressing the hook material
firmly against the fuzzy pile material. lf necessary, readjust
the cuff.
Page 4
6
7
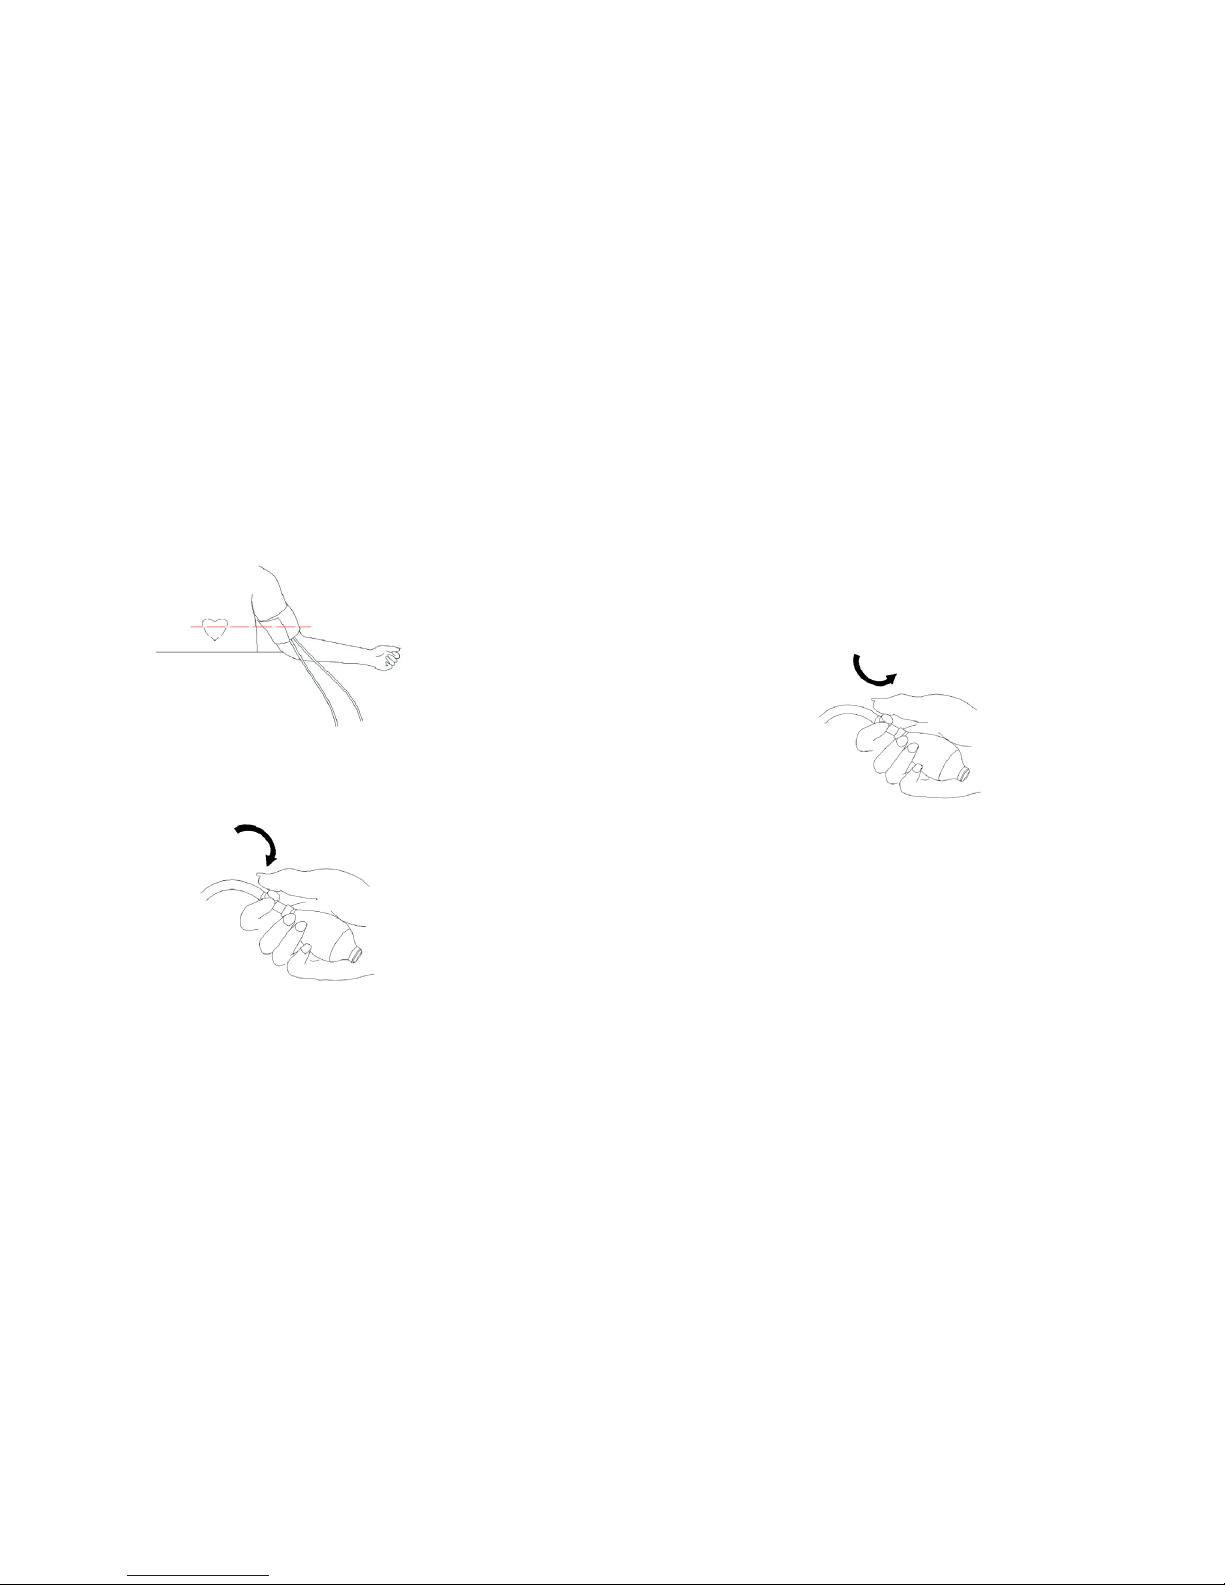
5. Rest their arm on a table. The arm should be relaxed with
the palm turned upward. Ensure the cuff is same level as
heart.
6. Hold the gauge in one hand with the numbers directly in
front of you. Hold the inflation bulb in your other hand. Close
the air release valve attached to the inflation bulb by turning
it clock wise.
7. To inflate the cuff, rapidly squeeze the inflation bulb.
Inflate the cuff until the gauge reaches approximately 20-30
mmHg ABOVE normal SYSTOLIC reading.
CAUTION:
DO NOT INFLATE THE CUFF ABOVE 280 mmHg.YOU MAY
INJURE THE PATIENT OR DAMAGE THE INSTRUMENT.
8. Slowly open the air release valve by turning it counter- clockwise. Release the air at a rate of 2-4 mmHg per
second.
9. Listen carefully for the appearance of sounds, watching
the gauge needle. When you hear the first appearance of
sound, it is the SYSTOLIC blood pressure reading.
10. Continue to release the air at a rate of 2-4 mmHg per
second. When you no longer hear any sounds, that is the
DIASTOLIC blood pressure reading.
11. Turn the air release valve counter-clockwise to release
the remaining air. Record the reading.
Page 5

8
9
NOTE: If you want to take another reading, you can rein-
flate up to twice. Wait at least 2- 3 minutes before measuring again, to avoid inaccurate readings due to the engorged
blood vessels.
QUICK REFERENCE GUIDE
BEFORE
1. Have the patient to RELAX for at least 5 minutes before
taking a measurement.
2. Remove tight fitting clothing from the upper arm.
3. The patient should NOT eat, smoke or exercise for at
least 30 minutes before taking a measurement.
DURING
1. PLACE CUFF at the heart level.
2. INFLATE unit to proper level. (20-30 mmHg above estimated systolic pressure).
3. The patient should not talk or move during a measurement .
4. DEFLATE unit at 2-4 mmHg per second.
AFTER
1. WAIT 2-3 minutes before taking another measurement.
CARE AND MAINTENANCE
To protect your unit from damage, please AVOID washing or
moistening the cuff or dropping the gauge.
Your new blood pressure unit has been carefully checked to
assure reliability and accuracy prior to shipment and use.
However, as with any sensitive instrument subjected to
repeated use, we recommend that your blood pressure
gauge be cheeked periodically. When the cuff is fully
deflated, the gauge needle must stay within the accuracy
indicator zone. If the needle points outside of the accuracy
indicator zone, the gauge will give inaccurate readings. In
this case you have to bring the device to the nearest service centre
for calibration (address mentioned in warranty card).
IMPORTANT:CONSULT A DOCTOR TO DETERMINE THE
ATIENTS NORMAL BLOOD PRESSURE. ONLY A CERTIFIED
HEALTHCARE PRACTITIONER IS QUALIFIED TO DIAGNOSE
AND TREAT HIGH BLOOD PRESSURE. PRACTICE THE
MEASUREMENT PROCEDURES FOR THIS INSTRUMENT
CAREFULLY.
Page 6

10
11
WARRANTY
The blood-pressure monitor is guaranteed for 18 months
from date of purchase. This guarantee includes the
instrument and the cuff. The guarantee does not apply
to damage caused by improper handling, accidents, not
following the operating instructions or alterations made to
the instrument by third parties.
The guarantee is only valid upon presentation of the
guarantee card filled out by the representative of the sales
organization and its stamp and safety of the packaging.
TECHNICAL SPECIFICATIONS
Weight: 385 g
Size: 170 x 120 x 70 mm
Storage temperature: -5îÑ to +35îÑ
Humidity: 80% relative humidity
maximum
Operation temperature: 0 tî 35 îÑ
Measuring range: 0 to 300 mmHg
Measuring resolution: 2 mmHg
Accuracy: within ±3mmHg in 15 îÑ to
25 îÑ
within ±6mmHg in 34 îÑ to
46 îÑ
Sphygmomanometer
pointer in the zero zone is
the norm
Air leakage: <±3.75 mmHg/sec.
Accessories:
1. sphygmomanometer
2. cuff (oversized with arm circumference of 25.4-40.6 cm)
with inlaid latex bladder
3. bulb and valve
4. soft bag
5. packaging
Technical alterations reserved!
Page 7

12
13
²НСТРУКЦ²Я КОРИСТУВАЧА
Профес³йний прилад для вим³рювання
артер³ального тиску
Mодель 700
Попередження
Будь ласка, уважно прочитайте цю ³нструкц³ю перед
використанням приладу для вим³рювання артер³ального
тиску. Додержуйтесь вс³х правил використання, щоб
уникнути пошкоджень приладу та не спричинити шкоди
пац³ºнту.
Ç̲ÑÒ
Зборка приладу 13
Як вим³рювати тиск 14
Стисле кер³вництво 18
Догляд 19
Гарант³я 20
Техн³чн³ характеристики 20
ЗБИРАННЯ ПРИЛАДУ
Розклад³ть частини приладу як указано на малюнку.
Подив³ться на малюнок, щоб з³брати прилад.
1. Приºднайте манометр до л³во¿ трубки.
2. Приºднайте грушу до право¿ трубки.
Розм³р манжети - для плеча окружн³стю 25.4-40.6 см.
Для легкост³ збирання користуйтесь схемою.
Page 8

14
15
Приºднуйте вс³ частини правильно, щоб запоб³гти
пошкодженню та псуванню приладу.
ЯК ВИМ²РЮВАТИ ТИСК
1. Переконайтесь, що пац³ºнт сидить спок³йно, ноги
пац³ºнта не перехрещен³, спина та рука мають опору, що
його рука знаходиться на р³вн³ серця.
ПОПЕРЕДЖЕННЯ: щоб уникнути пошкоджень та
отримання неправильних результат³в, переконайтесь, що
вс³ частини приладу приºднан³ правильно та безпечно.
2. Знайд³ть плечову артер³ю, розташувавши два пальц³
на 2 сантиметри вище внутр³шнього л³ктьового згину.
3. Розташуйте нижн³й край манжети приблизно на 1-2
сантиметри вище л³ктьового згину.
Page 9

16
17
4. Манжета повинна щ³льно облягати руку. Заф³ксуйте
манжету, заст³бнувши липучку. Якщо º необх³дн³сть,
поправте манжету.
5. Поклад³ть руку пац³ºнта на ст³л. Рука повинна бути
розслабленою, долонею вгору. Переконайтесь, що
манжета розташована на р³вн³ серця.
6. В³зьм³ть манометр в одну руку,
поверн³ть цифрами до себе. В³зьм³ть
грушу в другу руку. Закрийте
пов³тряний клапан, розташований
на груш³, повернувши гвинт за
годинниковою стр³лкою.
7. Щоб накачати манжету, р³вном³рно стискайте грушу
в руц³. Накачуйте манжету, доки стр³лка манометра
не перейде на 20-30 мм.рт.ст. вище ЗВИЧАЙНОГО
СИСТОЛ²ЧНОГО тиску.
ПОПЕРЕДЖЕННЯ: Н²КОЛИ НЕ НАКАЧУЙТЕ МАНЖЕТУ
Б²ЛЬШ Н²Ж 280 мм рт. ст. ЦЕ МОЖЕ ПРИЗВЕСТИ
ДО ТРАВМУВАННЯ ПАЦ²ªНТА АБО ПОШКОДЖЕННЯ
ПРИЛАДУ.
8. Пов³льно в³дкрийте пов³тряний
клапан, повертаючи ´винт проти
годинниково¿ стр³лки. Випускайте
пов³тря з³ швидк³стю 2-4 мм.рт.ст. в
секунду.
9. Уважно слухайте тони ³ спостер³гайте за стр³лкою
манометра. Коли Ви почуºте перший ч³ткий звук, це
значення º величиною СИСТОЛ²ЧНОГО артер³ального
тиску.
10. Продовжуйте випускати пов³тря з³ швидк³стю
2-4 мм рт. ст. в секунду. Коли досягнуто значення
Д²АСТОЛ²ЧНОГО артер³ального тиску, звук биття
перестаº бути в³дчутним.
11. В³дкрийте пов³тряний клапан, повертаючи ´винт
проти годинниково¿ стр³лки щоб повн³стю випустити
пов³тря з манжети. Запиш³ть показники.
Page 10

18
19
ÏÐÈ̲ÒÊÀ: Якщо ви хочете вим³ряти тиск повторно,
ви можете накачати манжету вдруге. При повторних
вим³рюваннях кров застоюºться в руц³, що може
призвести до неправильних результат³в вим³рювання.
Для того, щоб вим³рювання в³дбувалися коректно,
повторне вим³рювання сл³д виконувати лише п³сля паузи
в 2-3 хвилини.
СТИСЛЕ КЕР²ВНИЦТВО
ПЕРЕД
1. Перед вим³рюванням необх³дно РОЗСЛАБИТИСЯ
протягом 5 хвилин
2. Зн³м³ть одежу, яка пережимаº руку.
3. Пац³ºнт не повинен ¿сти, курити, ф³зично
навантажуватися як найменше протягом 30 хвилин перед
вим³рюванням.
Ï²Ä ×ÀÑ
1. РОЗТАШУЙТЕ МАНЖЕТУ на р³вн³ серця.
2. НАКАЧУЙТЕ до необх³дного р³вня (20-30 мм.рт.ст.
вище оч³куваного р³вня)
3. Пац³ºнт не повинен розмовляти або рухатися п³д час
вим³рювання.
4. ВИПУСКАЙТЕ ПОВ²ТРЯ з³ швидк³стю 2-4 мм рт.ст. в
секунду.
ϲÑËß
1. ЗАЖД²ТЬ 2-3 хвилини перед наступним вим³рюванням.
ДОГЛЯД
Щоб захистити ваш прилад в³д пошкоджень, будь ласка,
УНИКАЙТЕ прання або намокання манжети, не роняйте
манометр.
Перед виходом з заводу Ваш новий вим³рювач
артер³ального тиску пройшов перев³рку над³йност³ та
точност³. Проте, як ³ будь-який ³нший високоточний
прилад, яким пост³йно користуються, ми рекомендуºмо
пер³одично пов³ряти ваш вим³рювач артер³ального тиску.
Коли пов³тря з манжети повн³стю випущене, стр³лка
манометра повинна вказувати на сектор нуля. Якщо
стр³лка манометра знаходиться поза сектором нуля,
отриман³ результати будуть нед³йсними. В цьому випадку
необх³дно звернутись у найближчий серв³сний центр для
кал³брування приладу (адреса серв³сного центру вказана
у гарант³йному талон³).
ВАЖЛИВО: Проконсультуйтесь з л³карем, щоб визначити
р³вень тиску, який º нормальним для Вас. Лише л³кар
маº достатню квал³ф³кац³ю, щоб правильно встановити
д³агноз ³ призначити л³кування при п³двищеному
Page 11

20
21
артер³альному тиску. Навч³ться правильно вим³рювати
артер³альний тиск цим приладом. Проконсультуйтесь з
л³карем чи правильно ви це робите.
ГАРАНТ²Я
Вим³рювачев³ артер³ального тиску надаºться 18 м³сяц³в
гарант³¿ в³д дня придбання. Ця гарант³я поширюºться
на прилад ³ манжету. Гарант³я не поширюºться на
пошкодження, що виникли в результат³ неправильного
поводження, нещасних випадк³в, недотримання ³нструкц³¿
з експлуатац³¿ та модиф³кац³й приладу, що зд³йснен³ у
прилад³ трет³ми особами.
Гарант³я д³º лише при наявност³ гарант³йного
талону, заповненого прац³вником торговельно¿
орган³зац³¿, наявност³ печатки торговельно¿ орган³зац³¿,
непошкоджено¿ упаковки.
ТЕХН²ЧН² ХАРАКТЕРИСТИКИ
Âàãà: 385 ã
Ðîçì³ðè: 170 х 120 х 70 мм
Температура збер³гання: â³ä -5îÑ äî +35îÑ
Волог³сть: максимальна в³дносна
волог³сть 80%
Робоча температура: в³д 0 до 35 оС
Д³апазон вим³рювання: в³д 0 до 300 мм рт. ст.
М³н³мальний крок
показник³в:
2 ìì. ðò. ñò.
Точн³сть вим³рювання: ±3 мм. рт. ст. в межах в³д
15 îÑ äî 25 îÑ
±6 мм. рт. ст. в межах в³д
34 îÑ äî 46 îÑ
Стр³лка манометра в
сектор³ нуля - норма
Вит³кання пов³тря: <±3.75 ìì. ðò. ñò./ñåê.
Комплектац³я:
1. манометр
2. манжета (зб³льшений розм³р, з окружн³стю плеча
25.4-40.6 см) з внутр³шньою латексною камерою
3. гумовий балон з клапаном
4. футляр
5. пакувальна коробка
Можлив³ техн³чн³ зм³ни!
 Loading...