


The WiFi access points shall be set-up and configured by GameTech Int'l authorized personnel
according the instructions for that equipment to ensure compliance with the specific RF
regulations governing the installation location. The access points automatically control the
player units’ RF to fully comply with regulations for allowable 802.11 channels (RF frequencies)
and transmit power. The players and hall operations personnel shall have no control over these
parameters once the parameters are set.
Only GameTech Int’l authorized personnel are allowed to set up the WiFi client by accessing the
technician menu to set the SSID, authentication mode, security mode, and to enter the security
key or password.
WiFi “AdHoc” or peer-to-peer mode is not supported in the Explorer system.
NOTES
1. Operation of this device in the 5150 MHz to 5250 MHz range (802.11a) is
restricted to indoor use only.
2. Changes or modifications not expressly approved by GameTech Int'l could void the
user's authority to operate the equipment.
3. This equipment has been tested and found to comply with the limits for a Class A digital
device, pursuant to part 15 of the FCC Rules. These limits are designed to provide
reasonable protection against harmful interference when the equipment is operated in a
commercial environment. This equipment generates, uses and can radiate radio
frequency energy, and if not installed and used in accordance with the instruction
manual, may cause harmful interference to radio communications. Operation of this
equipment in a residential area is likely to cause harmful interference in which case the
user will be required to correct the interference at their own expense.
4. This equipment complies with FCC radiation exposure limits set forth for an
uncontrolled environment.
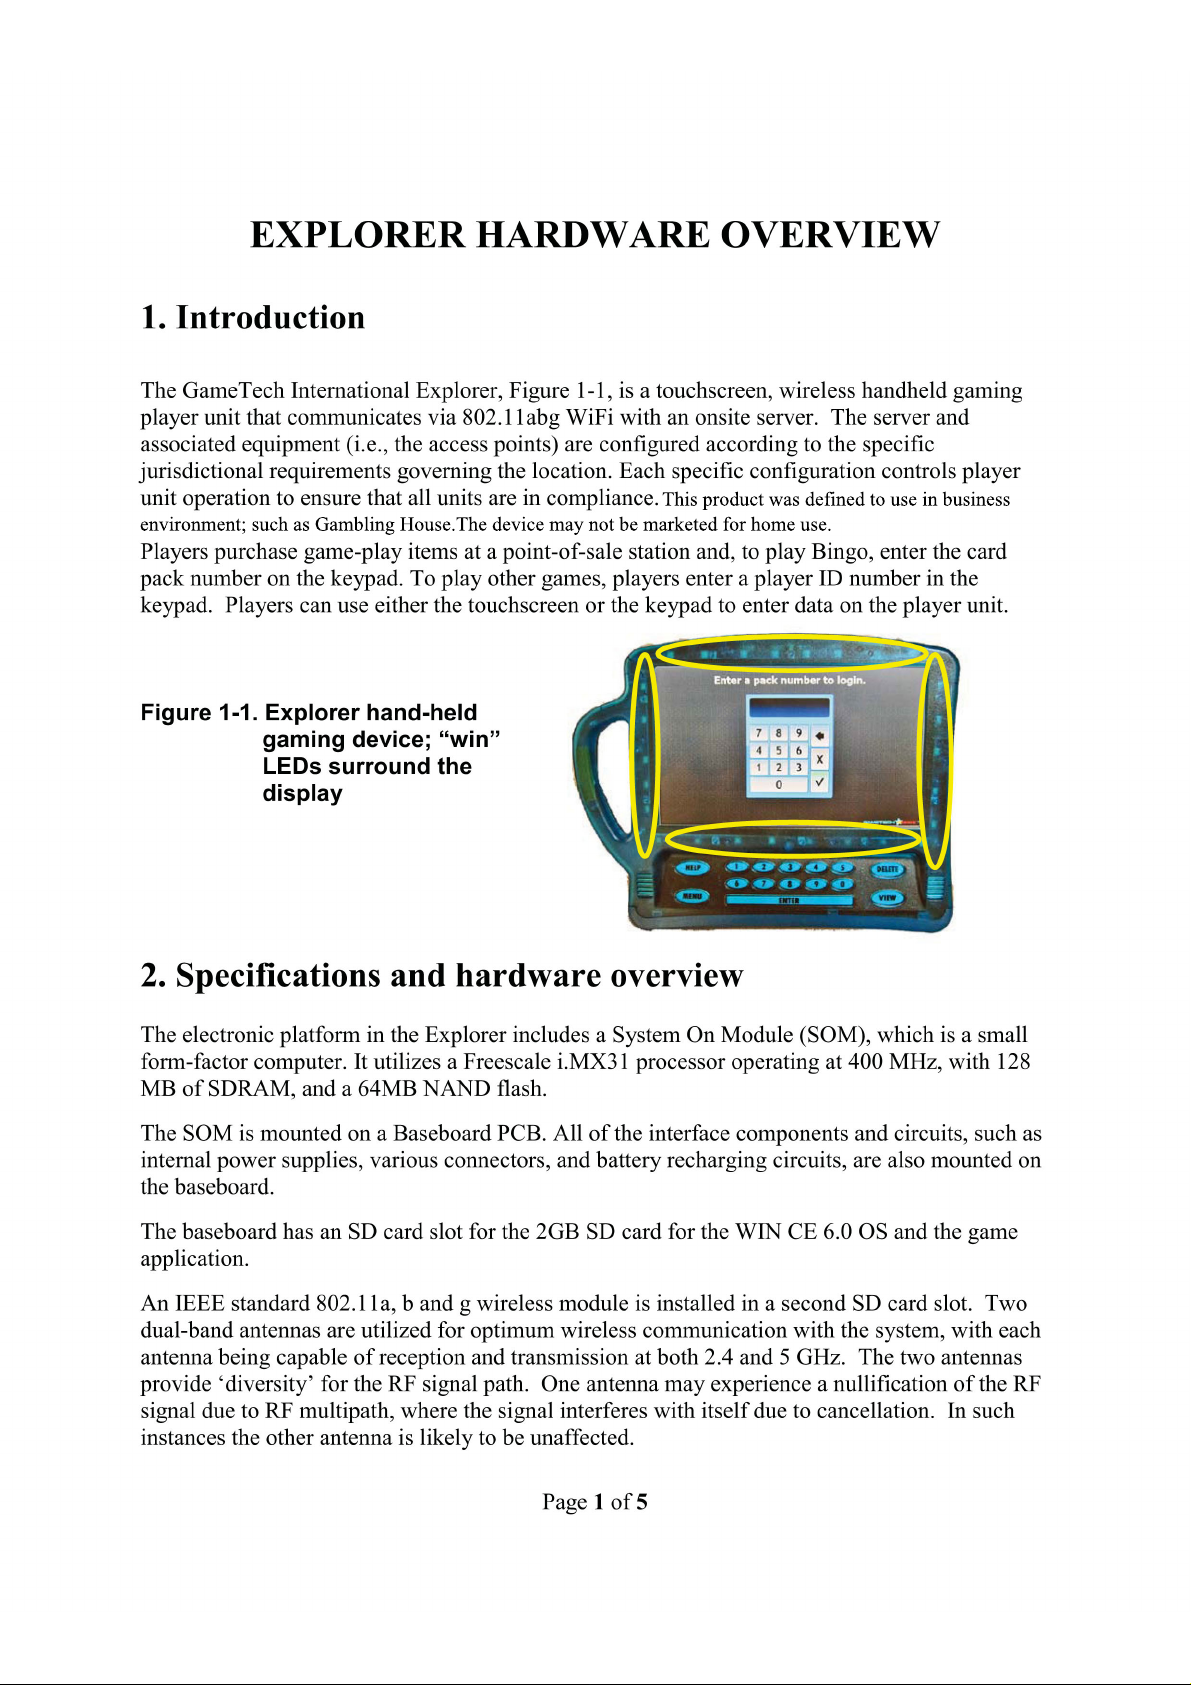
The capacitive keypad, Figure 1-2, is backlit.
The full color display is a
10.2-inch LCD with an
integrated touch screen. A
molded, high impact
polycarbonate front case is
transparent so that the “win”
LEDs are visible through the
plastic without being exposed
(see Figure 1-1 above). Figure 1-2. Backlit capacitive keypad
Page 2 of 5

The Explorer incorporates two high-capacity Li Poly rechargeable batteries for long playing
time. Both batteries are mounted in slots on the back (see Figure 1-3). The player unit operates
exclusively from these ‘lap-top style’ battery packs.
Battery charging is accomplished when the player unit is installed to its charging and storage
crate. Discrete contacts make the electrical power connection between the crate and player units.
The crate is powered from any standard 90-264VAC / 50-60Hz power source.
Upper batteryslot
Lower battery slot
ON-OFF
switch
Figure 1-3. Battery slots on back showing ON-OFF switch location
The main power ON-OFF
switch is located under the
upper battery when the battery
is installed. The switch is
shown in the ON position in
Figure 1-3. To gain access to
the switch, the battery must be
removed using the battery
release tool (see Figure 1-4).
Place the tool in the two slots
as shown, firmly press down on
the tool to free the latch from the Figure 1-4. Inserting the battery release tool
battery, and carefully slide the battery
out of the slot.
Battery latch
Page 3 of 5

To insert a battery, place the Explorer front-down on a clean surface, firmly grip the left side of
the Explorer, position the battery label-side down into the slot guides, then carefully slide the
battery fully to the left until it latches in place (see Figure 1-5).
Figure 1-5. Sliding battery into the upper slot
A fold-up stand is on the back of the Explorer that, when unfolded, allows users to view the
display at a comfortable angle. The stand features a friction swivel that holds the stand in any
chosen position (see Figure 1-6).
Figure 1-6. Back of Explorer showing unfolded stand
Page 4 of 5

r
To release the stand from the back of the Explorer case, perform the following:
1. Place the Explorer front-down on a
clean surface and firmly grip the top
of the Explorer.
2. Press all four fingers beneath
the metal cross bar of the
stand, as shown in Figure 1-7,
and push in and up to release
the stand from its secured
position.
Note
If unable to release the stand
by using finger pressure,
insert a wide, straight-slot
screwdriver beneath the
metal crossbar and turn it 90 )LJXUH)LQJHUVSUHVVLQJLQ
degrees left or right to DQGXSRQWKHVWDQG
release the stand (see Figure
1-8).
3. Beginning game play
With the Explorer powered on, players
can begin Bingo game play by entering
the card pack number on the keypad that
is displayed. To play other games,
players enter a player ID number on the
keypad (see Figure 1-9). If the device is
in a “sleep” mode, tap on the touchscreen
to display the keypad.
Figure 1-8. Screwdrive
inserted
beneath
stand
crossbar
WĂ
Page 5 of 5
Figure 1-9. Sign-on keypad
 Loading...