

Page 1
P.O. Box 957, Redmond, WA 98073-0957 U.S.A.
61216A
Nintendo of America Inc.
www.nintendo.com
INSTRUCTION BOOKLETINSTRUCTION BOOKLET
Page 2
PLEASE CA REF ULLY REA D T HE SEPARATE HEA LTH A ND SAF ETY
61216A
PRECAUTIO NS BOO KLE T I NCL UDE D W ITH THIS PROD UCT BE FOR E
USING YOU R N INT END O® HARDWARE SY STE M, GAME CARD OR
ACCESSORY. T HIS BO OKL ET CON TAIN S I MPORTANT HE ALTH AND
SAFETY IN FOR MATI ON.
IMPORTA NT SAF ETY INFORMATIO N: REA D T HE FOLLOWING
WAR NIN GS BEF ORE YO U OR YOUR CHI LD PLAY VID EO GAM ES.
WARNING - Seizures
• Some people (about 1 in 4000) may have seizures or blackouts triggered by light flashes or patterns,
such as while watching TV or playing video games, even if they have never had a seizure before.
• Anyone who has had a seizure, loss of awareness, or other symptom linked to an epileptic condition
should consult a doctor before playing a video game.
• Parents should watch when their children play video games. Stop playing and consult a doctor if you or
your child have any of the following symptoms:
Convulsions Eye or muscle twitching Loss of awareness
Altered vision Involuntary movements Disorientation
• To reduce the likelihood of a seizure when playing video games:
1. Sit or stand as far from the screen as possible.
2. Play video games on the smallest available television screen.
3. Do not play if you are tired or need sleep.
4. Play in a well-lit room.
5. Take a 10 to 15 minute break every hour.
WARNING - Radio Frequency Interference
The Nintendo DS can emit radio waves that can affect the operation of nearby electronics, including
cardiac pacemakers.
• Do not operate the Nintendo DS within 9 inches of a pacemaker while using the wireless feature.
• If you have a pacemaker or other implanted medical device, do not use the wireless feature of the
Nintendo DS without first consulting your doctor or the manufacturer of your medical device.
• Observe and follow all regulations and rules regarding use of wireless devices in locations such as
hospitals, airports, and on board aircraft. Operation in those locations may interfere with or cause
malfunctions of equipment, with resulting injuries to persons or damage to property.
WARNING - Repetitive Motion Injuries and Eyestrain
Playing video games can make your muscles, joints, skin or eyes hurt after a few hours. Follow these
instructions to avoid problems such as tendinitis, carpal tunnel syndrome, skin irritation or eyestrain:
• Avoid excessive play. It is recommended that parents monitor their children for appropriate play.
• Take a 10 to 15 minute break every hour, even if you don't think you need it.
• When using the stylus, you do not need to grip it tightly or press it hard against the screen. Doing so
may cause fatigue or discomfort.
• If your hands, wrists, arms or eyes become tired or sore while playing, stop and rest them for several
hours before playing again.
•
If you continue to have sore hands, wrists, arms or eyes during or after play, stop playing and see a doctor.
WARNING - Battery Leakage
The Nintendo DS contains a rechargeable lithium ion battery pack. Leakage of ingredients contained within the
battery pack, or the combustion products of the ingredients, can cause personal injury as well as damage to your
Nintendo DS.
If battery leakage occurs, avoid contact with skin. If contact occurs, immediately wash thoroughly with soap and
water. If liquid leaking from a battery pack comes into contact with your eyes, immediately flush thoroughly with
water and see a doctor.
To avoid battery leakage:
• Do not expose battery to excessive physical shock, vibration, or liquids.
• Do not disassemble, attempt to repair or deform the battery.
• Do not dispose of battery pack in a fire.
• Do not touch the terminals of the battery, or cause a short between the terminals with a metal object.
• Do not peel or damage the battery label.
Page 3
The official seal is your assurance
61216A
that this product is licensed or
manufactured by Nintendo. Always
look for this seal when buying
video game systems,
accessories, games
THIS GAME ALLOWS WIRELESS MULTIPLAYER
GAMES DOWNLOADED FROM ONE GAME CARD.
and related
products.
Nintendo does not license the sale or use of products
without the Official Nintendo Seal.
Nintendo's game pages, at www.nintendo.com/games, feature
walkthroughs, frequently-asked questions, and codes for many of our
games. If your answer isn't there, check out our forums where you can
If you don't have access to the web-site, recorded tips for many titles are
available on Nintendo's Power Line at (425) 885-7529. This may be a long-
distance call, so please ask permission from whoever pays the phone bill.
exchange tips with other gamers online.
For more information about our forums, visit
www.nintendo.com/community.
THIS GAME ALLOWS WIRELESS MULTIPLAYER
GAMES WITH EACH DS SYSTEM CONTAINING
A SEPARATE GAME CARD.
THIS GAME IS COMPATIBLE WITH
THE RUMBLE PAK ACCESSORY.
© 2006 NINTENDO. TM, ® AND THE NINTENDO DS LOGO ARE TRADEMARKS OF NINTENDO.
© 2006 NINTENDO. All Rights, including the copyrights of Game, Scenario, Music and Program, reserved by
NINTENDO. This product uses the LC Font by Sharp Corporation, except some characters. LCFONT, LC Font and
the LC logo mark are trademarks of Sharp Corporation.
2-6
2
Wireless DS
Single-Card
Download Play
Wireless DS
Multi-Card
Play
Rumble Pak
Compatible
(sold separately)
Story
Fox Stands Alone…
Controls
Getting Started
Combat Screen
Combat Actions
Single Player
Starting Play
Story Mode Rules
The Tactics Map
Round Progression
About Combat
CONTENTS
6
Download Play
6
DS Wireless Link/
8
DS Download Play
10
Wi-Fi Battle
12
Getting Started with Wi-Fi
14
Wi-Fi Play
18
Friend Codes
20
Wi-Fi Connections
20
Rumble Pak
22
Options
24
Character Introductions
28
Staff Credits
30
32
34
34
36
38
40
41
42
44
48
05
Page 4
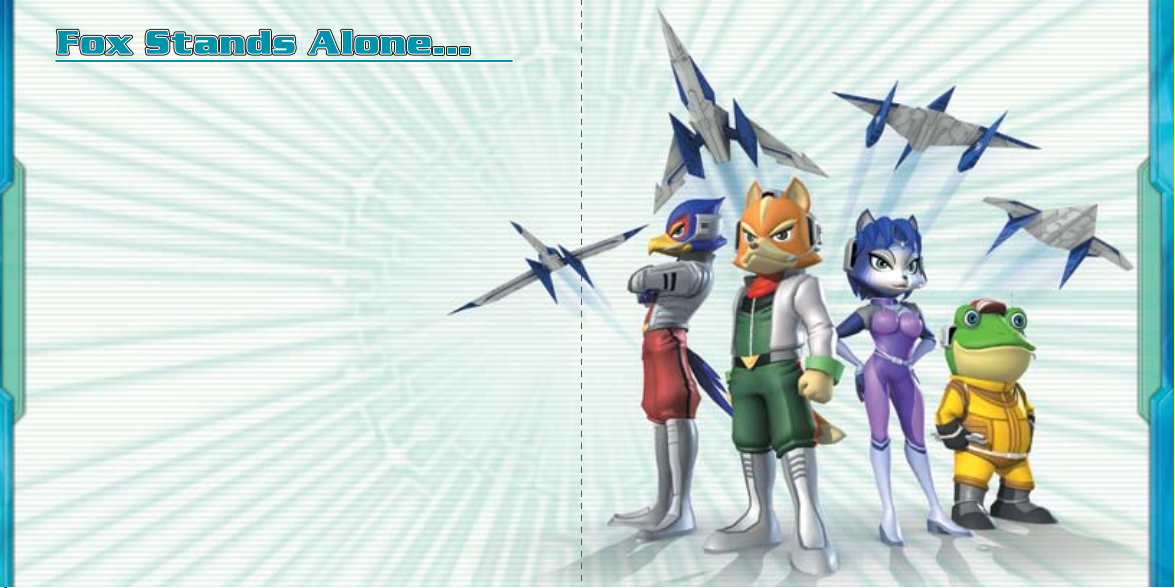
In days gone by, the burning desire of Dr. Andross to rule the Lylat
system filled the galaxy with the chaos of war. The mad ape sent out
wave after wave of armies from his stronghold on the pl anet
Venom, a nd used unique forms of radiation to create horrible
monsters and terrible soldiers. His ambition sw ept this army across
the galaxy to the planet Corneria.
It was there, however, that a quartet of mercenaries known
as Star Fox put an end to the threat, and the leader of the
team, Fox McCloud, defeated Andross in single com bat.
In the years that followed, Venom was designated a
forbidden planet and placed under the rigorous
watch of Cornerian forces. All was going well until a
mysterious army suddenly sprung forth from the to xic seas of the
planet. Controlled by a mysterious leader calle d the Anglar
Emperor, this new threat cuts thr ough the Lylat system like a scythe
through ripe wheat. The unexpected attack once ag ain places the
peoples, cities, and culture of the Lylat system in dire peril.
But much to the shock and dismay of the Lylat people, the members
of Star Fox have gone their separate ways…leaving F ox McCloud as
the lone obstacle in the Anglar army ’s pat h. Despite the odds, Fox
heroically launches himself into the fray. But can he survive without
the aid of his former teammates?
06 07
Page 5
ControlsControlsControls
You will control Star Fox C ommand by using both the Touch
You will control Star Fox C ommand by using both the Touch
Scre en and buttons. For more on Touch Screen contro ls,
Scre en and buttons. For more on Touch Screen contro ls,
see page 14.
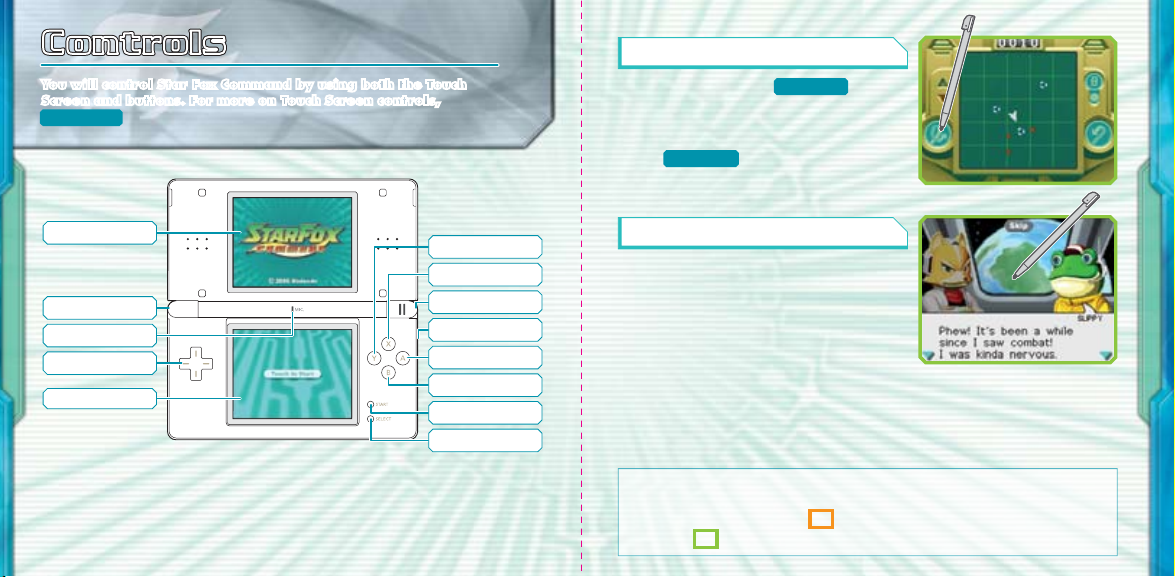
Combat Controls
On the Combat Screen (see p. 12) use the
A, B, X, Y, L or R Buttons—or the +Control
Pad—to fire lasers and initiate lock-on
attacks. Press START to display the pause
menu. (see p. 13) All other actions are
performed on the Touch Screen wit h
a stylus.
Top Screen
L Button
Mic
+Control Pad
Touch Screen
Closing the DS during game play will initiate Sleep Mode and conserve
battery life. Open the DS to resume game play.
Y Button
X Button
R Button
POWER Button
A Button
B Button
START Button
SELECT Button
Other Controls
On menu screens, you can make
selections and change screens by tapping
icons or bars. You can also tou ch the
screen to scroll through conversations or
make game-progression c hoices.
(You can also press t he A, B, X, Y, L or R
Buttons—or the +Control Pad—to scroll
through conversations.) Additionally, you
can skip conversations by touching the
Skip icon.
The color of the frames around the screen shots in this manual denote which
screen is being show.
Top screen images have a frame, while Touch Screen images
have a frame.
08 09
Page 6
Getting StartedGetting StartedGetting Started
Once y ou have Star Fox C omman d up and ru nning, go to the
Once y ou have Star Fox C omman d up and ru nning, go to the
mode s elect screen to choose the mode you want to play.
mode s elect screen to choose the mode you want to play.
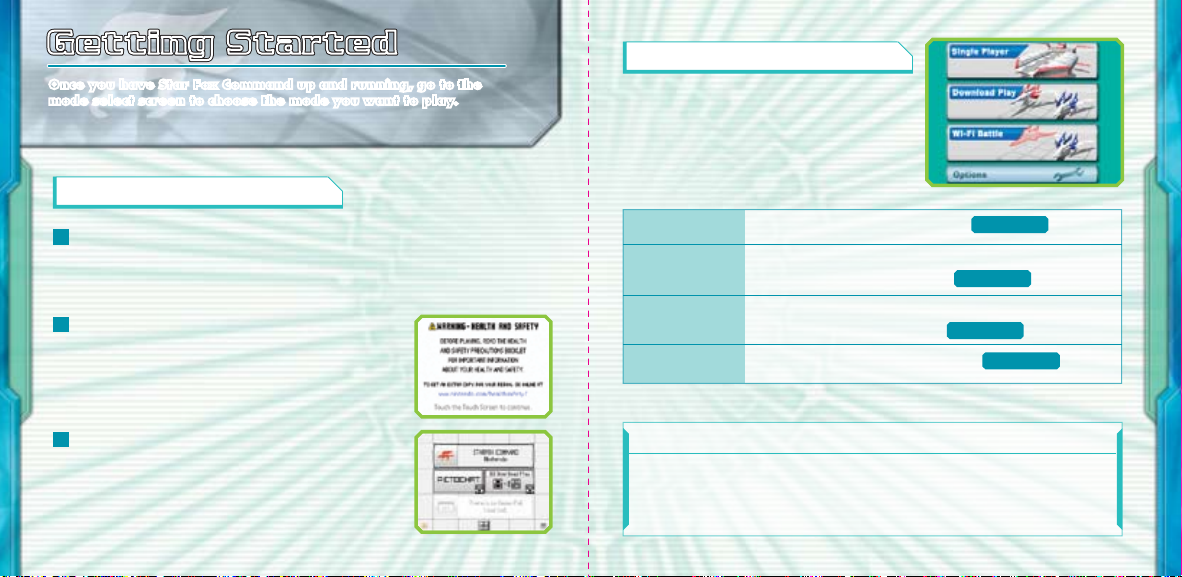
Mode Select Screen
Once you are on the title screen, press the
A Button or START (or tap the Touch
Screen) to bring up the Mode Select
screen. Select the mode you want to play
from the menu that appears.
Powering Up
Make sure your Nintendo DS is off, then insert the Star Fox Command
1
Game Card into the DS Game Card slot until it clicks into p lace.
If you’re using the DS Rumble Pak, insert it into the Game Boy
Advance slot.
Turn the power on and read the inform ation on
2
the start-up screen shown to the right. When
you’ve finished, tap the Touch Screen to advance
to the DS menu screen.
On the DS menu screen, tap the Star Fox
3
Command panel to display the title screen and
start the game.
If you have your Nintendo DS start-up mode set to
Auto, the DS menu screen will not appear. See your
Nintendo DS instruction booklet for more details.
10 11
Single Player Play the one-player story m ode. (See p. 18)
Download Play Use the DS local wireless system to play versus
matches with up to 6 players. (See p. 32)
Wi-Fi Match piloting skills with up to 3 friends via
Nintendo Wi-Fi Connection. (See p. 34)
Options Adjust a variety of game settings. (See p. 40)
Abo ut Saving
This game has an auto- save fe ature. Game progress will be saved when
you clear a mission or change any game setting in the options menu.
Page 7
5
Ene my Cor e Locations
Combat ScreenCombat ScreenCombat Screen
On the c ombat screen, you’ll pilot a fighter and engage the
On the c ombat screen, you’ll pilot a fighter and engage the
enem y. Master all of the moves at y our dis posal (see p. 14 ) to
enem y. Master all of the moves at y our dis posal to
make the most of your sh ip!
make the most of your sh ip!
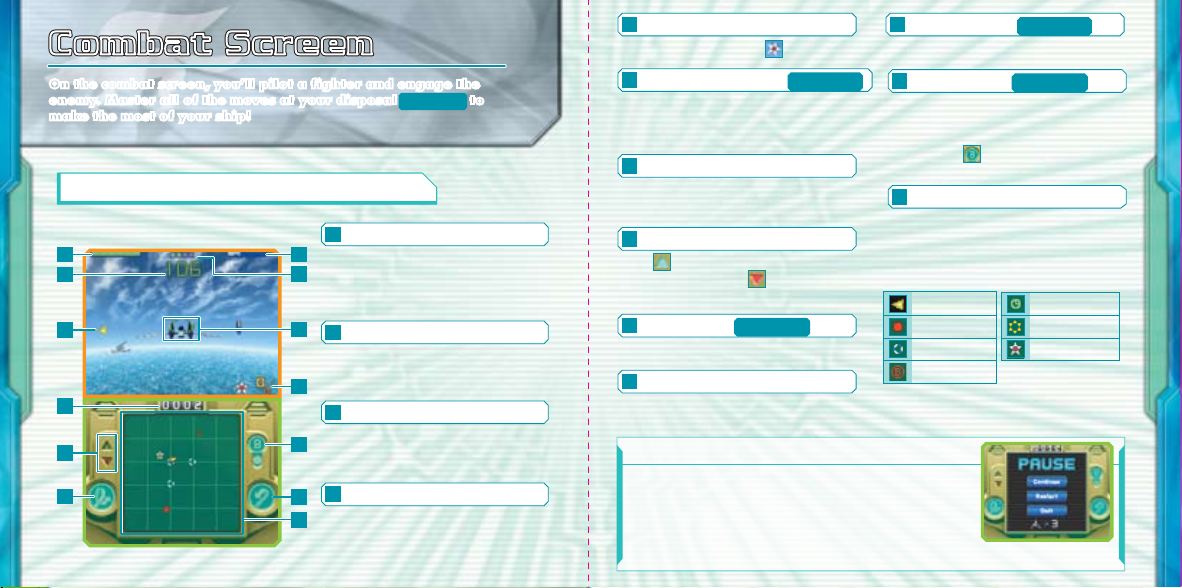
Viewing the Combat Screen
1
Shi elds
1 3
2
5
10
8
9
12 13
Your shields will w eaken when you
hit an object or take enemy fire. If
4
your shields run out completely,
your ship will explode!
7
2
Rem aini ng Time
If this gauge reaches zero, you will
run out of time and fuel, and lose
(p. 21) the battle.
6
Boo st Gau ge
3
The Boost Gauge will empty as you
12
boost, brake, or roll. It will fill as
time passes.
4
11
13
Ite m Coun tdow n
An item appears with every 5
enemies shot down. This meter
counts the current number of foes
you’ve defeated.
These will appear as .
Cor es Col lected (See p. 17)
6
The current number of collected cores
as well as the number needed to clear
the mission.
7
Ret icul e
Use this to target enemies—
it will flash red when you lock on.
8
The Accelerom eter
This will flash when you’re
boosting, and this wh en
you’re braking.
Loo p Icon (See p. 15)
9
Tap this to do a loop.
Kil l Coun t
10
This displays how many enemies
you’ve shot down.
Pause Menu
Press START while on the Combat screen to stop the
game and bring up the Pause menu. Choose Continue
to return to the game, Retry to start the mission over or
Quit to return to the title screen.
You can also confirm how many ships you have left. (p. 28)
11
U-Turn Ic on (See p. 15)
Tap this to do a U-turn.
Bom b Icon (See p. 16)
12
Touch and hold this, then slide
the stylus over the area you
want to attack to drop a bomb.
If you see , you’re out
of ammo!
13
Radar
This shows the entire playing field.
Items (see p. 17) and enemies are
represented by symbols.
Rad ar Key
Your ship Fuel Cell
Enemy ship Supply Ring
Item Ring
Bomb
(When there is on ly one ene my
containing a core remai ning, it will
flash on the radar.)
Enemy Core
Page 8
Combat ActionsCombat ActionsCombat Actions
Most f ighter actions are performed by tapping or slidi ng the
Most f ighter actions are performed by tapping or slidi ng the
styl us on the Touch Screen.
styl us on the Touch Screen.
Move Slide o r tap in the direction yo u want to proc eed
Your ship moves for ward automatically. To change directions, touch
the place on the map towards which you want to fly or simpl y slide the
stylus in that direction.
By going to Controller Type on the options menu and choosing controller
type B or D, you can reverse the vertical con trols.
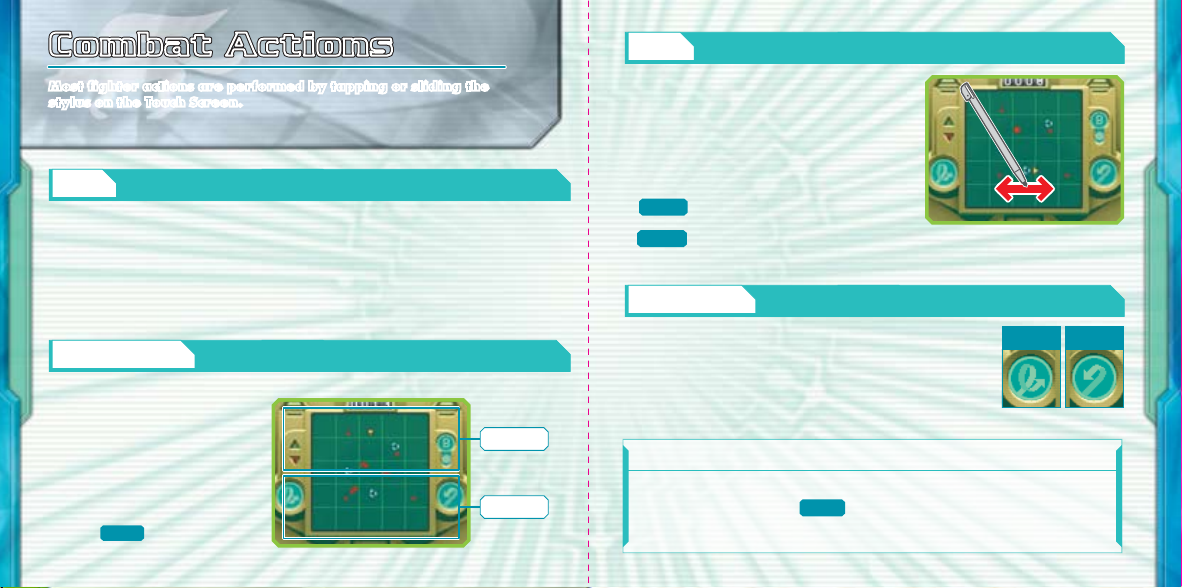
Boo st / Brake Double tap the Touch Sc reen
Double-tap and hold your
stylus on the top portion of
the Touch Screen to speed up.
Double-tap and continue t o
hold your stylus on the bottom
portion of the Touch Screen to
brake. You will con tinue to
boost or brake until you lift
your stylus or your Boost
gauge (p.12) runs out.
Boost
Brake
Rolling Rub th e styl us on the Touch Scre en
Quickly rub the stylus on the Touch
Screen two or three time to roll—which
will deflect enemy fire. The boost gauge
will deplete while you are rolling. You
will continue to roll until the boost
gauge is empty or you tap the screen
again. If you roll well and deflect
enemy fire, you’ll receive a time bonus
(p. 17) and increase your remaining
time. Additionally, rolling near items
(p. 17) will cause them to be drawn into
the ship.
Loo p / U-Turn Tap the Loop or U-Turn ic on
Tap the loop icon to loop, and the U-turn icon to
perform a U-turn and fly in the opposite
direction. Use these maneuvers when enemy
ships are on your tail!
Loop U-turn
Abo ut Automat ic U-t urns
Your fighter will automatically do a U-turn if you fly to the edg e of the
play area. Use your radar (p. 13) to keep track of yo ur location.
14 15
Page 9

Las er Attack / Lock-On Attack All Butt ons
Press the A, B, X, Y, L, R Button—or the
+Control Pad—to fire your lasers. Press
and hold any of these lock onto an
enemy, then release it to fire a blast that
will follow the foe across the sky!
Note that not all Characters have
lock- on abilities.
Locked-on
enemy
Bom bs Touc h the Bomb Icon
When you have bombs, touch and hold the bomb icon, then s lide the
stylus on the radar over the place you want to attack. Do ing so will drop
a bomb in that location. You can also quickly double tap the bomb icon
to drop a bomb directly in front of your ship. Bombs are po werful, but
you have only a limited supply, so use them carefully!
Abo ut Ite ms
You can pick up items by coming into contact with them. You can also pull
in nearby items by rolling (see p. 15) when you fly by them.
Enemy Cores appear when you destroy certain
Enemy Cores
Fuel Cell
Supply Ring
Bomb
target enemies. Collect a set number of cores to
clear a mission.
Grab one of these to increase your remaining time
(see p. 12) by twenty-five seconds.
Pick up one of these to restore your ship’s shields
(see p. 12).
Round up a bomb to increase your bomb supply
by one.
Coi n
Coins will appear after you have shot down 100 enemies. Collect
all of the coins before they disappear to gain an extra ship.
Abo ut Ite m Rings
Fly through item rings to reveal hidden fuel cells, supply
rings, or bombs. In single-player mode, one of these items
will appear for every five enemies that you destroy. Be sure to
keep an eye on the item countdown meter! (p. 12)
Item Ring
16 17
Page 10

Single PlayerSingle PlayerSingle Player
Choo se Start to play through the story mode, go to the Stage
Choo se Start to play through the story mode, go to the Stage
Sele ct screen, view the Gallery, or en ter Tra ining.
Sele ct screen, view the Gallery, or en ter Tra ining.
Stage Select
Choose this to see a list of previously
cleared missions. Select the mission you
want to play by tapping it.
Page
Tap this to turn
Single Player
The first time you select Single Player,
you will see a cinema scene and launch
into story mode. The next time you
choose Single Player, you will se e the
menu shown to the right.
Bac k
Tap this to return to the
mode select screen.
Gallery
Come here to view profiles of Fox and
his fellow pilots. You can also review
any endings that you have unlocked.
When viewing a character profile, that
character ’s theme music will play.
the page.
Training
Start
When the screen to the right is
displayed, choose Yes to co ntinue from
your last save. If you choose No, you
will be able to restart the game. If you
do so, clear a mission and save a new
game, you will overwrite your previous
save. Be careful!
18 19
Go here to brush up on your flying
and combat skills. There are four
training exercises to choose from.
Page 11

Single Player RulesSingle Player RulesSingle Player Rules
Destroying Enemy
Motherships and
Acce pt a mission to bring up the Tactics Map , wher e you
Acce pt a mission to bring up the Tactics Map (p. 25), where you
can di rect Fox and his c ompan ions in b attle. Destroy all
can di rect Fox and his c ompan ions in b attle. Destroy all
enem ies to clear the mission.
enem ies to clear the mission.
Story Mode Progression
You’ll move through the story mode in turns (p. 24), by directing your
pilots on the Tactics Map and battl ing enemies (p. 28) as you come into
contact with them. You must complete each mission within the specifie d
amount of turns you’re given.
Protect the Great Fox
Your enemies will t ry to shoot down the
Great Fox by sending troops or firing
long-range missil es. If the Great Fox is
destroyed, your mission will end in failure.
Use sound tactical maneuvering to keep
your enemies focused on your pilots, then
defeat them in combat before they become
a threat.
20 21
Liberating Captured Bases
Enemy motherships are located in all
captured bases. Use your fighters to destroy
the motherships and send the enemy forces
packing. You’ll gain extra t urns when you
liberate a base, and also be able to use it as
a base of your own. (p. 28)
Mission Complete!/
The Results Screen
Fulfill the objecti ves of each mission to clear
it and progress to the next one. The Great
Fox can carry up to three missiles from
mission to mission. Missions will end in
failure if any of the events listed below
occur. If that happens, you can retry or stop
playing and return to the title screen.
Mis sion Failure Conditions
Lose all your ships
Lose the Great Fox
Run out of turns
Page 12

Viewing Information
The Tactics MapThe Tactics MapThe Tactics Map
The Tactics Map displays the entire area over which a m issio n
The Tactics Map displays the entire area over which a m issio n
occu rs. Missions are broken up int o turns on this map.
occu rs. Missions are broken up int o turns on this map.
Viewing the Tactics Map
Rem aini ng Ships
Rem aini ng Time
This shows how much
time you have while
engaging in battle on
the combat screen.
Turn C apsules
This shows how many
turns are available
for a mission. One
capsule will vanish at
the beginning of
each turn.
22 23
All y Stat us
This shows how many
bombs and how much
shield power each of
your allies possesses.
You can also see how
many missiles the
Great Fox is carrying.
Tact ics Ma p
This map shows the
position of your ships,
enemies, and items.
The Great Fox will be
shown as and allied
pilots by character
icons.
During the flight-path drawing phase (p. 25)
of each turn, you can tap items or enemies
to see intelligence reports on the top screen.
Tap your pilots to display dossie rs on the
fighters they’re piloting.
Fig hter D ossiers
Laser Type
Lock- on
Bomb
Shield
Boost
Time Bonus
The type of laser equipped. Laser varieties include Single (one
beam), Twin (two beams), Plasma (two round shots), Arc
(curved beam), and Zapper (powerful, long-distance beam).
The type of lock-on ability possessed. There are thre e varieties
of lock-on capability; Single (1 lock-on point), Multi (up to 8
lock-on points), and Wide (can lock on to all visible enemies).
The remaining number of bombs.
The shield capacity.
The boost gauge capacity.
This shows the time bonus this ship will receive for rolling
(p. 15) and reflecting enemy fire.
Ene my Abi lities
Shield—
Weapon —
“X 2” etc. shows the number of enemies that must be destroyed.
This shows the enemy ’s shield rating.
This shows the enemy ’s attack rating.
Page 13

Single Player RulesSingle Player RulesSingle Player Rules
Each t urn in single -player mode is made up of thre e phase s.
Each t urn in single -player mode is made up of thre e phase s.
It’s especially important to remember t he part icula rs of the
It’s especially important to remember t he part icula rs of the
flig ht path phase.
flig ht path phase.
How to Draw a Flight Path
Touch a ship, then slide the stylus i n any direction to draw the flight path.
The maximum length of the flight path is determined b y how much fuel the
ship in question possesses. If you wish to change a shi p’s fligh t path,
simply touch it again and draw a new one. When you’ve finished drawing
all of your flight paths, double-tap the Touch Screen to bring up the turn
icon. Touch the icon to proceed to the movement phase.
About Turns and Phases
Turns proceed in the
order shown to the
right. Once all battles
in the combat phase
are complete, the turn
is finished.
Flight Path Phase –
Movement Phase –
Combat Phase –
Draw flight paths for all
fighters on the mission.
All allies and enemies move
along their respective
flight paths.
All battles take place in whatever
order you choose.
Fir ing Mi ssiles from
Fuel G auge
Shown during movement,
this empties as the route
grows longer.
All ied Ba se
Pass through these to
replenish your fuel.
the G reat Fox
Flight Path Phase
In this part of the turn, you draw flight paths for all shi ps in the field.
You can also view inf ormation on enemies and items on the map
(p. 22), or fire missiles from the Great Fox. Additio nally, you can display
the pause menu (p. 13) by pressing the START Button.
To fire a missile, touch the Great Fox and
then drag the missile onto an en emy.
Missiles are extremely powerful but limited
in number, so choose your targets wisely.
24 25
Page 14

Movement Phase
During this phase, all of your fighters
move simultaneously along their
respective flight paths. Enemies and
missiles also move during this phase.
Any items contacted during the
movement phase will become yours.
You can access the pause menu during the movement phase
by pressing START.
Engaging in Combat
The four types of enemies you can encounter are liste d below. If you
meet certain conditions while moving, you will engage these enemies in
battle. Once in the combat phase, fight one battle at a t ime until all
combat is complete.
Enemy Fighter
Enemy Missile
Enemy Bases
26 27
If one of these enemies crosses a ship’s flight path,
combat will occur. The number of (icon) shows the
number of enemies.
Combat will begin if a fighter and a missile come
into contact.
If a fighter passes over one of these, it will stop and
engage the enemy mothership protecting the base.
Combat Phase
If combat is initiated during the movement phase, t he top and Touch
Screens will switch. The Touch Sc reen will then display battle panels for
all of the upcoming battles.
Battle Pan els
The character engaging
in battle is displayed in
the upper right-hand
corner of the panel. The
number of cores needed
to win (p. 21) is in the
lower right-hand corner.
Beginning Combat
Touch a battle panel to begin that fi ght.
Once one battle is finished, touch
another panel to start that a new one.
Continue this pattern until all battles
are finished.
When panels are stacked on top of each other, you can select only the
front panel.
When two characters are displayed on a panel, you can choose which
character will fight.
Page 15

Single Player BattlesSingle Player BattlesSingle Player Battles
Duri ng the combat phase, sel ect bat tle pan els to move to
Duri ng the combat phase, (p. 27) select battle panels to move to
the co mbat screen and engage in battl e.
the co mbat screen (p. 27) and e ngage in battle.
Combat Rules
Before combat begins, the target enemy
will be displayed. Pilot your fighter
across the screen and destroy the target.
Once you collect the set number of
enemy cores (p. 21), the battle will be
finished.
Pursuit Combat and
Guide Beacons
The act of chasing down enemy motherships
and missiles is know as pursuit combat.
Follow the guide beacons to catch the
target, then follow the on- screen
instructions to destroy it. If you miss the
guide beacons, the enemy will escape or
you will be shot down!
Gui de Bea con
28 29
Completing Battle
Once the fighting is over, the comb at
results screen will display. You’ll receive
a time bonus based on the number of
enemies you shot down and then return
to the battle panel screen. (p. 27)
The remaining time is the time left for all
combat during the entire mission.
If you complete a battle with a perfect
score, the Great Fox will receive a
missile. (p. 25)
Penalties
If a fighter gets shot down or runs out of
time, that pilot will lose the battle in which
he or she is engaged, and the player’s ship
stock will be reduced by one ship.
Accordingly the remaining movement of the
fighter that was defeated in battle will be
cancelled, and the enemy that defeated the
fighter will continue along its original flight
path. If your fighter stock is zero and a
character falls, you will no longer be able to
use that character. If you run out of
characters, the mission will end in failure.
Gaining Turns
Liberate an allied city and you’ll get two turns (p. 22),
lengthening the number of turns you have to
complete the mission.
Page 16

Download PlayDownload PlayDownload Play
This m ode is for up to six players. For instructions on usin g the
This m ode is for up to six players. For instructions on usin g the
DS dow nload play, see
DS dow nload play, see p. 32.
Host System
In multiplayer mode, the player using the
system with the DS Game Card will be
the host and create the battle group. All
other players will join the host’s group.
Select Download Play to display the
screen shown to the right, then
select Recruit.
Guest System
In this mode you can download the game
from the host system and join a battle
group. Once the host system has selected
Cut Off, the download process will begin.
After this and ship set up are complete,
battle will commence.
Downloaded data will be lost when you
turn your DS off.
Download Play Rules
Fly against other pilots on the combat screen. If you s hoot down
another ship, a star will appear. The player with the most stars
at the end of the match is the winner. In addition, the following
items will be available during versus play.
Star
Entry
Wait for o pponents to appear on the
entry screen. Touch Cut Off to clos e the
group, and begin the downloading the
game. Complete the ship set up and
combat will begin automatically.
On your ship set up screen you can
choose between Short, Normal and Long
for your shield type. You can a lso choose
either Normal or Reve rse for your
control type.
30 31
Plasma
Twin
Stealth
Time Bomb
There is no pause menu in multiplayer games. If there is a tie, no one
will receive credit for a victory in their stats.
Pick this up to transform your laser into a plasma shot.
Snag this to equip a powerful twin laser.
Grab this to make yourself invisible to your opponents
radar for a short time.
Snatch this versus-only b omb and let the countdown to
destruction begin.
Page 17

Establishing the
Establishing the
Establishing the
DS Wireless Link
DS Wireless Link
DS Wireless Link
This s ection expla ins how t o estab lish a link for local
This s ection expla ins how t o estab lish a link for local
wire less play.
wire less play.
What You Will Need:
• Nintendo DS or Nintendo DS Lite systems – One per playe r
• Star Fox Command Game Cards - One - Two
You can enjoy download play with one DS Game Card. To exchange
friend codes, you will need 2 DS Game Cards.
Ste ps (When us ing a DS Game Card)
1. Make sure that the DS system is turned off, then insert a
Star Fox Command DS Game Card into the system.
2. Turn the game system on. The DS menu s creen will display.
3. Touch the Star Fox Command panel .
4. Follow the instructions on p. 30, 39.
Ste ps (When no t using a DS Game Card)
1. Turn the game system on. The DS menu s creen will display.
2. Touch the DS Download Play panel to display a list of
available games.
3. Select Star Fox Command. The download confirmation
screen will now display.
4. If you wish to continue, select Yes to begin downloading
the game from P1.
5. Follow the instructions on p. 31.
32 33
Download Confirmation Screen
Game List Screen
Important Wireless Communication Guidelines
• The DS Wireless icon indicates compatibility with DS Wireless
play. This icon appears on the DS menu screen, in-game menus, and
other places. Selecting any menu items that have this icon will turn on
the wireless communication system, so be aware of and comply with
rules and regulations regarding the use of wireless devices in locations
such as hospitals, airports, and
a ircraft, etc.
• During wireless game play, an
icon appears on-screen
showing the strength of the
wireless signal. The icon displays
four levels of signal strength. The
stronger the signal, the smoother
game play will be.
Number of bars
Signal Strength Weak S trong
The power light blinks when the wireless
function is working.
For optimum wireless communications, please f ollow these guidelines.
• Begin with the distance between systems at about 30 feet or less and move
closer or farther apart as desired, keeping the signal strength at two or
more bars for best results.
• The systems should face each other as directly as possible without having
people or other obstructions between them.
• Avoid interference from other devices. If communication seems to be
affected by other devices (wireless LAN, microwave ovens, cordless devices,
computers), move to another location or turn off the interfering devices.
(5) 30 fee t
(10 m) or le ss.
Page 18

Wi-Fi Battle Nintendo
Wi-Fi Battle Nintendo
Wi-Fi Battle Nintendo
Wi-Fi Connection
Wi-Fi Connection
Wi-Fi Connection
Nint endo Wi-Fi Co nnect ion all ows multiple Star Fox C omman d
Nint endo Wi-Fi Co nnect ion all ows multiple Star Fox C omman d
pilo ts to dogfight over the internet—even when separ ated by
pilo ts to dogfight over the internet—even when separ ated by
long d istances.
long d istances.
What i s Ninten do Wi-F i Connec tion?
Nintendo WFC is the first w orldwi de gamin g system from Nintendo that
allows gamers e verywh ere to pla y each other via the internet easily,
safely, and free of charge. Us ing acce ss point s in countries across the
globe or via wire less sys tems in th eir homes, gamers can easily play
multiplayer games, co operat e on adven tures, and heighten their
gaming experiences wi th other i nterna tional gamers.
Wi-Fi Battle Menu
Choose Wi-Fi Battle from the Mode
Select menu. When you do, the menu
below will display.
Rank
Star Fox Command ranks your pilot skill
from Z to A. The number to the right of
your rank represents your progress
through that rank. The higher you are, the
closer you are to advancing. The number
next to the shows the number of stars
you have collected. Wins, Drop Outs, and
Total stats are shown here as well.
Setting up Wi-Fi
To play Wi-Fi Battle, you must firs t
complete the Nintendo Wi-Fi set up. On
the Wi-Fi Battle menu, select Wi-Fi Set
Up and follow the instructions shown on
the screen shown to the right. For more
details and contact information, please
see the separate Nintendo Wi-Fi
Connection instruction booklet included
with this game.
34 35
Wi-Fi Battle
Friend Settings
Wi-Fi Settings
After you connect to Nintendo Wi-Fi Connection fo r the first time, it’s
important to continue using the same DS hardware an d Star Fox
Command DS Game Card. Once you connect to Nintendo WF C for the
first time, it treats the hardware and Game Card as a set . For more
information, please refer to the Nintendo Wi-Fi C onnection
instruction booklet.
Connect to Nintendo WFC to play versus matches. (p. 36)
Check your friend codes or register a friend code to your
friend roster here. (p. 38)
Select this option to adjust the settings used to connect to
Nintendo WFC.
Page 19

Wi-Fi Battle
Wi-Fi Battle
Wi-Fi Battle
Wi-Fi Modes
Wi-Fi Modes
Wi-Fi Modes
Wi-Fi Battle let yo u choos e the shi p you want to pilot. You can
Wi-Fi Battle let yo u choos e the shi p you want to pilot. You can
play a gainst up to three other players.
play a gainst up to three other players.
Choosing Wi-Fi Play
In Wi-Fi Mode, you can choose two
different versus modes: Battle Royale and
Free Battle. In Free Battle, you can
choose from four different games. Once
an opponent has been found, the entry
screen will display. When enough players
have been found, the game will begin.
Wi-Fi Connection Set Up
Choose Wi-Fi Play on the Wi-Fi Battle menu,
then confirm your selection by tapping OK to
initiate Nintendo WFC set up.
If you’re connecting to Nintendo WFC for the
first time, a Friend Code (p. 38) will
automatically be created for you.
Battle Royale—
Free Battle—
Choose Battle Royale to soar i nto combat against three other
fighters. Results will effect each player’s ranking. (p. 35)
Select Friend Battle to play against one to three people
registered on your friend ro ster. If you choose Ra ndom
Battle, you can select the number of players per game.
You can also select the number of players per game.
Choose from two players, three players,
and four players.
Wi-Fi Play Rules
Troubleshooting
If you can’t connect to Nintendo WFC, an error message and error
code will be displayed. For more information, please refer to the
Nintendo Wi-Fi Connection instruction booklet.
36 37
In this mode, you will compete three times
against the same competitor. Wi-Fi Play
rules are basically the same as those for
Download Play (p. 31). Shoot down other
fighters to make stars appear. The pilot who
gathers the most stars within the time of the
match wins.
Page 20

Wi-Fi Battle
Wi-Fi Battle
Wi-Fi Battle
Friend Code
Friend Code
Friend Code
If you a nd a frien d regist er each others' F riend Co des, you c an face each othe r
If you a nd a frien d regist er each others' F riend Co des, you c an face each othe r
in a Fri end Batt le while p laying the Free B attle po rtion of W i-Fi Pl ay mode.
in a Fri end Batt le while p laying the Free B attle po rtion of W i-Fi Pl ay mode.
Host SystemFriend Roster
Information on friends is displayed here. You can have up to 30
friends registered.
Sel ecte d Frie nd’s Ranki ng
Ent er a Friend Co de
1
When you see the screen shown to the right,
you can enter a Friend Co de. Once you
input all 12 digits, select OK.
Number Buttons
Touch numbers to
enter them. Select
to move
the cursor.
Confirm Code
Come here to view your own Friend Code.
Friend Roster
The information on your
friend is displayed.
Del ete
Select a name from the
roster and tap this to
delete that name from
the roster.
Input Code
Come here to enter other players' Friend Codes and register them on your
Friend Roster. Be sure to go to Confirm C ode and make note of your own
Friend Code.
38 39
Code Exchange
You can exchange Friend Codes via the DS Wire less system. (p. 32-33)
To exchange Friend Codes, first select Wi-Fi Battle fro m the main
1
menu, next choose Fri end Code on the Wi-Fi Battle menu, and then
Code Exchange on the Friend Code menu. From here the host system
will choose Code Center, and the gu est system will choose
Search Code
Once a search is successful, the host system’s nickname will
2
display on the guest system’s bottom screen. Select the host s ystem’s
nickname to exchange Friend Codes with that system. There can be
up to four host system nicknames displaying at the sa me time on the
guest system’s bottom screen, but the exchanging of Friend Codes
can only be done with one system at a time.
Page 21

Nintendo Wi-Fi ConnectionNintendo Wi-Fi ConnectionNintendo Wi-Fi ConnectionNintendo Wi-Fi ConnectionNintendo Wi-Fi ConnectionNintendo Wi-Fi Connection
The Ni ntendo Wi-F i Conne ction a llows multiple Star Fox
The Ni ntendo Wi-F i Conne ction a llows multiple Star Fox
The Ni ntendo Wi-F i Conne ction a llows multiple Star Fox
Comm and owners to play together over the internet—ev en
Comm and owners to play together over the internet—ev en
Comm and owners to play together over the internet—ev en
when s eparated by long distances.
when s eparated by long distances.
when s eparated by long distances.
Rumble PakRumble PakRumble Pak
This g ame is compatible with the Nintendo DS Rumble Pak (sold
This g ame is compatible with the Nintendo DS Rumble Pak (sold
sepa rately). The Rumble Pak incl udes built-in features tha t rumbl e
sepa rately). The Rumble Pak incl udes built-in features tha t rumbl e
whil e you play, providing rea listi c feedb ack. Please r ead the
whil e you play, providing rea listi c feedb ack. Please r ead the
foll owing before you play the game with Rumble Pak enabled.
foll owing before you play the game with Rumble Pak enabled.
TM
• To play Nintendo DS gam es over th e intern et, you must first set up the
Nintendo Wi-Fi Connection (Nin tendo WF C) on your N intend o DS system. Please
see the separate Ninten do Wi-Fi Connecti on instr uction b ooklet i ncluded with
this game for dir ection s on setti ng up your N intendo DS.
• To complete the Ninte ndo WFC se tup, you w ill also need access to a PC that
has a wireless network de vice ins talled ( such as a wi reless router) and an active
broadband or DS L intern et accou nt.
• If you do not have a wireless n etwork i nstall ed on your P C, you can order a
Nintendo Wi-Fi USB Connector (sold separ ately) d irectl y from Nintendo. See the
separate Nintendo WFC i nstruc tion boo klet for more information.
• Nintendo Wi-Fi Connection game play uses m ore batt ery powe r than other
game play. You may p refer to use the AC Ada pter to prevent running out o f
power when usin g the Nint endo WFC .
• You can also p lay Nintendo WFC compatib le games a t select ed inter net
hotspots without addi tional s etup.
• The Terms of Use Agreem ent whic h govern s Nintendo Wi-Fi co nnection game
play is available in the Ni ntendo W i-Fi Conn ection i nstruc tion booklet or online
at www.ni ntendo wifi.com/terms.
For addit ional inform ation on the Nin tendo WFC, set ting up your Nin tendo DS, or a list o f available in ternet
hot spot s, visit ninte ndowifi.co m (USA, Canad a, and Latin Amer ica)
or call 1- 800-895-16 72 (USA/Cana da only).
• Make sure the Nin tendo DS i s turned o ff.
• Insert the Rumb le Pak into Sl ot-2 on the f ront of th e Ninten do DS (the label
shou ld face toward the bottom) ju st like lo ading a Ga me Boy Advance Game Pak.
• Make sure to turn t he power o ff befor e removing the Rumble Pak.
Troubleshooting
• Nintendo DS Rum ble Pak is ma king a sou nd
- Whe n the Rumb le Featur e is on, the R umble Pak wi ll make sounds during game pl ay.
• Does not rumble
- Mak e sure the R umble Fea ture is tu rned on in t he game (select Options in th e
mai n menu).
- Make sure the edge connector of the Rumble Pak and the Nintendo DS system (Slot-2)
are not dirty.
• Does not stop rumbling
- Make sure the edge connector of the Rumble Pak and the Nintendo DS system (Slot-2)
are n ot dirty.
If the Rumble Pak still does no t work pro perly af ter following these troub leshoo ting
measures, ple ase call N intend o customer service.
40 41
Page 22

OptionsOptionsOptions
Sele ct Options on the Mode Select screen to display the
Sele ct Options on the Mode Select screen ( p. 38) to display the
foll owing Option menu selections.
foll owing Option menu selections.
Sound
This is where you can adjust the game’s sound setting s. Choose from
stereo, surround or headphone settings. You can also adjust the
character voice settings. Choose from User – play er-created voice,
Normal – the default voice, or Machine – no voice.
Control Type
This is where you can choose the control type used on the C ombat
screen. Available controller types are Type A – normal wi th rumble,
Type B – reverse with rumble, Type C – normal without rumble, Type D
– reverse without rumble.
Viewing the Keyboard Screen
Input letters from the keyboard by touching them. Press OK
when you’re finished with your selection.
Nic knam e
Keyb oard
Shi ft Button
Touch this to change
the keyboard.
Voice Record
You can use your own vo ice to create unique voice data for individual
characters in the game. Answer questions out loud w hen they appear
on screen, then press [ICON]. When you’ve answered all of the
questions, the data confirmation screen will be d isplayed. To make sure
the voice is OK , tap the charac ter for whom you want to use it and take
a listen. If everything’s all right, touch OK to fina lize the voice.
Nickname
Ready a eight-letter or less nickname for use in Wi-Fi Battle.
If you don’t input a nickname, your Nintendo DS game system
nickname will be used by default.
42 43
Clear Data
This is where you can clear game data. Select Voice Data to clear vo ice
data that you’ve recorded, or choose Single Data, which erases all
single player data, or choose Wi-Fi Results, which erases all
Wi-Fi results.
Once data has been erased, it’s gone forever! Be careful!
Page 23

Character IntrosCharacter IntrosCharacter IntrosCharacter IntrosCharacter IntrosCharacter Intros
For inf ormation on viewing individua l fighter specs,
see p. 23.
Fox
The hero of the game. He’s the leader
of the mercenary group, Star Fox. He
possesses a strong sense of justice,
and is brave. He can be too serious
at times.
Sky Claw
Lasers Single
Lock Multi
Bombs 1
Shields
Boost
Arwing II
Lasers Single
Lock Single
Bombs 2
Shields
Boost
Krystal
A former member of team
Star Fox. She’s strong and
kind, but can be overly
stubborn as well.
44 45
Cloud Runner
Lasers Twin
Lock Single
Bombs 1
Shields
Boost
Fox’s closest friend on the Star Fox
team. He’s a better mechanic than he
is a pilot, and he comes up with all
kinds of weapons for the team to use.
Bullfrog
Lasers Plasma
Lock None
Bombs 3
Shields
Boost
Falco
A brash and
headstrong pilot
who has issues
with authority
figures. His
undeniable flying
skills make him an
indispensable
member of the team.
Slippy
Page 24

Character IntrosCharacter IntrosCharacter IntrosCharacter IntrosCharacter IntrosCharacter Intros
For inf ormation on viewing individua l fighter specs,
see p. 23.
Dash
Mon key Arro w
Lasers Twin
Lock Single
Bombs 2
Shiel ds
Boost
Leon
Rai nbow De lta
Lasers N/A
Lock Wide
Bombs 2
Shiel ds
Boost
Panther
Bla ck Rose
Lasers Zapper
Lock N/A
Bombs 1
Shiel ds
Boost
Wolf
Red Fang
Lasers Twin
Lock Multi
Bombs 1
Shiel ds
Boost
Bill
Corn erian
Lasers Twin
Lock None
Bombs 3
Shiel ds
Boost
Tadp ole
Lasers Single Shields
Lock Multi Boost
Bombs 1
Katt
Cat ’s Paw MK. I I
Lasers Arc
Lock Single
Bombs 2
Shiel ds
Boost
Lucy
Sky Bu nny
Lasers Plasma
Lock Single
Bombs 1
Shiel ds
Boost
Amanda
Peppy
Arw ing
Lasers Twin
Lock Single
Bombs 2
Shiel ds
Boost
46 47
Page 25

Music Composition
CreditsCreditsCredits
Game Engine Lead
Producer
Takaya Imamura
Director
Dylan Cuthbert
Programming Lead
Ryuji Nishikawa
Art Lead
Paul Leonard
Technology Lead
James McLaren
Network and Schedule Direction
Takahiro Matsuya
Technical and Map Direction
Shouichi Tominaga
Strategy and Enemy Direction
Kazushi Maeta
Enemy Model Design
Yutaka Kurahashi
Stage Model Design
Paul Leonard
Character Model Design
Yutaka Kurahashi
48 49
Yasuhiro Miki
Strategy Map Design
Kazushi Maeta
Satoshi Ogino
Strategy Map Programming
Ryuji Nishikawa
Masahiro Yokota
Player and Camera Programming
Rhodri Broadbent
Yasuhiro Miki
Enemy Programming
Erik Slivken
Rhodri Broadbent
Game Sequence Programming
Masahiro Yokota
Kouichi Sato
Network Programming
Shinichiro Tanaka
Assistant Network Programming
Kouichi Sato
Hirokazu Eki
User Interface and 2D Design
Satoshi Ogino
Sound Effects and Programming in game
Masato Mizuta
Hajime Wakai
Tool Programming
Erik Slivken
Shinichiro Tanaka
Artwork
Ryo Koizumi
Yasuo Inoue
Assistant Map Director
Kazuya Shiogai
Assistant Art
Andy Palmer
Riho Ohtomo
Assistant Programming
Hirokazu Eki
Assistant Planning
Akito Takahashi
North American Localization Management
Jeff Miller
Leslie Swan
Bill Trinen
Nate Bihldorff
North American Localization
Duncan Flett
Alan Averill
Tim O'Leary
Developed By
Q-Games Ltd.
Technical Support
Hironobu Kakui
Yoshito Yasuda
Shintaro Jikumaru
Special Thanks
Koji Kondo
Yasuhiro Kawaguchi
Kenji Yamamoto
Tetsuya Nakata
Masato Kimura
Dale Thomas
Jerome Liard
Kenkichi Shimooka
Miyo Uno-Cuthbert
Isao Moro
Mel Ide
Mr. Pooh
NOA Product Testing Department
SUPER MARIO CLUB
Supervisor
Katsuya Eguchi
General Producer
Shigeru Miyamoto
Executive Producer
Satoru Iwata
Page 26

Important Legal Information
REV–D
Copying of any video game for any Nintendo system is illegal and is strictly prohibited by domestic
and international intellectual property laws. “Back-up” or “archival” copies are not authorized and
are not necessary to protect your software. Violators will be prosecuted.
This video game is not designed for use with any unauthorized copying device or any unlicensed
accessory. Use of any such device will invalidate your Nintendo product warranty. Nintendo (and/or
any Nintendo licensee or distributor) is not responsible for any damage or loss caused by the use of
any such device. If use of such device causes your game to stop operating, disconnect the device
carefully to avoid damage and resume normal game play.
If your game ceases to operate and you have no device attached to it, please contact Nintendo
Customer Service (see below).
The contents of this notice do not interfere with your statutory rights.
This booklet and other printed materials accompanying this game are protected by domestic and
international intellectual property laws.
For further information or assistance, please contact:
Nintendo Consumer Service
www.nintendo.com
or call 1-800-255-3700
(U.S. and Canada)
Warranty & Service Information
REV–P
You may need only simple instructions to correct a problem with your product. Try our website at www.nintendo.com or call our
Consumer Assistance Hotline at 1-800-255-3700, rather than going to your retailer. Hours of operation are 6 a.m. to 7 p.m., Pacific
Time, Monday - Sunday (times subject to change). If the problem cannot be solved with the troubleshooting information available online or over the
telephone, you will be offered express factory service through Nintendo. Please do not send any products to Nintendo without contacting
us first.
HARDWARE WARRANTY
Nintendo of America Inc. ("Nintendo") warrants to the original purchaser that the hardware product shall be free from defects in material and
workmanship for twelve (12) months from the date of purchase. If a defect covered by this warranty occurs during this warranty period, Nintendo
will repair or replace the defective hardware product or component, free of charge. The original purchaser is entitled to this warranty only if the date
of purchase is registered at point of sale or the consumer can demonstrate, to Nintendo's satisfaction, that the product was purchased within the last
12 months.
GAME & ACCESSORY WARRANTY
Nintendo warrants to the original purchaser that the product (games and accessories) shall be free from defects in material and workmanship for a
period of three (3) months from the date of purchase. If a defect covered by this warranty occurs during this three (3) month warranty period,
Nintendo will repair or replace the defective product, free of charge.
SERVICE AFTER EXPIRATION OF WARRANTY
Please try our website at www.nintendo.com or call the Consumer Assistance Hotline at 1-800-255-3700 for troubleshooting information and repair or
replacement options and pricing. In some instances, it may be necessary for you to ship the complete product, FREIGHT PREPAID AND INSURED FOR
LOSS OR DAMAGE, to Nintendo. Please do not send any products to Nintendo without contacting us first.
WARRANTY LIMITATIONS
THIS WARRANTY SHALL NOT APPLY IF THIS PRODUCT: (a) IS USED WITH PRODUCTS NOT SOLD OR LICENSED BY NINTENDO (INCLUDING, BUT NOT
LIMITED TO, NON-LICENSED GAME ENHANCEMENT AND COPIER DEVICES, ADAPTERS, AND POWER SUPPLIES); (b) IS USED FOR COMMERCIAL PURPOSES
(INCLUDING RENTAL); (c) IS MODIFIED OR TAMPERED WITH; (d) IS DAMAGED BY NEGLIGENCE, ACCIDENT, UNREASONABLE USE, OR BY OTHER CAUSES
UNRELATED TO DEFECTIVE MATERIALS OR WORKMANSHIP; OR (e) HAS HAD THE SERIAL NUMBER ALTERED, DEFACED OR REMOVED.
ANY APPLICABLE IMPLIED WARRANTIES, INCLUDING WARRANTIES OF MERCHANTABILITY AND FITNESS FOR A PARTICULAR PURPOSE, ARE
HEREBY LIMITED IN DURATION TO THE WARRANTY PERIODS DESCRIBED ABOVE (12 MONTHS OR 3 MONTHS, AS APPLICABLE). IN NO EVENT SHALL
NINTENDO BE LIABLE FOR CONSEQUENTIAL OR INCIDENTAL DAMAGES RESULTING FROM THE BREACH OF ANY IMPLIED OR EXPRESS WARRANTIES.
SOME STATES DO NOT ALLOW LIMITATIONS ON HOW LONG AN IMPLIED WARRANTY LASTS OR EXCLUSION OF CONSEQUENTIAL OR INCIDENTAL
DAMAGES, SO THE ABOVE LIMITATIONS MAY NOT APPLY TO YOU.
This warranty gives you specific legal rights. You may also have other rights which vary from state to state or province to province.
Nintendo's address is: Nintendo of America Inc., P.O. Box 957, Redmond, WA 98073-0957 U.S.A.
This warranty is only valid in the United States and Canada.
 Loading...