

Page 1

Page 2

SAFETY INFORMATION (left)
THE MAIN MENU 2
GAME SET-UP 2
Select Game Difficulty . . . . . . . . . . .2
Select HUD Color Scheme . . . . . . . .2
Select Portrait . . . . . . . . . . . . . . . . .3
Saving and Loading a Game . . . . . .3
CONTROLLER COMMAND
SCHEME 4
MOVING 4
Facing and Moving . . . . . . . . . . . . .4
Jumping and Falling . . . . . . . . . . . .5
Crouching . . . . . . . . . . . . . . . . . . . .5
Ladders . . . . . . . . . . . . . . . . . . . . . .5
Mantling . . . . . . . . . . . . . . . . . . . . .5
TARGETING AND FOCUS 6
USING AND
COLLECTING OBJECTS 6
Non-Inventory Items . . . . . . . . . . . .6
Throwing and Dropping . . . . . . . . .6
Multitools . . . . . . . . . . . . . . . . . . . .7
COMMUNICATING 7
Talking to People . . . . . . . . . . . . . . .7
Holo Projectors . . . . . . . . . . . . . . . .7
Datacubes . . . . . . . . . . . . . . . . . . . .8
Purchasing/Credits . . . . . . . . . . . . .8
COMBAT 8
Aiming . . . . . . . . . . . . . . . . . . . . . .8
Damage and Healing . . . . . . . . . . . .8
EMP Damage . . . . . . . . . . . . . . . . .9
Ammo . . . . . . . . . . . . . . . . . . . . . . .9
Alt Fire . . . . . . . . . . . . . . . . . . . . . . .9
Stealth . . . . . . . . . . . . . . . . . . . . . .10
Non-Lethal Options . . . . . . . . . . . .10
Weapon Modifications . . . . . . . . . .10
HUD 11
Health Meter . . . . . . . . . . . . . . . . .11
Compass . . . . . . . . . . . . . . . . . . . .11
Ammo Display . . . . . . . . . . . . . . . .11
Biomods . . . . . . . . . . . . . . . . . . . .12
Energy Meter . . . . . . . . . . . . . . . . .12
Toolbelt . . . . . . . . . . . . . . . . . . . . .12
TABLE OF CONTENTS
Hazard Icons . . . . . . . . . . . . . . . . .12
Biomod Upgrade Icon . . . . . . . . . .12
TARGETING INFORMATION 13
Target Brackets . . . . . . . . . . . . . . .13
Enemy Health Bar . . . . . . . . . . . . .13
Direction-of-Fire Indicator . . . . . . .14
Doors & Containers . . . . . . . . . . . .14
INVENTORY & DATA VAULT 15
Inventory . . . . . . . . . . . . . . . . . . . .15
Biomod Screen . . . . . . . . . . . . . . .16
Data Vault . . . . . . . . . . . . . . . . . . .16
BIOMODS 16
Black Market Mods . . . . . . . . . . . .17
Active and Passive Biomods . . . . . .17
Bio Energy . . . . . . . . . . . . . . . . . . .17
Biomod Screen . . . . . . . . . . . . . . .17
Installing and Upgrading . . . . . . . .18
Hot Switching . . . . . . . . . . . . . . . .18
BIOMOD LIST 18
WEAPONS & INVENTORY
EQUIPMENT LISTS 20
WEAPON MODS 24
THE OPTIONS MENU 25
Game Menu . . . . . . . . . . . . . . . . .25
Audio . . . . . . . . . . . . . . . . . . . . . .25
Video . . . . . . . . . . . . . . . . . . . . . . .25
Control . . . . . . . . . . . . . . . . . . . . .25
Credits . . . . . . . . . . . . . . . . . . . . . .25
TARSUS ACADEMIES: SECURITY
OPERATIONS RESIDENCY® 26
TARSUS SOR PROGRAM:
PERSONNEL PROFILES 27
Dr. Leila Nassif . . . . . . . . . . . . . . . .27
Billie Adams . . . . . . . . . . . . . . . . . .28
Leo Jankowski . . . . . . . . . . . . . . . .28
Klara Sparks . . . . . . . . . . . . . . . . . .29
DEUS EX: INVISIBLE WAR
TEAM 30
EIDOS INC. LIMITED
WARRANTY 32
1
Page 3

GETTING STARTED
GETTING STARTED
THE MAIN MENU
After Deus Ex: Invisible War loads you will see the main menu screen.
To pick one of the options on this screen, use the D-PAD to highlight
your selection and then press A to continue.
New Game. Begins a completely new game.
Save Game. Saves a game that is currently in progress. The Save
Game choice is only active if you visit the Main Menu screen from
gameplay.
Load Game. Resumes a previously saved game.
Options. Customizes your control, sound, graphic and other game
settings. See p. 25 for more information.
You can return to this menu any time during gameplay by pressing
the START button.
GAME SET-UP
When you begin a new game of Deus Ex: Invisible War, you must first
make a few choices.
Select Game Difficulty
This choice determines how deadly in-game combat will be. Difficulty
levels affect four things: ammo per clip, damage taken by enemies,
damage taken by Alex D (your character), and enemy accuracy. There
are four levels to choose from, in ascending order of difficulty:
Easy. Increased damage taken by enemies, decreased
•
enemy accuracy
• Normal. Base level
• Hard. Decreased damage taken by enemies, increased enemy
accuracy, decreased ammo received from ammo clips
Realistic. Increased damage taken by enemies, significantly
•
increased damage taken by Alex D, increased enemy accuracy,
decreased ammo received from ammo clips
You may change this setting at any time during the game, using the
Options Menu (see p. 25).
Select Portrait
Choose the image that will represent your character, Alex D, in the
game. This will determine both your appearance and your gender in the
game. There are three male and three female portraits to choose from.
When you have made your selections above, highlight the DONE box
and press A to start the game.
Saving and Loading a Game
As you play Deus Ex: Invisible War you will want to save your game fre-
quently. From the Main Menu you can save or load a game at any time.
Saving. From the Main Menu, select SAVE GAME and press A. A listing
of current saved games is displayed. You may create a new saved
game by selecting NEW SAVE and pressing A, or you may choose to
overwrite an existing saved game by selecting it and pressing A. If
you overwrite an existing saved game that game is lost permanently.
You may delete a saved game by highlighting it and pressing Y.
Once a saved game has been deleted it cannot be recovered.
Loading. To load a previously saved game, select LOAD GAME from the
Main Menu. Your saved games are listed with the most recent save at
the top of the screen. The map where the game was saved is the
default name of the saved game. The amount of time that the game
was played is also displayed with the map name. Use the D-PAD to
highlight the game you wish to load and press A. If you have a game
in progress when you choose to load a saved game, all progress in
your current game is lost.
Select Interface Color Scheme
You may select the color of your interface for maximum readability.
You may change this setting at any time during the game, using the
Options Menu (see p. 25).
2
3
Page 4
GAMEPLAY
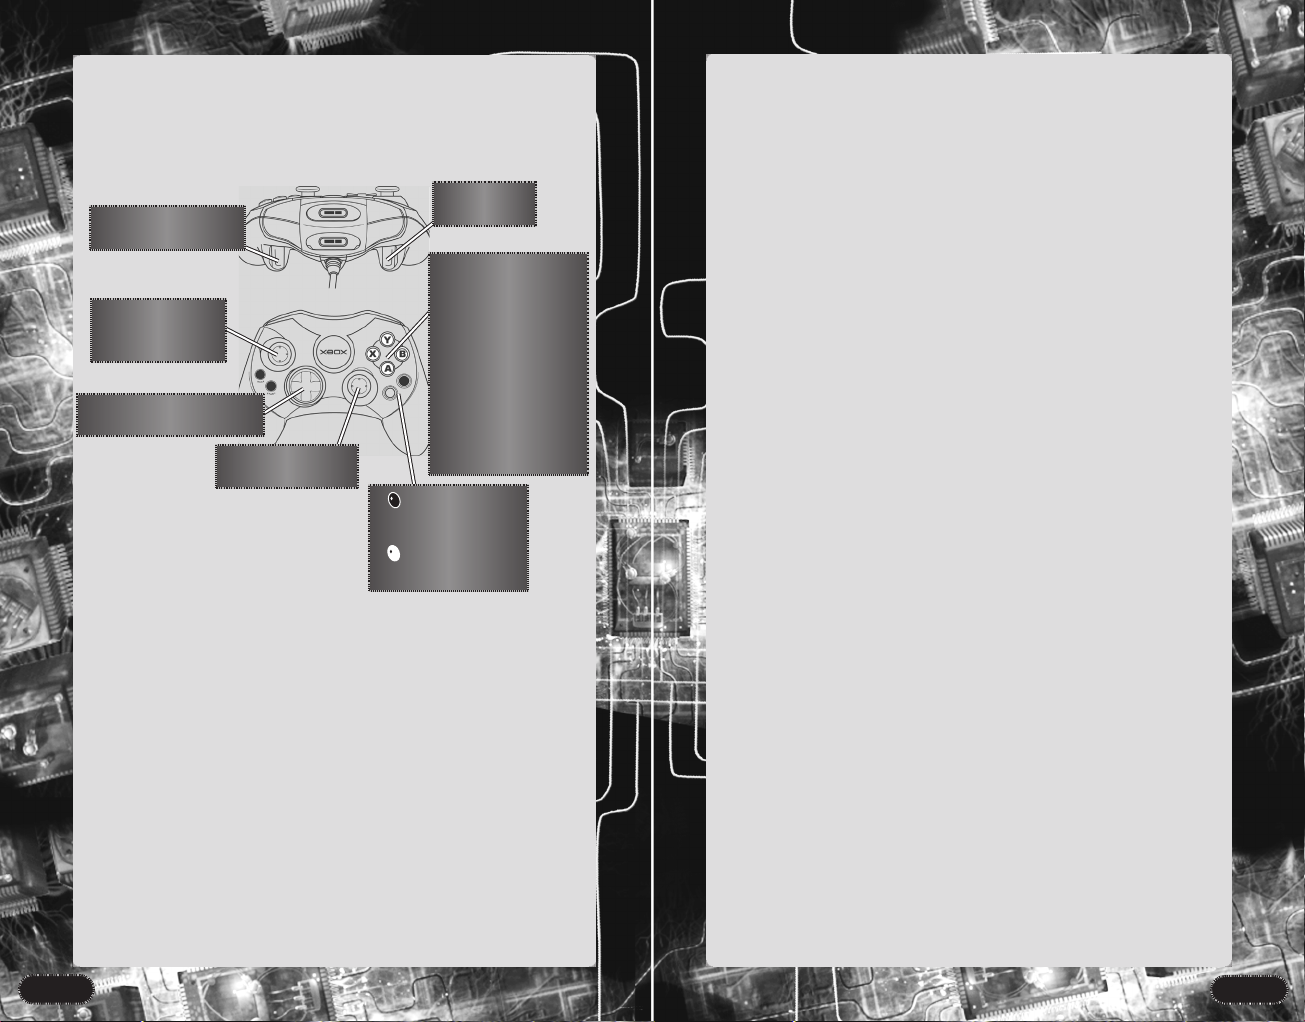
CONTROLLER COMMAND
SCHEME
The diagram below shows the default command scheme for
your controller.
L-TRIGGER
R-TRIGGER
Fire / Throw
LEFT THUMBSTICK
Move / Strafe
(Click to Crouch)
D-PAD
Cycle Inventory / Mods
RIGHT THUMBSTICK
Look / Turn
Biomod Screen
Data Vault Screen
There are several alternative configurations available. These can be
viewed and accessed by going to the Options Menu (see p. 25) and
selecting Control. From the Control Menu choose Controller Layout.
Alt-Fire
Y
Jump / Mantle
X
Inventory Screen
B
Toolbelt Switching
A
Use / Select / Speak
- BLACK BUTTON
- WHITE BUTTON
MOVING
In Deus Ex: Invisible War you move around and interact with the world
freely. This section will show you how to get to, through, past, around
or over whatever you find in the game.
Facing and Moving
The RIGHT THUMBSTICK controls the direction you are facing.
Move the
Move the
The direction you are facing determines your aiming point in combat
(p. 8) or for using objects (p. 6).
RIGHT THUMBSTICK 2 or 1 to turn.
RIGHT THUMBSTICK 3 to look up and 4 to look down.
GAMEPLAY
The LEFT THUMBSTICK controls your direction of movement.
Push 3 to move ahead.
Push 2 or 1 to strafe side-to-side.
Push 4 to back up.
Y Jumping and Falling
Press Y to jump. Jumping while standing still takes you straight up
and down — this can be useful for seeing over obstacles and grabbing
objects placed on high shelves.
To jump over or onto an obstacle, press Y while running.
The Speed Enhancement biomod can greatly increase your jumping
distance (see p. 19).
If you miss a jump from a high elevation — or simply step over a
precipice — you can take falling damage. Depending on the height from
which you fall, falling damage can be crippling or even fatal. The Speed
Enhancement biomod significantly decreases the damage from falling.
Crouching
Click LEFT THUMBSTICK to crouch. Crouching allows you to fit through
small openings and helps you take advantage of cover and concealment in stealth situations.
You can move while crouched. Moving while crouched is significantly
slower than normal movement, but you are much more silent and
harder to spot, making crouched movement the preferred method in
stealth situations.
Ladders
To climb a ladder, move toward it while looking in the direction you
wish to climb. You will automatically begin climbing when you reach
the ladder.
Mantling
You can “boost yourself up” onto objects too high to jump onto
directly. This is called “mantling.” Move next to the object you want
to climb onto, face it, and press and hold Y to mantle.
4
5
Page 5

GAMEPLAY
GAMEPLAY
TARGETING AND FOCUS
Your targeting/aiming cursor always appears at the center of the
screen. To interact with an object in the world, focus on the object by
approaching and centering your cursor on the object. The name of the
object will appear in your HUD along with brackets around the object.
When the object has focus — in other words, when you see its name and
brackets appear around it — you may interact with it by pressing A.
USING AND COLLECTING
OBJECTS
The game contains a variety of objects to pick up, use or otherwise
manipulate. Weapons, tools, food and other usable items that you can
carry with you are automatically added to your inventory when you
pick them up (provided you still have inventory slots available).
Managing your inventory is covered in detail beginning on p. 15, and
a complete list of usable objects can be found beginning on p. 20.
Non-Inventory Items
Many objects, ranging from basketballs to smaller furniture to dead
bodies, cannot be stored in your inventory, but can be picked up and
carried by hand. Focus on the item and press A to pick it up.
You can only have one object “in hand” at any given time, whether it
is an inventory or non-inventory item. If you are carrying a non-inventory object in hand, you have to drop it before you can ready, for
example, a weapon or multitool for use.
Some objects that are too heavy to lift — particularly large crates or
furniture — can be pushed. To push an object, position yourself with
the object in front of you, facing the direction you want to push, and
move forward.
R-TRIGGER Throwing Objects
You can throw most carried objects by pulling the R-TRIGGER.
The distance an object can be thrown is determined by its weight,
your strength, and where you are looking. If you want to throw for
distance, look ahead and slightly upwards. Thrown items can be used
to create a distraction.
Multitools
Multitools are self-configuring nano devices. In the hands of a skilled
operator (such as yourself) they can be used to modify or disable technological devices, and even to pick locks. The more difficult the task,
the more multitools are needed.
When you focus on a lock or object that can be disabled or modified
using multitools, your internal software will display how many multitools are required.
COMMUNICATING
Interacting with the people you meet as you progress through Deus
Ex: Invisible War is a vitally important part of the game.
Your internal software includes an IFF (Identification Friend or Foe) system that tells you whether a person is an enemy to be engaged in
combat or someone with whom you can speak peacefully. When you
are focused on a character, friendly characters are identified with
green brackets while hostiles have red brackets.
A Talking to People
To speak to characters, stand next to them until targeting brackets
appear, then press A to talk.
Sometimes you are given a choice of responses. You can cycle through
the various choices with the D-PAD, and press A to choose a response.
Your choice may affect how the character responds to you, and can
have significant repercussions over the course of the game. During a
conversation you may skip through the voice dialog by pressing A.
A Holo Projectors
Holo projectors are holographic communicators used to communicate
with characters in remote locations. They can both play recorded messages (“Vmail”) and transmit real-time conversations. To use a holo
projector, focus on it and press A. If there is
a message waiting for you, a mail icon is
shown on the projector. If someone wants
to speak to you, a holographic image of that
character is shown.
6
7
Page 6

GAMEPLAY
A Datacubes
Datacubes hold recorded data such as email, memos, pictures and graphics. To access the contents of a datacube,
focus on it and press A. Any data that’s important to your
mission will automatically be stored in your Data Vault (see p.
15).
Purchasing/Credits
As you progress through the game, you will from time to time find
Credits (the “virtual cash” of Deus Ex). Your credit total can be found
at the top of your Inventory Screen (X to access).
You can purchase weapons, ammo, information and other useful
items (including black-market biomods) with credits. If a character has
something he or she wishes to sell you, it will appear as an option
during conversation. You can choose to accept or decline the transaction just as you would choose any other conversation option — highlight your choice and press A to accept it.
COMBAT
In Deus Ex: Invisible War, combat is never the only way to accomplish
your goals. However, if you choose to resort to combat, you should
be aware of the resources at your disposal.
To engage a target, ready your weapon, face your enemy so that it’s
targeted and pull the R-TRIGGER to attack.
With hand-to-hand weapons, you must be standing within reach of
the target, of course.
Aiming
Taking time to aim at a distant target before firing increases your
chances of hitting. Some weapons, such as the sniper rifle and the
rocket launcher, take more time to aim.
Damage and Healing
When you hit an enemy in combat, the attack’s effectiveness depends
on its location — head shots are far more severe than body shots, but
the head is a harder target to hit.
Damage you sustain can be healed by eating or drinking, or by using
a medkit, a med-bot or the Regeneration biomod (see p. 19).
Food and drink heal only a very small amount of damage.
GAMEPLAY
Medkits can be carried with you. It may take several medkits to heal
severe wounds.
Med-bots can be found throughout the world. They provide much
greater healing power per use and they can be used multiple times.
The Regeneration biomod also provides quick and complete healing,
though using it requires bioenergy.
EMP Damage
EMP (Electromagnetic Pulse) weapons are designed for use against bots
and other mechanical targets. In general, EMP damage does not affect
organic targets (although some weapons are designed to both administer EMP damage and also affect organics through other means).
Thanks to your nano-systems, you are not entirely organic. If an EMP
weapon hits you, your bioenergy reserves will be drained severely.
Bots and other mechanical targets can be destroyed with either EMP
or physical damage.
Ammo
All weapons use the same ammunition: a nano-mass that is dynamically
configured by the weapon itself into ammunition of the appropriate type
— anything from a pistol shot to a guided rocket, or even incendiary fuel
for the flamethrower.
Heavier weapons use up more ammo per shot. You will get many more
pistol shots from a single magazine than you will rockets or grenades.
You can carry up to 10 magazines of ammo at any given time.
Your current ammunition is displayed on your HUD.
L-TRIGGER Alt Fire
Every ranged weapon in the game (plus all proximity mines) have an
“alt fire” mode, activated when you use the L-TRIGGER to fire. Alt-fire
effects range from targeting aids (the scope of the boltcaster and sniper
rifle), to completely different modes of attack (the SMG’s micro-grenade
launcher, or the flame thrower’s napalm caster). A list of the alt-fire
attacks can be found in the weapon descriptions that begin on p. 21.
While some alt-fire effects are passive and use no additional ammo at
all (e.g., scopes), other alt-fire attacks with high damage potential can
require significantly more ammo than a normal attack.
8
9
Page 7

GAMEPLAY
The rocket launcher’s alt-fire mode requires a bit of explanation: You
can fire the rocket launcher in guided fire mode. If you fire a missile
with guided fire, you will be shown a point of view from the nose of
the missile. You can then guide the missile to its target using the RIGHT
THUMBSTICK
to maneuver the projectile.
Stealth
Stealth can be an important tactical consideration. Depending on
your style of play, it can be as important as, or even more important
than, offensive prowess.
“Ninja” characters will find they can often use stealth to bypass combat entirely, while even the most aggressive “commando” fighters will
find that their survival odds are significantly increased if they use
stealth tactics to position themselves for the most effective assault.
To increase your chances of going unnoticed, move slowly or crouch,
and stick to dimly lit areas.
Avoid the line of sight of hostiles — it’s easier to sneak past an enemy
if his back is turned. It can be useful to distract the enemy with
thrown objects or other diversions (for example, a mine set to timed
detonation). However, this can also put the enemy on alert that something is amiss, so use this tactic cautiously.
Several biomods, such as Cloak and Move Silent, can dramatically
increase your stealth potential. See the list beginning on p. 18.
Non-Lethal Options
There are numerous non-lethal combat options available throughout
the game. Sometimes the best way to get through a combat situation
is simply to avoid it with stealth, but even if you choose to engage the
enemy, you can choose to do so with non-lethal means like the boltcaster, the stun prod or gas grenades. Remember, in Deus Ex: Invisible
War, deadly force is always a choice, not a requirement. Let your own
sense of ethics and morality (and fun!) be your guide.
GAMEPLAY
HUD
The HUD is a collection of readouts containing useful information
that is overlaid on your field of vision. The following information is
displayed on your HUD.
Health
Meter
Toolbelt
Ammo
Clip
Indicator
Compass
Pool
Health Meter
On the top left side of your HUD is your Health Meter. This curved red
bar displays your current health status. If the bar is full, your health is
fully charged. If the bar is empty your character is dead.
Compass
The Compass indicates the direction you are facing. Use the Compass
to help you find your way around. The Compass is at the top center of
your HUD.
Energy
Meter
Biomod
Display
Weapon Modifications
Ranged weapons can be customized with weapon modifications.
These devices enhance the performance of your weapon in various
ways. A list of available weapon mods can be found on p. 24.
Once you have acquired a weapon mod, open your Inventory Screen,
select the weapon on which you wish to install the mod and press
listing of available mods will be displayed. Select the mod to install and
A. Each weapon can have two weapon mods installed.
press
10
Y. A
Ammo Display
The Ammo Display in the lower left corner of your HUD shows the
amount of ammo you have. The Ammo Display has two main readouts.
The Ammo Pool shows how much of the current clip remains. When the
Ammo Pool is depleted, a new full clip refills the pool, if a clip is available.
The Clip Indicator shows how many clips of ammo you’re carrying, up
to a maximum of 10.
11
Page 8

GAMEPLAY
GAMEPLAY
Biomods
The Biomod Display, on the right
side of the screen, shows all your
biomod slots and the biomods
currently installed in each slot (if
any).
To activate a biomod, highlight it
on the HUD by pressing the D-PAD
1, and press A, or press the
button to display the Biomod
Screen. Some biomods are passive,
and work all the time, with no
need of activation.
Energy Meter
The Energy Meter shows the
amount of energy you currently
have available to power biomods
(see p. 17). It is a curved purple
bar next to the Biomod Display.
B Toolbelt
Your Toolbelt, on the left side of
the screen, consists of six slots
that can hold Inventory items
that are “at hand” — ready for
use at any time, without accessing your Inventory Screen. To use
a Toolbelt item, press B. This
will cycle through your toolbelt,
equipping each item in turn until
you get to the one you want.
Alternatively, use D-PAD 2 to
highlight the Toolbelt, then select
the item you want to use. Then
press A to take the item in hand.
See p. 15 for more on your
Toolbelt and Inventory.
Hazard Icons
BIOTOX
ELECTRICAL
EMP
FALLING
FIRE
HEALTH LEECH
RADIATION
Hazard icons appear in the center
of the screen when harmful environmental hazards are present.
Environmental hazards include
radiation, bio-toxins, heat and
electromagnetic fields.
Biomod Upgrade
Icon
The Biomod Upgrade icon
appears when an unused biomod
canister (including black-market
biomod canisters) is in your possession. Press the button to
access the Biomod install screen.
See page 18 for information on
installing biomods.
TARGETING INFORMATION
Your cursor does more than show your point of aim. Thanks to your
internal IFF system, it also shows you a great deal of useful information
about your environment.
Target Brackets
Targeting brackets
appear around
whatever you are
looking at. When
something is target-
Target
Brackets
Enemy Health Bar
Enemy
Health
Bar
ed you can aim a
weapon at it, pick it
up or use it. If a
friendly character is
targeted, pressing
A will initiate a
conversation.
If your IFF system
identifies a potentially hostile target,
it will display a bar
to the right of the
target showing the
target’s current
damage level. The
bar will shorten as
the target sustains
damage, allowing
you to see how
effective your
attacks are.
12
13
Page 9

GAMEPLAY
GAMEPLAY
Direction-of-Fire Indicator
If you are being hit by
enemy attacks, arrows
will flash in the center
of the screen showing
you the general direction that each hit
came from (front, rear,
Direction-of-Fire
Indicators
right or left).
Doors & Containers
Your internal sensors
provide valuable information about doors
and containers you
Lock
Strength
Door Strength
Many doors can be bashed or blown open. A red bar indicates the
door’s relative strength. No bar indicates the door is indestructible.
The indicator on the right displays the lock’s strength. Each lock icon
that is displayed represents the number of multitools that are needed
to pick the lock. A door can require up to three multitools to open.
When you focus on a locked door or container and press
automatically draw a multitool to pick the lock, if you have any multitools in inventory.
If no lock icons are displayed, that means the door or container is
unlocked and can be opened simply by pressing
may want to open.
When you focus on a
door or container, two
vertical indicators are
displayed.
The bar on the left displays the door or container’s structural
integrity (its strength).
A, you will
A to use it.
INVENTORY & DATA VAULT
Your internal data storage generates useful informational screens.
X Inventory
Use X to access your Inventory Screen.
You can carry up to 12 items in Inventory (or 14 with the Enhanced
Strength biomod). Each slot holds one item (or stack of identical
items), regardless of the item’s size.
Many items can be taken in hand, but not placed in Inventory. An
item that can go into your Inventory will automatically be placed there
when you press A to pick it up.
Consumable items (food, medkits, energy cells and so forth) can be
stacked in a single Inventory slot. If you have more than the allowable
maximum for a single stack, a new stack will be started in a second
Inventory slot (if one is available).
You can carry as many different identical weapons and non-stackable
items as you have space for.
From the Inventory Screen you can cycle among the items in your
possession using the
selected an item in the Inventory Screen, you have two options:
A Equip/Use. You will take the item in-hand, and hold it ready.
Items that are usable on yourself will be automatically used —
medkits, if you’ve taken damage, power cells if you need energy,
and so forth. To actually use other items, first exit the Inventory
Screen, then pull the
Y Drop. Drop the item where you stand. You can return and pick
it up again later, if you wish.
When an item is selected, moving the D-PAD to another Inventory or
Toolbelt slot will give you another option:
Swap. Swaps the selected Inventory item into the selected space.
This option allows you to move items between your Inventory and
Toolbelt or to adjust the position of items within your Inventory.
D-PAD. To select an item press A. Once you have
R-TRIGGER.
14
15
Page 10

EQUIPMENT
EQUIPMENT
Biomod Screen
Access the Biomod Screen with the button.
This screen displays detailed information about all biomods and dis-
plays your current biomod upgrade levels. You can access information
about both installed and uninstalled biomods from this screen. A
detailed guide to your biomods begins on p. 18.
Data Vault
Access your Data Vault with the button. The Data Vault stores the
Goals, Notes and Images that you receive while playing the game.
Cycle through the Goals, Notes and Images with D-PAD 2 and 1.
The Data Vault represents your internal “hard drive.” It can store
images and data files for access at any time. There are three sections
through which you can cycle.
The Goals Screen lists assigned mission goals waiting to be fulfilled.
The Notes Screen records important messages, keycodes and other
significant data. Completed goals also are displayed on your Notes
Screen.
The Images Screen records maps, diagrams and photographs that are
important to your mission.
Use D-PAD 3 and 4 to scroll through the various pages of each of
these screens.
BIOMODS
Biomods are modular nanotechnology implants that imbue you with
extraordinary abilities. They are your principal operational assets both
in and out of combat, as well as your main means of customizing
your character.
You have five assignable biomod slots corresponding with various
parts of your body. The light biomod is fixed in the sixth slot, and
cannot be upgraded or removed. Each additional slot can carry one
biomod at a time, and you must choose from three possible biomods
(two standard and one black market, see below) for each slot.
Standard biomod canisters can establish or upgrade any standard biomod in any slot, and black market canisters can establish or upgrade a
black market biomod in any slot.
Black Market Mods
Black market biomods use illegal nanotech to create powerful modifications. Black market biomod canisters work just like standard canisters. However, they can only be used to establish or upgrade black
market biomods. There is one and only one possible black market
biomod for each slot.
Standard biomod canisters cannot be used to upgrade black market
biomods.
Active and Passive Biomods
There are two types of biomods, active and passive.
Active biomods must be activated to use, and drain bio energy as long
as they are in use.
Passive biomods are always on. A passive biomod automatically acti-
vates when its effect is needed.
Active biomods can be activated from your HUD, or from the Biomod
Screen. In either case, highlight the biomod you wish to activate and
press A. To deactivate the biomod, highlight it and press A again.
Remember to deactivate active biomods when not in use, to save
bio energy.
Bio Energy
Bio energy is the electrical energy that powers your biomods. You
have internal bio energy “batteries” that must be recharged from an
external source when your reserves become low. Bio energy can be
recharged using repair bots or energy cells. Some biomods drain
your bio energy far faster than others. EMP attacks can also drain
your bio energy rapidly.
Biomod Screen
If you have an unused biomod canister in your possession you can
use it to establish or upgrade a biomod from your Biomod Screen.
The Biomod Screen is accessed with the button.
From the Biomod Screen, use D-PAD 3 and 4 to scroll through your
six biomod slots. As you highlight each slot, icons will appear in the
middle of the screen displaying the biomods that can be installed.
16
17
Page 11

EQUIPMENT
Y Installing and Upgrading
To install a new biomod, you must have an unused biomod canister
available (standard or black market, as appropriate).
Go to the Biomod Screen, highlight the slot where you wish to install
the new mod and press Y. Use D-PAD 2 and 1 to scroll through all
of the mods currently available for installation or upgrade in that slot
(two regular biomods if you have a normal biomod canister in
Inventory, one black market biomod if you have a black market canister, or all three mods if you have both). Select the mod that you wish
to install and press A.
Once you’ve installed a biomod in a slot, you can choose to use any
further biomod canisters you may find to upgrade that mod. Each
successive upgrade significantly increases the power of your mod. You
may upgrade a given mod up to three times.
Using a biomod canister to upgrade a mod is exactly like installing a
new mod, except that the mod you select has already been installed.
Hot Switching
If you install a biomod in a given slot, and later decide you would prefer a different mod there — for example, to replace a standard biomod with a black market biomod, or simply because you changed
your mind — you can use a new canister to make the switch at will.
However, the effects of the original mod, along with any upgrades
you have applied to that mod, are lost in the switch.
To switch biomods simply install the new biomod normally (select the
slot you wish to install on the Biomod Screen and press Y to display
Biomods, then use A to select the Biomod.) You will be prompted to
confirm your choice before the previous biomod is deleted.
BIOMOD LIST
BIOTOX ATTACK DRONE (active)
Arm
STRENGTH ENHANCEMENT
(passive)
Adds damage to
melee and thrown
attacks. Allows you
to lift heavier objects
and carry more items
in your inventory.
when you attack. The drone’s
dart attack is fairly quiet. Only
attacks organic targets.
Launches a drone
armed with a nonlethal biotox
weapon. Hovers
near you and attacks
BOT DOMINATION (active)
BLACK MARKET
Allows you to transfer your view/perceptions/control to a
nearby bot, camera
or turret.
Cranial
CLOAK (active)
Renders you invisible
to humans and animals. Not effective
against turrets, bots
or cameras.
HAZARD DRONE (active)
Protects you from
environmental hazards such as poison
and radiation.
NEURAL INTERFACE (passive)
BLACK MARKET
You can enter computer systems without a password.
Important email, key
phrases and codes
found in a computer system get
added to your Datavault as
Notes.
Eye
VISION ENHANCEMENT (active)
Improves your
vision. Provides low-
light enhancement
and increased tar-
geting accuracy.
EQUIPMENT
REGENERATION (active)
Rapidly restores lost
health.
Automatically deactivates when full
health is reached.
SPY DRONE (active)
BLACK MARKET
A remote camera
and EMP weapon.
This drone can be
piloted — you can
see through the
drone’s “eye” and maneuver it
normally. The drone can fly vertically, but it has a fairly low maximum flight altitude. It can fire an
EMP attack (which destroys the
drone) over a small radius.
Leg
SPEED ENHANCEMENT (active)
Increases speed and
jumping distance.
Decreases damage
from falls.
MOVE SILENT (passive)
Reduces the noise
made by walking,
running or jumping.
HEALTH LEECH DRONE (active)
BLACK MARKET
Allows you to heal
yourself when in
close proximity to a
corpse or uncon-
scious body, by
breaking down the body’s organic material nanotechnologically.
18
19
Page 12

EQUIPMENT
THERMAL MASKING (active)
Skeletal
AGGRESSIVE DEFENSE DRONE
(passive)
Forces incoming
missile projectiles to
detonate prematurely. Detonates hurled
enemy grenades
and projectiles.
ELECTROSTATIC DISCHARGE
(passive) BLACK MARKET
Renders you less visible to bots and
electronic devices,
including cameras
and turrets.
Enhances your handto-hand attacks with
EMP damage.
WEAPONS & INVENTORY
EQUIPMENT LISTS
BIOMOD CANISTER
STANDARD
Can be used to
install a new biomod
or to upgrade an existing biomod.
Standard canisters cannot install or
upgrade black-market biomods.
BIOMOD CANISTER
BLACK MARKET
Can be used to
install or upgrade
a black-market biomod.
BINOCULARS
A high-tech vision
device that enhances viewing distance and clarity.
FIRE EXTINGUISHER
A device to put out
small fires. It may also
be used creatively, for
example, to blind unprotected organic opponents. Each extinguisher is
effective for a limited duration,
after which it is drained and use-
less.
Resources
ENERGY CELL
These compact, single-use
batteries will restore some of
your lost bio energy. Energy cells
can be stacked in a single inventory slot.
MEDKIT
Restores a small
amount of lost health
when used. Medkits
can be stacked in a single inventory slot.
MULTITOOL
An all-purpose nanotech device that can be
used to bypass security devices
(like keypads, cameras and turrets)
and to pick locks. Some complex
tasks will require several multitools. Multitools can be stacked in
a single inventory slot.
Virtual Resources
CREDITS
The global “virtual currency.” Your current total is displayed in its own window at the
top center of the Inventory Screen.
SOFT KEY
A nano-code for a
specific lock. Your soft
key “ring” (a list of soft
keys currently stored by
your software) can be viewed in
your Datavault. Once a soft key is
in your possession, you can open
its associated lock at will. Since
they are data, soft keys take up
no physical inventory space.
Consumables
You can collect food and drink
resources of various types. Food
and drink (including water from
water fountains) can be
processed by your internal systems to heal a small amount of
physical damage. All consumables are consumed upon use.
CANDY BAR (MONTYBITES ! )
The candy of the future, tailored by nanotechnology
to maximize nutrition.
BEER/WINE
Mild alcoholic beverages.
Alcohol reacts with your nano-
systems to create a brief but
fairly intense period of disorientation before it is metabolized.
CIGARETTES
If you choose to smoke,
you will actually lose
health from the cigarette.
EQUIPMENT
Furthermore, a small cloud of
smoke follows you around, and
you are more likely to attract the
attention of thermal sensors.
SODA
A popular drink, often dispensed through vending
machines.
SOY FOOD
The food of the future, tailored by nanotechnology to
maximize nutrition.
BREAD, MEAT AND SO
FORTH
Old-fashioned
provisions.
Melee Weapons
The advantage of melee weapons
is that they do not (in general)
require ammo. The disadvantage
is that they have no ranged
attack.
COMBAT KNIFE
Damage Type
PHYSICAL
Heavy, military-style knife useful
for slashing.
CROWBAR
Damage Type
PHYSICAL
Standard warehouse implement,
which can be used as a cudgel.
ENERGY BLADE
Damage Type
ENERGY
This weapon is
the high end
of the melee weapon curve.
When “inactive,” it is a hilt and a
dark inert rod. When activated,
the rod glows with energy.
20
21
Page 13

EQUIPMENT
The energy blade has its own
internal power source, and does
not need ammo or power cells.
RIOT CONTROL BATON
Damage Type
PHYSICAL
A police
baton. Use as a cudgel.
STUN PROD
Damage Type
ELECTRICAL
Administers an electrical stun
attack. The stun prod uses ammo
as an energy source.
Thrown Weapons
GRENADES
Grenades are fused, hurled explosives. When thrown normally,
grenades explode after a short
time. (It’s possible to bounce a
grenade off a wall to throw it
around a corner.) When thrown
using alt-fire mode the grenade will
explode immediately on contact.
Concussion Grenade
Damage Type
EXPLOSIVE
A basic anti-personnel
explosive. Very noisy.
EMP Grenade
Damage Type
EMP
Attacks the control systems of
robotic units. Temporarily disrupts electronic devices like cameras, and temporarily reduces
energy weapons to half effect.
Gas Grenade
Damage Type
BIOTOX
Emits a cloud of incapacitating gas. Relatively quiet.
Scrambler Grenade
Damage Type
NONE
Emits a viral electronic transmission that temporarily causes bots
to regard their allies as hostiles
and their enemies as neutrals —
basically, the bot goes over to
your side for a time. Does no
physical damage.
FLASH BOMB
Damage Type
STUN
Emits a brilliant flash followed by a temporary illuminating flare effect. Blinds organic
units. Can cause bots with thermal targeting systems to lose target lock.
SPIDERBOMB
Damage Type
EMP/STUN
This “bomb” deploys a spiderbot
that will attack any nearby enemies with an
EMP/stun blast.
PHOSPHORUS FLARE
Damage Type
NONE
Radiates bright light. Can cause
bots with thermal targeting systems to lose target
lock. Does no physical damage.
NOISEMAKER
Damage Type
NONE
When thrown, it emits
noise, which can be used to provide a distraction.
Pistol Weapons
BALLISTIC PISTOL
Damage Type
BALLISTIC
Alternate Fire
FLASHLIGHT
The basic hand-held slug-thrower.
BOLTCASTER
Damage Type
BIOTOX
Alternate Fire
SMART SCOPE
Rather than a traditional tensionbased crossbow, the boltcaster
accelerates a bolt electromagnetically. The bolt injects a toxin that
inflicts non-lethal poison damage
over time.
Two-Handed
Ranged Weapons
SHOTGUN
Damage
Type
BALLISTIC
Alternate Fire
SMOKE
CANISTER LAUNCHER
Fires an anti-personnel blast.
SMG
Damage Type
BALLISTIC
Alternate
Fire
FLASHBANG
GRENADE LAUNCHER
A compact, fully automatic
weapon.
NOTE: Extended auto-fire causes
the shot grouping to spray.
EQUIPMENT
SNIPER RIFLE
Damage
Type
BALLISTIC
Alternate
Fire
SMART SCOPE
A powerful, extremely accurate
distance weapon with a slow
refire rate.
RAIL GUN
Damage
Type
BALLISTIC
& ENERGY
Alternate Fire
FIRES THROUGH WALLS
The rail gun produces a powerful
energy beam. In alt-fire mode, it
can be fired through walls and
other solid objects, striking the
target without damaging the
intervening objects.
Heavy Weapons
NOTE: Heavy weapons do not
inflict extra damage for head
shots.
FLAME THROWER
Damage Type
FIRE
Alternate Fire
NAPALM
GLOBE
Spews liquid fire that sticks to a surface and burns brightly for awhile.
22
23
Page 14

EQUIPMENT
OPTIONS
ROCKET LAUNCHER
Damage
Type
EXPLOSIVE
Alternate Fire
GUIDED FIRE
(see p. 10)
Fires a self-propelled tracking
rocket.
NOTE: The rocket launcher must have
time to lock on to a target before firing, or it will not guide itself in.
Mines
Mines must be
attached to a flat surface to be activated.
In the default proximi-
ty mode they will detonate if an enemy passes nearby
(you cannot set off your own
proximity mines, even if you
leave the area and return). Using
alt-fire mode sets a 15-second
timer, at the end of which the
mine will detonate. Mines can be
attached to walls, floors and ceilings. You can recover your own
undetonated proximity mines if
they are no longer needed.
CONCUSSION PROXIMITY MINE
Damage Type: EXPLOSIVE
Explodes when an enemy
approaches.
EMP PROXIMITY MINE
Damage Type: EMP
Temporarily disrupts electronic
devices like bots and cameras.
Temporarily causes energy
weapons to work at half effect.
BIOTOX GAS PROXIMITY MINE
Damage Type: BIOTOX
Emits a cloud of paralyzing gas.
WEAPON
MODS
A variety of weapon
mods can be installed
on the ballistic pistol,
boltcaster, shotgun,
SMG, sniper rifle and
rail gun. The following is a summary of the weapons mods that
can be found scattered throughout the game. Be aware, though,
that not all weapon mods can be
installed on all weapons.
AMMO SCAVENGER
The weapon uses less ammo.
EMP CONVERTER
Adds EMP damage (effective
against bots and electronic targets) to shots.
FRAGMENTARY ROUND
Creates a small-radius explosion
on impact that inflicts extra damage.
GLASS DESTABILIZER
Dissolves glass without setting off
alarms. Note that the glass destabilizer does not affect non-breakable glass.
INCREASED DAMAGE
Adds more damage per shot.
INCREASED RANGE
Increases shot range.
REFIRE RATE
Weapon fires faster.
SILENCER
Weapon sound is dampened.
THE OPTIONS MENU
The Options Menu can be used to configure the game to your taste. It
is accessed from the Main Menu. Select Options with the D-PAD and
press A. The Options Menu has five sub-menus.
GAME MENU
Difficulty. You can change the
game difficulty during play, if you
need help getting past a tough
challenge (or if you need a
tougher challenge). Options are
Easy, Normal, Hard and Realistic.
Interface Opacity. Controls how
transparent your HUD is. A more
opaque HUD might be easier to
read, but may interfere with your
view of surroundings. Choose a
setting between 1 and 100, with
100 being the most opaque.
Minimal Interface. The dynamic HUD will constantly change in
response to your circumstances.
This setting defaults to On.
Interface Color. Allows you to
select the color of your HUD for
maximum readability.
Enable Auto Aim. Auto Aim
allows for easier targeting and
aiming.
Help Text. Toggles help text.
Defaults to On. Help text appears
when you focus on an item.
AUDIO
All volume controls can be set
from 1 (softest) to 100 (loudest).
Speech Volume. Sets the loudness of speech.
Music Volume. Sets the level of
background music.
Sound FX Volume. Sets the level
of ambient sound effects.
Subtitles. Controls whether dialog
will appear as both speech and text,
or as speech only. Defaults to On.
VIDEO
Gamma / Brightness /
Contrast. The three video set-
tings control the brightness, contrast and definition (gamma) of the
image. They can be adjusted to
maximize the clarity of the game
on your system.
CONTROL
Vibration. Toggles vibration effect
on your XBox controller.
Sensitivity. Controls THUMBSTICK
sensitivity, from 1 (least sensitive) to
100 (most sensitive).
Lookspring. Toggles lookspring On
or Off. When On, your point of aim
will automatically return to “front
and center” after you’ve looked up
or down.
Invert Look. Toggles invert look
On or Off. By default, you look up
when the
and down when it’s moved
toggle allows you to reverse that, if
the reversed directions seem more
natural to you.
Controller Layout. There are several
schemes, or command sets, for your
Xbox controller. The scheme shown
on p. 4 is the default. This option
allows you to view the other schemes
and select the one you prefer.
THUMBSTICK is moved 3,
4. This
CREDITS
Displays game credits.
24
25
Page 15

INVITATION TO ACTION
TARSUS ACADEMIES:
SECURITY OPERATIONS
RESIDENCY®
A personal
invitation to
AlexD, from
Tarsus
Academies
Greetings, Alex. As one of the most outstanding graduates of the
Tarsus Academies’ primary and secondary school systems, you have
been selected to receive a full scholarship to our Security Operations
Residency program.
The Tarsus Security Operations Residency is an intensive three-year
program of training in leadership, technology, special operations,
counterespionage and creative problem solving. As a Tarsus SOR resident you will receive training and instruction from field-grade military
officers and strategists, international prize-winning scientists, and preeminent experts in all fields. We wish we could tell you just a few of
the SOR guest faculty members, but for reasons of personal and corporate security, the list must remain confidential until you confirm
your enrollment.
Fewer than a dozen Tarsus graduates worldwide have been invited to
participate in our inaugural residency. You, Alex, are one of them. As
an SOR resident you will be housed comfortably in your own apartment in our New Chicago training facility located in the elite WTO
enclave. Tuition, instructional materials (including your own unrestricted data hub access and holoterminal), comprehensive medical, room
and board are all fully paid by Tarsus Academies. In addition, you will
receive a generous monthly living stipend. Finally, you will receive free
medical screening and pre-operative prep for the very latest in field
op biomodification. Residents who successfully complete the initial
phase of training will receive a full suite of biomodifications and
extensive training in their use.
Tarsus is willing to go to all this expense because we want to take the
Tarsus Comprehensive Educational Doctrine® to its logical conclusion.
Our trainees have already been guaranteed premium assignments at
IMPORTANT DOSSIERS
top corporations, because they are the very best going in, and will be
even better coming out. We trust that you, Alex, will be among them.
Please discuss this opportunity with your loved ones and reply with
your acceptance within 30 days to: TARSUS.SOR.INVITE. In
the meantime, your further questions are welcome,
but confidentiality restrictions may apply until
acceptance is confirmed.
TARSUS
CONFIDENTIAL
SOR PROGRAM:
PERSONNEL
PROFILES
Dr. Leila Nassif
Position: Coordinator, Seattle Advanced Training
Facility
Status: Active
Born in poverty in Cairo, at age 6 Leila Nassif
was accepted into a local Tarsus Elementary program on a need-based scholarship. She thrived
under the Tarsus program, and over the next 22
years completed an education that culminated
in an MS degree in Administrative Science and a
medical degree from Seville Medical Center,
with certifications in biomodification and psychology. After four years as assistant administrator of the Quito Reconstructive Therapy Center,
she was offered her current position.
Despite her youth, Dr. Nassif has shown herself to be fully qualified for
her position. Energetic, personable and highly empathic, Dr. Nassif has
earned the loyalty and affection of her students. Having herself benefited extensively from Tarsus-backed scholarship programs, she can closely identify with the experiences of her residents. Her deep and abiding
loyalty to the underlying principles of Tarsus ensure that she will carry
out her mission in the SOR with objectivity and efficiency.
26
27
Page 16

IMPORTANT DOSSIERS
Billie Adams
Position: SOR Resident, Stage 2, New Chicago Facility
Status: Active
In many ways, Billie Adams is both the most
and the least successful of the Stage 2 SOR
residents. On the one hand, she has
absorbed her Stage 1 academic and physical
training with an efficiency, and to a degree,
that demonstrates her suitability for Stage 2.
However, her behavioral adaptability is far
less encouraging.
Adams grew up in post-Collapse Old
Chicago, and her early experiences on the
streets left her cynical and hardened, with a
particular mistrust for institutional authority.
Her impulses have frequently led her into
conflict, bordering on insubordination, with
her instructors. However, she has been retained in the SOR program
due to her high competency, as well as her
SECURITY CLASSIFICATION
Billie has shown an interest in subversive thought and organizations
that must be carefully monitored. She has formed a quasi-familial
affection for fellow Stage 2 resident AlexD, which can perhaps be
used to moderate her more volatile traits.
.
REFERENCE OMITTED AT YOUR
Leo Jankowski
Position: SOR Resident, Stage 2, Seattle Facility
Status: Active
A top performer, Leo Jankowski has consistently shown an extremely high level of assertiveness, as well as remarkable loyalty and an
unusual degree of suggestibility. These traits
combined suggest that he is uniquely qualified
for a future in military field operations. His
physical prowess is exceptional, while his academic achievement can best be described as
adequate. His highest academic achievements
have all related to biomodification science,
probably due to his great eagerness to complete the biomodification process.
IMPORTANT DOSSIERS
Leo’s aggressive impulses must be moderated, as they tend to manifest themselves as overconfidence to the point of arrogance. Because
of his ability to physically exceed fellow Stage 2 trainee Klara Sparks,
he has convinced himself that he is the “star pupil” of the SOR program. It is hoped that exposure to fellow trainees Billie and AlexD will
help Leo attain a more realistic appraisal of his own capabilities.
Because of his interest in military specialization, Leo has been allowed to
participate in a limited number of low-level security operations. In the
field, he has so far conducted himself in a disciplined and efficient fashion.
Klara Sparks
Position: SOR Resident, Stage 2, Seattle Facility
Status: Active
Klara Sparks, sailing through her studies with
alacrity, has also demonstrated a degree of
empathy far surpassing any of her Stage 2
counterparts. She shows great potential for a
career in negotiation or conflict resolution.
Klara is charismatic, with a genuine affection
for both her fellow residents and her instructors. She is an excellent motivator of others.
Her loyalty to the Tarsus program and her
commitment to its ideals are absolute.
Klara’s main drawback as a trainee is a tendency to subordinate her own progress to that of
others. In fact, her close friendship with fellow resident Leo Jankowski
has evolved into an almost co-dependent relationship, with Leo dominating Klara’s achievements in order to validate his own imagined
superiority, and Klara holding back from her full potential in order not
to threaten Leo. It is hoped that reintegrating Leo and Klara with the
New Chicago Stage 2 trainees will break this cycle, and allow both to
progress more according to their respective potentials.
28
29
Page 17

CREDITS
DEUS EX: INVISIBLE WAR TEAM
Ion Storm Austin
Studio Director Warren Spector
Project Director Harvey Smith
Executive Producer Denise Fulton
Producer Bill Money
Associate Producer Tara Thomas
Lead Programmer Chris Carollo
Programmers Matt Baer, Alex Duran, David Kalina, Jeremy Mappus, Art
Min, David Reese, Kain Shin
Additional Programming Jon Blow, Alex Chrisman,
James Clarendon, Ian Dunlop, Gabe Farris, John Harries, Elan Ruskin, Paul
Tozour
Director of Technology Tim Little
Lead Technology Programmer John Talley
Technology Group Ted Jump, Donavon Keithley, Tim Perry,
Mike Privett, Brian Sharp, Pete Shelus, Wendy White, David Whitney
Lead Designer Ricardo Bare
Senior Designers Monte Martinez, Steve Powers
Designer/Game Data Management Kent Hudson
Designers Brian Glines, Clay Hoffman
Additional Design Nate Blaisdell, Jeremy Graves, David Riegel
Art Direction Whitney Ayres, Sergio Rosas
Artists Gregory Callahan, Jared Carr, Chris Cobb, Mike Dean,
Paul Effinger, Steve Hartman, Raby Hampton, Rob Kovach, Jay Lee, Jim
Magill, Terry Manderfeld, Joey Santori, Brady Townsend,
Michael Washburn, Sam Yeates
Additonal Art Stefan Henry-Biskup, Clay Hoffman, Den Johnson, Frank
Teran, Mark Vearrier
Lead Writer Sheldon Pacotti
Writing Sarah Paetsch
Intro Cinematics Saab and Miller Productions
Endgame Cinematics vTorque
Audio Director Alexander Brandon
Audio Mark Lampert, Todd Simmons
Session Musicians Joey Santori, Shane O’Madden, Ian Davidson
CREDITS
NG Resonance Performed by kidneythieves (www.kidneythieves.com)
Quality Assurance Manager Kay Gilmore
Quality Assurance Lead Dane Caruthers
Senior Tester Jon Savinelli
Quality Assurance Team John Alme, Elizabeth Becker, Jacob Beucler,
Thomas Bonner, Mark Capers, Andre Garcia, Tim Johnson, Devin Krieg,
Patrick Moran, Nathan Regener, David Saleh, Tyler Sargent, Dwight
Spaulding, Josh Stoke, Justin Wingard, Brad Woolwine, Matt Wydra
Ion Storm Support Staff Mark Fletcher, Stan Herndon, Ethan
McDonald, Kim Wale, Chad Warren, Pam Wolford, Chuque Berry
Documentation Incan Monkey God Studios
(Chris McCubbin, writer; Raini Madden, designer;
David Ladyman, editor)
Special Thanks The Thief 3 Team, Doug Church, Lulu Lamer, Greg
Richardson, Jim Black, NVidia, Ken Demarest, Peter Marquardt, Jake Hughes,
Crystal Dynamics, Tracy Roswell Casting, Kyle Anderson, Microsoft ATG Team,
Dave Watkins, Nghia Lam, Stephen Orsak, Bionatics, Danetracks, Despot and
PlanetDeusEx, Our fans and supporters
And More Special Thanks to Unreal™ Technology Development, Tim
Sweeney and the rest of the Unreal™ team at Epic Games, Inc.
Deus Ex: Invisible War uses Bink Video. ©1997-2003 by RAD Game Tools, Inc.
Havok.com™, ©1999-2003 Telekinesys Research Limited
EIDOS INC. US
President Rob Dyer
VP of Marketing Paul Baldwin
Director of Marketing Chip Blundell
Product Manager Matt Gorman
Director of Product Operations Kathy Schoback
Quality Assurance Manager Michael R. Kelly
Asst. Quality Assurance Manager Colby McCracken
Product Test Coordinator Erik Kennedy
Asst. Product Test Coordinator Stephen Cavoretto
Product Submissions Manager Brian King
Customer Support Supervisor Scott Holbert
PR Manager Michelle Seebach Curran
PR Specialist Kjell Vistad
Channel Marketing Director Kim Pendleton
Website Yasuto Suga
30
31
Page 18

CREDITS
QA Test Team Ian Stasukevich, Darren Krommenhock, Jason Stevenson,
Kip Ernst, Nicole Ferrara, Mike Gonos, Patrick Goodspeed, Kari Hattner,
Julian Mehlfeld, Ralph Ortiz, Jordan Romaidis, Anthony Yuson, Daniel
Franklin, Matthew Kagle.
Special Thanks Kevin Weston, Christian Chatterjee, Jamie Bartolomei,
Paula Cook, Dan Johnson, Sharon Gamble, Michael Minson, Greg Wu,
Mike Orenich, Shelley Porter, Adam Braswell, Denny Chiu, Malachi Boyle,
Janty Sumimoto, Wyman Jung, Julie Leibowitz, Sam Tehrani, Rob
Fitzpatrick and Greg Richardson.
EIDOS INC. UK
President Mike McGarvey
Producer Patrick Cowan
Executive Producer Martin Alltimes
Development Director David Rose
Office Manager Louise Fisher
Group Localization Manager Flavia Timiani
Localization Manager Caroline Simon
Brand Manager Kathryn Clements
Mastering/Compatibility Jason Walker
QA Director Chris Rowley
Assistant QA Manager John Ree
Test Coordinator Lawrence Day
Assistant Test Coordinator Andrew Standen
QA Technicians Richard Acherki, Andrew Nicholas, Will Ormerod,
Tyrone O’Neil, Gabriel Allen, Mike Owusu, Paul Mulcare, Steve Addis
INFORMATION
EIDOS INC.
LIMITED WARRANTY
EIDOS INC. warrants to the original purchaser that this EIDOS INC. disc is
free from defects in materials and workmanship for a period of ninety (90)
days from the date of purchase. This EIDOS INC. disc is sold “as is” without
expressed or implied warranty of any kind, and EIDOS INC. is not liable for
any losses or damages of any kind resulting from the use of this program.
EIDOS INC. agrees for a period of ninety (90) days to either repair or
replace, at its option, free of charge, any EIDOS INC. disc, postage paid,
with proof of date of purchase at its Factory Service Center.
This limited warranty is not applicable to normal wear and tear. This limited
warranty shall not be applicable and shall be void if the defect in the EIDOS
32
33
 Loading...