

Page 1

1
1
INTERACTIVE
PRESENTS:
Senior Programmer - Alex Metallis
Graphic Artist -James Hartshorn
Assistant Programmer - Clive Francis
Assistant Programmer - Jon Medhurst
Manual - Martin Calpin
Producer - Tony Casson
Sim Furniss and Mick Sheehan
Additional Levels by Gremlin Graphics
Music and Sound Effects - Neil Biggin
Quality Assurance - Tony Howe, Lee Campbell, Rob Millington,
Page 2

2
considered suitable viewing by the age range(s) indicated.
This product is exempt from classification under U.K. Law. In
accordance with The Video Standards Council Code of Practice it is
Install Instructions Desert Strike and Jungle Strike Combined CD
Turn your computer on and insert your CD-Rom into your CD-Rom Drive.
To install the game(s) first change drives to your CD-Rom Drive (e.g. D:, E:).
Then to install Desert Strike Type Desinst at the prompt and press the return key.
To install Jungle Strike Type Junginst at the prompt and press the return key.
Follow all the on screen instructions.
To play either of the games move to the directory in which the game you wish to play is installed and type
Remember you need to have the CD-Rom in the CD-Rom drive to play either game.
either Desert or Jungle (depending on which game you wish to play) at the prompt and press return.
WE DO NOT RECOMMEND THAT YOU PLAY THIS GAME UNDER WINDOWS 95, RESTART YOUR MACHINE IN DOS
MODE AND INSTALL AND PLAY THE GAME FROM DOS
Page 3
3
3
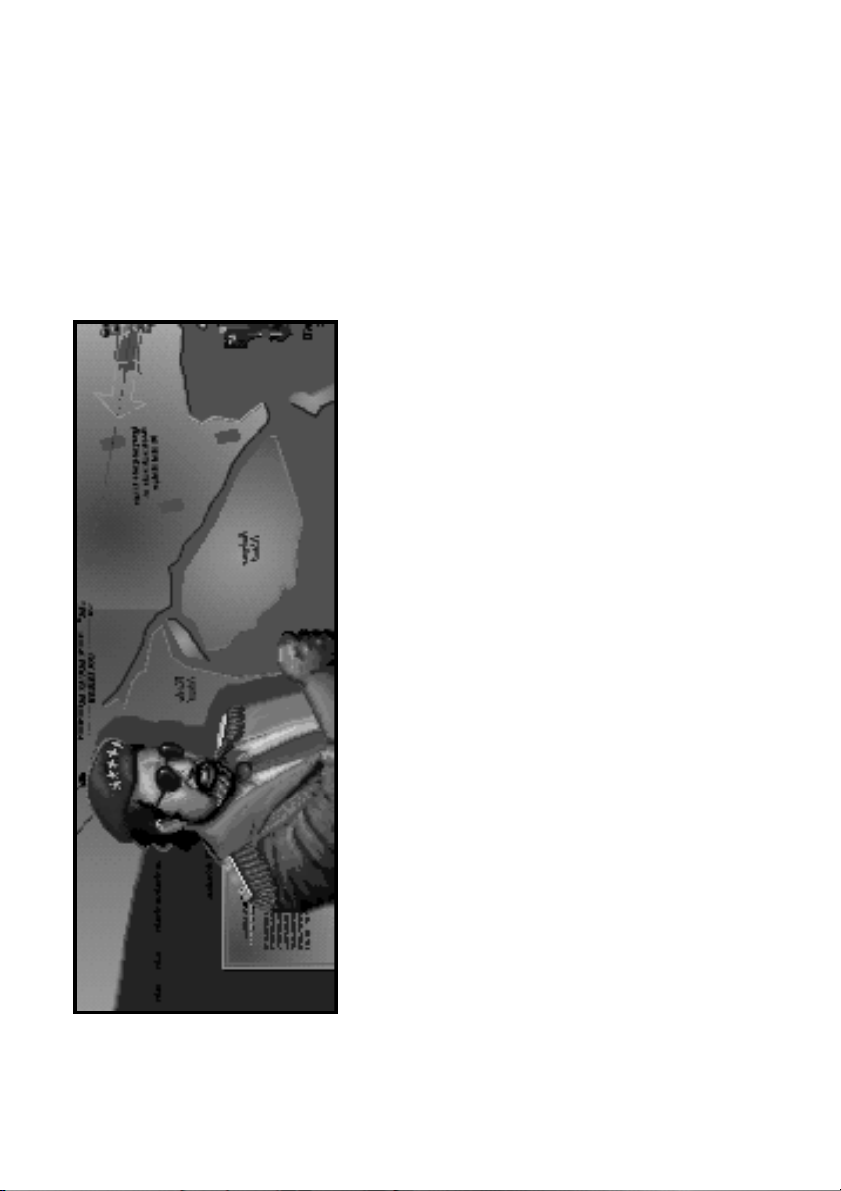
Without warning a madman has emerged in the Middle East and threatens to start Armageddon. The international
community knows very little about this menace, the self-styled “General” Kibaba, but we have enough evidence of
his military capabilities to take his threats very seriously. The President of the United States has chosen you to fly a
series of dangerous pre-emptive campaigns in the desert to vanquish this inimical despot.
Page 4
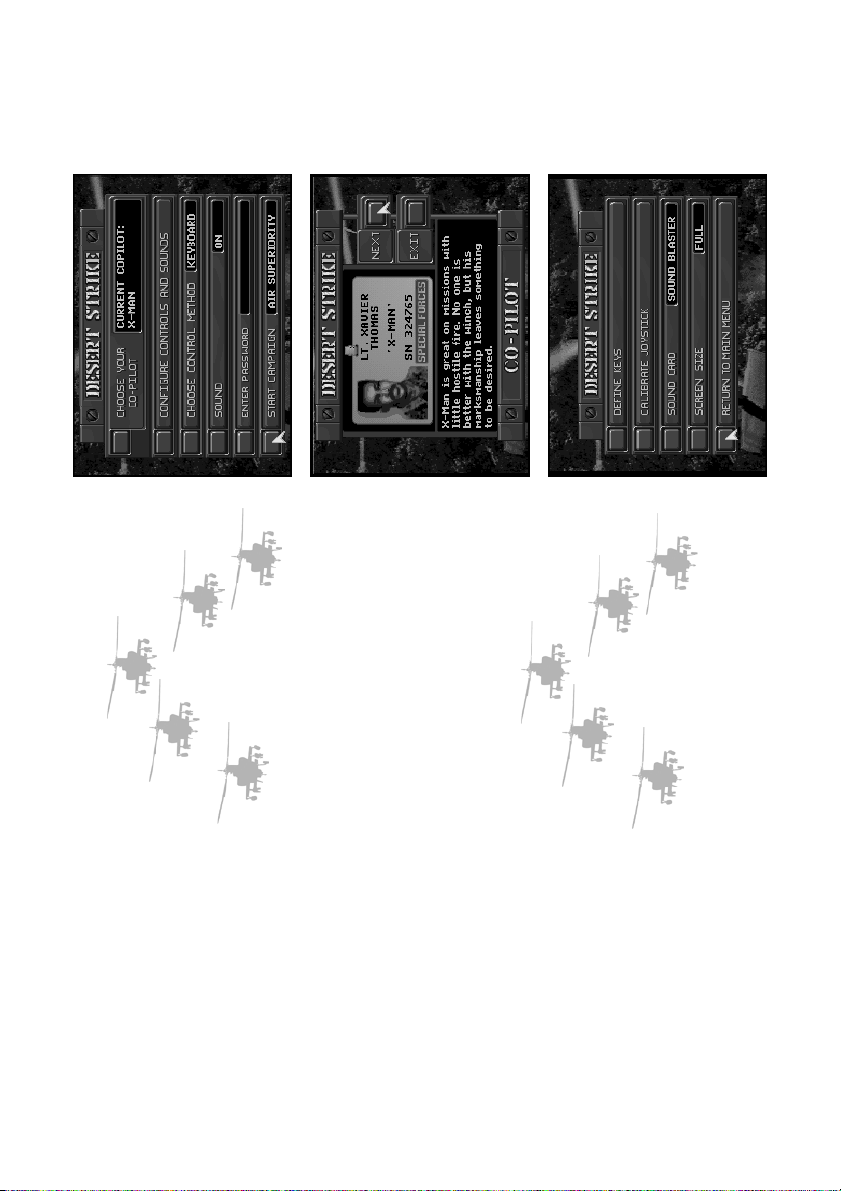
MAIN MENU.
Using the Main Menu.
Use the up/down cursor keys to toggle between the red choice buttons on the main
menu, to select press fire (if this is the first time you’ve played Desert Strike and you
haven’t changed any of the default keyboard settings - then press the default fire keys Z,
X or C).
CHOOSE YOUR CO-PILOT
Your co-pilot is responsible for aiming the guns and operating the winch. The more
capable your co-pilot, the easier your job as pilot will be. Each co-pilot has a dossier.
Press fire on the Co-Pilot button to go to the Co-pilot Menu.
You will see a picture of each co-pilot and a description of their skills and attributes. You
will notice that one of the Co-pilots is listed as MIA or Missing In Action. You can’t
select a pilot who is listed as MIA. They are out there somewhere, and if you find them
and return them safely to the frigate for some much needed first aid, you’ll be able to fly
the subsequent campaigns with the best co-pilot of the bunch. Press fire on the next
button on the co-pilot menu to select a co-pilot, when you’ve chosen a co-pilot, the co-
pilot shown in the window represents your selection, move to the exit button and press
Configure CONTROLs and sound OPTIONS
Move to the button and press fire to select. You are will be presented with the following
fire to return to the main menu. Your co-pilots name will now be shown in the window
on the main menu.
options Define Keys, Calibrate Joystick, Sound Card and Screen Size.
4
Page 5

5
5
zxwyCXZ
Define Keys
Move to the button and press fire to select. This feature allows you to change the default keys used for gameplay. The default keys are as
follows:
Left
Right
Forward
Reverse
Gun
Hydra
Hellfire
Once you’ve chosen the keys you wish to use the menu will automatically close and return you to the Configure Controls and Sound Menu.
Calibrate Joystick
Move to the button and press fire to select. Follow the on screen instructions, the menu will automatically close and return you to the
Configure Controls and Sound Menu once the joystick is configured. Because most joysticks have only two buttons we’ve designed the
controls so that you can use the space bar to toggle between weapons (Gun, Hydra and Hellfire), if for example you are using the fire button
on your joystick to operate the Gun press the space bar will switch weapons to the Hydra. Pressing the space bar again will bring the Hellfire
into use, press the spacebar again and you’ll switch back to the gun.
machine.
Sound Card
Press fire on the Sound Card button and the name of the sound card will appear in the window on the left, select the name of the sound card
you wish to use by pressing fire. Do not select a soundcard driver that isn’t installed or 100% compatible with the soundboard in your
Screen Size
Use the fire button to alter the size of the gameplay screen on your monitor, you can choose full, medium or small play screen area.
ENTER PASSWORD
simple type the password in again.
The password will save your co-pilot selection but it won't save any non-standard control settings you may have chosen. You have about five
minutes to write down the password before it disappears.
If this is the first time you’ve played Desert Strike you won’t have a password. At the end of each successful campaign you receive a
character password and your current score. Make sure to write it down if you wish to return to the game at the beginning of the next campaign
with your score intact, rounded down to the nearest thousand points. If you get the password incorrect a ? will appear the password window,
You are now ready to play Desert Strike, move to the start campaign button and press fire.
Page 6

on the map has a corresponding file in the data log. There you will find a picture of the
item, its name, and pertinent information.
ARMOUR POINTS
Armour points are listed for some of the targets. The number represents the amount of
damage that target can take before it is destroyed.
POWER POINTS
IN GAME MENUs
At any point during the game you can call up the following menus by pressing:
The action pauses when you call up the following menus.
F1 THE MAP SCREEN. You will need to refer to the battle map continually
throughout each campaign to locate yourself in relation to your targets and objectives.
You can view military data specific to your current campaign, and call up your current
status for the campaign. Besides your weapons, the battle map is your most important
tool as a pilot. Your Apache is depicted as a small helicopter graphic. Select objects from
the display below the battle map by using left and right cursor keys. The object selected
blinks on the battle map.
F2 THE MISSION INFORMATION. You can obtain detailed information about the
targets and objectives of a campaign from the Mission Data Log. Notice that every item
Power points are listed for the enemy’s weapons. If you get hit by a Rapier SAM, which
6
packs a 100 point wallop, your armour will lose 100 points.
F3 CURRENT MISSION STATUS. This gives you all the information on missions
that have been completed and ones to be completed.
Press the spacebar to exit any of the above F-key menus.
Page 7

7
7
Pressing ESC during play displays the following menu on screen:
F1 Sounds. Press F1 to turn on/off the sound.
F4 Control method. This allows to change control method, pressing F4 will toggle between the choices. Please note
that you must first calibrate your joystick (F6) before you can select it.
F5 Define keys. Change the default keys used in the game to the ones you’d like to use.
F6 Calibrate joystick.
F10 Abandon game. Returns you to the main menu
F12 Quit to DOS. Quits to DOS and returns you to the hard drive prompt.
ESC. Exits this menu
CRITICAL INFORMATION
You are allotted three lives per campaign. If you lose your third life before you accomplish the final mission of a
campaign, you must return to the beginning of that campaign and complete it before you can move on to the next
campaign.
Although the chain gun may appear to be hitting an object, make sure you look for the grey explosion to be certain
you are on target. Misses appear as yellow explosions and make only a small “gunfire” noise.
At times during a campaign you will receive announcements of incoming intelligence reports. If you wait more than
10 seconds to access the report, it will not be available.
Each time you drop off a passenger at a landing site your mechanics will have time to work on your armour.
In Campaign #1, each passenger is worth 150 armour points. In all subsequent campaigns, each is worth 100 points.
When your fuel level reaches 14 units a warning message appears on the screen. Each time you burn two more units,
the message appears again. When your Armour is reduced to 125 points, you receive a similar warning message.
If you crash from lack of fuel, your armour is automatically restored to a full 600 points. If you blow up from loss of
armour, your fuel supply remains the same as it was before you crashed, unless you had fewer than 25 units of fuel, in
which case your fuel tank is restored to 25 units.
Page 8

8
If you bump into an object (except for the frigate) your armour loses ten damage points and you lose control of the Apache momentarily. Also,
you cause ten damage points to the object you bumped into.When you crash and are restored, your “load” of passengers and your supply of
ammunition remain the same.
The following critical information appears on the map screen (F1).
Lives – Number of lives remaining.
Load – Number of passengers aboard (6 max).
Armour – Protection against attack (5-600).
Fuel – Fuel remaining (2-100).
Guns – Rounds remaining in the chain gun (1178 max).
Hydras – Hydras remaining (38 max).
Missiles – Missiles remaining (8 max).
Score – The higher your score, the more you’ve accomplished. Bonus points are sometimes available if you complete all tasks on a given
mission. For example, if you need only rescue 14 of 16 MIAs to complete a mission, bonus points are awarded for rescuing the other two.
You can lose points for destroying civilian or friendly targets.
Page 9

9
HINTS AND TIPS
9
ammo dumps are hidden in buildings, under sand dunes, etc. The only way to find hidden supplies is to blow up the structures that
KEEP MOVING
• You can’t win the game if you don’t learn how to out-manoeuvre the enemy’s weapons.
FUEL AND AMMO CONSERVATION
• In Campaigns 2, 3, and 4 there are more fuel drums and ammunition crates in the field than are indicated on the map. Numerous fuel and
conceal them.
use your chain gun to destroy targets.
them.
• Your missiles and Hydra are precious commodities not to be squandered. As long as it’s safe and you have fuel,
• Don’t waste fuel and ammo by picking them up when you’re already full or nearly full. It’s best to let them sit and return when you need
Apache to move left, right, forward or backward without rotating. Hold down the control key on the keyboard while moving left
and right keys or while using the joystick.
JINKING
• Certain targets are difficult to hit, even with Jake as your co-pilot. Jinking will help you increase your precision by allowing your
NEUTRAL TARGETS
hit a neutral target, you must point the Apache directly at it and fire. Jinking often comes in handy here.
• Some targets, such as buildings and dunes, are neutral, which means that your gunner will not fire on them automatically. If you want to
that passenger or back away from him before the ladder will drop for another passenger. Also, the ladder (and the winch) will appear
even when it’s behind a building or other object as to better help you guide it.
PICKING UP PASSENGERS
• When there is a crowd of waiting passengers, your co-pilot will pick out the closest one and drop the ladder for him. You must pick up
your passengers at appropriate times so as not to waste the armour value they bring. You need not pick up all
available passengers to win a campaign, but you should remember the locations of the people you did not pick up so that you can
use them for armour points later.
DROPPING OFF PASSENGERS
• When you land at a landing zone, all passengers (except commandos and EANN crew) will disembark. Try to drop off
Page 10

10
space for the rest of the campaign.
• The commandos and the EANN crew must be dropped off at their appropriate landing zones, or else they will take up valuable payload
ARMOUR CRATES
• There are armour toolboxes hidden in all four campaigns. Picking up an armour crate restores your armour to a full 600 points.
The quick ladder lasts for an entire campaign, even if you crash, but it does not carry over into subsequent campaigns.
QUICK LADDER
• The quick ladder allows you to pick up objects practically on the run. All four campaigns offer a quick ladder, but you have to find it.
need some of them to win the game. Extra lives do not carry over into subsequent campaigns.
EXTRA LIVES
• The box with the red cross on it contains an extra life. There are a few hidden throughout the campaigns, and you will almost certainly
information you receive during a campaign to find out which buildings or objects control which alert zones.
allows the enemy to move their turrets electronically, instead of manually. Weapons on aim alert cannot be out-manoeuvred. It’s best
just to stay away until you destroy the power station supplying them.
FOOLS RUSH IN
ALERT ZONES
• Certain targets are protected by alert zones, which dramatically increase the firepower and plating of the major weapons.
• Alert zones are controlled by radar stations, power stations and objects in the game. Pay attention during your briefings and to all
• Radar stations put out a range alert, which gives the enemy weapons an increased range. Power stations supply an aim alert, which
• You can save yourself a lot of heartache by checking the map for the positions of the enemy’s defences before travelling.
Page 11

11
11
WEAPONS APPENDIX
In Alert Zones, the values of armour and weapons power are increased.
ENEMY ARMOUR POWER RATE OF SPEED OF
CHAIN GUN: inflicts 3 points of damage.
HYDRA: inflicts 25 points of damage.
MISSILE: inflicts 100 points of damage.
carries 600 points of armour.
WEAPON NAME (DAMAGE) FIRE PROJECTILE
AK47 10 points 5 points 0.5 sec. fast
APHID 25 75 3.0 fast
AAA 50 20 2.5 fast
RAPIER 75 100 2.5 fast
Page 12

12
ENEMY ARMOUR POWER RATE OF SPEED OF
WEAPON NAME (DAMAGE) FIRE PROJECTILE
VDA 100 25 0.33 fast
ZSU 150 40 0.33 faster
SPEEDBOAT 150 50 1.25 faster
CHOPPER 150 100 1.5 faster
M48 200 100 2.5 faster
CROTALE 250 150 2.0 slower
Page 13

13
13
TROUBLE
SHOOTER
DESERT STRIKE
Page 14

Trouble shooting
Desert Strike CD Trouble Shooter
CD-ROM Drive
VGA Minimum
1 Megabytes of memory EMS
Supports Soundblaster/Roland/Adlib or 100% compatibles
Joystick/Keyboard option
DOS 5 or above required
550K Free of Base Memory (Largest Executable Program Size)
MSCDEX 2.1 or above and CD-ROM drivers needed
386/486 Compatible if above requirement are adhered too.
Audio
Desert Strike supports Soundblaster/Adlib/Roland cards or 100% compatibles.
If you have further problems please refer to the AUDIO PROBLEMS??? section in the trouble shooting guide found below.
Required Equipment
Memory Management
Error message - NOT ENOUGH BASE MEMORY
Desert Strike requires at least 550K of base memory to run properly. If your machine hasn’t enough base memory, when you try to run the
game the following error message will appear on screen. NOT ENOUGH BASE MEMORY YOU NEED 550K TO RUN DESERT STRIKE.
If you are unsure as to the amount of BASE MEMORY you have, simply make sure you PC is at the DOS prompt and type ‘MEM’.
14
DEVICE=C:\DOS\EMM386.EXE 1024
into your CONFIG.SYS.
This will present you with a list of different memory locations. The important one is ‘LARGEST EXECUTABLE PROGRAM SIZE’ (in
other words BASE MEMORY). If this is less than 550K then you will need to free some more memory up to play Desert Strike. Consult your
DOS manual for more information on base memory and how to make more available, or follow the guide to make a DOS BOOT DISK.
Error message - NOT ENOUGH FREE EXPANDED MEMORY
Desert Strike requires 1Megabytes of Expanded Memory (EMS) not Extended memory. You can use EMM386.EXE or other such drivers to
emulate Expanded Memory using Extended Memory.
You can do this by adding the line,
Page 15

15
15
DOS Boot Disk
DEVICE=C:\DOS\HIMEM.SYS
DEVICE=C:\DOS\EMM386.EXE 1024
FILES=20
BUFFERS=20
DOS=HIGH
If you have configured your PC to have 1Meg of EMS and are still experiencing the error message, then ensure that
either programs like ‘Smartdrive’ are not taking up your EMS memory; or simply add more than 1megs in your
EMM386 line in your CONFIG.SYS
e.g.. DEVICE=C:\DOS\EMM386.EXE 3072
Do not use the DOS Boot Disk section of the manual if you have any sort of disk compaction software on your hard
disk drive. Consult your disk compaction software manual to create a DOS boot disk.
If you do have problems with the above sections, then making a DOS Boot Disk could cure these problems. To create
a DOS Boot Disk follow these easy steps exactly as shown.
Please Note:
All examples of code assume that your DOS directory is on the ‘C’ drive and that the directory name is ‘DOS’;
i.e.. C:\DOS
If your DOS directory is on ‘D’, for example, and the directory name is MS-DOS, then replace C:\DOS with
whatever your needs are;
e.g.. D:\MS-DOS
1.) Insert a blank floppy disk into your A: drive of your computer.
2.) Make sure your machine is on and at the DOS prompt.
3.) Type ‘FORMAT A:/S’ and then press return or enter
4.) Wait while the disk is formatted and the system data has been transferred onto the disk.
5.) You will now be asked to name the disk. Type’ DS-BOOT’ and then press return or enter.
6.) If asked ‘ FORMAT ANOTHER DISK’ answer ‘N’ and press return
7.) You should now be at the DOS prompt.
8.) Type ‘EDIT’ and press return or enter
9.) Select ‘NEW’ from the file menu, and press return or enter.
10.) Type in the following information.
11.) Select “SAVE’ from the file menu and save as ‘ A:CONFIG.SYS’ ensuring that the DS BOOT disk is in drive A.
12.) DO NOT SAVE THIS FILE TO YOUR HARD DISK.
13.) Select ‘NEW’ from the file menu, and press return or enter.
14.) Type in the following information.
Page 16

PROMPT=$P$G
PATH=C:\DOS
15.) Select “SAVE’ from the file menu and save as ‘A:AUTOEXEC.BAT’ ensuring that the DS BOOT disk is in drive A.
16.) DO NOT SAVE THESE FILES TO YOUR HARD DISK.
17.) You will now need to copy your CD-ROM drivers onto this boot-up disk. Follow the advice given with your CD-ROM drive software on
floppy drive. Wait until the computer has ‘booted-up‘ and is at the DOS prompt. Now follow the instructions under the heading Playing
Desert Strike.
how to do that.
18.) After completing sections 1-17 you are now ready to play the game. Reset your computer leaving the DS-BOOT disk in the internal
Audio Problems???
If you experience any problems with the sound in Desert Strike then check through the following.
1.) Does the card work with other products?
2.) Have you used and installed the software that came with the card, if any did?
3.) Is your card 100% compatible with the sound cards listed?
4.) Have you installed the game to use the desired soundcard?
5.) Have you configured the card properly? Check the interrupt settings.
6.) Have you been through the SETUP program?
If Desert Strike is being run on a slow 386 you may experience a slight flickering effect while playing the game, to solve this we’ve added a
few features you might like to try, after all not everyone can afford a 486. Quit the game to the main menu and choose Configure Controls and
Sounds, from the Configure Menu select Screen Size. Use a fire button to toggle through the choices. Choose one that gives you the best
performance.
Extra Extra
If there are any other notes or alterations to this installation guide there will be a text file on the disk. (README.TXT). Please read this file
before proceding with the installation.
16
 Loading...