

Page 1
METAL HALIDE 575W
PRODUCT INSTRUCTIONS
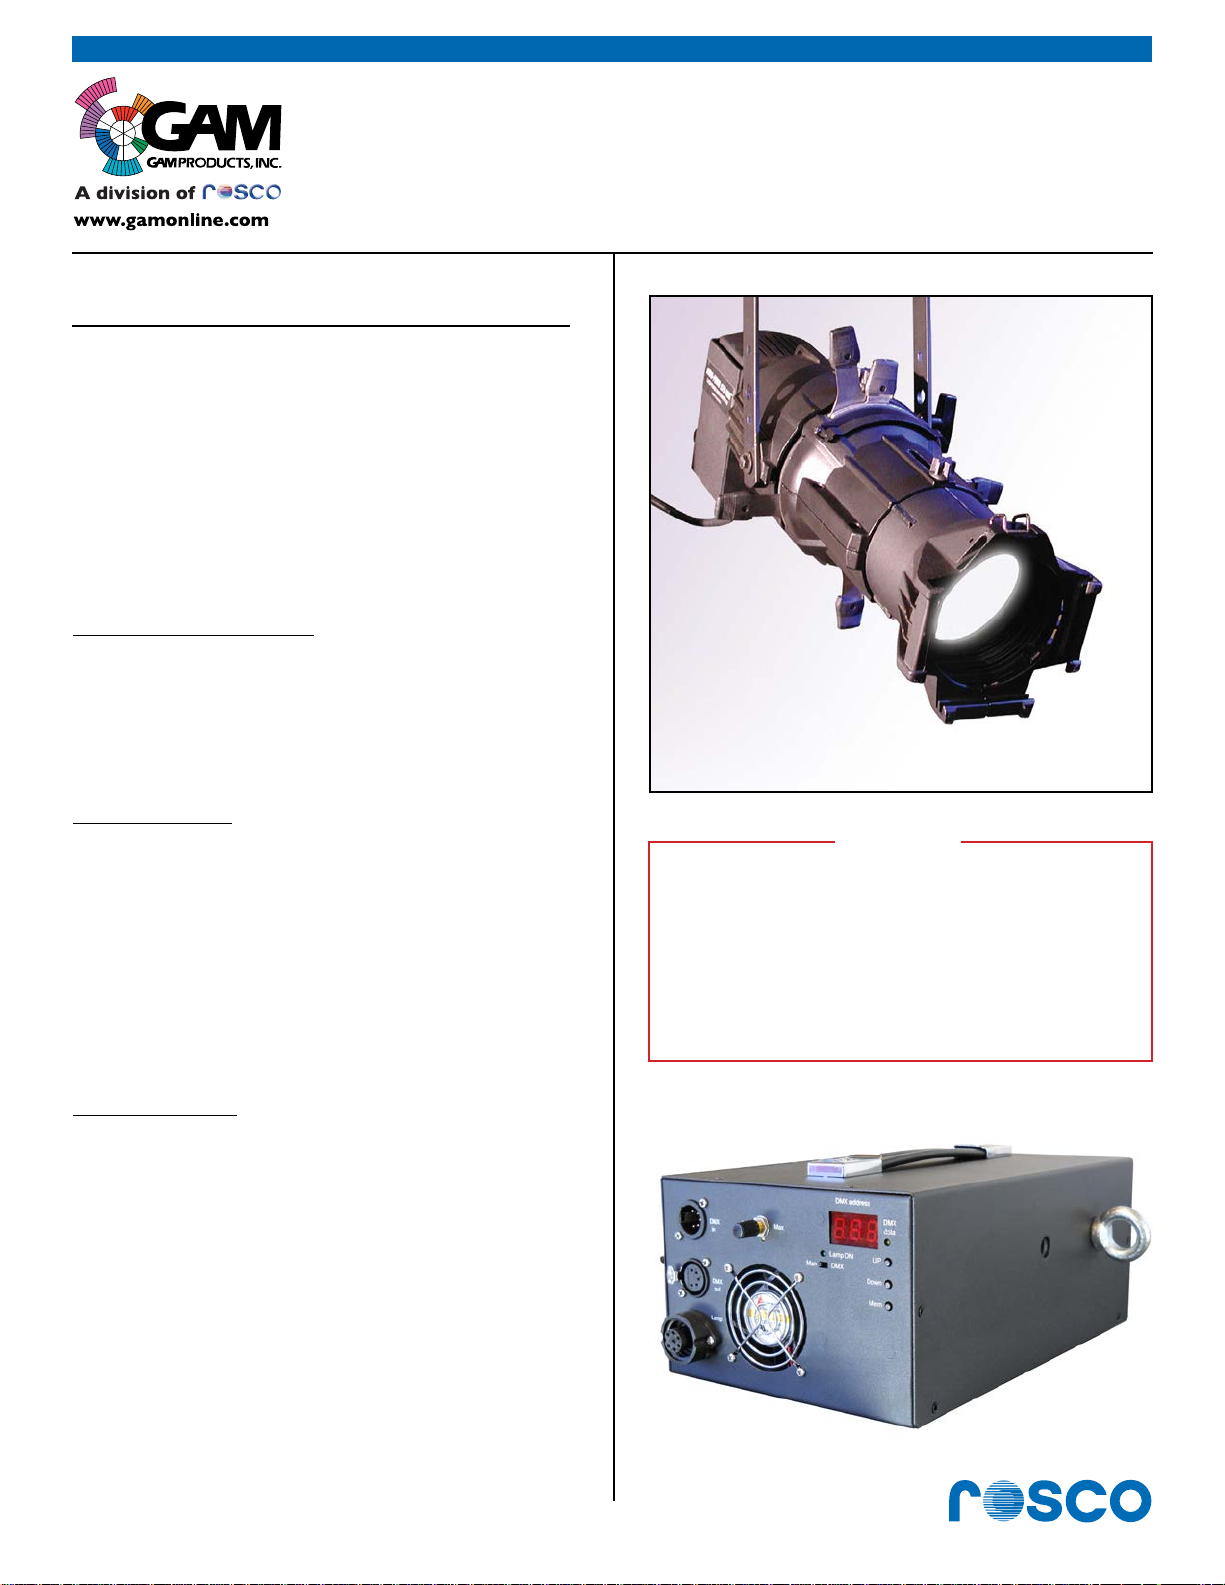
Congratulations on using one of the most powerful
METAL HALIDE 575W profile fixtures in the word. The
following information will guide you through the setup
process and operation of the GAM METAL HALIDE
575W with the electronic ballast LI4000.01M
The GAM METAL HALIDE 575W is for professional use
only. Read this complete manual before you start using.
Do not open the cover as this will cancel the warranty.
Unpacking and Powering:
Before connecting the ballast to A/C, first assemble; (1)
The A/C connection on the ballast, (2) the DMX connections, (3) the head cable connection between the ballast
and the GAM 575W METAL HALIDE fixture. (4) Now
install the lamp.
GAM Product # GL4002.15/30,25/50
A/C Connection:
Requires direct 90-265VAC, 50/60Hz power.
DO NOT PLUG THE ELECTRONIC BALLAST INTO A
THEATRICAL DIMMER CIRCUIT, EVEN IF IT IS PROFILED
IN THE LIGHTING CONTROL BOARD AS NON-DIM.
There is an A/C cable provided which plugs into the ICE
male connector on the ballast. There is an additional ICE
female connector to power the INNO DIM (Lighting Innovations Dimmer Shutter). Please consider the maximum
output current (7A at 230VAC, 4A at 110VAC).
DMX-Connection:
DMX input is connected to the built-in XLR5 male
connector. Additional DMX units are connected to DMX
throughout. The last unit in the DMX chain must have a
termination (120Ω resistor between pin 2 and pin 3). It
is recommended that if the GAM METAL HALIDE 575W
is being used with an INNO DIM, then the DMX chain
first runs to the GAM METAL HALIDE 575W ballast and
then is terminated at INNO DIM. There is a built-in DMX
termination switch on the INNO DIM, which then can
be turned to “on”.
CAUTION
When using a DMX device with a discharge lamp such
as CDM or an HMI, it’s suggested that you separate the
power circuit for the discharge lamp from the DMX control
device. When using DMX controlled units such as an Indexing TwinSpin™ or SX4® Gobo Changer or DMX Loop
Tray, the “noise” from the discharge lamp ballast may
cause some interference and or damage the electronics.
For best results we recommend providing separate line
voltage to the DMX devices and the discharge light fixture.
Electronic Ballast #LI4000.01M
Page 1 of 4
www.rosco.com
Page 2
METAL HALIDE 575W
GAM Product # GL4002.15/30,25/50
Silicone cable connection between ballast & fixture:
Connect the Amphenol plug coming from the lamphouse
to socket (output to lamp). Screw on the bayonet catch
(clockwise) to ensure safe connection.
Main Switch:
For normal operation & for DMX operation the main
switch should be at “ON” = 1 at all times. Should the
unit no longer react to standard DMX values, switching it
“OFF” and “ON” can reset it.
Ventilator Opening:
Make sure the ventilator openings do not become obstructed so that the free flow of air is maintained.
Note: The fan only runs when the fixture is in use and “lit”.
Hour Counter:
This serves to monitor
lamp service life. Reset
is not possible.
Lamp Installation
Make sure unit is
unplugged. Open the
milled screw at the
rear of the fixture with
a screwdriver. Pull the
lamp house back, tipping it down slightly. It is
secured from falling by
the grounding cable.
(Pull out the old lamp)
and insert the new lamp without touching the quartz element. The lamps of the fixtures are also numbered. You
have to use only the lamps and the fixtures with the same
numbers.
YOU ARE NOW READY TO POWER UP THE UNIT.
DMX Operation
The electronic ballast takes 2 channels. Set the switch to
manual and make sure the main switch is on.
Setting the Start Address:
Use the UP and DOWN keys to set the start address.
Press MEM, while display in on, to store the new
address. If you don’t press MEM then changes are lost.
Green LED shows valid DMX is present. To avoid
unwanted light from both displays, remember they are
only on after power up and when pressing a button.
Channel 1 (start address): on/off
LI4000.01M-DMX switches on at 128 (50%).
DMX% DMX (dec) Lamp
0-49 0-127 Off
50-100 128-255 On
It takes about two minutes for the GAM 575W Metal
Halide lamp to reach operating temperature in which
dimming is possible.
Channel 2 (start address + 1): dimming Intensity is
regulated according to DMX from 30% to 100%
DMX% DMX (dec) Intensity
0-9 0-24 Minimum (30%)
10-90 25-230 Dim
91-100 231-255 Maximum (100%)
Curve is linear to achieve even dimming.
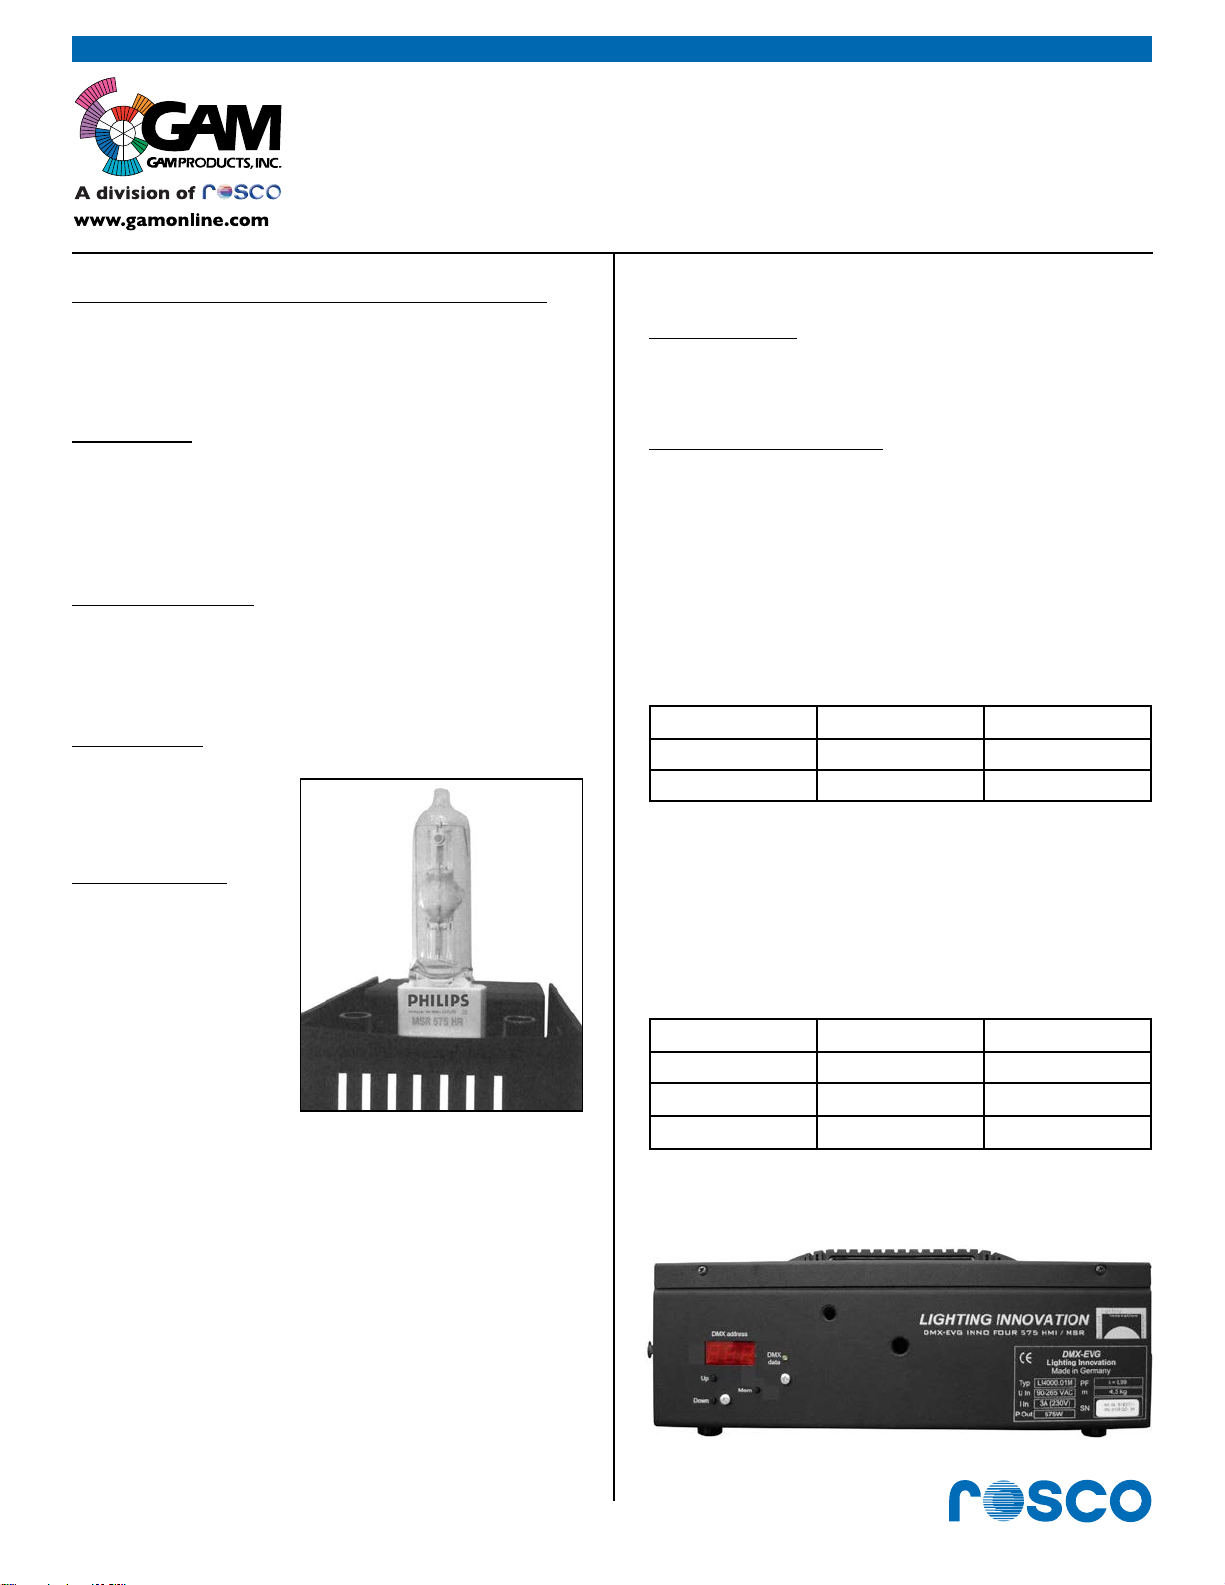
Due to the differences of the manufacturing of the Philips
MSR 575 HR lamp, it’s very important to pay attention
to the lamp position. You should insert the lamp only as
shown on the picture. The lamp is adjusted in that position, with the “Phillips” logo on the top (see photo).
Re-place the lamp house on the guide rails and push the
unit together.
Tighten the milled screw again with a screwdriver, until
you hear a click from the Safety switch.
Page 2 of 4
www.rosco.com
Page 3

METAL HALIDE 575W
GAM Product # GL4002.15/30,25/50
Local Operation
Set the switch to manual operation. You can switch the
lamp on and off by the main switch. Use the dim potentiometer to regulate intensity.
Notes on METAL HALIDE 575W Lamps
Frequent power cycling with operating times less than
two minutes will dramatically reduce life time. To achieve
operating temperature quickly set intensity to full for the
first 2 minutes of operation. After a hot re-strike do not
switch off the lamp until it achieves operating temperature (ca. 1 minute). This will cause ignition problems and
reduces the lifetime. Important information for hot re-strike:
The MSR HR Lamp, which is used in GAM METAL HALIDE 575W is generally hot re-strikeable.
But there are two conditions, where hot re-strike may not
be possible.
After cold start:
Lamp Adjustment
All lamp houses are adjusted when they are shipped.
Because of lamp variations it could be necessary to
readjust them with the attached wrench. The PAR units
need not be readjusted.
At the rear of the lamp houses are 3 holes, which provide access to the adjustment screws. Use an allen key
to bring the lamp into optimum position. Proportionately
turning of all 3 screws counterclockwise causes lamp
focus to approach a hot spot in the center with all off
around the edges.
Proportionately turning all of the screws clockwise
causes a de-focusing, with the fall off in the center with
the edges becoming bright. Turning only one of the
screws moves the area of highest light intensity in the
direction in which the screw is turned. Counterclockwise
the light intensity moves away from the screw, clockwise
towards the screw.
Normally you should NOT switch the ballast off when
the lamp has not reached operating temperature (after
2-3 minutes). This could cause problems with hot re-strike
and reduces the lifetime of the MSR lamp. On immediate
restart (also after power loss) the lamp ignites promptly. A
problem could occur if you try to ignite the lamp after 3060 seconds. After another couple of minutes the restart is
possible without any problems.
After a longer operating time (more than one hour):
If you try to hot re-strike the lamp in this period, it is possible that the igniter-system ignites several times before
the arc is established. If the arc could not be established
after 4-5 attempts (old MSR lamp), the igniter will be deactivated. Only when you give another ignite command
(per DMX or manual) will the igniter be working. In this
case it will be helpful to switch the ballast off, wait a
couple minutes and switch it on again.
Page 3 of 4
www.rosco.com
Page 4

METAL HALIDE 575W
Fuses
10A, 5x20mm, slow blow
Disconnect ballast & fixture from power.
Use a small screwdriver to remove the fuse holder next
to the socket. Exchange the fuse and refit the fuse holder before you re-power the unit.
Lamp Replacement:
The service of the lamp is 750 hours, with the EVG
ballast it is increased to 1000 hours. This service life
is shortened by each hot re-strike.
1) Switch off the unit and wait until the lamp is cool.
Disconnect ballast and fixture from power.
GAM Product # GL4002.15/30,25/50
2) Open the milled screw at the rear of the unit with
a screwdriver.
3) Pull the lamp house back, tipping it down slightly.
The grounding cable prevents it from falling.
4) Pull out the old lamp and insert the new lamp
without touching the quartz envelope.
5) Replace the lamp house on the guide rails and
push the unit together.
6) Tighten the milled screw again with the screw
driver until you hear a click from the safety switch.
Pull backward
Milled screw
Page 4 of 4
Safety switch
www.rosco.com
 Loading...