

Page 1
PLEX
quick start manual
Page 2
7 8 9 10 11
6
12
5
16
17
18
19
4
2023 22 21
2
1
3
#
15
14
13
Page 3

PLEX
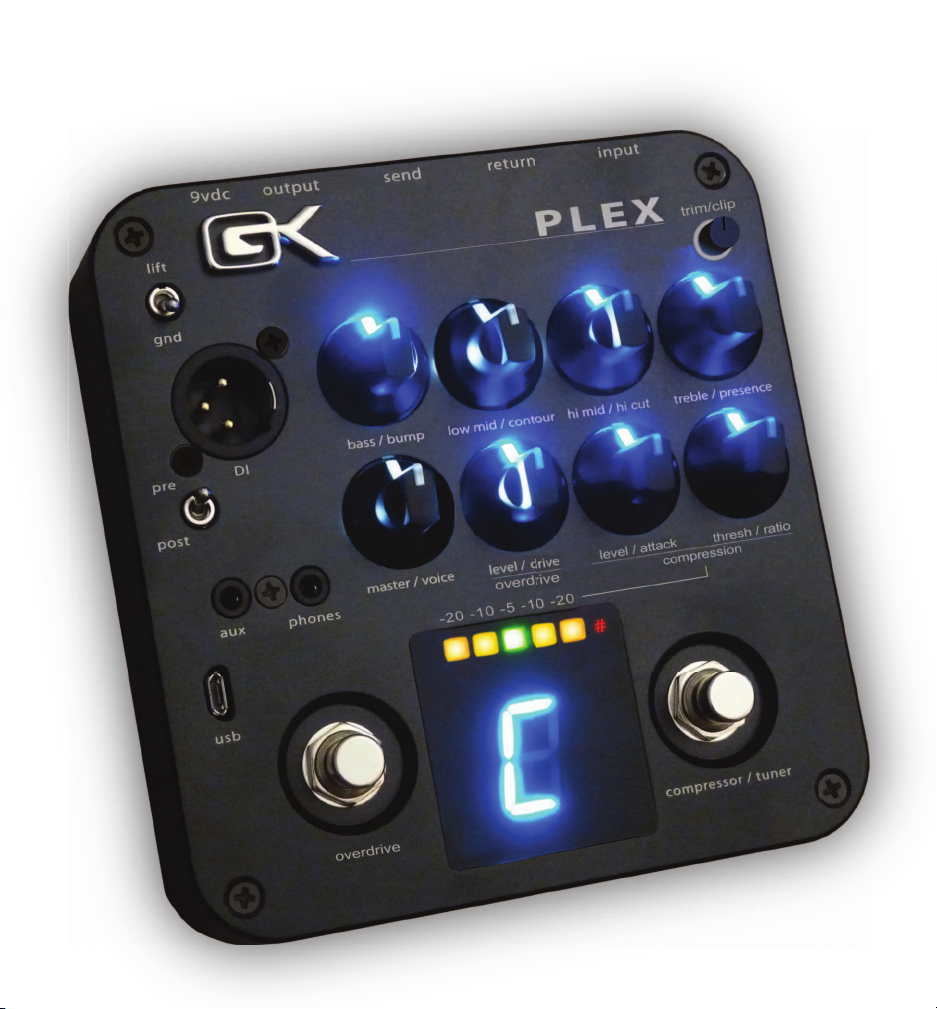
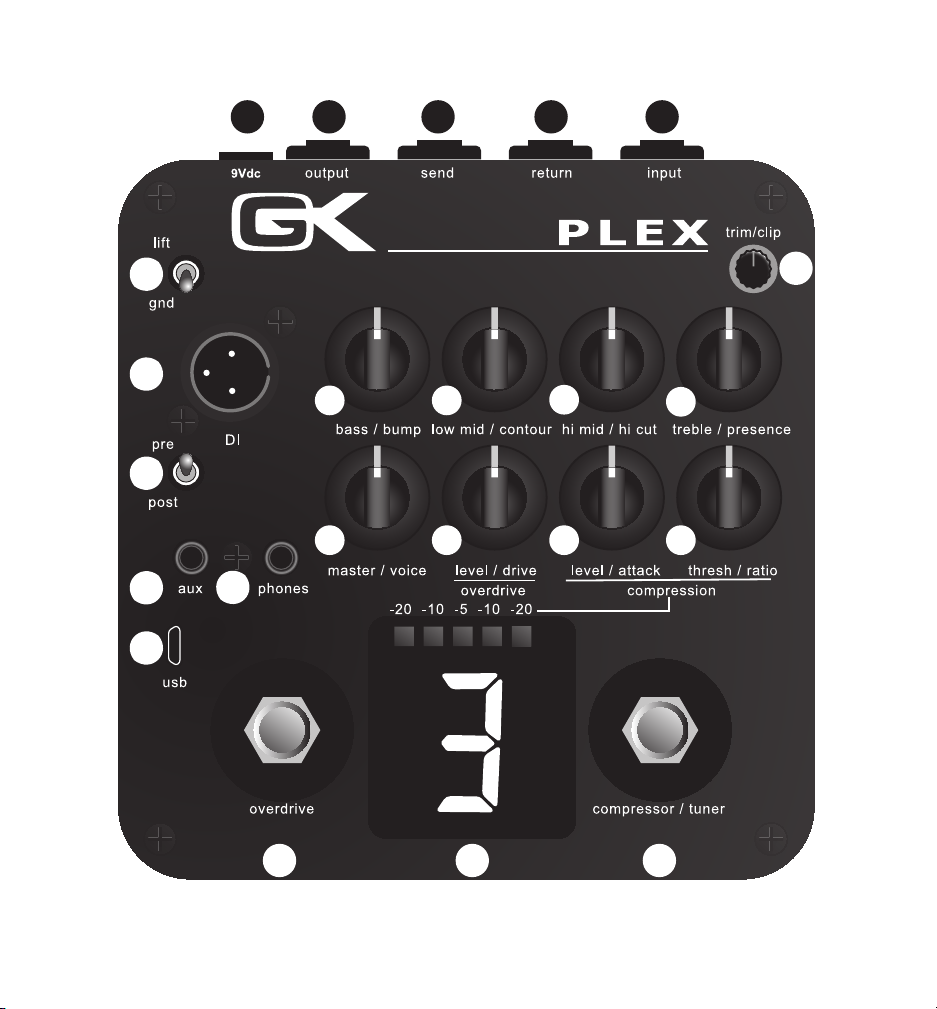
1
USB: Digital in/out provides recording, playback and
connections and controls
re-amp capability with USB equipped recording systems
and allows user to install firmware updates.
2
Aux: 3.5mm analog input for MP3 or other audio
playback device. Signal is introduced after EQ and
processing, prior to the Master Volume.
3
Phones: 3.5mm output for monitoring output through
headphones.
4
Pre/post: Selects the signal that is sent from the DI
output to be before or after the EQ.
5
DI: Electronically balanced output for connection to
mixer or other XLR equipped device using a standard
microphone cable.
Lift/gnd: Lifts or grounds pin 1 of the DI output. The
6
ground can be lifted to avoid ground loops.
7
9vdc: Attach supplied power supply here. Only negative
center/ 9vdc/500ma power supply should be connected.
8
Output: ¼” analog output for connection to amplifiers,
mixers as well as other pedals that are equipped with ¼”
inputs.
9
Send: ¼” analog output that enables the PLEX signal to
be sent to external devices after EQ and other processing,
prior to the Master Volume.
10
Return: ¼” analog input allows external signal to be
input into the PLEX after the EQ and other processing,
prior to the Master Volume.
11
Input: ¼” analog input to receive instrument signal.
12
Trim/Clip: The Trim knob adjusts the level of signal
coming in from the ¼” input. The Clip ring surrounding
the Trim knob flashes red when the incoming signal
begins to exceed the input circuit’s capability.
13
Compressor/Tuner: Engages/disengages the
compressor when pressed once. Double tapping quickly
activates the chromatic tuner. When tuner is active,
output of the PLEX is muted and all knobs are unlit. To
disengage tuner press twice quickly to return to play
mode.
14
LED Display: Displays the level of sub feature that is
selected as the knobs are pressed, tuning information
when tuner mode is active and gain reduction level when
compressor is engaged. *When Tuner mode is inactive
the sharp (#) indicator will light when the internal
processing capability has been exceeded due to extreme
EQ or volume settings.
15
Overdrive: Engages/disengages the overdrive section of
the PLEX. When Overdrive is active the Level/Drive
knob is illuminated blue.
***All rotary knobs have push functionality to access
the sub feature noted to the right of the main function
under each knob (main function/ sub function).
Pressing the knob activates the sub feature. Once
activated, the knob is lit blue and the LED display
shows the current level of sub function for 3 seconds.
Pressing the knob again within 3 seconds will toggle to
the next level. After 3 seconds the numeric display will
be unlit. Pressing any of the knobs once the display is
unlit will display that knobs current sub feature level
that is active. Pressing the knob again within 3
seconds will toggle to the next level. *See included
table for description of all sub features.
16
Bass/Bump: Rotary control allows the bass frequencies
to be boosted or cut. Pressing the knob activates the
Bump feature which applies varying levels of low
frequency enhancement.
Low Mid/Contour: Rotary control allows the low-mid
17
frequencies to be boosted or cut. Pressing the knob
activates the Contour feature to cut varying levels of mid
frequencies while boosting low and high frequencies.
Hi Mid/ Hi Cut: Rotary control allows the hi-mid
18
frequencies to be boosted or cut. Pressing the knob
activates the hi cut feature which applies varying levels
of high freq. reduction to remove unwanted clicking and
string noise.
19
Treble/Presence: Rotary control allows the treble
frequencies to be boosted or cut. Pressing the knob
activates the Presence feature which applies varying
levels of high freq. enhancement.
20
Thresh/Ratio: Activate by the pressing the
compressor/tuner button once. Once active the
Thresh/Ratio and Level/ Attack knobs are lit Blue.
Rotary control sets the threshold at which the compressor
is triggered by the incoming signal. Turning the knob
clockwise lowers the threshold ( increases the effect ) and
counter clockwise settings raise the threshold ( reduces
the effect). Pressing the knob activates the Ratio feature
which allows the selection of various compression ratios
from 2:1 to 20:1.
Level/Attack: Used in conjunction with Thresh/Ratio.
21
Rotary control sets the output volume of the compressor.
Pressing the knob activates the Attack feature which
selects various attack and release times of the
compressor.
Level/Drive: Activate by pressing the Overdrive
22
footswitch. Once active the level/Drive knob is lit Blue.
Rotary control sets the volume level of the overdrive
channel. Pressing the knob allows the selection of
multiple Drive intensities.
Master/Voice: Rotary control sets the main output
23
volume. Pressing the knob activates the Voice feature
which selects various EQ voicing characteristics.
Page 4

PLEX
1. Set Master/Voice, Level/Drive, Level/Attack and
Level/Ratio controls to the full counter clockwise
position.
2. Set the EQ controls (16 -19) to the 12 o’clock position.
3. Set the Trim knob to the full counter clockwise
position.
4. Attach the instrument to the input jack using a standard
¼” instrument cable.
5. Attach the Output using a ¼” instrument cable, DI
using an XLR mic cable or headphones to the 3.5mm
Phones jack for the desired application.
6. Play the instrument and turn the Trim knob clockwise
until only the notes struck forcefully illuminate the
surrounding Clip ring. If the light flashes more than
occasionally with the trim knob at the full counter
clockwise position, the level control on the instrument
should be lowered.
7. Turn the Master/Voice knob clockwise until the desired
output level is reached.
8. Press the Master/Voice knob to select the overall EQ
voicing of the PLEX.
9. Press the Overdrive footswitch once to activate the
Overdrive function. The Level/Drive knob will be lit blue
once active. Turn the Level/Drive knob clockwise until
the desired volume is reached. Press the knob to select the
drive amount. Once the desired Overdrive settings are
selected, press the Overdrive footswitch once to
disengage the overdrive circuit.
10. Press Compressor/Tuner footswitch once to activate
the Compressor function. The Thresh/Ratio and
Level/Attack knobs will be lit blue once active. Turn the
Level/Attack knob clockwise until the desired volume
level is reached. You can experiment with various
Attack/Release, Threshold and Ratio settings. The 6
segment LED display shows the amount of gain
reduction that is being applied at the various settings.
Once the desired Compression settings are achieved,
press the compressor/tuner footswitch once to disengage
the compressor function.
11. Press Compressor/Tuner footswitch twice quickly to
activate the Tuner function. All knob LEDs will be unlit
to indicate the tuner is active and all output will be muted.
The large numeric display automatically shows the note
being played while the 5 segment display reflects when
the pitch is sharp or flat of the note being displayed. The
# will light to reflect a sharp note (C#, D#, f# etc.). When
only the green center LED is lit the displayed note is in
tune. Once each string has been tuned to the appropriate
pitch, press the Compressor/Tuner button twice quickly
to disengage the tuner and return play mode.
initial settings and connections
You are now ready to experiment with all of the features
available from the PLEX.
Connecting to Your Computer using USB
1. Connect the PLEX to your computer using a Micro
USB cable.
2. Once your computer detects the PLEX, select it as the
input device within your DAW to record from the PLEX
via USB. If you wish to record, playback and re-amp with
the PLEX, select it as the input and output device.
*Please reference your DAW’s user manual for
detailed instructions regarding USB input/output
assignments as well as required driver and system
latency optimization etc.
PLEX signal routing: The PLEX utilizes one stereo
input and one stereo output via the USB connector. The
Left/Right channels are configured as two independent
mono channels that send/receive audio information at
different points within the PLEX. This provides the user
multiple options during recording, monitoring and
playback when used with digital recording systems.
Select the left input/pan left within you DAW to receive
the Pre signal from PLEX (instrument signal before EQ
and effects processing).
Select the right input/pan right within you DAW to
receive the Post signal (instrument signal after EQ and
effects processing).
Select the left output/pan left within you DAW to stream
audio to the input of Plex for processing.
Select the right output/pan right within your DAW to
stream audio to the output of Plex for monitoring only.
PRE and POST signals from PLEX can be input at the
same time by choosing both the Left and Right signal
within your DAW. *Please note that there is a delay
between PRE and POST channels. We recommend
playing back through either the PRE or POST
channel only, not both simultaneously.
For detailed information regarding connecting PLEX,
routing options, re-amping and more please visit
http://www.gallien-krueger.com/plex-preamp/
Page 5

This device complies with Part 15 of the FCC
Rules. Operation is subject to the following
two conditions:
This device may not cause harmful
interference, and
This device must accept any interference
received, including interference that may
cause undesired operation.
Note: This equipment has been tested and
found to comply with the limits for a Class B
digital device, pursuant to part 15 of the FCC
Rules.
Gallien-Krueger, Inc. 2234 Industrial Drive Stockton, CA 95206 (209) 234-7300
www.gallien.com
contact - info@gallien.com
Page 6

PLEX
Bump
Level 0
Level 1
Level 2
control features
O
6db boost at 65Hz. Provides moderate bass boost for fattening/warmth
9db boost at 65Hz. Provides substantial bass boost for classic rumble and girth
Contour
Hi Cut
Presence
Voice
Drive
Level 0
Level 1
Level 2
Level 3
Level 0
Level 1
Level 2
Level 0
Level 1O6db boost centered at 1kHz provides sheen and top end denition
Level 0
Level 1
Level 2
Level 3
Level 4
Level 5
Level 1
Level 2
Level 3
Level 4
Level 5
O
4db cut centered at 500Hz. Provides note denition
8db cut centered at 500Hz. Provides moderate mid scoop and clarity
12db cut centered at 500Hz. Provides substantial mid cut and bass/treble
boost for ultimate slap tone.
O
Cuts upper frequencies at 2.5kHz to reduce string noise and click
generated from aggressive plucking or pick use
Cuts a broader range of upper frequencies to reduce string noise and click
generated from aggressive plucking or pick use
Flat - No additional EQ sculpting
800RB
Fusion 550
MB800
MB150
Bypasses EQ and voice lters when connecting to an amplier with existing
tone controls. Only Overdrive, Compressor and Tuner will be active.
Warm Clipping
Low Drive
Moderate Drive
Full Drive
Aggressive Drive
Attack
Ratio
Level 1
Level 2
Level 3
Level 4
Level 5
Level 1
Level 2
Level 3
Level 4
Level 5
Fast attack/Fast Release
Medium Attack/Medium Release
Medium Attack/Slow Release
Slow Attack/Slow Release
Slow Attack/Very Slow Release
2 to 1
4 to 1
8 to 1
12 to 1
20 to 1
 Loading...