


MODEL 6001
REVERSE OSMOSIS
High Purity Water
Production System
THREE STAGE Filtration
for the reduction of:
♦ Organic Matter
♦ Total Dissolved Solids (TDS)
♦ Suspended Solids
♦ Chemical Contaminants
♦ Bad Taste and Odors
MEMBRANE PROCESS
for protection against:
♦ Cysts
♦ Bacteria
♦ Virus
♦ Micro-organisms
♦ 65 GPD @ 60 PSI -72F
INST ALLATION AND OPERA TIONS
Ft. Lauderdale FL 1-877-922-4862(YACHTMATE) * (954)769-9564
MANUAL
YACHT-MATE PRODUCTS, Inc.
www.yachtmate.com* E-Mail – sales@yachtmate.com
GM-5001 Manual – Revised 6- 20-2002

INTRODUCTION
READ THIS ENTIRE MANUAL BEFORE BEGINNING INSTALLATION
This Galley-Mate Reverse Osmosis ( RO ) Drinking Water System has been designed for quick and simple installations and maintenance. By carefully reading this instruction manual and following our operational guidelines you will
insure a successful installation and a reliable operation. Routine maintenance is essential to the longevity and overall
performance of the Galley-Mate RO System. Filters should be changed every six to twelve months depending on the
quality of the feed water supply.
GALLEY-MATE REVERSE OSMOSIS MEMBRANE
STANDARD MEMBRANE THIN FILM COMPOSITE ( TFCM ) POLYAMIDE
FEED WATER SPECIFICATIONS AND OPERATING PARAMETERS
NO DRINKING WATER SYSTEM SHOULD BE CONSIDERED YOUR PRIMARY SOURCE OF DISINFECTION FOR POTENTIALLY MICROBIOLOGICALLY UNSAFE
WATERS. EVEN THOUGH YOUR GALLEY-MATE SYSTEM IS A WATER PURIFICATION APPLIANCE, WE CAN ONLY CLAIM 99.99% REDUCTION OF MICRO-
ORGANISMS., THOUGH IN THEORY SMALLER THAN OUR MEMBRANE PORES. FOR WATER DISINFECTION OF STORED FRESH WATER CONTACT FACTORY.
CAUTION
2
STARTING YOUR INSTALLATION
PREPARATION
Check the following list of components to ensure that
all parts are packed with your system. Note, installation
requirements will vary from vessel to vessel. Often we
find the location for the installation is under the galley
sink, nevertheless, many systems are installed in remote locations such as the engine room, at which point
added materials may be required. Your distributor will
be able to supply additional fittings, tanks and longer
tubing runs if your installation were to require those.
1– Water Storage Tank (Remote Tanks boxed
separately if required for your installation)
1– Reverse Osmosis Purification assembly
1– Box with Pre & Post Filters plus Membrane element
1– Installation Kit with assorted fittings and tubing
(5ft)
All tubing is individually labeled and color coded for ease of your installation.
Determine the location for the installation of the RO
system. Avoid locations where the system might come
in contact with hot surfaces such as engines, exhaust,
hot water pipes, electrical panels and other hazards.
Determine the location for the pure water faucet. Check
to see that drilling a hole in a galley counter or sink
will not damage pipes or wires running under the sink.
If a second faucet is being installed in a remote sink or
entertainment bar area, and there is no cabinet under
sink, verify that there is a removable access panel.
Determine location(s) of storage tank(s). A maximum
of 15 feet is possible for close installations from tank to
faucet(s). If added faucets are being used, you will need
to add additional storage tanks at those locations.
1/4” Red – Connects the feed water line valve to the RO Pre-Filter
3/8” Blue – Connects the RO Membrane Product Port to the Storage Tank(s)*
1/4” Red – Connects the Membrane Reject Port to the Drain Connector**
3/8” White – Connects the Post Filter to the Faucet***
* For Remote Tanks to Bridge or Wet Bars, order special FDA approved tubing from our Distributor
** On certain installations, depending on water source and tank size, reject may be returned to fresh tank ,
to an existing drain or to a thru the hull fitting.
*** On Remote Tank installs, a 3/8” Quick Connect “T” can be located on blue line (3/8”) interconnecting the
tanks. Kit includes an in-line shut off. An Optional in-line polishing filter at the remote faucet connection
is available to pick up any possible taste from long tubing runs.
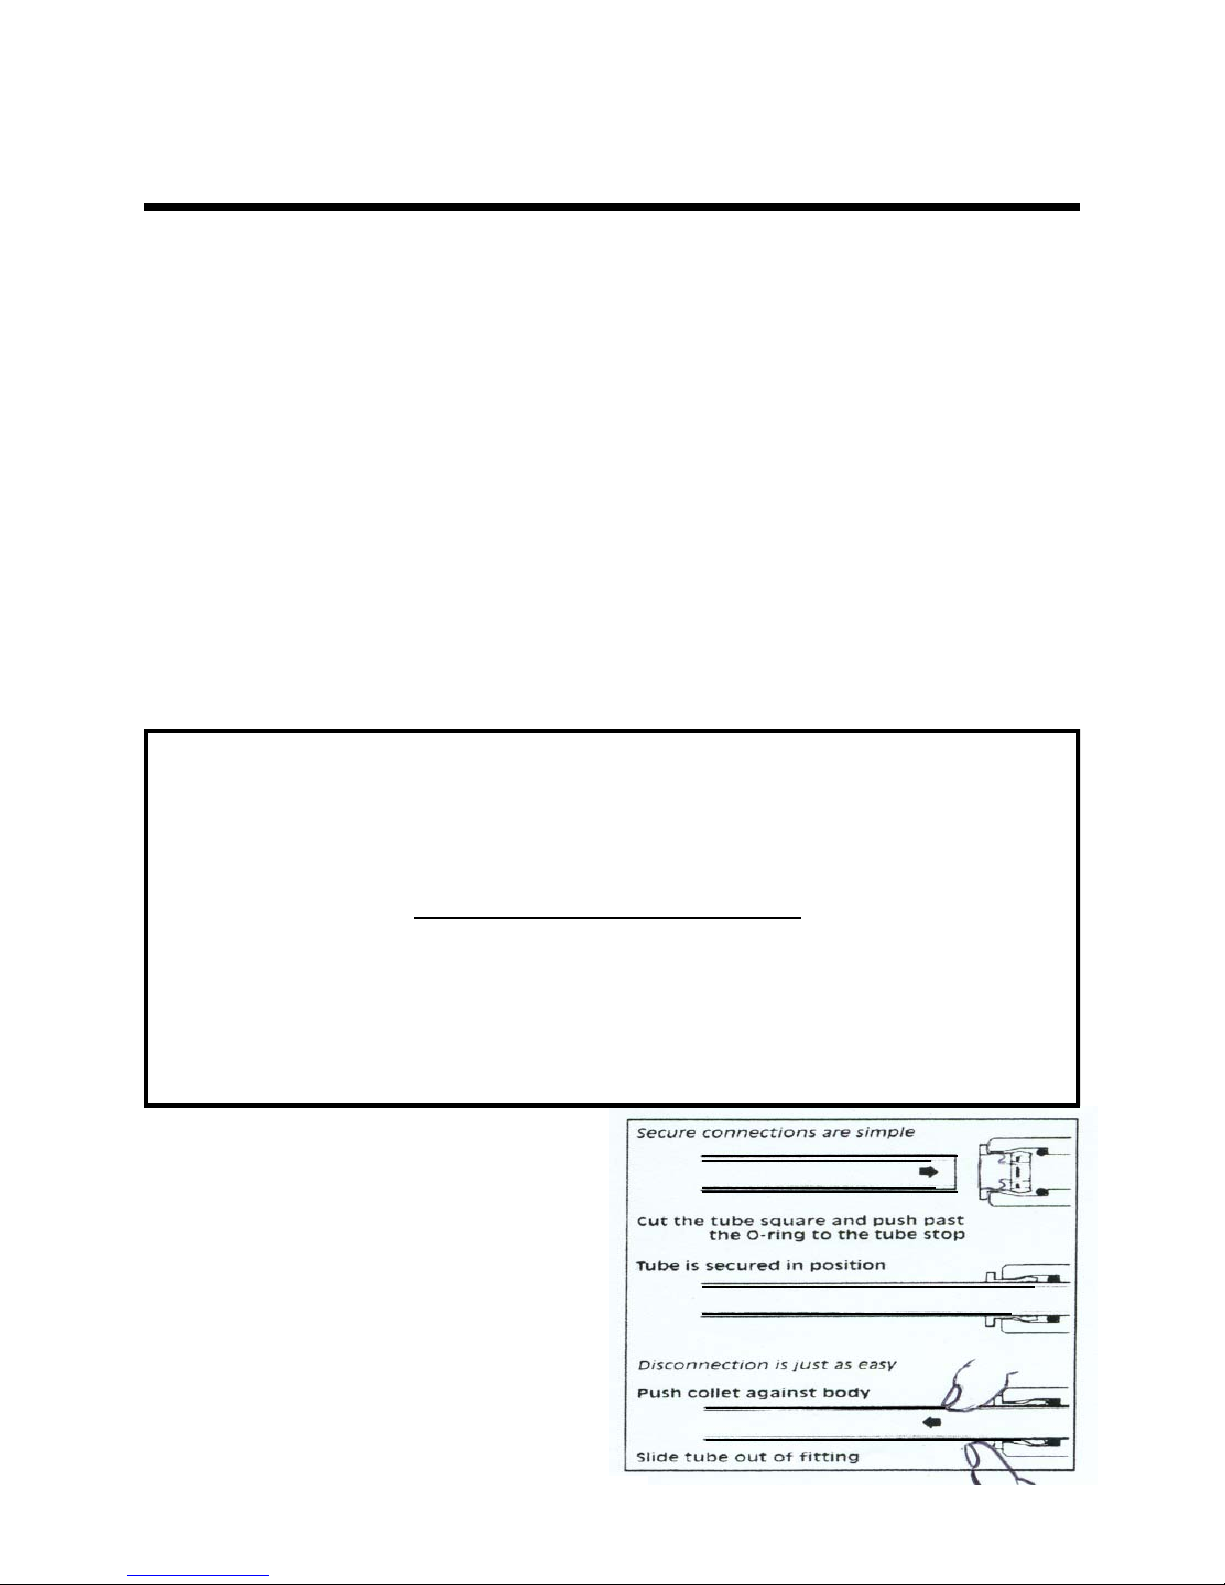
Fittings and Tubing
John Guest™ fittings are used throughout the system.
To insure optimal seal, tubing should be cut with the
end perfectly square. An angled cut or distortion of the
tubing will not provide an efficient seal and may cause
leaks.
To install a tube, push it through the collet until it seats
firmly. To remove a tube, push in the collet towards
fitting, and pull out the tube.
3
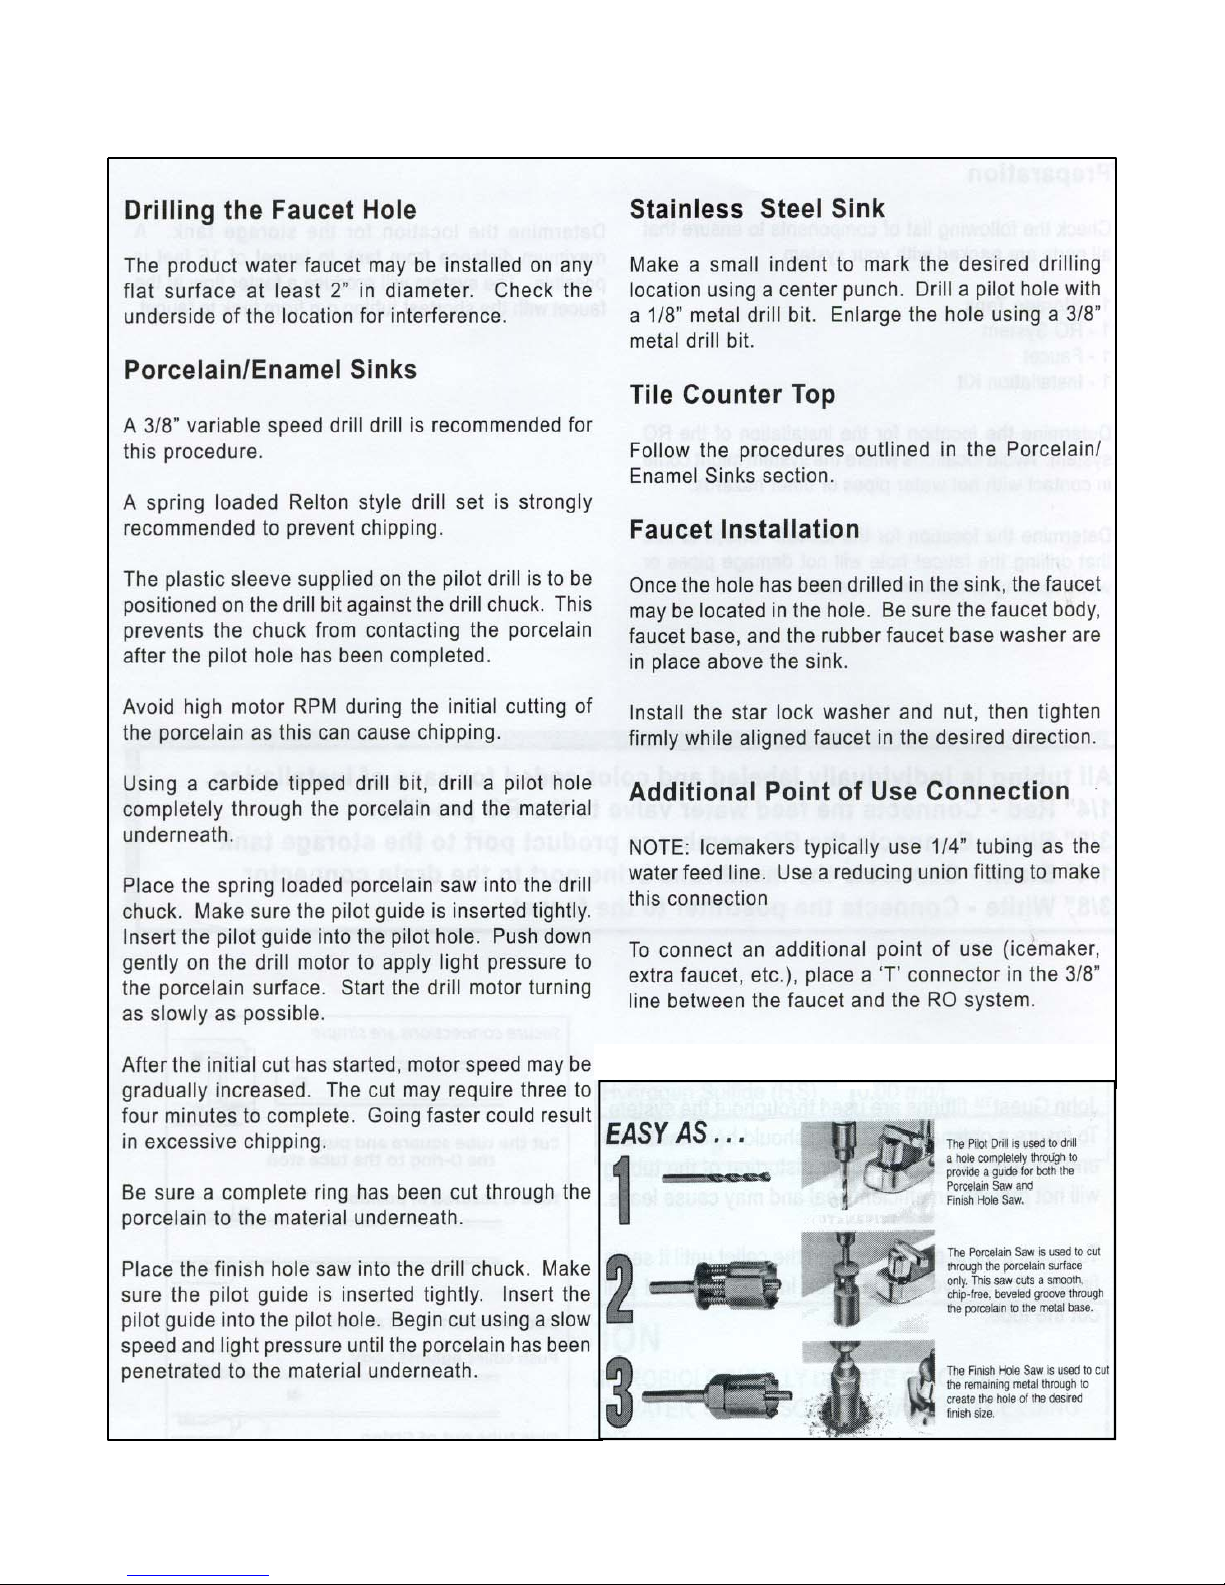
PURE WATER FAUCET INSTALLATION
Drilling with the Recommended Relton Cutter
4
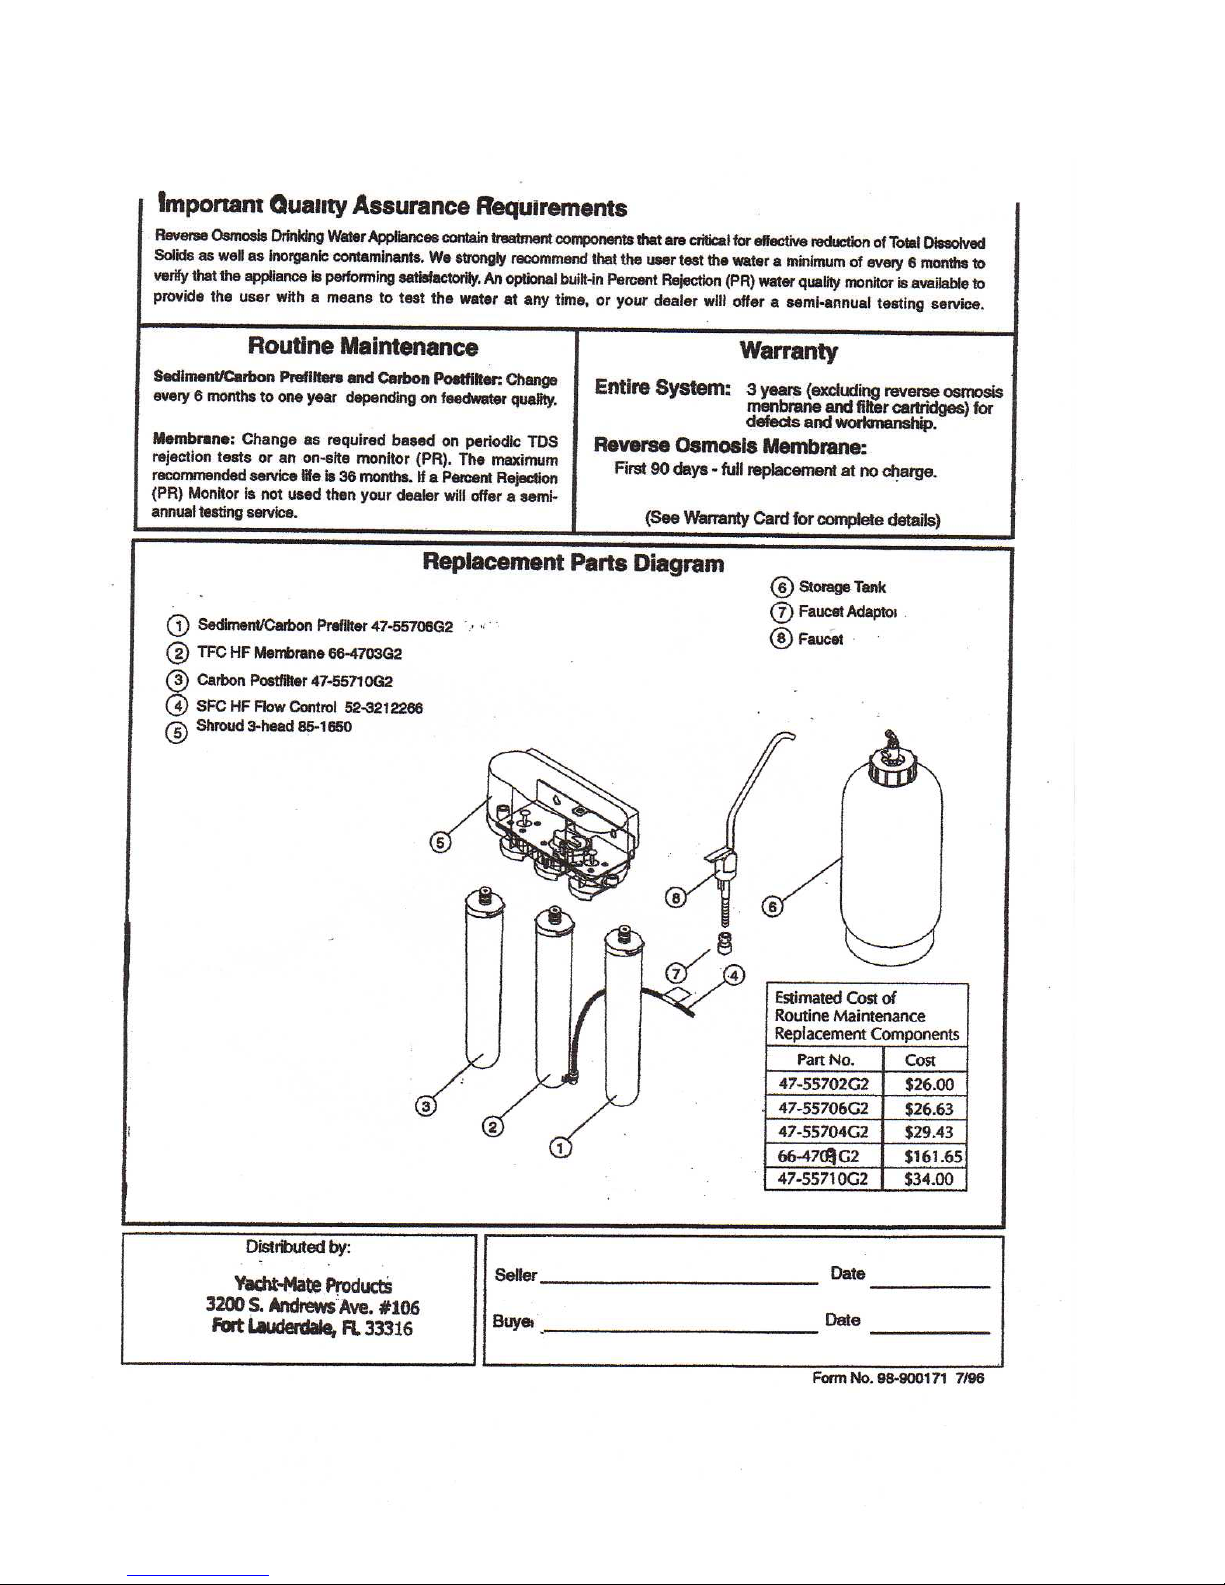
1- PRE –06
2- MEMBRANE –09
3- POST –10
GALLEY-MATE
F AUCET AND SYSTEM COMPONENTS
PARTS BREAKDOWN
Standard Faucet Assembly
Each Galley-Mate Reverse Osmosis System is packed
with a long reach polished chrome faucet. The instructions shown below will cover most variations of the
Standard Faucet, which is available in decorator colors,
polished brass, gold plated, and brushed antique finishes.
Were you to have specified a special decorator faucet,
mounting would be the same.
Yacht-Mate Products in addition, offers several lines of
specialty faucets, such as the handsome OPELLA Line.
In some cases, the hole size for mounting specialty faucets as well as the connecting assemblies may differ.
If you have ordered a specialty faucet from our distributor, please refer to the installation instructions included
with the alternate faucet, before you locate and drill any
holes for mounting.
NOTE:
For certain ice line applications, the ice line is provided
in 1/4” copper coil tubing. Cut /reduce length of 1/4”
copper to feed with 3/8” tubing (leaving enough to pull
out fridge) .When adapting plastic to copper , use a brass
compression fitting to adapt either 3/8” or 1/4” plastic
tube to 1/4” copper, using a 1/4 X 1/4 union or a 3/8 X
1/4 reducing union in brass, with plastic ferrules and
plastic tube inserts on the plastic tube, brass ferrules on
the copper tube.
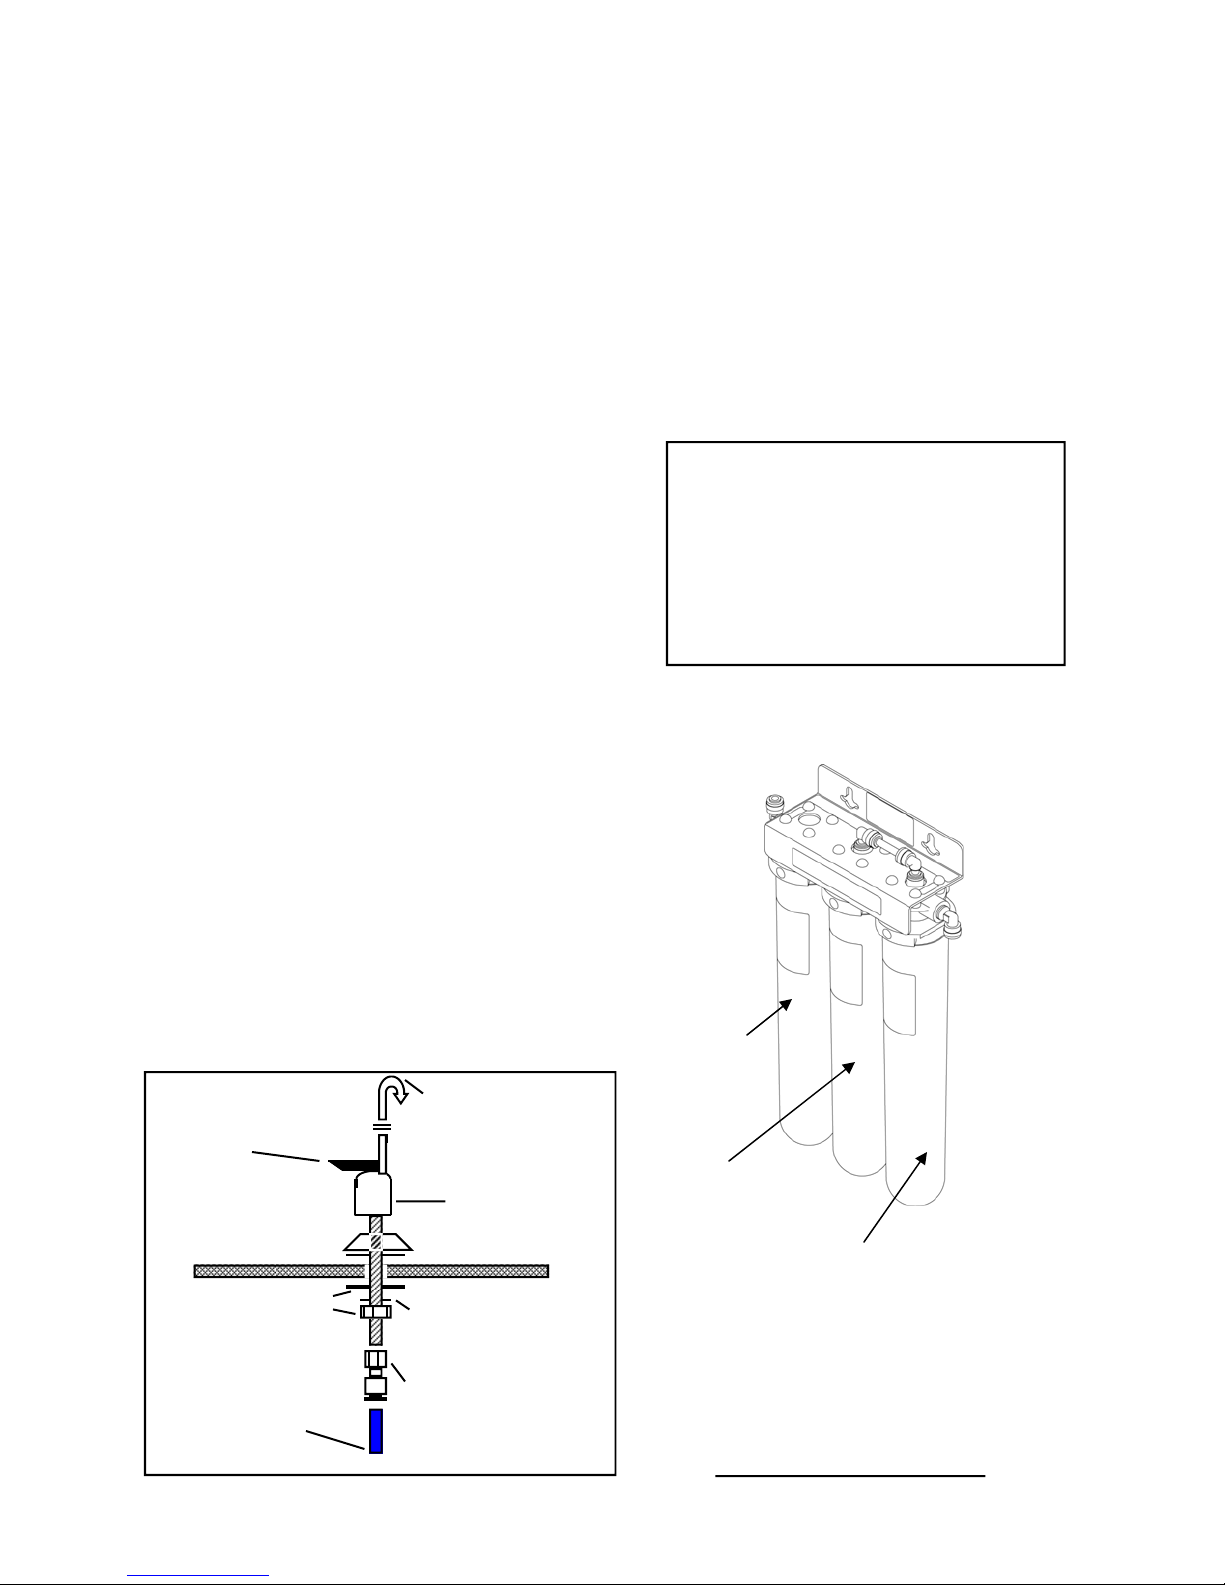
Faucet Water Actuator
Black Rubber Washer
Black Locating Washer
Escutcheon Plate
Fastening Nut
Short Spout, Gooseneck, or Long
Reach Faucet Spout
Faucet Body and Actuator Valve
Galley or Head Vanity
Counter Top
Lock Washer
John Guest™ Female X 3/8” Tubing
Quick Connect Plastic Fitting
65 GPM FCM
TMEMBRANE
STANDARD SYSTEMS
USE 65 GPD MEMBRANE
CERTAIN APPLICATIONS
MAY USE
A DIFFERENT CONFIGURATION
CARBON BLOCK
POST 55710G2
TFC
MEMBRANE
5709G2
CARBON PRE FILTER
55706G2 SED /CARBON
ELEGANT PLASTIC MOLDED COVER
INCLUDED NOT SHOWN
3/8” FDA Pure Water Tubing
REMOVABLE
COVER
5
WATER FEED SOURCE AND REJECT DRAIN CONNECTIONS
FEED WATER CONNECTIONS:
The feed water connection to the Galley-Mate marine
water purification system will vary from vessel to
vessel, depending on vessel size and type of piping
used on board.
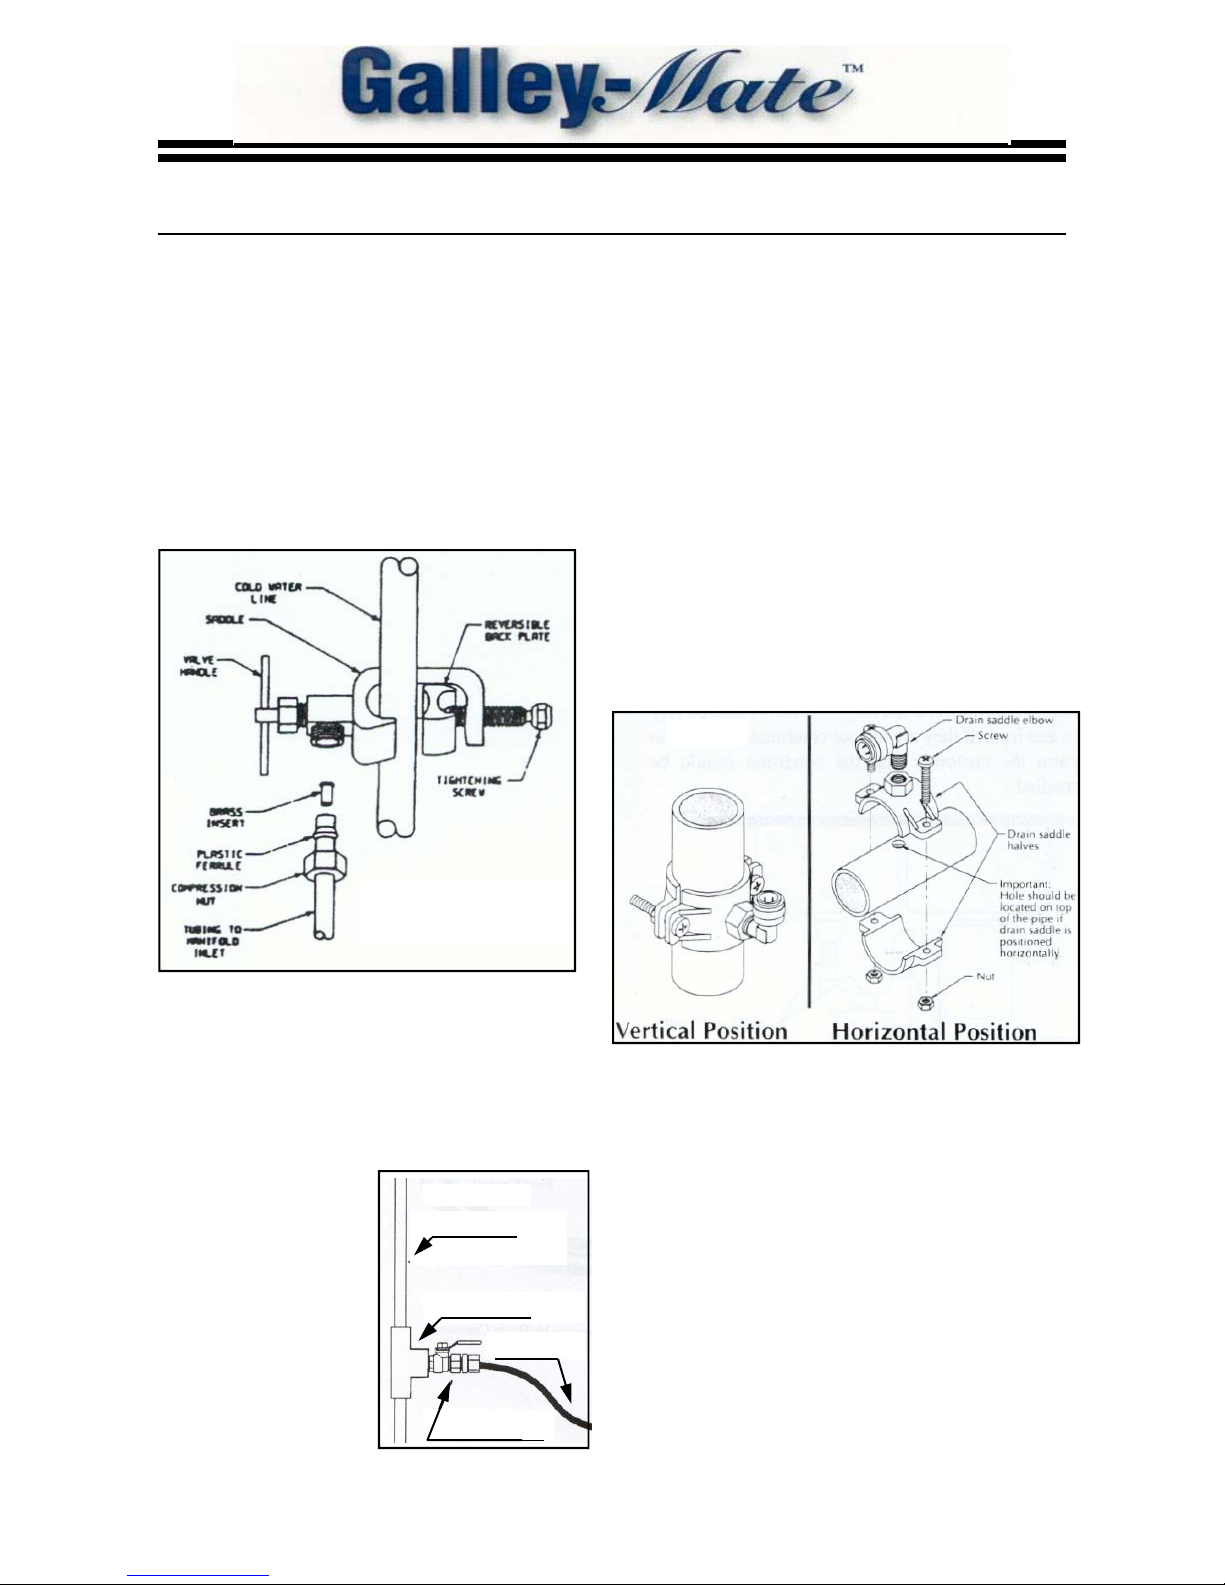
We include a 1/4” Self-Piercing valve that is normally
used under the galley sink on vessels that have the
cold water faucet piped with rigid copper rise rs.
(See figure 1-A.)
Today, many vessels use quick connect plastics for
DRAIN CONNECTIONS:
All Membrane Purification Systems have one feed water
inlet and two outlets, a purified water stream and the
reject drain stream. The reject flow must be taken to a
drain, which will vary from vessel to vessel.
We include a standard drain saddle valve which fits an y
1 1/2” OD straight wall pipe. This fitting may be used in
under galley sink installations where the riser above the
“P” Trap is 1 1/2” in diameter. This fitting can be installed either in a vertical position or on a horizontal
position as long as the fitting is above the trap. When
installing the Galley-Mate assembly in an engine room
you may utilize the saddle fitting on any non– pressurized straight wall pipe such as PVC. Do not install into
any pipe sections that are pressurized or in the position
of holding water in a void. ( See Figure 1-C ).
Select location for the drain clamp. Position the threaded
Figure 1-C
FIGURE 1-A
1/4” Self Piercing Saddle Valve
fittings and connectors along with the plastic tubing
that is available with specialty fittings such as those
supplied by Neptune Plumbing Systems, on a wide
range of production boats. For connection to plastic
tubes, we recommend locating a “T” with ball valve
(not supplied) to make the 1/4” connection to the Galley-Mate Feed Water port.
(See Figure 1-B)
Other connection fittings
are available. Feed connec-
Figure 1-B
Feed Water Source
tion can be achieved with
shut off of a variety of
styles. Although pre-filter
Plastic “T” Fitting
has a built in shut–off a
feed water shut off is re-
1/4” RO Feed
quired for a proper install.
Brass/Plastic Valve
1/2 of the saddle on pipe and mark the pipe through the
threaded opening. Drill a 1/4” hole at marked location
into pipe.
On board drain connections will vary depend ing on the
location for the installation of the system. Different
adaptors may be utilized when draining to an existing
thru-hull drain line. On some vessels, with larger fresh
water tanks and frequent water-maker fills from sea water, the RO drain may be diverted back to the fresh water
storage tank for a “O” waste system. If the TDS is low
in the tank, the rise of TDS from the RO will be insignificant to the tank volume. We recommend our WaterMate systems if this drain connection is used. Ask your
Distributor for Water-Mate product data.
6

ACTIVA TION, TROUBLESHOOTING, MAINTENANCE
Activating the System For the First Time
Connect the feed line if fed from a chlorinated city
water source, to the storage tank connection. If feed
line is fed from a fresh water storage tank or a non
chlorinated water supply, procure a thin ended medicine dropper and drop three to five drops of plain
unscented laundry bleach into the tubing or an open
ball valve on top of tank. The ball valve handle is in
line with the connection port when open. Connect
tubing to pressurized water source and turn water
on. When tank is full, it will feel heavy. Close the
ball valve and remove system feed tube.
Make sure all water supply & drain lines
are secure and free from leakage. Slowly
Connect tank line to tank. Open faucet by lifting handle to
allow the air out of the system. Slowly open feed water
valve to system.
Open the tank valve and drain through the open faucet.
This will flush the post filter and pressurize the post membrane side of your system. Once water has stopped running from the tank, leave faucet handle in the open position until all air is out of the system, and water is constantly dripping from the end of the faucet.
Close the faucet and allow 1/2 hour for system to pressurize the tank. Again check for leaks at all connections. Tank
should be full in approximately 1-1.5 hours. Leave tank
valve open.
turn the system feed valve to on position.
Do Not Use the First Two Fills of the Tank Reservoir
Allow the RO Tank two fills (1.5-2.5 hours each, dependant on pressure) and drain both fills to drain
through faucet. This will remove factory installed sanitizing solution from the entire system. The sanitizing solution is of course non toxic, yet should be removed prior to routine use of this appliance. A single
flush of the system should suffice, nevertheless we suggest a double flush on start up and after pickling
Maintenance
1) Close the ball valve on top of the storage tank(s). NOTE: If your vessel has additional storage tanks
in remote locations such as Fly-Bridge, Wet Bar or Master Suite, make sure all tank valves are
closed.
2) Open Faucet(s) at galley and any remote locations, to relieve pressure from the system. Standard
faucets will remain open when handle is lifted to up (on) position.
3) Remove the Pre-Filter by turning counter clockwise. Removal of the pre-filter automatically shuts
off the feed water supply. You may close the feed water shut off valve if so desired, for added as surance.
4) Remove the Post Filter by turning counterclockwise.
5) Install new replacement post filter. (Use activated carbon post filter only) Available through our
distributor. Element threads on clockwise. Do not over-tighten as a snug fit with the “O” rings will
provide a proper seal.
6) Install the new Pre-Filter. Thread into housing clockwise, without over tightening, to achieve an
“O” ring seal. Replacing the Pre-Filter will re-actuate the feed water automatically. If you closed
any feed water valves, re-open them. Close all faucet handles.
7) Open the Ball Valves on all the storage tanks throughout the vessel. Check for leaks.
8) Open faucet once again, and empty the storage tank(s). This will flush the Post Filters and allow
for a fresh tank fill with newly cartridges.
9) Allow 1.5-2.5 hours for tanks to be replenished with a fresh fill of highly pure water.
THIS MAINTENANCE SHOULD BE PERFORMED EVERY 6 MONTHS TO 1 YEAR
OR AS NECESSARY
7
GALLEY-MAT E ADDITIONAL
REMOTE TANK INST ALLATION
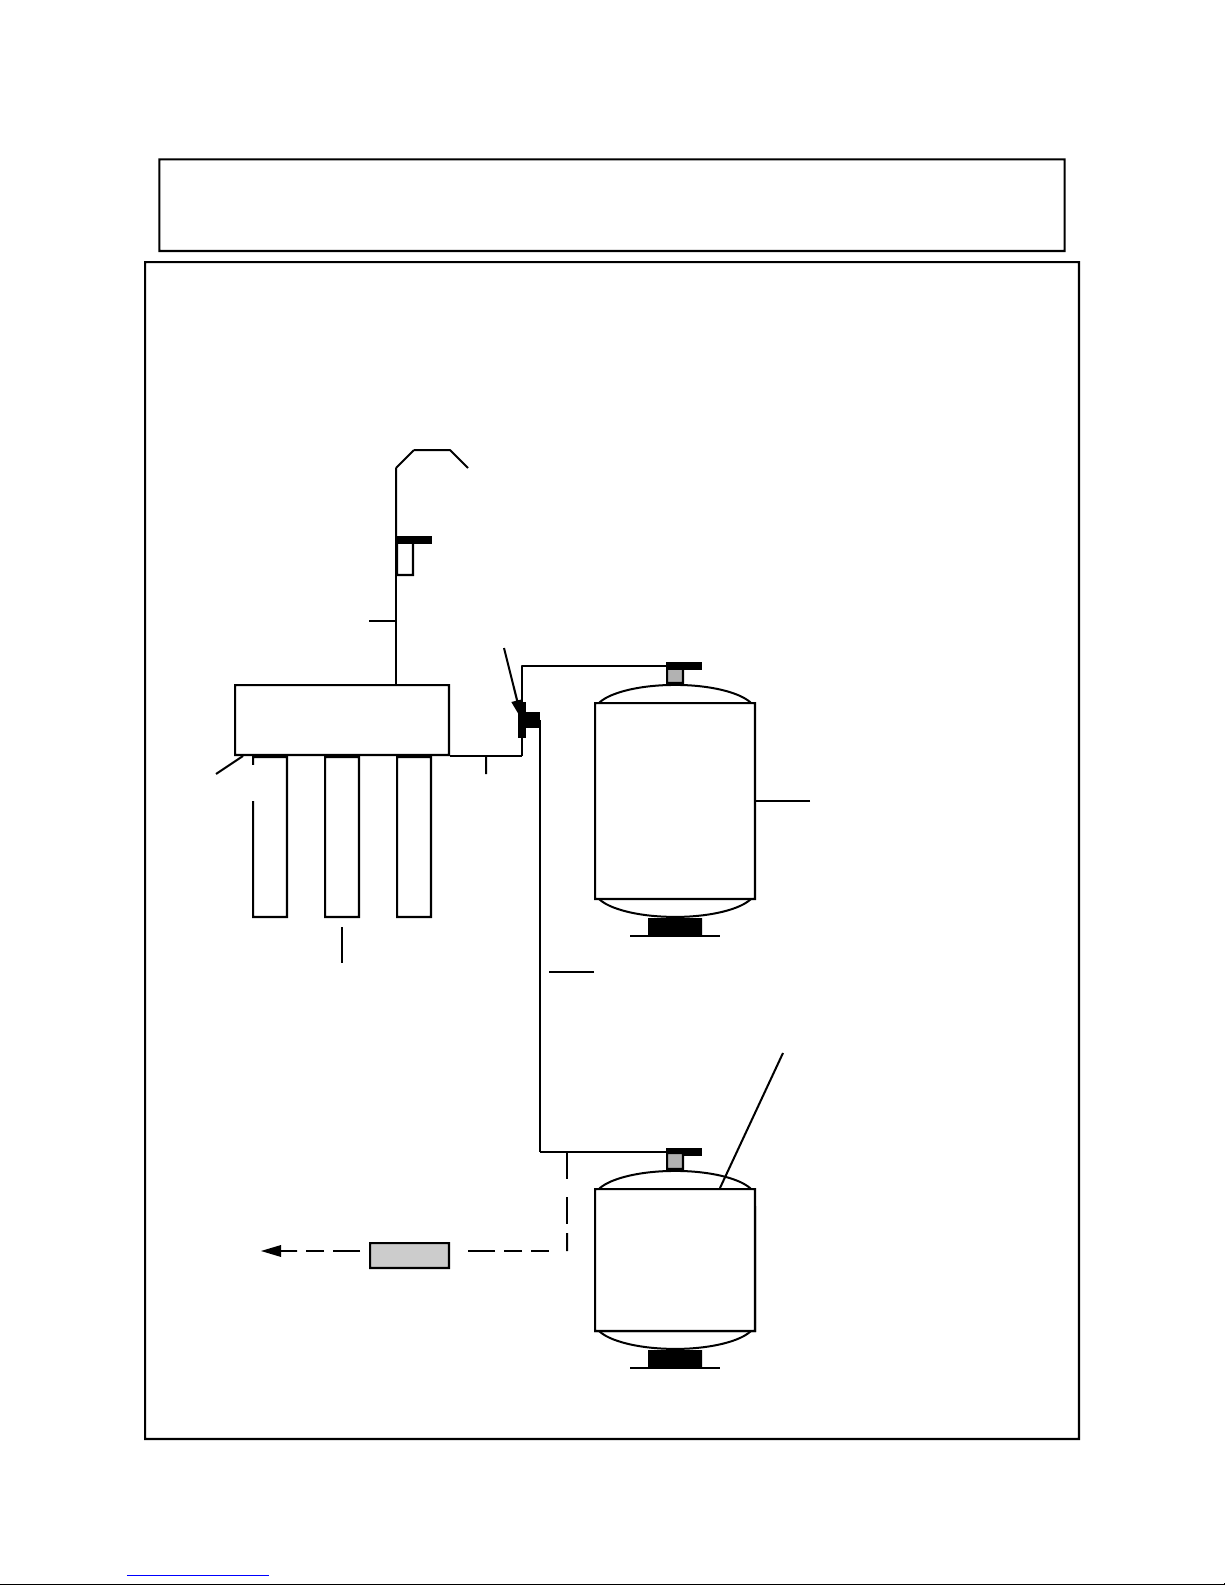
AS A SPACE SAVING MOVE, VESSELS OFTEN REQUIRE INSTALLATION OF THE
GALLEY-MATE SYSTEM IN ENGINE ROOMS, OR QUARTERS BELOW THE GALLEY. ON SUCH INSTALLATIONS, RUN THE 3/8” LINE FOR FAUCET UP TO GALLEY SINK. FOR A REMOTE TANK INSTALLATION, PLACE A QUICK CONNECT
“T” ON THE LINE TO PRIMARY TANK, AND INTERCONNECT TANK LINES.
NOTICE: ( OPTION B )
FOR INSTALLATIONS TO UPPER DECKS OR
TO GALLEY SINK
FAUCET
3/8 WHITE
3/8”
“T”
BRIDGE, TO FEED ICE-MAKERS, CONNECTION SHOULD BE MADE FROM TANK LINE,
UTILIZING A 10” INLINE FILTER AT THE
POINT OF USE TO KEEP TASTE OUT OF LINE
THIS IS TO BE RUN IN 3/8” MINIMUM.
NOTE:LARGER TANKS ARE AVAILABLE
FEED 1/4”
GALLEY-MATE SYSTEM
REVERSE OSMOSIS
65GPD
TO REMOTE ICE-MAKER AND/OR
FAUCET WITH 10” 3/8 QC
IN-LINE FILTER
GALLEY-MATE IS A PRODUCT OF
YACHT-MATE PRODUCTS, Inc.
.
3/8 TO
TANK
Blue
PRIMARY STORAGE
TANK 3.2 GAL
3/8 BLUE
OPTION B
REMOTE STORAGE
TANK 3.2 GAL
NOTE: LARGER TANKS
ARE AVAILABLE
8

WHAT YOU SHOULD KNOW ABOUT THIS PURE WATER APPLIANCE
FACTS ABOUT REVERSE OSMOSIS TECHNOLOGY
AND
TIPS FOR START-UP AND USE
Reverse Osmosis (RO) is the technology of membrane separations of fluids. When water is processed
through the Galley-Mate RO System, it is important to know that the system is not an ordinary filter, with
one inlet and one outlet. Your RO has one inlet and two outlets. One outlet is comprised of a pure water outlet that takes your high purity water to a storage tank, and then to a dispensing faucet. The other outlet carried unwanted impurities to a reject drain. In essence, we are not taking anything out of water, we are removing just the water in a nearly pure state, and virtually sending everything else to a waste drain. This
process utilizes several components, principal of which is the RO Membrane. A membrane is like a muscle,
as the more you use it, the better it will work for you, producing greater quantities of water, of even higher
qualities. Once the water is produced and stored, the system will shut off to avoid any unnecessary waste.
Nevertheless, when feed tanks and/or dock supplies are plentiful, be sure to use as much water as you wish.
There are varied uses beyond beverage preparation which you may consider, ranging from plant watering
to cleaning fine crystal, glass, appliances, varnished wood surfaces, and watering pets. Enjoy this appliance,
and put it to work for you!
START-UP TIPS:
YOUR REVERSE OSMOSIS SYSTEM WILL PRODUCE UP TO 65 GALLONS/DAY,
DEPENDING ON THE TEMPERATURE, THE PRESSURE AND THE LEVEL OF
DISSOLVED SOLIDS TO BE REMOVED FROM THE WATERS THAT FEED THE
SYSTEM.
For example, on start-up, we advise that you wait up an average of 4 hours for a tank to
fill, discard the water, and repeat the process. This is based on lower pressures often
found on board vessels, as well as on average temperatures between cold and warm climates. The Dissolved Solids start out higher than normal as our membranes have a sterilizing non toxic solution packed in them. The initial flush will rid the system of the solution
as well as any black carbon fines coming from post filters. Often, the tank fill may take
only one to two hours, and should provide approximately 1.5-2.0 gallons when drained
completely. This often can be completed within 2.5 to 3 hours total , allowing you to complete both flushes and have water ready for use within 4-5 hours after installation.
NOTE: When the storage tank is empty, you will only see fast series of drops and drips
coming from the faucet. That is normal, as the production rate for pure water at 77 degrees F. is 0.03 gallons/minute.
The faucet may be depressed to pour a glass of water or fill a small container. To fill a larger container, lift the faucet handle, and you will have a steady flow.
Were you to have any questions or concerns, call 877-922-4862(yachtmate) 954-769-9564
or e-mail sales@yachtmate.com. * visit: www.yachtmate.com
9
 Loading...