

Page 1

Instructions
G203
Page 2
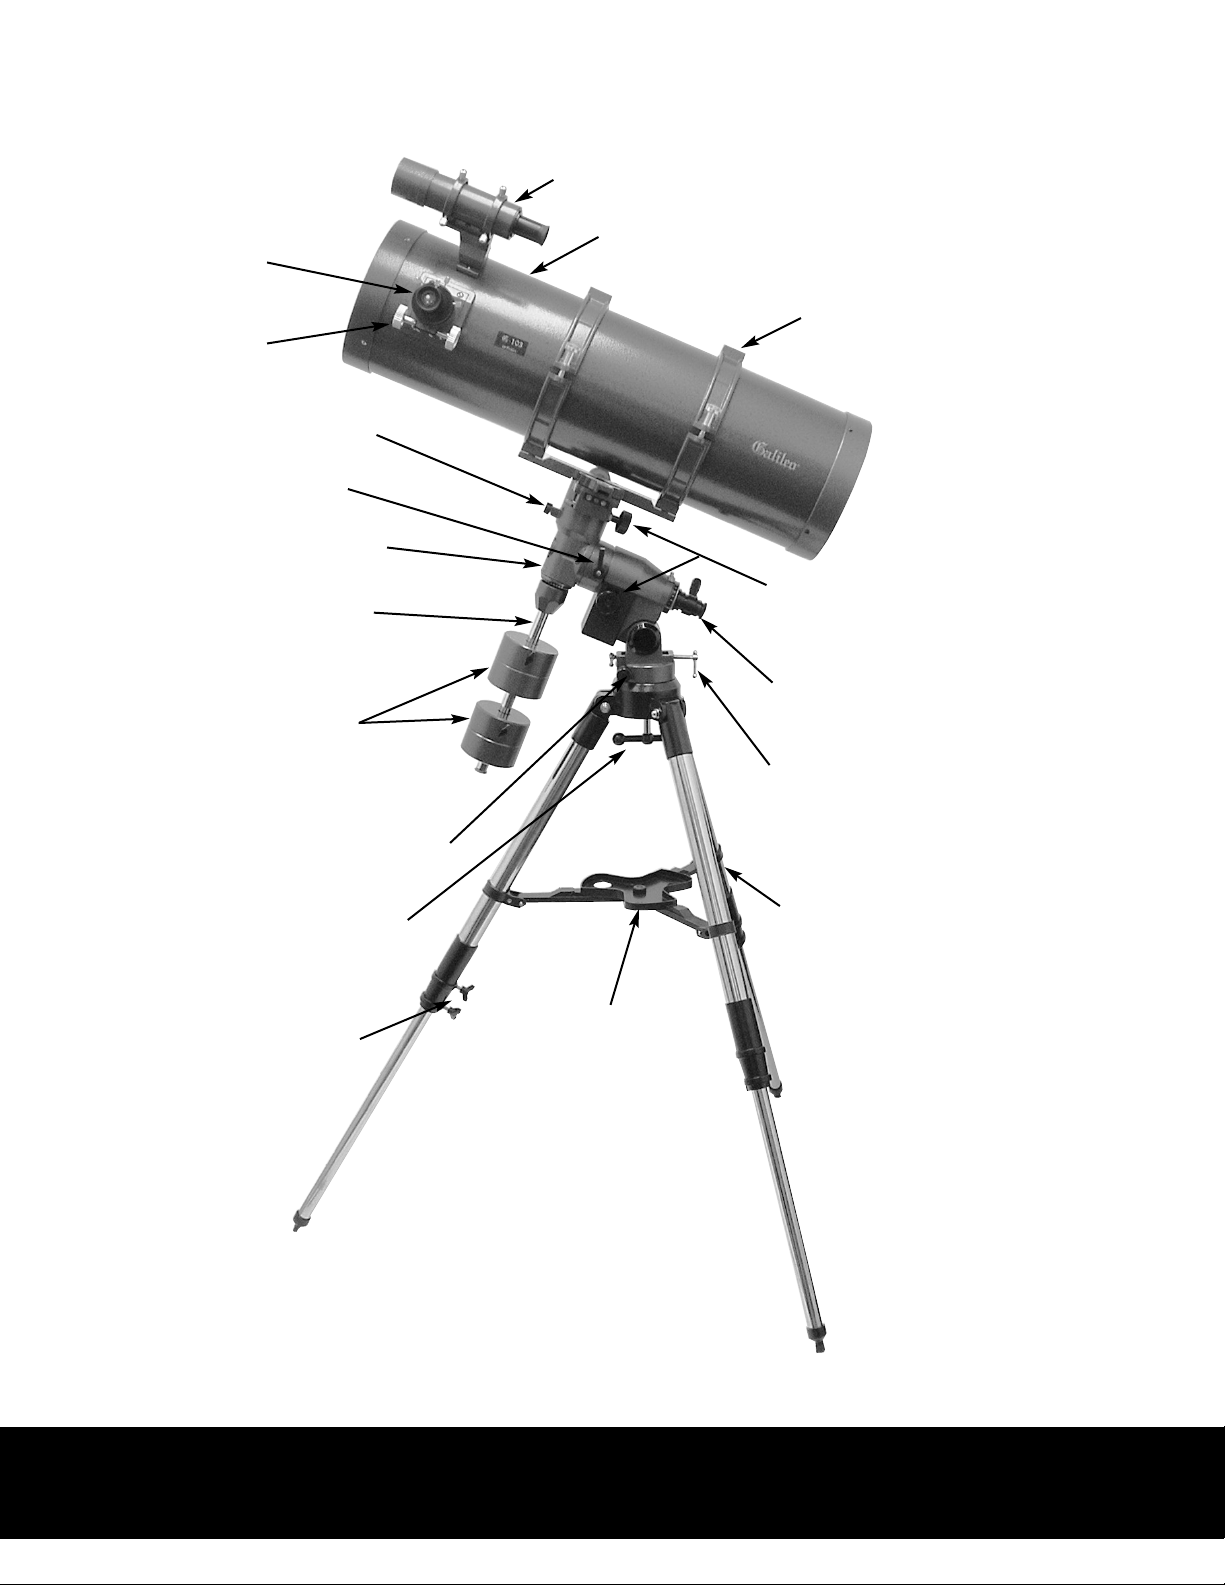
G203 Specs. & Features
Eyepiece
Focuser
Declination Lock Knob
R.A. Lock Knob
Equatorial Mount
8x50 Finder & Bracket
900x203mm Optical Tube Assy.
Tube Cradle
Counterweight Shaft
Counterweights
Azimuth Adjuster
Mount Locking Knob
Tripod Locking Knobs
Slow-Motion Controls
Polar Alignment Scope
Latitude Adjuster
Adjustable Aluminum Tripod
Accessory Tray
Note: See page 9 for Helpful Assembly Tips
Caution: Never point the telescope at the Sun, not even for a
brief moment. Your eyesight can be damaged permanently.
2
Page 3

Galileo’s G203 Reflecting Telescope
Congratulations on your purchase of Galileo’s model G203 reflecting
Telescope. Due to the fact that your new telescope has many parts and accessories, it is very important that you inspect all the parts and accessories prior
to assembly.
By taking a few minutes to carefully remove everything from the shipping
carton, you can become familiar with all the components before assembly.
Your new Galileo telescope has been produced to very high specifications in
order to make the assembly process as fast and as easy as possible. Even
realizing that it is our intention to keep the assembly process as fast and as
easy as possible, a little patience is still required.
Please take a few minutes to review the following instructions. Should you
have any questions regarding assembly, please call our customer service
department at: 1-800-548-3537
Step One
Remove and inspect all parts. A complete list of all the parts and accessories
are listed below. Should you discover that you are missing any parts or accessories, please contact us immediately.
1. 900x203mm Optical Tube Assembly
2. Tube Clamp
3. 8x50mm Finder and Bracket
4. 2" Focuser w/1.25" Adapter
5. 6.5mm & 20mm Plössl Eyepieces, 1.25"
6. Equatorial Mount, w/Illuminated Polar Finderscope
7. Fully Adjustable Aluminum Tripod
8. Slow-Motion Knobs (2ea.)
9. Counterweights (2ea.)
10. Counterweight Shaft
11. Accessory Tray
12. Galileo Planetarium CD-ROM
Note: See page 9 for Helpful Assembly tips
Specifications are subject to change without notice.
3
Page 4

Galileo’s G203 Reflecting Telescope
Step
Take the tripod out of the shipping carton and spread the legs apart. Then adjust the
height of the tripod legs to almost full extension (leaving a few inches at the top of the
legs). Tighten the locking knobs firmly. Make sure the tripod legs are even and the tripod is fairly level. Since the telescope is rather large, we suggest that you assemble the
telescope out of doors or in a large garage.
Step Three
Attach the accessory tray to the tripod.
Step Four
Place the Equatorial Mount onto the top of the tripod. The Equatorial Mount can only
go on one way. The part on the tripod head that sticks up must go in between the two
Azimuth adjusting knobs. They might have to be unthreaded a few turns in order for it
to fit. Once in place these two knobs can be tightened up. Next, thread the large locking
knob which is under the tripod head into the bottom of the Equatorial Mount, securely.
Two
Adjust Equatorial Mount until it looks like the picture on page two.
Step Five
Attach the Counterweight Shaft to the Equatorial Mount. This must be snug.
Step Six
Remove the knurled safety knob athe bottom of the Counterweight Shaft and place on
the side for a moment. Then loosen the locking knobs on the Counterweights until the
counterweights can be slid up the shaft. When both counterweights are on, replace the
knurled safety knob.
Step Seven
Attach the Slow-Motion Knobs to the Equatorial Mount.
Step Eight
Attach the telescope to the Equatorial Mount. Make sure that the RA & DEC locking
knobs are tight to prevent the telescope from moving once attached. This is best accomplished if the counterweight shaft is pointing towards the ground, as in the picture on
page two. The Tube Clamp has a dovetail on it’s bottom. This must be placed into the
dovetail slot on the top of the Equatorial Mount. Tighten the large knob first, and then
the small silver colored knurled knob, making sure that both are snug before releasing
the telescope.
4
Page 5

Galileo’s G203 Reflecting Telescope
Step Nine
Attach the Finderscope and bracket to the telescope. The finder bracket has a dovetail
mount on the bottom which is attached to the mating part that is afixed to the telescope
tube.
Step T
Place the 20mm Plossl eyepiece into the 1.25" adapter that is already in the 2"focuser
and tighten securely.
Step Eleven
The next step is to balance the telescope. While holding the telescope, unlock the R.A. &
DEC locking knobs (Make sure you are holding the telescope firmly or, have someone
helping you to see that the telescope doesn’t fall). Then move the telescope so the counterweight shaft is parallel to the ground and tighten the R.A. locking knob to secure.
Then move the telescope so it’s parallel to the ground. You should be holding the telescope with your hands and the telescope should be able to move in the DEC axis. Now,
move your hands to see if the telescope will go up or down. If it does, then you must
loosen the tube clamp slightly so the telescope can be moved back and forth. Move the
telescope until the telescope is balanced and doesn’t move. Then, lock the DEC locking
knob and loosen the R.A. locking knob (while still holding the telescope). Now, see if the
telescope moves on the R.A. axis. If it does, then the counterweights must be moved on
en
the shaft (back & forth) until the telescope doesn’t move. Once this is complete your telescope is balanced.
Step Twelve
Now to align the finderscope. You must be outside to align the finderscope. Do this during the daytime to get started. Find an object approximately 1 mile away or more (the
farther the better). Try to find a water tower, tall building etc. Use the main telescope
with the 20mm eyepiece and sight down the telescope tube and point it at your object
you’ve chose. Move the telescope with the slow-motion controls to align the object in the
center of the field of view of the eyepiece. Next, look through the finderscope and see
where the crosshairs are pointing. If the crosshairs are not on the object that you have in
the center of the field of view of the eyepiece in your telescope, using the adjusting
screws on the finder bracket, move the screws so the crosshairs are centered over the
object in the eyepiece. When you use the telescope on the sky observing the Moon,
Planets etc. and you find that the finder is slightly off, readjust it using the finder brackets adjusting screws.
5
Page 6

Galileo’s G203 Reflecting Telescope
Polar Aligning Tips
N
to Polaris
Declination Setting Circle
NOTE:
In the below configuration with Polaris in the
eyepiece of the telescope,
the Declination Setting
Circle should read 89.2°
Make sure the top of the tripod
is level before polar aligning.
R.A. Setting Circle
Set Latitude Scale to read
the degree your location is
above the equator, i.e.
Chicago, IL = 41.52°
More locations are on pg. 8
The more accurate the mount is
aligned to the north celestial pole, the
easier the tracking of astronomical
objects will be.
40´
60´
Reticle in Illuminated Polar Finder
#1
#2
Rotate Polar Finder so that the 4 stars (#1)
match-up. Next, adjust the Azimuth &
Latitude Knobs until the 4 Stars lineup perfectly & Polaris is in the small circle (#2).
TIP: Make sure the Polar Finder is aligned with the R.A. axis.
With the Polar Finder sighted on a land object rotate the R.A.
axis, if the crosshair moves, then adjust one of the three screws
that hold the Polar Finder in the rear of the R.A. axis. Keeping
adjusting the screws until the crosshair does not move away
from the object.
6
Page 7

Locating the pole star, Polaris Setting R.A. axis to pole star, Polaris
.
(pg 6)
7
Page 8

The Geographical Locations
list is a small compilation of
cites around the U.S. If you
do not live in or around one
of these cities use a GPS
device to locate your present
latitude. If you do not have a
GPS device contact a airport
close by your observing site
and ask what their latitude is,
and adjust the mounting to
read the same.
Telescope Maintenance
With proper care your telescope
should rarely need any maintenance work.
A. When not in use, always
replace all lens covers to keep dust
& contaminants off the optical
surfaces.
900mm.
B. A small amount of dust on any
optical surface is OK. If the dust
builds up, then use a can of compressed air and then a camel’s
hair brush to remove the dust.
C. If the mirrors need cleaning,
they should be cleaned by a professional. Either have your instrument serviced by a telescope
repair facility or return it to the
factory.
D. Collimation or alignment of the
optical system is done at the factory before shipment.
20
900÷20 = 45x
8
Page 9

Helpful Assembly Tips
Attaching the Tripod Locking Screws
Attaching Locking Knob to Mount
Placing EQ. Mount on Tripod
Attaching the CW Shaft to Mount Adjusting to your Latitude
Attaching “E” Clip to Locking Knob
Attaching the Finder Scope
Remove the Battery Saver
Replace the Illuminator Cover
9
Page 10

First Light
When first taking a look at an astronomical object we recommend the Moon. The Moon is very large, bright
and easy to find. Even though it’s our closest celestial neighbor it offers many points of interest on it’s lunar
landscape, i.e mountains, rilles, valleys and above all craters, thousands of craters. If you’ve just started
observing or if your advanced amateur with many years of experience, the Moon is always interesting to
observe.
Observing Tips
Before observing, give the telescope a chance to adjust to the ambient temperature. Take the telescope outside
around 30 minutes before observing. This will give the instrument time to cool down. If the inside temperature
is around 20 degrees or more than the outside temperature you will have to allow more time for the telescope
to adjust. If you start observing before the instrument has reached thermal equilibrium the image quality will
be subpar. This will especially be true at higher magnification where the image is more critical.
As you become more experienced in observing you’ll notice that the seeing conditions (air turbulence) will
also effect the quality of the image that the telescope produces. On evenings when the stars are twinkling rapidly you’ll soon discover that the images at mid to high magnification are not very good. The best viewing
will be at the zenith (overhead). At the zenith you’re viewing through 10 miles of atmosphere, and when
you’re viewing at the horizon, you’re viewing through 100 miles of atmosphere.
Galileo Limited One Year Warranty
We guarantee to replace or, at our option, repair any products or parts thereof which are found defective in material or workmanship during the first year from date of purchase. Our obligation with
respect to such products or parts shall be limited to replacement or repair, F.O.B. Miami, and in no
event shall we be liable for consequential or special damages or for transportation, installation, adjustment, or other expenses which may arise in connection with such products or parts. A S&H fee to cover
postage and handling is required with the return of the product. Please call Galileo at 1-800-548-3537 to
ascertain the S&H Fee. No expenses, warranties and implied warranties, whether or not merchantability
of fitness for any particular use or otherwise (except as to title) other than these expressly set forth
above which are made in writing and signed by executive officer of our corporation.
NO LIABILITY FOR CONSEQUENTIAL DAMAGES, IN NO EVENT SHALL THE MANUFACTURERS OR IT’S SUPPLIERS BE LIABLE FOR ANY DAMAGES WHATSOEVER. BECAUSE SOME
STATES DO NOT ALLOW THE EXCLUSION OR LIMITATION OF THE POSSIBILITY FOR CONSEQUENTIAL OR INCIDENTAL DAMAGES, THE ABOVE LIMITATION MAY NOT APPLY TO
YOU.
GALILEO
DIVISION OF DISCIPLINE MARKETING INC.
13872 S.W. 119th Ave., Miami, FL 33186
 Loading...