

Page 1

USER MANUAL / COMMAND REFERENCE
DMC-21x3
Amplifiers
& Accessories
Manual Rev. 1.0m
Galil Motion Control, Inc.
270 Technology Way
Rocklin, California 95765
Phone: (916) 626-0101
Fax: (916) 626-0102
E-mail Address: support@galilmc.com
URL: www.galilmc.com
Rev 12/08
Page 2

Using This Manual
This user manual provides information for proper operation of the daughter boards that connect to the
DMC-21x3 controllers. It also includes a small listing of commands that pertain to the daughter
boards. This is a subset of the commands listed in the command reference you received with your
motion controller.
Please note that many examples are written for the DMC-2143 four-axes controller or the DMC-2183
eight axes controller. Users of the DMC-2133 3-axis controller, DMC-2123 2-axes controller or
DMC-2113 1-axis controller should note that the DMC-2133 uses the axes denoted as XYZ, the DMC2123 uses the axes denoted as XY, and the DMC-2113 uses the X-axis only.
Examples for the DMC-2183 denote the axes as A,B,C,D,E,F,G,H. Users of the DMC-2153 5-axes
controller denotes the axes as A,B,C,D,E. DMC-2163 6-axes controller denotes the axes as
A,B,C,D,E,F. DMC-2173, 7-axes controller denotes the axes as A,B,C,D,E,F,G. In other words, the
axes names A,B,C,D may be used interchangeably with X, Y, Z, W.
WARNING: Machinery in motion can be dangerous! It is the responsibility of the user to design
effective error handling and safety protection as part of the machine. Galil shall not be liable or
responsible for any incidental or consequential damages.
Page 3

Contents
CONTENTS................................................................................................................................................................ 1
CHAPTER 1 OVERVIEW........................................................................................................................................ 5
INTRODUCTION ......................................................................................................................................................... 5
DC TO DC OPTION ................................................................................................................................................... 5
PINOUT ..................................................................................................................................................................... 5
DC TO DC PASS THROUGH....................................................................................................................................... 6
MODULE TYPES ........................................................................................................................................................ 6
Servo Drives........................................................................................................................................................ 6
Stepper Drives..................................................................................................................................................... 6
Non Amplifier Modules....................................................................................................................................... 6
Cables ................................................................................................................................................................. 7
CHAPTER 2 SR-19900............................................................................................................................................ 9
INTRODUCTION ......................................................................................................................................................... 9
LAYOUT.................................................................................................................................................................. 11
PINOUT ................................................................................................................................................................... 11
CONFIGURATION..................................................................................................................................................... 11
CHAPTER 3 ICM-20100....................................................................................................................................... 13
INTRODUCTION ....................................................................................................................................................... 13
LAYOUT.................................................................................................................................................................. 14
PINOUT ................................................................................................................................................................... 15
AMPLIFIER ENABLE ................................................................................................................................................ 17
CHAPTER 4 ICM-20105....................................................................................................................................... 19
INTRODUCTION ....................................................................................................................................................... 19
ELECTRICAL SPECIFICATIONS ................................................................................................................................. 20
LAYOUT.................................................................................................................................................................. 20
PINOUT ................................................................................................................................................................... 21
CONFIGURATIONS FOR ICM-20105 ........................................................................................................................ 23
Amplifier Enable Circuit................................................................................................................................... 23
Opto Isolation Settings...................................................................................................................................... 25
CHAPTER 5 SDM-20240/20242............................................................................................................................ 27
INTRODUCTION ....................................................................................................................................................... 27
ELECTRICAL SPECIFICATIONS ................................................................................................................................. 28
LAYOUT.................................................................................................................................................................. 28
PINOUT ................................................................................................................................................................... 29
Mating Connectors............................................................................................................................................ 31
DMC-21x3 Accessories Contents• 1
Page 4

CONFIGURATIONS FOR SDM-20240 & SDM-20242............................................................................................... 31
Motor Current Setting....................................................................................................................................... 31
Low Current Setting (JP1)................................................................................................................................ 32
ADDITIONAL SETTINGS FOR SDM-20242 ............................................................................................................... 33
Protection Circuitry and Error LED................................................................................................................. 33
ELO (Emergency Lock Out).............................................................................................................................. 33
Fault Output from SDM-20242......................................................................................................................... 33
CHAPTER 6 AMP-20341...................................................................................................................................... 35
INTRODUCTION ....................................................................................................................................................... 35
ELECTRICAL SPECIFICATIONS ................................................................................................................................. 36
LAYOUT.................................................................................................................................................................. 36
PINOUT ................................................................................................................................................................... 37
Mating Connectors............................................................................................................................................ 38
CHAPTER 7 AMP-20440/20420........................................................................................................................... 39
INTRODUCTION ....................................................................................................................................................... 39
ELECTRICAL SPECIFICATIONS ................................................................................................................................. 40
LAYOUT.................................................................................................................................................................. 40
PINOUT ................................................................................................................................................................... 41
OVER-VOLTAGE PROTECTION ................................................................................................................................ 43
OVER-CURRENT PROTECTION ................................................................................................................................ 43
ABORT INPUT OPTIONS........................................................................................................................................... 44
CHAPTER 8 ICM-20500....................................................................................................................................... 45
INTRODUCTION ....................................................................................................................................................... 45
ELECTRICAL SPECIFICATIONS ................................................................................................................................. 46
LAYOUT.................................................................................................................................................................. 46
PINOUT ................................................................................................................................................................... 47
CONFIGURATION..................................................................................................................................................... 48
CHAPTER 9 AMP-20540/20520............................................................................................................................. 49
INTRODUCTION ....................................................................................................................................................... 49
ELECTRICAL SPECIFICATIONS ................................................................................................................................. 50
LAYOUT.................................................................................................................................................................. 50
PINOUT ................................................................................................................................................................... 51
Mating Connectors............................................................................................................................................ 53
OPERATION............................................................................................................................................................. 54
Brushless Motor Setup...................................................................................................................................... 54
Brushless Amplifier Software Setup.................................................................................................................. 54
Brush Amplifier Operation................................................................................................................................ 55
Using External Amplifiers................................................................................................................................. 55
Error Monitoring and Protection...................................................................................................................... 56
Hall Error Protection........................................................................................................................................ 56
Under-Voltage Protection................................................................................................................................. 57
Over-Voltage Protection................................................................................................................................... 57
Over-Current Protection................................................................................................................................... 57
Over-Temperature Protection........................................................................................................................... 57
ABORT INPUT OPTIONS........................................................................................................................................... 58
CHAPTER 10 AMP-20542 ...................................................................................................................................... 59
INTRODUCTION ....................................................................................................................................................... 59
ELECTRICAL SPECIFICATIONS ................................................................................................................................. 60
LAYOUT.................................................................................................................................................................. 60
PINOUT ................................................................................................................................................................... 61
Mating Connectors............................................................................................................................................ 63
2 • Contents DMC-21x3 Accessories
Page 5

OPERATION............................................................................................................................................................. 64
Brushless Motor Setup...................................................................................................................................... 64
Brushless Amplifier Software Setup.................................................................................................................. 64
Brush Amplifier Operation................................................................................................................................ 65
Using External Amplifiers................................................................................................................................. 65
Error Monitoring and Protection...................................................................................................................... 65
Hall Error Protection........................................................................................................................................ 66
Under-Voltage Protection................................................................................................................................. 66
Over-Voltage Protection................................................................................................................................... 66
Over-Current Protection................................................................................................................................... 66
ABORT INPUT OPTIONS........................................................................................................................................... 66
CHAPTER 11 SDM-20640/20620............................................................................................................................ 67
INTRODUCTION ....................................................................................................................................................... 67
ELECTRICAL SPECIFICATIONS ................................................................................................................................. 68
LAYOUT.................................................................................................................................................................. 68
PINOUT ................................................................................................................................................................... 68
Mating Connectors............................................................................................................................................ 70
CONFIGURATIONS FOR SDM-206X0....................................................................................................................... 71
Current Level Setup (AG Command)................................................................................................................ 71
Low Current Setting (LC Command)................................................................................................................ 71
ABORT INPUT OPTIONS........................................................................................................................................... 71
CHAPTER 12 PCM-20900.................................................................................................................................... 73
INTRODUCTION ....................................................................................................................................................... 73
CHAPTER 13 DB-28040........................................................................................................................................ 75
INTRODUCTION ....................................................................................................................................................... 75
LAYOUT.................................................................................................................................................................. 76
PINOUT ................................................................................................................................................................... 77
ELECTRICAL SPECIFICATIONS ................................................................................................................................. 78
3.3V I/O (Standard)........................................................................................................................................... 78
5V I/O (-5V Option).......................................................................................................................................... 78
Analog Inputs.................................................................................................................................................... 78
INTERFACING TO THE DIGITAL I/O ......................................................................................................................... 78
SSI ......................................................................................................................................................................... 79
DB-28040 AND AMP-205X0.................................................................................................................................. 79
DB-28040 AND AMP-205X2 OR SDM-20640 ........................................................................................................ 79
CHAPTER 14 DB-28104.......................................................................................................................................... 81
INTRODUCTION ....................................................................................................................................................... 81
LAYOUT.................................................................................................................................................................. 83
THEORY OF OPERATION.......................................................................................................................................... 83
SETTING UP THE ENCODER ..................................................................................................................................... 85
TUNING THE SYSTEM .............................................................................................................................................. 87
EXAMPLE SIN/COS ENCODERS ................................................................................................................................ 89
CHAPTER 15 CABLES FOR AMP-20XXX ....................................................................................................... 91
APPENDIX A ABORT INPUT OPTIONS........................................................................................................... 97
ELO SCENARIOS..................................................................................................................................................... 97
DMC-2143 with AMP-20540............................................................................................................................ 97
DMC-2143 with SDM-20640............................................................................................................................ 98
DMC-2183 with two AMP-20440s.................................................................................................................... 98
APPENDIX B MATING D-SHELLS .................................................................................................................. 101
DMC-21x3 Accessories Contents• 3
Page 6

APPENDIX C COMMAND REFERENCE........................................................................................................ 103
AE.................................................................................................................................................................... 104
AG................................................................................................................................................................... 105
AU................................................................................................................................................................... 106
AW................................................................................................................................................................... 107
BR.................................................................................................................................................................... 108
BS.................................................................................................................................................................... 109
CN................................................................................................................................................................... 110
CO................................................................................................................................................................... 111
LC.................................................................................................................................................................... 112
QH................................................................................................................................................................... 113
TA.................................................................................................................................................................... 114
TK.................................................................................................................................................................... 115
TL (Binary 8a)................................................................................................................................................ 116
4 • Contents DMC-21x3 Accessories
Page 7

Chapter 1 Overview
________________________________________________________________________
Introduction
Galil’s DMC-21x3 series motion controllers connect with daughterboard modules that mount directly
on the motion controller. This eliminates the need for a separate cable between the motion controller
and the amplifier or breakout module. This approach saves the cost of the cable and significantly
reduces the real estate required for the controls within a system.
The DMC-21x3 uses a rugged 96 pin DIN board-to-board connector to interface the daughter boards
with the motion controller. The same controller can be ordered with different modules for different
system requirements. This controller series supports modules ranging from passive breakout modules
to 500W-per-channel brush and brushless servo drives to stepper and microstepper drives. Each
module breaks out the I/O provided by the controller and some of the boards also provide additional
I/O functions such as analog inputs or optoisolation. If you do not find the exact module you are
looking for, please contact Galil at 800-377-6329. We will work closely with you to create a module
that will fit your needs.
DC to DC Option
The DMC-21x3 series controllers can be ordered with an optional DC-to-DC converter so that a single DC
power supply can be used to power the controller (as opposed to the standard 5 V and +/-12 V input). This
can be ordered as either the –DC24 (18-36 VDC range) or –DC48 (36-72 VDC range). With the DC
option, a 4-pin molex power connector is provided for DC supply to controller at J99.
Pinout
J99 4-Pin Molex
1 Earth (optional)
2 No connection
3
4 GND
Mating connector = AMP #770 849-4
Pins = AMP #770 476-1
V
in
(18-36 or 36-72 VDC)
DMC-21x3 Accessories Chapter 1 Overview• 5
Page 8
DC to DC Pass Through
When using the DC-to-DC converter in conjunction with the Galil amplifier daughter boards described in
this manual, there is an option to have the DC power supply input shared among both boards, which
alleviates the need to supply power to two connectors. Power is passed through from the amp to the
controller via the “Pass Through” header located at J98 (1-4 axes) or JP14 (5-8 axes) on the controller.
When using the pass through on a 1-4 axis DMC-21x3 controller, DC power must be applied only to the
amplifier’s power connector.
When using the pass through on a 5-8 axis DMC-21x3 controller, DC power must be applied to both
amplifier’s power connectors. Power is passed through to the controller only from the second (axes E-H)
amplifier
The proper DC-to-DC converter must be chosen so that the DC voltage range is compatible with the
amplifier and motor voltage requirements. The J98/JP14 header comes standard, hence the purchaser must
specify if they would not like this header present with –NOJ98.
Module Types
Servo Drives
Part Number Description
AMP-20340 4 Axis Brush Type 20 Watt Linear Servo Drives. OBSELETE
AMP-20341 4 Axis Brush Type 20 Watt Linear Servo Drives (bipolar supply)
AMP-20420 2 Axis Brush Type 200 Watt/Axis PWM Servo Drives
AMP-20440 4 Axis Brush Type 200 Watt/Axis PWM Servo Drives
AMP-20520 2 Axis Brushless/Brush 500 Watt/Axis PWM Servo Drives
AMP-20540 4 Axis Brushless/Brush 500 Watt/Axis PWM Servo Drives
Stepper Drives
Part Number Description
SDM-20240 4 Axis 2 Phase Full/Half Step Stepper Motor Drive
SDM-20620 2 Axis 2 Phase Micro Stepper Motor Drive
SDM-20640 4 Axis 2 Phase Micro Stepper Motor Drive
Non Amplifier Modules
Part Number Description
ICM-20100 4 Axis Breakout to D Shell Connectors
ICM-20105 4 Axis Breakout to D Shell Connectors with opto-isolated I/O
DB-28040 Additional Configurable I/O and 8 Dedicated Analog Inputs
DB-28104 Accepts Sin/Cos Encoder Feedback
PCM-20900 Breadboard Module to Aid Design of Customer Daughter Boards
SR-19900 Shunt Regulator
6 • Chapter 1 Overview DMC-21x3 Accessories
Page 9

Cables
Part Number Description
15-pin high density D-sub cable with 1 m flying leads (AMP-204x0 and
CABLE-15-1m
CABLE-44-1m
AMP-205x0)
44-pin high density D-sub cable with 1 m flying leads (AMP-204x0 and
AMP-205x0)
DMC-21x3 Accessories Chapter 1 Overview• 7
Page 10

THIS PAGE LEFT BLANK INTENTIONALLY
8 • Chapter 1 Overview DMC-21x3 Accessories
Page 11

Chapter 2 SR-19900
____________________________________________________________________________
Introduction
For applications requiring a shunt regulator, Galil offers a small mountable model that can be configured for varying
voltage levels. Two fixed voltage threshold settings are available with jumpers, which can be set at either 33 or 66
volts. Additionally, a user defined voltage threshold can be set by changing a simple resistor. This shunt regulator
operates with hysteresis, where the regulator switches on at the set voltage threshold and switches off at 2 volts
below.
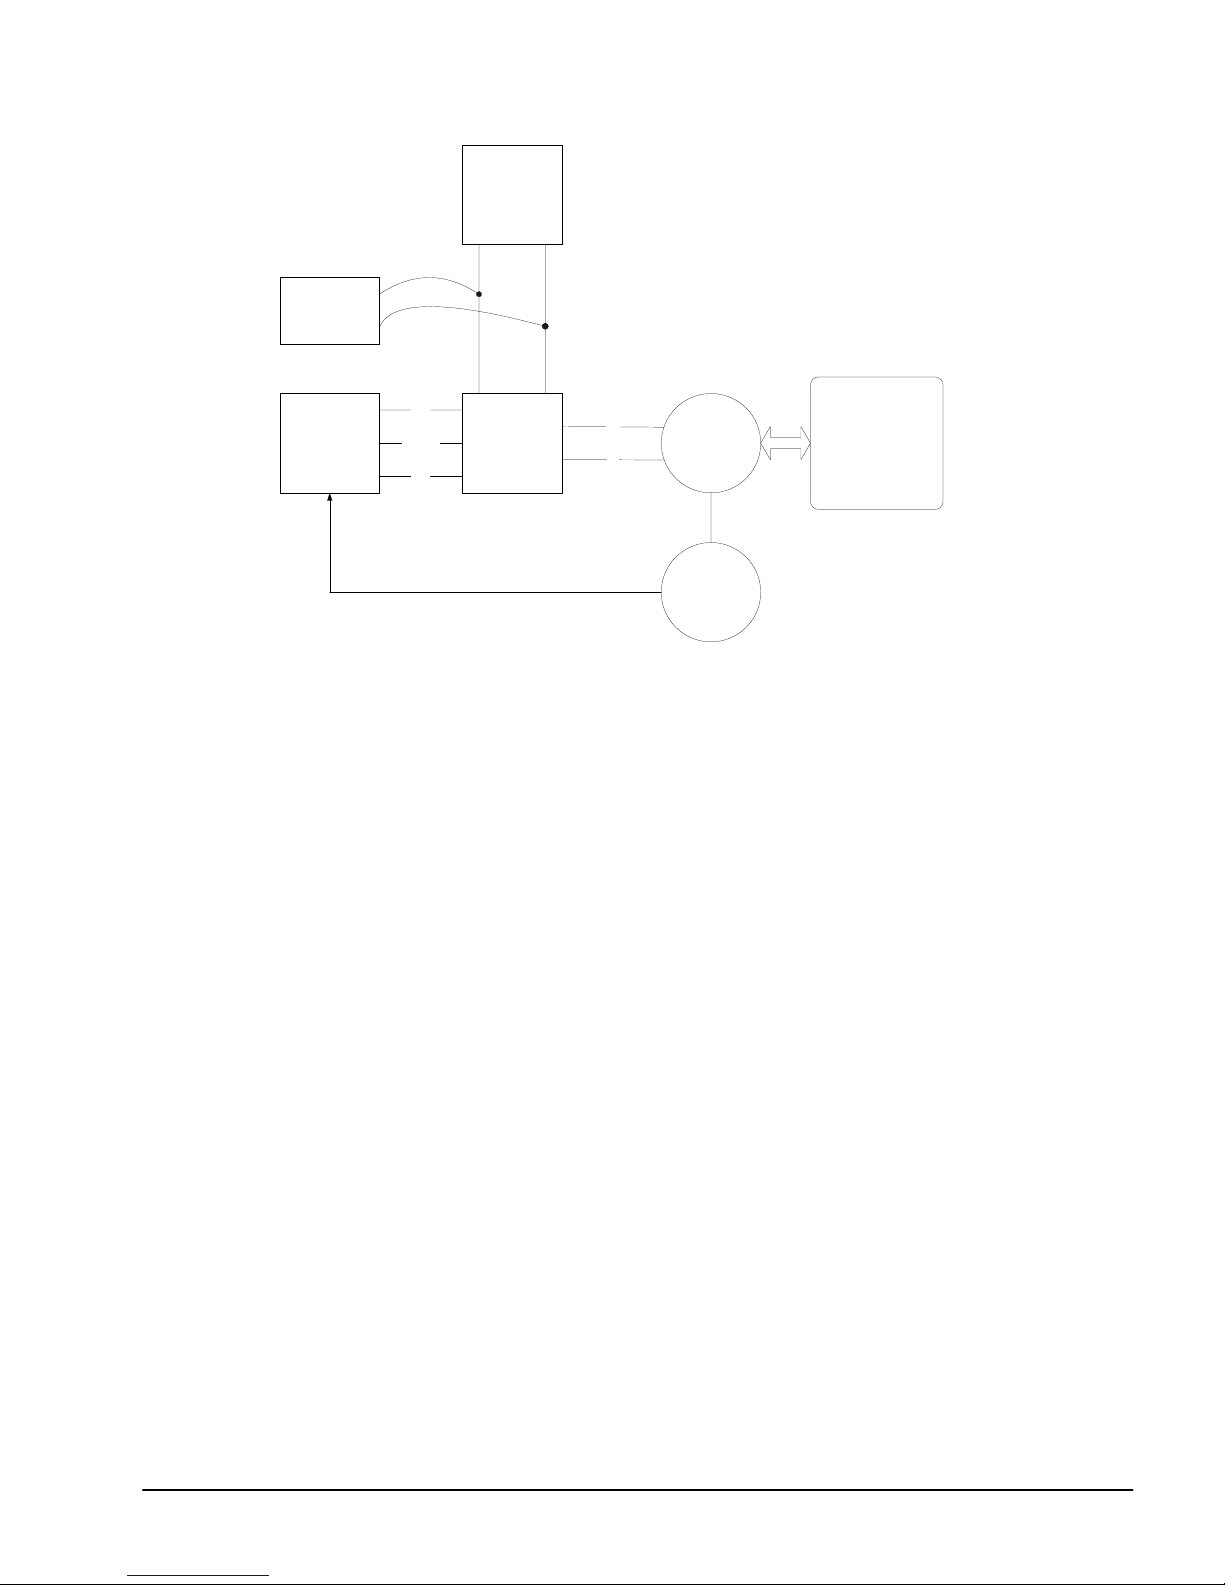
The shunt regulator should be placed in parallel with the power supply as in the figure below, and it should be
mounted to a metal surface using thermal grease to aid in heat transfer. Connections are made to the unit at VS
(voltage supply) and PG (power ground) using either the 4-pin Molex connector or the 8-pin Mate ‘N Lock
connector (AMP# 770579-1).
For a summary of shunt regulator operation, as well as details to help determine if one is required in your system,
please refer to application note #5448 at: (
http://www.galilmc.com/support/appnotes/miscellaneous/note5448.pdf).
DMC-21x3 Accessories Chapter 2 SR-19900• 9
Page 12
SR-19900
Shunt
Regulator
DCPower
Supply
+ -
Controller
GND
MOCMDx
AEN
+ -
PWM
Amplifier
M+
M-
Motor
System Load
(Inertia)
Encoder
Figure 1 Shunt Regulator Placement in a Typical Servo System
10 • Chapter 2 SR-19900 DMC-21x3 Accessories
Page 13
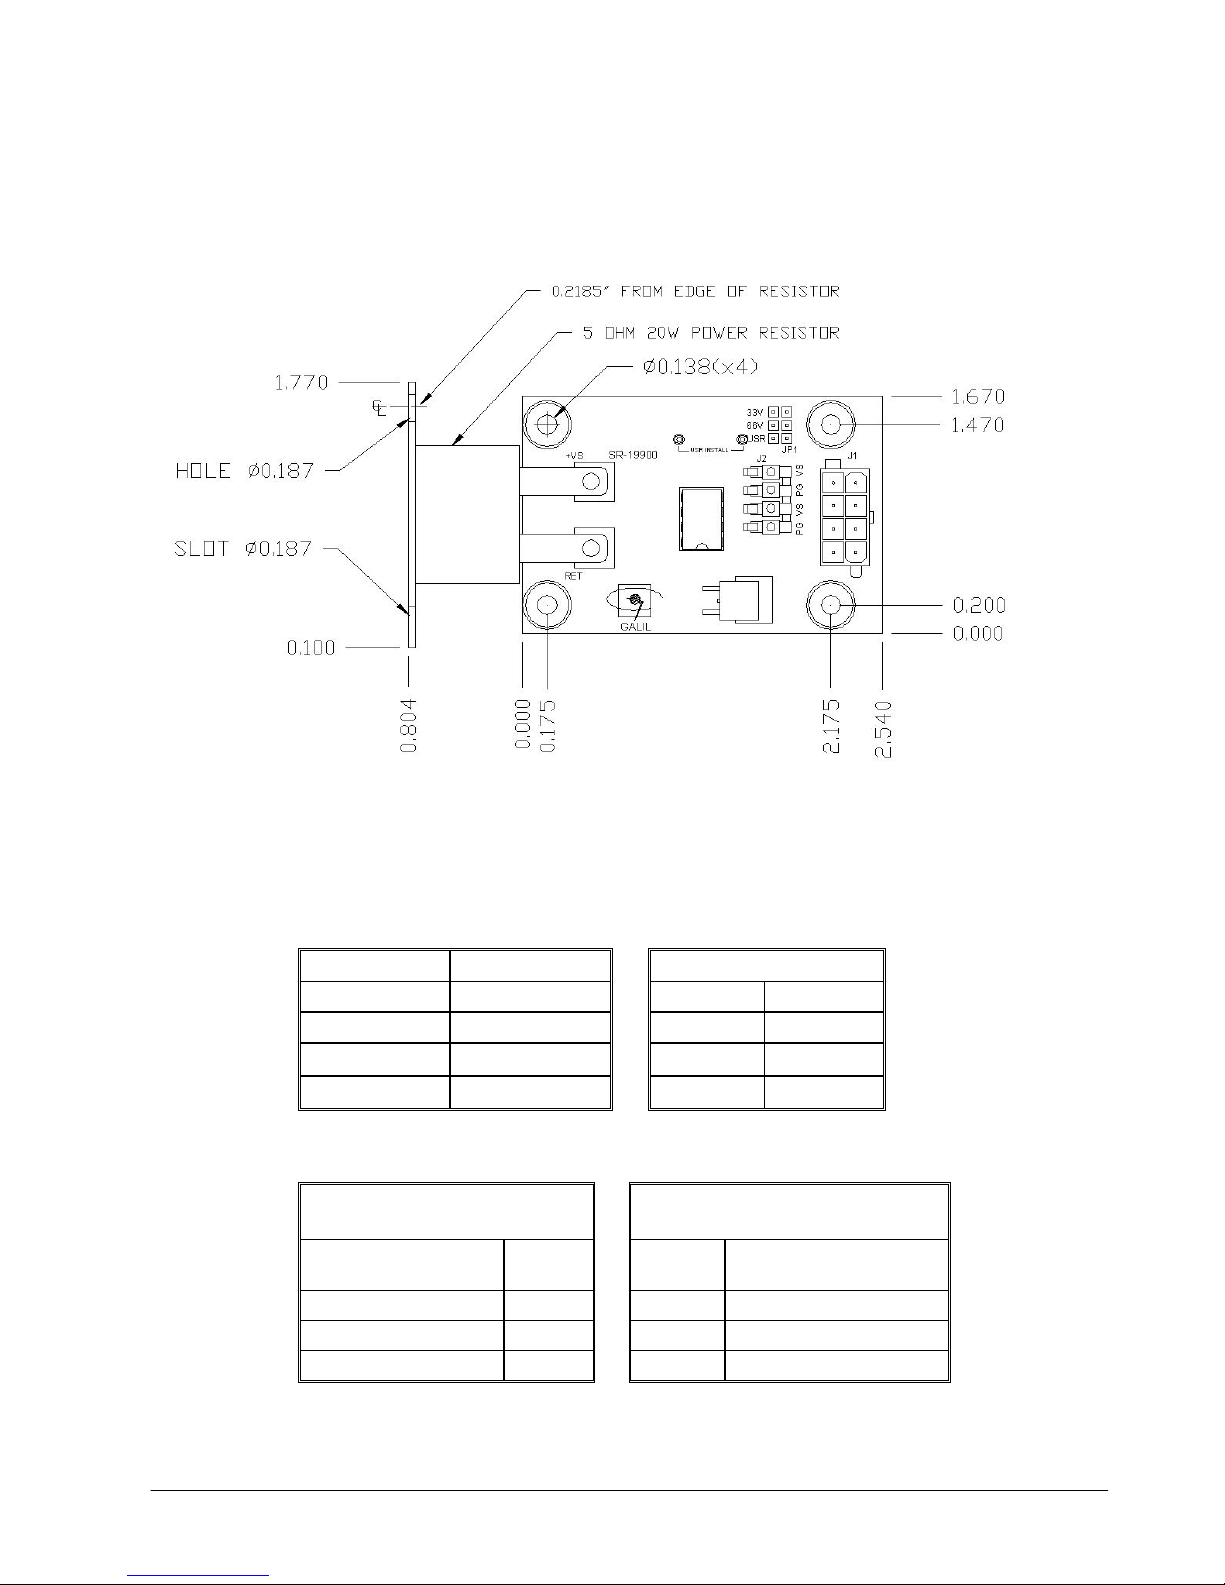
Layout
Figure 2 SR-19900 Layout
Pinout
J2 4-pin Molex J1 8-pin Mate ‘N Lock
Power Ground 1 PG
Voltage Supply 2 VS
Power Ground 3 PG
Voltage Supply 4 VS
1 Earth 5 PG
2 VS 6 PG
3 VS 7 PG
4 VS 8 PG
Configuration
USR - User Settable Voltage
SR-19900 Configuration
Voltage Threshold
Setting (Vs) JP1
33 volts 33V
66 volts 66V
User selectable USR
DMC-21x3 Accessories Chapter 2 SR-19900• 11
R8 = 1930 * Vs -42.2K
Voltage
(Vs) R8 value (ohms)
24 4.12 k
48 50.44 k
72 96.76 k
Page 14

THIS PAGE LEFT BLANK INTENTIONALLY
12 • Chapter 2 SR-19900 DMC-21x3 Accessories
Page 15
Chapter 3 ICM-20100
__________________________________________________________________
Introduction
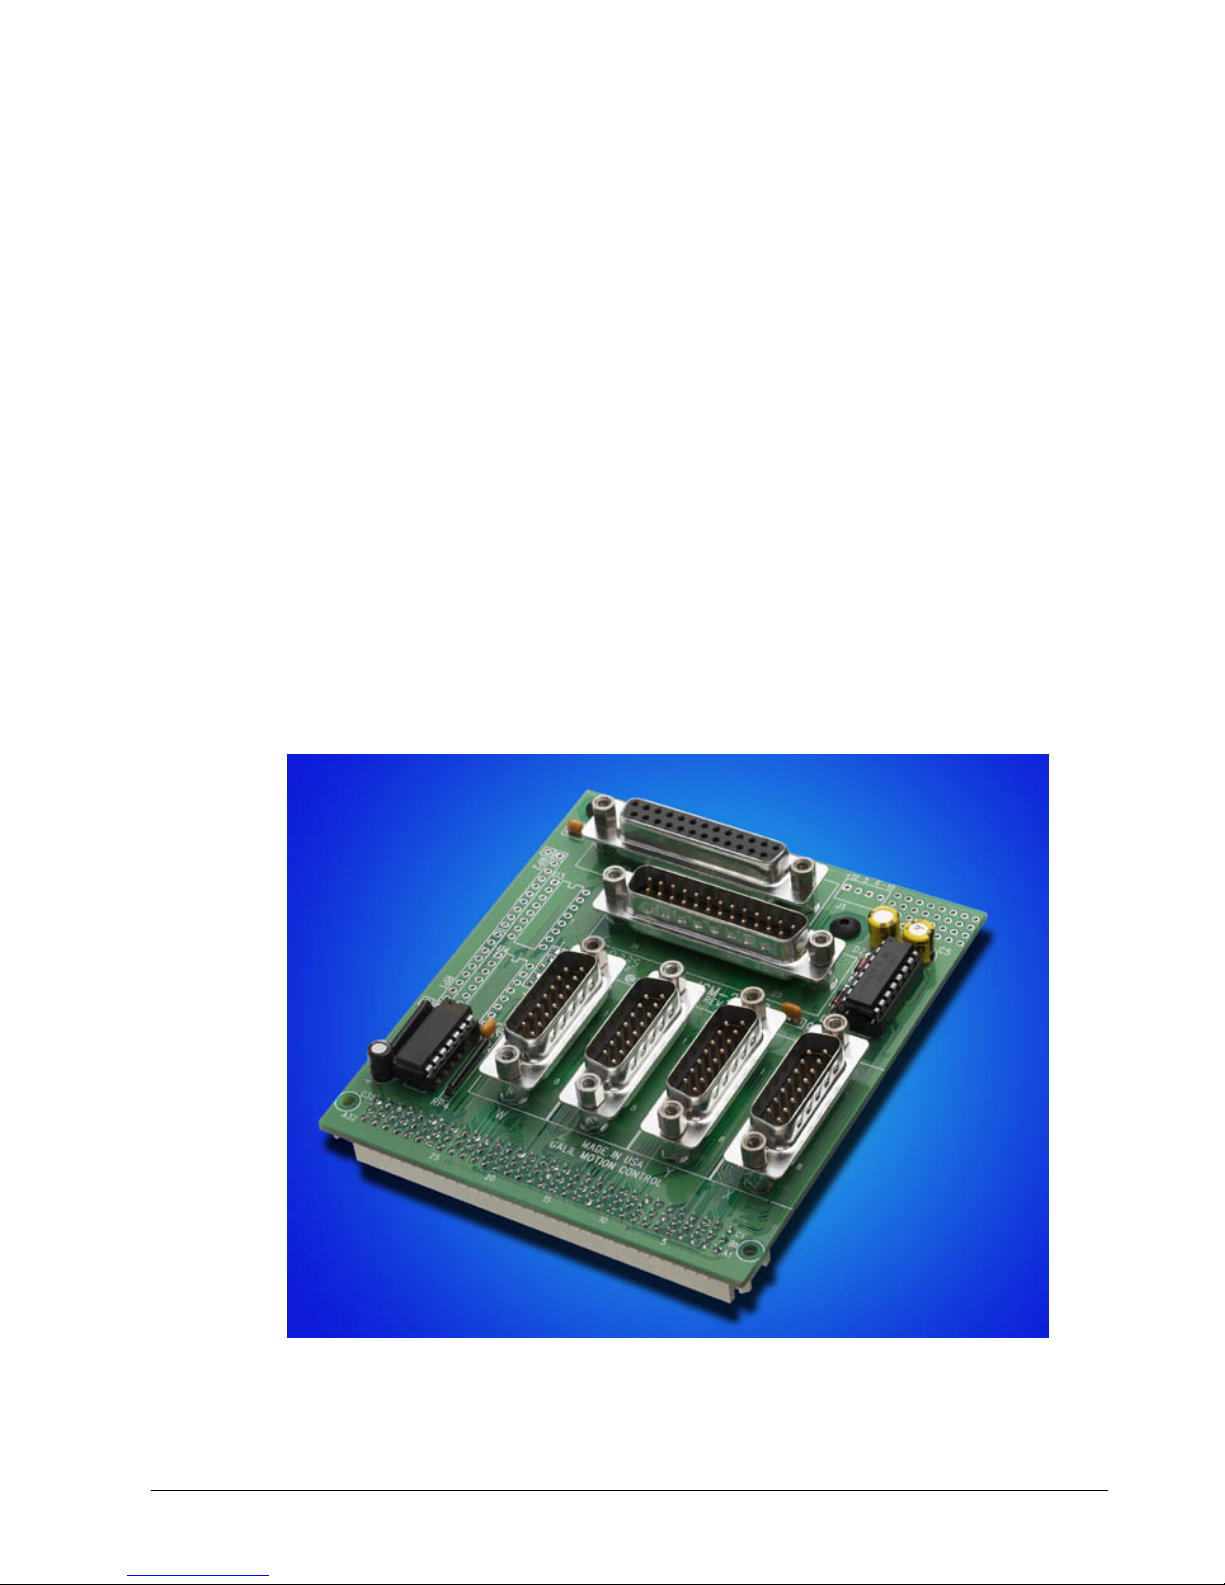
The ICM-20100 interconnect module provides D-Sub connections between the DMC-21x3 series
controllers and other system elements, such as amplifiers, encoders, and external switches. The
ICM-20100 provides access to the signals for up to 4 axes (two required for 5 or more axes).
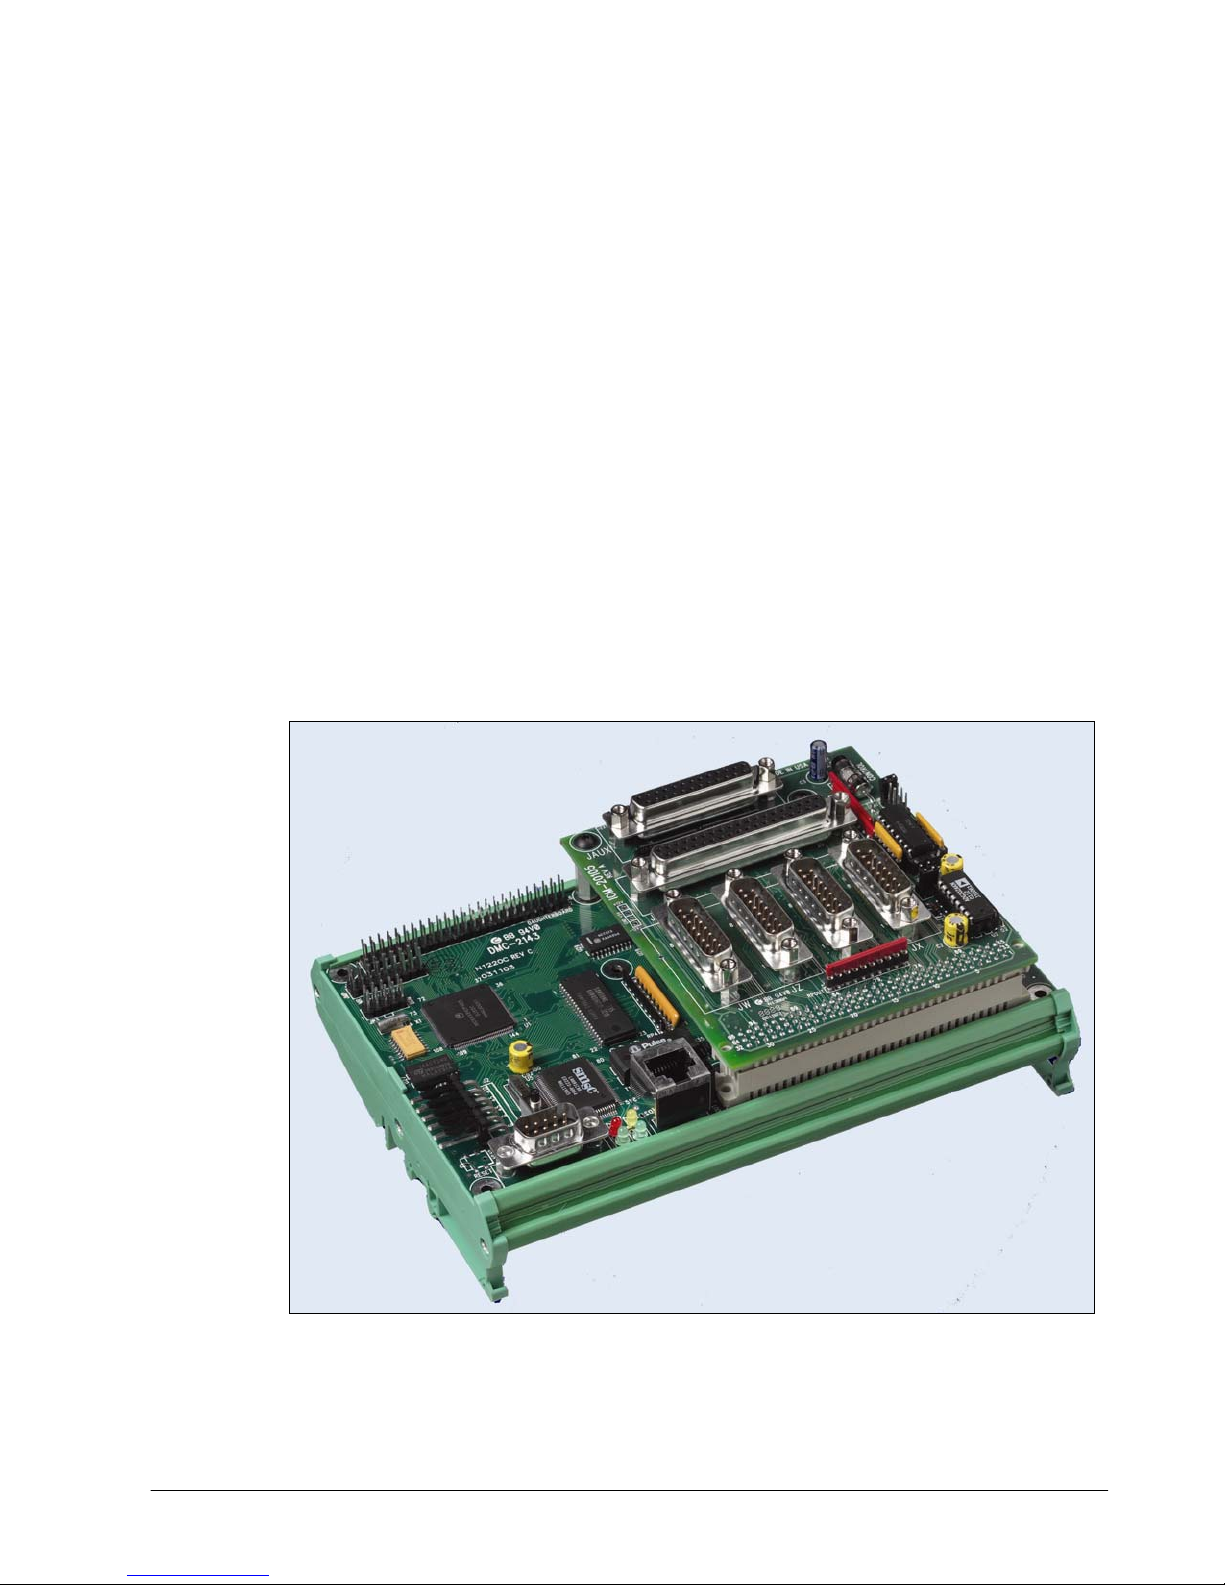
DMC-21x3 Accessories Chapter 3 ICM-20100• 13
Figure 3 ICM-20100
Page 16
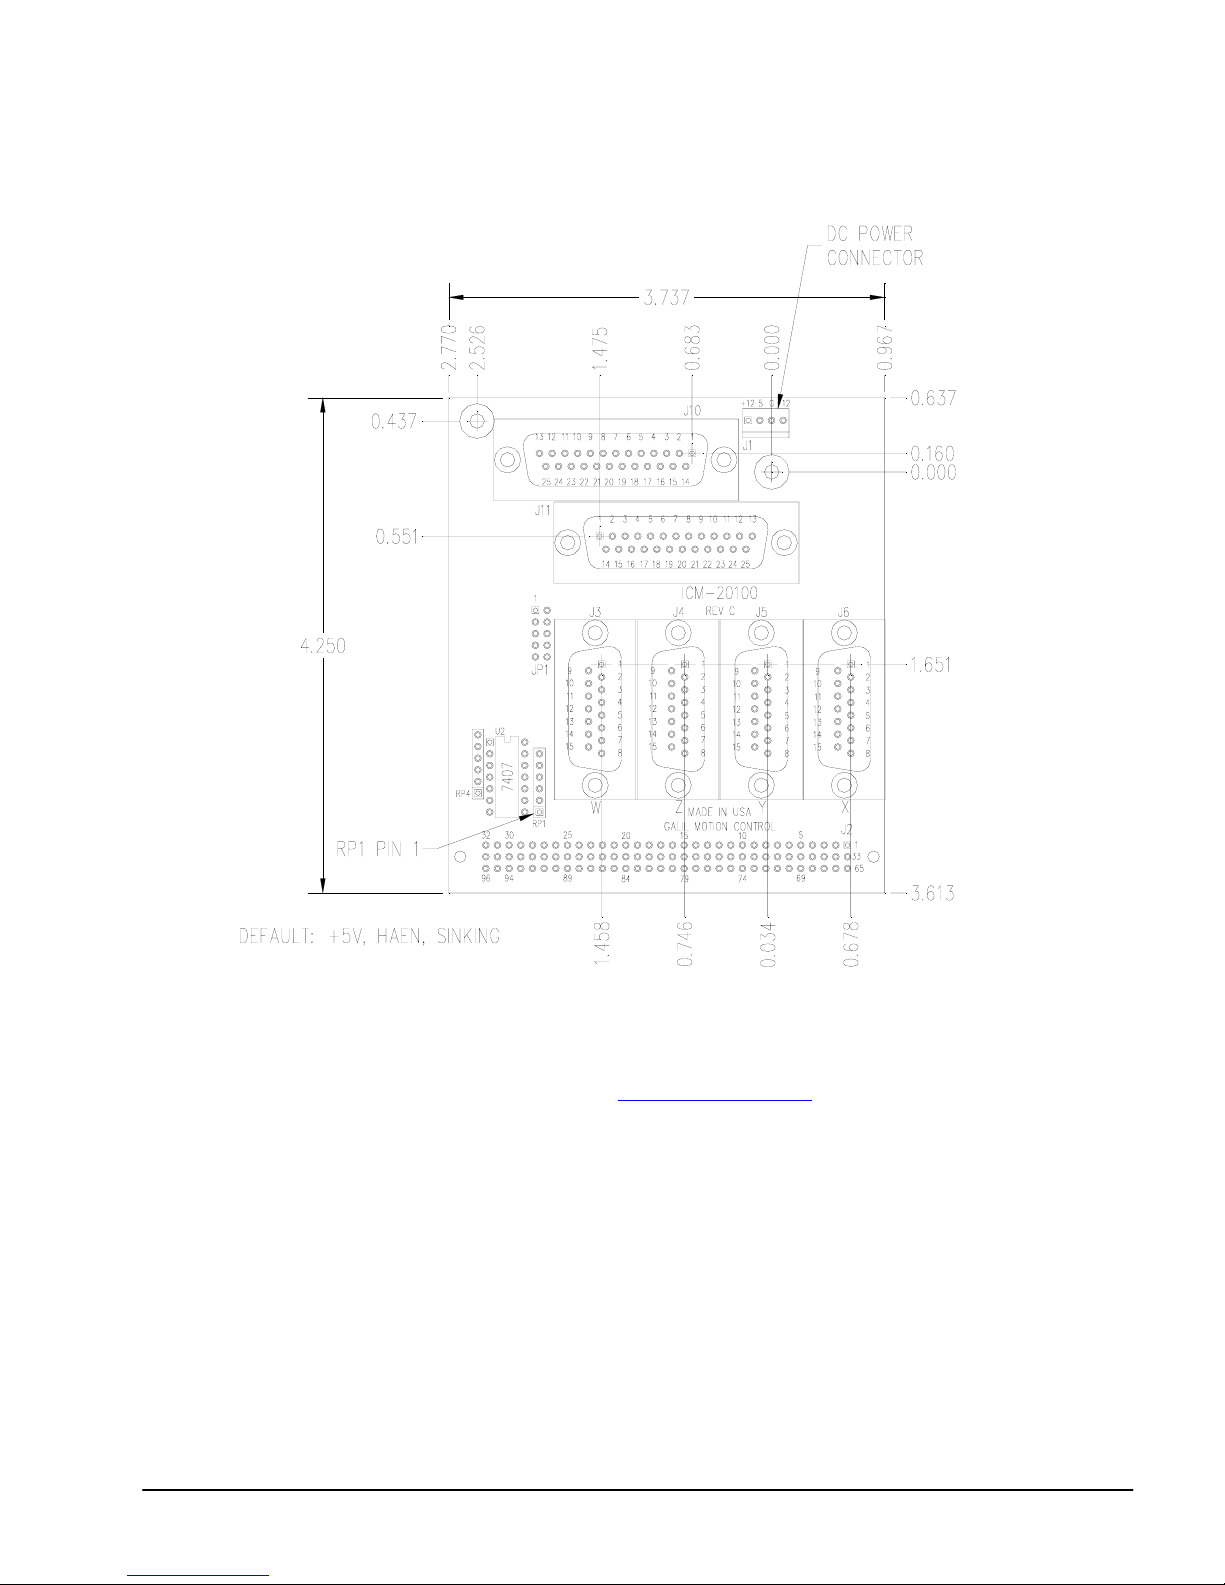
Layout
Drawing Not to Scale. For Reference Only. Dimensions are inches
Figure 4 ICM-20100 Layout
Board Dimensions are 3.7” x 4.25”. See Application Note #1231 for Hole Locations.
14 • Chapter 3 ICM-20100 DMC-21x3 Accessories
Page 17
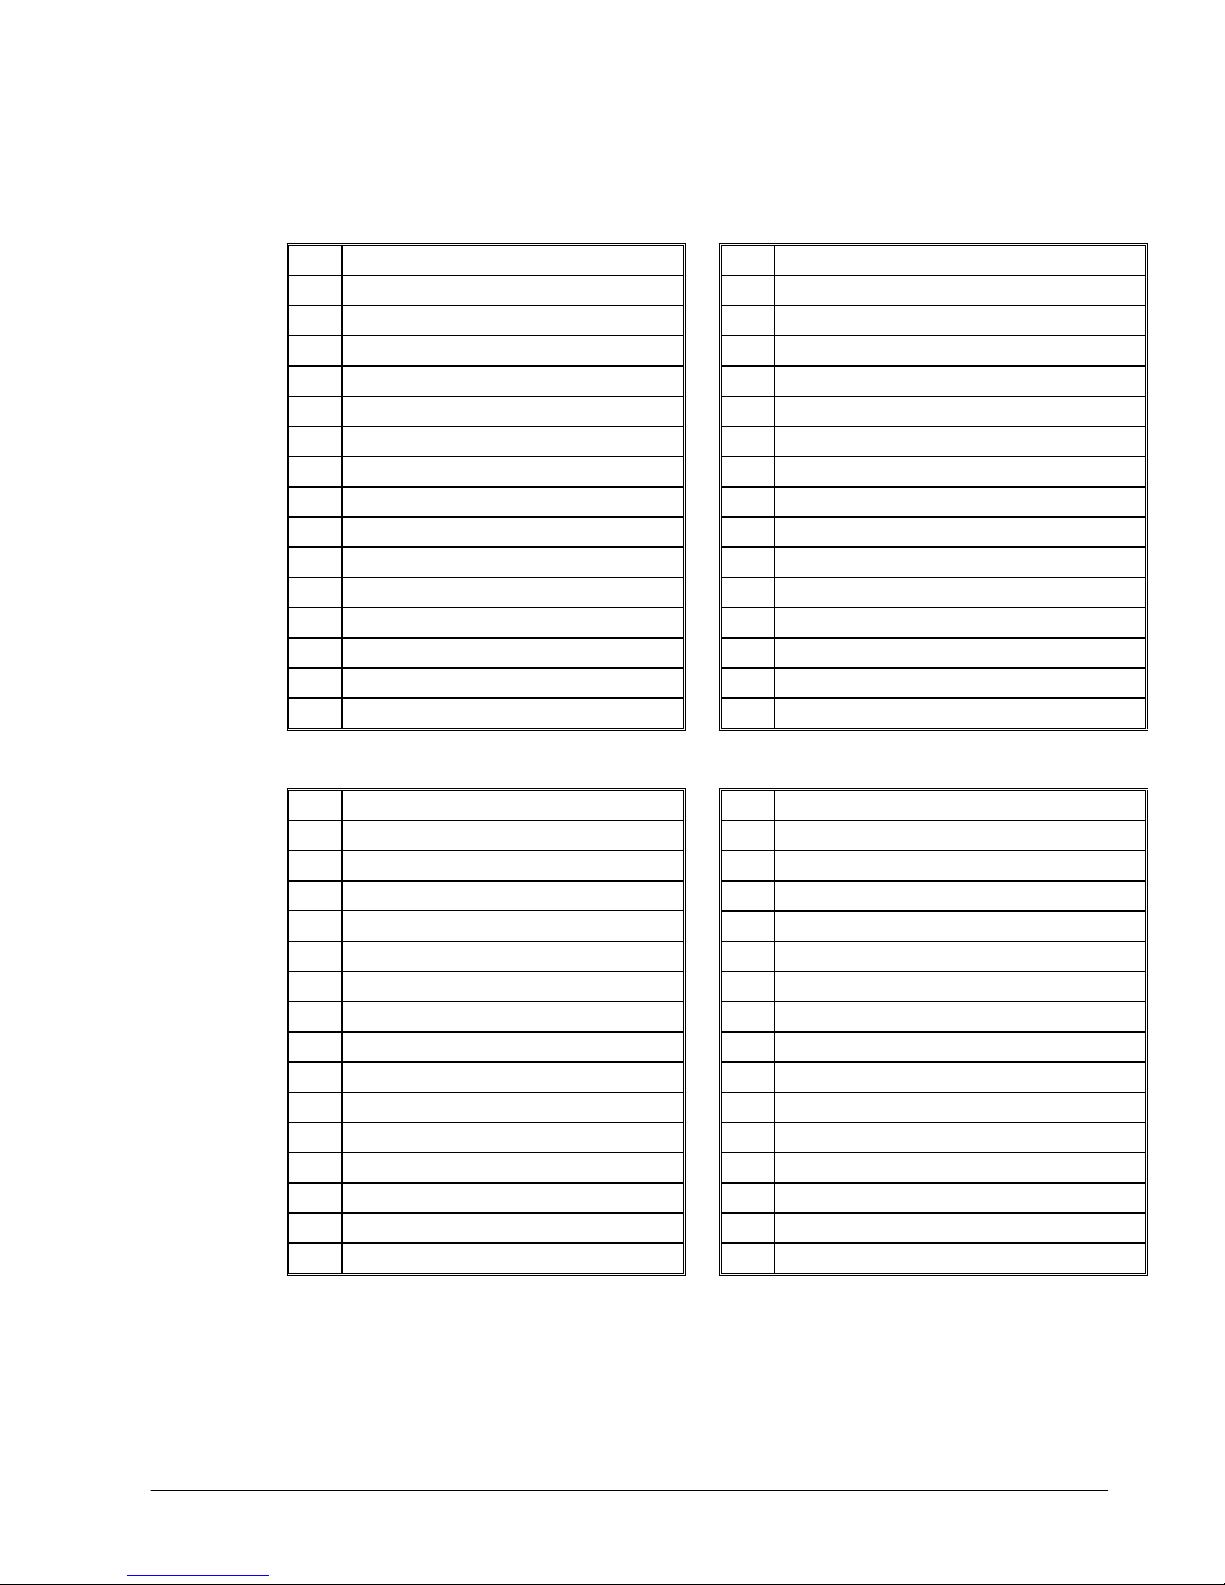
Pinout
J6 X-Axis 15-pin Male D-sub J5 J5 Y-Axis 15-pin Male D-sub
1 Forward limit X 1 Forward limit Y
2 Home X 2 Home Y
3 5V 3 5V
4 A- X 4 A- Y
5 B- X 5 B- Y
6 I- X 6 I- Y
7 Amp enable X 7 Amp enable Y
8 Sign/dir X 8 Sign/dir Y
9 Reverse limit X 9 Reverse limit Y
10 Ground 10 Ground
11 A+ X 11 A+ Y
12 B+ X 12 B+ Y
13 I+ X 13 I+ Y
14 Motor command X 14 Motor command Y
15 PWM/step X 15 PWM/step Y
J4 J4 Z-Axis 15-pin Male D-sub J3 W-Axis 15-pin Male D-sub
1 Forward Limit Z 1 Forward Limit W
2 Home Z 2 Home W
3 5V 3 5V
4 A- Z 4 A- W
5 B- Z 5 B- W
6 I- Z 6 I- W
7 Amp enable Z 7 Amp enable W
8 Sign/dir Z 8 Sign/dir W
9 Reverse limit Z 9 Reverse limit W
10 Ground 10 Ground
11 A+ Z 11 A+ W
12 B+ Z 12 B+ W
13 I+ Z 13 I+ W
14 Motor command Z 14 Motor command W
15 PWM/step Z 15 PWM/step W
DMC-21x3 Accessories Chapter 3 ICM-20100• 15
Page 18

J10 Aux Encoders 25-pin Female D-Sub J11 I/O 25-pin Male D-Sub
1 Reset * 1 Ground
2 AB- W 2 Latch X/Input 1
3 AA- W 3 Latch Z/Input 3
4 AB- Z 4 Input 5
5 AA- Z 5 Input 7
6 AB- Y 6 Abort *
7 AA- Y 7 Output 1
8 AB- X 8 Output 3
9 AA- X 9 Output 5
10 5V 10 Output 7
11 5V 11 Ground
12 +12V 12 NC
13 NC 13 NC
14 Error Output * 14 5V
15 AB+ W 15 Latch Y/Input 2
16 AA+ W 16 Latch W/Input 4
17 AB+ Z 17 Input 6
18 AA+ Z 18 Input 8
19 AB+ Y 19 Encoder-compare output
20 AA+ Y 20 Output 2
21 AB+ X 21 Output 4
22 AA+ X 22 Output 6
23 Ground 23 Output 8
24 Ground 24 5V
25 -12V 25 NC
* Active Low Signal
16 • Chapter 3 ICM-20100 DMC-21x3 Accessories
Page 19
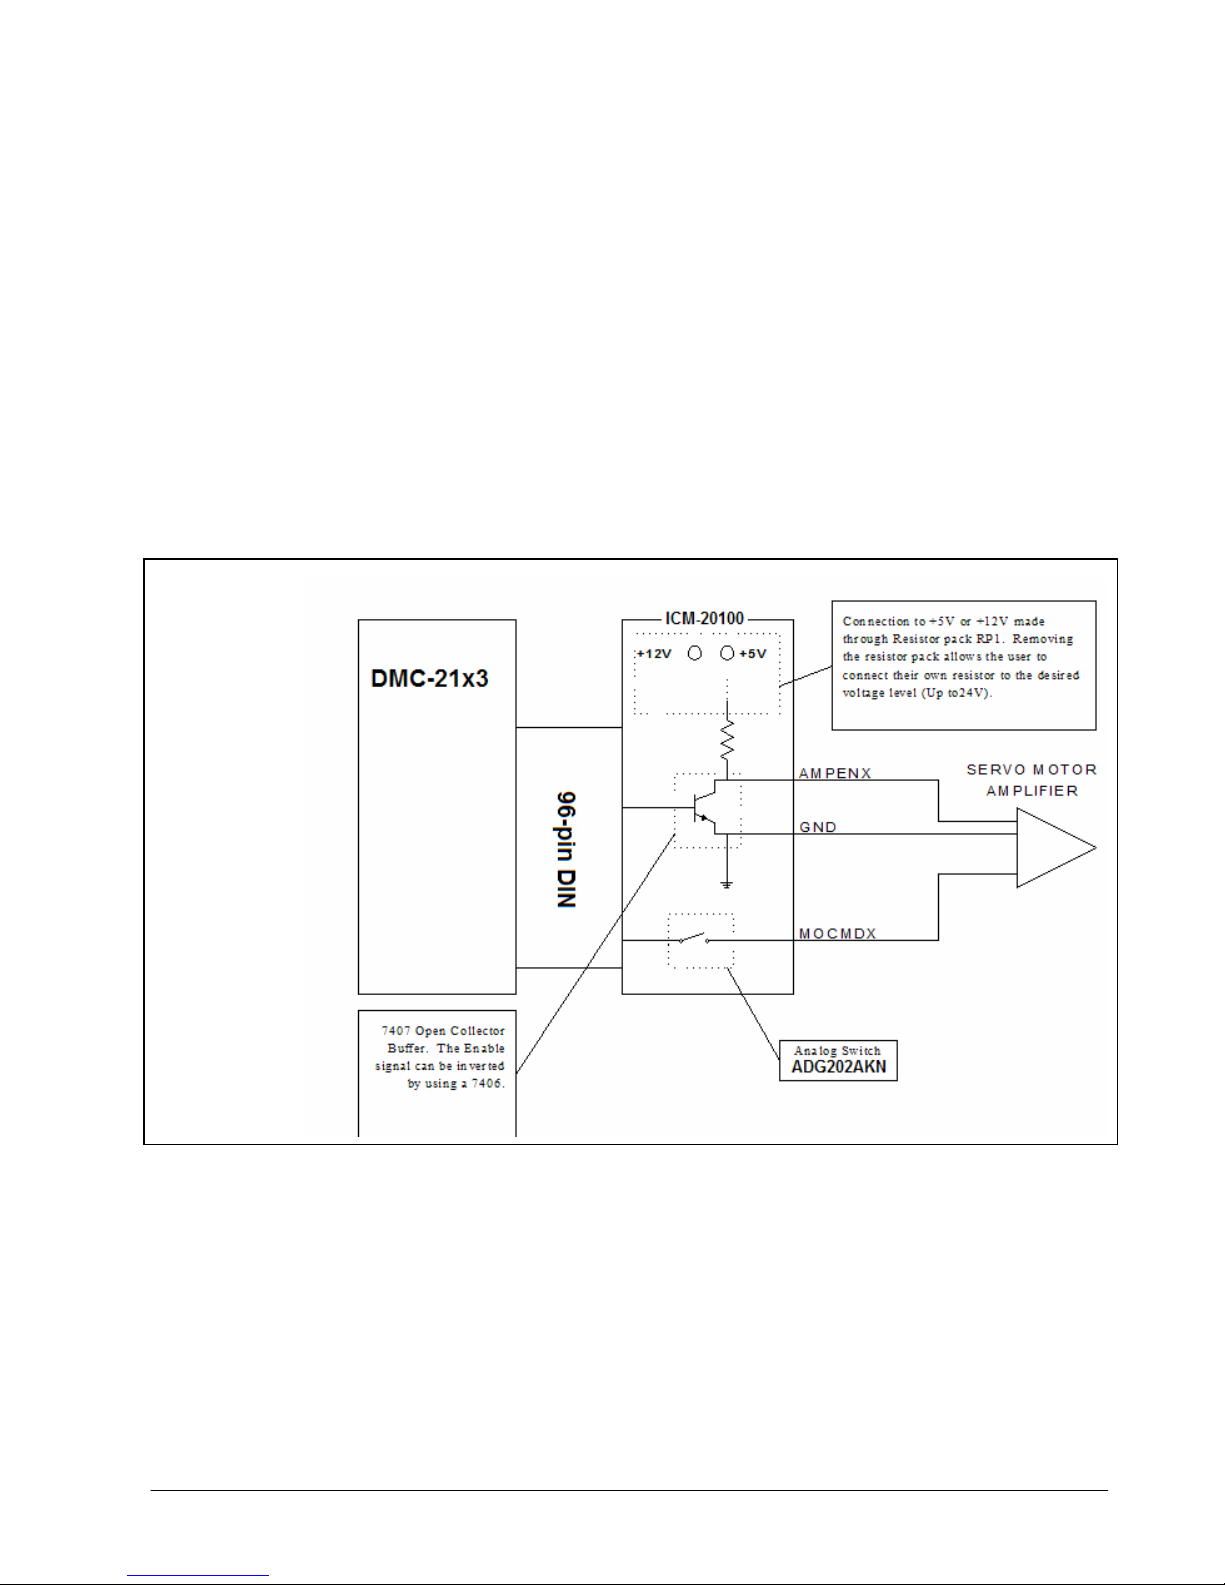
Amplifier Enable
The standard configuration of the AMPEN signal is TTL active high. In other words, the AMPEN
signal will be high when the controller expects the amplifier to be enabled. The polarity and the
amplitude can be changed. To change the polarity from active high (5 volts= enable, zero volts =
disable) to active low (zero volts = enable, 5 volts= disable), replace the 7407 IC with a 7406
(U2). Note that many amplifiers designate the enable input as ‘inhibit’.
To change the voltage level of the AMPEN signal, note the state of the resistor pack on the ICM-
20100. When pin 1 of the resistor matches pin 1 of the RP1, the output voltage is 0-5 V. To
change to 12 volts, pull the resistor pack and rotate it so that pin 1 is on the 12 volt side. Pin 1 of
the resistor will be marked with a designator, pin 1 of location RP1 can be determined by the
square through hole on the circuit board denoting pin 1. If you remove the resistor pack, the
output signal is open collector, allowing the user to connect an external supply with voltages up to
24V. Note that any external pull-up resistor should limit the current draw to 10 mA
Figure
Figure 5 ICM-20100 Amplifier Enable Circuit
RP1
DMC-21x3 Accessories Chapter 3 ICM-20100• 17
Page 20

THIS PAGE LEFT BLANK INTENTIONALLY
18 • Chapter 3 ICM-20100 DMC-21x3 Accessories
Page 21
Chapter 4 ICM-20105
__________________________________________________________________
Introduction
The ICM-20105 opto-isolated I/O module are used with DMC-21x3 controllers. It has four 15-pin
Male D-Sub connectors for individual axis signals. There is one 37-pin D-Sub for the 8 digital
inputs, 8 high side drive 500 mA digital outputs, home switches, limit switches, and one 25-pin DSub for 4 axes of auxiliary encoders.
Figure 6 ICM-20105 shown mounted to a DMC-2143
DMC-21x3 Accessories Chapter 4 ICM-20105• 19
Page 22
Electrical Specifications
Input Common Max Voltage 28 VDC
Output Common Max Voltage 30 VDC
Max Drive Current per Output 0.5 A (not to exceed 3A for all 8 outputs)
Minimum Current to turn on Inputs 1 mA
Max Enable Current @24V source 25 mA
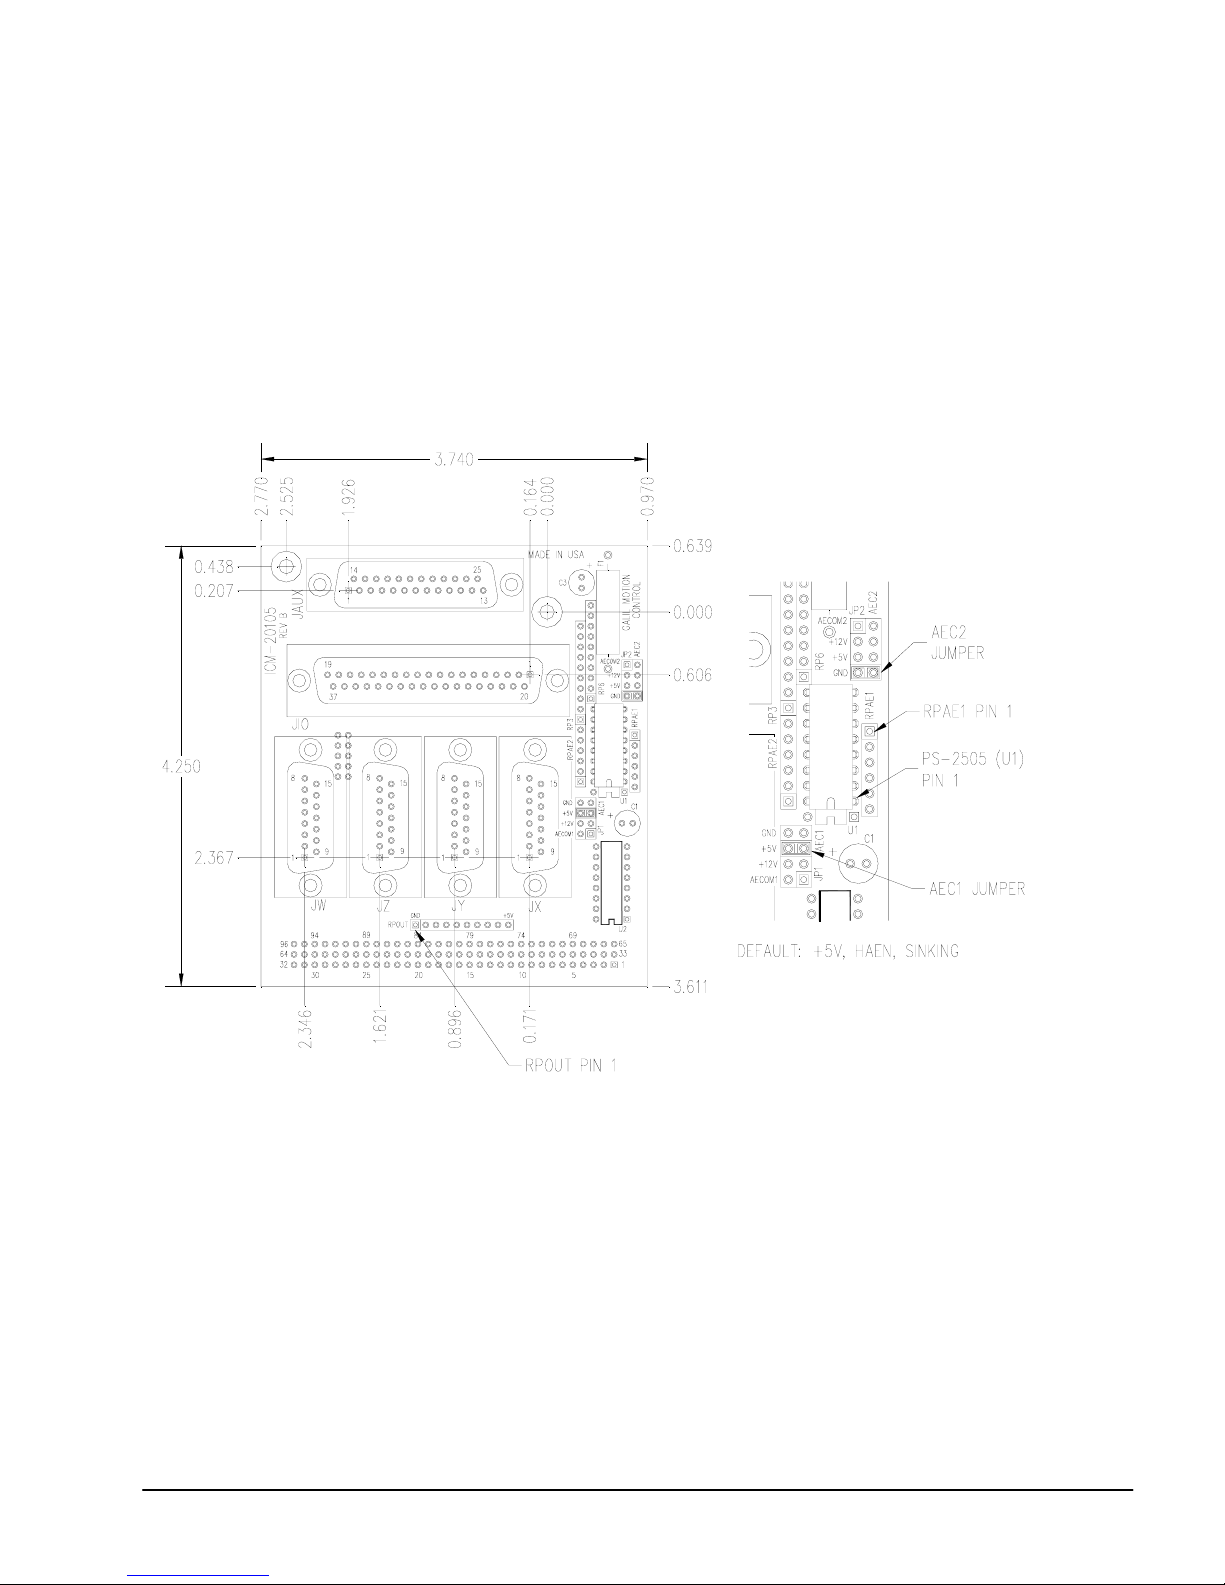
Layout
Drawing Not to Scale. For Reference Only. Dimensions are inches.
Figure 7 ICM-20105 Dimensions and Jumper Locations
Overall Dimensions: 4.25” x 3.70”
20 • Chapter 4 ICM-20105 DMC-21x3 Accessories
Page 23

Pinout
JX X-axis 15-Pin Male D-sub JY Y-axis 15-Pin Male D-sub
1 Amp enable common-1 (AECOM1) 1 Amp enable common-1 (AECOM1)
2 Amp enable X 2 Amp enable Y
3 5V 3 5V
4 A- X 4 A- Y
5 B- X 5 B- Y
6 I- X 6 I- Y
7 NC 7 NC
8 Sign/dir X 8 Sign/dir Y
9 Amp enable common-2 (AECOM2) 9 Amp enable common-2 (AECOM2)
10 Ground 10 Ground
11 A+ X 11 A+ Y
12 B+ X 12 B+ Y
13 I+ X 13 I+ Y
14 Motor command X 14 Motor Command Y
15 PWM/step X 15 PWM/step Y
JZ Z-axis 15-Pin Male D-sub JW W-axis 15-Pin Male D-sub
1 Amp enable common-1 (AECOM1) 1 Amp enable common-1 (AECOM1)
2 Amp enable Z 2 Amp enable W
3 5V 3 5V
4 A- Z 4 A- W
5 B- Z 5 B- W
6 I- Z 6 I- W
7 NC 7 NC
8 Sign/dir Z 8 Sign/dir W
9 Amp enable common-2 (AECOM2) 9 Amp enable common-2 (AECOM2)
10 Ground 10 Ground
11 A+ Z 11 A+ W
12 B+ Z 12 B+ W
13 I+ Z 13 I+ W
14 Motor Command Z 14 Motor Command W
15 PWM/step Z 15 PWM/step W
DMC-21x3 Accessories Chapter 4 ICM-20105• 21
Page 24
JAUX Aux. Encoder 25-pin Female D JIO I/O 37-Pin Female D-sub
1 NC 1 Input Common Voltage
2 AB- W 2 Input 2
3 AA- W 3 Input 4
4 AB- Z 4 Input 6
5 AA- Z 5 Input 8
6 AB- Y 6 Output Supply Voltage
7 AA- Y 7 Output 2
8 AB- X 8 Output 4
9 AA- X 9 Output 6
10 5V 10 Output 8
11 5V 11 Limit Switch Common
12 +12V 12 Reverse Limit X
13 NC 13 Forward Limit Y
14 NC 14 Home Y
15 AB+ W 15 Reverse Limit Z
16 AA+ W 16 Forward Limit W
17 AB+ Z 17 Home W
18 AA+ Z 18 5V
19 AB+ Y 19 Ground
20 AA+ Y 20 Input 1
21 AB+ X 21 Input 3
22 AA+ X 22 Input 5
23 Ground 23 Input 7
24 Ground 24 Abort
25 -12V 25 Output 1
26 Output 3
27 Output 5
28 Output 7
29 Output Return
30 Forward Limit X
31 Home X
32 Reverse Limit Y
33 Forward Limit Z
34 Home Z
35 Reverse Limit W
36 5V
37 Ground
22 • Chapter 4 ICM-20105 DMC-21x3 Accessories
Page 25

Configurations for ICM-20105
Amplifier Enable Circuit
The ICM-20105 gives the user a broad range of options with regards to the voltage levels present on the enable
signal. The user can choose between High-Amp-Enable (HAEN), Low-Amp-Enable (LAEN), 5V logic, 12V logic,
external voltage supplies up to 24V, sinking, or sourcing. The tables below illustrate the settings for jumpers,
RPacks, and the socketed optocoupler IC. Refer to Figure 7 for precise physical locations of all components. Note
that the resistor pack located at RPAE1 may be reversed to change the active state of the amplifier enable output.
The polarity of RPAE2 must not be changed; however, a different resistor value may be needed to limit the current
to 6 mA . The default value for RPAE2 is 820 ohms, which works at 5V. When using 24 V, RPAE2 should be
replaced with a 4.7 kΩ resistor pack.
Amplifier Enable Circuit
Sinking Output Configuration
1
N
I
P
5V or GND
TTL level Amp
Enable signal
from controller
(SH = 5V, MO = 0V)
RPAE1 (470 Ohm)
TTL level Amp
Enable signal
from controller
(SH = 5V, MO = 0V)
(Pin 1 of PS2505 in Pin 2 of Socket U1)
Socket U1
Pin 1
of socket
Pin 1
RPAE2 (820 Ohm)
2
M
O
V
D
V
C
2
N
E
1
5
A
G
+
+
JP2
AEC2
Amp Enable Output to Drive
1
M
O
V
D
V
C
2
N
E
1
5
A
+
+
G
JP1
AEC1
2
M
O
V
D
V
C
2
N
E
1
5
A
+
+
G
JP2
AEC2
Figure 8 Amplifier Enable Circuit Output Configuration
Sinking Configuration (pin1 of opto chip in pin2 of socket U1)
Logic State JP1 JP2
5V, HAEN (Default Configuration) 5V - AEC1 GND - AEC2 Dot on R-pack next to RPAE1 label
5V, LAEN 5V - AEC1 GND - AEC2 Dot on R-pack opposite RPAE1 label
12V, HAEN +12V - AEC1 GND - AEC2 Dot on R-pack next to RPAE1 label
12V, LAEN +12V - AEC1 GND - AEC2 Dot on R-pack opposite RPAE1 label
Isolated 24V, HAEN AECOM1 - AEC1 AECOM2 - AEC2 Dot on R-pack next to RPAE1 label
Isolated 24V, LAEN AECOM1 - AEC1 AECOM2 - AEC2 Dot on R-pack opposite RPAE1 label
DMC-21x3 Accessories Chapter 4 ICM-20105• 23
RPAE1
(square pin next to RPAE1 label is 5V)
Page 26

For 24V isolated enable, tie +24V of external power supply to AECOM1 at any axis D-sub, tie common return to
AECOM2. Replace RPAE2 with a 4.7 kΩ resistor pack. AECOM1 and AECOM2 are located on any 15-pin axis D-subs
(JX, JY, JZ, or JW). All pins labeled AECOM1 are connected. All pins Labeled AECOM2 are connected.
Amplifier Enable Circuit
Sourcing Output Configuration
RPAE1 (470 Ohm)
1
N
I
P
5V or GND
TTL level Amp
Enable signal
from controller
(SH = 5V, MO = 0V)
TTL level Amp
Enable signal
from controller
(SH = 5V, MO = 0V)
(Pin 1 of PS2505 in Pin 1 of Socket U1)
Socket U1
Pin 1
Pin 1
of socket
RPAE2 (820 Ohm)
2
M
O
V
D
C
V
2
N
E
1
5
A
+
+
G
JP2
AEC2
Amp Enable Output to Drive
1
M
O
V
D
V
C
2
N
E
1
5
A
+
+
G
JP1
AEC1
2
M
O
V
D
V
C
2
N
E
5
1
A
G
+
+
JP2
AEC2
Sourcing Configuration (pin1 of opto chip in pin1 of socket U1)
RPAE1
Figure 9 Amplifier Enable Circuit Sourcing Output Configuration
Logic State JP1 JP2
5V, HAEN GND - AEC1 5V - AEC2 Dot on R-pack opposite RPAE1 label
5V, LAEN GND - AEC1 5V - AEC2 Dot on R-pack next to RPAE1 label
12V, HAEN GND - AEC1 +12V - AEC2 Dot on R-pack opposite RPAE1 label
12V, LAEN GND - AEC1 +12V - AEC2 Dot on R-pack next to RPAE1 label
Isolated 24V, HAEN AECOM1 - AEC1 AECOM2 - AEC2 Dot on R-pack opposite RPAE1 label
Isolated 24V, LAEN AECOM1 - AEC1 AECOM2 - AEC2 Dot on R-pack next to RPAE1 label
For 24V isolated enable, tie +24V of external power supply to AECOM2 at any axis D-sub, tie common return to
AECOM1. Replace RPAE2 with a 4.7 kΩ resistor pack. AECOM1 and AECOM2 are located on any 15-pin axis D-subs
(JX, JY, JZ, or JW). All pins labeled AECOM1 are connected. All pins Labeled AECOM2 are connected.
(square pin next to RPAE1 label is 5V)
24 • Chapter 4 ICM-20105 DMC-21x3 Accessories
Page 27
Limit
Switch
Common
Opto Isolation Settings
The ICM-20105 module allows for opto-isolation on all of the digital inputs and outputs. This
includes the dedicated I/O including limits, homes, and abort. The limits and home are powered
by Limit Switch Common. The digital inputs and the Abort Input are powered by Input Common.
The digital outputs are also optically isolated and are capable of sourcing up to 0.5 A per pin with
a 3 A limit for the group of 8 outputs. The outputs are configured for hi-side drive only. The
supply voltage must be connected to output supply voltage, and the supply return must be
connected to output return.
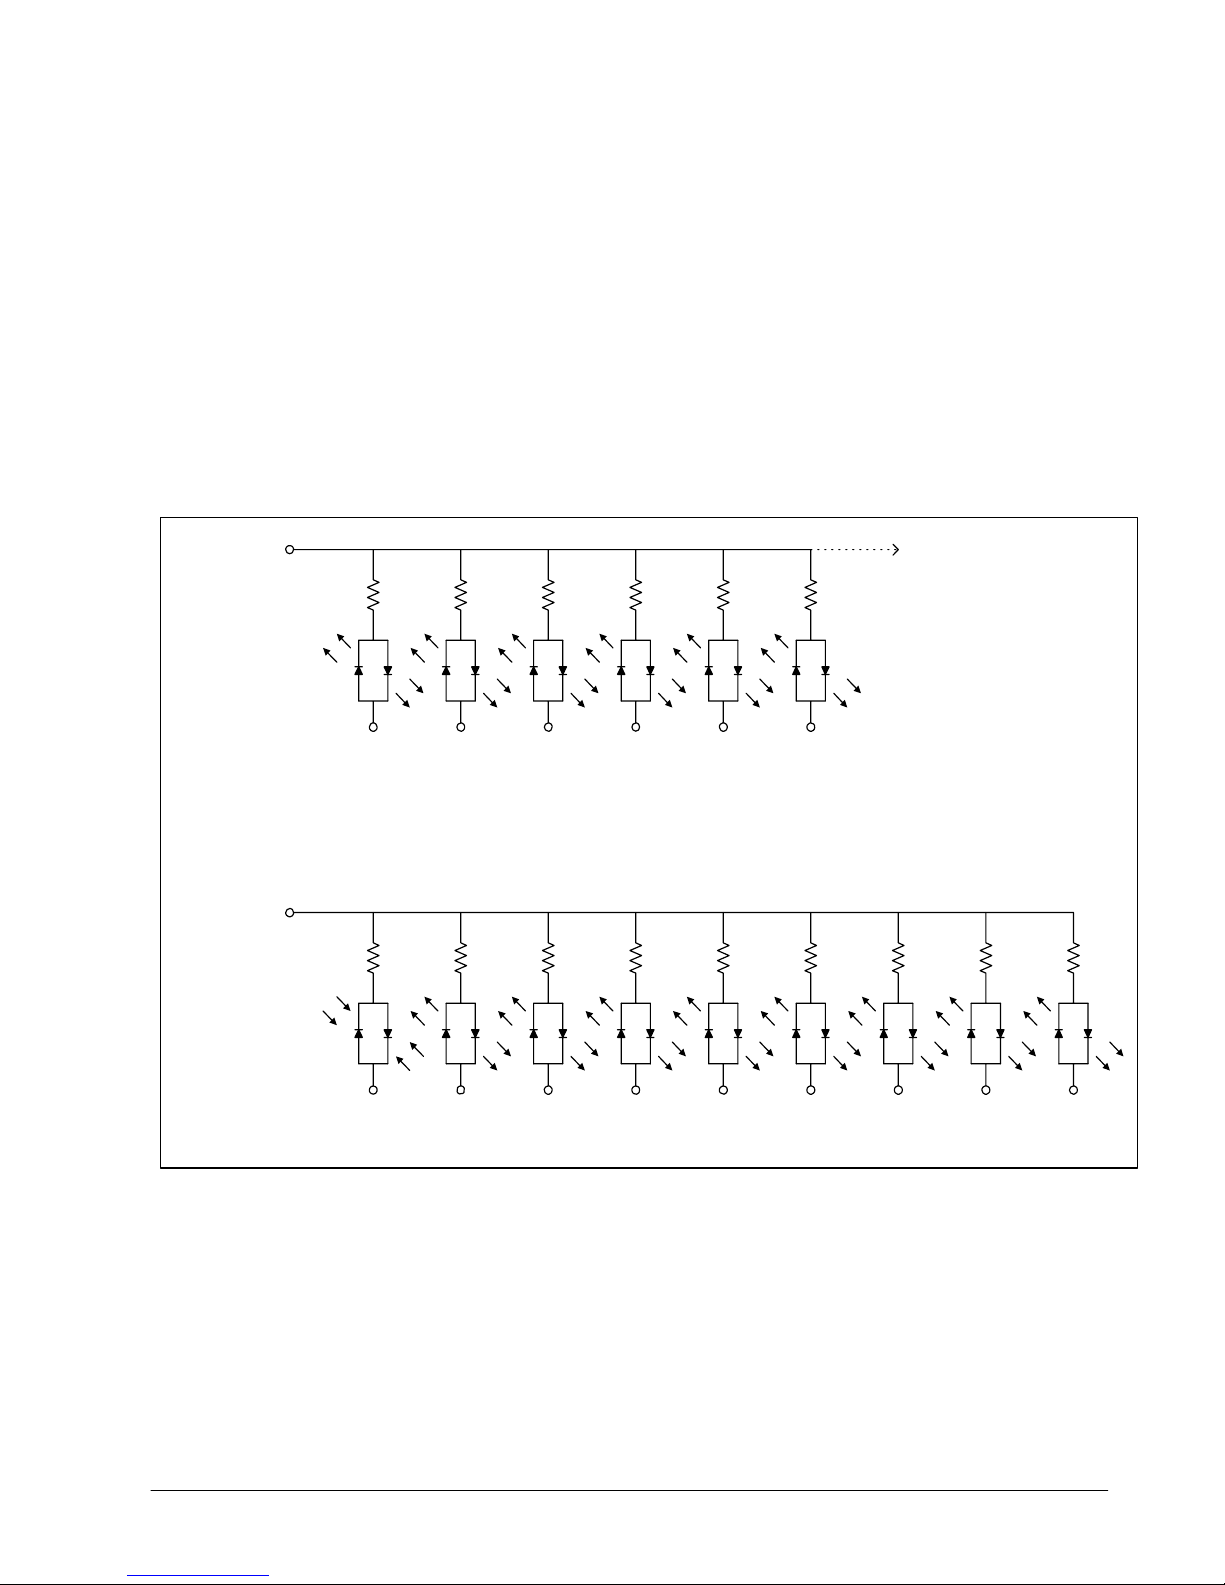
Input Isolation
Opto isolation of the general purpose inputs and the abort input is used by powering the Input
Common line. The limit switch and home inputs are powered by Limit Switch Common. Shown
below is the circuit diagram for the isolated inputs.
Additional Limit
RP2
2.2 kΩ
FLSX RLSX HOMEX FLSY RLSY HOMEY
Switches(Dependent on
Number of Axes)
Z and W switches
use RP1 2.2 kΩ
Input
Common
Voltage
RP3
2.2 kΩ
IN1IN2IN3IN4IN5IN6IN7IN8ABORT
(XLATCH) (YLATCH) (ZLATCH) (WLATCH)
Figure 10 ICM-20105 Digital Inp ut Isolation
DMC-21x3 Accessories Chapter 4 ICM-20105• 25
Page 28
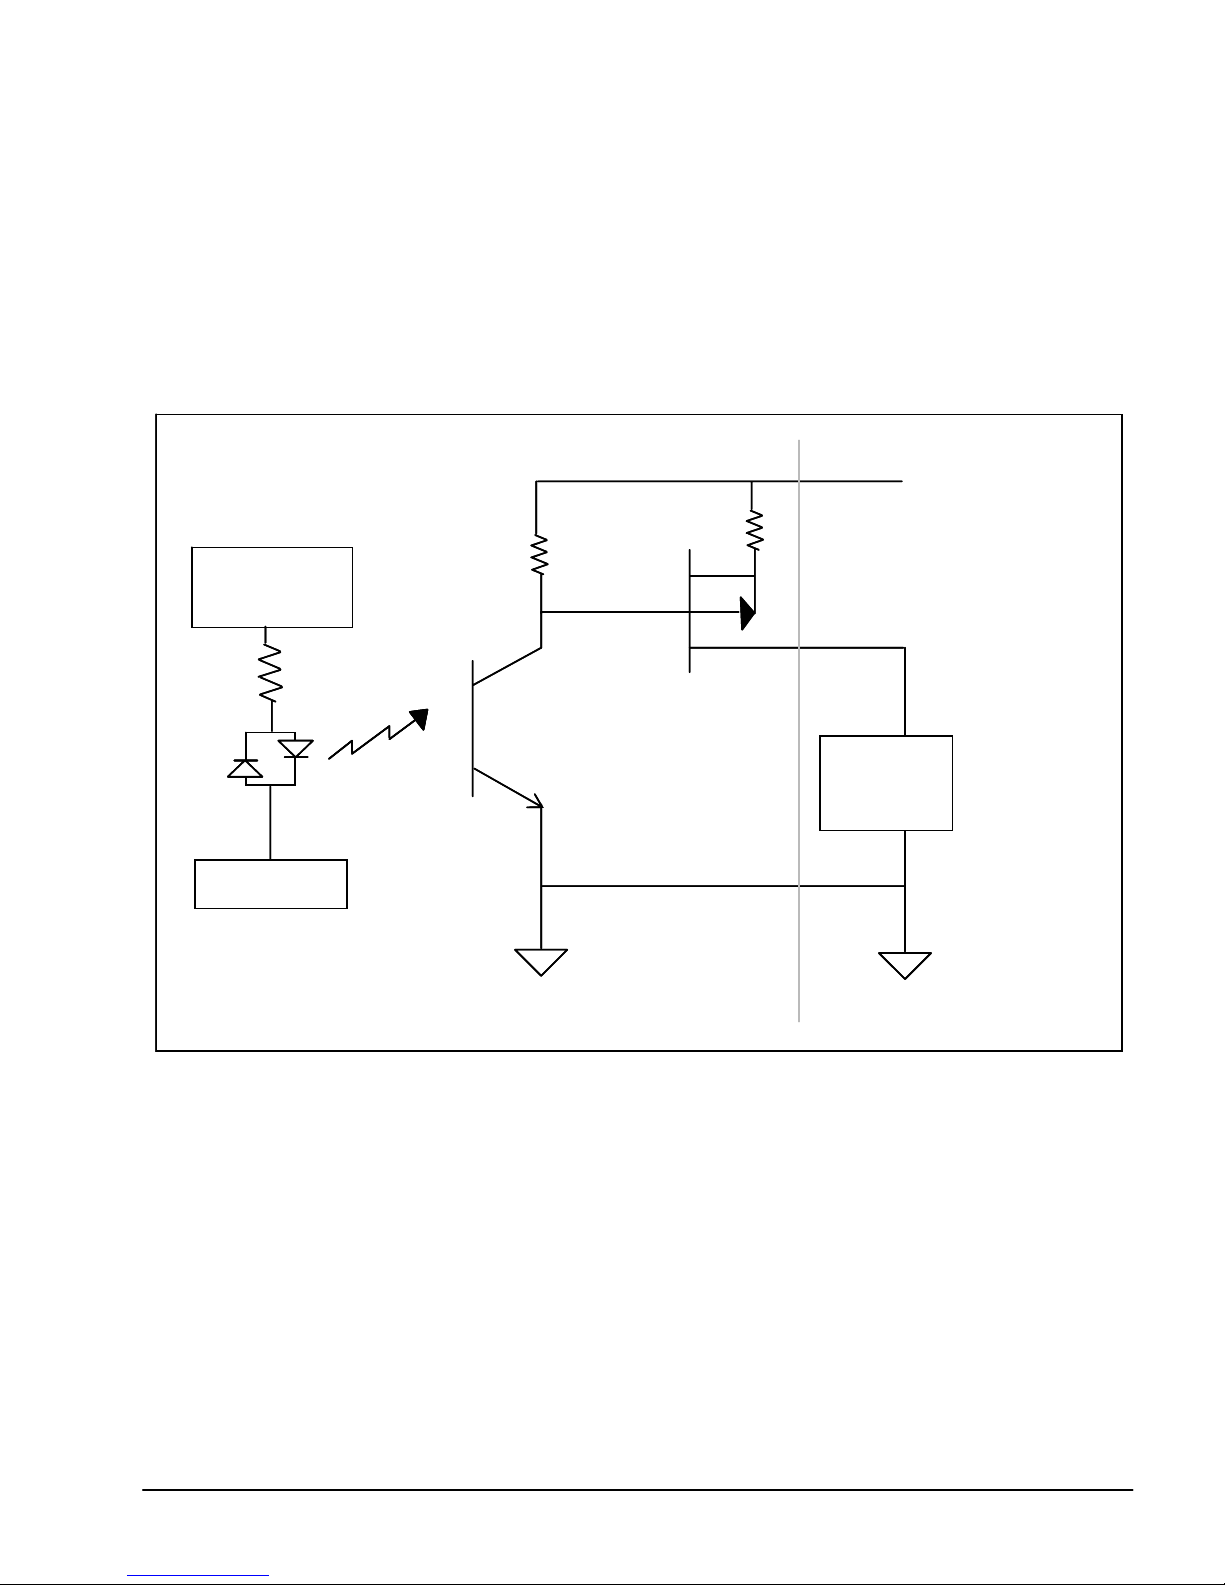
Output Isolation
The high current isolated outputs available through the ICM-20105 are configured for High Side
operation. The outputs are capable of 500 mA per output with a total of 3 A from the group of 8
outputs. The figure below shows the manner in which the load should be connected. The output
will be at the voltage that is supplied to the OUTSUP pin. Up to 30 VDC may be supplied to
OUTSUP.
The RPOUT resistor pack allows configuration of the active state of the outputs. For example
when you issue the SB1 command, the polarity of the resistor will determine whether the output is
turned on or off.
RPOUT
RPOUT
5V or GND
5V or GND
SB n = 5V
SB n = 5V
RP Out
RP Out
10K
10K
MachineICM-20105
MachineICM-20105
OUTSUP (+)
OUTSUP (+)
Load
Load
OUTRET (-)
OUTRET (-)
Figure 11 ICM-20105 General-Purpose Digital Output Opto-Isolation
26 • Chapter 4 ICM-20105 DMC-21x3 Accessories
Page 29
Chapter 5 SDM-20240/20242
______________________________________________________________________________
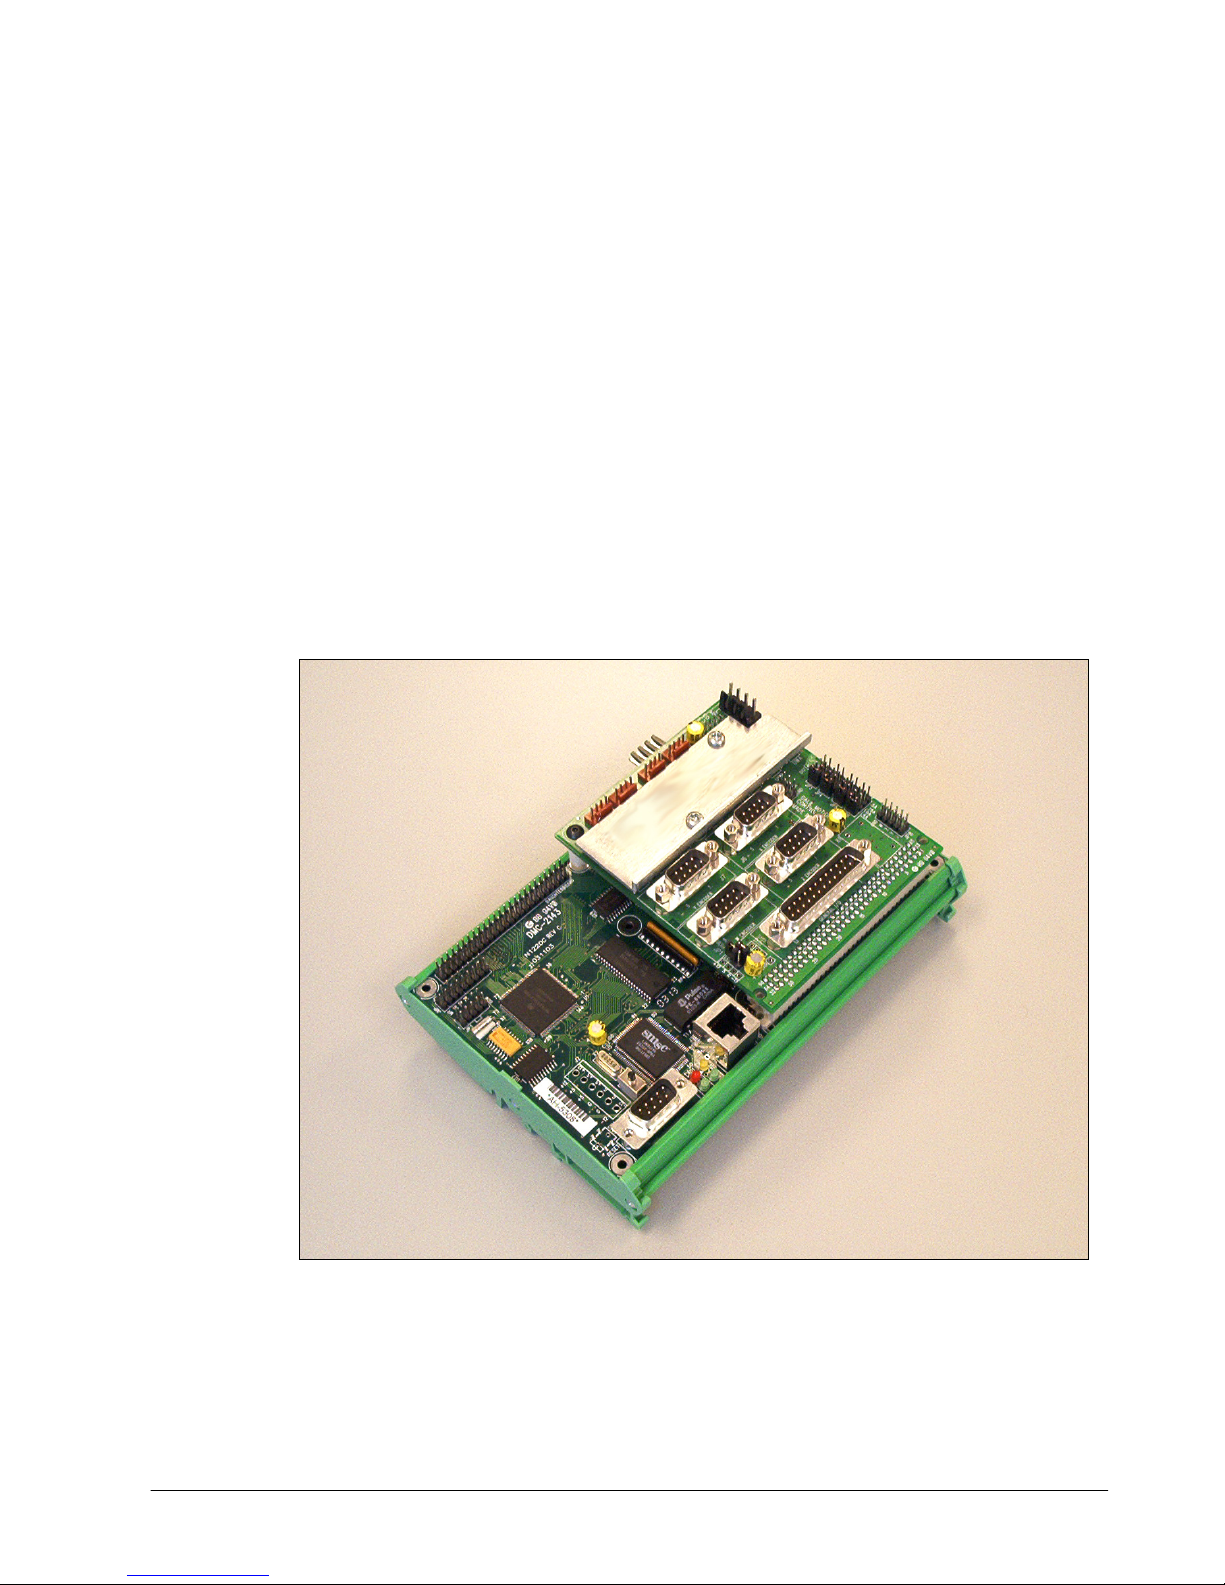
Introduction
The SDM-20240 and SDM-20242 are stepper driver modules capable of driving up to four bipolar
two-phase stepper motors. The current is selectable with options of 0.5, 0.75, 1.0, and 1.4
Amps/Phase. The SDM-20242 is the replacement for the SDM-20240 as of December 2006.
Figure 12 SDM-20240 shown mounted to a DMC-2143-DIN-DC24
DMC-21x3 Accessories Chapter 5 SDM-20240/20242• 27
Page 30
Electrical Specifications
DC Supply Voltage: 12-30 VDC
Max Drive Current (per axis) 1.4 Amps (jumper-settable)
Max Step Frequency 3 MHz
Motor Type Bipolar 2 phase
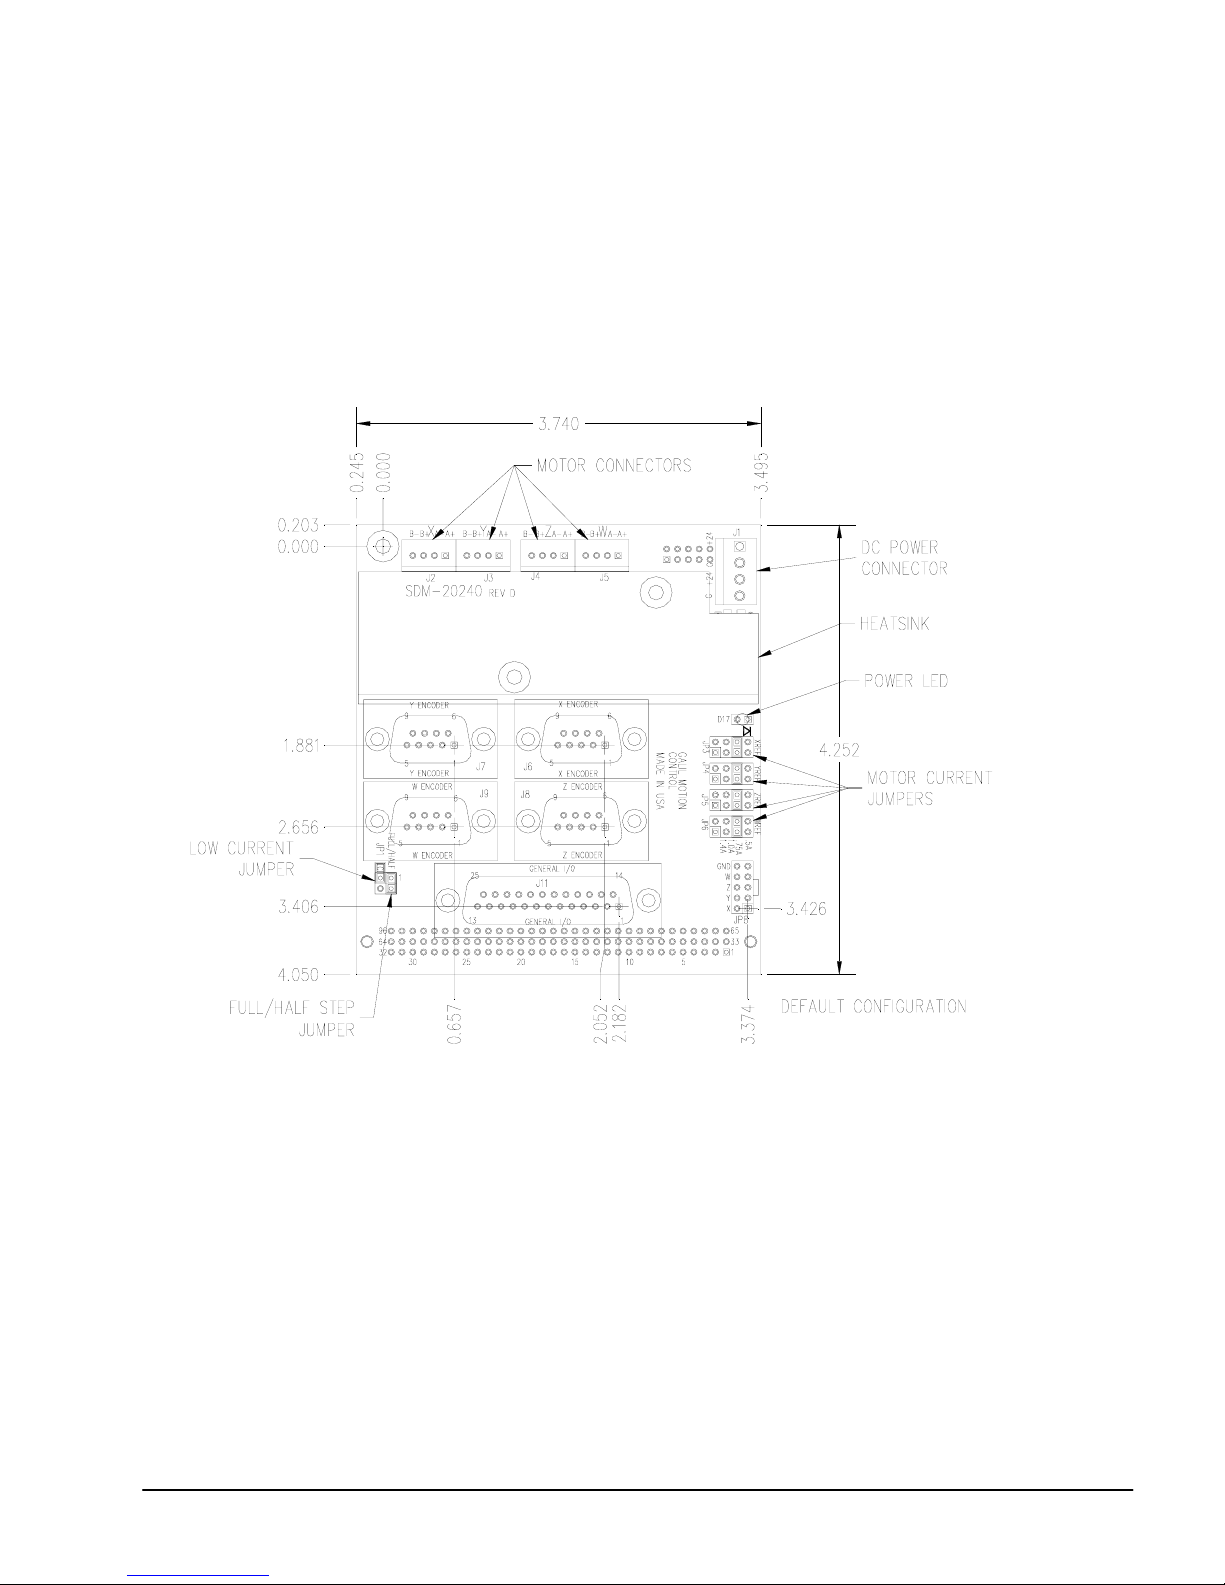
Layout
Drawing Not to Scale. For Reference Only. Dimensions are in inches
Figure 13 SDM-20240 Dimensions
Overall Dimensions: 4.25” x 3.70”
28 • Chapter 5 SDM-20240/20242 DMC-21x3 Accessories
Page 31

Pinout
Figure 14 SDM-20242 Layout
For connector dimensions, see SDM-20240 drawing above
J2 - Motor Output X (4pin Molex) J3 - Motor Output Y (4pin Molex)
1 XMOA+ 1 YMOA+
2 XMOA- 2 YMOA-
3 XMOB+ 3 YMOB+
4 XMOB- 4 YMOB-
J4 - Motor Output Z (4pin Molex) J5 - Motor Output W (4pin Molex)
1 ZMOA+ 1 WMOA+
2 ZMOA- 2 WMOA-
3 ZMOB+ 3 WMOB+
4 ZMOB- 4 WMOB-
DMC-21x3 Accessories Chapter 5 SDM-20240/20242• 29
Page 32

J6 - X-axis 9-pin Male D-sub J7 Y-axis 9-pin Male D-sub
1 Forward limit X 1 Forward limit Y
2 Home X 2 Home Y
3 5V 3 5V
4 A- X 4 A- Y
5 B- X 5 B- Y
6 Reverse limit X 6 Reverse limit Y
7 Ground 7 Ground
8 A+ X 8 A+ Y
9 B+ X 9 B+ Y
J8 Z-axis 9-pin Male D-sub J9 W-axis 9-pin Male D-sub
1 Forward limit Z 1 Forward limit W
2 Home Z 2 Home W
3 5V 3 5V
4 A- Z 4 A- W
5 B- Z 5 B- W
6 Reverse limit Z 6 Reverse limit W
7 Ground 7 Ground
8 A+ Z 8 A+ W
9 B+ Z 9 B+ W
J11 I/O 25-pin Male D-sub
1 Ground 14 5V
2 Latch X/Input 1 15 Latch Y/Input 2
3 Latch Z/Input 3 16 Latch W/Input 4
4 Input 5 17 Input 6
5 Input 7 18 Input 8
6 Abort 19 Encoder-compare output
7 Output 1 20 Output 2
8 Output 3 21 Output 4
9 Output 5 22 Output 6
10 Output 7 23 Output 8
11 Ground 24 5V
12 Reset 25 Error
13 NC
J1 Power
1 +V (12V-30V) 3 +V (12V-30V)
2 Ground 4 Ground
30 • Chapter 5 SDM-20240/20242 DMC-21x3 Accessories
Page 33

JP8 – Servo Motor Signals
1 XAEN (X Amp Enable)
2 XMCM (X Motor CMD)
3 YAEN (Y Amp Enable)
4 YMCM (Y Motor CMD)
5 ZAEN (Z Amp Enable)
6 ZMCM (Z Motor CMD)
7 WAEN (W Amp Enable)
8 WMCM (W Motor CMD)
9 GND
10 GND
Mating Connectors
J1: Power
J2-J5: Motor Leads
______________________________________________________________________________
Connector Terminal Pins
Molex: 26-03-4041 Molex: 08-50-0189
Molex: 22-01-3047 Molex: 08-50-0114
Configurations for SDM-20240 & SDM-20242
The SDM-20240 & 20242 have jumpers for setting different functions on the amplifier. The
output current per phase can be set as noted in the table below to 0.5, 0.75, 1.0, or 1.4
Amps/phase. Jumpers are also used to control the current level when the motor is holding position
and the degree of microstepping. The SDM-20242 has additional jumpers for extra functionality
The following paragraphs give the details of the jumper settings.
Motor Current Setting
Set the Current Reference jumpers for each axis to determine the maximum (peak) output current
for each motor. The axes X,Y,Z, and W apply to jumpers JP3, JP4, JP5, and JP6 (SDM-20240)
or JPX1, JPY1, JPZ1, and JPW1(SDM-20242) respectively. Four options are available for each
axis: 0.5A, 0.75A, 1.0A, and 1.4 A. In figure below, the X-axis is configured for 0.5A, the Y axis
as 0.75A, the Z-axis with 1.0 A, and the W axis for 1.4 A. (Note: when using the 1.4 A setting, a
cooling fan or adequate air flow may be required.)
DMC-21x3 Accessories Chapter 5 SDM-20240/20242• 31
Page 34

XREF YREF ZREF WREF
0.5A
.75A
1.0A
1.4A
JP6JP3 JP4 JP5
SDM-20240
Figure 15 Current Limit Jumper Configuration
Low Current Setting (JP1)
The LC jumper and associated “LC” command have three possible configurations for both the
SDM-20240 and SDM-20242:
LC command set to 1 and LC jumper ON – causes motor to use 25% (50% rev A & B) of
peak current while at a “resting” state (profiler is not commanding motion). This is the
recommended configuration to minimize heat generation and power consumption.
LC command set to 1 and LC jumper OFF – turns amplifiers off when at “rest” (not
commanding motion).
LC jumper ON or OFF and LC command set to 0 (default). Full current to drive even
when at rest. Proper heat dissipation is critical if using LC0.
The LC command must be entered after MT-2,-2,-2,-2. LC should be set for each axis – so
LC1,1,1,1 will cause all axes to operate in “Low Current” mode.
Low Current Setting SDM-20240/20242: LC n,n,n,n,n,n,n,n
100%
25% * / 0%
n = 0
n = 1
* LC function for SDM 20240 requires jumper
installation at JP1, else 0% current occurs.
SDM-20240 Half Step jumper (JP1) – determines whether pulses from the
controller are interpreted by the Driver chips as whole or half step increments.
Half Step Jumper On = Half step
Half Step Jumper Off = Full step
32 • Chapter 5 SDM-20240/20242 DMC-21x3 Accessories
Page 35

______________________________________________________________________________
Additional Settings for SDM-20242
Micro Step jumpers (JP1)
Determines whether pulses from the controller are interpreted by the Driver chips as whole, half,
or micro-step increments.
1
th
step
th
step
No Jumper = Full step
M1 ON only = Half step
M2 ON only = 1/4
M1 and M2 ON = 1/16
1
When running in full step mode – the current to the motor is 70% of maximum. All micro-step
settings are able to deliver full current
Protection Circuitry and Error LED
The SDM-20242 has short circuit protection circuitry as well as under/over voltage and over
temperature protection. Here is a list of possible reasons for the Error LED to turn on and stop all
motors from operating:
• If the motor leads are shorted together, or shorted to ground
• Power is applied to the controller before the driver board
When the LED comes on, the error has to be cleared by issuing MO;SH. If the controller is in
LC*=1 mode, an LC*=0;LC*=1 command is required to clear the error condition.
ELO (Emergency Lock Out)
The Emergency Lock Out jumper (ELO on JP1) is a jumper setting on the SDM-20242 which
configures the driver’s behavior when the abort line goes low. With the jumper absent (default),
the behavior of the motors is subject to the OE command. When the jumper is installed, the
amplifiers will be immediately shut down at a hardware level (bypasses the controller firmware).
When the ELO jumper is installed, the OE command should be set to 1. To recover, issue
MO;SH.
Fault Output from SDM-20242
The fault output jumper allows the user to choose to bring out the amplifier’s error signal to either
the Abort line or Input 7 of the controller. With no jumper – the fault signal is not connected to
the controller at all. If a jumper is placed between the center pin and towards the side that says
7_IN – then input 7 is used. Conversely, if the jumper is placed between the center pin and the
side that says ABORT – the Abort line is jumpered to the fault output.
JP5 FLT
7_IN
ABORT
DMC-21x3 Accessories Chapter 5 SDM-20240/20242• 33
Page 36

THIS PAGE LEFT BLANK INTENTIONALLY
34 • Chapter 5 SDM-20240/20242 DMC-21x3 Accessories
Page 37

Chapter 6 AMP-20341
______________________________________________________________________________
Introduction
The AMP-20341 contains four linear drives for operating small brush-type servo motors. The
AMP-20341 requires a ± 12–30 DC Volt input.* Output power is 20 W per amplifier or 60 W
total. The gain of each transconductance linear amplifier is 0.1 A/V at 1 A maximum current.
The typical current loop bandwidth is 4 kHz. The AMP-20341 uses 15-pin D-sub connectors for
encoder and limit connections on each axis and a 25-pin D-sub connector for I/O connections.
* The AMP-20341 replaces the AMP-20340, which accepted a single voltage supply
Figure 16 ICM-20100 (left) and AMP-20341 (right) shown mounted with DMC-2183-D IN
DMC-21x3 Accessories Chapter 6 AMP-20341• 35
Page 38

Electrical Specifications
DC Supply Voltage: +/-12-30 VDC (bipolar)
Max Current (per axis) 1.0 Amps
Amplifier gain: 0.1 A/V
Power output (per channel): 20 W
Total max. power output: 60 W
Layout
36 • Chapter 6 AMP-20341 DMC-21x3 Accessories
Figure 17 AMP-20341 Hole Dimensions
Page 39

Pinout
Pin J3 J4 J5 J6
1 Forward Limit X Forward Limit Y Forward Limit Z Forward Limit W
2 Home X Home Y Home Z Home W
3 5V 5V 5V 5V
4 A-X A-Y A-Z A-W
5 B-X B-Y B-Z B-W
6 I-X I-Y I-Z I-W
7 AA-X AA-Y AA-Z AA-W
8 AB-X AB-Y AB-Z AB-W
9 Reverse Limit X Reverse Limit Y Reverse Limit Z Reverse Limit W
10 Ground Ground Ground Ground
11 A+X A+Y A+Z A+W
12 B+X B+Y B+Z B+W
13 I+X I+Y I+Z I+W
14 AA+X AA+Y AA+Z AA+W
15 AB+X AB+Y AB+Z AB+W
JX - Motor Output X (2pin Molex) JY - Motor Output Y (2pin Molex)
JX1 XMO+ JY1 YMO+
JX2 XMO- JY2 YMO-
JZ - Motor Output Z (2pin Molex) JW - Motor Output W (2pin Molex)
JZ1 ZMO+ JW1 WMO+
JZ2 ZMO- JW2 WMO-
J2 I/O (25 Pin D-sub)
1 Ground 8 Output 3 15 Latch Y/Input 2 22 Output 6
2 Latch X/Input 1 9 Output 5 16 Latch W/Input 4 23 Output 8
3 Latch Z/Input 3 10 Output 7 17 Input 6 24 5V
4 Input 5 11 Ground 18 Input 8 25 Error Output *
5 Input 7 12 Reset * 19 Encoder compare output
6 Abort* 13 NC 20 Output 2
7 Output 1 14 5V 21 Output 4 * Active Low
DMC-21x3 Accessories Chapter 6 AMP-20341• 37
J9 Power
1 +V (12 to 30V)
2 Ground
3 -V (-12 to -30V)
Page 40

J8 External Amplifier
1 Amp Enable X 6 Motor Command
2 Motor Command X 7 Amp Enable W
3 Amp Enable Y 8 Motor Command W
4 Motor Command Y 9 Ground
5 Amp Enable Z 10 Ground
Mating Connectors
J9: Power
JX - JW: Motor Leads
Connector Terminal Pins
Molex: 26-03-4030 Molex: 08-50-0189
Molex: 22-01-3027 Molex: 08-50-0114
38 • Chapter 6 AMP-20341 DMC-21x3 Accessories
Page 41

Chapter 7 AMP-20440/20420
_____________________________________________________________
Introduction
The AMP-20420 and AMP-20440 are brush style amplifiers with a power capacity of 200 Watts
per channel. The amplifier is operational from 18-60 VDC. The amplifier is a transconductance
amplifier and will supply a current proportional to a given command signal. The amplifier
includes protection against over voltage and over current. The controller below is shown
connecting with an AMP-20440.
Figure 18 AMP-20440 shown mounted to a DMC-2143-DIN-DC24
DMC-21x3 Accessories Chapter 7 AMP-20440/20420• 39
Page 42

Electrical Specifications
DC Supply Voltage: 18-60 VDC
Max Current: 3.3 Amps (continuous and peak)
PWM Frequency: 60 kHz
Minimum Load Inductance: 0.5 mH
Over-Voltage Threshold (OV): 69 volts (resets at 66 volts)
Layout
Drawing Not to Scale. For Reference Only. Dimensions are inches.
Figure 19 AMP-20440 Dimensions
Overall Dimensions: 4.85” x 3.70”
40 • Chapter 7 AMP-20440/20420 DMC-21x3 Accessories
Page 43

Pinout
J4 X-axis 15-pin Hi-density Female D-sub
1 I+ X
2 B+ X
3 A+ X
4 AB+ X
5 Ground
6 I- X
7 B- X
8 A- X
9 AA- X
10 Forward Limit X
11 AA+ X
12 AB- X
13 Home X
14 Reverse Limit X
15 5V
J6 Z-axis 15-pin Hi-density Female D-sub
1 I+ Z
2 B+ Z
3 A+ Z
4 AB+ Z
5 Ground
6 I- Z
7 B- Z
8 A- Z
9 AA- Z
10 Forward Limit Z
11 AA+ Z
12 AB- Z
13 Home Z
14 Reverse Limit Z
15 5V
J5 Y-axis 15-pin Hi-density Female D-sub
1 I+ Y
2 B+ Y
3 A+ Y
4 AB+ Y
5 Ground
6 I- Y
7 B- Y
8 A- Y
9 AA- Y
10 Forward Limit Y
11 AA+ Y
12 AB- Y
13 Home Y
14 Reverse Limit Y
15 5V
J7 W-axis 15-pin Hi-density Female D-sub
1 I+ W
2 B+ W
3 A+ W
4 AB+ W
5 Ground
6 I- W
7 B- W
8 A- W
9 AA- W
10 Forward Limit W
11 AA+ W
12 AB- W
13 Home W
14 Reverse Limit W
15 5V
DMC-21x3 Accessories Chapter 7 AMP-20440/20420• 41
Page 44

J1 Power 4-pin
1 VM+ 18-60 VDC
2 Ground 15 PWM/Step W
3 VM+ 18-60 VDC 16 W-axis AmpEnable (RevD and greater)
4 Ground 17 Z-axis AmpEnable (RevD and greater)
Mating Connector AMP 770849-4 18 Output 7
Mating Connector Pins AMP 770476-1 19 Output 4
20 Output 1
JX1 Motor Output 2-pin Molex
1 XMO-
2 XMO+ 23 Latch W / Input 4
24 Latch X / Input 1
JY1 Motor Output 2-pin Molex
1 YMO-
2 YMO+ 27 Motor Command Y
28 Motor Command Z
JZ1 Motor Output 2-pin Molex
1 ZMO-
2 ZMO+ 31 NC
32 5V
JW1 Motor Output 2-pin Molex
1 WMO-
2 WMO+ 35 Ground
Mating Connector Molex 26-03-4020 36 Input 8
Mating Connector Pins Molex 08-50-0189 37 Input 5
38 Latch Y / Input 2
J3 I/0 44-pin Hi-density Female D-sub
1 NC 40 X-axis AmpEnable (RevD and greater)
2 Output 6 41 PWM/Step X
3 Output 8 42 PWM/Step Y
4 Output 5 43 PWM/Step Z
5 Output 2 44 Reset*
6 Abort* (see Appendix A) *Active Low Signal
7 Input 6
8 Latch Z / Input 3
9 Y-axis AmpEnable (RevD and greater)
10 Encoder-Compare Output
11 Sign/Dir X
12 Sign/Dir Y
13 Sign/Dir Z
14 Sign/Dir W
21 Output 3
22 Input 7
25 NC
26 Motor Command X
29 Motor Command W
30 Error Output*
33 5V
34 Ground
39 NC
42 • Chapter 7 AMP-20440/20420 DMC-21x3 Accessories
Page 45

Over-Voltage Protection
The AMP-204x0 is protected against over voltage. If the supply voltage to the amplifier
exceeds 69 V, the over voltage protection will take effect. The yellow over voltage LED will be
lit on the amplifier until the voltage drops below 66 V. It is possible to get into this condition if
the power supply voltage is too high, or if the voltage level is raised due to regeneration. If you
have very high inertial loads (which may cause regeneration), you may consider using a shunt
regulator such as the SR-19900 supplied by Galil. Another important issue to consider is the
level of the over voltage protection. You should set the shunt regulator at a voltage level which
will still allow for proper operation of the power supply. Note that if you are using the -DC24
option from Galil, the DC-DC converter is capable of receiving voltages up to 36 V. If you
need a shunt regulator, you should set the device to limit the voltage to a value less than 36 V.
If you are using the -DC48 option, the voltage should be limited to 66 V and it is recommended
that you use a supply of 60V or less.
Over-Current Protection
The controller also has protection against over current. Over current will cause the amplifier to
be disabled, and can be enabled again from the controller by issuing the MO and then SH
command. If you see that the red over current LED is lit on the amplifier, there is a problem
with either your system or the amplifier. The most likely reason is because of a short between
the motor phases or between the motor phases and ground. This indicates either a wiring
problem, or a faulty motor.
Please review the table below to configure the options for the over current signal. If you choose
the option of connecting the over current signal to the abort line, all axes in motion and the
controller’s application program will be aborted. If you choose to transmit the signal to input 7,
then an application program can be set to interrupt on this input, and run a user defined program.
For further information on using the abort, or the input interrupt routines, refer to the user
manual supplied with the motion controller.
No jumper (factory default): causes the controller to
take no action when an over-current condition occurs
(AMP-204x0 amplifier still disables).
OC-IN7: Place jumper between OC and IN7 to transmit
over-current condition to the controller’s General-Purpose
Digital Input 7. Use the AE command to allow
#AMPERR to run and TA to report status
OC-ABRT: Place jumper between OC and ABRT to
transmit over-current condition to the controller’s Abort
Input.
Figure 20 AMP-204x0 Overcurrent jumper configurations
DMC-21x3 Accessories Chapter 7 AMP-20440/20420• 43
Page 46

Abort Input Options
See Appendix A.
44 • Chapter 7 AMP-20440/20420 DMC-21x3 Accessories
Page 47

Chapter 8 ICM-20500
Fig
_________________________________________________________________
Introduction
The ICM-20500 provides a screw terminal interface for the AMP-205x0. The unit also provides optical
isolation on digital inputs and outputs to interface with up to 24V I/O. The first four outputs are high
power outputs capable of providing up to 500 mA at up to 24 VDC.
The ICM-20500 is also available with D-type connectors instead of screw terminals (order as ICM20500-DTYPE). This provides optical isolation of the I/O when using an AMP-205x0. The D-type
connectors include four 15-pin high density connectors and one 44-pin high-density connector. The
pinout of the 15-pin connectors is the same as the AMP-205x0. The 44-pin connections are the same
except for the following four signals:
Pin 9 Output Supply
Pin 25 Input Common (INCOM)
Pin 39 Output Return
Pin 40 Limit Switch Common (LSCOM)
Note that the ability to connect to external amplifiers on X and Y is lost when using an
ICM-20500-DTYPE.
ure 21 ICM-20500shown mounted to a DMC-2143 and AMP-20540
DMC-21x3 Accessories Chapter 8 ICM-20500• 45
Page 48

Electrical Specifications
Input Common Max Voltage 28 VDC
Output Common Max Voltage 28 VDC
Max Drive Current per Output 0.5 A (outputs 1-4), 25 mA (outputs 5-8)
Minimum Current to turn on Inputs 1 mA
Layout
Drawing Not to Scale. For Reference Only. Dimensions are inches.
46 • Chapter 8 ICM-20500 DMC-21x3 Accessories
Figure 22 ICM-20500 Dimensions
Overall Dimensions: 8.12” x 4.20”
Page 49

Pinout
ICM-20500 (standard product with screw terminals)
1 W Hall Phase C 37 Y Aux Encoder A + 73 Digital Output 6 (25 mA)
2 + 5 V (Power output) 38 Y Aux Encoder A - 74 Digital Output 7 (25 mA)
3 GND (Power return) 39 Y Aux Encoder B + 75 Digital Output 8 (25 mA)
4 W Aux Encoder B - 40 Y Main Encoder B - 76 Digital Output 3 (0.5 A)
5 W Hall Phase A 41 Y Main Encoder I + 77 Digital Output 4 (0.5 A)
6 W Hall Phase B 42 Y Main Encoder I - 78 Digital Output 5 (25 mA)
7 W Aux Encoder A + 43 Y Main Encoder A + 79 + 5 V (Power output)
8 W Aux Encoder A - 44 Y Main Encoder A - 80 Digital Output 1 (0.5 A)
9 W Aux Encoder B + 45 Y Main Encoder B + 81 Digital Output 2 (0.5 A)
10 W Main Encoder B - 46 X Hall Phase C 82 Digital Input 8
11 W Main Encoder I + 47 + 5 V (Power output) 83 INCOM
12 W Main Encoder I - 48 GND (Power return) 84 GND (Power return)
13 W Main Encoder A + 49 X Aux Encoder B - 85 Digital Input 5
14 W Main Encoder A - 50 X Hall Phase A 86 Digital Input 6
15 W Main Encoder B + 51 X Hall Phase B 87 Digital Input 7
16 Z Hall Phase C 52 X Aux Encoder A + 88 Y Latch / DI 2
17 + 5 V (Power output) 53 X Aux Encoder A - 89 Z Latch / DI 3
18 GND (Power return) 54 X Aux Encoder B + 90 W Latch / DI 4
19 Z Aux Encoder B - 55 X Main Encoder B - 91 LSCOM
20 Z Hall Phase A 56 X Main Encoder I + 92 Abort Input
21 Z Hall Phase B 57 X Main Encoder I - 93 X Latch / DI 1
22 Z Aux Encoder A + 58 X Main Encoder A + 94 W Home Input
23 Z Aux Encoder A - 59 X Main Encoder A - 95 W Reverse Limit
24 Z Aux Encoder B + 60 X Main Encoder B + 96 W Forward Limit
25 Z Main Encoder B - 61 Y Motor Command 97 Z Home Input
26 Z Main Encoder I + 62 X Amp Enable 98 Z Reverse Limit
27 Z Main Encoder I - 63 X Motor Command 99 Z Forward Limit
28 Z Main Encoder A + 64 Z Amp Enable 100 Y Home Input
29 Z Main Encoder A - 65 Z Motor Command 101 Y Reverse Limit
30 Z Main Encoder B + 66 Y Amp Enable 102 Y Forward Limit
31 Y Hall Phase C 67 + 5 V (Power output) 103 X Home Input
32 + 5 V (Power output) 68 W Amp Enable 104 X Reverse Limit
33 GND (Power return) 69 W Motor Command 105 X Forward Limit
34 Y Aux Encoder B - 70 Output Supply 106 Output Compare
35 Y Hall Phase A 71 Output Return 107 Error (Output)
36 Y Hall Phase B 72 GND (Power return) 108 Reset (Input)
ICM-20500-DTYPE (D-shell connectors and no screw terminals)
The pinout of 15-pin connectors is the same as the AMP-205x0. The 44-pin connections are the
same except for the following four signals:
DMC-21x3 Accessories Chapter 8 ICM-20500• 47
Pin 9 Output Supply
Pin 25 Input Common (INCOM)
Pin 39 Output Return
Pin 40 Limit Switch Common (LSCOM)
Page 50

Configuration
Limit
Switch
Common
LSCOM
FLSX RLSX HOMEX FLSY RLSY HOMEY
Input
Common
Voltage
INCOM
IN1 IN 2 IN3 IN 4 IN5 IN 6 IN 7 IN8 ABO R T
(XLAT C H ) (YLA T C H ) (ZL AT C H ) (WLAT C H )
Additional Limit
Switches(Dependent on
Number of Axes)
Figure 23 ICM-20500 Digital Inputs
The schematic above shows the digital input configuration. For digital inputs 1 to 8, INCOM
connects to the positive (+) terminal of an external DC supply for a sourcing configuration. For
a sinking configuration, the negative (-) supply terminal is connected instead. The same
approach is applied to the Home and Limit switch inputs with LSCOM.
On the digital outputs, the first
four outputs (Outputs 1 to 4)
are high power outputs capable
of providing up to 500 mA at
up to 24 VDC. An external
RPOUT
RPOUT
5V or GND
5V or GND
10K
10K
MachineICM-20500
MachineICM-20
OUTSUP (+)
OUTSUP (+)
DC supply must be connected
RP Out
RP Out
between Output Supply and
Output Return. The other four
Load
Load
outputs (Outputs 5 to 8) are
opto-isolated and can deliver
up to 25 mA at up to 24 VDC.
SB n = 5V
SB n = 5V
The diagram refers only to
outputs 1 to 4. On outputs 5 to
8, there is no FET on final
stage of the output, only the
opto-isolator.
Figure 24 High Power Outputs
OUTRET ( -)
OUTRET ( -)
The polarity of outputs 1-4
may be reversed by flipping RP11 180 degrees. The polarity of outputs 5-8 may be reversed by
flipping RP12 180 degrees.
48 • Chapter 8 ICM-20500 DMC-21x3 Accessories
Page 51

Chapter 9 AMP-20540/20520
____________________________________________________________________________
Introduction
The AMP-20540 (four-axis) and AMP-20520 (two-axis) are multi-axis brush/brushless
amplifiers that are capable of handling 500 watts of continuous power per axis. The AMP20540/20520 Brushless drive modules are connected to a DMC-21x3 controller via the 96 pin
DIN connector. The standard amplifier accepts DC supply voltages from 18-60 VDC. Note
that the -DC48 option is only rated to 72 VDC. The 80 V option requires the user to provide +/12 V and 5 V supplies to the controller separate from the amplifier. If higher voltages are
required, please contact Galil. Like the DB-28040, the AMP-205x0 family provides for the
addition of 8 analog input to the DMC-21x3. The analog inputs accept +/- 10 V input and have
a resolution of 12 bits; a 16 bit option is available.
DMC-21x3 Accessories Chapter 9 AMP-20540/20520• 49
Figure 25 AMP-20540
Page 52

Electrical Specifications
The amplifier is a brush/brushless trans-conductance PWM amplifier. The amplifier operates in
torque mode, and will output a motor current proportional to the command signal input.
Supply Voltage: 18-60 VDC (Up to 80V optional)
Continuous Current: 7 Amps
Peak Current 10 Amps
Nominal Amplifier Gain 0.4, 0.7, and 1.0 A/V
Switching Frequency 60 kHz (up to 140 kHz available-contact Galil)
Minimum Load Inductance: 0.5 mH (low inductance option available)
Brushless Motor Commutation angle 120° (60° option available)
Layout
Drawing Not to Scale. For Reference Only. Dimensions are inches.
Figure 26 AMP-20540 Dimensions
Overall Dimensions: 6.92” x 4.85”
50 • Chapter 9 AMP-20540/20520 DMC-21x3 Accessories
Page 53

Pinout
J4 - X-axis 15-pin HD Female D-sub J5 - Y-axis 15-pin HD Female D-sub
01 I+ X 01 I+ Y
02 B+ X 02 B+ Y
03 A+ X 03 A+ Y
04 AB+ X 04 AB+ Y
05 GND 05 GND
06 I- X 06 I- Y
07 B- X 07 B- Y
08 A- X 08 A- Y
09 AA- X 09 AA- Y
10 Hall X A 10 Hall Y A
11 AA+ X 11 AA+ Y
12 AB- X 12 AB- Y
13 Hall X B 13 Hall Y B
14 Hall X C 14 Hall Y C
15 5V 15 5V
J6 - Z-axis 15-pin HD Female D-sub J7 - W-axis 15-pin HD Female D-sub
01 I+ Z 01 I+ W
02 B+ Z 02 B+ W
03 A+ Z 03 A+ W
04 AB+ Z 04 AB+ W
05 GND 05 GND
06 I- Z 06 I- W
07 B- Z 07 B- W
08 A- Z 08 A- W
09 AA- Z 09 AA- W
10 Hall Z A 10 Hall W A
11 AA+ Z 11 AA+ W
12 AB- Z 12 AB- W
13 Hall Z B 13 Hall W B
14 Hall Z C 14 Hall W C
15 5V 15 5V
DMC-21x3 Accessories Chapter 9 AMP-20540/20520• 51
Page 54

JX1 - Motor Output X (4-pin ) JY1 - Motor Output Y (4-pin)
NC NC
2 X axis phase A 2 Y axis phase A
3 X axis phase C 3 Y axis phase C
4 X axis phase B 4 Y axis phase B
JZ1 - Motor Output Z (4-pin) JW1 - Motor Output W (4-pin)
NC NC
2 Z axis phase A 2 W axis phase A
3 Z axis phase C 3 W axis phase C
4 Z axis phase B 4 W axis phase B
J3 I/O 44-pin HD Female D-sub
01 PWM/MCMD Z 23 W Latch/Input 4
02 Output 6 24 X Latch/Input 1
03 Output 8 25 PWM/MCMD X
04 Output 5 26 X Home
05 Output 2 27 Y Home
06 Abort (see Appendix A) 28 Z Home
07 Input 6 29 W Home
08 Z Latch/Input 3 30 Error Out
09 SIGN/AEN Y 31 PWM/MCMD W
10 Output Compare 32 5V
11 Reverse Limit X 33 5V
12 Reverse Limit Y 34 Ground
13 Reverse Limit Z 35 Ground
14 Reverse Limit W 36 Input 8
15 Forward Limit W 37 Input 5
16 SIGN/AEN W 38 Y Latch/Input 2
17 SIGN/AEN Z 39 PWM/MCMD Y
18 Output 7 40 SIGN/AENX
19 Output 4 41 Forward Limit X
20 Output 1 42 Forward Limit Y
21 Output 3 43 Forward Limit Z
22 Input 7 44 Reset
52 • Chapter 9 AMP-20540/20520 DMC-21x3 Accessories
Page 55

J1 Power (8-pin)
1 Earth
2 +VDC (18V-60V)
3 +VDC (18V-60V)
4 +VDC (18V-60V)
5 GND
6 GND
7 GND
8 GND
J11 – Analog Input- 16 pin IDC Header
01 GND 09 Analog Input 7
02 GND 10 Analog Input 8
03 Analog Input 1 11 GND
04 Analog Input 2 12 GND
05 Analog Input 3 13 -12V
06 Analog Input 4 14 +12V
07 Analog Input 5 15 5V
08 Analog Input 6 16 GND
Mating Connectors
J1: DC Power
Connector
JX1, JY1, JZ1, and
JW1: 4-pin Motor
Lead Connector
Connector Terminal Pins
8-pin Mini Universal
MATE-N-LOK
AMP# 770579-1 AMP# 170361-1
4-pin Mini Universal
MATE-N-LOK
AMP# 172167-1 AMP# 170361-1
DMC-21x3 Accessories Chapter 9 AMP-20540/20520• 53
Page 56

Operation
Brushless Motor Setup
Note: If you purchased a Galil motor with the amplifier, it is ready for use. No additional setup
is necessary.
To begin the setup of the brushless motor and amplifier, it is first necessary to have
communications with the motion controller. Refer to the user manual supplied with your
controller for questions regarding controller communications. It is also necessary to have the
motor hardware connected and the amplifier powered to begin the setup phase. After the
encoders and motor leads are connected, the controller and amplifier need to be configured
correctly in software. Take all appropriate safety precautions. For example, set a small error
limit (ER*=1000), a low torque limit (TL*=3), and set off on Error to 1 for all axes (OE*=1).
Review the command reference and controller user manual for further details.
There are 3 settings for the amplifier gain: 0.4 A/V, 0.7 A/V, and 1.0 A/V. If the gain is set to
0.7 A/V, a torque limit of 3 (TLn=3) will allow the amplifier to output no more than 2.1 amps of
current on the specified axis. The controller has been programmed to test whether the Hall
commutation order is correct. To test the commutation for the X axis, issue the BS command
(BSX= n,m). The controller will attempt to move the motor through one revolution. If the
motor is unable to move, the controller will return “unknown Hall transition”, check wiring, and
execute BS again’. It may be necessary to issue more voltage to create motion. The default for
the BS command is BSn=0.25,1000 which will send 0.25 volts to the amplifier for 1 second.
BSX=0.5,300 will issue 0.5 volts from the controller for 300 milliseconds. If the controller is
able to move the motor and the Hall transitions are not correct, the controller will alert the
operator and recommend which motor phases to change. For example, the controller might
return “Wire A to Terminal B, Wire B to Terminal A.” If the controller finds that the
commutation order is correct, but the motor would run away due to positive feedback, the
controller will prompt the user to “Wire Phase B to C and C to B. Exchange Hall Sensors A and
B…”. After making any necessary changes to the motor phase wiring, confirm correct
operation by reissuing the BS command. Once the axis is wired correctly, the controller is
ready to perform closed-loop motion.
Brushless Amplifier Software Setup
Select the amplifier gain that is appropriate for the motor. The amplifier gain command (AG)
can be set to 0, 1, or 2 corresponding to 0.4, 0.7, and 1.0 A/V. In addition to the gain, peak and
continuous torque limits can be set through TK and TL respectively. The TK and TL values are
entered in volts on an axis by axis basis. The peak limit will set the maximum voltage that will
be output from the controller to the amplifier. The continuous current will set what the
maximum average current is over a one second interval. The following figure captured with
WSDK is indicative of the operation of the continuous and peak operation. In this figure, the
continuous limit was configured for 2 volts, and the peak limit was configured for 10 volts.
54 • Chapter 9 AMP-20540/20520 DMC-21x3 Accessories
Page 57

Figure 27 Peak Current Operation (DMC-2143 and AMP-20540)
With the AMP-20540 and 20520, the user is also given the ability to choose between normal
and high current bandwidth (AU). In addition, the user can calculate what the bandwidth of the
current loop is for their specific combination (AW). To select normal current loop gain for the
X axis and high current loop gain for the Y axis, issue AU 0,1. The command AW is used to
calculate the bandwidth of the amplifier using the basic amplifier parameters. To calculate the
bandwidth for the X axis, issue AWX=v,l,n where v represents the DC voltage input to the card,
l represents the inductance of the motor in millihenries, and n represents 0 or 1 for the AU
setting.
Note: For most applications, unless the motor has more than 5 mH of inductance with a 24V
supply, or 10 mH of inductance with a 48 volts supply, the normal current loop bandwidth
option should be chosen. AW will return the current loop bandwidth in Hertz.
Brush Amplifier Operation
The AMP-20540 and AMP-20520 also allow for brush operation. To configure an axis for
brush-type operation, connect the 2 motor leads to Phase A and Phase B connections for the
axis. Connect the encoders, homes, and limits as required. Set the controller into brush-axis
operation by issuing BR n,n,n,n. By setting n=1, the controller will operate in brushed mode on
that axis. For example, BR0,1,0,0 sets the Y-axis as brush-type, all others as brushless. If an
axis is set to brush-type, the amplifier has no need for the Hall inputs. These inputs can
subsequently be used as general-use inputs, queried with the QH command. The gain settings
for the amplifier are identical for the brush and brushless operation. The gain settings can be set
to 0.4, 0.7, or 1.0 A/V, represented by gain values of 0, 1, and 2 (e.g.. AG 0,0,2,1). The current
loop gain AU can also be set to either 0 for normal, or 1 for high current loop gain.
Using External Amplifiers
The AMP-205x0 breaks out the step/direction or amplifier enable/motor command signals to
control an external servo or stepper amplifier. For example, a machine might have two axes that
use the AMP-20520 and two stepper axes that use external drivers. The pulse and direction
signals are accessed through the high density 44-pin D-sub connector. The same connector pins
are used to bring out the amplifier enable and motor command line. Which signals are brought
DMC-21x3 Accessories Chapter 9 AMP-20540/20520• 55
Page 58

out is set via jumpers (see figure below). If no jumpers are installed (factory default), the
corresponding pins on the 44-pin connector will be no-connects. In this example, W axis will
output the motor command on pin 31 and amplifier enable on pin 16. The Z axis will output
PWM (Step) and Sign (Direction) to the appropriate pins.
Figure 28 The W-axis is configured for an external servo amplifier
and Z for an external stepper amplifier
Error Monitoring and Protection
The amplifier is protected against over-voltage, under-voltage, over-temperature, and overcurrent for brush and brushless operation. The controller will also monitor for illegal Hall states
(000 or 111 with 120° phasing). The controller will monitor the error conditions and respond as
programmed in the application. The errors are monitored via the TA command. TA n may be
used to monitor the errors with n = 0, 1, 2, or 3. The command will return an eight bit number
representing specific conditions. TA0 will return errors with regard to under voltage, over
voltage, over current, and over temperature. TA1 will return hall errors on the appropriate axes,
TA2 will monitor if the amplifier current exceeds the continuous setting, and TA3 will return if
the ELO has occurred as a result of a hard abort input.
The user also has the option to include the special label #AMPERR in their program to handle
soft or hard errors. As long as a program is executing in thread zero, and the #AMPERR label is
included, when an error is detected, the program will jump to the label and execute the user
defined routine. Note that the TA command is a monitoring function only, and does not
generate an error condition. The over voltage condition will not permanently shut down the
amplifier or trigger the #AMPERR routine. The amplifier will be momentarily disabled; when
the condition goes away, the amplifier will continue normal operation assuming it did not cause
the position error to exceed the error limit.
Hall Error Protection
During normal operation, the controller should not have any Hall errors. Hall errors can be
caused by a faulty Hall-effect sensor or a noisy environment. If at any time the Halls are in an
invalid state, the appropriate bit of TA1 will be set. The state of the Hall inputs can also be
monitored through the QH command. Hall errors will cause the amplifier to be disabled if OE 1
is set, and will cause the controller to enter the #AMPERR subroutine if it is included in a
running program.
56 • Chapter 9 AMP-20540/20520 DMC-21x3 Accessories
Page 59

Under-Voltage Protection
If the supply to the amplifier drops below 12 VDC, the amplifier will be disabled. The amplifier
will return to normal operation once the supply is raised above the 12V threshold; bit 3 of the
error status (TA0) will tell the user whether the supply is in the acceptable range.
Over-Voltage Protection
If the voltage supply to the amplifier rises above 68 VDC, then the amplifier will automatically
disable. The amplifier will re-enable when the supply drops below 66 V. This error is
monitored with bit 1 of the TA0 command. This protection is configurable to activate at 34V
and re-enable at 33V by placing a jumper onto JP5.
Over-Current Protection
The amplifier also has circuitry to protect against over-current. If the total current from the
supply exceeds 40 A, the amplifier will be disabled. The amplifier will not be re-enabled until
the SH command has been sent or the controller is reset. Since the AMP-20540 is a transconductance amplifier, the amplifier will never go into this mode during normal operation. The
amplifier will be shut down regardless of the setting of OE, or the presence of the #AMPERR
routine. Bit 0 of TA0 will be set.
Note: If this fault occurs, it is indicative of a problem at the system level. An over-current fault
is usually due to a short across the motor leads or a short from a motor lead to ground.
Over-Temperature Protection
The controller is also equipped with over-temperature protection. If the average heat sink
temperature rises over 110°C, then the amplifier will shut down. Bit 2 of TA0 will be set. The
amplifier will re-enable when the temperature drops below 110 °C. This error will trigger the
#AMPERR routine if included, and the user may decide whether to disable the amplifier.
DMC-21x3 Accessories Chapter 9 AMP-20540/20520• 57
Page 60

Abort Input Options
See Appendix A.
58 • Chapter 9 AMP-20540/20520 DMC-21x3 Accessories
Page 61

Chapter 10 AMP-20542
____________________________________________________________________________
Introduction
The AMP-20542 is a four-axis PWM servo amplifier designed for direct plug-in to the DMC21x3 motion controller. It requires a single input DC power supply of 18-60V, is capable of
handling up to 200 W continuous per axis, and is rated at 3.3A continuous, 5A peak. The axes
are individually software configurable for brush or brushless operation, as are the axes gains of
0.1, 0.25, or 0.5 A/V.
There are two software-configurable modes of operation to suit low inductance motors. These
modes are Inverter (for motors with 500 μH or greater inductance) and Chopper (for motors
with 200-500 μH inductance), configured by the AU command. The amplifier cannot be used
with controllers other than the DMC-21x3.
Figure 29 AMP-20542 PWM Servo Amplifier
DMC-21x3 Accessories Chapter 10 AMP-20542• 59
Page 62

Electrical Specifications
The amplifier is a brush/brushless PWM amplifier. The amplifier operates in torque mode, and
will output a motor current proportional to the command signal input.
Supply Voltage: 18-60 VDC
Continuous Current: 3.3 Amps
Peak Current 5 Amps
Nominal Amplifier Gain 0.1, 0.25, and 0.5 A/V
Switching Frequency 60 kHz
Minimum Load Inductance: 0.2 or 0.5 mH (software-configurable)
Brushless Motor Commutation angle 120°
Layout
Drawing Not to Scale. For Reference Only. Dimensions are inches.
60 • Chapter 10 AMP-20542 DMC-21x3 Accessories
Figure 30 AMP-20542 Dimensions
Overall Dimensions: 6.82” x 4.90”
Page 63

Pinout
J4 - X-axis 15-pin HD Female D-sub J5 - Y-axis 15-pin HD Female D-sub
01 I+ X 01 I+ Y
02 B+ X 02 B+ Y
03 A+ X 03 A+ Y
04 AB+ X 04 AB+ Y
05 GND 05 GND
06 I- X 06 I- Y
07 B- X 07 B- Y
08 A- X 08 A- Y
09 AA- X 09 AA- Y
10 Hall X A 10 Hall Y A
11 AA+ X 11 AA+ Y
12 AB- X 12 AB- Y
13 Hall X B 13 Hall Y B
14 Hall X C 14 Hall Y C
15 5V 15 5V
J6 - Z-axis 15-pin HD Female D-sub J7 - W-axis 15-pin HD Female D-sub
01 I+ Z 01 I+ W
02 B+ Z 02 B+ W
03 A+ Z 03 A+ W
04 AB+ Z 04 AB+ W
05 GND 05 GND
06 I- Z 06 I- W
07 B- Z 07 B- W
08 A- Z 08 A- W
09 AA- Z 09 AA- W
10 Hall Z A 10 Hall W A
11 AA+ Z 11 AA+ W
12 AB- Z 12 AB- W
13 Hall Z B 13 Hall W B
14 Hall Z C 14 Hall W C
15 5V 15 5V
DMC-21x3 Accessories Chapter 10 AMP-20542• 61
Page 64

JX1 - Motor Output X (4-pin ) JY1 - Motor Output Y (4-pin)
1 Earth 1 Earth
2 X axis phase A 2 Y axis phase A
3 X axis phase C 3 Y axis phase C
4 X axis phase B 4 Y axis phase B
JZ1 - Motor Output Z (4-pin) JW1 - Motor Output W (4-pin)
1 Earth 1 Earth
2 Z axis phase A 2 W axis phase A
3 Z axis phase C 3 W axis phase C
4 Z axis phase B 4 W axis phase B
J3 I/O 44-pin HD Female D-sub
01 PWM/MCMD Z 23 W Latch/Input 4
02 Output 6 24 X Latch/Input 1
03 Output 8 25 PWM/MCMD X
04 Output 5 26 X Home
05 Output 2 27 Y Home
06 Abort (see Appendix A) 28 Z Home
07 Input 6 29 W Home
08 Z Latch/Input 3 30 Error Out
09 SIGN/AEN Y 31 PWM/MCMD W
10 Output Compare 32 5V
11 Reverse Limit X 33 5V
12 Reverse Limit Y 34 Ground
13 Reverse Limit Z 35 Ground
14 Reverse Limit W 36 Input 8
15 Forward Limit W 37 Input 5
16 SIGN/AEN W 38 Y Latch/Input 2
17 SIGN/AEN Z 39 PWM/MCMD Y
18 Output 7 40 SIGN/AENX
19 Output 4 41 Forward Limit X
20 Output 1 42 Forward Limit Y
21 Output 3 43 Forward Limit Z
22 Input 7 44 Reset
62 • Chapter 10 AMP-20542 DMC-21x3 Accessories
Page 65

J1 Power (8-pin)
1 Earth
2 +VDC (18V-60V)
3 +VDC (18V-60V)
4 +VDC (18V-60V)
5 GND
6 GND
7 GND
8 GND
Mating Connectors
J1: DC Power
Connector
JX1, JY1, JZ1, and
JW1: 4-pin Motor
Lead Connector
Connector Terminal Pins
8-pin Mini Universal
MATE-N-LOK
AMP# 770579-1 AMP# 170361-1
4-pin Mini Universal
MATE-N-LOK
AMP# 172167-1 AMP# 170361-1
DMC-21x3 Accessories Chapter 10 AMP-20542• 63
Page 66

Operation
Brushless Motor Setup
Note: If you purchased a Galil motor with the amplifier, it is ready for use. No additional setup
is necessary.
To begin the setup of a brushless motor, it is first necessary to have communications with the
motion controller. Refer to the user manual supplied with your controller for questions
regarding controller communications. Connect the encoders and motor leads to the amplifier,
then configure the controller and amplifier in software. This first involves taking all appropriate
safety precautions. For example, set a small error limit (ER*=1000), a low torque limit (TL*=3),
and set off on Error to 1 for all axes (OE*=1). Review the command reference and controller
user manual for further details. Now it is safe to power the amplifier.
The controller has been programmed to test whether the Hall commutation order is correct. To
test the commutation for the X axis, issue the BS command. The default for the BS command is
BSn=0.25,1000 which will send 0.25 volts to the amplifier for 1 second. BSX=0.5,300 will
issue 0.5 volts from the controller for 300 milliseconds on the X axis. It may be necessary to
issue more voltage to create motion. The controller will attempt to move the motor through one
revolution. If the motor is unable to move, hall transitions are not correct, or the feedback
polarity is reversed, the controller will return suggestion to the terminal response window
regarding the problem and solution. After making any necessary changes to the motor phase
wiring, confirm correct operation by re-issuing the BS command. Once the axis is wired
correctly, the controller is ready to perform closed-loop motion.
Brushless Amplifier Software Setup
Select the amplifier gain that is appropriate for the motor. The amplifier gain command (AG)
can be set to 0, 1, or 2 corresponding to 0.1, 0.25, and 0.5 A/V. In addition to the gain, peak and
continuous torque limits can be set through TK and TL respectively. The TK and TL values are
entered in volts per axis. The peak limit will set the maximum voltage that will be output from
the controller to the amplifier. The continuous current will set what the maximum average
current is over a one second interval. As an example, if the gain is set to 0.5 A/V with a torque
limit of 3 (TLn=3) this will allow the amplifier to output no more than 1.5 amps of current on
the specified axis.
The user can choose between Inverter (AU0 or AU1) or Chopper mode (AU0.5 or AU1.5). For
motors with inductance between 200 and 500 μH, use Chopper mode, for motors with
inductance greater than 500 mH, use inverter mode. Note that chopper mode inherently has the
potential to cause instability at rest depending on tuning and axis characteristics. The user can
also select between normal (AU0 or AU0.5) or high current bandwidth (AU1 or AU1.5). As an
example of the AU command, if the X axis uses normal current loop bandwidth and chopper
mode, and the Y axis uses high current loop bandwidth and inverter mode, the setting would be
AU 0.5,1.
The bandwidth of the current loop for a specific combination can be determined by the AW
command with the basic amplifier parameters. To calculate the bandwidth for the X axis, issue
AWX=v,l,n where v represents the DC voltage input to the card, l represents the inductance of
the motor in millihenries, and n represents the AU setting.
Note: For most applications, unless the motor has more than 5 mH of inductance with a 24V
supply, or 10 mH of inductance with a 48 V supply, the normal current loop bandwidth option
should be chosen. AW will return the current loop bandwidth in Hertz.
64 • Chapter 10 AMP-20542 DMC-21x3 Accessories
Page 67

Brush Amplifier Operation
The AMP-20542 also allows brush servo operation. To configure an axis for brush-type
operation, connect the 2 motor leads to Phase A and Phase B connections for the axis. Connect
the encoders, homes, and limits as required. Set the controller into brush-axis operation by
issuing the BR command (BRn,n,n,n). By setting n=1, the controller will operate in brush mode
on that axis. For example, BR0,1,0,0 sets the Y-axis as brush-type, all others as brushless. If an
axis is set to brush-type, the amplifier has no need for the Hall inputs. These inputs can
subsequently be used as general-use inputs, queried with the QH command. The gain settings
for the amplifier are identical to the brushless operation.
Using External Amplifiers
The AMP-20542 breaks out the step/direction or amplifier enable/motor command signals to
control an external servo or stepper amplifier. For example, a machine might have two axes
(XY) that use the AMP-20542, one axis that uses an external stepper amplifier (Z), and another
that uses an external servo amplifier (W). The pulse and direction signals for an external step
drive are accessed through the high density 44-pin D-sub connector, as are the amplifier enable
and motor command line for an external servo amplifier. To configure which signals are
brought out, jumpers are used between connectors J3 and J4 (see figure below). If no jumpers
are installed (factory default), the corresponding pins on the 44-pin connector will be
unconnected. In the following example, the W axis will output the motor command on pin 31
and amplifier enable on pin 16. The Z axis will output PWM (Step) on pin 1 and Sign
(Direction) on pin 17 of the 44-pin connector.
Figure 31 The W-axis is configured for an external servo amplifier and Z for an external stepper amp lifier
Error Monitoring and Protection
The amplifier is protected against over-voltage, under-voltage, and over-current for brush and
brushless operation. The controller will also monitor for illegal Hall states (000 or 111 with
120° phasing). The controller will monitor the error conditions and respond as programmed in
the application. The errors are monitored via the TA command. TA n may be used to monitor
the errors with n = 0, 1, 2, or 3. The command will return an eight bit number representing
specific conditions. TA0 will return errors with regard to under voltage, over voltage, and over
current. TA1 will return hall errors on the appropriate axes, TA2 will monitor if the amplifier
DMC-21x3 Accessories Chapter 10 AMP-20542• 65
Page 68

current exceeds the continuous setting, and TA3 will return if the ELO has occurred as a result
of a hard abort input.
The user also has the option to include the special label #AMPERR in their program to handle
amplifier errors. As long as a program is executing in thread zero, and the #AMPERR label is
included, the program will jump to the label and execute the user-defined routine when an error
is detected. Note that the TA command is a monitoring function only, and does not generate an
error condition. The over voltage condition will not permanently shut down the amplifier or
trigger the #AMPERR routine. The amplifier will only be momentarily disabled and when the
condition goes away the amplifier will continue normal operation assuming the position error
has not exceed the error limit.
Hall Error Protection
During normal operation, the controller should not have any Hall errors. Hall errors can be
caused by a faulty Hall-effect sensor or a noisy environment. If at any time the Halls are in an
invalid state, the appropriate bit of TA1 will be set. The state of the Hall inputs can also be
monitored through the QH command. Hall errors will cause the amplifier to be disabled if OE 1
is set, and will cause the controller to enter the #AMPERR subroutine if it is included in a
running program.
Under-Voltage Protection
If the supply to the amplifier drops below 8 VDC, the amplifier will be disabled. The amplifier
will return to normal operation once the supply is raised above the 12V threshold. Bit 3 of the
error status (TA0) will tell the user whether the supply is in the acceptable range.
Over-Voltage Protection
If the supply to the amplifier rises above 68 VDC, then the amplifier will automatically disable.
The amplifier will re-enable when the supply drops below 66 V. This error is monitored with
bit 1 of the TA0 command. This protection is configurable to activate at 34V and re-enable at
33V by placing a jumper onto JP10.
Over-Current Protection
The amplifier also has circuitry to protect against over-current. If the total current from the
supply exceeds 20A, the amplifier will be disabled. The amplifier will not be re-enabled until
the SH command has been sent or the controller is reset. Since the AMP-20542 is a transconductance amplifier, the amplifier will never go into this mode during normal operation. The
amplifier will be shut down regardless of the setting of OE, or the presence of the #AMPERR
routine. Bit 0 of TA0 will be set.
Note: If this fault occurs, it is indicative of a problem at the system level. An over-current fault
is usually due to a short across the motor leads or a short from a motor lead to ground.
Abort Input Options
See Appendix A.
66 • Chapter 10 AMP-20542 DMC-21x3 Accessories
Page 69

Chapter 11 SDM-20640/20620
____________________________________________________________________________
Introduction
The SDM-20640 microstepper module drives four bipolar two-phase stepper motors with 1/64
microstep resolution (the SDM-20620 drives two). The current is selectable with options of 0.5,
1.0, 2.0, & 3.0 Amps per axis. Like the DB-28040, the SDM-206x0 family provides for the
addition of 8 analog input to the DMC-21x3. The analog inputs accept +/- 10 V input and have
a resolution of 12 bits; a 16 bit option is available. MT-2 MUST BE SET WHEN USING
THE SDM-206X0.
Figure 32 SDM-20640 shown mounted to a DMC-2143-DI N
DMC-21x3 Accessories Chapter 11 SDM-20640/20620• 67
Page 70

Electrical Specifications
WZY
X
DC Supply Voltage: 12-60 VDC
Max Drive Current (per axis) 3.0 Amps (selectable with AG command)
Max Step Frequency 3 MHz (microsteps)
Motor Type Bipolar two-phase
Switching Frequency 60 kHz
Minimum Load Inductance: 0.5 mH
Layout
MOTOR
PINOUT
POWER PINOUT
Pinout
JX1 Motor Output X (4pin Molex) JY1 Motor Output Y (4pin Molex)
1 XMOB+ 1 YMOB+
2 XMOA+ 2 YMOA+
3 XMOB- 3 YMOB-
4 XMOA- 4 YMOA-
68 • Chapter 11 SDM-20640/20620 DMC-21x3 Accessories
Figure 33 SDM-20640 Dimensions
Overall Dimensions: 6.92” x 5.11”
Page 71

JZ1 Motor Output Z (4pin Molex) JW1 Motor Output W (4pin Molex)
1 ZMOB+ 1 WMOB+
2 ZMOA+ 2 WMOA+
3 ZMOB- 3 WMOB-
4 ZMOA- 4 WMOA-
JX2 X-axis (9 pin Male D-sub) JY2 Y-axis (9 pin Male D-sub)
1 Forward limit X 1 Forward limit Y
2 Home X 2 Home Y
3 5V 3 5V
4 MA- X 4 MA- Y
5 MB- X 5 MB- Y
6 Reverse limit X 6 Reverse limit Y
7 Ground 7 Ground
8 MA+ X 8 MA+ Y
9 MB+ X 9 MB+ Y
JZ2 Z-axis (9 pin Male D-sub) JW2 W-axis (9 pin Male D-sub)
1 Forward limit Z 1 Forward limit W
2 Home Z 2 Home W
3 5V 3 5V
4 MA- Z 4 MA- W
5 MB- Z 5 MB- W
6 Reverse limit Z 6 Reverse limit W
7 Ground 7 Ground
8 MA+ Z 8 MA+ W
9 MB+ Z 9 MB+ W
J3 I/O (25 pin Male D-sub)
1 Ground 14 5V
2 Latch X/Input 1 15 Latch Y/Input 2
3 Latch Z/Input 3 16 Latch W/Input 4
4 Input 5 17 Input 6
5 Input 7 18 Input 8
6 Abort (see Appendix A) 19 Encoder – Compare Output
7 Output 1 20 Output 2
8 Output 3 21 Output 4
9 Output 5 22 Output 6
10 Output 7 23 Output 8
11 Ground 24 5V
12 Reset 25 Error Out
13 NC
DMC-21x3 Accessories Chapter 11 SDM-20640/20620• 69
Page 72

J1 Power (8 Pin Molex)
1 Earth Ground 5 Ground
2 +V (12V-60V) 6 Ground
3 +V (12V-60V) 7 Ground
4 +V (12V-60V) 8 Ground
J11 Analog (16 Pin IDC Header)
1 Ground
2 Ground
3 Analog In 1
4 Analog In 2
5 Analog In 3
6 Analog In 4
7 Analog In 5
8 Analog In 6
JP8 External Drive Breakout (10 Pin IDC Header)
1 X Amp Enable 2 X Motor Command
3 Y Amp Enable 4 Y Motor Command
5 Z Amp Enable 6 Z Motor Command
7 W Amp Enable 8 W Motor Command
9 Ground 10 Ground
9 Analog In 7 13 -12V
10 Analog In 8 14 +12V
11 Ground 15 +5V
12 Ground 16 Ground
Mating Connectors
J1: DC Power
Connector
JX1, JY1, JZ1, and
JW1: 4 pin Motor
Lead Connector
Connector Terminal Pins
8-pin Mini Universal
MATE-N-LOK
AMP# 770579-1 AMP# 170361-1
4-pin Mini Universal
MATE-N-LOK
AMP# 172167-1
AMP# 170361-1
70 • Chapter 11 SDM-20640/20620 DMC-21x3 Accessories
Page 73

Configurations for SDM-206x0
The AG command sets the current on each axis and the LC command configures each axis’s
behavior when holding position. These commands are detailed below:
Current Level Setup (AG Command)
AG configures how much current the SDM-206x0 delivers to each motor. Four options are
available: 0.5A, 1.0A, 2.0A, and 3.0Amps (Note: when using the 3.0A setting, a cooling fan or
adequate air flow is recommended).
Drive Current Selection per Axis: AG n,n,n,n,n,n,n,n
n = 0 0.5 A
n = 1 1 A (default)
n = 2 2 A
n = 3 3.0 A
Low Current Setting (LC Command)
LC configures each motor’s behavior when holding position (when RP is constant) and has
three possible configurations:
LC command set to 0 “Full Current Mode” - causes motor to use 100% of peak current
(AG) while at a “resting” state (profiler is not commanding motion). This is the default
setting.
LC command set to 1 “Low Current Mode” - causes motor to use 25% of peak current
while at a “resting” state. This is the recommended configuration to minimize heat
generation and power consumption.
LC command set to 2 causes motor to use zero current while at a “resting” state. This
setting is for a motor-off condition at rest.
Percentage of full (AG) current used while
holding position with LC n,n,n,n,n,n,n,n
The LC command must be entered after the motor type has been selected for stepper motor
operation (i.e. MT-2,-2,-2,-2). LC is axis-specific, thus LC1 will cause only the X-axis to
operate in “Low Current” mode.
Abort Input Options
See Appendix A.
n = 0
n = 1
n = 2
100%
25%
0%
DMC-21x3 Accessories Chapter 11 SDM-20640/20620• 71
Page 74

THIS PAGE LEFT BLANK INTENTIONALLY
72 • Chapter 11 SDM-20640/20620 DMC-21x3 Accessories
Page 75

Chapter 12 PCM-20900
____________________________________________________________________________
Introduction
The PCM-20900 is a module that can be used to facilitate the design of a custom daughter
board. The module contains the 96 pin connector allowing it to connect to the DMC-21x3. The
user can then test the operation of circuitry before committing to a daughter board design. If
you need more information for designing your own daughter board, please refer to application
note #1232 (http://www.galilmc.com/support/appnotes/econo/note1232.pdf).
Please also note that if for some reason, the standard daughter boards do not provide the
required options, you may contact Galil for pricing regarding Galil designed custom daughter
boards.
DMC-21x3 Accessories Chapter 12 PCM-20900• 73
Figure 34 PCM-20900
Page 76

THIS PAGE LEFT BLANK INTENTIONALLY
74 • Chapter 12 PCM-20900 DMC-21x3 Accessories
Page 77

Chapter 13 DB-28040
____________________________________________________________________________
Introduction
The DB-28040 is an I/O daughter board for the DMC-21x2/21x3 series motion controllers.
NOTE: The following information will apply to all DB-28040 revision E or newer boards.
For information on previous revision boards please see application note #1253.
http://www.galilmc.com/support/appnotes/econo/note1253.pdf
DMC-21x3 Accessories Chapter 13 DB-28040• 75
Figure 35 DB-28040 Mounted to DMC-2143-DI N
Page 78

Layout
Figure 36 DB-28040 Interconnect Mounting Dimensions
Overall Dimensions: 3.075” x 2.425”
76 • Chapter 13 DB-28040 DMC-21x3 Accessories
Page 79

Pinout
J1 – 40 Digital I/O (50-Pin IDC Header)
1 Bank 4 – Bit 40 2 Bank 5 – Bit 41
3 Bank 4 – Bit 39 4 Bank 5 – Bit 42
5 Bank 4 – Bit 38 6 Bank 5 – Bit 43
7 Bank 4 – Bit 37 8 Bank 5 – Bit 44
9 Bank 4 – Bit 36 10 Bank 5 – Bit 45
11 Bank 4 – Bit 35 12 Bank 5 – Bit 46
13 Bank 4 – Bit 34 14 Bank 5 – Bit 47
15 Bank 4 – Bit 33 16 Bank 5 – Bit 48
17 Bank 3 – Bit 32 18 Bank 6 – Bit 49
19 Bank 3 – Bit 31 20 Bank 6 – Bit 50
21 Bank 3 – Bit 30 22 Bank 6 – Bit 51
23 Bank 3 – Bit 29 24 Bank 6 – Bit 52
25 Bank 3 – Bit 28 26 Bank 6 – Bit 53
27 Bank 3 – Bit 27 28 Bank 6 – Bit 54
29 Bank 3 – Bit 26 30 Bank 6 – Bit 55
31 Bank 3 – Bit 25 32 Bank 6 – Bit 56
33 Bank 2 – Bit 24 34 GND
35 Bank 2 – Bit 23 36 GND
37 Bank 2 – Bit 22 38 GND
39 Bank 2 – Bit 21 40 GND
41 Bank 2 – Bit 20 42 GND
43 Bank 2 – Bit 19 44 GND
45 Bank 2 – Bit 18 46 GND
47 Bank 2 – Bit 17 48 GND
49 5 V 50 GND
J3 – 8 Analog Inputs (16-Pin IDC Header)
1 GND 2 GND
3 Analog Input 1 4 Analog Input 2
5 Analog Input 3 6 Analog Input 4
7 Analog Input 5 8 Analog Input 6
9 Analog Input 7 10 Analog Input 8
11 GND 12 GND
13 -12 Volt Supply 14 +12 Volt Supply
15 5 V 16 GND
DMC-21x3 Accessories Chapter 13 DB-28040• 77
Page 80

Electrical Specifications3.3V I/O (Standard)
Inputs
Max Input Voltage 3.4 VDC
Guarantee High Voltage 2.0 VDC
Guarantee Low Voltage 0.8 VDC
Inputs are internally pulled up to 3.3V through a 4.7kΩresistor
Outputs
Sink/Source 4mA per output5V I/O (-5V Option)
Inputs
Max Input Voltage 5.25 VDC
Guarantee High Voltage 2.0 VDC
Guarantee Low Voltage 0.8 VDC
Inputs are internally pulled up to 5V through a 4.7kΩresistor
Outputs
Sink/Source 20mA
Analog Inputs
Input Impedance (12 and 16 bit) 42kΩ
The DB-28040 comes with 12-bit analog inputs standard. For 16-bit analog inputs, order the
DB-28040-16. When using the 16 bit hardware, the controller requires special firmware that can
be downloaded from the website free of charge (if the DB-28040-16 is ordered with a controller
the factory will install the proper firmware).
To ensure the analog inputs function properly, don’t apply a voltage to the analog inputs until
after the controller is powered. If possible, it is recommended that circuit generating the analog
signal be powered by the +5 or ±12V sources available on the controller. This will ensure that
the input voltage is not applied too soon.
The default range of the analog inputs is +-10VDC. The hardware on board allows for different
ranges of analog inputs, however currently the DMC-21x2/21x3 firmware (rev 1.0p) does not
support this. Future versions of the firmware will allow for this, please contact Galil if this is
required for your application.
Interfacing to the Digital I/O
The DB-28040-5V offers 40 digital I/O points that can interface directly to Grayhill and OPTO22 I/O mounting racks. These I/O points can be configured as inputs or outputs in 8 bit
increments with the CO command. The I/O points accessed from the J2 header of the DB28040-5V are connected directly to the I/O rack using a 50-pin IDC ribbon connector.
Note: special considerations must be made to avoid damage when using Opto-22 G4 series
racks, read application note# 5450 for details:
(http://www.galilmc.com/support/appnotes/miscellaneous/note5450.pdf)
78 • Chapter 13 DB-28040 DMC-21x3 Accessories
Page 81

SSI
The DB-28040 can also be ordered to support SSI encoders.
When using the SSI option for the DB-28040, note that bank 6 (bits 49 to 56) are not active.
Please see Application Note 2438: Galil SSI Encoder Interface, for more details.
DB-28040 and AMP-205x0
The standard DB-28040 is not compatible with an AMP-205x0; however, the DB-28040-RA
can be ordered to have a special right angle connector installed so that it can connect while the
AMP-205x0 is present. This option must be ordered at the time the AMP and DMC-21x3 is
ordered because both the AMP and DB require modification. Order AMP-205x0-DBREADY.
The eight analog inputs on the AMP become invalid in this configuration. Only the eight analog
inputs on the DB may be used.
Figure 37 DMC-2143-DIN with AMP-20540 and DB-28040
DB-28040 and AMP-205x2 or SDM-20640
To use the AMP-205x2 or SDM-20640 with the DB-28040, order AMP-205x2-DBREADY or
SDM-20640-DBREADY. The standard DB-28040 is used, and lays flat on top of the AMP or
SDM, but the AMP or SDM requires modification. The eight analog inputs on the AMP
become invalid in this configuration. Only the eight analog inputs on the DB may be used.
DMC-21x3 Accessories Chapter 13 DB-28040• 79
Page 82

THIS PAGE LEFT BLANK INTENTIONALLY
80 • Chapter 13 DB-28040 DMC-21x3 Accessories
Page 83

Chapter 14 DB-28104
____________________________________________________________________________
Introduction
A family of feedback devices, commonly called Sin/Cosine encoders or 1 Volt peak-peak
encoders are becoming increasingly popular due to their cost, ease of use, and performance.
Galil Motion Control has developed an interface board for the DMC-21x2/21x3 series motion
controllers that give the engineer the ability to close the servo loop around these feedback
devices. Figure 1 shows the DB-28104.
DMC-21x3 Accessories Chapter 14 DB-28104• 81
Figure38 DB-28104
Page 84

The DB-28104 can be used in conjunction with any of the Galil amplifier boards. In Figure 2, a
DMC-2143 is mated to the DB-28104 and an ICM-20100 breakout module.
Figure 39 DMC-2143+ICM-20100+DB-28104
82 •Chapter 14 DB-28104 DMC-21x3 Accessories
Page 85

Layout
Theory of Operation
Traditional quadrature rotary encoders work by having two sets of lines inscribed radially
around the circumference of an optical disk. A light is passed through each of these two sets of
lines. On the other side of the gratings, photo sensors detect the presence (or absence) of these
lines. These two sets of lines are offset from each other such that one leads the other by one
quarter of a complete cycle as shown in Figure 3 below. These signals are commonly referred
to as the Channels A and B. The direction of rotation of the encoder can be inferred by which of
the A and B signals leads the other. Each rising or falling edge indicates one quadrature count.
Thus for a complete cycle of the square wave there are a total of four encoder counts.
DMC-21x3 Accessories Chapter 14 DB-28104• 83
Figure 40 DB-28104 Dimensions
Overall Dimensions: 3.075” x 3.510”
Page 86

Channel A
Channel B
Figure 41 Quadrature Encoder Signals
A sinusoidal encoder is similar to a quadrature encoder in that it produces two signals that are
read from two sets of lines inscribed on an optical disk. The difference is that the two signals
are output as analog sinusoidal waves as shown in Figure 4.
Va V
b
Figure 42 Sinusoidal Encoder Signals
When the motion controller is mated to the DB-28104, the position is tracked on two levels.
First, the number of coarse cycles is counted much like is done with a quadrature encoder. On
the fine level the precise position inside the cycle is determined from the two sinusoidal signals
using bit-wise interpolation. This interpolation can be set by the user in the range of 2
12
points per sinusoidal cycle
2
84 •Chapter 14 DB-28104 DMC-21x3 Accessories
5
through
Page 87

The unique position within one cycle can be read using the following equation:
n
2
=
Fine
360
The overall position can be determined using:
where:
n is the number of bits of resolution that were used in the conversion.
Coarse_cycles is the whole number of cycles counted.
Fine is the interpolated position within one cycle.
and V
V
b
are the two signals as indicated in Figure 4.
a
tan
⎛
⎞
V
1-
b
⎜
⎟
⎜
⎟
V
a
⎝
⎠
Setting up the Encoder
Each axis uses a 9-pin female connector. The pinout is described below.
JX1 X-Axis (9-pin Female D-sub) JZ1 Z-Axis (9-pin Female D-sub)
Pin Description Pin Description
1 5 Volt encoder power 1 5 Volt encoder power
2 Index - 2 Index -
3 MA-X 3 MA-Z
4 MB-X 4 MB-Z
5 NC 5 NC
6 Ground 6 Ground
7 Index + 7 Index +
8 MA+X 8 MA+Z
9 MB+X 9 MB+Z
JY1 Y-Axis (9-pin Female D-sub) JW1 W-Axis (9-pin Female D-sub)
Pin Description Pin Description
1 5 Volt encoder power 1 5 Volt encoder power
2 Index - 2 Index -
3 MA-Y 3 MA-W
4 MB-Y 4 MB-W
5 NC 5 NC
6 Ground 6 Ground
7 Index + 7 Index +
8 MA+Y 8 MA+W
9 MB+Y 9 MB+W
n
Fine2lesCoarse_cycPosition
+⋅=
DMC-21x3 Accessories Chapter 14 DB-28104• 85
Page 88

After wiring the encoders, it is recommended that the system is powered up with the Motor Off
jumper installed, or the power to the amplifiers disabled. Connect to the controller using
DMCSmartTerminal or other compatible software. Sinusoidal encoder interpolation mode is
selected using the AF command:
AFm
where m=0 uses the default quadrature encoder.
m=1 for standard Analog Feedback (DB-28040 or AMP-20540 or SDM-20640 required)
m
m=5 to 12 indicates that the sinusoidal encoder input is to be used with 2
per encoder cycle. (The DB-28104 is required.)
For example, if the encoder cycle is 40 microns, AF10 results in 2
resolution of 39 nanometers per count. Figure 5 shows a screen capture.
10
interpolation counts
=1024 counts per cycle, or a
86 •Chapter 14 DB-28104 DMC-21x3 Accessories
Figure 43 Setting AF command.
Page 89

Once the encoder is shown to provide acceptable feedback with correct polarity, set a low
torque limit (TL). Set a reasonable Error Limit (ER) and enable the Off-on-Error function (OE).
This ensures that the axis will not be driven unstable once power is applied to the motors.
Once an axis is controlled using a sinusoidal encoder, the maximum allowable speed to
50,000,000 counts/sec and acceleration/deceleration settings are increased to 10
If the axis is controlled in a coordinated move with the VM or LM mode, the parameters of the
coordinated move, VA, VD or VS are also increased to the expanded values. However, it is the
responsibility of the user to assure that the speeds on the other axes involved in the coordinated
move, if not in sinusoidal encoder mode, remain within the 12,000,000 counts/s limit.
Tuning the System
With high-resolution feedback, it is very common for the controller to require tuning gains that
are numerically low. If the tuning gains are very low, consider using an amplifier that has lower
gain. It is almost certain that manual tuning will be required. Set up a ‘typical’ move, and
capture the position data with the WSDK oscilloscope function. For this example, the X axis
was set up with the following program:
#SETUP
AFX=10;'SET SINE ENCODER TO 10 BIT INTERPOLATION
SPX=1000000;'X AXIS SLEW TO 1m COUNTS/SEC
ACX=1000000;DCX=1000000;'SET ACCEL AND DECEL
#MOVE
PRX=1000;' MOVE X AXIS FWD 1000 COUNTS
BGX;AMX;'BEGIN MOTION AND WAIT FOR COMPLETE
WT500;'WAIT 500 SAMPLES
PRX=0;'MOVE X AXIS TO POSITION ZERO
BGX;AMX'BEGIN MOTION AND WAIT FOR COMPLETE
WT500'WAIT 500 SAMPLES
JP#MOVE;'LOOP
9
counts/s2.
After extensive manual tuning, the following parameters were determined:
KDX = 22.5
KPX = 6.13
KIX= 4.3
ILX= 9
ITX= 0
FAX= 0
FVX= 1
PLX= 0
This set of tuning parameters resulted in a step response shown in Figure 6.
DMC-21x3 Accessories Chapter 14 DB-28104• 87
Page 90

Figure 44 AFX=10 Step Response
Close inspection of the step response shows that some overshoot occurred. However, any
attempt to eliminate this overshoot resulted in an overdamped system.
A second test was run with AFX=12. This highest interpolation requires that the system be
wired in such a way that noise is nearly eliminated. Even one or two bits of noise on the analog
signals can result in large disturbances in the position calculation. The same system with
AFX=12 resulted in the following gains:
KDX = 4.75
KPX = 2.0
KIX= 2.1
ILX= 9
ITX= 0
FAX= 0
FVX= 0
PLX= .2
Figure 7 shows the associated step response.
88 •Chapter 14 DB-28104 DMC-21x3 Accessories
Page 91

Figure 45 AFX=12 step response.
Example sin/cos Encoders
RSF Elektronik MSA 670.3
20 μm pitch
at AFX=12 results in 5 nm position resolution.
* This encoder can be ordered from RSF with
a cable that mates directly to the DB-28104.
Use cable code UIE.
www.rsf.net
Renishaw RGH41B30F00A
40 μm pitch
at AFX=10 result in 40 nm position resolution
Renishaw RGH22B series
20 μm pitch
at AFX=12 result in 5 nm position resolution
www.renishaw.com/client/category/UKEnglish/CAT-1079.shtml
DMC-21x3 Accessories Chapter 14 DB-28104• 89
Page 92

THIS PAGE LEFT BLANK INTENTIONALLY
90 •Chapter 14 DB-28104 DMC-21x3 Accessories
Page 93

Chapter 15 Cables for AMP-20xxx
____________________________________________________________________________
The Cable-44pin-xm is used to break-out the I/O signals on connector J3 of the AMP-205x0 or
AMP-20542. This cable consists of a 44-pin High Density Male DSub connector at one end, and
flying leads at the other end. This cable is available in 1 meter or 2 meter lengths, designated by
the ‘xm’ portion of the part number. For example, the part number for the 2 meter length is
Cable-44pin-2m.
There are three versions of the Cable-44, each version has different pinout color coding. The
following describes the three versions and their differences.
Version 1: Cables purchased before January 2004 have a slick black sheath. The part number on
the sheath is 0006-0044 REV.-S1.
Fig 1. Version 1 Cable-44 Part Number
For pinout information of this cable, see Table 1 below.
Note: This chapter refers only to the pinout of the AMP-205x0 and 20542. For the AMP-204x0,
refer to Chapter 7.
DMC-21x3 Accessories Chapter 15 Cables for AMP-20xxx• 91
Page 94

Table 1. First Version of Cable-44, Pinout Color-Code
Pin Description Cable Color (Dot ) Pin Description Cable Color (Dot )
1
2 Output 6 White(Black) 24 Input1/LatchX Dark Blue(White)
3 Output 8 Black 25
4 Output 5 Black(White) 26 HOMEX Dark Blue(Brown)
5 Output 2 Brown 27 HOMEY Purple
6 Abort Brown(White) 28 HOMEZ Purple(White)
7 Input 6 Red 29 HOMEW Silver
8 Input3/LatchZ Red(White) 30 Error Silver(White)
9 NC/SignY/AmpenY1 Red(Black) 31
10 CMP Red(Purple) 32 +5V White(Orange)
11 RLSX Orange 33 +5V White(Yellow)
12 RLSY Orange(White) 34 GND White(Green)
13 RLSZ Orange(Black) 35 GND White(Blue)
14 RLSW Orange(Purple) 36 Input8 White(Purple)
15 FLSW Yellow 37 Input5 Pink
16 NC/SignW/AmpenW1 Yellow(White) 38 Input2/LatchY Pink(White)
17 NC/SignZ/AmpenZ1 Yellow(Black) 39
18 Output1 Yellow(Purple) 40 NC/SignX/AmpenX1 Pink(Brown)
19 Output4 Green 41 FLSX Light Blue
20 Output1 Green(White) 42 FLSY Light Blue(White)
21 Output3 Green(Black) 43 FLSZ Light Blue(Black)
22 Input7 Green(Purple) 44 Reset Light Blue(Brown)
1
Refer to specific amplifier pinout information in the DMC-21x3 Accessories Manual.
NC/PWMZ/Motor
Command Z
1
White 23 Input4/LatchW Dark Blue
NC/PWMX/Motor
Command X1
NC/PWMW/Motor
Command W1
NC/PWMY/Motor
Command Y1
Dark Blue(Black)
White(Brown)
Pink(Black)
Version 2: Cables purchased between January 2004 and March 2006 a black braided sleeve over
the slick black sheath. The part number on the braided sleeve is 0006-0044 REV.-S1(same as
Version 1).
92 •Chapter 15 Cables for AMP-20xxx DMC-21x3 Accessories
Fig 2. Version 2 Cable-44 Part Number
Page 95

For pinout information of this cable, see Table 2 below.
Table 2. Second Version of Cable-44, Pinout Color-Code
Pin Description Cable Color(Stripe) Pin Description Cable Color (Stripe)
1
2 Output 6 Black(White) 24 Input1/LatchX Dark Blue(Brown)
3 Output 8 Brown 25
4 Output 5 Brown (White) 26 HOMEX Purple(White)
5 Output 2 Red 27 HOMEY Light Blue
6 Abort Red(White) 28 HOMEZ Light Blue(White)
7 Input 6 Red(Black) 29 HOMEW Light Blue(Black)
8 Input3/LatchZ Red(Purple) 30 Error Light Blue(Brown)
9 NC/SignY/AmpenY1 Orange 31
10 CMP Orange(White) 32 +5V Silver(White)
11 RLSX Orange(Black) 33 +5V Pink
12 RLSY Orange(Purple) 34 GND Pink(White)
13 RLSZ Yellow 35 GND Pink(Black)
14 RLSW Yellow(White) 36 Input8 Pink(Purple)
15 FLSW Yellow(Black) 37 Input5 White
16 NC/SignW/AmpenW1 Yellow(Brown) 38 Input2/LatchY White(Black)
17 NC/SignZ/AmpenZ1 Green 39
18 Output7 Green(White) 40 NC/SignX/AmpenX1 White(Red)
19 Output4 Green(Black) 41 FLSX White(Yellow)
20 Output1 Green(Purple) 42 FLSY White(Green)
21 Output3 Dark Blue 43 FLSZ White(Blue)
22 Input7 Dark Blue(White) 44 Reset White(Purple)
1
Refer to specific amplifier pinout information in the DMC-21x3 Accessories Manual.
NC/PWMZ/Motor
Command Z
1
Black 23 Input4/LatchW Dark Blue(Black)
NC/PWMX/Motor
Command X1
NC/PWMW/Motor
Command W1
NC/PWMY/Motor
Command Y1
Purple
Silver
White(Brown)
Version 3: Cables purchased from March 2006 onward which are RoHS-compliant, have a slick
black sheath(similar to Version 1). The part number on the sheath is 89140-03044 REV.-S1.
DMC-21x3 Accessories Chapter 15 Cables for AMP-20xxx• 93
Fig 3. Version 3 Cable-44 Part Number
Page 96

For pinout information of this cable, see Table 3 below.
Table 3. Third Version of Cable-44, Pinout Color-Code
Pin Description Cable Color (Stripe) Pin Description Cable Color (Stripe)
1
2 Output 6 Brown 24 Input1/LatchX Gray(Black)
3 Output 8 Red
4 Output 5 Orange 26 HOMEX Pink(Red)
5 Output 2 Yellow 27 HOMEY Pink(Blue)
6 Abort Green 28 HOMEZ Pink(Green)
7 Input 6 Blue 29 HOMEW Light Blue
8 Input3/LatchZ Purple 30 Error Light Blue(Black)
9 NC/SignY/AmpenY1 Gray 31
10 CMP White 32 +5V Light Blue(Blue)
11 RLSX Pink 33 +5V Light Blue(Green)
12 RLSY Light Green 34 GND Gray(Red)
13 RLSZ Black(White) 35 GND Gray(Green)
14 RLSW Brown(White) 36 Input8 Purple(Black)
15 FLSW Red(White) 37 Input5 Blue(Black)
16 NC/SignW/AmpenW1 Orange(White) 38 Input2/LatchY Light Green(Black)
17 NC/SignZ/AmpenZ1 Green(White) 39
18 Output7 Blue(White) 40 NC/SignX/AmpenX1 Light Green(Blue)
19 Output4 Purple(White) 41 FLSX Light Green(Green)
20 Output1 Red(Black) 42 FLSY Light Yellow
21 Output3 Orange(Black) 43 FLSZ Light Yellow(Black)
22 Input7 Yellow(Black) 44 Reset Light Yellow(Red)
1
Refer to specific amplifier pinout information in the DMC-21x3 Accessories Manual.
NC/PWMZ/Motor
Command Z
1
Black 23 Input4/LatchW Green(Black)
25
NC/PWMX/Motor
Command X1
NC/PWMW/Motor
Command W1
NC/PWMY/Motor
Command Y1
Pink(Black)
Light Blue(Red)
Light Green(Red)
The Cable-15pin-xm
J7 of the AMP-205x0 or AMP-20542. This cable consists of a 15-pin High Density Male DSub
connector at one end, and flying leads at the other end. This cable is available in 1 meter or 2
meter lengths, designated by the ‘xm’ portion of the part number. For example, the part number
for the 1 meter length is Cable-15pin-1m. This cable has a slick black sheath with part number
0006-0045 REV.A S1.
94 •Chapter 15 Cables for AMP-20xxx DMC-21x3 Accessories
is used to break-out the encoders and hall signals on connector J4, J5, J6, &
Page 97

Fig 4. Cable-15 Part Number
For pinout color code information of this cable, see Table 4 below.
Table 4. Cable-15, Pinout Color-Code
Pin Description Cable Color (Stripe) Pin Description Cable Color (Stripe)
1 Index +
2 Main B+ Black (White) 10 Hall U Blue
3 Main A+ Brown 11 Aux A+ Purple
4 Aux B+ Brown (White) 12 Aux B- Silver
5 GND Red 13 Hall V White
6 Index - Red (White) 14 Hall W Pink
7 Main B- Orange 15 5V Light Green
8 Main A- Yellow
Black 9 Aux A- Green
DMC-21x3 Accessories Chapter 15 Cables for AMP-20xxx• 95
Page 98

THIS PAGE LEFT BLANK INTENTIONALLY
96 •Chapter 15 Cables for AMP-20xxx DMC-21x3 Accessories
Page 99

Appendix A Abort Input Options
The factory default behavior of a falling edge on the abort digital input causes the program to stop
and all motors to servo to an instantaneous stop; however, it may be advantageous configure the
shut down of the amplifiers and/or keep the program running when this occurs.
CN Command: Program Control
The 5th field of the CN command configures how the program is handled when the abort line goes
low on the controller. CN ,,,,0 is the default and causes program execution to halt. CN,,,,1 will
allow program to continue.
OE Command: Firmware Disable
If OE is set, the controller’s firmware will toggle all amp enable lines to turn all drives off when
an abort input occurs. The SH command needs to be issued to command further motion. If OE is
not set, the controller will instantaneously servo all axis to a stop.
ELO Jumper: Hardware Disable (AMP-204x0, 205x0, SDM-206x0)
ELO (Emergency Lock Out) is a jumper setting on the AMP-204x0, AMP-205x0, and SDM206x0 which configures the amplifier’s behavior when the abort line goes low. With the jumper
absent (default), the behavior of the motors is subject to the OE command above. If the jumper is
installed, the amplifiers will be immediately shut down, leaving the axes in a free-spin state.
Having the ELO jumper installed is similar to OE1, except that the amplifiers are disabled in
hardware rather than firmware. WHEN ELO IS INSTALLED, OE SHOULD BE SET TO 1. To
recover, issue MO; SH. When ELO is active, the overcurrent and overvoltage lights will turn on
with the AMP-204x0 and AMP-205x0 (just the overcurrent light will blink on the SDM-206x0).
ELO Scenarios
The following tables show the response of the AMP-204x0, 205x0, and SDM-206x0 (with ELO
jumper installed) to abort input and over current conditions.
DMC-2143 with AMP-20540
OE*=1; CN,,,,1; #AMPERR defined
Condition input LED state Reaction #AMPERR
runs
Abort (J3 pin 6) OC + OV -disables axes A-D
A-D Over Current OC
“
yes TA3
“
TA Recovery
MO;SH
returns 1
TA0
returns 1
“
DMC-21x3 Accessories Appendix A Abort Input Options• 97
Page 100

DMC-2143 with SDM-20640
OE*=1; CN,,,,1; #AMPERR defined
Condition input LED state Reaction #AMPERR
runs
Abort (J3 pin 6) OC blinks -disables axes A-D
A-D Over Current OC
“
yes TA3
“
DMC-2183 with two AMP-20440s
JP5: OC-IN7 (both AMP-20440s) RECOMMENDED
OE*=1; AE1,1; CN,,,,1; #AMPERR defined
Condition input LED state Reaction #AMPERR
runs
A-D Abort (J3 pin 6) OC + OV axes A-D -disables axes A-D
-disables axes E-H*
E-H Abort (J3 pin 6) OC + OV axes E-H -disables axes A-D*
-disables axes E-H
A-D & E-H Abort OC + OV
axesA-D, E-H
A-D Over Current OC axes A-D -disables axes A-D
E-H Over Current OC axes E-H -disables axes A-D*
-disables axes A-D
-disables axes E-H
-disables axes E-H*
-disables axes E-H
JP5: OC-ABRT (both AMP-20440s)
OE*=1
Condition input LED state Reaction #AMPERR
A-D Abort (J3 pin 6) OC + OV axes A-D -disables axes A-D
-disables axes E-H*
E-H Abort (J3 pin 6) OC + OV axes E-H
A-D & E-H Abort OC + OV
axes A-D, E-H
A-D Over Current OC axes A-D -disables axes A-D
E-H Over Current OC axes E-H
-A-D motion continues
-disables axes E-H
-disables axes A-D
-disables axes E-H
-disables axes E-H*
-A-D motion continues
-disables axes E-H
JP5: no jumper (both AMP-20440s)
OE*=1
Condition input LED state Reaction #AMPERR
A-D Abort (J3 pin 6) OC + OV axes A-D -disables axes A-D
-disables axes E-H*
E-H Abort (J3 pin 6) OC + OV axes E-H
A-D & E-H Abort OC + OV
axes A-D, E-H
A-D Over Current OC axis A-D -disables axes A-D
-A-D motion continues
-disables axes E-H
-disables axes A-D
-disables axes E-H
-E-H motion continues
yes 1 MO;SH
“
“
“
“
runs
NO
“
“
“
“
runs
NO
“
“
“
TA Recovery
MO;SH
returns 1
TA0
returns 1
TA0 Recovery
“
“
“
“
TA0 Recovery
N/A OE*=0;MO;SH;
“
“
“
“
TA0 Recovery
N/A MO;SH
“
“
“
“
“
“
“
“
WT2;OE*=1
“
“
“
“
“
“
“
98 •Appendix A Abort Input Options DMC-21x3 Accessories
 Loading...