

Galaxy Audio LA4D Quick Start Manual
GAL A X Y AUDIO Quick Start Guide
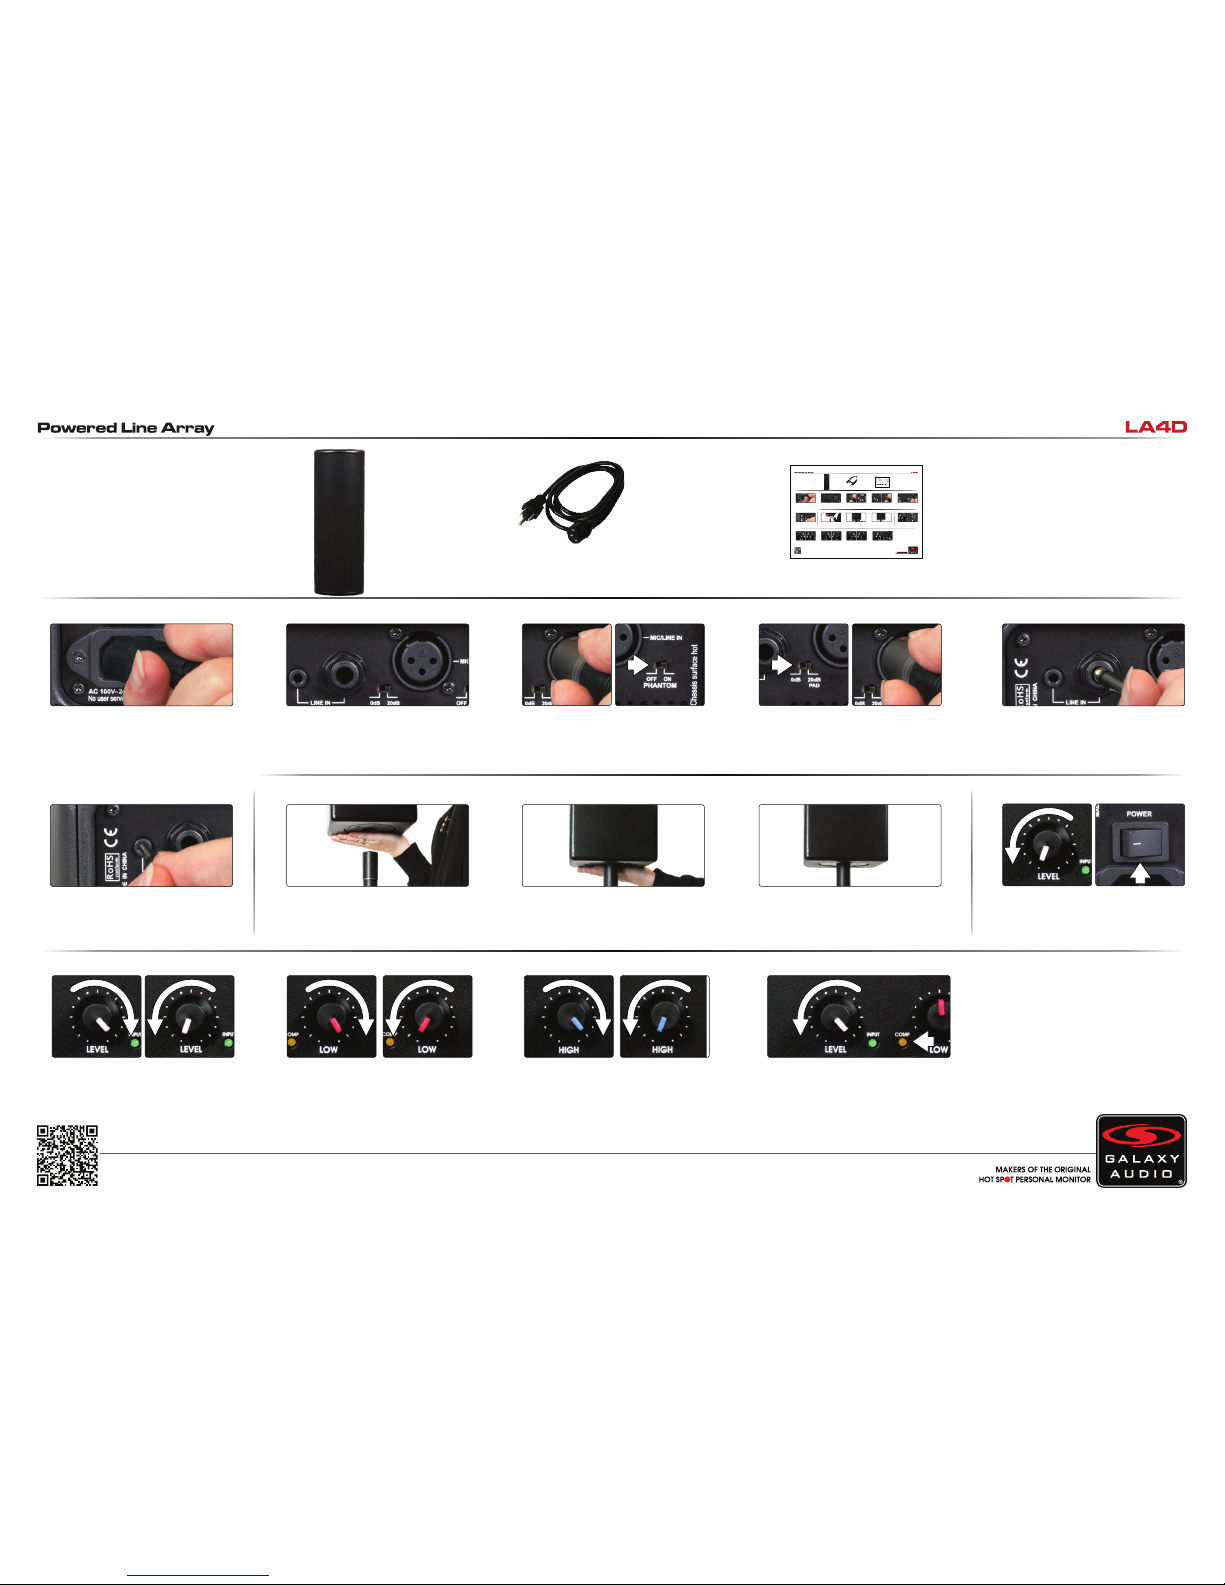
Included Components
1. LA4D x1
2. IEC Power Cable x1
3. Quick Start Guide x1
1. 2.
Connect power cable to LA4D, connect
other end to a power outlet.
2
Choose the input needed:
XLR for microphone or line level.
1/4" for balanced/unbalanced line level.
1/8" for stereo from a media player etc.
3
For a microphone, plug the XLR male
end of the cable into the XLR female
connector on the LA4D. If the
microphone is a condenser that requires
phantom, turn on phantom power switch.
4
For line level with an XLR cable, move
the 0,20dB switch to the 20dB PAD
position. Plug the XLR male end of the
cable into the XLR female connector on
the LA4D.
5
For line level with a 1/4" cable, plug into
the 1/4" input that is to the left of the
XLR. This can be a balanced TRS or an
unbalanced TS input.
Setup
1
For a stereo signal from an MP3 player,
attach 1/8" stereo cable into the 1/8"
input, this input will sum left and right.
Stand Mounting
1
With a firm grip, align the LA4D up with
the speaker stand.
2
Carefully bring the LA4D down onto the
speaker stand.
6
2
Level control: turn clockwise to raise the
level. Turn counter-clockwise to lower
the level.
3
Tone controls: To increase the low
frequencies, turn the “Low” tone control
clockwise. To decrease, turn
counter-clockwise.
4
Tone controls: To increase the high
frequencies, turn the “high” tone control
clockwise. To decrease, turn
counter-clockwise.
5
Max. level is reached when the yellow
“Comp” light only flashes at peak levels.
If the light is on constantly, turn the level
control down to avoid damage to the
LA4D.
3.
3
Operation
Insure the input level control is turned
down (fully counter-clockwise) Turn the
power switch on.
1
GALAX Y AUDIO Quick Start Guide
Included Components
1. LA4D x1
2. IEC Power Cable x1
3. Quick Start Guide x1
1. 2.
Connect power cable to LA4D, connect
other end to a power outlet.
2
Choose the input needed:
XLR for microphone or line level.
1/4" for balanced/unbalanced line level.
1/8" for stereo from a media player etc.
3
For a microphone, plug the XLR male
end of the cable into the XLR female
connector on the LA4D. If the
microphone is a condenser that requires
phantom, turn on phantom power switch.
4
For line level with an XLR cable, move
the 0,20dB switch to the 20dB PAD
position. Plug the XLR male end of the
cable into the XLR female connector on
the LA4D.
5
For line level with a 1/4" cable, plug into
the 1/4" input that is to the left of the
XLR. This can be a balanced TRS or an
unbalanced TS input.
Setup
1
For a stereo signal from an MP3 player,
attach 1/8" stereo cable into the 1/8"
input, this input will sum left and right.
Stand Mounting
1
With a firm grip, align the LA4D up with
the speaker stand.
2
Carefully bring the LA4D down onto the
speaker stand.
6
2
Level control: turn clockwise to raise the
level. Turn counter-clockwise to lower
the level.
3
Tone controls: To increase the low
frequencies, turn the “Low” tone control
clockwise. To decrease, turn
counter-clockwise.
4
Tone controls: To increase the high
frequencies, turn the “high” tone control
clockwise. To decrease, turn
counter-clockwise.
5
Max. level is reached when the yellow
“Comp” light only flashes at peak levels.
If the light is on constantly, turn the level
control down to avoid damage to the
LA4D.
3
Operation
Insure the input level control is turned
down (fully counter-clockwise) Turn the
power switch on.
1
3.
3. Q. Will I get left and right when plugging my MP3 player into the 1/8" jack?
A. Yes. It sums the two together.
Specifications subject to change without notice.
V20151208
601 E. Pawnee Wichita, KS 67211 316. 263.2852 FAX 316.263.0642 www.galaxyaudio.com
Distributed in Canada by Audio Distributors International (ADI) 1275 Newton, unit 6 Boucherville, QC J4B 5H2 Canada
450.449.8177 FAX 450.449.8180
Other Helpful Sources
LA4D
Manual
(PDF Download)
LA4D
Product Page
LA4D
Cutsheet
(PDF Download)
YouTube
How To Video
Quick Start Guide
TM
FAQ
1. Q. My condenser mic does not work.
A. Make sure the Phantom Power switch is on.
2. Q. I’m using the XLR input, but it is distorted and I can barely turn it up before it is too loud.
A. Engage the 20dB PAD.
Printed in USA
 Loading...